

Page 1

Multimedia Net Card
User Guide
Version 1.2
Date: 01-11-2006
2006 Flarion Technologies, Inc.
Page 2

Preliminary Material
COPYRIGHT AND TRADEMARK STATEMENT
Copyright 2006 Flarion Technologies, Inc. All rights reserved.
Flarion
, FLASH-OFDM, RadioRouter, Vector-LPDC and FlashView are among
the trademarks of Flarion Technologies, Inc. Other trademarks, trade names and brands
contained herein are the property of their respective owners. Data subject to change
without notice. Printed in the USA.
WARRANTY DISCLAIMER
NO WARRANTY, EXPRESS OR IMPLIED, IS PROVIDED PURSUANT TO THE TERMS OF THIS TMOBILE MULTIMEDIA NET CARD USER GUIDE. ANY WARRANTY PROVIDED BY FLARION,
IF ANY, SHALL BE SOLELY PURSUANT TO A SEPARATE SUPPLY AGREEMENT BETWEEN
FLARION AND THE INITIAL PURCHASER OF THE T-MOBILE MULTIMEDIA NET CARD. SUCH
WARRANTY IS IN LIEU OF ALL OTHER WARRANTIES, EXPRESS OR IMPLIED, ARISING BY
LAW OR FROM A COURSE OF PERFORMANCE, A COURSE OF DEALING, TRADE USAGE OR
OTHERWISE. FLARION SPECIFICALLY DISCLAIMS, WITHOUT LIMITATION, ALL
WARRANTIES OF ANY KIND, WHETHER EXPRESS OR IMPLIED, INCLUDING BUT NOT
LIMITED TO, THE IMPLIED WARRANTIES OF MERCHANTABILITY, FITNESS FOR A
PARTICULAR PURPOSE, TITLE AND NON-INFRINGEMENT. THE PRODUCT, ITS
COMPONENTS, INTERFACES, ANY RELATED EQUIPMENT, ANY DOCUMENTATION AND
OTHER MATERIALS ARE PROVIDED TO YOU STRICTLY ON AN “AS IS” BASIS.
LIMITATION OF LIABILITY
IN NO EVENT WILL FLARION OR ITS OFFICERS, DIRECTORS, EMPLOYEES, MANAGERS,
ATTORNEYS OR AGENTS BE LIABLE FOR ANY SPECIAL, INDIRECT, INCIDENTAL, PUNITIVE,
EXEMPLARY OR CONSEQUENTIAL DAMAGES OF ANY KIND (INCLUDING, BUT NOT
LIMITED TO, LOST PROFITS, LOST DATA OR INFORMATION, LOSS OF USE, BUSINESS
INTERRUPTION, LOSS OF BUSINESS REPUTATION OR GOODWILL, COSTS OF SUBSTITUTE
GOODS OR SERVICES, OR DOWNTIME COSTS) WHICH YOU OR OTHERS MAY INCUR OR
EXPERIENCE, DIRECTLY OR INDIRECTLY ARISING OUT OF OR RELATING TO ANY FLARION
PRODUCT OR SERVICE, EVEN IF FLARION HAS BEEN ADVISED OF THE POSSIBILITY OF
SUCH DAMAGES AND NOTWITHSTANDING ANY FAILURE OF ESSENTIAL PURPOSE.
NOTWITHSTANDING ANYTHING TO THE CONTRARY, THE AGGREGATE LIABILITY OF
FLARION (AND ITS OFFICERS, DIRECTORS, EMPLOYEES, MANAGERS, ATTORNEYS AND
AGENTS) FOR DAMAGES FOR ANY CAUSE WHATSOEVER DIRECTLY OR INDIRECTLY
RELATING TO OR ARISING FROM USE OF ANY FLARION PRODUCT OR SERVICE, AND
REGARDLESS OF THE FORM OF ACTION, SHALL BE LIMITED TO THE AMOUNT PAID BY
YOU TO FLARION FOR SUCH PRODUCT OR SERVICE.
Multimedia Net Card User Guid e
Page 2
Page 3

Preliminary Material
DECLARATION OF CONFORMITY IN ACCORDANCE WITH THE
RADIO AND TELECOMMUNICATIONS TERMINAL EQUIPMENT DIRECTIVE
1999/5/EC (R&TTE DIRECTIVE)
Product Identification:
Product: Wireless Network Card
Brand: Flarion Technologies, Inc.
Model / Type: FPC2045
The product as detailed above when used for its intended purpose, is declared compliant
with the essential requirements of Council Directive 1999/5/EC – the R&TTE Directive.
Compliance based on the procedures laid down in Article 3 of the R&TTE Directive and
testing to the following standards:
Health and safety requirements pursuant to Article 3(1)(a)
Harmonised standards applied: EN 60950-1; Safety of Information Technology
Equipment - Part 1, General Requirement Incl. Deviation of CENELEC Countries.
Protection requirements concerning electromagnetic compatibility to Article 3(1)(b)
Harmonised standards applied:
EN 301-489-1, V1.4.1 (2002-08); Electromagnetic compatibility and Radio spectrum
Matters (ERM); Electromagnetic Compatibility (EMC) Standard for Radio Equipment
and Service. Part 1: Common technical requirements
ETSI EN 301 489-25 V2.2.1 (2003-05)
Electromagnetic compatibility and Radio spectrum Matters (ERM);
ElectroMagnetic Compatibility (EMC) standard for radio equipment and services;
Part 25: Specific conditions for IMT-2000 CDMA Multi-carrier Mobile Stations and
ancillary equipment
EN55022/CISPR 22: 2003, Class A, Limits and methods of measurement of radio
disturbance characteristics of information technology equipment
Version 1.2
Page 3
Page 4

Preliminary Material
Measures for the efficient use of the radio frequency spectrum to Article 3(2)
Notified Body approved radio test suite for FLASH-OFDM® based on;
- EN 301-908-1 V2.2.1; Base Stations (BS), Repeaters and User Equipment (UE)
for IMT-2000 Third Generation Cellular Networks. Part 1: Harmonized EN for
IMT-2000, Introduction and common requirements, covering essential
requirements of article 3.2 of the R&TTE Directive.
- EN 301-908-5 V2.2.1; Base Stations (BS), Repeaters and User Equipment (UE)
for IMT-2000 Third Generation Cellular Networks. Part 5: Harmonized EN for
CDMA Multi-Carrier (cdma2000) (BS and Repeaters) covering essential
requirements of article 3.2 of the R&TTE Directive.
- EN 301-908-4 V2.2,1; Base Stations (BS), Repeaters and User Equipment (UE)
for IMT-2000 Third Generation Cellular Networks. Part 5: Harmonized EN for
CDMA Multi-Carrier (cdma2000) (UE) covering essential requirements of article
3.2 of the R&TTE Directive
- ETSI Draft EN for CDMA-2000 1X in the 450 MHz band (ref. ERM-TG39-001
as modified by ETSI EN 301 xyz V0.0.2 2004-11). - Draft Harmonized EN for
cdma450 and CDMA-PAMR Mobile Stations covering essential requirements of
article 3.2 of the R&TTE Directive and Draft Harmonized EN for cdma450 and
CDMA-PAMR Base Stations and Repeaters covering essential requirements of
article 3.2 of the R&TTE Directive.
- ETSI TR 102 260 v1.1.1 (2003-12); Electromagnetic compatibility and Radio
spectrum Matters (ERM); Code Division Multiple Access Public Access Mobile
Radio (CDMA-PAMR); System reference document, Compliant to Band Class 11
RFI-Global Services (Notified Body Number 0889)
Multimedia Net Card User Guid e
Page 4
Page 5

Preliminary Material
TABLE OF CONTENTS
Chapter 1. Multimedia Net Card Basics....................................................................... 8
1.1 About the Multimedia Net Card ......................................................................... 8
1.2 Multimedia Net Card Features and Benefits....................................................... 8
1.3 Multimedia Net Card Applications..................................................................... 9
1.4 Multimedia Net Card Package Contents............................................................. 9
1.5 Multimedia Net Card Software........................................................................... 9
1.6 Multimedia Net Card Documentation............................................................... 10
1.6.1. About T-Mobile Mobility Manager.......................................................... 10
1.6.2. About Driver Software.............................................................................. 11
Chapter 2. Using the Multimedia Net Card................................................................ 12
2.1 Installing the Multimedia Net Card .................................................................. 12
2.1.1. Checking Hardware and Software Requirements..................................... 13
2.1.2. Installing T-Mobile Mobility Manager Software ..................................... 14
2.1.2.1 Installing for Windows ......................................................................... 14
2.1.2.2 Installing for Linux ............................................................................... 16
2.1.2.3 Installing for Macintosh........................................................................ 17
2.1.3. Attaching the External Antenna to the Multimedia Net Card (Optional) . 23
2.1.4. Inserting the Multimedia Net Card into the PCMCIA Slot ...................... 24
2.1.4.1 Loading Device Drivers for Windows 98............................................. 24
2.1.4.2 Loading Device Drivers for Windows 2000/XP................................... 25
2.2 Using the Multimedia Net Card........................................................................ 26
2.2.1. General Usage Guidelines......................................................................... 26
2.2.2. Using T-Mobile Mobility Manager .......................................................... 27
2.2.2.1 Monitoring Connection Status and Connection Time .......................... 29
2.2.2.2 Monitoring Kilobytes Received and Sent ............................................. 30
2.2.2.3 Monitoring Signal Strength and Quality............................................... 31
2.2.2.4 Closing, Exiting and Ending Sessions .................................................. 32
2.2.2.5 Enabling and Disabling the Multimedia Net Card................................ 34
2.2.2.6 Upgrading Software .............................................................................. 35
2.2.2.6.1 About Software Upgrades............................................................... 35
2.2.2.6.2 Upgrade Methods............................................................................ 36
2.2.2.6.2.1 Over-the-Air Automatic Upgrade ............................................ 36
2.2.2.6.2.2 Over-the-Air Manual Upgrade................................................. 39
2.2.2.6.2.3 Complete Package Uninstall and Reinstall .............................. 42
2.2.2.7 Software Upgrade Notes ....................................................................... 43
2.2.3. Removing the Multimedia Net Card......................................................... 44
2.2.4. Removing the Antenna from the Multimedia Net Card............................ 45
2.2.5. Uninstalling Multimedia Net Card Software ............................................ 46
2.2.5.1 Uninstalling for Windows..................................................................... 46
2.2.5.2 Uninstalling for Linux........................................................................... 47
2.2.5.3 Uninstalling for Macintosh ................................................................... 48
2.3 Troubleshooting the Multimedia Net Card ....................................................... 50
Appendix A. Technical Specifications ............................................................................. 53
Version 1.2
Page 5
Page 6

Preliminary Material
LIST OF FIGURES
Figure 1: Multimedia Net Card........................................................................................... 8
Figure 2: CD Launcher Menu ........................................................................................... 14
Figure 3: Macintosh Driver Files...................................................................................... 17
Figure 4: Introduction Screen ........................................................................................... 18
Figure 5: Welcome Screen................................................................................................ 18
Figure 6: Read Me Screen................................................................................................. 19
Figure 7: License Screen................................................................................................... 19
Figure 8: License Agreement Screen................................................................................ 20
Figure 9: Select Destination Screen.................................................................................. 20
Figure 10: Installation Type Screen.................................................................................. 21
Figure 11: Authenticate Screen......................................................................................... 21
Figure 12: Restart Notice Screen ...................................................................................... 22
Figure 13: Installation Finishing Screen ........................................................................... 22
Figure 14: Attaching the Standard Antenna...................................................................... 23
Figure 15: Hardware Installation (Windows XP) ............................................................. 25
Figure 16: Digital Signature Not Found (Windows 2000) ............................................... 25
Figure 17: T-Mobile Mobility Manager Icon ................................................................... 27
Figure 18: T-Mobile Mobility Manager System Tray Icon .............................................. 27
Figure 19: T-Mobile Mobility Manager Indicators .......................................................... 28
Figure 20: Connection Status and Connection Time ........................................................ 29
Figure 21: Kilobytes Received and Sent........................................................................... 30
Figure 22: Signal Strength and Quality Indicators ........................................................... 31
Figure 23: Closing, Exiting and Ending ........................................................................... 33
Figure 24: Upgrade Available Message............................................................................ 36
Figure 25: Information Screen – Advanced Tab............................................................... 37
Figure 26: Downloading Update Message........................................................................ 38
Figure 27: Click OK to Update Message.......................................................................... 38
Figure 28: Check for Upgrade .......................................................................................... 39
Figure 29: No Files Need Updating Message ................................................................... 40
Figure 30: Update Available Message.............................................................................. 40
Figure 31: Update Yes/No Message ................................................................................. 40
Figure 32: Downloading Updates Message ...................................................................... 41
Figure 33: Click OK to Update Message.......................................................................... 41
Figure 34: Antenna Grips.................................................................................................. 45
Figure 35: Control Panel Folder ....................................................................................... 46
Figure 36: Add/Remove Programs Screen ....................................................................... 47
Figure 37: Macintosh Driver Files.................................................................................... 48
Figure 38: Uninstaller Message Screen ............................................................................ 48
Figure 39: Authenticate Screen......................................................................................... 49
Figure 40: Successful Message Screen ............................................................................. 49
Multimedia Net Card User Guid e
Page 6
Page 7

Preliminary Material
LIST OF TABLES
Table 1: Hardware Requirements for the Multimedia Net Card....................................... 13
Table 2: Multimedia Net Card Troubleshooting (for Notebook Usage)........................... 50
Table 3: Multimedia Net Card Technical Specifications.................................................. 53
Version 1.2
Page 7
Page 8

Chapter 1
Chapter 1. Multimedia Net Card Basics
1.1 About the Multimedia Net Card
The Multimedia Net Card from T-Mobile® enables high-speed wireless connectivity for
subscribers. It runs on most computer operating systems. It is plug-and-play compatible
with a standard Type II PCMCIA card slot.
The Multimedia Net Card is based on FLASH-OFDM® technology from Flarion®
Technologies, Inc. This technology was designed around the Internet Protocol.
Figure 1: Multimedia Net Card
1.2 Multimedia Net Card Features and Benefits
The Multimedia Net Card:
• Provides the freedom, flexibility and full mobility of wireless connectivity
• Enables the power of high-speed Internet access
• Allows for full connected mobility — even at vehicular speeds
Multimedia Net Card User Guid e
Page 8
Page 9

Multimedia Net Card Basics
1.3 Multimedia Net Card Applications
Examples of applications that can be used with the Multimedia Net Card include:
• E-mail (including large file attachments)
• High-Speed web browsing
• Virtual Private Network (VPN) access
• File transfer
• Online gaming
• Streaming video and audio
• Video conferencing
1.4 Multimedia Net Card Package Contents
The Multimedia Net Card package includes the following:
• Multimedia Net Card
• Antenna
• Installation CD, which also includes this User Guide
• Quick Start Guide
1.5 Multimedia Net Card Software
The Multimedia Net Card comes with the following software:
• T-Mobile Mobility Manager (TMM)
• Driver software
Version 1.2
Page 9
Page 10

Chapter 1
1.6 Multimedia Net Card Documentatio n
The Multimedia Net Card comes with the following documentation:
• Quick Start Guide - describes basic product installation and usage. The document
is available in hard copy, and is included in the Multimedia Net Card delivery
package.
• User Guide (this document) - provides detailed product installation,
configuration, usage, and troubleshooting material. The document is available in
electronic format on the installation CD that is part of the Multimedia Net Card
delivery package. In addition, the User Guide is accessible from the Help menu of
the T-Mobile Mobility Manager interface.
Note:
The User G uide is avai lab le i n .P DF form a t. To re ad the U ser G uide, Ad obe Rea der
must be ins talle d on your comp uter . If it i s no t ins tal led, inse rt th e Mul time dia Net
Device Installation CD into your computer. When the CD Launcher Menu appears,
click the View Documentation link, and then the Install Adobe Reader link. Click the
link for the operating system of your computer, and then follow on screen installation
instructions.
1.6.1. About T-Mobile Mobility Manager
T-Mobile Mobility Manager provides a user interface with the functionality of the
Multimedia Net Card.
The T-Mobile Mobility Manager interface includes:
• Session information
o Connection status
o Connection time
o Kilobytes sent and received
o Signal strength
o Signal quality
• Connection functionality
o Enable
o Disable
o Exit
Multimedia Net Card User Guid e
Page 10
Page 11

Multimedia Net Card Basics
• Upgrade functionality
o Manual upgrade check
o Automated upgrade
• Help information
o On line help
o “About” information
1.6.2. About Driver Software
Multimedia Net Card driver software establishes the interface between the device and the
operating system. It is installed using the Installation CD that comes with the Multimedia
Net Card package.
Version 1.2
Page 11
Page 12

Chapter 2
Chapter 2. Using the Multimedia Net Card
The Multimedia Net Card can be installed and used in a notebook computer, to provide
high-speed mobile broadband connectivity.
This chapter details procedures for using the Multimedia Net Card with a notebook
computer, including:
• Installing the Multimedia Net Card
• Using the Multimedia Net Card
• Troubleshooting the Multimedia Net Card
2.1 Installing the Multimedia Net Card
WARNING
Installing the Multimedia Net Card involves the following basic steps. Perform these
steps in sequential order:
1. Checking hardware and software requirements
2. Installing T-Mobile Mobility Manager software
3. Attaching the antenna to the Multimedia Net Card (optional)
4. Inserting the Multimedia Net Card into the PCMCIA Slot (and automatically
loading drivers)
FOR WINDOWS SYSTEMS, MULTIMEDIA NET CARD
SOFTWARE NEEDS TO BE INSTALLED ON THE
COMPUTER BEFORE INSERTING TH E MU LTIM EDIA N ET
CARD INTO THE PCMCIA SLOT. THE APPLICATION WILL
NOT WORK IF THE MULTI MEDIA N ET CARD I S INSERTED
BEFORE THE SOFTWARE IS INSTALLED.
Multimedia Net Card User Guid e
Page 12
Page 13

Using the Multimedia Net Card
2.1.1. Checking Hardware and Software Requirements
The Multimedia Net Card requires certain hardware and software capabilities of the
notebook computer. Verify that the following hardware requirements are met:
Table 1: Hardware Requirements for the Multimedia Net Card
Category Requirement
Card Slot Type II PCMCIA
RAM 128 MB
Hard Disk Space 15 MB
Disk Drive CD-ROM
I/O Resources 1 IRQ, 256 Bytes I/O space
Suggested Minimum Processor Speed 600 Mhz
The Multimedia Net Card functions with computers that utilize the following operating
systems:
• Windows® 98 SE, 2000, XP
• Red Hat
• Mac OS
®
Linux
®
X 10.2, 10.3, 10.4
®
9
The Multimedia Net Card functions with the following Internet browsers:
• Microsoft® Internet Explorer 6.0
• Mozilla Firefox™ 1.01
• Safari™
Version 1.2
Page 13
Page 14
Chapter 2
2.1.2. Installing T-Mobile Mobility Manager Software
When it is clear that hardware and software requirements are met, installation may
proceed. Software is available for the following installations:
• Windows
• Linux
• Macintosh
2.1.2.1 Installing for Windows
For Windows systems, T-Mobile Mobility Manager software must be installed prior to
insertion of the Multimedia Net Card.
To install T-Mobile Mobility Manager:
1. Power on the computer and/or close any Windows programs that are running.
2. Insert the installation CD into the CD-ROM driver.
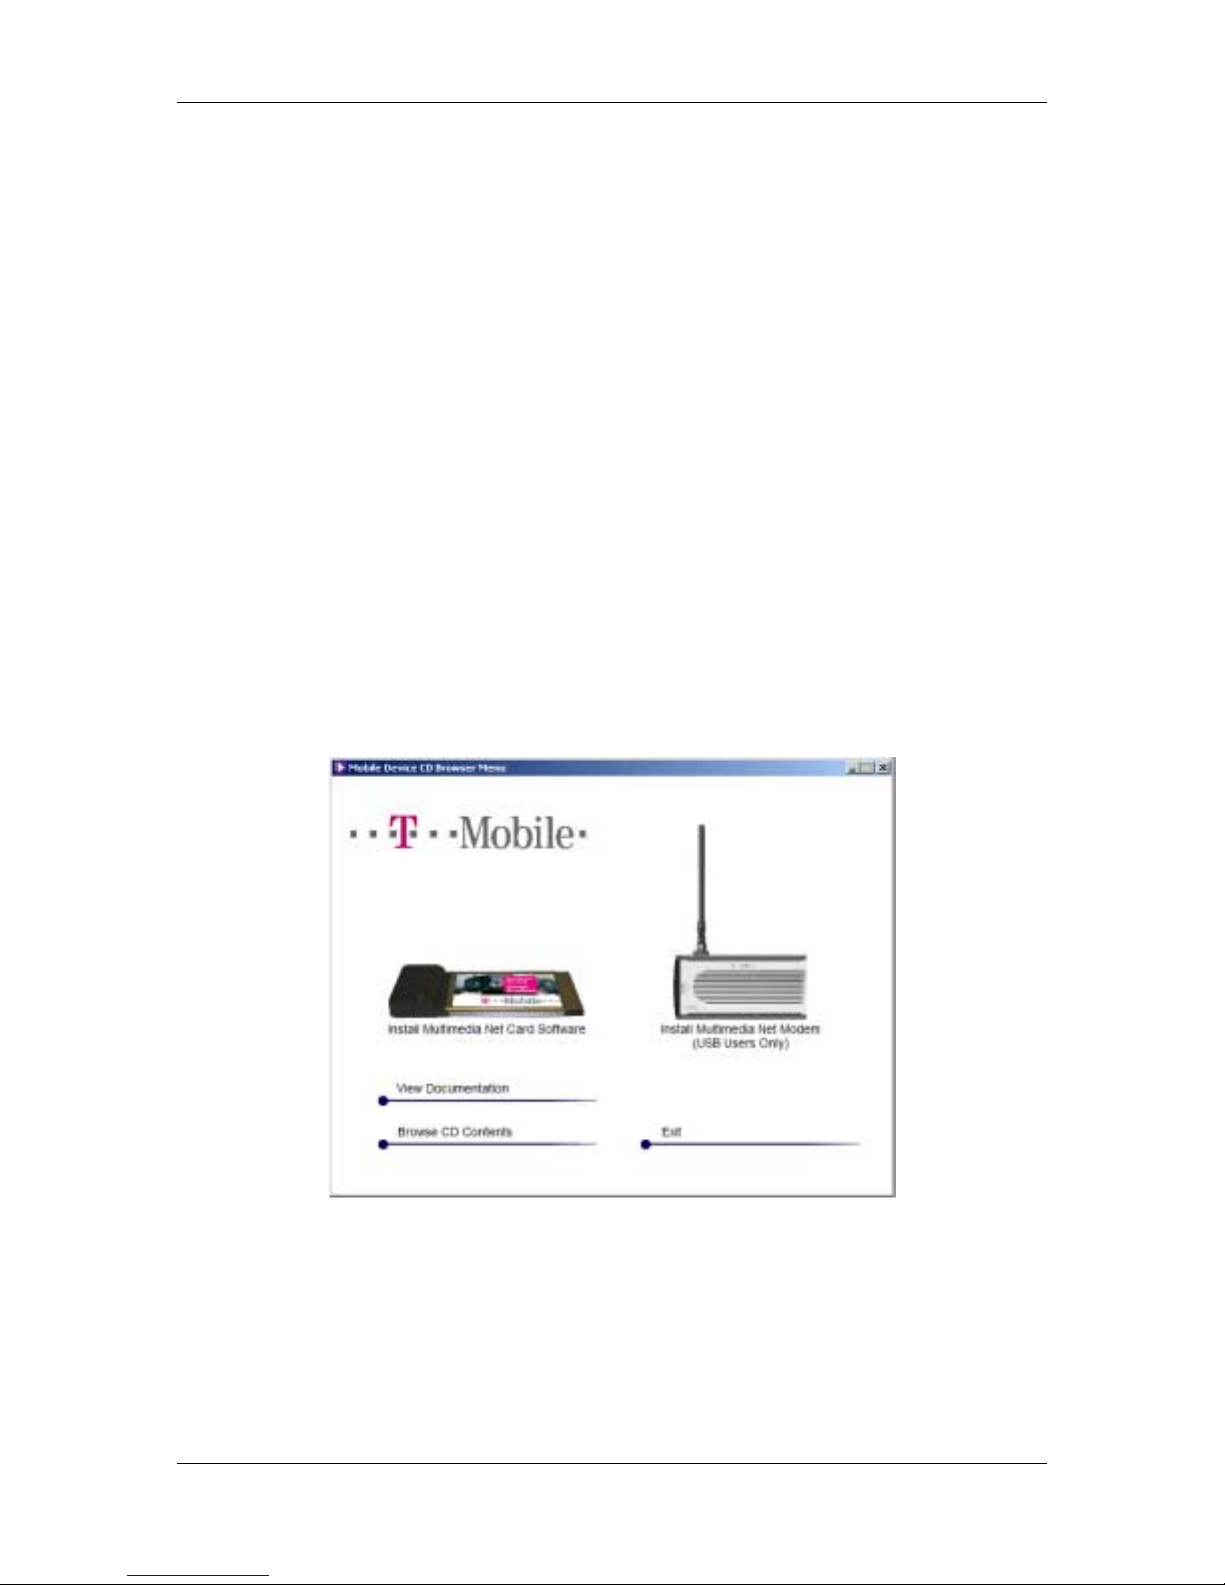
The CD Launcher Menu appears:
Figure 2: CD Launcher Menu
Multimedia Net Card User Guid e
Page 14
Page 15

Using the Multimedia Net Card
Note:
If the CD Launcher menu does no t automa tically ap pear:
1. Click Start ⇒ Run ⇒ Open.
2. Type the letter of the CD Drive followed by install.exe (e.g.: D:\install.exe,
where D is the CD- ROM driv e). Al ternate ly, c lick Brow se to loc ate and se lec t
the install.exe file on the CD-ROM drive.
3. Click OK.
The CD Lau ncher menu appe ars.
3. On the CD Launcher menu, click “Install Multimedia Net Card Software ”
The Mobility Manager Setup screen appears.
4. Follow the Mobility Manager on-screen directions. Click “Next” after each step.
5. Click Finish to end the installation.
Note:
If the CD Launcher menu is still visible, click the “Exit” link.
6. Remove the Installation CD from the computer.
Version 1.2
Page 15
Page 16

Chapter 2
2.1.2.2 Installing for Linux
Multimedia Net Card software for Linux systems is available on the installation CD.
These instructions are tested on the Red Hat 9 distribution. The binaries included with
this package will work only onthe Red Hat 9 distribution package with Linux kernel
2.4.20-8.
This package will support other linux distributions that have Linux kernel 2.4.X but will
require a rebuild of the binaries. Instructions for building a new set of binaries are
available on the readme.txt file available in the installion CD Linux folder.
To install for Linux:
1. On the installation CD, locate the Linux folder.
2. Extract the Linux package with the following command:
tar xzvf ft1000_linux.tgz
3. Change to the ft1000_linux package directory
4. Run ./install.sh and select option 1 to install the driver
5. Note that Linux requires an ifcfg-ethX file for all network interfaces
6. Use the ifconfig -a command to see which is the next interface number (ethX)
7. Create an ifcfg-ethX in the /etc/sysconfig/network-scripts directory with the
following entries:
a. DEVICE=ethX
b. ONBOOT=yes
c. BOOTPROTO=dhcp
Multimedia Net Card User Guid e
Page 16
Page 17

Using the Multimedia Net Card
2.1.2.3 Installing for Macintosh
Multimedia Net Card software for Macintosh systems is available on the installation CD.
Note:
File and folder names, as well as content of installation screens may vary slightly
from those that appear in this document. For example, End User License
Agreement material and other text may be modified.
To install for Macintosh:
1. On the installation CD, locate the Macintosh folder.
2. In the Macintosh package folder, open the Mac Driver folder.
The Macintosh driver files appear:
Version 1.2
Page 17
Figure 3: Macintosh Driver Files
Page 18
Chapter 2
3. Open the FPC2000.Installer.pkg file.
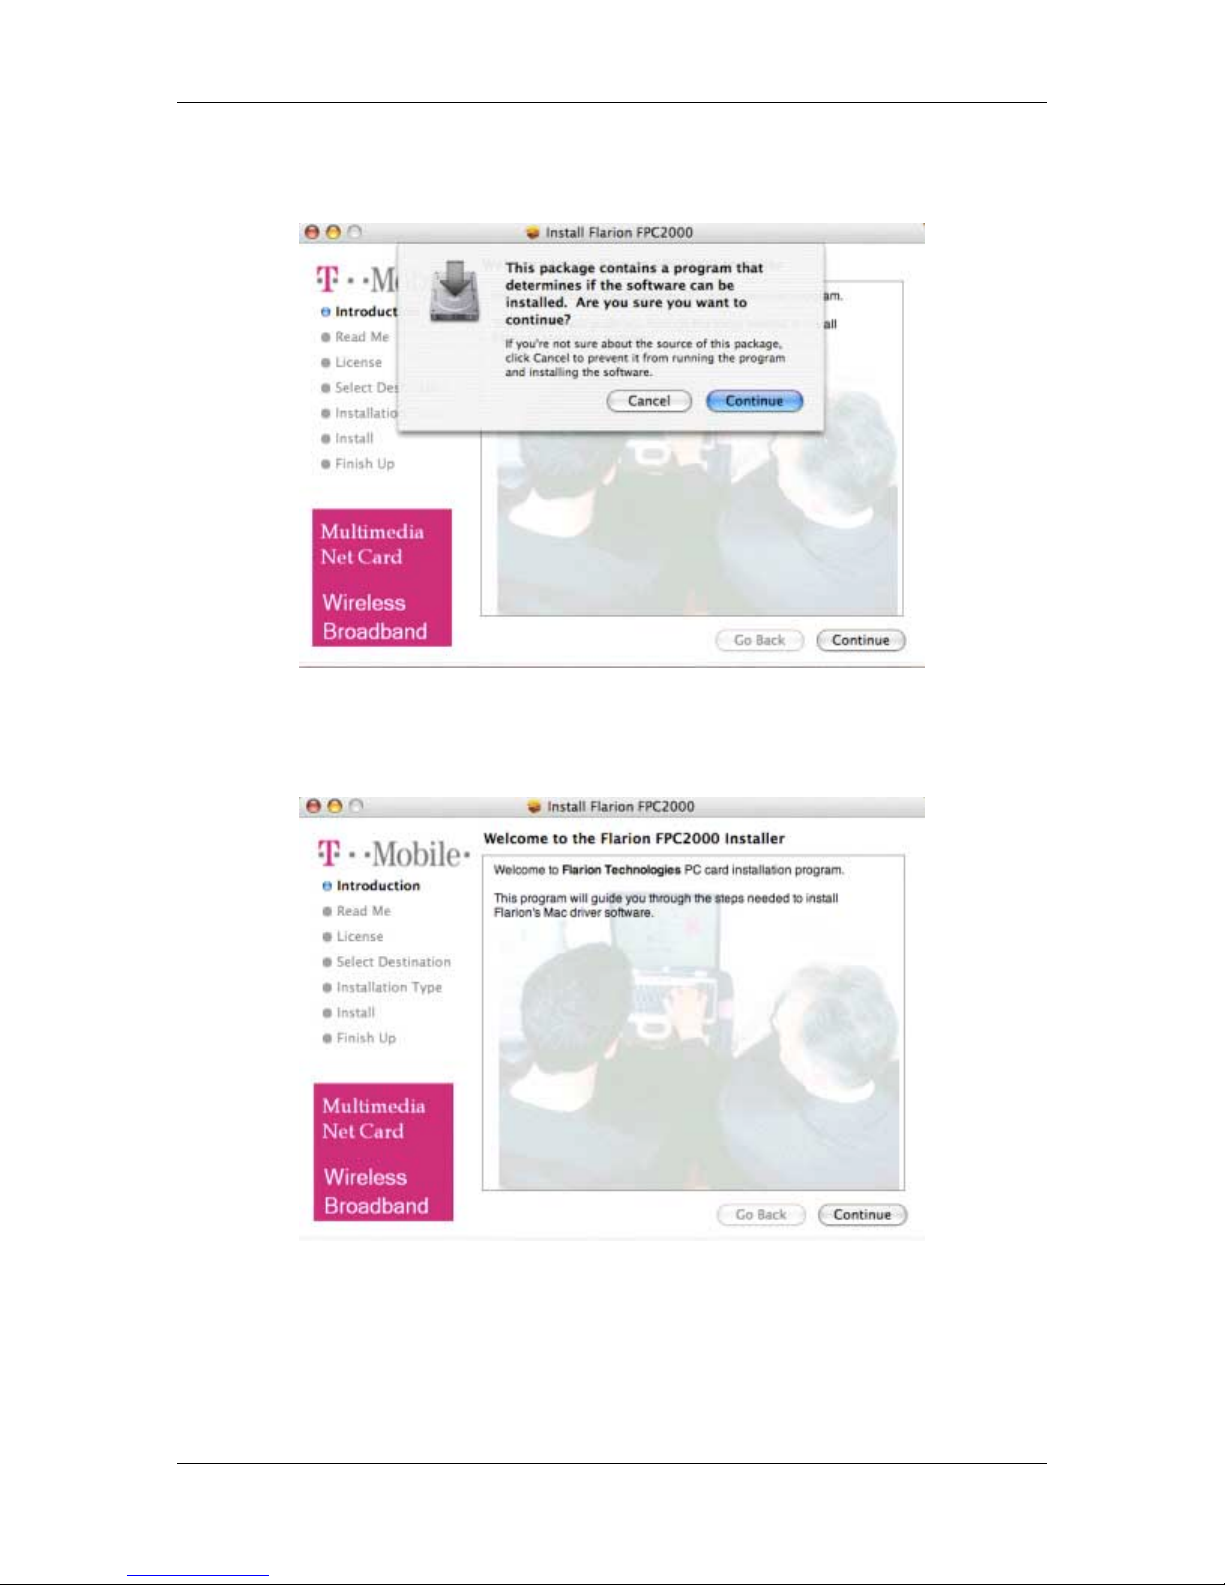
The Introduction screen appears:
Figure 4: Introduction Screen
4. In the Introduction screen, click the Continue button.
The Welcome screen appears:
Figure 5: Welcome Screen
Multimedia Net Card User Guid e
Page 18
Page 19

5. In the Welcome screen, click the Continue button.
The Read Me screen appears:
Using the Multimedia Net Card
Figure 6: Read Me Screen
6. In the Read Me screen, click the Continue button.
The License screen appears:
Figure 7: License Screen
Version 1.2
Page 19
Page 20

Chapter 2
7. In the License screen, click the drop down menu and select the language of
choice. Read the license agreement, and click theContinue button.
The License Agreement screen appears:
Figure 8: License Agreement Screen
8. If the license is agreed to, click the Agree button.
The Select Destination screen appears:
Figure 9: Select Destination Screen
Multimedia Net Card User Guid e
Page 20
Page 21
Using the Multimedia Net Card
9. In the Select Destination screen, click the appropriate volume and click the
theContinue button.
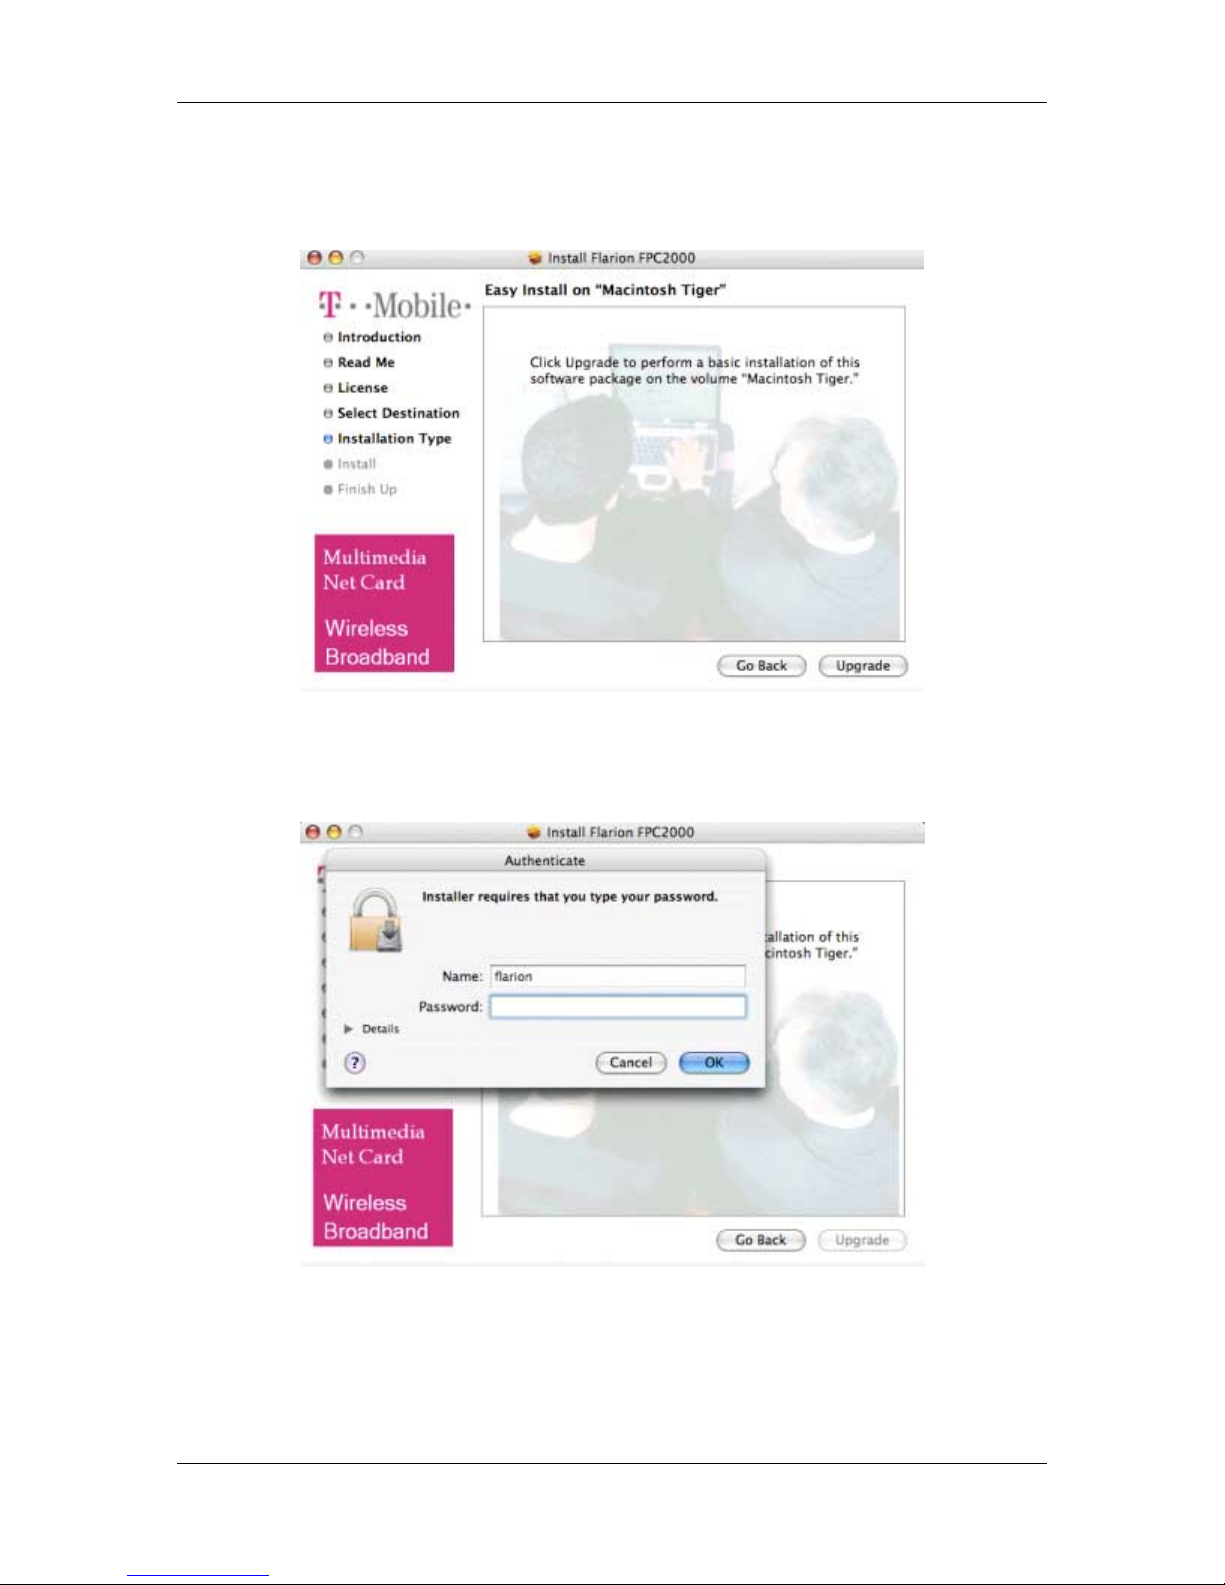
The Installation Type screen appears:
Figure 10: Installation Type Screen
10. Na obrazovke Installation Type kliknite na tlačidlo Upgrade (Inovovať).
The Authenticate screen appears:
Version 1.2
Page 21
Figure 11: Authenticate Screen
Page 22
Chapter 2
11. In the Authenticate screen, type in Name and Password information, and click
OK.
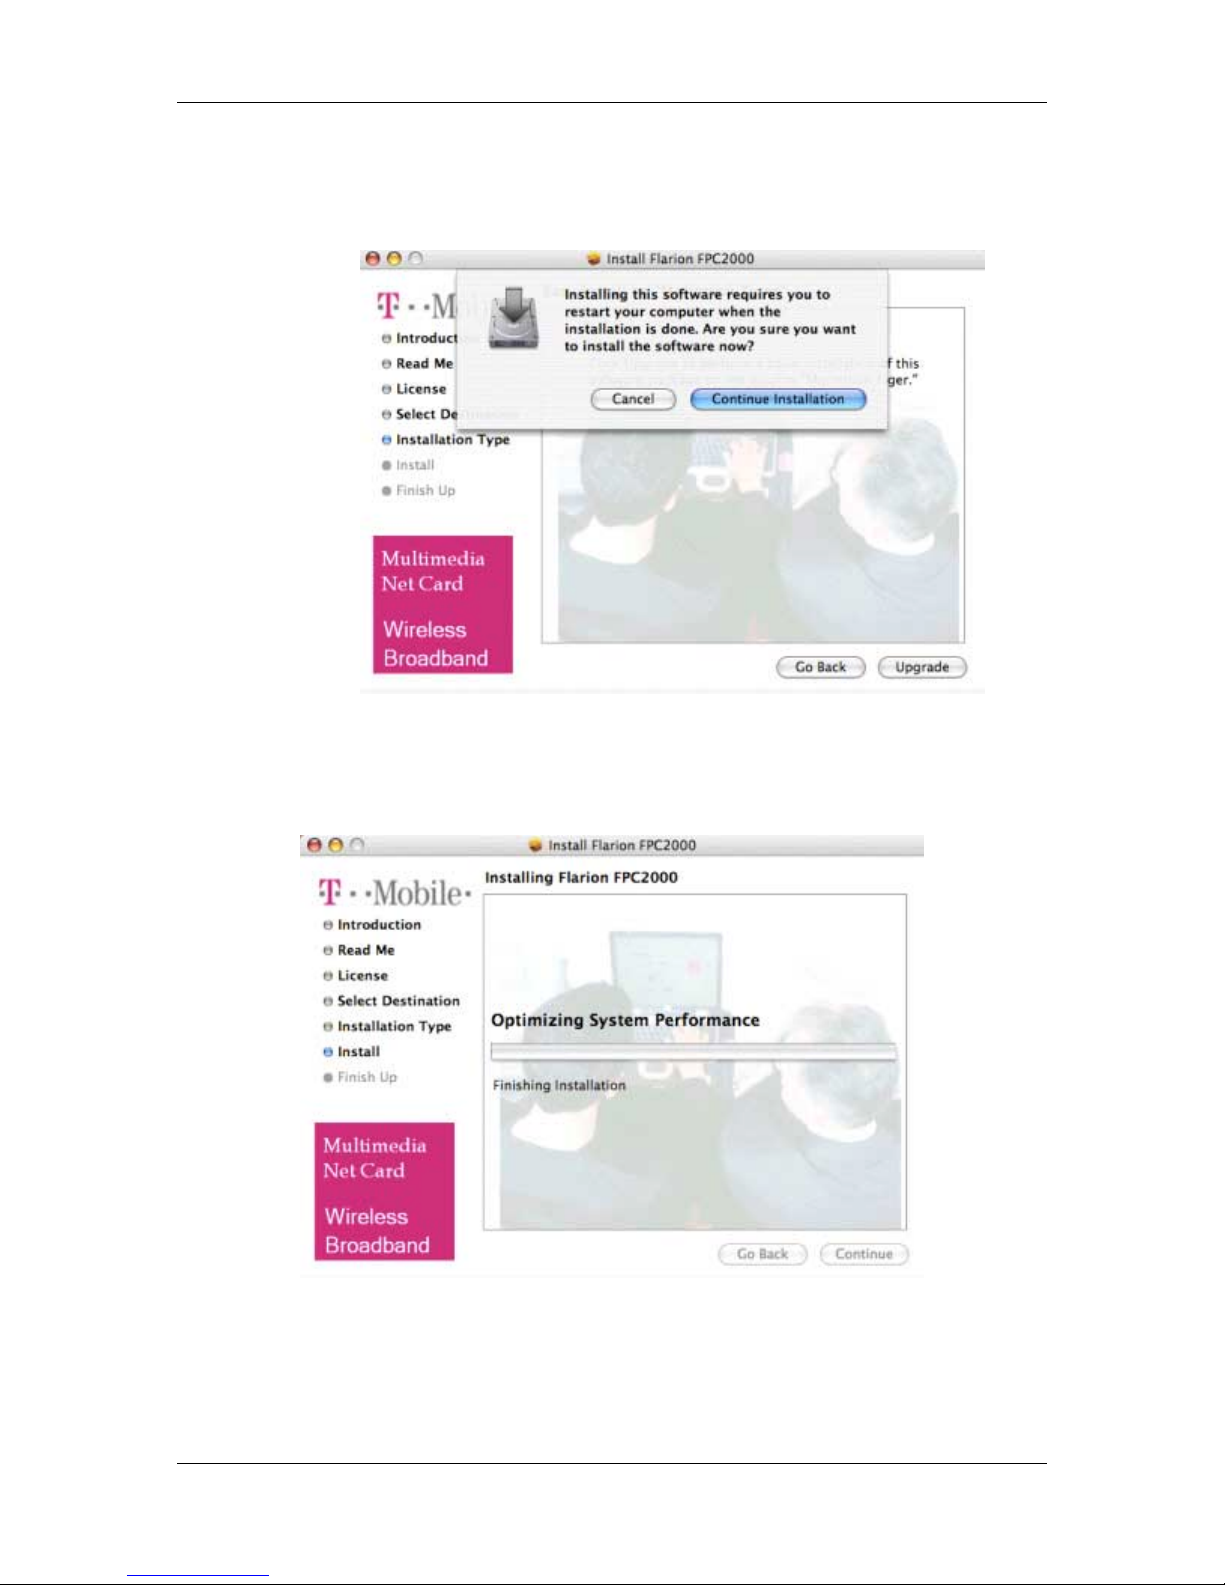
The Restart Notice screen appears:
Figure 12: Restart Notice Screen
12. In the Restart Notice screen, click Continue Installation.
The installation proceeds.
Figure 13: Installation Finishing Screen
Multimedia Net Card User Guid e
Page 22
Page 23

Using the Multimedia Net Card
13. In the Finish Up screen, click the Close button.
The installation screens close.
14. Reboot the Macintosh.
Installation is complete.
2.1.3. Attaching the External Antenna to the Multimedia Net
Card (Optional)
The Multimedia Net Card ships includes a built in bulb-extension antenna. This typically
provides excellent broadband reception.
In addition, the Multimedia Net Card ships with a standard antenna. This enhances
reception when in areas on the edge of the network coverage area. When T-Mobile
Mobility Manager installation is complete, optionally attach the antenna to the
Multimedia Net Card.
To attach the standard antenna to the Multimedia Net Card:
Figure 14: Attaching the Standard Antenna
1. Grasp the antenna with the attachment pin facing the Multimedia Net Card.
2. Place the antenna pin in the circular connector of the Multimedia Net Card.
3. Press firmly until it seats fully.
Note:
Keep the antenna in the up posi tion to ass ure maximum perform ance.
Version 1.2
Page 23
Page 24

Chapter 2
2.1.4. Inserting the Multimedia Net Card into the PCMCIA Slot
When software has been installed and the antenna attached (if desired), proceed to insert
the Multimedia Net Card into the PCMCIA slot. Inserting the Multimedia Net Card will
cause the software drivers to load.
To insert the Multimedia Net Card (and load device drivers):
1. Holding the Card at the bulb extension antenna with the graphic label facing up,
insert the Card fully into the slot.
o A blue “connected” LED lights on the side of the Multimedia Net Card
and blinks until the Multimedia Net Card connects to the network.
o The “Found New Hardware Setup” appears. This prompts you for action
according to the type of operating system on your computer.
2.1.4.1 Loading Device Drivers for Windows 98
1. When the Windows 98 SE hardware setup detects the Multimedia Net Card, it
presents a “Welcome to the Found New Hardware Setup” screen. If prompted,
insert the original Windows operating system CD into the CD-ROM drive.
2. Select the option to install the software automatically (recommended) or to install
from a specific location (advanced). Then click “Next”.
3. From the “Completing the Found New Hardware Setup” page, click “Finish”. If
prompted, restart your computer.
Note:
It is recommended that Windows 98 SE users check with Microsoft to upgrade to
the latest Service Packs.
Multimedia Net Card User Guid e
Page 24
Page 25

Using the Multimedia Net Card
2.1.4.2 Loading Device Drivers for Windows 2000/XP
1. When the Windows 2000/XP hardware setup detects the Multimedia Net Card,
the “Hardware Installation” (for XP users) or “Digital Signature Not Found” (for
2000 users) page appears, click “Continue Anyway” or “Yes”.
Figure 15: Hardware Installation
(Windows XP)
Figure 16: Digital Signature Not
Found (Windows 2000)
2. From the "Completing the Found New Hardware Wizard" page, click “Finish”.
3. If prompted, restart your computer.
Multimedia Net Card installation is now complete.
Version 1.2
Page 25
Page 26

Chapter 2
2.2 Using the Multimedia Net Card
When the T-Mobile Mobility Manager software has been installed, the antenna has been
attached (optionally) and the Multimedia Net Card has been placed in the PCMCIA slot,
registered users can enjoy high-speed mobile connectivity.
This section details usage of the Multimedia Net Card, including
• General usage guidelines
• Using the T-Mobile Mobility Manager
• Removing the Multimedia Net Card
• Removing the antenna from the Multimedia Net Card
2.2.1. General Usage Guidelines
Use the following guidelines to assure proper functionality and effectiveness of the
Multimedia Net Card:
• When attaching the antenna, be sure to click it into the circular connector (see
Figure 14).
• When inserting the Multimedia Net Card, never force the card into the PCMCIA
slot. When it is inserted correctly, the Multimedia Net Card’s blue light will
appear and blink until it connects to the network.
• Keep the external antenna pointed upwards to ensure its optimum performance,
but never forcefully bend it.
• When storing or transporting a notebook computer, remove the external antenna
and store it in a safe place.
• Keep the Multimedia Net Card away from liquids, excessive heat, and dust.
Multimedia Net Card User Guid e
Page 26
Page 27

Using the Multimedia Net Card
2.2.2. Using T-Mobile Mobility Manager
T-Mobile Mobility Manager enables monitoring of the wireless broadband connection, as
well as connection and upgrade functionality.
After installation, the T-Mobile Mobility Manager icon appears on the computer desktop:
Figure 17: T-Mobile Mobility Manager Icon
After installation, and every time the Multimedia Net Card is inserted into the PCMCIA
slot, the T-Mobile Mobility Manager system tray icon appears:
Figure 18: T-Mobile Mobility Manager System Tray Icon
Version 1.2
Page 27
Page 28

Chapter 2
After installation, and every time the Wireless Broadband Adapter is inserted into the
PCMCIA slot, the T-Mobile Mobility Manager application opens. If for any reason it
does not open, initialize the program via the desktop or system tray icon.
Options Menu Help Menu
Link to
home page
Close Window
(does not end session)
Connection Status
Connection Time
Kilobytes Received
Kilobytes Sent
Figure 19: T-Mobile Mobility Manager Indicators
T-Mobile Mobility Manager functionality includes:
• Monitoring connection status and connection time
• Monitoring kilobytes received and sent
• Monitoring signal strength and quality
• Closing, exiting and ending sessions
• Enabling and disabling the Multimedia Net Card
• Upgrading software
Signal Strength
Signal Quality
Multimedia Net Card User Guid e
Page 28
Page 29

Using the Multimedia Net Card
2.2.2.1 Monitoring Connection Status and Connection Time
T-Mobile Mobility Manager indicates either “Connected” or “Searching”, depending on
the Connection Status. The light on the side of the card also blinks until a connection is
made. The Connection Time Indicator shows how long your notebook computer has been
connected to the network. When you end the session (turn the computer off or disable the
session), this value is reset to zero.
Connection Status
Connection Time
Figure 20: Connection Status and Connection Time
If Connection Status does not change to Connected after several seconds, check that:
• The computer is within the broadband coverage area
• The antenna is upright and inserted properly
• The Wireless Broadband Adapter is fully inserted into the PCMCIA card slot
• The card is “Enabled” via the Options menu
Version 1.2
Page 29
Page 30
Chapter 2
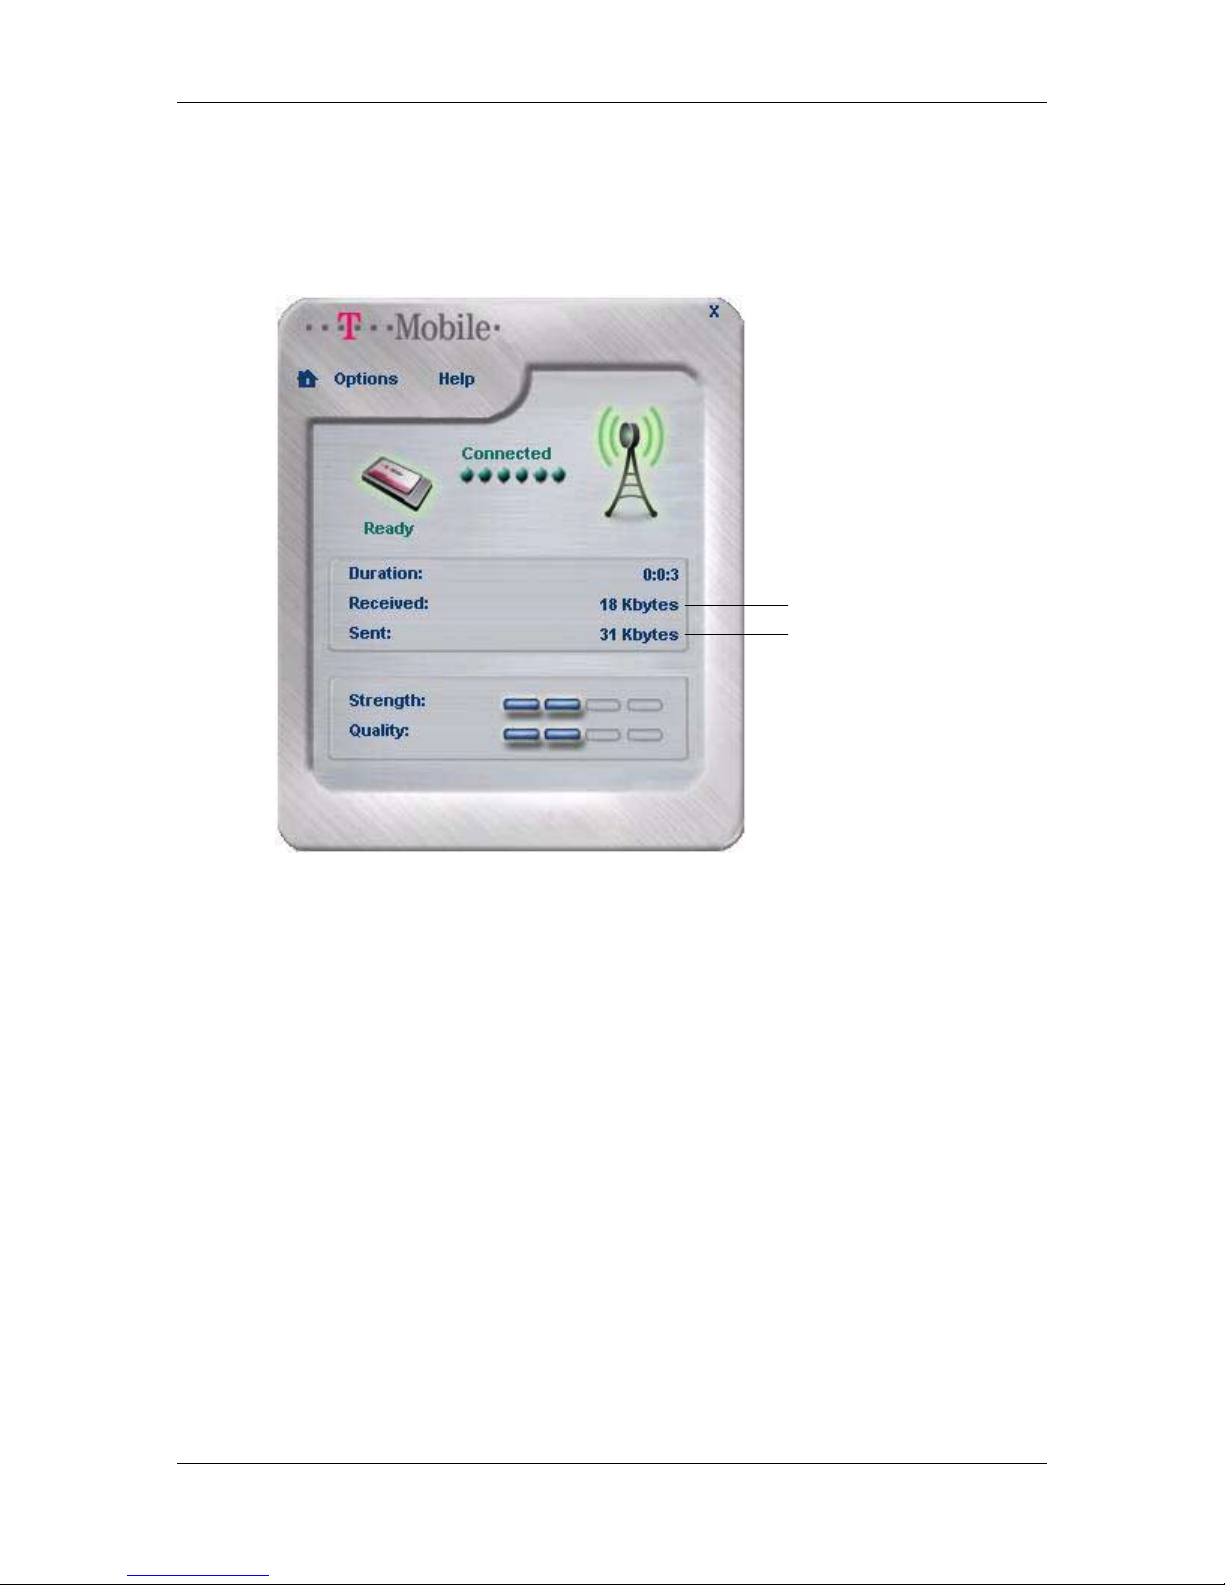
2.2.2.2 Monitoring Kilobytes Received and Sent
To monitor the amount of data sent or received during your session, refer to the relevant
received/sent indicators.
Kilobytes Rec e ived
Kilobytes Sent
Figure 21: Kilobytes Received and Sent
These indicators show the total number of bytes transmitted and received during the
current session. When the session ends (when the computer is turned off or the session is
disabled), these values are both reset to zero.
Multimedia Net Card User Guid e
Page 30
Page 31

Using the Multimedia Net Card
2.2.2.3 Monitoring Signal Strength and Quality
Signal strength shows the power level of the signal you are receiving. When the signal is
strongest, four bars are shown. When it is weakest, one bar is shown. When the
Multimedia Net Card is searching for a signal, the bars will scan from left to right.
Signal Quality measures the actual quality of the signal (signal in relation to surrounding
noise/interference).
Signal Strength
Signal Quality
Figure 22: Signal Strength and Quality Indicators
Version 1.2
Page 31
Page 32

Chapter 2
2.2.2.4 Closing, Exiting and Ending Sessions
To close the T-Mobile Mobility Manager window, click the “X” in the top right corner.
Note that this does not end the session. To relaunch T-Mobile Mobility Manager, click
the Mobility Manager icon on the system tray or desktop.
To exit the T-Mobile Mobility Manager program, but keep the modem session running,
click Options ⇒ Exit. This will remove the Mobility Manager icon from the system tray.
To reenter the program, double click the icon on the desktop. The T-Mobile Mobility
Manager window will pop up again and the icon will reappear in the system tray. Note
that exiting the T-Mobile Mobility Manager application does not end the session.
Shutting down the computer ends the T-Mobile Wireless Broadband session. To end your
session without having to shut down your computer, use the “Disable” function. Click
Options ⇒ Disable. This is especially practical in places that allow for electronic devices,
but not wireless communication (airplanes, hospitals). To begin another session, click
Options ⇒ Enable.
Note:
Certain operating systems behave differently with regard to Enable/Disable functions.
Refer to the Enabling and Disabling the Multimedia Net Card section for descriptions of
these behaviors.
Multimedia Net Card User Guid e
Page 32
Page 33

Options Menu
(Exit, Enable/Disable)
Using the Multimedia Net Card
Close Window
(does not end session)
Figure 23: Closing, Exiting and Ending
Version 1.2
Page 33
Page 34

Chapter 2
2.2.2.5 Enabling and Disabling the Multimedia Net Card
To end a wireless broadband connection without shutting down the computer, click
Options ⇒ Disable. To begin another session, click Options ⇒ Enable.
Certain operating systems act differently when the “Enable” or “Disable” function is
selected:
• Windows 2000/XP
o Enable: When searching for the connection, T-Mobile Mobility Manager
displays "Ready/Searching". When the connection is found, T-Mobile
Mobility Manager displays "Ready/Connected"
o Disable: T-Mobile Mobility Manager displays "Disabled"
• Windows 98 SE
o Enable: When enabled, T-Mobile Mobility Manager displays
"Ready/Searching" when it is searching for a connection and
"Ready/Connected" when the connection is found.
o Disable: T-Mobile Mobility Manager displays "Ready/Idle”
Note:
In Windows 98 SE, when T-Mobile Mobility Manager is disabled, and then
the notebook computer enters hibernate/standby mode, the status remains
disabled. However, when the computer returns from hibernate/standby mode,
T-Mobile Mobility Manager search and connection automatically resumes. If
disable is still desired, once again initiate the disable function (Tools ⇒
Disable).
Multimedia Net Card User Guid e
Page 34
Page 35

Using the Multimedia Net Card
2.2.2.6 Upgrading Software
2.2.2.6.1 About Software Upgrades
Upgrading Multimedia Net Card software assures that all the latest features and
functionalities are available for use.
Upgrades to Multimedia Net Card software may include any or all of the following
software components:
• DSP Image
• Multimedia Net Card Drivers
• T-Mobile Mobility Manager Program
Upgrade software will typically be issued as one of the following two packages:
• Full package (including DSP Image, Multimedia Net Card Driver and T-Mobile
Mobility Manager)
• DSP Image alone
Version 1.2
Page 35
Page 36

Chapter 2
2.2.2.6.2 Upgrade Methods
Multimedia Net Card software can be upgraded with one of the following methods:
• Over-the-Air automatic upgrade
• Over-the-Air manual upgrade
• Complete package uninstall and reinstall
Note:
Several issues may affect the software upgrade process. Refer to Software Upgrade Notes
on page 43 for details.
2.2.2.6.2.1 Over-the-Air Automatic Upgrade
During the course of connected operation, T-Mobile Mobility Manager maintains contact
with an Over-the-Air (OTA) server. The server informs T-Mobile Mobility Manager
software when an upgrade is available. Notification typically appears in the form of the
“Upgrade Available” message (see Figure 24).
Figure 24: Upgrade Available Message
User notification follows these guidelines:
• When the full package upgrade is available, T-Mobile Mobility Manager
automatically displays the “Upgrade Available” message”
• When only DSP Image upgrade is available, notification depends on user
settings. These settings are configured in the T-Mobile Mobility Manager
Information Screen – Advanced Tab (Options ⇒ Information ⇒ Advanced):
Multimedia Net Card User Guid e
Page 36
Page 37

Using the Multimedia Net Card
Figure 25: Information Screen – Advanced Tab
o When “Always notify me before downloading and installing updates” is
selected, T-Mobile Mobility Manager will present the “Upgrade
Available” message when a DSP Image update is available
o When “Always notify me before downloading and installing updates” is
not selected, T-Mobile Mobility Manager will automatically upgrade DSP
firmware, without prior notification.
Note:
By default, “Always notify me before downloading and installing
updates” is not selected. Therefore, by default, DSP Image updates will
occur without user intervention, when available.
To change the default setting:
1. Check “Always notify me before downloading and installing updates”.
2. Click Apply.
3. Click OK.
Note:
If you click the OK button and do not click the Apply button, the dialog will be dismissed
with no action taken.
Version 1.2
Page 37
Page 38

Chapter 2
To install the automatically detected upgrade:
1. In the Software Upgrade Available (see Figure 24) message, click Yes.
T-Mobile Mobility Manager downloads the update (see Figure 26), and presents
the Click OK to Update message (see Figure 27).
Figure 26: Downloading Update Message
Figure 27: Click OK to Update Message
2. In the Click OK to Update Mobility Manager message box, click OK.
T-Mobile Mobility Manager installs the updated software.
Multimedia Net Card User Guid e
Page 38
Page 39

Using the Multimedia Net Card
2.2.2.6.2.2 Over-the-Air Manual Upgrade
Users may wish to manually check if upgrades are available (rather than waiting for
automated notification). This method enables immediate checking of upgrade
availability, rather than waiting for a preset “polling” interval.
To manually check for upgrades:
1. From the Options menu, select Check for Upgrade…(see Figure 28).
Figure 28: Check for Upgrade
T-Mobile Mobility Manager checks the Over-the-Air server for available
upgrades.
Version 1.2
Page 39
Page 40

Chapter 2
• If no upgrade is available, the “No files need updating” message (see Figure 29)
appears:
Figure 29: No Files Need Updating Message
• If an upgrade is available (whether DSP Image or full package), the Update
Available message appears (see Figure 30), along with an Update Yes/No
message (see Figure 31):
Figure 30: Update Available Message
Figure 31: Update Yes/No Message
Multimedia Net Card User Guid e
Page 40
Page 41
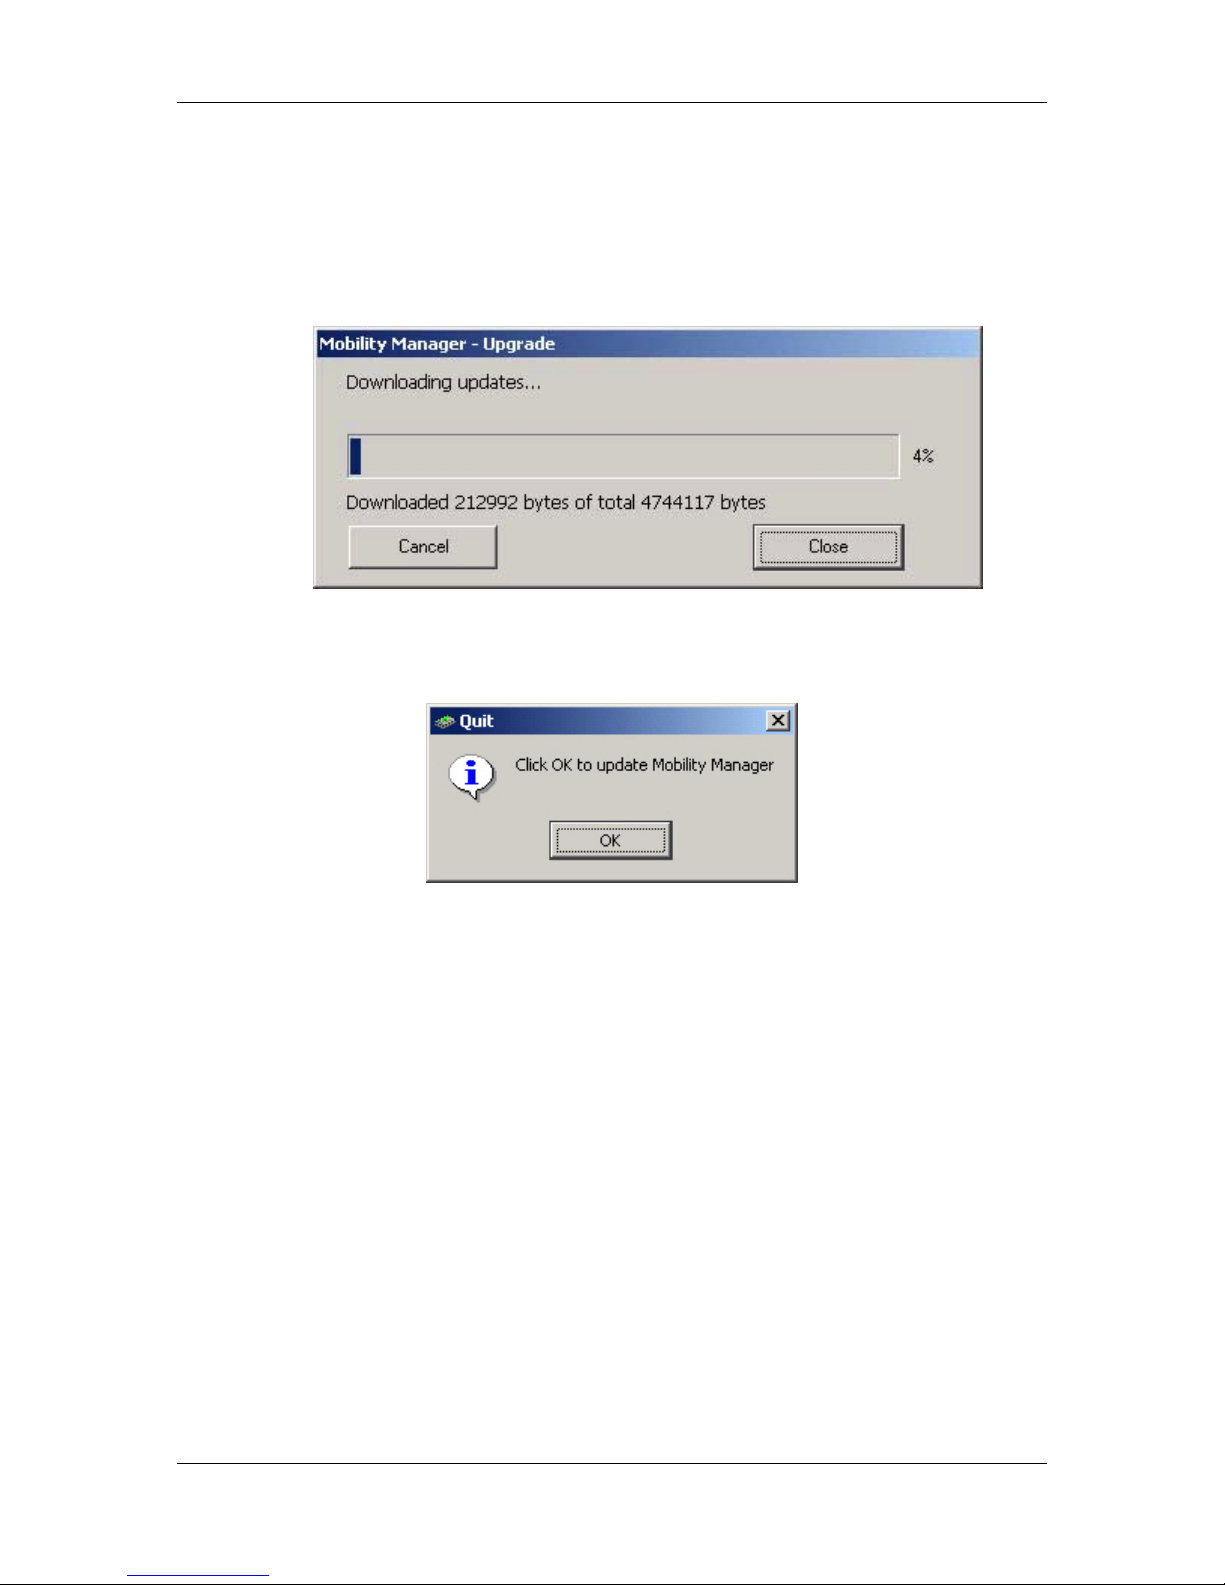
To install the manually detected upgrade:
1. In the Update Yes/No message, click Yes.
T-Mobile Mobility Manager downloads the update (see Figure 32), and presents
the Click OK to Update message (see Figure 33)
Figure 32: Downloading Updates Message
Using the Multimedia Net Card
Figure 33: Click OK to Update Message
2. In the Click OK to Update Mobility Manager message box, click OK.
T-Mobile Mobility Manager installs the updated software.
Version 1.2
Page 41
Page 42

Chapter 2
2.2.2.6.2.3 Complete Package Uninstall and Reinstall
In addition to Over-the-Air upgrade, Multimedia Net Card software can be upgraded by
uninstalling current software, and installing upgraded software.
To uninstall T-Mobile Mobility Manager software:
1. Double click the “My Computer” icon on your desktop.
2. Double click the “Control Panel” icon in your “My Computer” folder.
3. Double click the “Add/Remove Programs” icon.
4. Scroll down to “T-Mobile Mobility Manager” and click it. Then click on
“Change/Remove”. Follow instructions. Click “Next” and then “Finish”.
5. The software is now uninstalled.
To install upgraded software:
1. Access the latest version of the Multimedia Net Card complete software package.
2. Follow software installation instructions (refer to Installing the Multimedia Net
Card on page 12).
Multimedia Net Card User Guid e
Page 42
Page 43

Using the Multimedia Net Card
2.2.2.7 Software Upgrade Notes
Several issues apply to the Multimedia Net Card upgrade process:
• Third party firewall programs may affect over-the-air upgrade. If the over-the-air
upgrade does not work, you may need to disable all third party firewalls before
retrying. Check with third party firewall software user instructions on how to
disable.
• The situation may occur that users stop download of upgrade software before
completion. When download is resumed, it will continue from where it was
halted.
• When upgrading driver software on a computer running Windows 98 SE, users
will be prompted to reboot the computer for the changes to take effect.
• Computer s running Windows 2000 and Windows XP require user login, per
configured user rights. These rights affect the upgrade process as follows:
o Users logged in as “Administrators” have full rights regarding upgrade.
They can install software upgrades as detailed in the preceding sections.
o Users logged in as “Power Users” will be able to upgrade T-Mobile
Mobility Manager software and DSP image, but will receive an error
message when trying to install a new driver. To enable a driver upgrade,
the current T-Mobile Mobility Manager session must be closed, and then a
user with “Administrator” rights must log in to the computer to perform
the upgrade.
o Users logged in as “Users” or as any other available user type will not be
able to upgrade Multimedia Net Card software. To enable a software
upgrade, the current T-Mobile Mobility Manager session must be closed,
and a user with “Administrator” rights must log in to the computer to
perform the upgrade.
Version 1.2
Page 43
Page 44

Chapter 2
2.2.3. Removing the Multimedia Net Card
To remove the Multimedia Net Card from the computer:
1. Click the Unplug or Eject Hardware icon on your system tray.
2. From the options presented, select “Stop FLASH-OFDM NIC device”. Click
“Stop”.
A dialog box appears notifying you that it is safe to eject the card
3. Press the Ejector button at the side of the PCMCIA slot and remove the
Multimedia Net Card from the slot.
Note:
To restart the device after it has been stopped in this way, the Multimedia Net Card must
be physically removed and reinserted into the slot.
Multimedia Net Card User Guid e
Page 44
Page 45

Using the Multimedia Net Card
2.2.4. Removing the Antenna from the Multimedia Net Card
When transporting the Multimedia Net Card, it may be helpful to first remove the
external antenna.
WARNING
WHEN REMOVING THE EXTERNAL ANTENNA FROM
THE MULTIMEDIA NET CARD, DO NOT PULL FROM
THE TOP OF THE ANTENNA. THIS MAY CAUSE THE
ANTENNA TO BREAK.
To remove the external antenna from the Multimedia Net Card:
1. Rotate the antenna so that it aligns with the Multimedia Net Card.
2. Grasp the antenna by the molded antenna grips.
Antenna Grip
Antenna Grip
Figure 34: Antenna Grips
3. Pull the antenna out of the Multimedia Net Card.
Version 1.2
Page 45
Page 46

Chapter 2
2.2.5. Uninstalling Multimedia Net Card Software
To uninstall Multimedia Net Card software, follow the procedures for the specific
computer system.
2.2.5.1 Uninstalling for Windows
To uninstall Multimedia Net Card software for Windows (T-Mobile Mobility Manager):
1. Click Start ⇒⇒⇒⇒ Settings ⇒⇒⇒⇒ Control Panel.
The Control Panel folder opens:
Multimedia Net Card User Guid e
Page 46
Figure 35: Control Panel Folder
Page 47

Using the Multimedia Net Card
2. In the Control Panel folder, double click Add/Remove Pr ogra ms .
The Add/Remove Programs screen appears:
Figure 36: Add/Remove Programs Screen
3. Scroll to T-Mobile Mobility Manager and click it.
4. Click Change/Remove.
5. Click Next.
6. Click Finish.
The software is now uninstalled.
2.2.5.2 Uninstalling for Linux
To uninstall Multimedia Net Card software for Linux:
1. Navigate to the ft1000_linux package directory.
2. Run ./install.sh
3. Select option 2 to uninstall.
The system uninstalls the software.
Version 1.2
Page 47
Page 48

Chapter 2
2.2.5.3 Uninstalling for Macintosh
To uninstall Multimedia Net Card software for Macintosh:
1. Navigate to the Mac Driver folder (available on the installation CD).
The Macintosh driver files appear:
Figure 37: Macintosh Driver Files
2. In the Mac Driver folder, open the Uninstaller.app file.
The Uninstaller Message screen appears:
Figure 38: Uninstaller Message Screen
Multimedia Net Card User Guid e
Page 48
Page 49

Using the Multimedia Net Card
3. In the Uninstaller Message screen, click Uninstall.
The Authenticate screen appears:
Figure 39: Authenticate Screen
4. In the Authenticate screen, type Name and Password information and click
OK..
The software uninstalls and the Successful Message screen appears:
Figure 40: Successful Message Screen
5. Reboot the Macintosh.
The uninstall procedure is complete.
Version 1.2
Page 49
Page 50

Chapter 2
2.3 Troubleshooting the Multimedia Net Card
When properly installed and used, the Multimedia Net Card is very reliable. Problems
that arise are likely to be because:
• Wireless broadband coverage is not available.
• The Multimedia Net Card is not compatible with the operating system in your
computer. The following operating systems do not work with the Multimedia Net
Card: Windows 95, Windows 98 (Gold Edition), and NT 4.0.
• Other devices are using the system resources that are required for the Multimedia
Net Card to function.
• The wrong driver has been installed.
Identify possible causes and solutions to problems from the Troubleshooting Table.
Table 2: Multimedia Net Card Troubleshooting (for Notebook Usage)
Card Problems Possible Causes Suggestions
The T-Mobile
Mobility Manager
icon says
“Disabled”.
The Multimedia
Net Card is not
fully inserted.
You disabled the
session but forgot
to enable it.
The driver was
stopped from the
system tray.
The software was
not successfully
installed.
Reinsert the Multimedia Net Card. The
blue light should appear when inserted
properly.
In the T-Mobile Mobility Manager
window, Click “Options”, then “Enable”.
Remove and reinsert the Multimedia Net
Card.
Uninstall and then reinstall the software
correctly.
Multimedia Net Card User Guid e
Page 50
Page 51

Card Problems Possible Causes Suggestions
Using the Multimedia Net Card
The blue light
(LED) on the side
of the Multimedia
Net Card fails to
illuminate after
driver installation,
OR "Driver
Installation Error"
message displays
after software
installation.
Unsuccessful
driver installation.
An ft1000clean.exe utility is provided on
the distribution CD under the Tools
directory to resolve unsuccessful driver
installation.
Use the following procedure to resolve the
above problems during a full installation:
1. Eject the Multimedia Net Card from
the system.
2. Uninstall the software package via
My Computer ⇒ Control Panel ⇒
Add/Remove Programs ⇒ T-Mobile
Mobility Manager ⇒
Change/Remove.
3. Run ft1000clean.exe (located on the
distribution CD under the Tools
directory).
4. Reboot the system as instructed by
the ft1000clean.exe utility.
5. Reinstall the software package
following the normal installation
procedure.
For an upgrade installation:
1. Eject the Multimedia Net Card from
the system.
2. Run ft1000clean.exe (located on the
distribution CD under the Tools
directory).
3. Reboot the system as instructed by
the ft10000clean.exe utility.
4. Run Upgrade.exe located under the
'UpgradeCache' directory in the TMobile Mobility Manager folder.
5. Select "yes" when prompted by
Upgrade.exe to repair the current TMobile Mobility Manager.
6. Insert the Multimedia Net Card after
completion of Upgrade.
Version 1.2
Page 51
Page 52

Chapter 2
Card Problems Possible Causes Suggestions
Windows asks you
to restart your
computer before
the “click to finish”
message appears
from the
installation.
The Multimedia
Net Card cannot be
enabled after
restarting.
Your computer
locks up.
You may have
inserted the
Multimedia Net
Card before
completing the
software
installation.
The driver was
stopped from the
system tray.
You probably
ejected and reinserted the
Multimedia Net
Card while it was
enabled, which
causes the
computer to lock
up.
Choose “No” or “Cancel” and then restart
your computer manually after clicking
“Finish” on the installation setup.
See the section titled “Removing the
Multimedia Net Card.”
Make sure that you disable the card and
follow the proper removal steps before
unplugging it
See the section titled “Removing the
Multimedia Net Card.”
The T-Mobile
Mobility Manager
flashes on the
screen and then
disappears.
The over-the-air
upgrade does not
work.
Click the Mobility Manager icon that is
located in your system tray or desktop,
which will bring the T-Mobile Mobility
Manager window back.
3rd party firewalls
are preventing
upgrades.
Disable the firewall before attempting to
upgrade. We recommend you check with
the third party firewall software user
instructions on how to disable.
Multimedia Net Card User Guid e
Page 52
Page 53

Appendix A
Appendix A. Technical Specifications
Table 3: Multimedia Net Card Technical Specifications
Category Specification
Airlink FLASH-OFDM
Frequency Bands 450-456MHz UL;
460-466MHz DL, any one channel1
Peak download 3.0 Mbps Maximum Data Rate2
Peak upload 900 kbps
Antennas
Integrated Antenna Bulb extension
Detachable Antenna Dipole
(+2dBi over bulb)
Antenna Connectors 3SSMB
Dimensions (excluding external antenna) 118 x54 x 12
Weight (including external antenna) 60g
Power4 supply (PCMCIA) 5V (PCMCIA slot)
3.3V Operating voltage
Peak current draw 0.9A
Operating temperature 0C -+55C
Storage temperature -20C -+65C
Operating humidity <95%, non-condensing
1
Channelization depends on service provider
2
Measured at PHY layer, average experience depends on signal strength and network loading
3
Supports use of remote higher gain antennas, contact service provider for details
4
Average power consumption depends on data rates and data consumption
Version 1.2
Page 53
 Loading...