


Basics
™
Welcome
to Android

Phone Navigation
Move around your touch screen
Tap
or
to select an item or open an
application.
Touch & hold
to drag an item or to add widgets,
shortcuts, and applications to the
Home screen.

the top bar to open the
Notication screen.
Swipe left & right
Touch & drag down
to see more of your Home
screens.

Hardkeys
Are always there to help you out

Home key
Menu key
Tap to go back to your
Tap to display a
Home screen.
list of options.
Genius Button™
Tap to search your
phone or online.
Back key
Tap to return to the
previous screen.
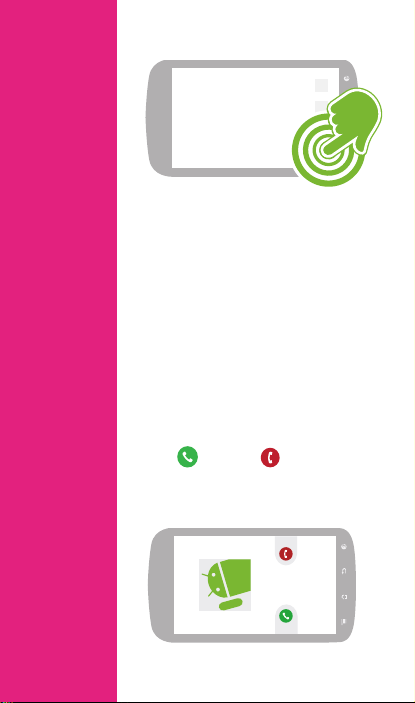
tap the Phone icon to
open the dialer screen...
To place a call,
right, towards
To answer a call,
drag
the middle of the screen.
Dialer
Make phone calls and stay in touch
left, towards
To decline a call,
drag
the middle of the screen.
555-555-5555
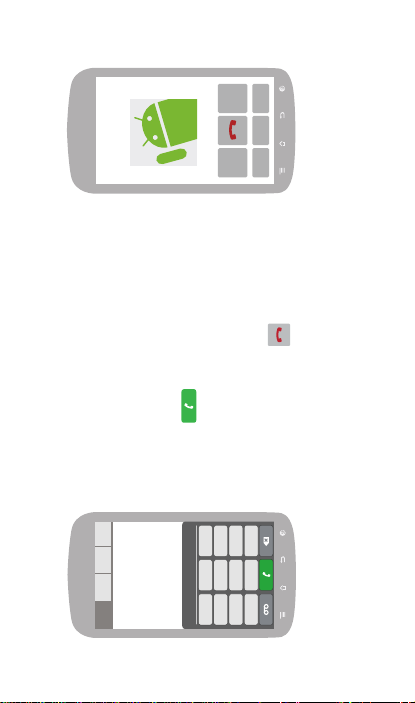
555-555-5555
1 2 3
4 5 6
7 8 9
*
0
#
555-555-5555
To end a call,
...then
enter a phone number
or tap a contact and
then tap
tap

Search
Find anything, anytime, and virtually anywhere
Google Play™
Access Music, Movies, Books,
and Apps on the web and on
your Android-powered devices.
Android Market™ is now part of
Google Play.
TeleNav GPS Navigator™
Search
TM
Google
Access the world’s
information to nd
what you’re looking for.
Internet
Find your way around.
Surf the Web while on
the go.

Additional Features
Want to know
more?
Visual Voicemail
Tap for Visual Voicemail.
Please see the rest of this
guide for more information.
Messaging
Tap for Messages.
Open Contacts List
To view your Contacts.

TABLE OF CONTENTS
Support .......................................................... 1
Service ........................................................... 2
Phone Overview ............................................ 3
Sim card ........................................................ 5
Memory Card ................................................ 7
Battery ........................................................... 8
Power............................................................. 9
Home Screen ................................................ 9
Ringtones .................................................... 12
Volume......................................................... 13
Voicemail ..................................................... 14
Contacts ...................................................... 15
Email Setup ................................................. 16

Messaging ................................................... 18
Wi-Fi ............................................................ 19
Wi-Fi Calling ................................................ 20
Smartphone Mobile HotSpot ...................... 23
Tethering ...................................................... 25
Bluetooth
®
.................................................. 26
Battery & Memory Management ................ 27
Caring For Your Phone ................................ 30
Accessories ................................................. 31
Safety Tips ................................................... 32
Emergency Dialing ...................................... 33
Additional Information ................................. 34

SUPPORT
This guide provides you with the information
you need to get started.
For more information and additional
support, please visit www.t-mobile.
com/support where you can:
Register for my.t-mobile.com to check
your minutes, pay your bill, upgrade your
phone, and change your rate plan.
Review your phone’s User Manual
and troubleshooting FAQs.
View the latest troubleshooting
solutions in the Support Forums
or ask a question of your own.
You can also visit the following sites
to learn more about your phone:
Help for Setting Up Your New
Android Device: http://support.t-
mobile.com/docs/DOC-2501
Help for Your Device: http://support.
t-mobile.com/community/phones_
data_devices/android
You can also access account and device
information from your phone:
1. From any Home screen, tap
the Applications
then tap Access T-Mobile.
icon and
1

SERVICE
If you are a new T-Mobile® customer and
your service has not yet been activated,
call Customer Care at 1-800-937-8997
and a T-Mobile Activations representative
will assist you.
You will need the following information
when activating service:
Service Agreement and agent
code on your Agreement
Your name, home address, home
phone number, and billing address
Note: For business and government accounts,
please provide the name of your company or
government agency, address, and tax ID.
Your Social Security number, current
driver’s license number, and date of
birth for credit check purposes
Your choice of T-Mobile rate plan and
services (see www.t-mobile.com for
latest plan information)
SIM serial number and IMEI number
(located on the box barcode label)
By activating service, you acknowledge that you have read,
understand, and agree to be bound by each of T-Mobile’s
Terms and Conditions, and your Service Agreement.
2
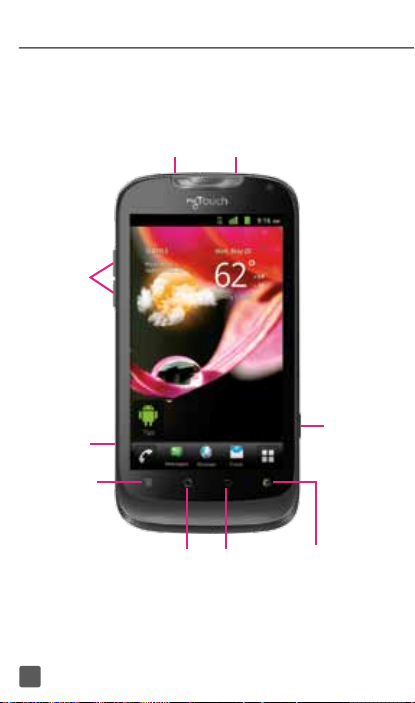
PHONE OVERVIEW
Volume
keys
Charger/
USB port
Menu
3
Headset jack
key
Home
key
Power/Lock key
Genius button
Back
Press to speak
key
commands for
calling friends,
searching the
Web, or nding
a business.
Camera
key
TM
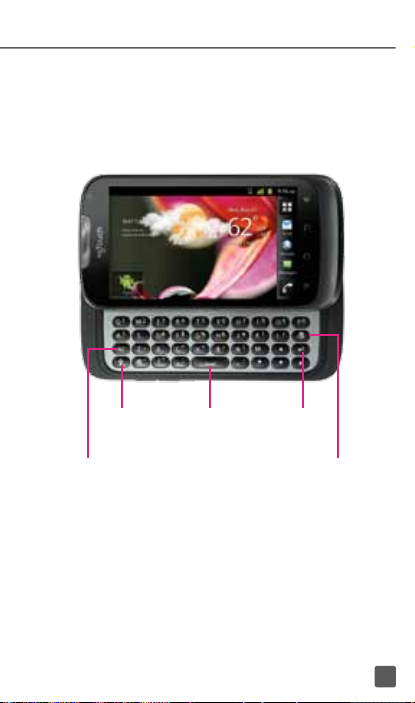
Shift key
Space key
Return key
Alt key
Press to enter
alternate options
on a key
Delete
key
4

SIM CARD
Your SIM (Subscriber Identity Module) card
identies your phone to the wireless network.
IMPORTANT: To make or receive phone calls and
browse the Internet, you must rst activate and
insert the SIM card that comes with your phone.
Also to use the Wi-Fi Calling feature, you must
use the SIM card that comes with your phone.
Insert the SIM card
1. Detach the SIM card from its packaging.
2. Use the notch on the bottom
of the phone to detach and
pull the back cover away.
5

3. Remove the battery and insert
the SIM card, as shown.
4. Align the golden contacts on the
battery with the golden contacts in
the battery compartment and press
into place. Replace the back cover.
6

MEMORY CARD
Your phone does not come with
a microSD memory card, but you
can purchase one separately.
Install or remove the memory card
1. Use the notch on the bottom of the
phone to remove the back cover.
2. Gently slide the memory card in, as
shown, until it clicks into place. To
remove, gently press the memory card
in until it clicks and then release.
7

BATTERY
Your phone is shipped with the
battery partially charged. Please
charge it fully before use.
For more information on how to
conserve battery life, see the Battery
& Memory Management section
at the back of this guide.
Charge the battery
1. Insert the small end of the
charger cable into the charger/
USB port, as shown.
2. Plug the other end into an
electrical wall outlet or a USB
port on a computer.
8

POWER
To turn the power on,
press and hold the
Power/Lock key.
To turn the power
off, press and hold
the Power/Lock key
and tap Power Off.
HOME SCREEN
Swipe your nger left or right to view
more of your Home screen.
Swipe left to
view screens
to the right
You can customize each screen with widgets
or shortcuts to your favorite applications.
9
Swipe right to
view screens
to the left

Status bar
The Status bar appears at the top of
every Home screen. Icons indicating
the phone’s status and new notication
alerts appear on the Status bar.
Notification screen
To open the Notication screen, touch
and drag the Status bar down.
Status bar
Touch and
drag down
to open
Quick
Setting
icons
Notication
icons
10

Applications screen
To access the Applications screen, from
any Home screen, tap the Applications
icon to view the following:
All apps to view all applications
on your phone.
Downloads to view applications
you have downloaded.
Recent to view applications
you have opened recently.
Unlock the screen
Swipe the Lock icon down
to unlock the display.
Add items to the Home screen
1. Swipe left or right to the
desired Home screen.
2. Touch and hold an empty
spot on the screen.
3. Tap Shortcuts, Widgets, or Folders.
4. Tap the desired item to add.
Move and delete items
Touch and hold the item you want to move
or delete until your phone vibrates, then
drag it to another location or to the Trash
Can icon at the bottom of the screen.
11

Change Home screen wallpaper
1. Touch and hold an empty
spot on the Home screen.
2. Tap Wallpapers.
3. Tap Gallery, Live wallpapers,
or Wallpapers.
4. Tap the desired image.
5. Adjust the crop box, if necessary
and tap Set wallpaper or Save.
RINGTONES
Set call and notification ringtone
1. From any Home screen,
tap the Menu key.
2. Tap Settings.
3. Tap Sound.
4. Tap Phone ringtone or
Notication ringtone.
5. Tap Ringtone or Music.
6. Tap the desired ringtone.
7. Tap OK.
Set other sounds
1. From any Home screen,
tap the Menu key.
2. Tap Settings.
3. Tap Sound.
4. Tap to select or clear the check
box next to the following items
to turn the sound on or off:
12

Silent mode
Audible touch tones
Audible selection
Screen lock sounds
Haptic feedback
VOLUME
Set call volume
While on a call, press the Volume key up
or down.
Set other volume
1. From any Home screen,
tap the Menu key.
2. Tap Settings.
3. Tap Sound.
4. Tap Volume.
5. Touch and drag the Ringtone, Media,
and Alarm sliders to the desired level.
6. Tap to clear the Use incoming
call volume for notications
check box and adjust the
Notication slider, if desired.
7. Tap OK.
Silence ringer volume
From any Home screen, press
the Volume key down until you
see the Vibrate mode icon.
13

VOICEMAIL
Use voicemail
To call and set up voicemail:
1. From any Home screen,
tap the Phone
2. Tap the Voicemail icon or touch
and hold 1 to call voicemail.
3. Follow the instructions to set
up your voicemail account.
To reset the voicemail password to the
last four digits of your phone number:
1. From any Home screen,
tap the Phone icon.
2. Enter #793#.
3. Tap the green Phone icon.
4. Tap OK.
Use Visual Voicemail
With Visual Voicemail, you can view
a list of your voicemail messages
and play them in any order.
To set up Visual Voicemail:
1. From any Home screen, tap
the Applications icon.
2. Tap Visual Voicemail.
3. Tap Next to activate Visual Voicemail.
4. Tap Done.
icon.
14

To check Visual Voicemail messages:
1. From any Home screen, tap
the Applications
2. Tap Visual Voicemail.
3. Tap the voicemail message
you want to play.
4. Tap the Play icon.
To delete Visual Voicemail messages:
1. From any Home screen, tap
the Applications icon.
2. Tap Visual Voicemail.
3. Tap the voicemail message
you want to delete.
4. Tap the Delete icon.
5. Tap OK.
To reply to Visual Voicemail messages:
1. From any Home screen, tap
the Applications icon.
2. Tap Visual Voicemail.
3. Tap the voicemail message you want
to reply to and tap the Phone icon.
icon.
CONTACTS
Add new contact
1. From any Home screen,
tap the Phone icon.
2. Tap the Contacts tab near
the top of the screen.
15

3. Tap Create contact.
4. Enter the contact’s information.
5. Tap Save.
Call contact from the contacts list
1. From any Home screen,
tap the Phone icon.
2. Enter the name or phone number of
the desired contact and select from the
list of potential matches. If the contact
is not saved in your phone book,
enter the complete phone number.
Note: You can also tap the Contacts tab
near the top of the screen to view and select
from contacts saved in your phone book.
3. Tap the green Phone icon to call.
EMAIL SETUP
Set up Gmail™
1. From any Home screen, tap
the Applications icon.
2. Tap Gmail.
Note: If you have already set up at least
one other Google account, tap the Menu
key > Accounts > Add account to set up
additional Google accounts.
3. Tap Next.
4. Tap Create or Sign in.
5. Follow the on-screen instructions.
16

Set up Internet email
1. From any Home screen,
tap Email icon.
Note: If you have already set up an email
account, tap the Menu key > More >
Accounts > Menu key > Add account.
2. Tap the desired email provider.
3. Enter your email address.
4. Tap the Password eld and
enter your password.
5. Tap Next.
6. Enter the name you want displayed
on outgoing messages.
7. Enter a name for your
account (optional).
8. Tap Done.
Set up corporate email
1. From any Home screen,
tap Email icon.
Note: If you have already set up an email
account, tap the Menu key> More >
Accounts > Menu key > Add account.
2. Tap Exchange.
3. Enter your email address.
4. Tap the Domain eld and
enter your domain name.
5. Tap the Username eld and
enter your username.
17

6. Tap the Password eld and
enter your password.
7. Tap the Server eld and
enter your server name.
8. Tap Next.
9. Tap OK.
10. Modify the account options,
as desired, and tap Next.
11. Enter a name for your
account (optional).
12. Tap Done.
Contact your company’s IT
department if you need more help.
MESSAGING
Send a text message
1. From any Home screen, tap
the Messages icon.
2. Tap New message.
3. At To, enter the name or phone
number of the desired contact
and select from the list of potential
matches. If the contact is not
saved in your phone book, enter
the complete phone number.
4. Tap Type to compose and
enter your message.
5. Tap the Send icon to send.
18

Read text messages
Touch and drag the Status bar down
and tap the message or tap the
Messages icon to view your inbox.
Delete text messages
1. From any Home screen, tap
the Messages icon.
2. Touch and hold the message
you want to delete.
3. Tap Delete thread.
Note: You can also open a thread and touch
and hold a specic message and then tap
Delete message.
4. Tap Delete.
WIFI
Your phone can connect to
the Internet using Wi-Fi.
Turn on Wi-Fi
1. Touch and drag the Status bar down
to open the Notication screen.
2. Tap Wi-Fi.
Connect to Wi-Fi networks
1. From any Home screen,
tap the Menu key.
2. Tap Settings.
3. Tap Wireless & networks.
19

4. Tap to select the Wi-Fi check box
and turn on Wi-Fi, if necessary.
5. Tap Wi-Fi settings to view a
list of available networks.
6. Tap the network you want to use.
7. If necessary, enter the network
password and tap Connect.
WIFI CALLING
IMPORTANT:
Wi-Fi Calling requires that you use the SIM
card that is shipped with your phone.
Also, you must register your address for
9-1-1. Wi-Fi Calling will not work until you
have registered for 9-1-1 by logging into
your account at www.t-mobile.com. Go
to your prole and click Customer Info
and continue on to enter your address.
About Wi-Fi Calling
Wi-Fi Calling may improve your coverage
and allows you to make phone calls and
send messages over a Wi-Fi network
(when a Wi-Fi network is available). Unless
your rate plan provides otherwise, Wi-Fi
Calling minutes count the same as T-Mobile
cellular calling minutes on your phone bill.
To use Wi-Fi Calling, you must rst
turn on Wi-Fi and connect to a Wi-Fi
network, then turn on Wi-Fi Calling.
20

When the Wi-Fi Calling feature is on,
your phone displays the
Wi-Fi Calling icon on the
Status ba r.
To stay on a Wi-Fi call, you must
remain within range of the Wi-Fi
network. Your call will drop as you
leave the Wi-Fi range. When your
Wi-Fi signal weakens, your phone
will beep and display a warning
message alerting you that your call
will drop if the signal gets weaker.
Wi-Fi Calling offers three connection options:
Wi-Fi Preferred: All calls are
made over an available Wi-Fi
network. If there are no available
Wi-Fi networks calls are made
over the cellular net work.
Wi-Fi Only: All calls are made over
an available Wi-Fi network. If there
are no available Wi-Fi networks,
your calls will not connect.
Cellular Preferred: All calls are
made over the cellular network
unless the cellular network is not
available, then calls are made
over an available Wi-Fi network.
21

Turn on Wi-Fi Calling
Note: Wi-Fi must be turned on before Wi-Fi Calling
can be turned on.
1. From any Home screen,
tap the Menu key.
2. Tap Settings.
3. Tap Wireless & networks.
4. Tap to select the Wi-Fi Calling
check box to turn it on.
When you see the Wi-Fi Calling
icon on your Status bar, you are
ready to make phone calls and send
messages over the Wi-Fi network.
If you choose to turn off Wi-Fi Calling, you can
still stay connected to Wi-Fi for data usage.
Set connection preferences
Note: Wi-Fi Calling must be turned on to change
connection preferences.
1. From any Home screen,
tap the Menu key.
2. Tap Settings.
3. Tap Wireless & networks.
4. Tap to select the Wi-Fi Calling check
box to turn it on, if necessary.
5. Tap Wi-Fi Calling Settings.
6. Tap Connection Preferences.
7. Tap Wi-Fi Preferred, Wi-Fi
Only, or Cellular Preferred.
8. Tap OK.
22

SMARTPHONE MOBILE
HOTSPOT
Share your mobile data connection with
other devices wirelessly by turning your
phone into a portable Wi-Fi hotspot.
To use your phone’s hotspot capability,
you must have the Smartphone Mobile
HotSpot service added to your rate plan.
When Smartphone Mobile HotSpot
is turned on, your phone displays the
Mobile HotSpot icon on the Status bar.
Note: You cannot use Wi-Fi and use your phone
as a hotspot at the same time.
Turn on Smartphone Mobile HotSpot
1. From any Home screen,
tap the Menu key.
2. Tap Settings.
3. Tap Wireless & networks.
4. Tap Tethering and Mobile HotSpot.
5. Tap to select the Mobile
HotSpot check box.
Your phone starts broadcasting its
Wi-Fi network name (SSID).
23

Configure Smartphone Mobile
HotSpot
1. From any Home screen,
tap the Menu key.
2. Tap Settings.
3. Tap Wireless & networks.
4. Tap Tethering and Mobile HotSpot.
5. Tap Mobile HotSpot settings.
6. Tap OK.
7. Tap Congure Mobile HotSpot.
8. Enter a new name in the Network
SSID eld (optional).
9. Tap the Security drop-down menu
and tap Open or WPA2 PSK.
10. If you have selected WPA2
PSK, tap the Password eld
and enter a password.
11. Tap Save.
24

TETHERING
Share your phone’s mobile data connection
with a single computer by tethering.
To use your phone’s tethering capability,
you must have the Smartphone Mobile
HotSpot service added to your rate plan.
When tethering is turned on, your phone
displays the Tethering icon in the Status bar.
For more information on tethering,
go to www.android.com/tether.
For Windows XP, you must rst
install the driver on your computer
before you can tether. To install the
driver, go to http://www.microsoft.
com/download/en/details.
aspx?DisplayLang=en&id=15.
When you connect your phone to
a computer with a USB cable, you
can either share your mobile data
connection by tethering or you can
share les—you cannot do both.
Do not turn on tethering if you want
to use your computer to access
your phone’s memory card.
25

Tether your phone
1. Connect your phone to a
computer with a USB cable.
2. Tap the Menu key.
3. Tap Settings.
4. Tap Wireless & networks.
5. Tap Tethering and Mobile HotSpot
6. Tap to select the USB tethering
check box to turn on tethering.
7. Tap OK.
Your phone starts sharing its wireless
network data connection with your
computer via the USB connection.
BLUETOOTH®
Your phone comes with Bluetooth
connectivity, a wireless technology that
enables a data connection between your
phone and a Bluetooth headset or other
Bluetooth device (sold separately).
Prepare Bluetooth headset
Make sure that your headset is fully charged
and in pairing mode. Refer to the headset’s
user manual for more information.
26

Turn on Bluetooth and
pair with headset
1. From any Home screen,
tap the Menu key.
2. Tap Settings.
3. Tap Wireless & networks.
4. Tap Bluetooth settings.
5. Tap to select the Bluetooth check box
to turn it on, if necessary. You phone
will scan for devices automatically.
6. From the list, tap the headset you
want to pair with your phone.
7. If necessary, enter the
PIN or passcode.
8. Tap OK.
BATTERY & MEMORY
MANAGEMENT
Screen & brightness timeout
To optimize battery life, you can adjust your
screen brightness and display timeout.
1. From any Home screen,
tap the Menu
2. Tap Settings.
3. Tap Display.
4. Tap Brightness.
5. Tap to clear the Automatic
brightness check box, if desired.
key.
27

6. Touch and drag the Brightness
slider to the desired level.
7. Tap OK.
8. Tap Screen timeout.
9. Tap the desired timeout setting.
Optimize memory
To use Task Manager to free up memory
space:
1. From any Home screen,
tap the Menu
2. Tap Manage apps.
3. Tap the following tabs near
the top of the screen:
Downloaded to view and uninstall
downloaded applications.
All to view all applications.
On SD card to monitor storage.
Running to view applications
that are currently running.
4. Tap the application you want
to stop or uninstall.
5. Tap Stop, Force stop, or
Uninstall, if available.
To clear the Browser cache:
1. From any Home screen, tap
the Browser icon.
2. Tap the Menu key.
key.
28

3. Tap More.
4. Tap Settings.
5. Scroll to the Privacy settings section
and tap Clear cache, Clear history,
Clear all cookie data, Clear form
data, or Clear location access.
6. Tap OK.
To delete old text messages:
1. From any Home screen, tap
the Messages icon at the
bottom of the screen.
2. Tap the Menu key.
3. Tap Settings.
4. Tap to select the Delete old messages
check box to automatically delete text
messages when the limit is reached.
To reduce text message limit:
1. From any Home screen, tap
the Messages icon at the
bottom of the screen.
2. Tap the Menu key.
3. Tap Settings.
4. Tap to select the Delete old
messages check box, if necessary.
5. Tap Text message limit.
6. Tap the Plus or Minus icons
to set he desired number of
messages you wish to save.
7. Tap Set.
29

CARING FOR YOUR PHONE
Make it last
Your phone is a complex electronic
device; think of it as a mini-computer.
Here are some tips to help you
extend the life of your new phone.
Do not get your phone wet.
Water will damage your phone and
accessories. Even a small amount
of moisture can cause damage.
Protect your phone’s touch screen. Your
phone’s touch screen is delicate. Guard
against scratches by using a screen
protector or by keeping it in a protective case.
Use the original manufacturer’s
batteries and accessories. Non-
approved batteries and accessories can
harm you and damage your phone.
Do not use damaged accessories. If your
charger or any other accessory is damaged,
replace it or take it to a qualied service
dealer. Do not attempt to charge your phone
if the charger has received a sharp blow,
been dropped, or is otherwise damaged;
doing so may damage your phone.
30

ACCESSORIES
Whether you want a charger, a fashionable
carrying case, a Bluetooth headset, or you
just want to browse for fun extras, T-Mobile
is the place to shop for all your phone
accessories. Here are a few examples…
Screen Protector Holster
To purchase accessories for your phone,
visit T-Mobile.com, call 1.800.204.2449,
or visit your nearest T-Mobile store.
Accessory selection subject to change and may vary
by location.
31

SAFETY TIPS
Consider device compatibility
If you have a pacemaker or hearing aid,
check with your doctor to make sure it is
safe for you to use a cell phone. In some
cases, cellular radio frequencies can
disrupt the performance of other electronic
equipment. If you have questions about
the interaction between your phone and
any other piece of electronic equipment,
ask the equipment manufacturer.
Drive safely
When you are driving, T-Mobile encourages
you to use your phone in a safe and
sensible manner. Here are a few tips:
Assess road conditions before
answering your phone. Your safety
is more important than any call.
Prepare your hands-free headset,
if you have one, or turn on your
speakerphone, before you
start moving.
Keep your phone close. If it rings
and you discover it’s in the back
seat, do NOT crawl over the seat
to answer it while driving.
32

Pre-program frequently used
numbers into your phone for
easy, one-touch dialing.
Remember that laws prohibiting or
restricting the use of a cell phone
while driving may apply in your area.
EMERGENCY DIALING
Although all phones are equipped with
9-1-1 emergency calling, this phone
may or may not permit its location to be
approximated during a 9-1-1 call.*
* Availability of this feature depends on upgrades to the
(a) wireless network and (b) 9-1-1 calling system that
are required to be installed by the local 9-1-1 response
agency or public safety answering point (PSAP); these
upgrades may not be available everywhere within our
wireless coverage area or your roaming area. This
approximation of the phone’s location and the transmittal
of location information are subject to emergency situations,
transmission limits, network problems/limitations,
interconnecting carrier problems, your phone, buildings/
tunnels, signal strength and atmospheric/topographical
conditions, and may be curtailed, interrupted, dropped or
refused. The phone’s approximate location is transmitted
to the local 9-1-1 response agency or PSAP while the call
is in progress; this approximation is intended solely to
aid the PSAP in dispatching emergency assistance or to
limit the search area for emergency services personnel.
You should not rely solely on a phone for essential
communications (such as a medical or other emergency).
Please see T-Mobile’s Terms and Conditions and Privacy
Policy for additional service restrictions and details.
33

ADDITIONAL INFORMATION
Use of some features or services may
incur separate, additional charges
and/or require a qualifying data plan,
or access to a Wi-Fi connection.
Wi-Fi: Device will not transition between
Wi-Fi and the cellular network. Devices
using wireless connections may be
vulnerable to unauthorized attempts to
access data and software stored on
the device. Plan data allotment applies
to use by connected devices sharing
Wi-Fi. Use of connected devices subject
to T-Mobile Terms and Conditions.
Smartphone Mobile HotSpot/
Tethering: Plan data allotment applies.
Use of connected devices subject to
T-Mobile’s terms and conditions.
Messaging/Data: You will be charged
for all data sent by or to you through the
network, regardless of whether or not
data is received. Character length/file
size of messages/attachments may be
limited. T-Mobile is not liable for content of
messages/attachments or for any failures,
delays or errors in any T-Mobile generated
alerts or notications. Your data session,
plan, or service may be slowed,
suspended, terminated, or restricted if you
use your service in a way that interferes with
or impacts our network or ability to provide
quality service to other users, if you roam for
34

a signicant portion of your usage, or if you
use a disproportionate amount of bandwidth
during a billing cycle. You may not use
your plan or device for prohibited uses.
Downloads/Applications: T-Mobile is not
responsible for any third party content
or Web site you may be able to access
using your phone. Additional charges
may apply; not all downloads available
on all phones. You obtain no rights in
downloads; duration of use may be limited
and downloads may be stored solely
for use with your phone. T-Mobile is not
responsible for any download lost due to
your error. T-Mobile is not responsible for
Apps, including download, installation,
use, transmission failure, interruption or
delay, third party advertisements you may
encounter while using an App, alterations
any App may make to the functionality of
your device, including any changes that
may affect your T-Mobile plan, service,
or billing, or any content or website you
may be able to access through an App.
Hearing Aid Compatibility: This phone has
been tested and rated for use with hearing
aids for some of the wireless technologies
that it uses. However, there may be some
newer wireless technologies used in this
phone that have not been tested yet for use
with hearing aids. It is important to try the
different features of this phone thoroughly
and in different locations, using your hearing
aid or cochlear implant, to determine if
35

you hear any interfering noise. Consult
your service provider or the manufacturer
of this phone for information on hearing
aid compatibility. If you have questions
about return or exchange policies, consult
your service provider or phone retailer.
Devices, accessories and screen images
simulated. See brochures and the Terms and
Conditions (including arbitration provision)
at T-Mobile.com, for rate plan information,
charges for features and services,
and restrictions and details, including
important limitations on availability
and reliability of 9-1-1 emergency
service when using Wi-Fi calling.
The Bluetooth
®
word mark and logo are
owned by the Bluetooth SIG, Inc. and
are used by T-Mobile under license.
Google, Gmail, Android, Android market
and Google Play are trademarks of
Google, Inc. Android robot is created and
shared by Google and used according
to the Creative Commons 3.0 Attribution
License. T-Mobile and the magenta color
are registered trademarks of Deutsche
Telekom AG. ©2012 T-Mobile USA, Inc.
36

37

38

 Loading...