

Page 1
Page 2

OVERVIEW
This guide provides you with information to
get started. For more information and
support, please visit www.t-mobile.com/
support where you can:
n
Register for my.t-mobile.com
to check your minutes, pay
your bill, upgrade your phone,
and change your rate plan.
n
Review the User Manual and
troubleshooting FAQs.
n
View the latest troubleshooting
solutions in the Support Forums
or ask a question of your own.
You can also access Help
information on your phone:
1. From any Home screen, tap
the Applications icon.
2. Tap My Account or My Device.
Page 3

TABLE OF CONTENTS
Service Activation ............................................. 1
Introducing Your Phone ................................... 2
SIM Card ..........................................................4
Memory Card ...................................................6
Battery .............................................................. 7
Power ............................................................... 8
Home Screens .................................................9
Applications Screen .......................................11
Notication Screen.........................................11
Coverage Indicators ......................................12
Call Functions ................................................13
Contacts .........................................................14
Volume & Ringtones ......................................16
Wi-Fi Calling ...................................................18
Tethering & Wi-Fi Sharing ..............................21
Text Messaging .............................................24
E-mail ............................................................. 25
Camera & Video ............................................29
Music Player ................................................... 31
Market ............................................................32
Bluetooth® ......................................................34
Accessories for Your Phone ..........................35
Emergency Dialing ........................................36
Caring for Your Phone ...................................36
Tips for Safety ................................................37
Additional Information .................................... 38
Page 4
1
SERVICE ACTIVATION
If you are a new T-Mobile® customer and
your service has not been activated, simply
call Customer Care at 1-800-937-8997
from your landline phone and a T-Mobile
Activations representative will assist you.
You will need the following information when
activating service:
n
Service Agreement and agent code on
your Agreement
n
Your name, home address, home phone,
and billing address
Note: For business and government accounts, please
provide the name of your company or government
agency, address, and tax ID.
n
Your Social Security number, current
driver’s license number, and date of birth
for credit check purposes
n
Your choice of T-Mobile rate plan and
services (see www.t-mobile.com for
latest plan information)
n
SIM serial number and IMEI number
(located on the box bar code label)
By activating service, you acknowledge that you have read,
understand, and agree to be bound by each of T-Mobile’s
Terms and Conditions and your Service Agreement.
Page 5
2 3
INTRODUCING YOUR PHONE
Congratulations on your purchase.
Now you can:
n
Experience blazing fast Web
browsing, searches, and
downloads at 4G speeds on
T-Mobile’s 4G network1.
n
T-Mobile TV – live and on
demand mobile HD TV2.
n
Voice Actions for Android™
make it faster to nd info
and get things done.
1
T-Mobile’s HSPA+ 4G network not available
everywhere; see coverage details at www.t-mobile.com.
Device has theoretical peak speed of 14.4 Mbps.
2
Mobile HD TV can deliver a bitrate of 800kbps
and 16:9 resolution; the bitrate & resolution you
experience will vary based on many factors, e.g.,
programming, network connection, & device.
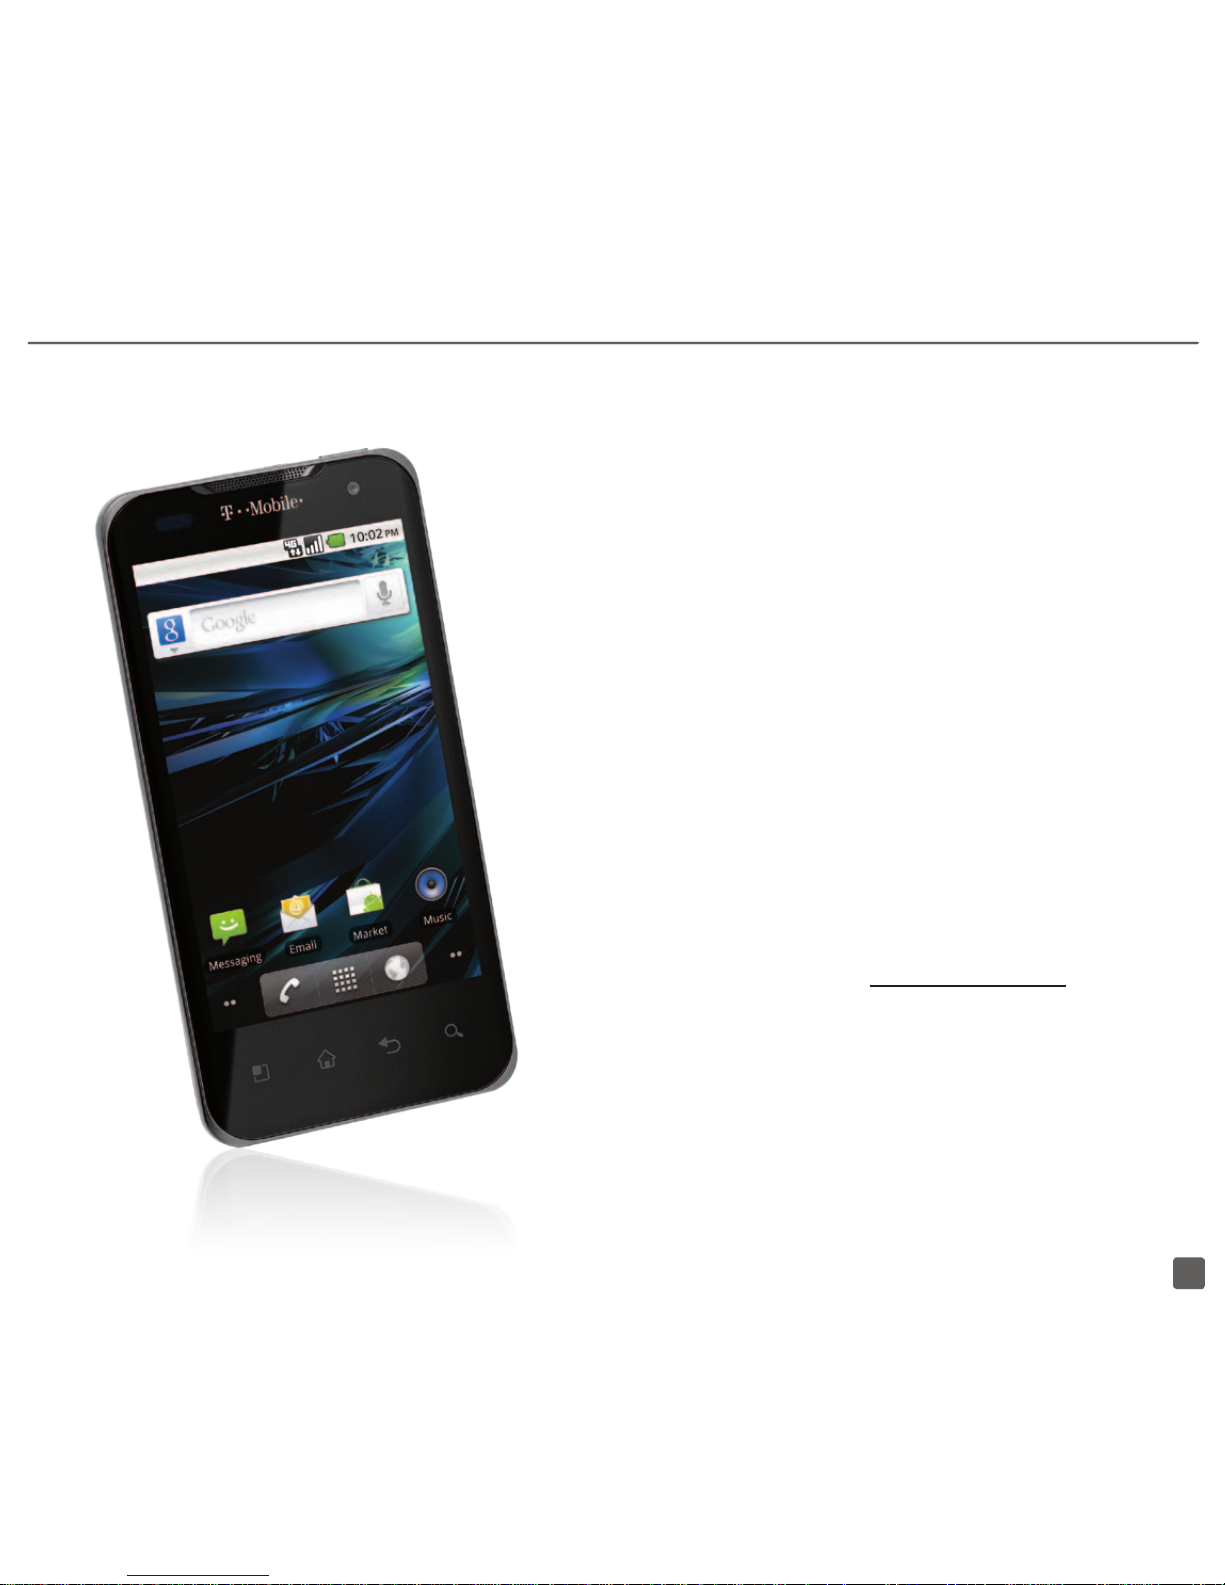
Power Key
Press to put the display
to sleep or press and
hold to turn on/off.
3.5mm Headset
Jack
HDMI Port
Home Key
Tap to return to
the Home screen.
Menu Key
Tap to open
menu options.
Charging/
USB Port
Volume
Keys
Search Key
Tap to
search the
Web, apps,
or contacts.
Back Key
Page 6
4 5
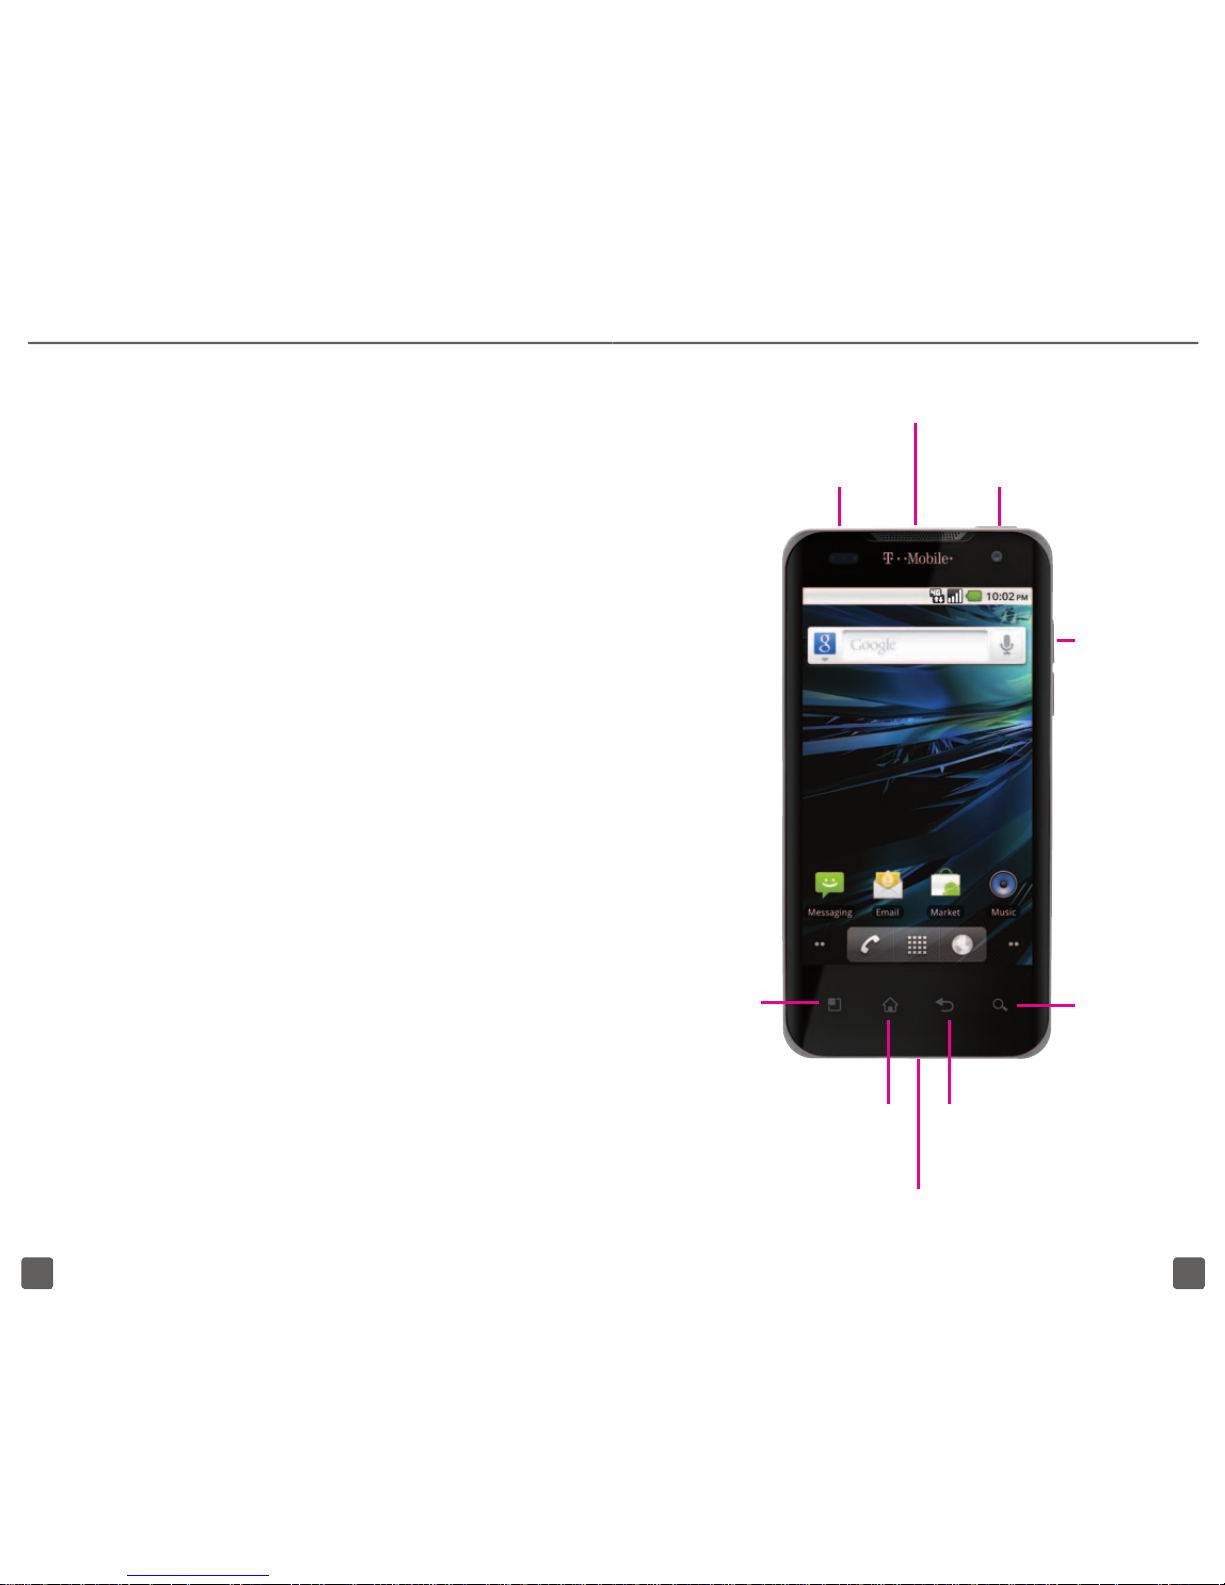
SIM CARD
Your Subscriber Identity Module (SIM) card
identies you to the wireless network. Your
phone will not work without the SIM card.
Insert SIM card and battery
1. Detach your SIM card.
2. Place your ngernail in the notch
on the bottom of your phone
and lift the back cover off.
3. Lift up the battery to remove.
Slide the SIM card into the
SIM card slot, as shown.
4. Align the gold contacts on the battery
with the gold contacts in the battery
compartment. Press the battery into
place and replace the battery cover.
Page 7

6 7
BATTERY
Charge using a wall outlet
On your phone, insert the small end of
the charger into the charging port on the
bottom of your phone. Plug the other
end of the charger into a wall outlet.
Charge using a computer
You can also charge using the USB
cable. Insert the small end of the USB
cable into the charging port on the
bottom of your phone and the other end
into the USB port of your computer.
MEMORY CARD
Your phone does not come with a
microSD memory card. However, you
can purchase one to store music,
pictures, videos–whatever you want!
Insert memory card
1. Place your ngernail in the notch
on the bottom of your phone
and lift the back cover off.
2. Slide the memory card into the memory
card slot with the gold contacts
facing down toward the phone.
3. Gently press until the memory
card clicks into place.
To remove, gently press the memory
card into the slot until it clicks. Release
the card and it will pop out slightly. Gently
remove from the memory card slot.
Page 8

8 9
Battery Life
Your phone has a convenient Power
Control widget to help you monitor and
maximize your phone’s battery life. To
add the widget to your Home screen:
1. Touch and hold an empty spot
on your Home screen.
2. Tap Widgets.
3. Tap Power Control.
Note: If additional battery options are needed, visit
your T-Mobile store for a selection of accessories
including car chargers and extra batteries.
POWER
To turn on your phone,
press and hold the Power
/ Lock key on the top.
To turn it off, press and hold
the Power / Lock key. Tap
Power Off and then tap OK.
Unlock the screen
1. Quickly press the Power/
Lock key on top of your
phone to wake your display.
2. Touch the Lock icon and
slide to the right.
HOME SCREENS
Your Home screen is wider than you think.
Simply swipe your nger right or left to
view any of the ve Home screens.
You can customize each screen with widgets
or shortcuts to your favorite applications.
Page 9

10 11
Add shortcuts, widgets, and
folders to Home screen
1. Navigate to the Home screen
where you want to add the item.
2. Touch and hold an empty
spot on the screen.
3. Tap Shortcuts, Widgets, or Folders.
4. Tap the item to add.
Change wallpaper
1. Touch and hold an empty spot
on your Home screen.
2. Tap Wallpapers.
3. Tap Gallery, Live wallpapers,
or Wallpapers.
4. Tap the wallpaper.
5. Adjust the crop box and tap
Save or tap Set wallpaper.
Remove items from Home screen
1. From the Home screen, touch and
hold the item you want to delete.
2. Drag it to the Trash icon and
release your nger.
APPLICATIONS SCREEN
While on any Home screen, tap the
Applications icon. Touch and slide
your
nger up or down to scroll through
applications.
Applications are in alphabetical
order.
NOTIFICATION SCREEN
To view your notications, touch and drag the
Status bar down to open the Notication
screen.
Page 10

12 13
COVERAGE INDICATORS
Indicates that your
phone is connected to
HSPA+ technology
Indicates that your phone is
connected to 3G technology
Indicates that your
phone is connected to
EDGE technology
Indicates that your
phone is connected to
GPRS technology
Indicates that your phone is
connected to Wi-Fi technology
Indicates your signal strength
(the more bars, the stronger
the signal strength)
Device speeds depend on factors such as wireless
trafc, topography, weather, and network
conditions.
CALL FUNCTIONS
Make and end calls
1. From any Home screen, tap the
Phone icon to open the dialer.
2. Enter the phone number and tap
the Phone icon to call.
3. To end the call, tap End.
Answer calls
Touch the Phone icon and slide to the right.
Set up voicemail
1. From any Home screen,
tap the Phone icon.
2. Tap the Voicemail icon or touch
and hold 1 to call voicemail.
3. Follow the tutorial to set up
your voicemail account.
Reset the voicemail password to the
last four digits of your phone number
1. From any Home screen,
tap the Phone icon.
2. Tap #793#.
3. Tap the Phone icon.
4. Tap OK.
Page 11

14 15
CONTACTS
Add new contact
1. From any Home screen,
tap the Phone icon.
2. Tap Contacts.
3. Tap the Menu key.
4. Tap New contact.
5. Enter the contact’s name, phone number,
and any additional information desired.
6. Tap Done.
Call contact from the contact list
1. From any Home screen,
tap the Phone icon.
2. Tap Contacts.
3. Swipe up and then touch and drag the
tab on the right side of the screen to
the desired letter, or tap the Search
key and enter the contact’s name.
4. Tap the contact.
5. Tap the desired number
to initiate the call.
Sync account contacts
You can import and sync contacts from
your e-mail and social networking accounts
like Gmail™, Microsoft® Exchange, and
Twitter™. All contacts will display in your
phone’s contact list. To turn contact
sync on or off, follow these steps:
1. From any Home screen,
tap the Menu key.
2. Tap Settings.
3. Tap Accounts & sync.
4. Tap the account you want
to sync contacts with.
5. Tap to select or clear the Sync Contacts
check box to turn contact sync on/off.
Import contacts from SIM card
1. From the Home screen,
tap the Phone icon.
2. Tap Contacts.
3. Tap the Menu key.
4. Tap Import/Export.
5. Tap Import from SIM card.
6. Tap the Menu key.
7. Tap Import all.
Page 12

16 17
VOLUME & RINGTONES
Adjust call volume
While on an active call, press the Volume
key up or down to adjust the call volume.
Adjust ring volume
1. From any Home screen,
tap the Menu key.
2. Tap Settings.
3. Tap Sound.
4. Tap Volume.
5. Touch and drag the Ringtone
slider to the desired level.
6. Tap OK.
Tip: To set a different volume for your notications,
tap to clear the Use incoming call volume for
notications check box and then touch and drag
the Notication slider to the desired volume.
Adjust media volume
1. From any Home screen,
tap the Menu key.
2. Tap Settings.
3. Tap Sound.
4. Tap Volume.
5. Touch and drag the Media
slider to the desired level.
6. Tap OK.
Adjust touch tone volume
1. From any Home screen,
tap the Menu key.
2. Tap Settings.
3. Tap Sound.
4. Scroll to and tap the Audible touch
tones and Audible selection check
boxes to turn on/off touch tone volume.
Silence ring / notification volume
1. From any Home screen,
tap the Menu key.
2. Tap Settings.
3. Tap Sound.
4. Tap the Silent mode check
box to silence all sounds
except media and alarms.
Set incoming call ringtone
1. From any Home screen,
tap the Menu key.
2. Tap Settings.
3. Tap Sound.
4. Tap Phone ringtone.
5. Tap the desired tone.
6. Tap OK.
Page 13

18 19
Set notification ringtone
1. From any Home screen,
tap the Menu key.
2. Tap Settings.
3. Tap Sound.
4. Tap Notication ringtone.
5. Tap the desired tone.
6. Tap OK.
WI-FI CALLING
Wi-Fi Calling can improve your coverage
and allows you to make phone calls and
send messages over a Wi-Fi network (when
one is available). Unless your rate plan
provides otherwise, Wi-Fi Calling minutes
count the same as your T-Mobile wireless
calling minutes on your phone bill.
n
To use Wi-Fi Calling, you must
rst turn on Wi-Fi on your phone,
connect to a Wi-Fi network, and
then turn on Wi-Fi Calling.
n
When the Wi-Fi Calling feature
is on, your phone displays the
Wi-Fi Calling icon on the Status
bar on the top of your screen.
n
To stay on a Wi-Fi call, you must
remain in range of the Wi-Fi network.
Your call will drop as you leave the
Wi-Fi range. Your phone makes
an audible beep and shows a
message when a call will drop.
Wi-Fi Calling offers three connection options:
n
Wi-Fi Preferred: All calls go
through Wi-Fi when connected
to a Wi-Fi network. Calls drop
as you leave the Wi-Fi range.
n
Cellular Preferred: Calls go over
the cellular network, and Wi-Fi
Calling is a backup if the cellular
network is not available.
n
Wi-Fi Only: Calls can be made
when connected to a Wi-Fi network.
If there is no Wi-Fi network, then
your calls cannot connect.
Turn on Wi-Fi and Wi-Fi Calling
1. From any Home screen,
tap the Menu key.
2. Tap Settings.
3. Tap Wireless & networks.
4. Tap Wi-Fi settings.
5. Tap to select the Wi-Fi check box.
6. Tap Skip or Learn more, if necessary.
7. Tap the desired network.
8. Enter the password, if necessary,
and tap Connect.
Page 14

20 21
9. Go back to the Home screen.
10. Tap the Applications icon.
11. Tap Wi-Fi Calling.
12. Tap View Tutorial, if desired, or tap
the Back key to clear the alert.
13. At the bottom of the screen, tap the On/
Off icon to turn on/off Wi-Fi Calling.
When Wi-Fi Calling is on, your phone
displays the Wi-Fi Calling icon on the
Status bar at the top of your screen. You
can now make phone calls and send
messages over the Wi-Fi network.
Turn Off Wi-Fi Calling
You can choose to turn off Wi-Fi Calling.
You can stay connected to Wi-Fi for data
usage but not use the Wi-Fi Calling feature.
To turn off Wi-Fi Calling, follow these steps:
1. From any Home screen, tap
the Applications icon.
2. Tap Wi-Fi Calling.
3. At the bottom of the screen, tap the
On/Off icon to turn off Wi-Fi Calling.
Set Connection Preference
to Wi-Fi or Cellular
Note: Wi-Fi Calling must be turned on
to change connection preferences.
1. From any Home screen, tap
the Applications icon.
2. Tap Wi-Fi Calling.
3. Tap the Menu key.
4. Tap Settings.
5. Tap Connection preferences.
6. Tap one of the following options:
n
Wi-Fi Preferred
n
Cellular Preferred
n
Wi-Fi Only
7. Tap OK.
TETHERING & WI-FI SHARING
To use your phone’s tethering or WiFi sharing capability, you must have a
Tethering and Wi-Fi Sharing service plan.
Tethering
Your phone has the capability to share
its mobile data connection with a
single computer via a USB cable.
Page 15

22 23
n
Tethering works with Windows® 7,
Windows XP, Windows Vista®, and
Linux. For more information on
tethering with operating systems, go
to www.android.com/tether#usb.
n
For Windows XP, you must rst install
the driver on your computer before
you can tether. To install the driver,
go to www.android.com/tether.
n
When you connect your phone to
your computer using the USB cable,
you can either tether or access les
on the memory card but you cannot
do both. If you want to use your
computer to access the memory card,
then you must not turn on tethering.
Wi-Fi Sharing
You can share the mobile data
connection from your phone with
other devices by turning your phone
into a portable Wi-Fi hotspot.
n
When your phone is serving as a
Wi-Fi hotspot, you cannot access
the Internet via its Wi-Fi connection.
n
For more information, go to
www.android.com/tether#wi.
Tether Your Phone
1. Connect your phone to your
computer using the USB cable.
2. On your phone, tap the Back key.
3. Tap the Menu key.
4. Tap Settings.
5. Tap Wireless & networks.
6. Tap Tethering and portable hotspot.
7. Tap to select the USB
tethering check box.
Your phone starts sharing its wireless
network data connection with your
computer via the USB connection.
Turn on Wi-Fi Sharing
1. From any Home screen,
tap the Menu key.
2. Tap Settings.
3. Tap Wireless & networks.
4. Tap Tethering and portable hotspot.
5. Tap to select the Portable
Wi-Fi hotspot check box.
Your phone starts broadcasting its Wi-Fi
network name (SSID), allowing you to
connect up to eight Wi-Fi enabled computers
or other devices. Your phone’s default SSID
is AndroidAP.
Page 16

24 25
6. Tap Portable Wi-Fi hotspot settings.
7. Tap Congure Wi-Fi hotspot.
8. Enter a new name for the SSID.
9. Tap the Security drop-down menu.
10. Tap WPA2 PSK.
11. Tap the Password eld and
enter your password.
12. Tap Save.
13. On your computer, open the
application you use to connect via
Wi-Fi and select your phone’s SSID.
TEXT MESSAGING
Access messaging
1. From any Home screen, tap
the Applications icon.
2. Tap Messaging.
Delete a message or message thread
1. While viewing your message or
while in your message inbox,
touch and hold the message.
2. Tap Delete message or Delete thread.
3. Tap OK.
E-MAIL
Your phone comes with e-mail capability
so you can stay connected with
Gmail™, Microsoft® Exchange, Yahoo!®,
Windows Live® Hotmail®, AOL®, and
other popular e-mail providers.
Set up Internet e-mail
1. From any Home screen, tap
the Applications icon.
2. Tap Email.
3. Tap Others.
4. Enter your e-mail address
and password.
5. Tap Next.
6. Enter a name for your
account (optional).
7. Enter the name you
want displayed on
outgoing messages.
8. Tap Done.
Set up Corporate/work e-mail
Contact your company’s IT department if
you need more help. This feature works with
Microsoft® Exchange e-mail servers only.
1. From any Home screen, tap
the Applications icon.
Page 17

26 27
2. Tap Email.
Note: If you have already set up an
e-mail account, tap the Menu key, tap
Accounts, tap the Menu key again,
and then tap Add account.
3. Tap MS Exchange.
4. Enter your e-mail address and password.
5. Tap Next.
6. Enter the domain, username,
and server, as needed.
7. Tap Next.
8. Adjust the e-mail checking frequency,
synchronization schedule, and
notication options, if desired.
9. Tap Next.
10. Enter a name for your account
(optional) and tap Done.
Create a Gmail™ e-mail account
1. From any Home screen, tap
the Applications icon.
2. Tap Gmail.
3. Tap Next.
4. Tap Create.
Note: If you already have a Google account,
tap Sign in and enter your login information.
5. Enter your rst name, last name, and the
username you want on your account.
6. Tap Next.
Tip: Tap the Back key to close
the on-screen keyboard.
7. Enter a password.
8. Tap the Conrm password eld
and re-enter the password.
9. Tap Next.
10. Tap the Security question drop-down
menu and tap the desired question.
11. Enter your answer and a secondary
e-mail address (optional).
12. Tap Create.
Add additional e-mail accounts
1. From any Home screen, tap
the Applications icon.
2. Tap Email.
3. Tap the Menu key.
4. Tap Accounts.
5. Tap the Menu key again.
6. Tap Add account.
7. Tap Other.
8. Enter your e-mail address and password.
9. Tap Next.
10. Enter a name for your account (optional).
11. Enter the name you want displayed
on outgoing messages.
12. Tap Done.
Page 18

28 29
Access your mailbox
1. From any Home screen, tap
the Applications icon.
2. Tap Email. The inbox for the last e-mail
account you viewed will display.
3. To change to a different account, tap the
account name at the top of the screen.
4. Tap the desired account.
Send e-mail
1. While in your mailbox, tap the Menu key.
2. Tap Compose.
3. At the To eld, enter the e-mail address.
Tip: Tap the Back key to close
the on-screen keyboard.
4. Enter your subject and message.
5. Tap Send.
Delete e-mail accounts
1. While in your mailbox, tap the Menu key.
2. Tap Accounts.
3. Touch and hold the account
that you want to delete.
4. Tap Remove account.
5. Tap OK.
CAMERA & VIDEO
Take a picture
Pictures are saved to
Applications > Gallery.
1. From any Home screen, tap
the Applications icon.
2. Tap Camera to open the capture
screen in landscape mode.
3. Frame your subject.
4. Tap the Camera icon to capture.
Send a picture
1. Take a picture.
2. Tap Share. If you don’t see Share, tap
the picture to display additional options.
3. Tap one of the following and
continue on to send your picture:
n
Bluetooth
n
Email
n
Gmail
n
Messaging
n
Picasa
Page 19

30 31
Record a video
Videos are saved to Applications > Gallery.
1. From any Home screen, tap
the Applications icon.
2. Tap Camera to open the capture
screen in landscape mode.
3. Touch and drag the Camera/
Video Mode slider to video.
4. Frame your subject.
5. Tap the red Record icon
to start recording.
6. Tap the blue Stop icon to stop.
Send a video
1. Record a video.
2. Tap Share. If you don’t see Share, tap
the picture to display additional options.
3. Tap one of the following and
continue on to send your video:
n
Bluetooth
n
Email
n
Gmail
n
Messaging
n
YouTube
Adjust settings
1. From any Home screen, tap
the Applications icon.
2. Tap Camera to open the capture screen.
3. Tap Settings. If you don’t see
Settings, tap the picture to
display additional options.
4. Tap the desired settings to adjust.
MUSIC PLAYER
Access the music player
1. From any Home screen, tap
the Applications icon.
2. Tap Music.
Transfer music from computer
1. Connect your phone to your
computer using the USB cable.
2. On your phone, from any Home
screen, tap the Menu key.
3. Tap Settings.
4. Tap SD card & phone storage.
5. Tap to select the Mass
storage only check box.
6. Tap Turn on USB storage.
7. Tap OK. The Removable Disk
window opens on your computer.
Page 20

32 33
8. Click Open folder to view les using
Windows Explorer and click OK.
9. Locate the le(s) on your computer
that you want to copy.
10. Copy and paste the le(s) into
the memory card drive.
11. When nished, on your phone
tap Turn off USB storage and
disconnect your phone.
Play music
1. From any Home screen, tap
the Applications icon.
2. Tap Music.
3. Locate and tap the song.
MARKET
Download fun games and cool apps
from the Android Market™.
Browse the T-Mobile channel
1. From the Home screen, tap
the Applications icon.
2. Tap Market.
Note: If you do not already have a Gmail
account set up, follow the on-screen
instructions to set one up at this time.
3. Read the Android Market terms
of service and tap Accept.
4. Tap T-Mobile to view applications
recommended by T-Mobile.
Install applications
1. While browsing the marketplace,
tap the desired application.
2. Tap Install.
3. Tap OK to allow the application
access, if necessary.
4. When the application has
successfully installed you will see a
Notier icon on the Status bar.
5. Touch the Status bar and drag down
the Notication screen. Tap the
application Notier icon to complete
additional installation steps or to launch
the application. You can also launch the
application from the icon in Applications.
Full access to Web requires the purchase of
a qualifying data plan. Separate additional
charges may apply for downloads; actual
content available for download may vary.
Page 21

34 35
BLUETOOTH®
Your phone comes with Bluetooth
technology, a wireless technology that
enables a data connection between your
phone and a Bluetooth wireless headset and
other Bluetooth devices (sold separately).
Prepare Bluetooth headset
To pair your phone with a Bluetooth
headset, make sure that your headset is
fully charged and that you set the headset
into pairing mode. See your Bluetooth
headset’s manual for more information.
Turn on Bluetooth and
pair with headset
1. From any Home screen,
tap the Menu key.
2. Tap Settings.
3. Tap Wireless & networks.
4. Tap Bluetooth settings.
5. Tap to select the Bluetooth check
box and turn it on. A list of available
Bluetooth devices displays.
6. Tap your headset in the list.
7. Enter the PIN or passcode, if requested.
8. Tap OK.
ACCESSORIES FOR YOUR
PHONE
Whether you are looking for a charger, a
fashionable carrying case, a Bluetooth®
headset or just want to browse for fun extras
for your phone, T-Mobile is the place to shop
for accessories. Here are a few examples…
To purchase accessories for your phone,
visit T-Mobile.com, call 1.800.204.2449
or visit your nearest T-Mobile store.
Accessory selection subject to change
and may vary by location.
Charger
Bluetooth
Headset
Page 22

36 37
EMERGENCY DIALING
While all phones are equipped with
911 emergency calling, this phone
may or may not permit its location to
be approximated during a 911 call.*
* Availability of this feature depends on upgrades to the (a)
wireless network and (b) 911 calling system that are required
to be installed by the local 911 response agency or public
safety answering point (PSAP); these upgrades may not
be available everywhere within our wireless coverage area
or your roaming area. This approximation of the phone’s
location and the transmittal of location information are
subject to emergency situations, transmission limits, network
problems/limitations, interconnecting carrier problems, your
phone, buildings/tunnels, signal strength and atmospheric/
topographical conditions, and may be curtailed, interrupted,
dropped or refused. The phone’s approximate location is
transmitted to the local 911 response agency or PSAP while
the call is in progress; this approximation is intended solely
to aid the PSAP in dispatching emergency assistance or
to limit the search area for emergency services personnel.
You should not rely solely on a phone for essential
communications (such as a medical or other emergency).
Please see T-Mobile’s Terms and Conditions and Privacy
Policy for additional service restrictions and details.
CARING FOR YOUR PHONE
MAKING IT LAST
Your phone is a complex electronic
device; think of it as a mini-computer.
Here are some hints that will help you
extend the life of your new phone.
Phones aren’t cheap, so keep yours in
a safe place. Keep the phone away from
children who want to see if the phone sinks or
oats, and away from dogs that nd plasticcoated products to be irresistible chew toys.
Water will damage your phone and
accessories. Even a small amount of
water from a soda in your car cup-holder,
melting snowakes, tears of joy, squirtgun crossre, or steam from the kitchen
or bathroom can damage your phone.
Use only batteries and accessories
from the original manufacturer of your
phone. Non-approved accessories can
damage you or your phone and shorten
the phone’s life. Hint: If it’s being sold out
of someone’s car trunk, walk away.
If your charger or any other accessory is
damaged, replace it or take it to a qualied
service dealer. Do not attempt to operate
your phone charger if it has received a sharp
blow, been dropped, thrown from a speeding
motorcycle, or is otherwise damaged;
doing so may damage your phone.
TIPS FOR SAFETY
Check with your doctor if you have a
pacemaker or hearing aid to ensure
that cell phone usage is safe with your
device. If you have questions about the
interaction of cellular radio frequency
and any other electronic equipment,
ask the manufacturer of the equipment
if cell phone radio frequencies will
disrupt the equipment’s performance.
Page 23

38 39
When you are driving, T-Mobile
encourages you to use your phone in
a safe and sensible manner. Here are
a few tips:
n
Assess road conditions before
answering. Your safety is more
important than any call.
n
Prepare your hands-free headset, if
you have one, or turn on your
speakerphone option before you
start moving.
n
If your phone rings and you discover
it’s in the back seat, do NOT crawl
over the seat to answer it while
driving.
n
Program frequently used numbers into
your speed dial for easy one-select
dialing.
n
Remember that laws prohibiting or
restricting the use of a mobile phone
while driving may apply in your area.
ADDITIONAL INFORMATION
Use of some features or services may
incur separate, additional charges and/
or require a qualifying data plan.
Wi-Fi: Device will not transition between Wi-Fi
and the wireless network. Devices using
wireless connections may be vulnerable
to unauthorized attempts to access data
and software stored on the device.
Wi-Fi Calling: This phone has been tested
and rated for use with hearing aids for
some of the wireless technologies that it
uses. However, there may be some newer
wireless technologies used in this phone
that have not been tested yet for use with
hearing aids. It is important to try the different
features of this phone thoroughly and in
different locations, using your hearing
aid or cochlear implant, to determine if
you hear any interfering noise. Consult
your service provider or the manufacturer
of this phone for information on hearing
aid compatibility. If you have questions
about return or exchange policies, consult
your service provider or phone retailer.
Messaging/Data: You will be charged for all
data sent by or to you through the network,
regardless of whether received. Character
length/le size of messages/attachments
may be limited. T-Mobile is not liable for
content of messages/attachments or for
any failures, delays or errors in any T-Mobile
generated alerts or notications. Your data
session, plan, or service may be slowed,
suspended, terminated or restricted if you
use your service in a way that interferes with
or impacts our network or ability to provide
quality service to other users, if you roam for
a signicant portion of your usage, or if you
use a disproportionate amount of bandwidth
during a billing cycle. You may not use
your plan or device for prohibited uses.
Downloads/Applications: T-Mobile is
not responsible for any third party content
or Web site you may be able to access
Page 24

40
using your phone. Additional charges
may apply; not all downloads available
on all phones. You obtain no rights in
downloads; duration of use may be limited
and downloads may be stored solely
for use with your phone. T-Mobile is not
responsible for any download lost due to
your error. T-Mobile is not responsible for
Apps, including download, installation,
use, transmission failure, interruption or
delay, third party advertisements you may
encounter while using an App, alterations
any App may make to the functionality of
your device, including any changes that
may affect your T-Mobile plan, service,
or billing, or any content or web site you
may be able to access through an App.
See brochures and the Terms and
Conditions (including arbitration provision)
at T-Mobile.com, for rate plan information,
charges for features and services,
and restrictions and details, including
important limitations on availability
and reliability of 9-1-1 emergency
service when using Wi-Fi calling.
The Bluetooth® word mark and logo are
owned by the Bluetooth SIG, Inc. and are
used by T-Mobile under license. T-Mobile
and the magenta color are registered
trademarks of Deutsche Telekom AG.
web2go is a registered trademark, and
T-Mobile G2x is a trademark, of T-Mobile
USA, Inc. Google and the Google logo,
Google Voice, Google Search, Gmail, Google
Talk, Android, Android Market are trademarks
of Google Inc. © 2011 T-Mobile USA, Inc.
Page 25

 Loading...