

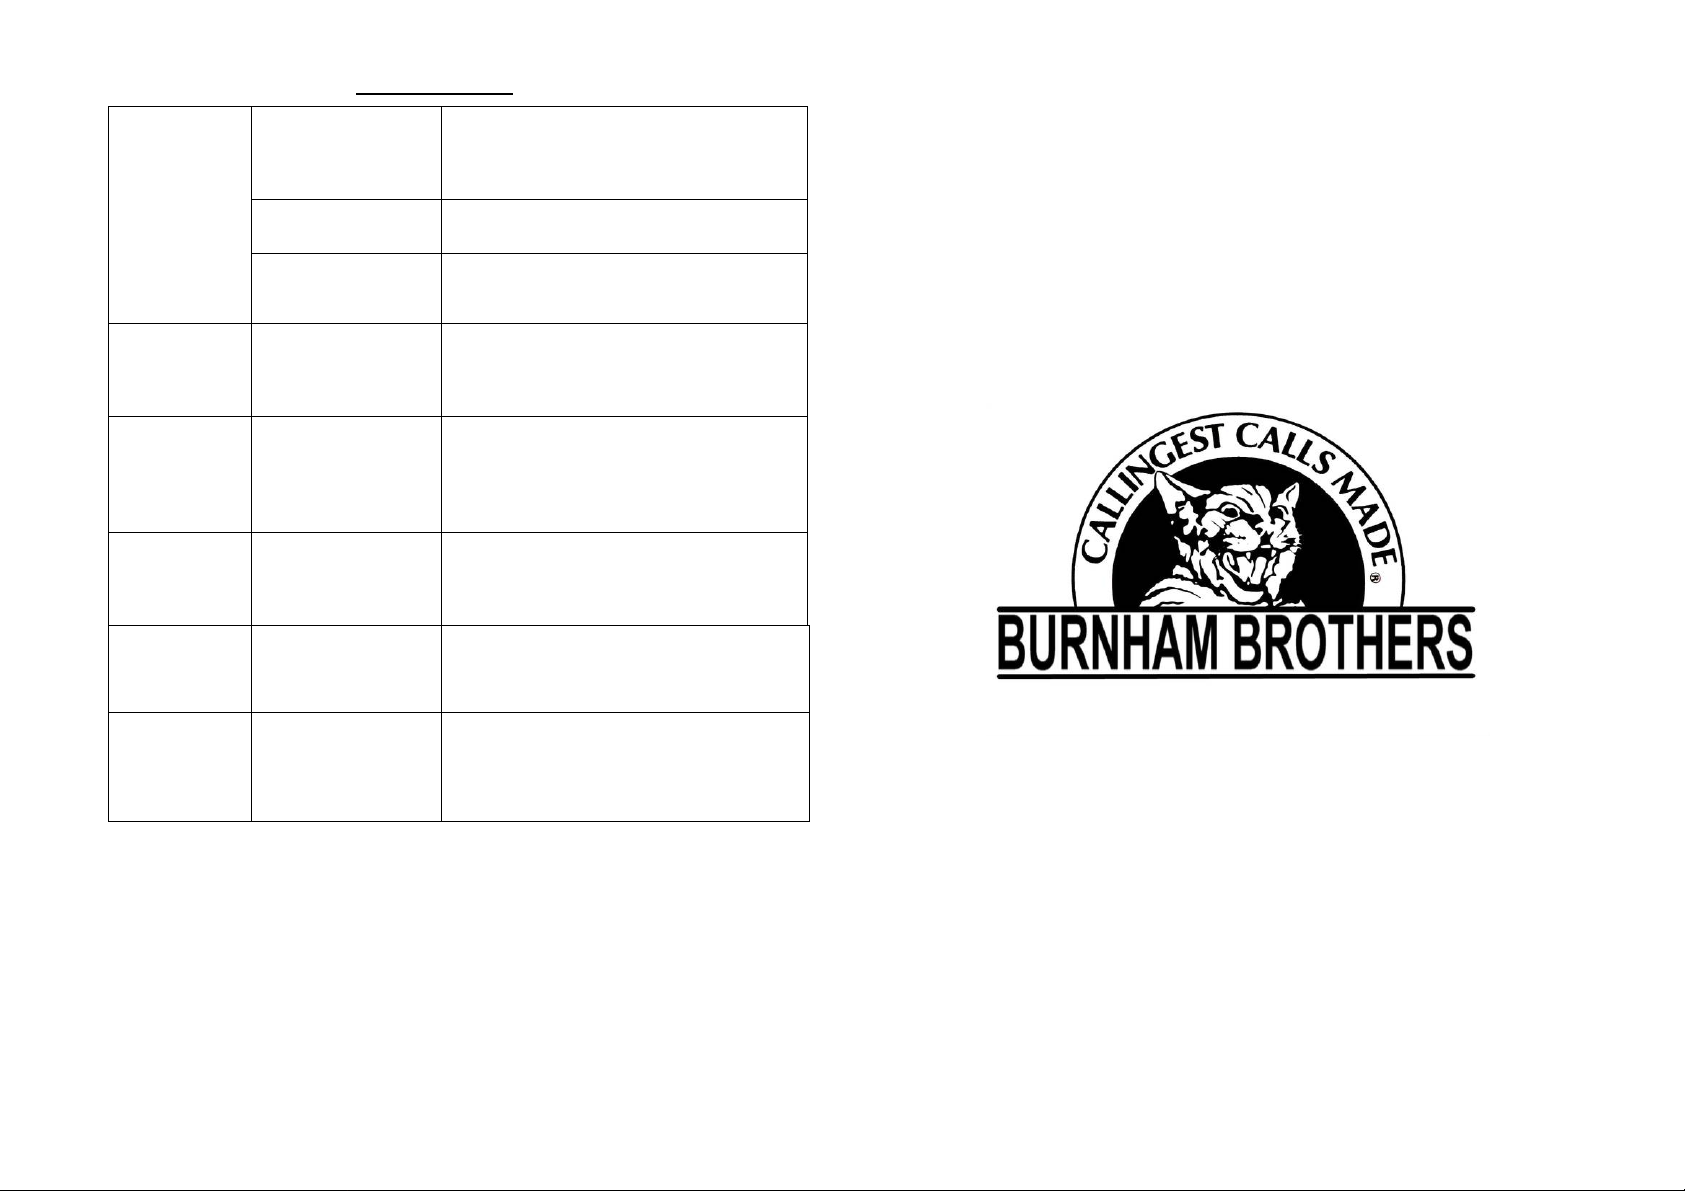
Troubleshooting
Start / stop button
Base unit will
not power on.
Remote will
not power on
Remote does
not function
or range is
short
“base not
found” is
displayed
Base is turned off,
not being held
down long
enough.
Speaker not
making contact
Battery dead –
(dim or no green
light)
Start / stop button
not being held
down long
enough.
Remote batteries
are loose, weak or
dead
Base may be out
of range
or battery in base
is dead
Hold down start / stop for at least 5-7
seconds or until green light flashes
Check speaker jack
Recharge battery or install disposable
batteries
Hold down start / stop for at least 5-7
seconds or until display shows
Check battery holder. Install 3 new
AAA batteries
Move closer to base
Check power on base, recharge
battery, or replace batteries in base
Remote is not
coded to the base
Refer to coding instructions earlier in
manual
COMPUCALLER III
Burnham Brothers
P.O. Box 427
Menard, TX 76859
325-396-4572
info@burnhambrothers.com
INSTRUCTION MANUAL

FCC Statement This device complies with Part 15 of the FCC Rules. Operation is
subject to the following two conditions: (1) this device may not cause harmful
interference, and (2) this device must accept any interference received, including
interference that may cause undesired operation.
Changes or modifications not expressly approved by the party responsible for
compliance could void the user's authority to operate the equipment.
Congratulations, you have purchased the most technically advanced electronic
wildlife calling system in the world! The sound quality, volume, remote control
capabilities and size put COMPUCALLER III in a league of its own. While
COMPUCALLER III IS NOT AN ANVIL, it is more than rugged enough to handle
temperatures from below zero to over 100 degrees and the standard abuse of day
to day calling. We guarantee that any hunter will call more predators with the
COMPUCALLER III than any other method presently known.
To install additional soundcards, first power the unit off, and simply line up the card
in the slot (card will only fit one direction) and push the card into the slot firmly until
it stops. The unit will recognize the new card when it is powered back on. To
remove a soundcard, first power the unit off, and firmly grip the soundcard with the
thumb and forefinger and pull straight up. Individuals with larger hands may find
that prying the card up with a coin at first is helpful. Repeat the process for any
other sounds you wish to replace.
Changing Soundcards
1
6

Operating the unit from the base is as follows:
Press the start / stop button to start playing a sound. Pressing the V+ button
increases the volume, pressing the V- button reduces the volume. Pressing the
S+ button switches the caller to next sound, pressing the S- button switches the
caller to the previous sound. You can change the volume and select the sounds
while the caller is paused. The green light on the caller flashes to confirm the
commands.
Operation via the remote is similar to the base except to change the sounds,
press the S+ or S- to scroll through the sounds. When you find the sound you
want to play, press the start / stop button to select the sound and start playing it.
If the caller is already playing, the selected sound will start playing immediately.
To turn off the base and / or remote off, press and hold the start / stop button until
the unit powers off.
: should you get the error message “base not found”, you may be out of
Note
range , base may be off, base needs to be recharged, or you may need to recode the remote to the base by following these steps:
Make sure both the base and remote are both off. First, turn on the remote. The
“base not found” message may appear. Then press and hold the S+ button down
until “coding” appears in the display. Then turn on the base unit. When the green
lights starts flashing, press and hold the S+ button down on the base until the
remote begins vibrating and receiving commands from the base. Your remote is
now coded for your base.
After an extended period of inactivity, the base and remote will power off to save
batteries.
(1) Compucaller III base unit
(2) Hand-held remote control
(3) Camouflage carrying bag
(4) 110v AC wall charger
(5) 12v DC cigarette lighter charger
Before your first use, you need to charge the base unit. To do this, plug your wall
charger in the wall and plug the other end in the jack marked “CHARGER”. Your
indicator light will turn red and will stay red to indicate the unit is charging. Let the
unit charge for 24 hours for the initial charge. After the initial charge, the normal
recharge time is 8-10 hours. NOTE: The cigarette lighter charger should only be
Inside the box you will find:
5
used for short periods (30 mins-2 hrs) of time. It will not recharge a “dead” battery.
2

Operation
To operate the caller, press and hold the start/stop button on the base unit for 5-7
seconds, or until the green light begins flashing. The green light will flash quickly
indicating that the caller is initializing.
(1) Next, turn on the remote control by pressing and holding the start/stop
button on the remote for 5-7 seconds. The remote will start vibrating
indicating that it is receiving information from the base unit, and the
green light on the base will flash quickly for a few seconds.
(2) When the green light is steady green, or when the remote control stops
vibrating, the unit is ready to receive commands.
(3) The display on the remote shows the following:
(1) Play / Stop button
(1) Signal strength indicator (6) Name of selected sound
(2) Playing / Stopped indicator (7) Volume up/down buttons
(3) Volume Level indicator (8) Sound selection up/down
(4) Remote control battery level (9) Play/stop button
(2) Volume up / down buttons
(3) Sound select buttons
3
(5) Base unit battery level indicator
4
 Loading...