

Page 1
Use & Care Manual
Connect IoTM Intelligent OvenTM
Model PS302SS00 Professional Series,
Refrigerated, Internet Controlled,
30” Electric Double Wall Oven
Page 2

TMIO LICENSE AGREEMENT
[TMIO Operating System] (the “Software”)
1. ATTENTION!
YOU SHOULD CAREFULLY READ THE FOLLOWING TERMS AND CONDITIONS BEFORE INSTALLING
OR POWERING UP THIS APPLIANCE.
OPENING THE PACKAGING ON THIS APPLIANCE AND/OR
POWERING UP THE APPLIANCE OR ANY COMPONENT THEREOF MEANS YOU ACCEPT THESE
TERMS AND CONDITIONS AND UNDERSTAND THAT THEY WILL BE LEGALLY BINDING ON YOU, ANY
END USER, AND THE COMPANY
. IF YOU DO NOT AGREE WITH THEM, OR DO NOT WANT THEM TO BE
BINDING ON YOU, YOU SHOULD PROMPTLY RETURN THE APPLIANCE TO THE POINT OF PURCHASE
FOR A FULL REFUND.
2. OWNERSHIP
It is hereby understood and agreed by you that TMIO, LLC, with offices at 1220A Flynn Street, Chattanooga,
TN 37403 (LICENSOR) is the owner of all right, title and interest to the Software (SOFTWARE) recorded on the
enclosed appliance and all subsequent copies thereof, regardless of the media or form in which the original
or copies may exist. You as licensee (LICENSEE) through your purchase of this product do not acquire any
ownership rights to the Software. The Licensee owns the appliance on which the Software is recorded, but
the Licensor retains ownership of all copies of the Software itself. The Licensee assumes sole responsibility
for the installation, use and results obtained from use of the Software.
3. LICENSE
A. In consideration of the payment of a license fee, which is a percentage of the price paid by Licensee
for this product, Licensor hereby grants Licensee a non-exclusive right to use and display this copy of the
Software on a single appliance on the incorporated video screen at the appliance’s location.
B. The Software is protected by copyright law. You expressly agree to not reverse engineer, copy,
transfer, decompile or otherwise modify, attempt to modify the Software.
C. All rights not expressly granted are hereby reserved by Licensor.
4. TERM
A. The license is effective until terminated.
B. This license will terminate upon conditions set forth elsewhere within this Agreement or if Licensee
fails to comply with any term or condition of this Agreement. In such event, no notice shall be required by
Licensor to effect such termination.
C. Upon termination of this Agreement, Licensee agrees to destroy the Software together with all printed
or written materials, and merged portions in any form, or return same to Licensor at Licensee’s expense.
5. RESTRICTIONS ON USE
Licensee shall not, without Licensor’s express written consent:
1. Copy or reproduce the Software;
2. Electronically transfer the Software through a LAN (local area network) or other network system or
through any computer subscriber system or “bulletin board” system; or
3. Modify, adapt or create derivative works based on the Software or any accompanying materials.
6. RESTRICTIONS ON TRANSFER
A. Licensee may transfer the Software and this license to another party in connection with a transfer of
the appliance provided the other party agrees to accept the terms and conditions of this Agreement.
B. Licensee shall not sublicense, assign, or transfer the license or the Software except as expressly
provided in this Agreement. Any attempt otherwise to sublicense, assign, or transfer any of the rights, duties,
or obligations hereunder renders this license VOID.
7. UPDATES
In the event that upgraded versions of the Software are developed, Licensor may, at its discretion, make such
updates available to those Licensees that are connected to the Internet and have registered on-line in the
“Registration” portion of the user interface.
i
Page 3

8. USAGE DATA
TMIO, LLC reserves the right to collect usage information regarding your use of the Software and the
Appliance. You expressly consent to the collection of such usage data by TMIO, LLC for purposes including,
but not limited to resolving issues, generating upgrades, providing service and repairs, and for transmission
to third-parties in connection with an unresolved insurance claim or other legal proceeding. The usage data
may include, but need not be limited to, frequency of use, temperatures, length of usage, features used,
commands used, and other relevant information regarding your use of the Software and/or Appliance. This
data may be collected via service call, upgrade installation, remotely via an Internet connection or via any
other communications employed by the Appliance and TMIO, LLC. At no time will TMIO, LLC divulge any
personal confidential information to a third party without your consent or pursuant to a valid court order.
9. LIMITED WARRANTY
A. To the best of Licensor’s knowledge, your use of the Software in accordance with its printed
documentation will not, in and of itself, infringe any third party’s copyright, patent, or other intellectual
property right.
B. TO THE EXTENT PERMITTED BY APPLICABLE LAW, THE SOFTWARE IS PROVIDED “AS IS”
WITHOUT WARRANTY OF ANY KIND, EITHER EXPRESS OR IMPLIED, INCLUDING, BUT NOT LIMITED
TO, THE IMPLIED WARRANTIES OF MERCHANTABILITY AND FITNESS FOR A PARTICULAR PURPOSE
BEYOND THE TERMS OF OUR STANDARD LIMITED WARRANTY FOR THE APPLIANCE. LICENSOR
DOES NOT WARRANT THAT THE FUNCTIONS CONTAINED IN THE SOFTWARE WILL MEET YOUR
REQUIREMENTS OR THAT THE OPERATION OF THE SOFTWARE WILL BE UNINTERRUPTED OR
ERROR FREE.
TAMPERING WITH THE SOFTWARE, HARDWARE OR ANY OTHER COMPONENT COVERED UNDER THIS
LICENSE AGREEMENT VOIDS THE ENTIRE LIMITED WARRANTY OF THE APPLIANCE AND THE
DESIGN/LISTING CERTIFICATION OF THE NATIONALLY RECOGNIZED TESTING LABORATORY. THIS
PRODUCT HAS BEEN CERTIFIED TO THE NATIONAL STANDARDS AS INDICATED ON THE EQUIPMENT
RATING PLATE. ANY MODIFICATION WITHOUT THE WRITTEN PERMISSION OF TMIO, LLC
IS PROHIBITED.
10. REMEDIES
To the extent permitted by applicable law, in no event will Licensor be liable for any damages, including but
not limited to, lost profits, lost savings, or other incidental or consequential damages arising out of the use or
inability to use such program even if Licensor or its authorized dealer has been advised of the possibility of
such damages, or for any claim by any other party.
11. QUESTIONS
All questions concerning this Agreement must be directed to TMIO, LLC, Customer Service, 1220A Flynn
Street, Chattanooga, TN 37403, or by telephone at 1.800.881.TMIO (8646).
12. JURISDICTION AND DISPUTES
A. This Agreement and the Limited Warranty shall be governed by the laws of the State of Ohio.
B. All disputes hereunder shall be resolved in the applicable state or federal courts of the State of Ohio.
The parties consent to the jurisdiction of such courts, agree to accept service of process by mail, and waive
any jurisdictional or venue defenses otherwise available.
13. INTEGRATION
This Agreement constitutes the entire understanding of the parties, and revokes and supersedes all prior
agreements, oral or written, between the parties, and is intended as a final expression of their Agreement.
It shall not be modified or amended except in writing signed by the parties hereto and specifically referring
to this Agreement. This Agreement shall take precedence over any other documents that may be in
conflict therewith.
LICENSEE HEREBY ACKNOWLEDGES THAT IT HAS READ THIS AGREEMENT, UNDERSTANDS IT AND
AGREES TO BE BOUND BY ITS TERMS AND CONDITIONS.
ii
Page 4

TABLE OF CONTENTS
Safety Instructions ............................... 2
Features of Your Oven
Parts Identification .................................. 3
Location of Model and Serial Number ....
Oven Rack Positions ...............................
Operating Instructions
Using the Oven Display........................... 5
Kitchen Timer .......................................... 6
Calendar .................................................. 6
My Oven
Preferences
Brightness .......................................... 6
Sleep Mode ........................................ 7
Volume ................................................ 7
Units ................................................... 8
Temperature Offset ............................. 8
Set Date & Time .................................. 9
Set Alerts .......................................... 10
Notepad ................................................ 10
Cooking Guide ...................................... 11
Contact Information .............................. 11
Network Settings .................................. 12
Remote Access ..................................... 12
Remote Control of Your Oven
Phone .................................................... 13
Computer .............................................. 13
Refrigerate .......................................... 14
Cook Now .......................................14-15
Defrost ................................................. 23
Dehydrate ............................................ 23
Proof .................................................... 23
4
4
Sabbath/Holiday
Sabbath............................................ 24-25
Holiday .............................................
Self Clean (Green Clean) ............... 26-27
Oven Service
Touch Calibration .................................. 27
Software Update ...................................
Oven Reset ........................................... 28
Circuit Breaker ...................................... 28
Enable Demo Mode ..............................
Oven Diagnostics ..................................
Power Failure ...................................... 29
Do-It-Yourself Maintenance
Cleaning Methods ................................. 30
Refrigeration Unit Cleaning ................... 30
Oven Light Assembly ............................
Troubleshooting
Fault Codes ........................................... 30
Cooking Charts
Bake Chart ............................................ 31
Meat Chart ............................................ 32
Poultry Chart ......................................... 33
Broiling Chart ........................................
25-26
28
28
29
30
34
Cook Later .....................................16-17
My Favorites (storing favorite recipes)
Selecting A Dish ............................... 17-18
Add A Dish ....................................... 18-19
Edit Dish ................................................ 19
Delete Dish ............................................ 20
Probe Cooking ............................... 20-22
Broil ................................................
22-23
Warranty .............................................. 35
Page 5

SAFETY INSTRUCTIONS
WARNING
TO REDUCE THE RISK OF FIRE, ELECTRICAL SHOCK, INJURY TO PERSONS, OR DAMAGE, PLEASE
READ ALL INSTRUCTIONS CAREFULLY BEFORE USING THIS OVEN.
♦ Before installation make sure the voltage and
frequency listed on the data plate correspond with
the household electrical supply. This data must
correspond to prevent injury and machine damage.
♦ This appliance must be properly installed and
grounded by a qualified technician.
♦ Do not replace or repair any part of oven unless by
an authorized service technician.
♦ Do not operate this appliance if it is not working
properly or if it has been damaged, until an
authorized service technician has examined it.
♦ Do not cover or block any vent ducts or openings
on appliance.
♦ Do not use oven to warm or heat a room. This can
damage the oven parts.
♦ Do not leave children alone or unattended in area
where oven is in use.
♦ Do not lean, sit, stand or place heavy items on the
open oven door.
♦ Loose-fitting or hanging garments should never be
worn while using the oven.
♦ Do not use the cavity for storage purposes. Do
not leave paper products, cooking utensils or food
in the cavity when not being used.
♦ Flammable materials should not be stored in oven.
♦ Do not slide pots or pans on the oven floor. This
could scratch and damage the surface.
♦ Only use the TMIO meat probe supplied with
the oven. Contact the TMIO Customer Service
Department if you need to purchase a new probe.
♦ To prevent damage, remove meat probe from oven
when not being used.
♦ Do not let aluminum foil, metal objects or the meat
probe come in contact with the broil element as it
could break the element.
♦ Clean only parts listed in this manual.
♦ Do not clean door gasket. It is essential for a
good seal. Care should be taken not to rub,
damage, move or remove door gasket.
♦ Do not use commercial oven cleaners or oven liner
protective coatings of any kind in or around any
part of the oven.
♦ Before self-cleaning the oven, remove any food,
broiler pan, oven racks, other utensils and excess
soft spillage.
♦ During the self-cleaning function the oven will
become very hot. Keep children away from an
oven in use.
♦ Listen for fan. A fan noise should be heard
intermittently during the cleaning cycle. If no fan
is heard, call for service.
♦ If materials inside the oven should ignite, keep
oven door closed. Turn oven off and disconnect
circuit at the circuit breaker box.
♦ Do not use water on a grease fire. Smother fire or
use a dry chemical or foam-type extinguisher.
♦ To prevent burns, allow the heating element to
cool completely before cleaning by hand.
♦ Be sure the blower fan runs whenever the oven is
in operation. If fan does not operate, do not use
the oven and call for service.
♦ Always open door carefully to allow hot air or
steam to escape before placing or removing food.
♦ Never add water to food on a hot tray or pan
or directly onto food in a hot oven. The steam
created could cause serious burns or scalds.
♦ Do not heat unopened food containers. Build-up
of pressure may cause the container to burst and
result in injury.
♦ Use only dry potholders. Moist or damp
potholders on hot surfaces may result in burns
from steam. Do not let potholder touch hot
heating elements. Do not use a towel or other
bulky cloth.
♦ Always place oven racks in desired location while
oven is cool. If rack must be moved while oven
is hot, do not let potholder contact hot heating
element in oven.
♦ To prevent burns, do not touch, or let clothing
or other flammable materials contact heating
elements, interior surfaces, oven vent openings,
oven doors, or windows of oven doors until they
have had sufficient time to cool. Heating elements
may be hot even though they are dark in color.
Interior surfaces become hot enough to cause
burns.
2
Page 6
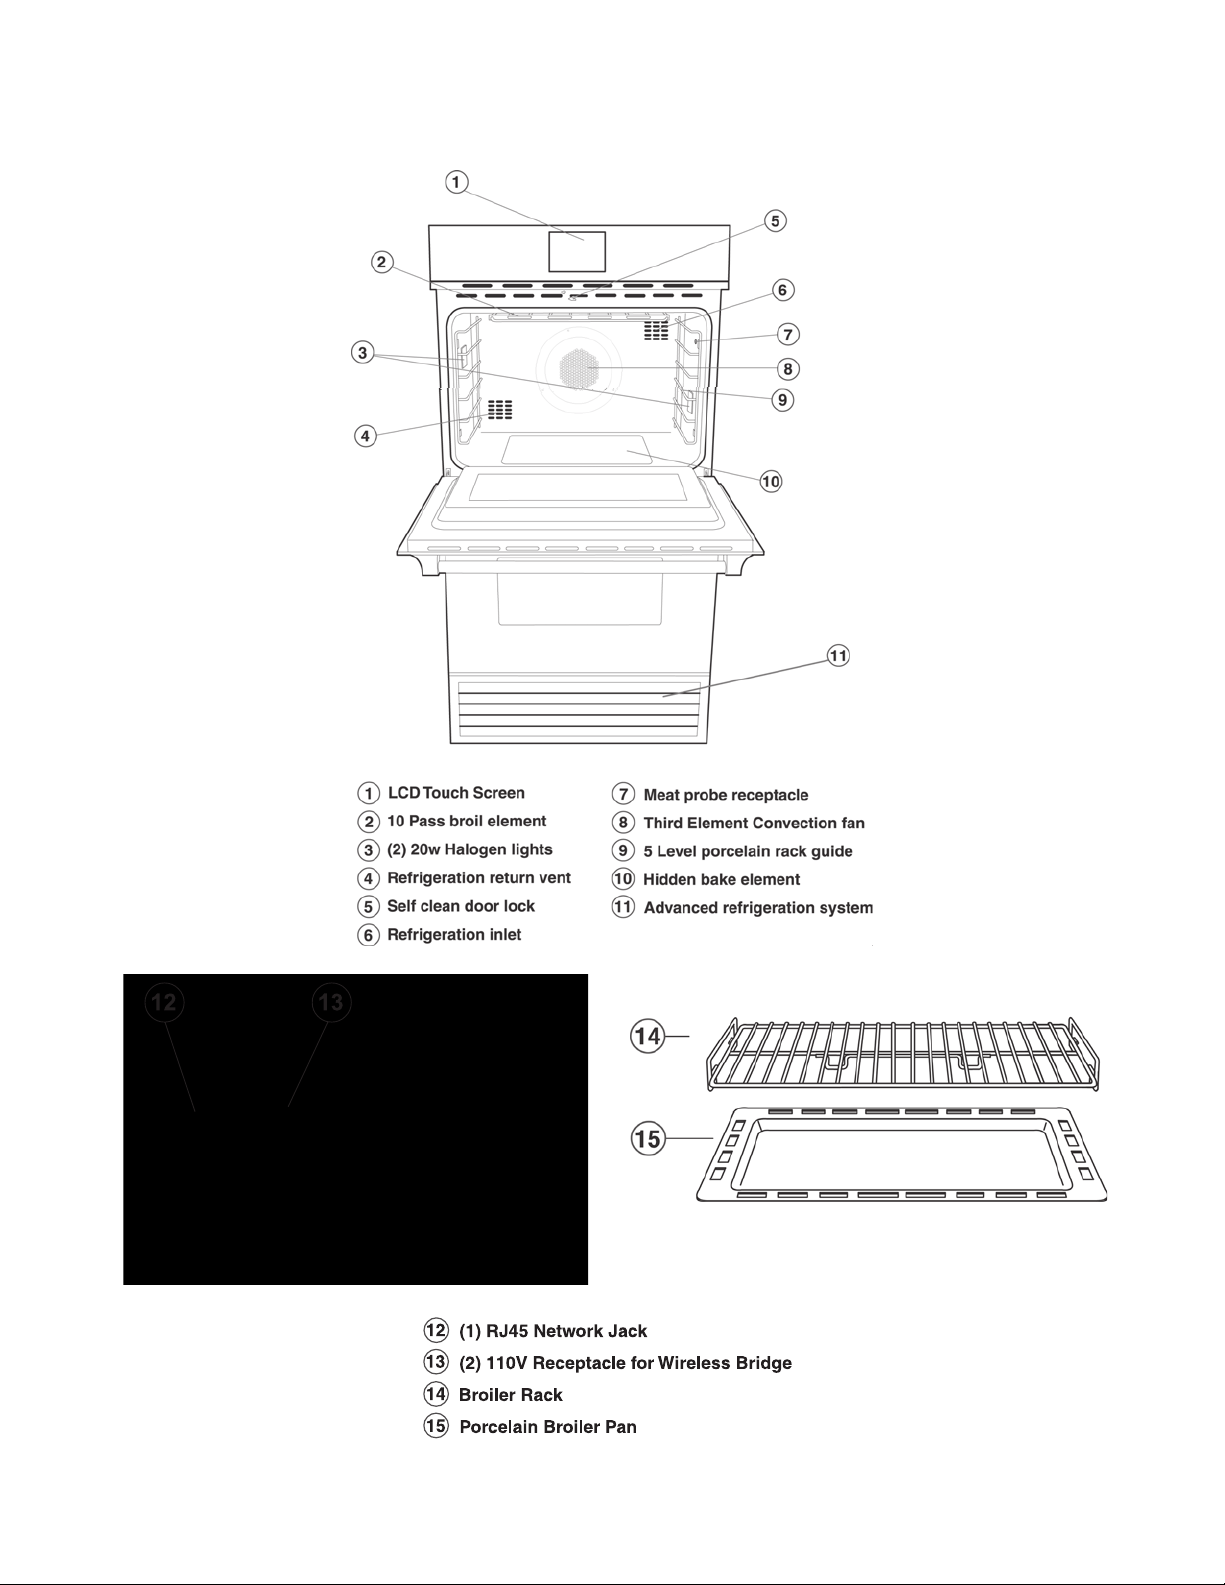
Parts Identification
FEATURES OF YOUR OVEN
3
Page 7
FEATURES OF YOUR OVEN
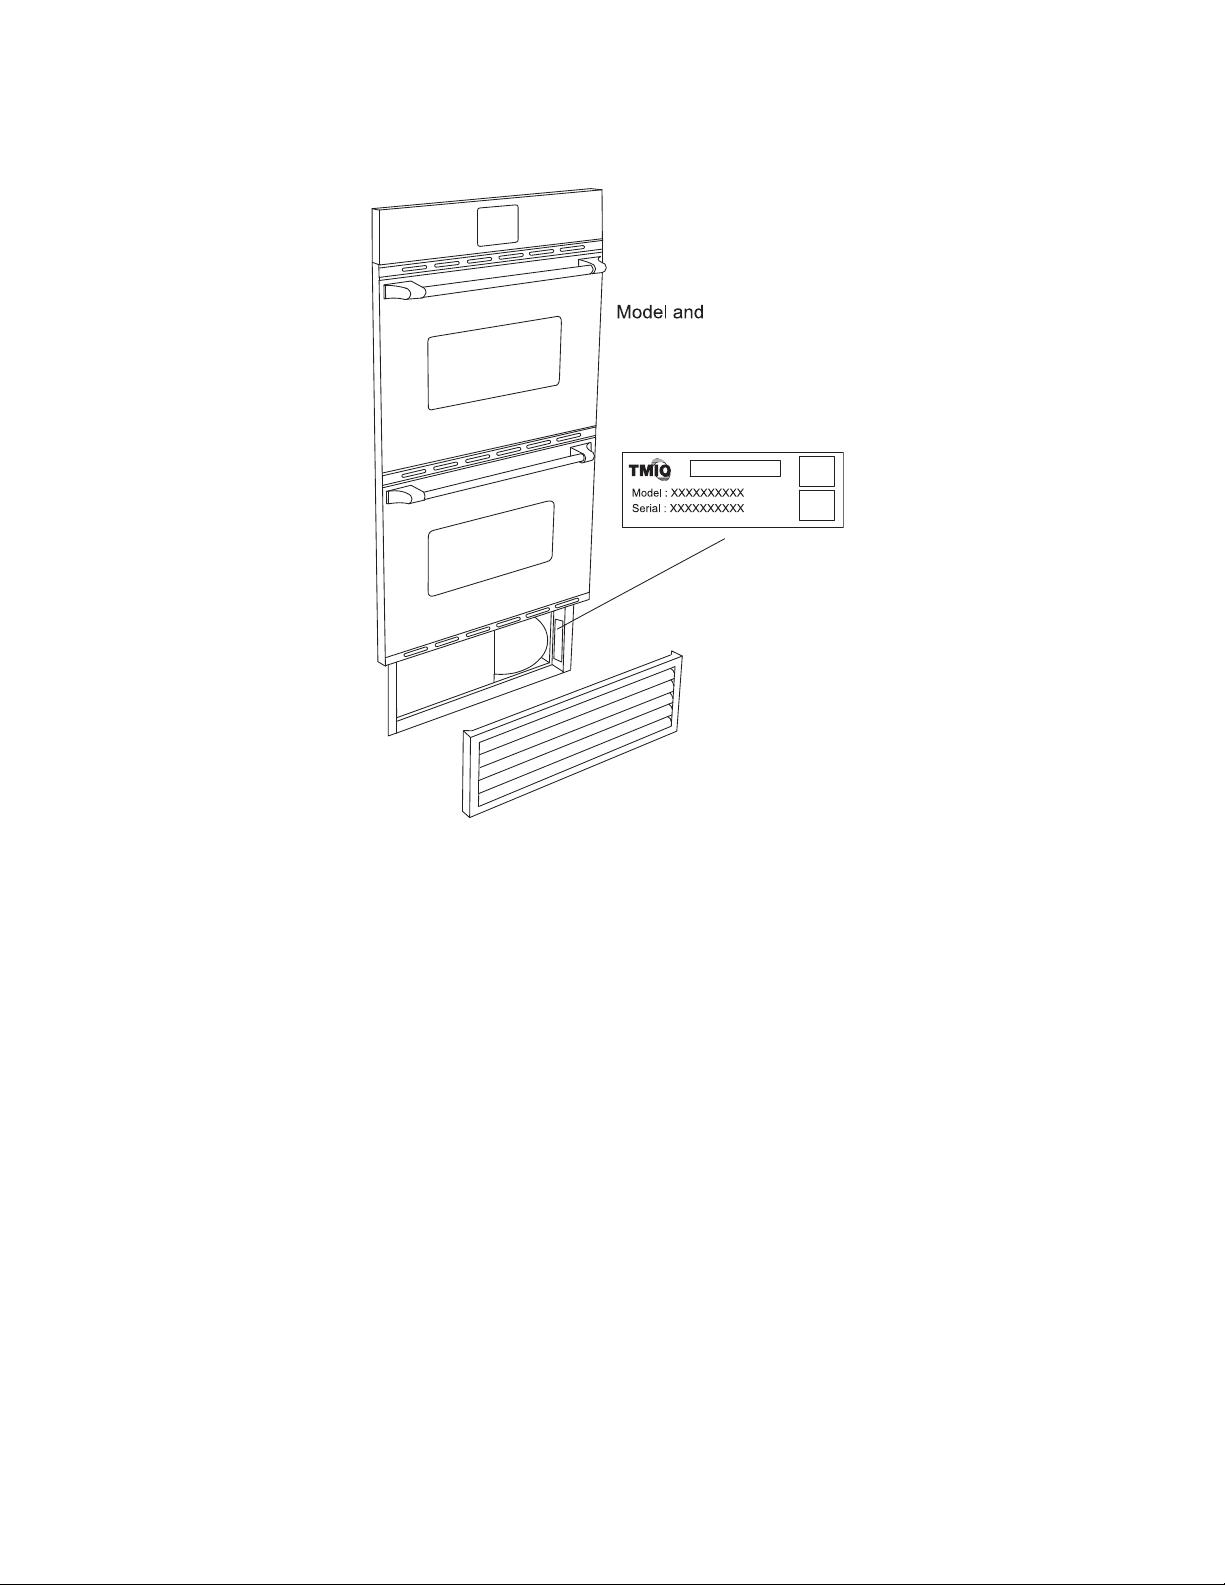
Location of Model and Serial Number
You can also find this information under My Oven / Contact Info / Registration tab.
Oven Rack Positions
Rack position 1 is closest to the bottom and position 5 is closest to the top.
Page 8

OPERATING INSTRUCTIONS
Using the Oven Display
The oven is equipped with a full color 3M Touch screen control panel
The Main Screen of the oven
Controls Refrigerate, Cook Now, Cook Later, My Favorites Menus,
Light Switches, My Oven, and Kitchen Timer.
Additional oven control can be found under My Oven
You can also find oven control under My Oven / Preferences
Note: Selecting Main Menu from this screen will take you back to the
Main Screen
You can also find oven control under My Oven / Oven Service
Note: Selecting Main Menu from this screen will take you back to the
Main Screen
The My Favorites buttons use a preset dish, add a dish, edit dish,
and delete dish from your My Favorites dish list for either Cook Now
or Cook Later
5
Page 9

OPERATING INSTRUCTIONS
Kitchen Timer
The Kitchen Timer can be used to time things without turning the oven on. An audible alarm will sound when
the timer expires.
From the Main Screen
• Select the
• Using the keypad, enter the desired time
• Select OK to start Timer or Cancel to discard settings and return to
the Main Screen
• Remaining time will appear on the Main Screen under Kitchen Timer
• To turn off the Timer once finished, select the Kitchen Timer button
• To cancel during time cycle, select the Kitchen Timer button
Kitchen Timer button
Calendar
The Calendar displays a calendar of the current month, with the current date highlighted. The arrow buttons
on the Calendar may be used to view previous or future months.
From the Main Screen
• Select My Oven drop down
• Select Calendar
• View Calendar from this screen
• Select OK to return to the Main Screen
MY OVEN
Preferences
Brightness
Controls how bright or dim the screen is.
From the Main Screen
• Select My Oven drop down
• Select Preferences
• Select Brightness
• Place your finger on the slider button and drag it to the desired
brightness setting
• Select OK to save settings and return to the Main Screen, or Cancel
to discard the settings and return to the Main Screen
6
Page 10

MY OVEN
Preferences
Sleep Mode
The Sleep Mode preference controls what is displayed when the oven is idle for 5 minutes or more, once a
sleep mode has been selected. Note: The sleep mode display will not be shown while the oven is cooking
or refrigerating.
From the Main Screen
• Select My Oven drop down
• Select Preferences
• Select Sleep Mode
• Select the desired Sleep Mode display
– None will disable the sleep mode
– Slideshow will display your favorite photos. To upload photos you
must first setup Remote Access (see My Oven / Remote Access).
Once logged on to your oven select the “Manage Photos” link
above your oven screen. This will open a new browser window
for you to display, upload, and delete your photos. To upload your
photos, select Browse to choose the location where your photos
are stored and select Open. Then, select Upload. Only one (1) photo
can be uploaded at a time.
– Blank Screen will display a blank (or black) screen
– Weather will display a date and time along with current weather
information for the zip code provided in the My Oven / Contact
Info screen. The weather information is updated every fifteen
minutes. The oven must be connected to the Internet in order to
display weather information. See My Oven / Network Settings
for information on connecting to the Internet.
• Select OK to save settings and return to the Main Screen, or
Cancel to discard the settings and return to the Main Screen
Note: To show the sleep mode display immediately, without waiting,
select My Oven / Sleep Mode
Volume
The volume feature is used to adjust the oven’s speaker volume.
From the Main Screen
• Select My Oven drop down
• Select Preferences
• Select Volume
• Place your finger on the slider button and drag it to your desired
speaker volume
• Select OK to save settings and return to the Main Screen, or Cancel
to discard the settings and return to the Main Screen
7
Page 11

Page 12

MY OVEN
Preferences
Set Date & Time
The Set Date & Time feature sets the oven clock. Two time modes are available by setting the USE INTERNET
TIME button. The user can manually set the oven clock by setting the USE INTERNET TIME button to “off”.
Alternately, the user can have the oven clock set automatically via the Internet by setting the USE INTERNET
TIME button to “on” and selecting a time zone as described below.
Setting the Date and Time automatically via Internet:
From the Main Screen
• Select My Oven drop down
• Select Preferences
• Select Set Date & Time
• Select Time tab
• Toggle the USE INTERNET TIME button to “on”
• Select the Time Zone tab
• Use the arrow keys to select the desired time zone
Note: Selecting a time zone is required in order for Daylight Savings
Time to be accurately calculated
• Toggle the Daylight Savings Time button to “on” or “off”
• Select OK to save the settings and return to the Main Screen, or
Cancel to discard the settings and return to the Main Screen
Note: If power to oven is off for more than 3 days, the clock will need
to be reset
Setting the Date and Time Manually:
• Select Time tab
• Toggle the USE INTERNET TIME button to “off”
• Using the key pad, set the desired time
• Toggle the am/pm button to desired selection
• Select OK to save settings and return to the Main Screen, Cancel to
discard settings and return to the Main Screen, or select the Date tab
to set the Date
• Using the key pad, set the desired date
• Select OK to save settings and return to the Main Screen, Cancel to
discard settings and return to the Main Screen, or select the Time
Zone tab to set the Time Zone
• Toggle the Daylight Savings Time button to “on” or “off”
• Use the arrow keys to select the desired Time Zone
Note: Selecting a Time Zone is required in order for Daylight Savings
Time to be accurately calculated
• Select OK to save the settings and return to the Main Screen, or
Cancel to discard the settings and return to the Main Screen
9
Page 13

MY OVEN
Preferences
Set Alerts
The Set Alerts feature sends a pre-formatted email message to a designated email account to inform the user
when cooking is about to start and/or finish.
From the Main Screen
• Select My Oven drop down
• Select Preferences
• Select Set Alerts
• Select Email and use the key pad to enter the email account that will
receive the email alerts
• Select OK to save the email setting and return to the Set Alerts screen
• Select the desired Before Cooking Starts and Before Cooking
Finishes alert times by toggling the buttons between: Do Not
Contact Me, or Contact Me 5 Minutes, 10 Minutes, or 15 Minutes
• Select OK to save settings and return to the Main Screen, or Cancel
to discard the settings and return to the Main Screen
Notepad
The Notepad can be used to display a personal message on the oven for someone else to view on the touch
screen at home or remotely from any computer.
From the Main Screen
• Select My Oven drop down
• Select Notepad
• Using the key pad, enter your message
• Select OK to save your message, or Cancel to discard the message
and return to the Main Screen
10
Page 14

MY OVEN
Cooking Guide
From the Main Screen
• Select My Oven drop down
• Select Cooking Guide
• Select Cooking Weights and Measurements for a list of
measurements and their conversions
• Select Temperature Definitions for a list of helpful cooking
temperatures for various items
• Select Meat Probe Temperatures for a list of probe temperatures for
various meat and poultry dishes
• Select OK to exit and return to the Main Screen
Contact Information
This information is required for a service call or for the Sleep Mode to display the Weather on the screen.
From the Main Screen
• Select My Oven drop down
• Select Contact Info
• Select Contact Info tab
• Select and complete each field, Name, Address, City, State, Zip
Code, Phone (10 digit), with the appropriate contact information
• Select Registration tab
• Select and complete Purchase Date and Place of Purchase
(Model Number and Oven ID can not be changed) with the
appropriate information
• Select OK to save settings and return to the Main Screen, or Cancel
to discard the settings and return to the Main Screen
11
Page 15

MY OVEN
Network Settings
Network Settings sets up your oven for Internet connectivity (Dial up is not supported). Most home networks
use DHCP to assign IP addresses. If your home network uses fixed IP addresses, then set DHCP to “off”
and enter the address manually. Additional information is available in our Frequently Asked Questions (FAQ)
section on our website www.tmio.com.
From the Main Screen
• Select My Oven drop down
• Select Network Settings
• Toggle the Use DHCP button to “on”
• Select OK to save settings and return to the Main Screen, or Cancel
to discard the settings and return to the Main Screen
Remote Access
You must enable Remote Access to access your oven from a web browser or via a phone. Enable Remote
Access by entering a 10 digit phone number and 4 digit PIN number, and set the Remote Access to “on”.
This phone number and PIN are required at log in.
From the Main Screen
• Select My Oven drop down
• Select Remote Access
• Select Phone # and enter the 10 digit phone number you will most
likely be calling from to access the oven. Caller ID will recognize
your phone number.
Note: When calling from a different phone number, the Caller ID will
not be recognized automatically, and you will be prompted to enter the
phone number you entered here as part of the log in process. To log
in via the www.tmio.com web page, enter this phone number. (See
Remote Control of Your Oven section below)
• Select PIN # and enter a 4 digit numeric number only (changes to PIN
can only be done at oven interface)
• Toggle Remote Access button to “on”
• Select OK to save settings and return to the Main Screen, or Cancel
to discard the settings and return to the Main Screen
12
Page 16

REMOTE CONTROL OF YOUR OVEN
Phone
You can call the TMIO Voice Control Center on any phone or cell phone and hear the cook status of your
oven as well as control many of the operations that you can perform at home. You can check on the status
of your oven, start cooking a meal, create or change a cooking program, stop cooking, or place your oven
in refrigeration mode.
You can interact with the TMIO Voice Control Center either using Touch Tones® or simply by speaking your
commands or input. Speaking your commands is the way to control your oven from the phone, however,
there are times when background noise or the use of speaker phones may make it necessary to use the
touch tone controls.
Here are some tips for some of the prompts when using speech input:
• Whenever you hear a prompt that asks you to enter a number, you may say that number
• For the Cook Method, you may say the allowable methods such as: “Bake”, “Convection Bake”, “Roast”, or
“Convection Roast”
• For the Oven Temperature, you may speak the digits, or say a number, such as: “three two five” or “three
hundred twenty five”
• For the Cook Time, just say the number of hours and/or minutes such as: “one hour thirty minutes”, “two hours”, or
“forty five minutes”
• For saying when you want the meal to be ready (Meal Time), the more you say, the less you will be prompted for
additional information. Some examples are: “six thirty PM tonight”, “seven PM tomorrow”, “six PM Wednesday”, or
“seven thirty PM November seventh”
To access the TMIO Voice Control Center Dial 1-919-882-2330.
• If the phone number you are calling from is the phone number you entered in the My Oven / Remote Access section on
your oven, our system will recognize you from the Caller ID and you will only be prompted to enter your PIN number.
• If you are calling from a different phone number, you will be prompted to enter in the 10 digit phone number and 4 digit
PIN number you setup on your oven under the My Oven / Remote Access section.
• Three (3) unsuccessful log in attempts will lock out remote access to your oven until you go to the My Oven / Remote
Access screen and press the Unlock Account button.
• Once you log into our Voice Control Center, the current status of the top and bottom oven will be reported.
• You will then be prompted with additional options according to the status of your oven. You operate one particular
oven at a time, and can switch to the other oven when prompted.
• When finished, simply hang up
Computer
In order to control your oven remotely you will need a Java enabled Web Browser (Microsoft Internet Explorer
version 5 or later recommended).
• Navigate your web browser to http://www.tmio.com and click on the My Oven Log-In link.
Note: If you do not currently have Java on your computer, you will be prompted to install Java at first time log-in.
• Enter the 10 digit phone number and 4 digit PIN that you setup under My Oven / Remote Access.
• You will be logged in to your oven and can control it as if you were at home. Some features are restricted when logged
in remotely such as Self Clean and Broil.
13
Page 17

REFRIGERATE
WHEN COOKING IN ONE OVEN AND REFRIGERATING IN THE OTHER SIMULTANEOUSLY, YOU MUST
USE THE BOTTOM OVEN TO REFRIGERATE!
Refrigerate is a unique feature of the TMIO Oven. Both the top and bottom oven refrigerate together or
independently of each other.
If refrigeration is selected immediately following a cooking cycle or self clean, refrigeration will not begin until
the oven temperature reaches 170ºF (77ºC).
To maintain optimum refrigeration performance it is necessary to remove dirt and dust from the refrigeration
panel. (See Do-It-Yourself Maintenance: Refrigeration Unit Cleaning - page 30)
The Refrigeration feature is not intended to replace your conventional refrigerators. Although great for party
trays and Holiday leftovers, its main intended use is as a companion to the cooking modes.
When used in “Cook Later”, Refrigerate is the automatic first step so food stays fresh before cooking begins.
Note: In Refrigerate Mode only, the oven lights automatically shut off after a one (1) minute delay. This
prevents interference with the refrigeration.
From the Main Screen
• Select Refrigerate (Top or Bottom Oven)
• To cancel refrigeration, select Off
COOK NOW
Cook Now
This function cooks now.
From the Main Screen
• Select Cook Now (Top or Bottom Oven)
• Select Cook Method (Bake, Roast, Broil, Warm, Proof, Convection,
Convection Bake, Convection Roast, Defrost, or Dehydrate)
• Select Next
• Select Oven Temperature by dragging the slider button; AND/OR
• Use the +/- 5º buttons for fine adjustment
• Select Next
14
Page 18

COOK NOW
Cook Now (Continued)
• Set Cooking Time (Max time is 12 hours) using the number pad
• Select Next
• The timer can be bypassed by selecting Next
• Confirm your settings
• If any changes are required, select each button individually to
make changes
• Select Start to begin preheating
• If you set a Cooking Time, once oven has finished preheating, select
Start Timer to begin cook cycle
• If you would like to cancel the cook cycle once started, select Off
Note: The Timer causes the oven to turn off automatically
• At end of cooking cycle select Clear
Adjust Settings:
• Takes you back to the confirm screen to make changes to Cook
Method, Oven Temperature, Timer, or Add Stages
To Add a Cooking Stage:
From the Confirm Screen
• Select + button under Add Stage
• This will walk you through the Cook Now steps
Note: Up to 2 additional cooking stages can be added.
15
Page 19

COOK LATER
Cook Later
Cook Later is used to program a dish to cook later in the day. Enter a COOKING TIME (i.e. lasagna takes 45
minutes to cook), then enter a MEAL TIME (i.e. you want to eat dinner at 6:30pm).
The Connect Io™ Intelligent Oven™ calculates when the oven should start cooking as designated by the
MEAL TIME. The oven AUTOMATICALLY refrigerates until the cooking begins. At the end of the cooking
cycle, the oven shuts off.
Example: Cooking time = 45 minutes Meal time = 6:30pm
The oven refrigerates until 5:45pm, cooking starts and continues for 45 minutes, then oven shuts off.
From the Main Screen
• Select Cook Later (Top or Bottom Oven)
• Select Cook Method (Bake, Roast, Warm, Proof, Convection,
Convection Bake, Convection Roast, Defrost, or Dehydrate)
• Select Next
Note: The Broil feature is unavailable in Cook Later
• Set Oven Temperature by dragging the slider button; AND/OR
• Use the +/- 5º buttons for fine adjustment
• Select Next
• Set Cooking Time (Max time is 12 hours) using the number pad
• Select Next
• Set Meal Time using the number pad. Meal Date can also be
selected by toggling the Meal Date button.
Note: Meal Time is the time you would like to have your meal finished
• Select Next
16
Page 20

COOK LATER
Cook Later (Continued)
• Confirm your settings
• Here you can select your After Cooking steps by toggling between
Refrigerate, Turn Oven Off, Keep Warm, or Warm then Refrigerate
• If any changes are required, select each button individually to
make changes
• Select Start
• If you would like to cancel the cook cycle once started, select Off
• At end of cooking cycle select Clear to return to the Main Screen
Adjust Settings:
• Takes you back to the confirm screen to change Cook Method, Oven
Temperature, Timer, Meal Time, After Cooking, or Add Stage
To Add a Cooking Stage:
From the Confirm Screen
• Select + button under Add Stage
• This will walk you through the Cook Later steps and return you to the
Confirm screen.
Note: Up to 2 additional cooking stages can be added.
MY FAVORITES
Selecting A Dish
From the Main Screen
• Select
(Cook Now or Cook Later / Top or Bottom Oven)
• Use the arrow buttons to scroll through your list of favorite dishes
• Select a dish (selection will be highlighted in blue)
• Select Next
My Favorites button
• If selecting for Cook Later, you will need to set Meal Time using the
number pad. Meal Date can also be selected by toggling the Meal
Date button.
Note: Meal Time is the time you would like to have your meal finished.
• Select Next
• Confirm your settings
17
Page 21

MY FAVORITES
Selecting A Dish (Continued)
• If any changes are required, select each button individually to
make changes
• Set Start to begin cooking
Add A Dish
Selecting Add A Dish will guide you through the same screens as in Cook Now or Cook Later, and save the
settings with a descriptive name in My Favorites for future use! (Note: Up to 1,000 favorites may be added)
From the Main Screen
• Select
(Cook Now or Cook Later / Top or Bottom Oven)
• Select Add A Dish
• Select Cook Method (Bake, Roast, Warm, Proof, Convection,
Convection Bake, Convection Roast, Defrost, or Dehydrate)
• Select Next
Note: If selecting a cook method for Cook Later, Broil will be unavailable
• Set Oven Temperature by dragging the slider button; AND/OR
• Use the +/- 5º buttons for fine adjustment
• Select Next
My Favorites button
• Set Cooking Time (Max time is 12 hours) using the number pad
• Select Next
• The timer can be bypassed by selecting Next
18
Page 22

MY FAVORITES
Add A Dish (Continued)
• Name your dish using the keypad, select Next
• Confirm your settings
• If any changes are required, select each button individually to make
changes
• Select Save to save your dish under My Favorites
Edit Dish
From the Main Screen
• Select
(Cook Now or Cook Later / Top or Bottom Oven)
• Use the arrow buttons to scroll through your list of favorite dishes
• Select a dish (selection will be highlighted in blue)
• Select Edit Dish
• Select between Dish Name, Cook Method, Oven Temperature, Timer,
and/or Add Stage to make any changes
• Once all changes are made, select Save
My Favorites button
19
Page 23

Delete Dish
From the Main Screen
MY FAVORITES
• Select
(Cook Now or Cook Later / Top or Bottom Oven)
• Use the arrow buttons to scroll through your list of favorite dishes
• Select a dish (selection will be highlighted in blue)
• Select Delete Dish
• You will be prompted to confirm that you would like to delete the
selected dish by selecting Delete Dish a second time
• The dish is now deleted
My Favorites button
PROBE COOKING
Probe Cooking
From the Main Screen
• Insert Cooking Probe into probe receptacle in upper right hand corner
of oven (Top or Bottom Oven)
• Probe icon appears on screen
• Select Cook Now or Cook Later
• Select Cook Method and select Next, or select the blue bar to use
Meat Temperature Guide
Note: Broil and Warm are unavailable through Cook Later
If using Meat Temperature Guide:
• Select a preset Probe Meat Setting from the list (selection will be
highlighted in blue) and select OK
Note: These are recommended Probe Temperature settings and
Cooking Times/lb. You can change these settings at the Confirm and
Start screen
20
Page 24

PROBE COOKING
Probe Cooking (Continued)
• Confirm the settings
• If any changes are required, select each individual button to change
the Meat Settings, Probe Temperature, Weight & Time/Unit, Cook
Method, Oven Temperature, and or Mealtime
• Select Start
If selecting your own Cook Method:
• Set Oven Temperature by dragging the slider button; AND/OR
• Use the +/- 5º buttons for fine adjustment
• Select Next
• Set Probe Temperature by dragging the slider button; AND/OR
• Use the +/- 5º buttons for fine adjustment
• Select
Next
• If selecting for Cook Later, set Meal Weight and Minutes per lb/kg
• Select Next
• If selecting for Cook Later, set Meal Time using the number pad.
Meal Date can also be selected by toggling the Meal Date button.
Note: Meal Time is the time you would like to have your meal finished.
• Select
Next
21
Page 25

PROBE COOKING
Probe Cooking (Continued)
• Confirm your settings
• If any changes are required, select each button individually to
make changes
• Select Start to begin cooking
• Select Off to cancel cycle
• The oven will shut off when probe temperature is reached
• Select Clear to return to the Main Screen
Adjust Settings:
• Takes you back to the Confirm screen to change Meat Settings,
Probe Temperature, Weight & Time/Unit, Cook Method, Oven
Temperature, and/or Mealtime
BROIL
Broil
Your oven is equipped with Convection Broiling providing air circulation from the air at the rear of the
oven. Convection Broiling has the advantage of broiling food slightly quicker than conventional. Broiling
is a dry-heat cooking method using direct or radiant heat. It is used for small individualized cuts such
as steaks, chops, and patties. Broiling is most successful for cuts of meat 1-2 inches thick. Your oven
contains a top broil element to provide additional flexibility for broiling foods such as stuffed lobster and
for top browning casseroles, meringues, etc. Broiling speed is determined by the distance between
the food and the broil element. For fast broiling, food may be as close as 2 inches to the broil element.
Fast broiling is best for meats where rare to medium doneness is desired. For slow broiling, allow
approximately 4 inches between the top surface of the food and the broil element. Slow broiling is best
for chicken and ham in order to prevent over browning it. The Broil feature is not available in Cook Later.
Broiling Tips:
• Never leave your oven unattended while broiling
• Always use a broiler pan and grid when broiling. They are designated to provide drainage of excess
liquid and fat away from the cooking surface to help prevent splatter, smoke, and fire.
• Slit fatty edge of meat to keep from curling
• Lightly grease broiler tray to prevent sticking
• Brush chicken and fish with butter several times throughout broiling to prevent them from drying out
• Broil first side slightly more than half the recommended time, season, and turn. Season second side just before removing.
• Always pull rack out to stop position before turning or removing food
• Use tongs or a spatula to turn meats
• Never pierce meat with a fork as this allows the juices to escape
• Remove the broiler pan from the oven when you remove the food to prevent the drippings from baking onto the pan
• While pan is hot, place damp paper towel over grid, drizzle with liquid dishwashing detergent, and pour water over
grid. This will make cleaning the pan easier.
22
Page 26

BROIL
Broil
Arrange oven rack to desired position before turning broiler on
From the Main Screen
• Select Cook Now (Top or Bottom Oven)
• From the Cook Method screen, select Broil
• Select Next
• From the Set Cooking Time screen, set your Broil Time using the
number pad
• Select Next
• The timer can be bypassed by selecting Next
• Confirm your settings
• If any changes are required, select each button individually to
make changes
• Select Start to begin preheating
• If you set a Cooking Time, once oven has finished preheating,
select Start Timer to begin broil cycle
• If you would like to cancel the broil cycle once started, select Off
Note: The Timer causes the oven to turn off automatically
• At end of cooking cycle select Clear
DEFROST
Defrost
This method defrosts foods prior to cooking. Simply follow the instructions on the screen to use with your recipe.
DEHYDRATE
Dehydrate
This method dehydrates meats, fruits and vegetables. You can use it for smoking fish or making jerky.
Simply follow the instructions on the screen to use with your recipe.
PROOF
Proof
This method proofs bread. Simply follow the instructions on the screen to use with your recipe. (Note: It can
also be used to heat plates safely prior to serving your meals.)
23
Page 27

SABBATH / HOLIDAY
Sabbath
STAR-K CERTIFIED
Maintaining tradition and having delicious, warm meals over the Sabbath (Shabbos) for your family is
made easy with the Connect Io™ Intelligent Oven™. Star-K Certified Connect Io™ offers the safest, most
advanced, most convenient, and easiest to use Sabbath cooking modes available from any electric oven.
TMIO works diligently with Star-K in order to make Connect Io™ the most kosher consumer friendly cooking
appliance possible for your Sabbath needs.
From the Main Screen
• Select My Oven drop down
• Select Sabbath
• Select Top Oven or Bottom Oven (either or both can be used)
• Select Next
• Select Cook Method (Bake, Roast, Warm or Refrigerate)
• Select Next
• Set Oven Temperature by dragging the slider button; AND/OR
• Use the +/- 5º buttons for fine adjustment
• Select Next
• Using the key pad, set Start and Stop Time
• Select Next
• Confirm your settings
• If any changes are required, select each button individually to
make changes
• You can also select Refrigerate Before Cooking and/or one of the
Warm After Cooking time periods
• Select Start
24
Page 28

SABBATH / HOLIDAY
Sabbath (Continued)
• The Off button will remain on the status screen and, if ever needed,
must be held down for two (2) seconds or touched twice quickly
Note: To use the other oven at the same time, go to My Oven / Sabbath
and repeat the steps above
Once the oven is set in Sabbath:
• Other screens and options will no longer be accessible
• Oven lights and audible tones are disabled
• Functions/Modes that are disabled will appear in grey rather than the
usual black letters
• Opening an oven door will not activate the heating elements
• The refrigeration defrost system is timed
• The normal 12 hour heating elements cut-off is disabled
Holiday (Yom Tov)
Holiday provides all the features of Sabbath plus the capability to preset (program) one or both ovens to operate
over a 3 day (72 hour) period. Holiday also allows multiple cooking and/or refrigeration periods within the same day.
From the Main Screen
• Select My Oven drop down
• Select Holiday
• Select Top Oven or Bottom Oven (either or both can be used)
• Select Next
• Select Cook Method (Bake, Roast, Warm, or Refrigerate)
• Select Next
• Set Oven Temperature by dragging the slider button; AND/OR
• Use the +/- 5º buttons for fine adjustment
• Select Next
25
Page 29

SABBATH / HOLIDAY
Holiday (Yom Tov) (Continued)
• Using the key pad, Set Start and Stop Time and set the Start Date &
Stop Date for the first day by toggling each button
• Select Next
• Select your Second day tab at top of screen
• Select the + key and repeat Holiday programming steps
• Select your Third day tab at top of screen
• Select the + key and repeat Holiday programming steps
• Confirm or change any Cook Method, Temperature, Run Time, or
Add/Subtract a cooking step by pressing + or - key
• Select Start
• The Off button will remain on the status screen and, if ever needed,
must be held down for two (2) seconds or touched twice quickly
Once the oven is set in Holiday:
• Other screens and options will no longer be accessible
• Oven lights and audible tones are disabled
• Functions/Modes that are disabled will appear in grey rather than the
usual black letters
• Opening an oven door will not activate the heating elements
• The refrigeration defrost system is timed
• The normal 12 hour heating elements cut-off is disabled
SELF CLEAN
Green Clean
NEVER use any alkaline cleaners such as “Easy Off” in the oven or it will damage porcelain and void warranty.
ALWAYS remove stainless steel oven racks, all non-porcelain contents, and wipe out excess spills with a mild
detergent such as “Dawn” before Self Cleaning. The Self Clean feature is not available in Cook Later.
From the Main Screen
• Select My Oven drop down
• Select Self Clean
• Select Top Oven or Bottom Oven, select Next
Note: Both ovens cannot be cleaned simultaneously. While self
cleaning one oven, the other will be idle and unavailable for use until
self cleaning cycle has completed.
26
Page 30

SELF CLEAN
Green Clean (Continued)
• Using the number pad, set the Start Time you would like the self
clean cycle to begin
• If you wish to begin the self clean now, leave Start Time blank
• Select Next
• Confirm and Start
• Oven Latch will secure oven door
• Cleaning time is two (2) hours, followed by cool down of one (1) hour
• To cancel the self clean cycle select Cancel
• Once self clean is complete, select Clear
Note: For safety, oven door will not unlock until oven temperature
reaches 400ºF (204ºC)
OVEN SERVICE
Touch Calibration
Touch Calibration is used to make sure the location pressed on the touch screen is properly aligned to match
the correct button on the display. Calibration is initially performed during manufacturing and should not need
to be repeated.
From the Main Screen
• Select My Oven drop down
• Select Oven Service
• Select Touch Calibration
• Follow prompts carefully. After three (3) touches the calibration
is complete
27
Page 31

OVEN SERVICE
Software Update
The Connect Io™ Intelligent Oven™ will continue to offer the most advanced features for our customers.
Periodic updates are made by TMIO for ovens connected to the Internet.
From the Main Screen
• Select My Oven drop down
• Select Oven Service
• Select Software Update
Note: Oven must be connected to Internet for Software updates
• System will automatically download any updates and reboot the system
Oven Reset
This is a re-boot of the system.
From the Main Screen
• Select My Oven drop down
• Select Oven Service
• Select Oven Reset
• The oven will automatically re-boot itself
• In the event the system does not re-boot correctly, remove louvered
refrigeration panel and press reset switch located on the right hand side
Circuit Breaker
A 15 Amp push button circuit breaker is found next to the reset switch behind the louvered refrigeration panel.
This is used if the 110V receptacle (See Features of Your Oven: Parts Identification - page 3) is not working due
to excessive amperage.
Enable Demo Mode
The Demo Mode is only used when demonstrating the oven’s features in a store, and should never be used in
the home. When in Demo Mode, the heating elements or the refrigeration system will not activate.
From the Main Screen
• Select My Oven drop down
• Select Oven Service
• Select Enable or Disable Demo Mode
• Oven operates in normal condition
Note: In Demo Mode a demo icon appears in the upper right corner of
the Main Screen. This icon will not appear when Demo Mode is disabled.
In Demo Mode:
If Lock Controls has been activated,
the Oven ID number found on the Oven
Diagnostics screen will be required to
unlock controls.
28
Page 32

OVEN SERVICE
Oven Diagnostics
In the event service is required, our Authorized Service Technician can diagnose most problems remotely,
if connected to the Internet, reducing service calls to one visit to the home. The exclusive TMIO online
Virtual Repairman provides assistance and technical information to the Service Technician. Service
calls are an inconvenience to the customer and we at TMIO want to offer the best service with the least
aggravation to the customer.
From the Main Screen
• Select My Oven drop down
• Select Oven Service
• Select Oven Diagnostics
Note: Oven must be connected to Internet and contact and registration
information (see page 11 Contact Information) must be complete
• Select Upload Diagnostics
• Call Customer Service at 1-800-881-TMIO (8646) or your Dealer to
schedule the service call
Note: Many repairs can be made by pressing Oven Reset before
calling for service
POWER FAILURE
Power Failure
If the user has enabled “email alerts” in the My Oven / Preferences / Set
Alerts menu, an email alert will be sent to the user when power resumes.
Power Failure Recovery Rules:
• If the power fails for less than three (3) minutes, this is considered
a “blink” and the oven will continue to operate as it was prior to the
power outage
• If the power fails for more than six (6) hours, the oven will remain off
• If the oven was refrigerating when power failed, it will continue to
refrigerate once power resumes
• If the oven was in Sabbath or Holiday mode, it will continue in
Sabbath or Holiday mode once power resumes
• If the oven was in Self Clean, once power resumes the oven will
resume in a safe “cool down” mode and a warning will be displayed
• In Cook Now, if cooking was interrupted, the oven will refrigerate
once power resumes and a warning will be displayed
• In Cook Later, if cooking was interrupted, the oven will refrigerate
once power resumes and a warning will be displayed
• In Cook Later, if the refrigeration stage was interrupted and the
temperature exceeded 40ºF, the oven will refrigerate once power
resumes and a warning will be displayed
• In Cook Later, if the power remained off until after the meal time, the
oven will refrigerate and a warning will be displayed
29
Page 33
DO-IT-YOURSELF MAINTENANCE
Cleaning Methods
• The oven is designed with its Hidden Bake element below the floor of each oven cavity, providing easy wiping of
spills and grease.
• Be certain the oven has cooled before wiping spills or an accidental burn could occur.
• Use a mild dish washing detergent such as “Dawn” to clean lightly soiled areas.
• Never use oven cleaners such as “Easy Off” or harsh detergents. Use can result in damage to the porcelain finish and
will void your warranty.
Refrigeration Unit Cleaning
Keeping the condenser fins free of dust and pet hair is important to saving energy and maintaining peak
performance of your refrigeration unit.
• Remove the louvered refrigeration panel twice annually (or as needed) and carefully vacuum dust from the metal fins
on the condenser (For instructions on how to remove the Refrigeration Panel see “Installation Instructions” manual.)
• Replace panel
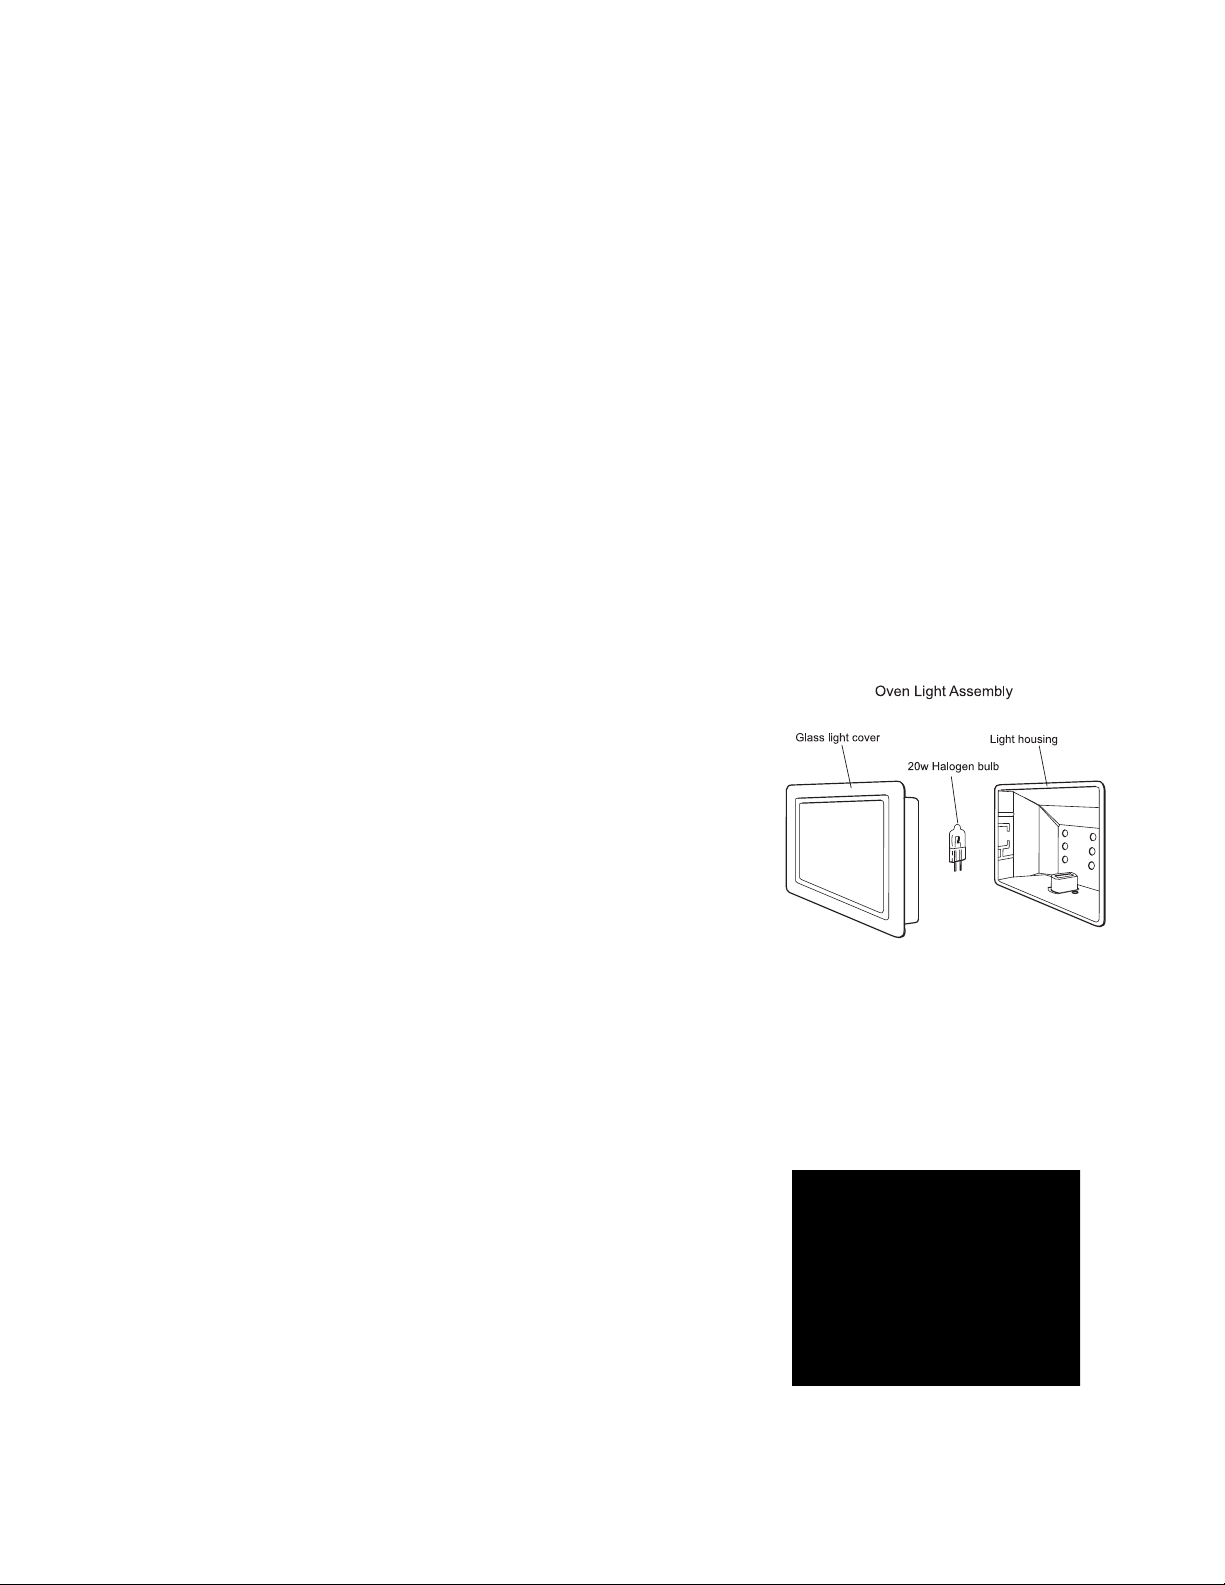
Oven Light Assembly
If the oven light(s) burn out, simply replace with 20 W Halogen bulb.
• Shut off power to oven at fuse or Breaker box. Never attempt any
repairs while power is active to the oven. Touch screen on oven
should be grey and off. Also, open an oven door where bulbs are
functional and double-check power is off.
• Make sure oven is cool to avoid burns
• Carefully remove glass cover with flat screwdriver
• Remove and replace bulb
• Wipe finger prints off bulb and replace cover
• Restore power at fuse or Breaker box
• Check light
TROUBLESHOOTING
Fault Codes
All Fault Codes will have a description of the fault along with a Fault
Code number
Please make note of the Fault Code number
You will be required to contact an authorized service provider
supplied by your TMIO dealer at the time of purchase or call TMIO at
1-800-881-TMIO (8646)
30
Page 34

Bake Chart
FOOD ITEM
Breads
Muffins
Crust
Cookies
COOKING CHARTS
OVEN TEMPERATURE
COOK TIMEºF ºC
White 425 218 25 - 30 min
Whole Wheat 375 191 40 min
Whole Grain 350 177 40 min
Cornbread 400 204 20 - 25 min
Biscuits 425 218 10 - 12 min
Rolls 350 177 15 - 20 min
Apple 375 191 20 - 25 min
Blueberry 400 204 15 - 17 min
Banana Nut 350 177 20 min
Bran 350 177 20 - 25 min
Pie 425 218 15 - 18 min
Sugar 350 177 12 - 14 min
Drop 375 191 8 - 10 min
Oatmeal Raisin 350 177 9 - 10 min
Chocolate Chip 375 191 8 - 10 min
Cakes
Desserts
Angel Food 350 177 50 - 60 min
Coffee 350 177 25 - 30 min
Dump 350 177 40 min
Pound 350 177 45 - 55 min
Sour Cream Bundt 350 177 45 - 50 min
Brownies 350 177 20 min
Bread Pudding 375 191 60 - 75 min
Creme Brulee 350 177 35 - 40 min
Custard 350 177 35 - 40 min
Convection
Follow these general guidelines for converting conventional to convection cooking:
1. Bake at the same temperature the conventional recipe recommends, but for approximately 25-30% less time, or
2. Bake for the amount of time the conventional recipe calls for, but reduce the oven temperature by approximately 25ºF.
3. If the original conventional recipe time is less than 15 minutes, keep the original bake time, but reduce the temperature by
approximately 25-30ºF.
4. Casseroles and high-sided pans are not recommended for convection cooking as they block the heat from circulating around the
food and prevent the oven from cooking efficiently.
31
Page 35

Meat Chart
COOKING CHARTS
MEAT
TYPE
Beef
Pork
Ham
Lamb
Veal
MEAT
CUT
Tenderloin (half) 2-3 425ºF (218ºC)
Tenderloin (whole) 4-6 425ºF (218ºC)
Sirloin Tip 4-6 325ºF (163ºC)
Ribeye 4-6 350ºF (177ºC)
Round or Rump Roast 2-4 325ºF (163ºC)
Tenderloin 1/2-1 in. 425-450ºF (218-232ºC) 155 68 25-29 min
Top Loin Roast 2-5 350ºF (177ºC) 160 71 20-30 min/lb
Center Loin Roast 3-5 350ºF (177ºC) 160 71 20-30 min/lb
Picnic Shoulder 5-8 350ºF (177ºC) 170 77 30-35 min/lb
Ribs (back or spare) 2-4 325ºF (163ºC) 1-3 hrs
Cooked, Whole (boneless)
Cooked, Whole (bone-in) 12-14 325ºF (163ºC) 140 60 15 min/lb
Cooked, Half (boneless) 3-4 325ºF (163ºC) 140 60 25-30 min/lb
Cooked, Half (bone-in) 5-7 325ºF (163ºC) 140 60 18-20 min/lb
Uncooked, Half (bone-in) 5-7 350ºF (177ºC) 160 71 25-30 min/lb
Leg of Lamb, Whole (bone-in) 5-7 325ºF (163ºC)
Leg of Lamb, Whole (boneless) 4-7 325ºF (163ºC)
Shoulder Roast 4-6 325ºF (163ºC)
Crown Roast 2-3 375ºF (191ºC)
Loin (bone-in) 3-4 325ºF (163ºC) Medium 160 71 34-36 min/lb
Loin (boneless) 2-3 325ºF (163ºC) Medium 160 71 18-20 min/lb
Crown 7-10 325ºF (163ºC) 155 68 19-21 min/lb
SIZE
(lbs)
6-8
14-16 5-7 min/lb
OVEN
TEMP.
325ºF (163ºC) 140 60
INTERNAL TEMP.
COOK TIMEºF ºC
Med. Rare 145 63 35-40 min
Medium 160 71 45-50 min
Med. Rare 145 63 50-60 min
Medium 160 71 60-70 min
Med. Rare 145 63 25-30 min/lb
Medium 160 71 30-35 min/lb
Med. Rare 145 63 18-20 min/lb
Medium 160 71 20-22 min/lb
Med. Rare 145 63 30-35 min/lb
Medium 160 71 35-40 min/lb
10-12 min/lb
Med. Rare 14 63 20-25 min/lb
Medium 160 71 25-30 min/lb
Med. Rare 145 63 25-30 min/lb
Medium 160 71 30-35 min/lb
Med. Rare 145 63 20 min/lb
Medium 160 71 25 min/lb
Med. Rare 145 63 25 min/lb
Medium 160 71 30 min/lb
Convection
Follow these general guidelines for converting conventional to convection cooking:
1. Cooking at the same temperature the conventional recipe recommends, but for approximately 25-30% less time, or
2. Cooking for the amount of time the conventional recipe calls for, but reduce the oven temperature by approximately 25ºF.
3. If the original conventional recipe time is less than 15 minutes, keep the original cook time, but reduce the temperature by approximately 25-30ºF.
4. Casseroles and high-sided pans are not recommended for convection cooking as they block the heat from circulating around the food and prevent
the oven from cooking efficiently.
32
Page 36

Poultry Chart
POULTRY
TYPE CUT
Chicken
Turkey
Cornish Game Hen
Goose
Duck
Pheasant
Breasts (boneless & skinless) 375ºF (191ºC) 170 77 20-25 min
Breasts (bone-in) 350-375ºF (177-191ºC) 170 77 30-40 min
Drumsticks 350-375ºF (177-191ºC) 180 82 35-45 min
Thighs (boneless & skinless) 375ºF (191ºC) 180 82 30-35 min
Thighs (bone-in) 350-375ºF (177-191ºC) 180 82 40-50 min
Whole 2-5 375ºF (191ºC) 1 - 2 hrs
Capon 5-7 325ºF (163ºC) 1 3/4 - 2 1/2 hrs
Breast (boneless)
Breast (bone-in)
Whole (stuffed)
Whole (unstuffed)
COOKING CHARTS
INTERNAL
SIZE
(lbs)
2-3
4-6 2 1/2 - 3 1/2 hrs
2-5
5-8 2 - 2 1/2 hrs
6-8
8-12 3 1/2 - 4 1/2 hrs
12-16 4 - 5 hrs
6-8
8-12 3 - 4 hrs
12-16 3 1/2 - 4 1/2 hrs
1-2 375ºF (191ºC) 180 82 1 - 1 1/4 hrs
7-10 350ºF (177ºC) 180 82 2 - 3 hrs
3-6 350ºF (177ºC) 180 82 1 1/2 - 3 hrs
2-3 350ºF (177ºC) 180 82 1 - 1 1/2 hrs
OVEN
TEMP.
325ºF (163ºC) 170 77
325ºF (163ºC) 170 77
325ºF (163ºC) 180 82
325ºF (163ºC) 180 82
TEMP.
COOK TIMEºF ºC
1 1/2 - 2 1/2 hrs
1 1/2 - 2 hrs
3 - 3 1/2 hrs
2 1/2 - 3 1/2 hrs
Convection
Follow these general guidelines for converting conventional to convection cooking:
1. Bake at the same temperature the conventional recipe recommends, but for approximately 25-30% less time, or
2. Bake for the amount of time the conventional recipe calls for, but reduce the oven temperature by approximately 25ºF.
3. If the original conventional recipe time is less than 15 minutes, keep the original bake time, but reduce the temperature by approximately 25-30ºF.
4. Casseroles and high-sided pans are not recommended for convection cooking as they block the heat from circulating around the food and prevent
the oven from cooking efficiently.
33
Page 37

COOKING CHARTS
Broiling Chart
MEAT TYPE THICKNESS/CUT
Beef Steaks
Breads
Chicken
Franks
Fish
Ground Beef
Ham Steak
Lamb Chops
Pork Chops
3/4˝ to 1˝
1-1/4˝ to 1-1/2˝
3/4˝ to 1˝
Garlic Toast
Pieces/Halves 30 - 45
Hot Dogs Whole 4 - 5
Polish Sausage Cut in half 7 - 9
1/2˝ to 1˝ 8 - 12
Patties
3/4˝ to 1˝
1/2˝ 7 - 11
1˝ 12 - 15
1/2˝ to 1˝
1-1/4˝ to 1-1/2˝
1/2˝ to 1˝ Well 18 - 25
Medium Rare 7 - 11
Medium 8 - 12
Well 9 - 14
Medium Rare 16 - 22
Medium 22 - 25
Well 26 - 32
Medium Rare 8 - 12
Medium 9 - 14
Well 10 - 15
Medium 12 - 17
Well 15 - 20
Medium 21 - 27
Well 27 - 33
TOTAL COOKING
TIME (Minutes)
4 - 6English Muffins
34
Page 38

“Connect Io” REFRIGERATOR-OVEN WARRANTY
FULL TWO-YEAR WARRANTY
For two years from the date of purchase, when this appliance is operated and maintained in accordance with
the instructions furnished with this product, TMIO, LLC will pay for replacement parts and repair labor to correct
defects in materials or workmanship. Service must be provided by a TMIO, LLC designated service company.
FIVE-YEAR FULL WARRANTY ON SEALED REFRIGERATION PARTS AS LISTED
For five years from the date of purchase, when this product is operated and maintained in accordance with the
instructions furnished with this product, TMIO, LLC will pay for replacement parts and repair costs to correct
defects in materials or workmanship in the sealed refrigeration system. The sealed refrigeration system consists of
the compressor, condenser, evaporator, dryer and all connecting tubing.
THIRD THROUGH FIFTH YEAR LIMITED WARRANTY
From the third through the fifth year from the date of original installation, TMIO, LLC will repair or replace the
following parts that prove to be defective in materials or workmanship. Labor to remove and replace defective
parts is not covered. TMIO, LLC recommends that you use TMIO, LLC authorized repair persons to perform such
services. The following parts are covered: electric heating elements, blower motors, and electronic oven control
boards (EOC’s).
LIMITATIONS
TMIO, LLC will not pay for:
1. Service calls to correct the installation of your appliance, to instruct you how to use your appliance, to
replace house fuses or correct house wiring, or to replace owner-accessible light bulbs.
2. Repairs when your appliance is used in other than normal, single-family household use.
3. Pickup and delivery. Your appliance is designed to be repaired in the home.
4. Damage resulting from accident, alteration, misuse, abuse, fire, flood, improper installation, acts of God or
use of products not approved by TMIO, LLC.
5. Repairs to parts or systems resulting from unauthorized modifications made to the appliance or the software
operating the appliance.
6. Repairs to parts or systems to correct any defect caused by negligence, accident or improper use,
maintenance, installation, service or repair.
7. Replacement parts or repair labor costs for units operated outside the United States and Canada.
8. Travel or transportation expenses for customers who reside in remote areas.
9. Any labor costs during the limited warranty period.
10. Stainless Steel doors, panels, and frame repairs beyond 30 days for cosmetic defects.
THE REMEDIES DESCRIBED ABOVE FOR EACH WARRANTY ARE THE ONLY ONES WHICH TMIO, LLC WILL
PROVIDE, EITHER UNDER THIS WARRANTY OR UNDER ANY WARRANTY ARISING BY OPERATION OF LAW.
TMIO, LLC WILL NOT BE RESPONSIBLE OR LIABLE FOR ANY CONSEQUENTIAL OR INCIDENTAL DAMAGES
ARISING FROM THE BREACH OF THIS WARRANTY OR ANY OTHER WARRANTY, WHETHER EXPRESS,
IMPLIED OR STATUTORY.
Some states do not allow the exclusion or limitation of incidental or consequential damages, so this exclusion or
limitation may not apply to you. This warranty gives you specific legal rights and you may also have other rights
which may vary from state to state.
For service questions visit the web at www.tmio.com or call 1-800-881-TMIO (8646).
35
Page 39

Connect Io Use & Care Manual
Part No. 101205
Internet & Cell Phone Controlled Connect Io Intelligent Ovens
Give You More Time For Your Lifestyle
Designed and manufactured in the USA with pride by TMIO, LLC • Chattanooga, TN • US toll-free +1.800.881.TMIO (8646) • www.tmio.com
Connect IoTM, Intelligent OvenTM, Intelligent OvensTM, Green CleanTM, and TMIO® are registered trademarks of TMIO, LLC.
Your Lifestyle, Your Dinner, Your Time. Your Lifestyle, Your Dinner, Your Time.
 Loading...