

Page 1

Model PS301SS00 Professional Series
Refrigerated, Internet Controlled
30” Electric Built-In Single Wall Oven
Installation Instructions
Part No. 101768
Before You Start
2
Electrical Requirements
3
Internet & Network
3
Product Dimensions
4
Cabinet Dimensions
5
Cabinet Requirements
6
7 - 13
14
14
14
Installation Steps & Final Checklist
Cleaning Your Oven
More Information
Customer Service
Page 2
BEFORE YOU START
!
WARNING!
CAUTION: Oven is heavy. Use care in handling.
!
Proper Installation is your responsibility. Ensure
!
the oven is electrically connected by a qualified
electrical installer and conforms with the National
Electrical Code, ANSI/NFPA 70 - latest edition, or in
CANADA, Canadian Electrical Code, CSA C22.11982 and C22.2 No. 01982 - latest edition.
Do not use this appliance for space heating.
!
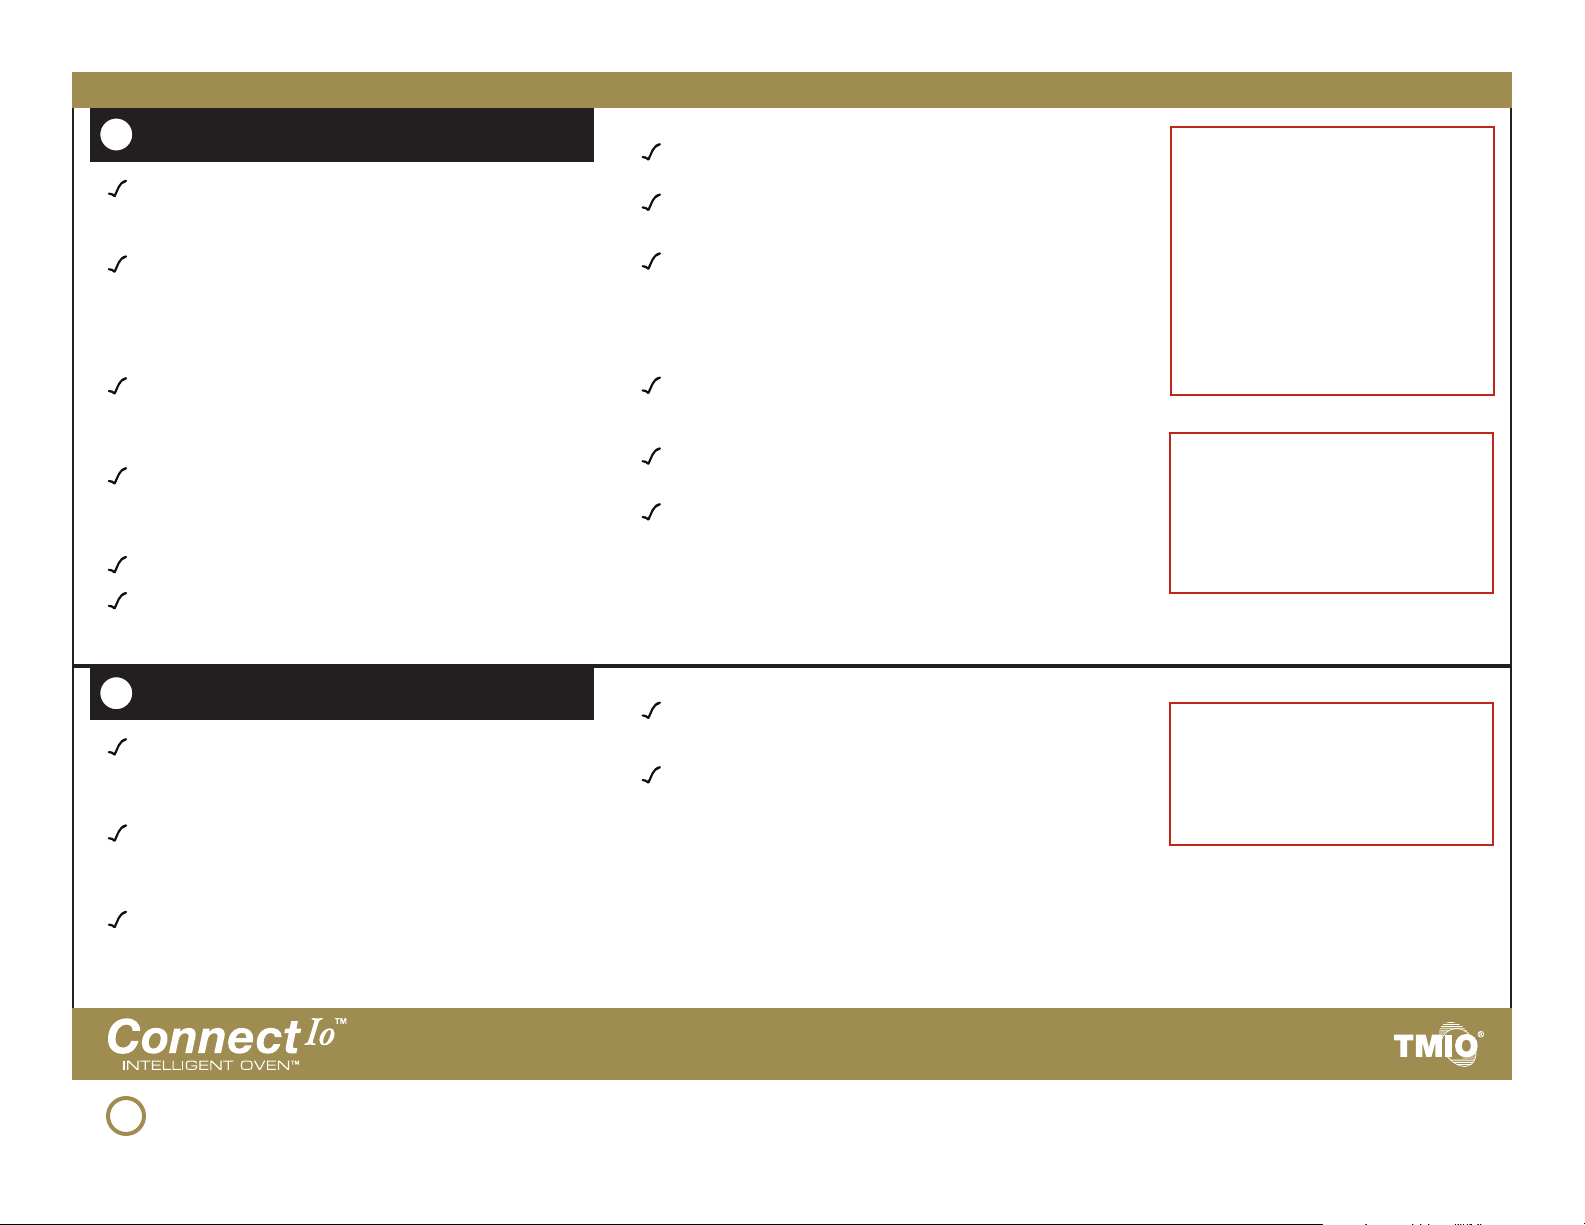
We STRONGLY RECOMMEND running CAT5 cable to
where the back of the oven will be located.
Observe all governing codes and ordinances.
Do not remove permanently affixed labels,
warnings, or plates from the oven! These are
important for your safety.
Always disconnect the electrical supply to the
oven before servicing.
Electrical Preparation: Cut out a Square opening
(sized to the junction box) in the top left rear corner
of the oven cabinet and/or sheet rock to enable
the 4-wire oven electrical cord to pass through the
cabinet, and connect to the household electrical
supply. See Cabinet Dimensions (page 5) for
details.
Ensure that the oven is properly grounded. See
Electrical Requirements (page 3) and Installation Steps:
Step 3. Electrical Connections (page 9) for details.
Required cabinet cutout width is 28 5/8” (72.7 cm).
Required cabinet cutout depth is 24” (60.9 cm).
Oven support surface should be flat, level, and
be able to support a weight greater than 350
pounds159 kg.
Recessed installation area must provide
complete enclosure surrounding the recessed
portion of the oven.
Oven location should be away from strong draft
areas (windows/doors) and strong heating vents.
SPECIAL SYMBOLS
This is a safety alert. Always read and obey all
!
safety messages. This symbol warns you of potential
hazards that can hurt or kill you and others.
This is an information symbol and indicates
i
additional detailed instructions in this manual.
You can be seriously
injured if you don’t follow
the instructions in this
manual before you start.
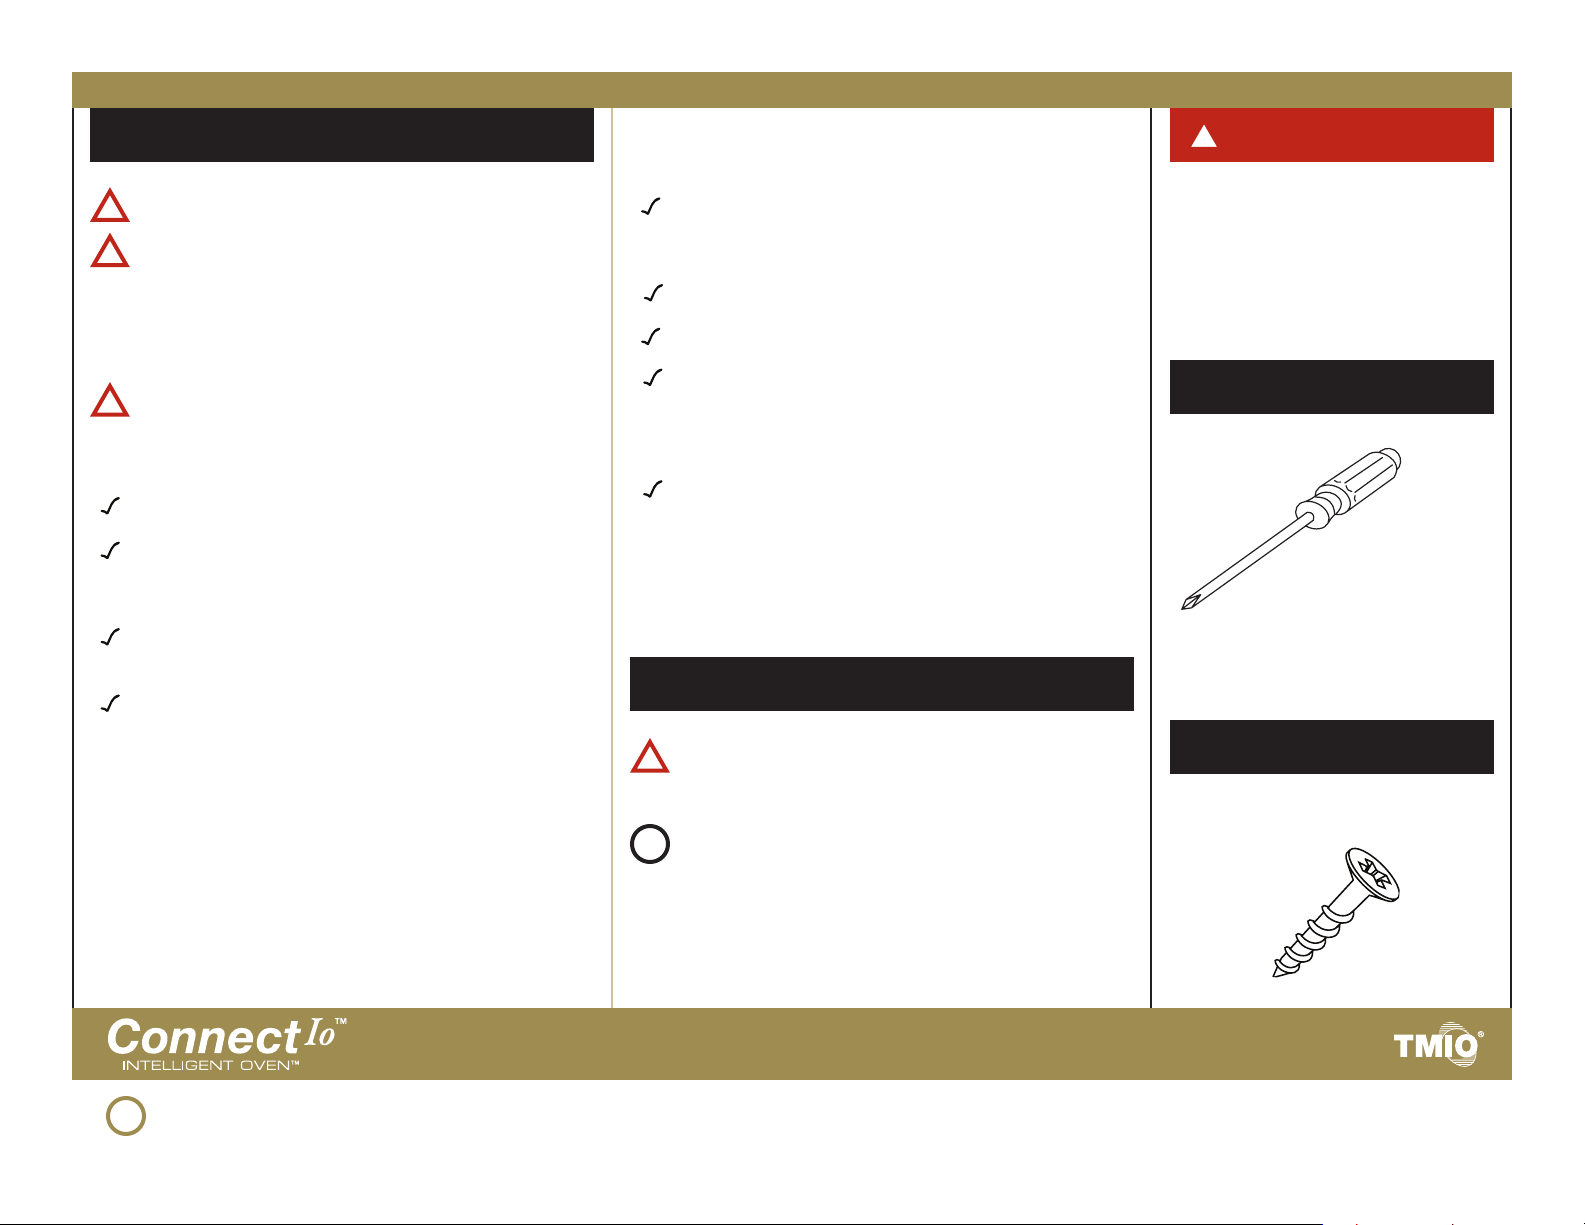
TOOLS NEEDED
•Phillips Screwdriver
PARTS SUPPLIED
•Qty. 4 Phillips Cabinet
Mounting Screws
2
Designed and manufactured in the USA with pride by TMIO, LLC • Chattanooga, TN • US toll-free +1.800.881.TMIO (8646) • www.tmio.com
Connect IoTM, Intelligent OvenTM, Intelligent OvensTM, Green CleanTM, and TMIO® are registered trademarks of TMIO, LLC.
Page 3
i
ELECTRICAL REQUIREMENTS
The Connect Io Intelligent Oven requires a
separate, grounded 4-wire, 240V (AC), 50 Amp
service with its own circuit breaker.
Wire sizes and connections must conform with the
rating of the appliance and to the requirements
of the National Electrical Code, ANSI/NFPA 70
- latest edition, or Canadian Electrical Code, CSA
C22.1-1982 and C22.2 No. 01982 - latest edition,
and all local codes and ordinances.
Oven must be connected to the proper
electrical voltage and frequency as specified
on the model/serial rating plate (located
behind the louvered refrigeration panel).
Oven must be connected to grounded metal
permanent wiring system. Check with a
qualified electrician to make sure the oven is
properly grounded.
Do not ground to a gas pipe.
Do not use an extension cord with this
appliance, because this may result in
electrical shock or other personal injury.
i
INTERNET & NETWORK
A broadband (DSL or cable modem) Internet
connection is required. Dial-up Internet services
are not supported.
The oven either can be connected to a home
network or connected directly to an Internet Service
Providers’ (ISP’s) network box inside the home.
This unit is equipped with a No. 10 ground wire in
the conduit.
The electrical conduit must be kept to the top left
for a flush installation. Never cut the conduit.
Connect the flexible armored cable directly
to 4-wire, 240V household service. If codes
permit and separate grounding wiring is used,
we recommend that a qualified electrician
determine the grounding path and that the wire
gauge is in accordance with local codes.
Junction boxes installed on rear wall behind oven
must be recessed and located at the upper left-
hand corner of the cabinet.
A UL-Listed conduit connector must be provided
at the junction box.
Do not install a fuse in the neutral or grounding
circuit. We recommend a time-delayed fuse or
circuit breaker. Connect directly to the fused
disconnect (or circuit breaker box) through
flexible armored, or non-metallic sheathed,
copper cable (with grounding wire).
The oven’s RJ45 connector enables direct hardwiring either ethernet or wireless bridge connections.
The oven will configure its settings via DHCP
automatically. If your network environment is not
configured to handle DHCP, you must manually
configure the oven Internet settings by entering:
(1) the IP address, (2) network mask, (3) the
gateway IP address, and (4) DNS server address.
IMPORTANT if location
utilizes aluminum wiring:
• Connect the aluminum
wiring to the copper wire using
special connectors designed
and UL listed for joining
aluminum to copper.
• Aluminum/copper
connection must conform
with local codes and industry
accepted wiring practice.
Electrical Specifications:
• Maximum Amp Usage: 46.7A
• Preheat Rating: 5300W
• Broil Element Rating: 3300W
• Baking Element Rating: 2000W
• Convection Element Rating, 1650W
NOTE: If the oven is not
connected to the Internet, it will
still cook and refrigerate, but all
connections to outside the home
will be unavailable.
We recommend running a CAT5 cable to
the back of the oven, where a RJ45 network
connector is mounted.
3
Designed and manufactured in the USA with pride by TMIO, LLC • Chattanooga, TN • US toll-free +1.800.881.TMIO (8646) • www.tmio.com
Connect IoTM, Intelligent OvenTM, Intelligent OvensTM, Green CleanTM, and TMIO® are registered trademarks of TMIO, LLC.
Page 4
PRODUCT DIMENSIONS
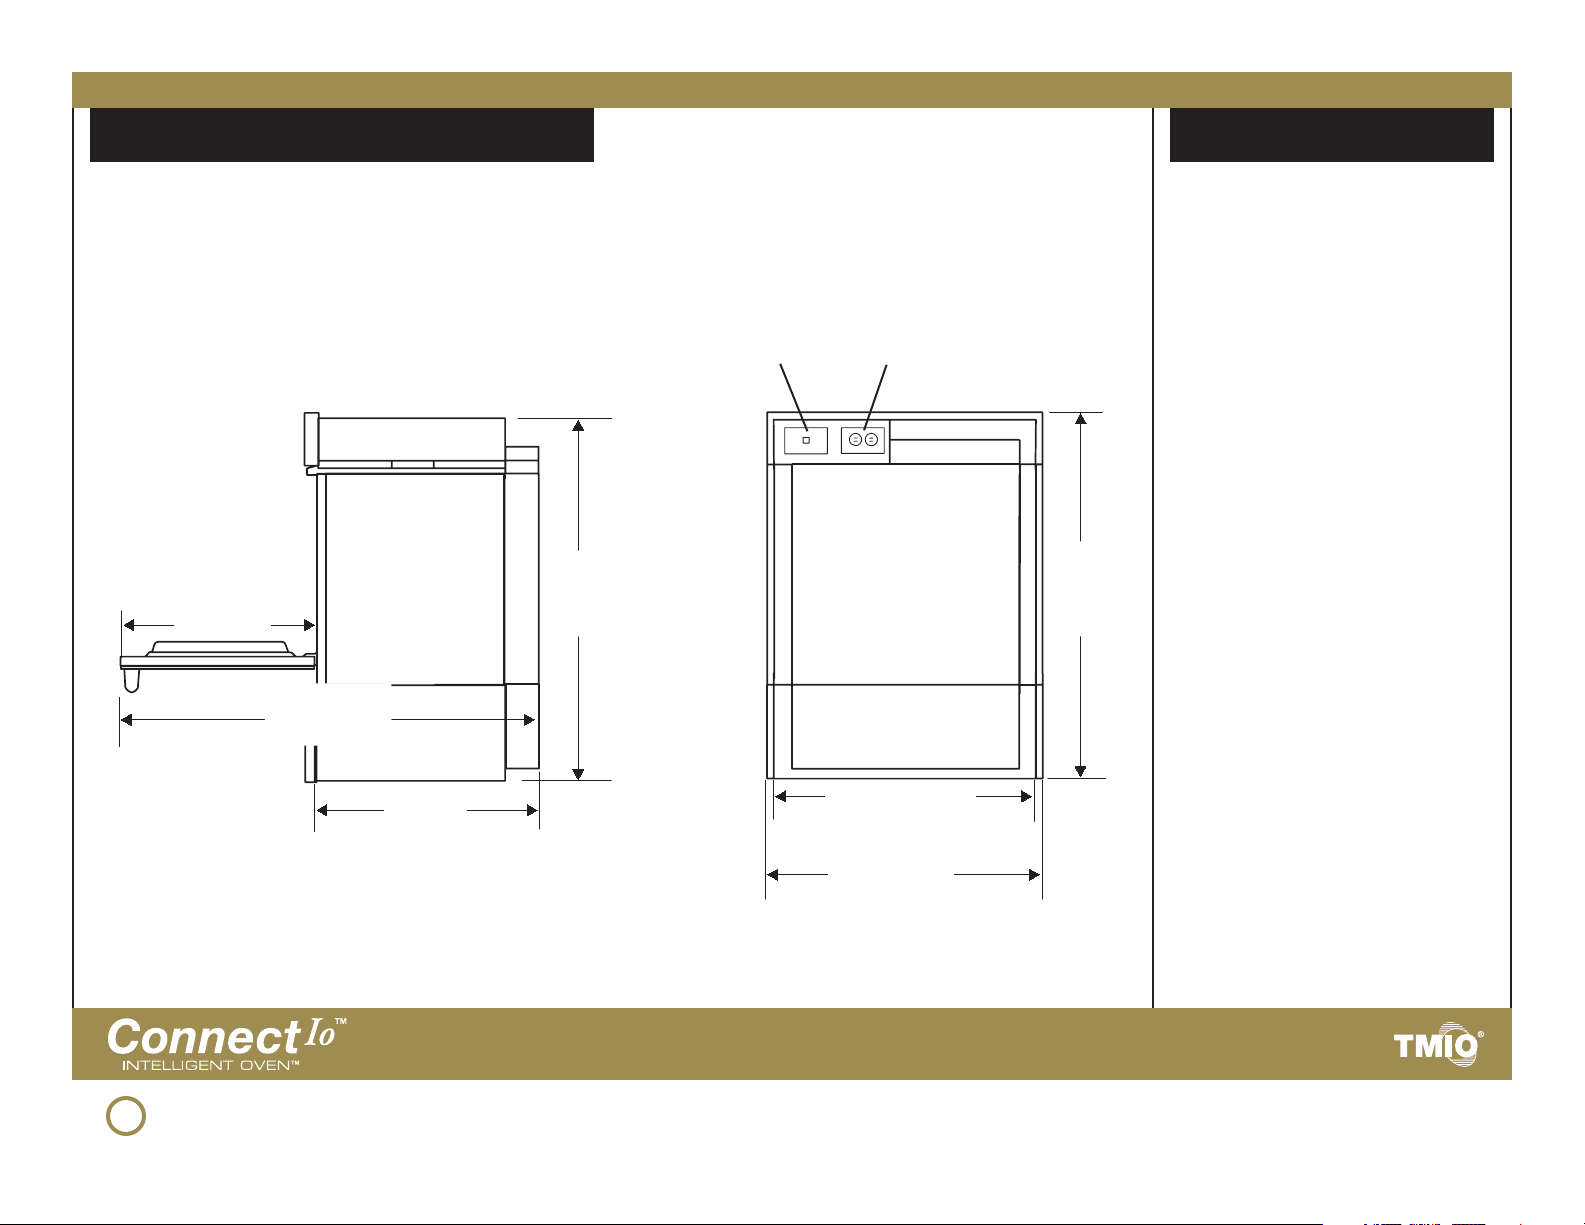
Quick Reference
APPROXIMATE SHIPPING WEIGHT:
350 lbs / 159 kg
Door extends 21”
(53.3 cm) from
cabinet face
Door extends
44 1/2” (113 cm)
from oven rear
Oven Right View Oven Rear View
120V outletsRJ45 network jack
37 5/8”
(95.6 cm)
recessed
height
23 1/2”
(59.7 cm)
recessed
depth
28 1/2” (71.4 cm)
recessed width
30” (76.2 cm)
overall width
39 1/8”
(99.4 cm)
overall
height
REFRIGERATION:
Refrigeration ductwork is located at
the rear of the oven and must not be
damaged during installation.
INTERNET HOOKUPS:
RJ45 (CAT5/Ethernet) network
connection is located at the rear
of the oven. If a wireless bridge
connection is preferred, or if local
routers or adaptors are used, then
use the 2-socket 120V electrical
outlet provided.
ALIGNMENT:
Align the oven front with the
cabinet front during installation.
Make sure the vertical axis of the
oven front is parallel with the vertical
axis of the cabinet.
4
Designed and manufactured in the USA with pride by TMIO, LLC • Chattanooga, TN • US toll-free +1.800.881.TMIO (8646) • www.tmio.com
Connect IoTM, Intelligent OvenTM, Intelligent OvensTM, Green CleanTM, and TMIO® are registered trademarks of TMIO, LLC.
Page 5

5
Designed and manufactured in the USA with pride by TMIO, LLC • Chattanooga, TN • US toll-free +1.800.881.TMIO (8646) • www.tmio.com
Connect IoTM, Intelligent OvenTM, Intelligent OvensTM, Green CleanTM, and TMIO® are registered trademarks of TMIO, LLC.
Page 6

6
Designed and manufactured in the USA with pride by TMIO, LLC • Chattanooga, TN • US toll-free +1.800.881.TMIO (8646) • www.tmio.com
Connect IoTM, Intelligent OvenTM, Intelligent OvensTM, Green CleanTM, and TMIO® are registered trademarks of TMIO, LLC.
Page 7
INSTALLATION STEPS
STEP 1. Unpacking the Oven
j Make sure to TURN OFF the breaker for the
oven power supply.
WARNING: Use two or more people to move and
!
install oven. Failure to follow this instruction can
result in back injury or other injury.
k Move the oven close to final installation
position prior to removing packaging materials.
WARNING: Never use door handles or any portion
!
of the control panel or trim for lifting the oven. This
may cause severe damage to the product.
l Carefully remove plastic wrapping,
polystyrene protectors, cardboard, and blue tape.
Exercise care if using a knife or sharp object to
cut plastic or tape in order to prevent permanent
damage to the stainless steel surfaces.
CAUTION: Remove oven door, and remove the
louvered refrigeration panel before removing unit
from shipping pallet.
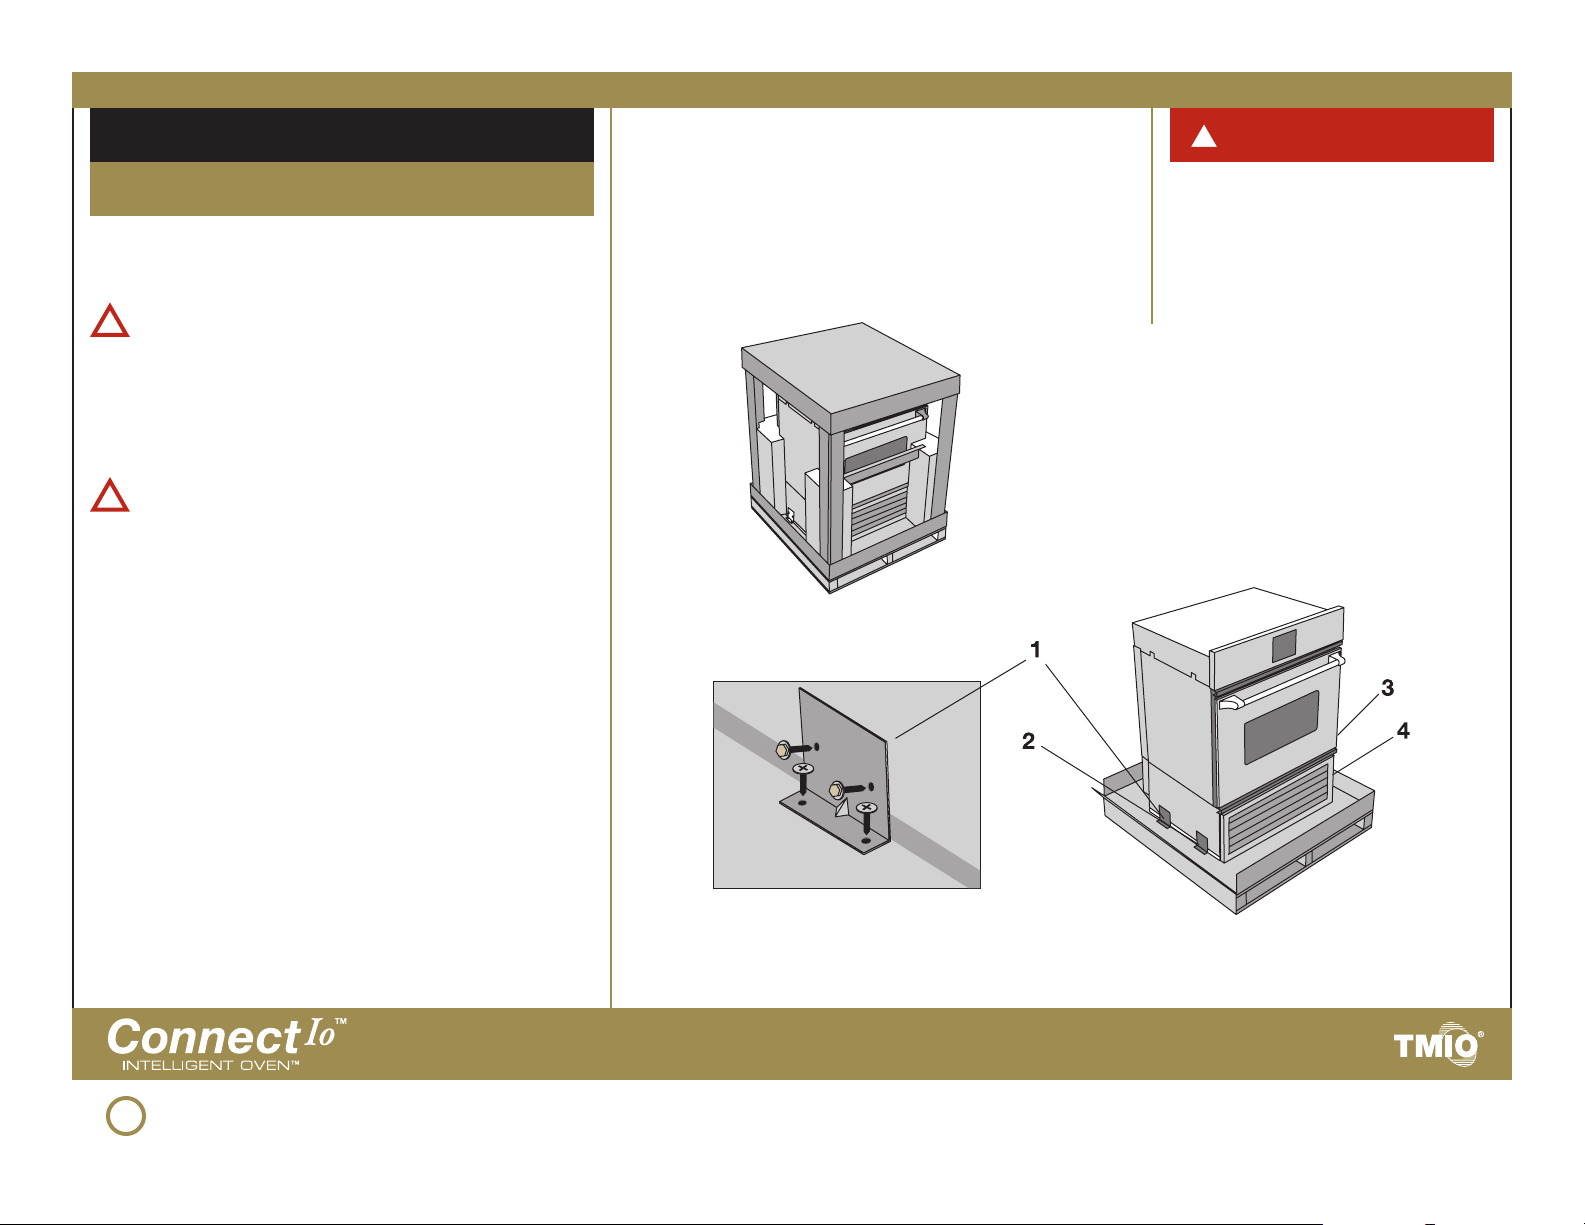
Carefully remove all packing
material from unit
Remove four (qty. 4) screws
from shipping brackets
!
WARNING!
THE OVEN SHOULD NEVER BE LAID ON
ITS BACK OR SIDE. If the oven has been
laid on its back or side, the oil in the
compressor will need at least one (1)
hour to drain back into the compressor
before powering up the oven.
m Remove the four (qty. 4) screws from the
shipping brackets located on both sides of the
oven. Replace the four screws after removing
the brackets.
n Carefully remove the louvered refrigeration
panel from the bottom front of the oven and
set the refrigeration panel in a safe place. The
refrigeration panel will be attached again later in
the installation process.
7
Designed and manufactured in the USA with pride by TMIO, LLC • Chattanooga, TN • US toll-free +1.800.881.TMIO (8646) • www.tmio.com
Connect IoTM, Intelligent OvenTM, Intelligent OvensTM, Green CleanTM, and TMIO® are registered trademarks of TMIO, LLC.
Page 8

8
Designed and manufactured in the USA with pride by TMIO, LLC • Chattanooga, TN • US toll-free +1.800.881.TMIO (8646) • www.tmio.com
Connect IoTM, Intelligent OvenTM, Intelligent OvensTM, Green CleanTM, and TMIO® are registered trademarks of TMIO, LLC.
Page 9
INSTALLATION STEPS
STEP 3. Electrical Connections
!
WARNING!
Turn OFF the household power supply breaker
!
before connecting wires. The oven must be
connected to a permanent and grounded
supply. Failure to follow these instructions can
result in death, fire or electrical shock.
This oven requires a separate, grounded 4-wire,
i
240V (AC), 50 Amp service with its own circuit
breaker. Installation must comply with National
Electric Code.
(page 3).
We strongly recommend connecting this oven
to No. 8 gauge copper wire.
j With the oven positioned in front of the
cabinet opening, disconnect the household
power supply. Feed house wiring through the
opening in the cabinet. If using a junction box,
thread the oven cable into the junction box
and secure with a UL-listed conduit connector.
See Cabinet Dimensions (page 5) drawing for
recommended power location.
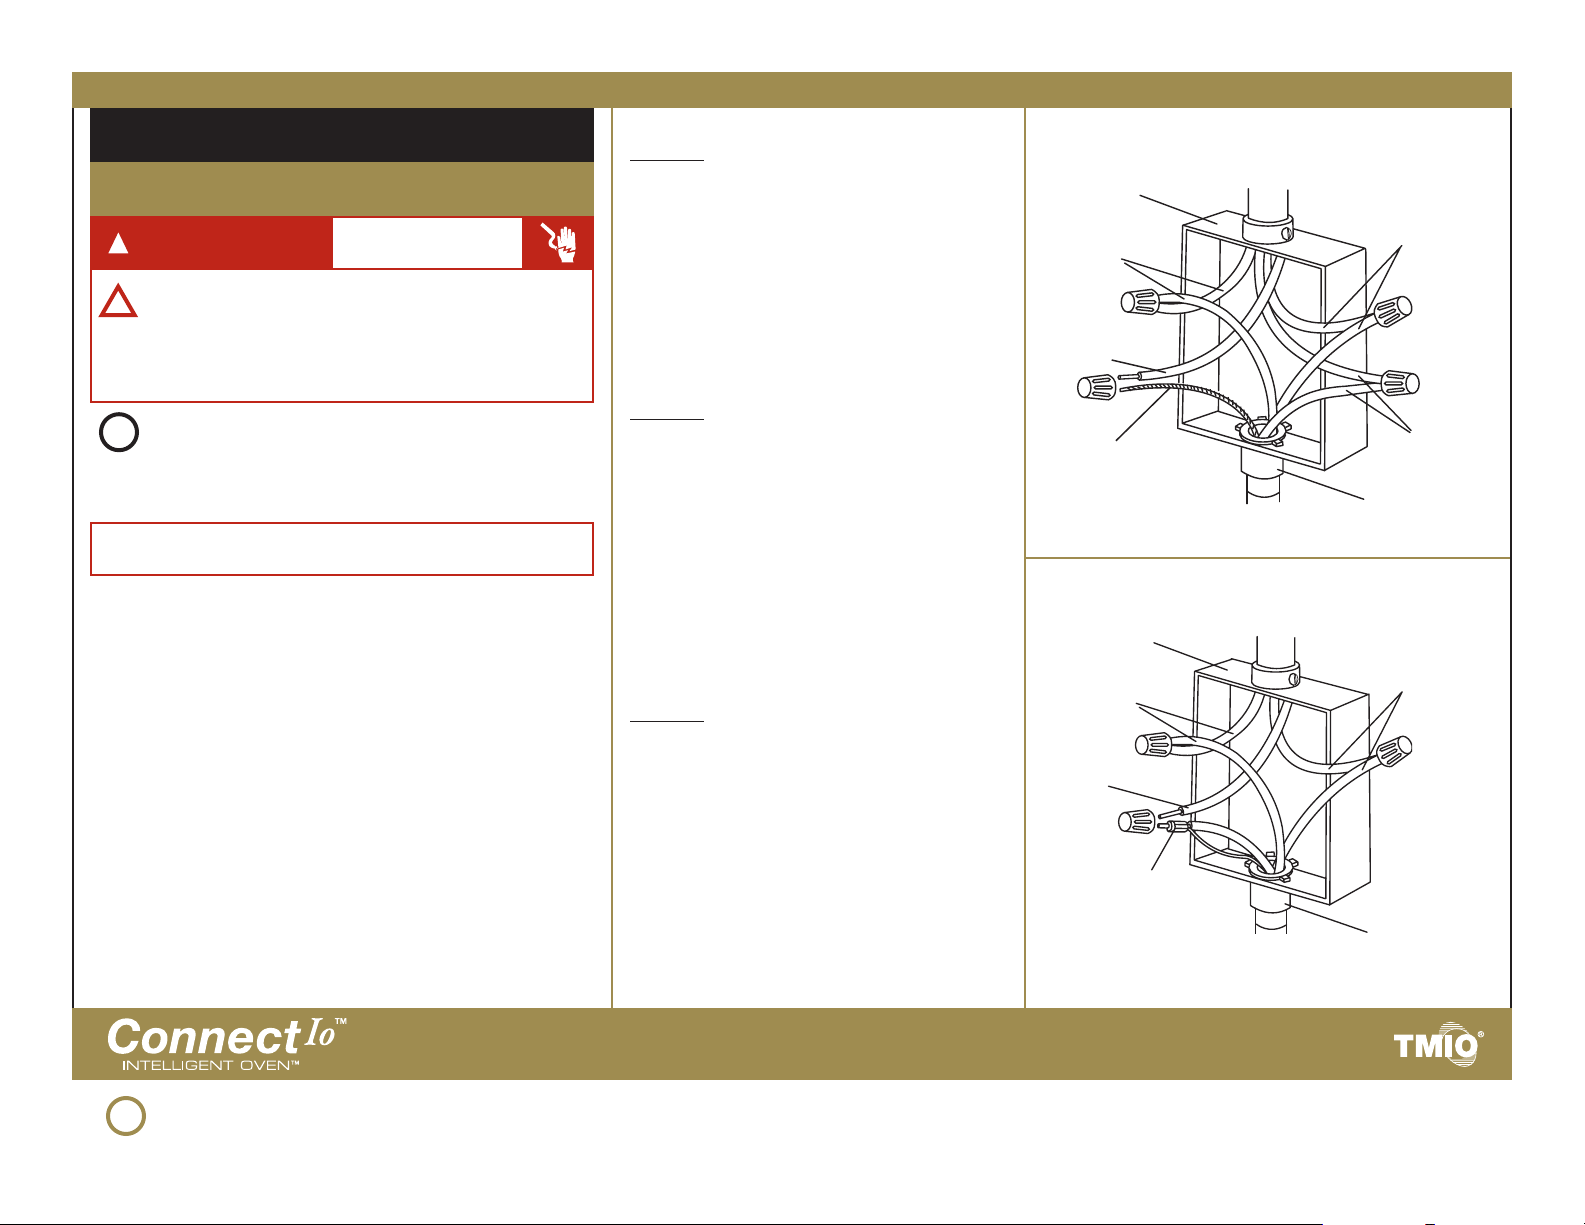
k Connect the black wire from the household
power supply with black wire in the oven
conduit using twist-on connectors.
l Connect the red wire from the household
power supply with the red wire in the oven
conduit using twist-on connectors.
m Follow local codes and ordinances to
complete the neutral and ground connection
according to the following options:
ELECTRICAL SHOCK
HAZARD!
See “Electrical Requirements”
Option 1: If Connecting to a 4-wire System:
n Connect the white oven conduit wire
to the neutral (white) wire in the junction
box.
See Figure 1.
o Connect the bare grounding oven
cable wire to the green or bare grounding
wire in the junction box.
Option 2: If local codes DO NOT PERMIT
connecting the Oven Ground Wire to
Neutral (White) Wire in Junction Box:
See Figure 1
.
n Connect the white oven cable wire to
the neutral (white) wire in junction box. See
Figure 1.
o Connect the bare grounding oven
cable wire to the green or bare grounding
wire in the junction box.
Option 3: If local codes PERMIT connecting
the Oven Ground Wire to the Neutral
(White) Wire in the Junction Box:
See Figure 1
.
n Twist together and crimp the neutral
(white) oven cable wire to the oven bare
ground wire.
See Figure 2
.
o Connect the crimped white/bare oven
wire to the neutral (white) power supply
line in the junction box.
See Figure 2
.
Junction Box
Red wires
Bare or green
grounding wire
Bare grounding
oven cable wire
Junction Box
Red wires
White wire
White & bare
grounding oven
cable wires
Figure 1.
Cable from power supply
Cable from oven
Figure 2.
Cable from power supply
Cable from oven
White wires
Black wires
UL-listed
conduit
connector
Black wires
UL-listed
conduit
connector
9
Designed and manufactured in the USA with pride by TMIO, LLC • Chattanooga, TN • US toll-free +1.800.881.TMIO (8646) • www.tmio.com
Connect IoTM, Intelligent OvenTM, Intelligent OvensTM, Green CleanTM, and TMIO® are registered trademarks of TMIO, LLC.
Page 10

10
Designed and manufactured in the USA with pride by TMIO, LLC • Chattanooga, TN • US toll-free +1.800.881.TMIO (8646) • www.tmio.com
Connect IoTM, Intelligent OvenTM, Intelligent OvensTM, Green CleanTM, and TMIO® are registered trademarks of TMIO, LLC.
Page 11
INSTALLATION STEPS
STEP 6. Install Oven Into Cabinet
!
WARNING!
OVEN MUST BE SECURED INTO CABINET USING
ATTACHMENT TRIM. Failure to do so can result in the
oven tipping and falling out of the cabinet and cause
personal injury or death.
IMPORTANT: Use the oven side hand grips to lift the
oven into the cabinet. Use the front frame to push the
oven into the cabinet. Do not push against outside
edges of the oven.
j Slide the oven into the cabinet cutout, using the
oven cavity opening as an area to grip. Push the
oven 3/4 way into the cabinet.
k Make sure the CAT5 cable can drop straight down
between back of the oven and rear of the cabinet
without any obstruction.
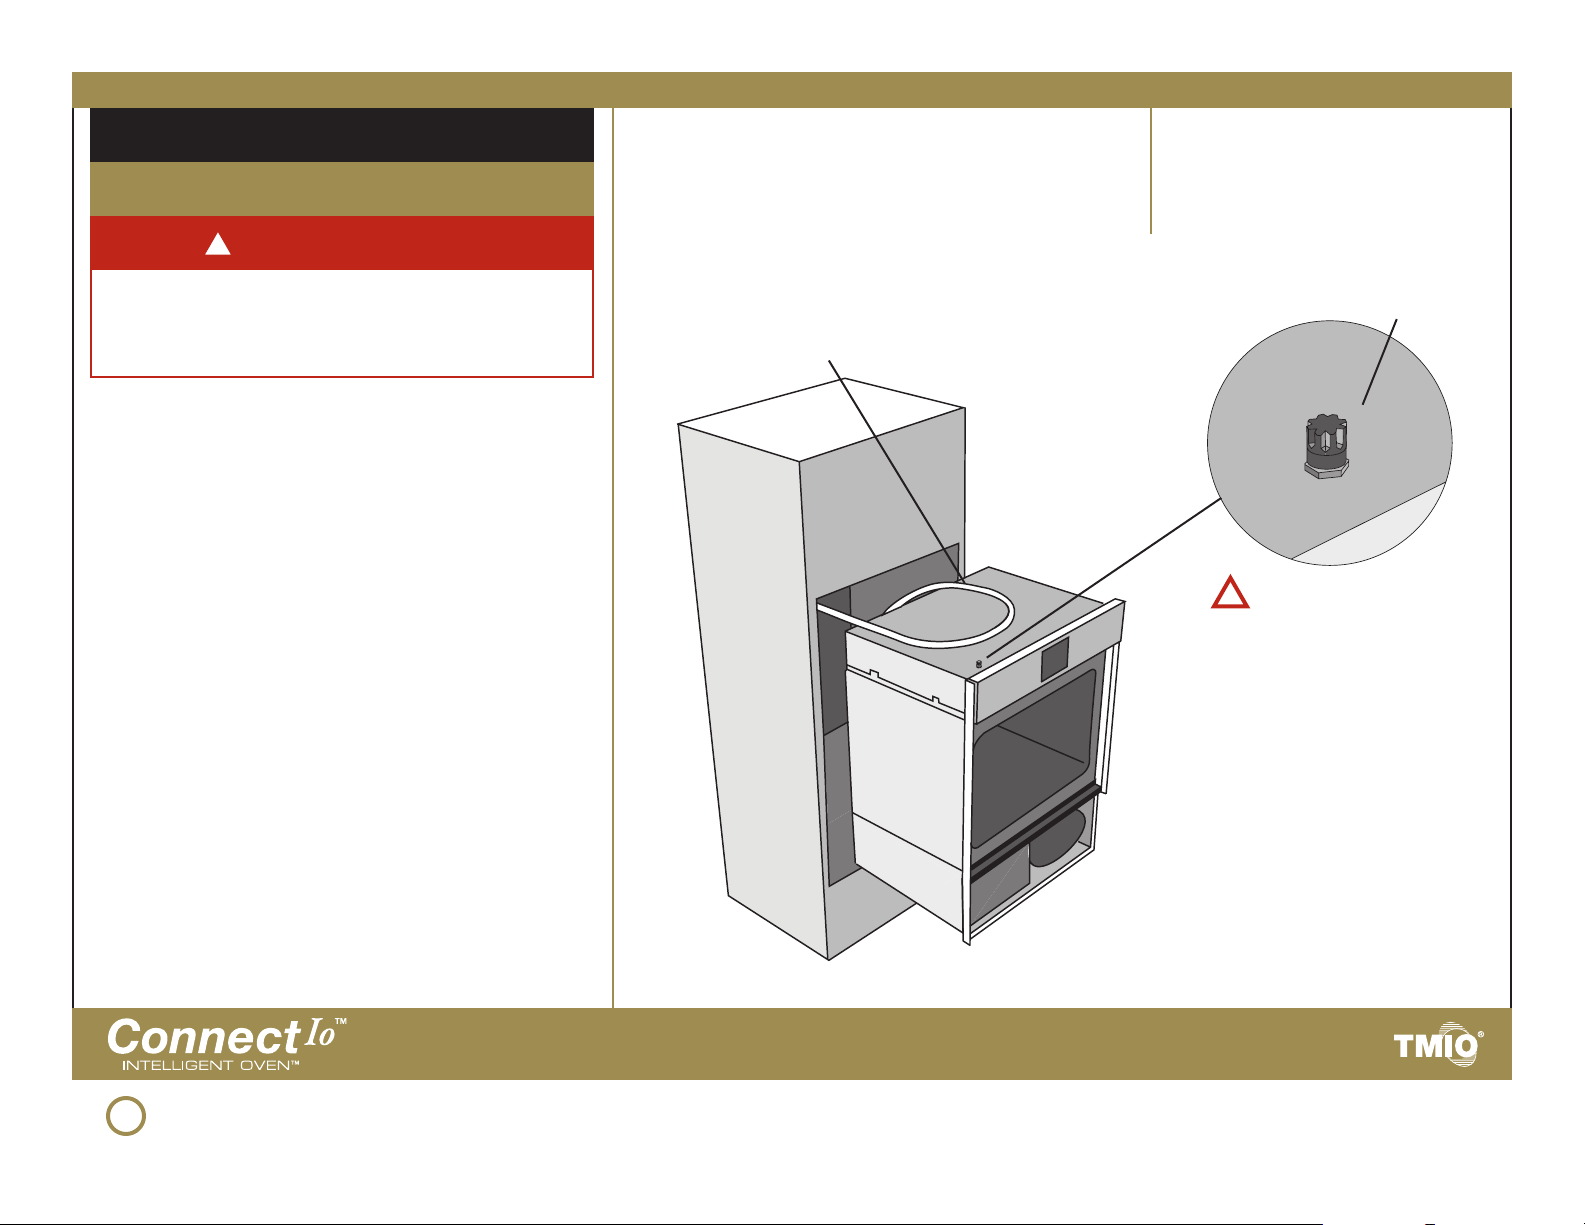
l Make sure the electrical supply cable is routed
on top of the oven as shown in the drawing (right). A
string may be useful to secure the cable to the top of
the oven while sliding the oven forward into cabinet.
m Push the oven completely into the cabinet and
center the oven in the cabinet cutout.
o IMPORTANT: Securely fasten the oven to the cabinet
using the four (qty. 4) Phillips cabinet mounting screws
provided. Insert the Phillips screws through holes in the
oven vertical side trim. Do not over-tighten screws.
When sliding the oven into the cabinet, make
sure to place the power cable on top of the
oven for a correct fit into the cabinet rear.
Fuse Holder for
120v convenience outlet
CAUTION: Use care not to
!
damage when sliding unit
into cabinet.
Fuse Replacement:
Replace with only
15 amp / 250 vac fuse
Littelfuse Part # 314 015p
This fuse can be obtained
by calling TMIO Customer
Service.
n If the oven does not sit flush with the front of the
cabinet, make certain the electrical supply cable or
CAT5 cable is not jammed behind the oven.
11
Designed and manufactured in the USA with pride by TMIO, LLC • Chattanooga, TN • US toll-free +1.800.881.TMIO (8646) • www.tmio.com
Connect IoTM, Intelligent OvenTM, Intelligent OvensTM, Green CleanTM, and TMIO® are registered trademarks of TMIO, LLC.
Page 12

12
Designed and manufactured in the USA with pride by TMIO, LLC • Chattanooga, TN • US toll-free +1.800.881.TMIO (8646) • www.tmio.com
Connect IoTM, Intelligent OvenTM, Intelligent OvensTM, Green CleanTM, and TMIO® are registered trademarks of TMIO, LLC.
Page 13
INSTALLATION STEPS
STEP 8. Final Checklist
j Make sure the oven is level, and securely fitted/
attached to the oven cabinetry.
k Reinstall oven door. See “Door Attachment”.
l Make sure to remove all internal packaging from the
oven cavity, and replace the oven racks.
m Make sure all oven vents and openings, including the
refrigeration panel, are clear and free of any obstruction.
n Some stainless steel parts will have a protective
plastic wrap. Peel off this plastic wrap. Remove all blue
plastic tape.
i
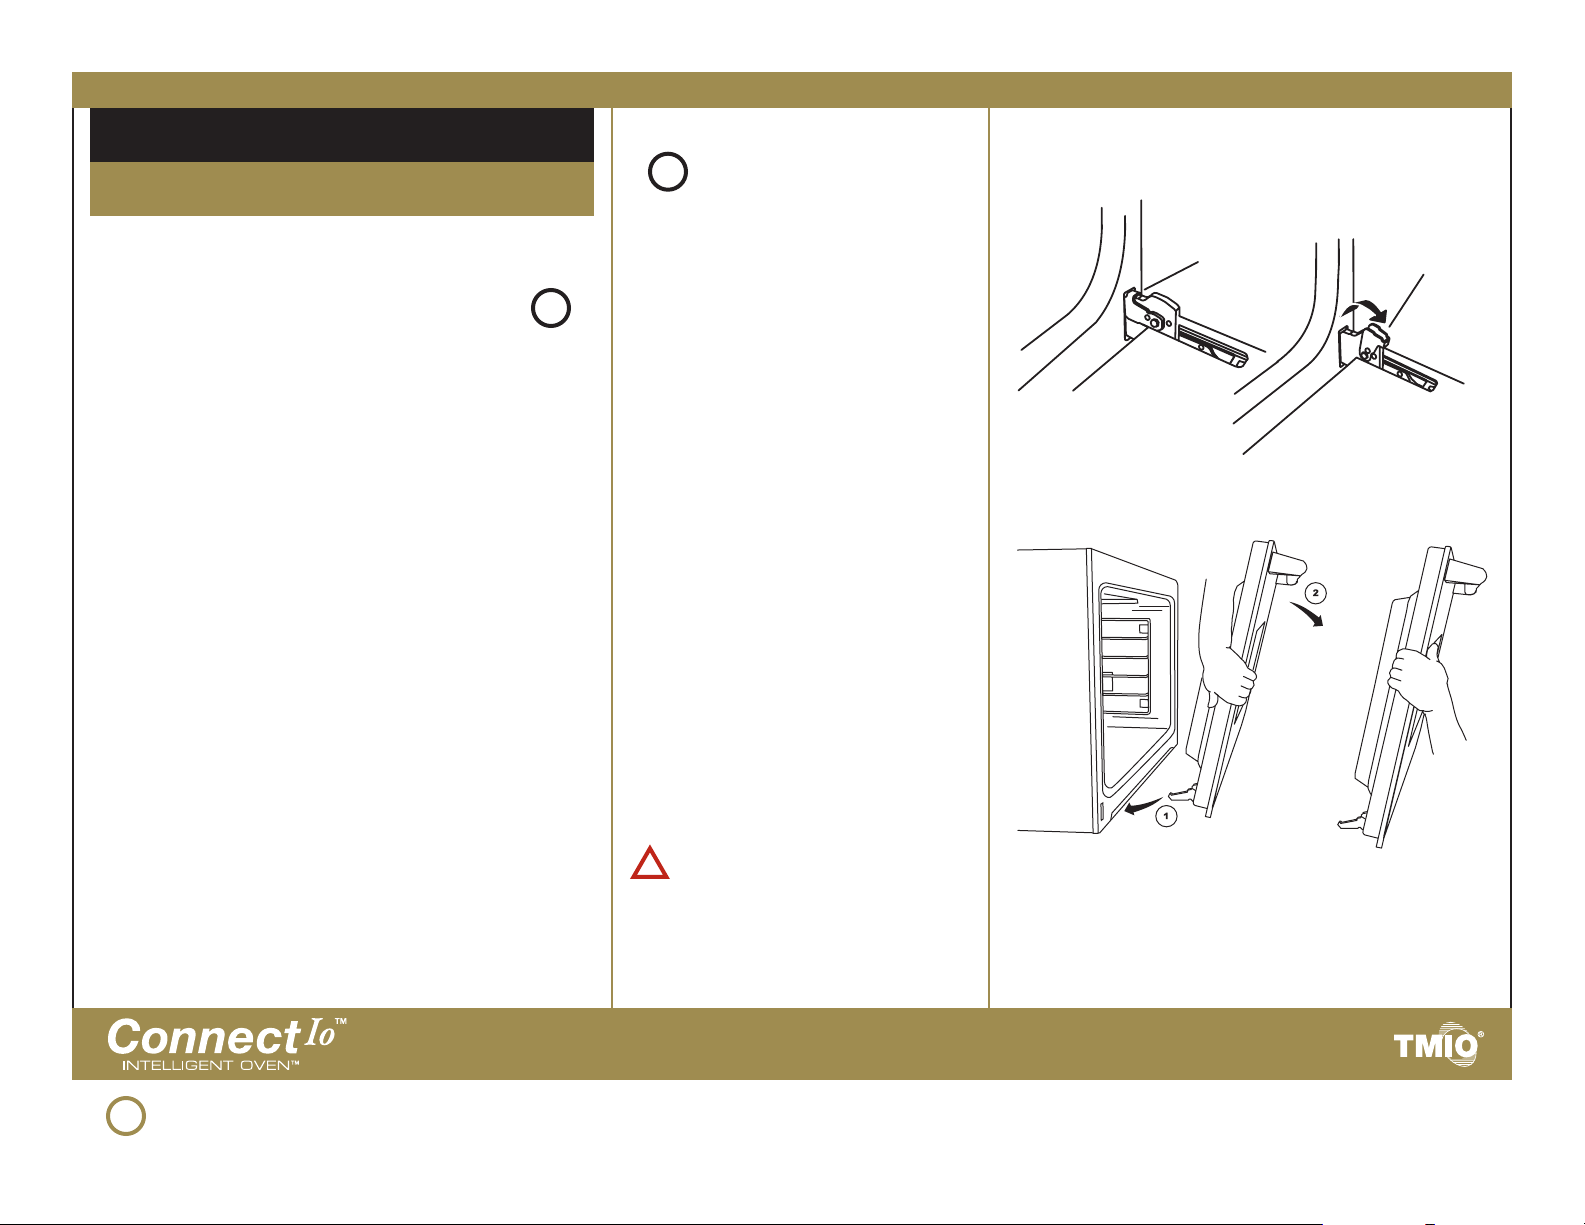
DOOR ATTACHMENT:
i
• Place both hinge arms back in the
slots of the hinge receiver.
• Push the hinge arms in as far as they
will go until the bottom of the door
meets the frame of the oven. When
inserted properly, the hooks on the
hinge arms will automatically lock onto
the hinge receiver. When the hinge
arms are securely inserted and locked
into the hinge receiver, you will not be
able to pull the door out towards you.
• Lower the door gently.
Door hinge
in locked
position
Door hinge
in unlocked
position
o Turn ON the power to the oven at the electrical box.
p Refer to Step 4, Network Connections (page 10, steps
2 – 7) to test and verify your Network Connections.
13
• Rotate the catches back away from
you until the catches rest squarely
against the oven frame.
• The door can now be closed.
• If door appears tilted, it is not inserted
properly into the hinge receivers.
Remove the door and repeat Door
Attachment steps until door is correctly
aligned, and securely fastened.
• Repeat for the second oven door.
WARNING! Misuse of oven door
!
(e.g. stepping, sitting, or leaning
on them) can result in possible
hazards and/or injuries.
Designed and manufactured in the USA with pride by TMIO, LLC • Chattanooga, TN • US toll-free +1.800.881.TMIO (8646) • www.tmio.com
Connect IoTM, Intelligent OvenTM, Intelligent OvensTM, Green CleanTM, and TMIO® are registered trademarks of TMIO, LLC.
Hand grip position
for lower door
Hand grip position
for upper door
Page 14
CLEANING YOUR OVEN
Cleaning Tips & Precautions
OVEN INTERIOR
3
Wash the interior of the Connect Io oven
thoroughly with hot, soapy water to remove film
residues and any installation dust or debris before
use for food preparation. Follow this washing
procedure by rinsing and wiping dry. Solutions
stronger than soap and water are rarely needed.
STAINLESS STEEL SURFACES
3
Wipe clean stainless steel surfaces using a
cleaner intended specifically for stainless steel.
TMIO recommends using the Cerama Bryte®
stainless steel cleaning polish and conditioner for
your Connect Io stainless steel components.
Do NOT use a metal knife, spatula, or any other
metal tool to scrape encrusted material on
stainless steel! Scratches are almost impossible
to remove.
Do NOT use steel wool, abrasive cloths, nonstainless steel cleaners, or powdered cleansers on
stainless steel to remove debris.
MORE INFORMATION
Other Tips & References
Keep the Connect Io Installation Manual in a
convenient location near the Connect Io Intelligent
Oven for easy reference.
Please also read the Connect Io Use & Care Manual
before operating the Connect Io Intelligent Oven. This
manual is also included with your purchase.
CUSTOMER SERVICE
Contact TMIO
For more information, help with installation or operation of
your Connect Io Intelligent Oven, please contact TMIO at:
TMIO Customer Service
+1.800.881.TMIO (8646)
[email protected]
www.tmio.com
1220A Flynn St.
Chattanooga, TN 37403 USA
When contacting TMIO Customer Service, please have
ready: (1) product model number and (2) product serial
number—for faster service. Both numbers are found on the
model/serial rating plate on the oven front frame, behind the
louvered refrigeration panel. Write them down in the spaces
provided below for easy reference:
REPLACEMENT PARTS:
Only authorized replacement parts
may be used in performing service
on the Connect Io Intelligent Oven.
Do not repair or replace any part
of the appliance unless specifically
recommended in the Connect
Io Use & Care Manual. All other
servicing should be referred to a
qualified technician.
Please also visit www.tmio.com
for more detailed Connect Io
customer service information.
14
Model # Serial #
Designed and manufactured in the USA with pride by TMIO, LLC • Chattanooga, TN • US toll-free +1.800.881.TMIO (8646) • www.tmio.com
Connect IoTM, Intelligent OvenTM, Intelligent OvensTM, Green CleanTM, and TMIO® are registered trademarks of TMIO, LLC.
Page 15

Connect IoTM Intelligent Oven
TM
Model PS302SS00 Professional Series
Refrigerated, Internet Controlled
30” Electric Built-In Double Wall Oven
Installation Instructions
Part No. 101206
© 2007 TMIO, LLC • +1.800.881.TMIO (8646) • www.tmio.com • 1220A Flynn St. • Chattanooga, TN 37403 USA
 Loading...