

TMC Aquarium V2iLumenAir 900, V2iLumenAir 1200 Instructions For Installation And Use Manual

V
LumenAir 900/1200
2
i
V
2
900/1200
INSTRUCTIONS FOR INSTALLATION AND USE
Important Safety Information - Please Read Carefully
• Caution: Do not use any other power supply unit with the V2iLumenAir as the light unit may
not work and this may cause irreparable damage to the light unit. If the PSU supplied with the
unit needs to be replaced then please obtain an authentic V
Tropical Marine Centre’s local sto
• Always isolate the PSU from the mains electricity before installing or carrying out any maintenance.
• Caution: Do not operate this appliance if any part of it has a damaged cord or plug, is malfunctioning,
or has been dropped, immersed in water or damaged in any way. If the external cord of this unit is
damaged, it should be replaced by a cord exclusively available from the manufacturer or his service agent.
• This unit is designed to be used indoors and is not suitable for any outdoor applications.
• Caution: Ensure the light unit is securely installed above the tank before operating.
ckists.
2
iLumenAir PSU supplied by one of
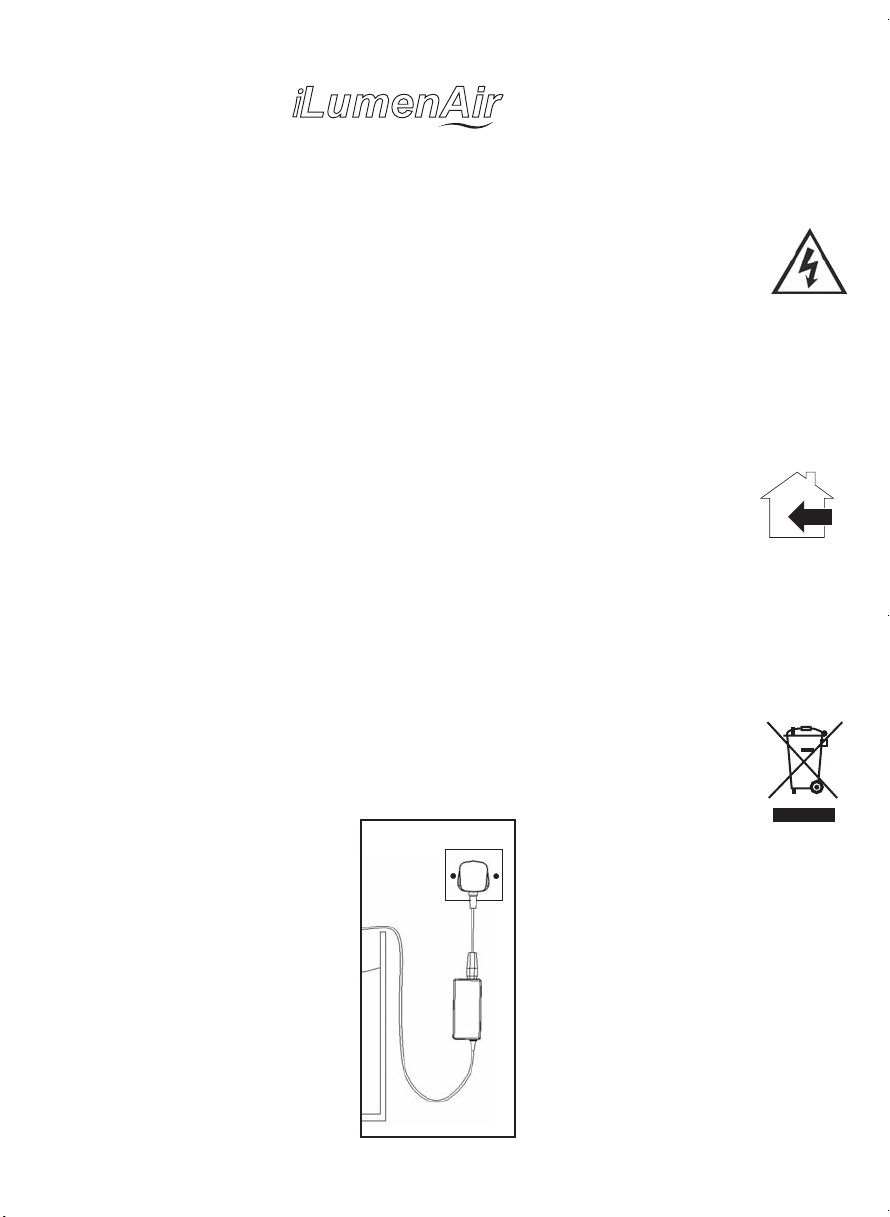
• Caution: Always leave a drip-loop in the DC supply cable to the V
water running down the cable and reaching the PSU (see picture below).
• Caution: Do not splash or submerge the lamp or power supply.
• Caution: Do not obstruct the cooling fans in any way.
• To prolong the li
debris.
• Dispose of this unit responsibly. Check with your local authority for disposal information.
of your lamp unit please ensure that it is kept free of dust, salt and other
fe
2
iLumenAir light unit to prevent
1

Product Specification
Model: V2iLumenAir 900
Size: 690 x 260 x 40mm
Suitable for tanks 730 -1200mm long
x 300 - 880mm wide
Input: 100-240V 50/60Hz
Total Power: 170W
Total Luminous Flux: 9000lm
Parts List
Please ensure that you have all parts shown below.
Product Specification
Model: V2iLumenAir 1200
Size: 812 x 260 x 40mm
Suitable for tanks 840 -1300mm long
x 300 - 880mm wide
Input: 100-240V 50/60Hz
Total Power: 215W
Total Luminous Flux: 10000lm
2
3
Wire suspension kit
(sold separately)
16
1
17
4
15
10
13
18
19
8
7
9
6
5
14
12
11
2

Installation
L
X
X = L + 25mm
The V2iLumenAir can be mounted via the tank mounting kit (supplied) or wire suspension kit
(V2iLumenAir 900 - sold separately).
2
a. Tank Mounting - V
iLumenAir 900 b. Tank Mounting V2iLumenAir 1200
3
1
2
1
10
1
2
2
13
3
4
5
4
3
4
6
7
19
18
5
7
6
3
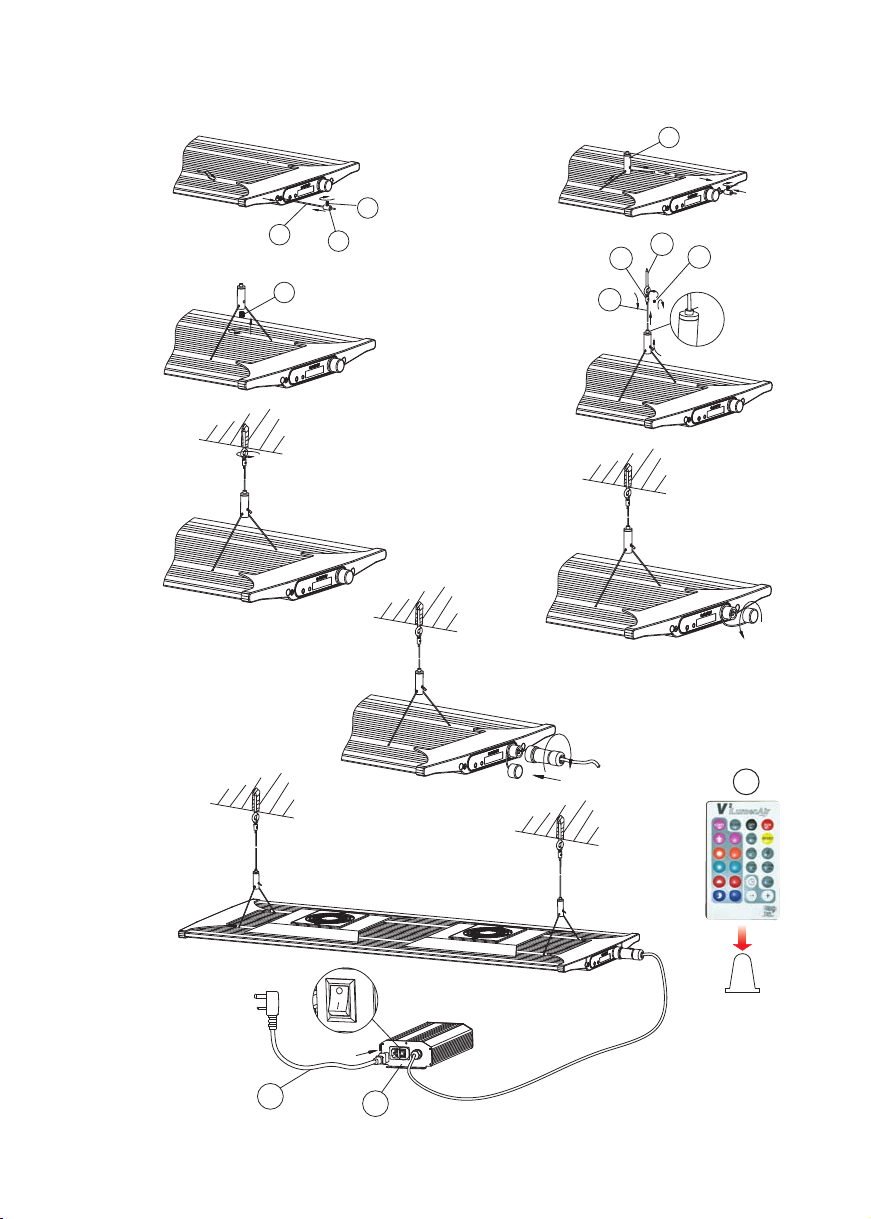
c. Wire Suspension
16
12
8
11
14
12
11
9
17
Press
15
19
Remove the
clear plastic tab
from the remote
control
18
4
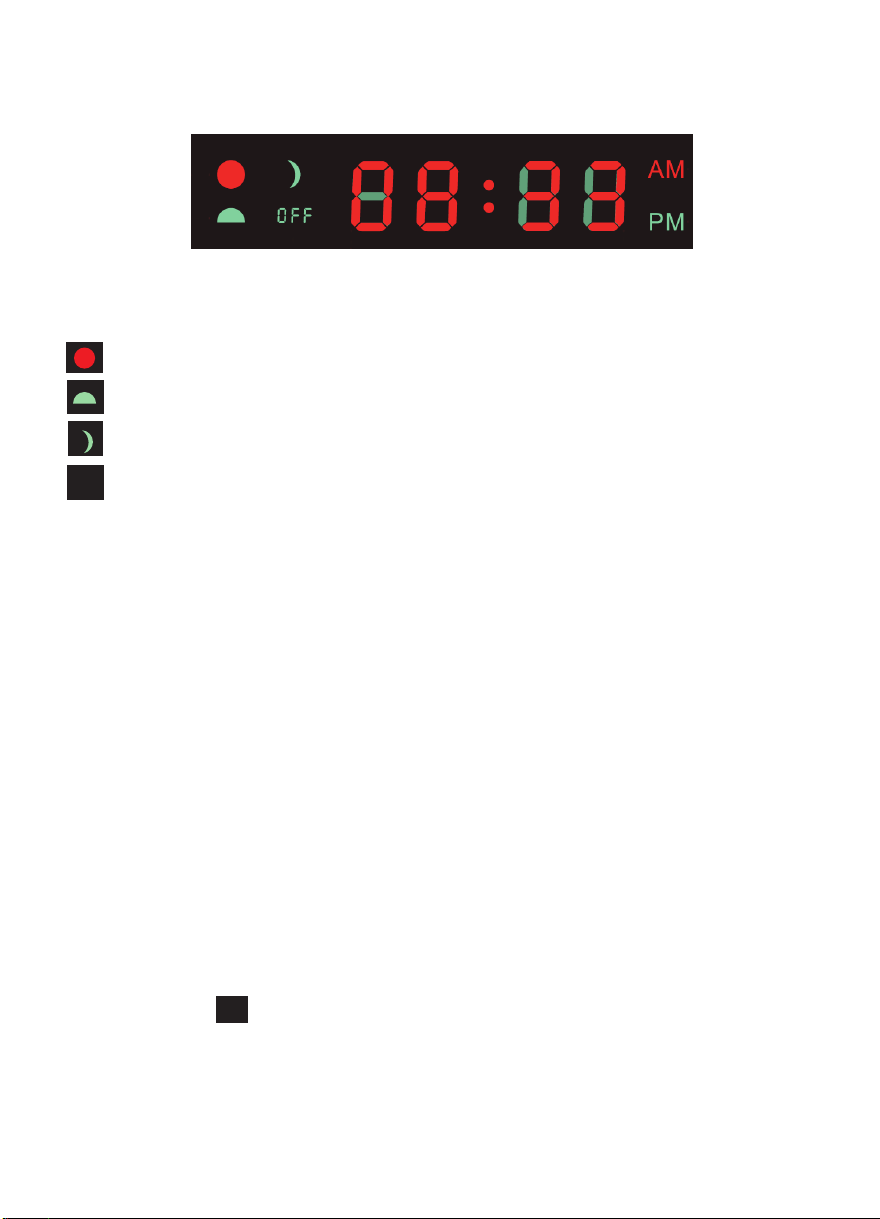
Display Screen
shows when in daytime phase
shows when in sunrise or sunset phase
shows when in dawn or moonlight phase
shows when the light is off
OFF
• In run mode the display shows the time in either 24 or 12 hour clock format.
• When setting the phases the first digit represents the time period you are setting:1 indicates dawn
2 indicates sunrise
3 indicates daytime
4 indicates sunset
5 indicates moonlight.
The letter represents which LED channel you are setting:-
•
A is the white channel
b is the blue channel
C is the colour mix
• The last two digits indicate the brightness level of the channel from ‘00’ to ‘32’.
• In storm mode the display indicates the frequency of lightning strikes from ‘1’ to ‘8’.
• In colour demo mode the display indicates the frequency of colour variation from ‘Co01’ to ‘Co12’.
• If the display shows that means that this fixture is a slave to another control unit.
In
5

Operating Instructions
RUN
RUN
OFF
RUN
COLOUR
DEMO
OC/O
F/
W
SLAVE
RUN
24/12
Quick start
1. Ensure the clear plastic battery protection tab is removed from the bottom of the remote control
(see page 4).
2. To use the remote control, point it at the infrared sensor at the cable entry to the light unit.
3. Press to set the clock. Press once to adjust the hour and twice to adjust the minute.
Use and to adjust u
p or down.
The time setting will be automatically saved after ten seconds, or you can press to go back to
your user set program with the updated time.
4. Press to choose between 24 hour and 12 hour clock format.
5. Press to run the set program (details of the factory set program on page 8).
6. Press to switch the light off.
7. Press to enter storm mo
de. Use and to change the frequency of lightning strikes.
Press to return to the set program.
8. Press to enter a colour demo. Use and to change the speed of the transitions.
In the slowest settings this can be used to simulate clouds passing over. Press to return to the
set program.
9. Press repeatedly to cycle the display through, sh
owing the temperature of the light unit in °C
and °F and the electrical power being drawn by the light unit in Watts.
10. Press to slave the unit from another controller (sold separately).
6
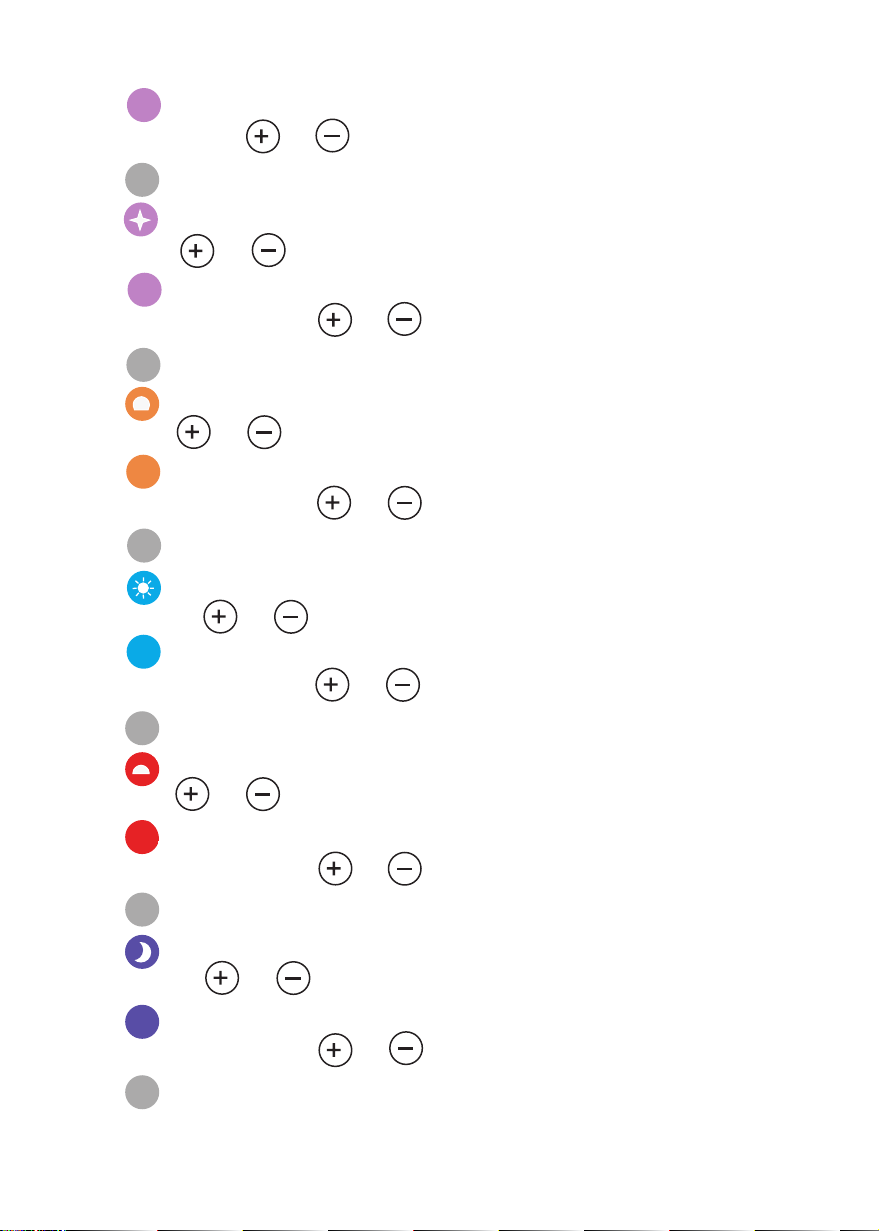
Programming
START
SAVE
SAVE
SAVE
SAVE
SAVE
SAVE
1. Press to set the start time for your photoperiod. Press once to adjust the hour and twice to
adjust the minute. Use and to adjust up or down.
2. Press to save your settings.
3. Press to set the dawn phase duration. Press once to adjust the hours and twice to adjust the
minutes. Use and to adjust up or down.
re
4. Press
brightness of each channel using and to create your preferred dawn effect.
5. Press to save your settings.
6. Press to set the sunrise phase duration. Press once to adjust the hours and twice to adjust the
minutes. Use and to adjust up or down.
7. Press
brightness of each channel using and to create your preferred sunrise effect.
8. Press to save your settings.
9. Press to set the daytime phase duration. Press once to adjust the hours and twice to adjust
the minutes. Use and to adjust up or down.
peatedly to choose between the white, blue and colour mixing channel. Adjust the
re
peatedly to choose between the white, blue and colour mixing channel. Adjust the
re
10. Press
peatedly to choose between the white, blue and colour mixing channel. Adjust the
brightness of each channel using and to create your preferred daytime effect.
11. Press to save your settings.
12. Press to set the sunset phase duration. Press once to adjust the hours and twice to adjust the
minutes. Use and to adjust up or down.
13. Press
re
peatedly to choose between the white, blue and colour mixing channel. Adjust the
brightness of each channel using and to create your preferred sunset effect.
14. Press to save your settings.
15. Press to set the moonlight phase duration. Press once to adjust the hours and twice to adjust
the minutes. Use and to adjust up or down.
16. Pre
ss re
peatedly to choose between the white, blue and colour mixing channel. Adjust the
brightness of each channel using and to create your preferred moonlight effect.
17. Press to save your settings.
7

Once you have set your program, you can see a demo of your settings by pressing . This will run
OC/O
F/
W
RESET
CYCLE
DEMO
C
START
1A 01
05
28
10
10
2A 10
3A 28
4A 15
5A 02
through the 24 hour photoperiod in just over 2 minutes (1 second = 10 minutes of the cycle.
NOTE: If the total number of hours in your photoperiod is less than 24 hours then the light will turn off
after the moonlight phase and will come on again at the start time. If the total is more than 24 hours then
the part over 24 hours will be overridden by the dawn at the set start time.
Daylight Recommendations
The suggestions below are for guidance purposes only. Corals can be kept in deeper aquariums. Please
note that it is up to you to ensure that your corals receive the correct amount of light. Refer to your
local fish store if you are unsure.
Small Polyp Stony Coral
All channels 100% (32) for 60cm+ de
All channels 90% (29) for 45cm deep tanks
All channels 75% (24) for 30cm deep tanks
Large Polyp Stony Coral
All channels 75% (24) for 60cm deep tanks
All channels 65% (20) for 45cm deep tanks
All channels 55% (17) for 30cm deep tanks
Soft Coral
All channels 65% (20) for 60cm deep tanks
All channels 55% (17) for 45cm deep tanks
All channels 45% (14) for 30cm deep tanks
ep tanks
Factory Settings
To reset to the factory settings press then
Functions Buttons Start Time/ Set Brightness
Light Start time 05:00 -- -
Dawn duration & colour 02:00
Sunrise duration & colour 01:00
Daytime duration & colour 10:00
Sunset duration & colour 02:00
Moonlight duration & colour 03:00
Duration
(start time)
8
White Blue Colour Mix
1b 01
2b
3b
4b
5b
1C 01
2C 28
3C 28
4C 30
5C 02

Over Temperature Protection
OFF
RUN
RUN
RUN
RUN
COLOUR
DEMO
OFF
OFF
The smart fans will start to work when the lights are on full, or the temperature of the light is over 38°C
(100°F) and will stop when it cools to around 34°C (93°F). If the unit gets too hot, at around 60°C
(140°F), the light will shut down and the display will show
Err
Blue LED Trim Operation
To control the blue LED trim, point the remote control at the infrared sensor on the light unit at the
opposite end from the cable entry.
Press and to change the brightness of the blue LED trim up and down.
Press to turn it off and to turn it back on again.
If you press the trim will automatically dim and brighten to create a pulsing effect.
Troubleshooting
The light does not work
1. Check that it is connected to the power. If not, connect it.
Check if the light is in slave mode or off (display showing or ). If so press to return to run mode.
2.
3
. Check if the brightness is set to ‘0’. Press or or or or to adjust the brightness level.
4. Check that the light is not supposed to be off according to your set program. Refer to page 7 to adjust
the program.
In
The light is always on
eck if
1. Ch
the total photoperiod is over 24 hours in duration. Refer to page 7 to adjust the program.
2. Check the time is set correctly. Press and or to set the time.
The screen displays
Err
1. Check if the top of the unit and fans are blocked or covered. If they are, remove dust/debris to ensure
good air flow.
2. Check if the fans are operating. If not then refer to Tropical Marine
Ce
ntre or your local dealer for
replacement fans.
The remote control does not work
1. Check if the light is in slave mode or off (display showing or ). If so press to return to run mode.
In
2. Check that the remote control is pointing to the correct infrared sensor on the light unit for the
operation you are trying to perform. Refer to page 6.
be re
3. Check the battery. This can easily
placed with a CR2025 coin cell.
The light is flashing
1. Ensure that the light isn’t in storm or demo mode. Press to return to run mode.
9

Tropical Marine Centre,
Solesbridge Lane,
Chorleywood,
Hertfordshire,WD3 5SX, UK
Technical Information Lines
Tel: +44 (0) 1923 284151 Fax: +44 (0) 1923 285840
Open between
9am - 5pm Monday to Thursday/9am - 12pm Friday.
www.tropicalmarinecentre.co.uk tmc@tropicalmarinecentre.co.uk
v.2/2014
 Loading...