

Page 1

ProPlex IQ Two 66 2x
USER MANUAL
TMB 24/7 Technical Support
US/Canada: +1 818.794.1286
Toll Free: 1 877.862.3833 (877.TMB.DUDE)
UK: +44 (0)20.8574.9739
Toll Free: 0800.652.5418
e-mail: techsupport@tmb.com
Page 2

Specifications
Power
100-240 VAC 50-60 Hz
Power Consumption
10.2 A
Fuse
1.0A 250V
Ethernet Ports
2
DMX P orts
6
DMX Connectors
Neutrik XLR5 Female (NC5FAV)
DMX Port Isolation
Optical, up to 1000V
Ethernet Connectors
Neutrik EtherCon RJ45
Ethernet Type
1 Gbps
Network Protocols
ArtNet, sACN (E1.31)
Cooling
Convection
Operating Temperature
-20º to +40º C
Width
8.15 in / 206.9 mm
Depth
10.72 in / 272.3 mm
Height
5.33 in / 135.4 mm
Weight
9.03 lbs. / 4.1 kg
Dimensions
– inches [mm]
Page 3

Overview
NOTE: Ethernet port 1 supports PoE Input
Page 4

LED status information
Configuration
ProPlex IQ Two can be configured locally on the unit by using the
keypad or remotely through the Ethernet port by accessing the
built-in web page with a web browser or with the ProPlex Software.
Access Main menu functions using the navig ati on pad next to the
LCD display.
While in home screen:
Press any of directional buttons to activate selection window
marked green and choose CONFIG menu or any of six ports for
configuration.
Page 5

Menu Tree
At the bottom of the home screen are located two indicators. ETH1 and
ETH2 indicates status of the two Ethernet ports located at the back of
the unit.
RED: None of the ports are connected and active.
GREY: Port is inactive
GREEN: Port is connected and active (1Gbps)
ORANGE: Port is connected and active (10/100 Mbps)
Page 6
Port Setup
Press any of the directional buttons on the home screen to activate
selection window marked green.
Press <SELECT> to access the desired menu.
Use <UP> and <DOWN> buttons to scroll through the menus.
<LEFT> menu button can be used as secondary <BACK> button and
<RIGHT> button can be used for navigation or as a secondary <SELECT>
button.
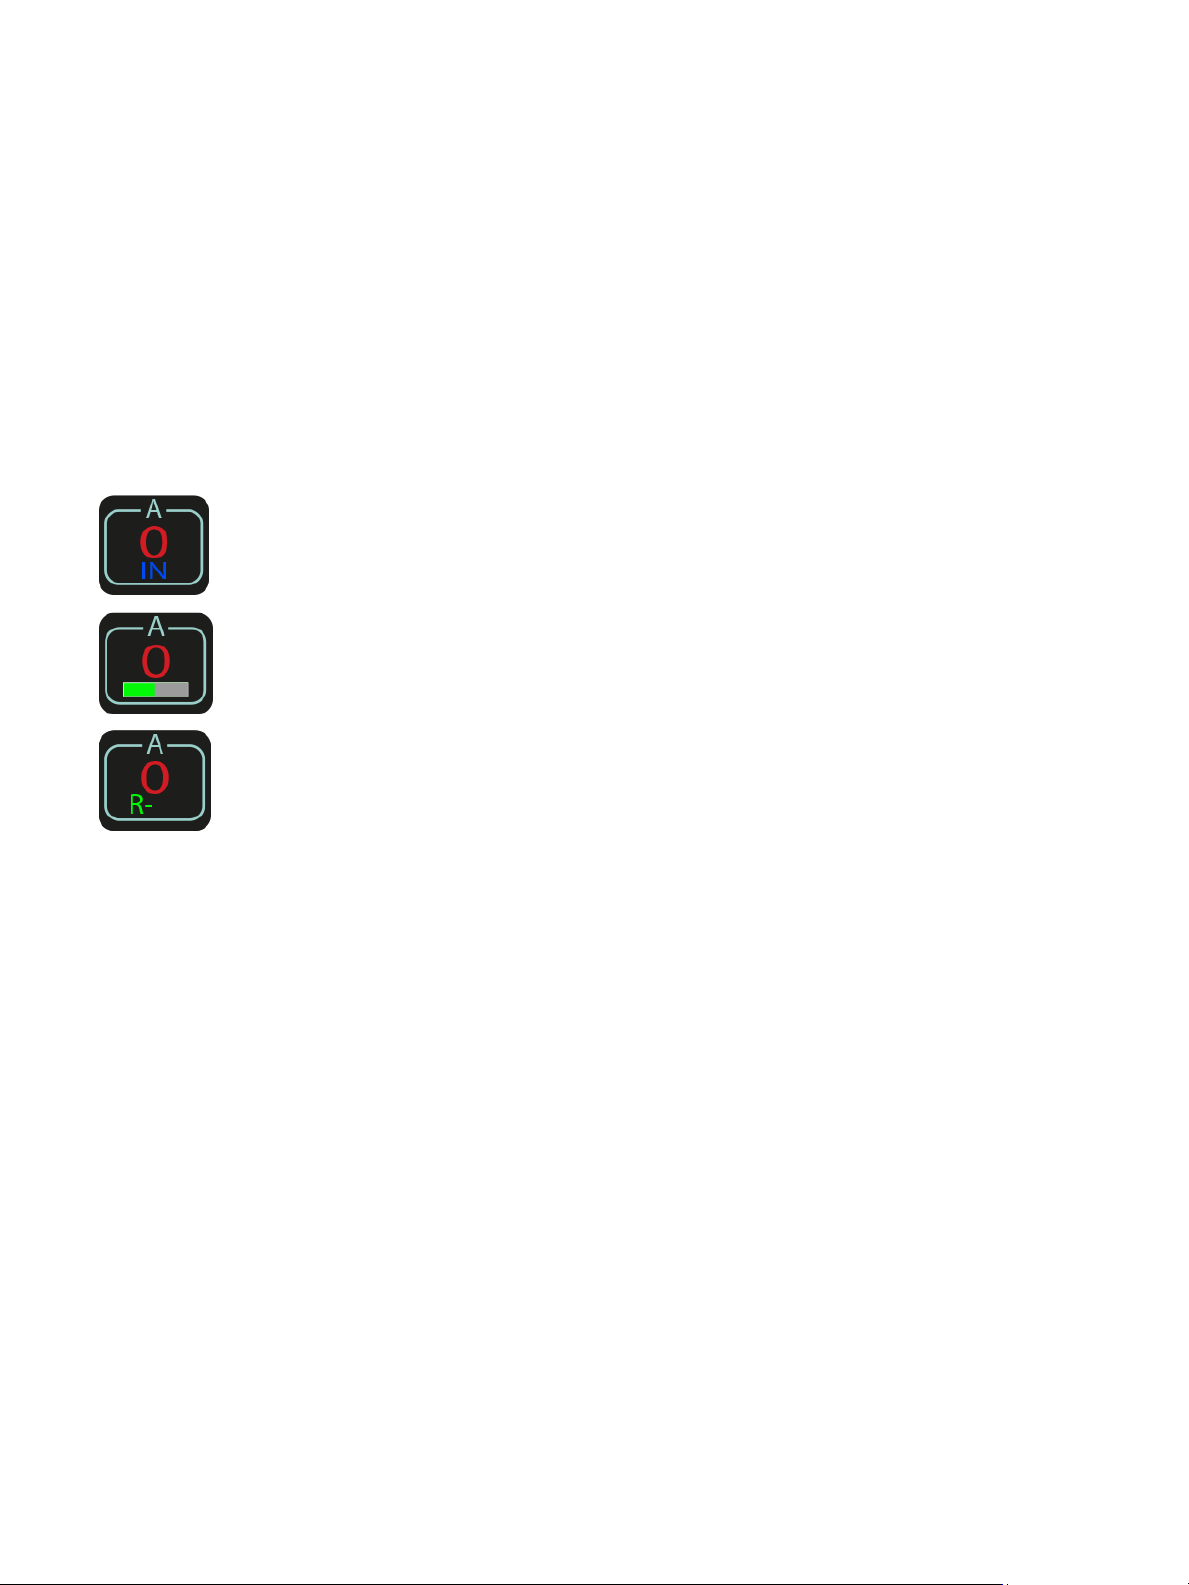
IN: Port is configured as DMX Input
Green bar indicates the amount of data being received
R -: RDM function has been enabled
Universe Set
Press <SELECT> or <RIGHT> to enter the Port subm enu or <LEFT> to return
to the home screen. Select any of six ports to set the desired values.
Press <SELECT> button to access the Universe submenu.
Press <UP> or <DOWN> to set the universe.
Press <LEFT> or <RIGHT> to decline or confirm, <SELECT> to accept.
Page 7

Direction
Press <SELECT> to access the DMX Direction sub men u.
Press <UP> or <DOWN> to assign the port dire cti on (OUT/ IN) for each DMX port.
Press <SELECT> or <RIGHT> to accept, <LEFT> to decline changes.
RDM
Press <SELECT> to access the RDM submenu.
Press <UP> or <DOWN> to enable or disable RDM function.
Press <SELECT> or <RIGHT> to accept, <LEFT> to decline changes.
Priority
Press <SELECT> to access the Priority submenu.
Press <UP> or <DOWN> to set desired priority number (0-200).
Press <LEFT> or <RIGHT> to decline or confirm, <SELECT> to accept.
When signal is lost for the highest priority port, the DMX signal will be taken from the port that has the next
highest priority.
Page 8

Protocol Setup
While in home screen, press any of directional buttons to activate selection window.
Navigate selection window to CONFIG and press <SELECT> to access CONFIG submenu.
Press <SELECT> or <RIGHT> to enter the Protocol Setup submenu or <LEFT> to return to the home
screen.
Protocol
Press <DOWN> or <UP> to choose between ArtNet or sACN lightning
protocols.
Press <SELECT> or <RIGHT> to set or <LEFT> to decline.
Press <LEFT> to return to the home screen.
Easy Priority
Source loss action
Press <DOWN> or <UP> to turn the Easy Priority ON or OFF.
Press <SELECT> or <RIGHT> to set or <LEFT> to decline.
Press <LEFT> to return to the home screen.
When two or more of the same universes are coming in to the node, the
console with the higher channel 512 value will have control over the universe, If
Easy Priority is turned ON.
Press <DOWN> or <UP> buttons to choose what happens if the source is lost.
Press <SELECT> or <RIGHT> to set or <LEFT> to decline.
Press <LEFT> to return to the home screen.
When the "Hold values" (DEFAULT) setting is chosen, after the source DMX is
lost, the ProPlex IQ Two 66 2X holds the last DMX values it has received and
continues to output these values until incoming DMX has been restored.
When the "Blackout" setting is chosen, after the source DMX is lost, all DMX
values will change to 0 and be held at this value until incoming DMX is
restored.
Page 9

Source loss timeout
Press <UP> or <DOWN> to set Source loss timeout (5-120s)
Press <LEFT> or <RIGHT> to decline or confirm, <SELECT> to accept.
This setting determines how long the IQ Two 2x will wait before using the
Source Loss setting. This time is set in seconds (5-120). Once the
source loss timeout time has been reached, the IQ Two will revert to the
Source Loss timeout setting.
.
DMX rate
Press <DOWN> or <UP> buttons to choose DMX refresh rate value.
Press <SELECT> or <RIGHT> to set or <LEFT> to decline.
Press <LEFT> to return to the home screen.
The DMX refresh rate setting controls how many times per second the device
outputs DMX over 5 -pin XLR connectors. Some DMX devices operate using
different refresh rate settings. For high-speed devices like LED walls and
displays, the “Adaptive” option can improve response time by matching the
incoming refresh rate of DMX coming from the source.
ArtNet Idle resend
Universe Format
Press <DOWN> or <UP> to choose ArtNet Idle respond time (0.5s-4.0s)
Press <SELECT> or <RIGHT> to set or <LEFT> to decline.
Press <LEFT> to return to the home screen.
This setting determines the time ArtNet will refresh the signal after idling. Select
0.5s, 1s, 2s, or 4s depending on the application. This only applies to ProPlex IQ
Two DMX connectors set to input mode. Some consoles may not resend a DMX
packet if there is the value is unchanged. ArtNet idle resend time ensures ArtNet
regenerates this unchanged value as some devices like media servers and
moving light need recurring DMX over ArtNet even if no change in values exist.
Press <DOWN> or <UP> to choose how Universe format for DMX ports will be
displayed at the home screen. Press <SELECT> or <RIGHT> to set or
<LEFT> to decline.
Press <LEFT> to return to the home screen.
Page 10

Network Setup
Press <SELECT> or <RIGHT> to enter the Network Setup submenu or <LEFT> to return to the home screen.
IP Address
Press <UP> or <DOWN> to change value for each highlighted window.
Press <LEFT> or <RIGHT> to navigate selection window.
Press <DOWN> and then <LEFT> or <RIGHT> to decline or confirm,
<SELECT> to accept changes for the IP address.
Mask
Easy IP
Press <UP> or <DOWN> to change value for each highlighted window.
Press <LEFT> or <RIGHT> to navigate selection window.
Press <DOWN> and then <LEFT> or <RIGHT> to decline or confirm,
<SELECT> to accept changes.
To change the assigned subnet mask, replace the current network subnet
mask with the desired network subnet mask.
NOTE: In case when Easy IP setting is ON you will not be able to change the
mask settings.
Press <DOWN> or <UP> to turn the Easy IP ON or OFF.
Press <SELECT> or <RIGHT> to set or <LEFT> to decline.
Press <LEFT> to return to the home screen.
This setting ensures that the software will search for all masks, not only for a
specified one. You will not be able to change the subnet mask, if the Easy IP
is on. This setting is useful for most networking situations where subnet
filtering is not required. The IQ Two will automatically find and output ArtNet
and sACN information regardless of IP or Subnet Mask settings. Turning of f
Easy IP is useful when using subnet filtering to help separate different areas of
a network when used in conjunction with a managed switch network. An
example of this would be multiple TV studios having independent networks all
attached to one console.
Page 11

Node Setup
Press <SELECT> or <RIGHT> to enter the Node Setup submenu or <LEFT> to return to the home screen.
Info
Info menu gives the information about the software version currently on the
device.
Press any button to return to NODE submenu.
LCD/LED Brightness
Press <DOWN> or <UP> to choose the brightness of LCD display and LED
state.
Press <SELECT> or <RIGHT> to set or <LEFT> to decline.
Press <LEFT> to return to the home screen.
Page 12

Universe Format
Press <DOWN> or <UP> to choose how Universe format for DMX ports will be
displayed at the home screen.
Press <SELECT> or <RIGHT> to set or <LEFT> to decline.
Press <LEFT> to return to the home screens.
Configuration
Press <SELECT> or <RIGHT> to enter the Configuration submenu or <LEFT> to return to the home screen.
User Configuration
Press <SELECT> or <RIGHT> to record user desired configuration settings.
It is possible to save two different configurations.
Press <SELECT> in order to record the current configuration.
Press <LEFT> to decline.
Page 13

By pressing Record, another window will pop up to confirm or decline
recording.
Navigate to decline by pressing <LEFT> or confirm by pressing <RIGHT>
Press <SELECT> to confirm or decline changes.
If the user chooses to record current settings, it will return user to previous
window. Recorded configuration is now visible as config 1.
Defaults
When recorded, user configuration can be:
• Overwritten
• Loaded
• Deleted
Press <DOWN> or <UP> buttons to choose default settings for
Output defaults (will reset all DMX port related settings)
Protocol defaults (will reset all protocol related settings (sACN/ ArtNet settings).
Reset all values to their default setting.
Press <SELECT> or <RIGHT> to set or <LEFT> to decline.
Press <LEFT> to return to the home screen.
Page 14

By pressing any of three default settings, another window will pop up to confirm or decline changes.
Navigate to decline by pressing <LEFT> and confirm by pressing <RIGHT>.
Installation
MOUNTING / RIGGING
Orientation – ProPlex Mini units may be mounted in any position, using the standard yoke. Always make sure
there is adequate room for ventilation.
Rigging – Always consult a certified rigging specialist before suspending any device overhead.
Use ProBurger® couplers or equivalent C- or O-type clamps for attaching to truss. After establishing the desired
position, tighten all appropriate bolts.
Always use safety cables!
When selecting installation location, consider routine
maintenance.
Never mount Mini enclosure where it will be expos ed t o
moisture, high humidity, extreme temperatures, or restricted
ventilation
RackMount Kit
ProPlex RackMount Kits are designed to allow easy rack mounting of ProPlex PortableMount un its.
ProPlex PortableMount enclosures include a yoke for truss mounting. Before attaching RackMount Kit, remove the
yoke by unscrewing four Phillips-head (crosshead) screws which attach the yoke to the chassis.
Important: Be sure to reinsert the yoke screws into the unit after yoke has been removed.
Page 15

ProPlex RackMount Kits are available for both Single- or Dual-unit mounting configurations. The 2U
Front of unit
Rack ear screws
Dual Joiners
(front and rear)
RackMount Kit Single is comprised of two rack ears, one long and one short. The Dual has two short rack
ears + two Dual Joiners for front and rear of the units.
To fasten the rack ears to the ProPlex PortableMount chassis, remove the three chassis screws on each side
that align with the rack ear mounting holes at the front of the chassis. Then use the same screws to securely
fasten the ears to the chassis, per below illustrations. The short and long ears can be mounted to either side
of the chassis.
(3x ea. side)
The drawing below depicts the 2U Large Single (top) and Dual (bottom) RackMount Kits. Note the Dual version requires TWO center Dual Joiners (included in the Kit), attached at the front and rear of the units, enhancing stability in the rack.
When ordering ProPlex RackMount Kit, Single or Dual, be sure and specify “Large” for the IQ Two 66 2x.
Important: Large Dual RackMount Kits are specified only for ProPlex PortableMount Devices (IQ 66 2x or
Opto-Splitter 2x8). Only Large Single RackMount Kits are specified for PortableMount ProPlex Drives
(FloppyDrive, IMS Universe Drive, and Mozart Drive).
Page 16

When installing multiple units, they can be mounted on alternating sides of the rack, side by side, or
Allow minimum ½ U
assemblies
underneath one another. When Mounting ProPlex IQ Two 66 2x, ensure adequate airflow when mounting
one above the other, whether in Single or Dual Mounting configurations.
rack space between
Limited Warranty
ProPlex Data Distribution Devices are warranted by TMB against defective materials or workmanship for a
period of two (2) years from the date of original sale by TMB.
TMB’s warranty shall be restricted to the repair or replacement of any part that proves to be defective and for
which a claim is submitted to TMB before the expiration of the applicable warranty periods.
This Limited Warranty is void if the defects of the Product are the result of:
• Opening the casing, repair, or adjustment by anyone other than TMB or persons specifically authorized
by TMB
• Accident, physical abuse, mishandling, or misapplication of the product.
• Damage due to lightning, earthquake, flood, terrorism, war, or act of God.
TMB will not assume responsibility for any labor expended, or materials used, to replace and/or repair the
Product without TMB’s prior written authorization. Any repair of the Product in the field, and any associated
labor charges, must be authorized in advance by TMB. Freight costs on warranty repairs are split 50/50:
Customer pays to ship defective product to TMB; TMB pays to ship repaired product, ground freight, back to
Customer.
This warranty does not cover consequential damages or costs of any kind.
A Return Merchandise Authorization (RMA) Number must be obtained from TMB prior to return of any
defective merchandise for warranty or non-warranty repair. For all repairs please contact TMB Tech Support
Repair using the contact information below or email TechSupportRepairNA@tmb.com.
US UK
527 Park Ave. 21 Armstrong Way
San Fernando, CA 91340 Southall, UB2 4SD England
Tel: +1 818.899.8818 Tel: +44 (0)20.8574.9700
Fax: +1 818.899.8813 Fax: +44 (0)20.8574.9701
tmb-info@tmb.com tmb-info@tmb.com
www.tmb.com www.tmb.com
Page 17

Return Procedure
Please send returned merchandise prepaid and in the original packing. Freight call tags will not be issued for
shipping the product to TMB, but TMB will pay the freight for return to the customer. Clearly label package
with a Return Merchandise Authorization Number (RMA #). Products returned without an RMA # will delay
service. Please contact TMB and request an RMA # prior to shipping the unit. Be prepared to provide the
model number, serial number, and a brief description of the cause for the return. Be sure to properly pack the
unit; any shipping damage resulting from inadequate packaging is the customer’s responsibility. TMB
reserves the right to use its own discretion to repair or replace product(s). Proper UPS packing or double
boxing will better ensure product integrity when shipped.
Note: If you are given an RMA #, please include the following information on a piece of paper inside
the box:
1) Your name
2) Your address
3) Your phone number
4) The RMA #
5) A brief description of the symptoms
 Loading...