

TMB ProPlex IQ ONE 4, ProPlex IQ ONE 8, ProPlex IQ ONE 8 Optical, ProPlex IQ ONE Mini User Manual
Page 1
IQ One RDM Capable Bidirectional
Ethernet-DMX Nodes
USER MANUAL
TMB 24/7 Technical Support
US/Canada: +1 818.794.1286
Toll Free: 1 877.862.3833 (877.TMB.DUDE)
UK: +44 (0)20.8574.9739
Toll Free: 0800.652.5418
e-mail:
techsupport@tmb.com
Page 2

ProPlex IQ One user manual version 1.6.8 122216
2
TABLE OF CONTENTS
1. BEFORE BEGINNING ........................................................................... ...... ....... .. ........ 3
Unpacking Instructions 3
Safety Instructions 3
Power Requirements 3
2. INTRODUCTION ......................................................................................................... 4
Description 4
IQ One RackMount Overview 4
IQ One Mini Overview 5
IQ One Optical RackMount Overview 5
3. SETUP ......................................................................................................................... 6
Fuse Replacement 6
Ethernet Connector 6
Fibre Optic Connector 6
Mounting/Rigging (Mini) 7
4. IQ CONFIGURATION ................................................................................................. 7
Configuration using bui lt-in web page 7
Configuration using control panel display 8
IQ Menu Tree 9
Network Setup 9
Protocol Setup 9
Routing Setup 10
Load Configuration 10
6. APPENDIX .................................................................................................................. 11
Remote Configuration/Monitoring 11
RDM Functionality 12
Basics of HTP Merging 12
Basics of Easy-Merge 12
Limited Warranty 12
Return Procedure 13
Technical Specifications 14
Page 3
ProPlex IQ One user manual version 1.6.8 122216
3
1. BEFORE BEGINNING
U
NPACKING INSTRUCTIONS
Upon receipt of the unit, carefully unpack the carton and check the contents to ensure that all parts are
present and in good condition. Notify the shipper immediately and retain packing material for inspection if
any parts appear to be damaged from shipping or if the carton itself shows signs of mishandling. Save the
carton and all packing materials. In the event that a unit must be returned to the factory, it is important that it
be returned in the original factory box and packing.
POWER REQUIREMENTS
Before powering the unit, make sure the line voltage is within the range of accepted voltages. This unit
accommodates 100-240VAC, 50/60Hz. All units must be powered directly from a switched circuit and cannot
be operated with a rheostat (variable resistor) or dimmer circuit, even if the rheostat or dimmer channel is
used solely for a 0-100% switch.
S
AFETY INSTRUCTIONS
• Keep this User Guide for future reference. If unit is sold to another user, make sure they also receive this
instruction booklet.
• Ensure the unit is connected to proper voltage, and that line voltage is not higher than that stated on the
device.
• Make sure there are no flammable materials close to the unit while operating.
• Always disconnect from the power source before servicing or fuse replacement. Always use the fuse
specified in this manual..
• Always use a safety cable when hanging unit overhead.
• Maximum ambient temperature (Ta) is 40°C (104°F). Do not operate unit at temperatures above this
rating.
• In the event of a serious operating problem, stop using the unit immediately. Repairs must be carried out
by trained, authorized personnel. Contact the nearest authorized technical assistance center. Only OEM
spare parts should be used.
• Do not connect the device to a dimmer pack.
• Make sure power cord is never crimped or damaged.
• Never disconnect power cord by pulling or tugging on the cord.
Caution! There are no user serviceable parts inside the unit. Do not open the housing or attempt any
repairs yourself. In the unlikely event your unit may require service, please contact your distributor.
Please read these instructions carefully. This user guide
contains important information about the installation, us age
and maintenance of this product.
Disconnect the power cord before replacing a
fuse and always replace with the appropriate
fuse.
Page 4
ProPlex IQ One user manual version 1.6.8 122216
4
2. INTRODUCTION
DESCRIPTION
ProPlex IQ One bid irec tio n al Ether net-DMX are available in both Rack Mount and Mini tour-ready enclosures.
RackMount models include the IQ One 4, IQ One 8, and IQ One 8 Optical and convert between Ethernet and
4 or 8 universes of DMX as well as bidirectional Art-Net /sACN to DMX via Neutrik OpticalCon. The IQ One
Mini 4-way converts between Ethernet and 4 universes of DMX in a compact, versatile Mini enclosure. Just a
few of the features include:
• Bidirectional merging and Ethernet protocol conversion of DMX data (sACN/ArtNet)
• Intuitive, simple web interface or front panel control of all basic functions
• All Neutrik
™
connectors: Locking PowerCon, EtherCon, XLR
• Fibre optic version with OpticalCon c on nec tor av ai lab le!
• Four or eight DMX universes
• ProPlex “Blue Box” rugged, tour-ready enclosures
• RackMount and Mini format with truss-mount yoke
• Shock-mounted circuitry
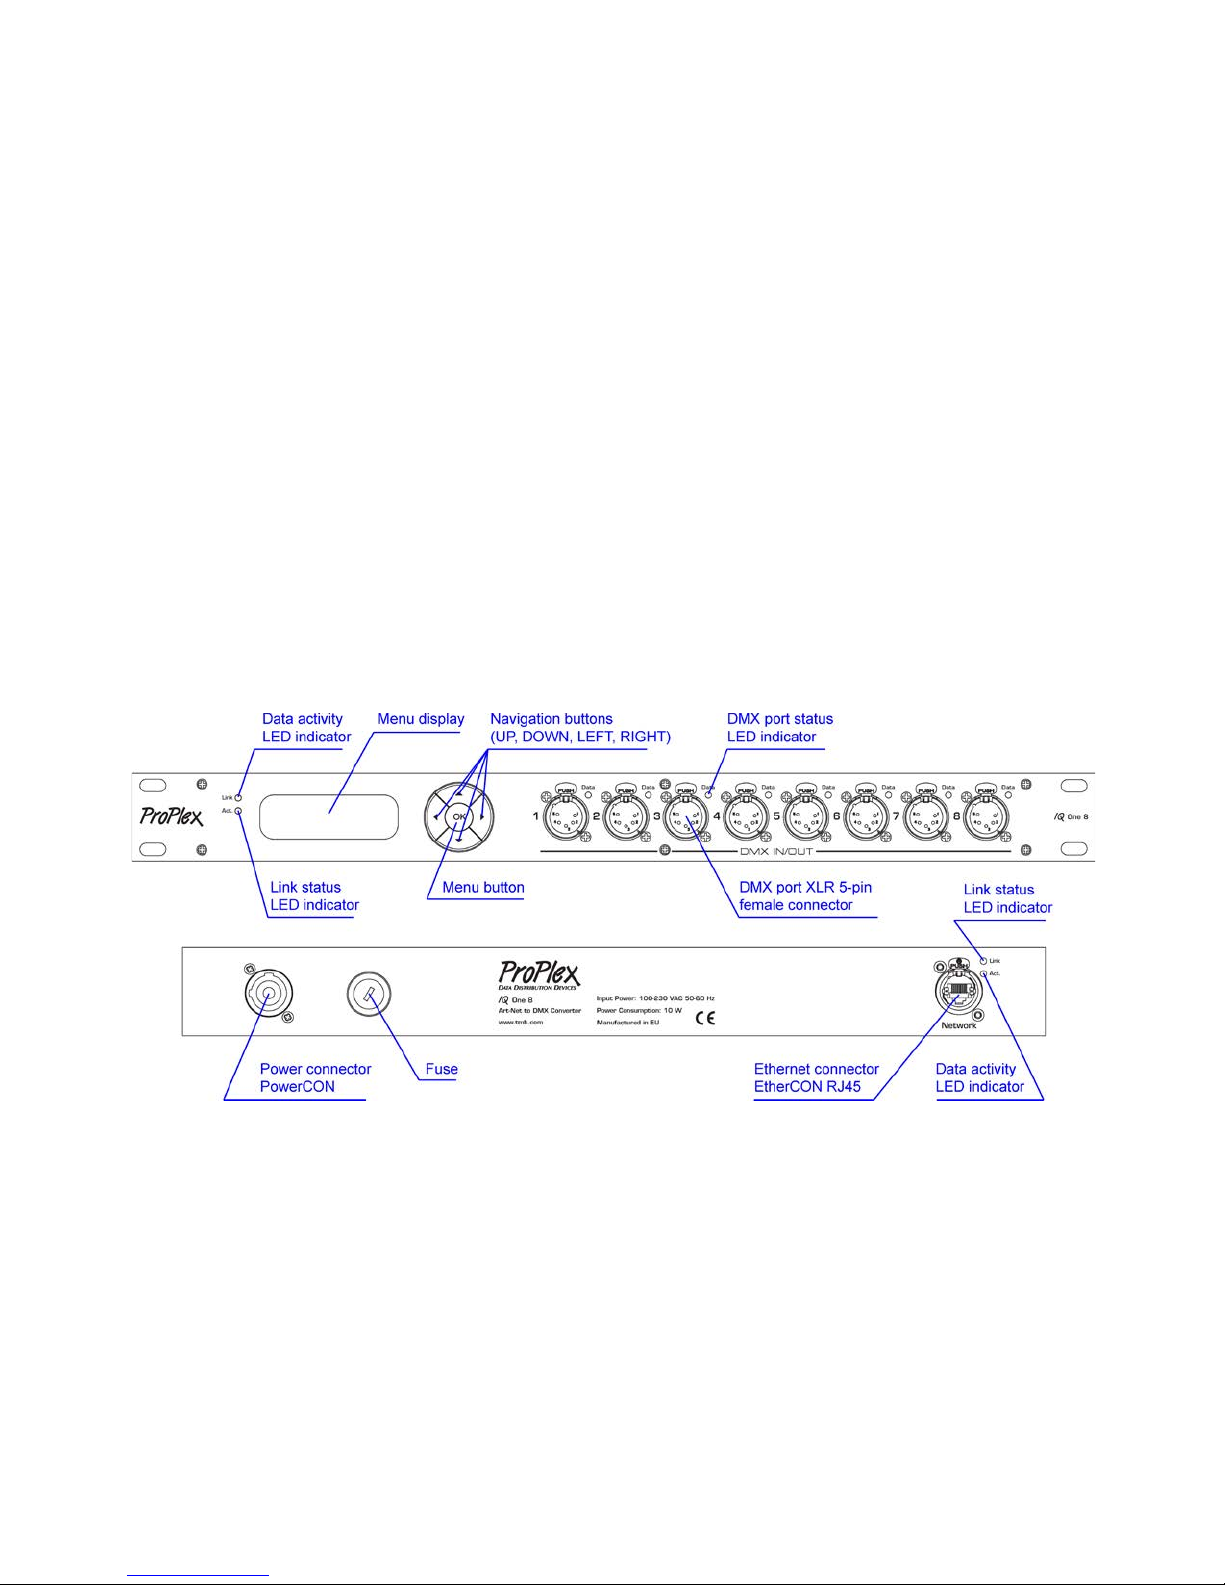
PROPLEX IQ ONE RACKMOUNT OVERVIEW
Page 5
ProPlex IQ One user manual version 1.6.8 122216
5
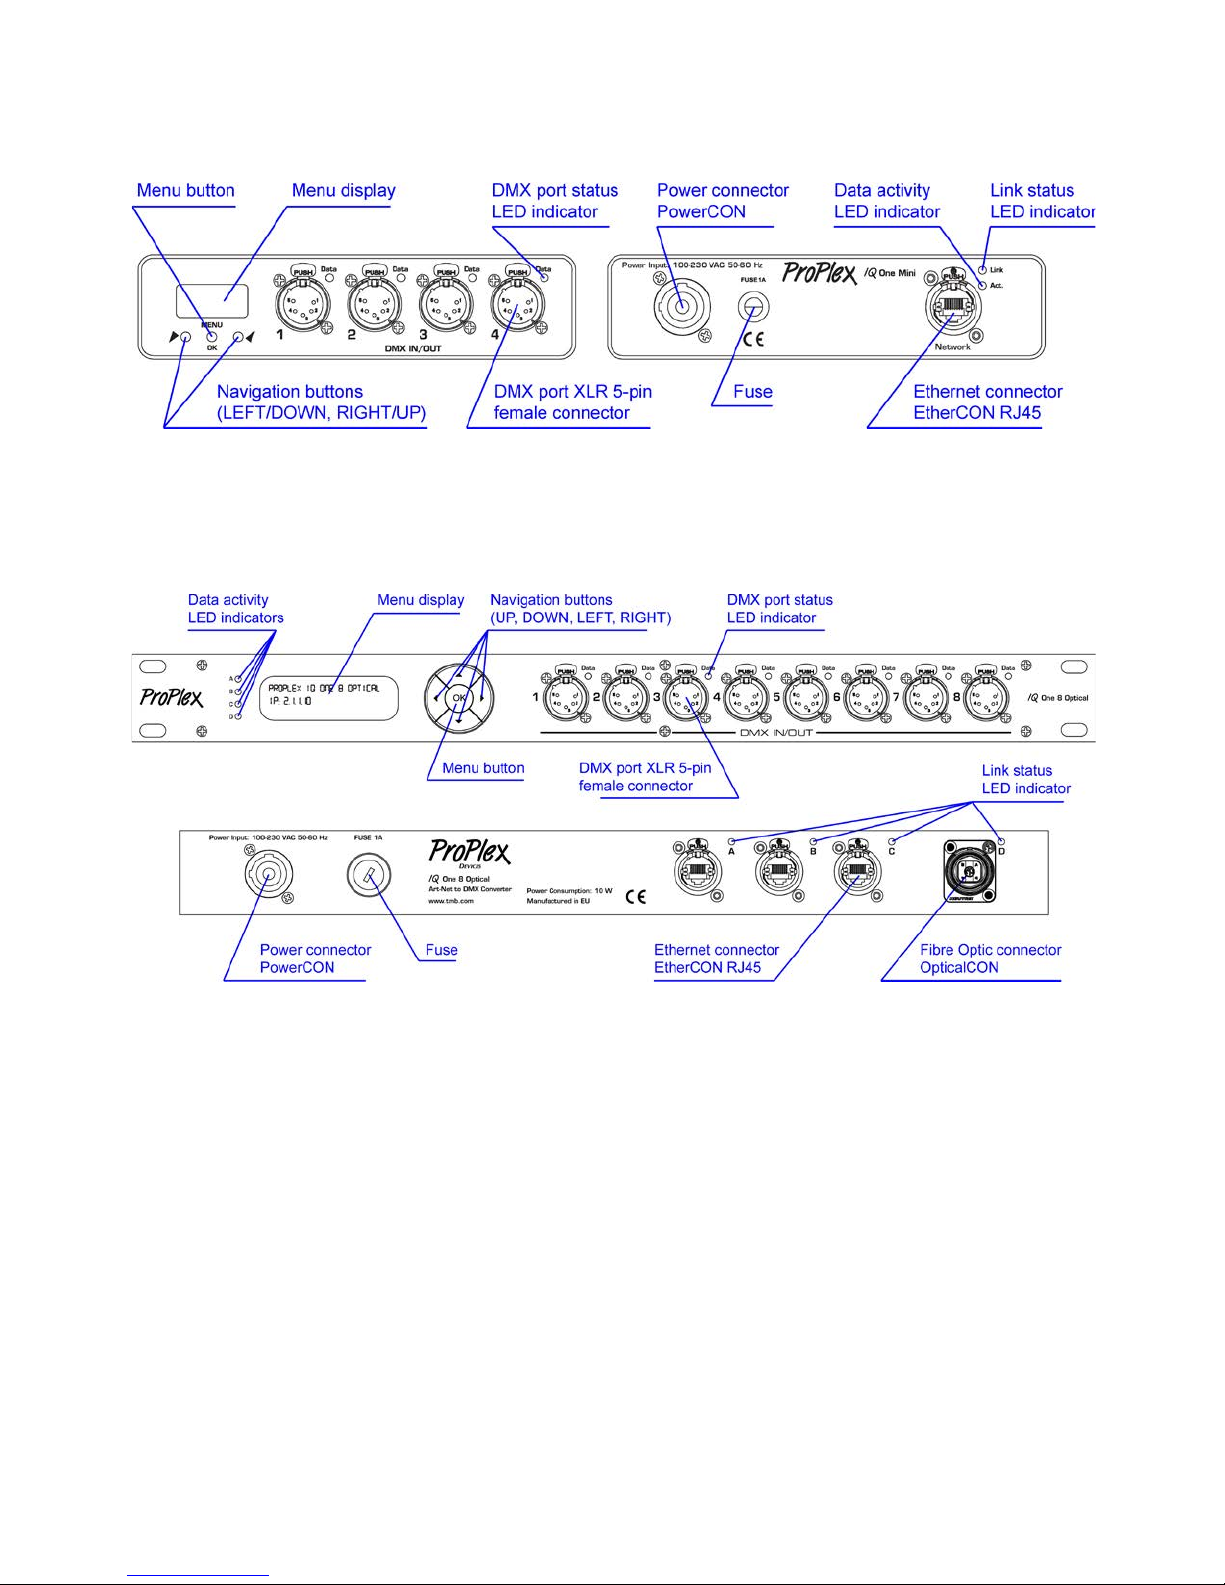
PROPLEX IQ ONE MINI OVERVIEW
PROPLEX IQ ONE OPTICAL RACKMOUNT OVERVIEW
Page 6

ProPlex IQ One user manual version 1.6.8 122216
6
3. SETUP
F
USE REPLACEMENT
The fuse for this fixture is located on the back of the unit. ProPlex IQ devices use a 1A, 250V, 5x20mm
(0.2x0.8 in.) cylindrical fuse. To replace fuse:
1. With a screwdriver turn the fuse cap counter-clockwise to remove fuse cap with fuse.
2. Replace fuse attached to fuse cap.
3. Reinsert fuse cap with new fuse and tighten clockwise.
ETHERNET CONNECTIONS
The Ethernet connector is Neutrik® EtherCon RJ45. Ethernet is 10/100 Base-T with auto-negotiation.
Ethernet connector has two status LEDs. Green indicates link state – if on, link is established and
communication can proceed. If Ethernet cable is connected, but Link LED is off, check cable or device at
other end of Ethernet cable. Active LED shows data activity – every time Ethernet packet is sent or
received, LED blinks once.
F
IBRE OPTIC CONNECTIONS
The IQ One 8 Optical RackMount has one fibre optic port with Neutrik OpticalCon QUAD chassis connector.
The optical port accepts 50/125µm multi-mode optical fibre with Neutrik OpticalCon QUAD connectors. Max
cable length is 550m. Three RJ45 Ethernet ports are all 10/100 /10 00 Base-T with max cable length 100m.
All Ethernet ports are connected and switched internally so all data is regenerated to all ports. For example,
if optical fibre cable is run to FOH, the Ethernet ports can be used to extend the network by connecting to
other equipment.
Disconnect the power cord before replacing fuse.
Always replace with the appropriate fuse..
Page 7
ProPlex IQ One user manual version 1.6.8 122216
7
M
OUNTING/RIGGING – PROPLEX MINI ENCLOSURES
Orientation
ProPlex Mini units may be mounted in any position, using the standard yoke. Always make
sure there is adequate room for ventilation.
Rigging – Always consult a certified rigging specialist before suspending any device
overhead.
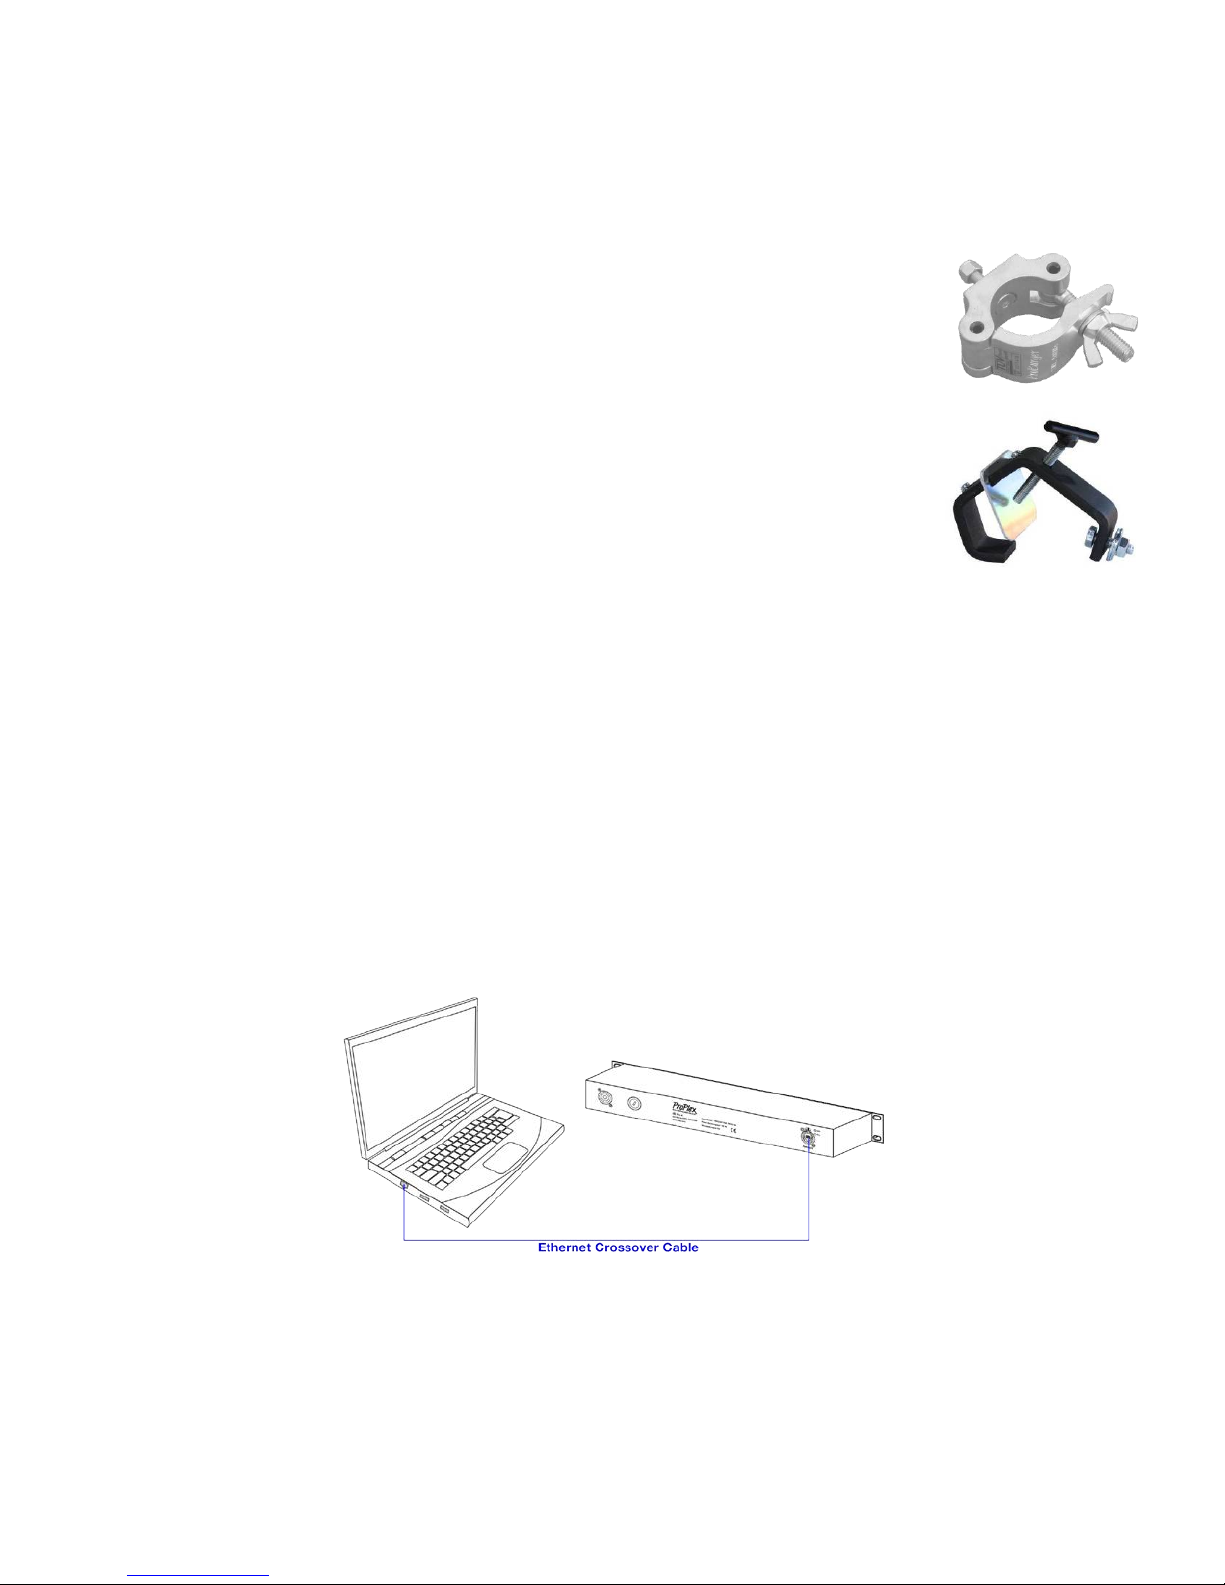
Use ProBurger® couplers or equivalent C- or O-type clamps for attaching to truss. After
establishing the desired position, tighten all appropriate bolts.
• Always use safety cables!
• When selecting installation location, consider routine maintenance.
• Never mount Mini enclosure where it will be exposed to moisture, high humidity,
extreme temperatures, or restricted ventilation.
4. PROPLEX IQ CONFIGURATION
ProPlex IQ can be configured in two ways;
1) Remotely via Ethernet by accessing built-in web page with Ethernet browser.
2) Using control panel display and buttons.
CONFIGURATION USING BUILT-IN WEB PAGE
All device settings can be changed remotely by accessing built-in web page from a computer connected to
same network as ProPlex IQ. To connect ProPlex IQ to a personal computer, an Ethernet crossover cable
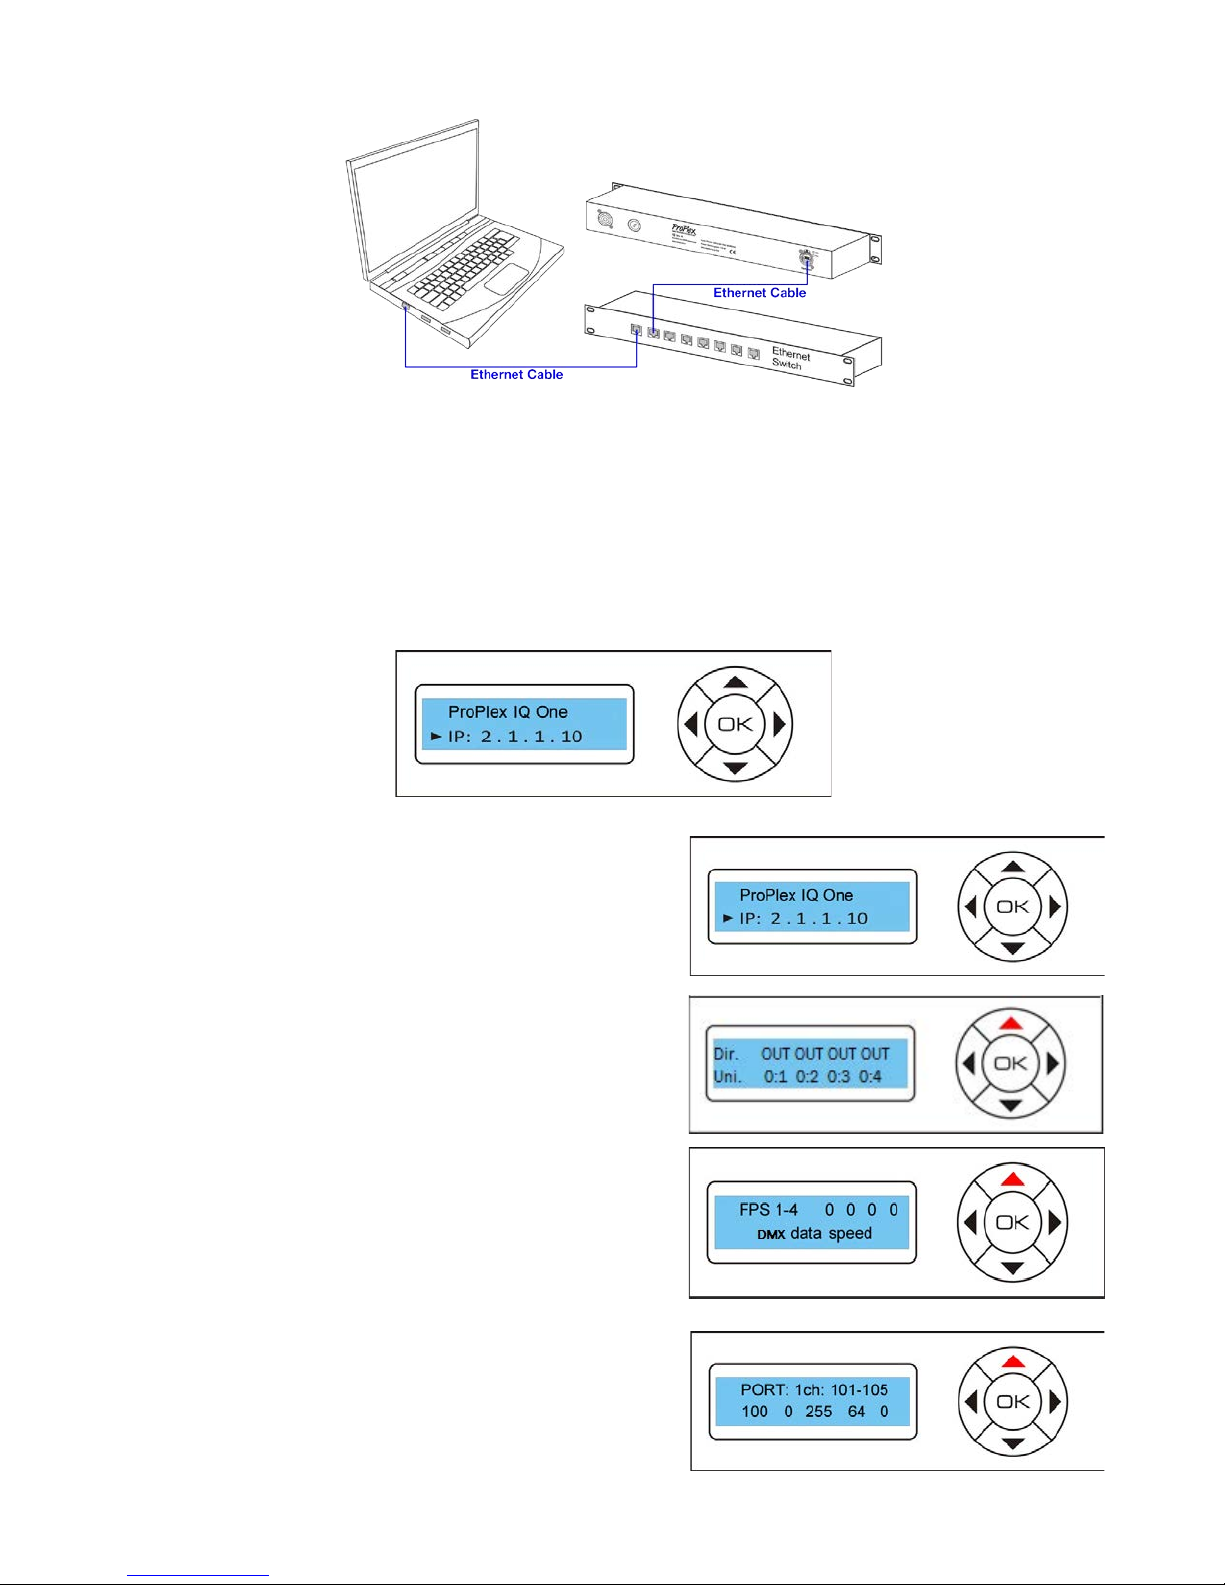
may be required, although some PCs auto-sense the type of connection. If a crossover cable is not
available, then use an Ethernet switch to connect ProPlex IQ to your PC.
Page 8
ProPlex IQ One user manual version 1.6.8 122216
8
To access the ProPlex IQ configuration page, ent er device IP addr ess (def au lt 2.1 .1.10) in any web browser.
To change any of the parameters, adjust corresponding field and press SET button near it to apply new
value.
CONFIGURATION USING CONTROL PANEL DISPLAY
Navigation through the menu is done using the 4-direction keypad with central key as OK (confirm) key.
Up / Down keys are used to change status screens.
Four screens are available:
1. Shows device name and IP address
2. Shows port directions and universes assigned
3. Shows DMX IN packet rate per second
4. Shows DMX values, current channels can be
changed using Left / Right buttons
Page 9

ProPlex IQ One user manual version 1.6.8 122216
9
IQ MENU TREE
To enter Main menu, press OK key. Select sub-menu with Left/Right keys and confirm with OK. To exit
menu, press Right until “EXIT” appears, then and press OK.
NETWORK SETUP
Here you can change Ethernet settings: IP address, Subnet Mask and Gateway. Use Left/Right to select
parameter. To edit, press OK. Up/Down changes value, Left/Right selects field to edit. Press OK again to
save changes made. To exit, press Right until “EXIT” appears, then press OK.
PROTOCOL SETUP
In this Menu you are able to configure the incoming or outgoing protocol (ART-Net or sACN). After selecting
‘Protocol Setup’ from the main menu, press enter to get to the sub menu here you can go left or right on the
key pad to ‘Enable Merging’ or ‘Select Protocol’. Press enter on either and use the arrow keys to select
which protocol or enable / disable merging, press ‘Enter’ when the desired selection is underlined and scroll
to the right to exit this menu.
NETWORK SETUP >
< ROUTING SETUP > < LOAD CONFIG >
< EXIT
< IP >
2 . 1 . 1 . 10
< GATEWAY >
2 . 1 . 1 . 1
< EXIT
DMX port 1 >
Dir IN univ= 0 ( 00 )
< DMX port 2 >
Dir IN univ= 1 ( 01 )
< DMX port 3 >
Dir IN univ = 3 ( 03 )
< DMX port 4 >
Dir IN univ = 4 ( 04 )
< EXIT
Config 1 >
All IN univ 0 - 3
< Config 2 >
All OUT univ 0 - 3
< EXIT
< MASK >
255. 0 . 0 . 0
< PROTOCOL SETUP >
Protocol Select >
Art-Net
<Merging >
Status: Disabled
< EXIT
< User Config 3 >
User Defined
< DEVICE SETUP >
LCD Contrast >
< LCD Backlight >
Settings
< Device Info >
< EXIT
< Front Panel >
Lock
< Art-Net Loss >
< Art-Net Resend >
<Defaults >
reset all defaults
< DMX OUT Rate >
< User Config 4 >
User Defined
- MASK -
255. 0 . 0 . 0
- Protocol -
sACN Art-Net
- Merging -
Enable Disable
Page 10

ProPlex IQ One user manual version 1.6.8 122216
10
ROUTING SETUP
To change DMX routing settings, set individual port directions (IN or OUT) and select Art-Net universe for
each port. Art-Net universe is displayed in two formats – decimal and hexadecimal (hex value is in brackets).
Use Left/Right to select port. To edit, press OK. Left selects direction field, right selects universe field.
Up/Down changes values. Press OK again to save changes made. To exit, press Right until “EXIT” appears,
then press “OK”.
LOAD CONFIGURATION
To load pre-defined configurations and reset device to its defaults:
1) Config 1 – Sets ports to inputs and sets universes 0 through 3 for each port.
2) Config 2 – Sets ports to outputs and sets universes 0 through 3 for each port.
3) Config 3 – User-configurable preset.
4) Defaults – Resets all device settings, including name and network configuration to defaults.
Default name is “ProPlex IQ One” and default IP is 2.1.1.10.
5) EXIT -- To exit from main Menu.
Use Left/Right to select configuration. To load, press OK and confirm by selecting YES and pressing OK
again. To exit, press Right until “EXIT” appears, then press OK.
- DMX port 1 -
dir OUT univ= 1 ( 01 )
- Config 2 -
all OUT univ 0 - 3
Page 11

ProPlex IQ One user manual version 1.6.8 122216
11
5. APPENDIX
REMOTE CONFIGURATION AND MONITORING OF IQ NODES
ProPlex IQ Ethernet to DMX nodes can be configured and monitored via two methods: ProPlex IQ RDM
Manager software and v ia a web bro wser.
The ProPlex IQ RDM Manager software is
available as a free PC download from
www.tmb.com
. This software includes a
full suite of configuration and monitoring
features, and makes managing multiple
nodes on a network extremely easy. The
Software also includes a RDM
management suite for devices connected
the IQ nodes or via a ProPlex RDMigo
Cable.
ProPlex IQ Ethernet to DMX nodes can also be remotely configured via their onboard webserver. Using a
PC or Mac internet browser, connect to individual IQ nodes by typing their IP address into the internet
address bar.
For more information on the ProPlex IQ RDM
Manager software, RDMigo Cab le, and oth er
ProPlex IQ series products, please visit
www.tmb.com
Page 12

ProPlex IQ One user manual version 1.6.8 122216
12
RDM FUNCTIONALITY
ProPlex IQ One devices have RDM Functionality. Below are the RDM functions available in these devices.
TMB has many options for RDM control of your devices: ProPlex RDMigo and IQ RDM Manager Soft ware;
ProPlex Striker; and ProPlex MasterFade. Additionally, ProPlex RDM Opto-Splitters and the ProPlex IQ
product range offer many means of RDM over DMX data distribution.
Main
Sensor Count
Patch
Name
Present value
Protocol selection
Address
Lowest value
Easy Priority
Highest value
Art-Net configuration mode
DMX refresh setup
Port configuration
B
ASICS OF HTP MERGING
When multiple streams of data are being sent to the IQ, the IQ will merge the data using the rule “Highest
Takes Precedence” (HTP). This means that if multiple sources are sending values to the same channel, the
highest value will be passed through to the IQ’s DMX Output. For example, if one console is sending a DMX
value of 127, and a second console is sending a value of 255 to the same channel, the higher value will
prevail.
B
ASICS OF EASY-MERGE
When multiple streams of data are being sent to the IQ, the IQ will merge the data via “Easy-Priority”. This
means that whichever stream is sending the highest value to channel 512, this will be the stream that takes
precedence.
L
IMITED WARRANTY
ProPlex Data Distribution Devices are warranted by TMB against defective materials or workmanship for a
period of two (2) years from the date of original sale by TMB.
TMB’s warranty shall be restricted to the repair or replacement of any part that proves to be defective and
for which a claim is submitted to TMB before the expiration of the applicable warranty periods.
This Limited Warranty is void if the defects of the Product are the result of:
• Opening the casing, repair, or adjustment by anyone other than TMB or persons specifically
authorized by TMB
• Accident, physical abuse, mishandling, or misapplication of the product.
• Damage due to lightning, earthquake, flood, terrorism, war, or act of God.
TMB will not assume responsibility for any labor expended, or materials used, to replace and/or repair the
Product without TMB’s prior written authorization. Any repair of the Product in the field, and any associated
labor charges, must be authorized in advance by TMB. Freight costs on warranty repairs are split 50/50:
Customer pays to ship defective product to TMB; TMB pays to ship repaired product, ground freight, back to
Customer.
This warranty does not cover consequential damages or costs of any kind.
A Return Merchandise Authorization (RMA) Number must be obtained from TMB prior to return of any
defective merchandise for warranty or non-warranty repair. For all repairs please contact TMB Tech Support
Repair using the contact information below or email TechSupportRepairNA@tmb.com.
Page 13

ProPlex IQ One user manual version 1.6.8 122216
13
US UK
527 Park Ave. 21 Armstrong Way
San Fernando, CA 91340 Southall, UB2 4SD England
Tel: +1 818.899.8818 Tel: +44 (0)20.8574.9700
Fax: +1 818.899.8813 Fax: +44 (0)20.8574.9701
tmb-info@tmb.com tmb-info@tmb.com
www.tmb.com www.tmb.com
RETURN PROCEDURE
Please send returned merchandise prepaid and in the original packing. Freight call tags will not be issued
for shipping the product to TMB, but TMB will pay the freight for return to the customer. Clearly label
package with a Return Merchandise Authorization Number (RMA #). Products returned without an RMA #
will delay service. Please contact TMB and request an RMA # prior to shipping the unit. Be prepared to
provide the model number, serial number, and a brief description of the cause for the return. Be sure to
properly pack the unit; any shipping damage resulting from inadequate packaging is the customer’s
responsibility. TMB reserves the right to use its own discretion to repair or replace product(s). Proper UPS
packing or double-boxing will better ensure product integrity when shipped.
Note: If you are given an RMA #, please include the following information on a piece of paper inside
the box:
1) Your name
2) Your address
3) Your phone number
4) The RMA #
5) A brief description of the symptoms
Page 14

ProPlex IQ One user manual version 1.6.8 122216
14
TECHNICAL SPECIFICATIONS
Model:
ProPlex IQ ONE 4
ProPlex IQ ONE 8
ProPlex IQ ONE 8
Optical
ProPlex IQ ONE Mini
Part Number
PPIQA415RD
PPIQA815RD
PPIQA845RDO
PRIQA415MD
Ethernet Ports
1 1 3
1
DMX Ports
4 8 8
4
DMX Connectors
Neutrik XLR5 Female (NC5FAV)
DMX Port Isolation
Optical, up to 1000V
Ethernet Connector
Neutrik EtherCon RJ45
Ethernet Type
10/100 Base-T
Network Protocols
Art-Net, sACN (E1.31)
Additional Features
HTP merging
Optical Connector
N/A
N/A
Neutrik NO4FDW-R
N/A
Power
85V-265V, 50-60 Hz
Power Consumption
10W
10W
25W
10W
Cooling
Convection
Operating
Temperature
-20º to +40º C
Operating Humidity
10-85%
Unit Dimensions
(WxHxD)
19 x 1.75 x 0.8 in
(482 x 44 x 203 mm)
19 x 1.75 x 0.8 in (482
x 44 x 203 mm)
19 x 1.75 x 0.8 in (482
x 44 x 203 mm)
7.25 x 3 x 8.74 in
(186 x 76 x 222 mm)
w/yoke
Unit Weight
(unpacked)
5 lbs (2.3 kg) 5 lbs (2.3 kg) 6 lbs (2.7 kg) 4.7 lbs (2.1 kg)
Packed Dimensions
(WxHxD)
20.5 x 3.5 x 10.6 in
(522 x 89 x 269 mm)
20.5 x 3.5 x 10.6 in
(522 x 89 x 269 mm)
20.5 x 3.5 x 10.6 in
(522 x 89 x 269 mm)
11.8 x 4.2 x 9.4 in
(300 x 106 x 240 mm)
Shipping Weight
5.6 lbs (2.6 kg)
5.6 lbs (2.6 kg)
6.6 lbs (3 kg)
5 lbs (2.3 kg)
 Loading...