

Page 1

T700
EVDO Wireless Router
User Manual
V1.1
V1.1
V1.1
Page 2
T700
EVDO
EVDO
EVDO
Router
Router
Router
T700
T700
T700
Terminal
Terminal
Terminal
Front
Front
Front
Side
Side
Side
EVDO
EVDO
EVDO
Router
Router
Router
T700
T700
T700
Terminal
Terminal
Terminal
back
back
back
side
side
side
Page 3

T700
CONTENTS
CHAPTER
CHAPTER
CHAPTER
111
NOTICE
NOTICE
NOTICE
...
...
...
...
...
...
...
...
...
...
...
...
...
...
...
...
...
...
...
...
...
...
...
...
...
...
...
...
...
...
...
...
...
...
...
...
...
...
...
...
...
...
...
...
...
...
...
...
...
...
...
...
...
...
...
...
...
...
...
...
...
...
...
...
...
...
...
...
...
...
...
...
...
...
...
...
...
...
...
...
...
...
...
...
...
...
...
...
...
...
...
...
...
...
...
...
...
...
...
...
...
...
...
...
...
...
...
...
...
...
...
...
...
...
...
...
...
...
...
...
...
...
...
...
...
...
...
...
...
...
...
...
...
111
CHAPTER
CHAPTER
CHAPTER
222
PRODUCT
PRODUCT
PRODUCT
INTRODUCTION
INTRODUCTION
INTRODUCTION
...
...
...
...
...
...
...
...
...
...
...
...
...
...
...
...
...
...
...
...
...
...
...
...
...
...
...
...
...
...
...
...
...
...
...
...
...
...
...
...
...
...
...
...
...
...
...
...
...
...
...
...
...
...
...
...
...
...
...
...
...
...
...
...
...
...
...
...
...
...
...
...
...
...
...
...
...
...
...
...
...
...
...
...
...
...
...
...
...
...
...
...
...
...
...
...
...
...
...
...
...
...
...
...
...
...
...
...
222
2.1 P
R ODUCTBR IEF
. . . . . . . . . . . . . . . . . . . . . . . . . . . . . . . . . . . . . . . . . . . . . . . . . . . . . . . . . . . . . . . . . . . . . . . . . . . . . . . . . . . . . . . . . . . . . . . . . . . . . . . . . . . . . . . . . . . . . . . . . . . . . . . . . . . . . . . . . . .
2
2.2 F
EAT UR ES
. . . . . . . . . . . . . . . . . . . . . . . . . . . . . . . . . . . . . . . . . . . . . . . . . . . . . . . . . . . . . . . . . . . . . . . . . . . . . . . . . . . . . . . . . . . . . . . . . . . . . . . . . . . . . . . . . . . . . . . . . . . . . . . . . . . . . . . . . . . . . . . . . . .
2
2.3 P
ACKINGLIST
. . . . . . . . . . . . . . . . . . . . . . . . . . . . . . . . . . . . . . . . . . . . . . . . . . . . . . . . . . . . . . . . . . . . . . . . . . . . . . . . . . . . . . . . . . . . . . . . . . . . . . . . . . . . . . . . . . . . . . . . . . . . . . . . . . . . . . . . . . . . .
2
2.4 P
ANEL
ANDUSAGE
. . . . . . . . . . . . . . . . . . . . . . . . . . . . . . . . . . . . . . . . . . . . . . . . . . . . . . . . . . . . . . . . . . . . . . . . . . . . . . . . . . . . . . . . . . . . . . . . . . . . . . . . . . . . . . . . . . . . . . . . . . . . . . . . . . . . . . .
2
2.5 T700 E
VDO
W
IREL ESSROUTERHAR DWAR EREQUIR EMENT
. . . . . . . . . . . . . . . . . . . . . . . . . . . . . . . . . . . . . . . . . . . . . . . . . . . . . . . . . . . . . . . . . . . . . . . . . . . . . . . . . . . . . .
3
2.6 U
SAGEEXPLANATION
. . . . . . . . . . . . . . . . . . . . . . . . . . . . . . . . . . . . . . . . . . . . . . . . . . . . . . . . . . . . . . . . . . . . . . . . . . . . . . . . . . . . . . . . . . . . . . . . . . . . . . . . . . . . . . . . . . . . . . . . . . . . . . . . . . . . .
3
CHAPTER
CHAPTER
CHAPTER
333
INSTALLATION
INSTALLATION
INSTALLATION
...
...
...
...
...
...
...
...
...
...
...
...
...
...
...
...
...
...
...
...
...
...
...
...
...
...
...
...
...
...
...
...
...
...
...
...
...
...
...
...
...
...
...
...
...
...
...
...
...
...
...
...
...
...
...
...
...
...
...
...
...
...
...
...
...
...
...
...
...
...
...
...
...
...
...
...
...
...
...
...
...
...
...
...
...
...
...
...
...
...
...
...
...
...
...
...
...
...
...
...
...
...
...
...
...
...
...
...
...
...
...
...
...
...
...
...
...
...
...
...
...
...
...
...
...
...
444
3.1 H
AR DWAR ECONNECT ION
. . . . . . . . . . . . . . . . . . . . . . . . . . . . . . . . . . . . . . . . . . . . . . . . . . . . . . . . . . . . . . . . . . . . . . . . . . . . . . . . . . . . . . . . . . . . . . . . . . . . . . . . . . . . . . . . . . . . . . . . . . . . . . . .
4
3.2 D
EFAULTSETT ING
. . . . . . . . . . . . . . . . . . . . . . . . . . . . . . . . . . . . . . . . . . . . . . . . . . . . . . . . . . . . . . . . . . . . . . . . . . . . . . . . . . . . . . . . . . . . . . . . . . . . . . . . . . . . . . . . . . . . . . . . . . . . . . . . . . . . . . . . .
4
3.3 C
OMPUTERSET T ING
. . . . . . . . . . . . . . . . . . . . . . . . . . . . . . . . . . . . . . . . . . . . . . . . . . . . . . . . . . . . . . . . . . . . . . . . . . . . . . . . . . . . . . . . . . . . . . . . . . . . . . . . . . . . . . . . . . . . . . . . . . . . . . . . . . . . . .
5
CHAPTER
CHAPTER
CHAPTER
444
SETTING
SETTING
SETTING
PREP
PREP
PREP
ARATION
ARATION
ARATION
...
...
...
...
...
...
...
...
...
...
...
...
...
...
...
...
...
...
...
...
...
...
...
...
...
...
...
...
...
...
...
...
...
...
...
...
...
...
...
...
...
...
...
...
...
...
...
...
...
...
...
...
...
...
...
...
...
...
...
...
...
...
...
...
...
...
...
...
...
...
...
...
...
...
...
...
...
...
...
...
...
...
...
...
...
...
...
...
...
...
...
...
...
...
...
...
...
...
...
...
...
...
...
...
...
...
...
...
...
...
...
...
666
4.1 PREP ARATION B
EFO R ESETT ING
. . . . . . . . . . . . . . . . . . . . . . . . . . . . . . . . . . . . . . . . . . . . . . . . . . . . . . . . . . . . . . . . . . . . . . . . . . . . . . . . . . . . . . . . . . . . . . . . . . . . . . . . . . . . . . . . . .
6
4.2 L
OGIN
. . . . . . . . . . . . . . . . . . . . . . . . . . . . . . . . . . . . . . . . . . . . . . . . . . . . . . . . . . . . . . . . . . . . . . . . . . . . . . . . . . . . . . . . . . . . . . . . . . . . . . . . . . . . . . . . . . . . . . . . . . . . . . . . . . . . . . . . . . . . . . . . . . . . . .
6
4.3 C HECK S
TATUSINFO
. . . . . . . . . . . . . . . . . . . . . . . . . . . . . . . . . . . . . . . . . . . . . . . . . . . . . . . . . . . . . . . . . . . . . . . . . . . . . . . . . . . . . . . . . . . . . . . . . . . . . . . . . . . . . . . . . . . . . . . . . . . . . . . . . . . . .
8
CHAPTER
CHAPTER
CHAPTER
555
NETWORK
NETWORK
NETWORK
SETTING
SETTING
SETTING
...
...
...
...
...
...
...
...
...
...
...
...
...
...
...
...
...
...
...
...
...
...
...
...
...
...
...
...
...
...
...
...
...
...
...
...
...
...
...
...
...
...
...
...
...
...
...
...
...
...
...
...
...
...
...
...
...
...
...
...
...
...
...
...
...
...
...
...
...
...
...
...
...
...
...
...
...
...
...
...
...
...
...
...
...
...
...
...
...
...
...
...
...
...
...
...
...
...
...
...
...
...
...
...
...
...
...
...
...
...
...
...
...
...
...
...
101010
5.1 T HE S
ETT ING
OFOPERAT ION
M
ODE
. . . . . . . . . . . . . . . . . . . . . . . . . . . . . . . . . . . . . . . . . . . . . . . . . . . . . . . . . . . . . . . . . . . . . . . . . . . . . . . . . . . . . . . . . . . . . . . . . . . . . . . . . . . . .
10
5.2 WAN S
ETT ING
. . . . . . . . . . . . . . . . . . . . . . . . . . . . . . . . . . . . . . . . . . . . . . . . . . . . . . . . . . . . . . . . . . . . . . . . . . . . . . . . . . . . . . . . . . . . . . . . . . . . . . . . . . . . . . . . . . . . . . . . . . . . . . . . . . . . . .
10
5.2.1 Mobile Telecommunication Network Connection Setting... …………………………………… .11
5.2.2 Ethernet Connection Setting …………… ... …………………………………………………… ..12
5.3 LAN S
ETTING
. . . . . . . . . . . . . . . . . . . . . . . . . . . . . . . . . . . . . . . . . . . . . . . . . . . . . . . . . . . . . . . . . . . . . . . . . . . . . . . . . . . . . . . . . . . . . . . . . . . . . . . . . . . . . . . . . . . . . . . . . . . . . . . . . . . . . .
10 6
5.4 DHCP S
ETTING
. . . . . . . . . . . . . . . . . . . . . . . . . . . . . . . . . . . . . . . . . . . . . . . . . . . . . . . . . . . . . . . . . . . . . . . . . . . . . . . . . . . . . . . . . . . . . . . . . . . . . . . . . . . . . . . . . . . . . . . . . . . . . . . . . . . .
10 7
5.5 VPN P
ASS-THROUGH
. . . . . . . . . . . . . . . . . . . . . . . . . . . . . . . . . . . . . . . . . . . . . . . . . . . . . . . . . . . . . . . . . . . . . . . . . . . . . . . . . . . . . . . . . . . . . . . . . . . . . . . . . . . . . . . . . . . . . . . . . . . . . .
10 7
5.6 A
DVANCEROUT ESETTING
. . . . . . . . . . . . . . . . . . . . . . . . . . . . . . . . . . . . . . . . . . . . . . . . . . . . . . . . . . . . . . . . . . . . . . . . . . . . . . . . . . . . . . . . . . . . . . . . . . . . . . . . . . . . . . . . . . . . . . . .
10 8
5.7 QOS Q
UALIT Y
OFSERVICE
. . . . . . . . . . . . . . . . . . . . . . . . . . . . . . . . . . . . . . . . . . . . . . . . . . . . . . . . . . . . . . . . . . . . . . . . . . . . . . . . . . . . . . . . . . . . . . . . . . . . . . . . . . . . . . . . . . . . . . .
10 9
5.8 T IME M
ANAG EMENT
ANDDYNAMICDOMAINSETTING
. . . . . . . . . . . . . . . . . . . . . . . . . . . . . . . . . . . . . . . . . . . . . . . . . . . . . . . . . . . . . . . . . . . . . . . . . . . . . . . . . . . . .
10 9
CHAPTER
CHAPTER
CHAPTER
666
WIRELESS
WIRELESS
WIRELESS
NETWORK
NETWORK
NETWORK
SETTING
SETTING
SETTING
...
...
...
...
...
...
...
...
...
...
...
...
...
...
...
...
...
...
...
...
...
...
...
...
...
...
...
...
...
...
...
...
...
...
...
...
...
...
...
...
...
...
...
...
...
...
...
...
...
...
...
...
...
...
...
...
...
...
...
...
...
...
...
...
...
...
...
...
...
...
...
...
...
...
...
...
...
...
...
...
...
...
...
...
...
...
...
...
...
...
...
...
...
...
...
...
...
...
...
...
212121
6.1 AP M
ODESETTING
. . . . . . . . . . . . . . . . . . . . . . . . . . . . . . . . . . . . . . . . . . . . . . . . . . . . . . . . . . . . . . . . . . . . . . . . . . . . . . . . . . . . . . . . . . . . . . . . . . . . . . . . . . . . . . . . . . . . . . . . . . . . . . . . . . . .
21
6.1.1 B asic Setting
. . . . . . . . . . . . . . . . . . . . . . . . . . . . . . . . . . . . . . . . . . . . . . . . . . . . . . . . . . . . . . . . . . . . . . . . . . . . . . . . . . . . . . . . . . . . . . . . . . . . . . . . . . . . . . . . . . . . . . . . . . . . . . . . .
21
6.1.2 Advanced Setting
. . . . . . . . . . . . . . . . . . . . . . . . . . . . . . . . . . . . . . . . . . . . . . . . . . . . . . . . . . . . . . . . . . . . . . . . . . . . . . . . . . . . . . . . . . . . . . . . . . . . . . . . . . . . . . . . . . . . . . . . .
23
6.1.3 Safe Mode
. . . . . . . . . . . . . . . . . . . . . . . . . . . . . . . . . . . . . . . . . . . . . . . . . . . . . . . . . . . . . . . . . . . . . . . . . . . . . . . . . . . . . . . . . . . . . . . . . . . . . . . . . . . . . . . . . . . . . . . . . . . . . . . . . . . .
23
6.1.4 WPS
. . . . . . . . . . . . . . . . . . . . . . . . . . . . . . . . . . . . . . . . . . . . . . . . . . . . . . . . . . . . . . . . . . . . . . . . . . . . . . . . . . . . . . . . . . . . . . . . . . . . . . . . . . . . . . . . . . . . . . . . . . . . . . . . . . . . . . . . . . . . . .
25
6.1.5 AP Client
. . . . . . . . . . . . . . . . . . . . . . . . . . . . . . . . . . . . . . . . . . . . . . . . . . . . . . . . . . . . . . . . . . . . . . . . . . . . . . . . . . . . . . . . . . . . . . . . . . . . . . . . . . . . . . . . . . . . . . . . . . . . . . . . . . . . .
25 6
6.1.6 WDS
. . . . . . . . . . . . . . . . . . . . . . . . . . . . . . . . . . . . . . . . . . . . . . . . . . . . . . . . . . . . . . . . . . . . . . . . . . . . . . . . . . . . . . . . . . . . . . . . . . . . . . . . . . . . . . . . . . . . . . . . . . . . . . . . . . . . . . . . . . .
25 6
6.1.7 Station List
. . . . . . . . . . . . . . . . . . . . . . . . . . . . . . . . . . . . . . . . . . . . . . . . . . . . . . . . . . . . . . . . . . . . . . . . . . . . . . . . . . . . . . . . . . . . . . . . . . . . . . . . . . . . . . . . . . . . . . . . . . . . . . . . .
25 7
Page 4

T700
CHAPTER
CHAPTER
CHAPTER
777
SECURITY
SECURITY
SECURITY
SETTING
SETTING
SETTING
...
...
...
...
...
...
...
...
...
...
...
...
...
...
...
...
...
...
...
...
...
...
...
...
...
...
...
...
...
...
...
...
...
...
...
...
...
...
...
...
...
...
...
...
...
...
...
...
...
...
...
...
...
...
...
...
...
...
...
...
...
...
...
...
...
...
...
...
...
...
...
...
...
...
...
...
...
...
...
...
...
...
...
...
...
...
...
...
...
...
...
...
...
...
...
...
...
...
...
...
...
...
...
...
...
...
...
...
...
...
...
...
...
...
...
...
...
...
282828
7.1 MAC/IP/P
ORTFILT ERSETTING
. . . . . . . . . . . . . . . . . . . . . . . . . . . . . . . . . . . . . . . . . . . . . . . . . . . . . . . . . . . . . . . . . . . . . . . . . . . . . . . . . . . . . . . . . . . . . . . . . . . . . . . . . . . . . . . . . . . . . .
28
7.2 F
ICTITIOUSSER VER
. . . . . . . . . . . . . . . . . . . . . . . . . . . . . . . . . . . . . . . . . . . . . . . . . . . . . . . . . . . . . . . . . . . . . . . . . . . . . . . . . . . . . . . . . . . . . . . . . . . . . . . . . . . . . . . . . . . . . . . . . . . . . . . . . . . . . .
29
7.3 DMZ
. . . . . . . . . . . . . . . . . . . . . . . . . . . . . . . . . . . . . . . . . . . . . . . . . . . . . . . . . . . . . . . . . . . . . . . . . . . . . . . . . . . . . . . . . . . . . . . . . . . . . . . . . . . . . . . . . . . . . . . . . . . . . . . . . . . . . . . . . . . . . . . . . . . .
29
7.4 S
YST EMSECUR ITYSETTING
. . . . . . . . . . . . . . . . . . . . . . . . . . . . . . . . . . . . . . . . . . . . . . . . . . . . . . . . . . . . . . . . . . . . . . . . . . . . . . . . . . . . . . . . . . . . . . . . . . . . . . . . . . . . . . . . . . . . . . . . . . . . .
30
CHAPTER
CHAPTER
CHAPTER
888
SYSTEM
SYSTEM
SYSTEM
MANAGEMENT
MANAGEMENT
MANAGEMENT
...
...
...
...
...
...
...
...
...
...
...
...
...
...
...
...
...
...
...
...
...
...
...
...
...
...
...
...
...
...
...
...
...
...
...
...
...
...
...
...
...
...
...
...
...
...
...
...
...
...
...
...
...
...
...
...
...
...
...
...
...
...
...
...
...
...
...
...
...
...
...
...
...
...
...
...
...
...
...
...
...
...
...
...
...
...
...
...
...
...
...
...
...
...
...
...
...
...
...
...
...
...
...
...
...
...
...
...
...
313131
8.1 L
ANGUAG E
ANDADMINISTR ATORSETTING
. . . . . . . . . . . . . . . . . . . . . . . . . . . . . . . . . . . . . . . . . . . . . . . . . . . . . . . . . . . . . . . . . . . . . . . . . . . . . . . . . . . . . . . . . . . . . . . . . . . . . . . . . . . .
31
8.2 S
OFTWAREUPGR ADE
. . . . . . . . . . . . . . . . . . . . . . . . . . . . . . . . . . . . . . . . . . . . . . . . . . . . . . . . . . . . . . . . . . . . . . . . . . . . . . . . . . . . . . . . . . . . . . . . . . . . . . . . . . . . . . . . . . . . . . . . . . . . . . . . . . . .
32
8.3 S
ETTINGMANAG EMENT
. . . . . . . . . . . . . . . . . . . . . . . . . . . . . . . . . . . . . . . . . . . . . . . . . . . . . . . . . . . . . . . . . . . . . . . . . . . . . . . . . . . . . . . . . . . . . . . . . . . . . . . . . . . . . . . . . . . . . . . . . . . . . . . .
32
8.4 S
YST EMINSTRUCTION
. . . . . . . . . . . . . . . . . . . . . . . . . . . . . . . . . . . . . . . . . . . . . . . . . . . . . . . . . . . . . . . . . . . . . . . . . . . . . . . . . . . . . . . . . . . . . . . . . . . . . . . . . . . . . . . . . . . . . . . . . . . . . . . . . . . .
34
8.5 S
YST EMINFOR MAT ION
. . . . . . . . . . . . . . . . . . . . . . . . . . . . . . . . . . . . . . . . . . . . . . . . . . . . . . . . . . . . . . . . . . . . . . . . . . . . . . . . . . . . . . . . . . . . . . . . . . . . . . . . . . . . . . . . . . . . . . . . . . . . . . . . . .
35
CHAPTER
CHAPTER
CHAPTER
999
FAQ
FAQ
FAQ
...
...
...
...
...
...
...
...
...
...
...
...
...
...
...
...
...
...
...
...
...
...
...
...
...
...
...
...
...
...
...
...
...
...
...
...
...
...
...
...
...
...
...
...
...
...
...
...
...
...
...
...
...
...
...
...
...
...
...
...
...
...
...
...
...
...
...
...
...
...
...
...
...
...
...
...
...
...
...
...
...
...
...
...
...
...
...
...
...
...
...
...
...
...
...
...
...
...
...
...
...
...
...
...
...
...
...
...
...
...
...
...
...
...
...
...
...
...
...
...
...
...
...
...
...
...
...
...
...
...
...
...
...
...
...
...
...
...
...
...
363636
9.1 L
OGINFAILUR E
. . . . . . . . . . . . . . . . . . . . . . . . . . . . . . . . . . . . . . . . . . . . . . . . . . . . . . . . . . . . . . . . . . . . . . . . . . . . . . . . . . . . . . . . . . . . . . . . . . . . . . . . . . . . . . . . . . . . . . . . . . . . . . . . . . . . . . . . . . .
36
9.1.1 L ine and Equipment Inspect
. . . . . . . . . . . . . . . . . . . . . . . . . . . . . . . . . . . . . . . . . . . . . . . . . . . . . . . . . . . . . . . . . . . . . . . . . . . . . . . . . . . . . . . . . . . . . . . . . . . . . . . .
36
9.1.2 Setting Inspect
. . . . . . . . . . . . . . . . . . . . . . . . . . . . . . . . . . . . . . . . . . . . . . . . . . . . . . . . . . . . . . . . . . . . . . . . . . . . . . . . . . . . . . . . . . . . . . . . . . . . . . . . . . . . . . . . . . . . . . . . . . . . .
36
CHAPTER
CHAPTER
CHAPTER
101010
TECHNICAL
TECHNICAL
TECHNICAL
SPECIFICATION
SPECIFICATION
SPECIFICATION
...
...
...
...
...
...
...
...
...
...
...
...
...
...
...
...
...
...
...
...
...
...
...
...
...
...
...
...
...
...
...
...
...
...
...
...
...
...
...
...
...
...
...
...
...
...
...
...
...
...
...
...
...
...
...
...
...
...
...
...
...
...
...
...
...
...
...
...
...
...
...
...
...
...
...
...
...
...
...
...
...
...
...
...
...
...
...
...
...
...
...
...
...
...
...
...
...
...
...
...
...
...
...
383838
CHAPTER
CHAPTER
CHAPTER
111111
ENVIRONMENTAL
ENVIRONMENTAL
ENVIRONMENTAL
PROTECTION
PROTECTION
PROTECTION
INSTRUCTION
INSTRUCTION
INSTRUCTION
...
...
...
...
...
...
...
...
...
...
...
...
...
...
...
...
...
...
...
...
...
...
...
...
...
...
...
...
...
...
...
...
...
...
...
...
...
...
...
...
...
...
...
...
...
...
...
...
...
...
...
...
...
...
...
...
...
...
...
...
...
...
...
...
...
...
...
...
...
...
...
...
...
...
393939
Page 5

T700
Page 1 , Total 39 pages
CHAPTER
CHAPTER
CHAPTER
111
NOTICE
NOTICE
NOTICE
1. Do not disassemble T700 EVDO Wireless Router equipment.
2. Please keep away T700 EVDO Wireless Router away from heating zone.
3. Moisture-proof .
4. Avoid children to swallow or to use without adult's supervision.
5. Avoid direct sunlight.
6. Keep environmental ventilation.
7. Keep plug dry, please unplug if abnormal situation happens (Smoking, abnormal sound or peculiar smell )
Page 6
T700
Page 2 , Total 39 pages
CHAPTER
CHAPTER
CHAPTER
222
Product
Product
Product
Introduction
Introduction
Introduction
2.1
2.1
2.1
Product
Product
Product
Brief
Brief
Brief
EVDO Wireless Router T700 is a convenient, flexible, standard SOHO Internet access gateway device , it
can connect the internal information-based device to the wireless or wire line networks and provide
anticipated application.
2.2
2.2
2.2
Features
Features
Features
1.
You can configure and monitor the T700 EVDO Wireless Router by computer webpage.
2.
T700 EVDO Wireless Router supports auto-dial up, allow you to access internet more convenient .
3.
NAT,
DHCP function can help you to configure the network and let you enjoy your internet trip.
4.
Firewall function can keep your network safe.
5.
MAC, URL filter function can customize the internet security policy under your personal requirement.
6.
Internal network terminal wireless access function can realize the sharing of internet access.
7.
USB 2.0 EVDO wireless internet access.
8.
Wireless switch function.
2.3
2.3
2.3
Packing
Packing
Packing
List
List
List
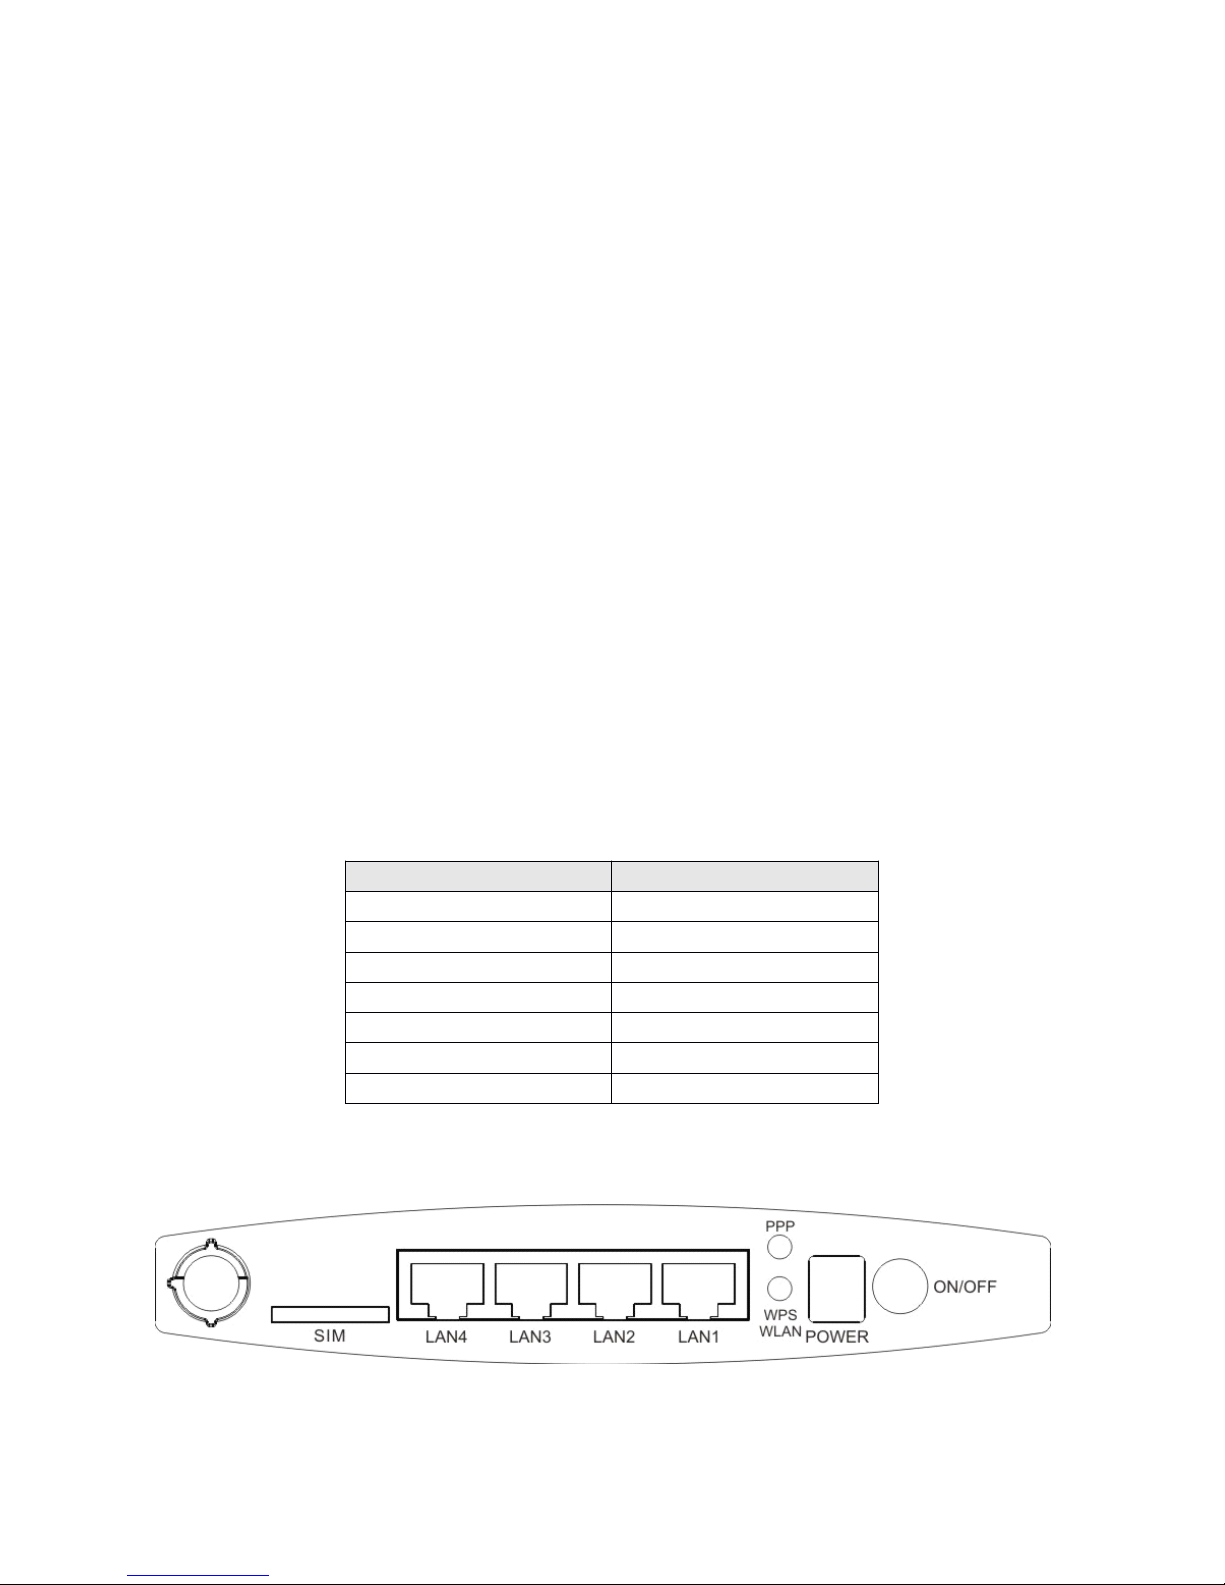
2.4
2.4
2.4
Panel
Panel
Panel
and
and
and
Usage
Usage
Usage
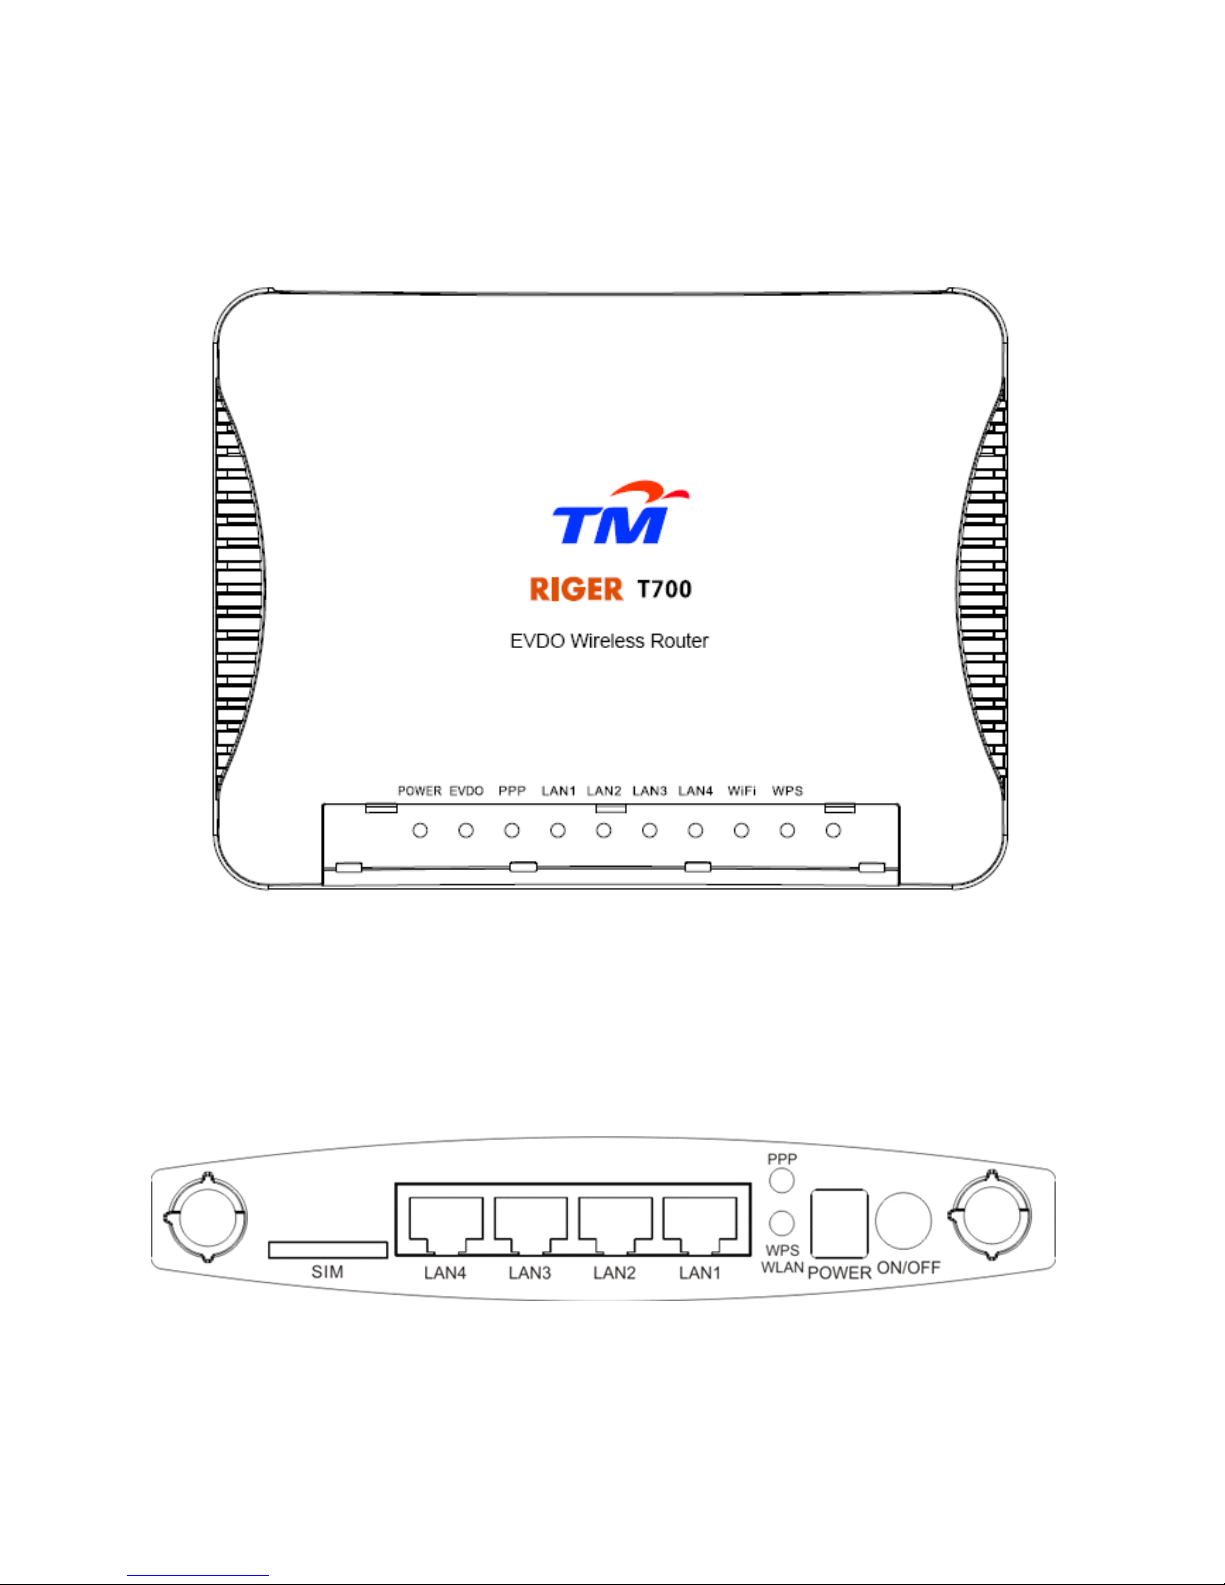
From left to right, the introduction of interface is as follows :
1. SIM : Connect EVDO SIM card.
Name
Quantity
T700 EVDO Wireless Router
1
English User Guide
1
Power Transformer
1
Installation Disc
1
Network Cable
2
USB Cable
1
Warranty Card
1
Page 7

T700
Page 3 , Total 39 pages
2. LAN1, LAN2, LAN3, LAN4 : Connect PC or other network peripheral equipment.
3. PPP : Dial-up manually to connect the network.
4. WPS (WiFi Protected Setup): Facilitate the achievement of the automatic configuration and wireless
connectivity (The terminal device need have the same function).
WLAN : Users can quickly switch on/off the internal wireless network access.
5. POWER : Electric power connection.
6. SWITCH : The electricity switch of T700 EVDO Wireless Router.
2.5
2.5
2.5
T700
T700
T700
EVDO
EVDO
EVDO
Wireless
Wireless
Wireless
Router
Router
Router
Hardware
Hardware
Hardware
Requirement
Requirement
Requirement
Hardware Requirement :
Processor : Pentium ® MMX 233
Minimum Memory : 64MB.
Minimum hard disc remaining space: 20MB.
Operation System :
Windows ® Me
Windows ® 98 SE
Windows ® 2000
Windows ® XP
Windows ® Vista
Windows ® 7
Linux
2.6
2.6
2.6
Usage
Usage
Usage
Explanation
Explanation
Explanation
Users can finish the advanced function configuration under the instruction of User’s guide,the main functio ns
are listed as below:
operation mode
The setting of network including WAN, LAN, DHCP terminal list, VPN Pass-through, advanced router
configuration, QoS quality service.
Wireless network setting including normal setting, advanced setting, security setting, WPS, terminal list.
Firewall including MAC/IP/Port filter , Virtual Server, DMZ, System security setting.
System Management including user’s management, software upgrade, setting management, status,
statistical data, system instruction, system record, EVDO status.
Page 8
T700
Page 4 , Total 39 pages
CHAPTER
CHAPTER
CHAPTER
333
Installation
Installation
Installation
3.1
3.1
3.1
Hardware
Hardware
Hardware
Connection
Connection
Connection
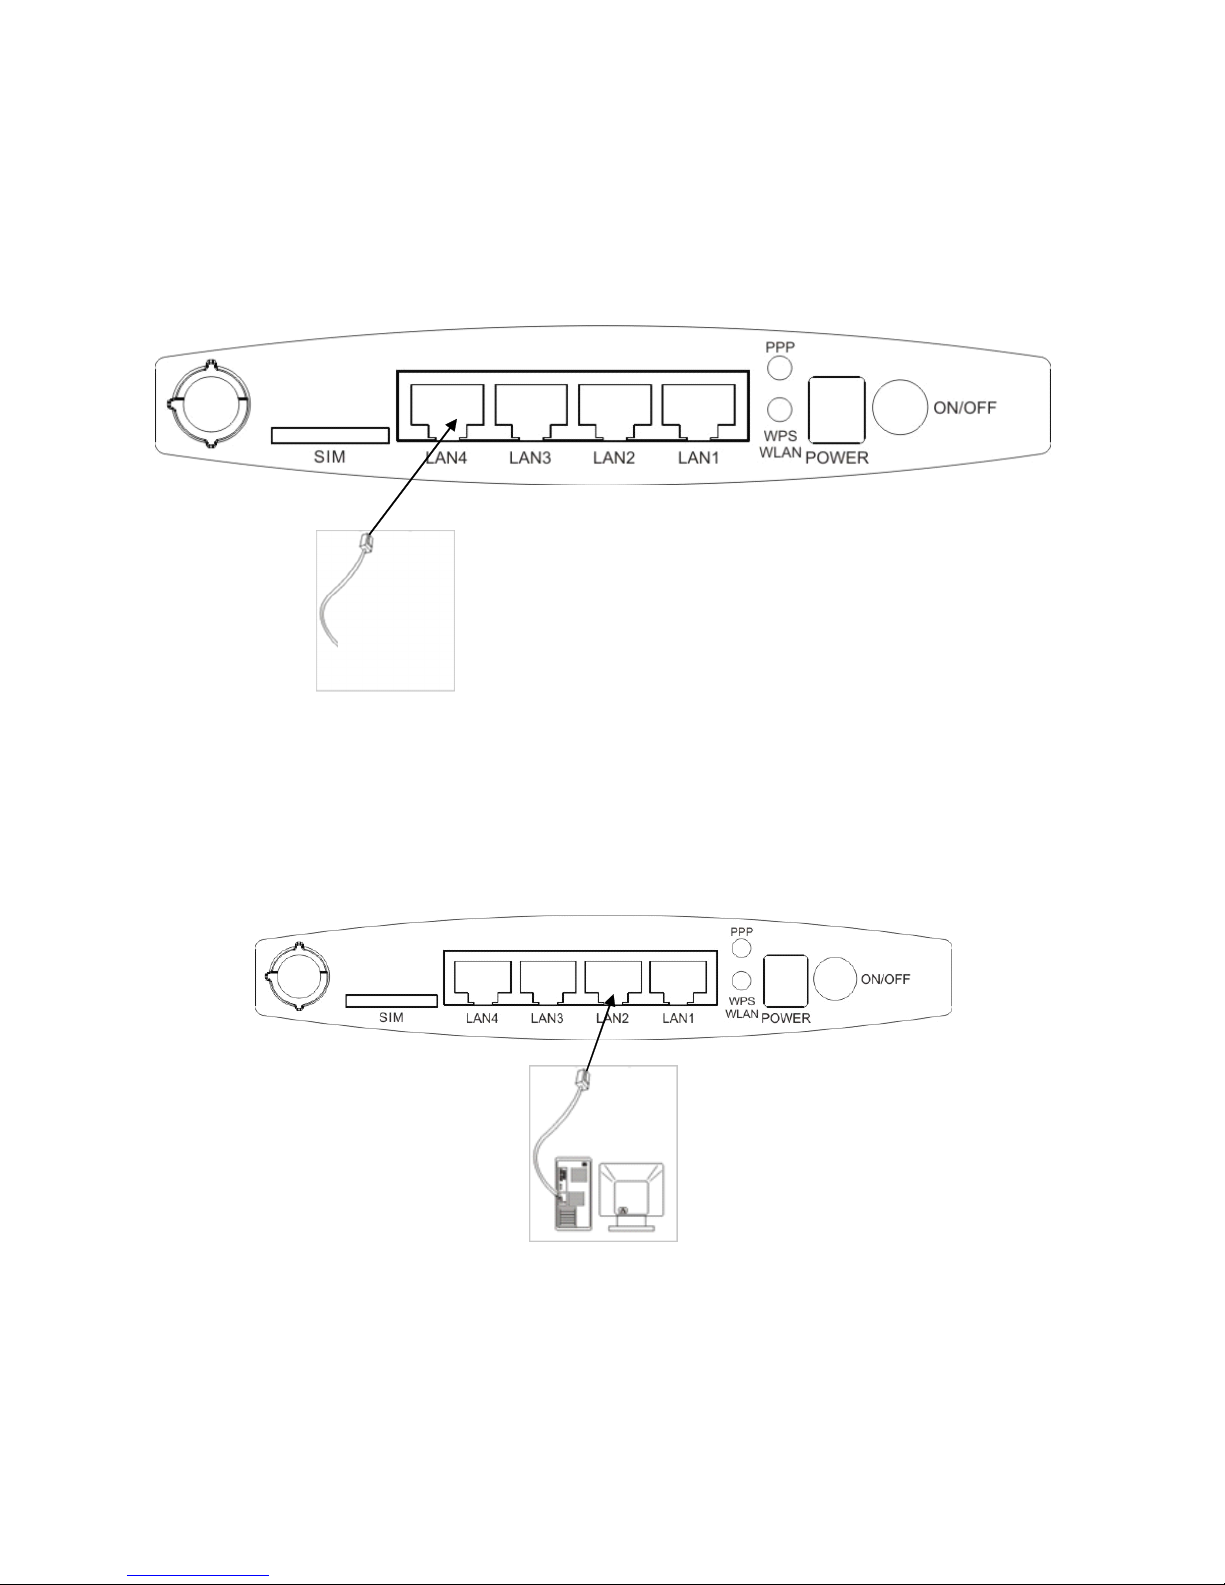
Explanation :
1. The Sketch map between Cable broadband user’s access line and Local Router.
Graph a
2. By using the complimentary cable to realize the connection between LAN1-LAN3 of T700 EVDO Wireless
Router and the network card of terminal device. Look at graph b.
Graph b
3.2
3.2
3.2
Default
Default
Default
Setting
Setting
Setting
The login id of administrator is tmadmin , password is tmadmin.
Wireless SSID is StreamyxMobility_xxxx , no password.
Page 9

T700
Page 5 , Total 39 pages
3.3
3.3
3.3
Computer
Computer
Computer
Setting
Setting
Setting
The default setting of IP is : 192.168.1.1, subnet mask : 255.255.255.0. You can configure the internet
setting by WEB browser or use T700 EVDO Wireless Router as DNS server. Before the setting, you only need
to set the properties of TCP/IP as " automatically obtain IP address and DNS address", look at graph 3.1
Graph3.1
Page 10

T700
Page 6 , Total 39 pages
CHAPTER
CHAPTER
CHAPTER
444
Setting
Setting
Setting
Preparation
Preparation
Preparation
4.1
4.1
4.1
Preparation
Preparation
Preparation
before
before
before
Setting
Setting
Setting
1.
Maintain the connection of hardware, refer to 3.1
2.
Make sure the setting of PC is right, refer to 3.3
4.2
4.2
4.2
Login
Login
Login
1.
Open the browser, input http://192.168.1.1
http://192.168.1.1
http://192.168.1.1
, press enter and then the login interface pop up, look at
graph 4.1.
2.
Input “ Modem
Modem
Modem
Username
Username
Username
”””
( “““
tmuser
tmuser
tmuser
”””),
“ Modem
Modem
Modem
Password
Password
Password
”””
( “““
tmuser
tmuser
tmuser
”””
) ,
click “ Login ” and enter t he
admin page,look at graph 4.2.
3.
Input “ Modem
Modem
Modem
Username
Username
Username
”””
( “““
tmadmin
tmadmin
tmadmin
”””),
“ Modem
Modem
Modem
Password
Password
Password
”””
( “““
tmadmin
tmadmin
tmadmin
”””
) ,
click “ Login ” and en ter
the admin page,look at graph 4.3.
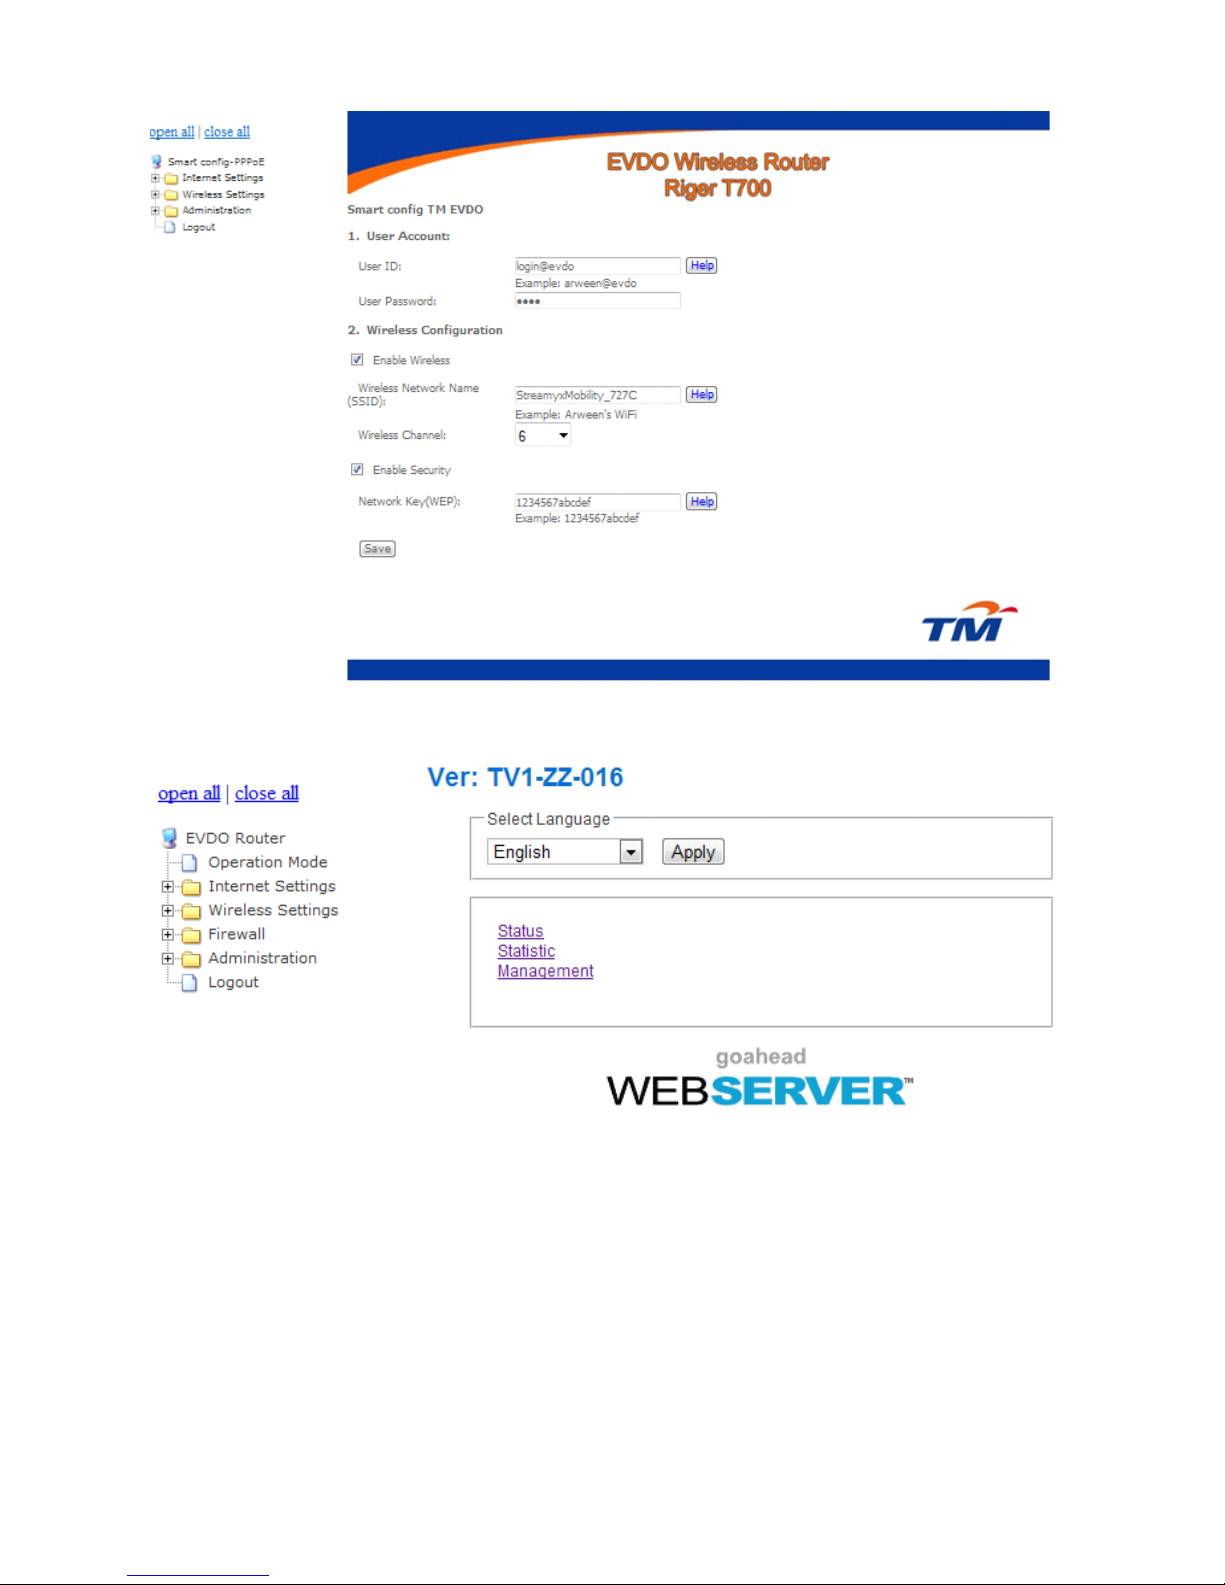
Graph4.1
Page 11
T700
Page 7 , Total 39 pages
Graph 4.2
Graph 4.3
Web
Web
Web
Smart
Smart
Smart
config
config
config
---
TMTMTM
EVDO
EVDO
EVDO
:
Simple configuration web for tmuser , includes User Account and Wireless Configuration.
Page 12
T700
Page 8 , Total 39 pages
4.3
4.3
4.3
Check
Check
Check
Status
Status
Status
Info
Info
Info
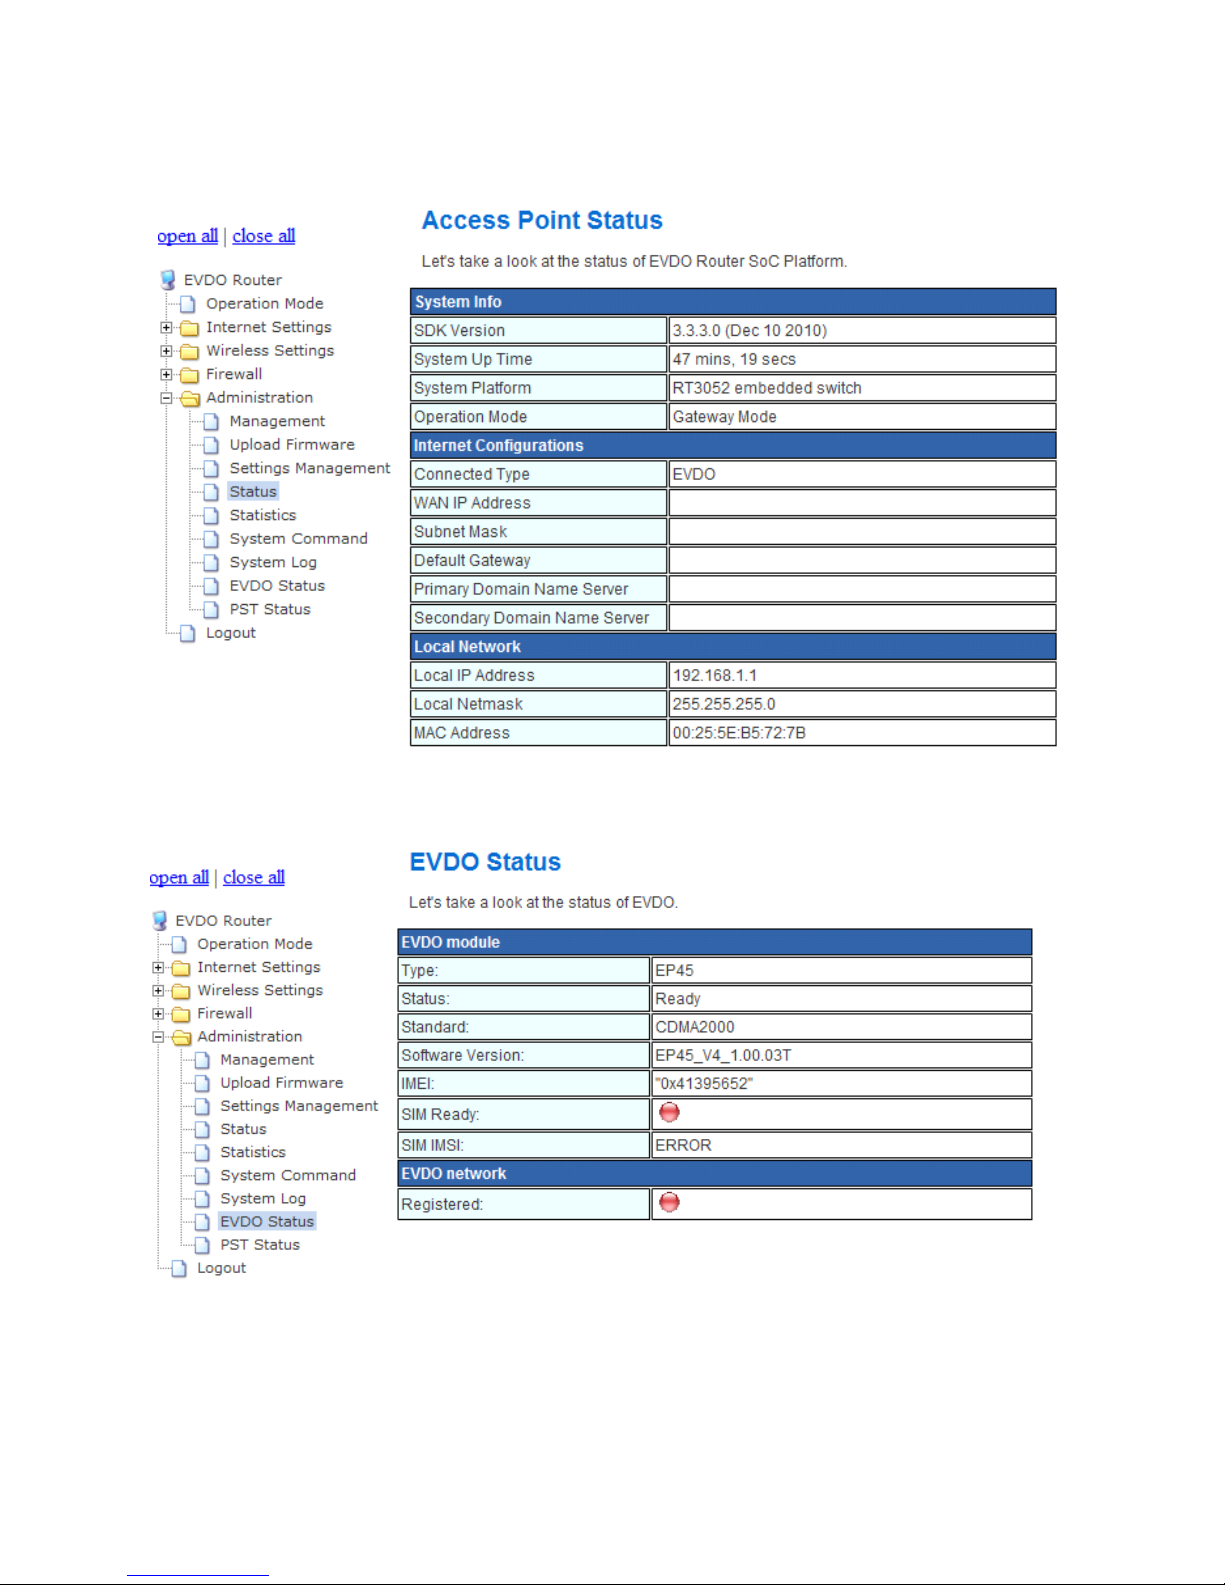
Click“Administration->Status ” Menu , check the normal info of device, look at graph 4.4,
Graph 4.4
Click“Administration->EVDO Status ” Menu , check the EVDO status of EVDO internet module, look at graph 4.5
Graph4.5
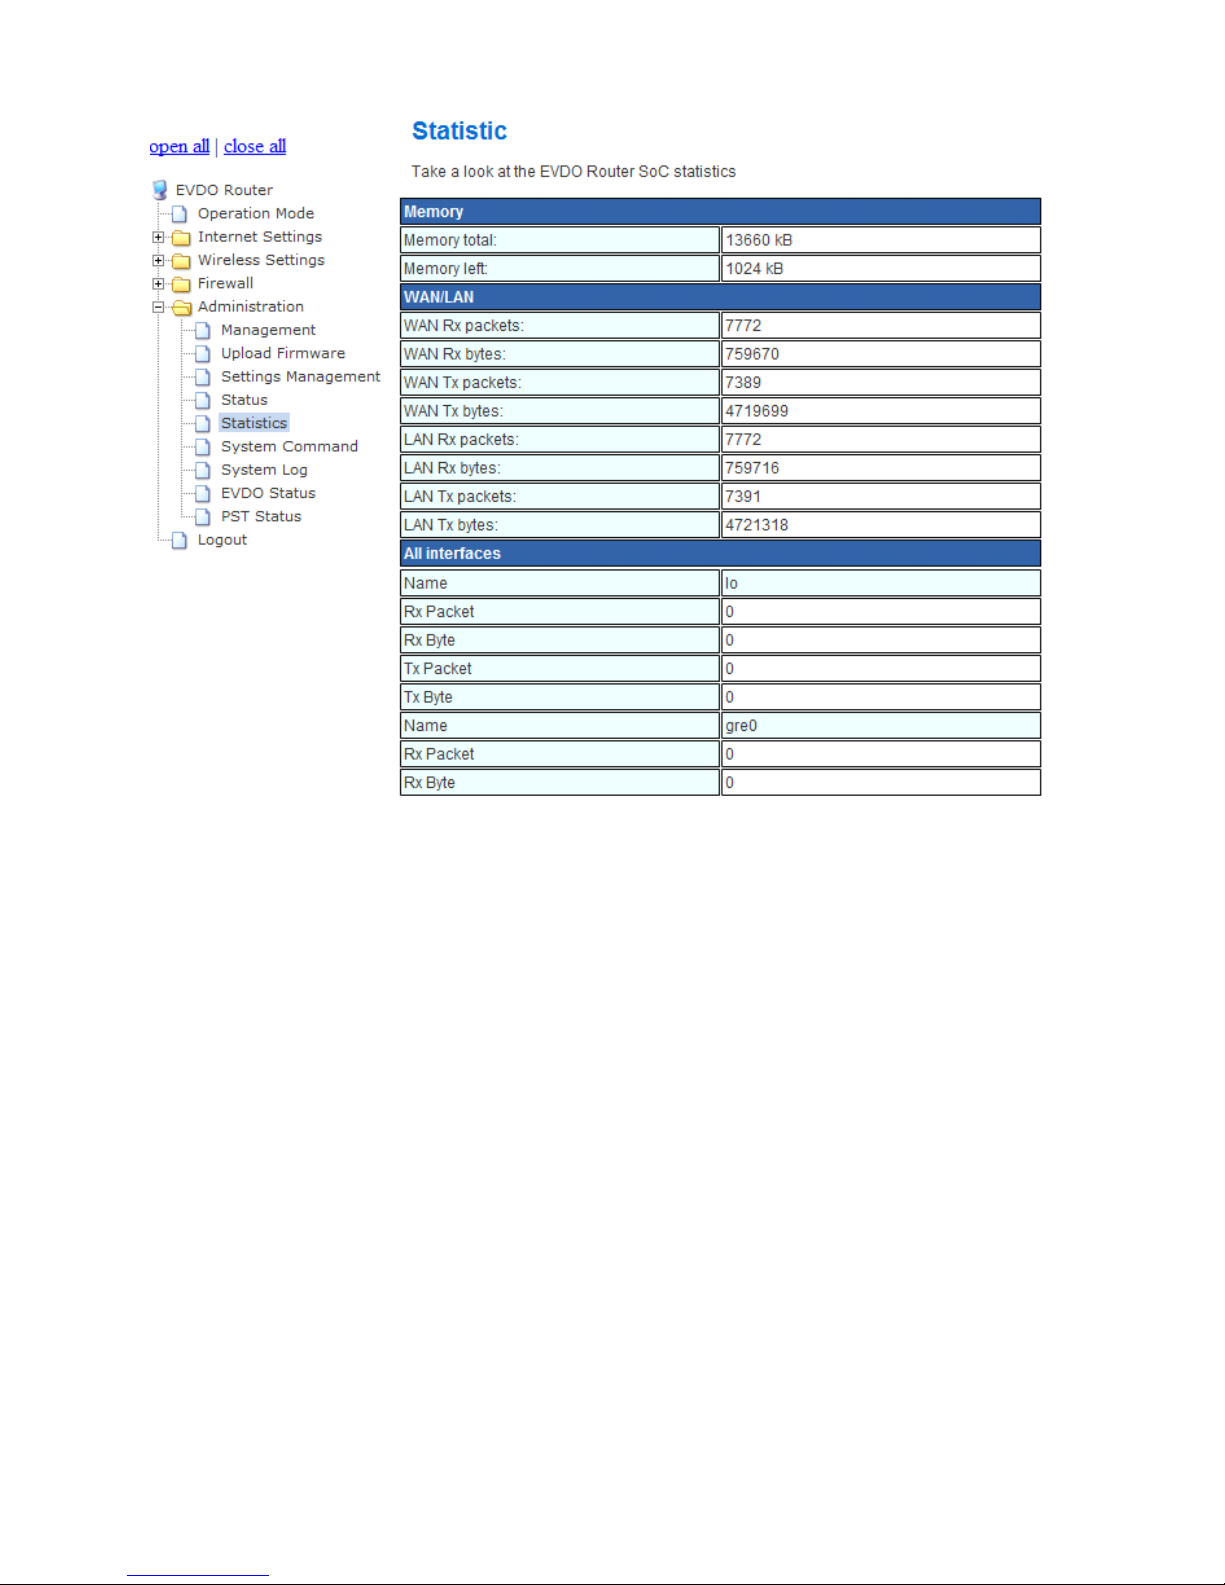
Click“Administration->Statistics ” Menu , check the memory status and data traffic, look at graph4.6
Page 13
T700
Page 9 , Total 39 pages
Graph 4.6
Page 14

T700
Page 10 , Total 39 pages
CHAPTER
CHAPTER
CHAPTER
555
Network
Network
Network
Setting
Setting
Setting
Note : All the setting will be effective only after click“Apply”.
5.1
5.1
5.1
The
The
The
Setting
Setting
Setting
ofofof
Operation
Operation
Operation
Mode
Mode
Mode
After login (refer to 4.2,click menu “ Operation Mode ” and enter the broadband setting page, look at graph 5. 1.
Graph 5.1
Bridge:
Bridge:
Bridge:
All ethernet and wireless interface are bridged into a single bridge interface br0.
Gateway:
Gateway:
Gateway:
The first ethernet port is treated as WAN port. The other ethernet ports and the wireless
interfaces are bridged together and are treated as LAN ports. In EVDO mode, PORT 0 is Lan port.
Please set
NAT
Enabled enable.
APAPAP
Client:
Client:
Client:
The wireless apcli interface is treated as WAN port, and the wireless ap interface and the ethernet
ports are LAN ports. Please set
NAT
Enabled enable.
5.2
5.2
5.2
WAN
WAN
WAN
Setting
Setting
Setting
The WAN online mode can select mobile communication network or Ethernet.
Notice: In Ethernet mode, PORT 0 is Wan port;
In EVDO mode, PORT 0 is Lan port;
Page 15

T700
Page 11 , Total 39 pages
5.2.1
5.2.1
5.2.1
Mobile
Mobile
Mobile
Telecommunication
Telecommunication
Telecommunication
Network
Network
Network
Connection
Connection
Connection
Setting
Setting
Setting
Graph 5.2
Network Selection : “ Hybrid ” means the EVDO Signal is the first choice, otherwise you can also choose CDMA
1x network,
“ EVDO Only ” means selecting EVDO network only,
“ CDMA 1x Only ” means selecting CDMA 1x network only,
Connect method :
“
Auto ” means the system will auto dialup after system restart.
“ Manual ” means the dialup will be activated only by click“connect ” button.
“ On Demand ” means the dial up will be activated after data follow is generated.
“ latency time of Auto network disconnection ” : in the “ On Demand ” mode, setting
the maximal to no flow time, the PPP will be broken
after the configured no flow time.
Access Point name: The APN need to be configured if TD-SCDMA or WCDMA is in use, The APN needn ’ t to be
configured if CDMA2000 is in use.
Dialup Number: The EVDO network dialup number in PPP method. Input local telecom operators ’ number. For
example, China Mobile dial up number:*98*1#;China Telecom dial up number:#7 77
;
China Unicom dial up number : *99# ;
User name and password : For example, in China Telecom CDMA2000, user name and password is :
Page 16

T700
Page 12 , Total 39 pages
ctnet@mycdma.cn and vnet.mobi ; In the other standard, please configure by case.
PPP Status : Display the current PPP status, online time and the PPP disconnection reason.
5.2.2
5.2.2
5.2.2
Ethernet
Ethernet
Ethernet
Connection
Connection
Connection
Setting
Setting
Setting
Ethernet connection mode: PPPoE 、 DHCP (auto config), Static (fixed IP),
L2TP , PPTP .
Graph5.3
Graph5.4
Page 17

T700
Page 13 , Total 39 pages
Graph 5.5
Page 18

T700
Page 14 , Total 39 pages
Graph 5.6
Graph 5.7
Page 19

T700
Page 15 , Total 39 pages
5.3
5.3
5.3
LAN
LAN
LAN
Setting
Setting
Setting
Graph 5.8
DHCP Setting : Start DHCP service,configure Start IP address, End IP address, Subnet mask, Lease time.
DNS Setting : Suggest to select “ use default DNS Server/Gateway”and make ppp to search DNS Server an d
Page 20

T700
Page 16 , Total 39 pages
Gateway IP automatically . Y ou can also choose setting up the DNS server and default gateway manually.
802.1d Spanning tree : Avoid the bridging loop and maintain the redundant pathway .
LLTD : Discovery the link layer topology , get the equipment location in network topology.
IGMP Proxy : I ntercept the IGMP requirement of terminal client and process the requirement , then sen d
the processed requirement to up layer router.
UPnP:Universal plug-and-play,a right-peer network connecting system that applying in PC and intellige nt
device.
Router Advertisement : Router advertisement.
PPPoE relay : PPPOE forward.
DNS Proxy : DNS forward block.
5.4
5.4
5.4
DHCP
DHCP
DHCP
Clients
Clients
Clients
The information of the host that connect to DHCP .
GRAPH 5.9
5.5
5.5
5.5
VPN
VPN
VPN
Pass-through
Pass-through
Pass-through
Users can start the
NAT
Pass-through of IPSec, PPTP and L2TP protocols.
Page 21

T700
Page 17 , Total 39 pages
Graph 5.10
5.6
5.6
5.6
Advanced
Advanced
Advanced
Routing
Routing
Routing
Setting
Setting
Setting
Users can set the static routing rule and the dynamic routing protocol, check the current setting rule. The
dynamic route can use RIP protocol.
GRAPH 5.11
Page 22

T700
Page 18 , Total 39 pages
5.7
5.7
5.7
QoS
QoS
QoS
Quality
Quality
Quality
ofofof
Service
Service
Service
Graph 5.12
After Set up “ select”QoS,set up the upload bandwidth and download bandwidth, click “ submit ”,then the Q oS
group will be displayed. User can load system by default or creat new QoS rule.
5.8
5.8
5.8
Time
Time
Time
Management
Management
Management
and
and
and
Dynamic
Dynamic
Dynamic
Domain
Domain
Domain
Setting
Setting
Setting
User can select synchronization with the host or input the time server address.,select the correct time. Look a t
Graph 5.13.
Dynamic domain service can provide the setting of DNS server that can provide the variable address .
Page 23

T700
Page 19 , Total 39 pages
Graph 5.13
Page 24

T700
Page 20 , Total 39 pages
CHAPTER
CHAPTER
CHAPTER
666
Wireless
Wireless
Wireless
Network
Network
Network
setting
setting
setting
6.1
6.1
6.1
APAPAP
Mode
Mode
Mode
Setting
Setting
Setting
If the operation mode is configured as “ Gateway
Gateway
Gateway”, then the wireless network module will be AP mode.
6.1.1
6.1.1
6.1.1
Basic
Basic
Basic
Setting
Setting
Setting
Click menu “ Wireless network setting->basic setting ” and enter the wireless setting page, look at graph
6.1
Page 25

T700
Page 21 , Total 39 pages
Graph 6.1
Click “ basic setting configure ” and set the basic wireless parameter .
Broadcast network name : If you choose stop then the wireless name(SSID)will be hidden.
Network mode : including 5 modes, 802.11b , 802.11g , 802.11n , 802.11b/g adaptive and 802.11b/g/n
adaptive.
Network
name
( SSID
)
(service set identifier):The wireless users will be permitted to visit LAN only if t hey
make their wireless network name (SSID) and T700 equipment name(SSID) the same. Support multi-SSID
,
users can make the wireless terminal login t he network in different ways by the needs and implement of
the rating isolation management to the wireless access.
Channel: Select wireless channel .
AP Isolation/MBSSID AP Isolation : The terminals can visit each other if several terminals login the AP at
the same time.
Page 26

T700
Page 22 , Total 39 pages
6.1.2
6.1.2
6.1.2
Advanced
Advanced
Advanced
Setting
Setting
Setting
Graph 6.2
Please do not modify the setting only if users can deeply understand the WIFI technology.
6.1.3
6.1.3
6.1.3
Safe
Safe
Safe
Mode
Mode
Mode
Certification model are:
Open, Shared, 802.1x, WP A,WPA-PSK,WPA2, WP A-PSK, WPA2/WPA mixture , WPA2/WPA – PSK mixture.
Shared encryption
Don ’ t choose “ Disable ” WEP encryption mode, the WEP encryption option will be displayed.
Encryption strength: 128 or 64.
Page 27

T700
Page 23 , Total 39 pages
Access password:Wireless user can ’ t login the target wireless AP if the user’s Encry ption Key is not same wit h
AP’s
key.
Graph 6.3
802.1x
802.1x
802.1x
certification
certification
certification
Select “ 802.1x”and enter802.1x certification page.
802.1x certification need a Radius server . Y ou can input Radius server, IP address, port and password.
Look at graph 6.4
Page 28

T700
Page 24 , Total 39 pages
Graph 6.4
6.1.4
6.1.4
6.1.4
WPS
WPS
WPS
WPS “ activate ”,the WPS setting menu will display. Users can set WPS by inputting PIN or PBC button on route
r.
Long press WPS button and then Reset OOB.
If users want to use PIN mode to connect with ST A, the PIN of AP must be the same as PIN of STA.
Graph 6.5
Page 29

T700
Page 25 , Total 39 pages
6.1.5
6.1.5
6.1.5
APAPAP
Client
Client
Client
If the operation mode is configured as “ APAPAP
Client
Client
Client”, then the AP client fuction will be opened.
Notice :
To
make AP client function works normal, the MAC address of wireless interface of the router and the
relevant router must both be configured as the number which is the multiple of 4.
Graph 6.6
6.1.6
6.1.6
6.1.6
WDS
WDS
WDS
Please configure the operation mode as “ Gateway
Gateway
Gateway”.
WDS“enable ” , the WDS setting menu will display.
In Lazy mode, the APs can be connected automatically.
In Bridge mode, this AP is just as bridge, other clients can ’ t see the client connected with this
AP.
In repeater mode, you need to set the MAC address of the wireless interface of the AP which you want to
connect with.
Page 30

T700
Page 26 , Total 39 pages
Graph 6.7
6.1.7
6.1.7
6.1.7
Station
Station
Station
list
list
list
Graph 6.8
Page 31

T700
Page 27 , Total 39 pages
CHAPTER
CHAPTER
CHAPTER
777
Security
Security
Security
setting
setting
setting
7.1
7.1
7.1
MAC/IP/Port
MAC/IP/Port
MAC/IP/Port
Filter
Filter
Filter
Setting
Setting
Setting
Select “ Firewall ” , click “ MAC/IP/Port filter setting”.
Filter the data of specific MAC address device,
Filter the data of specific IP or source IP address device and filter certain packet of protocol.
Filter the data of device in specific port number range.
Graph7.1
URL filter page , users can filter URL by setting up this page.
Graph7.2
Page 32

T700
Page 28 , Total 39 pages
7.2
7.2
7.2
Fictitious
Fictitious
Fictitious
Server
Server
Server
Users can setup fictitious server on this page. Setup server in LAN and activate fictitious server.
Nominate port number and IP address and protocol; make it available to the extranet host.
Graph 7.3
7.3
7.3
7.3
DMZ
DMZ
DMZ
Users can setup isolation zone between extranet and intranet, to avoid the invasion.
Graph 7.4
Page 33

T700
Page 29 , Total 39 pages
7.4
7.4
7.4
System
System
System
Security
Security
Security
Setting
Setting
Setting
Users can configure the remote control, filter WAN ping packets, packet filter testing, start or forbidden.
Graph 7.5
Page 34

T700
Page 30 , Total 39 pages
CHAPTER
CHAPTER
CHAPTER
888
System
System
System
Management
Management
Management
8.1
8.1
8.1
Language
Language
Language
and
and
and
Administrator
Administrator
Administrator
Setting
Setting
Setting
Users can choose English or Simply Chinese.
Users can change account and password in Administrator setting page.
Page 35

T700
Page 31 , Total 39 pages
Graph 8.1
8.2
8.2
8.2
Software
Software
Software
Upgrade
Upgrade
Upgrade
After selecting the target file, click“confirm ” and then upgrade start.
Graph 8.2
8.3
8.3
8.3
Setting
Setting
Setting
Management
Management
Management
Users can export current router setting file or import existing setting file to router . Press restore default then
the router will be back to initial settings. Press restart button then the system will close and start again.
Page 36

T700
Page 32 , Total 39 pages
Graph 8.3
Page 37

T700
Page 33 , Total 39 pages
8.4
8.4
8.4
System
System
System
Instruction
Instruction
Instruction
User can input command in this page and then the command will be executed under shell.
Graph 8.4
Page 38

T700
Page 34 , Total 39 pages
8.5
8.5
8.5
System
System
System
Information
Information
Information
User can trace the syslog in this page and check the fault cause .
Graph 8.5
Page 39

T700
Page 35 , Total 39 pages
CHAPTER
CHAPTER
CHAPTER
999
FAQ
FAQ
FAQ
9.1
9.1
9.1
Login
Login
Login
Failure
Failure
Failure
9.1.1
9.1.1
9.1.1
Line
Line
Line
and
and
and
Equipment
Equipment
Equipment
Inspect
Inspect
Inspect
1.
Check the power light is open or not, if not, please confirm the electricity and adaptor are correctly
connected or not.
2.
Check LAN1-LAN3 light is open or not, if not, please confirm whether Ethernet cable is correctly
connected or straight / cross cable is correctly selected.
3.
If users are using EVDO connection, please confirm EVDO dial up is in use. Besides, please confirm the
parameters of “ network/EVDO setting”are correct.
(Notice: if EVDO internet is selected, please reset the router; if EVDO internet setting is changed but
ppp is not up, wait the dialup of router . Please do not unplug EVDO modem during router is working.
Please repeat above process if necessary.)
If above requirement is well comply, the line and router should be in shape, please check PC and
equipment setting.
9.1.2
9.1.2
9.1.2
Setting
Setting
Setting
Inspect
Inspect
Inspect
Below will introduce the setting inspect of built-in dial-up in Windows 2000.The inspect on the other dialup
method and operation system is similar.
1. Enter the device manager to check the PC card is properly installed.
2. Check the setting of PC card; make sure the network connection setting is configured as
“ automatically obtain IP address”. refer to 3.3
3. T ry to execute “ ping 192.168.1.1 ” , observe the reaction. If “ time out”, please recheck the Ethernet
connection and IP setting.
4. If the connection is successful, please try to ping a extranet address, for example “ ping
202.96.209.133”.
If the ping is successful, we can make sure that the setting of router is ok, please continue to
check the problem refer to step 5.
If the ping is unsuccessful, please check the setting is correct or not by step 6.
5. Please try to ping extranet URL address , for example “ ping www.google.com”.
If the ping is successful , that means the network setting is ok, please check PC side setting, for
example the security level is too high or the installation of anti-virus firewall.
If the ping is unsuccessful, please check the setting of PC card, refer to 3.3.
Note 1:The way to input command in Windows2000 is:click “ run ” in Windows start menu, input“cmd ” in t he
pop up window and enter, the Open Command Window will pop up.
Note 2: The standard of successful connection is that the return showed as below after the ping command is
executed. See graph 9.1.
Page 40

T700
Page 36 , Total 39 pages
Graph 9.1
6.
If only the ping to extranet IP is unsuccessful, please try to focus on the correction of device settings.
7.
Please refer to 5.1 for the connection setting.
Make sure above parameters are correctly saved, then the users can surf the internet.
Page 41

T700
Page 37 , Total 39 pages
CHAPTER
CHAPTER
CHAPTER
101010
Technical
Technical
Technical
Specifications
Specifications
Specifications
Machine at full speed maximum power consumption : <20W
Power adapter input : 12V , 0.7A
Weight : 342g
Operating temperature : 0 ℃ -40 ℃
Operating humidity : 20%~90% ( non-condensing )
Size : 196mm * 142mm * 30mm (without antenna)
Machine power : 12V
Page 42

T700
Page 38 , Total 39 pages
CHAPTER
CHAPTER
CHAPTER
111111
Environmental
Environmental
Environmental
Protection
Protection
Protection
Instruction
Instruction
Instruction
1. The company promises that the product is in full compliance with the EU ROHS environmental protection
directives.
2. That some of the device from a technological or economic point of view, there is no alternative, so the use
of leaded materials, but these materials are exempted from environmental protection in the EU. Within the
framework of the list, parts list is a s follows:
The name and content of Products, toxic and hazardous substances or elements
Part Name
Toxic and hazardous substances or elements
Lead
(Pb)
Mercury
(Hg)
Cadmium
( Cd)
hexavalent
chromium
(Cr6+)
pbb
(PBB)
pbde
(PBDE)
circuit module
×
OOOOO
Adapter
×
OOOOO
the antenna and its
connection
components
×
OOOOO
O: Indicates that the toxic and harmful substances in the part of all homogeneous materials are less than the
content of the restrictions imposed in the SJ/T11363-2006 standard
×:Indicates that the toxic and hazardous substance exceeds the restrictions imposed by the standard requirement s
SJ/T11363-2006 at least in this part of the content of a homogeneous material.
Note : 1 ) If the product sold have built-in antenna, there is no the antenna and its connecting components , If the
product is only USB-powered products, there is no adapter. 2 ) The lead contained in circuit module is mainly
inDischarge tube, transistors, diode s, transistors, SMD resistors and capacitors, high-frequency converter . The
lead contained in adapter is mainly in PIN feet and plug metal parts. The lead contained in antenna and its
connecting components is in metal part.
3. The products can be environmentally friendly used in the period of 10 years.
Conditions for environmental protection use period : -20 ℃ ~ 50 ℃ , No acid or other hazardous gas
environments.
4. Unless mark the other special mark, this 10 years mark cover the whole Environmental Use period. Some parts
may have a different environmental protection use period (for example, batteries, power adapter) attached.
 Loading...