

Page 1
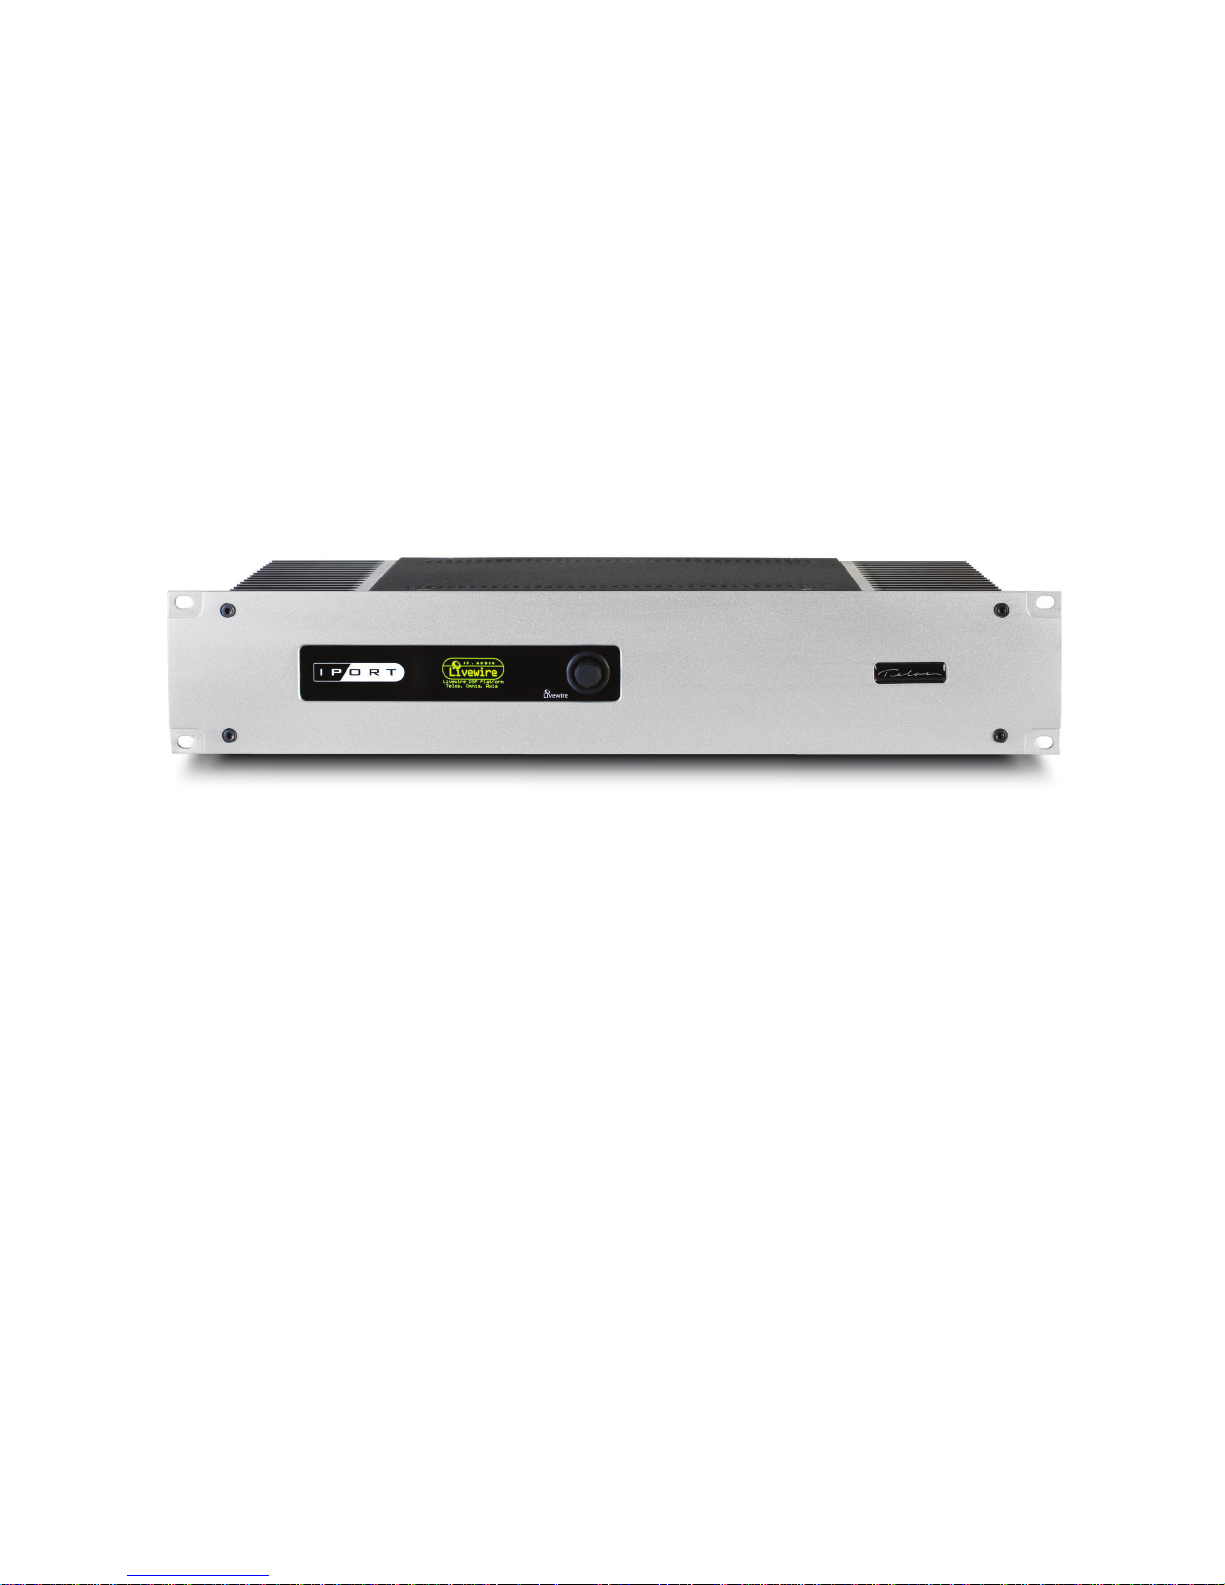
iPort
Livewire-MPEG Gateway
USER’S MANUAL
Manual Version 2.0 for software version 1.6.1g and later
December, 2011
Page 2

Telos iPort Manual
© 2011 TLS Corporation. Published by Telos Systems/TLS Corporation. All rights reserved.
Trademarks
Telos Systems, the Telos logo, iPort, Livewire, Zephyr, ZephyrExpress, Zephyr Xstream, Nx12, TWOx12,
Series 2101, Desktop Director, and Status Symbols are trademarks of TLS Corporation. All other trade-
marks are the property of their respective holders.
Notice
All versions, claims of compatibility, trademarks, etc. of hardware and software products not made
by Telos mentioned in this manual or accompanying material are informational only. Telos Systems
makes no endorsement of any particular product for any purpose, nor claims any responsibility for
operation or accuracy.
We reserve the right to make improvements or changes in the products described in this manual,
which may aect the product specications, or to revise the manual without notice.
Warranty
is product is covered by a two year limited warranty, the full text of which is included in this manual.
Updates
e operation of the iPort is determined largely by software. We routinely release new versions to add
features and x bugs. Check the Telos web site for the latest. We encourage you to sign-up for the
email notication service oered on the site.
Feedback
We welcome feedback on any aspect of the Telos iPort or this manual. In the past, many good ideas
from users have made their way into software revisions or new products. Please contact us with your
comments.
Service
You must contact Telos before returning any equipment for factory service. We will need the serial
number, located on the back of the unit. Telos Systems will issue a Return Authorization number
which must be written on the exterior of your shipping container. Please do not include cables or accessories unless specically requested by the technical support engineer at Telos. Be sure to adequately
insure your shipment for its replacement value. Packages without proper authorization may be refused.
US customers please contact Telos technical support at +1 (216) 241-7225. All other customers should
contact your local representative to make arrangements for service.
We support you...
By Phone / Fax:
You may reach our 24/7 Support Team anytime around the clock by calling +1-216-622-0247.
For billing questions or other non-emergency technical questions, call +1-216-241-7225 between 9:30 AM to 6:00 PM
USA Eastern Time, Monday through Friday.
Our fax is +1-216-241-4103.
By E-Mail:
Technical support is available at [email protected].
All other inquiries at [email protected].
Via World Wide Web:
e Telos Web site has a variety of information which may be useful for product selection and support.
e URL is www.Telos-Systems.com
10 9 8 7 6 5 4 3 2 1
Page 3

Telos Systems USA
This symbol, wherever it appears, alerts you to the presence
of uninsulated, dangerous voltage inside the enclosure –
voltage which may be sufficient to constitute a risk of shock.
This symbol, wherever it appears, alerts you to important
operating and maintenance instructions. Read the manual.
Telos Systems
1241 Superior Avenue E
Cleveland, OH 44114 USA
+1-216-241-7225 (phone)
+1-216-241-4103 (fax)
+1-216-622-0247 (24/7 Technical Support)
Notices and Cautions
CAUTION:
THE INSTALLATION AND SERVICE INSTRUCTIONS IN THIS MANUAL ARE FOR
USE BY QUALIFIED PERSONNEL ONLY. TO AVOID ELECTRIC SHOCK, DO NOT
PERFORM ANY SERVICING OTHER THAN THAT CONTAINED IN THE OPERATING
INSTRUCTIONS UNLESS YOU ARE QUALIFIED TO DO SO. REFER ALL SERVICING
TO QUALIFIED PERSONNEL.
WARNING:
TO REDUCE THE RISK OF ELECTRICAL SHOCK, DO NOT EXPOSE THIS PRODUCT
TO RAIN OR MOISTURE.
USA CLASS A COMPUTING DEVICE INFORMATION TO USER. WARNING: is
equipment generates, uses, and can radiate radio-frequency energy. If it is not installed and used as
directed by this manual, it may cause interference to radio communication. is equipment complies
with the limits for a Class A computing device, as specied by FCC Rules, Part 15, Subpart J, which
are designed to provide reasonable protection against such interference when this type of equipment
is operated in a commercial environment. Operation of this equipment in a residential area is likely
to cause interference. If it does, the user will be required to eliminate the interference at the user’s
expense. NOTE: Objectionable interference to TV or radio reception can occur if other devices are
connected to this device without the use of shielded interconnect cables. FCC rules require the use of
shielded cables.
CANADA WARNING: “is digital apparatus does not exceed the Class A limits for radio noise
emissions set out in the Radio Interference Regulations of the Canadian Department of Communications.” “Le present appareil numerique n’emet pas de bruits radioelectriques depassant les
limites applicables aux appareils numeriques (de Class A) prescrites dans le reglement sur le brouillage
radioelectrique edicte par le ministere des Communications du Canada.”
Page 4

Page 5

TELOS IPORT MANUAL | V
Table of Contents
We support you... . . . . . . . . . . . . . . . . . . . . . . . . . . . . .i
1 Introduction 1
Welcome to the iPort . . . . . . . . . . . . . . . . . . . . . . . . . . . . 1
Features & Benets . . . . . . . . . . . . . . . . . . . . . . . . . . . 2
Installation . . . . . . . . . . . . . . . . . . . . . . . . . . . . . . . . . 2
Connections . . . . . . . . . . . . . . . . . . . . . . . . . . . . . . 2
Front Panel LCD . . . . . . . . . . . . . . . . . . . . . . . . . . . . . 3
Initial Start-Up . . . . . . . . . . . . . . . . . . . . . . . . . . . . . 3
Web User Interface . . . . . . . . . . . . . . . . . . . . . . . . . . . . . 3
Changing Passcodes . . . . . . . . . . . . . . . . . . . . . . . . . . . 5
Backing-up and Restoring Conguration . . . . . . . . . . . . . . . . . . 5
Reset . . . . . . . . . . . . . . . . . . . . . . . . . . . . . . . . . . 5
Firmware Upgrade . . . . . . . . . . . . . . . . . . . . . . . . . . . . 5
V-Mixer and V-Mode . . . . . . . . . . . . . . . . . . . . . . . . . . . . 6
To Learn More . . . . . . . . . . . . . . . . . . . . . . . . . . . . . . . 6
2 Livewire-WAN Link 7
Getting Started . . . . . . . . . . . . . . . . . . . . . . . . . . . . . . . 8
Conguring the iPort . . . . . . . . . . . . . . . . . . . . . . . . . . . . 8
Network . . . . . . . . . . . . . . . . . . . . . . . . . . . . . . . . 9
Codec conguration . . . . . . . . . . . . . . . . . . . . . . . . . . . 10
V-Mixer and V-Mode . . . . . . . . . . . . . . . . . . . . . . . . . . . . 11
Diagnostics and Troubleshooting . . . . . . . . . . . . . . . . . . . . . . . 13
FAQs . . . . . . . . . . . . . . . . . . . . . . . . . . . . . . . . . . . . 13
3 Streaming 17
Conguring the iPort for Streaming . . . . . . . . . . . . . . . . . . . . . . 18
Streaming Servers . . . . . . . . . . . . . . . . . . . . . . . . . . . . . . 20
Page 6

vi |
Steamcast . . . . . . . . . . . . . . . . . . . . . . . . . . . . . . . 20
SHOUTcast . . . . . . . . . . . . . . . . . . . . . . . . . . . . . . . 31
ICEcast . . . . . . . . . . . . . . . . . . . . . . . . . . . . . . . . . 32
Stream and Track Names . . . . . . . . . . . . . . . . . . . . . . . . . 32
Using a PC Player to Listen . . . . . . . . . . . . . . . . . . . . . . . . . . 33
Hardware Players . . . . . . . . . . . . . . . . . . . . . . . . . . . . . . 33
MPEG License & Music Copyright . . . . . . . . . . . . . . . . . . . . . . . 34
A1 Warranty and Safety 37
Page 7

| 1
1
Introduction
Welcome to the iPort
e Telos iPort is designed to help you achieve one of two objectives:
♦ Connect two Livewire-equipped facilities over a wide-area network, such that they
appear to be local to each other. As many as 8 bi-directional channels are possible. In the
simplest case, a single Livewire 8x8 interface Node and an iPort at each end provide 8x
bi-directional codec links over an IP channel.
♦ Encode streams for Internet transmission to the public or for internal distribution
systems. ese are normally sent to a SHOUTcast or compatible server to generate the
many streams needed to support individual listeners. As many as 16 encode-only streams
are possible.
It uses state-of-the-art MPEG codec technology to conserve network bandwidth, while
preserving high audio quality. A range of codec types and bitrates are supported.
Codec Bitrates Notes
AAC 24 - 320kbps Standard AAC
AAC-HE 24 - 320kbps High-eciency AAC, also called AAC+
AAC-HEv2 24 - 320kbps Latest generation AAC-HE with parametric stereo enhancements
AAC-LD 24 - 320kbps Low-delay AAC
Layer 3 (MP3) 24 - 320kbps Standard MP3
e codecs are all licensed from Fraunhofer IIS, the inventor of MP3 and co-inventor of
AAC. ey are the highest-possible quality implementations, running on a powerful Intel
oating-point processor.
All audio is connected via a single RJ-45 jack. Because it uses Livewire for the local audio
inputs/outputs, it does not need expensive and space-consuming onboard converters and
connectors.
Conguration is via a web interface. A front-panel LCD oers a simple and immediate
local display of basic operation status and parameters such as the assigned IP number.
ere are two Ethernet jacks, one for connection to the local network and the other to the
wide-area network.
In the link operating mode, the iPort is intended to be used over IP connections that have reasonably good
Quality of Service (QoS), with controlled packet loss, jitter, and bandwidth. The AAC codec has a concealment mechanism to deal with occasional packet loss, but it is not intended for conditions where packet
Page 8
2 | Section 1
loss is routine such as on the public Internet. There are congurable buers to accommodate jitter, but longer
buer lengths add to delay. When you need to use non-QoS-controlled links, the Telos Z/IP family products are a
better choice because they have adaptive mechanisms to deal with network problems.
Features & Benets
e iPort is an innovative approach to providing MPEG codec functionality, made possible by
the use of Livewire for its audio interface. Its features include:
♦ High density. 8x8 codec or 16 encode-only channels in a 2U box.
♦ Low cost. We’ve built the iPort on a single industrial PC motherboard rather than on the
usual multiple DSP cards in a frame approach. Together with the Livewire-only audio
interface, we are able to manufacture the iPort at a fraction of the cost of the traditional way.
♦ Direct Livewire connectivity. For people who already have facilities based on Livewire IP
audio, there is no need for any interface or conversion. e iPort simply plugs into a port on
the Ethernet switch and all encode/decode channels are connected with 24-bit/48kHz quality.
♦ Web conguration. Can be done with a PC located anywhere on the network.
♦ Full range of state-of-the-art MPEG codecs. AAC-LD for delay-sensitive applications,
AAC-HE and AAC-HEv2 for low bitrate requirements. Standard AAC for best quality and
resilience to packet loss at higher bitrates.
♦ Excellent quality and high-density streaming encoder with the advantage of the Livewire IP
Audio network interface.
Installation
e iPort mounts in a 2RU high space in a standard 19” rack. e unit will operate in any
environment where the stirred air temperature around the unit is between 0 to 40 degrees
Celsius (32 to 104 degrees Fahrenheit) with a relative humidly of 0 to 98% (non-condensing).
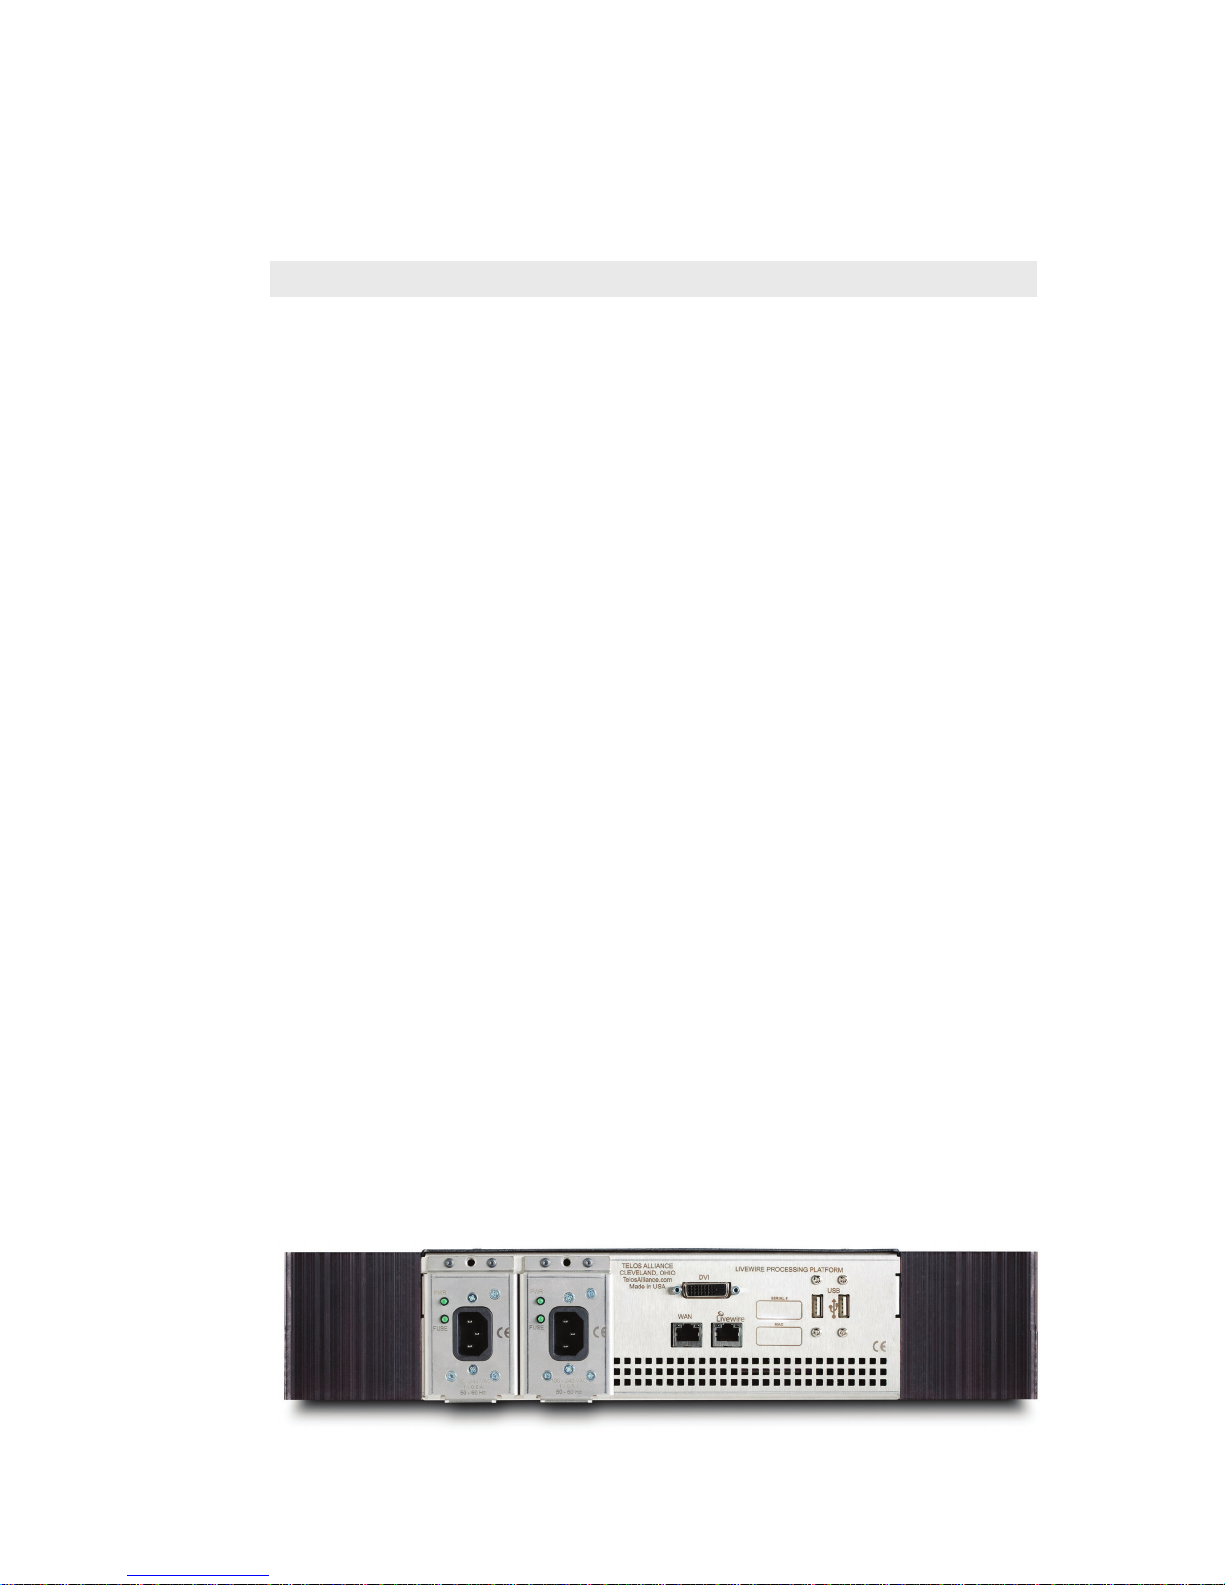
ere are redundant ventilation fans on the rear panel which exhaust air that is taken in from
openings in the box sides. All of these need to remain unobstructed.
e fan speed is controlled automatically, and is normally quite slow. If the fans are running at
high speed, or if there is an over-temperature indication on the front panel LCD, a problem
with air ow or high ambient temperature is probably to blame.
Connections
All audio input/output and control is via two rear-panel Ethernet Rj-45 jacks. e jack labeled
Livewire is for connection of studio-side audio.
Page 9

INTRODUCTION | 3
e jack labeled WAN is for the compressed streams, which is normally connected to a
Wide Area Network link. It automatically adapts its rate to the port at the other end of the
connection.
For both jacks, the iPort’s Ethernet mode is set permanently to AUTO, so the other end
must be, as well. (Problems can result if the other end is set to 100BT or 1000BT.)
Usually, these jacks are connected to an Ethernet switch or an IP router and a PC is
connected to a spare jack on one of these to support the Web control interface. An Ethernet
cross-cable can be used for a temporary direct connection to a PC, allowing conguration.
CAT-5e cables may be used for the Livewire connection, though we recommend CAT-6
when possible. e 100/1000 connection may be CAT-5e if used with a 100BT port at the
other end, or CAT-6 when the other end is 1000BT (gigabyte).
Front Panel LCD
e front panel LCD gives basic status indication. Together with the adjacent knob, it lets
you enter IP values during initial set-up.
Initial Start-Up
Since all user interface is via a Web browser, the rst step is to set the iPort’s IP number and
netmask values. ere are two ways to do this:
♦ Using the iPort’s default IP address, which is displayed on the LCD, connect a PC di-
rectly (via a cross-cable or small Ethernet switch) and change the values to your network’s
requirements with the Web interface. Since the WAN port’s Web access is disabled by
default, you would use the LW Ethernet port.
♦ Set the IP values you need using the LCD/knob front panel interface. Note that it only
allows changing the values for the LW port, but that is what you need, anyway. en,
when you have Web access, congure the WAN values to your requirements.
Web User Interface
e iPort contains a Web server to support a PC with Web browser for conguration and
control. We’ve tested with MS Internet Explorer, Firefox, Opera, and Apple Safari. Java
must be installed in your browser so that dynamic functions such as meters will work.
Point your browser to the iPort by entering the unit’s IP address, like this:
http://192.168.1.7. You will be asked for a user name and password. e defaults are:
♦ User name: user
♦ Password: <blank>
When the home page is opened, you will see a top-level menu with the following links:
♦ Codec conguration - Enable / disable codec instances, assign Livewire channels and
link addresses, set options, display status.
♦ V-Mixer and V-mode - Display virtual mixer and V-Mode modules settings.
♦ Stream Statistics - Display incoming stream performance statistics.
♦ Network - Set host name, IP address, subnet mask and gateway IP address.
♦ System - Display system and network status. Conguration backup / restore / reset to
Page 10
4 | Section 1
factory defaults. Firmware setup. Restart.
♦ Diagnostics - View and capture system diagnostics info.
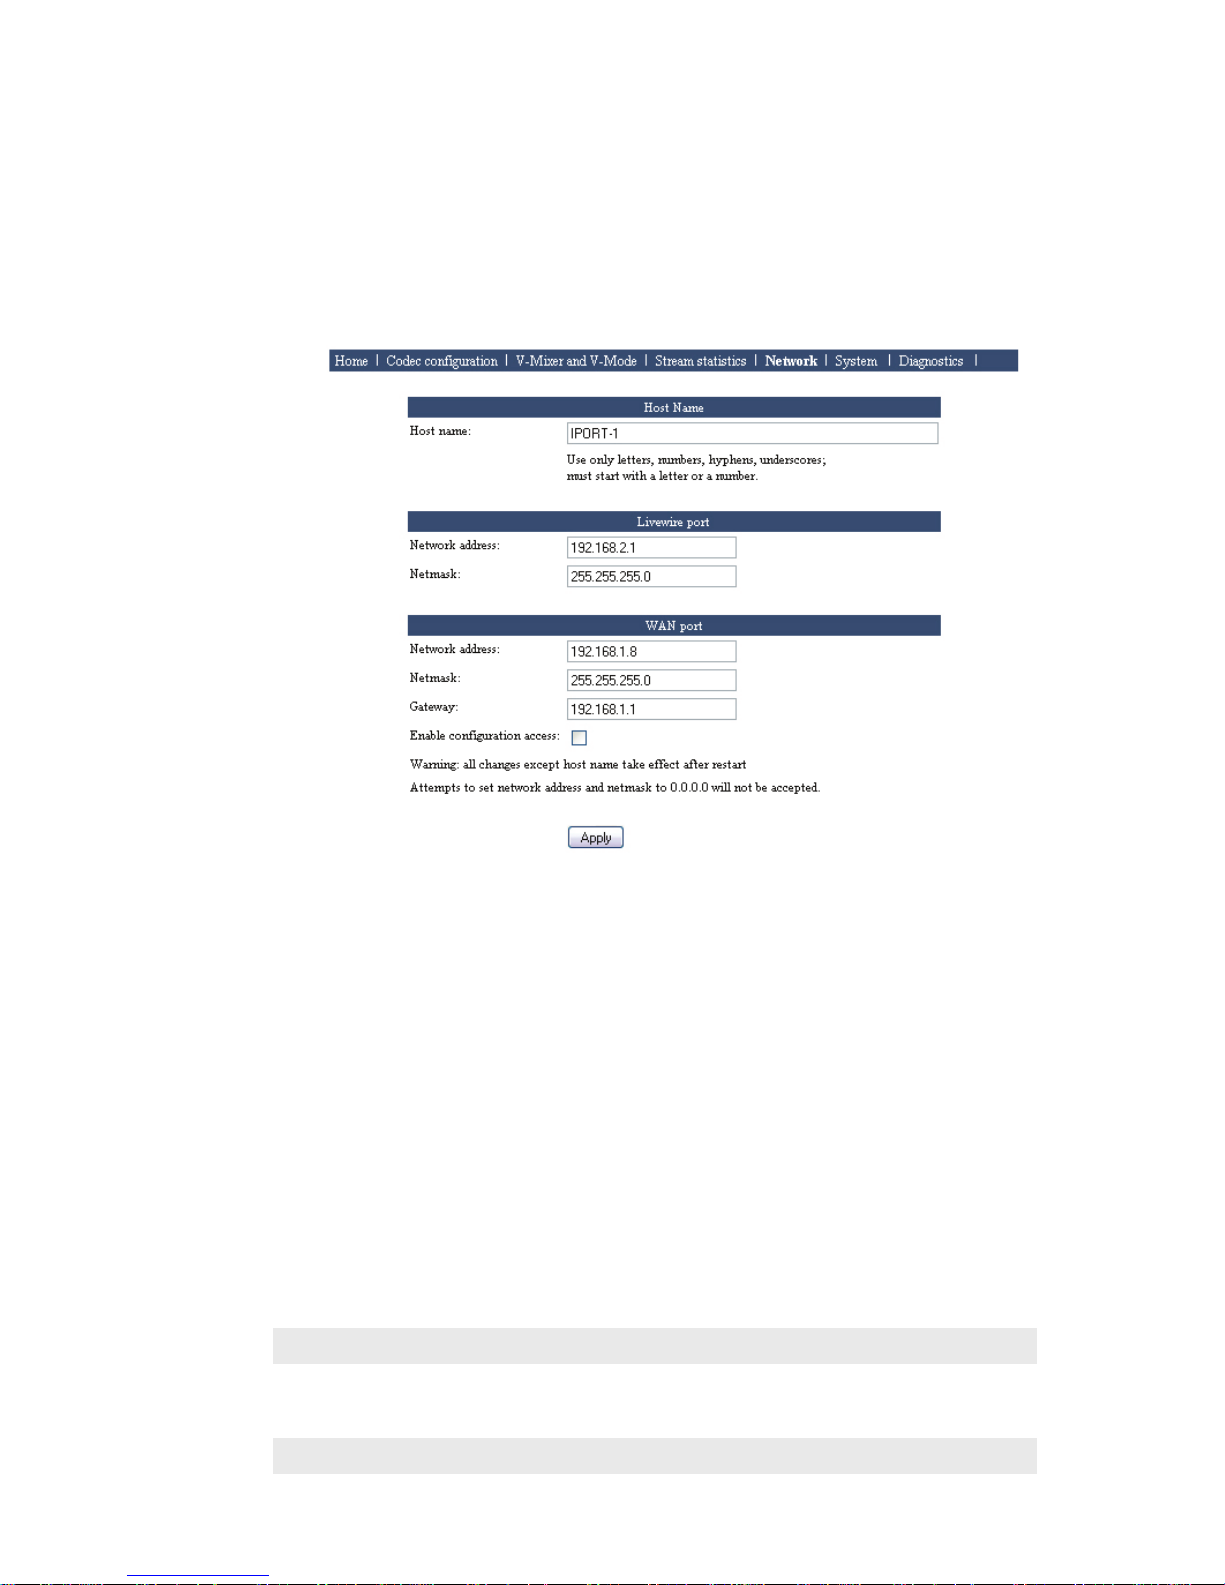
e rst step is going to be to congure the network parameters, so click on the Network link
to open that page.
Host Name
is is the Linux host name that is used for device identication, such as, for example, when
system logs are being sent to an external machine. ese should be unique for each device in
your network, so if you have more than one iPort, you will want to change this from the default
‘ZEPHYR’ text., as we have done here. If this will be your only iPort, you can keep the default.
Livewire port
is is the value for the Livewire Ethernet port. Normally, this will set to a value in the
192.168.x.x range, since these are reserved for local use on LANs and are not routed out to
the Internet or other WANs. For this reason, there is no gateway entry possible. Note that the
netmask value needs to correspond with that of your other equipment, including the PC that is
hosting the Web browser.
WAN port
e WAN port may be set to any needed value. Here, you must enter a correct gateway IP
address for the iPort to work correctly. is will normally be the IP address of the router used
to access the Internet or other WAN.
By default, Web access via the WAN port is disabled. Click the box if you want to enable it.
When the Livewire and WAN networks are independent, the two IP addresses must be in dierent subnets.
In the example above, the 255.255.255.0 netmask means that any IP number with the same rst three digits
would be in the same subnet. The LW and WAN ports are in dierent subnets because we’ve entered dierent
values in the third digit - 2 for the Livewire port and 1 for the WAN port. Other devices that need to communicate with the iPort must be on the corresponding subnets.
Page 11
INTRODUCTION | 5
However, if you do want only one connection to the iPort, then it’s OK to enter the same subnet for both
elds. In this case, both the Livewire and codec streams will be on whichever single physical port you connect. The other should remain unconnected.
Changing Passcodes
is may be done on the System page. You can do this for both the front panel LCD/knob
and Web access.
Default for the LCD/knob is <blank>, meaning no password is needed.
Default for the Web interface is also <blank>.
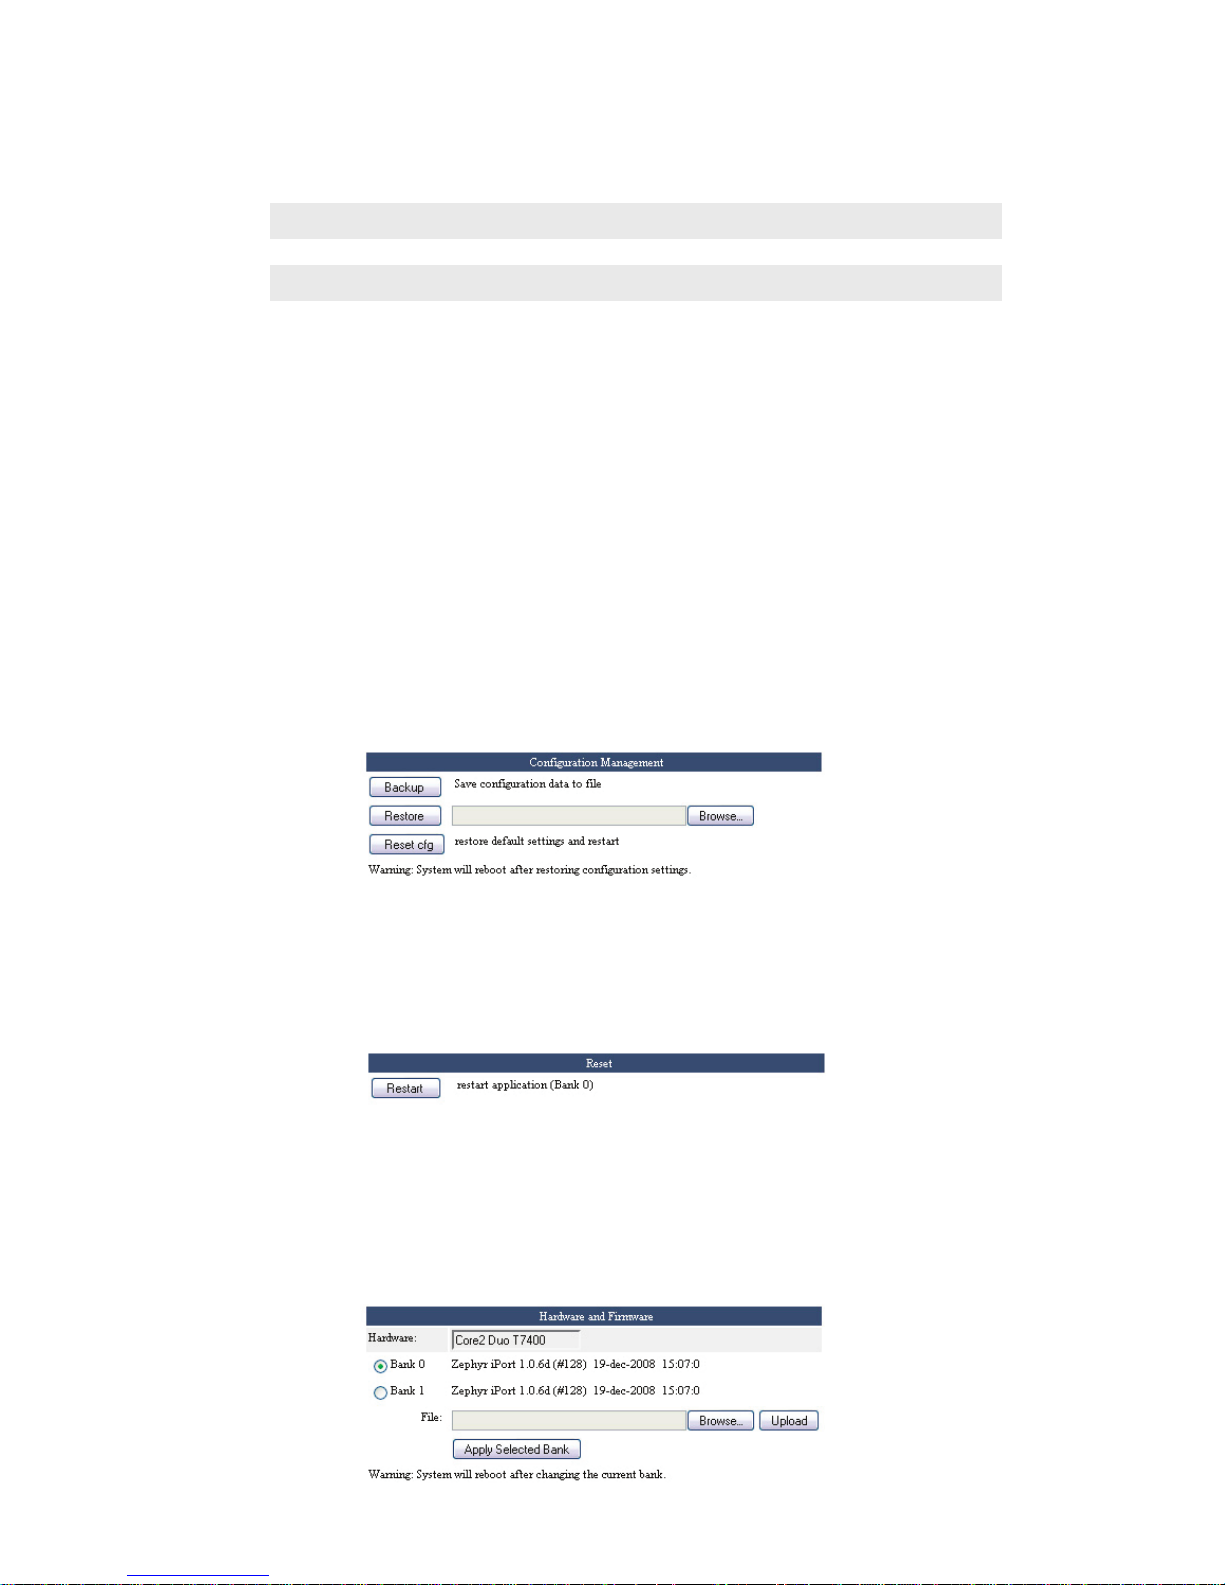
Backing-up and Restoring Conguration
is is on the System page.
It can be time-consuming to enter all the needed iPort conguration values. So we give you
a way to save them all in a le on your local PC. is can also be used to “clone” additional
iPorts after you have congured the rst in a multiple iPort installation. (Don’t forget to
change the Host name, IP numbers, etc. before connecting to your network...)
You can also reset the iPort to factory defaults using the Reset cfg button.
Reset
is is on the System page.
Clicking the Reset button causes the iPort to reset and restart, while retaining all the
current conguration values.
Firmware Upgrade
is is on the System page.
Page 12

6 | Section 1
To install new rmware, the rst step is to download it to your PC. You might receive this via
email from our support department, or you might nd it on our website. After it is on your PC,
browse to locate it, then click the Upload button to install it into the iPort. It will be stored the
in bank checked in the ‘radio button’ above. For a unit in active use, you would store this in the
bank that is not currently active. When the rmware has been successfully uploaded, click the
Apply Selected Bank button to activate it.
V-Mixer and V-Mode
ese are additional functions that can be performed on Livewire streams. ese are the same as
in the Livewire Engine we provide as part of an Element mixing console package, so if you are
familiar with that, you will know how to use this.
V-Mixer oers a way to sum streams to create mixed new ones. e iPort has two 5-input
mixers. ere is a main output, which includes the sum of all inputs, two submix outputs, which
include the sum of each set of 5 inputs, and an individual unmixed output for each input. is
latter is used when only gain control is required, with no mixing.
V-Mode oers a simple function that is useful to split left/right channels, sum L+R, etc. e
iPort has 8 channels of V-Mode.
Normally, these would be used to pre- or post-condition LW channel audio before or after the
iPort’s inputs or outputs.
e virtual “fader” and other values may be entered into the V-Mixer and V-Mode Web page
for xed, manual control. Or they can be supplied dynamically over a network connection,
using a special Telos/Axia protocol. e PathnderPC software application oered by Axia can
control these values in realtime. e protocol description is available upon request to 3rd parties
who want to remotely control these iPort functions.
To Learn More
e axiaaudio.com website has a wealth of information on Livewire technology, the wide range
of LW-equipped gear, and partners. e telos-systems.com site has a lot of information on
MPEG codecs, networks, IP streaming, etc.
Our support team is standing-by to answer specic questions. In the USA, contact +1 216
241.7225. Worldwide, email [email protected].
Page 13
| 7
2
Livewire-WAN Link
Livewire is a professional-grade IP Audio system, used over controlled local area networks. As a
modern replacement for older analog or TDM digital systems, it oers very low delay and high
audio delity. ere are a wide range of products made for broadcast studio facilities that take
advantage of Livewire: interface nodes for analog and AES3 audio, routers, mixing consoles,
dynamics processors, ISDN and POTS telephone interfaces, delay units, satellite encoders and
receivers, PC-based delivery systems, and – of course – codecs. Facilities span the gamut from a
single interface Node to multi-studio installations with dozens or even hundreds of connected
devices.
Because Livewire is uncompressed, it requires a lot of bandwidth: around 3Mbps for a stereo
channel. And because Livewire needs to be very low delay, it cannot tolerate a network with too
much latency or jitter. ese conditions are easily fullled with an inexpensive switched Ethernet LAN. But these conditions don’t generally exist for wide area networks, which use telephone
lines and IP routers. e iPort bridges the two environments. It reduces the needed bandwidth
and accommodates the delay and jitter caused by WANs. Remember that 3Mbps rate? After
MPEG AAC compression, a typical rate would be 140kbps – over 20 times less. Most of the
reduction comes from the compression process, but some comes from using larger packets with
less header overhead.
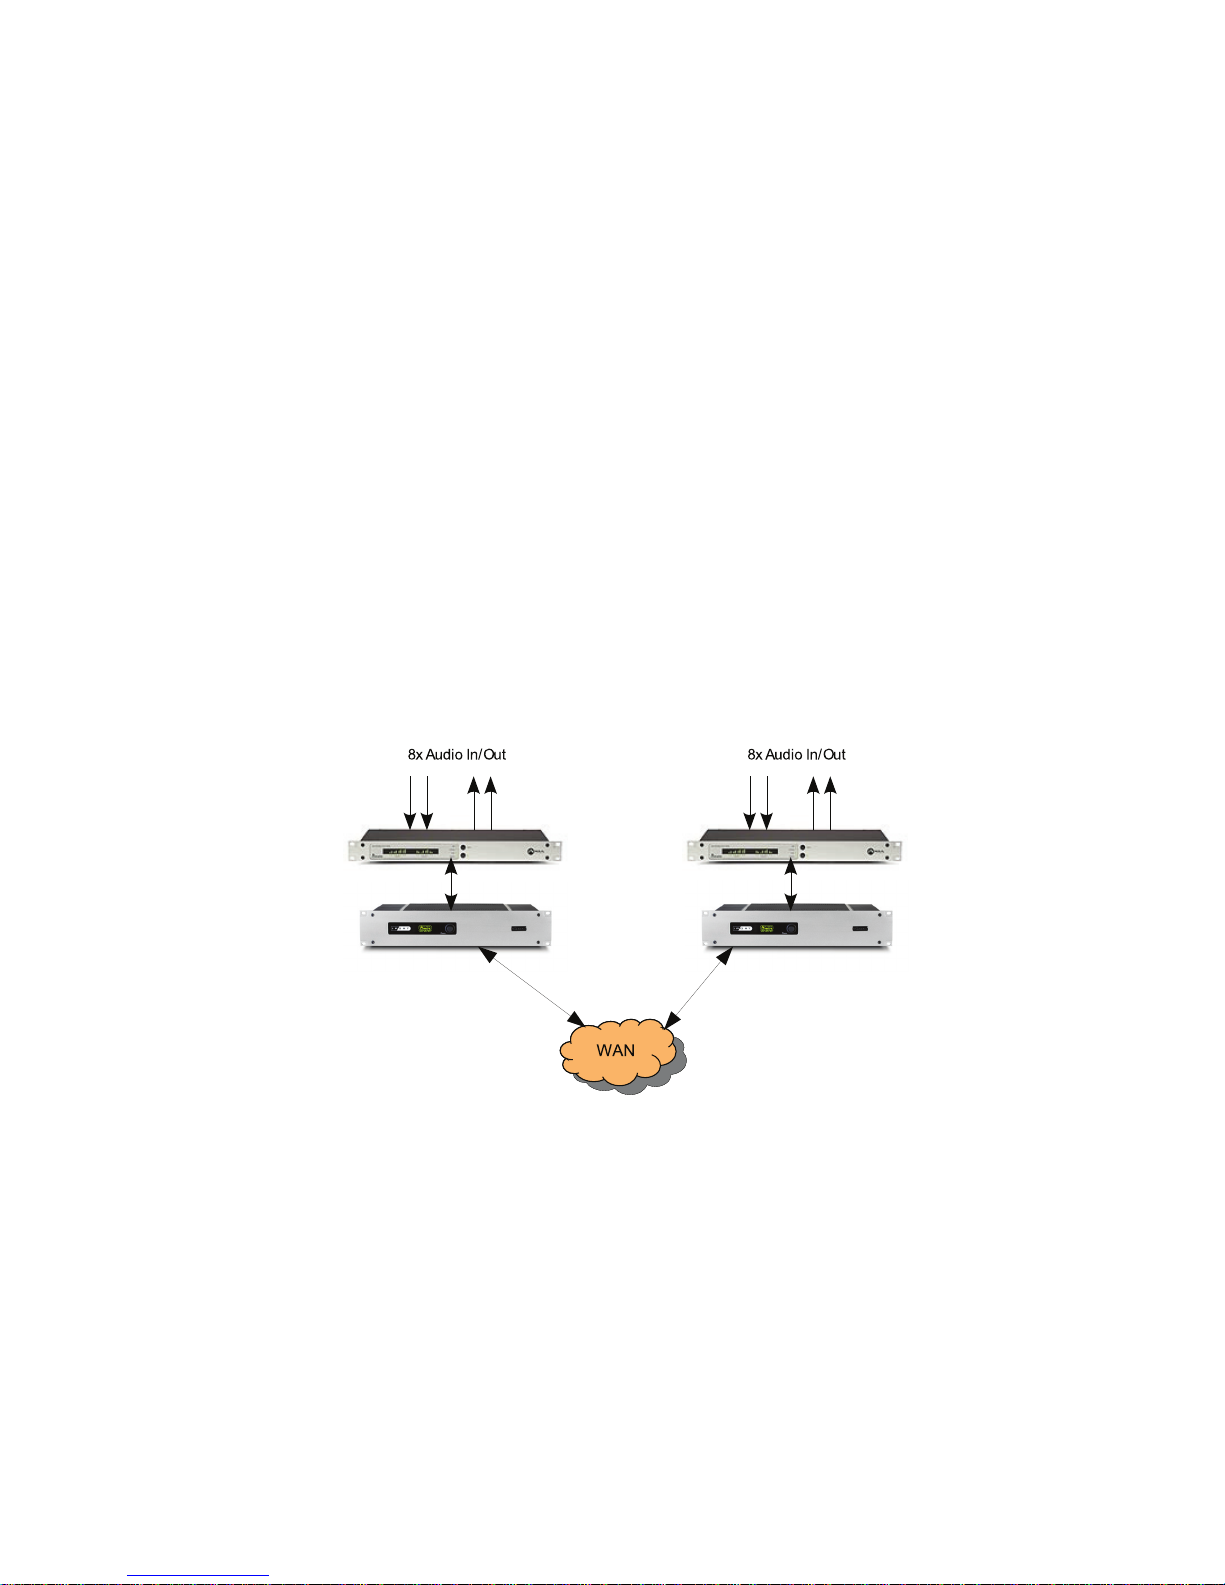
If you already have a Livewire-based installation, the iPort is a simple and low-cost way to
extend it over a wide-area IP network. Connect the local network to one of the iPort’s jacks, the
WAN to the other, make some conguration choices, and you are ready to go. is application
nicely illustrates the advantages of IP Audio – were you to do the same thing with traditional
Page 14
8 | Section 2
- IP Router
- Firewall
Private or
Internet Link
equipment, you’d have a rack full of codec boxes, expensive router interface cards, and a
plethora of cables.
If you don’t already have a Livewire installation, no problem. You can use an audio interface
Node, or two, and still benet from the iPort’s simplicity and low cost.
Getting Started
A simple installation would look like the one in the block diagram above. In this case, a LW
Node is providing the audio interface. Both analog and AES3 Nodes are available. Since
each Node provides 8 inputs and 8 outputs, you have a perfect correspondence with the
channel capacity of the iPort. e Node could be connected with a small Ethernet switch.
You could then connect a PC for conguration to a spare port. Or you could use an Ethernet cross-cable for a direct connection. e conguration PC would be connected only for
set-up, in advance of use, then disconnected. Or it could be connected to the WAN port, if
that has been congured to allow Web access.
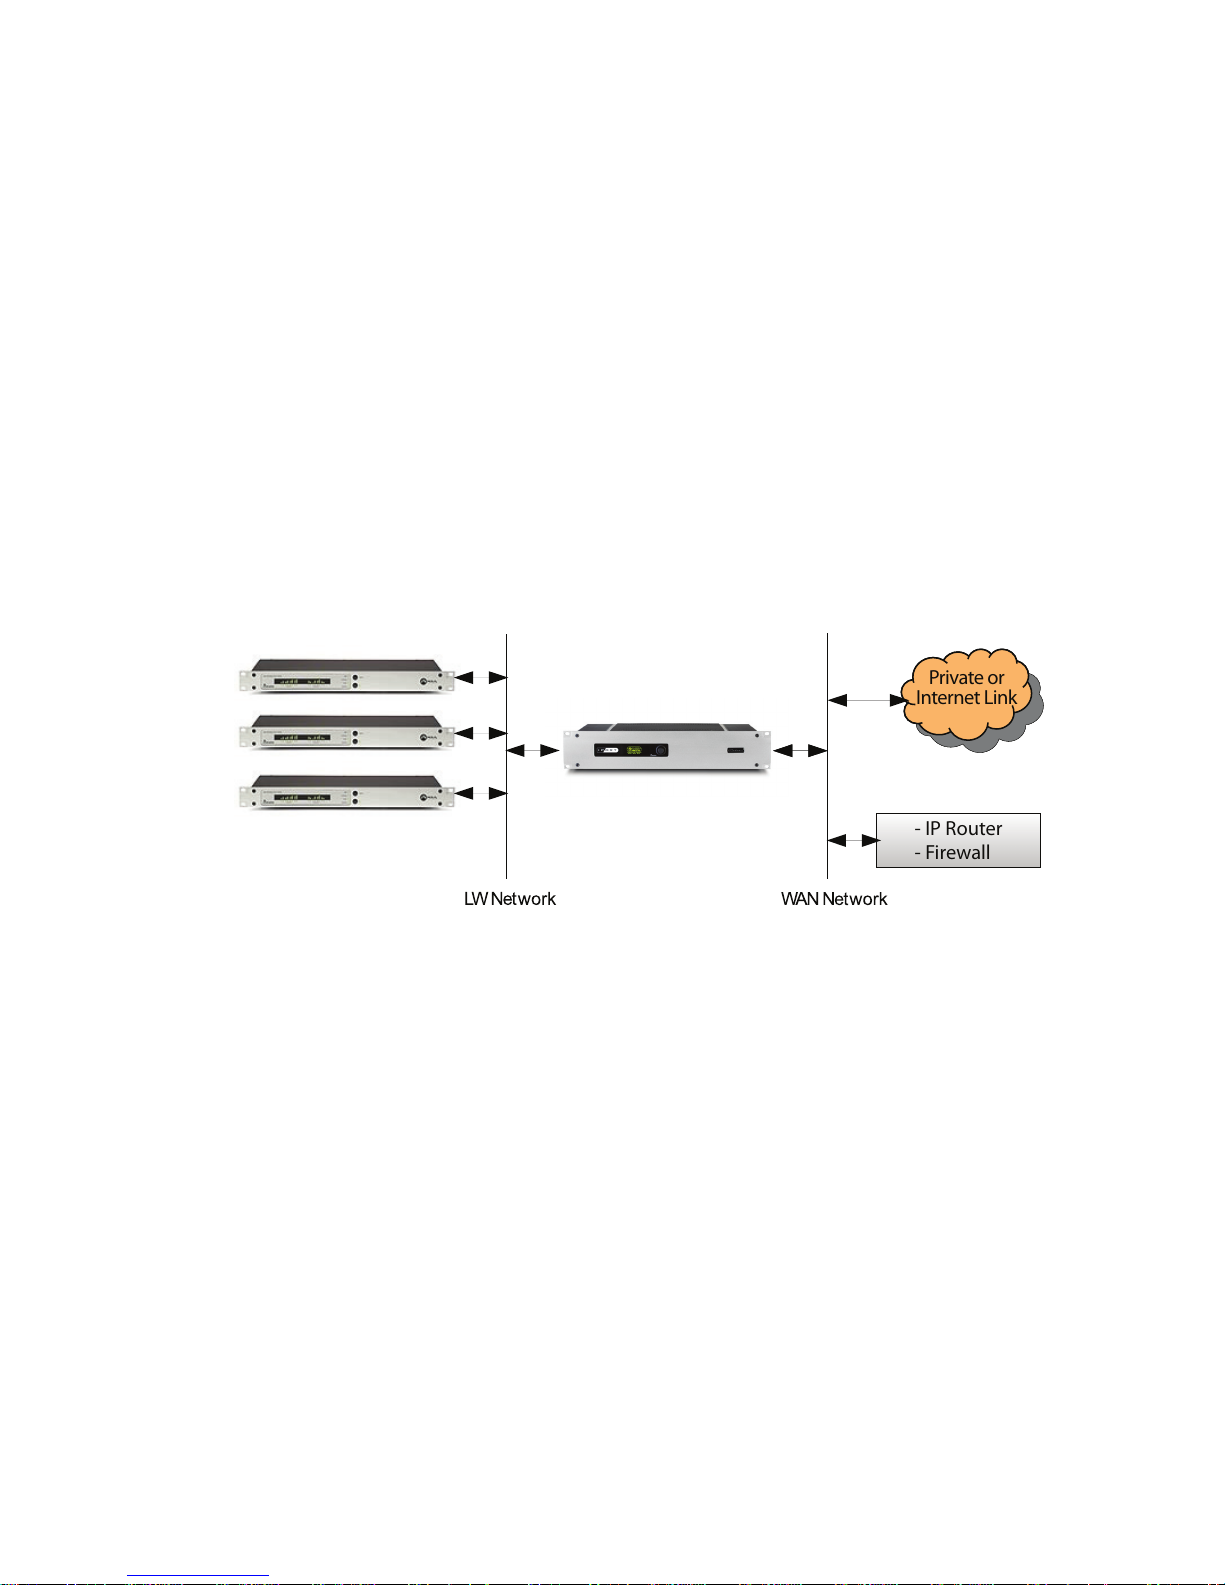
If you will be using the iPort within a facility that is already Livewire-equipped, the Node
will not be required. Just connect the LW port of the iPort to a free Ethernet port in your
system. Livewire sources may be from/to either Nodes or PC software drivers, however
there must be at least one hardware Livewire Node in the system to provide the required
clock signal to the network.
Most Livewire installations will be like that in the diagram above, with separate networks
for the Livewire audio and the general network, which has the WAN interface. e iPort is
ready for this case, with its two Ethernet interface ports. It keeps the two networks isolated.
However, some LW installations will have the audio and general networks combined.
Conguring the iPort
All conguration is via a Web interface. By default, this is accessible only via the Livewire
port, but access over the WAN port can be enabled.
e rst step is to set-up the network values. Open a Web browser and point it to the IP
address of the iPort. For example: http://192.168.1.7. You will be asked for a user name and
password. e factory defaults are:
User name: user
Password: <blank>
Page 15
LIVEWIREWAN LINK | 9
Network
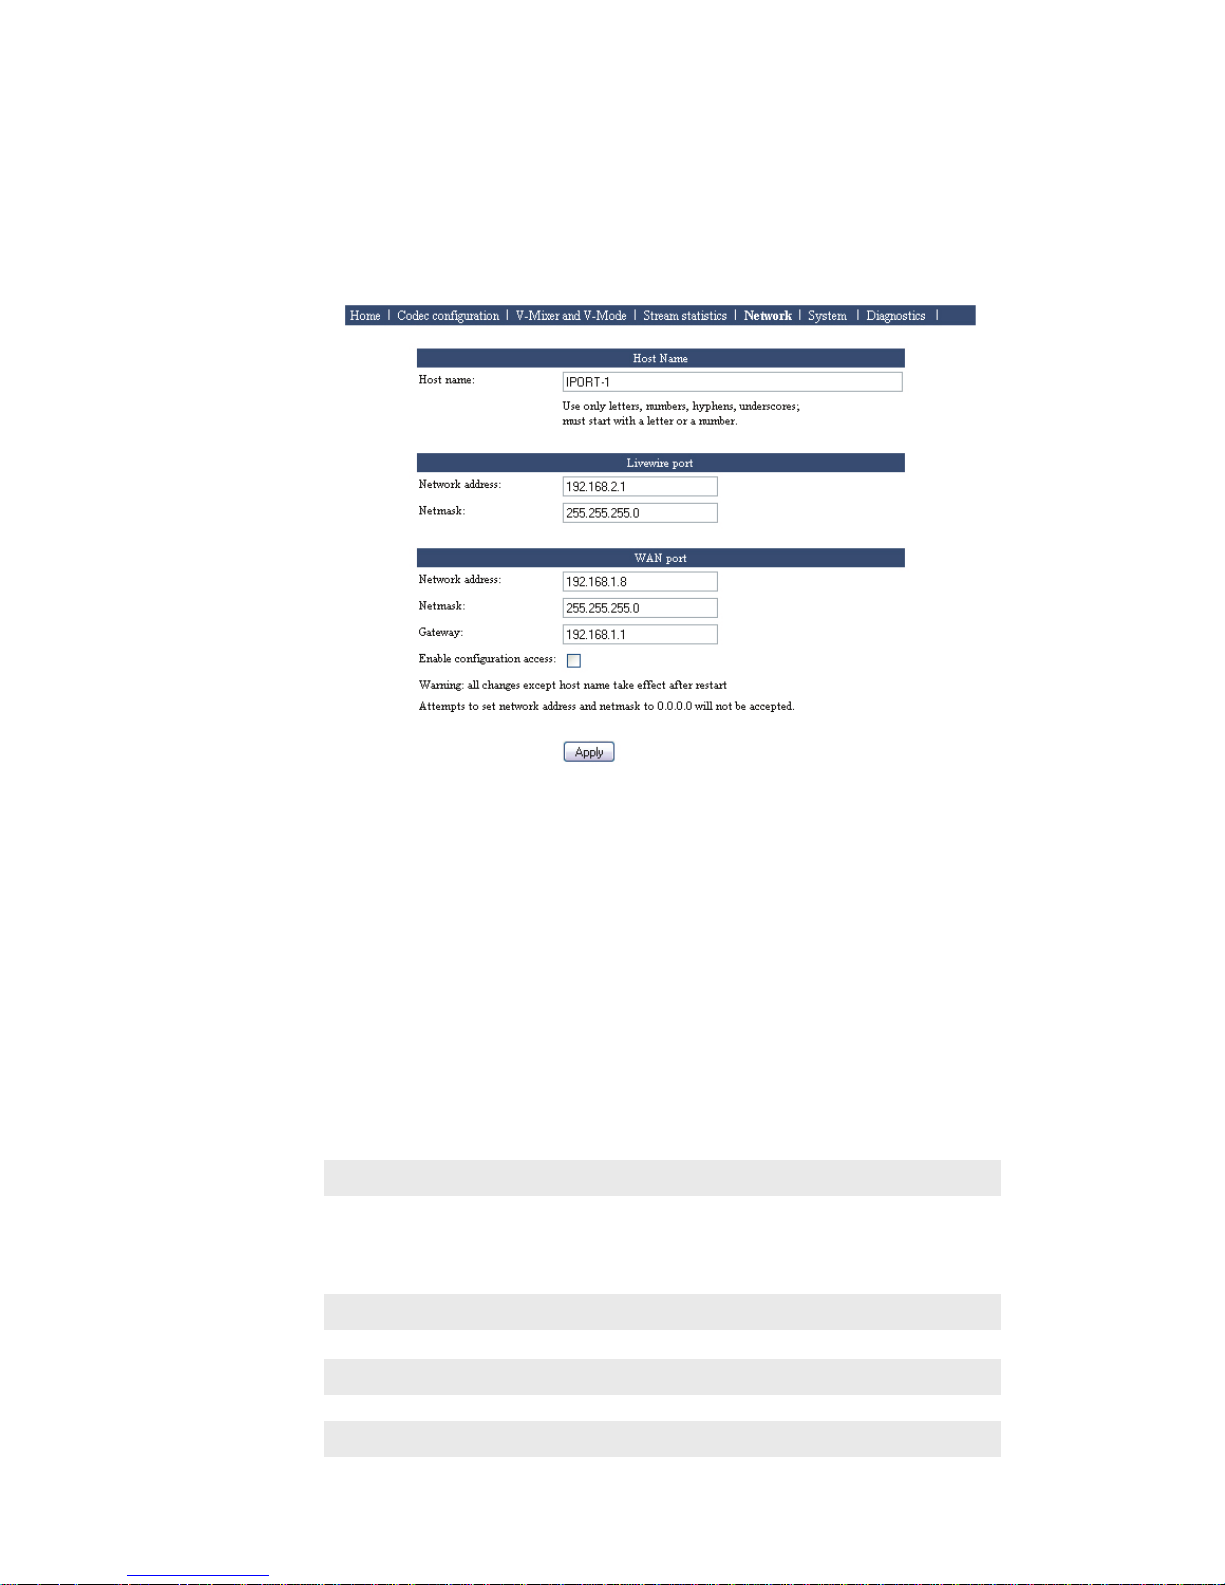
Click on the Network link, and you will see this page:
Host Name
Enter a convenient name, if you want to change from the Zephyr default. (Advanced note:
is is the Linux host name, used for network identication.)
Livewire port
If you have not already done so via the front panel LCD interface, enter the IP number you
would like the iPort to have within your LW network. Enter the netmask value used in your
system. No gateway is needed for the LW port since this is going to a LAN and there is no
need for osite IP routing.
WAN port
Enter the values for the WAN-side network interface. Here, the gateway value is important
and required.
If you want to have Web access via the WAN port, such as for osite conguration and
monitoring, click the checkbox for that.
When the Livewire and WAN networks are independent, the two IP addresses must be in
dierent subnets. In the example above, the 255.255.255.0 netmask means that any IP
number with the same rst three digits would be in the same subnet. The LW and WAN
ports are in dierent subnets because we’ve entered dierent values in the third digit - 2
for the Livewire port and 1 for the WAN port. Other devices that need to communicate
with the iPort must be on the corresponding subnets.
However, if you do want only one connection to the iPort, then it’s OK to enter the same
subnet for both elds. In this case, both the Livewire and codec streams will be on
whichever single physical port you connect. The other should remain unconnected.
Page 16
10 | Section 2
Codec conguration
Global Options
Conrm that the factory default is set for 8 encoder / decoder channels. (e 16-channel
encode-only option is used for streaming applications.)
Codec and Channel Settings
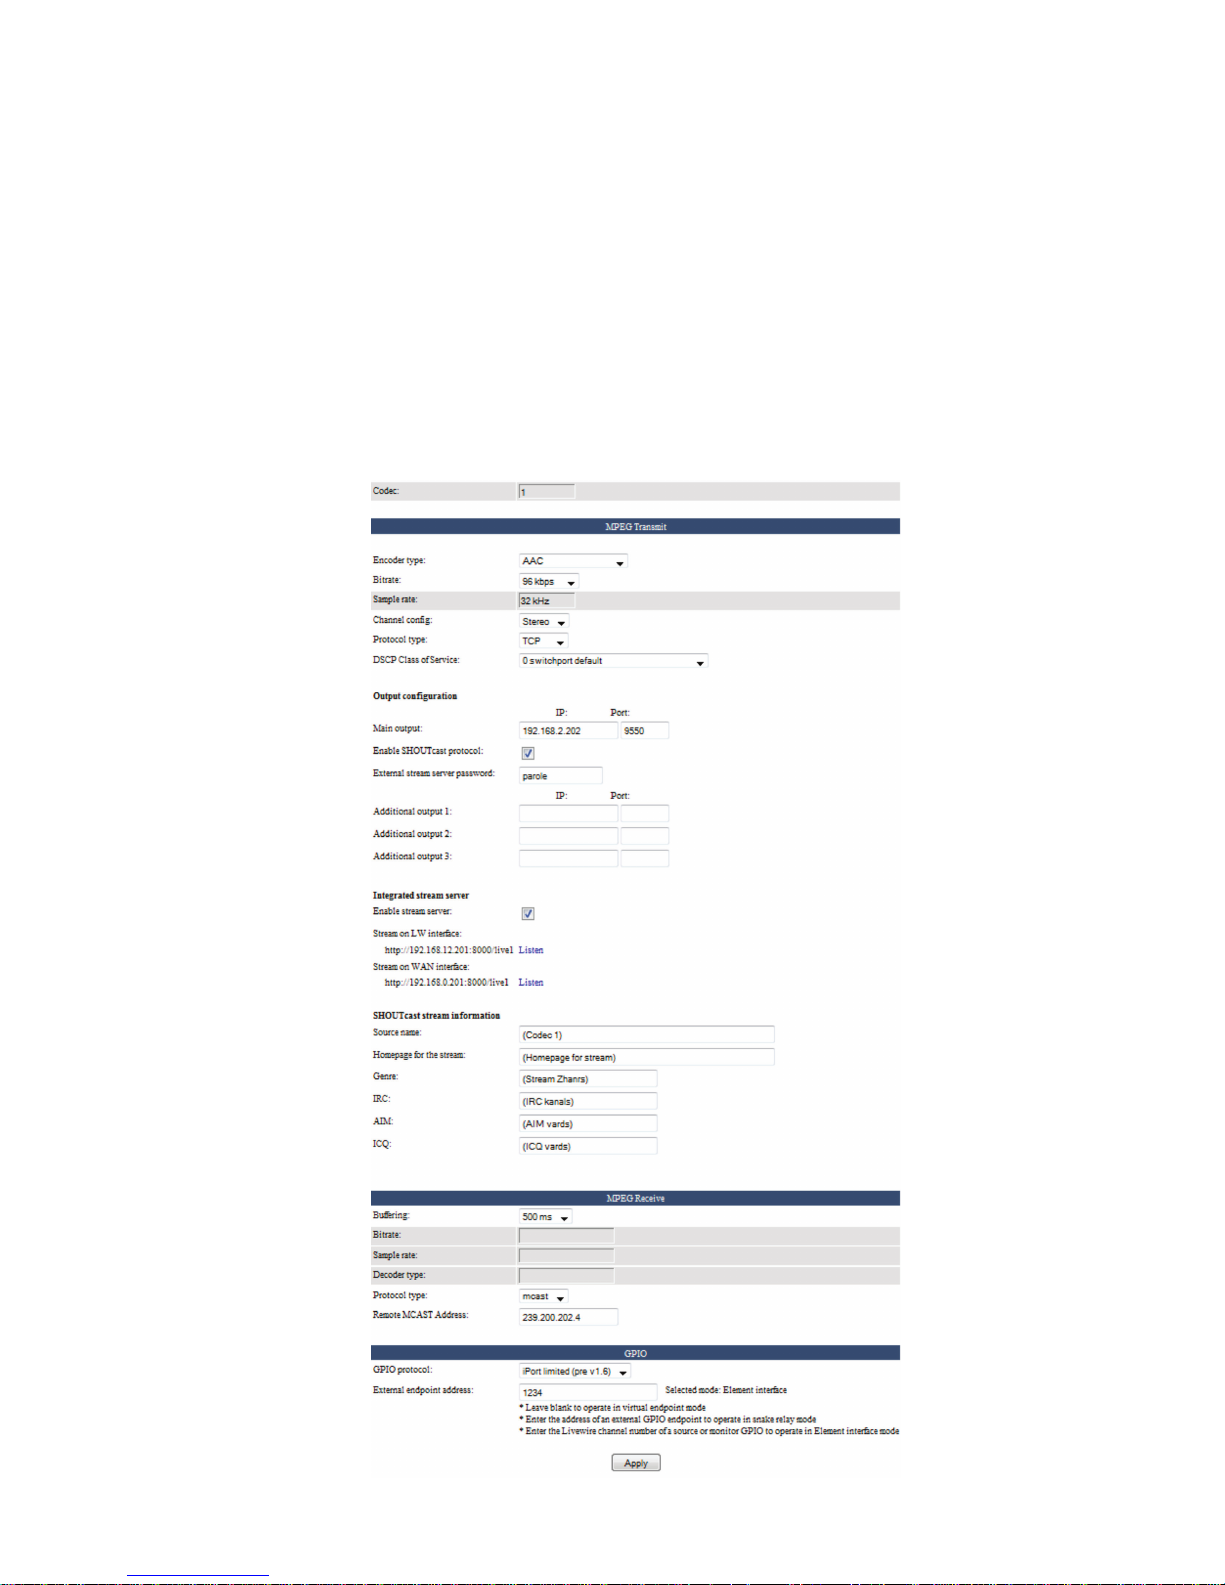
Usually, the rst step will be to click the Options button for the channel you are conguring to set the details of the codec and protocol parameters. Having done so, you will see this
this page:
Page 17
LIVEWIREWAN LINK | 11
MPEG Transmit
Set the codec type, bitrate, and stereo/mono mode you want to use for this channel.
Use the Encoder Type dropdown to select the method of MPEG encoding you wish to use.
Along with serveral options for AAC, MP3 and MP2 encoding, you can also choose linear
(uncompressed) audio and GPIO only.
e Protocol type is either UDP or TCP. ere are tradeos in this choice that are only
fully understood if you have knowledge of this aspect of IP networks. Here is a simple
overview: UDP is the usual choice because it oers lower delay than TCP and is not
impaired by TCP’s ow/rate control. However, with UDP, there is no network recovery of
lost packets as there is with TCP, so the codec’s concealment is used to reduce the audibility
of these events.
With AAC, up to around 10% random packet loss can be eectively concealed. is is
one of the strengths of AAC. e other codecs also have concealment, but it will not be as
eective.
Network links with high and guaranteed Quality of Service will almost always let you use
UDP without trouble.
e Output Conguration section allows you to specify the IP of the main output, as well
as up to 3 more replicated streams.
e Enable SHOUTcast protocol option is used only for streaming with an external
server, so is not checked.
V-Mixer and V-Mode
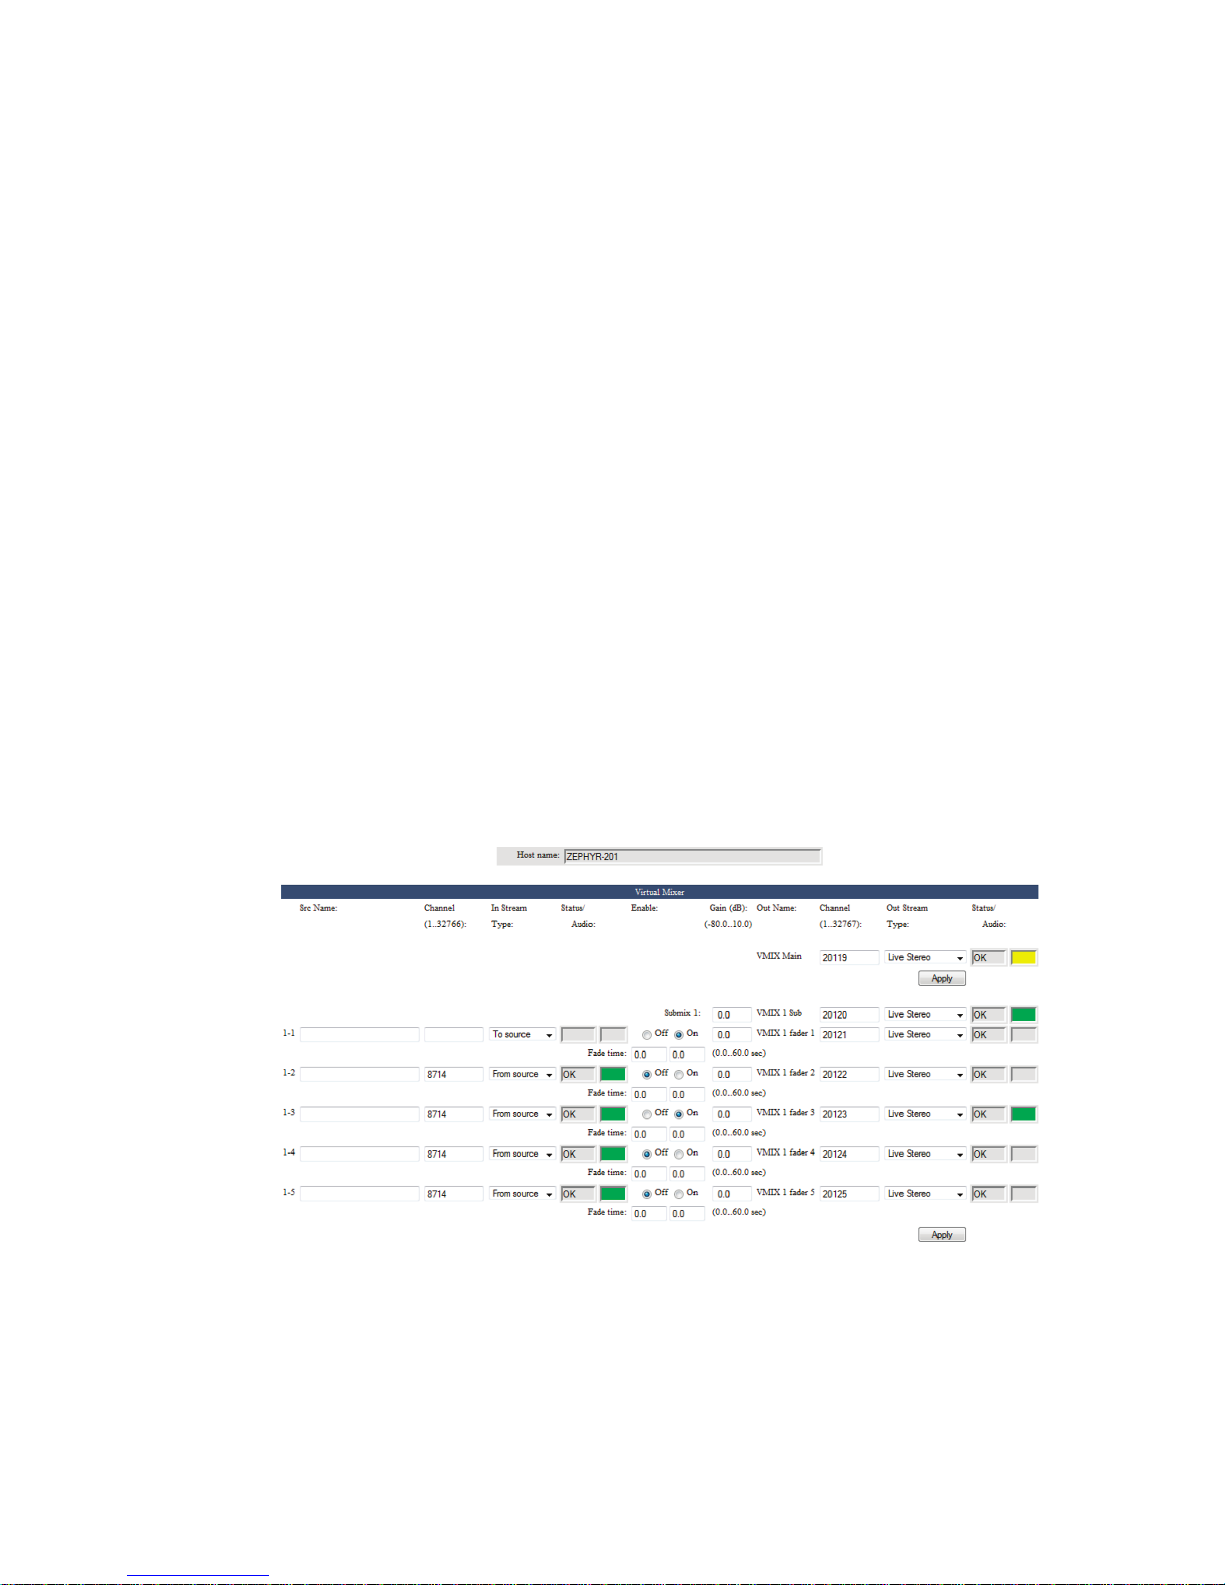
Virtual Mixer (or VMIX) is a “virtual mixer” with 40 stereo input channels, a direct output
for each channel, 8 submixer outputs, and one master out. e 40 channels are divided
equally among the 8 subgroups providing 5 stereo channels in each subgroup mixer. Using
these, you can combine multiple Livewire audio channels into a single, summed channel,
which can then be sent to a receiving iPort.
VMODE is an adjunct to the Virtual Mixer; its job is to help strip, sum, or compile a
custom audio stream from other avail able streams in the network. Using VMODE, you can
Page 18
12 | Section 2
create a mono feed, a dual-mono feed or a split-channel stereo feed using multiple Livewire
audio sources.
For a detailed description of how VMIX and VMODE can be used, please refer to Chapter
7 of the Axia Element v2.0 Installation and Users Guide, downloadable from AxiaAudio.
com/manuals/ .
MPEG Receive
e Buering drop-down box lets you choose how much buer is applied to the received
streams. A lower value gives lower delay, but depends upon the network to have low jitter. ere are a range of values, so that you can experiment to nd the optimum for your
network conditions. e usual procedure is to try successively lower values until you hear
audio interruptions. en back o to a higher value with a bit of margin.
e Protocol type is set to correspond to the value set at the encode side unit.
When all values are entered, click the Apply button. is both accepts your changes and
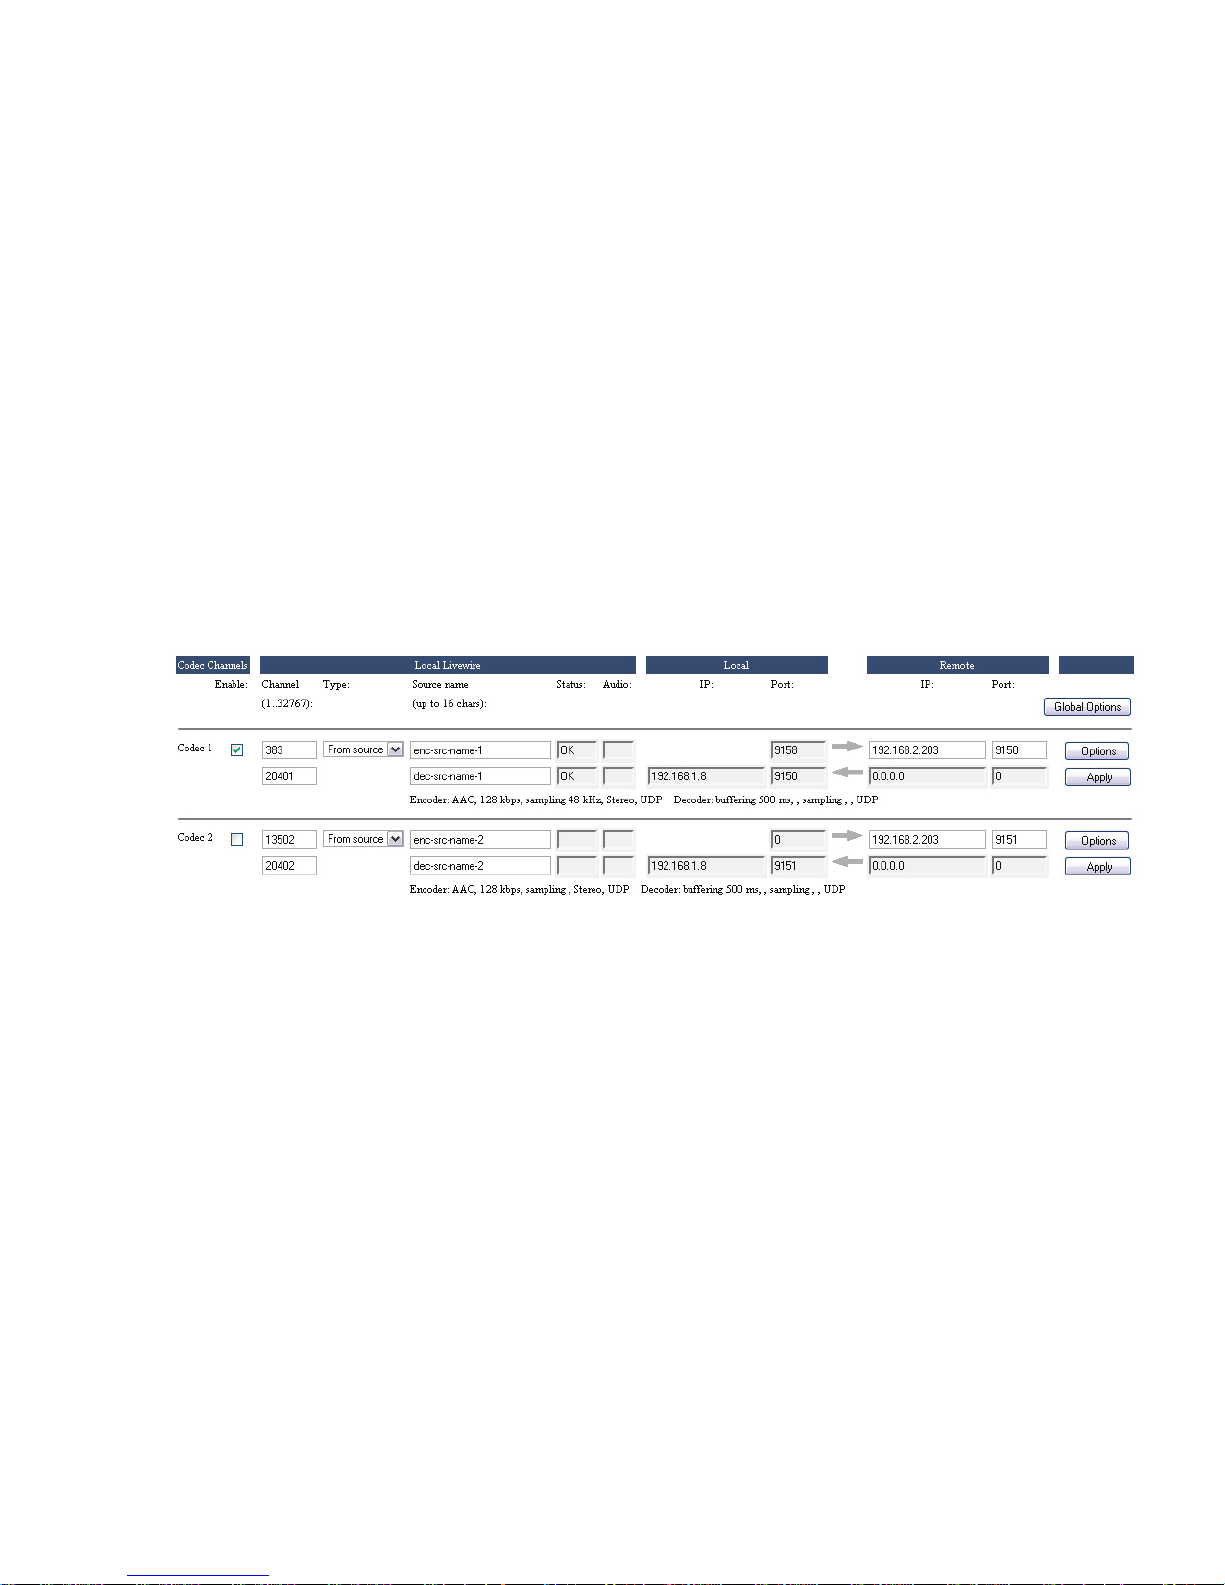
takes you back to the main Codec page. Here are sample congurations for the rst two
channels:
e Livewire channel numbers and names are entered as you would for any LW device.
While it’s possible to enter separate channel numbers and names for the send and receive
directions (as in this example), normally these would be the same, since Livewire channel
numbers/names identify a bundle of both send and receive audio.
e Status box shows the condition of the LW channel. OK means that the Livewire audio
stream is being correctly sent and/or received and has proper synchronization. e Audio
box is a kind of simple level indicator that shows green when audio is present.
Under the Local heading, you can see the IP number and ports being used by the iPort for
the MPEG stream. ese are greyed-out because they are for your information only; the
values cannot be changed.
Under the Remote heading are the values for the far-end iPort to which this one is connected. You should enter the IP number and port for the send stream destination. e
greyed IP values are automatically lled-in to show the source of the MPEG streams from
the remote iPort.
Don’t forget to click the Apply button when all of your entries are made. is must be done
individually for each channel.
e line of text at the bottom of each channel’s eld shows the congured codec and stream
protocol values that were made on the page under the Options button.
Page 19

LIVEWIREWAN LINK | 13
GPIO Section
e GPIO Protocol drop-down allows you to specify iPort’s style of GPIO bridging. Using
these options, you may set up a GPIO snake, enable control of GPIO from an Element
console, or set up WAN transportation using Livewire Routing Protocol. Follow the onscreen instructions to congure this option.
Diagnostics and Troubleshooting
e Stream Statistics and Diagnostics pages oer information and functions useful for
checking the iPort for proper operation and for troubleshooting when there are problems.
e iPort can log with various levels of detail to either an internal le that can be downloaded and inspected or to an external standard Linux-style syslog device. ese options are
selected on the Diagnostics page. ese are mostly intended for our engineers. Should you
have a problem that might be diagnosable via these logs, our support people will ask you to
download and email us the les.
FAQs
Do all the channels need to go to a single unit at the other end?
No. Each of the iPort’s channels are independent and may be used individually. Simply
enter the IP numbers/ports for the unit you want to use at the other end.
Can I use the iPort with Telos Z/IP or ZXS codecs at the other end?
Yes, with proper conguration.
Can I use the iPort with codecs from other manufacturers?
e iPort creates and consumes standard MPEG streams with standard RTP/UDP/IP
packet formatting - nothing proprietary or special. If another vendor’s codec conforms to
the standards, it should work with the iPort.
Does the iPort conform to the ITU N/ACIP specication?
No, it does not. e iPort is intended for a dierent class of applications. e N/ACIP
standard envisions VoIP call-like operation with SIP control, whereas the the iPort is
generally used in a ‘nailed-up’ way.
Our Z/IP codec family does conform to N/ACIP.
What about rewalls?
You will need to open the appropriate ports in your rewall. e IP and port numbers are
easily set/determined from the iPort’s Web pages, so you know which have to be opened.
is follows from the usual nailed-up applications for which iPort is intended.
Our Z/IP codec family has sophisticated technology for automatically punching through
many kinds of rewalls. To do so, it uses a special server that resides outside the rewall.
(is can be the one we operate as a service to Z/IP users, or one you operate yourself.) e
iPort has no way to use such a server because it does not use SIP for call set-up.
Page 20

14 | Section 2
Which codec type should I use?
ere are tradeos among those available in the iPort, with each having advantages and
disadvantages. at’s why we give you the choice. Here are some guidelines:
♦ AAC is the best all-round codec for bitrates of 96kbps and above (stereo). It has
excellent packet-loss concealment.
♦ AAC-HE (AAC+) should be used at rates under 96kbps. It has good audio quality
at 64kbps, and is pretty good even down to 48kbps. It also has good packet-loss
resilience, but not as good as AAC.
♦ AAC-HEv2 is the most ecient codec for stereo. It has a new “parametric stereo”
function that kicks-in at low bitrates. Rather than sending the left/right channels
discretely, it sends a core mono signal together with steering control. is makes
reasonable quality stereo possible down to 32kbps, and useful stereo even to 24kbps.
♦ AAC-LD has the lowest delay of the codecs, so is the choice when inter-activity is
important, such as for intercoms. It has about 30% less eciency than AAC, which
means that for equal quality, you would need to use 30% higher bitrate. Its packetloss concealment is good, but not as good as AAC.
♦ MP3 (MPEG layer 3) is not as ecient as AAC and has the worst packet-loss
concealment. It is included mostly for compatibility with codecs and software players
that only support MP3.
Will you be including other codec types in future software releases?
Maybe. Please let us know your needs.
Where can I learn more about TCP and UDP?
Any good network engineering book would explain these in detail. One of our favorites is
Computer Networking by Kurose and Ross. ere is a section in our Introduction to Livewire
that introduces networking concepts to audio engineers, including a discussion of TCP and
UDP. If a copy was not included with your iPort, you can download one from our website.
Indeed, the axia.com and telos.com sites have a number of papers and other resources that
could be useful to you.
I need to calculate the actual network bitrate. ere will be packet overhead, right?
Yes. e network rate is higher than the codec rate owing to the headers for the IP packets
taking some additional bandwidth. MPEG streams are very ecient in this regard, however.
e overhead varies with the specic codec, but should be under 10%.
Will the iPort work over the public Internet?
at depends. ere are no guarantees of any kind on most Internet connections. is is
certainly true when multiple ISPs are involved, since nobody can take full responsibility for
the entire link. If you are lucky, all could be well. When you choose AAC as your codec, the
iPort provides quite good packet-loss concealment up to 10% random loss. at’s pretty
good, and would probably allow many Internet links to work reasonably well. Higher buer
time helps, of course - but at the expense of delay.
Page 21

LIVEWIREWAN LINK | 15
If you can take even more delay, you can use the TCP protocol option. In this case, lost
packets are recovered by re-transmission, making bad links more usable. (is, BTW, is
why streaming audio over the Internet works pretty good. e streaming servers use TCP
to connect to players. Delay is not an issue - indeed, multiple seconds of buering is the
norm.)
As we mentioned before, the Telos Z/IP is intended for such applications. It has a suite of
adaptive technologies to accommodate bad and variable network conditions.
Page 22

Page 23
STREAMING | 17
3
Streaming
When used with an appropriate server, the iPort can be used as a simple, reliable encoder
for Internet or internal audio distribution. Because the iPort generates standards-based
MPEG streams, a wide variety of PC-hosted and hardware players can be used for listening.
e iPort is only an encoder, which can generate only a few output streams. To feed a large
number of listeners, a server is required. SHOUTcast (yes, that is the way it is spelled),
Steamcast, or other SHOUTcast protocol compatible servers are commonly used for this
application.
For delivering audio over a LAN or private network, the encoder and server can be together
in the same rack. For public streaming over the Internet, the encoder typically runs in the
place where the audio is generated (e.g. a studio) and the server is in a place where a lot of
bandwidth is available such as an Internet co-location site.
For those whose streaming requirements are more modest, or who prefer a PC-based
solution, we oer a software product that runs on Windows PCs. This provides integrated Omnia processing and MPEG/WMA encoding.
Streams that are served by SHOUTcast protocol servers can be heard on Winamp, Apple
iTunes, XMMS, VLC, Foobar, MS Windows Media Player, and many other PC software
players. Many hardware players are also on the market. Among the most popular are
Logitech’s SlimPlayer, and Freecom’s network player.
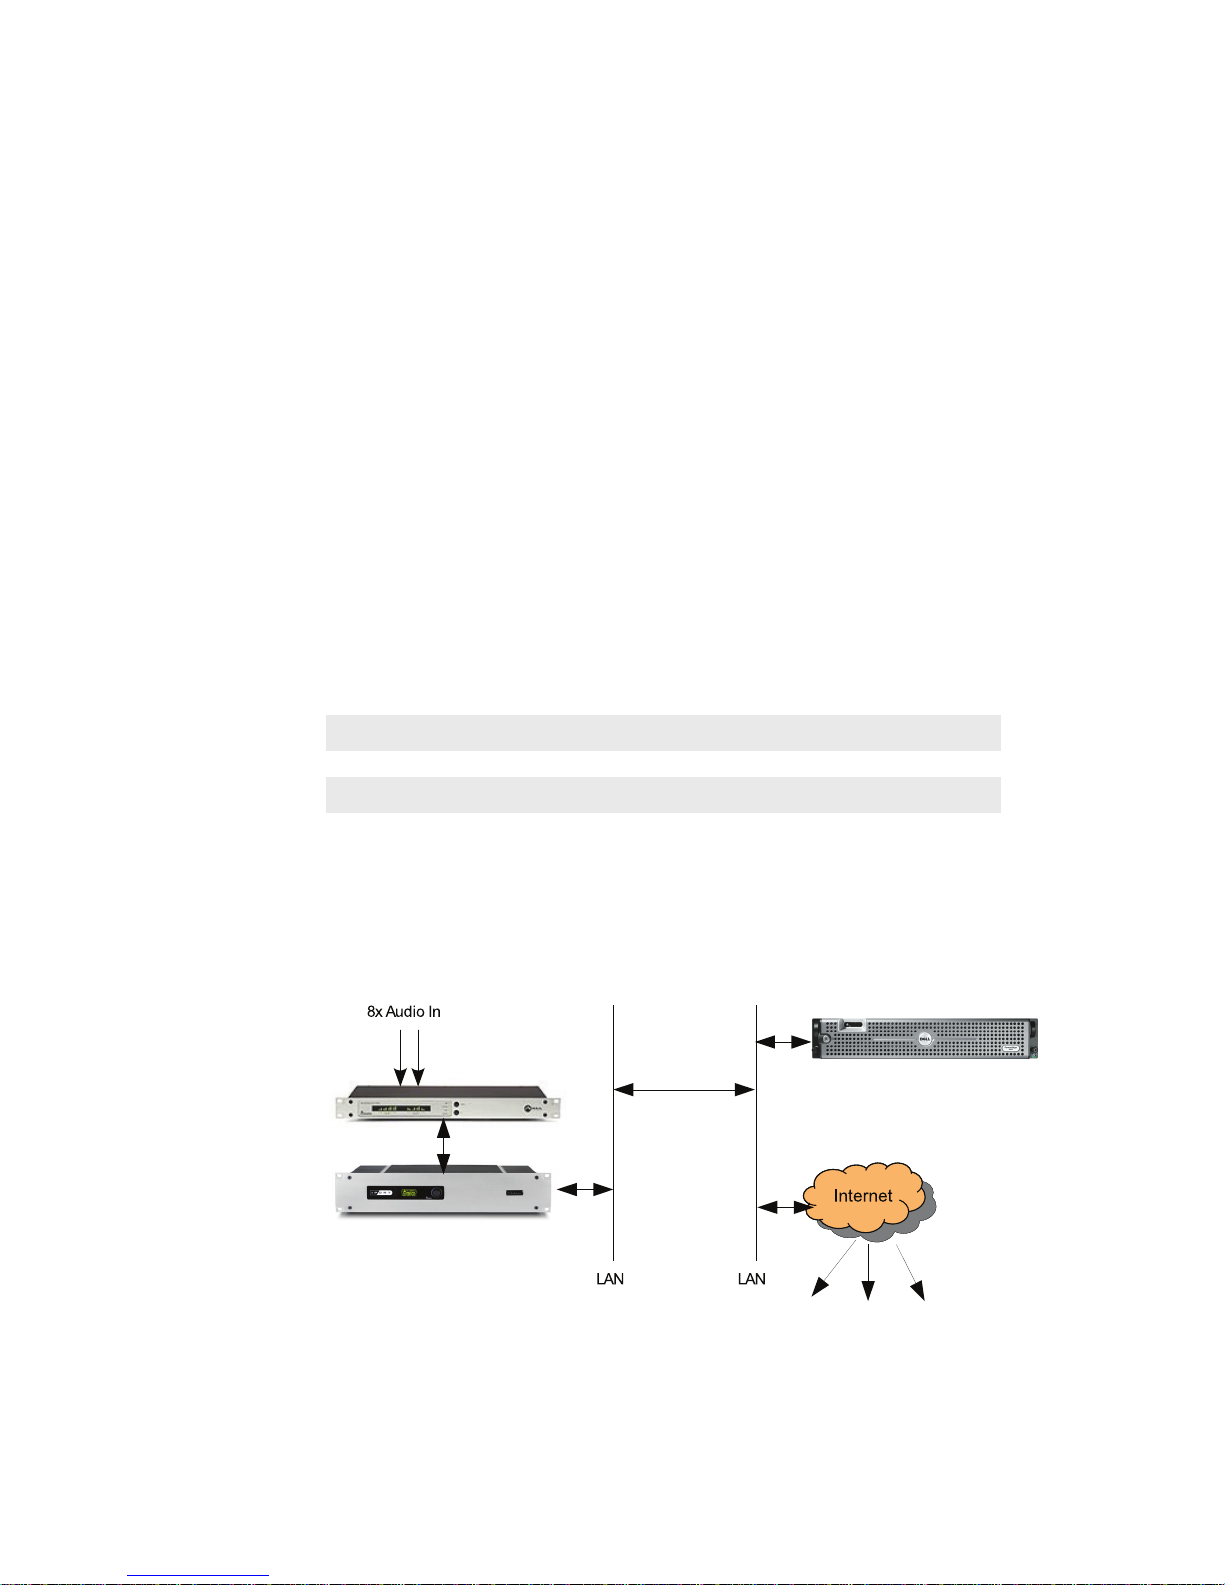
e diagram above shows a simple set-up. A Livewire Node provides live audio input,
which connects directly to the Livewire Ethernet jack on the iPort. e iPort’s WAN
jack goes to a LAN that connects to a link that leads to a remotely located server, which
provides streams to listeners over the Internet. Many variants are possible. For example,
a Livewire PC driver could provide the source audio rather than a hardware Node. (But
Private or Internet
Link
SHOUTcast-compatible Stream
Server
Listeners
Page 24
18 | Section 3
there must be a hardware Node somewhere on the network to provide the timing clock.)
An installation which already has Livewire equipment would not need a Node dedicated to
the iPort - you would just select the channels you want to stream directly from the Livewire
network.
e original idea for the SHOUTcast server is that it was to accept an audio input from
the Winamp player which has a special ‘DSP’plug-in. But since Nullsoft, the company that
designed both Winamp and SHOUTcast, published the specications for the interface,
encoders like the iPort can connect, as well. e server ‘thinks’ the iPort is a Winamp player.
If you are planning to make public broadcasts via the Internet and you don’t want the hassle
of running your own server, or if you don’t have enough network bandwidth, you can host
your broadcast through a third party that will handle the streaming for you. You can search
the Internet for the streaming host solution that ts your needs. e SHOUTcast forums
would be a good place to start.
iPort
Private or
Internet Link
SHOUTcast-compatible
Stream Server
Omnia 8x Processor
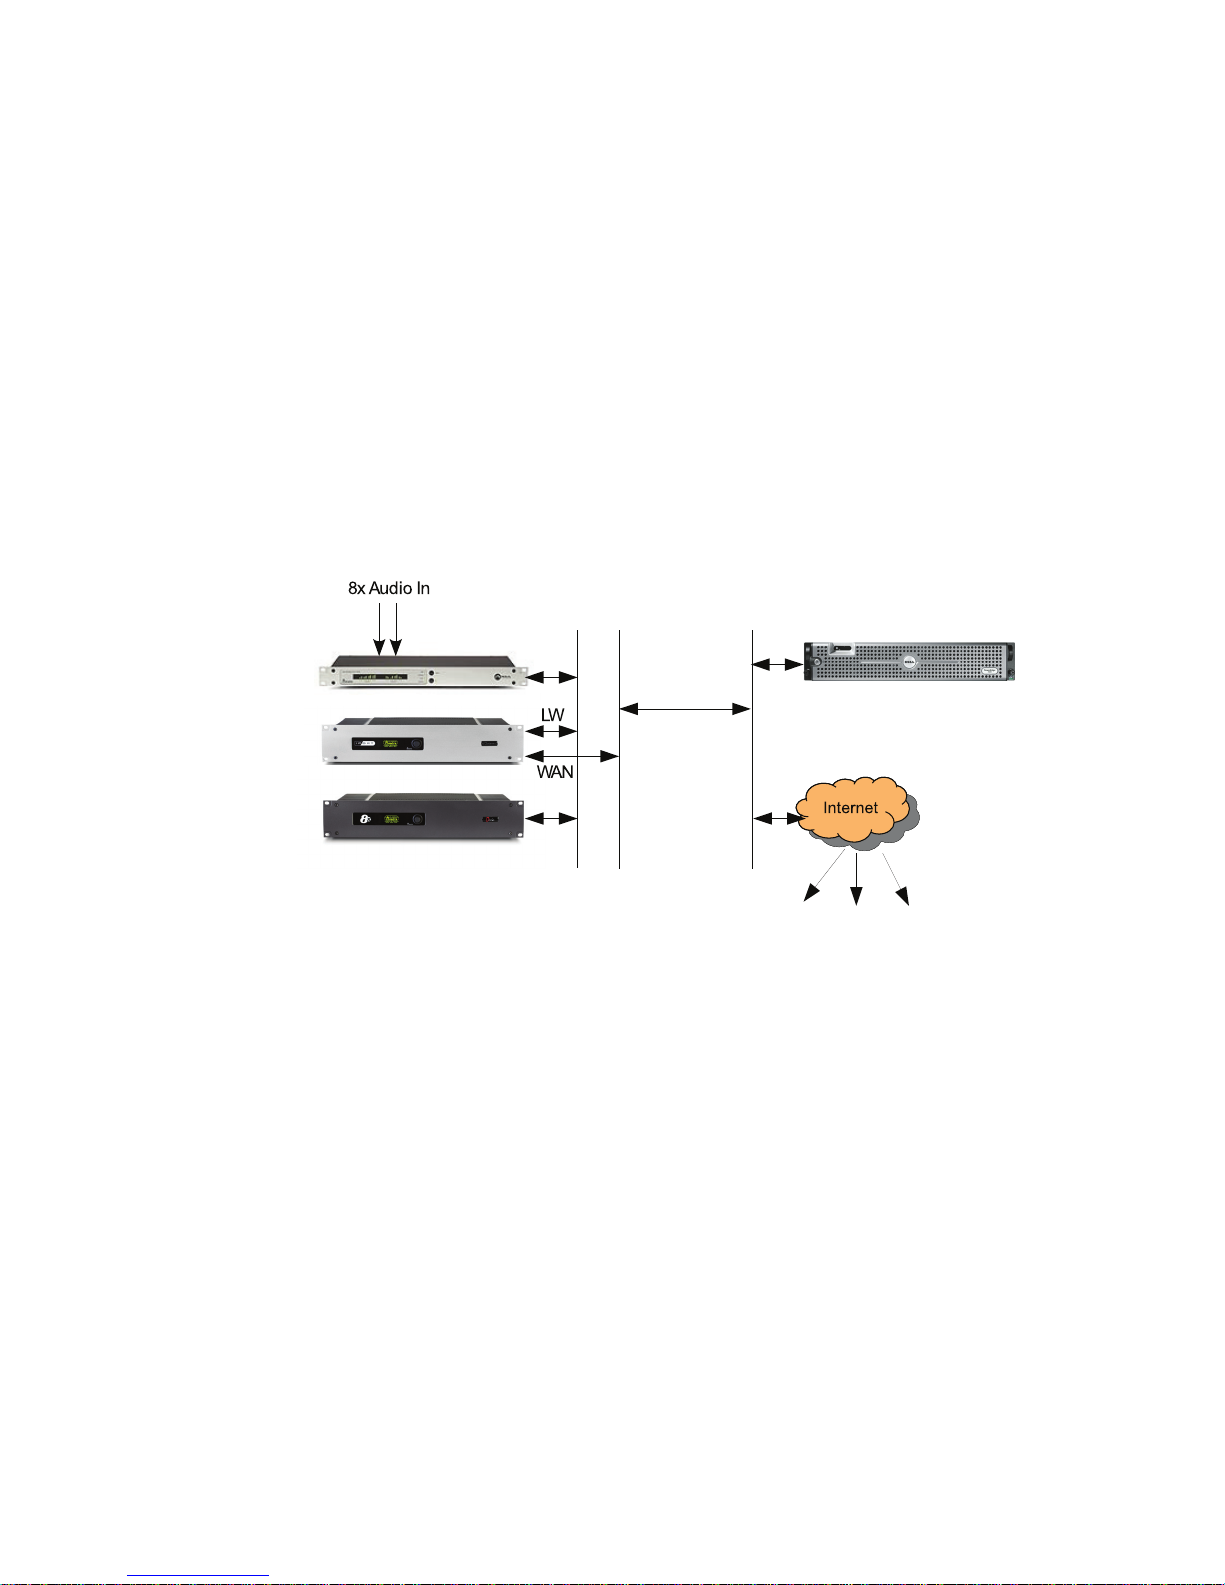
e installation would be like the one above. In this case, one LAN ties together the Node,
iPort, and an Omnia dynamics processor. Another network links to the WAN (presumably
with a rewall in the picture). is oers good security since the LW network is isolated
from the WAN. It would also be possible to use a single network on the studio side. In this
case, the rewall would be responsible for protecting the LW network.
e Omnia.8x is a perfect companion to the iPort. You get 8 channels of high-quality
dynamics processing at low cost, and with the same simple one-RJ-45 connection advantage
that the iPort oers.
Conguring the iPort for Streaming
Go to the “Codec Conguration” web page. For each stream:
1. Enter the Livewire channel number you want to use as your source
2. Enter the LW text name
3. Enter the stream server IP number and port (the port must correspond to that set in
the server’s conguration)
Press the Options button to access the codec detail conguration, then:
Listeners
4. Enter the codec type, bitrate, and other parameters
Page 25
STREAMING | 19
5. Select ‘TCP’ as the protocol (used for the iPort to server link)
6. Click the box Enable SHOUTcast and enter a password that will be used by the
server to authenticate the stream
Install, congure, and start the server (Steamcast for our example)
7. Install Steamcast and its support les the host PC
8. Edit the cong le (as described below)
9. Start the Steamcast server
10. Point a Web browser to Steamcast for monitoring
Enter the stream URL into a player and enjoy listening!
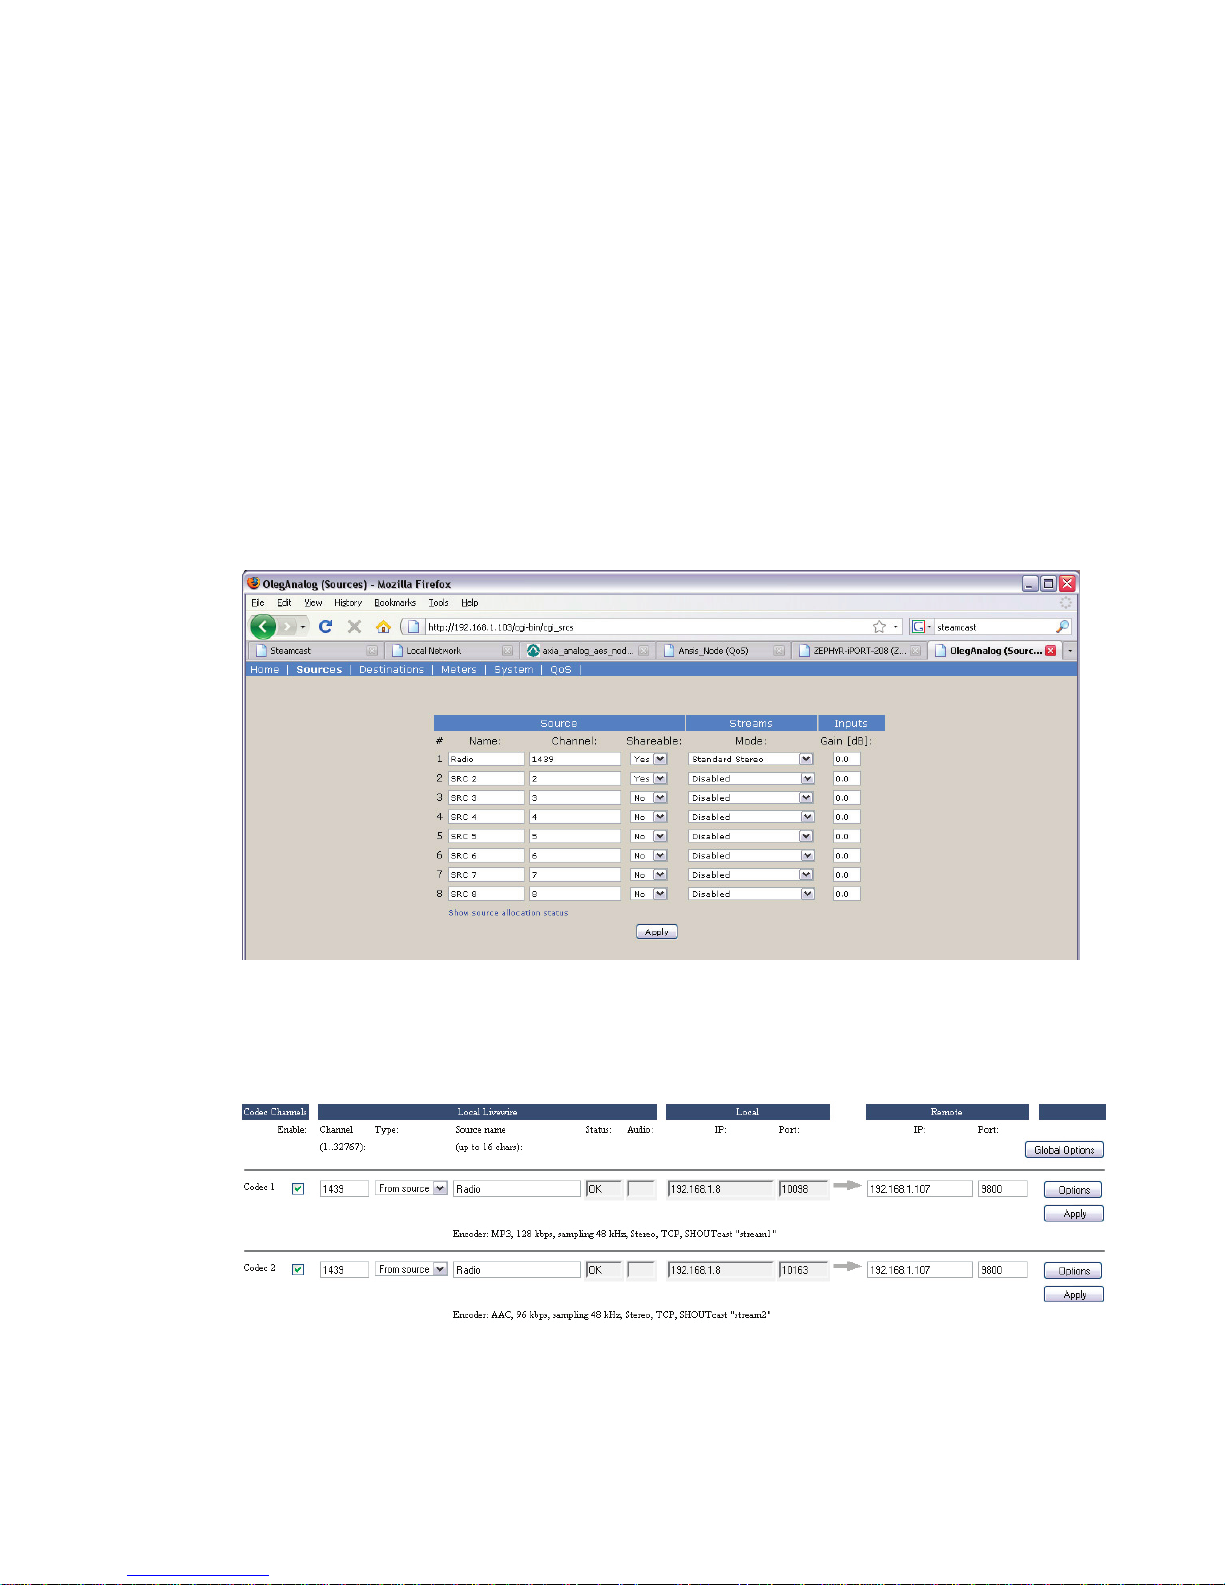
For our example app, an analog Livewire Node will be our audio source, with the conguration shown below. e stream is named ‘Radio’ and given LW channel number 1439.
We’ve already set up the browser with tabs pointing to the Node, iPort, and Steamcast
server. So, now we’ll click on the tab that brings up the iPort stream conguration screen.
Here, we will congure and enable two streams, one for MP3 and another for AAC, both
being fed from the same Livewire source.
In Global Options we have already set the iPort to be in the 16-channel encode-only
mode, rather than the usual 8x8 codec mode. e LW source is entered to correspond to
the Node settings. e Remote IP number and port is entered to be those for the streaming
server. In this case, the server is running on a PC with IP number 192.168.1.107. e port
is 9800, which is what the server is expecting from its conguration.
Page 26
20 | Section 3
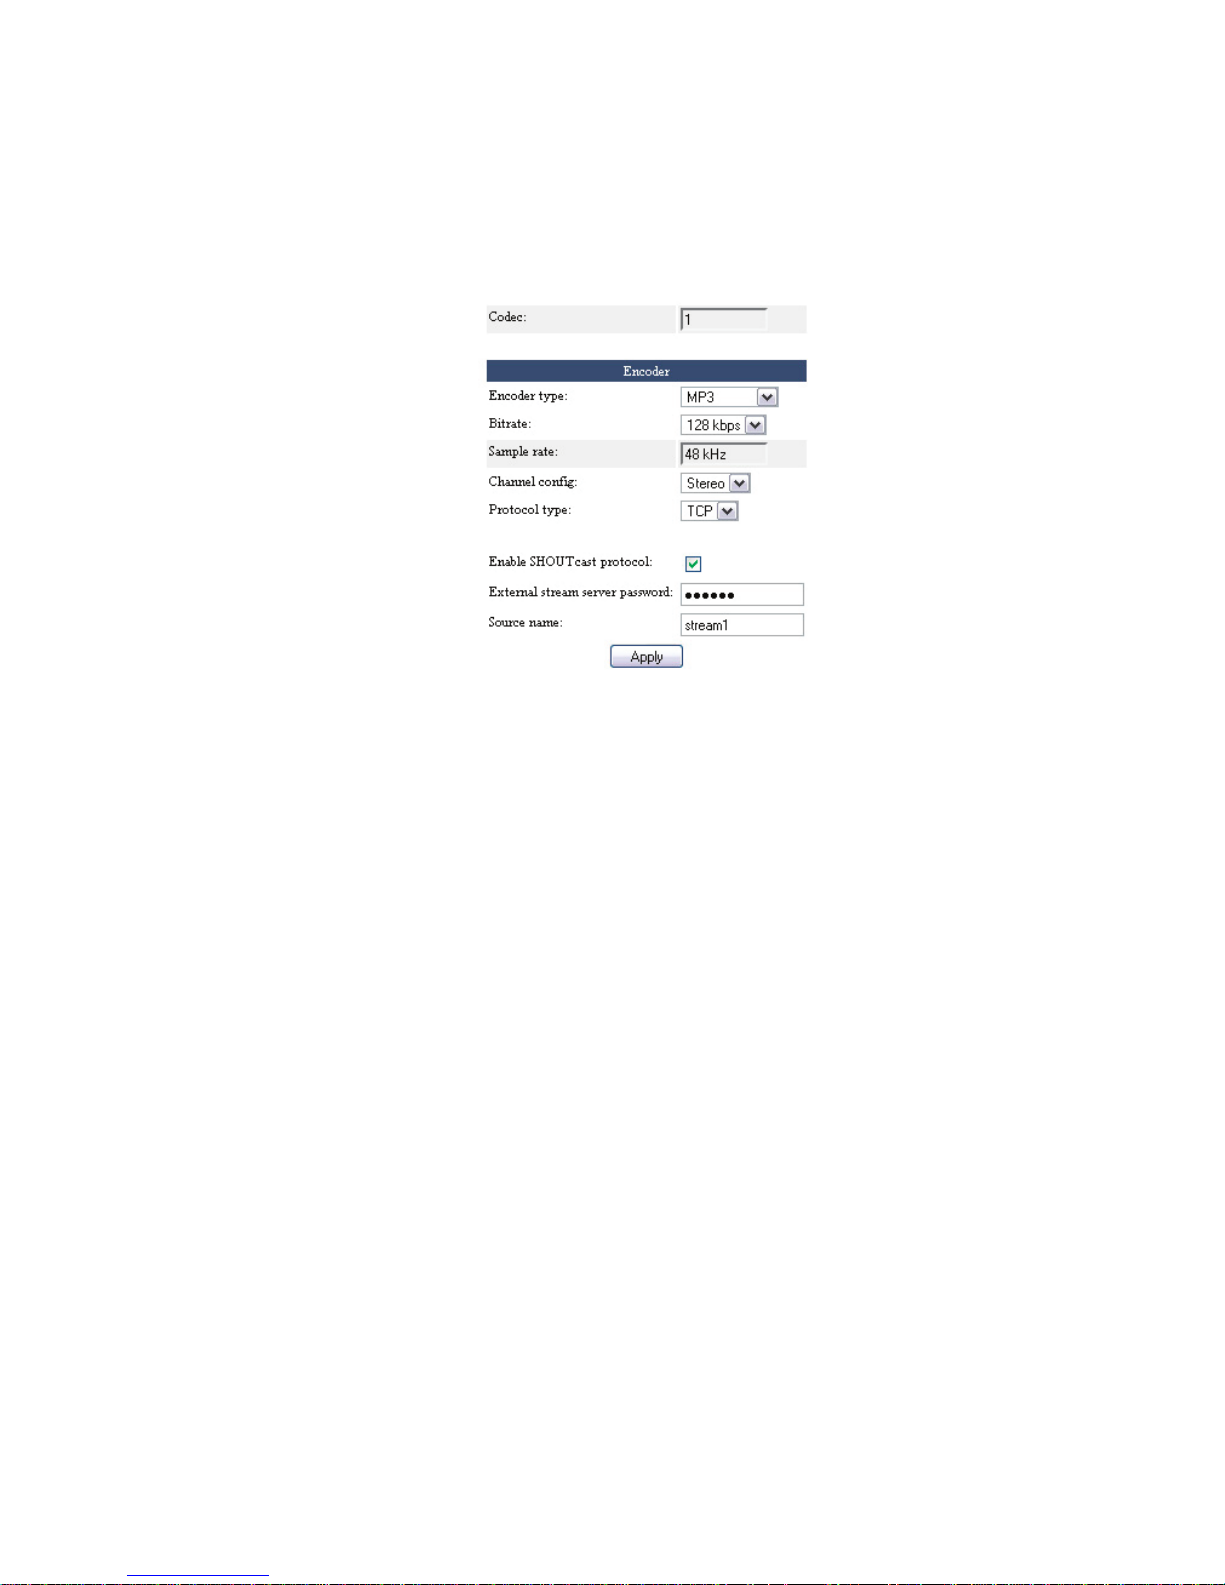
Clicking on Options gets us to the page that lets us enter the codec details.
For this rst stream, we’ve chosen the MP3 encoder, and a high-quality 128kbps bitrate. For
communication with streaming servers, the Protocol type will be TCP. Click the Enable
SHOUTcast protocol box and enter a password. is password will be used by the server
to check that the stream is authorised. For this example we will enter ‘telos1’. Enter a stream
name. Here we have entered ‘stream1’. is, too, will be used by the streaming server.
Streaming Servers
Following are the specic set-up details for Steamcast and general information about
alternate server possibilities. e website associated with each provides a wealth of information, including user forums and other resources.
Steamcast
We’ve had the most experience with this server. It runs on both Windows and Linux, does
all that usually needs to be done, and is very ecient with regard to both CPU and memory
usage.
Steamcast is a freeware streaming media server that extends the capabilities of the Icecast2/
SHOUTcast framework. e creators of Steamcast intend for the project to be format/codec agnostic and want to support as many encoding, listening and client systems as possible.
Steamcast is currently available for Microsoft Windows, FreeBSD, and Linux.
Steamcast was created by Jay Krivanek of Radio Toolbox and was rst introduced in 2004.
e project has been in a beta state ever since, though many users have had success in
production situations.
One of the features that sets Steamcast apart from other systems is the included web
interface that allows for management of sources and clients. e server also supports a
wide variety of source encoders and players that encompass other projects like Icecast2 and
SHOUTcast. e server also supports multiple publishing points/mount points which can
all stream on the same instance and ports. e support of the Icecast2 YP listing specication also allows the server to list on multiple listing services which helps to promote a
Page 27
STREAMING | 21
web broadcast. Steamcast’s backend XML sheets are supported by other services such as
LoudCity for royalty requirements and the interface is also utilized by several IRC and
PHP projects to include stats in varying listener locations.
Installing and Using Steamcast
Download the server software from www.steamcast.com.
Windows Installation Procedure: Simply extract the .zip le to a folder (C:\Program Files\
Steamcast\). Once extracted, you can create a shortcut to steamcast.exe on your desktop and
edit the steamcast.conf le with your favorite text editor. e steamcast.conf le must be
in the same folder as the steamcast.exe le. Once your changes are made and saved back to
steamcast.conf you can start steamcast by double clicking either the shortcut or executable.
Unix Installation Procedure: To extract the tar.gz le you can gunzip the distribution le
then un-tar the archive. Using a text editor such as vi or pico, open the steamcast.conf le
and edit it to your needs. It does not matter where the server runs or what user the server
runs under as long as that user has read/write access to the extracted les and the current
working directory. To execute steamcast simply issue the command ‘./steamcast’
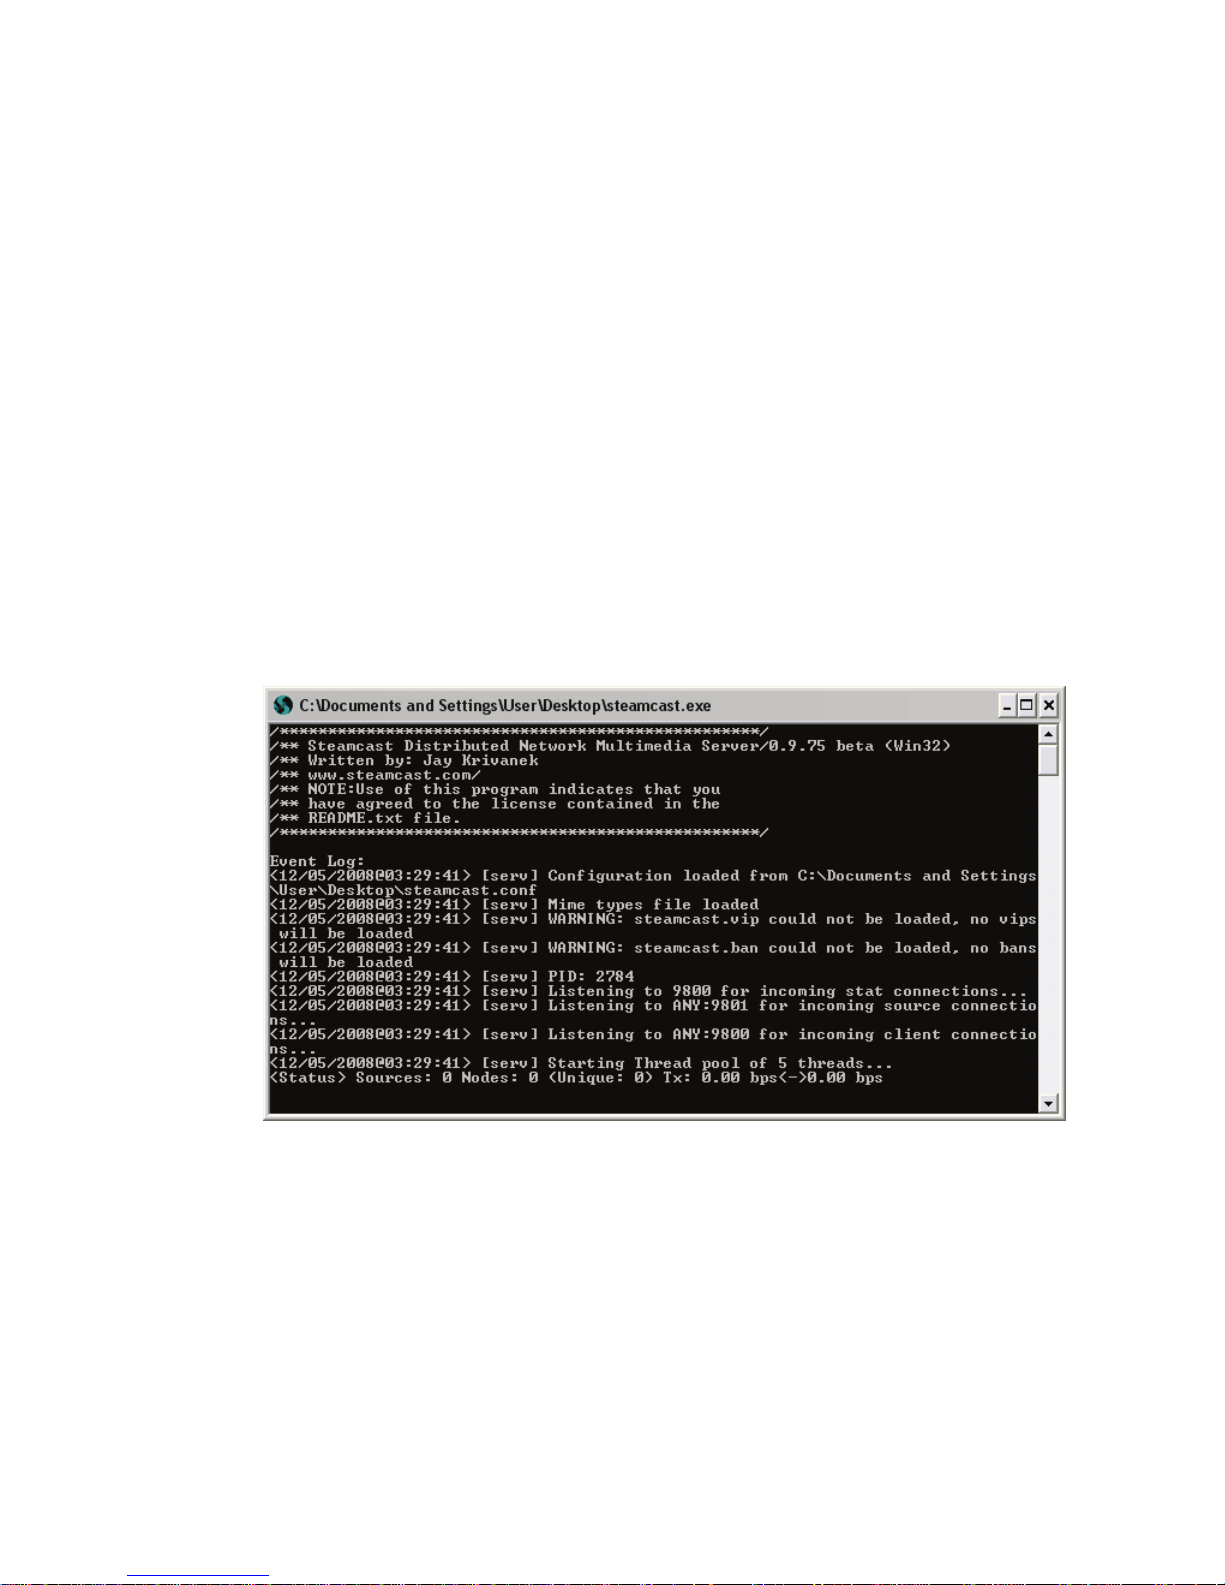
Running under Windows, you will see something like the command-line window below:
e rst line shows that the conguration le has been successfully loaded. e second that
the mime types le has loaded. Neither the .vip nor .ban les were present. e PID value
was loaded from a .pid le. e encoder has not yet been enabled, so we see that the server
is listening for, but has not yet found a source connection. It is also listening for player
connections, but of course there are, as of yet, none.
Steamcast Conguration
You congure Steamcast by editing the .conf text le. Here, we will show you an example
conguration to work with a typical iPort application. e text below is from the author
of the software, who includes these comments in his sample .conf le. As you can see, he
carefully explains all of the items. Following is a set-up for up to 16-channel streaming.
Page 28

22 | Section 3
; Steamcast Conguration File
; ================================
; is is the default Steamcast server conguration le, feel free to use
; it as a template for your server’s conguration. All lines beginning with ;
; or blank are ignored by the server’s conguration parser.
; Server Conguration
; ====================
; PortBase [*8000]: e port that Steamcast will listen for connections on, generally it is
; acceptable to just leave this at the default, change it if you use port
; 8000 and/or 8001 for some other server. Ports < 1024 are reserved, so try to
; stay above that.
PortBase=9800
; MaxUser: e maximum amount of streaming clients Steamcast should
; handle, this is a global setting for all multimedia connections. Set this
; to a smart number. Setting this too high could cause your network connection
; to be ooded and cause real problems for all end users. In 0.9.7 this conguration
; option became optional. Set this to set hard limits on max listener counts, otherwise
; cumulative SourceUserMax will be used to determine the overall UserMax.
MaxUser=20
; MaxBandwidth: is is the maximum amount of out-going bandwidth allowed by Steamcast
; in units of kilo-bits per second. is is a soft limit so it is possible for the server to exceed this
; limit due to the average bandwidth system some enforcement latency may occur as well. A
; setting of zero disables this feature.
; MaxBandwidth=0
; IPMaxUser [*0]: e maximum amount of streaming clients Steamcast should
; handle per IP, this is a global setting for all multimedia connections.
; A setting of 0 disables this feature.
; IPMaxUser=0
; LogFile [None|*steamcast.log]: e location you would like Steamcast to store
; it’s log le, setting this to ‘None’ or blank disables this feature. You can use use variable
; templates to control the name of the log in real time. View the Readme for a full list of
; variables available. Ex: %m-%d-%Y-steamcast.log to have steamcast create a dierent log
; every day.
LogFile=steamcast.log
; MimeFile [None|*mime.types]: e location of your mime types le. e mime types le is
; critical in the implementation and usage of the on-demand capabilities of the server. is le
Page 29

STREAMING | 23
; also enables steamcast’s auto extension feature so that the server will assign the correct
; extension to your mount points based on the audio format/codec in use.
MimeFile=mime.types
; BanFile [None|*steamcast.ban]: Use this variable to specify the location of your ban le. e
; ban le contains information about pre-existing bans. If the ban le does not exist, steamcast
; will attempt to create it. A setting of None disables saving or loading of ban information.
BanFile=steamcast.ban
; VipFile [None|*steamcast.vip]: e le used to load pre-existing vip information. VIP’s are
; IPs and users designated as having a higher privilege level then average users. A setting of
; None disables saving or loading of ban information.
VipFile=steamcast.vip
; ScreenLog [*Yes|No]: Setting this to Yes will allow steamcast to output log information
; the the screen in CLI environments.
ScreenLog=Yes
; RealtimeLog [*Yes|No]: Setting this to Yes will allow steamcast to output Realtime statistical
; information to the screen in CLI environments.
RealtimeLog=Yes
; YPLog [*Yes|No]: Enable the logging of YP Touches. is setting has no eect on
; YP Errors, or YP Add or YP Removes. It will only hide logging of Successful touches
; when set to No.
YPLog=Yes
; PidFile [None|*steamcast.pid]: e le location you would like Steamcast to store
; it’s PID or Process ID, setting this to ‘None’ or blank disables this feature.
; Regardless of this setting, Process ID’s will be stored in the Log on each startup.
PidFile=steamcast.pid
; NameLookups [Yes|*No]: Setting NameLookup to Yes will have Steamcast
; do a reverse dns lookup on each connection made to the server. High Trac servers
; should leave this setting disabled until I can come up with a better threading method.
NameLookups=No
; ShowLastSongs [*20]: is setting tells steamcast how many stream related meta updates
; to store in history. is capability was added for compatibility with reporting agencies.
; A Setting of 1 through 50 is acceptable.
ShowLastSongs=20
Page 30

24 | Section 3
; ClientTimeout [*30]: Number of seconds a listener/viewer should stay connected while no
; source exists for thier mount.
ClientTimeout=30
; User Conguration
; ==================
; AdminUser & Admin Pass: is is the credentials that allow full control of the server remotely
; so be very careful in determining what to put here. Essentially with these settings
; a user would be able to connect to the server using a CNTRL application and use
; the server as if they are sitting in front of it. Please make sure that admin passwords are
; dierent from mount passwords in SHOUTcast compatibility mode. Encoders passwords take
; precedence in the event they are, this is for compatibility and security reasons.
AdminUser=telos1
AdminPass=telos1
; Source Conguration
; ====================
; Each source that you wish to allow on the server needs to be congured
; here rst. e parser will read strait down the le so if you have
; multiple source mounts and you declare a new mount before nishing
; conguration of another, then those congurations after the new
; declaration will go to the new mount.
; SourceMount: is is the mount you would like to create, if you set
; this to /ghey then you would be able to access this mount by
; going to http://localhost:8000/ghey It is critical that you
; make sure to include the slash at the beginning.
SourceMount=/stream1
; SourceUser: e last SourceMount declared will require this Username
; in order to become a source for this mount. Note: if you are running
; this mount in shoutcast compatibility mode, this is not required. However
; it’s best to set this anyhow as it allows your encoder users to administrate
; their mounts from a CNTRL app or web panel.
SourceUser=telos
; SourcePass: is is the last Source Mount’s password, this is required
; for all connecting encoders. Mounts without passwords are invalid.
SourcePass=telos1
; SourceUserMax [*5]: is particular mount’s UserMax, if all of your source
Page 31

STREAMING | 25
; UserMaxes combined exceed the global UserMax then the UserMax takes presedence.
SourceUserMax=5
; SourceRelay: is particular mount will pull data from the location specied below.
; If you publish both servers on yp.shoutcast.com and wish that they cluster at that
; yp server then enter your relay url without http:// or trailing path or slashes
; like the example below. It is now permissable to make a list out of this variable
; to have in eect fallback masters in the event one is unavailable.
; SourceRelay=audio.str3am.com:4080
; SourceDisconnectWait: [*10]: Allows you to control the wait time in seconds between
; reconnect attempts if a relay fails. Values from 1 and up are acceptable.
; SourceDisconnectWait=10
; SourceDirectory: is mount will be an on-demand mount for steamcast. Any directory
; location is acceptable here. is aspect of Steamcast still needs alot of work. So stay tuned.
; SourceDirectory=./content
; SourceGateway: e location of a le you want to be played before the stream begins for each
; listener. Use %s and Steamcast will only look for les with a matching extension. Files must
; be the same in everyway with the stream currently playing.
; SourceGateway=/intro.%s
; SourceBackup: is is the mount you would like listeners directed to in the
; event that this source becomes unavailable. ese two mounts must be completely
; identical bitstreams in order for this feature to work properly.
; SourceBackup=/live_back
; SourceBitrateLimit: Set this to have Steamcast choke sources that exceed a
; certain average data rate. is value is based on actual data transfer and not any particular
; format headers. is is a great way to control users in community or hosting
; environments. Default is no limits. Steamcast waits 20 seconds into a connect before
; limiting, the choke takes aect after a source goes 10% over the limit.
; SourceAvgBitrateLimit=128
; SourceIsSC [*Yes|No]: Setting this to Yes will allow source applications
; which do not have a username capability to use the last source
; declared anyway.
SourceIsSC=Yes
; SourceNameFormat: Provides a new Stream name either derived from the source or
; completely replacing the sources option. is title is used in client media players and
Page 32

26 | Section 3
; publishing outlets. You can use %s anywhere in the title to have the encoder’s option included
; into the nal stream name.
; SourceNameFormat=%s powered by Steamcast
; SourceIsDefault [*Yes|No]: Setting this to Yes will make this particular
; mount available globally. ere can be only one global mount. is
; is also the only mount that will be able to list at shoutcast.com
SourceIsDefault=Yes
; SourceIP: Setting this to a dotted IP address will make this particular
; mount available at the root of steamcast (much like SHOUTcast) for the IP
; specied here. Note: You must own the IP you place here. Inaccurate
; settings will have no eect. is setting essentially will allow you to
; list multiple source points in the SHOUTcast directory. It is not neccessary
; to set this setting if you only own one IP. Setting this for any Source will
; disable the SourceIsDefault ag on any mount.
; SourceIP=123.45.67.89
; SourceAuth: [Yes|*No]: Allows you to setup HTTP Basic Authorization on this
; mount point. All Authentication is currently le based. Please see steamauth.txt
; SourceAuth overrides the public bit and will force all SourceAuth’d streams to be
; private.
; SourceAuth=No
; SourceAuthMax: [*0]: Allows you to set the maximum amount of connections per
; authenticated
; user. A setting of 0 is interpreted as unlimited.
; SourceAuthMax=0
; SourceListenerTimer: [*0]: Allows you to specify the amount of time a client can stay
; connected in minutes. A value of 0 disables this feature and allows clients to stay connected
; for an unlimited amount of time.
; SourceListenerTimer=0
; SourcePublic: [*Default|Always|Never]: Allows you to specify whether to override the source’s
; public bit setting. When set to Always a source mount will list on directory services regardless
; of the encoder’s specied preference. When set to Never the source mount will refuse to list on
; directory services. e default of... Default (heh) sets the source to let the encoder decide
; listing preference.
; SourcePublic=Default
; SourcePublicRelays: [*Yes|No]: Whether servers which relay steamcast should list on directory
Page 33

STREAMING | 27
; services.
; SourcePublicRelays=Yes
; SourceRawKey: Set this variable to the key you would like passed in a parameter string to
; access the raw data stream in HTTP form. is is great for things such as Flash. If you
use
; the example below then access to the raw data stream (unprotected by user-agent lters)
can
; be obtained by passing http://localhost:8000/mountname.mp3?rawdata to the player, as
always
; substitute the address with your specic implementation. Leaving this option blank or
; commented disables this capability.
; SourceRawKey=rawdata
; SourceBuUtil [*100]: is value allows you to control the start position
; of connecting clients within the buer. 0 would eectively set a new connecting
; client to the write point of the buer giving a more real-time like experience
; although due to the way the internet really works it can never be truely real-time.
; Setting this to 100 would start them all the way at the back of the buer which
; gives most clients no buer wait times. It is highly recommended that you not mess
; with this parameter except in instances where the bitrate of the stream is extremely
; low and you require an interactive experience from the users connected to the server.
; (i.e. A talk show or other low bitrate interactive live program) Most other broadcasts
; SHOULD NOT CHANGE THIS SETTING!!! Doing so will make the connecting
users
; feel like they are on dialup in 1996 listening to Real Player. :)
SourceBuUtil=1
; Directory Conguration
; =======================
;Directory=http://www.steamcast.com/sbin/yp.php
;Directory=http://dir.xiph.org/cgi-bin/yp-cgi
; Advanced Conguration
; ======================
; Do not mess with these conguration values unless you know what you are
; doing, typically these are settings which should not need adjusting. But
; are here for those users who feel they need more control over how the
; server behaves.
; ServIP [*Any]: is option allows you to control which interface or IP Steamcast
; should bind to. Setting this option will limit which IP clients can connect through.
; ANY (case sensitive) will allow steamcast to bind to all and any ip interfaces available.
Page 34

28 | Section 3
; ServIP=ANY
; SrcIP [*Any]: SrcIP is the IP that Steamcast will listen for source connections. For
; instance setting this option to 127.0.0.1 will limit SHOUTcast source connection attempts
; to only from the the machine steamcast resides on. ANY (case sensitive) will allow
; steamcast to bind to all and any ip interfaces available.
; SrcIP=ANY
; readPool [*5]: Set this to control the amount of available threads for incoming clients.
; Generally you should not have to change this setting. Setting anything below 2 is not allowed,
; due to severe loss of performance. Setting this too high will mean more memory and overhead
; will be needed to load the server, be sensible if you must change this number. While you are
; allowed to set a number as high as 100 anything over 10 is generally considered excessive.
; readPool=5
; MetaInterval [*8192]: Set this to control the meta data interval in bytes for audio types that
; utilize the Icy Meta Data protocol. is is a server wide option. Technical notes: Excessive
; CPU and unlistenable streams may result if you set this value too low. Steamcast will go no
; lower then 1024bytes.
; MetaInterval=8192
; if I could smile I would.
; We’ve congured one source; now we’ll do all the others, following the same pattern...
; Stream 2 is MPEG AAC. We have to use the .aac sux so that player will know what decoder
; to use
SourceMount=/stream2.aac
SourceUser=telos2
SourcePass=telos2
SourceUserMax=5
SourceIsDefault=No
SourceMount=/stream3.mp3
SourceUser=telos3
SourcePass=telos3
SourceUserMax=5
SourceIsDefault=No
SourceMount=/stream4.mp3
SourceUser=telos4
Page 35

STREAMING | 29
SourcePass=telos4
SourceUserMax=5
SourceIsDefault=No
SourceMount=/stream5.mp3
SourceUser=telos5
SourcePass=telos5
SourceUserMax=5
SourceIsDefault=No
SourceMount=/stream6.mp3
SourceUser=telos6
SourcePass=telos6
SourceUserMax=5
SourceIsDefault=No
SourceMount=/stream7.mp3
SourceUser=telos7
SourcePass=telos7
SourceUserMax=5
SourceIsDefault=No
SourceMount=/stream8.mp3
SourceUser=telos8
SourcePass=telos8
SourceUserMax=5
SourceIsDefault=No
SourceMount=/stream9.mp3
SourceUser=telos9
SourcePass=telos9
SourceUserMax=5
SourceIsDefault=No
SourceMount=/stream10.mp3
SourceUser=telos10
SourcePass=telos10
SourceUserMax=5
SourceIsDefault=No
Page 36

30 | Section 3
SourceMount=/stream11.mp3
SourceUser=telos11
SourcePass=telos11
SourceUserMax=5
SourceIsDefault=No
SourceMount=/stream12.mp3
SourceUser=telos12
SourcePass=telos12
SourceUserMax=5
SourceIsDefault=No
SourceMount=/stream13.mp3
SourceUser=telos13
SourcePass=telos13
SourceUserMax=5
SourceIsDefault=No
SourceMount=/stream14.mp3
SourceUser=telos14
SourcePass=telos14
SourceUserMax=5
SourceIsDefault=No
SourceMount=/stream15.mp3
SourceUser=telos15
SourcePass=telos15
SourceUserMax=5
SourceIsDefault=No
SourceMount=/stream16.mp3
SourceUser=telos16
SourcePass=telos16
SourceUserMax=5
SourceIsDefault=No
Page 37
STREAMING | 31
Web Interface
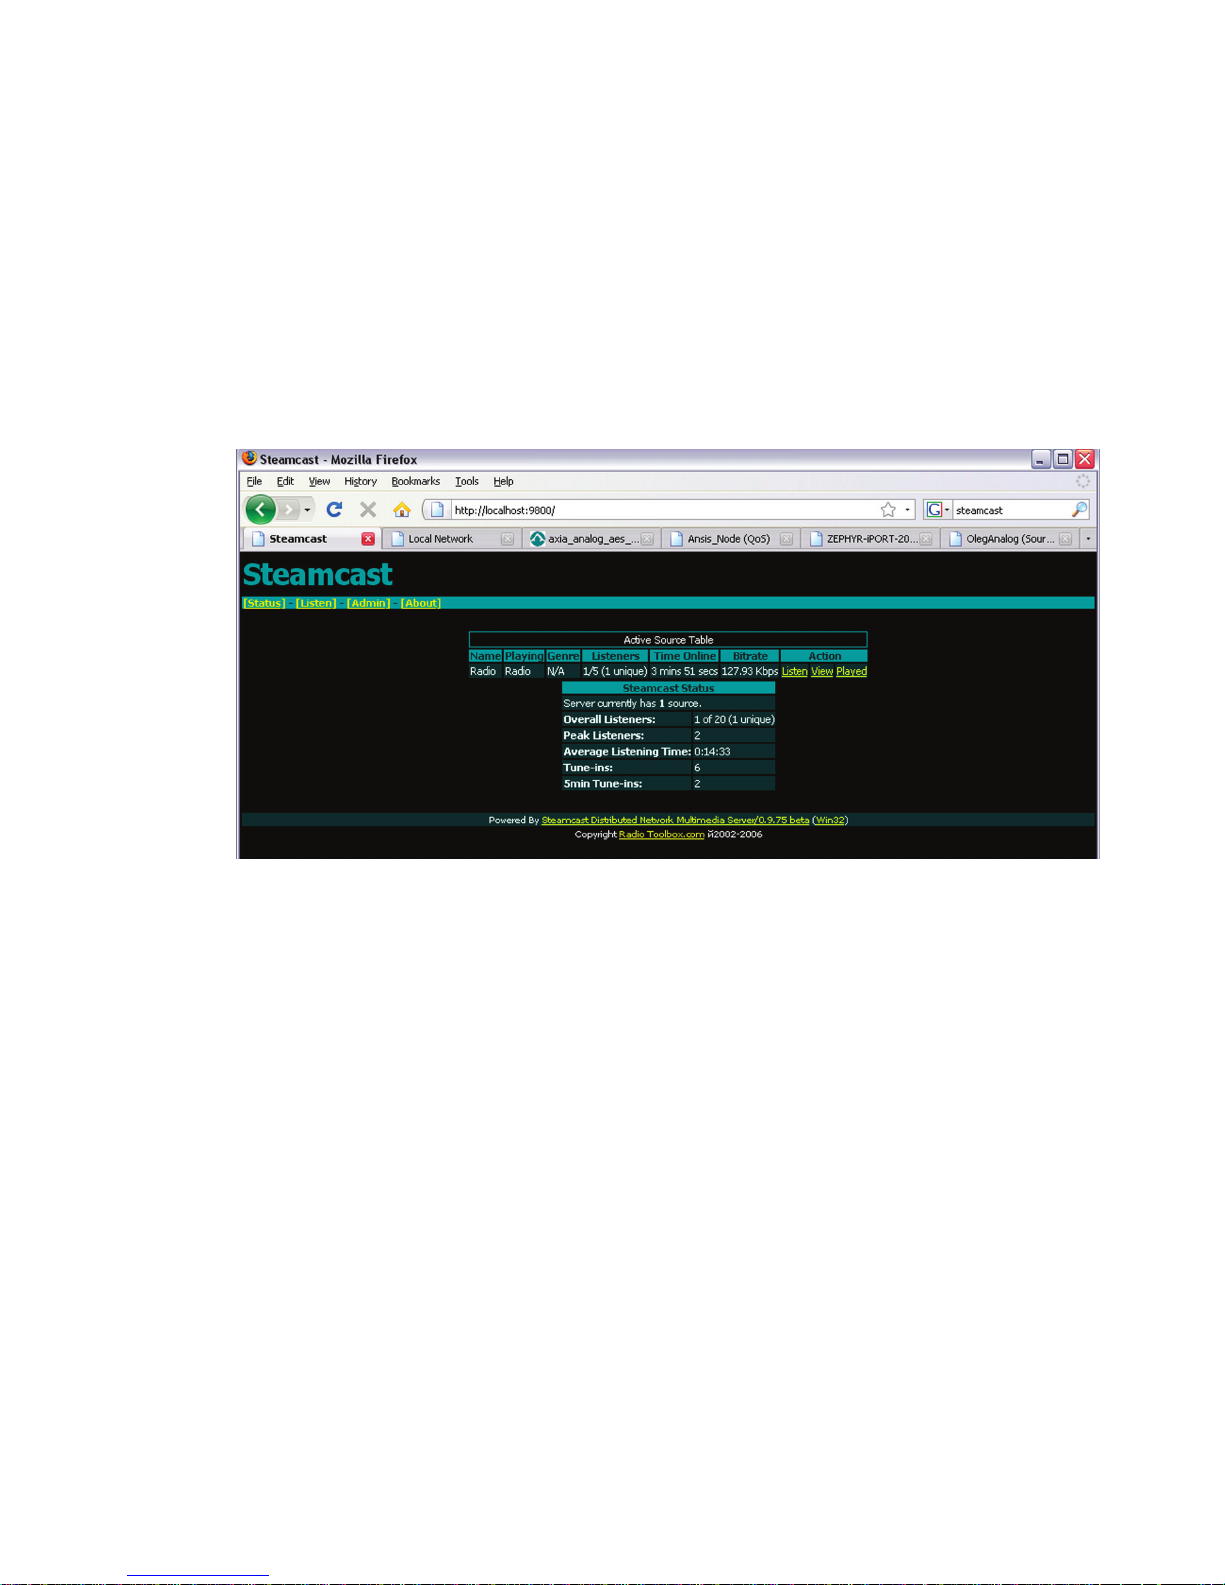
To use the Web interface on the same PC where Steamcast is running, open a Web browser
and point it to: http://localhost:9800. e number after the colon is the IP port number,
which we have set via the Steamcast conguration le to 9800 in our example. You can
also use a browser on a remote machine, by entering the host PC’s IP number in place of
‘localhost’. Here is a screenshot of the Steamcast Web interface, showing one stream and
one active listener:
For administration, you will need to enter a user name and password. ese are the ones you
entered in the steamcast.conf le.
SHOUTcast
e SHOUTcast DNAS (Distributed Network Audio Software) server is available for
Windows, Linux, and Mac OSX at: www.shoutcast.com. It is freeware, but not open
source. is was the server that started it all, developed by Nullsoft, the people who created
Winamp. e software is now in the hands of AOL, who don’t seem to be investing much
in its continued development. Neverthess, it gets the job done.
Here are the user instructions, taken from the SHOUTcast site:
Windows 95/98/ME/NT/2000/XP:
1. Download the SHOUTcast DNAS application for Windows.
2. Once the download has nished, extract all the les into a folder and create a shortcut for
SC_SERV.EXE on the Desktop.
3. Start up the SHOUTcast Radio server by double-clicking on SC_SERV.EXE
4. Click on the “Edit Cong” menu option located at the top. is will start the default text
editor, opening the conguration le for SHOUTcast DNAS application. Follow all the
directions that are written into the conguration le.
5. Once you are done making changes, save the le, close the editor, and restart the
Page 38

32 | Section 3
SHOUTcast Radio DNAS application.
UNIX, LINUX, FreeBSD and MAC OSX:
1. Download the SHOUTcast DNAS application version appropriate to your system by
proceeding to this link.
2. Unzip the distribution and un-tar the archive.
3. Use a text editor to congure the sc_serv.conf le
4. Note that the user you run the server as requires read access to the cong le, and write
access for the les you dene for le storage and log storage.
Conguration File
Like Steamcast, the SHOUTcast Radio Server conguration le contains several options
that can be changed. See the SHOUTcast website for details.
ICEcast
Icecast is a free streaming media project maintained by the Xiph.org Foundation. It also
refers specically to the server program which is part of the project. e main website for
information and download is: http://www.icecast.org. Kerry Cox oers an excellent online
“book” devoted to Icecast at: http://www.gnuware.com/icecast/.
Icecast was created by Jack Mott and Barath Raghavan to provide an open source audio
streaming server that anyone could modify, use, and tinker with.Version 2 was started in
2001, a ground-up rewrite aimed at multi-format support and scalability.
e Icecast server is capable of streaming MP3 and AAC over the SHOUTcast protocol.
(AAC is only supported in version 2.2.0 and newer.) It runs on both Linux and Windows.
Icecast is generally regarded as being the most sophisticated and capable of the streaming
servers, especially for users who want to use Linux and are comfortable with command-line
interfaces. It supports detailed reporting of audience statistics. For simple in-house distribution applications, Icecast might be over-the-top. But for serious public Internet radio
station-like streaming, this might be just what you need.
As of the writing of this manual, we have not yet tested Icecast in our lab, but there is no
reason why it shouldn’t work.
Conguration File
Like Steamcast and SHOUTcast, the icecast.conf conguration le contains several options that can be changed. Icecast2 uses an XML conguration approach. See the ICEcast
website or the online book referenced above for details.
Stream and Track Names
e iPort sends the LW channel text name to the server, which uses it as the Stream name.
e same text is sent as the Track name. However, this is only sent one time, so your source
audio application can update the Track name via a direct and independent connection to the
server.
Page 39
STREAMING | 33
Using a PC Player to Listen
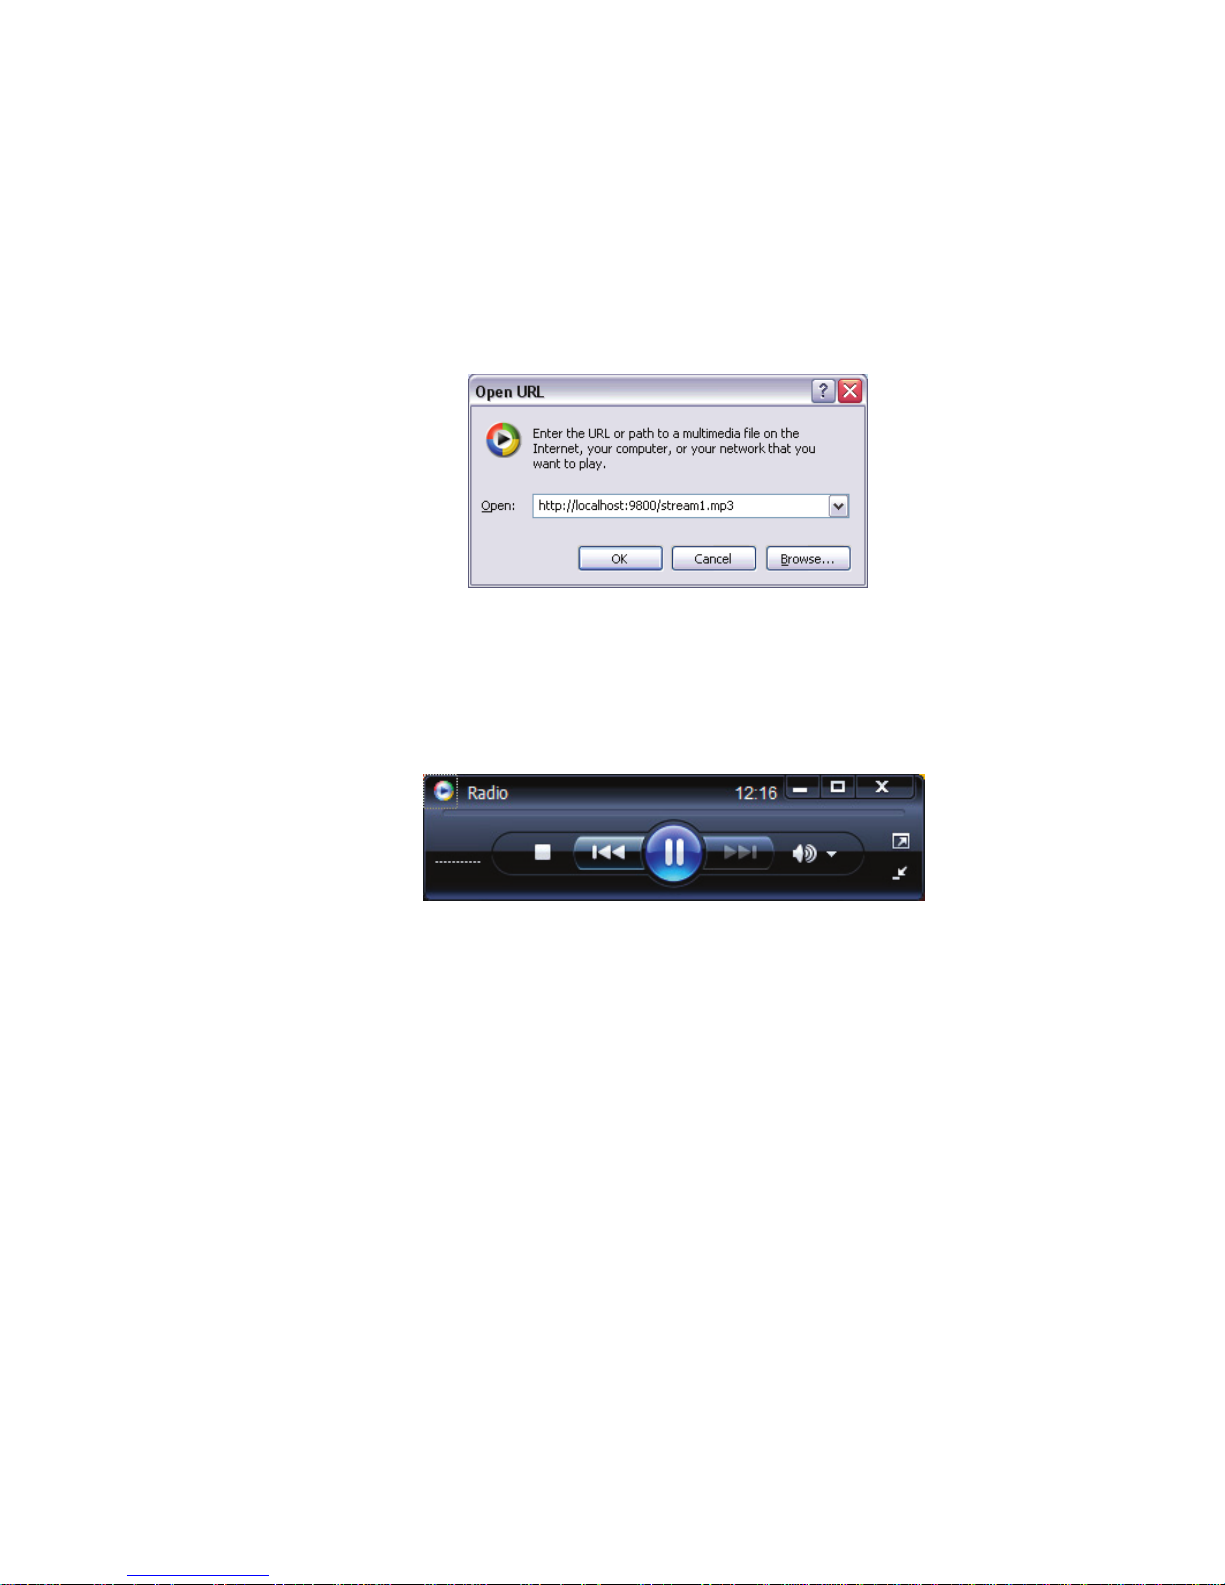
We will use the Windows Media Player 11 for our rst test with the Steamcast server
congured as above. Open the player, right click, go to the File menu and select Open
URL.... is window will appear:
Enter the IP and port, then the stream name. Because the player is running on the same
machine as the server in this case, ‘localhost’ is entered as the IP number. Were you to
be listening on a another machine, you would enter the server’s IP number, like this:
http://198.168.1.107:9800/stream1.mp3. e stream name is the one that was congured in
the steamcast.conf le. Click OK .
After some buering time, you should have audio. Note that the player is showing ‘Radio’ as
the stream name, as we expected it would. is is the Livewire text name being promulgated
through the iPort to the server, and then on to the player.
Normally, a user would not have to enter the URL. Rather, this would be a link embedded
in a web page.
We have tested MP3 streams with the WM player, Winamp, VLC player, Foobar, and
iTunes. AAC streams will work on the players that support AAC decoding, which are all of
the above except WM player.
(We’ve noticed that Winamp seems to have a bug playing ‘localhost’ URLs, but it works
ne on a remote machine.)
Hardware Players
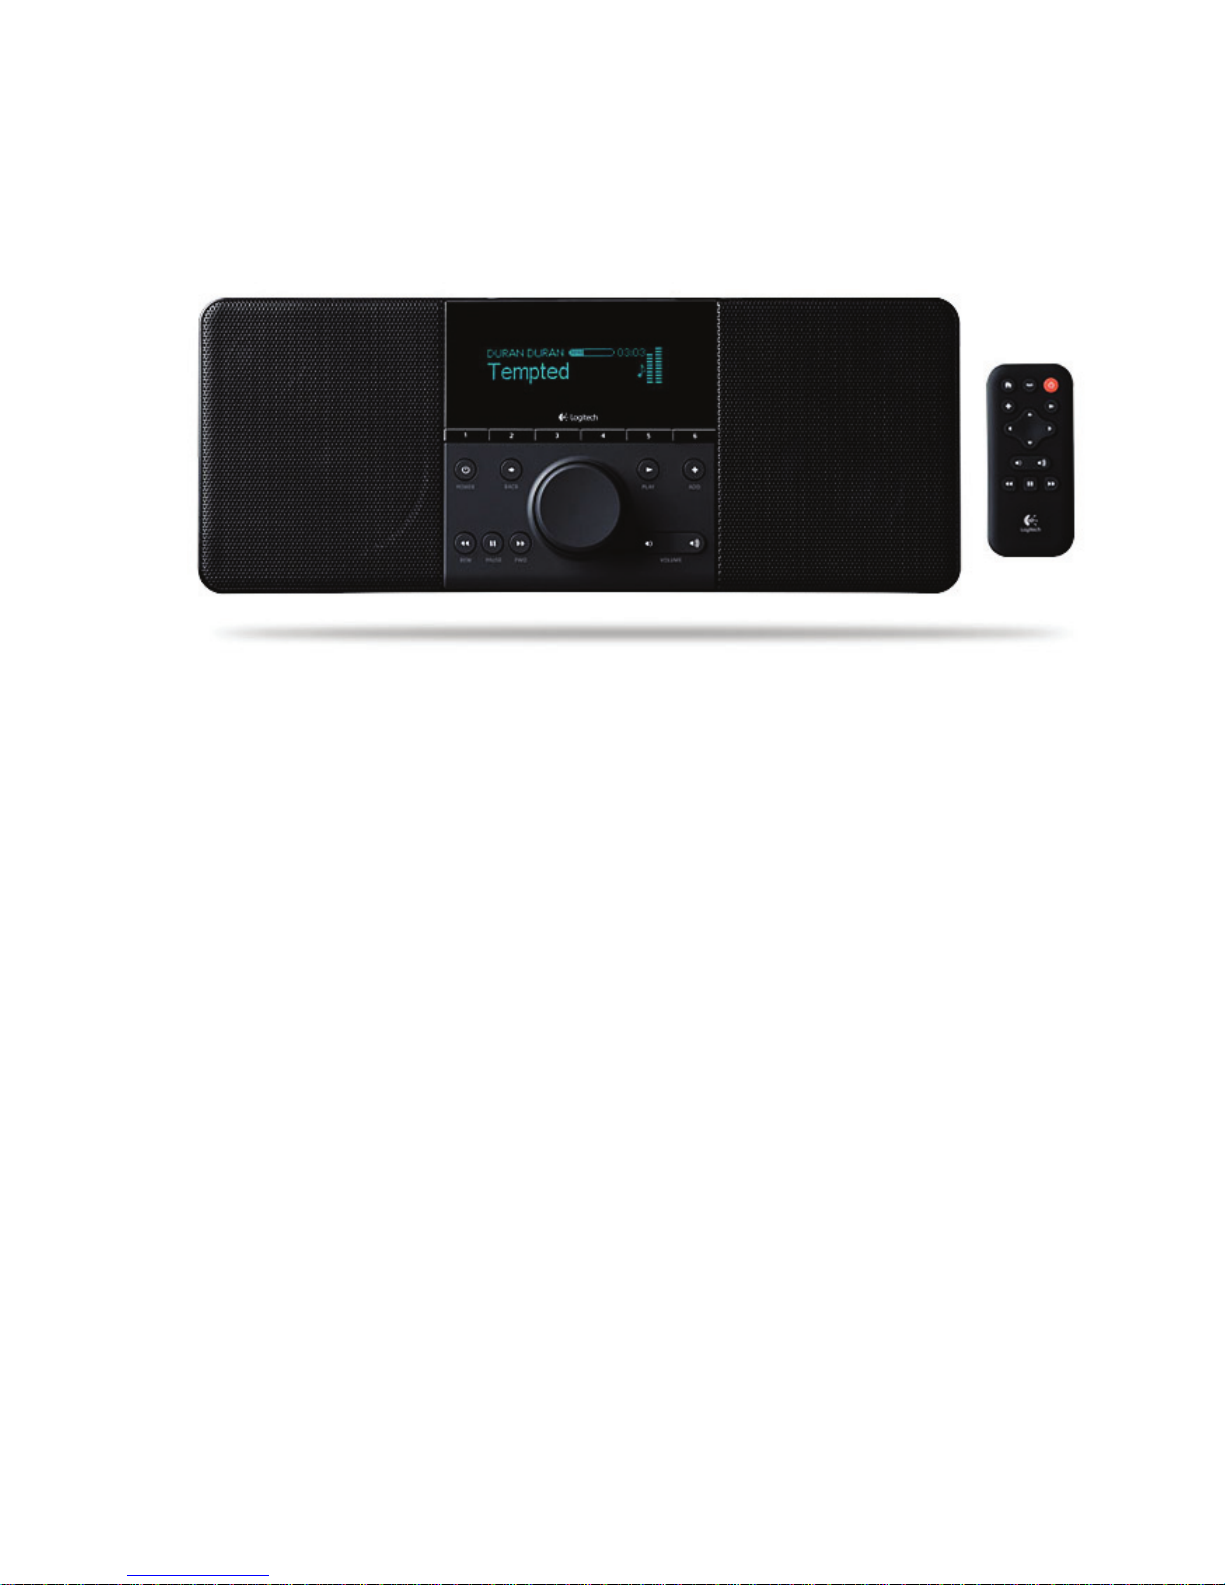
You can also play the streams on a variety of hardware devices. We’ve tested with the Logitech ‘Slimplayer’ and a few others. e device needs to support the codec you have chosen.
MP3 has universal support, with AAC decoding being available on only a subset of devices.
Most hardware players are unable to open URLs directly. ey need an intermediate server
that drives the program listing on the device and translates the audio stream format, if
necessary. e Logitech needs ‘Slimserver’ and many others need a server that conforms to
the UPnP standard. is software could run on the same machine as the streaming server.
Page 40
34 | Section 3
MPEG License & Music Copyright
e MPEG encoders in the iPort are properly licensed for professional, non-public applications such as broadcast remotes, private distribution systems, and the like. We’ve paid the
fees as part of the cost of making the iPort (in fact, it is a signicant part of our expense),
and the use license is passed to you when you buy the equipment. For this kind of application, you have no need to pay any additional fees.
However, public streaming applications may require additional license payments. It’s your
responsibility to investigate whether you have this obligation.
Musical compositions and sound recordings are creative works that are protected by the
copyright laws of the United States (title 17, U.S. Code) and other countries. Under
U.S. law, the owner of a copyright has the exclusive right to (and to authorize others to)
reproduce the work, use parts of the work in a new creation, distribute the work in whole or
in part, and to publicly display or perform the work (including on web pages and through
webcasting). With few exceptions, it is illegal to reproduce, distribute or broadcast a sound
recording without the permission of the copyright owner. It is your responsibility to comply
with the copyright laws of the United States and other countries in which you broadcast
and to pay all applicable royalties to the copyright owners when you become a webcaster.
ere have been recent amendments to the copyright law regarding webcasting of sound
recordings. ese new provisions allow webcasting under the terms of a statutory license,
as a way to help webcasters get permission without having to go to each sound recording’s
owner. e statutory license, however, has strict requirements that you must follow. Some
of these requirements include the payment of license fees, limitations on the number of
songs from the same album or artist that may be played in a three hour period (called the
sound recording performance complement); a prohibition on publishing advance playlists;
and a requirement to identify the song, artist and album on the website. ere are other
requirements as well. e Recording Industry Association of America provides quite a bit of
information on copyright law as it applies to webcasting, and both ASCAP and BMI have
created license agreements that they are willing to grant to webcasters that they believe conform to the provisions of the new copyright rules for webcasting. For additional information
Page 41

STREAMING | 35
on the statutory license and other aspects of webcasting, please visit the following sites:
e U.S. Copyright Oce
http://www.copyright.gov
e Recording Industry Association of America
http://www.riaa.com/issues/music/webcasting.
ASCAP
http://www.ascap.com/weblicense/webintro.html
BMI
http://www.bmi.com/iama/webcaster/index.asp
Page 42

Page 43

WARRANTY AND APPLICATION CAUTIONS | 37
A1 Warranty and Application Cautions
iPort LIMITED WARRANTY
is Warranty covers “the Products,” which are dened as the various audio equipment, parts,
software and accessories manufactured, sold and/or distributed by TLS Corp., d/b/a Telos
Systems (hereinafter “Telos Systems”).
With the exception of software-only items, the Products are warranted to be free from defects
in material and workmanship for a period of two years from the date of receipt by the end-user.
Software-only items are warranted to be free from defects in material and workmanship for a
period of 90 days from the date of receipt by the end-user.
is warranty is void if the Product is subject to Acts of God, including (without limitation)
lightning; improper installation or misuse, including (without limitation) the failure to use
telephone and power line surge protection devices; accident; neglect or damage.
EXCEPT FOR THE ABOVE-STATED WARRANTY, TELOS SYSTEMS MAKES NO
WARRANTIES, EXPRESS OR IMPLIED (INCLUDING IMPLIED WARRANTIES
OF MERCHANTABILITY AND FITNESS FOR A PARTICULAR PURPOSE).
In no event will Telos Systems, its employees, agents or authorized dealers be liable for incidental or consequential damages, or for loss, damage, or expense directly or indirectly arising from
the use of any Product or the inability to use any Product either separately or in combination
with other equipment or materials, or from any other cause.
In order to invoke this Warranty, notice of a warranty claim must be received by Telos Systems
within the above-stated warranty period and warranty coverage must be authorized by Telos
Systems. If Telos Systems authorizes the performance of warranty service, the defective Product
must be delivered, shipping prepaid, to: Telos Systems, 1241 Superior Avenue East, Cleveland,
Ohio 44114.
Telos Systems at its option will either repair or replace the Product and such action shall be the
full extent of Telos Systems’ obligation under this Warranty. After the Product is repaired or
replaced, Telos Systems will return it to the party that sent the Product and Telos Systems will
pay for the cost of shipping.
Telos Systems’ authorized dealers are not authorized to assume for Telos Systems any additional
obligations or liabilities in connection with the dealers’ sale of the Products.
 Loading...