

TLR 8IGHT-T E 3.0 User Manual

TM

2
2
NOTICE
All instructions, warranties and other collateral documents are subject to change at the sole discretion of Horizon Hobby, LLC.
For up-to-date product literature, visit http://www.horizonhobby.com and click on the support tab for this product.
SAFETY PRECAUTIONS AND WARNINGS
Read and follow all instructions and safety precautions before use. Improper use can result in fi re, serious injury and damage
to property.
MEANING OF SPECIAL LANGUAGE
WARNING: Procedures, which if not properly followed, create the probability of property damage, collateral damage,
and serious injury OR create a high probability of superfi cial injury.
WARNING: Read the ENTIRE instruction manual to become familiar with the features of the product before
operating. Failure to operate the product correctly can result in damage to the product, personal property and cause
serious injury.
This is a sophisticated hobby product and NOT a toy. It must be operated with caution and common sense and requires some
basic mechanical ability. Failure to operate this Product in a safe and responsible manner could result in injury or damage to
the product or other property. This product is not intended for use by children without direct adult supervision. Do not use
with incompatible components or alter this product in any way outside of the instructions provided by Horizon Hobby, LLC.
This manual contains instructions for safety, operation and maintenance. It is essential to read and follow all the instructions
and warnings in the manual, prior to assembly, setup or use, in order to operate correctly and avoid damage or serious injury.
Components
Engines and some electronic
components can become hot while
in use. Do not touch parts until cool.
Should any compatibility questions exist,
please refer to the product instructions,
the component instructions or contact
Horizon Hobby, LLC.
Batteries
Always follow the manufacturer’s
instructions when using and disposing
of any batteries. Mishandling
or improper storage may result in fi re
causing serious injury or damage.
Small Parts
This kit includes small parts and should
not be left unattended near children as
choking and serious injury could result.
Safe Operating Recommendations
• Inspect your model before every run to make sure it is track worthy.
• Be aware of any other radio frequency user who may present an interference problem.
• Always be courteous and respectful of other users of your selected driving area.
• Choose an area clear of obstacles and large enough to safely accommodate your driving activity.
• Make sure this area is clear of friends and spectators prior to running your vehicle.
• Be aware of other activities in the vicinity of your path that could cause potential confl ict.
Important Safety Notes
• Select an area for assembly that is away from the reach of small children. Some parts in this vehicle are
small and can be swallowed by children, causing choking and possible internal injury; PLEASE USE CAUTION!
• The shock fl uid and greases supplied should be kept out of children’s reach. They are not intended for human consumption!
• Exercise care when using any hand tools, sharp instruments, or power tools during construction.
• Carefully read all manufacturer’s warnings and cautions for any chemicals, glues, or paints that may be used for assembly
and operating purposes.
Age Recommendation: Not for Children under 14 years. This is not a toy.

3
3
HINWEIS
Alle Anweisungen, Garantien und dazugehörigen Dokumente können ohne Ankündigung von Horizon Hobby LLC
geändert werden. Eine aktuelle Version ersehen Sie bitte im Support Feld unter: http://www.horizonhobby.com.
SICHERHEITSHINWEISE UND WARNUNGEN
Bitte lesen und befolgen Sie allen Anweisungen und Sicherheitswarnungen. Nicht sachgemäßer oder falscher Gebrauch kann
zu Feuer, schweren Verletzungen oder Beschädigungen an Eigentum führen.
ERKLÄRUNG DER BEGRIFFE
WARNUNG: Wenn diese Verfahren nicht korrekt befolgt werden, ergeben sich wahrscheinlich Sachschäden,
Kollateralschäden und schwere Verletzungen ODER mit hoher Wahrscheinlichkeit oberfl ächliche Verletzungen.
WARNUNG: Lesen Sie sorgfältig die gesamte Bedienungsanleitung durch und machen sich vor dem Betrieb mit dem
Produkt vertraut. Falscher und oder nicht sachgemäßer Umgang kann zu Beschädigungen am Produkt, eigenen und fremden
Eigentum und ernsthaften Verletzungen führen. Bitte beachten Sie, dass dieses Produkt ein hoch entwickeltes Hobby Produkt
und kein Spielzeug ist. Es erfordert bei dem Betrieb.
Aufmerksamkeit und grundlegende mechanische Fähigkeiten. Falscher, nicht sachgemäßer Umgang kann zu Beschädigungen
an eigenem oder fremden Eigentum oder zu Verletzungen an sich selbst oder Dritter führen. Verwenden Sie das Produkt nicht
mit inkompatiblen Komponenten oder verändern es in jedweder Art ausserhalb der von Horizon Hobby, LLC vorgegebenen
Anweisungen. Dieses Produkt ist nicht für den Gebrauch von Kindern ohne direkte Aufsicht durch ihre Eltern bestimmt.
Die Bedienungsanleitung enthält Anweisungen und wichtige Informationen für die Sicherheit und Betrieb. Es ist daher
notwendig, allen darin enthaltenen Anweisungen und Warnungen Folge zu leisten und diese Anleitung vor dem
Zusammenbau und Inbetriebnahme sorgfältig durch zu lesen.
Komponenten
Einige elektrische Komponenten
können während des Betriebs heiß
werden. Fassen Sie diese Teile nicht an
bevor sie abgekühlt sind. Verwenden
Sie diese Teile nur mit geeigenten
Komponenten. Sollten Sie Fragen zur
Kompatibilität haben, sehen Sie bitte
in der Bedienungsanleitung nach oder
kontakten den Service von Horizon
Hobby.
Akkus
Befolgen Sie zum Betrieb und zur
Entsorgung immer die Anweisungen
des Herstellers. Falscher oder nicht
sachgemäßer Umgang kann zu
Feuer , ernsten Verletzungen und
Sachbeschädigung führen.
Kleinteile
Dieser Bausatz enthält Kleinteile und
darf nicht in der Nähe von Kleinkindern
gelangen, da die Gefahr von Verschlucken
und ernsthaften Verletzungen besteht.
Empfehlungen Zum Sicheren Betrieb
• Bitte überpüfen Sie vor dem Einsatz ob das Modell sich in einem einwandfreien Zustand befi ndet.
• Stellen Sie sicher dass kein anderer Fahrer auf der gleichen Frequenz wie sie fährt.
• Gehen Sie höfl ich und respektvoll mit anderen Fahrern auf ihrer Strecke um.
• Suchen Sie sich einen Platz der groß genug und frei von Hindernissen ist.
• Stellen Sie sicher, dass die Fahrstrecke frei von Freunden und Zuschauern ist.
• Haben Sie evtl. andere Aktivitäten im Blick die auf der Strecke zum Konfl ikt führen könnten.
Wichtige Sicherheitshinweise
• Wählen Sie für den Zusammenbau einen Ort außerhalb der Reichweite von kleinen Kindern. Einige Bauteile in diesem Fahrzeug
sind klein und können von Kindern verschluckt werden, was Erstickungen und mögliche innere Verletzungen auslösen kann;
BITTE GEBEN SIE ACHT!
• Die im Lieferumfang enthaltene Stoßdämpferfl üssigkeit und Fette sollten außerhalb der Reichweite von Kindern aufbewahrt
werden. Sie sind nicht für den menschlichen Verzehr bestimmt!
• Seien Sie achtsam, wenn Sie Handwerkzeuge, scharfe Instrumente oder Elektrowerkzeuge während dem Aufbau verwenden.
• Lesen Sie gründlich alle Warn- und Sicherheitshinweise des Herstellersfür jegliche Chemikalien, Kleber oder Lacke,
die für den Zusammenbau oder Betriebszwecke eventuell verwendet werden.
Nicht geeignet für Kinder unter 14 Jahren. Dies ist kein Spielzeug.

4
4
REMARQUE
Toutes les instructions, garanties et autres documents sont modifi ables à la seule discrétion de Horizon Hobby, LLC.
Pour des documents à jour sur les produits, vous pouvez consulter http://www.horizonhobby.com et cliquer sur
l’onglet de support de ce produit.
PRÉCAUTIONS ET AVERTISSEMENTS LIÉS
À LA SÉCURITÉ
Lisez et respectez toutes les instructions et précautions de sécurité avant utilisation. L’utilisation incorrecte peut entraîner un incendie,
des blessures graves et des dommages aux biens.
SIGNIFICATION DE CERTAINS TERMES SPÉCIFIQUES
AVERTISSEMENT : Procédures qui, si elles ne sont pas suivies correctement, peuvent entraîner des dégâts matériels, des
dommages collatéraux et des blessures graves OU engendrer une probabilité élevée de blessure superfi cielle.
AVERTISSEMENT: Lisez la TOTALITE du manuel d’utilisation afi n de vous familiariser avec les caractéristiques du
produit avant de l’utiliser. Une utilisation incorrecte du produit peut causer des dommages au produit lui-même, aux biens
voire entraîner des blessures graves.
Ceci est un produit de loisirs perfectionné et NON PAS un jouet. Il doit être manipulé avec prudence et bon sens et requiert
quelques aptitudes de base à la mécanique. L’incapacité à manipuler ce produit de manière sûre et responsable peut provoquer
des blessures ou des dommages au produit ou à d’autres biens. Ce produit n’est pas destiné à être utilisé par des enfants sans
la surveillance directe d’un adulte. N’essayez pas de modifi er ou d’utiliser ce produit avec des composants incompatibles hors
des instructions fournies par Horizon Hobby, LLC. Ce manuel comporte des instructions de sécurité, de mise en oeuvre
et d’entretien. Il est capital de lire et de respecter toutes les instructions et avertissements du manuel avant le montage,
le réglage ou l’utilisation afi n de manipuler le Produit correctement et d’éviter les dommages ou les blessures graves.
Eléments
Certains composants électroniques
peuvent être très chauds pendant
l’utilisation. Ne touchez pas les pièces
avant qu’elles aient refroidi. N’utilisez
qu’avec des composants compatibles. Pour
toute question de compatibilité, consultez
les instructions concernant le produit,
celles concernant le composant ou prenez
contact avec Horizon Hobby, LLC.
Batteries
Toujours suivre les consignes du fabricant
quand vous utilisez et manipulez des
batteries. Une mauvaise manipulation
des batteries Li-Po peut provoquer un
incendie causant des dégâts et des
blessures graves.
Petites pièces
Ce kit contient de petites pièces qui
ne doivent pas être laissées à la portée
des enfants sous peine d’étouffement
ou de blessure grave.
Recommandations de sécurité d’utilisation
• Contrôlez votre modèle avant chaque utilisation pour vous assurer qu’il est en état de rouler.
• Prenez garde à tout autre utilisateur de fréquence radio pouvant créer des problèmes d’interférences.
• Restez toujours courtois et respectueux des autres utilisateurs sur le lieu choisi pour la conduite.
• Choisissez une zone sans obstacles et suffi samment grande pour accueillir en toute sécurité les évolutions de conduite.
• Assurez-vous que cette zone est dégagée de tous amis et spectateurs avant le démarrage de votre véhicule.
• Prenez garde aux autres activités dans le voisinage de votre trajectoire pouvant créer des confl its potentiels.
Notes de Securité Importantes
• Pour le montage, choisissez une zone hors de portée des enfants en bas âge. Certaines pièces de ce véhicule sont très petites et
peuvent être avalées par des enfants, provoquant un étouffement et des blessures internes. AGISSEZ AVEC PRECAUTION!
• Le fl uide et les graisses destinés aux amortisseurs doivent être tenus hors de portée des enfants. Ils ne sont pas destinés à la
consommation humaine!
• Faites attention lorsque vous utilisez des outils à main, des instruments coupants ou des outils électriques lors de la construction.
• Lisez attentivement tous les avertissements du fabricant concernant les produits chimiques, les colles ou les peintures pouvant
être utilisés pour le montage ou l’utilisation.
14 ans et plus. Ceci n’est pas un jouet.

5
5
AVVISO
Tutte le istruzioni, garanzie e altri documenti allegato sono soggetti a cambiamenti a totale discrezione di Horizon Hobby, LLC.
Per una letteratura aggiornata sul prodotto si prega di visitare il sito http://www.horizonhobby.com e cliccare sul tab di
riferimento per questo prodotto.
PRECAUZIONI PER LA SICUREZZA E AVVERTENZE
Leggere e seguire le istruzioni e le precauzioni di sicurezza prima dell’uso. Un utilizzo improprio può risultare in un incendio, in gravi
lesioni o danni a cose.
SIGNIFICATO DEI TERMINI PARTICOLARI
AVVERTENZA: Procedure che, se non debitamente seguite, espongono alla possibilità di danni alla proprietà fi sica o possono
comportare una elevata possibilità di provocare ferite superfi ciali.
AVVERTENZA: Leggere TUTTO il manuale di istruzioni e familiarizzare con le caratteristiche del prodotto, prima di
farlo funzionare. Un utilizzo scorretto del prodotto può causare danni al prodotto stesso, alle persone o alle cose, causando
gravi lesioni.
Questo è un prodotto sofi sticato di hobbistica e NON è un giocattolo. Esso deve essere manipolato con cautela, con giudizio
e richiede delle conoscenze basilari di meccanica. L’utilizzo improprio o irresponsabile del modello potrebbe causare lesioni,
danni al prodotto stesso o nei confronti di terzi. Questo prodotto non è concepito per essere usato dai bambini senza la diretta
supervisione di un adulto. Non usare componenti non compatibili o alterare il prodotto in nessuna maniera al di fuori delle
istruzioni fornite da Horizon Hobby, LLC. Questo manuale contiene le istruzioni per la sicurezza, l’utilizzo e la manutenzione
del prodotto. È fondamentale leggere e seguire tutte le istruzioni e le avvertenze nel manuale prima di montare, impostare
o usare il prodotto, al fi ne di usarlo correttamente e di evitare danni.
Componenti
Alcuni componenti elettronici possono
diventare caldi durante il loro uso.
Non toccarli fi nché non si raffreddano.
Usare solo componenti compatibili. Se
ci sono delle domande in relazione alla
compatibilità bisogna riferirsi alle istruzioni
del prodotto, alle istruzioni dei componenti
o contattare Horizon Hobby, LLC.
Batterie
Seguire sempre le istruzioni del
produttore quando si smaltiscono le
batterie. Se si manipolano le batterie LiPo in maniera errata si può verifi care un
incendio, serie lesioni e danni.
Minuterie
Il kit include delle minuteria e non
deve essere lasciato incustodito vicino
ai bambini, che potrebbero inghiottirli
e farsi davvero male.
Raccomandazioni per un utilizzo sicuro
• Controllare il modello prima di ogni corsa per vedere se funziona correttamente.
• Essere al corrente di altri utenti con frequenze radio che potrebbero interferire.
• Essere sempre cortesi e rispettosi verso gli altri utenti della pista di guida.
• Scegliere un’area senza ostacoli abbastanza grande per consentirvi di guidare in sicurezza.
• Accertarsi che quest’area sia priva di persone e spettatori, prima di guidare il veicolo.
• Essere consapevoli di altre attività vicine al percorso che possono causare potenziali confl itti.
Note Importanti di Sicurezza
• Scegliere un’area per il montaggio che non sia facilmente raggiungibile dai bambini. Alcuni pezzi di questo veicolo sono piccoli
e possono essere inghiottiti dai bambini causando soffocamento e possibili lesioni agli organi interni; PRESTARE ATTENZIONE!
• L’olio e il grasso per gli ammortizzatori dovrebbero essere tenuti lontani dalla portata dei bambini. Tali elementi non
sono commestibili!
• Durante il montaggio, prestare attenzione quando si usano utensili, strumenti affi lati o alimentati da energia elettrica.
• Leggere attentamente tutti gli avvertimenti e i consigli dettati dal produttore relativi alle sostanze chimiche, alla colla,
agli smalti e a tutti gli elementi di montaggio e di funzionamento del veicolo.
Almeno 14 anni. Non è un giocattolo.

6
6
WELCOME TO TEAM LOSI RACING
Thank you for selecting the new Team Losi Racing® 8IGHT-T E™ 3.0 racing Truggy. The 8IGHT-T E 3.0 is a result of 30 years of eating, breathing and sleeping RC racing.
Everything we’ve done has led us to this moment. Every race we’ve won. Every vehicle we’ve designed. It all helped us create the 8IGHT-T E 3.0. Based on the championship
winning 8IGHT™ 3.0 platform, we combined the most durable chassis features of our successful Truggy and all the cutting edge power system features of our Electric Buggy to
create an RC vehicle that will blow your minds and rock your spirit! The 8IGHT-T E 3.0 is destined to turn the E-Truggy class on its head!
Good luck and good racing,
Team Losi Racing
DE Willkommen bei Team Losi Racing
Vielen Dank, dass Sie sich für den Team Losi Racing 8IGHT-T-E 3.0 als Ihren neuen Racing Truggy entschieden haben. Der 8IGHT-T-E 3.0 ist das Ergebnis von 30 Jahren
intensivster Beschäftigung mit RC. All unser Tun führt uns zu diesem Moment. Jedes Rennen, das wir gewonnen haben. Jedes Fahrzeug, das wir entworfen haben. Basierend auf
der erfolgreichen 8IGHT 3.0 Plattform haben wir die besten Chassis Features unseres siegreichen Truggys mit einem Hochleistungsantrieb kombiniert, der die E-Truggy Klasse
revolutionieren wird.
Viel Glück und ein gutes Rennen,
Team Losi Racing
FR Bienvenue chez Team Losi Racing
Nous vous remercions d’avoir choisi le nouveau Truggy de compétition 8IGHT-T-E 3.0. Ce modèle est le fruit de 30 années d’une totale implication dans le monde de la RC. Chaque
course que nous avons remporté, chaque véhicule que nous avons conçu, toutes nos expériences menées jusqu’à présent, nous ont aidé a créer le 8IGHT-T E 3.0. Basé sur le châssis
8IGHT 3.0 remportant de nombreux championnats, nous avons associé le châssis ultra-résistant de notre célèbre Truggy avec la technologie de notre buggy électrique pour créer un
véhicule RC qui va balayer tous les préjugés !
Cette plateforme ne ressemble à aucune autre et elle va révolutionner le monde de la RC.
Bonne chance et bonnes courses !
Team Losi Racing
IT Benvenuto nel Team Losi Racing
Grazie di aver scelto il nuovo truggy Team Losi Racing 8IGHT-T E 3.0. La 8IGHT-T E 3.0 è il risultato di 30 anni dedicati alle corse RC. Tutto quello che abbiamo raggiunto sulle piste
di tutto il mondo ci ha portato a questo risultato, lo sviluppo della 8IGHT-T E 3.0. Sulla base della comprovata piattaforma 8IGHT 3.0, abbiamo combinato la robustezza del Truggy
con la potenza del buggy elettrico, per creare un veicolo RC che supererà tutte le vostre aspettative. La 8IGHT-T E 3.0 è stata costruita per rivoluzionare la classe dei Truggy elettrici!
Buona fortuna e buona corsa,
Team Losi Racing

7
7
REGISTER YOUR TEAM LOSI RACING PRODUCT ONLINE
KIT/MANUAL ORGANIZATION
Register your Team Losi Racing product online at TLRACING.com and follow the product registration link to stay connected.
DE Registrieren Sie Ihr Team Losi Racing Produkt online
Registrieren Sie Ihr Produkt online bei TLRACING.com, und folgen Sie dem Link zur Produktregistrierung, um auf dem Laufenden
zu bleiben mit Team Losi Racing.
FR Enregistrez votre produit Team Losi Racing en ligne
Enregistrez votre produit auprès de la Team Losi Racing sur la page TLRACING.com
IT Registrazione online del prodotto Team Losi Racing
Registrando online il prodotto a TLRACING.com e seguire il link di registrazione del prodotto per essere sempre aggiornati
con Team Losi Racing.
The kit is composed of different bags marked A through H. Each bag contains all of the parts necessary to complete a particular
section of the kit. Some of these bags have sub-assembly bags within them. It is essential that you open only one bag at a time and
follow the correct assembly sequence. It is helpful to read through the instructions for an entire bag prior to beginning assembly.
For your convenience, the hardware identifi cation of each hardware item used is located to the left of each step. The silhouette
of each part is 1:1 (actual size). To check a part, hold it against the silhouette until the correct part is identifi ed.
DE Kit/Manual Organisation
Der Kit umfasst verschiedene Beutel, die mit A bis H beschriftet sind. Jeder Beutel enthält alle erforderlichen Bauteile für einen
bestimmten Teil des Kits. Einige dieser Beutel enthalten wiederum kleinere Beutel. Öffnen Sie unbedingt jeweils nur einen Beutel, und
folgen Sie den Montageschritten in der korrekten Reihenfolge. Es wird empfohlen, dass Sie sich die Anweisungen für einen ganzen
Beutel durchlesen,bevor Sie mit der Montage beginnen.
Zur Vereinfachung fi nden Sie die Identifi zierung der verwendeten Kleinteile links neben jedem Schritt. Die Silhouette der
einzelnen Teile ist 1:1 (Originalgröße). Um zu überprüfen, ob Sie das richtige Teil haben, halten Sie es gegen die Silhouette.
FR Organisation du Kit/Manuel
Le kit se compose de différents sachets, marqués de A à H. Chaque sachet contient toutes les pièces nécessaires pour réaliser une
section donnée du kit. Certains de ces sachets comportent des sachets de sous-assemblage. Il est essentiel que vous n’ouvriez qu’un
sachet à la fois et que vous suiviez la bonne séquence d’assemblage. Il est utile de lire l’intégralité des instructions correspondantes
au sachet avant de commencer l’assemblage.
Par commodité, l’identifi cation de chaque élément utilisé se situe à gauche de chaque étape. La silhouette de chaque pièce
est à l’échelle 1:1 (taille réelle). Pour contrôler une pièce, placez-la sur les silhouettes jusqu’à l’identifi er correctement.
IT Kit / manuale Organizzazione
Il kit è composto da diverse buste, contrassegnate con le lettere da A a H. Ogni busta contiene tutti i componenti necessari per
completare la sezione corrispondente del kit. Alcune di queste buste contengono delle buste di sub-assemblaggio. È fondamentale
aprire solo una busta per volta e seguire la sequenza di assemblaggio corretta. Prima di iniziare l’assemblaggio è opportuno leggere
attentamente le istruzioni dell’intera busta.
Per maggiore comodità, a sinistra di ciascun passaggio è indicata l’identifi cazione di ciascun componente meccanico utilizzato.
La sagoma di ogni parte è 1:1 (dimensioni effettive). Per il controllo di ciascun un componente, posizionarlo sulla sagoma e
verifi care che sia quello corretto.
8
8
ICON KEY / SYMBOLSCHLÜSSEL / LÉGENDE DES ICÔNES /
RIFERIMENTO ICONA
ENGLISH DEUTSCH FRANÇAIS ITALIANO
TLR-LOK
Apply TLR-Lok™ Threadlock
- TLR76004
TLR-Lok auftragen Appliquer du
frein filet TLR-Lok
Applicare TLR-Lok
Apply High Pressure
Black Grease - TLR77000
Schwarzes Hochdruckfett auftragen Appliquer de la graisse
haute pression noire
Applicare grasso nero
ad alta pressione
GLUE
Apply CA Glue CA-Kleber auftragen Appliquer de la colle CA Applicare colla CA
GREASE
CLEAR
Apply Clear Grease Farbloses Schmierfett auftragen Appliquer de la graisse
Clear Grease (transparente)
Applicare grasso trasparente
Degrease with Motor Spray
-DYN5500
Mit Motorspray
entfetten
Dégraisser au nettoy ant moteur Togliere il grasso con lo spray per
motori
OIL
Fill With Silicone Oil Mit Silikonöl füllen Remplir d’huile silicone Riempire con olio al silicone
Pay Special
Attention
Besonders aufpassen Faire particulièrement
attention
Prestare molta attenzione
CUT
Cut/Trim Schneiden/
Abgleichen
Couper/ébavurer Tagliare / regolare
Ensure Free
Movement
Leichtgängigkeit
sicherstellen
Vérifier la liberté
de mouvement
Assicurare un
movimento libero
Ensure Free Rotation Freigängigkeit
sicherstellen
Vérifier la libre rotation Assicurare una rotazione libera
Ensure Proper
Orientation
Passende Ausrichtung sicherstellen Vérifier l’orientation correcte Assicurare un corretto orientamento
Push Firm Fest drücken Pousser fermement Spingere forte
L
Side Shown Seite dargestellt Côté présenté Mostrato lateralmente
L
R
L
R
Assemble Other
Side the Same
Andere Seite gleich
zusammenbauen
Monter l’autre côté
à l’identique
Assemblare l’altro
Lo stesso per l’altro lato
x2
Repeat/Build Multiple Wiederholen/
mehrfachbauen
Répéter/assembler
plusieurs fois
Ripetere/costruire multiplo
Screw Partially Provisorisch anschrauben Visser partiellement Avvitare parzialmente
DO NOT OverTighten/Snug Tight
KEINESFALLS zu stark/bis
zum Anschlag anziehen
NE PAS serrer excessivement (serrer
juste assez)
NON stringere troppo
(stringere sufficientemente)
Tighten Festziehen Serrer Stringere
9
9
A-1
EN Steering Link Assembly
DE Zusammenbau des Lenkgestänges
FR Assemblage de la tringlerie de direction
IT Assemblaggio rinvii sterzo
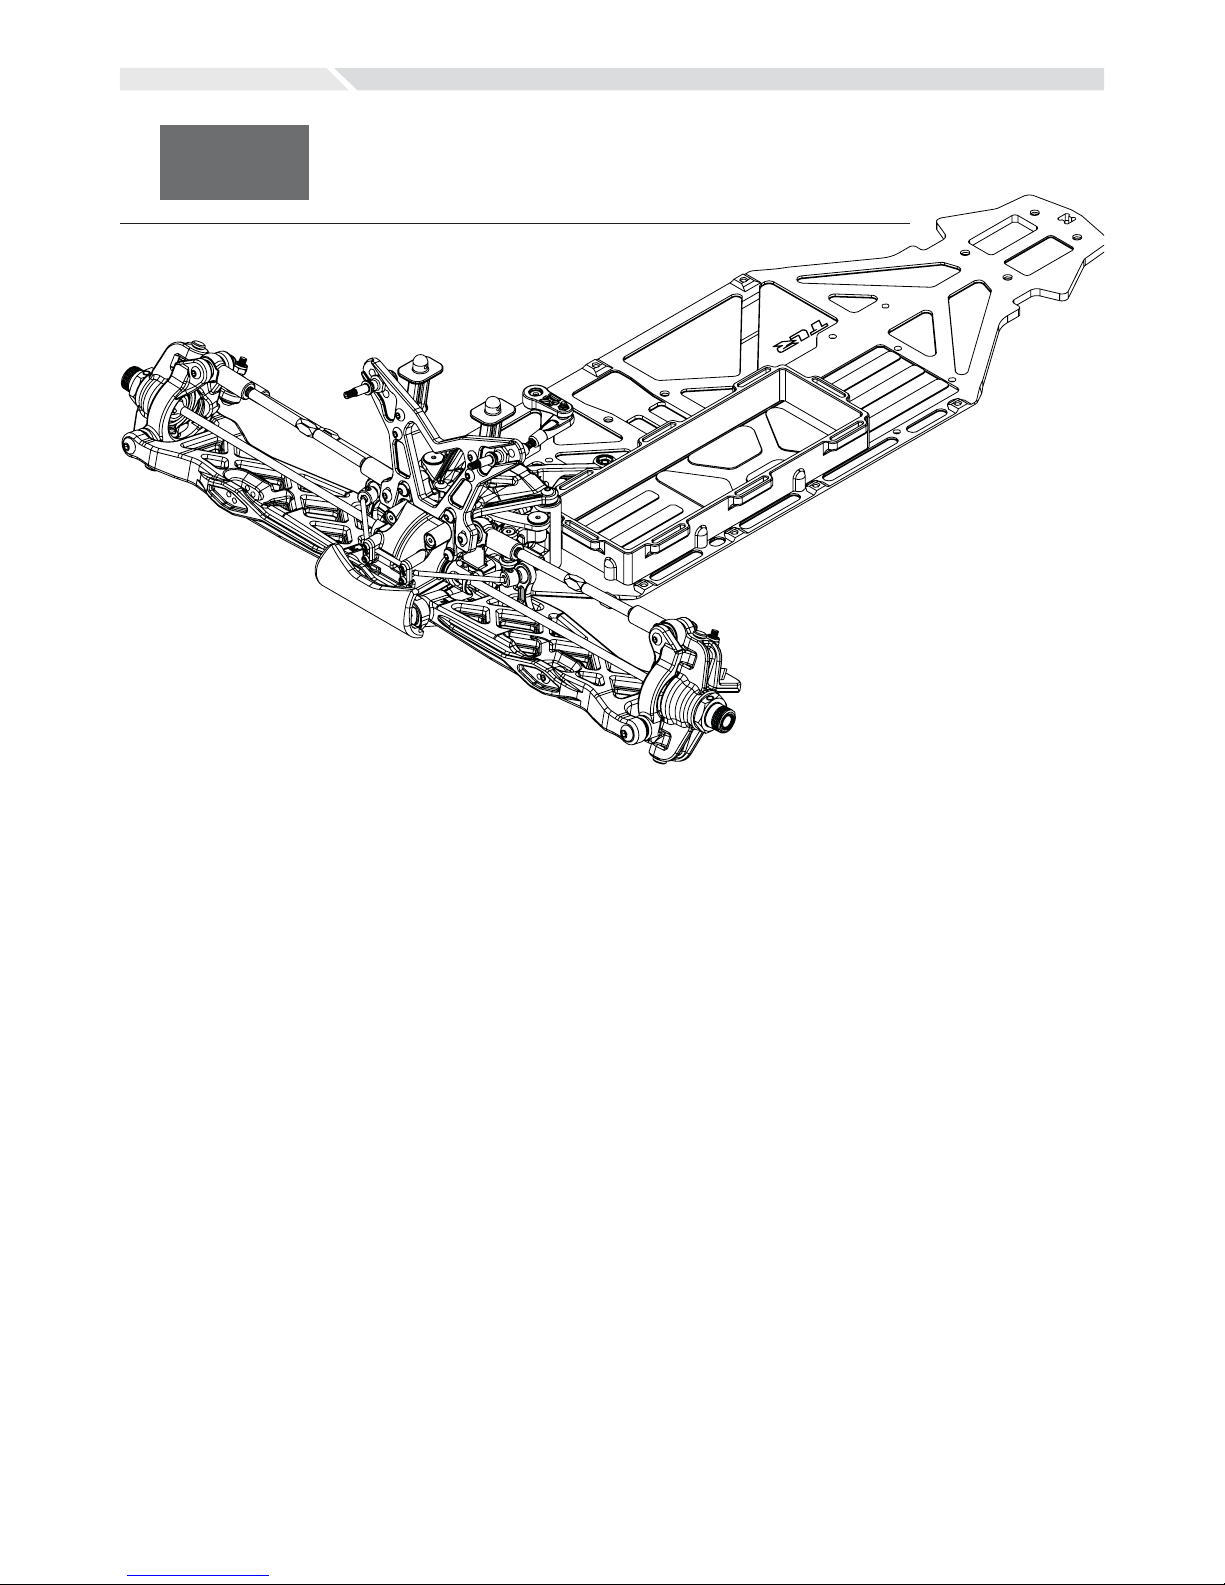
Completed Kit Specifi cations
20.08 in (560.7mm) Overall Length\Gesamtlänge\Longueur totale\Lunghezza totale del telaio
14.9–15.1 in (379-383mm) Wheelbase\Radstand\Empattement\Interasse
16.4 in (417mm) Front Track Width\Spurbreite vorne\Largeur de la voie avant\Larghezza zona anteriore
16.4 in (417mm) Rear Track Width\Spurbreite hinten\Largeur de la voie arrière\Larghezza zona posteriore
7.3 in (185mm) Overall Height\Höhe\Hauteur totale\Altezza generale
LOSA9168
LOSA6306
58.34mm
LOSA6256
LOSA6306 x 1
4-40 x 3/16”
LOSA6044 x 2
rod ball ends
LOSA6256 x 1
4-40 x 1/2”
LOSA6045
LOSA6045 x 1
5-40 x 7/8”
4.5mm
TOOLS REQUIRED \ ERFORDERLICHE WERKZEUGE \
OUTILS NÉCESSAIRES \ UTENSILI NECESSARI
ENGLISH DEUTSCH FRANÇAIS ITALIANO
.050” Hex Wrench 0,050-Zoll-Inbusschlüssel Clé hexagonale, 1,27 mm Chiave esagonale da 0,050”
1.5mm Hex Wrench 1,5 mm-Inbusschlüssel Clé hexagonale, 1,5 mm Chiave esagonale da 1,5 mm
1/16” Hex Wrench 1/16”-Inbusschlüssel Clé hexagonale, 1/16”” Chiave esagonale da 1/16”
5/64” Hex Wrench 5/64”-Inbusschlüssel Clé hexagonale, 5/64” Chiave esagonale da 5/64”
3/32” Hex Wrench 3/32”-Inbusschlüssel Clé hexagonale, 3/32” Chiave esagonale da 3/32”
Body Scissors Lexanschere Ciseaux à lexan Corpo forbici
Needle-Nose Pliers Spitzzange Pince à bec Pinze a becchi lunghi
Regular Pliers Normale Zange Pince ordinaire Pinze normali
Hobby Knife Hobbymesser Cutter Cutter da modellismo

10
10
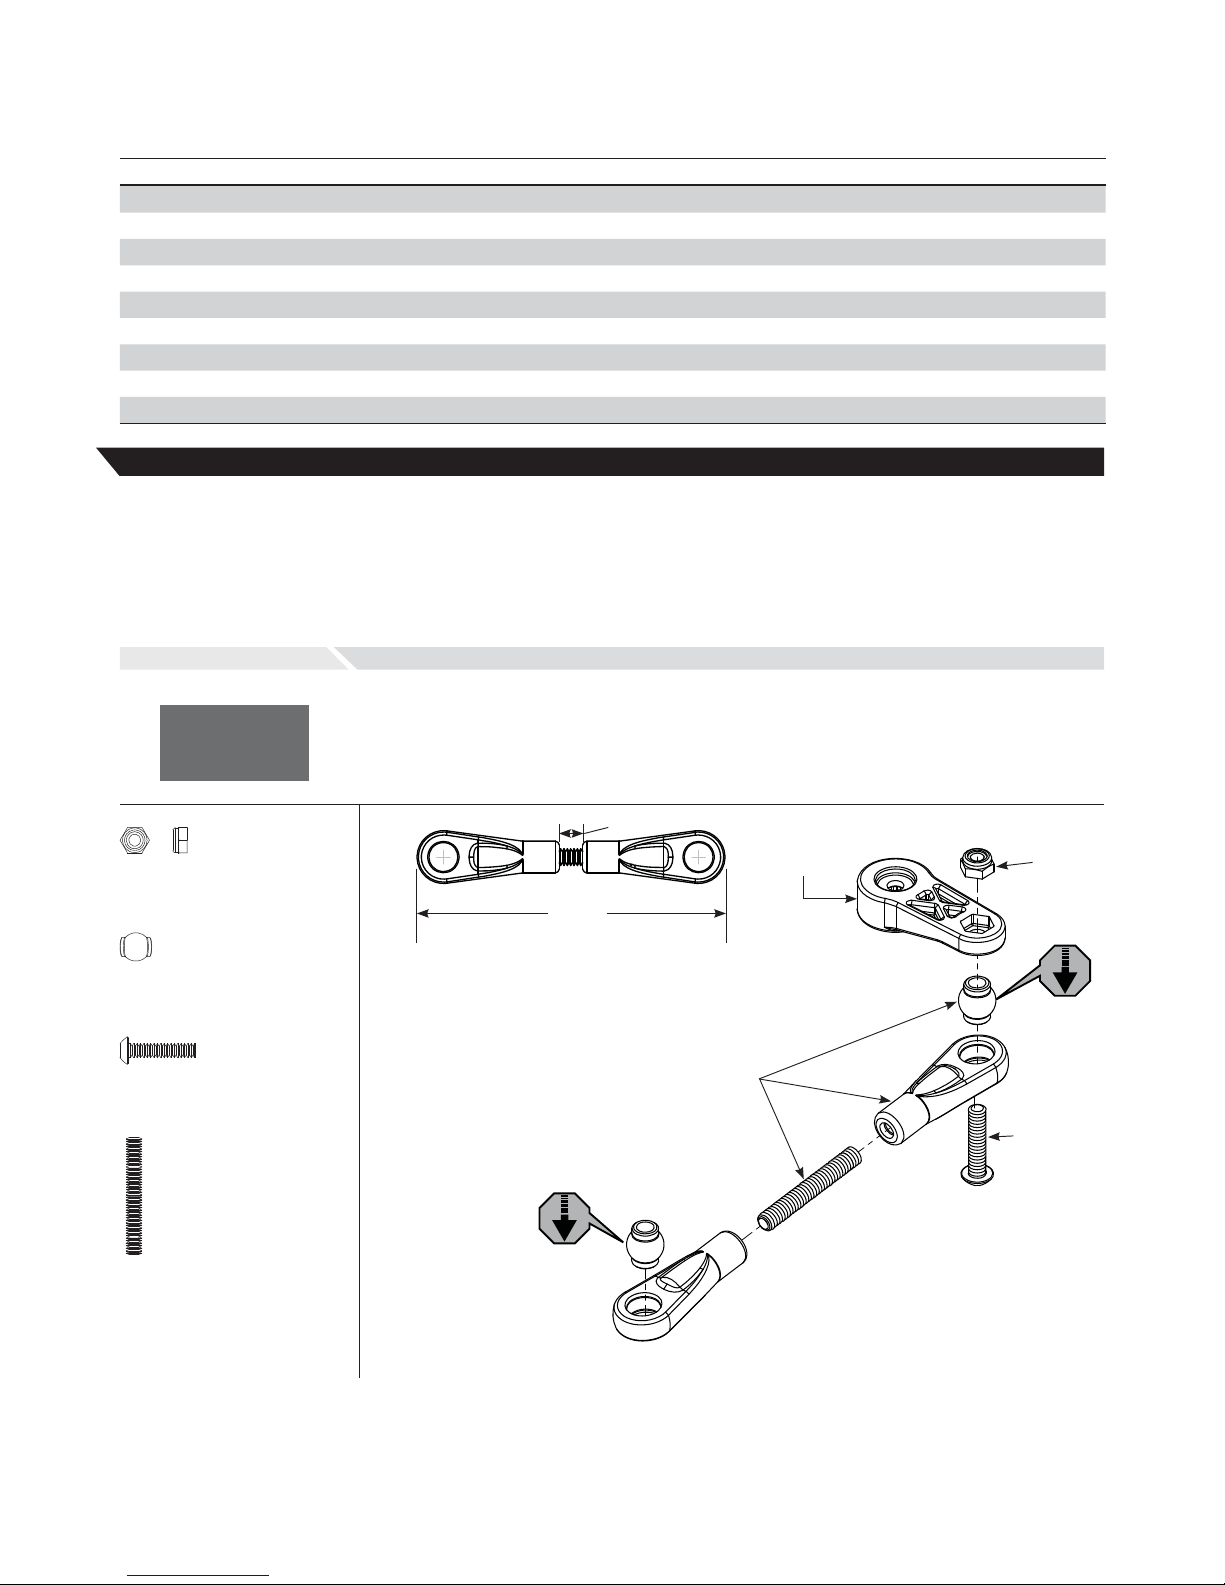
A-2
EN Servo Saver Assembly
DE Zusammenbau des Servo Savers
FR Montage du sauve-servo
IT Assemblaggio salva servo
A-3
EN Battery Stay
DE Akkuhalter
FR Support de batterie
IT Supporto batteria
TLR-LOK
EN Tighten the servo saver
nut all the way down,
then back off 51/2 turns.
DE Ziehen Sie die Mutter des
Servo Savers fest an und
drehen Sie sie dann 51/2
Umdrehungen zurück.
FR Serrez complètement la
bague du sauve servo,
puis desserrez-la de 51/2
tours et demi.
IT Stringere completamente
il dado del salvaservo,
poi tornare indietro
di 5 giri e 1/2.
LOSA6256 x 1
4-40 x 1/2”
LOSA6306 x 1
4-40 x 3/16”
LOSA4406
LOSA4406
LOSA6306
LOSA4406
LOSA6256
TLR244005
TLR244005
LOSA4406
TLR244006
LOSA6302
LOSA6271
LOSA6270
TLR241012
TLR241011
TLR241010
TLR-LOK
LOSA4408
LOSA6204 x 3
4-40 x 1/2”
LOSA6271 x 4
5-40 x 1/2”
LOSA6270 x 6
5-40 x 3/8”
LOSA6302 x 3
5-40 x 1/4”

11
11
A-4
EN Steering/Top Plate Assembly
DE Befestigungsplatte
FR Montage de direction/renfort supérieur
IT Assemblaggio sterzo / piastra superiore
A-5
EN Completed Steering Assembly
DE Vollständige Baugruppe Lenkung
FR Ensemble de direction terminé
IT Assemblaggio completo dello sterzo
L
R
L
R
L
LOSA6271
TLR241003
LOSA6278
LOSA6278
LOSA6946
TLR-LOK
TLR-LOK
LOSA6271 x 1
5-40 x 1/2”
LOSA6278 x 2
5-40 x 1/2”
LOSA6946 x 4
6 x 10 x 3mm
12
12
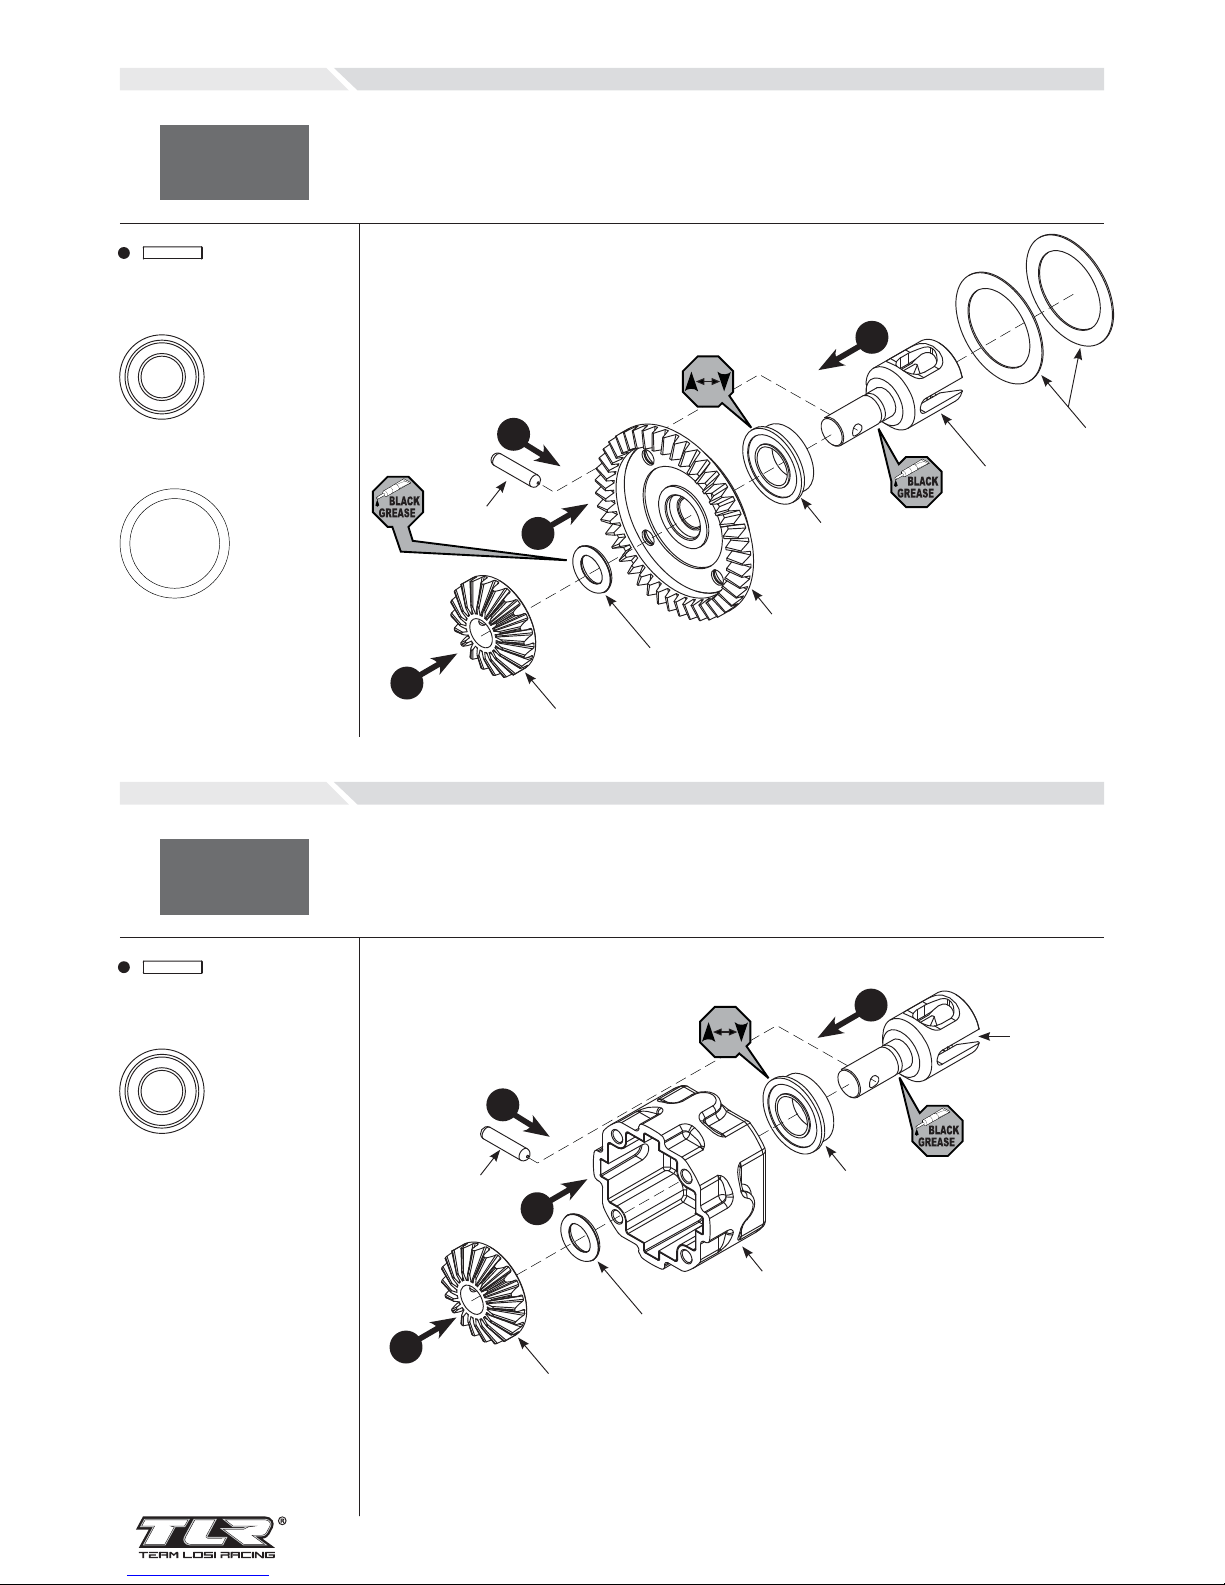
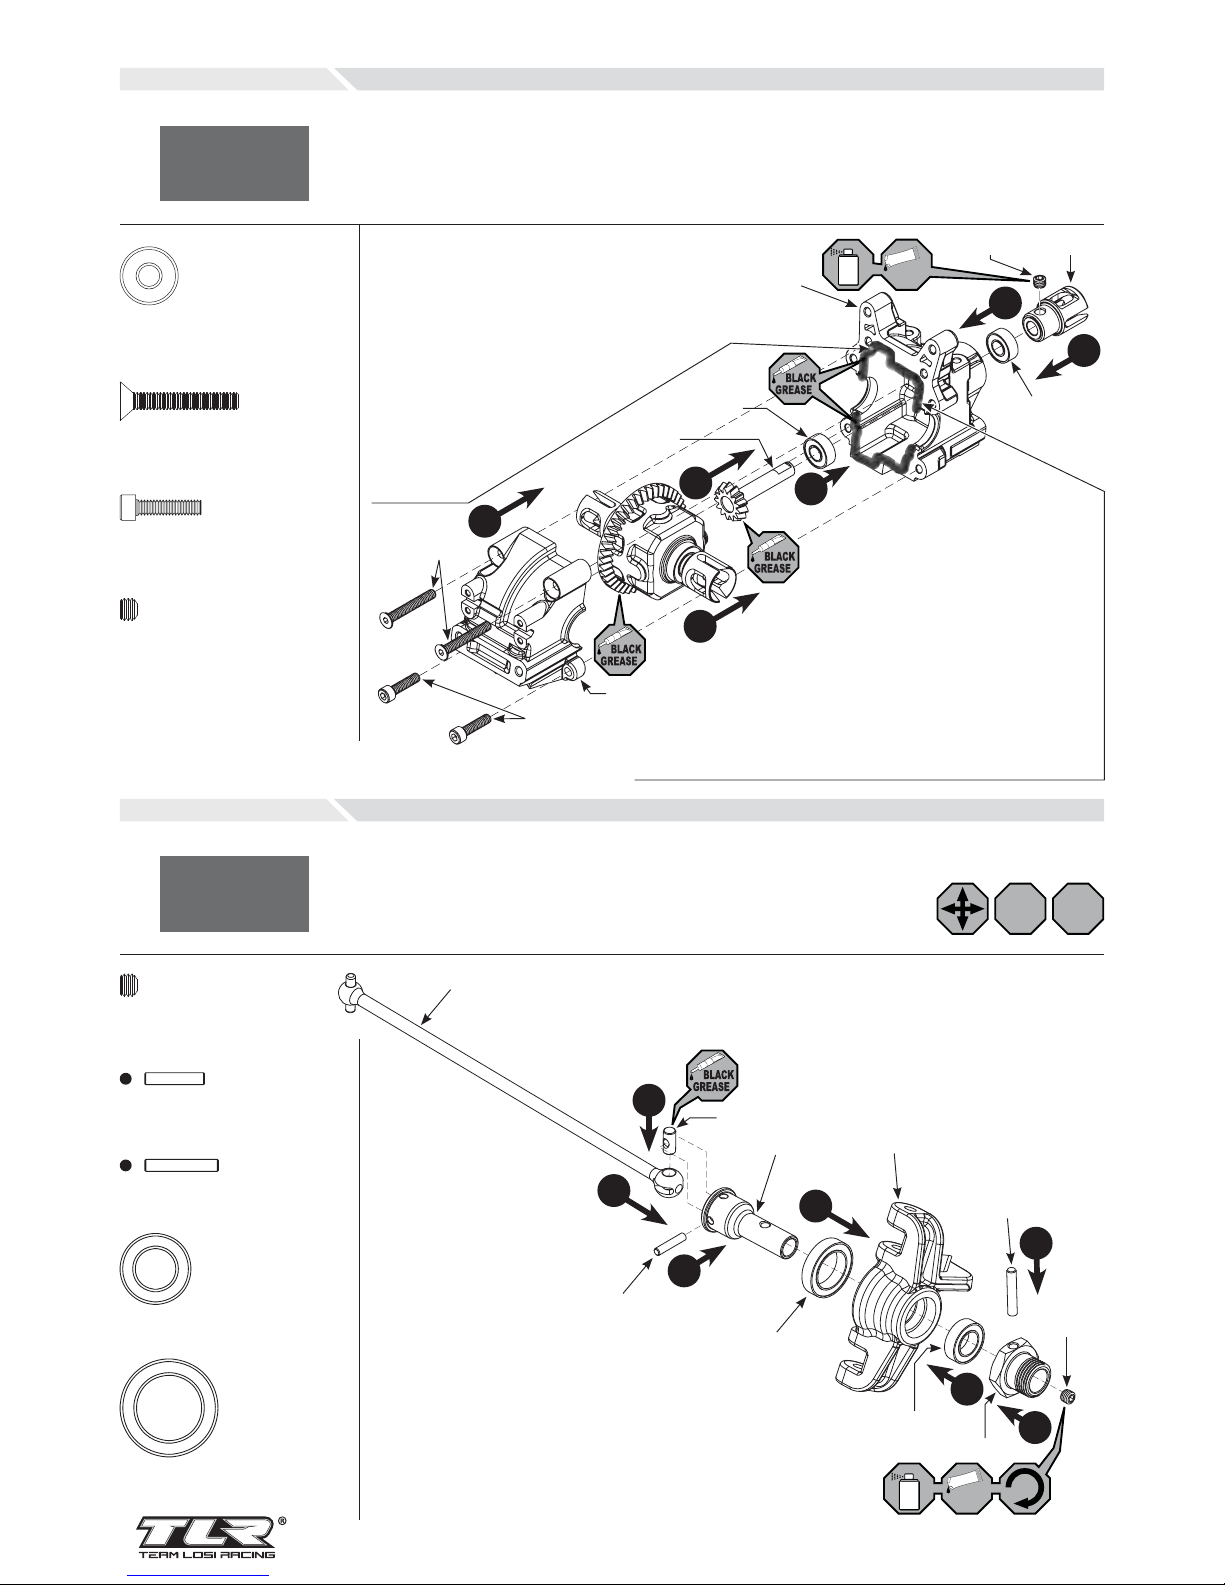
B-1
EN Ring Gear Assembly
DE Zusammenbau des Tellerrads
FR Montage du planétaire
IT Assemblaggio corona dentata
B-2
EN Differential Case Assembly
DE Zusammenbau des Differenzialgehäuses
FR Assemblage du corps de différentiel
IT Assemblaggio alloggiamento diff
LOSA6948
TLR242011
LOSA3505
LOSA3502
1
2
3
4
LOSA3518
LOSA3553
LOSA6948
LOSA3505
LOSA3502
LOSA3518
1
2
3
4
LOSA3500
LOSA3553
LOSA4452
LOSA3518 x 1
2.5 x 12.80mm
LOSA6948 x 1
F 8 x 14 x 4mm
LOSA3518 x 1
2.5 x 12.80mm
LOSA6948 x 1
F 8 x 14 x 4mm
LOSA4452 x 2
14 x 17 x 0.1mm
13
13
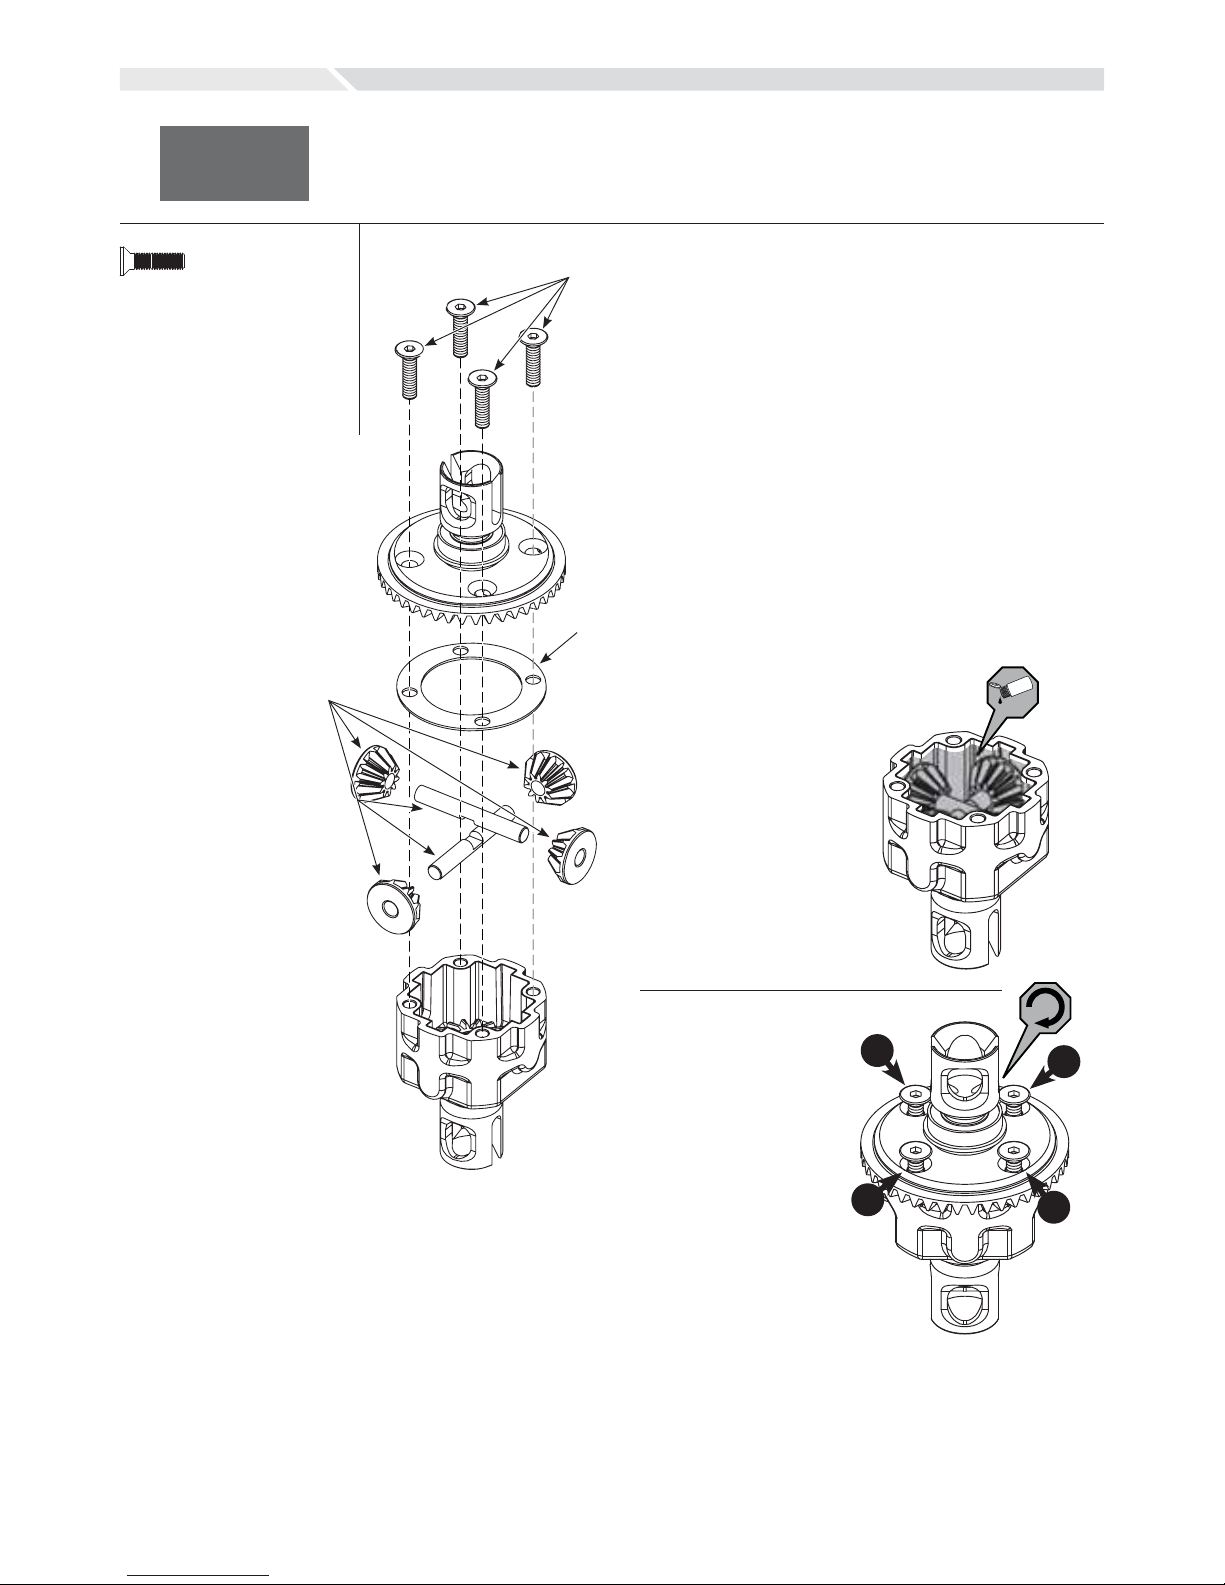
B-3
EN Complete Differential Assembly
DE Vollständiger Zusammenbau des Differenzials
FR Différentiel complet
IT Assemblaggio completo diff
EN Fill with 10,000 wt oil just
above the planetary gear.
DE Mit 10,000 WT ÖL bis zum
Planetengetriebe füllen.
FR Remplir d’huile 10,000
wt jusqu’au-dessus
des satellites.
IT Riempire con olio
10,000 wt fi no sopra
l’ingranaggio planetario.
OI
L
EN Tighten the diff
scews in this order.
DE Differenzialschrauben
in dieser Reihenfoge
festiehen.
FR Serrez les vis
du diférentiel
dans cet ordre.
IT Stringere le viti del
differenziale in
questo ordine.
1
2
3
4
LOSA3505
LOSA3502
LOSA3500
LOSA3500 x 4
M3 x 12mm
14
14
B-4
EN Front Differential Installation
DE Einbau des Frontdifferenzials
FR Assemblage de la transmission avant
IT Montaggio differenziale anteriore
B-5
EN Front Spindle & CV Assembly
DE Zusammenbau von Vorderachse u. CV
FR Montage des fusées et cardans avant
IT Assemblaggio alberino anteriore & CV
LOSA3586
LOSA3522 TLR244003
LOSA6953
LOSA3518
LOSA3523
LOSA6945
TLR-LOK
LOSA3518
LOSA3530
LOSA6298
1
2
3
4
5
6
7
L
R
L
R
L
2
LOSA6296
TLR-LOK
TLR242003
LOSA6947
TLR242013
LOSA6273
LOSA6240
1
3
4
5
6
FR Afi n d’éviter que de la poussière
fi ne pénètre à l’intérieur du boîtier
de différentiel, appliquez un fi n
bourrelet de graisse sur toute la
longueur de la jonction.
IT Per evitare che le polveri sottili entrino
nella scatola ingranaggi, applicare un
leggero strato di grasso lungo il bordo
di giunzione della scatola ingranaggi.
EN To prevent fi ne dust from entering
the gearbox, apply a thin bead of
grease along the edge of the
entire gear case.
DE Tragen Sie einen dünnen Streifen
Fett entlang der Kanten des
Gehäuses - wie abgebildet auf, um zu verhindern,
dass feiner Staub in
das Getriebe
gelangt.
LOSA6947
TLR242011
TLR242013
LOSA6298 x 1
C 8-32 x 1/8”
LOSA3518 x 1
2.5 x 12.80mm
LOSA3518 x 1
3 x 17mm
LOSA6945 x 1
8 x 14 x 4mm
LOSA6953 x 1
1/2” x 3/4”
LOSA6240 x 2
5-40 x 1/2”
LOSA6296 x 1
F 8-32 x 1/8”
LOSA6273 x 2
5-40 x 7/8”
LOSA6947 x 2
5 x 11 x 4mm

15
15
EN Spindle/Carrier Assembly
DE Zusammenbau von Achsschenkel und Radträger
FR Assemblage fusée/étrier porte fusée sur triangle avant
IT Assemblaggio perno/semiasse
B-6
L
R
L
R
L
4
TLR245000 x 1
10-32 x 7.50mm
LOSA6251 x 2
C 5-40 x 3/16”
LOSA6266 x 2
8-32 x 5/8”
LOSA6263 x 2
8-32 x 3/4”
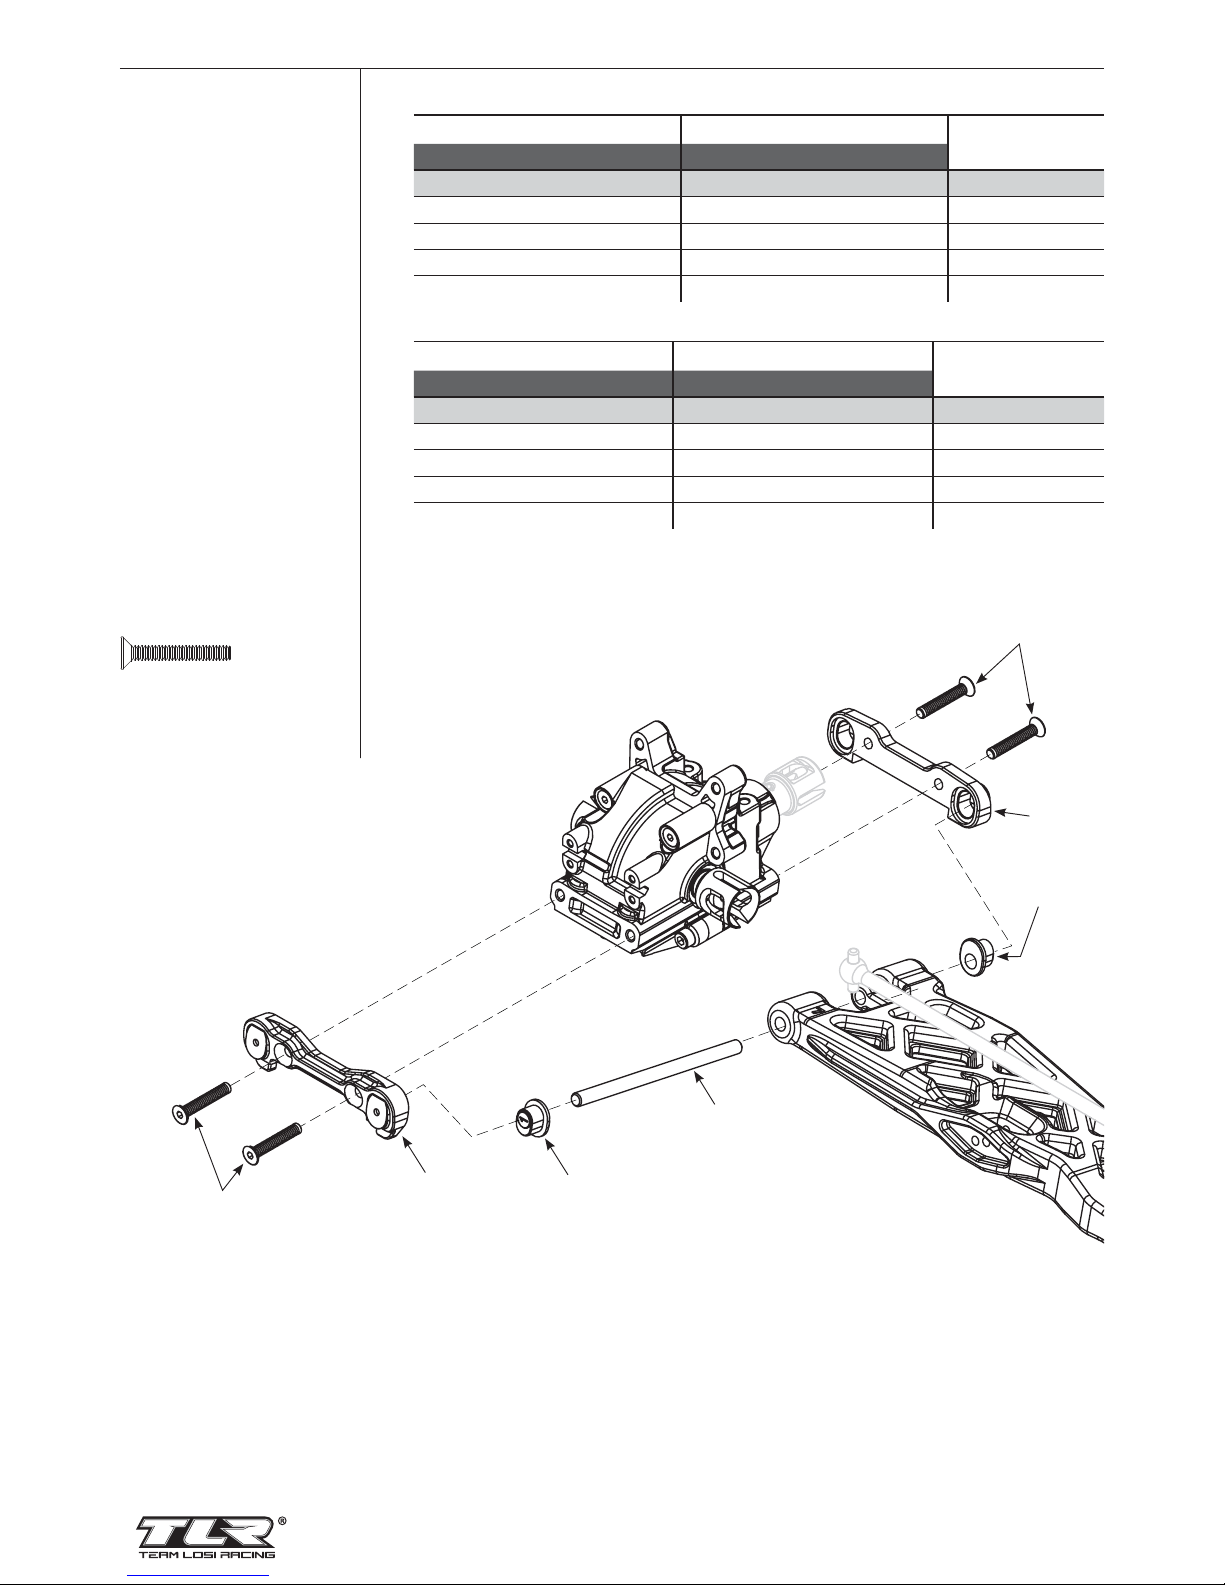
EN Front Suspension Arm Assembly
DE Zusammenbau des vorderen Querlenkers
FR Installation des triangles avant
IT Assemblaggio braccio sospensione anteriore
B-7
L
R
L
R
L
FRONT KICK-UP ANGLE ADJUSTMENT
Outer Front Brace Inner Front Brace Total Kick-Up
Insert Position Insert Number Insert Position Insert Number
Up 1° Down 1° +2°
Up 0.5° Down 0.5° +1°
Middle 0° Middle 0° 0°
Down 0.5° Up 0.5° -1°
Down 1° Up 1° -2°
EN
WINKEL EINSTELLUNG FRONT KICK-UP
Halter Aussen Halter Innen Gesamt Kick-Up
Einsatz Position Einsatz Nr. Einsatz Position Einsatz Nr.
Oben 1° Unten 1° +2°
Oben 0.5° Unten 0.5° +1°
Mitte 0° Mitte 0° 0°
Unten 0.5° Oben 0.5° -1°
Unten 1° Oben 1° -2°
DE
TLR245000
TLR244017
1
5
5
LOSA6266
LOSA6263
TLR244001
LOSA1701
TLR244016
TLR244003
LOSA6251
TLR244007
2
3
16
16
LOSA6272
TLR244011
LOSA6272
LOSA1756
LOSA1756
LOSA1754
LOSA6272 x 4
5-40 x 3/4”
RÉGLAGE DE L’ANGLE D’ANTI-PLONGÉE AVANT
Renfort avant extérieur Renfort avant intérieur Angle d’anti-
plongée total
Position de l’insert Numéro de l’insert Position de l’insert Numéro de l’insert
Haut 1° Bas 1° +2°
Haut 0.5° Bas 0.5° +1°
Milieu 0° Milieu 0° 0°
Bas 0.5° Haut 0.5° -1°
Bas 1° Haut 1° -2°
FR
REGOLAZIONE ANGOLO ANTERIORE
Supporto esterno anter. Supporto interno anter. Angolo totale
Posizione inserim. Numero inserim. Posizione inserim. Numero inserim.
superiore 1° inferiore 1° +2°
superiore 0.5° inferiore 0.5° +1°
centrale 0° centrale 0° 0°
inferiore 0.5° superiore 0.5° -1°
inferiore 1° superiore 1° -2°
IT
LOSA1754

17
17
EN Sway Bar Assembly
DE Zusammenbau des Querlenkers
FR Montage de la barre stabilisatrice
IT Assemblaggio barra antitorsione
LOSA1750
LOSA6204
LOSA1750
(2.3mm)
B-8
LOSA6254
LOSA6227
L
R
L
R
L
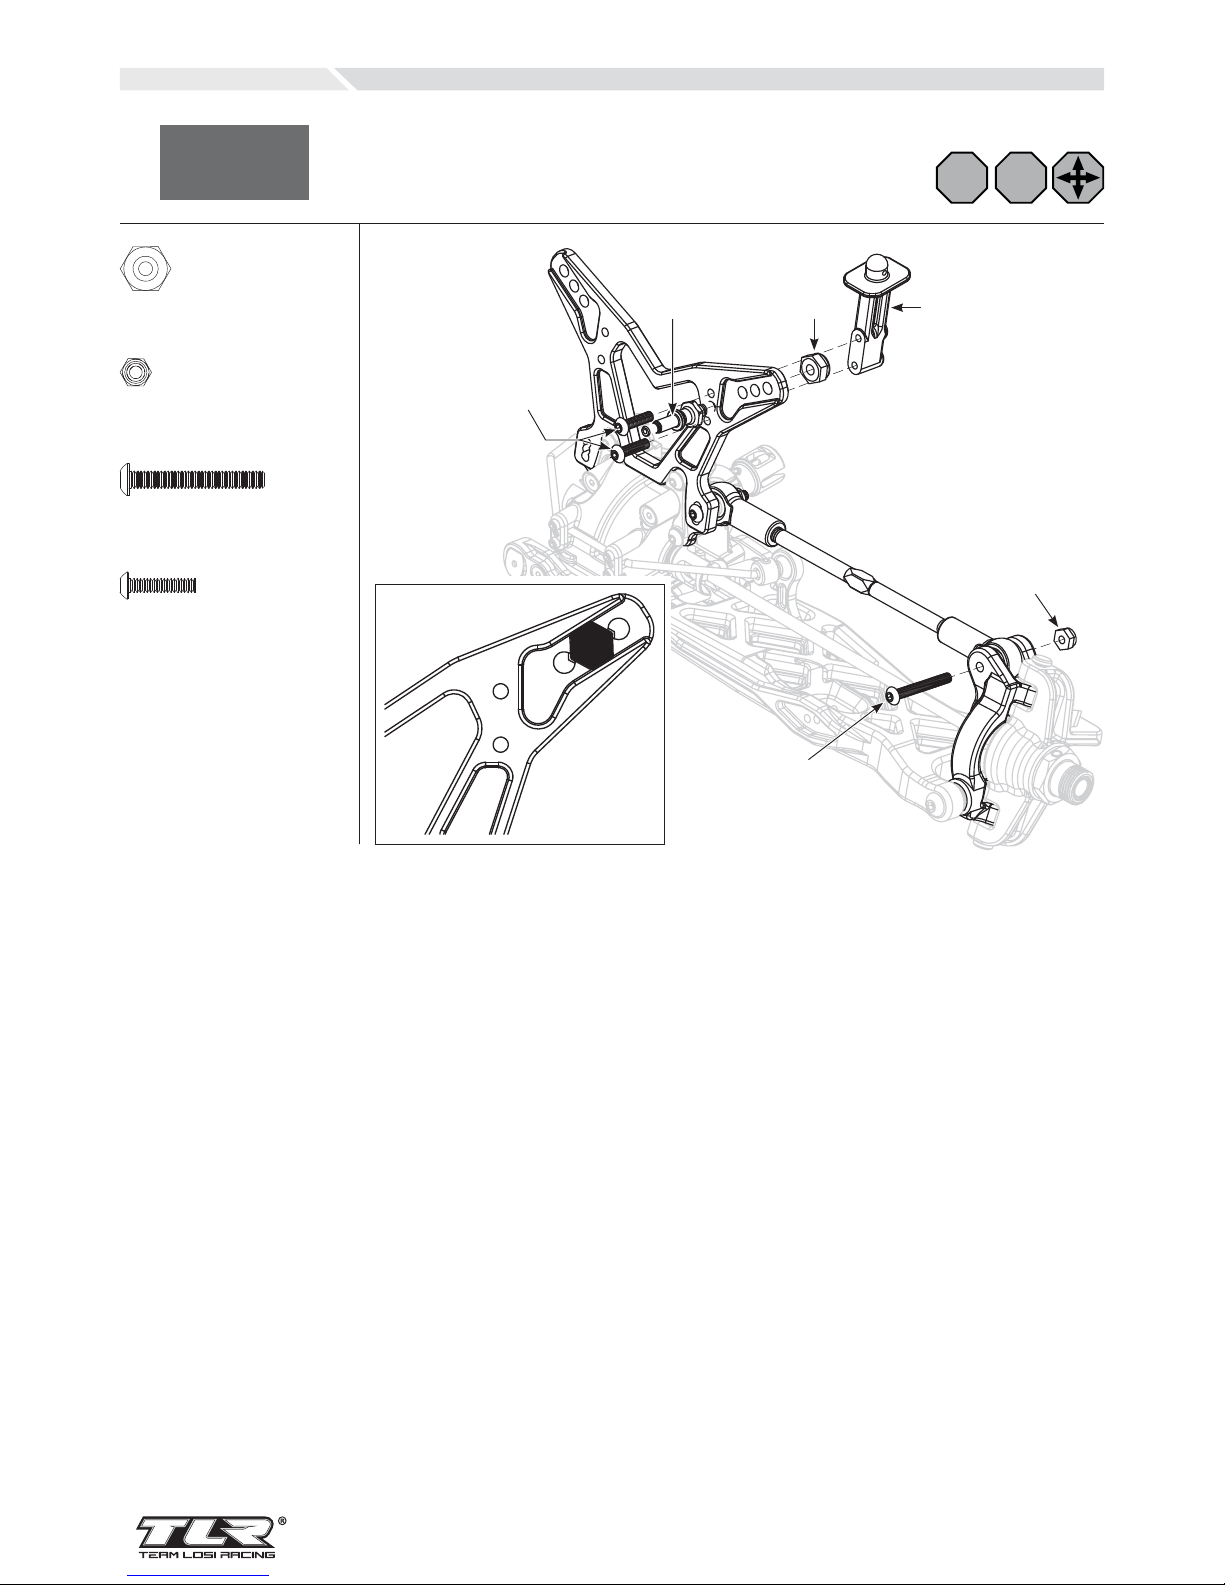
EN Tie Rod/Shock Tower Assembly
DE Zusammenbau Spurstange / Dämpferbrücke
FR Installation du support d’amortisseurs et de la biellette de carrossage
IT Assemblaggio tirante/supporto ammortizz.
B-9A
L
R
L
R
L
EN Be sure to install the assembled Tie
Rod onto the car with the groove
(next to the center square section)
on the driver’s left side for easier
adjustment later.
DE Bitte unbedingt die
zusammengebaute Spurstange mit
der Nut (neben dem Mittelstück)
zur leichteren späteren Justierung
auf der linken Seite des Fahrers auf
dem Auto anbringen.
FR Prenez soin d’installer la biellette
en plaçant la rainure (située à
côté du carré) du côté gauche
du véhicule afi n de faciliter
les futurs réglages.
IT Bisogna installare sull’auto il
tirante montato con la scanalatura
(vicino alla sezione quadrata
centrale) rivolta verso sinistra
per poterlo regolare facilmente
in seguito.
LOSA6049
TLR244019
LOSA6286
LOSA4453
LOSA6048
LOSA6302
LOSA6546
LOSA6282
LOSA6286 x 4
5-40 x 5/8”
LOSA6302 x 1
5-40 x 1/4”
LOSA6282 x 1
5-40 x 7/8”
142.0mm
LOSA6047
LOSA6297
LOSA6227 x 2
C 4-40 x 1/8”
LOSA6254 x 4
2-56 x 1/4”
LOSA6204 x 1
4-40 x 1/2”
LOSA6297 x 2
F 5-40 x 1/8”
18
18
EN Shock Mount Assembly
DE Zusammenbau Dämpferhalter
FR Montage des entretoises d’amortisseurs
IT Assemblaggio supporto ammortizzatore
B-9B
L
R
L
R
L
LOSA6302
LOSA6311TLR243000
LOSA6280
LOSA6256
LOSA4433
LOSA6256 x 2
4-40 x 1/2”
LOSA6311 x 1
8-32 x 11/32”
LOSA6302 x 1
5-40 x 1/4”
LOSA6280 x 1
5-40 x 1”

19
19
140.0mm
EN Be sure to install the assembled Tie Rod
onto the car with the groove (next to the
center square section) on the driver’s left
side for easier adjustment later.
DE Bitte unbedingt die zusammengebaute
Spurstange mit der Nut (neben dem
Mittelstück) zur leichteren späteren
Justierung auf der linken Seite des Fahrers
auf dem Auto anbringen.
FR Prenez soin d’installer la biellette en
plaçant la rainure (située à côté du carré)
du côté gauche du véhicule afi n de
faciliter les futurs réglages.
IT Bisogna installare sull’auto il tirante
montato con la scanalatura (vicino alla
sezione quadrata centrale) rivolta verso
sinistra per poterlo regolare facilmente
in seguito.
EN Steering Rod Assembly
DE Zusammenbau der Lenkstange
FR Assemblage des biellettes de direction
IT Assemblaggio tirante sterzo
B-10
L
R
L
R
L
LOSA6547
LOSA6050
LOSA6050
LOSA6282
LOSA6302
LOSA6046
LOSA6282 x 1
5-40 x 7/8”
LOSA6302 x 1
5-40 x 1/4”
20
20
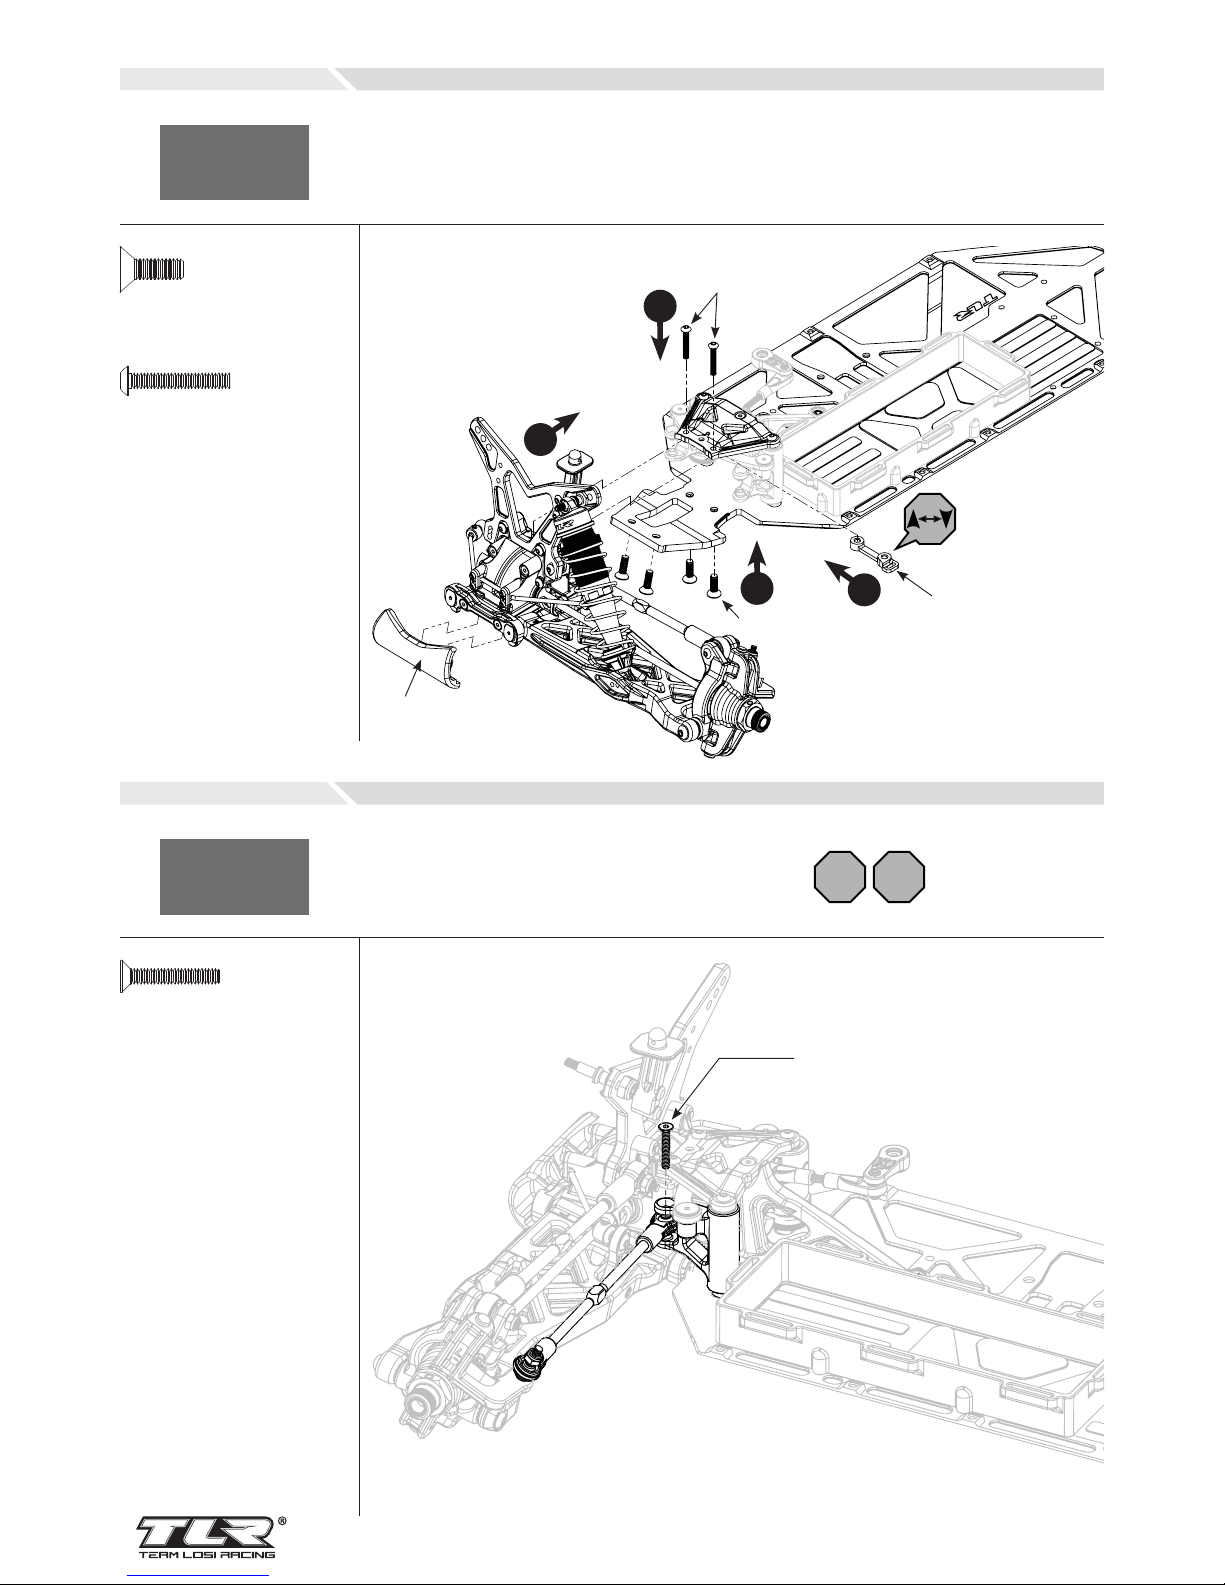
EN Front Clip Assembly
DE Zusammenbau des Frontclips
FR Installation du train avant
IT Assemblaggio clip anteriore
EN Steering Rod Assembly
DE Zusammenbau Lenkstange
FR Installation des biellettes de direction
IT Montaggio tirante sterzo
B-11
B-12
TLR241005
LOSA6279
LOSA6262
LOSA4453
LOSA6272
1
2
3
4
L
R
L
R
L
LOSA6262 x 4
8-32 x 1/2”
LOSA6279 x 2
5-40 x 3/4”
LOSA6272 x 1
5-40 x 3/4”
21
21
EN Completed Front End Assembly
DE Fertigstellung des Vorderwagens
FR Assemblage du train avant terminé
IT Assemblaggio parte anteriore completato
B-13
 Loading...