

Page 1

ASSEMBLY MANUAL
9GR - RECUMBENT CYCLE
Page 2

Page 3

2
IMPORTANT SAFETY INSTRUCTIONS
• Read this Owner’s Manual and follow it’s instructions carefully before assembly the
machine. Make sure that it is properly assembled and tightened before each use.
• Inspect your machine prior to exercise to ensure that all nuts and bolts are fully tightened.
• Replace the worn parts immediately.
• Most exercise equipment is not recommended for small children. Children should not
use the machine unless they are under adult supervision.
• Exercise equipment has moving parts. In the interest of safety, keep others, especially
children and pets, at a safe distance while exercising.
• Warm up 5 to 10 minutes before each workout and cool down 5 to 10 minutes afterward.
Never hold your breath while exercising.
• Rest adequately between workouts. Muscles tone and develop during these rest periods.
Beginners should work out twice a week and increase gradually to 4 to 5 times per week.
• Remove all jewelry, including rings, chains and pins before commencing exercise.
• Never exercise in bare feet or socks, always wear correct footwear, such as running, walking, or
cross-training shoes.
• Always wear suitable clothing and footwear during exercise. Do NOT wear loose fitting
clothing that could become entangled with the moving parts of your exercise machine.
MEDICAL WARNING
• Before beginning any exercise program, consult your personal physician. Evaluate
your present fitness level and determine the exercise program that is most
appropriate for your particular age and condition.
• If you experience any pain or tightness in your chest, irregular heartbeats, shortness of
breath, faintness or other unusual discomfort while exercising, stop and consult your
physician before continuing.
Maximum recommended exercise weights not to exceed 400Lbs (182Kgs)
Page 4

3
Page 5
4
BEFORE YOU BEGIN
Note: Before beginning assembly remove all parts and hardware from the carton, ensure
you have everything according to the list.
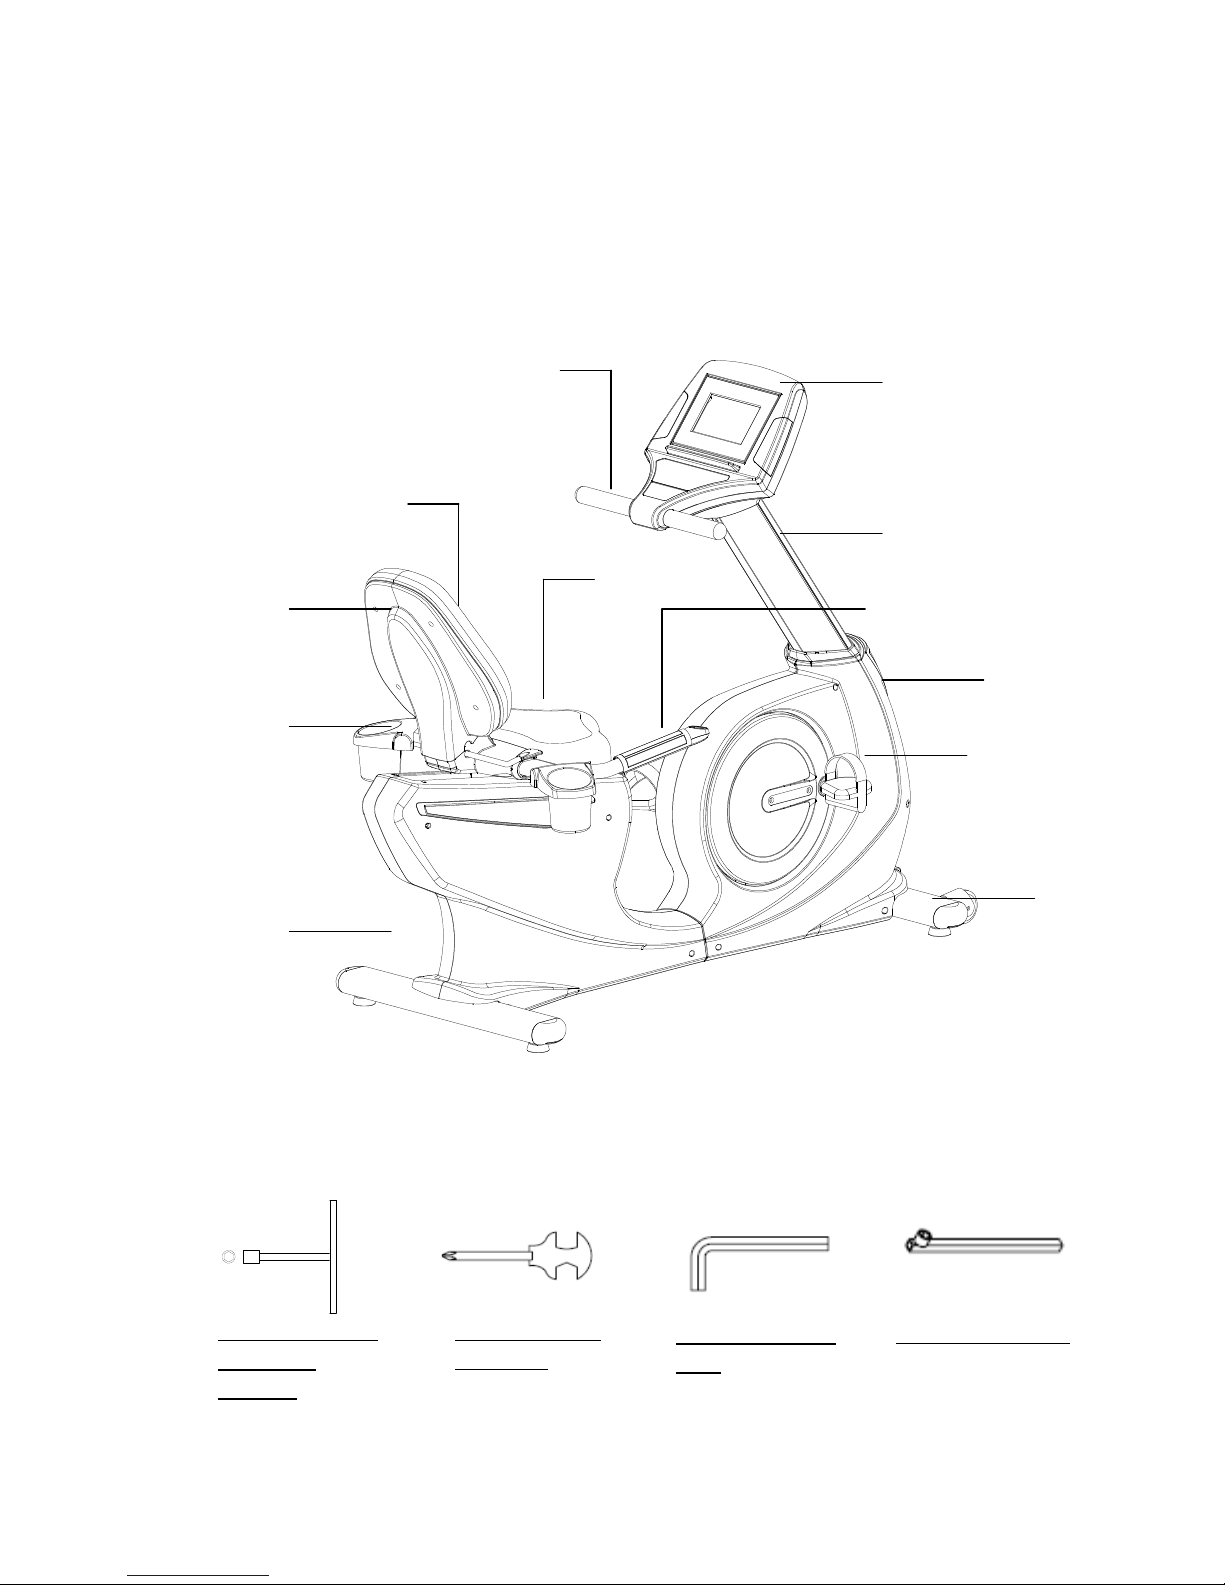
THE FOLLOWING TOOLS ARE INCLUDED FOR ASSEMBLY:
Handlebar
Console
Upright Cover
Pedal
Seat Handlebar
Accessory Tray
Rear Stabilizer
Main Frame
Front Stabilizer
Back Cushion Cover
Back Cushion
Seat
T-HAND SOCKET
WRENCH
(17MM)
ALLEN WRENCH
(M6)
SOCKET WRENCH
COMBINATION
WRENCH
Page 6

5
HARDWARE PACK
Hardware pack
Part #
Description
Q’TY
85
85 Washer (8x38x2.0t)
4
90
90 Lock Washer (M8)
6
95
95 Screw, Round Head (M5xp0.8x15mm)
10
96
96 Screw, Round Head (M5xp0.8x50mm)
2
104
104 Bolt, Socket Head (M8xp1.25x50mm)
2
109
109 Bolt, Hex Head (M8xp1.25x65mm)
4
114
114 Bolt, Hex Head (M10xp1.5x50mm)
2
131
131 Screw (M4x10mm)
4
Page 7

6
EXPLODED DIAGRAM (A)
Page 8

7
PARTS LIST
NO.
Item Name
Q'TY
1
Main Frame
1
2
Front Stabilizer
1
3
Rear Stabilizer
1
4
Seat Handlebar
1
5
Back Cushion Bracket
1
6
Back Cushion Frame
1
7
Seat Frame
1
8
Upright Post
1
9
Upper Handlebar
1
10
Front Left-Side Cover
1
11
Front Right-Side Cover
1
12
Crank Cover
2
13
Rear Left-Side Cover
1
14
Rear Right-Side Cover
1
15
Left Pedal
1
16
Right Pedal
1
17
Console Display
1
18
Console Bracket
1
19
Console Lower Case
1
20
Battery Door
1
21
Front Decorating Upright Cover
1
22
Upright Sleeve
1
23
Back Cushion Cover
1
24
Back Cushion
1
25
Seat Cushion
1
26
Sliding Belt
2
27
Seat Roller
3
28
Plastic Seat Support Cover (L)
1
29
Plastic Seat Support Cover (R)
1
30
Back Cushion Hinge
1
31
Adjustment Leveler Handle
2
32
Accessory Tray
2
33
Pulse Sensor upper Housing
2
34
Pulse Sensor Bottom Housing
2
35
Quick-Access Key Base (Ç)
1
Page 9

8
NO.
Item Name
Q'TY
36
Quick-Access Key Base (-)
1
37
Square Plug (30x60mm)
1
38
End Cap (50x100mm)
4
39
Leveler (ψ50)
4
40
Transport Wheel
2
41
Generator
1
42
Belt (584mm J8)
1
43
Pulley (120mm)
1
44
Magnet
1
45
Pulley (235mm)
1
46
Belt (1059mm J8)
1
47
Seat Rail End Cap
2
48
Foam Grip
2
49
Front Aluminum Upright Cover
1
50
Rear Aluminum Upright Cover
1
51
Cushion Adjustment Lever
1
52
Back Cushion Adjustment Bracket
1
53
Cushion Torsion Spring
1
54
Cushion Spring
1
55
Cushion Linkage Axel
1
56
Seat Torsion Spring
1
57
Seat Adjustment Lever
1
58
Roller Plate
2
59
Bearing (6000N)
6
60
Resistor
1
61
Controller
1
62
Right Mounting Plate
1
63
Left Mounting Plate
1
64
Idler Spring
1
65
Washer (ψ10.6×ψ60×2.0t)
1
66
Idler Arm
1
67
Axle Cover
1
68
Bearing (6004ZZ)
8
69
Idler Shaft
1
70
One Way Pulley (51mm)
1
71
One Way Bearing (2520mm)
1
72
Axle
1
Page 10

9
NO.
Item Name
Q'TY
73
Left Crank
1
74
Right Crank
1
75
Crank Shaft
1
76
Roller Axle
1
77
Spacer (M8×12×7mm)
2
78
Seat Linkage Spacer
1
79
Eye Bolt (40mm)
2
80
Eye Bolt (50mm)
4
81
Tension Bracket
2
82
Square Key (6×6×15mm)
1
83
E Clip
2
84
Crescent Ring
4
85
Washer (8×38×2.0t)
5
86
Washer (10×23×2.0t)
2
87
Washer (17×25×1.0t)
1
88
Washer (18.3×25×1.0t)
1
89
Washer (20×1.0t)
2
90
Lock Washer (M8)
18
91
Screw (M3×10mm)
3
92
Screw (M3×25mm)
4
93
Screw (M4×20mm)
6
94
Screw (M5×18mm)
23
95
Screw, Round Head (M5×p0.8×15mm)
12
96
Screw, Round Head (M5×p0.8×50mm)
2
97
Screw, Round Head (M5×p0.8×75mm)
2
98
Bolt, Round Head (M6×p1.0×15mm)
8
99
Screw, Round Head (M5×p0.8×12mm)
6
100
Bolt, Button Head (M6×p1.0×12mm)
2
101
Bolt, Button Head (35mm)
2
102
Bolt, Button Head (M8×p1.25×20mm)
20
103
Bolt, Button Head (M10×p1.5×45mm)
1
104
Bolt, Socket Head (M8×p1.25×55mm)
4
105
Bolt, Socket Head (M10×p1.5×30mm)
1
106
Bolt, Hex Head (M8×p1.25×15mm)
4
107
Bolt, Hex Head (M8×p1.25×10mm)
1
108
Bolt, Hex Head (M8×p1.25×60mm)
1
109
Bolt, Hex Head (M8×p1.25×65mm)
4
Page 11

10
NO.
Item Name
Q'TY
110
Bolt, Hex Head (M8×p1.25×75mm)
1
111
Bolt, Hex Head (M8×p1.25×80mm)
4
112
Bolt, Hex Head (M10×p1.5×145mm)
2
113
Bolt, Hex Head (M10×p1.5×144mm)
2
114
Bolt, Hex Head (M10×p1.5×50mm)
2
115
Flange Nut (M5)
2
116
Nut (M6)
3
117
Nut (M8)
4
118
Nylon lock Nut (M6)
4
119
Nylon lock Nut (M8×6.2t)
4
120
Nylon lock Nut (M8)
12
121
Nylon lock Nut (M10)
6
122
Generator Wire (3pin×700mm)
2
123
Extension Wire (5pin×300mm) (Back of the Console Display)
1
124
Extension Wire (5pin×1100mm) (inside Upright post)
1
125
Extension Wire (5pin×800mm) (Inside Main Frame)
1
126
Sensor Wire (2pin×400mm) (Inside Main Frame)
1
127
Pulse Sensor Wire 1 (8pin×300mm) (Back of the Console Display)
1
128
Pulse Sensor Wire 2 (8pin×1100mm) (Inside Upright Post)
1
129
Pulse Sensor Wire 3 (8pin×2300mm) (Inside Main Frame)
1
130
Pulse Sensor Wire 4 (8pin×500+200mm) (Inside Seat Handlebar)
1
131
Screw (M4×10mm)
4
Page 12
11
ASSEMBLY INSTRUCTIONS
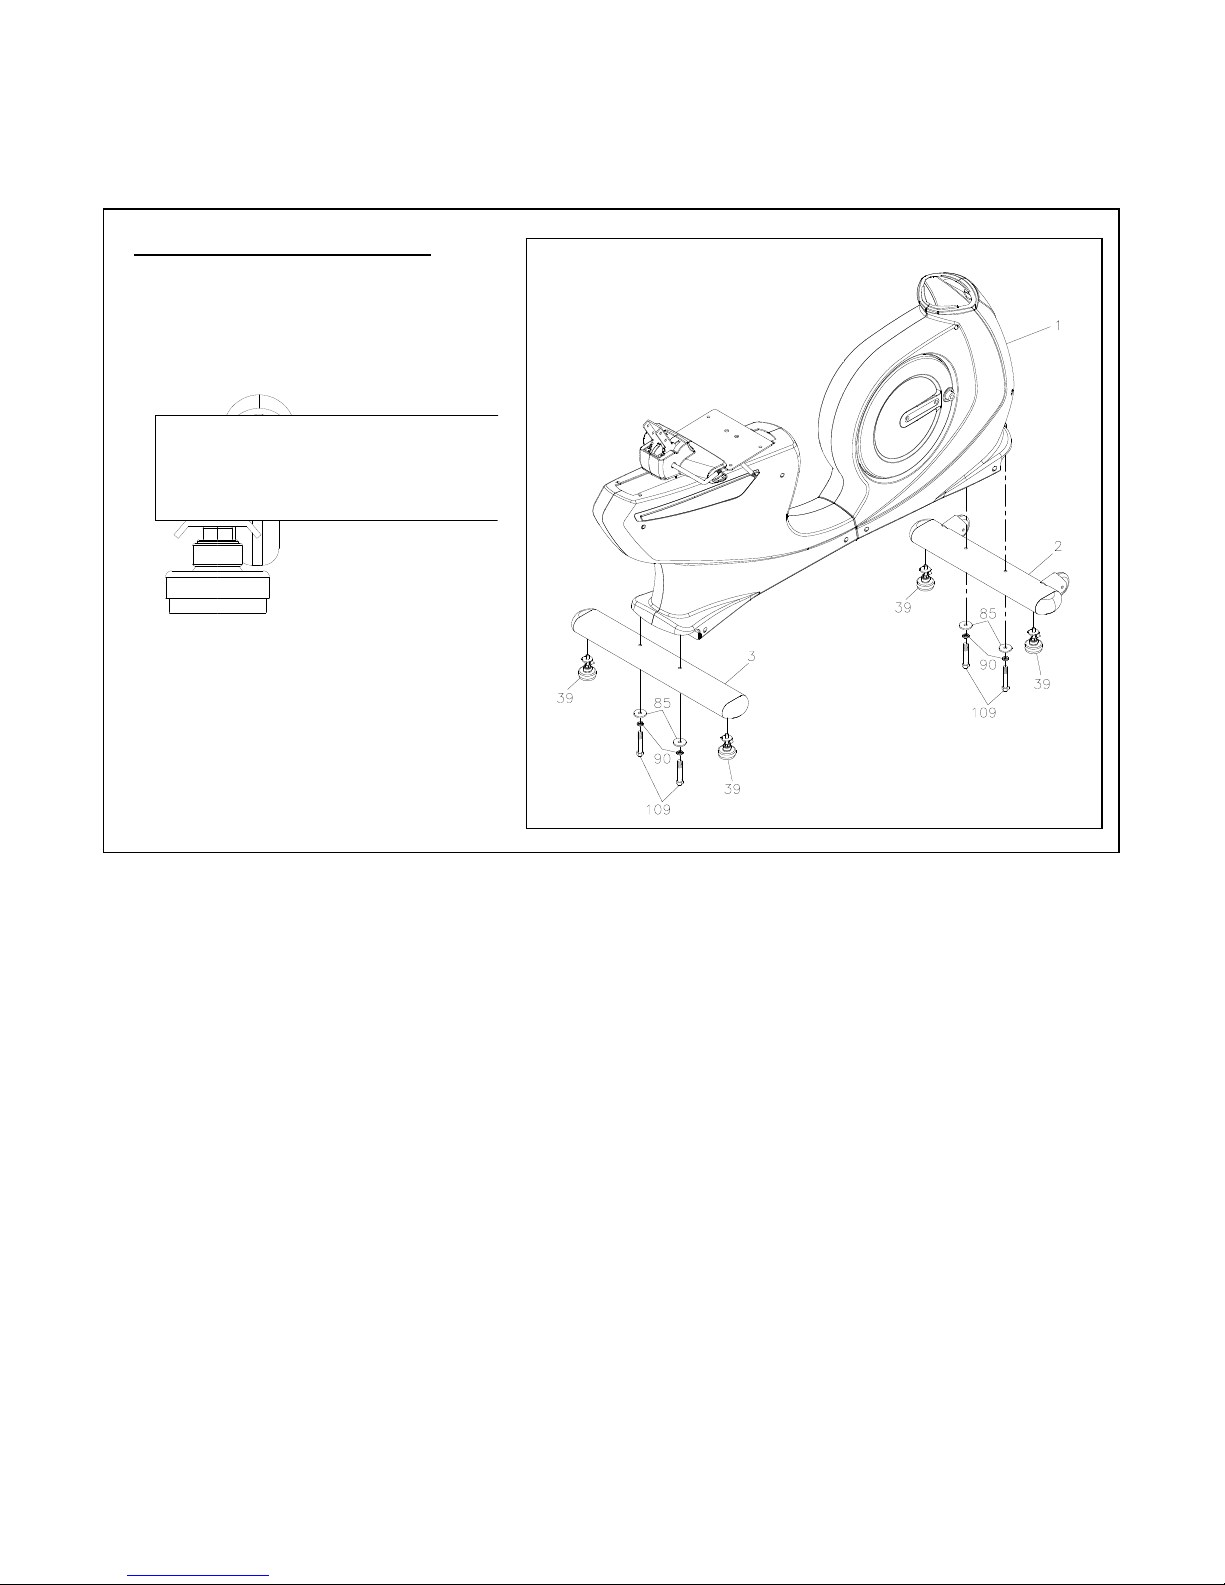
STEP 1 Leveler Installed
a. Attach the Leveler (39) to the Front Stabilizer (2) and the Rear Stabilizer (3)
b. Adjust the Leveler (39) then securely tighten the Adjustment Plate (diagram above)
STEP 2 Front & Rear Stabilizer Assembly
Attach the Front Stabilizer (2) and the Rear Stabilizer (3) to the Main Frame (1) and secure it
with 4 Washer (8x38x2.0t) (85) 4 Lock Washer (M8) (90) and 4 Bolts, Hex Head
(M8xp1.25x65mm) (109). Tighten it using the socket wrench (Included).
Check Leveling: If the bike is not leveled
1. Loosen the Leveler (39) and the Adjustment Plate.
2. Adjust the Leveler (39)
3. Tighten the Adjustment Plate securely against the Stabilizer to lock the Leveler (39)
Stabilizer
Adjustment Plate
Diagram : Leveler adjustments
Page 13
12
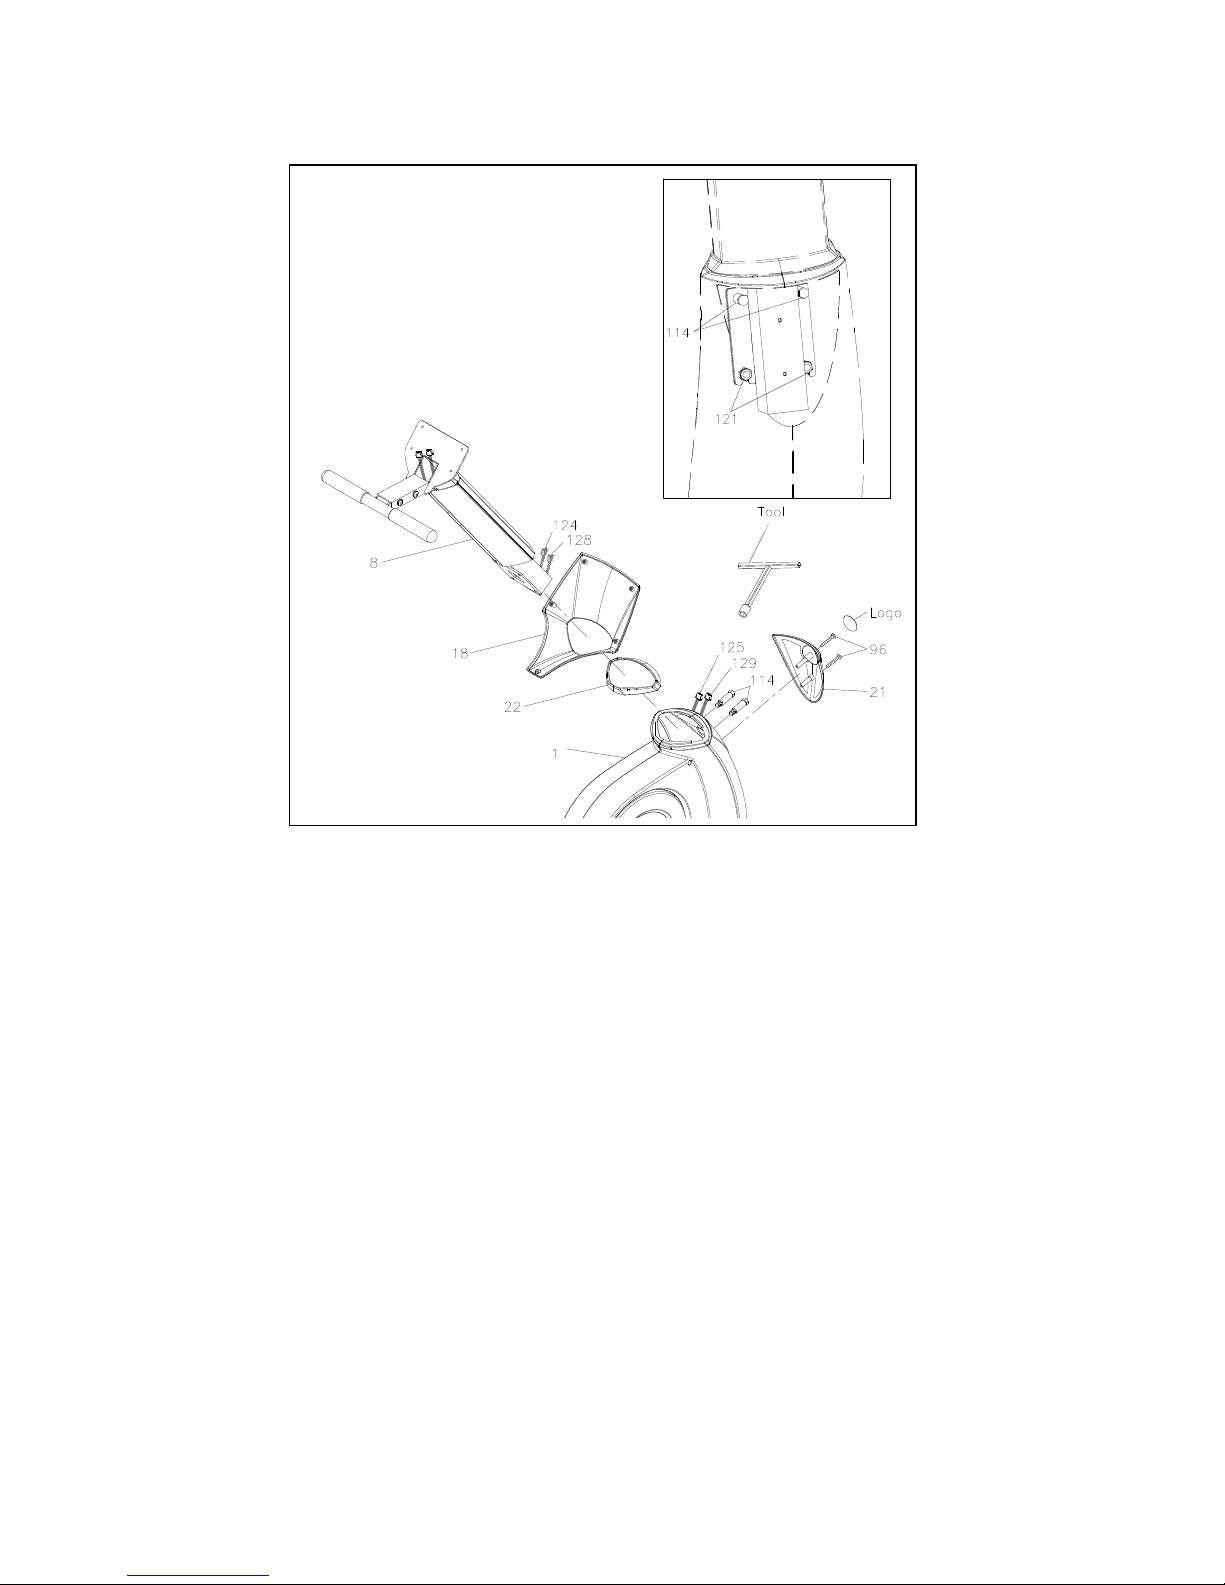
STEP 3 – Upright Post Assembly
Slide the Console Bracket (18) and the Upright Sleeve (22) onto the Upright Post (8.)
• Make sure the flat side of the Upright Post (8) is facing forward.
STEP 4
a. Insert 2 Nylon lock Nuts (M10) (121) into the front of the Main Frame (1) (illustration
shown above)
b. Slide the Upright Post (8) into the Main Frame (1) and secure it with 2 Bolts, Hex Head
(M10xp1.5x50mm) (114), tighten these 2 Bolts using the T-Head Socket Wrench
(Included).
• Be careful not to damage the Extension Wire (124) and the Pulse Sensor Extension
Wire (128) during the assembly process.
Page 14

13
STEP 5
a. Connect the Extension Wire (124) in the Upright post to the Lower Connection Wire (125)
in the Main Frame.
b. Connect the Pulse Sensor Wire in the Upright Post (128) to the Pulse Sensor Wire in the
Main Frame (129)
c. Make sure the plugs and the sockets are connected and locked securely.
d. Install the Front Decorative Cover (21) onto the front of the Main Frame (1) using 2
Screws, Round Head (M5xp0.8x50mm) (96.)
e. Attach the TAG Logo to the center of the Front Decorative Cover (21)
f. Roll down the Upright Sleeve (22) to cover the gap between the Upright Post and the Main
Frame.
Page 15
14
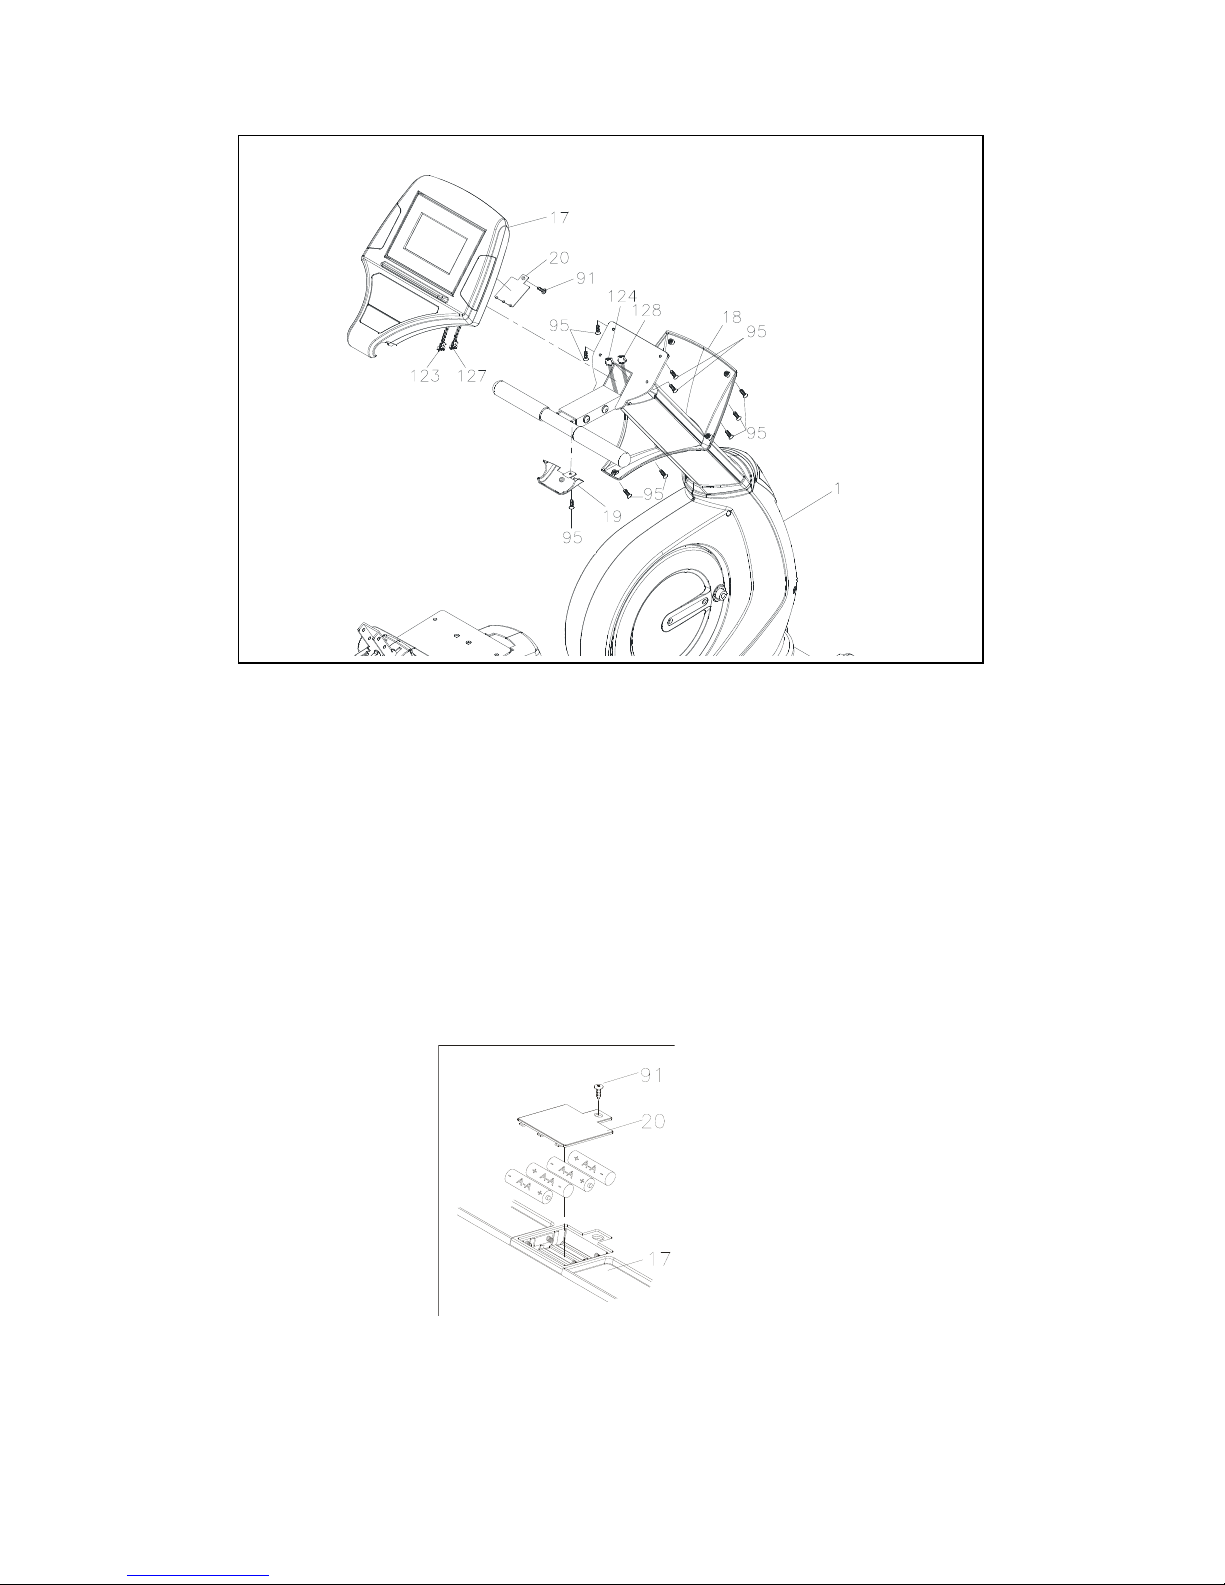
STEP 6 – Display Console and Handlebar Assembly
a. Remove the Screw (M3x10mm) (91) in the back on the console using a Philips Screw
Driver.
b. Remove the Battery Door (20).
c. Install the “AA” rechargeable batteries. (4 rechargeable battery are included in the
hardware pack).
• Please only use the Nickel-Metal Hybrid (NI-MH) rechargeable batteries.
NOTE: Using the Regular battery or the wrong type of batteries will damage the console
display.
STEP 7
Re-attach the Battery Door (20) to the back of the Console (17), secure it using the Screw
(M3x10mm) (91) that removed in STEP 6-a.
Page 16
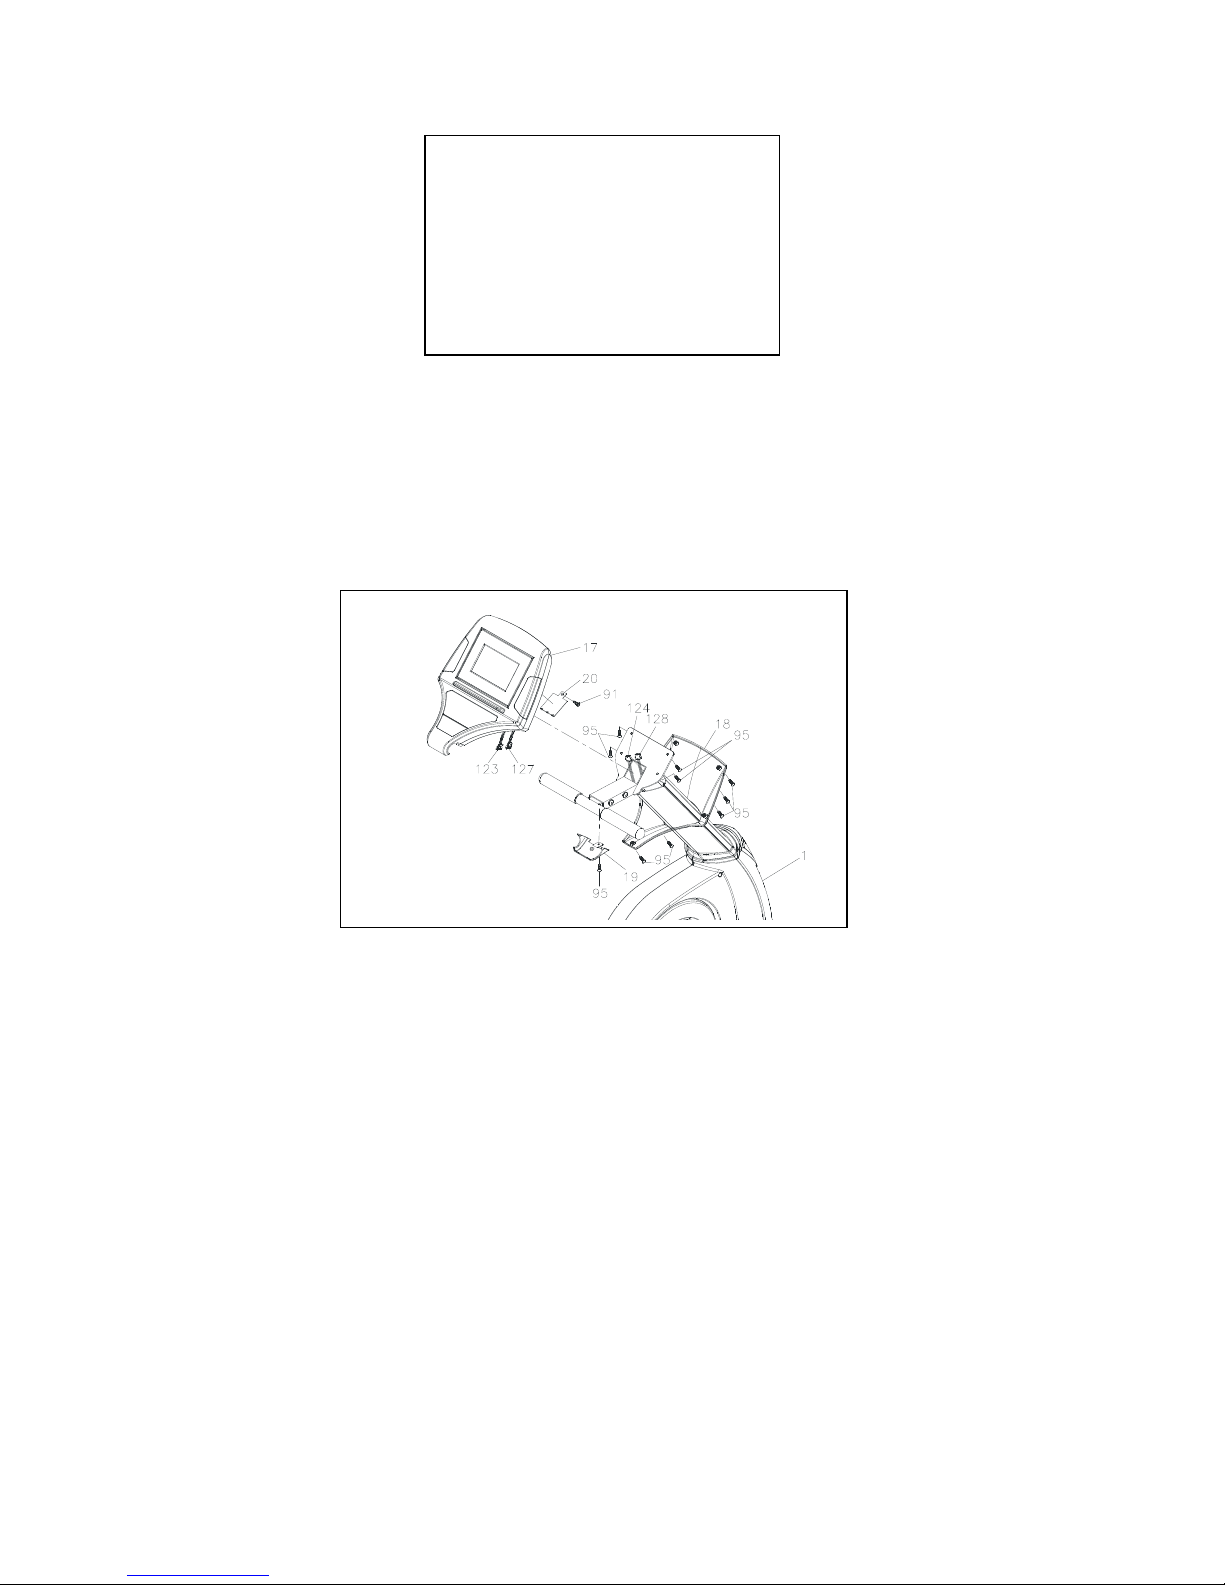
15
STEP 8
a. Connect the Pulse Sensor Wire in the back of the Console (127) to the Pulse Sensor Wire
in the Upright Post (128.)
b. Connect the Extension Wire (123) in the back of the Console to the Extension Wire (124)
in the Upright Post.
STEP 9
Attach the Console (17) to the Main Frame (1) secure it using 4 Screws, Round Head
(M5xp0.8x15mm) (95).
STEP 10
Slide the Console Bracket (18) up and attached to the back of the Console (17) secure it using
4 Screws, Round Head (M5xp0.8x15mm) (95).
STEP 11
Attach the Console Lower Case (19) to the Console (17) and secure with a Screw, Round
Head (M5xp0.8x15mm) (95).
Tighten all Screws with Philips Screw Driver.
Page 17
16
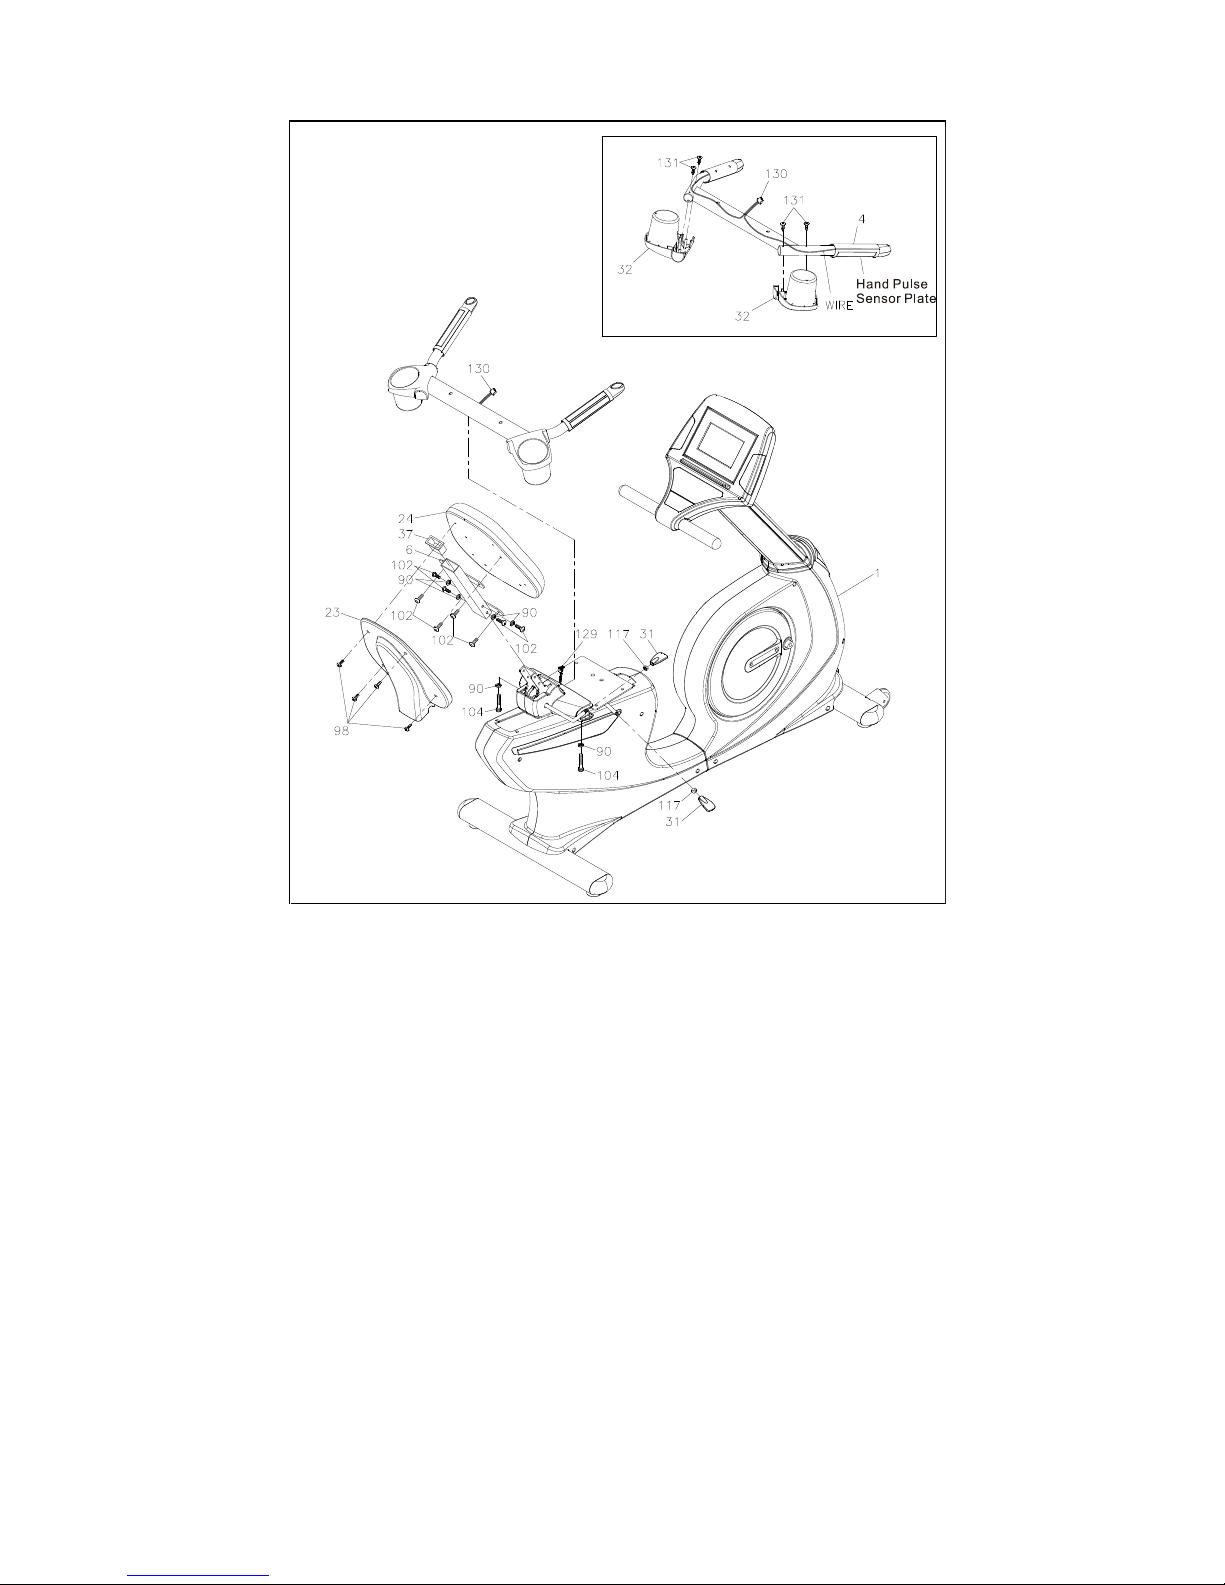
STEP 12
a. Remove the 4 Bolts, Button Head (M8xp1.25x20mm) (102) and 4 Lock Washers (M8)
(90) from the Back Cushion Frame (6).
b. Installed the Back Cushion Frame (6) to the Back Cushion Adjustment Bracket (52),
secure it using the 4 Lock Washers (90) and the 4 Bolts (102) that removed earlier
(STEP 12-a).
c. Tightened it securely with wrench.
STEP 13
a. Remove the 4 Bolts, Button Head (M8xp1.25x20mm) (102) and 4 Lock Washers (M8)
(90) from the Back Cushion (24).
b. Attach the Back Cushion (24) to the Back Cushion Frame (6), secure it using the Bolts and
the Washers removed in STEP 13-a. Tighten it securely with wrench.
c. Attach the Cushion Cover (23) to the back of the Back Cushion (24), secure it using 4
Bolts, Round Head (M6×p1.0×15mm) (98). Tighten it with a Philip Screw Driver.
Page 18

17
STEP 15
Attach the Accessory Tray (32) onto the Seat Handlebar (4) and secure it using 4 Screws
(M4x10mm) (131) from underneath. Tighten it with a Philip Screw Driver.
STEP 16
Install the Seat Handlebar (4) into the Back Cushion Bracket (5), secure it using 2 Lock
Washers (M8) (90) and 2 Bolt, Socket Head (M8xp1.25x50mm) (104). Tighten it securely
with wrench.
STEP 17
Connect the Pulse Sensor Wire (130) in the back of the Seat Handlebar to the Pulse Sensor
Wire (129) in the Main Frame.
Page 19
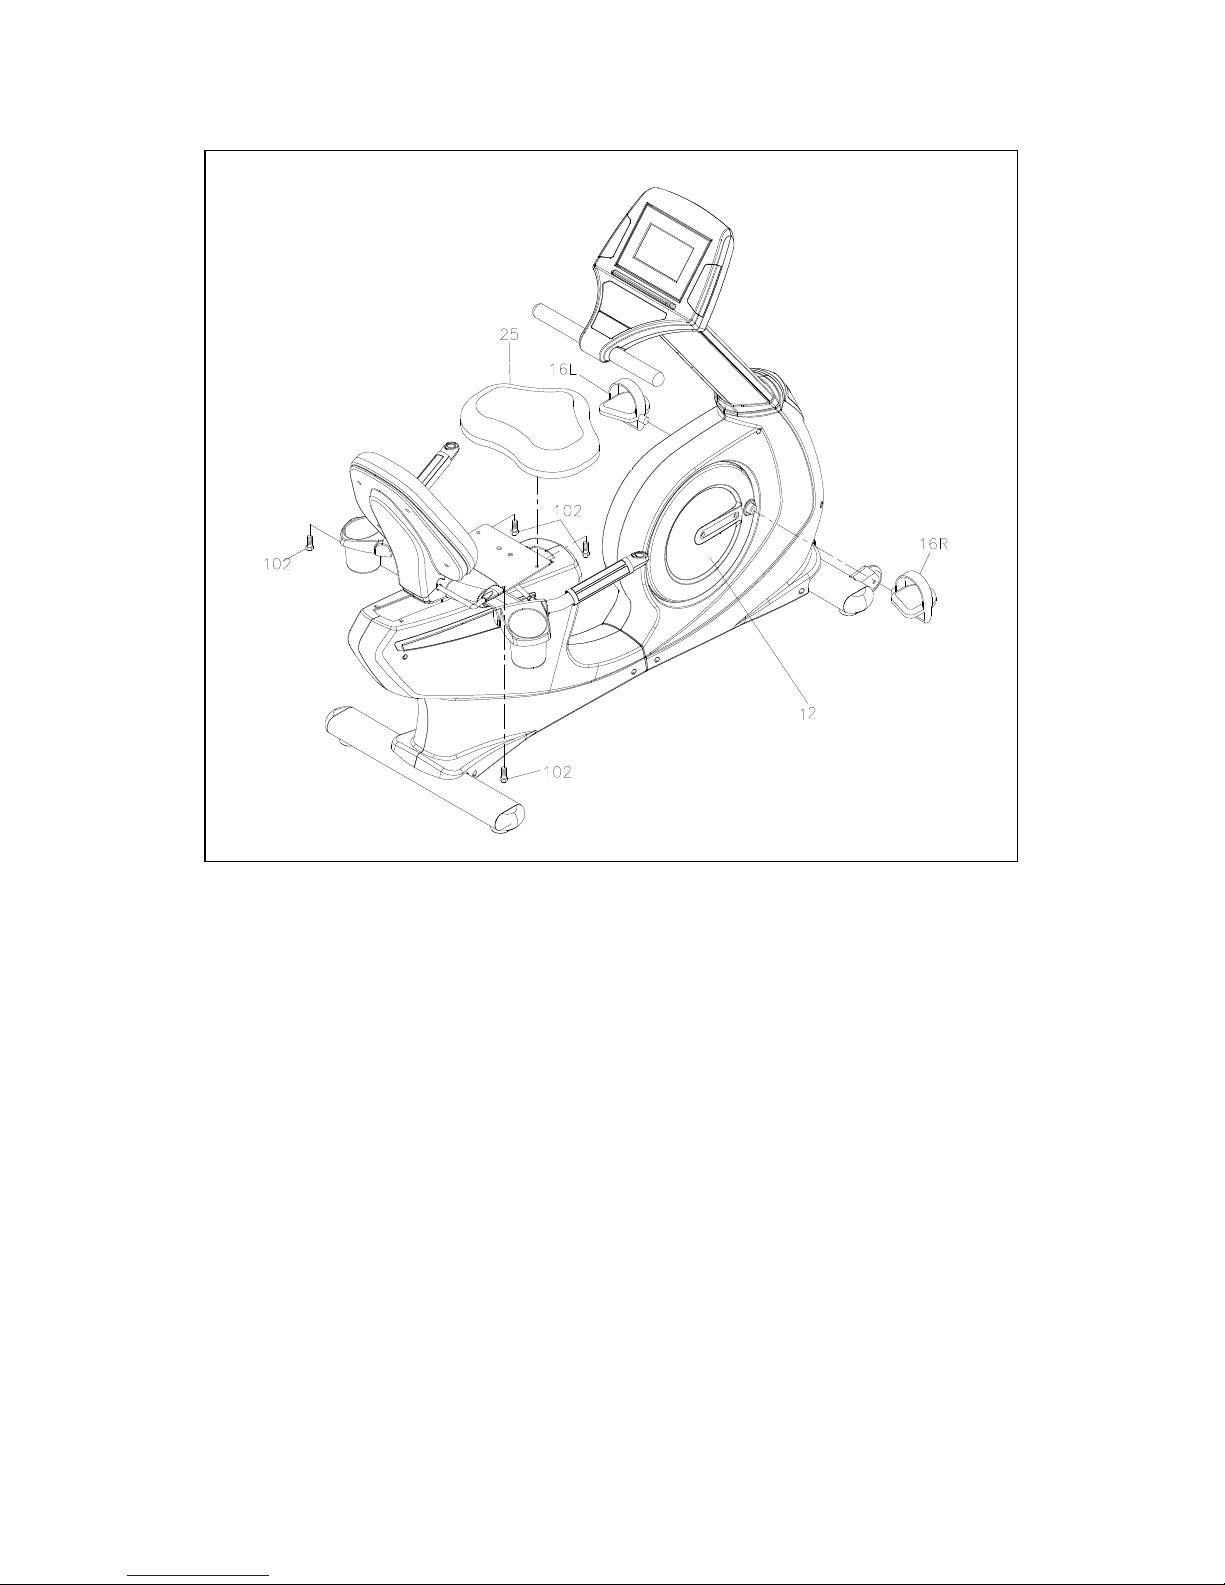
18
STEP 18
a. Loosen and remove all 4 Bolt, Button Head (M8xp1.25x20mm) (102) at the bottom on
the Seat Cushion (25).
b. Attach the Seat Cushion (25) onto the Seat Frame (7) and reattach the Bolts (102)
removed in the last step. Tighten it securely with wrench.
STEP 19
Attach the Foot Pedals to the Sprocket. turn the Right Pedal (16) clockwise into the Right
Crank in the Right Crank Cover (12). Tighten the pedal securely with wrench.
Attach and turn the Left Pedal (15) counter-clockwise into the Left Crank. Tighten it with
wrench.
USE HARDWARE KIT C
Page 20
19
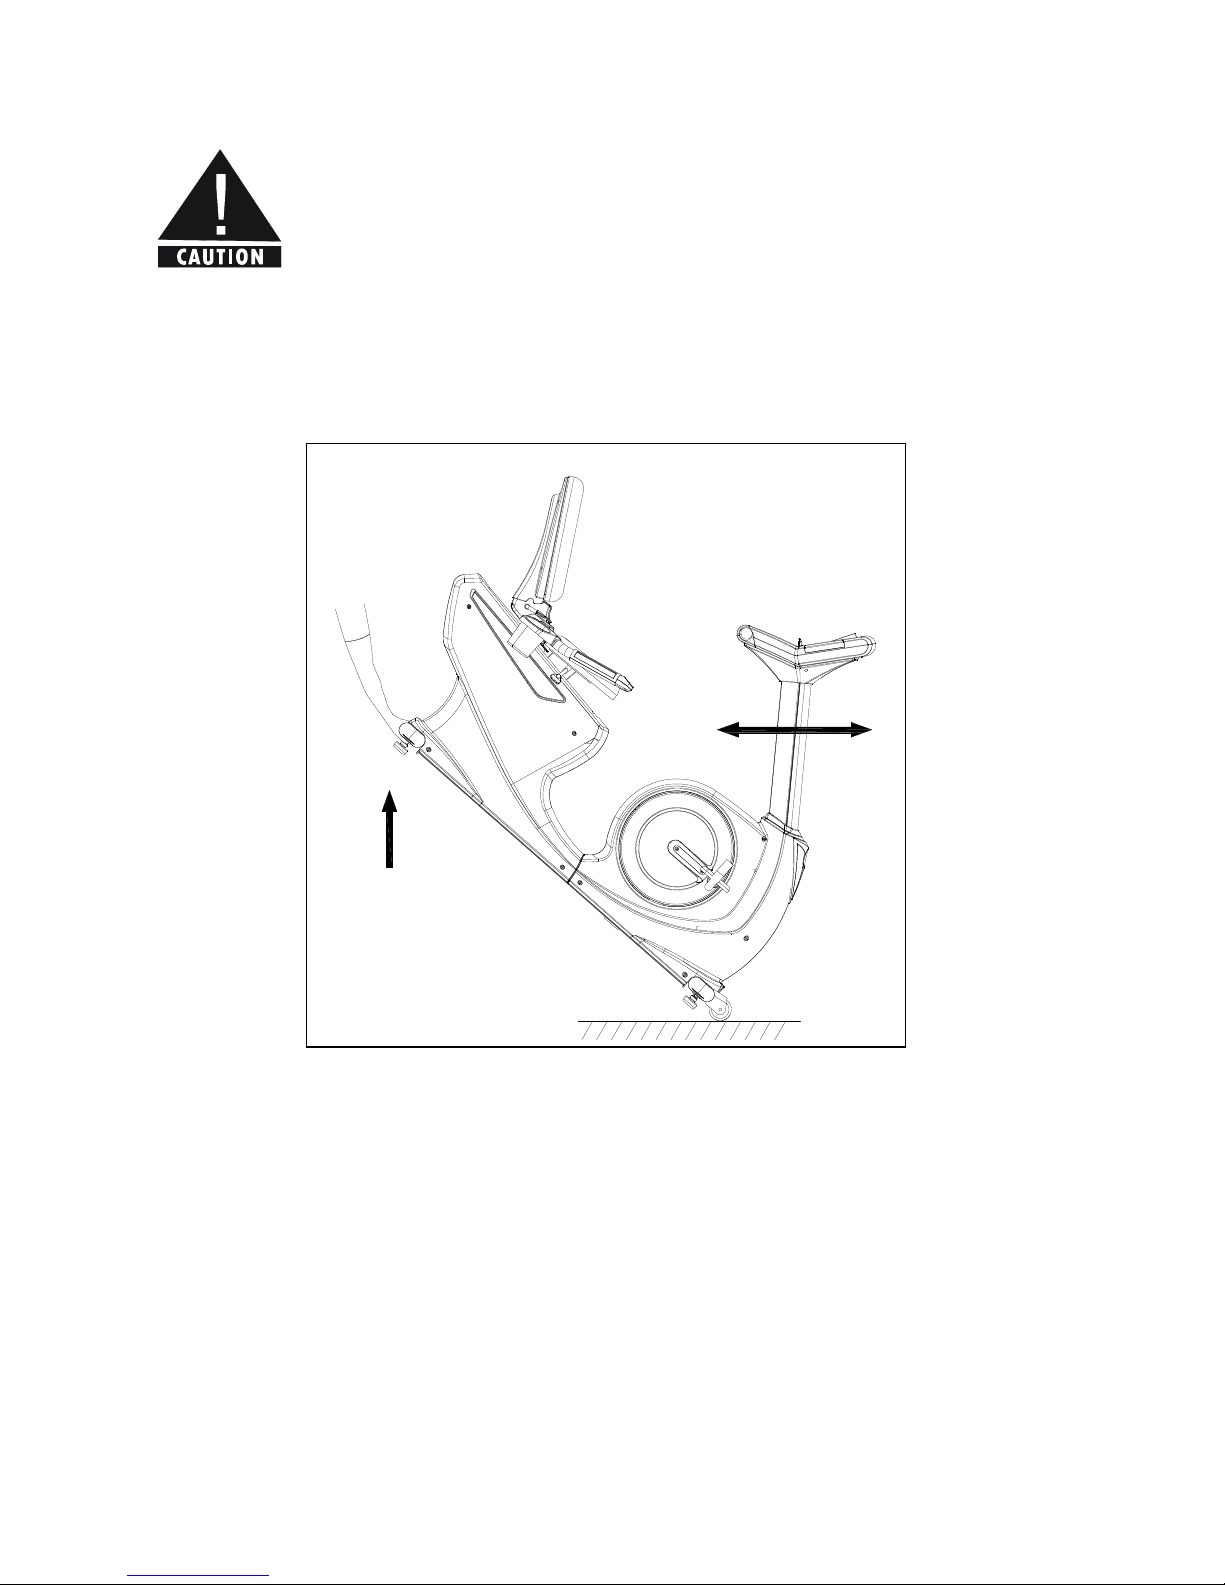
Your Recumbent Cycle is now ready to use. Please make sure that all Nuts and Bolts are
securely tightened before exercising.
Transport your Recumbent Cycle
• There are Two Oversized Transport Wheel in the front of the Recumbent Cycle.
• Lift up and Hold the Rear Stabilizer (3) to move the Recumbent Cycle to the desired
location carefully with both hands.
Page 21
20
ADJUSTMENTS
Uneven Floor
After placing the unit where it will be used, check its stability. If there is even a slight rocking
motion or the unit is not stable, determine which stabilizer is not resting on the floor. To adjust
the Floor Leveler in the Front and/or the Rear Stabilizer by turing the Leveler clockwise to
lower or counter clockwise to raise.
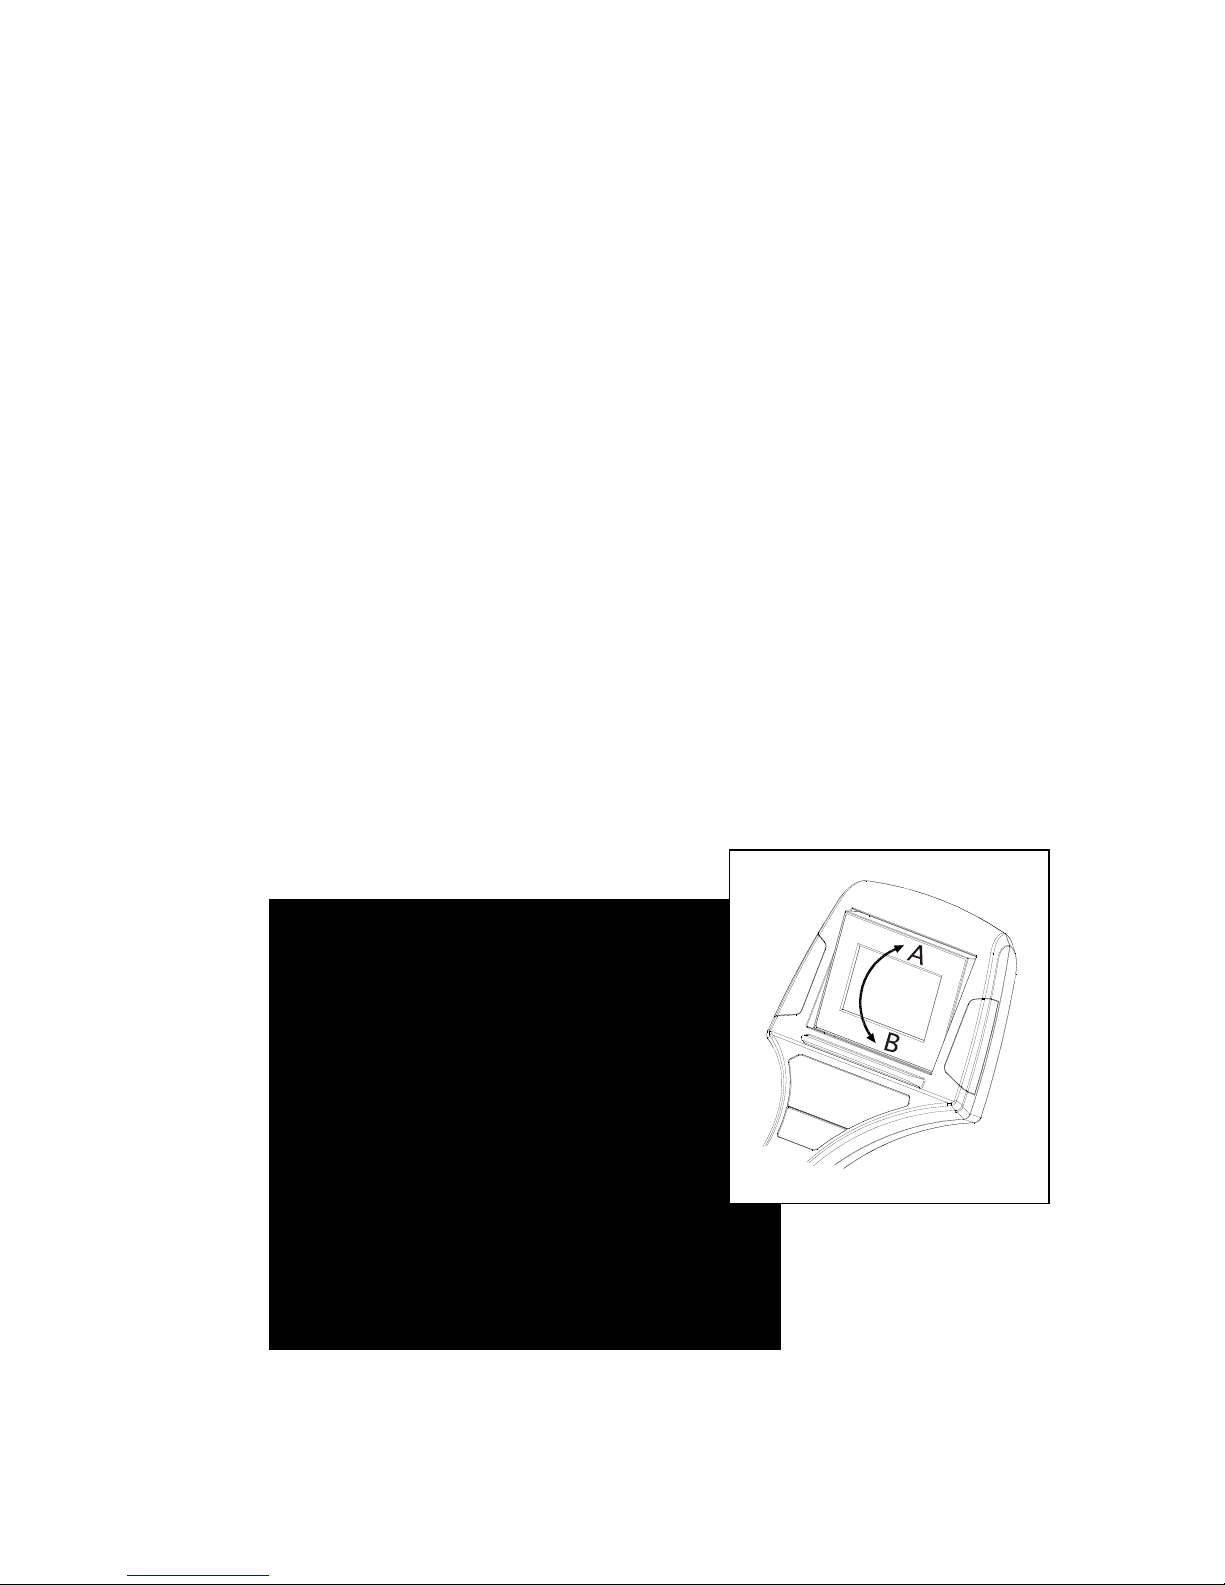
Adjusting the Console Display Angle
The angle of the Console Display can be adjusted by pushing the top or the bottom.
Page 22
21
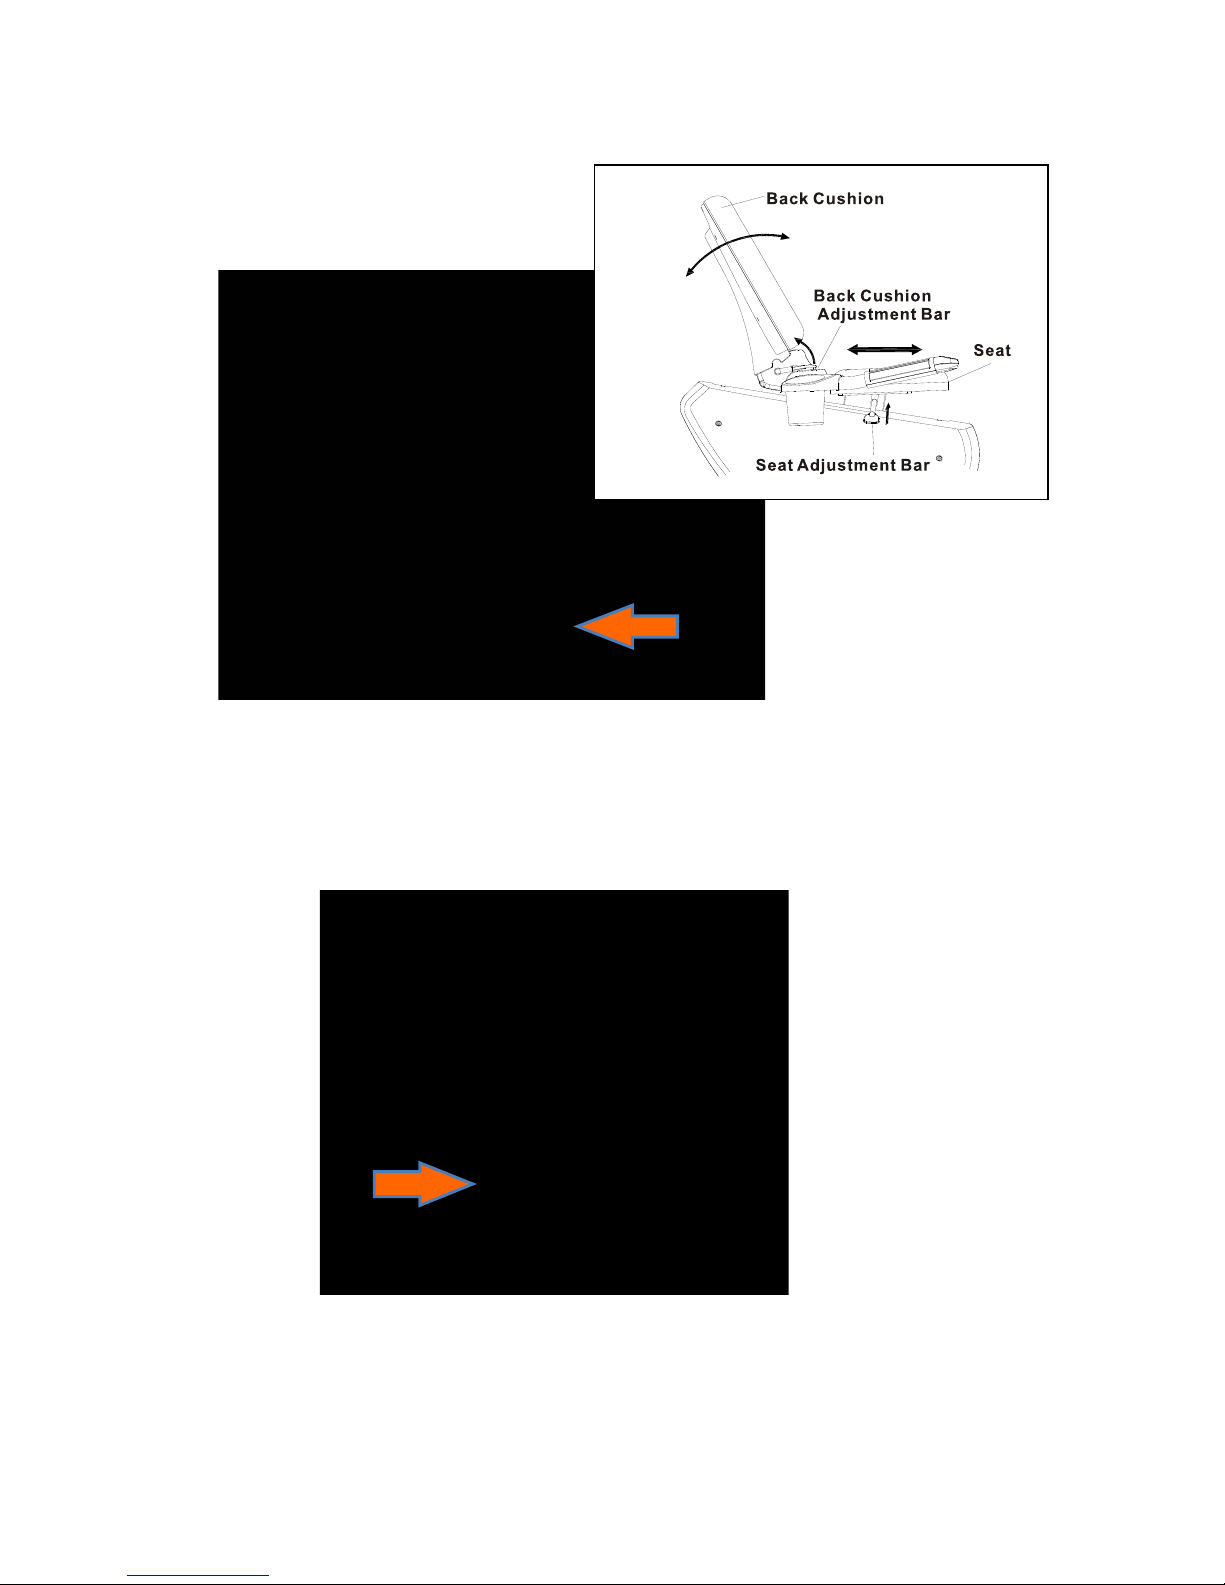
Adjusting Seat Position & Back Rest Angle
Seat Adjustments
• Lifting the Seat Adjustment Leveler upward to move the seat forward and backward.
• Release the Leveler when adjusted to the most suitable position. A “click” sound should
be heard.
Back Cushion Adjustments
• Lifting the Back Cushion Adjustment Leveler upward to adjust the Back Cushion angle.
• Release the Leveler when adjusted to the most suitable angle. A “click” sound should
be heard
Page 23
22
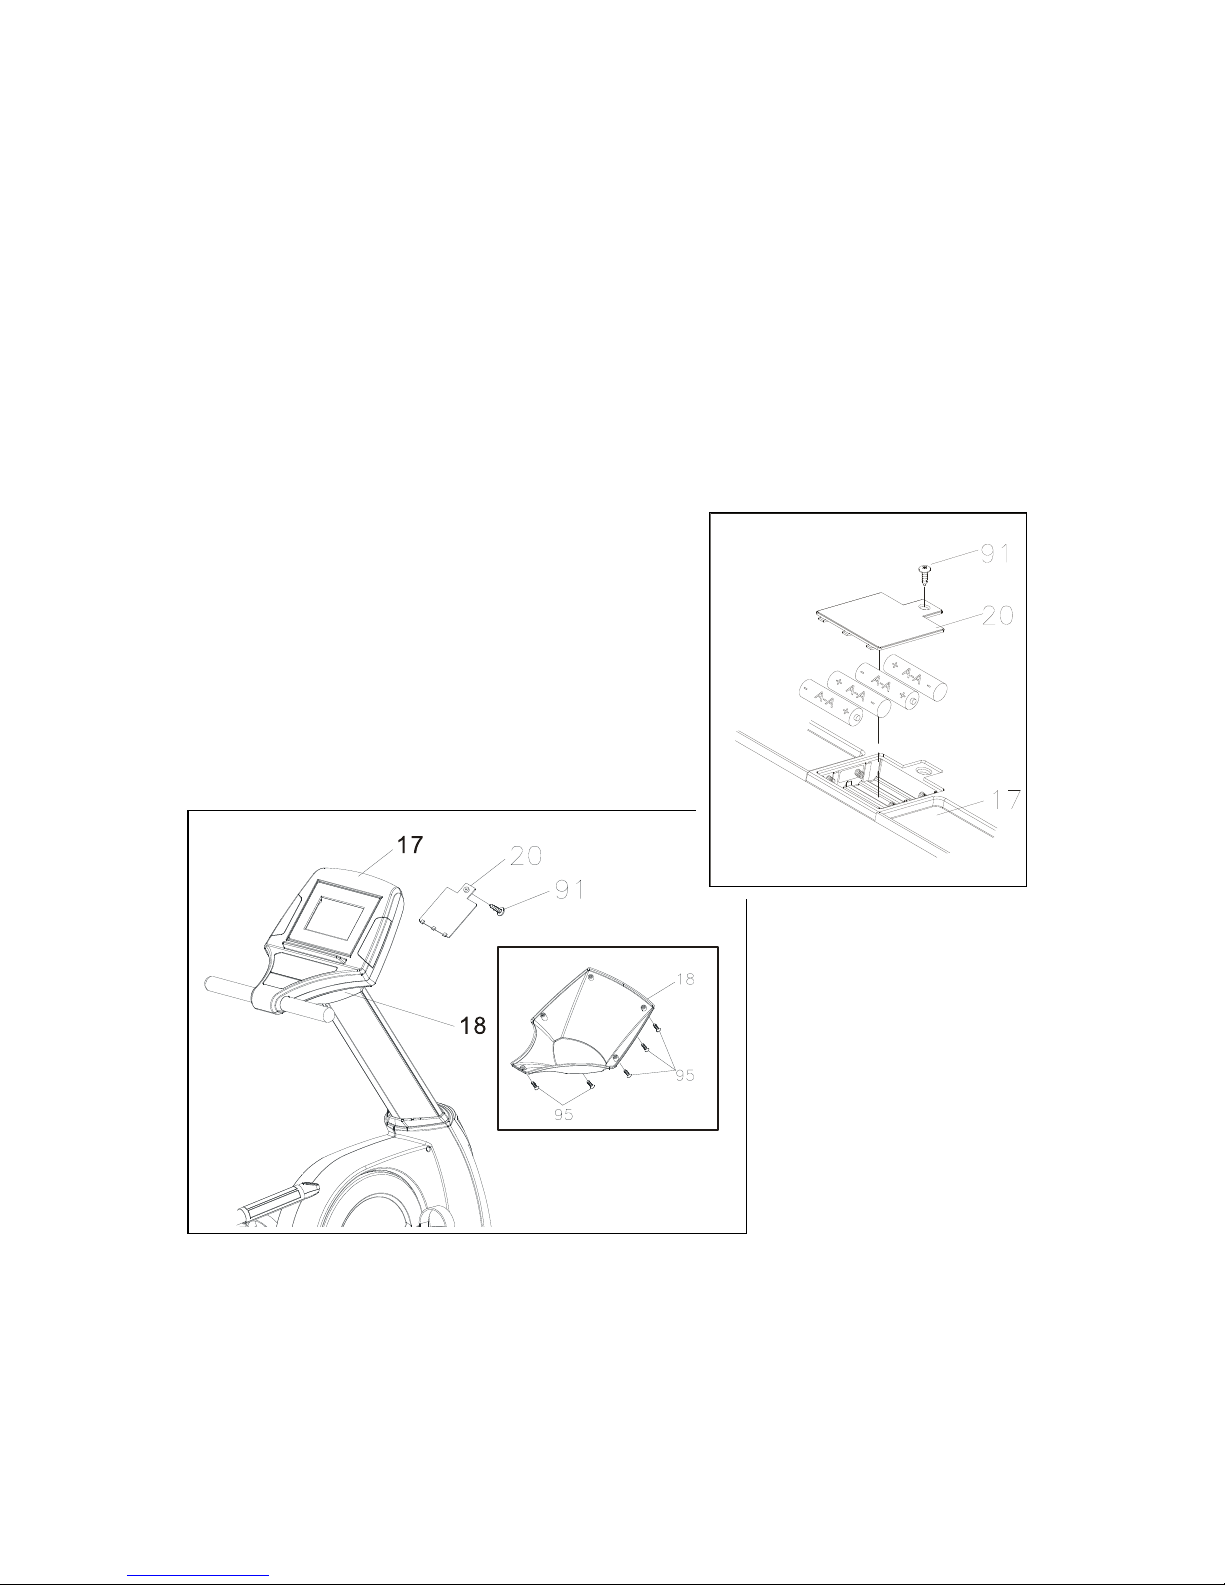
How To Replace Batteries
a. Remove the Console Bracket (18) by loosening the Screws at the bottom of the Console
Bracket.
b. Loosen and remove the Screw at the bottom on the Console (17) by using a Philips Screw
Driver.
c. Open the Battery Door (20)
d. Replace all 4 “AA” rechargeable Batteries.
e. Make sure you only use the Nickel-Metal Hybrid (NI-MH) rechargeable batteries.
NOTE: Using the Regular battery or the wrong type of batteries will damage the console
display.
 Loading...