

Page 1
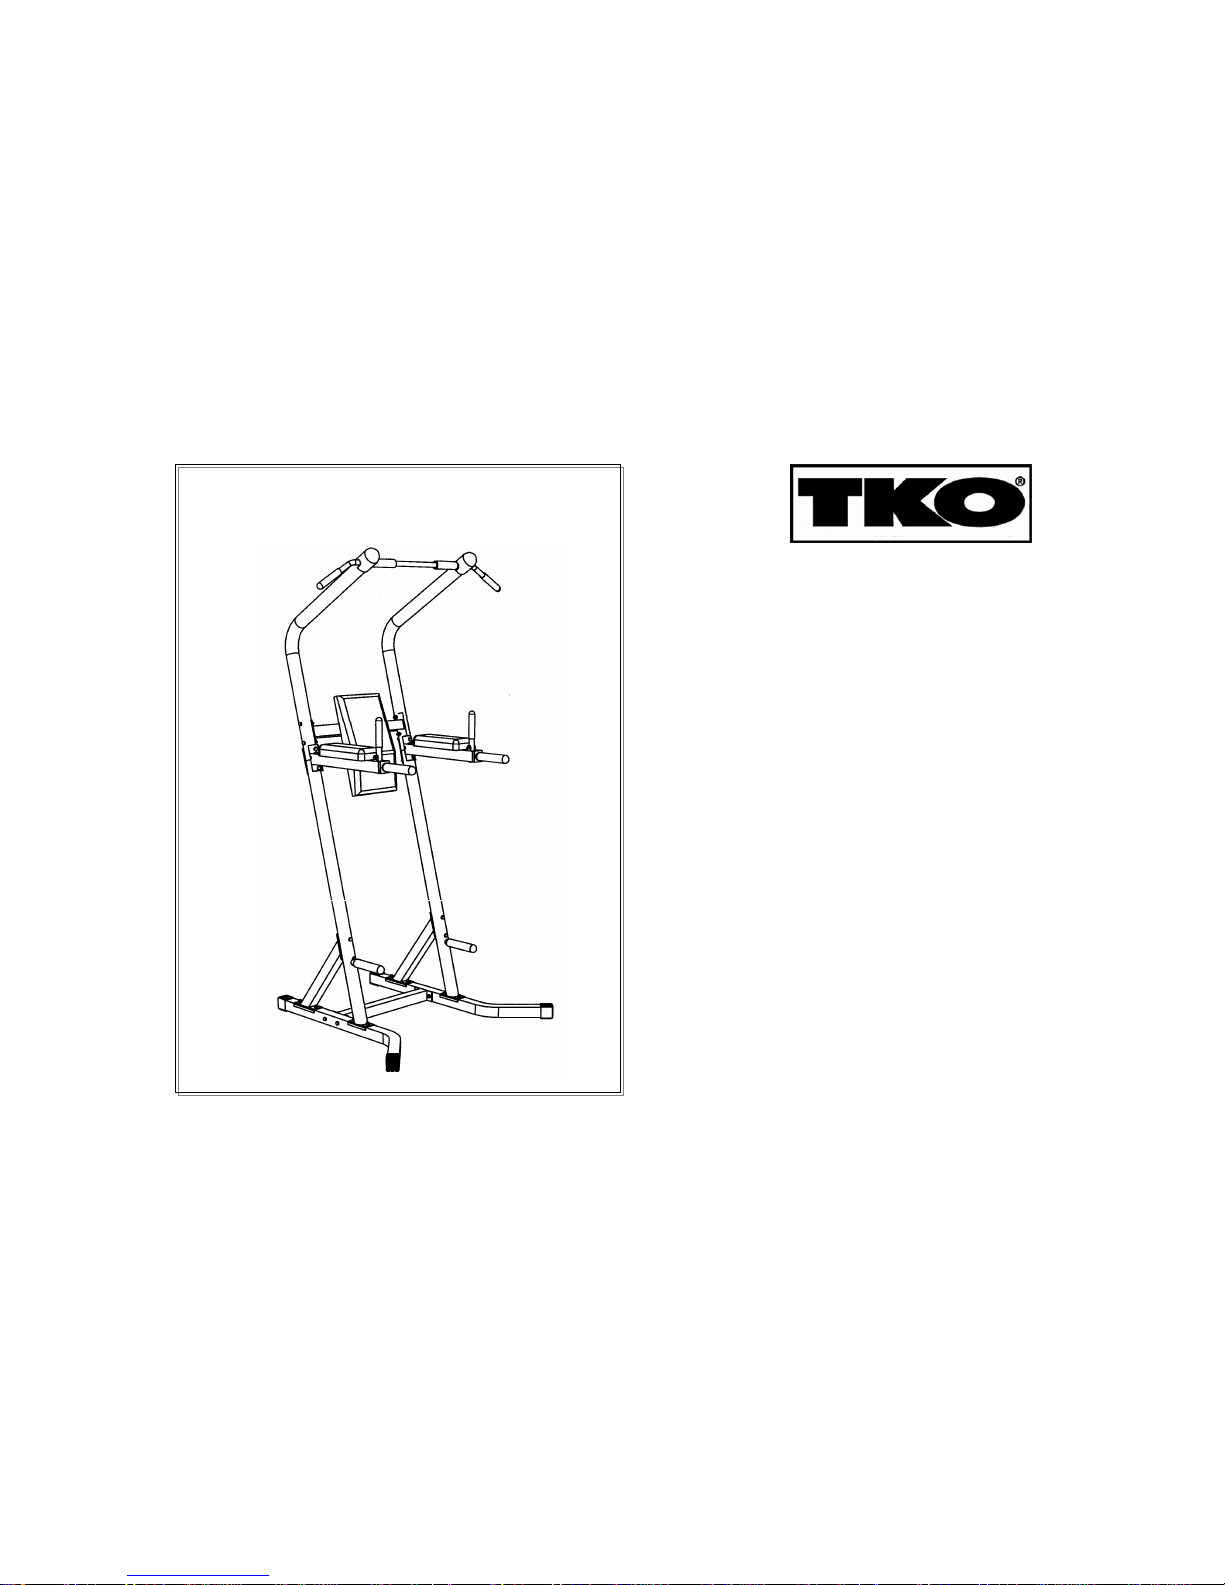
6150
POWER TOWER
Page 2

IMPORTANT SAFETY INSTRUCTIONS
Thank you for purchasing the 6150 Power Tower.
• This machine is intended for household use only. It is not designed for commercial use.
• This manual is designed to help you to assemble, adjust, maintain and to use. Please read this manual carefully and follow it
before you use your machine.
• Inspect your machine prior to exercise to ensure that all nuts and bolts are fully tightened.
• Most exercise equipment is not recommended for small children. Children should not use the machine unless they are under
adult supervision.
• Exercise equipment has moving parts. In the interest of safety, keep others, especially children, at a safe distance while
exercising.
• Warm up 5 to 10 minutes before each workout and cool down 5 to 10 minutes afterward. Never hold your breath while
exercising.
• Rest adequately between workouts. Muscles tone and develop during these rest periods. Beginners should work out twice a
week and increase gradually to 4 to 5 times per week.
• Remove all jewelry, including rings, chains and pins before commencing exercise. Always wear suitable clothing and footwear
during exercise. Do NOT wear loose fitting clothing that could become entangled with the moving parts of your exercise
machine.
MEDICAL WARNING
• Before beginning any exercise program, consult your personal physician. Evaluate your present fitness level and determine the
exercise program that is most appropriate for you particular age and condition.
• If you experience any pain or tightness in your chest, irregular heartbeats, shortness of breath, faintness or other unusual
discomfort while exercising, stop and consult your physician before continuing.
Page 3

TABLE OF CONTENTS:
Overview Of An Exercise Program 4
Weight Capacities 5
Parts List 6
Overview Drawing 7
Assembly steps 8-13
Customer service 14
Page 4

OVERVIEW OF AN EXERCISE PROGRAM
The guidelines below represent the basic components of safe and effective exercise program.
Warm Up
3 to 5 minutes of low intensity aerobic or calisthenics type activity (sit up, push up, jumping jacks...etc)
3 to 5 minutes of static stretching.
Aerobic Training
Perform a minimum of 20 to 30 minutes of cardiovascular exercise, 3 to 5 days per week.
Strength Training
Perform a total of 8 to 12 exercises, using all the major muscle groups, 2 to 3 times per week. A minimum of 1 set of 8 to 12
repetitions for each exercise should be performed to near muscle fatigue. Weight resistance should be increased by 5% to 10%
when 12 repetitions can be completed in proper form at a given weight/resistance for desired number of sets. Rest a minimum of 48
hours, but not more than 96 hours, between strength training sessions that use the same muscle groups.
Page 5

MAXIMUM WEIGHT CAPACITY
The maximum recommended weight capacities for your 6150 Power Tower are as follows.
Maximum recommended exercise weights not to exceed:
Pull up station
350 pounds
VKR
450 pounds
MAINTENANCE
Your 6150 is a high quality machine and is built to last. Simple routine cleaning and preventive maintenance go a long way
extending the life of your machine.
Inspect and Tighten all nuts and bolts each time you use the machine.
Replace the worn parts immediately.
Page 6

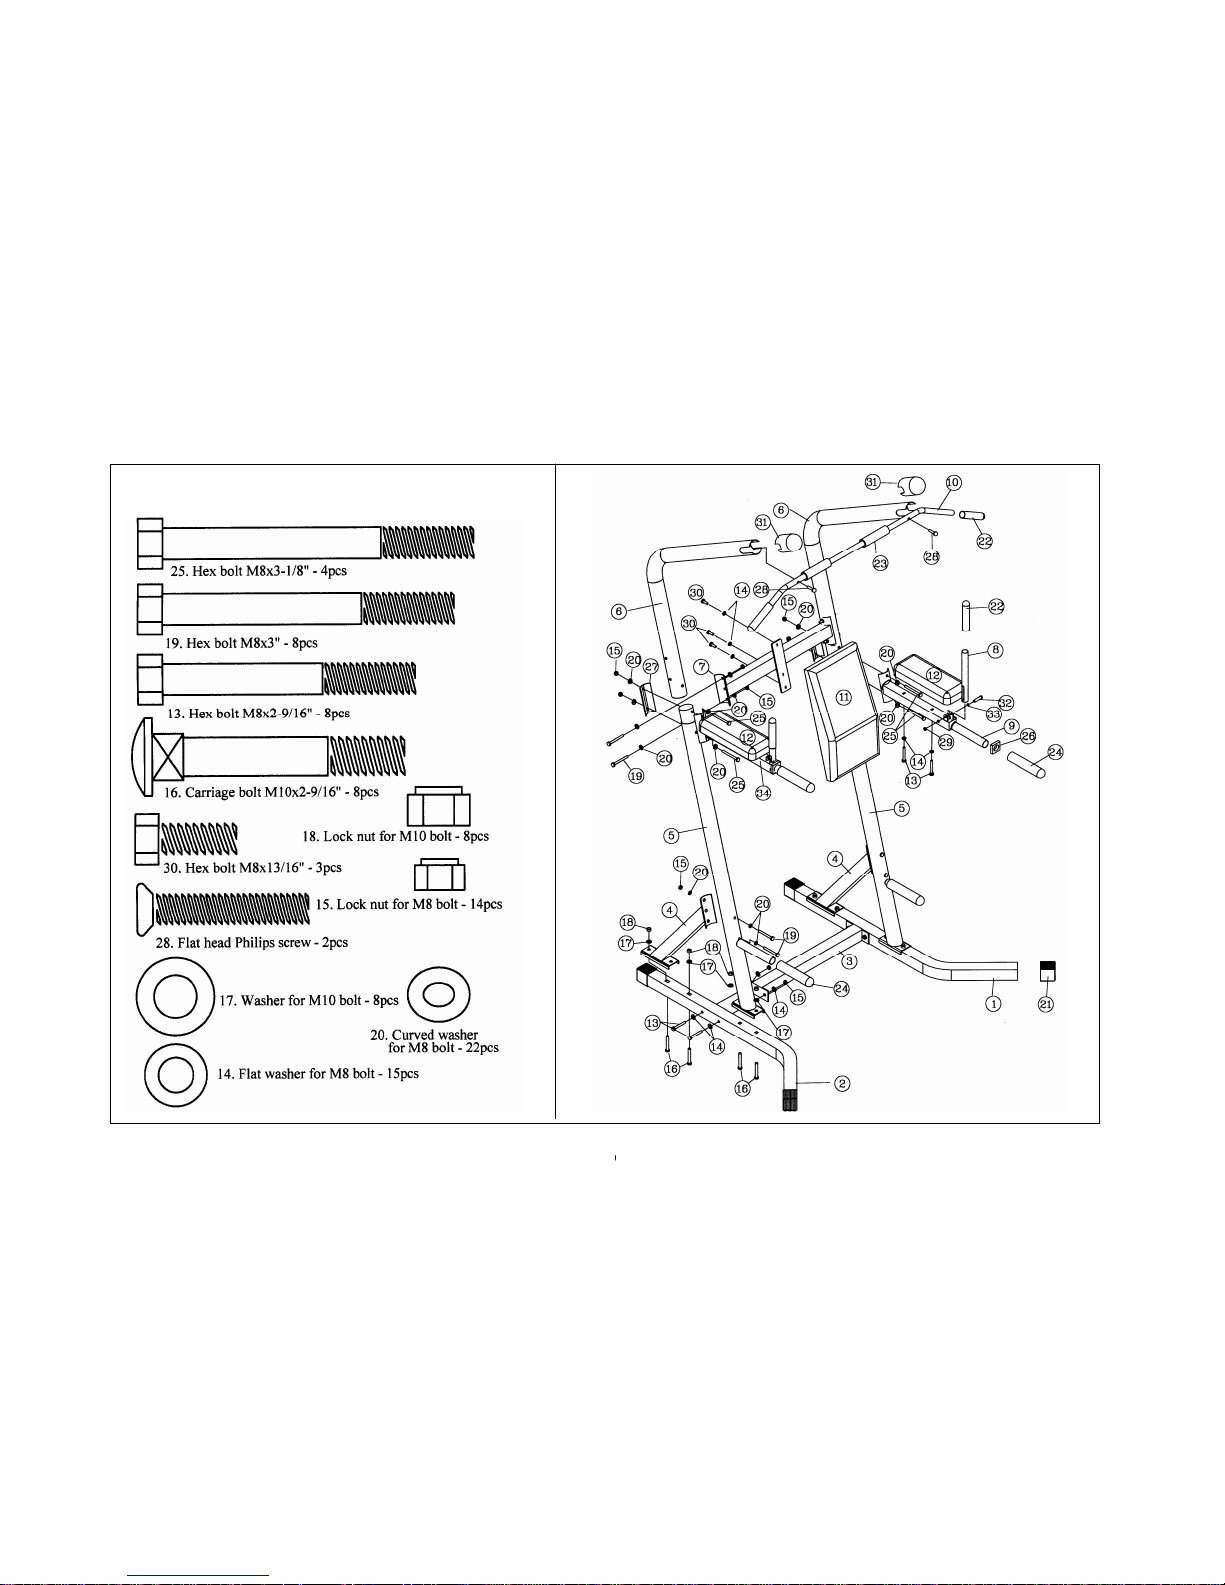
PARTS LIST
Part Numbers & Description
1. Base frame (left)
2. Base frame (Right)
3. Base cross frame
4. Upright angle support frame
5. Upright
6. L shaped upper frame
7. Back pad support frame
8. VKR handlebar
9. VKR arm rest support frame – Left
10. Pull up handlebar
11. Back pad
12. Arm pads
13. Bolt M8x2-9/16” (65mm) (8pcs)
14. Washer for M8 bolt (15pcs)
15. Lock nut for M8 bolt (14pcs)
16. Carriage bolt M10x2-9/16” (65mm) (8pcs)
17. Washer for M10 bolt (8pcs)
18. Lock nut for M10 bolt (8pcs)
19. Bolt M8x3” (75mm) (8pcs)
20. Curved washer for M8 bolt (22pcs)
21. Base end cap (2”x2”)
22. PVC hand grip (25mm I.D.)
23. Foam grip
24. PVC hand grip (32mm I.D.)
25. Bolt M8x3-1/8” (80mm) (4pcs)
26. Plastic bushing (50mmx50mm/32mmdia)
27. Curved shaped metal plate (2pcs)
28. Screw M8x1-9/16” (40mm) (2pcs)
29. Lock nut for M6 bolt (2pcs)
30. Bolt M8x13/16” (20mm) (3pcs)
31. Upper frame end cap (60mm round)
32. Bolt M6x1-9/16” (40mm) (2pcs)
33. Washer for M6 bolt (4pcs)
34. VKR arm rest support frame –Right
Page 7
7
Page 8

ASSEMBLY STEPS
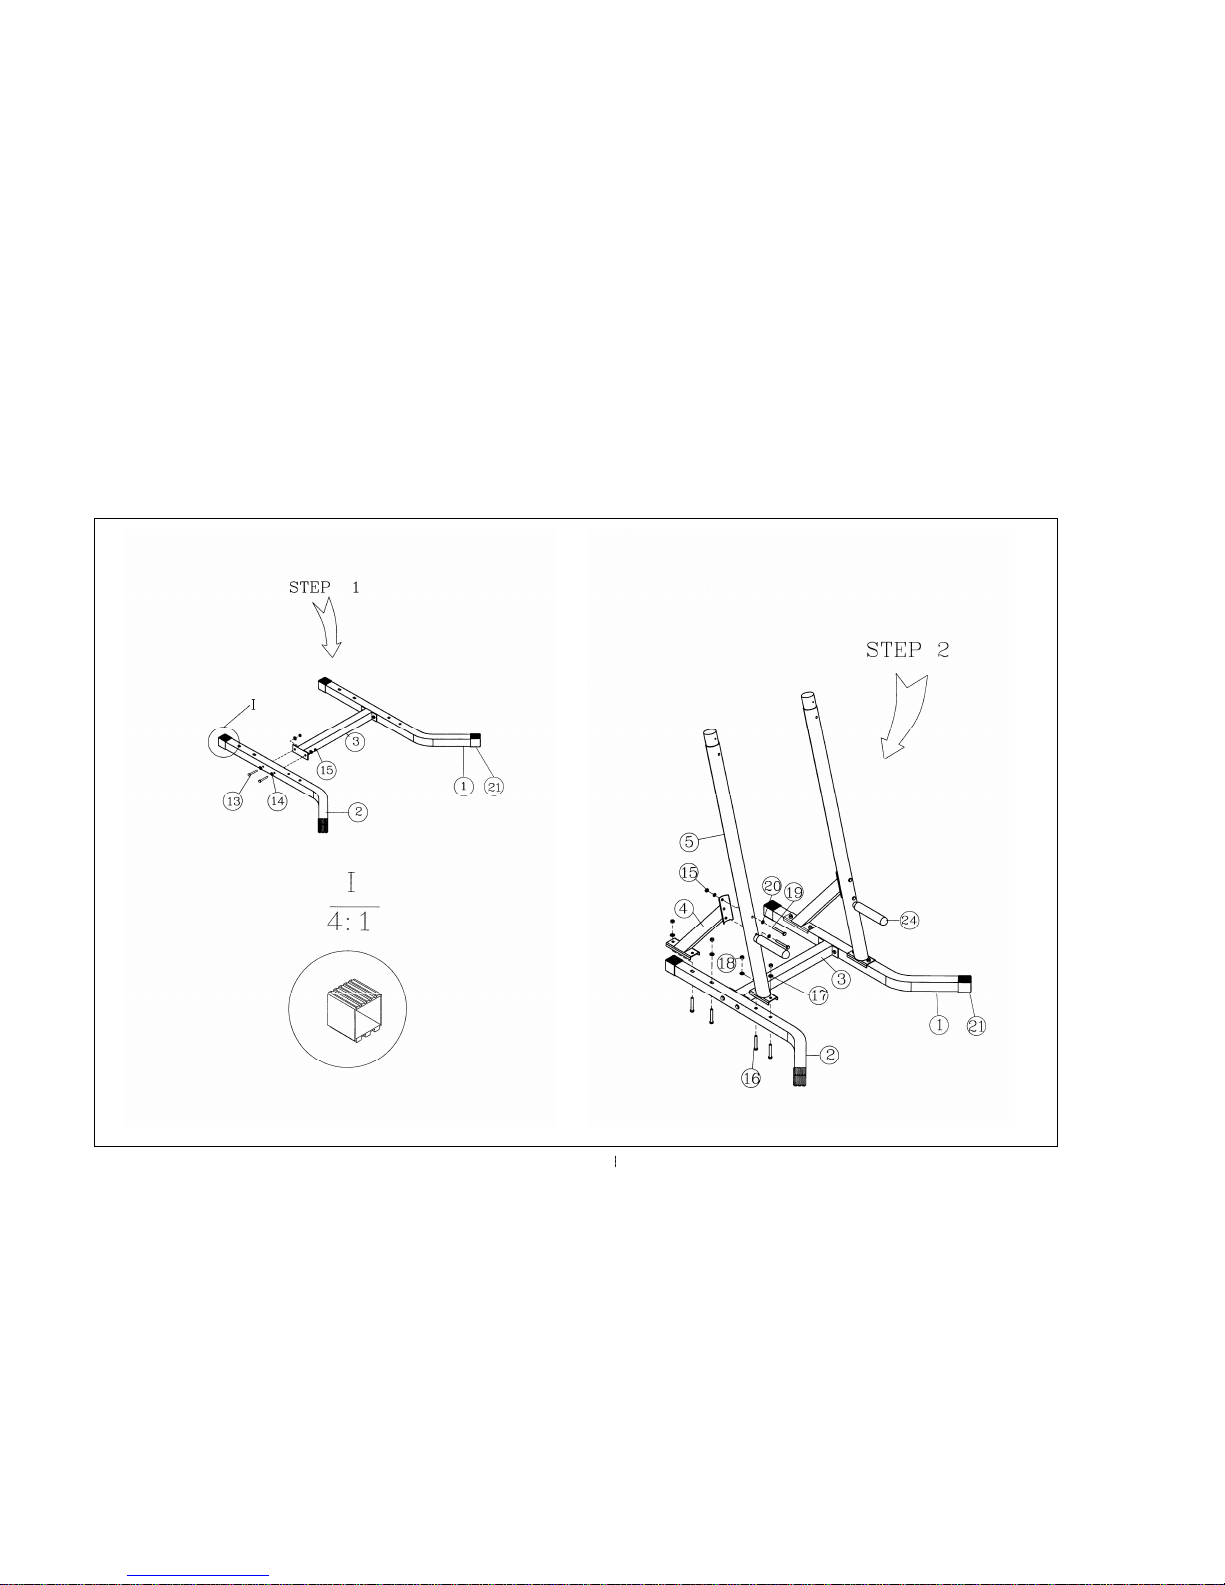
STEP 1 Install the Base cross frame (3) to the Left and right base frame (1 & 2) using 4 bolts (13) 8 washers (14)
and 4 lock nuts (15). Hand tighten these nuts and bolts. Do not use wrench at this time.
STEP 2 1) Install the uprights (5) to the Base frame assembly, using 4 carriage bolt (16) from underneath, 4
washers (17) and 4 lock nuts (18). Hand tighten these nuts and bolts. Do not use wrenches at this
time.
2) Make sure the Push up handlebar that welded at the bottom of the upright angle frame are facing
forward.
3) Connect the Upright angle support frame (4) to the back of the Uprights (5), using 4 bolts (19), 6
washers (20) and 2 lock nuts (15). Do not tighten it with wrenches at this time.
4) Then connect the other end of the Upright angle support frame (4) to the Base frame assembly.
Using 4 Carriage bolts (16), 4 washers (17) and 4 lock nuts (18).
5) Hand tighten these nuts and bolts. Do not use wrenches yet at this time.
Page 9
ASSEMBLY STEPS
Page 10

ASSEMBLY STEPS
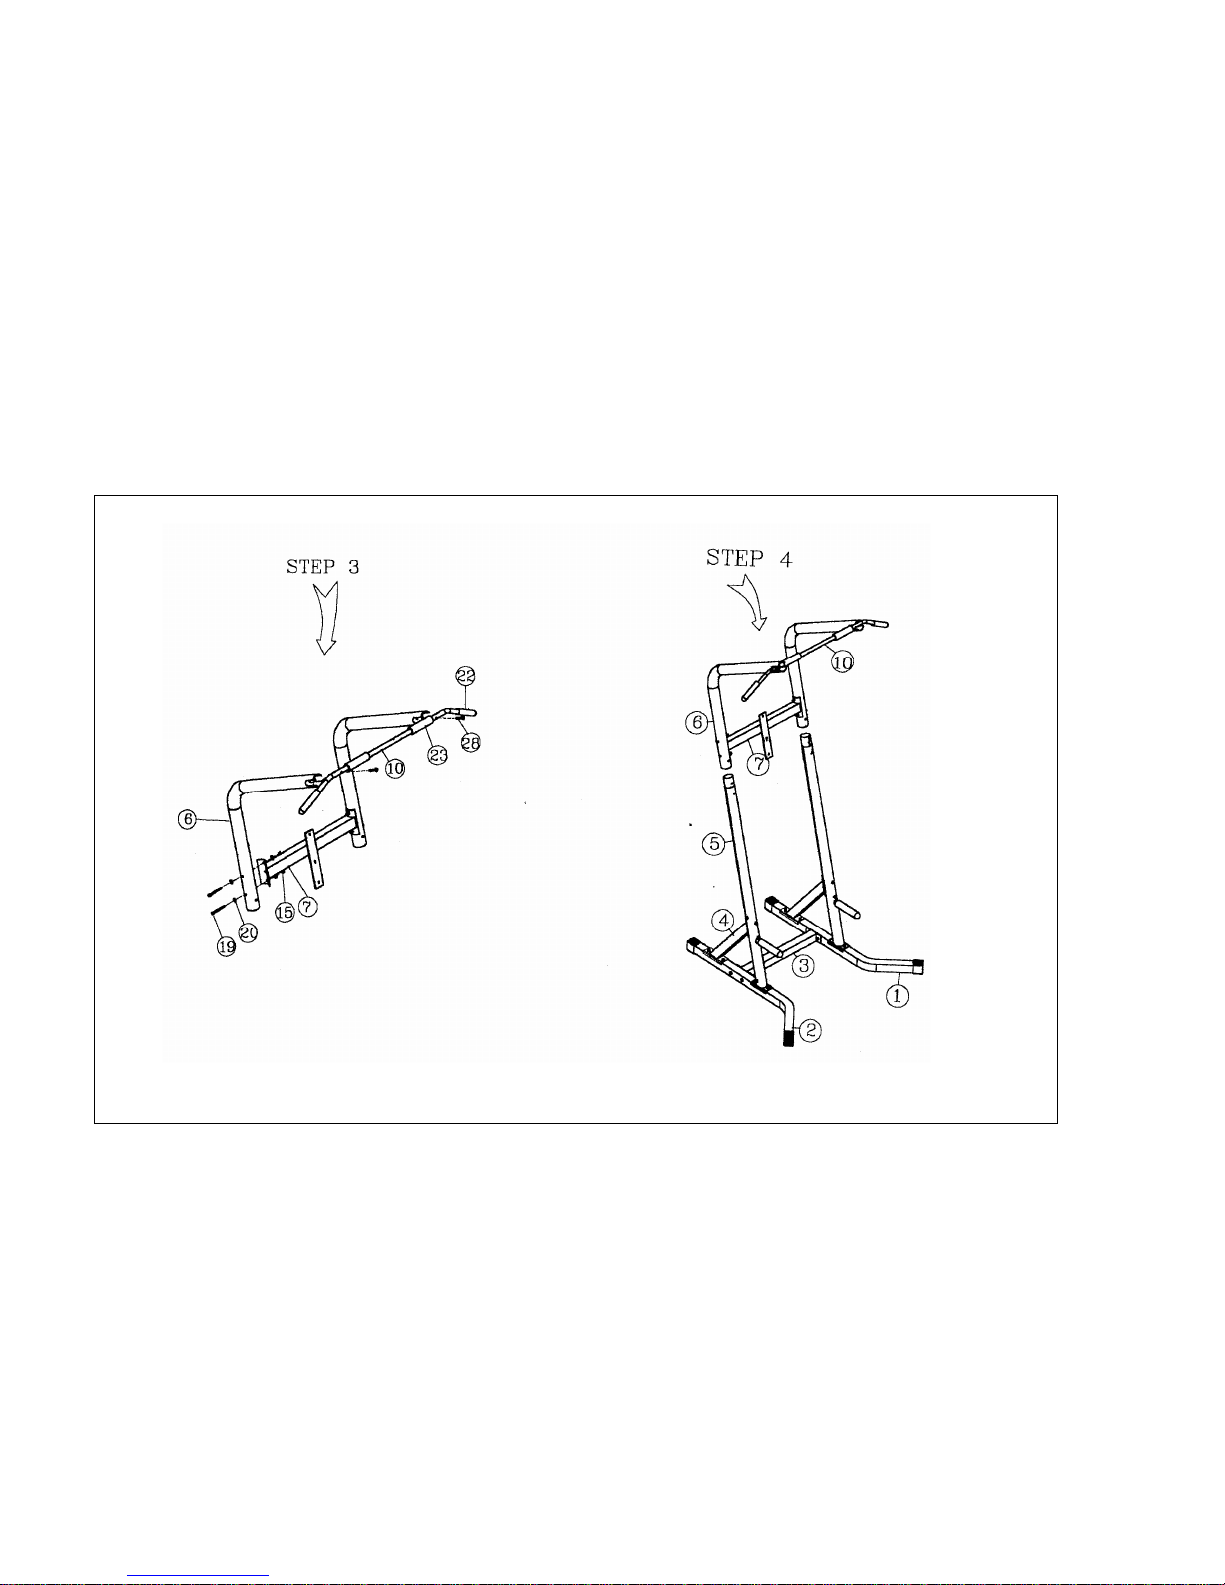
STEP 3 1) Install the Pull up handlebar (10) to the top end of the L shaped upper frame (6) using 2 Screws (28).
Tighten it securely with Phillips screwdriver.
2) Connect the Back pad support frame (7) with both L shaped upper frame, using 4 bolts (19) 8
washers (20) and 4 lock nuts (15). Tighten it with wrenches securely.
STEP 4 Install the Upper frame assembly onto the uprights (5)
Page 11
11
Page 12

ASSEMBLY STEPS
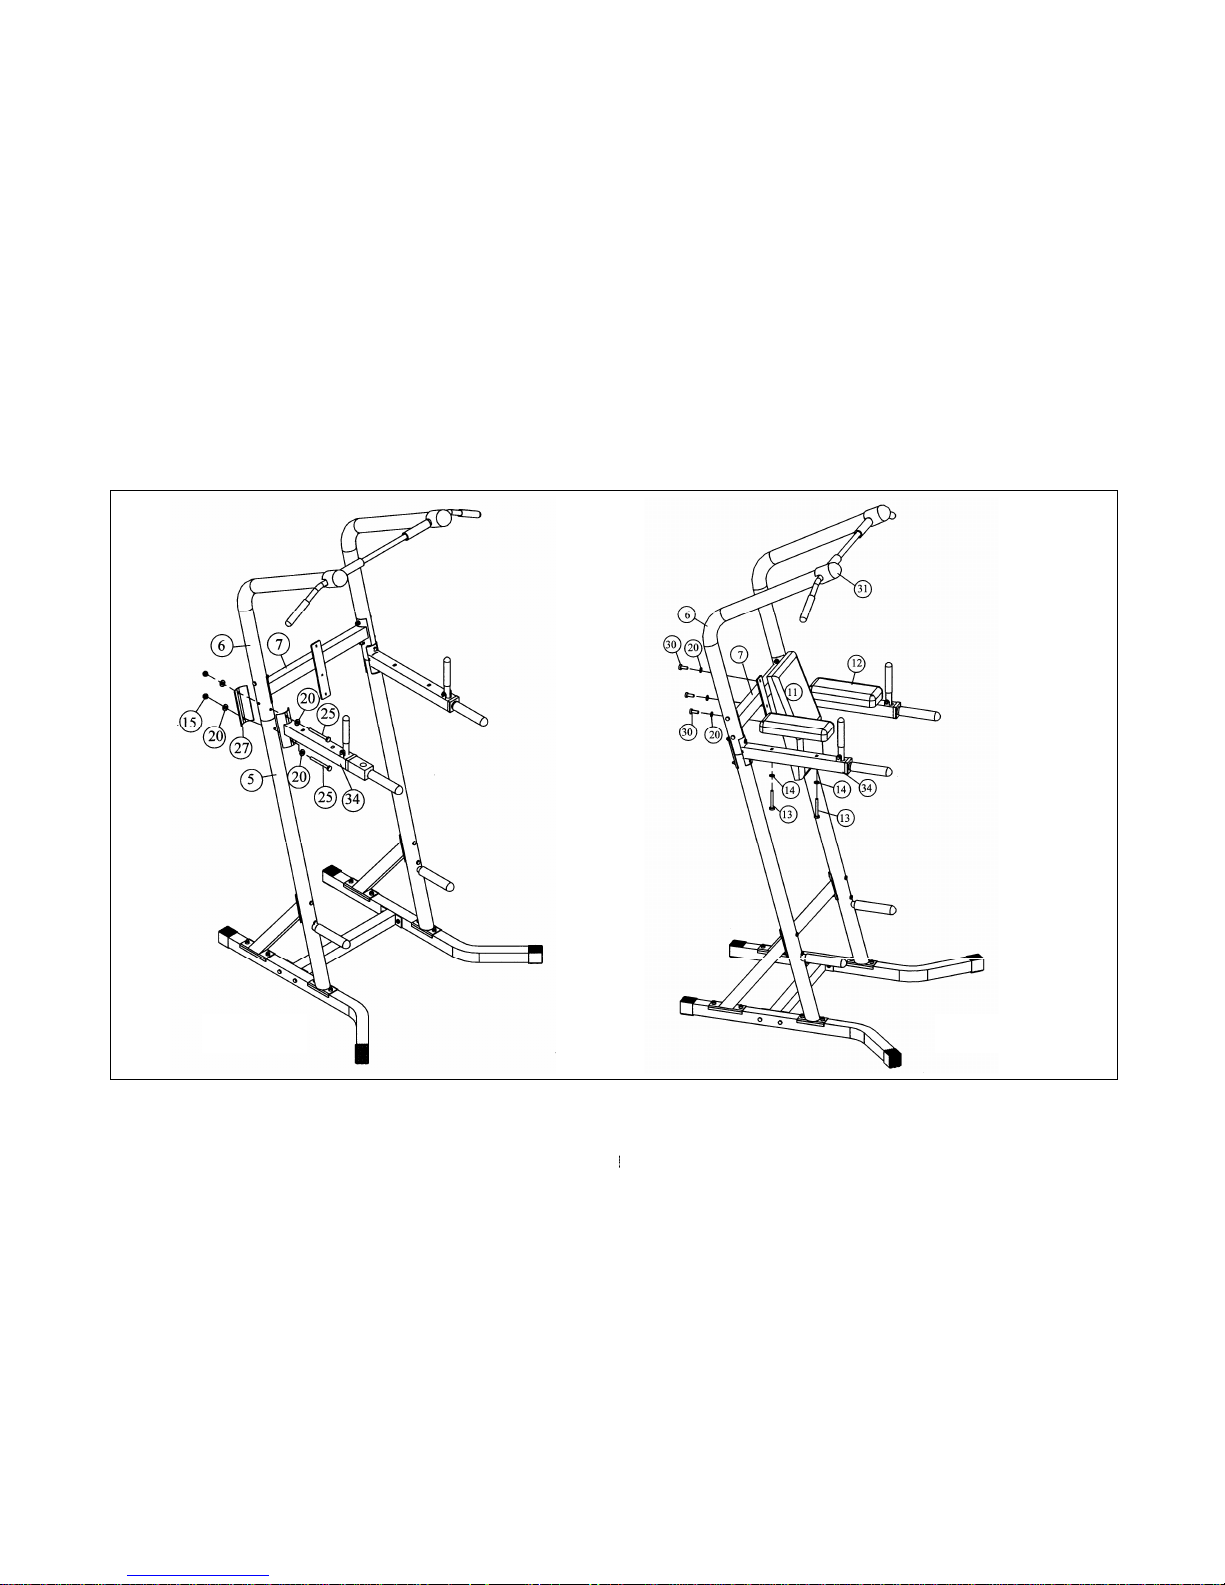
STEP 5 Install the left and right VKR arm rest support frame (9 & 34) to Upright frame assembly. Using 4 bolts
(25) 8 washers (20), 2 curved shaped metal plates (27) and 4 lock nuts (15).
Tighten it securely with wrenches.
Now tighten all 16 nuts and bolts with wrenches. Tighten it securely.
STEP 6 1) Install the Back pad (11) to the Back pad support frame (7), using 3 bolts (30) and 3 washers (14).
Make sure the back pad contour section is at the bottom when install.
2) Install the Arm pads (12) to the Arm rest support frame (9 & 34) using 4 bolts (13) and 4 washers
(14).
Note. Double check the VKR handlebars are securely attached to the VKR arm rest support frame (9 &
34). The VKR handlebar can be folded down when using the Pull up handlebar, so it will not be interfere with
your elbow movement.
3) Install the Plastic end cap (31) to the end of the L shaped upper frame.
Page 13
STEP 6 STEP 5
Page 14

CUSTOMER SERVICE
We have installed a convenient toll-free telephone hot line to serve our customers. A customer support specialist is available to
answer any questions you may have.
CUSTOMER SERVICE:
Toll free: 866-856-3488 or 713-895-9270
Monday-Friday 8:00am to 5:00pm CT
If the technician cannot resolve your problem over the phone, he/she will request that you return the problem part(s) to us for
evaluation and repair or replacement. He/she will assign you a RAN (return goods authorization number). The RAN should be on
the outside of the package that contains the item(s) to be returned.
Forward the package to TKO Sports Group USA, Ltd. prepaid.
Merchandise returned without a RAN the outside of the package or shipments sent C.O.D. will not be accepted by the TKO
receiving department (distribution center).
Goods damaged in shipment should not be returned for credit before notifying the freight carrier. Shipping damages are the
responsibility of the freight carrier (UPS, Federal Express, Trucking companies, etc.).
Upon receiving the shipment, check the boxes carefully. Any damage seen with a visual check must be noted on the freight bill and
signed by the carrier’s agent. The freight carrier will provide you with the required forms for claims.
Failure to do so will result in the freight carrier’s refusal to honor your damage claims.
Concealed damage is also the freight carrier’s responsibility.
Page 15

TKO SPORTS GROUP USA, LTD.
7354 Denny Road #100
Houston, TX 77040
1-713-895-9270
1-713-895-9379 Fx
www.tko.com
 Loading...