

TKMOUNTS Skull Mount Clamp Quick Start Manual
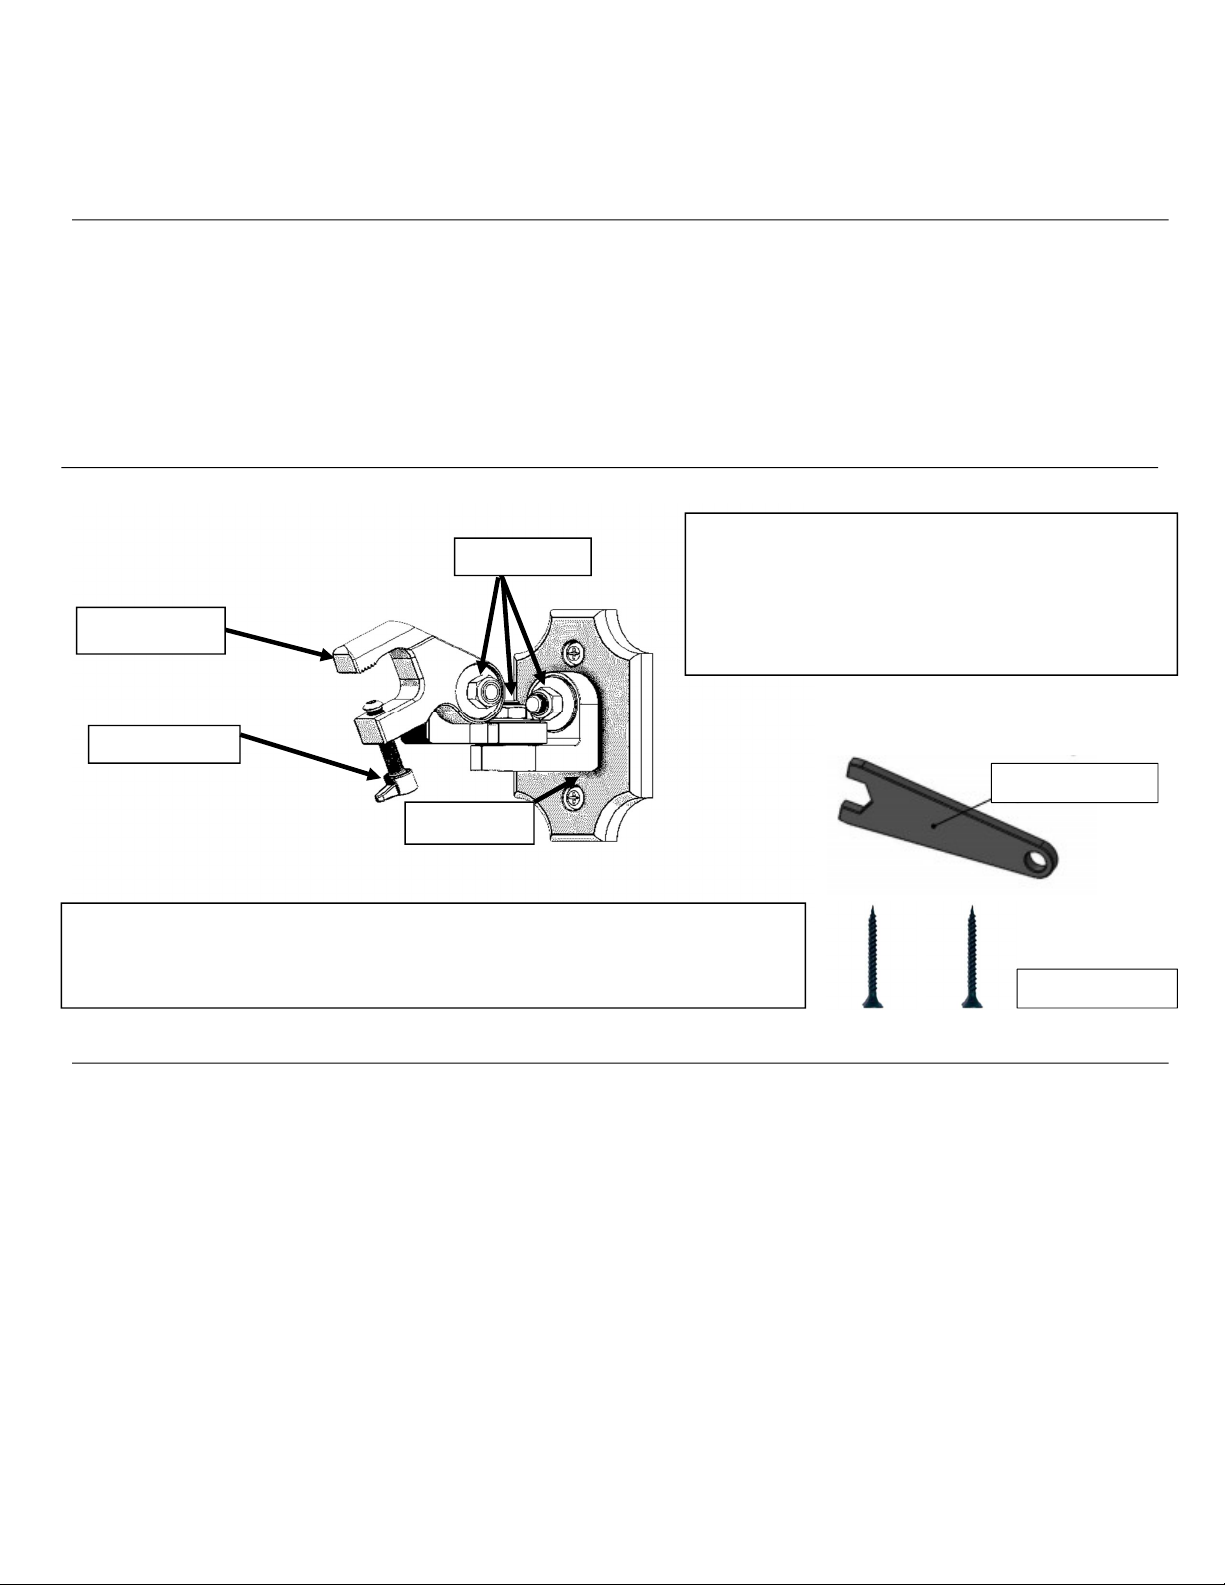
TKMOUNTS Skull Mount Clamp
3 Joint nuts
Wall plate
Thumb screw
Top of clamp
Figure
1
NOTE:
The ideal, proper
functioning of the TKMOUNTS Skull Mount Clamp is
NOTE: Device and h
ardware have
been
provided in
Wrench
2 Wall screws
Thank you for your purchase! We are happy to help you preserve the memory of your hunt.
Tools required:
Electronic stud finder for drywall installation
Phillips head screw driver
Enclosed wrench
Electric drill, wood or masonry drill bit, depending on mounting surface
Pencil
Optional: level
Installation diagram: (Enclosed – 1 fully assembled skull clamp, 1 wrench, 2 wall screws)
dependent on the joint nuts being loose enough to move with applied force,
but tight enough to hold in place against gravity and incidental force.
black scratch-resistant finish. The finish is,
however, not scratch-proof. Take care during install
and adjustment to minimize contact between tools
and surfaces not being adjusted.
Installation instructions:
Prior to installation of this product, the installation instructions and CAUTIONS should be read and completely
understood. The installation instructions and CAUTIONS must be read to prevent personal injury and property
damage. Keep these installation instruction in an easily accessible location for future reference.
1. Adjust the three rotation joints to the ideal tension. Using the wrench provided, adjust all three joint nuts on
the mounting device so the joints can be rotated by hand, but have enough tension to hold in place. The joints
should not be loose, but should be able to rotate with force applied by hand– DO NOT OVER-TIGHTEN THE JOINT
NUTS. Turn the three joints so there is clear access to the screw openings of the wall plate.
2. Mount wall plate to the wall. Locate a stud in the wall you wish to hang your mount. Pre-drill a pilot hole in the
stud at the desired height, or directly in the wall if it is cement or brick. Hold the device to the wall, so the hole
drilled in the wall is centered in the top opening of the mounting plate. A level may be used to ensure the plate
is vertical. Using a pencil through the lower opening of the wall plate, mark the 2nd hole to be drilled in the wall.
Set the mount aside and drill your 2nd pilot hole. Hold the wall plate to the wall so that the two pilot holes are
centered in its openings. Use a screwdriver to mount the plate to the wall stud using the two screws.
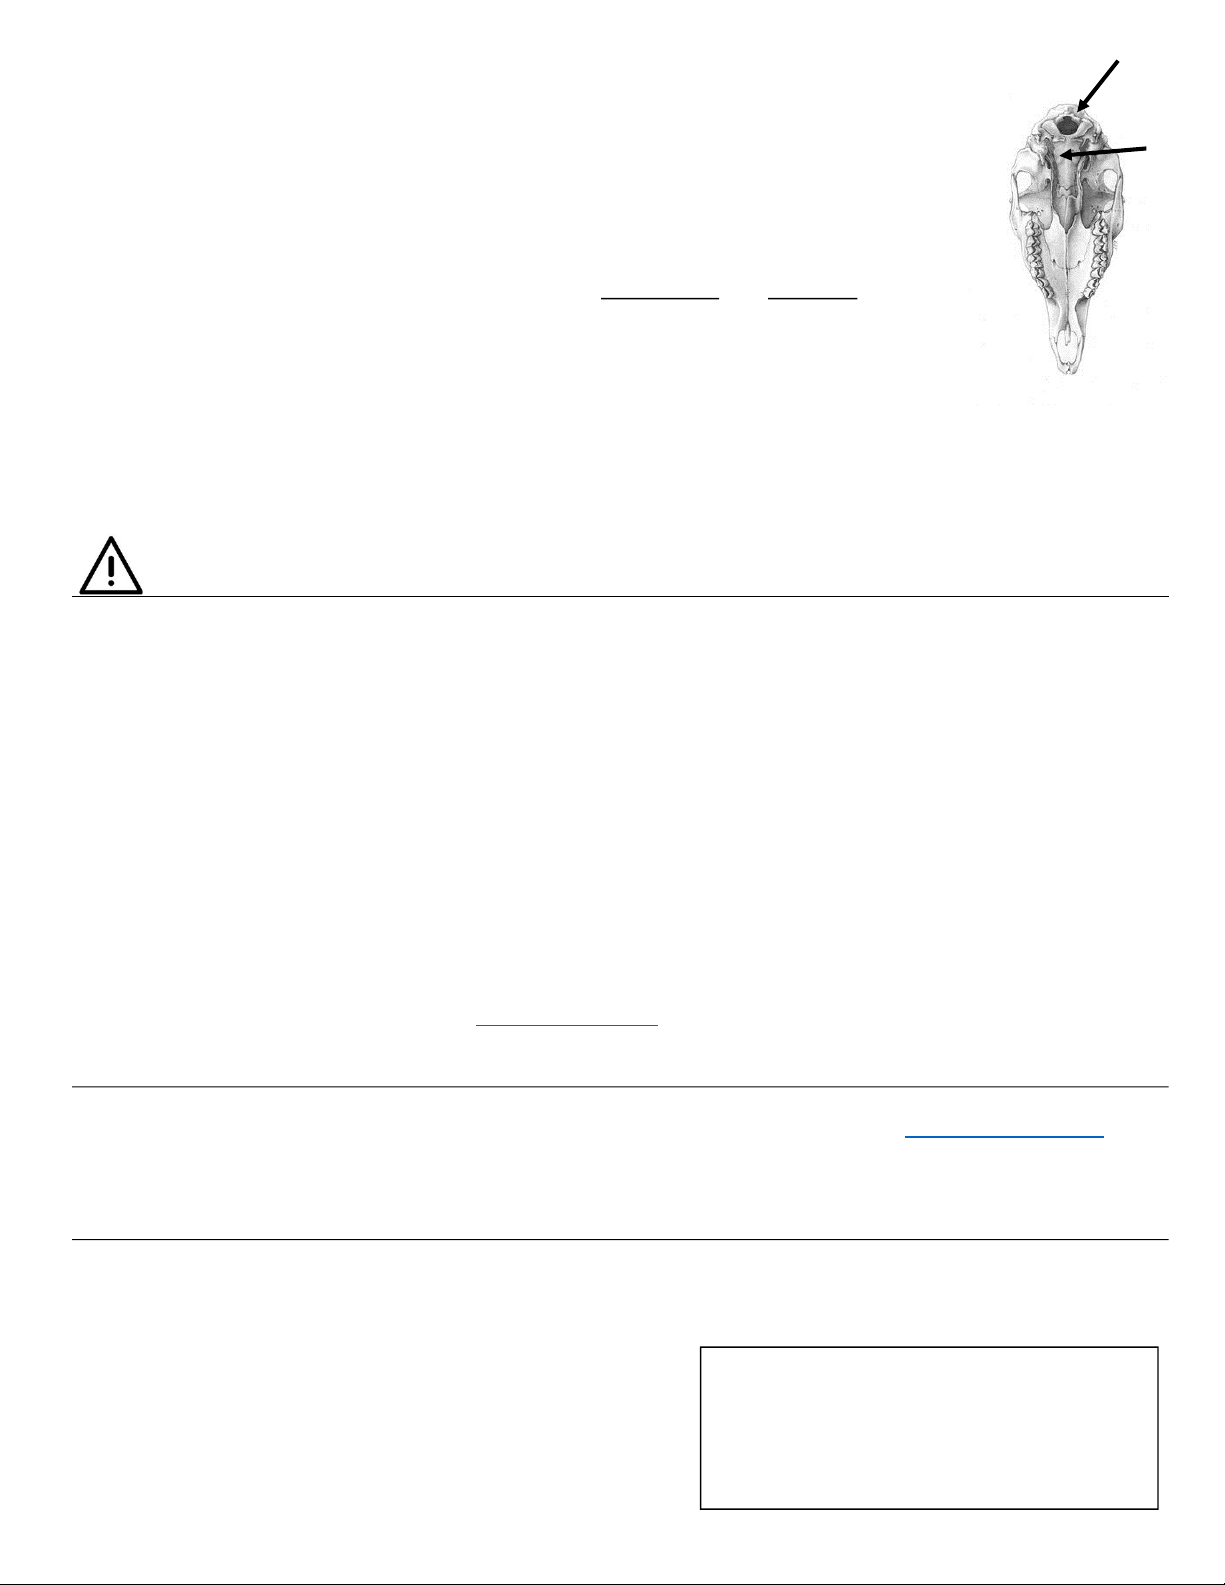
3. Secure skull mount on the clamp. Open the clamp by turning the thumb screw. Do
Figure 2
A
B
not remove the screw completely. Holding the mid-size wildlife skull (deer, bear, boar,
wolf, antelope, etc.), place the upper part of the clamp into the foramen magnum - spinal
opening at skull base – (Figure 2, A). The clamp should enter the skull as far as it will go.
While continuing to hold the skull with one hand, tighten the thumbscrew to close the
clamp causing it to grip the skull securely. If the occipital bone (Figure 2, B) has a
prominent ridge the clamp may need to be secured to the right or the left of that ridge.
TIGHTEN THIS THUMB SCREW AGAINST THE SKULL COMPLETELY, and SECURELY.
CAUTION: Failure to tighten the thumb screw completely and securely may pose a risk of
property damage and/or personal injury due to the skull falling from the clamp.
4. Re-adjust tension of three rotation joints, if necessary. Check again that the three joint
nuts are allowing movement of the joint, but hold in place in different positions.
Tighten/loosen joint nuts small amounts with the wrench until joint tension is optimal for repositioning the
mounting device by hand, but holding in place when no force is applied. DO NOT OVER-TIGHTEN THE JOINT
NUTS.
CAUTIONS:
DO NOT DISASSEMBLE THIS PRODUCT! Springs and cork washers inside the joints are installed according to
manufacturing specifications. If incorrectly re-assembled the safety and proper workings of the mount will be
compromised. This mounting device contains small parts which can act as a choking hazard if swallowed.
CAUTION: This mounting device must only be used for the purpose of displaying a skull by mounting it to a wall.
The skull must be from one of the following animal types: deer, bear, antelope, sheep, mountain lion, wolf, boar
or similar mid-sized species. Use of this device for another animal type or other purpose may cause it to fail.
Recommended mounting surfaces: wood stud, solid concrete, or brick.
Make sure no water, electrical, or gas lines are present where the mount is to be installed. Drilling into water,
electric, or gas lines could cause personal injury or property damage.
When mounting to a wall that contains wood studs, confirm the center of the wood stud prior to installation.
This product is intended for indoor installation. Premature product failure or personal injury could occur if this
product is used outdoors.
Proper installation, following the instructions below, must be followed. If instructions are not understood,
please use our website for support – www.tkmounts.com – click on Support.
Support:
For questions regarding installation or use, please see the support tab at our website www.tkmounts.com or
call 1-877-800-5432 (M-F, 8 AM to 4 PM CST).
Warranty information:
This product has a one year warranty against manufacturer defect from the time of purchase. Please keep
purchase receipt as proof of purchase date. Warranty is void if installation instructions and precautions are
not followed or if product has been disassembled in part or
whole. Please mail all warranty correspondence to:
Trophy King LLC
16166 Waltz Lane
Boscobel, Wisconsin 53805
PRODUCT DISCLAIMER: In no event shall Trophy King LLC,
manufacturer and distributor of TKMOUNTS Skull Clamp,
be liable for any direct, indirect, punitive, incidental,
special consequential damages, to property, life, or
person whatsoever, arising out of or connected with the
use or misuse of our products.
 Loading...