

TK AUDIO BC501
500 series Stereo Bus Compressor
Congratulations on buying one of the most transparent stereo bus compressors ever made,
it’s manufactured and assembled by hand in Sweden and thoroughly tested before leaving
the factory .
The BC501 provides smooth bus compression associated with one of the most famous bus
compressors from the mid 80’s. Mixing engineers call it the ”magic glue” when transparent
compression strengthens mixes without compromising clarity . The BC501 provides just that
kind of compression bringing cohesion and punch; equally useful for drum bus and instrument
compression.
The built-in blend control makes it easy to apply parallel compression by adjusting the mix of
dry and compressed signal.
A switchable side chain filter can be applied at 80Hz, 150Hz or 220Hz which makes the
BC501 less responsive to low frequency energy .
The external side chain input makes it possible to have the BC501 pump to an external
source.
The BC501 will add the ”magic glue” and make your mixes sound punchy and coherent.
All controls are stepped for 100% repeatability .

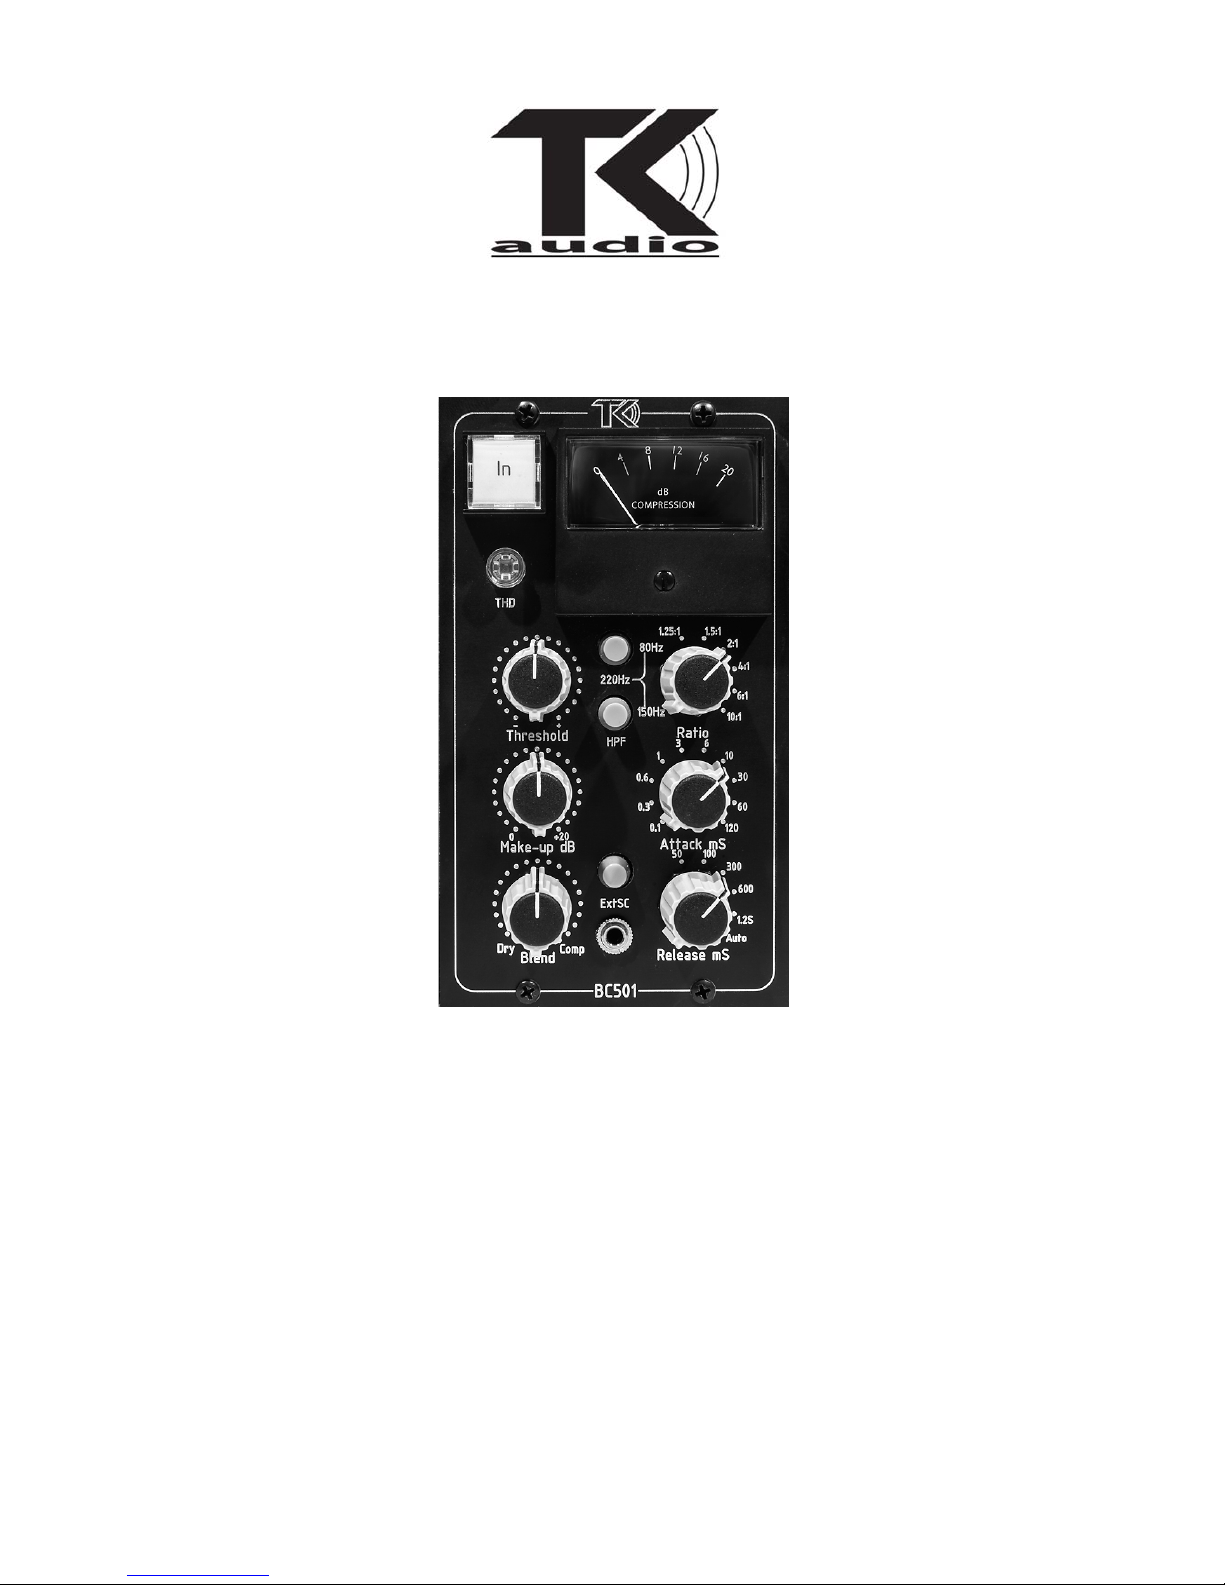
THE PARAMETERS:
THRESHOLD: -20dB to +20dB in 41 steps. The threshold adjusts the level above where the
signal is reduced. A lower threshold means a larger portion of the signal will be treated. For
optimal results make sure that the input level is high enough.
RATIO: 1.25:1 / 1.5:1 / 2:1 / 4:1 / 6:1 / 10:1. The ratio determines the input/output ratio for
signals above the threshold. For example, a 4:1 ratio means that a signal overshooting the
threshold by 4 dB will leave the compressor 1 dB above the threshold. At the 1.5:1 and 2:1
setting a relatively subtle soft knee compression is applied. At 4:1, the compression becomes
more obvious, and at 10:1, the BC1-S is basically a peak limiter.
HPF: When engaged a gentle 6dB/octave high pass filter at 80Hz, 150Hz or 220Hz is
applied to the internal or external side chain signal, making the compression less responsive
to low frequency energy . Both 80Hz and 150Hz engaged gives 220Hz.
EXT SC: Engages the external side chain input through the 1/8” stereo jack. By using the
external side chain another signal can control the behavior of the compressor; most
commonly used by DJs for ducking / lowering the music volume automatically when speaking.
It’s also effectively used for ducking the bass track or background whenever the kick drum hits
by sending the kick track to the external sidechain input. For more information please read
the section about side chain compression.
ATTACK: UF (ultrafast) / 0.1 / 0.3 / 0.6 / 1 / 3 / 10 / 30 / 60 / 120mS. The attack setting
defines the time it takes for the compressor to decrease the gain and reach the level
determined by the ratio. Faster attack settings means better control of the transient part of the
sound, but if set too fast the compressor might cut away more transients than wanted. A good
starting point is 10ms.
RELEASE: 50 / 100 / 300 / 600ms / 1.2S / Auto. The release setting defines the time it takes
for the compressor to increase the gain to the level determined by the ratio, once the level has
fallen below the threshold. Higher release settings will result in a less intrusive compression
with lower distortion, but if set too high the compression might not be effective enough. A
good starting point is 100ms or Auto.
AUTO RELEASE: Makes the release function time dependent on the duration of the signal
peak. In practise it’s a fire-and-forget setting that behaves the same way as a classic British
bus compressor used by many since the 80’s.
GAIN REDUCTION METER: The metering shows the average level (RMS) of the gain
reduction which differs from the peak level meters of most plug-ins - comparatively it’s slower
and in practise it means that a little goes a long way . The proper amount of compression on a
mix is usually done when the needle moves in the middle of 0 and 4. Higher ratio and faster
release settings will result in a more obvious compression/limiting that sometimes is too fast
for the needle to show. Always use your ears first and just use the metering as a quick
reference.
MAKE-UP: 0 to+20dB of gain in 41 steps to balance the compressed signal level against the
input signal level.
IN: Engages and disengages the compressor. Should be used a lot to control how the
compressor is affecting the sound.
BLEND: Straight to compressed sound in 21 steps. Turning the knob clock wise will mix the
original signal with the compressed signal. For more information please read the section
about parallel compression.

STARTING PRESETS
MIX BUS
The main purpose of the BC501 is to act as a bus compressor and it does it very well.
AUTO RELEASE MAGIC
One of the true unique features of the BC501 is the auto release setting and it’s ability to glue
the mix together. The auto release is a good starting point when setting up the compressor for
2 bus duty . Adjust the Threshold until 2 to 3 dB of compression is shown by the meter . It’s all it
takes to glue the mix together .
Threshold: ±0 dB
Ratio: 1.25:1, 1.5:1, 2:1 or 4:1
HFP: ON
Attack: 10 ms
Release: Auto
Make-up: 8 o’clock
Blend: Comp
POP MIX COMPRESSION
For more obvious compression a fast release should be used. Adjust the Threshold until it
shows about 3 to 4 dB of compression on the loudest parts of the song.
Threshold: ±0 dB
Ratio: 4:1
HFP: ON
Attack: 10 ms
Release: 100 or 300 ms
Make-up: 9 o’clock
Blend: Comp
SLAMMING 2 BUS COMPRESSION
Depending on the source material sometimes the compression can effectively slam the mix. It
usually works for electronic music with fast transients that need to be tamed. The result can be
a bit fatiguing but it sure can inject energy when needed rendering a super processed mix.
Threshold: 5 dB
Ratio: 10:1
HFP: ON
Attack: 3 ms
Release: 50 ms
Make-up: 9 to 10 o’clock
Blend: Comp

DRUMS
The BC501 can go from subtle to pretty slamming compression on a drum bus and here are a
few good starting points. Make a habit of adjusting the Make-up gain until the compressed
signal is equally loud as the uncompressed signal, and toggle the Comp in button to listen
what’s actually happening to the drums when they are compressed.
A TOUCH OF DRUM COMPRESSION
Adjust the Threshold until the compression meter shows about 2 dB of gain reduction. The
effect should be very subtle and just make the drums come together without adding or altering
the kick or snare drum.
Threshold: 0 to +5 dB
Ratio: 2:1
HFP: ON
Attack: 3 ms
Release: AUTO
Make-up: 9 o’clock
Blend: Comp
TIGHT DRUM COMPRESSION
T o tighten up the drum bus without altering the drums too much, a low ratio should be used.
Adjust the Threshold until about 3 or 4 dB of compression is done.
Threshold: -5 to -10 dB
Ratio: 2:1
HFP: ON
Attack: 10 ms
Release: 100 ms
Make-up: 9 to 1 1 o’clock
Blend: Comp
HARD DRUM COMPRESSION
Applying hard drum compression will alter the sound of the snare drum and cymbals but in a
dense mix that might be the right thing to do. Adjust the Threshold until about 5 to 6 dB of
compression is shown.
Threshold: -5 to -10 dB
Ratio: 4:1
HFP: ON
Attack: 10 ms
Release: 50 or 100 ms
Make-up: 12 to 1 o’clock
Blend: Comp

SLAMMING DRUM COMPRESSION
T o slam the drum bus usually more coloured compression is used, but utilizing the Hard Ratio
setting can render some pretty interesting results. St art by setting the Make-up to 1 o’clock
because a lot of make-up gain will be used. Then adjust the Threshold until 10 to 12 dB of
compression is shown and try a couple of different attack settings. For a little smoother
compression set the release to 100ms. A cool mixing trick is to set the Blend setting to
Straight (meaning no compression) and then slowly turn it clock-wise as the song is
approaching the chorus. It will make the drums go more and more slamming the closer they
get to the chorus adding some excitement to the mix.
Threshold: -5 to -10 dB
Ratio: Hard
HFP: ON
Attack: From UF to 30 ms
Release: 50 ms
Make-up: 12 to 3 o’clock
Blend: Comp
VOCAL RIDING
Lead vocals usually need a bit of volume automation to cut through a dense mix - an important
and time consuming job. Due to its ultra transparent compression the same job can
automatically be done with the BC501. The trick is to use a low Ratio and fast release, and
set the Threshold until about 4 dB of compression is done.
Threshold: -5 to -10dB
Ratio: 1.5:1 or 2:1
HFP: ON
Attack: 10 ms
Release: 50 ms
Make-up: 9 o’clock
Blend: Comp
GUIT AR SOLO GAIN RIDING
Similar settings can be used to gain ride a guitar solo or other solo instruments.
Threshold: -5 to -10dB
Ratio: 1.5:1 or 2:1
HFP: ON
Attack: 10 or 30 ms
Release: 50 or 100 ms
Make-up: 9 o’clock
Blend: Comp

BASS RIDING
Bass guitar can be a pretty tricky animal to harness. Often more coloured compression is
used, but due to the transparent nature of the BC501 it can very effectively even out stray
notes that are played too loud or too soft without adding any pumping or distortion. The result
is a more coherent bass guitar that still sounds like a bass guitar . Similar settings can
effectively be used on bass synthesizers as well. Adjust the Threshold until 3 to 5dB of
compression is shown by the metering.
Threshold: 3 o´clock
Ratio: 10:1
HFP: OFF (note that the high pass filter is deactivated)
Attack: 3 ms
Release: 300 ms
Make-up: 10 o’clock
Blend: Comp
PARALLEL COMPRESSION WITH THE BC501
Parallel compression is a great way of injecting more nerve and energy into a mix or
instrument, without affecting the transients or the overall sound too much. The trick is to make
the compressor work pretty hard - around 8 to 16dB on the meter - and blend the compressed
signal with the original sound. T o get the best resolution set the Blend knob to Comp (the fully
clock wise position). Adjust the Make-up knob until the compressed signal sounds equally
loud or slightly louder than the original signal. Check by toggling the Comp In button. Then use
the Blend knob to set the proper amount of parallel compression, usually somewhere between
the fully counter wise position and 12 o’clock. Always toggle the Comp In button to comp are it
with the original signal. Use the Straight Mute button to check the compressed signal without
altering the Blend control.
2 BUS WITH SOFT PUNCH PARALLEL COMPRESSION
There is a great way to add some energy without affecting the overall sound too much using
long attack time and auto release. Adjust the Threshold level until the compression meter
shows roughly 8dB of compression.
Threshold: 0 to -5 dB
Ratio: 10:1
HFP: ON
Attack: 30 or 60 ms
Release: AUTO
Make-up: 9-1 1 o’clock
Blend: 9-12 o’clock

2 BUS WITH SNAPPY PARALLEL COMPRESSION
For a more snappy compression use slow attack and one of the faster release settings and
Ratio 10:1 - adjust the Threshold until there is about 8 to 12dB of gain reduction.
Threshold: -5 to -10 dB
Ratio: 10:1
HFP: ON
Attack: 30 or 60 ms
Release: 50, 100 or 300 ms
Make-up: 12 o’clock
Blend: 9-12 o’clock
2 BUS WITH SLAMMING PARALLEL COMPRESSION
Sometimes a mix needs an energy injection and what a better way to do it than with some
slamming parallel compression. Usually a more coloured compression is preferred but tickled
the right way the BC501 can work wonders.
Adjust the Threshold until the compression meter move roughly between 8 and 12dB. For
even more effect lower the Threshold until the compression meter moves between 12 and
16dB. Adjust the Blend until proper amount of p arallel compression is achieved.
Threshold: -5 to -10 dB
Ratio: 10:1
HFP: ON
Attack: 10 or 30 ms
Release: 50 or 100 ms
Make-up: 3 o’clock
Blend: Between 9 and 12 o’clock
EXTERNAL SIDE CHAIN COMPRESSION
The external side chain inputs on the back is unbalanced mono input and can be used to
control the compressor with an external signal.
BASS TRACK DUCKING BY KICK DRUM
A classic mixing technique is to have the kick drum duck the bass track. It’s done by sending
the bass track into the compressor and the kick drum into the external side chain input. Then
try the settings below. Adjust the Threshold until about 2 dB of compression is shown. This will
make room for the kick drum without having to back down the bass track.
Threshold: ±0 to 5 dB
Ratio: 10:1
HFP: OFF (note that the high pass filer is deactivated)
EXT SC: ON (note that the external side chain is activated)
Attack: 1 ms
Release: 50 ms
Make-up: 0
Blend: Comp

DUCKING DANCE PADS WITH KICK DRUM
Another classic trick is to duck the pads and synthesizer parts with the kick drum. Adjust the
Threshold until 1 to 4 dB compression is shown and try different release settings to find out
which works best with the tempo of the song. Naturally the release time can’t be perfectly
matched with the tempo of the song, but that’s the charm of it.
Threshold: ±0 to 5 dB
Ratio: 10:1
HFP: OFF (note that the high pass filter is deactivated)
EXT SC: ON (note that the external side chain is activated)
Attack: 1 or 3 ms
Release: 50, 100, 300 or 600 ms
Make-up: 0
Blend: Comp
 Loading...