

Page 1
DWS-5800
5.8GHz DIGITAL WIRELESS MICROPHONE SYSTEM
ENGLISH
Manual
한국어
사용설명서
ᇖ
ൗႯනଃඇ
INDONESIA
Buku Manual
TIẾNG VIỆTTIẾNG VIỆT
Hướng Dẫn Sử Dụng
Page 2
v
.2
Page 3
Page 4

Page 5
Make sure to read safety precautions, before use.
This product is using radio frequency , therefore please get an official
approval for use from national standardization.
It is prohibited from emission of omnidirectional RF and a point to multi-point data
transmission services of same information(data) by Law.
DWS-5800 Manual
5.8GHz DIGITAL WIRELESS MICROPHONE SYSTEM
ENGLISH
Page 6
1. Read these instructions.
2. Keep these instructions.
3. Heed all warnings.
4. Follow all instructions.
5. Do not use this apparatus near water.
6. Clean only with a dry cloth.
7. Install in accordance with the manufacturer’s instructions.
8. Do not install near any heat sources such as radiators, heat registers, stoves,
or other apparatus (including amplifiers) that produce heat.
9. Use only with a cart, stand, tripod, bracket, or table specified by the manufacturer,
or sold with the apparatus. When a cart is used, use caution when moving
the cart/ apparatus combination to avoid injury from tip-over.
10. Unplug this apparatus during lightning storms or when unused for long periods of time.
11. Refer all servicing to qualified service personnel. Servicing is required when the apparatus
has been damaged in any way, such as power-supply cord or plug is damaged,
liquid has been spilled or objects have fallen into the apparatus, the apparatus has been
exposed to rain or moisture, does not operate normally, or has been dropped.
12. Use the mains plug to disconnect the apparatus from the mains.
13. WARNING: TO REDUCE THE RISK OF FIRE OR ELECTRIC SHOCK, DO NOT EXPOSE
THIS APPARATUS TO RAIN OR MOISTURE.
14. DO NOT EXPOSE THIS EQUIPMENT TO DRIPPING OR SPLASHING AND ENSURE
THAT NO OBJECTS FILLED WITH LIQUIDS, SUCH AS VASES, ARE PLACED ON
THE EQUIPMENT.
TO PREVENT ELECTRIC SHOCK, DO NOT DISASSEMBLE THE PRODUCT.
NO USER SERVICEABLE PARTS INSIDE.
REFER SERVICING TO QUALIFIED SERVICE PERSONNEL.
Safety precaution
WATCH FOR THESE SYMBOLS:
The lightning bolt triangle is used to alert the user to the risk of electric shock.
The exclamation point triangle is used to alert the user to important operating
or maintenance instructions.
This device is designed and evaluated under the condition of 2000 meters tall
above sea level; and, it can be only used in locations below 2000 meters tall
above sea level. Using the device above 2000 meters altitude would result
in high safety risk.
6
Page 7
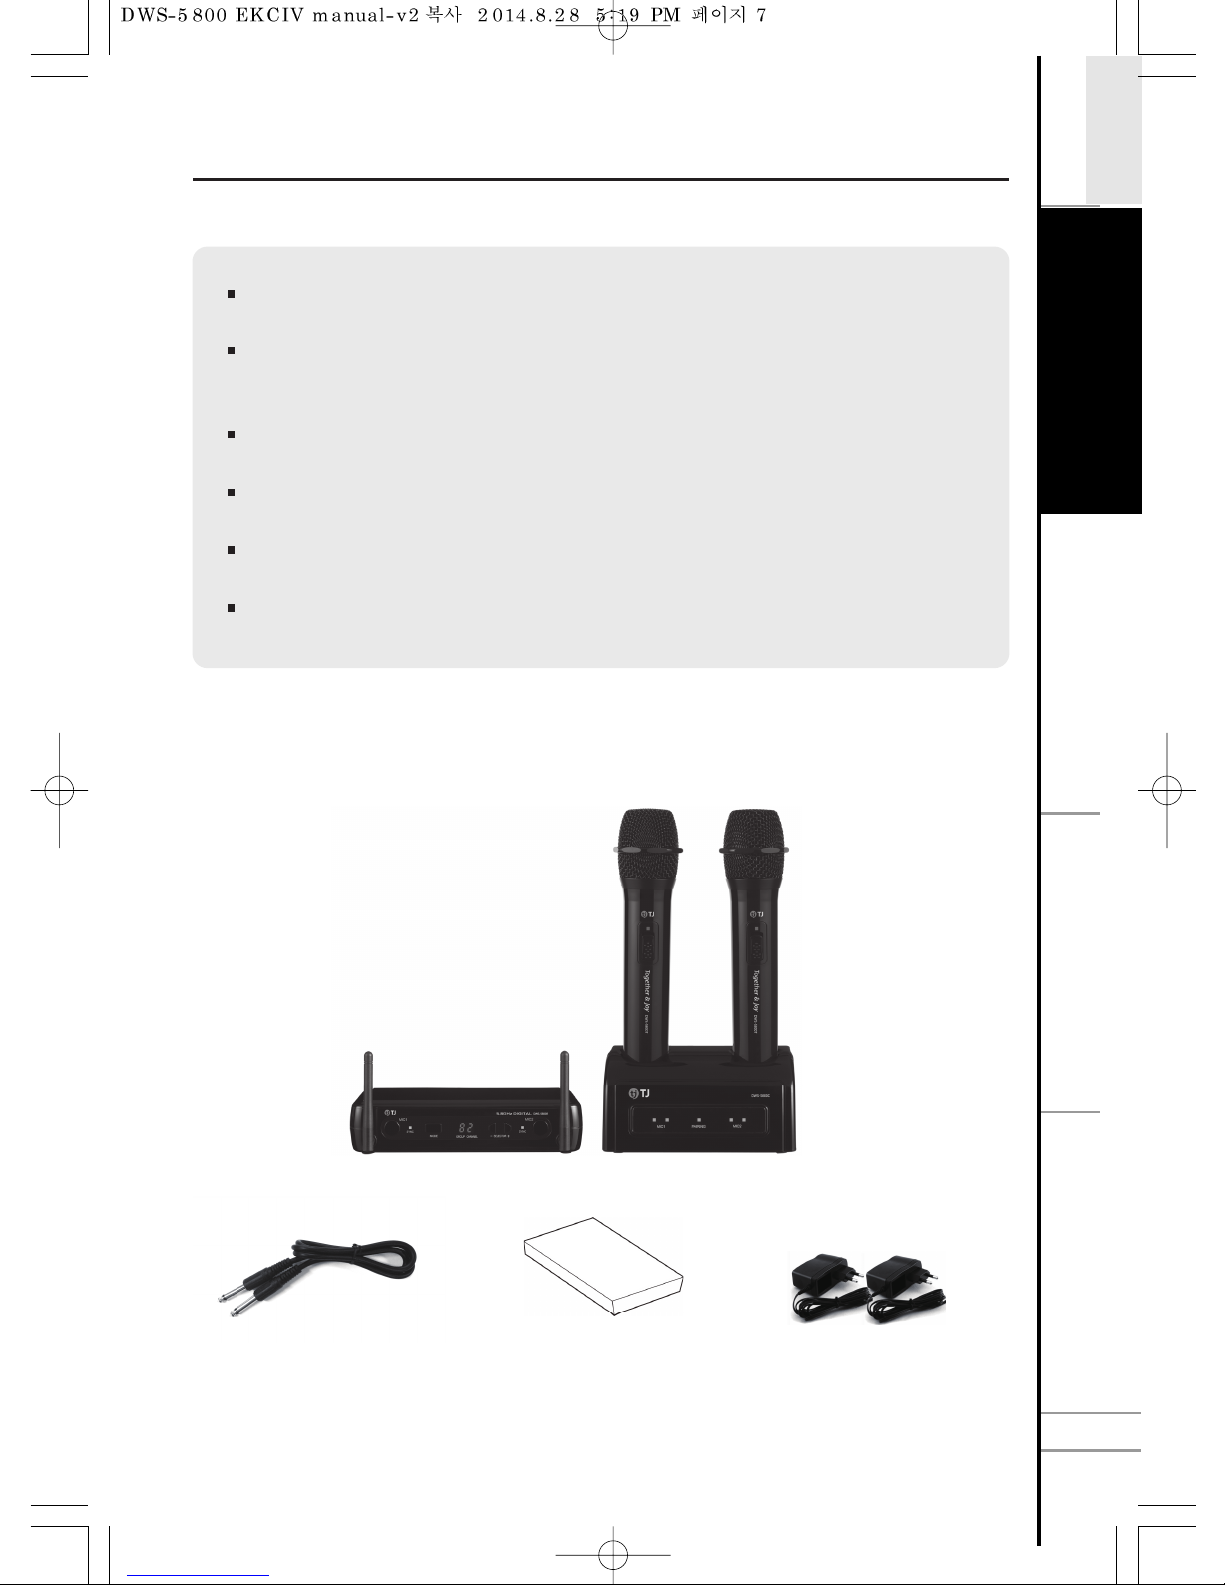
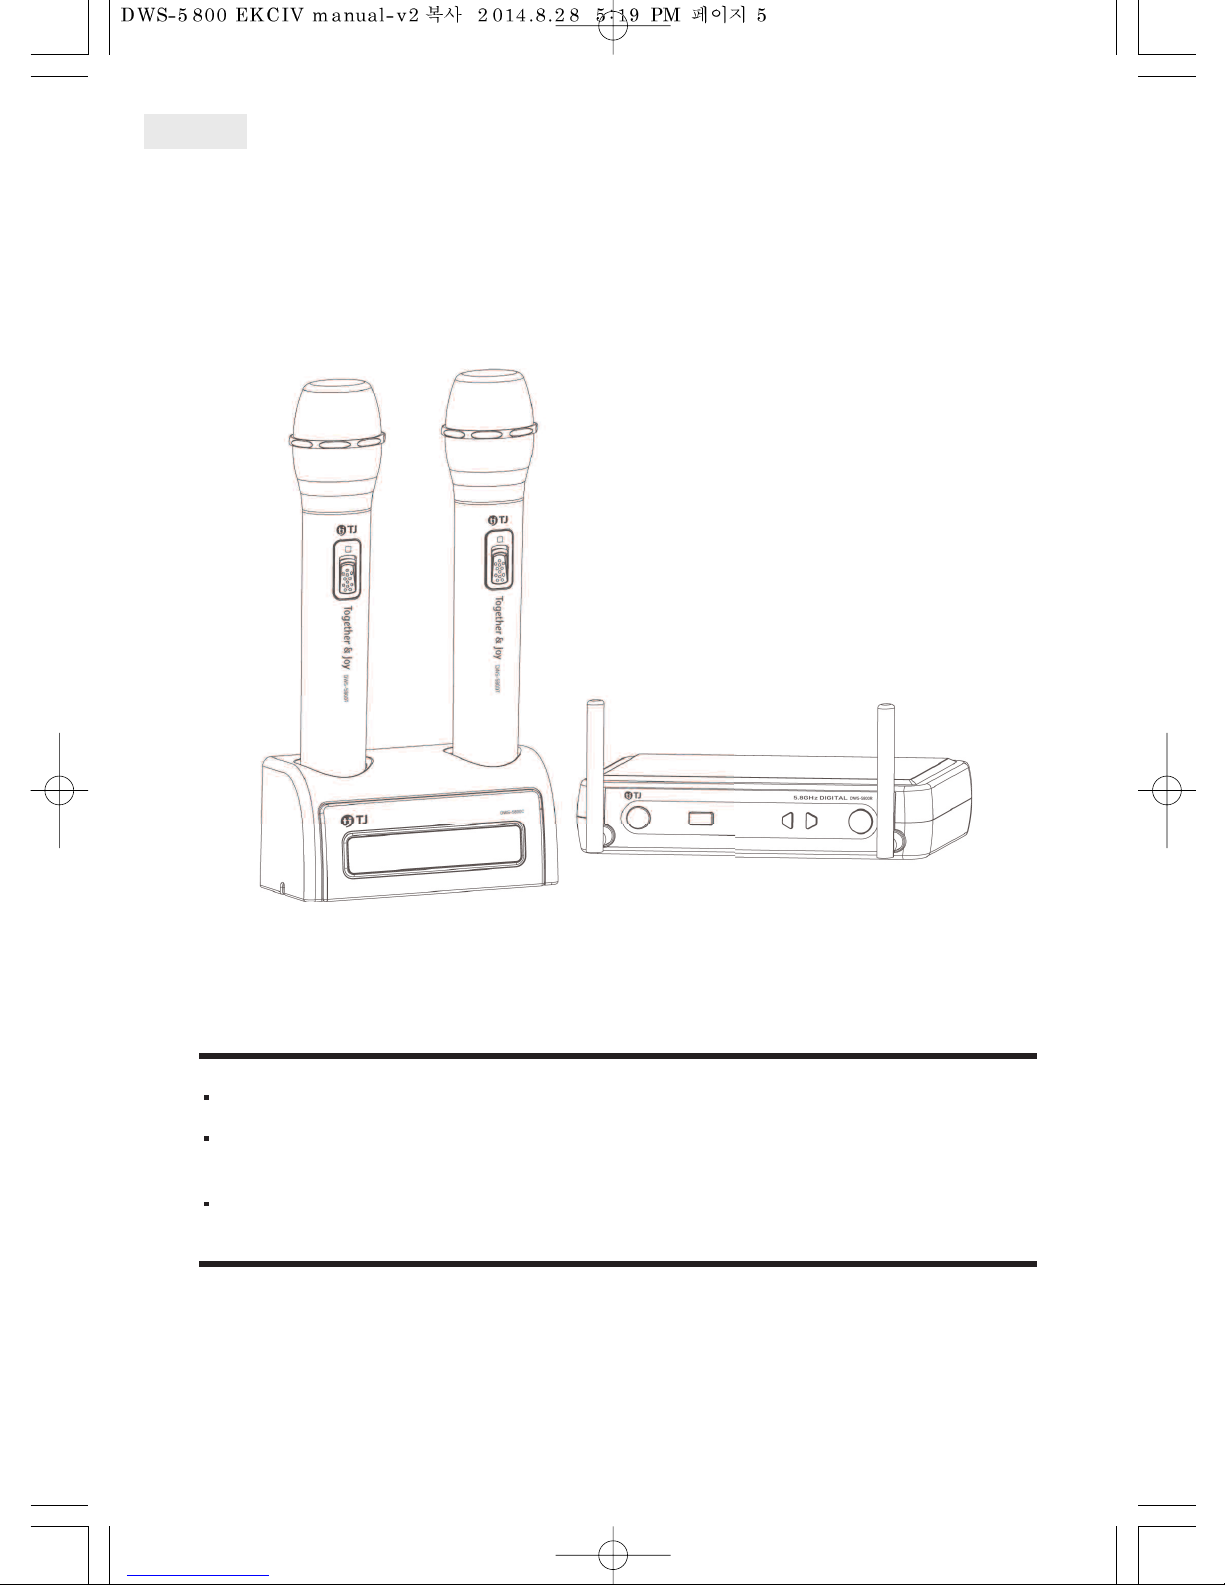
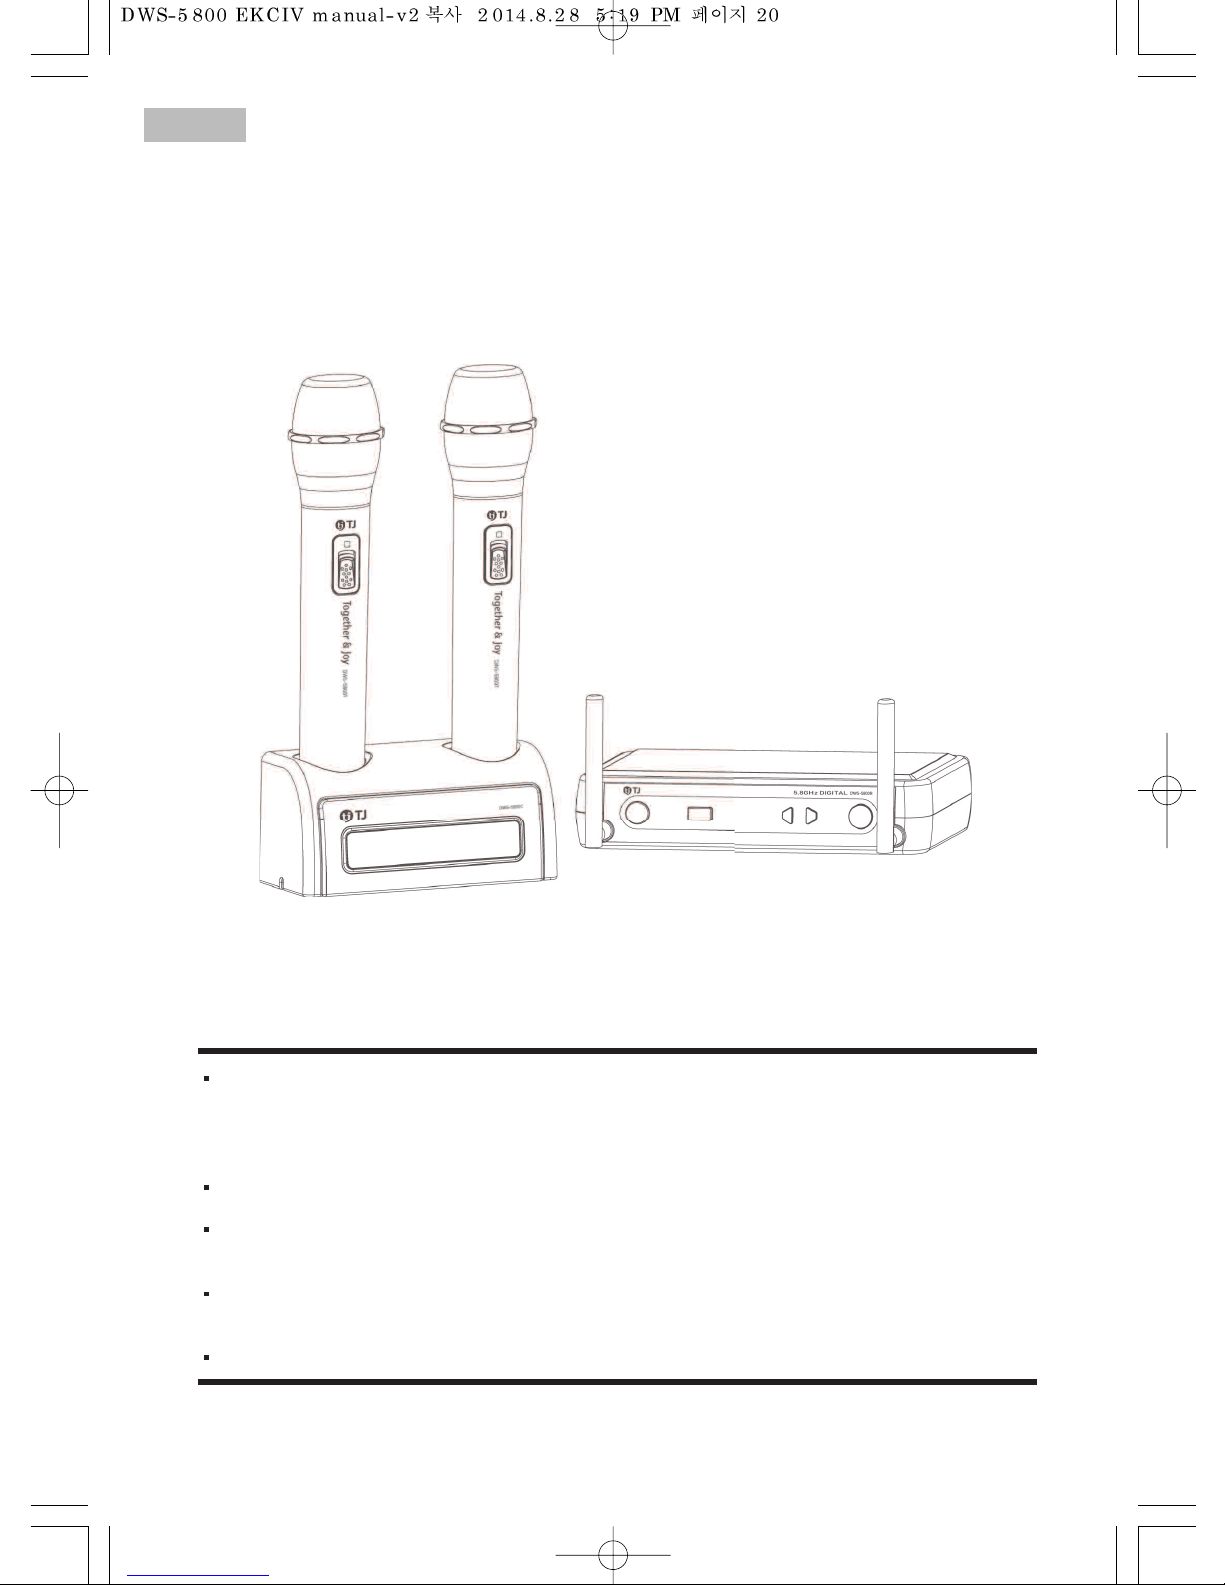
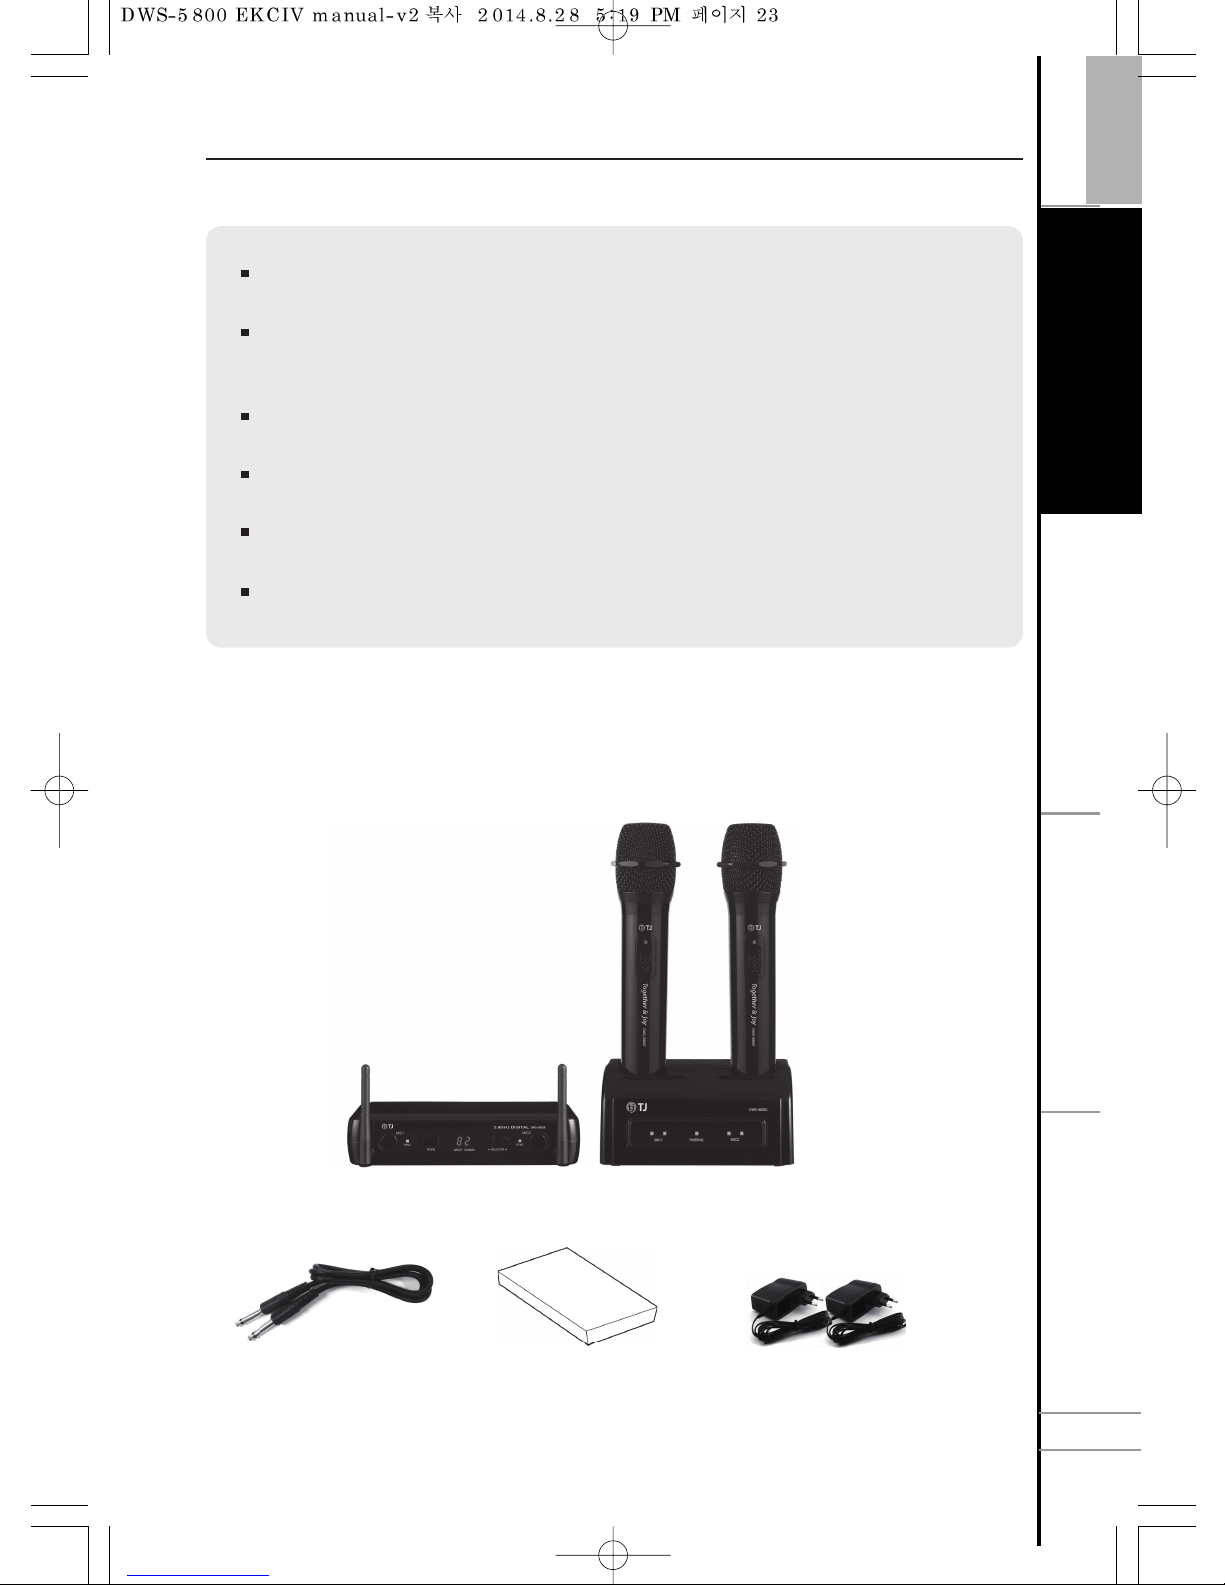
The world first 5.8 GHz digital wireless microphone
Support maximum 85 channels (1 Channel = 2 Microphones),
170 microphones at the same time
Best vocal microphone of 24bit & 96KHz sample rate
Luxury & solid high glossy design
Easy pairing between transmitter and receiver
Easy channel setting of transmitter via charging cradle
Microphone cable Manual 12V, 1.5A Adaptor(2 EA)
Transmitter (2 PCS)
Charging cradleReceiver
DWS-5800 Features
Accessories
7
E
T
C
.
S
A
F
E
T
Y
ENGLISH
S
Y
S
T
E
M
S
E
T
T
I
N
G
C
O
N
N
E
C
T
I
O
N
7
Page 8
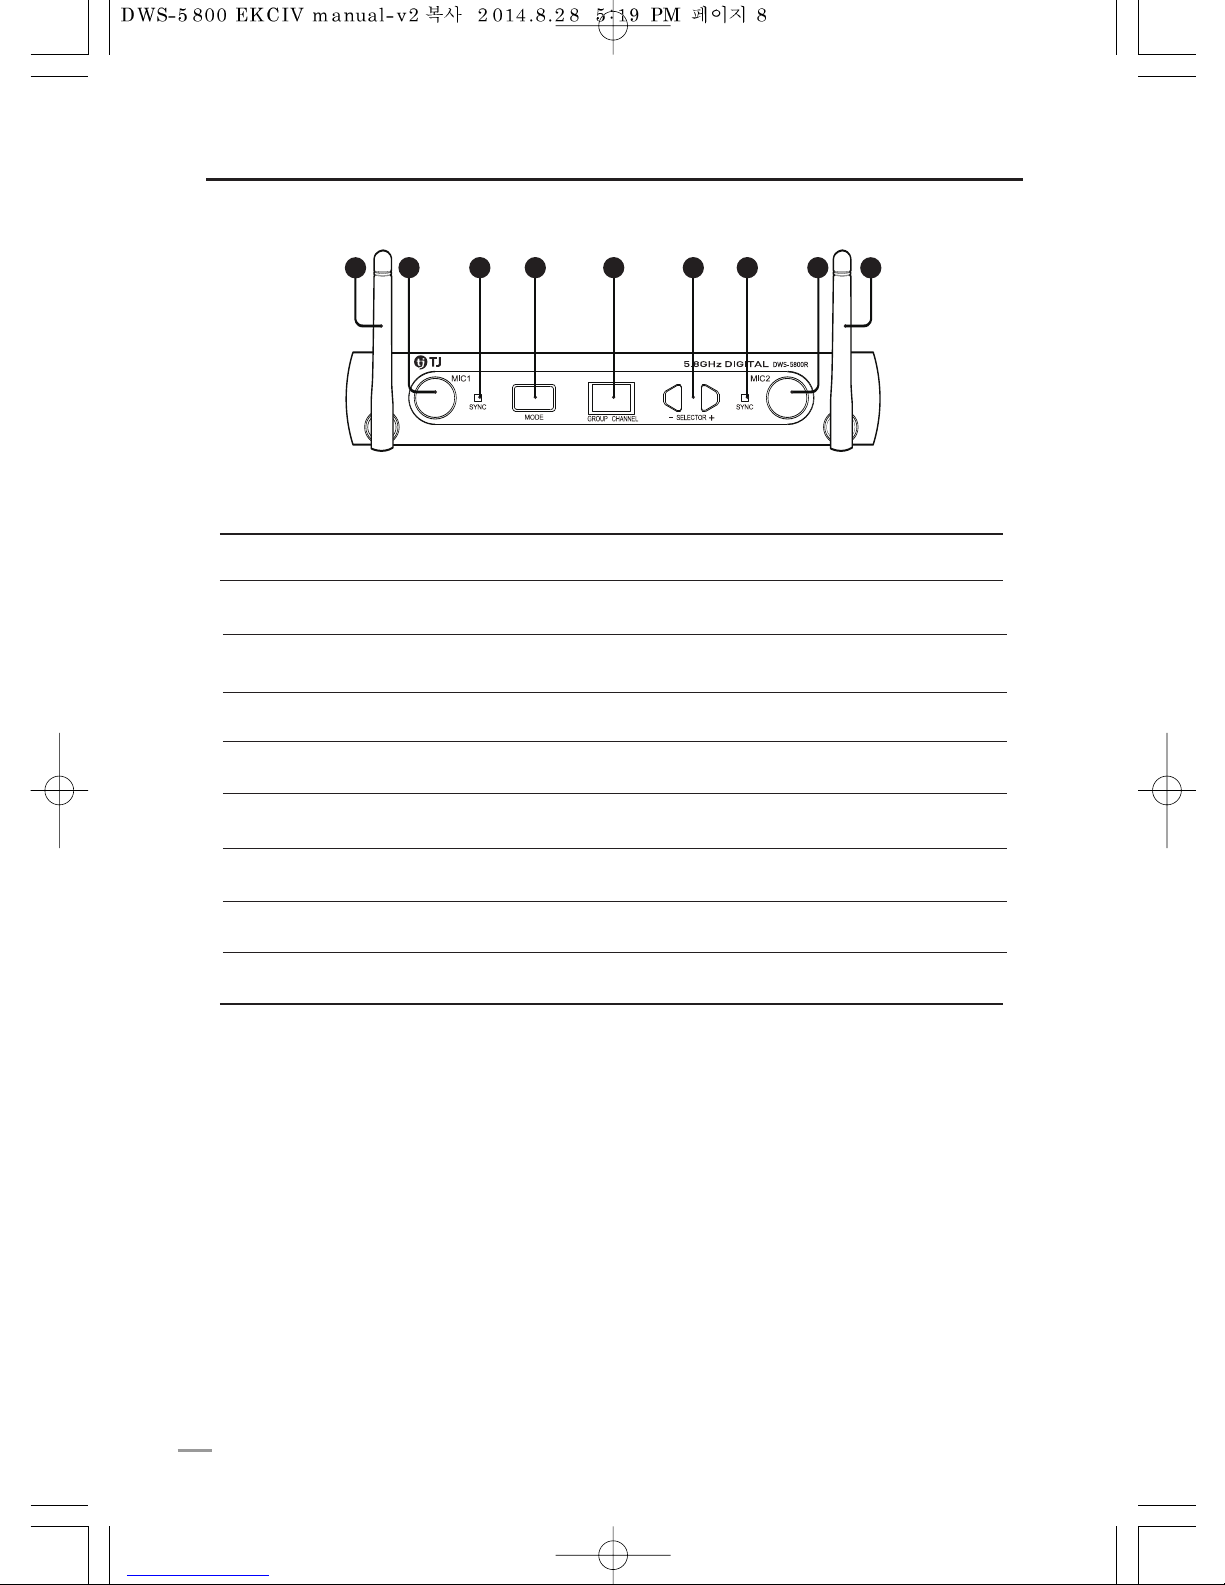
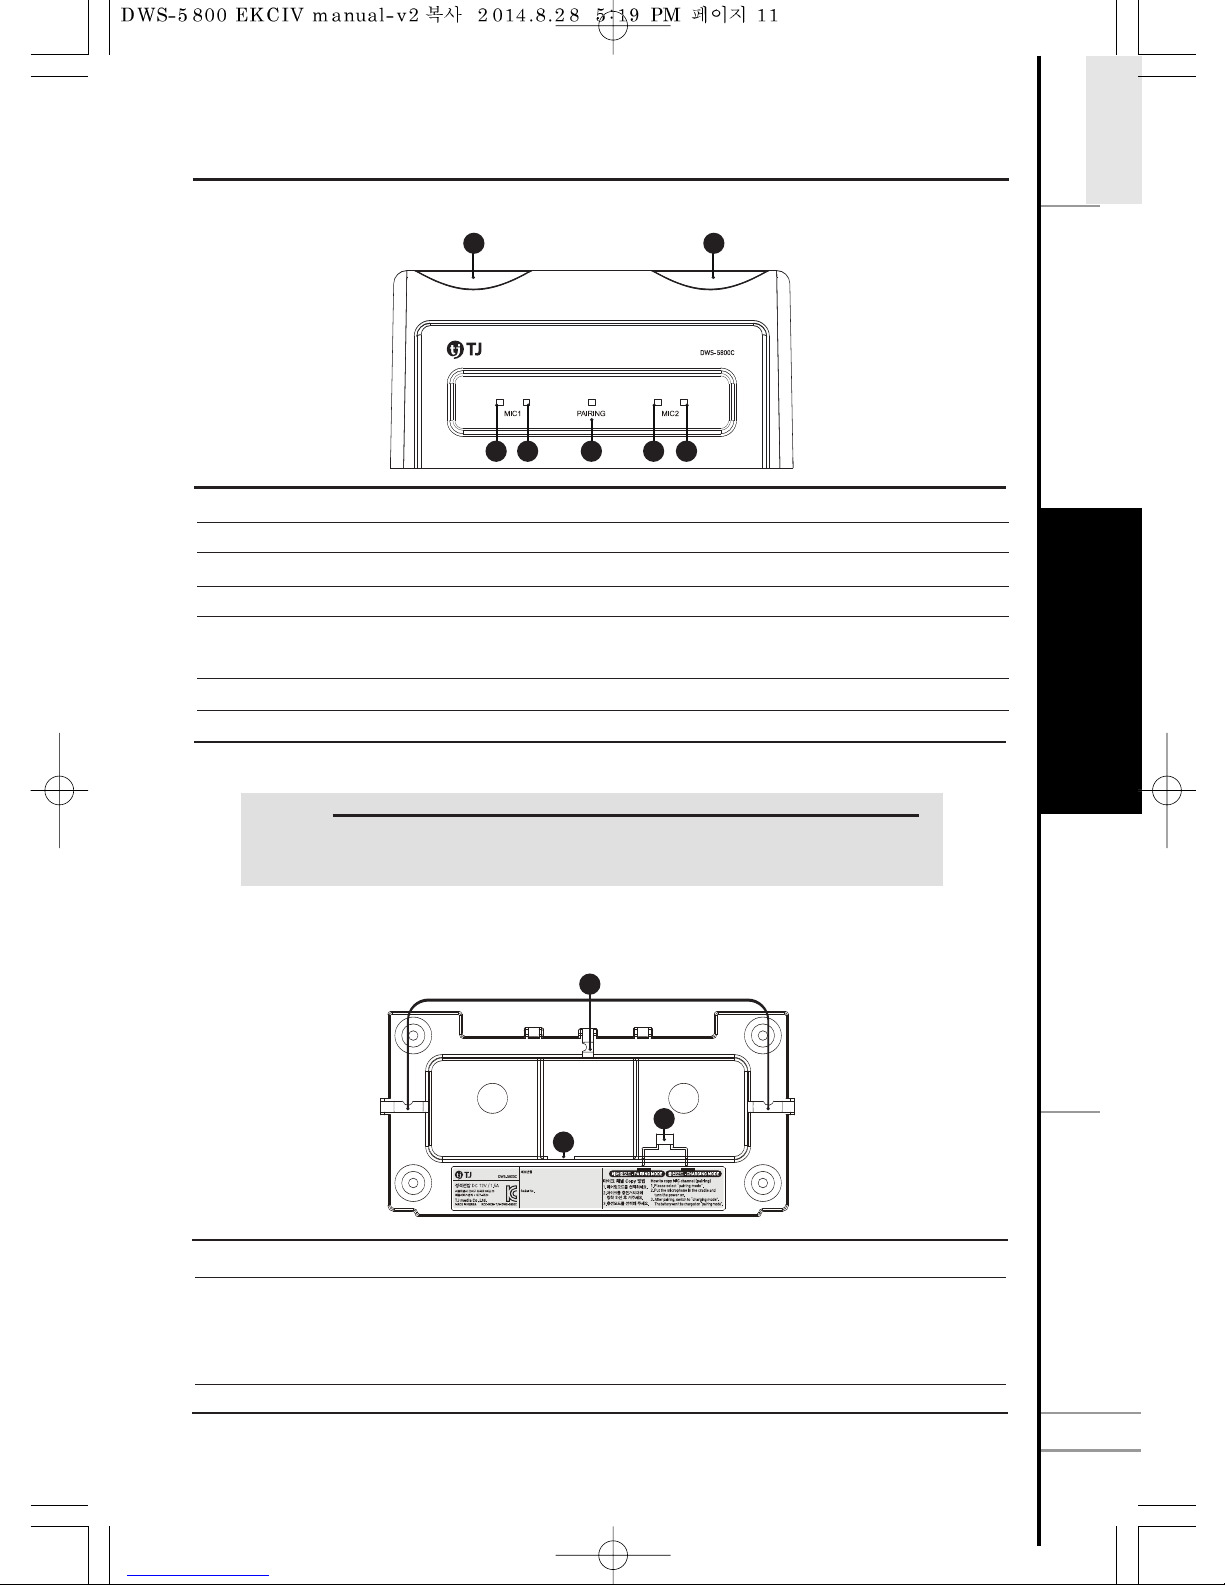
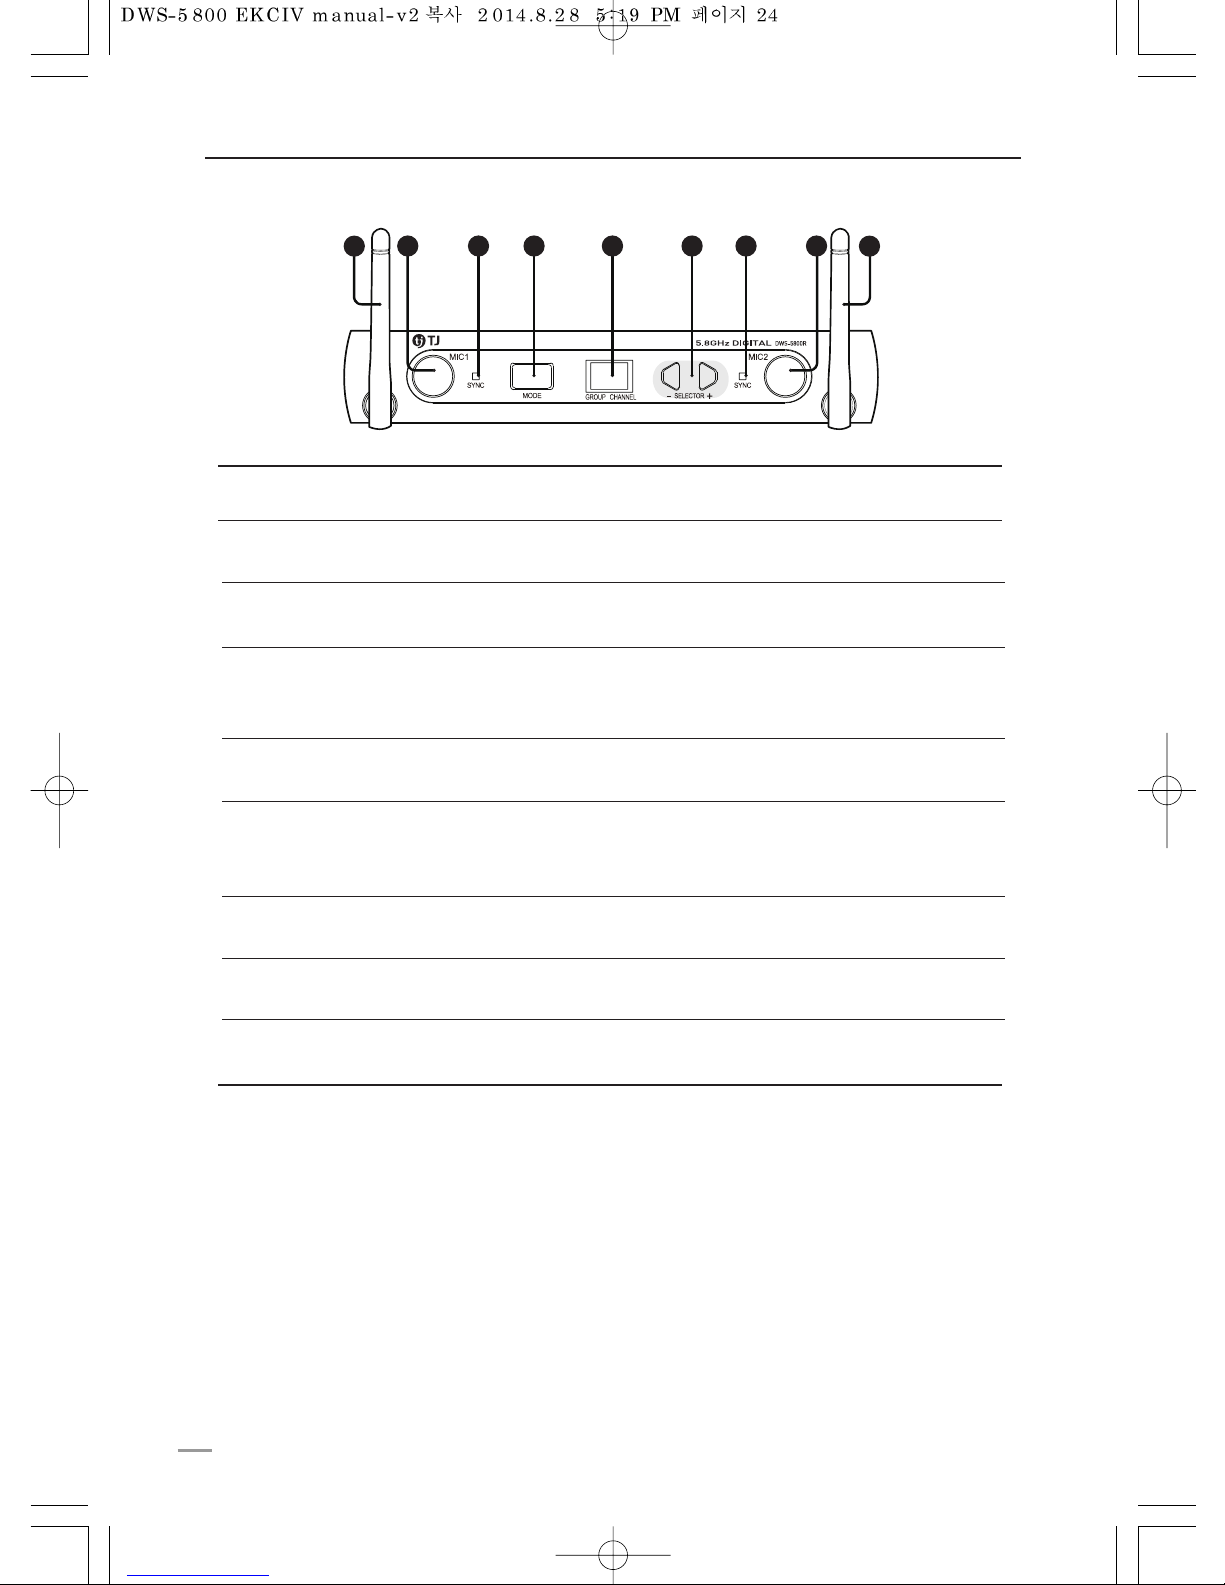
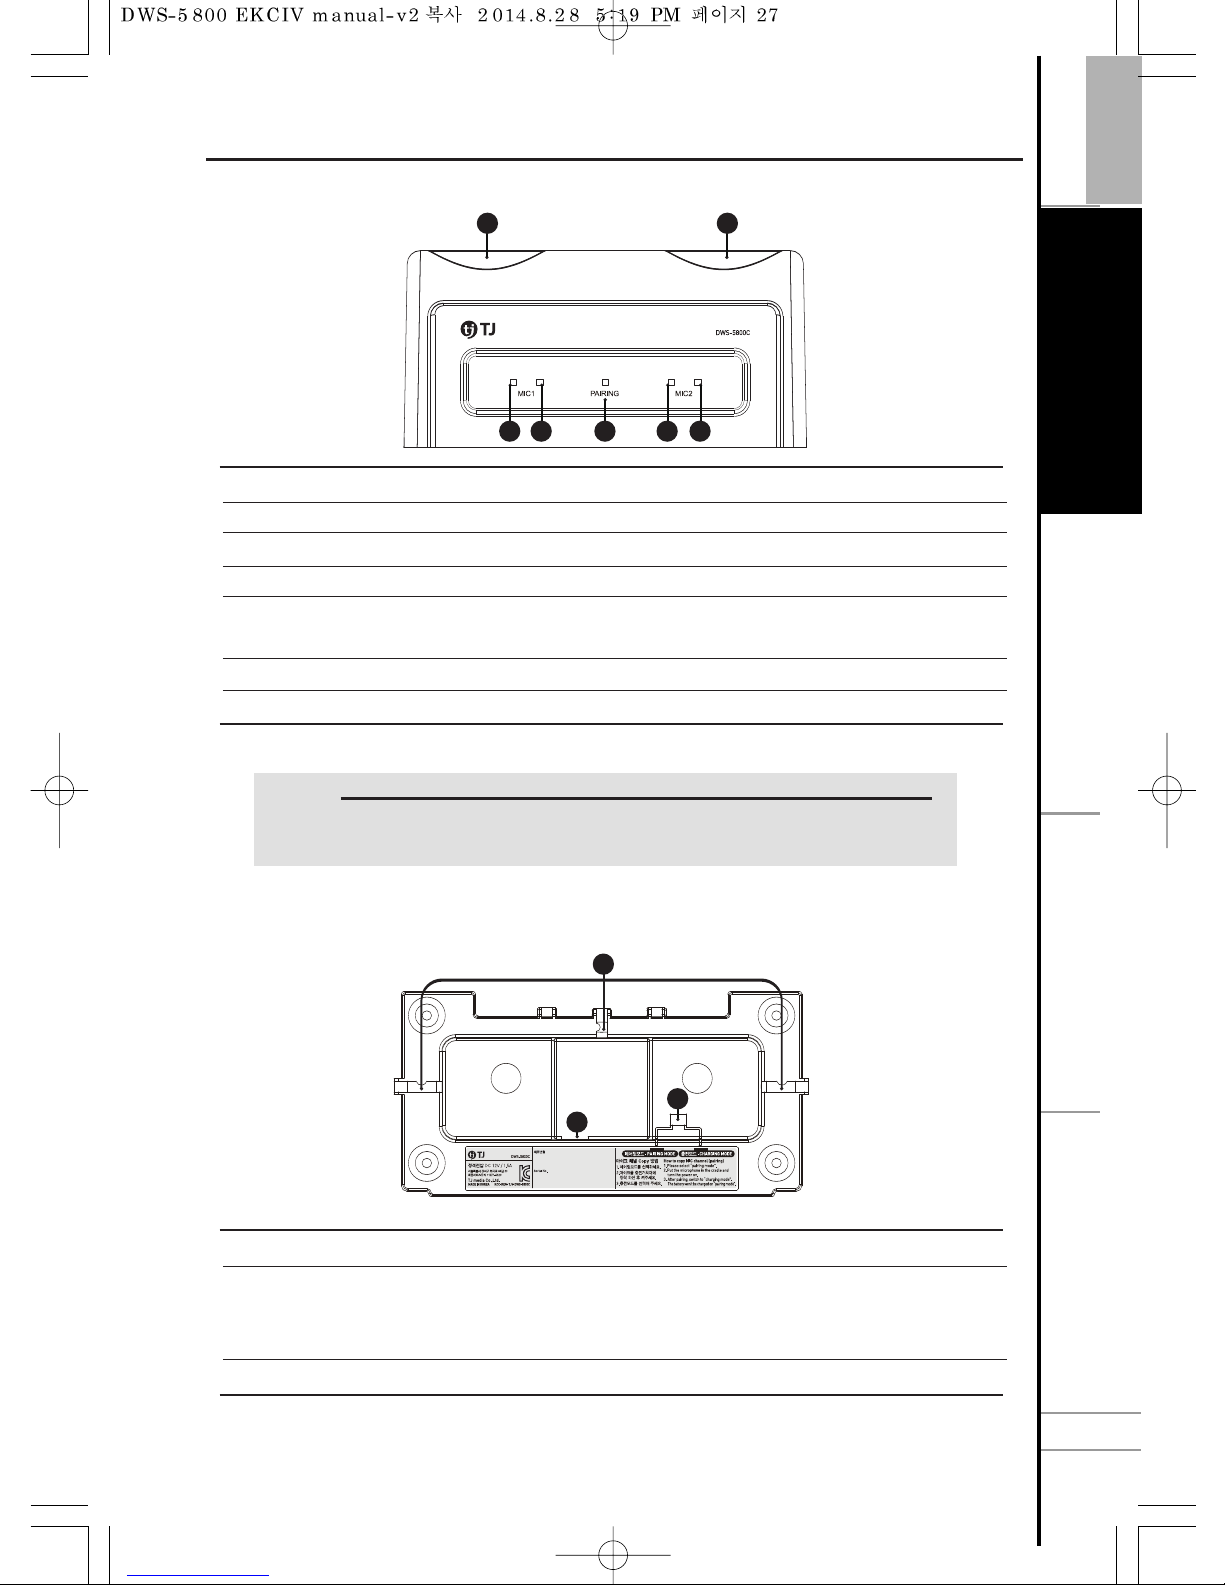
1 Antenna
2 Pairing switch for MIC1
3 Indicator for sync MIC1
4 MODE
5 Display screen
6 Selector
7 Indicator for sync MIC2
8 Pairing switch for MIC2
9 antenna
*For more detail of operating, please refer to “SYSTEM SETTING”.
External antenna for MIC1
Tact switch for pairing MIC1
MIC1 Light for connection, blinking on request MIC1 pairing
Multi-purpose button : While in pairing process
Indicator for group and channel
Change channel and group using ‘+’ and ‘-’.
MIC2 Light for connection, blinking on request MIC2 pairing
Tact switch for pairing MIC2
External antenna for MIC2
Receiver operation manual (front)
82
1 9
2 83 4 5 6 7
8
Page 9
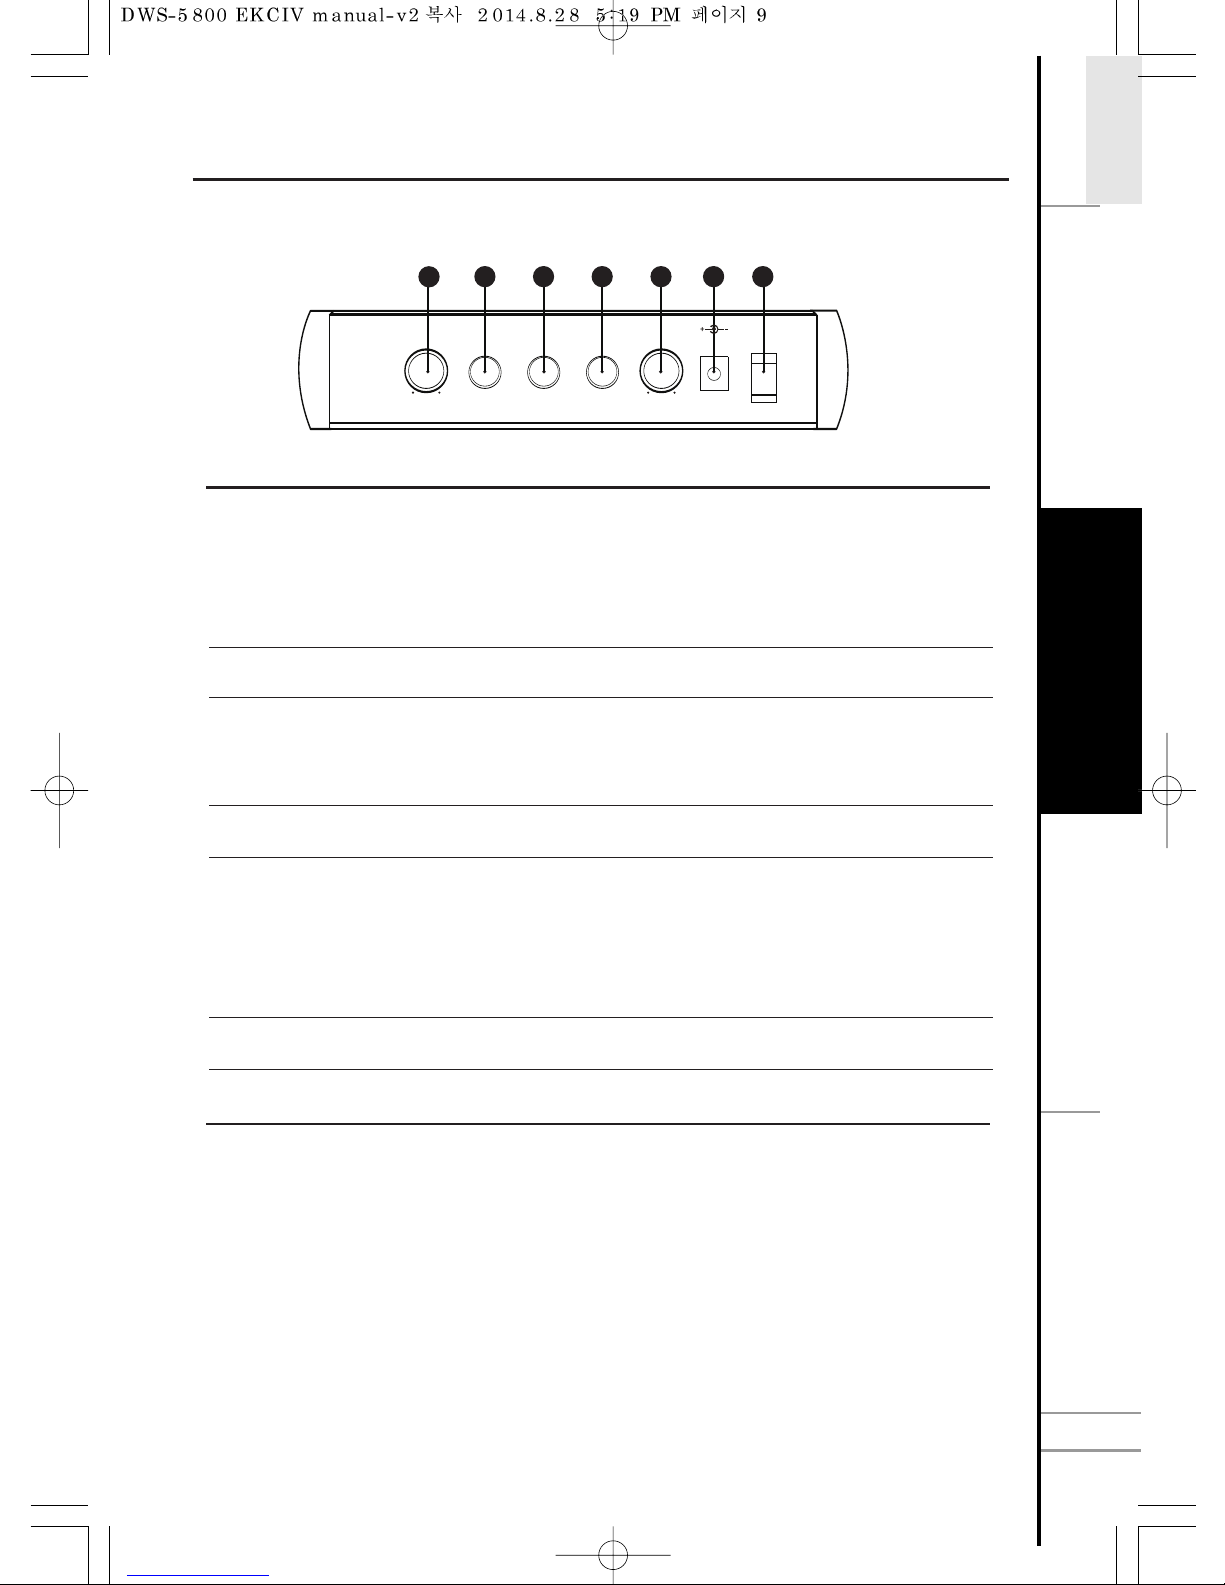
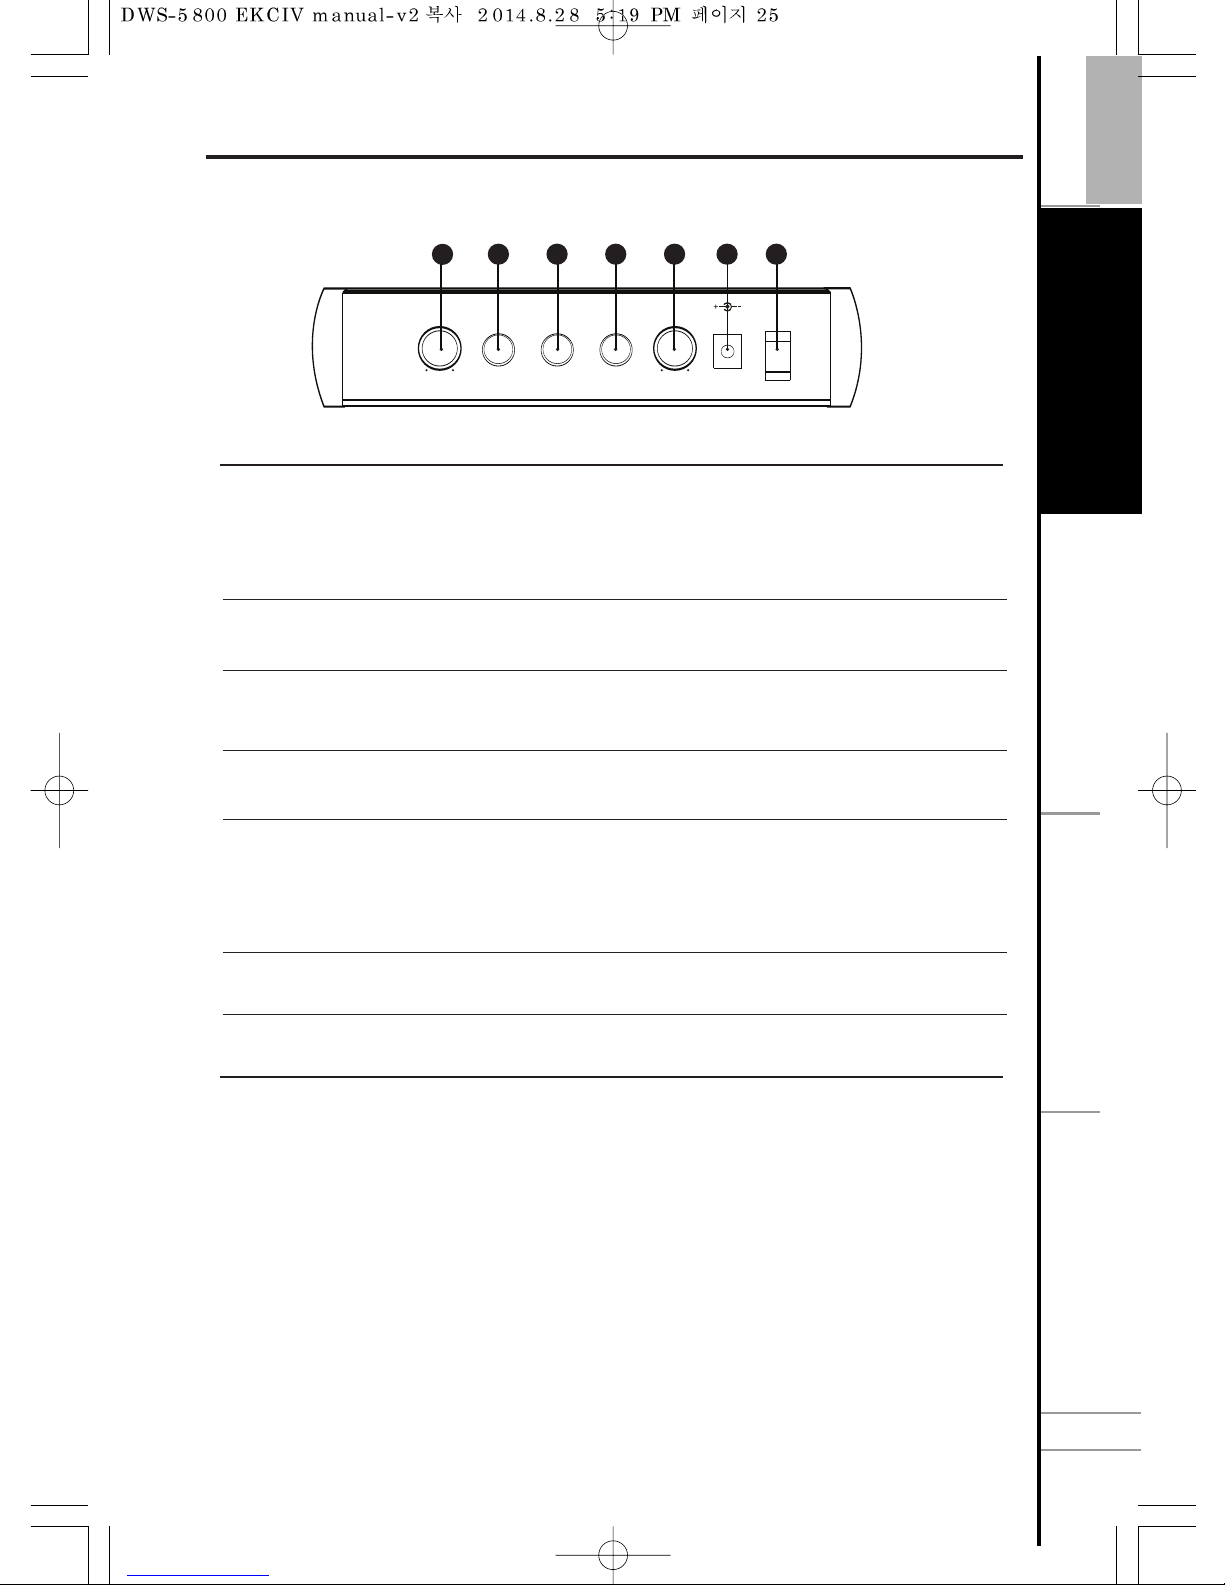
1 VOL 2
2 MIC 2
3 MIX
4 MIC 1
5 VOL 1
6 DC12V 1.5A
7 POWER ON/OFF
Adjust output volume for MIC2.
- Recommend to set the knob to 12’o clock direction(Center).
- MIC 2 sound could be distorted when adjusting the volume
of VOL2 according to input sensitivity of MIC preamp.
- Please adjust VOL2 adequately not to be distorted.
¼Jack output connector for MIC2.
¼Jack output signal connector for MIC1 and MIC2.
If the input gain from MIC preamp is not loud enough,
please adjust MIX knob.
¼Jack output connector for MIC1.
Adjust output volume for MIC1.
- Recommend to set the knob to 12’o clock direction(Center).
- MIC 1 sound could be distorted when adjusting the volume
of VOL1 according to input sensitivity of MIC preamp.
- Please adjust VOL1 adequately not to be distorted.
DC adaptor connector. (DC12V 1.5A only)
Power on/off switch for receiver.
Receiver operation manual (back)
2
1
2 3 4 5 6 7
VOL 2VOL 2 MIC 2MIC 2 MIXMIX MIC 1MIC 1 VOL 1VOL 1 DC12V 1.5ADC12V 1.5A POWERPOWER
MINMIN MAXMAX MINMIN MAXMAX
ONON
OFFOFF
S
A
F
E
T
Y
E
T
C
.
C
O
N
N
E
C
T
I
O
N
ENGLISH
S
Y
S
T
E
M
S
E
T
T
I
N
G
9
Page 10
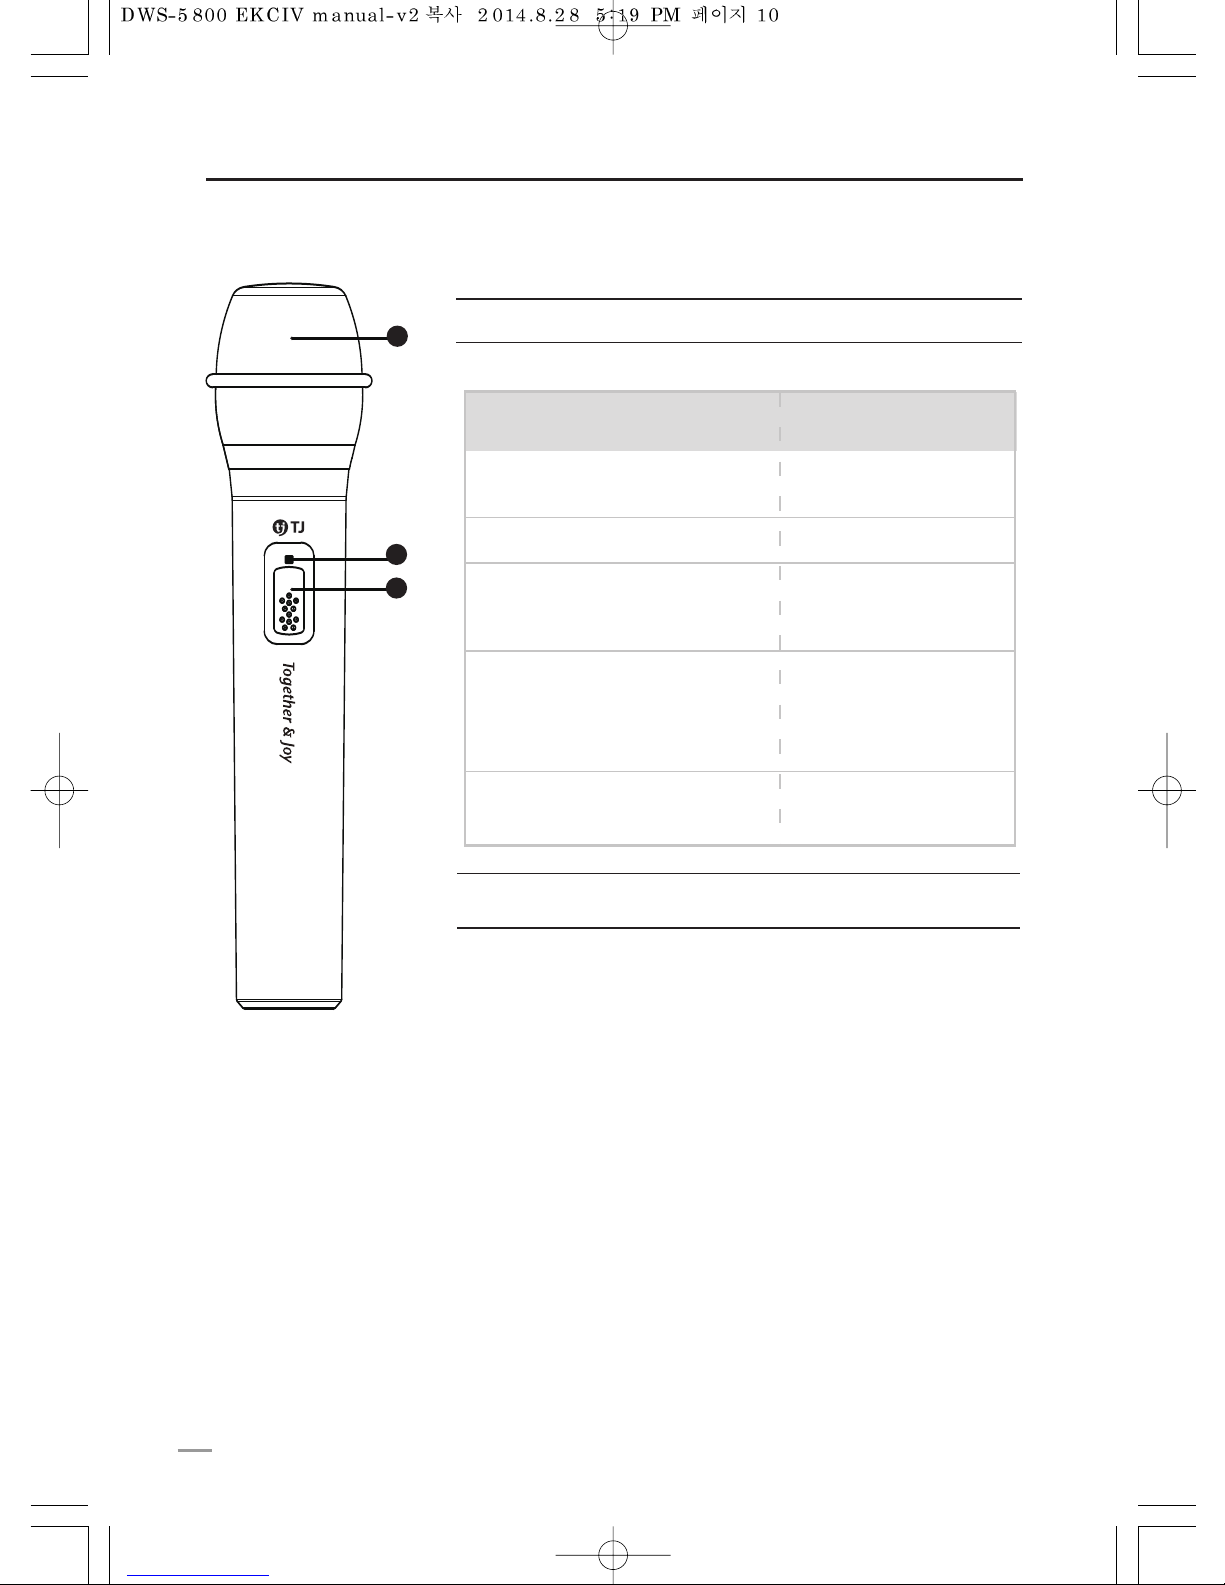
1 MIC ball
2 Lamp
*For more detail in power switch, please refer to ‘SYSTEM SETTING’ page.
MIC cartridge protector
Indicate status, control and alerting of transmitter.
3 Power switch
Pairing and on/off power switch for transmitter.
Indication of Lamp LED Status
Indication of
Transmitter Status
Yellow LED blinks for a second and off.
→
Green LED blinks every 4 second.
Unpaired.
Yellow LED blinks for a second and off.
Transmitter is turned off.
Red LED is on.
Warning indicator of
low battery.
(just before power
shut down)
Red LED blinks.
MIC is on during
charging battery.
Yellow
→
Green LED blinks.
(every 2sec/10 times)
→
Red LED is on.
Low battery indicator.
Microphone(Transmitter) operation manual
1
2
3
DWS-5800T
10
Page 11
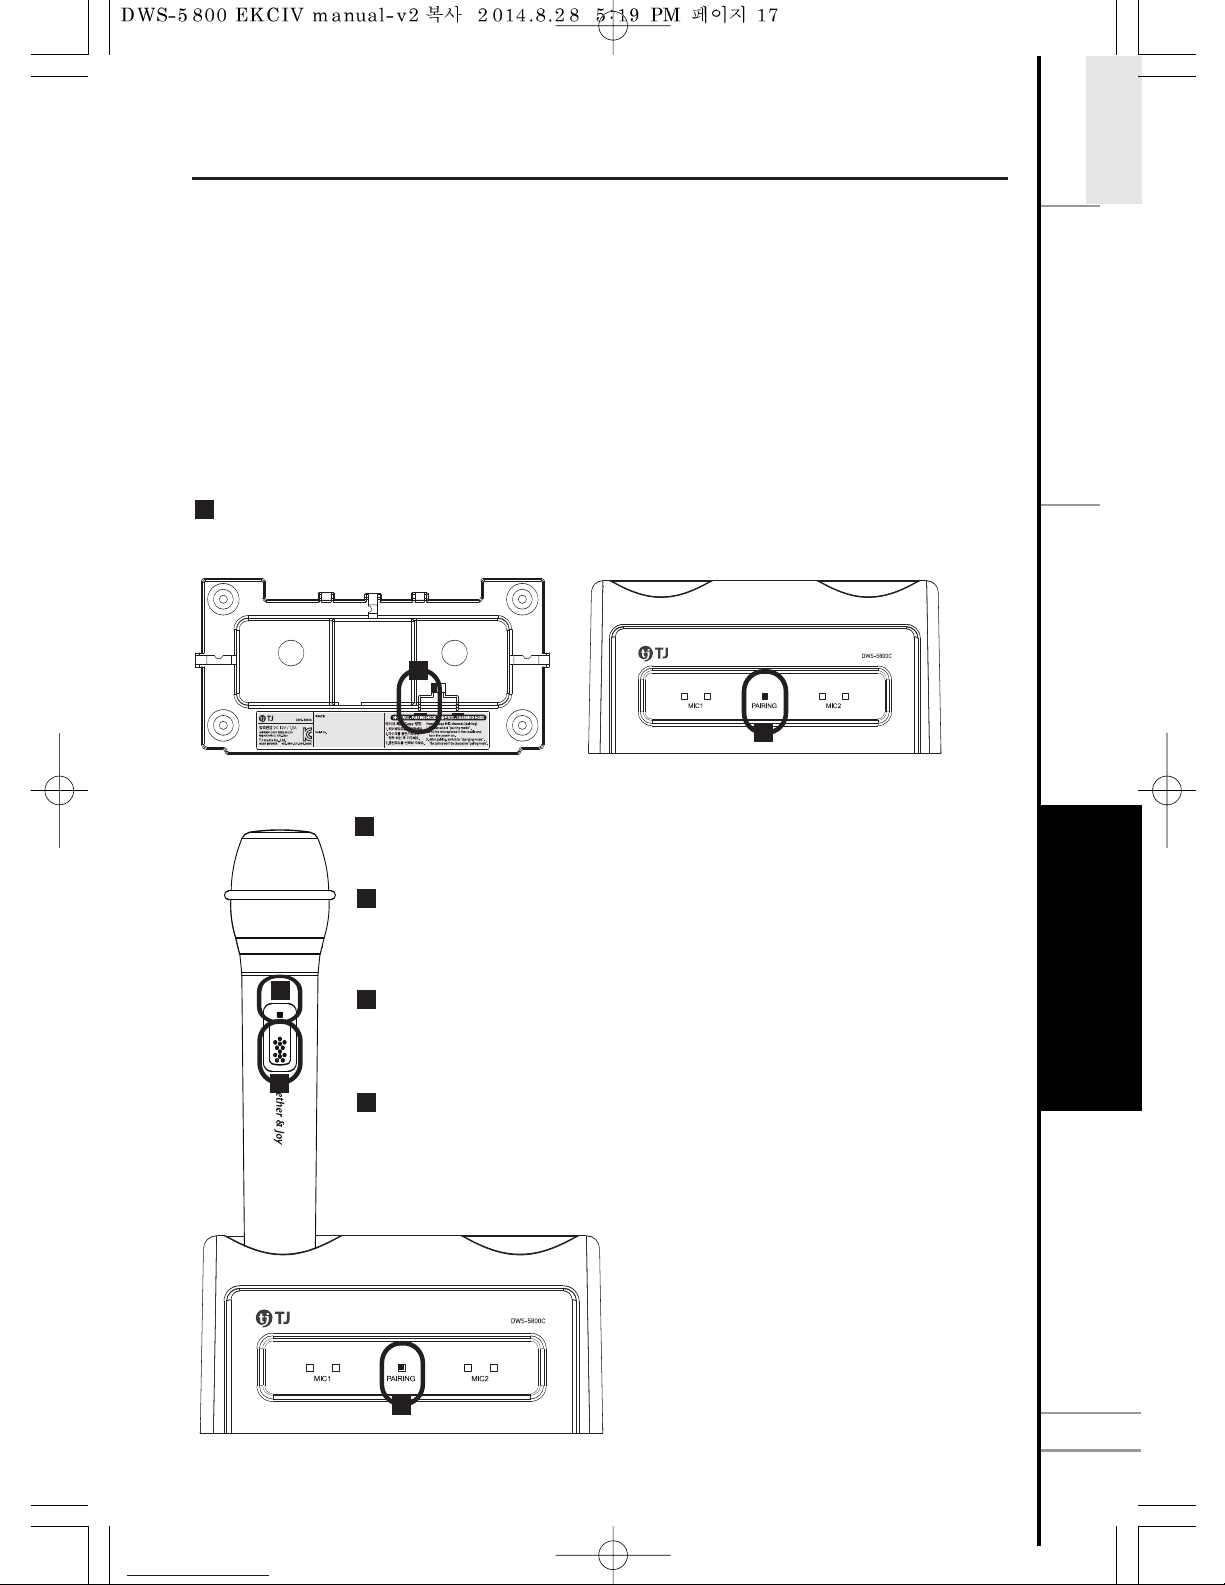
Charging and paring cradle for MIC1 transmitter.
Charging and paring cradle for MIC2 transmitter.
Red light is on during charging MIC 1 (transmitter).
Green light on MIC1 indicates battery fully charged.
If the pairing switch on the bottom of the charging cradle
is selected to “pairing mode”, the white light will be on.
Red light is on during charging MIC 2 (transmitter).
Green light on MIC2 indicates battery fully charged.
*For more detail of pairing through charging cradle, please refer to “How to pair with charging cradle”.
1 Cradle of MIC1 transmitter
2 Cradle of MIC2 transmitter
3 Charging indication light of MIC1
4 Fully charged indication light of MIC1
5 Pairing light
6 Charging Indication light of MIC2
7 Fully charged indication light of MIC2
- Pairing Mode : Pairing channels between the
transmitter and the charging cradle.
(Only for when in installation)
- Charger mode : For charging the transmitter.
1 Adaptor connector
2 Mode Switch
3 Cable guide for adaptor
Charging cradle operation manual (front)
Charging cradle operation manual (bottom)
2
1 2
3 4 6 75
1
2
3
Please switch off when charging the transmitter (MIC).
If the transmitter is on, green LED blinks quickly and repeatedly for caution.
Caution
S
A
F
E
T
Y
E
T
C
.
C
O
N
N
E
C
T
I
O
N
ENGLISH
S
Y
S
T
E
M
S
E
T
T
I
N
G
11
Page 12
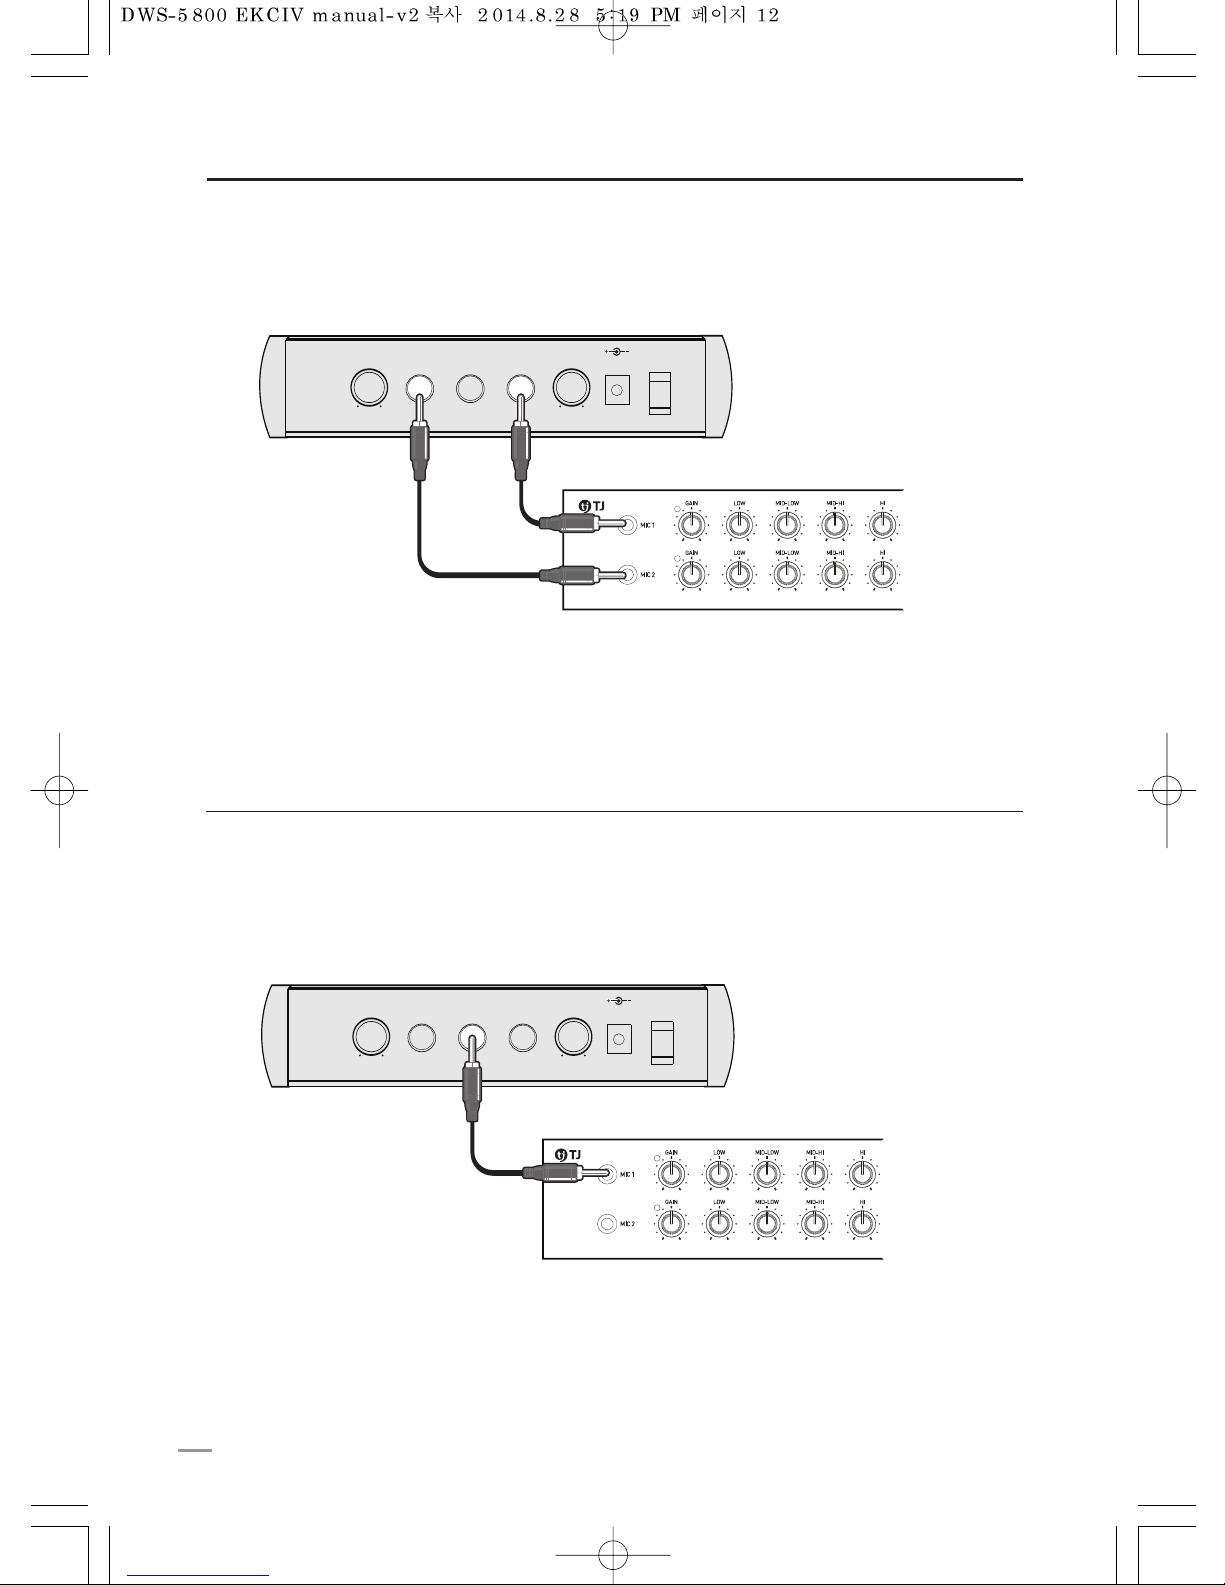
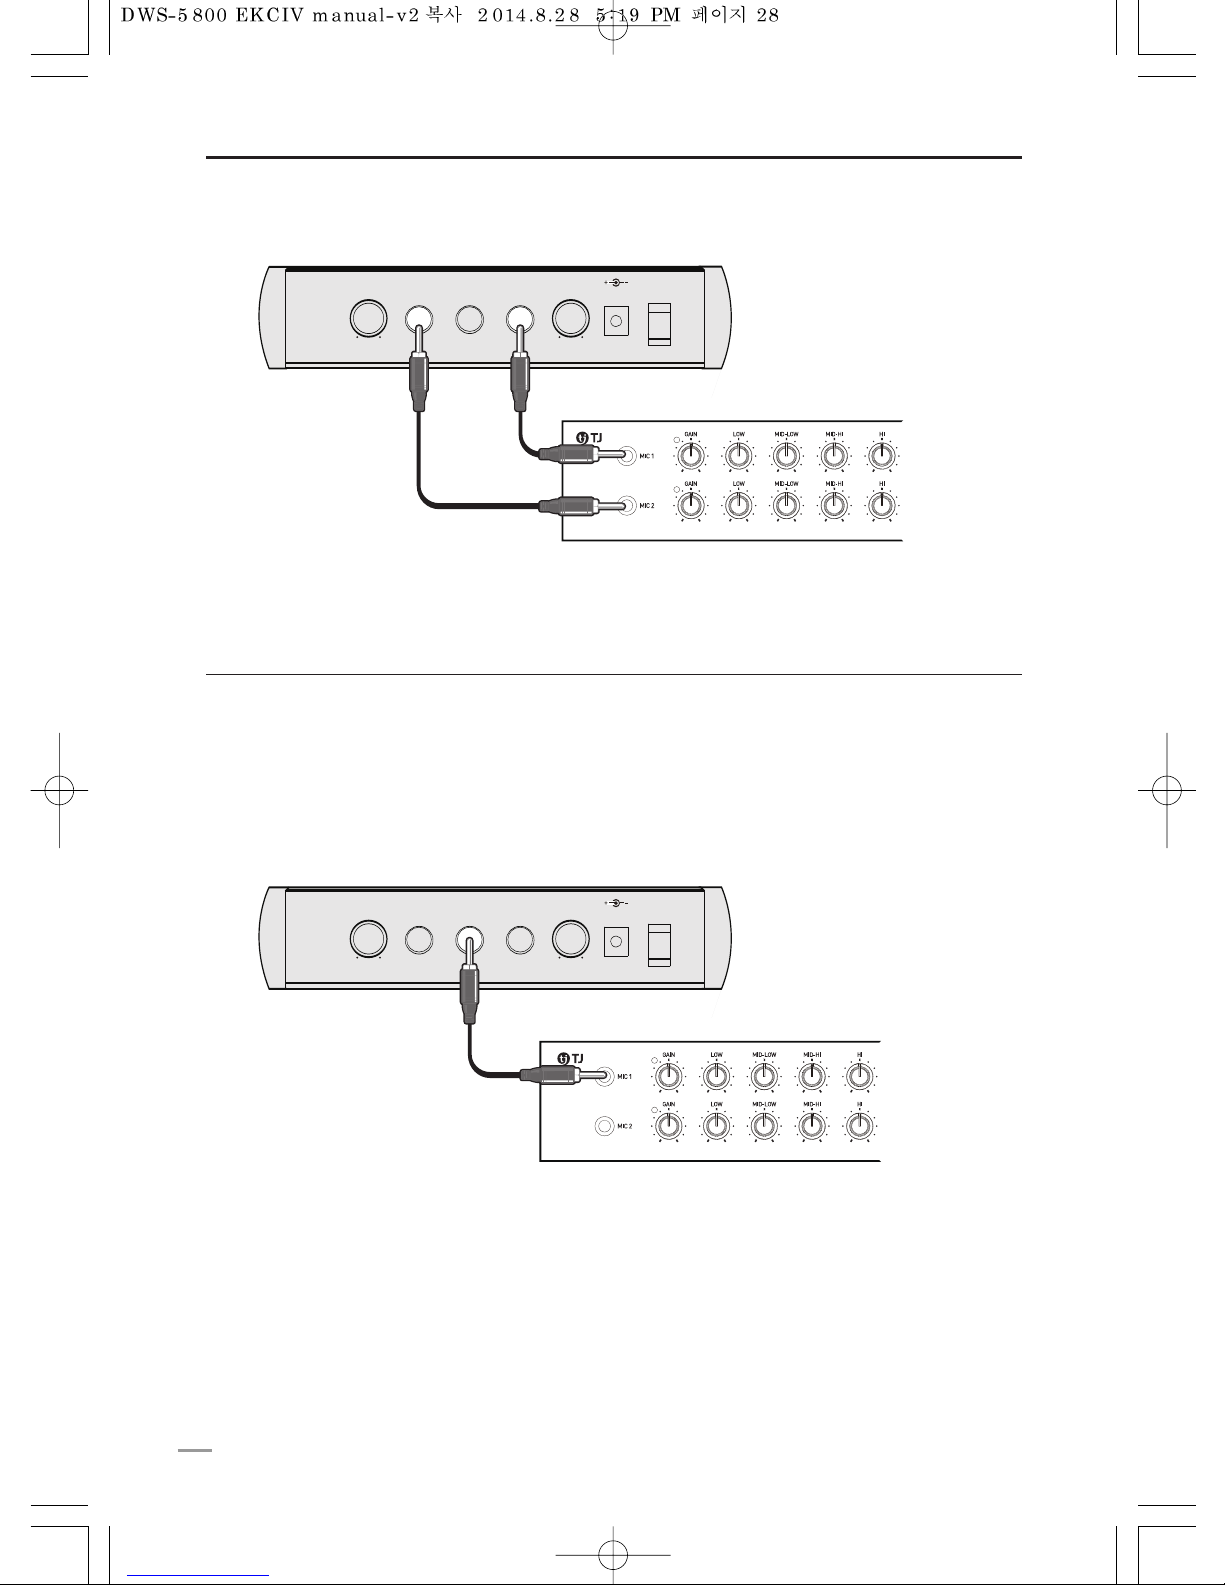
Connection with effector or powered mixer amplifier
Connection of microphones with ‘Mix’ output
Connecting with MIC input of powered mixer amplifier or effector.
‘Mix’ output makes it possible for the outputs of individual 2 microphones to be mixed in 1 output.
So, even if there is only one microphone input in your mixer, amplifier or karaoke machine,
you can use 2 microphones at the same time using ‘Mix’ output of DWS-5800.
VOL 2VOL 2 MIC 2MIC 2 MIXMIX MIC 1MIC 1 VOL 1VOL 1 DC12V 1.5ADC12V 1.5A POWERPOWER
MINMIN MAXMAX MINMIN MAXMAX
ONON
OFFOFF
¼ Jack
Individual connection of microphone(s)
Connecting with MIC input of powered mixer amplifier or effector.
VOL 2VOL 2 MIC 2MIC 2 MIXMIX MIC 1MIC 1 VOL 1VOL 1 DC12V 1.5ADC12V 1.5A POWERPOWER
MINMIN MAXMAX MINMIN MAXMAX
ONON
OFFOFF
¼ Jack
¼ Jack
12
Page 13
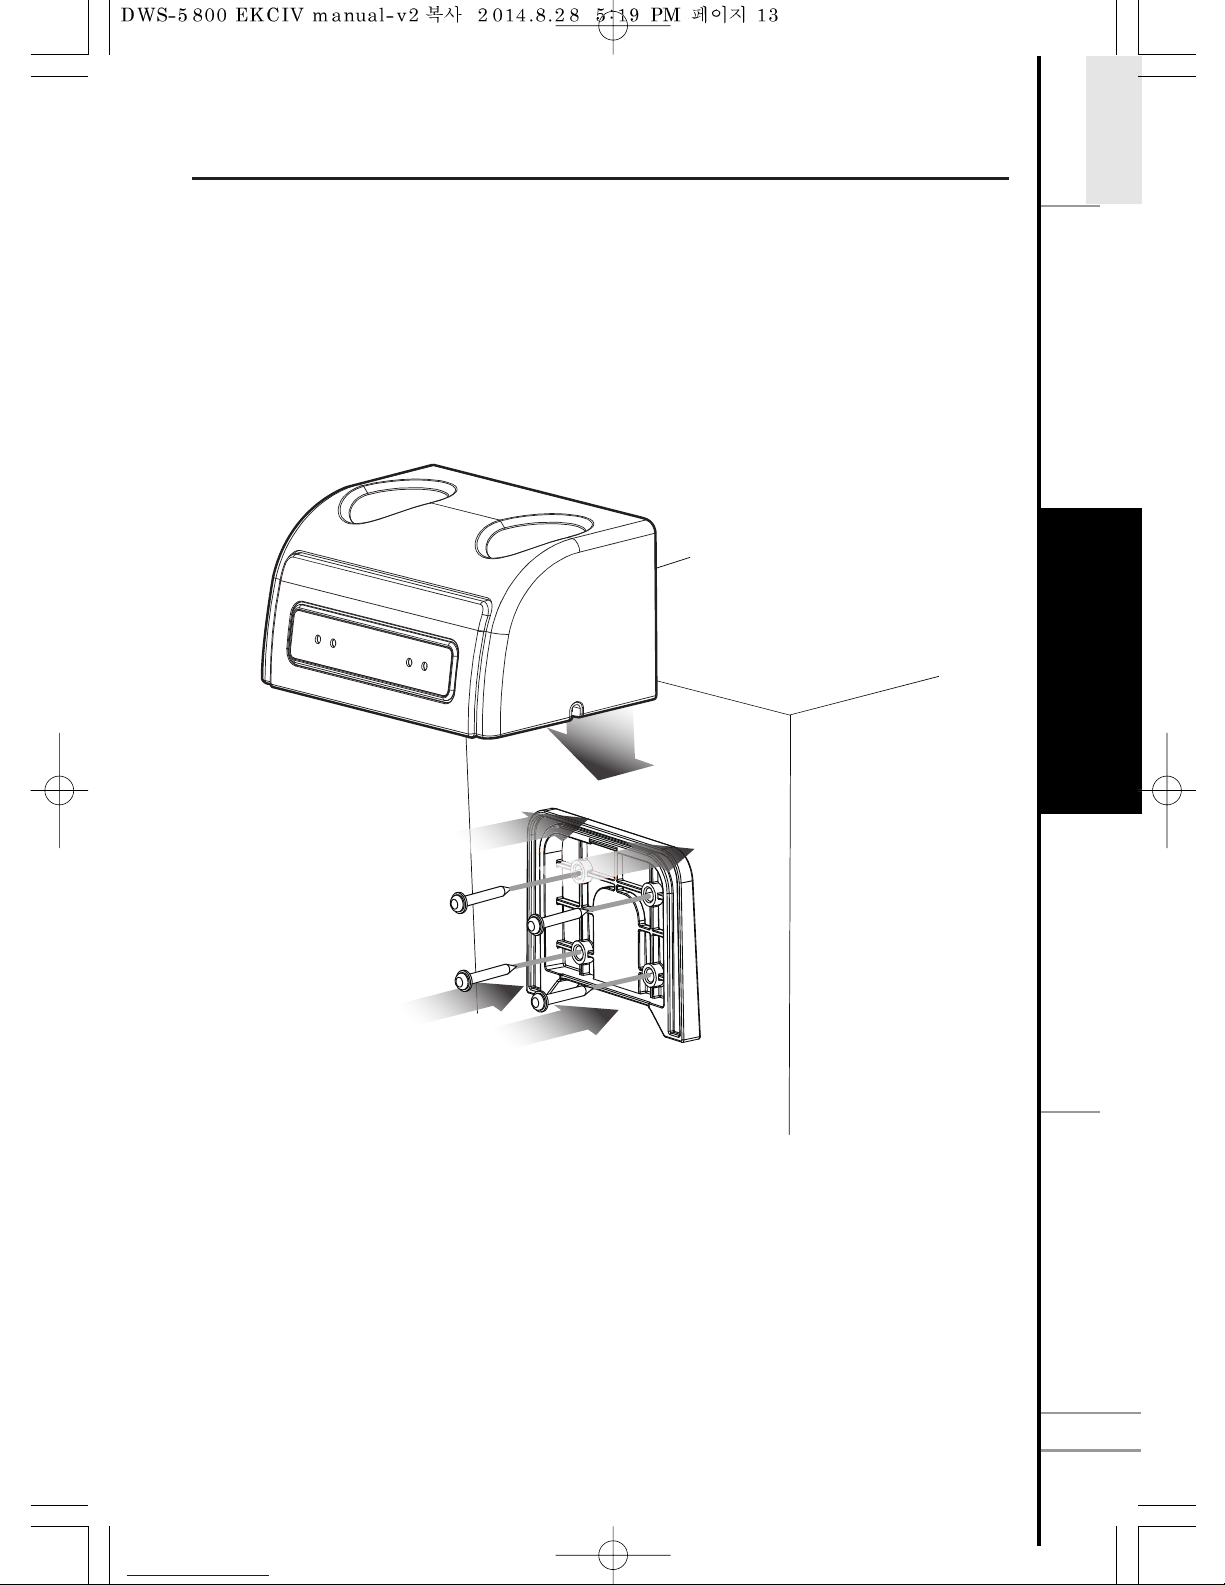
Installation of charging cradle mount
The charging cradle mount has a separable bracket to install to a wall.
Please refer to the following instruction when installing to a wall.
STEP1
Screw up the separable bracket (4 Points).
STEP2
Charging cradle mount set in bracket as following the picture.
2
1
1
1
1
S
A
F
E
T
Y
E
T
C
.
C
O
N
N
E
C
T
I
O
N
ENGLISH
S
Y
S
T
E
M
S
E
T
T
I
N
G
13
Page 14
System setting
(Setting group, channel)
DWS-5800 wireless microphone can simply set channel and easily pair between
transmitters and a receiver.
DWS-5800 supports from 01CH ~ 99CH through a combination of group and channel.
(But the maximum supported channels are 85 channels due to 14 non-allocated channels)
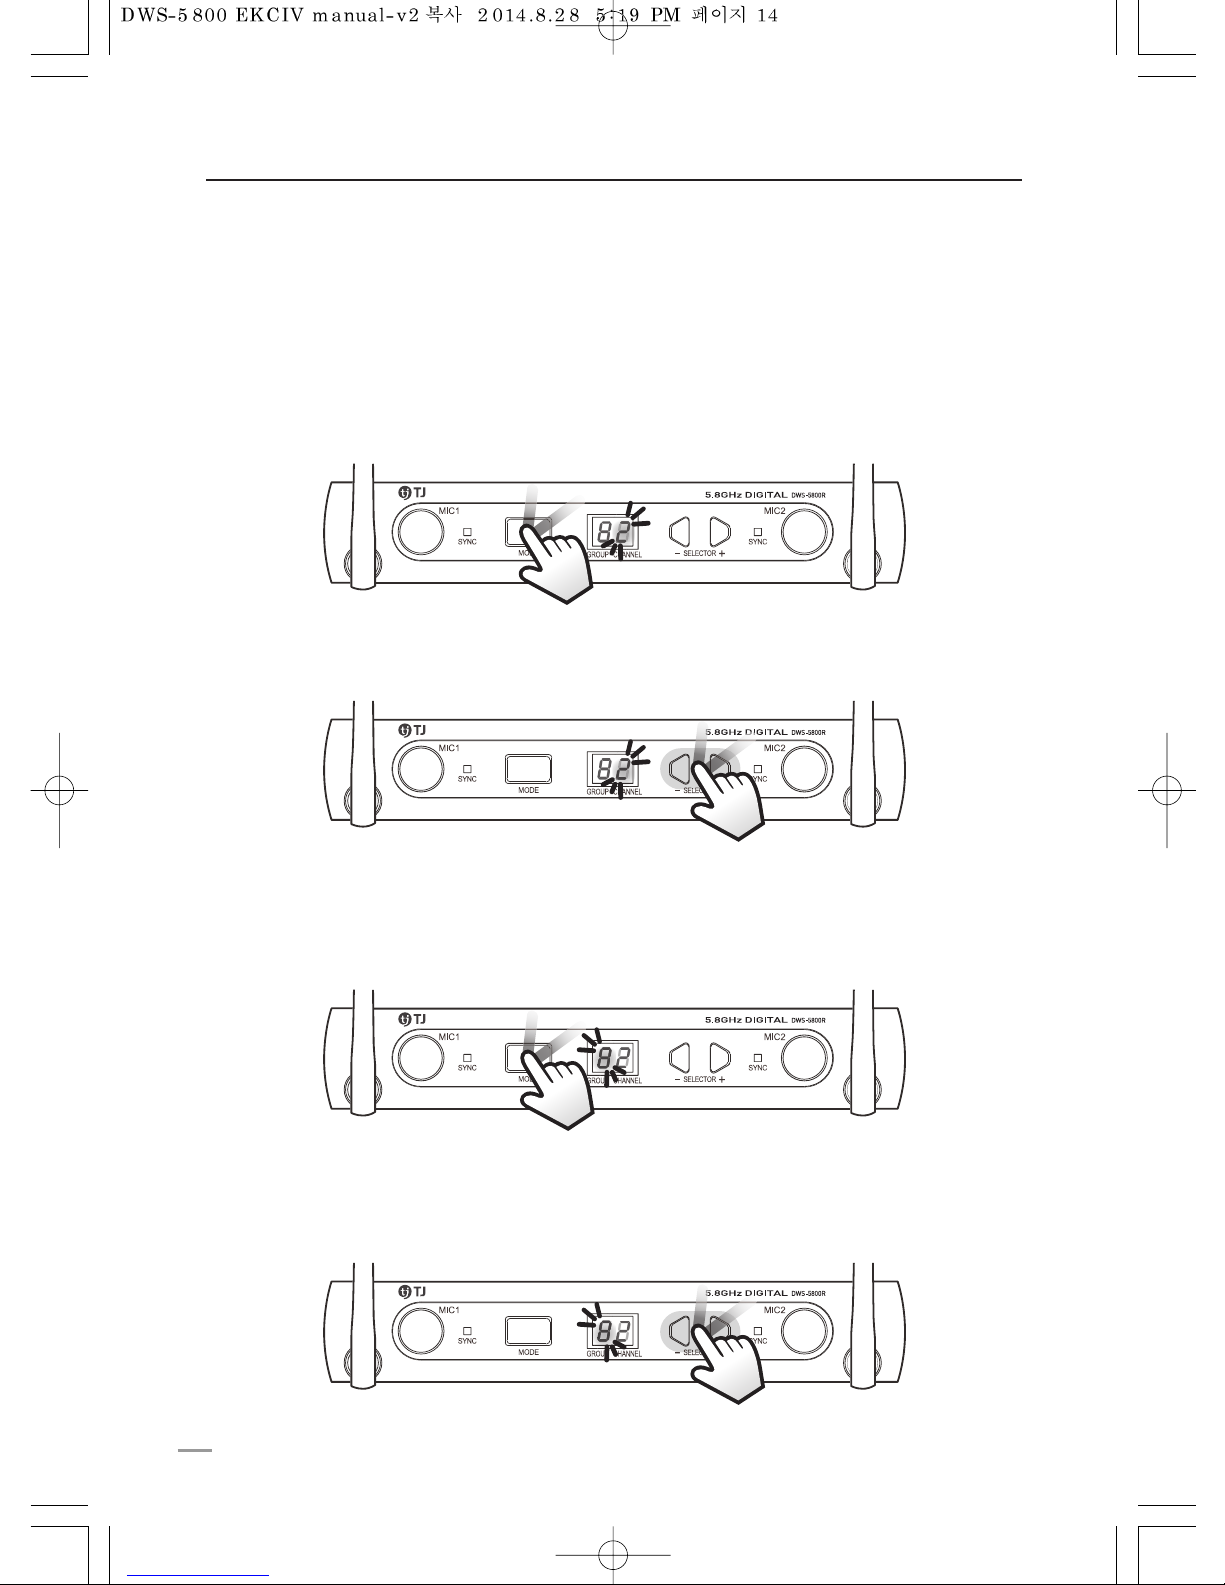
1. ‘MODE’ Button
: When you press the ‘MODE’, CHANNEL display panel will blink.
888
8828
2. ‘SELETOR’ -, + Button
: Use ‘SELECTOR - +’ to set the CHANNEL.
8828
3. ‘MODE’ Button
: After select the channel and press ‘MODE’, again. GROUP display panel will blink.
Then, you can set ‘GROUP’ in the same way with channel setting.
288
4. ‘SELETOR’ -, + Button
: Use ‘SELECTOR - +’ to set the GROUP.
82
14
Page 15

System setting
(How to pair : With receiver
→
MIC 1 pairing)
Please keep the distance within 50cm between receiver and microphone when pairing.
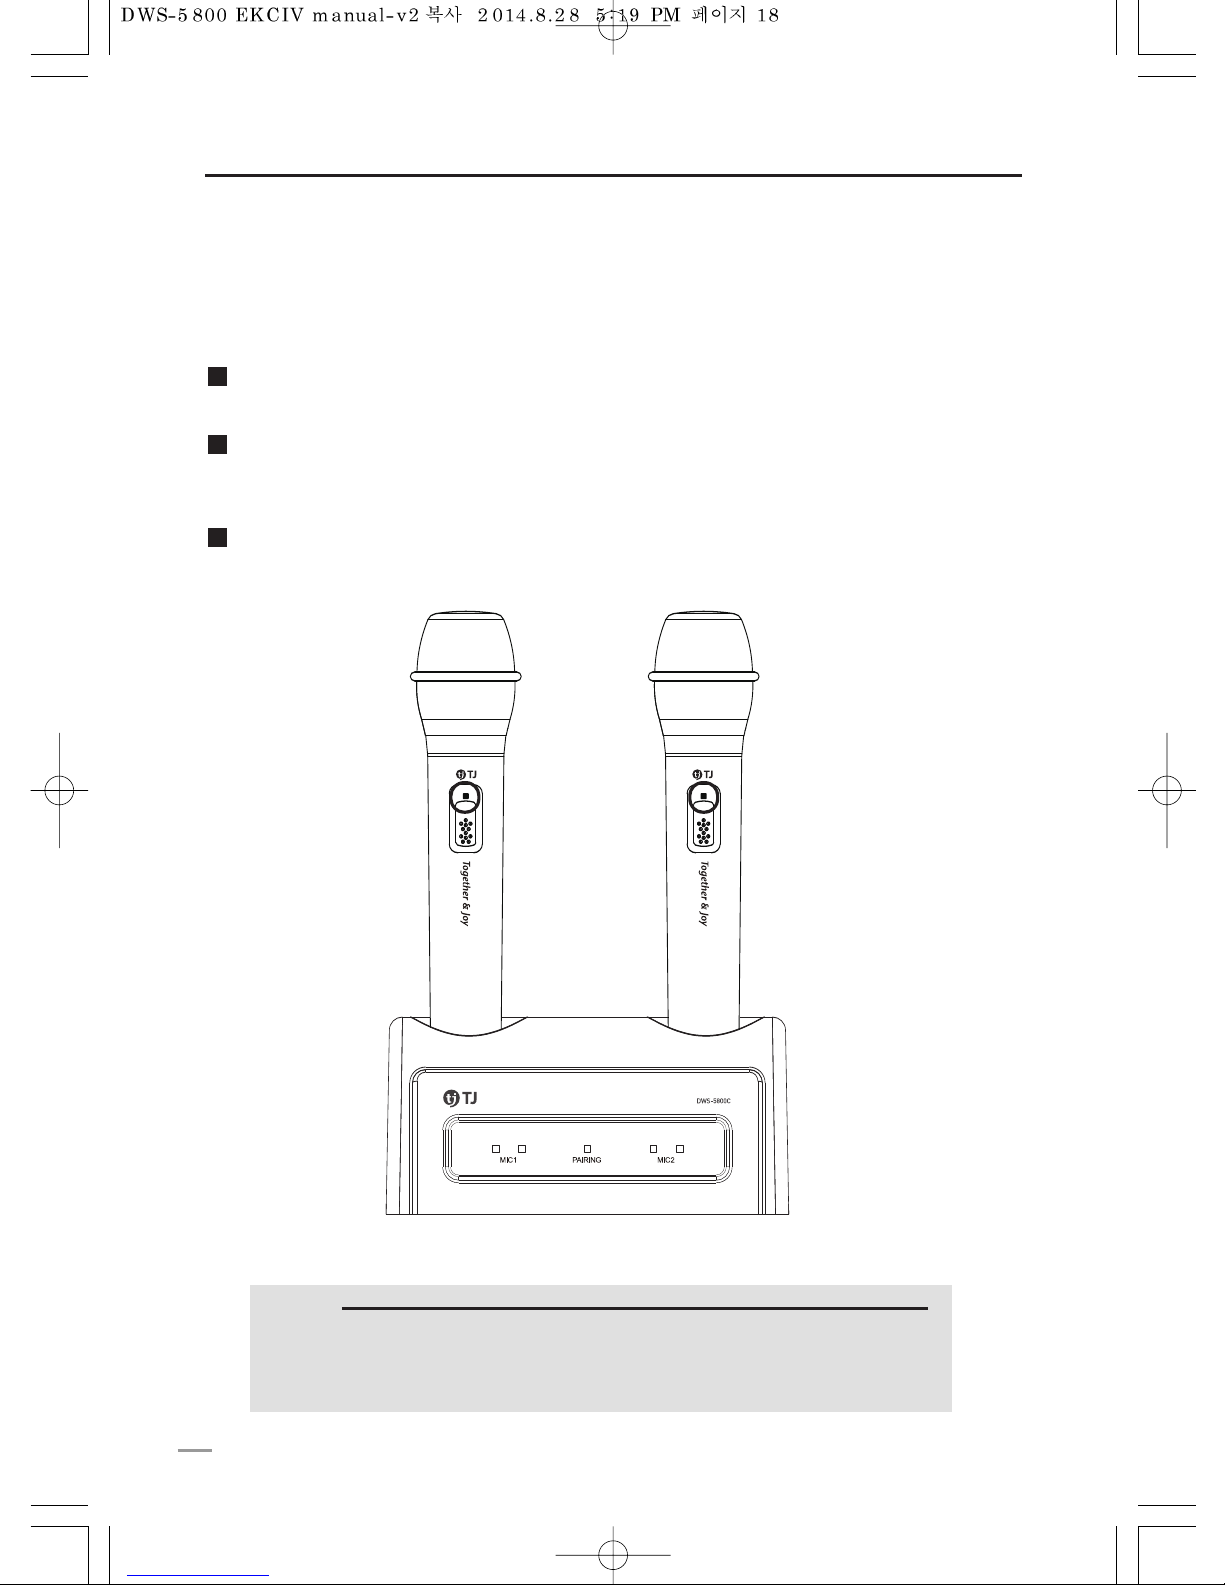
1 receiver supports 2 microphones, please finish the pairing of two microphones.
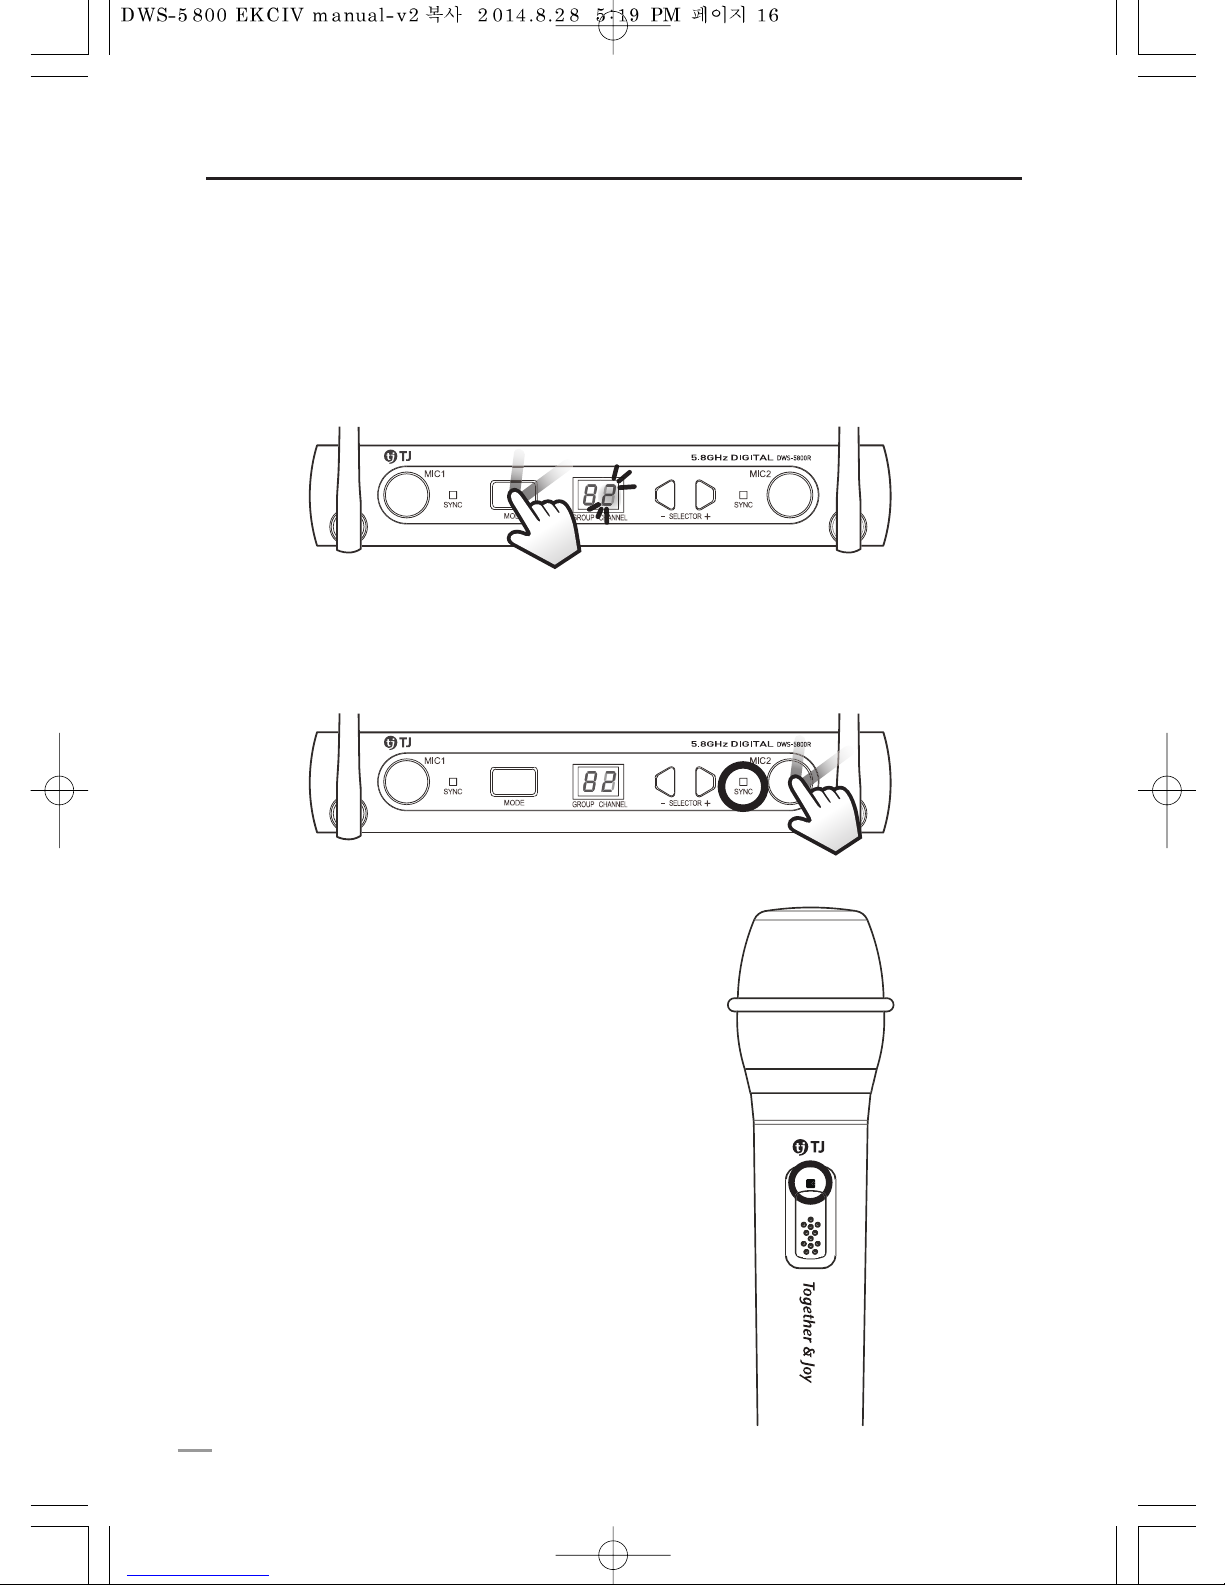
1. ‘MODE’ Button
: CHANNEL display blinks when pressing ‘MODE’ button.
00
0820
2. ‘MIC 1’ Button
: When press ‘MIC 1’ button, indicator for sync MIC 1 will blink.
Which means MIC1 and Receiver are ready for pairing.
3. ‘MIC 1’ Switch ON
: When the green LED is on, the pairing succeeds.
*If the pairing fails, the red RED will be on.
00
00
DWS-5800T
S
A
F
E
T
Y
E
T
C
.
S
Y
S
T
E
M
S
E
T
T
I
N
G
ENGLISH
C
O
N
N
E
C
T
I
O
N
15
Page 16
System setting
(How to pair : With receiver
→
MIC 2 pairing)
Please keep the distance within 50cm between receiver and microphone when pairing.
1 receiver supports 2 microphones, please finish the pairing of two microphones.
1. ‘MODE’ Button
: CHANNEL display blinks when pressing ‘MODE’ button.
00
080820
2. ‘MIC 2’ Button
: When press ‘MIC 2’ button, indicator for sync MIC 2 will blink.
Which means MIC2 and receiver are ready for pairing.
3. ‘MIC 2’ Switch ON
: When the green LED is on, the pairing succeeds.
*If the pairing fails, the red LED will be on.
DWS-5800T
16
Page 17
System setting
(How to pair : With charging cradle)
- It is also possible to pair between ‘Charging cradle’ and microphone(transmitter).
When the receiver is installed in cabinet or invisible place, you can easily pair with the charging
cradle.
- Please carefully read the below steps before installation.
The pairing with the charging cradle should be done only once at the initial installation.
But if a channel of the receiver and transmitters are changed, the channel of the charging
cradle should be synchronized with the changed channel of the receiver and transmitters.
Please select “pairing mode” on the bottom of charging cradle.
: White LED will be on, which means the charging cradle is ready to receive the channel from the receiver.
Step 1 : Transmit the channel of MIC(transmitter) to charging cradle
1
Please put the MIC1 which is already paired with receiver on the
charging cradle.
2
Turn on the MIC1
: When the MIC1 is on, the channel of MIC1 starts to be transmitted
to the charging cradle.
If the pairing is successful, the red LED and the green LED on MIC1
will blink consecutively and the white LED at the front of charging cradle
will blink as well.
4
After pairing, please select ‘charger mode’ on the bottom of the charging
cradle for normal use.
5
3
DWS-5800T
1
1
4
3
4
S
A
F
E
T
Y
E
T
C
.
S
Y
S
T
E
M
S
E
T
T
I
N
G
ENGLISH
C
O
N
N
E
C
T
I
O
N
17
Page 18
18
System setting
(How to pair : With charging cradle)
This step is for when transmitter is replaced.
It is possible to simply pair for new transmitter using the charging cradle.
Step 2 : How to pair with charging cradle
Two microphones(transmitters) must be put on the charging cradle in order to transmit
the channel of charging cradle to the microphones(transmitters).
1
Turn on the transmitters on the charging cradle at the same time.
: green and red LED will blink subsequently when turn on the transmitter,
channel of charging cradle will be sent to transmitter automatically.
2
After the pairing, please turn off the microphones for charging.
3
Please turn off the microphones(transmitters) before charging.
If microphones(transmitters) are put on the charging cradle with turning on,
the green LED will blink.
Caution
DWS-5800T
DWS-5800T
Page 19
Specification
SYSTEM
Working range line of sight
Operating channels
Audio sampling
Latency (delay)
Dynamic range
Total harmonic distortion
Operating temperature range
Up to 15m
85 channels
24Bit / 96kHz
3.4msec less
100dB, A-weighted
0.3% less, A-weighted, typical (Ref. 1KHz,100mV/rms)
0°C~+50°C
TRANSMITTER (MICROPHONE)
Working range line of sight
RF frequency band
Transmit power
Operating life time
Power consumption
Power supply
Dimensions (H × W × D)mm
Weight
Up to 15m
5.7275 to 5.820875 GHz
10mW less
Up to 10 Hours (one time charge)
820mW
Li-ion 3.7V / 2,200mA
250 × ট40 (Mic Ball ট52)
284g (with battery)
RECEIVER
RF frequency band
Transmit power
Audio output connectors
Configuration
Power consumption
Power supply
Dimensions (W × H × D)mm
Weight
5.7275 to 5.820875 GHz
10mW less
¼” Phone Jack × 2, Mixer ¼” Jack × 1
Impedance Unbalanced
2.64W
Adaptor(SMPS) DC12V / 1.5A
208(W) × 45(H) × 110(D)
306g
CHARGER
Power supply
Dimensions (W × H × D)mm
Weight
Adaptor(SMPS) DC12V / 1.5A
152.5(W) × 75.5(H) × 81.5(D)
258g
S
A
F
E
T
Y
E
T
C
.
ENGLISH
C
O
N
N
E
C
T
I
O
N
S
Y
S
T
E
M
S
E
T
T
I
N
G
19
Page 20
본 제품은 대한민국용으로 제작, 판매되는 제품으로 타국가 판매 시 발생되는 전파, 품질 문제에 대해서는 TJ미디어는
책임을 지지 않습니다.
무선 제품으로 국가별 전파 규격에 영향을 받는 제품이기 때문에 대한민국 이외 국가에서 사용시 반드시 해당 국가의 전파 승인을
득하시기 바랍니다.
법에 의해 전방향 전파발사 및 동일한 정보를 동시에 여러 곳으로 송신하는 점-대-다지점 서비스에의 사용은 금지되어 있습니다.
사용전에 안전을 위한 주의사항을 반드시 읽고 정확하게 사용해 주세요.
사용설명서에 제품보증서가 포함되어 있습니다.
제품의 성능을 충분히 활용할 수 있도록 사용설명서를 처음부터 끝까지 잘 읽어 주세요.
다 읽으신 후에도 필요하실 때에 볼 수 있는 장소에 보관해 주세요.
본 제품은 전자파 장해 검정을 받은 기기로서 업소용으로 사용할 수 있습니다.
DWS-5800 사 용 설 명 서
5.8GHz DIGITAL WIRELESS MICROPHONE SYSTEM
한국어
Page 21
기
타
안
전
및
연
결
한국어
설
치
방
법
세
팅
방
법
경 고
전원코드는 무리하게 잡아 당기거나 피복이 벗겨지지 않도록 하세요.
•
화재나 감전의 원인이 됩니다.
•
코드가 훼손(전선의노출,절단)되면 구입하신 대리점에 교환을 의뢰하세요.
본 기기를 설치할 때에는 벽으로 부터 일정거리를 두어 통풍이 잘되게 하세요.
•내부 온도상승으로 인한 화재의 원인이 됩니다.
•벽에서 10cm이상, 윗면에서 2cm이상, 뒷면에서 5cm이상의 최소공간을 남겨두세요.
지정된 전압 외에는 사용하지 마세요.
•화재나 감전의 원인이 됩니다.
본 기기를 욕실이나 옥외의 물이 침투하기 쉬운 장소에서는 사용하지 말아 주세요.
•화재나 감전의 원인이 됩니다.
본 기기를 선박등의 직류(DC) 전원에 접속하지 말아 주세요.
•기기가 정상 동작을 하지 않거나 화재의 원인이 됩니다.
•특정 장소의 설치를 위하여 기기의 전원을 변경 시키면 화재, 감전의 원인이 됩니다.
본 기기를 바람이 잘 통하지 않는 곳이나 융단, 이불 등의 위에서 사용하지 말아 주세요.
•통풍구가 막혀서 기기 내부의 온도가 상승하여 화재의 원인이 됩니다.
본 기기에서 연기가 나오거나 이상한 냄새가 나면 즉시 전원플러그를 빼고 서비스센터나 대리점으로 연락하세요.
•화재나 감전의 원인이 됩니다.
본 기기 내부에 이물질이 들어갔을 경우 즉시 전원플러그를 빼고 서비스 센터나 대리점으로 연락하세요.
•화재나 감전의 원인이 됩니다.
표시되어 있는 전원전압 교류 220V이외의 전압에서 사용하지 마세요.
•화재나 감전의 원인이 됩니다.
본 기기의 내부에 클립이나 작은 금속 물체를 넣지 마세요.
•기기가 정상으로 동작하지 않거나 화재나 감전의 원인이 됩니다.
내부의 점검, 정비, 수리는 서비스센터나 대리점에 의뢰 하세요.
•당사 서비스 센터 또는 대리점이 아닌 곳에서 분해했을 경우,
그 후의 성능과 품질에 대하여 당사는 책임을 지지 않습니다.
천둥이 심하게 칠 때는 전원 스위치를 끄고 전원플러그를 뽑아 주세요
.•기기 고장이나 화재, 감전의 원인이 됩니다.
본 기기를 분해하거나 커버를 분리하지 말아 주세요.
•감전, 부상의 원인이 됩니다.
이 그림기호는 위험을 끼칠 우려가 있는 사항과 조작에 대하여 주의를 환기시키기 위한 기호입니다.
주의사항은 "경고"와 "주의"의 두가지로 구분 되어 있습니다. "경고"와 "주의"의 의미는 다음과 같습니다.
경고 : 지시사항을 위반할 때, 심각한 상해나 사망이 발생할 가능성이 있는경우
주의 : 표시사항을 위반할 때, 경미한 상해나 손상이 발생할 가능성이 있는 경우
안전을 위한 주의사항
21
Page 22
22
주 의
안전을 위한 주의사항
·휴대폰, 무선기기 등은 전파에 의한 간섭이 발생할 수 있으므로 본 기기 가까이 사용하지 마세요.
·표면의 이물질은 중성 세제를 희석한 액에 천을 적셔 잘 짜서 이물질을 닦아내고 마른 천으로 닦아 주세요.
·옆으로 놓거나 뒤집어서 사용하지 마세요.
·화병, 화분, 컵, 화장품, 약품이나 물 등이 들어있는 용기나 금속 물체를 올려놓고 사용하지 마세요.
·본 기기는 옆과 같은 조건에서 사용하세요. [온도조건 : 5~35℃ (사용 시) / 습도조건 :45~80%]
·추운 겨울에 오랜 시간 차가워진 기기는 내부에 결빙이 생겨 동작하지 않을 수도 있습니다.
그 때에는 전원 플러그를 콘센트에서 뽑은 상태로 1~2시간 놔두었다가 사용하세요. 실내온도는 되도록 서서히 올릴 수 있도록 하세요.
·여름에 냉방기의 바람이 직접 닿는 장소에 설치하면 결빙의 가능성이 있습니다. 이 경우에는 설치장소를 옮겨 주세요.
제품을 닦을 때에는 안전을 위해 전원 플러그를 콘센트에서 빼고 나서 행하여 주세요.
•
당사 서비스 센터 또는 대리점이 아닌 곳에서 캐비닛을 열었을 경우,
그 후의 성능과 품질에 대하여 당사는 책임을 지지 않습니다.
전원플러그를 뺄 때에는 전원코드를 당기지 말고 반드시 플러그를 잡고 빼주세요.
•전선안의 선이 끊어지면 화재나 감전의 원인이 됩니다.
장기간 본 기기를 사용하지 않을 때에는 안전을 위해 전원플러그를 콘센트에서 빼주세요.
•뜻밖의 사고로 발전할 수 있습니다.
본 기기의 이동시 밑면의 좌우를 확실히 잡고 수평상태를 유지하여 이동 하세요.
•떨어뜨려 부상을 입을 수도 있습니다.
젖은 손으로 전원플러그 및 기기를 만지지 마세요.
•감전의 위험이 있습니다.
본 기기를 먼지가 많은 장소에 두지 마세요.
•화재나 감전의 원인이 됩니다.
기기의 이동시에는 연결되어있는 모든 코드를 분리 하여 코드가 훼손되지 않도록 주의하세요.
•코드가 훼손되면 화재나 감전사고의 원인이 됩니다.
•본체에 무리한 하중이 걸려 변형이나 고장의 원인이 됩니다.
•파손에 의한 부상, 화재, 감전의 원인이 됩니다.
본 기기를 조리대나 가습기의 근처 등과 열기구의 열이 직접 닿는 장소에 설치하지 말아 주세요.
•화재나 감전의 원인이 될 위험이 있습니다.
본 기기에 다른 기기를 연결할때 에는 각 기기의 사용설명서에 따라 지정코드를 사용하여 주세요.
•지정되지 않은 코드로 연결하거나 코드를 연장하여 사용하면 코드가 발열하여 화상 또는 화재, 감전의 원인이 됩니다.
왁스, 벤젠, 알코올, 신나, 모기약, 방향제, 윤활제, 세정제등의 화학 약품을 사용하지 마세요.
•제품의 도장이 벗겨지거나 변형의 원인이 됩니다.
본 기기를 직사광선이나 스포트라이트가 직접 닿는 장소, 난방기구등 뜨거운 물건 가까이 놓지 마세요.
•화재나 감전사고의 원인이 됩니다.
운송, 개봉, 소각 시 포장재의 취급에 주의를 기울여 주세요.
•종이에 손을 베이거나 부상의 원인이 됩니다.
본 기기 위에 화병, 화분, 컵, 화장품, 약품 등 액체용기 및 촛불 등을 올려놓지 마세요.
•화재나 감전의 원인이 됩니다.
Page 23
기
타
안
전
및
연
결
한국어
설
치
방
법
세
팅
방
법
23
세계 최초 5.8GHz 대역의 디지털 무선마이크
채널당 2개의 마이크 세팅 방식이며, 최대 85채널 사용이 가능하기 때문에
총 170개의 마이크 사용 가능
보컬용 마이크에 최적화된 음색과 24bit/96KHz 샘플레이트 기반의 고음질
세련된 고광택 하이그로시의 미려하고 견고한 외관
수신기와 송신기의 간편한 채널 세팅 기능
충전거치대를 통한 간편한 송신기 채널 세팅이 가능
송신기 2
수신기 충전거치대
MIC 케이블 매뉴얼
어댑터 2(12V 1.5A)
제품의 특장점
제품 구성물
Page 24
24
1 안테나
2 MIC 1 페어링 버튼
3 MIC 1 Sync 인디케이터
4 MODE
5 디스플레이창
6 Selector 버튼
7 MIC 2 Sync 인디케이터
8 MIC 2 페어링 버튼
9 안테나
※ 수신기의 상세 동작 방법은 채널 그룹 설정 방법, 페어링 방법 설명 참고 바랍니다.
MIC 1 용 외부 안테나
MIC 1 페어링 시 사용 버튼
MIC 1 연결 시 점등 (MIC 1 페어링 진행시 깜빡임)
MODE 선택 스위치 : 채널 및 그룹 변경,
마이크 등록 및 페어링 시 사용하는 버튼
그룹과 채널 표시
그룹과 채널 변경 시 디스플레이에 표시되는 숫자를
+, - 방향으로 움직이면서 세팅
MIC 2 연결 시 점등 (MIC 2 페어링 진행 시 깜빡임)
MIC 2 페어링 시 사용 버튼
MIC 2 용 외부 안테나
수신기 전면 동작 설명
82
1 9
2 83 4 5 6 7
Page 25
기
타
안
전
및
연
결
한국어
설
치
방
법
세
팅
방
법
1 VOL 2
2 MIC 2
3 MIX
4 MIC 1
5 VOL 1
6 DC12V 1.5A
7 POWER ON/OFF
MIC2의 출력 볼륨 조정
- 센터에 놓고 사용 권장
- 볼륨을 올릴 경우 사용하는 마이크 프리앰프의 입력 감도에 따라
마이크2가 찌그러질 수도 있으며, 찌그러지지 않는 범위에서 볼륨을
적절히 조절
MIC2의 출력 연결 단자이며, 마이크 프리앰프의 MIC2 입력단자와 연결
( ¼ Jack 사양)
MIC1과 MIC2의 신호를 동시에 출력하는 단자로 마이크 프리앰프의
입력단자가 충분하지 않을 경우 MIX 출력을 이용하여 동시 사용
( ¼ Jack 사양)
MIC1의 출력 연결 단자이며, 마이크 프리앰프의 MIC1 입력단자와 연결
( ¼ Jack 사양)
MIC1의 출력 볼륨 조정
- 센터에 놓고 사용 권장
- 볼륨을 올릴 경우 사용하는 마이크 프리앰프의 입력 감도에 따라
마이크1이 찌그러질 수도 있으며, 찌그러지지 않는 범위에서
볼륨을 적절히 조절
전용 DC 어댑터 연결 단자 (DC12V 1.5A 어댑터 전용)
수신기의 전원을 제어하는 스위치
수신기 후면 동작 설명
2
1
2 3 4 5 6 7
VOL 2VOL 2 MIC 2MIC 2 MIXMIX MIC 1MIC 1 VOL 1VOL 1 DC12V 1.5ADC12V 1.5A POWERPOWER
MINMIN MAXMAX MINMIN MAXMAX
ONON
OFFOFF
25
Page 26
26
1 마이크볼
2 램프
※ 전원스위치의 상세한 동작 방법은 채널 그룹 설정 방법, 페어링 방법
설명 참고 바랍니다.
마이크 유닛을 보호하는 철망
(마이크볼의 경우 사용 중 충격에 의해 파손 및
마모가 될 수 있으며, 마이크볼은 소모품으로 파손되었을
경우 당사 AS센터를 통해 구입이 가능합니다)
송신기의 다양한 상태를 표시하는 램프
3 전원스위치
송신기 사용을 위한 ON 스위치.
송신기 페어링 때에도 사용합니다.
램프 LED상태 송신기 상태
노란색 LED 1초 ON 후 OFF
→ 4초 마다 녹색 LED ON
마이크 페어링 안된 경우
노란색 LED 1초 ON 후 OFF 수신기 전원 OFF 상태
적색 LED_ON
충전이 반드시 필요한 상태
(MIC 전원 OFF 직전임)
적색 LED깜박임
충전 중 MIC
전원스위치 ON
노란색
→ 녹색 (2초 간격 10회)깜박임
→ 적색 LED_ON
LOW BATTERY 안내
송신기 동작 설명
1
2
3
DWS-5800T
Page 27
기
타
안
전
및
연
결
한국어
설
치
방
법
세
팅
방
법
MIC1 송신기 충전 시, 페어링 시 장착하는 가이드 홈
MIC2 송신기 충전 시, 페어링 시 장착하는 가이드 홈
MIC1 송신기가 충전 중일 때 적색 램프 점등
MIC1 송신기가 완전충전 되었을 때 녹색 램프 점등
충전거치대 하단 스위치를 ‘페어링 모드’에 놓았을 때
흰색 램프가 점등
MIC2 송신기가 충전 중일 때 적색 램프 점등
MIC2 송신기가 완전충전 되었을 때 녹색 램프 점등
※ 충전거치대를 통한 페어링 방법의 상세 동작 방법은 페어링 방법 설명 참고 바랍니다.
1 MIC1 송신기 장착부
2 MIC2 송신기 장착부
3 MIC1 충전 중 점등 램프
4 MIC1 완충전 점등 램프
5 페어링 점등 램프
6 MIC2 충전 중 점등 램프
7 MIC2 완충전 점등 램프
- 페어링 모드 : 송신기의 채널을 충전거치대에 저장할 때 사용
(반드시 설치 시에만 사용합니다)
- 충전 모드 : 송신기를 충전하는 모드
1 어댑터 연결 단자
2 모드 선택 스위치
3 어댑터 케이블 고정 가이드 홈
충전거치대 동작 설명
충전거치대 하단 설명
2
1 2
3 4 6 75
1
2
3
송신기를 충전할 경우는 반드시 송신기의 전원 스위치를 OFF후 충전하시기 바랍니다.
ON후 충전할 경우는 녹색 램프가 빠르게 깜빡이면서 주의 표시를 하게 됩니다.
주의
27
Page 28
28
시스템 설치 방법 [이팩트, 파워더 믹서 앰프 연결 방법]
MIC의 개별 연결 방법
파워더 믹서 앰프 또는 이팩트 마이크 입력단 연결
VOL 2VOL 2 MIC 2MIC 2 MIXMIX MIC 1MIC 1 VOL 1VOL 1 DC12V 1.5ADC12V 1.5A POWERPOWER
MINMIN MAXMAX MINMIN MAXMAX
ONON
OFFOFF
¼ Jack
¼ Jack
MIC의 MIX 연결 방법
파워더 믹서 앰프 또는 TEF-10 이팩트 마이크 입력단 연결
MIX 연결의 경우 무선마이크 2개를 하나의 출력으로 사용할 수 있습니다.
따라서, 이팩트 또는 파워더 믹서 앰프 연결 시 MIC 1 또는 MIC2 입력 한곳과 연결하시면
2개의 마이크를 동시에 사용 가능합니다.
VOL 2VOL 2 MIC 2MIC 2 MIXMIX MIC 1MIC 1 VOL 1VOL 1 DC12V 1.5ADC12V 1.5A POWERPOWER
MINMIN MAXMAX MINMIN MAXMAX
ONON
OFFOFF
¼ Jack
Page 29

기
타
안
전
및
연
결
한국어
설
치
방
법
세
팅
방
법
시스템 설치 방법 [반주기와의 연결 방법]
반주기
MIC의 개별 연결 방법
MIC의 MIX 연결 방법
MIX 연결의 경우 무선마이크 2개를 하나의 출력으로 사용할 수 있습니다.
따라서, 반주기와 연결시 MIC 1에 연결하시면 2개의 마이크 동시 사용 가능합니다.
TJ미디어의 마이크 믹서가 내장 된 반주기
( S10, S20, P10, P20, C40, C50, C60 )
반주기
TJ미디어의 마이크 믹서가 내장 된 반주기
( S10, S20, P10, P20, C40, C50, C60 )
VOL 2VOL 2 MIC 2MIC 2 MIXMIX MIC 1MIC 1 VOL 1VOL 1 DC12V 1.5ADC12V 1.5A POWERPOWER
MINMIN MAXMAX MINMIN MAXMAX
ONON
OFFOFF
VOL 2VOL 2 MIC 2MIC 2 MIXMIX MIC 1MIC 1 VOL 1VOL 1 DC12V 1.5ADC12V 1.5A POWERPOWER
M
INMIN MAXMAX
M
INMIN MAXMAX
ONON
OFFOFF
¼ Jack ¼ Jack
¼ Jack
29
Page 30

30
시스템 설치 방법 [충전거치대 설치 방법]
충전거치대는 벽면에 바로 설치할 수 있도록 분리형 브라켓이 장착된 제품입니다.
벽면에 설치할 경우는 브라켓을 분리한 후 아래와 같은 순서로 벽면에 설치하시기 바랍니다.
1단계 스크류로 4곳을 체결합니다.
2단계 충전거치대를 그림과 같이 화살표 방향으로
브라켓에 끼우면 됩니다.
2
1
1
1
1
Page 31

시스템 세팅 방법 [그룹, 채널 설정 방법]
DWS-5800 제품은 디지털 방식 시스템으로 간편하게 채널 세팅이 가능하고,
수신기와 송신기의 페어링이 가능합니다.
또한, 그룹과 채널의 조합을 통해 01CH ~ 99CH 채널의 조합이 가능합니다.
(14개의 비할당 채널이 포함되어 있기 때문에 실제 사용 가능 채널은 85개입니다)
1 MODE 버튼
: MODE 버튼을 누르면 디스플레이의 CHANNEL 표시창이 깜빡 거립니다.
888828
2 SELECTOR -, + 버튼
: SELECTOR -, + 버튼을 눌러 원하는 CHANNEL을 설정합니다.
8828
3 MODE 버튼
: 채널 선택 후 MODE 버튼을 누르면 [GROUP] 설정이 가능하며,
디스플레이의 [GROUP] 표시창이 깜빡 거립니다.
288
4 SELECTOR -, + 버튼
: SELECTOR -, + 버튼을 눌러 원하는 GROUP을 설정합니다.
82
안
전
및
연
결
기
타
세
팅
방
법
한국어
설
치
방
법
31
Page 32

32
시스템 세팅 방법 [페어링 방법 1]
수신기를 이용한 방법 → MIC 1 페어링
페어링시 수신기와 마이크의 거리를 50cm 이내 유지가 필요합니다.
1 세트당 2개의 MIC를 동시 사용하기 때문에 송신기 2개를 반드시 페어링 해야 합니다.
1 MODE 버튼
: MODE 버튼을 누르면 디스플레이의 CHANNEL 표시창이 깜빡 거립니다.
00
0820
2 MIC 1 버튼
: MIC 1의 버튼을 누르면 MIC 1의 SYNC가 깜빡거리며, 페어링 대기 상태에 진입합니다.
3 MIC 1에 사용할 송신기의 전원 ON
: 녹색 LED 들어오면 정상 페어링 상태입니다.
※ 페어링이 되지 않은 경우 Red LED가 깜빡입니다.
82
008200
DWS-5800T
Page 33

안
전
및
연
결
기
타
세
팅
방
법
한국어
설
치
방
법
33
시스템 세팅 방법 [페어링 방법 1]
수신기를 이용한 방법 → MIC 2 페어링
페어링시 수신기와 마이크의 거리를 50cm 이내 유지가 필요합니다.
1 세트당 2개의 MIC를 동시 사용하기 때문에 송신기 2개를 반드시 페어링 해야 합니다.
1 MODE 버튼
: MODE 버튼을 누르면 디스플레이의 CHANNEL 표시창이 깜빡 거립니다.
00
080820
2 MIC 2 버튼
: MIC 2의 버튼을 누르면 MIC 2의 SYNC가 깜빡거리며, 페어링 대기 상태에 진입합니다.
3 MIC 2에 사용할 송신기의 전원 ON
: 녹색 LED 들어오면 정상 페어링 상태입니다.
※ 페어링이 되지 않은 경우 Red LED가 깜빡입니다.
82
82
DWS-5800T
Page 34

34
시스템 세팅 방법 [페어링 방법 2]
충전거치대를 이용한 방법 1단계
DWS-5800은 수신기와 별도로 충전거치대를 통한 페어링이 가능 합니다.
: 이 경우는 수신기를 장식장이나 보이지 않는 곳에 설치했을 경우 충전거치대를 통해 손쉽게 페어링이 가능합니다.
반드시 아래의 페어링 방법을 잘 읽어보신 후 설정하시기 바라며, 충전거치대의 페어링은 설치시 1회만
세팅하도록 합니다.
: 만약, 수신기의 채널을 변경 시 반드시 해당 충전거치대도 새롭게 채널 세팅을 해야 합니다.
1단계 충전거치대 채널 세팅
충전거치대 하단 스위치를 ‘페어링 모드’로 설정합니다.
: 이 경우 전면 White LED 켜지며, 충전거치대는 송신기의 채널을 받을 준비를 합니다.
1
충전거치대에 이미 페어링 된 송신기 중 1개를 MIC1 거치대에 장착합니다.
2
장착 후 송신기 전원을 ON 합니다.
: ON시 송신기의 채널 정보를 충전거치대에 전달하기 시작합니다.
이때 적색 점등 후 녹색 LED가 깜빡이고, 충전거치대 전면 화이트 LED도
함께 깜빡거리면 충전거치대에 채널 세팅이 완료 됩니다.
4
페어링 완료 후 충전거치대 하단의 스위치를 충전모드로 설정을 변경해야 합니다.
5
충전모드 전환 후 충전 상태로 사용이 가능합니다.
6
3
1
1
4
4
DWS-5800T
3
Page 35

안
전
및
연
결
기
타
세
팅
방
법
한국어
설
치
방
법
35
시스템 세팅 방법 [페어링 방법 2]
충전거치대를 이용한 방법 2단계
충전거치대를 통한 채널 세팅은 송신기를 교체하는 경우에 사용되는 보조 기능입니다.
항상 충전거치대를 통해 간단히 새로운 송신기에 채널 세팅이 가능합니다.
2단계 충전거치대를 통한 송신기 채널 세팅
반드시 송신기 2개를 동시에 장착 했을 때만 충전거치대에 저장된 채널 정보를 송신기로 전달하게
됩니다.
1
송신기를 충전거치대에 장착 후 전원을 ON 합니다.
: 송신기 전원 ON시 녹색과 적색 LED가 차례로 점등되고, 충전거치대에 저장된 채널 정보가 송신기에
자동 세팅됩니다.
2
세팅 후 송신기 전원을 OFF하고 충전모드로 전환합니다.
3
DWS-5800T
DWS-5800T
Page 36

36
채널 배분 방법
1 그룹, 채널 세팅 방법
DWS-5800 디지털 무선마이크의 경우는 채널간 혼신이 없도록 주파수 간격이 넓게 설정되어 있습니다.
따라서 설치 환경에 설치 대수가 많은 경우 아래와 같은 방법으로 채널과 그룹을 설정하시는 것이 효과적입니다.
2 DWS-5800 세트 설치 시 주의 사항
그룹과 채널은 순차적으로 설치
: 그룹을 0x, 1x, 2x, ⋯.., 8x, 9x 순서로 진행합니다.
: 채널은 x1, x2, x3, x4, ⋯.., x8, x9
예) 01 → 02 → 03 → ⋯⋯ 09 → 11 → 12 → 13 → ⋯⋯, 19 → 21 → 22 → ⋯.. 29 → ⋯⋯.
반드시 설치할 룸별 채널 및 그룹 설정을 마친 후 앰프를 연결 하시기 바랍니다.
동일 채널과 그룹이 설정된 상태에서는 혼신이 발생되며, 혼신에 따른 노이즈가 발생될 수 있습니다.
노이즈 발생에 따라 앰프 출력이 큰 경우 굉음 발생으로 앰프 및 스피커가 손상될 수 있으며, 이에 대한
책임은 TJ미디어가 지지 않습니다.
동일한 채널을 설치 할 경우에는 반드시 룸간격을 이격하여 설치하시기 바랍니다.
: 4개 벽 이상 간격을 띄워 사용하길 권장하며 평균 룸 2개 간격 필요합니다)
동일한 그룹 내에서는 자유롭게 한 공간에 설치하시어 사용 가능합니다.
: 채널 정보 두 자리 중 앞자리가 그룹입니다.
건물의 설치가 각기 다른 층에 제품이 설치되는 경우는 동일한 그룹과 채널의 사용이 가능합니다.
1
1
2
3
4
여러 층의 룸들을 운영
: 한 층에 동일한 그룹의 채널을 순차적으로 설치하시기 바랍니다.
예) 1층 : 01 → 02 → 03 → ⋯⋯. 09 // 2층 : 11 → 12 → 13 → ⋯⋯. 19
2
Page 37

안
전
및
연
결
기
타
설
치
방
법
한국어
세
팅
방
법
설치 방법
업소 내 룸 구조별 DWS-5800 설치 예제
1. 일자형 (복도형) 타입
2. ㄱ자형 타입
카
운
터
창
고
04
05 06 07
03 02 01
04
03
02
01
05 06
카운터
내실
1번방2번방3번방
5번방 6번방
4번방
3번방
2번방
5번방 6번방
1번방
7번방
4번방
37
Page 38

38
설치 방법
업소 내 룸 구조별 DWS-5800 설치 예제
3 ㄷ자형 타입
4 ㅁ자형 타입
1번방2번방3번방
8번방
7번방
6번방
1번방
2번방
3번방
8번방
9번방10번방
4번방
5번방
7번방
6번방
5번방 4
번방
카운터
01
02
03 04 05
06
07
08
1112
카
운
터
03
08
07
06 05 04
02 01
대기실
Page 39

안
전
및
연
결
기
타
설
치
방
법
한국어
세
팅
방
법
설치 방법
업소 내 룸 구조별 DWS-5800 설치 예제
5. 복합형 A 타입 (20 룸 이하)
: 방번호 중심으로 채널을 세팅하고, 채널이 없는 해당 방 번호만 최종 설치한 채널에 이어서 설치하도록 합니다.
6. 복합형 B 타입 (20 룸 이상)
: 전체 노래방 구조에서 3등분하여 채널 배치를 하도록 합니다.
0번 그룹 1열에 배치하고, 1번 그룹 2열에 배치하고, 2번 그룹 3열에 배치하며,
2번 그룹은 0번 그룹과 반대 방향 채널 세팅을 권장합니다.
(예. 21번 채널은 01번 채널과 반대 방향의 룸에 설치하도록 합니다)
02
03 04 05 06
07
08
19
21
11
14
13
15
16
12
17
18
01
01
02 03 04 05
06
07
08
19
21
12
13
14
16
15
17
18
11
카운터
27 26 25 24 23
22
카운터
2번방
1번방
3번방 4번방 5번방 6번방
7번방
8번방
9번방
10번방
11번 방
17번 방
18번 방
16번 방
14번 방
13번 방
15번 방
12번 방
2번방
1번 방
3번방 4번방 5번방 6번방
7번방
8번방
9번방
10번방
11번 방
19번 방 20번 방 21번 방 22번방 23번방
24번 방
17번방
18번방
16번 방
14번 방
13번 방
15번 방
12번 방
39
Page 40

40
무선 혼신에 대한 주의 사항 및 AP와의 혼신 대책
DWS-5800 디지털 무선마이크의 경우 5.8GHz 대역 주파수를 사용하는 무선 제품입니다.
동일한 장소에 동일한 5GHz 대역의 무선 장비와 혼용하여 사용할 경우 상호 무선 품질에 영향을 줄 수 있으니
반드시 아래 주의 사항을 잘 읽어보신 후 제품을 설치 하시기 바랍니다.
1 무선 주파수 간섭 관련 주의 사항
DWS-5800 주파수 배분 Table : 단위 GHz
5GHz 대역 무선 AP를 설치한 경우 :
무선 AP의 사용 시 반드시 수동 전환 모드로 사용하시기 바랍니다.
AP사용 채널의 세팅은 CH : 149 ~ 165 범위를 벗어난 채널로 설정하여 사용하시기 바랍니다.
AP의 주파수 변경 방법은 AP 사용 설명서를 참고하시거나, AP 설치 통신사에 문의 하시기 바랍니다.
5GHz 대역 무선 제품 동시 사용할 경우 :
동시 사용하는 무선제품의 주파수를 5.725GHz ~ 5.825GHz
(AP 해당 CH : 149 ~ 165)를 피한 주파수로 세팅을 변경하여 주시기 바랍니다.
구분
Channel
1
5.7331
5.7275
5.7342
5.7286
5.7353
5.7297
5.7365
5.7308
5.7376
5.7320
2
5.7443
5.7387
5.7455
5.7398
5.7466
5.7410
5.7477
5.7421
5.7488
5.7432
3
5.7556
5.7500
5.7567
5.7511
5.7578
5.7522
5.7590
5.7533
5.7601
5.7545
4
5.7668
5.7612
5.7680
5.7623
5.7691
5.7635
5.7702
5.7646
5.7713
5.7657
5
5.7781
5.7725
5.7792
5.7736
5.7803
5.7747
5.7815
5.7758
5.7826
5.7770
6
5.7893
5.7837
5.7905
5.7848
5.7916
5.7860
5.7927
5.7871
5.7938
5.7882
7
5.8006
5.7950
5.8017
5.7961
5.8028
5.7972
5.8040
5.7983
5.8051
5.7995
8
5.8118
5.8062
5.8130
5.8073
5.8141
5.8085
5.8152
5.8096
5.8163
5.8107
9
5.8175
5.8186
5.8197
5.8208
5.8220
Group
1
2
0
1
2
3
4
5
6
7
8
9
Page 41

안
전
및
연
결
기
타
한국어
세
팅
방
법
설
치
방
법
무선 혼신에 대한 주의 사항 및 AP와의 혼신 대책
3 혼신 발생시 회피 방법
AP 사용채널의 DWS-5800 채널 확인 테이블 (AP 채널을 당사 제품의 해당 주파수에 표기)
설정변경
5GHz 대역 AP 사용 시 혼신의 문제가 발생하면 아래와 같이 설정을 변경하시기 바랍니다.
구분
Channel
1
-
-
-
-
149
-
149
-
149
-
0
1
2
3
4
5
6
7
8
9
2
149
149
149
149
149
149
149
149
149
149
3
153
149
153
149
153
149
153
149
153
149
4
153
153
153
153
153
153
153
153
153
153
5
157
153
157
153
157
153
157
157
157
157
6
157
157
157
157
157
157
157
157
157
157
7
161
157
161
161
161
161
161
161
161
161
8
161
161
161
161
161
161
165
161
165
161
9
-
165
-
165
-
165
-
165
-
165
Group
1
회피 방법
1] 혼신이 발생된 세트의 채널에 ‘+ 13’ 채널로 세팅 (설치된 세트수가 많을 경우)
(예) 01 ch → 조정 : 01 + 13 = 14 ch,
22 ch → 조정 : 22 + 13 = 35 ch
2] 혼신이 발생된 세트의 채널에 ‘+ 2’ 채널로 세팅 (설치된 세트수가 적을 경우)
(예) 11 ch → 조정 : 11 + 02 = 13 ch,
06 ch → 조정 : 06 + 02 = 08 ch
3] 혼신 발생시 그룹의 대표 채널 변경을 통한 세팅 방법 (긴급 대처 방법으로 아래 표를 이용)
(예) 12 ch 에서 혼신 발생한 경우 (1번 그룹) → 01 ch 또는 21 ch로 변경하여 사용
2
그룹
0번, 2번 그룹
1번 그룹
3번, 5번, 7번 그룹
변경 가능
그룹.채널 정보
11 ch , 31 ch
01 ch, 21 ch
21 ch
그룹
4번 그룹
6번 그룹
8번 그룹
변경 가능
그룹.채널 정보
31 ch, 51 ch, 71 ch
11 ch, 51 ch, 71 ch
01 ch, 11 ch, 31 ch, 71 ch
41
Page 42

42
제품 사양
시스템
Working Range Line of sight
Operating channels
Audio Sampling
Latency (Delay)
Dynamic Range
Total Harmonic Distortion
Operating Temperature Range
Up to 15m
85개
24Bit / 96kHz
3.4msec less
100dB, A-weighted
0.3% less, A-weighted, typical (Ref. 1KHz,100mV/rms)
0°C~+50°C
송신기
Working Range Line of sight
RF Frequency Band
Transmit power
Operating Life time
Power consumption
Power Supply
Dimensions (H × W × D)mm
Weight
Up to 15m
5.7275 to 5.820875 GHz
10mW이하
Up to 10 Hours ( one time charge )
820mW
Li-ion 3.7V / 2,200mA
250 × ট40 (Mic Ball ট52)
284g (with battery)
수신기
RF Frequency Band
Transmit power
Audio Output Connectors
Configuration
Power consumption
Power Supply
Dimensions (W × H × D)mm
Weight
5.7275 to 5.820875 GHz
10mW less
¼” Phone Jack × 2, Mixer ¼” Jack × 1
Impedance Unbalanced
2.64W
Adaptor(SMPS) DC12V / 1.5A
208(W) × 45(H)× 110(D)
306g
충전기
Power Supply
Dimensions (W × H × D)mm
Weight
Adaptor(SMPS) DC12V / 1.5A
152.5(W) × 75.5(H) × 81.5(D)
258g
Page 43

품질보증기간은 1년,
부품 보유 기간은
제품 단종 후
5년입니다.
DWS-5800
티제이미디어 주식회사
본 제품은 엄격한 품질관리 및 검사 과정을 거쳐서 만들어진 제품으로
소비자의 정상적인 사용상태에서 고장이 발생하였을 경우,
고객센터를 통하여 보증기간 내에서 무상서비스를 제공하여 드립니다.
본 제품에 대한 보증은 보증서에 기재된 내용으로 혜택을 받습니다.
Page 44

D
사정에 따라 센터명 및 전화번호가 변경될 수 있습니다.
고객지원센터 서울특별시 강서구 화곡로 64길 23 (등촌동 640-8) www.tjmedia.com
서울지역
대전지역 대전센터 042-524-9595
부산지역 부산센터 051-818-3340
강서센터(본사) 02-3663-4700 을지로센터 02-2264-4367
영등포센터 02-2634-7035 용산센터 02-713-9593
1577-5520
제품 서비스 문의
5
Page 45

Page 46

46
Page 47

中文
47
Page 48

48
Page 49

中文
49
Page 50

50
Page 51

中文
51
Page 52

52
Page 53

中文
53
Page 54

54
Page 55

中文
55
Page 56

56
DWS-5800T
Page 57

中文
57
Page 58

58
Page 59

中文
59
Page 60

Pastikan Anda membaca peringatan keselamatan, sebelum menggunakan produk.
Produk ini menggunakan frekuensi radio, oleh karena itu harap mendapatkan persetujuan
resmi dari badan standarisasi nasional sebelum menggunakannya.
Emisi omnidirectional RF dan layanan transmisi data point to multi-point dilarang oleh
undang-undang.
Buku Manual DWS-5800
Sistem Mikrofon Nirkabel Digital 5.8GHz
INDONESIA
Page 61

1. Baca instruksi ini.
2. Simpan instruksi ini.
3. Patuhi semua peringatan.
4. Ikuti semua petunjuk.
5. Jangan gunakan alat ini dekat air.
6. Bersihkan hanya dengan kain kering.
7. Pasang sesuai dengan pentunjuk pabrik pembuatnya.
8. Jangan pasang dekat sumber panas seperti radiator, heat register, kompor atau alat lainnya
(termasuk amplifier) yang menghasilkan panas.
9. Hanya gunakan dengan cart, stand, tripod, bracket atau meja yang ditentukan oleh
pabrik pembuat atau yang dijual bersamaan dengan alat. Ketika cart digunakan,
gunakan dengan hati-hati ketika memindahkan gabungan cat/alat agar tidak luka
karena kejatuhan.
10. Lepas colokan alat ini ketika ada petir atau ketika tidak digunakan dalam waktu yang lama.
11. Rujuk semua servis ke personil servis resmi. Servis diperlukan ketika alat rusak, seperti
kabel suplai daya atau colokan rusak, ada cairan tumpah atau benda jatuh ke alat,
alat terpapar hujan atau ada air embun, tidak bisa beroperasi dengan normal, atau jatuh.
12.
Jangan paparkan baterai ke panas yang berlebihan seperti sinar matahari, api atau sejenisnya.
13. PERINGATAN: UNTUK MENGURANGI RISIKO KEBAKARAN ATAU KORSLETING, JANGAN
PAPARKAN ALAT INI KE HUJAN ATAU EMBUN (LEMBAB).
14. JANGAN PAPARKAN ALAT INI KE TETESAN ATAU PERCIKAN AIR DAN PASTIKAN TIDAK
ADA BENDA YANG TERISI DENGAN CAIRAN SEPERTI POT BUNGA, YANG DITEMPATKAN
DI ATAS ALAT INI.
UNTUK MENCEGAH KORSELTING, JANGAN LEPAS TUTUP ATAS ATAU BAWAH.
SUKU CADANG BAGIAN DALAM TIDAK BOLEH DISERVIS OLEH PENGGUNA SERVIS
HARUS DILAKUKAN OLEH PERSONIL YANG BERKUALIFIKASI.
Peringatan Keselamatan
61
L
A
I
N
L
A
I
N
K
E
S
E
L
A
M
A
T
A
N
INDONESIA
S
I
S
T
E
M
P
E
N
Y
E
T
I
N
G
A
N
K
O
N
E
K
S
I
61
Page 62

Peringatan Keselamatan
AWASI SIMBOL-SIMBOL INI :
Tanda petir di tengah segitiga digunakan untuk memberi peringatan pengguna mengenai
risiko korsleting.
Tanda seru di tengah segitiga digunakan untuk memberi peringatan pengguna mengenai
instruksi operasi atau perawatan penting.
Perangkat ini didesain dan dievaluasi sesuai kondisi ketinggian 2000 meter di atas laut;
dan hanya dapat digunakan di bawah ketinggian 2000 meter di atas permukaan laut.
Menggunakan perangkat ini di atas ketinggian 2000 meter dapat menyebabkan risiko
keselamatan yang tinggi.
62
Page 63

Mikrofon Nirkabel Digital 2.5 GHz merupakan produk pertama di Dunia.
Support maksimal 85 kanal (1 kanal = 2 mikrofon),
170 mikrofon pada waktu yang sama.
Mikrofon vokal terbaik pada sampel rate 24 bit & 96 KHz.
Desain Mewah dan Solid High Glossy.
Pemasangan (pairing) yang mudah antara transmitter dan receiver.
Penyetingan kanal transmitter yang mudah via charger.
Kabel mikrofon Buku manual 12V, 1.5A Adaptor(2 EA)
Transmitter (2 PCS)
Receiver Charger
Fitur DWS-5800
Aksesories
63
L
A
I
N
L
A
I
N
K
E
S
E
L
A
M
A
T
A
N
INDONESIA
S
I
S
T
E
M
P
E
N
Y
E
T
I
N
G
A
N
K
O
N
E
K
S
I
63
Page 64

1 Antena
2 Switch pemasangan untuk MIC 1
3 Indikator untuk sync MIC 1
4 MODE
5 Layar display
6 Selector
7 Indikator untuk syn MIC2
8 Swith pemasangan untuk MIC2
9 Antena
*Untuk keterangan lebih lanjut tentang operasi, harap lihat “penyetingan channel” dan “pemasangan”.
Antena eksternal untuk MIC 1.
Switch untuk memasang MIC 1.
Lampu MIC 1 untuk koneksi, berkedip pada saat
meminta pemasangan MIC 1.
Pilih mode switch: ubah channel atau grup dan juga
ketika sedang melakukan pemasangan.
Indikator untuk grup dan channel.
Mengganti channel dan grup dengan menggunakan
“+” dan “-“.
Lampu MIC2 untuk koneksi, berkedip saat meminta
pemasangan MIC2.
Switch untuk memasang MIC2.
Antena eksternal untuk MIC2.
Manual Operasi Receiver (Depan)
82
1 9
2 83 4 5 6 7
64
Page 65

1 VOL 2
2 MIC 2
3 MIX
4 MIC 1
5 VOL 1
6 DC12V 1.5A
7 POWER ON/OFF
Pengaturan volume keluaran (output) untuk MIC2.
- Dirokomendasikan untuk menyeting tombol ke arah jarum
jam 12 (tengah).
- Suara MIC2 dapat terdistorsi ketika menyesuaikan volume VOL2
menurut sensitivitas input MIC preamp
- Harap sesuaikan VOL2 secara memadai agar tidak terdistorsi.
Konektor keluran jack ¼ untuk MIC2.
Konektor sinyal keluaran jack ¼ untuk MIC1 dan MIC2.
Jika hasil input dari MIC preamp tidak cukup keras,
harap sesuaikan tombol MIX.
Konektor keluran jack ¼ untuk MIC1.
Pengaturan volume keluaran (output) untuk MIC1.
- Dirokomendasikan untuk menyeting tombol ke arah jarum jam
12 (tengah).
- Suara MIC1 dapat terdistorsi ketika menyesuaikan volume VOL1
menurut sensitivitas input MIC preamp.
- Harap sesuaikan VOL1 secara memadai agar tidak terdistorsi.
Konektor adaptor DC (DC12V 1.5A saja).
Tombol menyalakan/mematikan receiver.
Manual Operasi Receiver (Belakang)
2
1
2 3 4 5 6 7
VOL 2VOL 2 MIC 2MIC 2 MIXMIX MIC 1MIC 1 VOL 1VOL 1 DC12V 1.5ADC12V 1.5A POWERPOWER
MINMIN MAXMAX MINMIN MAXMAX
ONON
OFFOFF
K
E
S
E
L
A
M
A
T
A
N
L
A
I
N
L
A
I
N
K
O
N
E
K
S
I
INDONESIA
65
S
I
S
T
E
M
P
E
N
Y
E
T
I
N
G
A
N
Page 66

1 Micc Ball
2 Lampu
*Untuk keterangan lebih rinci tentang tombol daya,
silahkan lihat halaman “PENYETINGAN SISTEM”.
Pelindung unit MIC.
Menunjukkan status, kontrol dan pemberi
peringatan transmitter.
3 Tombol daya
Tombol daya tombol menyalakan/mematikan
daya untuk transmitter.
Indikasi status Lampu LED Indikasi status transmitter
LED menyala Kuning beberapa saat
dan kemudian mati.
→
LED menyala hijau setiap 4 detik.
Bila tidak ada pemasangan
(pairing).
LED menyala kuning satu detik dan
dan kemudian mati.
Daya pada transmitter mati.
LED menyala merah.
Indikator peringatan baterai
lemah (sesaat sebelum
daya dimatikan).
LED menyala merah berkedip
Data MIC “Nyala” mengisi
baterai.
Kuning
→
LED menyala hijau berkedip-kedip.
(setiap 2 detik/10 kali)
→
LED menyala merah.
Indikator baterai lemah.
Manual Operasi Mikrofon (Transmitter)
1
2
3
DWS-5800T
66
Page 67

*untuk keterangan lebih rinci tentang pemasangan (pairing) melalui tempat (cradle) pengisian daya,
silahkan lihat halaman “Cara memperbaiki tempat (cradle) pengisian daya”.
Mode pemasangan: channel pemasangan antara
transmitter dan tempat (cradle) pengisian daya.
(hanya untuk ketika dalam instalasi)
Mode pengisi daya: untuk mengisi daya transmitter.
1 Konektor adaptor
2 Tombol mode
3 Panduan kabel untuk adaptor
Tempat pengisian daya dan pemasangan untuk transmitter MIC1.1 Tempat transmitter MIC1
Tempat pengisian daya dan pemasangan untuk transmitter MIC2.2 Tempat transmitter MIC1
Lampu merah menunjukkan pengisian daya transmitter MIC1.3 Lampu indikasi pengisian daya MIC1
Lampu hijau pada MIC1 menunjukkan baterai telah terisi daya penuh.
4 Lampu indikasi pengisian
daya penuh pada MIC1
Jika tombol pemasangan pada bagian bawah cradle pengisian daya MIC sedang
dalam “mode pemasangan”, maka lampu putih akan menyala (ON).
5 Lampu pemasangan
Mengisi daya baterai ketika menyala merah pada transmitter MIC2.
6 Lampu indikasi pengisian daya MIC2
Lampu hijau pada MIC2 menunjukkan baterai telah terisi daya penuh.
7 Lampu indikasi pengisian
daya penuh pada MIC2
Manual Operasi Tempat (cradle) Pengisian Daya
Manual Operasi Tempat (cradle) Pengisian Daya (Bagian Bawah)
2
1 2
3 4 6 75
1
2
3
Harap matikan ketika mengisi daya transmitter [MIC]. Jika transmitter hidup,
LED hijau akan berkedip dengan cepat dan berulang-ulang sebagai tanda peringatan.
Perhatian
K
E
S
E
L
A
M
A
T
A
N
L
A
I
N
L
A
I
N
K
O
N
E
K
S
I
INDONESIA
67
S
I
S
T
E
M
P
E
N
Y
E
T
I
N
G
A
N
Page 68

Koneksi dengan effector, Powered mixer ampplifier
Masing-masing koneksi mikrofon
Menghubungkan masukan (input) MIC pada powered mixer
amplifier atau effector.
VOL 2VOL 2 MIC 2MIC 2 MIXMIX MIC 1MIC 1 VOL 1VOL 1 DC12V 1.5ADC12V 1.5A POWERPOWER
MINMIN MAXMAX MINMIN MAXMAX
ONON
OFFOFF
¼ Jack
¼ Jack
Koneksi mikrofon dengan keluaran (output) ‘mix’
Menghubungkan masukan (input) MIC pada powered mixer
amplifier atau effector.
Keluaran ‘mix’ memungkinkan keluaran (output) dua mikrofon dicampur di dalam 1 output.
Dengan demikian, sekalipun jika hanya ada satu masukan (input) mikrofon di dalam mixer,
amplifier atau mesin karaoke anda, anda dapat menggunakan dua mikrofon pada waktu yang
sama dengan menggunakan keluaran (output) Mix pada DWS-5800.
VOL 2VOL 2 MIC 2MIC 2 MIXMIX MIC 1MIC 1 VOL 1VOL 1 DC12V 1.5ADC12V 1.5A POWERPOWER
MINMIN MAXMAX MINMIN MAXMAX
O
NON
OFFOFF
¼ Jack
68
Page 69

Memasang tempat (cradle) pengisian daya instalasi
Tempat pengisian batrei dapat digantung di tembok dengan menggunakan braket yang
terpisah.
Gantungan tembok dapat dipasang mengikuti cara dibawah ini.
LANGKAH 1
pasang sekrup braket [4 titik]
LANGKAH 2
pasang tempat (cradle) pengisian daya di dalam braket
seperti pada gambar di bawah ini.
2
1
1
1
1
K
E
S
E
L
A
M
A
T
A
N
L
A
I
N
L
A
I
N
K
O
N
E
K
S
I
INDONESIA
69
S
I
S
T
E
M
P
E
N
Y
E
T
I
N
G
A
N
Page 70

System Pemasangan
(Menyeting grup, channel)
Mikropon nirkabel DWS-5800 dapat dengan mudah menyeting channel dan diasangkan
dengan transmitter-receiver menurut sistem digital. DWS-5800 mendukung channel dari
01CH-99CH melalui kombinasi grup dan channel.
[Tetapi channel maksimum yang dapat didukung adalah 85 channel karena ada 14 channel
yang tidak dialokasikan].
1. Tombol MODE
: Ketika anda menekan ‘MODE’, maka panel tampilan CHNNEL akan berkedip.
888828
2. Tombol SELECTOR’ -, +
: Gunakan SELECTOR -+’ untuk menyeting CHANNEL.
8828
3. Tombol MODE
: Setelah memilih channel dan menekan ‘MODE’ lagi, panel tampilan GROUP akan berkedip.
Lalu, anda dapat melakukan penyetingan‘GROUP’ sebagaimana penyetingan channel.
288
4. Tombol SELECTOR’ -, +
: Gunakan SELECTOR -, + untuk menyeting GROUP.
82
70
Page 71

System Pemasangan
(Cara memperbaiki : receiver
→
pemasangan MIC1)
Please keep the distance within 50cm between Receiver and Microphone when pairing.
1 Receiver supports 2 Microphones, please finish the pairing of two microphones.
1. Tombol MODE
: Tampilan CHANNEL berkedip ketika tombol ‘MODE’ ditekan.
00
0820
2. Tombol MIC 1
: Ketika tombol ‘MIC 1’ ditekan, indikator untuk sync MIC 1 akan
Berkedip yang berarti MIC1 dan Receiver siap untuk dipasangkan.
3. MIC 1 hidup
: Ketika lampu LED hijau menyala (hidup),
pemasangan (pairing) berarti telah berhasil.
*Jika pemasangan gagal, lampu LED merah
akan menyala.
82
008200
DWS-5800T
K
E
S
E
L
A
M
A
T
A
N
L
A
I
N
L
A
I
N
INDONESIA
K
O
N
E
K
S
I
71
S
I
S
T
E
M
P
E
N
Y
E
T
I
N
G
A
N
Page 72

System Pemasangan
(Cara memperbaiki : Receiver
→
pemasangan MIC2)
Please keep the distance within 50cm between Receiver and Microphone when pairing.
1 Receiver supports 2 Microphones, please finish the pairing of two microphones.
1. Tombol MODE
: Tampilan CHANNEL berkedip ketika tombol ‘MODE’ ditekan.
00
000
2. Tombol MIC 2
: Ketika tombol ‘MIC 2’ ditekan, indikator untuk sync MIC 2 akan berkedip,
yang berarti MIC2 dan Receiver siap untuk dipasangkan.
3. MIC 2 hidup
: Ketika lampu LED hijau menyala (hidup),
pemasangan (pairing) berarti telah berhasil.
*Jika pemasangan gagal, lampu LED merah
akan menyala.
DWS-5800T
72
Page 73

System Pemasangan
(Cara memperbaiki : tempat pengisian daya)
- Juga dimungkinkan untuk memasangkan antara ‘tempat pengisian daya’ dan mikrofon
(transmitter). Ketika receiver dipasang di kabinet atau tempat yang tidak terlihat,
anda dapat dengan mudah memasangkan dengan tempat (cradle) pengisian daya.
- Harap baca dengan cermat langkah-langkah di bawah ini sebelum melakukan instalasi.
Pemasangan (pairing) tempat pengisian daya (charging cradle) harus dilakukan sekali saja di
instalasi awal. Tetapi jika kanal (channel) receiver telah berubah,
harap pasangkan kanal tempat pengisian daya menurut perubahan kanal receiver.
Pilih “pairing mode” di bagian bawah tempat pengisian daya.
: Lampu LED putih akan menyala, yang berarti tempat pengisian daya telah siap untuk menerima
kanal dari receiver.
Langkah 1 : transmisikan kanal MIC (transmitter) ke tempat pengisian daya (charging cradle).
1
Letakkan MIC1 yang telah dipasangkan dengan receiver pada tempat
pengisian daya (charging cradle).
2
Hidupkan MIC1 Ketika MIC1 hidup, kanal MIC1 mulai ditransmisikan ke
tempat pengisian daya (charging cradle).
Jika pemasangan (piaring) berhasil, lampu LED merah dan lampu LED hijau
pada MIC1 akan berkedip secara berurutan dan lampu LED putih di
depan tempat pengisian daya akan berkedip juga.
4
Setelah pemasangan, pilih “charger mode” pada bagian bawah tempat
pengisian daya untuk penggunaan normal.
5
3
DWS-5800T
1
1
4
3
4
K
E
S
E
L
A
M
A
T
A
N
L
A
I
N
L
A
I
N
INDONESIA
K
O
N
E
K
S
I
73
S
I
S
T
E
M
P
E
N
Y
E
T
I
N
G
A
N
Page 74

74
System Pemasangan
(Cara memperbaiki : tempat pengisian daya)
Langkah ini diambil ketika transmitter diganti.
Dimungkinkan untuk membuat pasangan transmitter baru dengan menggunakan tempat
pengisian daya.
Langkah 2 : cara memasangkan pengisian daya
Dua mikrofon (transmitter) harus diletakkan pada tempat pengisian daya guna
mentransmisikan kanal tempat pengisian daya ke mikrofon(transmitter).
1
Nyalakan setelah menempatkan transmitter pada tempat pengisian daya.
: Lampu LED hijau dan merah akan berkedip secara bergantian ketika transmitter hidup,
kanal tempat pengisian daya akan dikirim ke transmitter secara otomatis.
2
Setelah pemasangan (pairing), matikan mikrofon untuk pengisian daya.
3
Matikan mikrofon (transmitter) sebelum pengisian daya.
Jika mikrofon (transmitter) diletakkan di tempat pengisian daya dengan
keadaan hidup, lampu LED hijau akan berkedip.
Perhatian
DWS-5800T
DWS-5800T
Page 75

Spesifikasi
SISTEM
Rentang kerja
Rentang kerja
Audio sampling
Latensi (delay)
Rentang dinamik
Total distorsi harmoni
Rentang suhu operasi
Sampai 15 m
85 kanal
24Bit / 96kHz
3.4msec less
100dB, A-weighted
0.3% less, A-weighted, tipikal (ref. 1KHz, 100mV/rms)
0°C~+50°C
TRANSMITTER (MIKROFON)
Rentang kerja
Pita frekuensi RF
Daya transmit
Waktu umur operasi
Konsumsi daya
Suplai daya
Dimensi (H × W × D)mm
Berat
Sampai 15 meter
5.7275 sampai 5.820875 GHz
10mW less
Sampai 10 jam (satu kali charge)
820mW
Li-ion 3.7V / 2,200mA
250 × ট40 (Mic Ball ট52)
284g(dengan baterai)
RECEIVER
Pita frekuensi RF
Daya transmit
Audio Output Connector
Konfigurasi
Konsumsi daya
Suplai daya
Dimensi (W × H × D)mm
Berat
5.7275 to 5.820875 GHz
10mW less
¼” Phone Jack × 2, Mixer ¼” Jack × 1
Impedensi tak seimbang
2.64W
Adaptor [SMPS] DC12V/1.5A
208(W) x 45(H) × 110(D)
306g
CHARGER
Suplai daya
Dimensi (W × H × D)mm
Berat
Adaptor(SMPS) DC12V / 1.5A
152.5(W) x 75.5(H) x 81.5(D)
258g
K
E
S
E
L
A
M
A
T
A
N
L
A
I
N
-
L
A
I
N
INDONESIA
K
O
N
E
K
S
I
75
S
I
S
T
E
M
P
E
N
Y
E
T
I
N
G
A
N
Page 76

Bảo đảm đọc hướng dẫn an toàn trước khi sử dụng.
Sản phẩm này sử dụng tần số radio, do đó vui lòng xin phép sử dụng từ tổ chức tiêu
chuẩn của quốc gia .
TIẾNG VIỆTTIẾNG VIỆT
DWS-5800 Hướng Dẫn Sử Dụng
Page 77

1. Đừng sử dụng thiết bị này gần nguồn chứa nước.
2. Chỉ lau chùi bằng khăn khô.
3. Cài đặt theo hướng dẫn của nhà sản xuất.
4. Không lắp đặt thiết bị gần các nguồn sinh nhiệt như lò sưởi, lỗ thông nhiệt, bếp lò,
hoặc các thiết bị sinh nhiệt khác (kể cả ampli).
5. Rút phích cắm khỏi nguồn khi có sấm sét hoặc khi không sử dụng thiết bị trong thời gian dài.
6. Liên hệ sửa chữa sản phẩm ở các điểm dịch vụ đạt tiêu chuẩn.
Nên sửa chữa khi thiết bị có bất kỳ hư hỏng nào như dây nguồn hoặc phích cắm bị hư,
chất lỏng hoặc vật lạ rơi vào thiết bị, thiết bị dính nước mưa hoặc bị nhiễm ẩm, thiết bị
không hoạt động bình thường hoặc bị rơi.
7. CẢNH BÁO : ĐỂ GIẢM THIỂU NGUY CƠ CHÁY NỔ HOẶC ĐIỆN GIẬT,
KHÔNG ĐƯỢC ĐỂ SẢN PHẨM DÍNH NƯỚC MƯA HOẶC Ở NƠI ẨM ƯỚT.
8. KHÔNG ĐỂ THIẾT BỊ NÀY BỊ DÍNH NƯỚC VÀ BẢO ĐẢM KHÔNG ĐẶT CÁC VẬT
DỤNG CHỨA CHẤT LỎNG NHƯ LÀ BÌNH HOA TRÊN THIẾT BỊ.
ĐỂ TRÁNH NGUY CƠ ĐIỆN GIẬT, KHÔNG NÊN TỰ Ý THÁO VỎ TRÊN VÀ VỎ DƯỚI CỦAMÁY.
KHÔNG NÊN TỰ Ý SỬA CHỮACÁC BỘ PHẬN BÊN TRONG THIẾT BỊ.
LIÊN HỆ SỬA CHỮA Ở CÁC ĐIỂM DỊCH VỤ ĐẠTTIÊU CHUẨN.
Hướng dẫn an toàn
77
Page 78

Hướng dẫn an toàn
LƯU Ý CÁC KÝ HIỆU SAU :
Hình mũi tên tia chớp trong tam giác được sử dụng để cảnh báo người dùng các nguy cơ điện giật.
Hình dấu chấm than trong tam giác được sử dụng để cảnh báo người dùng các hoạt động
quan trọng và các hướng dẫn về bảo trì, sửa chữa.
Thiết bị này được thiết kế và kiểm định dưới điều kiện độ cao 2000 mét so với mực nước
biển và chỉ có thể sử dụng ở những nơi có độ cao dưới độ cao 2000 mét so với mực nước
biển. Sử dụng thiết bị này ở độ cao trên 2000 mét so với mực nước biển sẽ gây ra các nguy
cơ cao đến vấn đề an toàn.
78
Page 79

Mic không dây digital đầu tiên trên thế giới sử dụng tần số 5.8GHz.
Hỗ trợ tối đa 85 kênh (1 kênh = 2 Mic), sử dụng 170 Mic cùng một lúc.
Mic cho chất lượng âm thanh tốt với sample rate 24bit & 96KHz.
Thiết kế sang trọng và chắc chắn.
Dễ dàng ghép đôi giữa đầu phát (Mic) và đầu thu (receiver).
Dễ dàng cài đặt kênh cho đầu phát (Mic) bằng giá đỡ sạc pin.
Dây Mic Sách hướng dẫn sử dụng 12V 1.5A adaptor (2 cái)
Đầu phát (2 Mic)
Giá đỡ sạc pinĐầu thu (receiver)
Tính năng của DWS-5800
Thành phần bộ sản phẩm
79
Page 80

1. Ăng-ten
2. MIC1
3. SYNC - Đèn hiệu kết nối Mic 1
4. MODE
5. GROUP CHANNEL Màn hình hiển thị:
6. SELECTOR - Nút chọn
7. SYNC - Đèn hiệu kết nối Mic 2
8. MIC2
9. Ăng-ten
*
Để biết thêm chi tiết về hoạt động của thiết bị, vui lòng tham khảo mục “CÀI ĐẶT HỆ THỐNG”.
Ăng-ten ngoài cho Mic 1
công tắc ghép đôi Mic 1
Đèn sáng khi Mic 1 đã kết nối ,
đèn nhấp nháy khi nhận yêu cầu kết nối của Mic 1
nút bấm dùng trong khi đang ghép đôi.
cho biết nhóm và kênh
thay đổi kênh và nhóm bằng cách sử dụng nút
“+” và “-”
Đèn sáng khi Mic 2 đã kết nối ,
đèn nhấp nháy khi nhận yêu cầu kết nối của Mic 2
Công tắc ghép đôi Mic 2
Ăng-ten ngoài cho Mic 2
Hướng dẫn hoạt động của đầu thu - receiver (mặt trước)
1 9
2 83 4 5 6 7
80
Page 81

1 VOL 2
2 MIC 2
3 MIX
4 MIC 1
5 VOL 1
6 DC12V 1.5A
7 POWER ON/OFF
Chỉnh âm lượng Mic 2.
- Nên chỉnh nút theo hướng 12 giờ (chính giữa)
- Âm thanh của Mic 2 có thể bị méo nhiễu khi chỉnh âm lượng VOL 2
tùy vào độ nhạy input của Mic preamp.
- Xin chỉnh VOL 2 vừa đủ để âm thanh không bị méo nhiễu.
Cổng cắm (loại đầu cắm ¼) của Mic 2.
Cổng cắm (loại đầu cắm ¼) tín hiệu ra của Mic 1 và Mic 2.
Nếu gain input từ Mic preamp không đủ lớn, cần điều chỉnh nút MIX.
Cổng cắm (loại đầu cắm ¼) của Mic 1.
Chỉnh âm lượng Mic 1.
- Nên chỉnh nút theo hướng 12 giờ (chính giữa)
- Âm thanh của Mic 1 có thể bị méo nhiễu khi chỉnh âm lượng VOL 1
tùy vào độ nhạy input của Mic preamp.
- Xin chỉnh VOL 1 vừa đủ để âm thanh không bị méo nhiễu.
Cục chuyển điện DC(DC 12V 1.5A).
Công tắc nguồn mở/tắt của đầu thu.
Hướng dẫn hoạt động của đầu thu - receiver (mặt sau)
1
2 3 4 5 6 7
VOL 2VOL 2MIC 2MIC 2 MIXMIX MIC 1MIC 1 VOL 1VOL 1 DC12V1.5ADC12V 1.5A POWERPOWER
MINMIN MAXMAX MINMIN MAXMAX
ONON
OFFOFF
81
Page 82

1. MIC ball
2. Đèn
*Để biết thêm chi tiết cách hoạt động của công tắc,
xin tham khảo mục “CÀI ĐẶT HỆ THỐNG”.
Vỏ lưới bảo vệ MIC
thể hiện các trạng thái,
điều khiển và thông báo của Mic
3. Công tắc
công tắc mở/tắt và ghép đôi của Mic
Các dạng hiển thị của đèn LEDCác dạng hiển thị của đèn LED
Ý nghĩa trạng thái của MicÝ nghĩa trạng thái của Mic
Đèn màu vàng nhấp nháy vài giây
rồi tắt
→
đèn màu xanh nhấp nháy mỗi 4 giây
Chưa ghép đôi
Đèn màu vàng
→
đèn màu xanh nhấp nháy
(cứ 2 giây 10 lần)
→
đèn sáng màu đỏ
Pin yếu
Đèn sáng màu đỏ
Cảnh báo pin quá yếu
(ngay trước khi tắt nguồn)
Đèn đỏ nhấp nháy
MIC đang ở chế độ sạc pin
Đèn màu vàng nhấp nháy vài giây
rồi tắt.
Mic đã được tắt
Hướng dẫn hoạt động của microphone (transmitter – đầu phát)
1
2
3
DWS-5800T
82
Page 83

Chân cắm để sạc pin và ghép đôi cho MIC 1.
Chân cắm để sạc pin và ghép đôi cho MIC 2.
Đèn màu đỏ sáng suốt thời gian sạc pin của MIC1.
Đèn màu xanh cho biết pin MIC 1 đã được sạc đầy.
nếu công tắc ghép đôi ở mặt dưới của giá đỡ sạc được bật sang
“PAIRING MODE” (“chế độ ghép đôi”), đèn màu trắng sẽ sáng.
Đèn màu đỏ sáng suốt thời gian sạc pin của MIC2.
Đèn màu xanh cho biết pin MIC 2 đã được sạc đầy.
*Để biết thêm chi tiết cách ghép đôi bằng giá đỡ sạc pin, xin tham khảo mục “Cách ghép đôi bằng giá đỡ sạc pin”.
1. Chân cắm MIC1
2. Chân cắm MIC2
3. Đèn hiển thị đang sạc pin củaMIC1
4. Đèn hiển thị đã sạc đầy pincủa MIC1
5. Đèn ghép đôi
6. Đèn hiển thị đang sạc pin củaMIC2
7. Đèn hiển thị pinđã sạc đầycủa MIC2
- Pairing mode : chế độ ghép đôi các kênh cho mic với giá đỡ sạc pin
(chỉ sử dụng khi cài đặt).
- Charging mode : chế độ sạc pin cho Mic.
1. Cổng cắmdây adaptor
2. Công tắcchuyển chế độ
3. Khe dẫn giấudây adaptor
Hướng dẫn hoạt động của giá đỡ sạc pin (mặt trước)
Hướng dẫn hoạt động của giá đỡ sạc pin (mặt dưới)
1 2
3 4 6 75
1
2
3
Chú ý
Vui lòng tắt Mic khi đang sạc pin.
Nếu Mic vẫn mở thì đèn màu xanh trên giá đỡ sẽ nhấp nháy nhanh liên tục để cảnh báo.
83
Page 84

Kết nối với effector (mixer) hoặc ampli powered mixer
Kết nối các Mic bằng cổng “Mix” output
Kết nối với MIC input của ampli powered mixer hoặc effector.
Cổng cắm “Mix” output cho phép 2 Mic đơn có thể hợp (mix) lại thành một cổng output.
Do đó, dù chỉ có một Mic input từ mixer, ampli hoặc đầu karaoke,
bạn vẫn có thể sử dụng được 2 Mic cùng một lúc nhờ sử dụng “Mix” output của DWS-5800.
VOL2VOL 2 MIC 2MIC 2 MIXMIX MIC 1MIC 1 VOL1VOL 1 DC12V 1.5ADC12V 1.5A POWERPOWER
MINMIN MAXMAX MINMIN MAXMAX
ONON
OFFOFF
Đầu cắm ¼
Kết nối các Mic đơn
Kết nối với MIC input của ampli powered mixer hoặc effector.
VOL2VOL 2 MIC 2MIC 2 MIXMIX MIC 1MIC 1 VOL1VOL 1 DC12V 1.5ADC12V 1.5A POWERPOWER
MINMIN MAXMAX MINMIN MAXMAX
ONON
OFFOFF
Đầu cắm ¼
Đầu cắm ¼
84
Page 85

Cài đặt giá đỡ sạc pin
Giá đỡ sạc pin có một bộ phận để lắp giá đỡ cố định vào tường.
Vui lòng tham khảo các hướng dẫn bên dưới khi muốn cố định giá đỡ vào tường.
Bước 1 Khoan bắt ốc các điểm như hình (4 điểm).
Bước 2 Giá đỡ sạc pin được khớp vào giống như hình bên dưới.
2
1
1
1
1
85
Page 86

86
Cài đặt hệ thống
(Cài đặt nhóm, kênh)
Mic không dây DWS-5800 có thể cài đặt kênh đơn giản và dễ dàng ghép đôi đầu phát (Mic)
với đầu thu (receiver).
DWS-5800 hỗ trợ kênh từ kênh 1 ~ 99 bằng sự kết hợp của nhóm và kênh.
(Nhưng số kênh tối đa được hỗ trợ là 85 kênh do có 14 kênh không được phân bổ).
1. Nút “MODE”
Khi nhấn vào nút “MODE”, màn hình sẽ nhấp nháy hiển thị KÊNH.
2. Nút “SELECTOR” -,+
Sử dụng nút “SELECTOR -,+” để thiết lập KÊNH.
3.Nút “MODE”
Sau khi chọn xong kênh, nhấn nút “MODE” lần nữa. Màn hình nhấp nháy hiển thị NHÓM.
Sau đó bạn có thể thiết lập NHÓM giống như cách thiết lập kênh.
4. Nút “SELECTOR” -,+
Sử dụng nút “SELECTOR -,+” để thiết lập NHÓM.
Page 87

Cài đặt hệ thống
(Cách ghép đôi : với đầu thu – ghép đôi MIC 1)
Giữ khoảng cách dưới 50cm giữa đầu thu (receiver) và Mic khi ghép đôi.
Một đầu thu hỗ trợ 2 Mic, xin hãy hoàn tất thao tác ghép đôi cho cả 2 Mic.
1. Nút “MODE”
Màn hình sẽ nhấp nháy hiển thị số KÊNH khi nhấn vào nút “MODE”.
2. Nút “MIC1”
Khi nhấn nút “MIC1”, đèn hiệu kết nối (SYNC) MIC1 sẽ nhấp nháy.
Có nghĩa là MIC1 và đầu thu đã sẵn sàng để ghép đôi.
3. Mở công tắc “MIC 1”
Khi đèn màu xanh sáng lên, ghép đôi đã thành công.
*Nếu ghép đôi không thành công, thì đèn sẽ sáng màu đỏ.
87
Page 88

88
Cài đặt hệ thống
(Cách ghép đôi : với đầu thu – ghép đôi MIC 2)
Giữ khoảng cách dưới 50cm giữa đầu thu (receiver) và Mic khi ghép đôi.
Một đầu thu hỗ trợ 2 Mic, xin hãy hoàn tất thao tác ghép đôi cho cả 2 Mic.
1. Nút “MODE”
Màn hình sẽ nhấp nháy hiển thị số KÊNH khi nhấn vào nút “MODE”.
2. Nút “MIC2”
Khi nhấn nút “MIC2”, đèn hiệu kết nối (SYNC) MIC2 sẽ nhấp nháy.
Có nghĩa là MIC2 và đầu thu đã sẵn sàng để ghép đôi.
3. Mở công tắc “MIC 2”
Khi đèn màu xanh sáng lên, ghép đôi đã thành công.
*Nếu ghép đôi không thành công, thì đèn sẽ sáng màu đỏ.
Page 89

Cài đặt hệ thống
(Cách ghép đôi : với giá đỡ sạc pin)
- Bạn cũng có thể ghép đôi giữa “giá đỡ sạc pin” và Mic (transmitter).
Khi đầu thu (receiver) được đặt ở trong tủ hoặc các vị trí khuất,
bạn có thể dễ dàng ghép đôi bằng giá đỡ sạc pin.
- Xin đọc kỹ các hướng dẫn bên dưới trước khi cài đặt.
Ghép đôi bằng giá đỡ sạc pin chỉ thực hiện được khi đã có sẵn các cài đặt cơ bản.
Nhưng nếu kênh của đầu thu và Mic được thay đổi thì kênh của giá đỡ sạc cũng nên được
đổi lại khớp với kênh đã đổi của đầu thu và Mic.
Chọn sang chế độ “PAIRING MODE” ở mặt dưới giá đỡ sạc.
Khi đèn sáng màu trắng thì lúc này giá đỡ sạc đã sẵn sàng nhận diện tín hiệu kênh từ đầu
thu (receiver).
Bước 1: Thao tác để giá đỡ sạc pin nhận diện kênh từ Mic (đầu phát – transmitter)
1
Đặt MIC 1 đã được ghép đôi với đầu thu vào giá đỡ sạc.
2
Mở MIC 1 lên
Khi MIC 1 được mở,
tín hiệu kênh MIC 1 đang sử dụng sẽ được gửi sang giá đỡ sạc pin.
Nếu ghép đôi thành công,
đèn màu đỏ và màu xanh trên MIC 1 sẽ nhấp nháy liên tục và
đèn trắng ở mặt trước giá đỡ sạc cũng nhấp nháy theo.
4
Sau khi ghép đôi xong,
chọn lại chế độ “CHARGER MODE” ở mặt dưới giá đỡ sạc để sử
dụng bình thường.
5
3
':67
1
1
4
3
4
89
Page 90

90
Cài đặt hệ thống
(Cách ghép đôi : với giá đỡ sạc pin)
Bước này áp dụng khi có Mic được thay thế.
Dễ dàng ghép đôi cho Mic mới được thay thế bằng cách sử dụng giá đỡ sạc pin.
Bước 2 : Cách ghép đôi với giá đỡ sạc pin
Hai Mic phải được đặt vào giá đỡ để nhận tín hiệu kênh từ giá đỡ sạc sang Mic.
1
Mở hai Mic nằm trong giá đỡ sạc pin cùng một lúc.
Đèn xanh và đèn đỏ nhấp nháy nối tiếp nhau sau khi mở MIC,
tín hiệu kênh của giá đỡ sạc sẽ tự động được gửi đến MIC.
2
Sau khi đã ghép đôi, xin tắt Mic để sạc pin.
3
Xin tắt Mic trước khi sạc pin.
Nếu Mic vẫn còn mở được đặt vào giá đỡ sạc pin thì đèn đỏ sẽ nhấp nháy.
Chú ý
DWS-5800T
DWS-5800T
Page 91

Thông số kỹ thuật
HỆ THỐNG
Working range line of sightWorking range line of sight
Operating channelsOperating channels
Audio samplingAudio sampling
Latency (delay)Latency (delay)
Dynamic rangeDynamic range
Total harmonic distortionTo tal harmonic distortion
Operating temperature rangeOperating temperature range
Up to 15m
85 channels
24Bit / 96kHz
3.4msec less
100dB, A-weighted
0.3% less, A-weighted, typical (Ref. 1KHz,100mV/rms)
0°C~+50°C
MIC (ĐẦU PHÁT - TRANSMITTER )
Working range line of sightWorking range line of sight
RF frequency bandRF frequency band
Transmit powerTransmit power
Operating life timeOperating life time
Power consumptionPower consumption
Power supplyPower supply
Dimensions (H × W × D)mmDimensions (H × W × D)mm
WeightWeight
Up to 15m
5.7275 to 5.820875 GHz
10mW less
Up to 10 Hours (one time charge)
820mW
Li-ion 3.7V / 2,200mA
250 × ф40 (Mic Ball ф52)
284g (with battery)
ĐẦU THU (RECEIVER)
RF frequency bandRF frequency band
Transmit powerTransmit power
Audio output connectorsAudio output connectors
ConfigurationConfiguration
Power consumptionPower consumption
Power supplyPower supply
Dimensions (W × H × D)mmDimensions (W × H × D)mm
WeightWeight
5.7275 to 5.820875 GHz
10mW less
¼” Phone Jack × 2, Mixer ¼” Jack × 1
Impedance Unbalanced
2.64W
Adaptor(SMPS) DC12V / 1.5A
208(W) × 45(H) × 110(D)
306g
GIÁ SẠC PIN
Power supplyPower supply
Dimensions (W × H × D)mmDimensions (W × H × D)mm
WeightWeight
Adaptor(SMPS) DC12V / 1.5A
152.5(W) × 75.5(H) × 81.5(D)
258g
91
Page 92

 Loading...