

Page 1
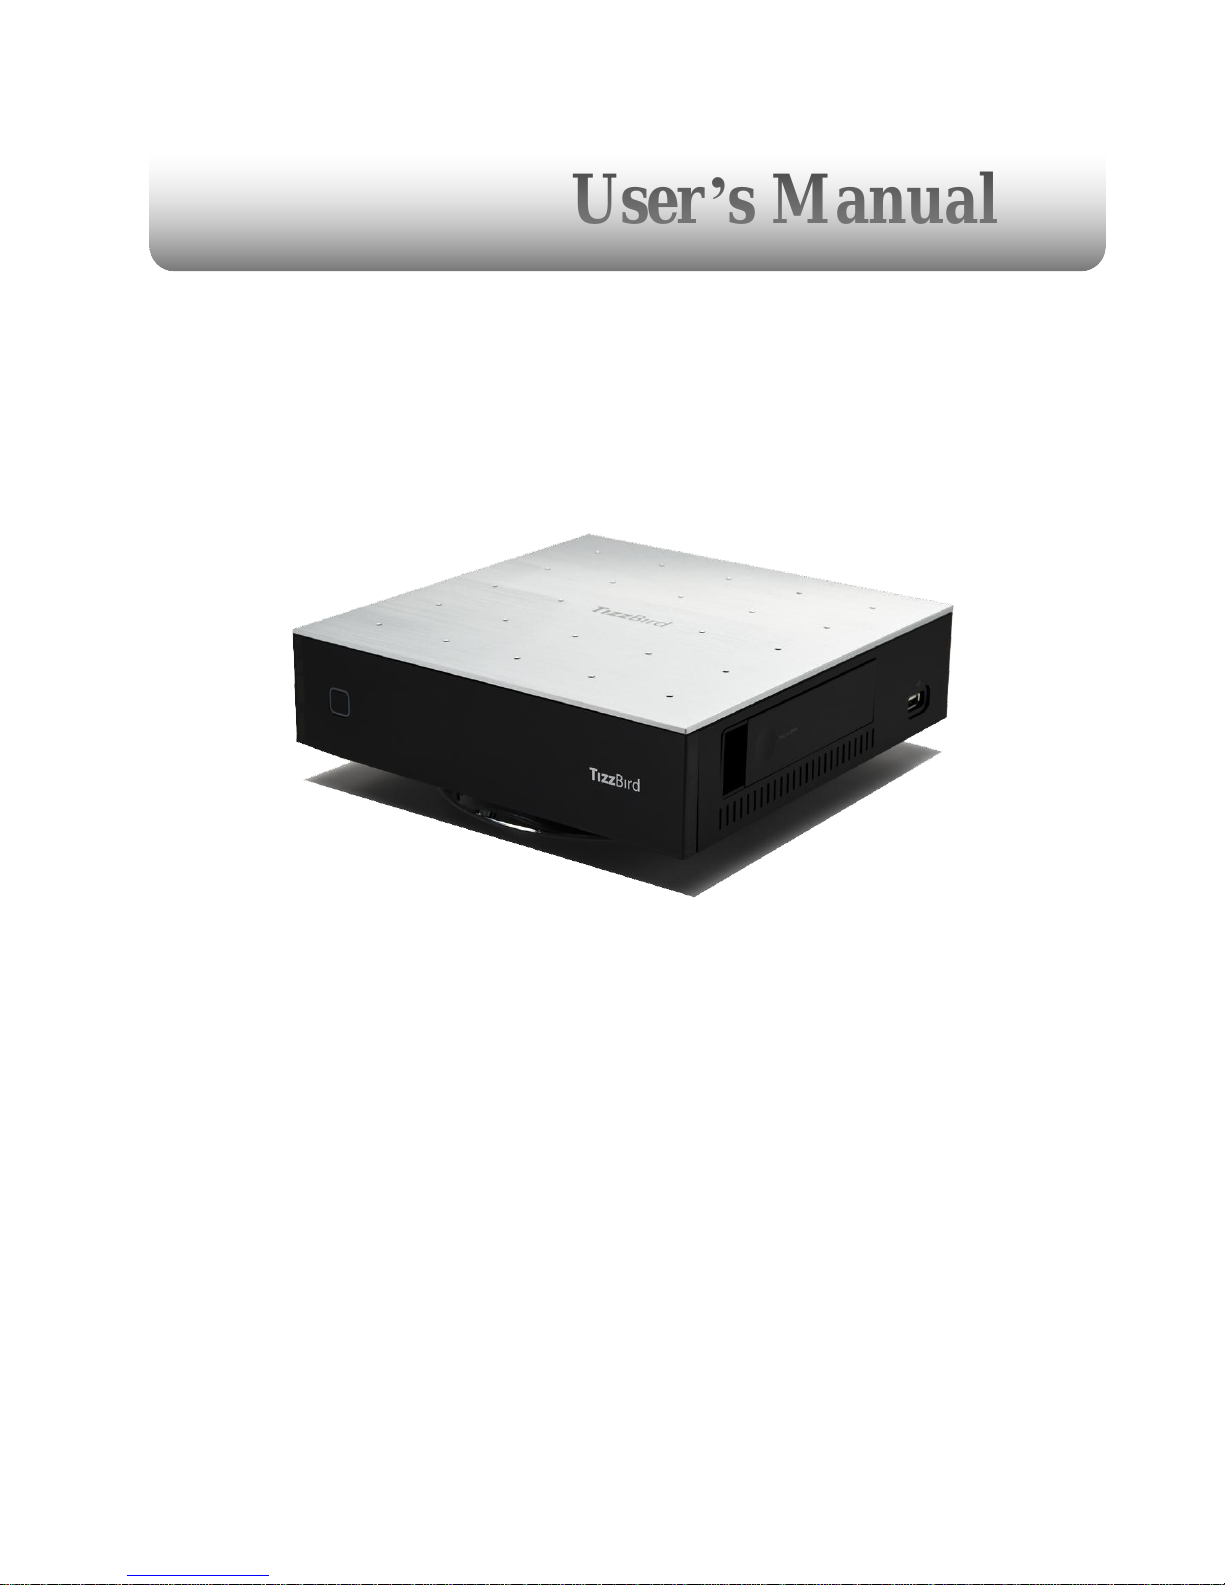
User’s Manual
Smart Media Player
TIZZBIRD™ F30
Rev 1.2x
Page 2

2
Table of Contents
1. Safety Notice ............................................................................. 4
2. Features .................................................................................... 5
3. Specifications ............................................................................ 6
4. Description of Each Part ............................................................. 7
5. Package Contents ...................................................................... 8
6. Installation and Connection ........................................................ 9
7. Using Remote Controller............................................................ 14
8. Initial Screen ............................................................................ 15
8.1 Turning On Power .......................................................................................................... 15
8.2 Setting TV Output ........................................................................................................... 15
8.3 Setting Menu Language ................................................................................................. 16
8.4 Screen Alignment ........................................................................................................... 17
8.5 Audio & Visual Settings.................................................................................................. 18
8.6 Network Settings ............................................................................................................ 20
8.6.1 Configure Wi-Fi Connection .......................................................................................... 20
8.6.2 Configure Ethernet Connection ..................................................................................... 22
8.6.3 Configure Manual-IP Ethernet ...................................................................................... 22
8.7 Turning Power Off, Completely Power Off ................................................................... 23
9. Start-Up and Terminate ............................................................. 25
9.1 Home Screen ................................................................................................................... 25
9.2 Status Bar and Weather Widget ................................................................................... 26
9.3 Change Cover-View Style .............................................................................................. 27
9.4 Movie Browser ................................................................................................................ 28
9.5 Terminate ........................................................................................................................ 28
10. Watching Movie ....................................................................... 29
10.1 Movie Browser ................................................................................................................ 29
10.2 Selecting Device and View ............................................................................................ 30
10.3 Movie Browser Menu ...................................................................................................... 31
10.4 To Add Movie Poster ...................................................................................................... 32
10.5 Resume and Bookmark .................................................................................................. 34
10.6 Movie Playback Menu .................................................................................................... 35
10.7 Playback Speed Control ................................................................................................. 36
10.8 Searching Menu (Time, Chapter, Bookmark) .............................................................. 36
10.9 Playback Information Menu .......................................................................................... 37
10.10 Subtitle Menu .................................................................................................................. 37
10.11 Audio Menu ..................................................................................................................... 37
10.12 Video Parameter Menu .................................................................................................. 38
10.13 Playback 3D Format Movies .......................................................................................... 38
10.14 Skip Playback Position ................................................................................................... 38
11. Listening Music ......................................................................... 39
11.1 Music Browser ................................................................................................................ 39
11.2 Sorting Music .................................................................................................................. 40
11.3 Music Playback Screen ................................................................................................... 40
11.4 Music Playback Menu ..................................................................................................... 40
12. Watching Photo ....................................................................... 41
12.1 Photo Browser ................................................................................................................ 41
12.2 Photo Browsing Menu .................................................................................................... 41
12.3 Photo Wall & Photo Stack .............................................................................................. 41
12.4 Photo Playback Screen .................................................................................................. 42
12.5 Slideshow Control .......................................................................................................... 42
13. Using File Browser ................................................................... 43
Page 3

3
13.1 File Browser Screen ....................................................................................................... 43
13.2 Selecting Device at File Browser .................................................................................. 44
13.3 Register Subtitle Font File ............................................................................................. 44
13.4 Using File Operation ....................................................................................................... 45
14. Connecting Internet ................................................................ 47
14.1 Execute Internet Browser ............................................................................................. 47
14.2 Control Internet Browser .............................................................................................. 47
15. Install & Execute Applications .................................................. 48
15.1 Move Applications at Android Phone to TizzBird ......................................................... 48
15.2 Execute Application ........................................................................................................ 49
16. Settings .................................................................................... 50
16.1 System ............................................................................................................................. 50
16.2 Audio and Visual ............................................................................................................. 53
16.3 Movie ............................................................................................................................... 55
16.4 Music ................................................................................................................................ 56
16.5 Photo ............................................................................................................................... 57
16.6 Network ........................................................................................................................... 57
16.7 Cover-View ...................................................................................................................... 58
17. Connecting Network Server or NAS ............................................ 59
17.1 Network connection using NFS ..................................................................................... 59
17.1.1 Downloading TizzNFS Server ........................................................................................ 59
17.1.2 Executing TizzNFS Server & Configuration .................................................................. 59
17.1.3 Downloading other NFS Server ..................................................................................... 60
17.1.4 Executing freeNFS Server & Configuration .................................................................. 60
17.1.5 Connecting NFS Server at Device ................................................................................. 61
17.2 Network Connection using Samba ............................................................................... 63
17.2.1 Activating PC Share ........................................................................................................ 63
17.2.2 Connecting Samba Server at Device ............................................................................ 63
17.3 Accessing Network Drive at File/ Media Browser ....................................................... 65
18. Firmware Upgrade .................................................................... 66
18.1 Online Upgrade (O.T.A – Over The Air Upgrade) ......................................................... 66
18.2 Local Upgrade ................................................................................................................. 66
18.2.1 Upgrade at Settings Screen ........................................................................................... 66
18.2.2 Upgrade at File Browser ................................................................................................ 67
Page 4
4
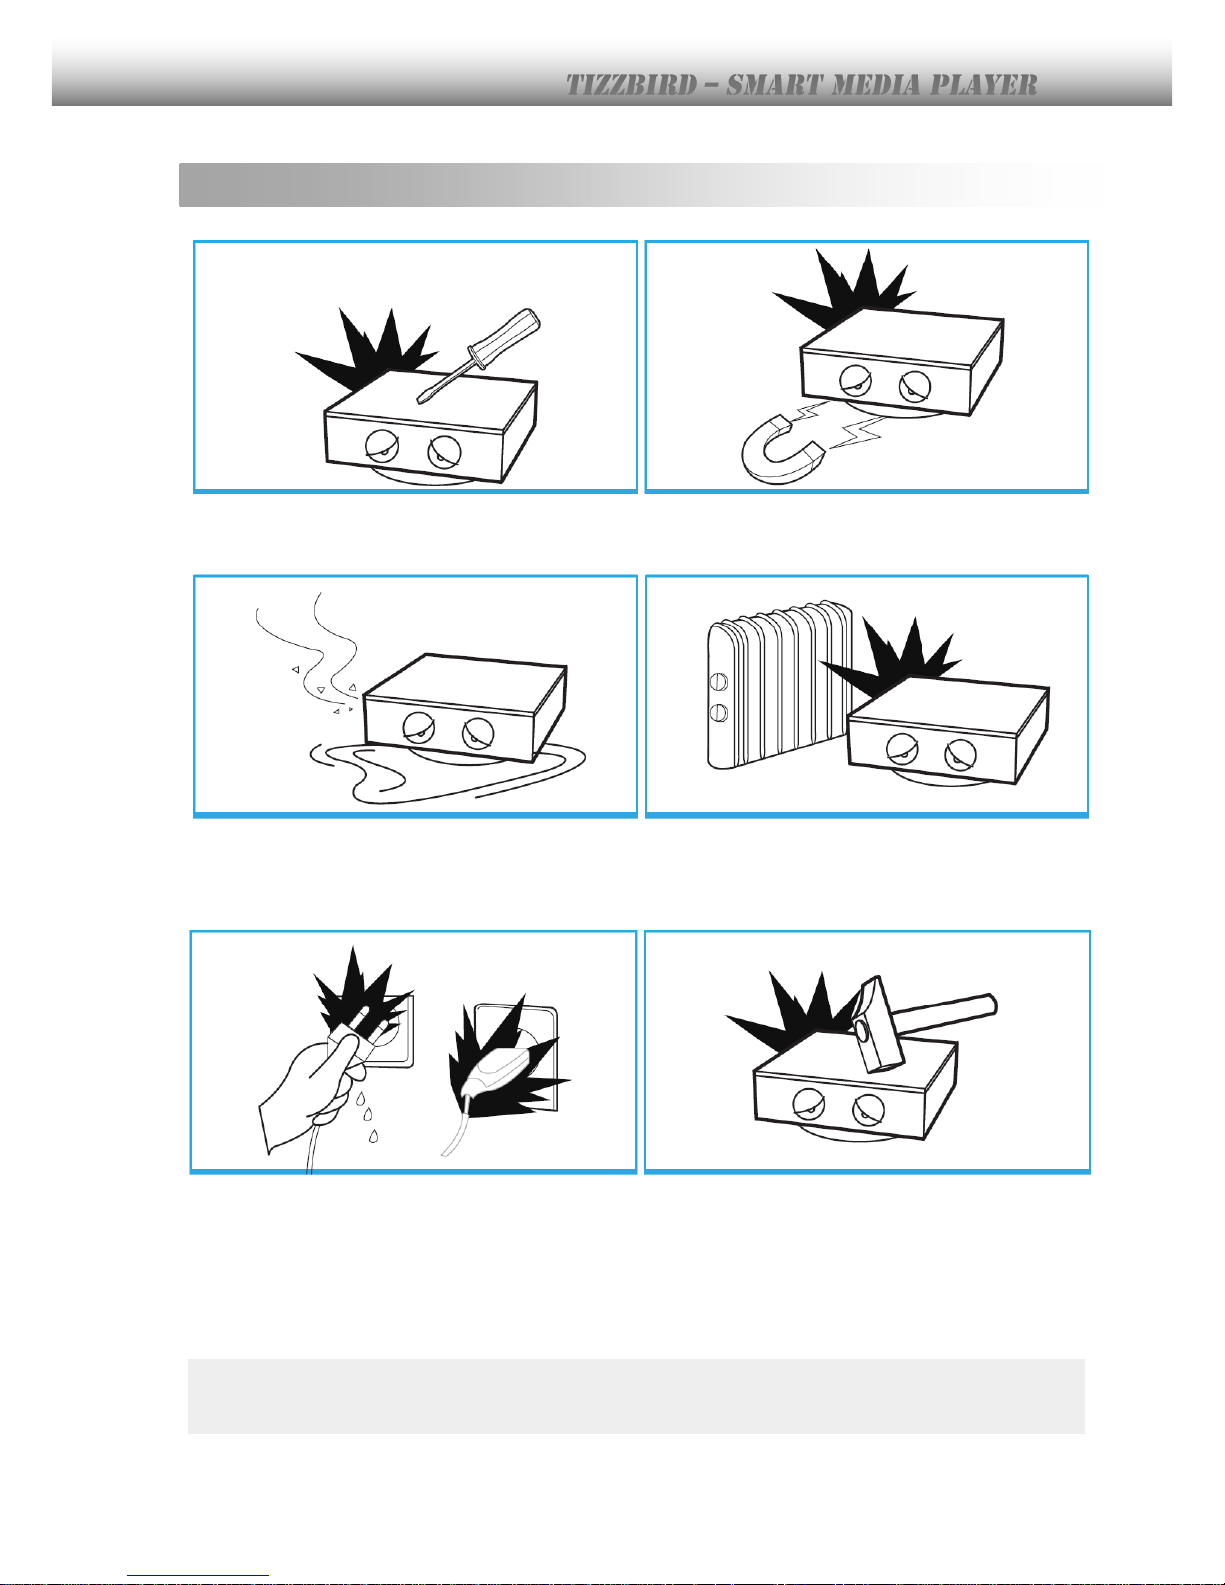
1. Safety Notice
Do not try to disassemble the unit. It may cause
malfunction or fire.
Keep away the unit from magnetized devices. It
may erase the data stored in the HDD drive
inside.
Do not place the unit in places that are exposed
to oil, water, dust, humidity, rain or wind.
Keep away the unit from overheated areas, such
as heaters. Place it well ventilated location.
Ensure that a free airflow is maintained around
the unit.
Do not touch the power plug with wet hands or
use defective power cables and electric outlets.
It may cause electric shocks or fire.
Do not drop or shock the unit from heights.
Doing so may cause serious damage to the HDD
inside.
Please install the unit nearby the socket-outlet and easily accessible place. Unplug the
power cable when the device is not used for a long time.
Page 5
5
2. Features
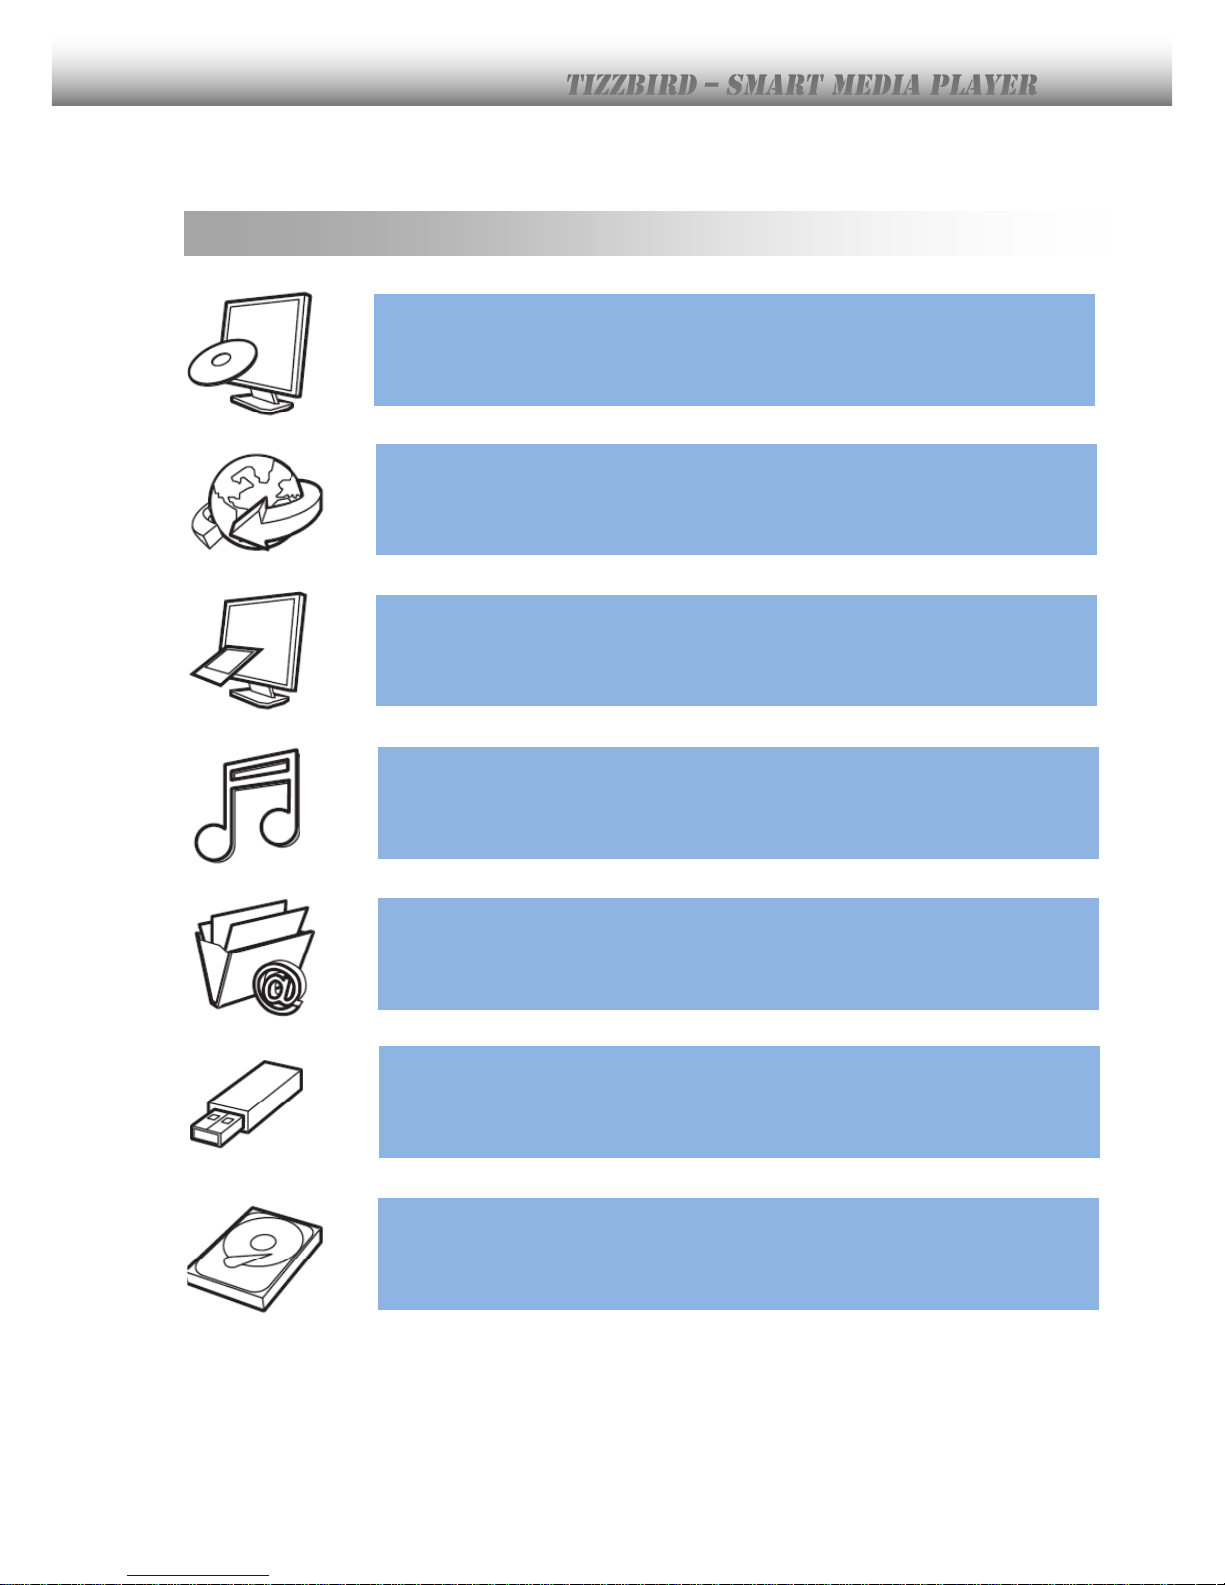
Tizzbird playbacks various full HD movie contents including HDMV and DVD backup
formats as well as AVI, MKV, XVID and TS formats on TV. It supports most recent
video formats such as H264 and VC-1.
TizzBird provides a full web-browsing capability very similar like PC. Mouse and
keyboard can be attached to support various inputs, which enable slick Internet
surfing even on the big screen TV.
TizzBird playbacks high resolution photo images on TV. It can slideshow the photos
while playing back the music in background. Transition effects such as fade-in-out
or zooming can be applied during transition of each photo.
TizzBird playbacks high quality lossless music such as FLAC, WAV up to 24bit/
96Khz. It also supports compressed MP3, OGG, AAC and CUE format thru high
fidelity Wolfson DAC.
TizzBird runs applications on TV exact same APPs installed on the Android
Smartphone without any conversion. This also includes 3D games or 3D APPs that
utilize the superb OPEN-GL 3D accelerator. Some APPs that fixed screen-aspect
ratio cannot be applicable in some cases.
It also supports gigabit Ethernet which enables fastest networking ever before.
TizzBird supports NFS, SAMBA, uPnP network protocols to connect various servers.
It also has multiple mounting drive options and automatic browsing capability
which maximize the network connection experience.
TizzBird can be used as an external USB 3.0 storage thru connecting PC. TizzBird
also supports playback the contents at USB flash drive or external HDD thru
connecting USB host ports.
Page 6
6
3. Specifications
Model
TizzBird F30
System
TCC9302 1Ghz CPU/ 512M Memory/ 2GB NAND flash
Booting time from stand-by is less than two seconds.
OS
Android Rev 2.3 Gingerbread
Video
Format: AVI/ MKV/ MPG/ WMV/ VOB/ TP/ TRP/ M2TS/ MOV/ FLV/ IFO/
ISO/ HDMV
Codec: MPEG 1/2/4, H264, XVID, WMV9([email protected]) VC-1(AP@L3)
Resolution: Max 1080p 60Hz
Audio
MP3/ OGG/ WAV/ AAC/ FLAC/ APE/ WMA
Dolby Digital / DTS Down Mixing and Pass-thru
Image
JPG, JPEG, BMP, PNG, GIF, TIF
Connection
USB 2.0 Host Port 3 EA (Current Max 500mA / Port)
USB 3.0 Device Port 1EA (Max Transfer Rate 5Gbps)
Gigabit Ethernet,
Wireless Wi-Fi 802.11n (Optional)
Network Protocol : Samba (CIFS)/ NFS/ uPnP
Video Output
HDMI 1.3a / Component(YPbPr)/ Composite
Audio Output
Digital: Coaxial and Optical Output / Analogue: Stereo RCA Output
File System
NTFS, FAT32
Subtitle
smi, smil, sub, sub/idx, srt, ssa, ass
Power
DC 12V / 3A Adapter, Standby power consumption < 0.4w
Languages
English, French, German, Spanish, Italian, Portuguese, Vietnamese,
Swedish, Czech,Norwegian, Danish, Japanese, Korean, Traditonal Chinese
Dimension
215 x 215 x 59 mm
Page 7
7
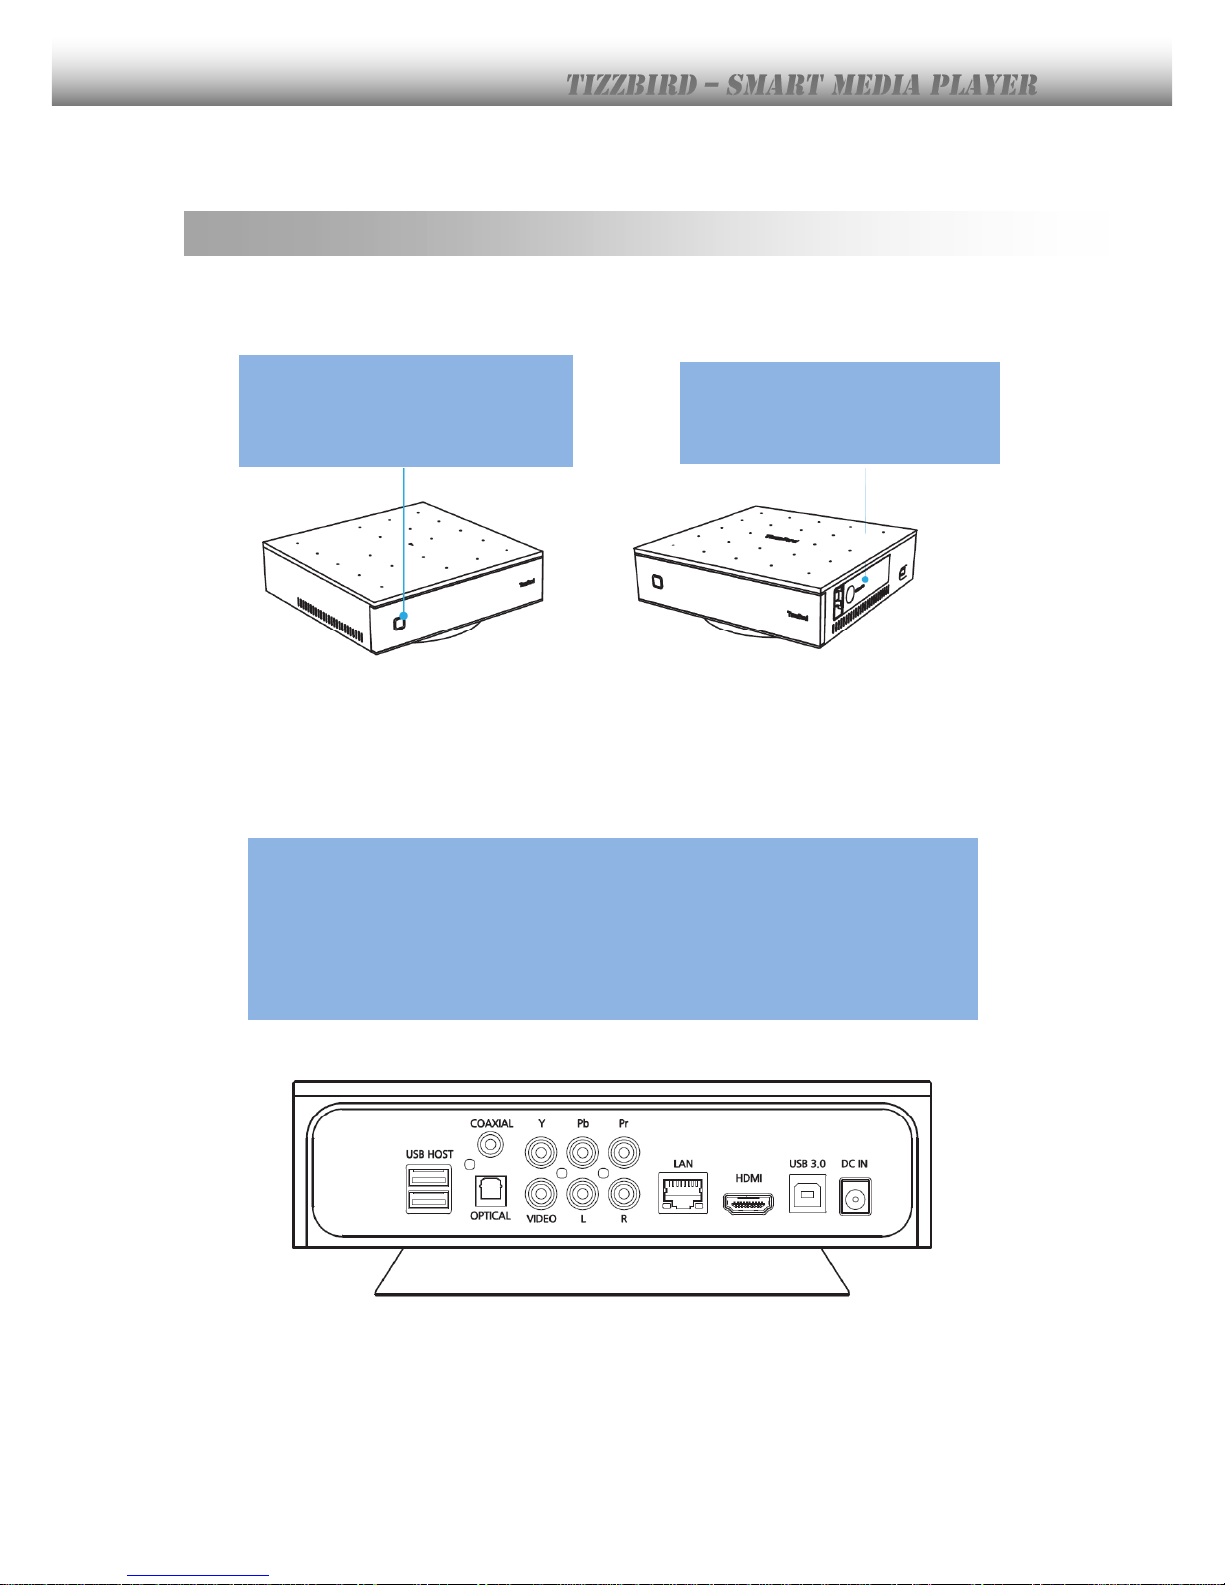
4. Description of Each Part
Power Button
Turn ON/OFF power of the unit.
Smart HDD Rack
Install/ uninstall the HDD easily
with this RACK
Connectors
Please connect the unit to AV port of the TV or AV receiver. Please connect
Ethernet cable or install the Wi-Fi USB dongle for connecting the network.
* There’s another USB host port at the side.*
Page 8
8
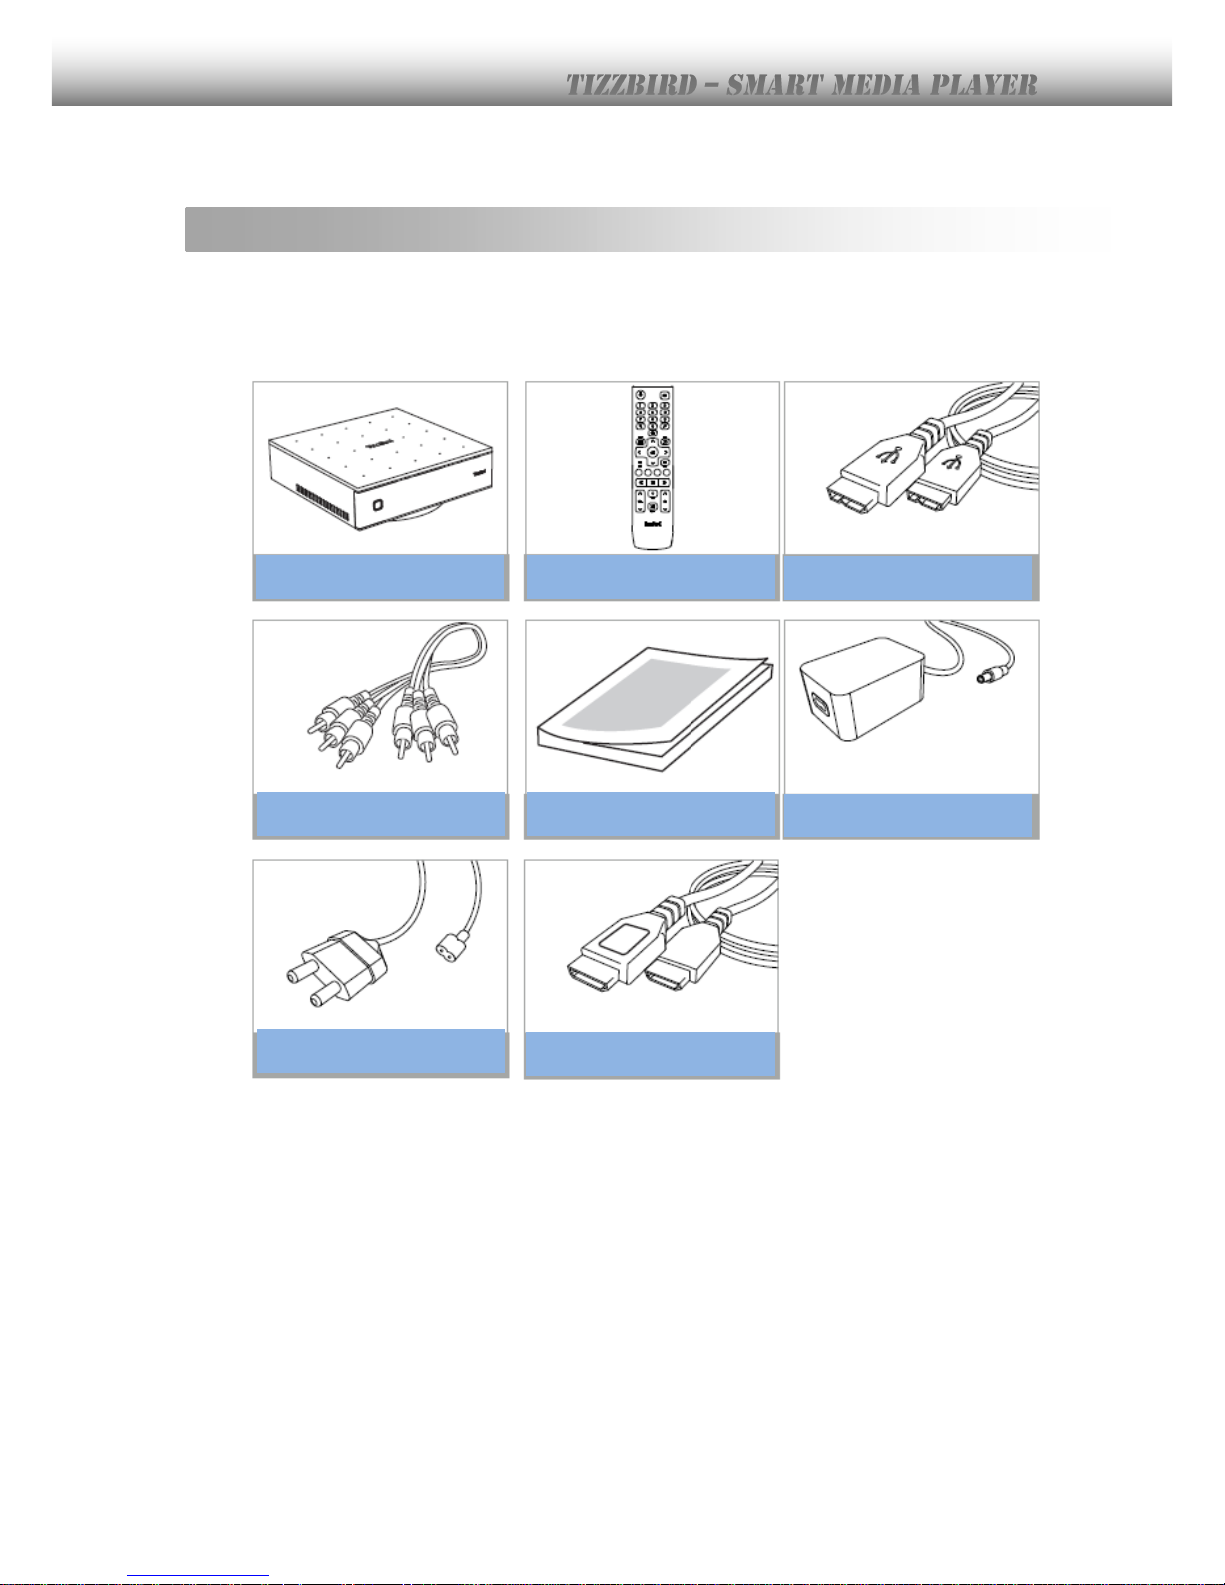
5. Package Contents
The TizzBird package contains the following items. The shape of items described below may
slightly different from the actual contents.
Main Unit
Remote Controller
USB 3.0 Cable
A/V Cable
Quick Guide
Power Adapter
Power Cable
HDMI Cable
Page 9
9
6. Installation and Connection
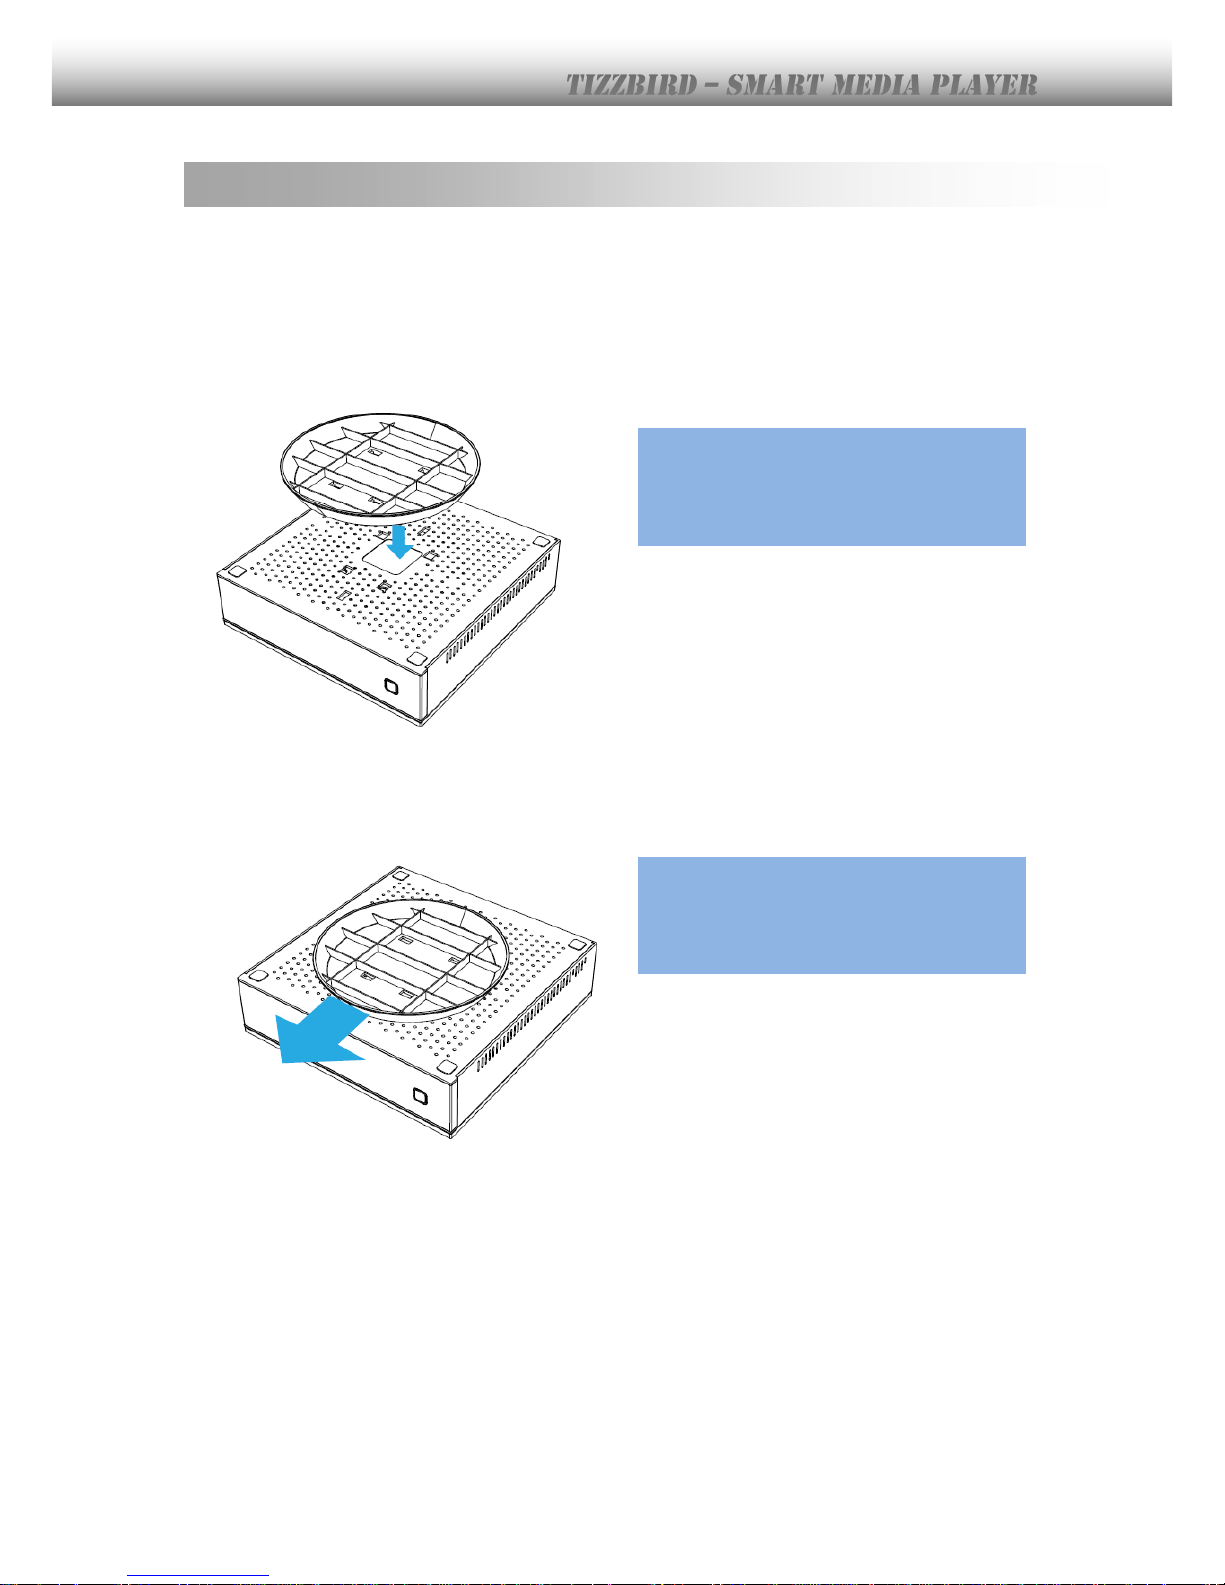
Pedestal Assembly
This is a guide for assembly of pedestal into the main unit. No screw needed.
Find out six bumps of the pedestal and
assembly them with six holes of the
bottom side of the main unit.
Push the pedestal to the front side
until the “CLICK” sound.
Page 10
10
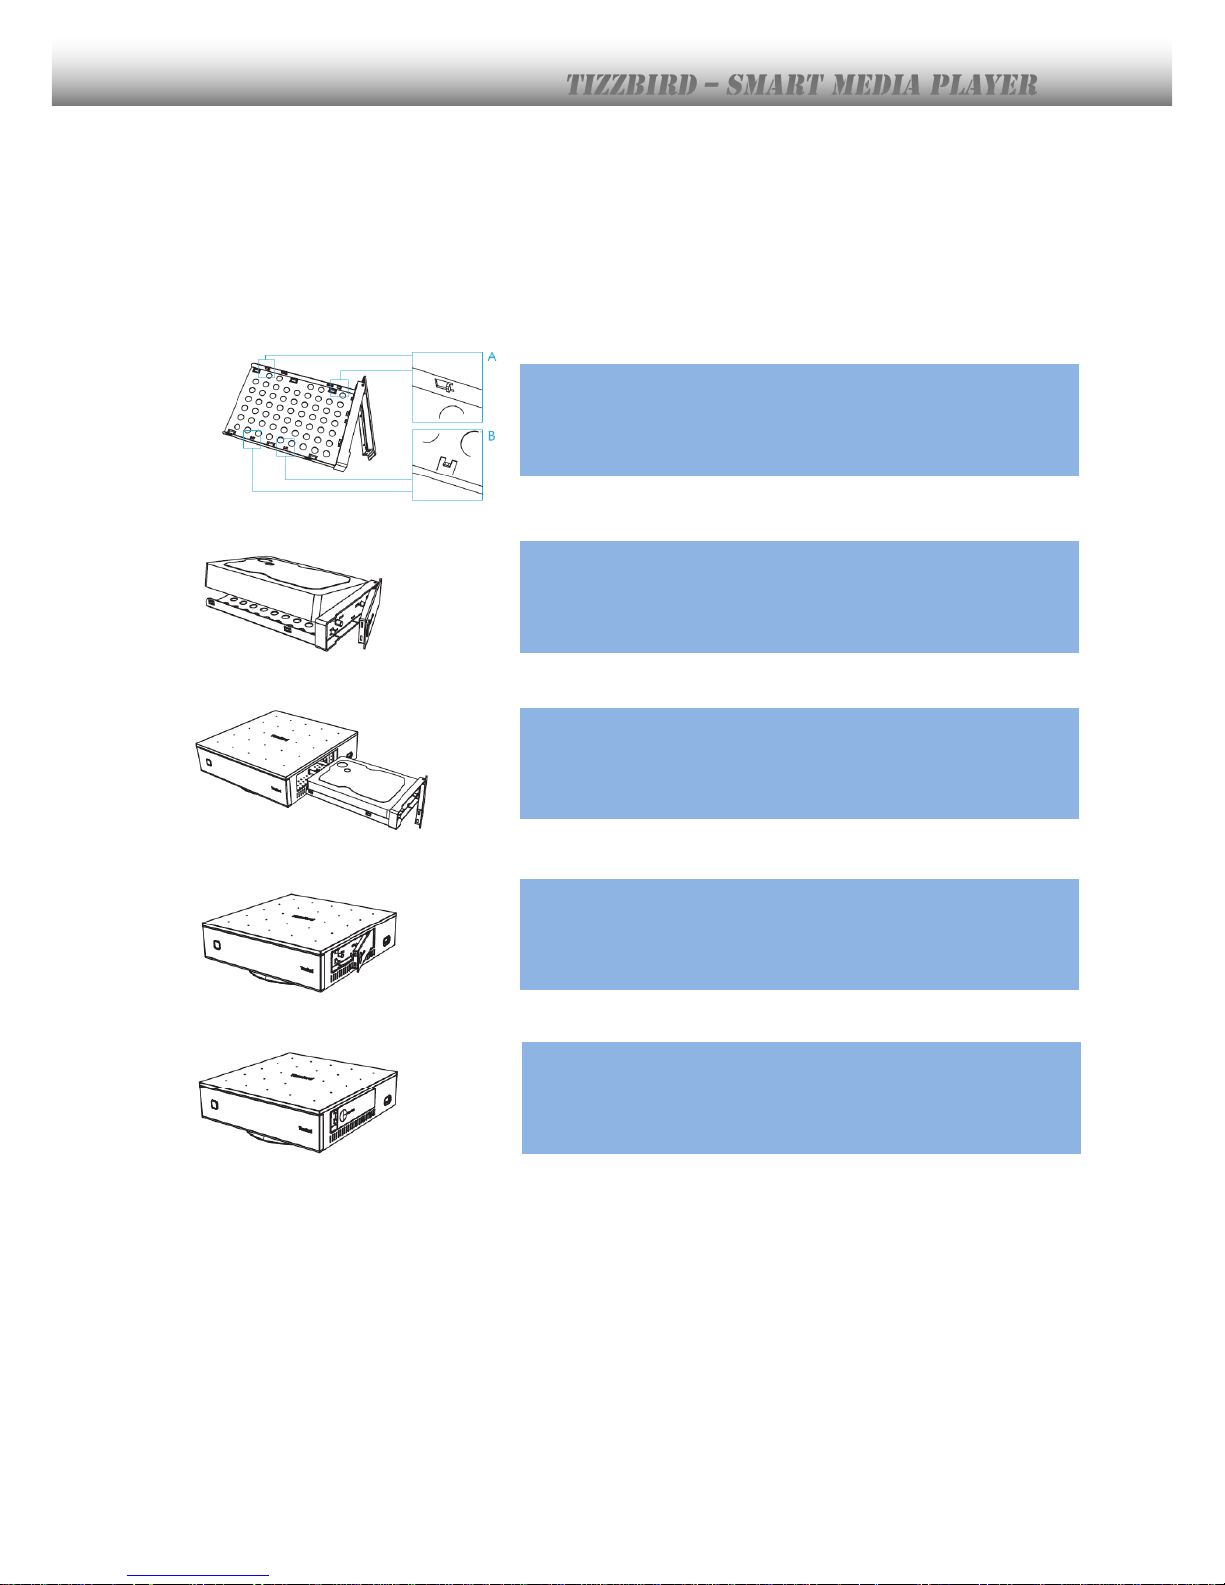
HDD Installation
This is a guide for installation of HDD into the rack. No screw needed
Before install the HDD into the rack, please check the
four bumps on the rack. There are two A bumps on the
side, and two B bumps on the bottom.
Find out the side holes of HDD, and assembly them with
two A bumps. Insert the HDD first on the side. Then
assembly the bottom holes of HDD with two B
Insert the rack smoothly into the main unit. Please make
sure that handle of rack is open status, before insertion.
Push the rack until it reaches internal end of the unit.
Close the handle of the rack after insertion.
Page 11
11
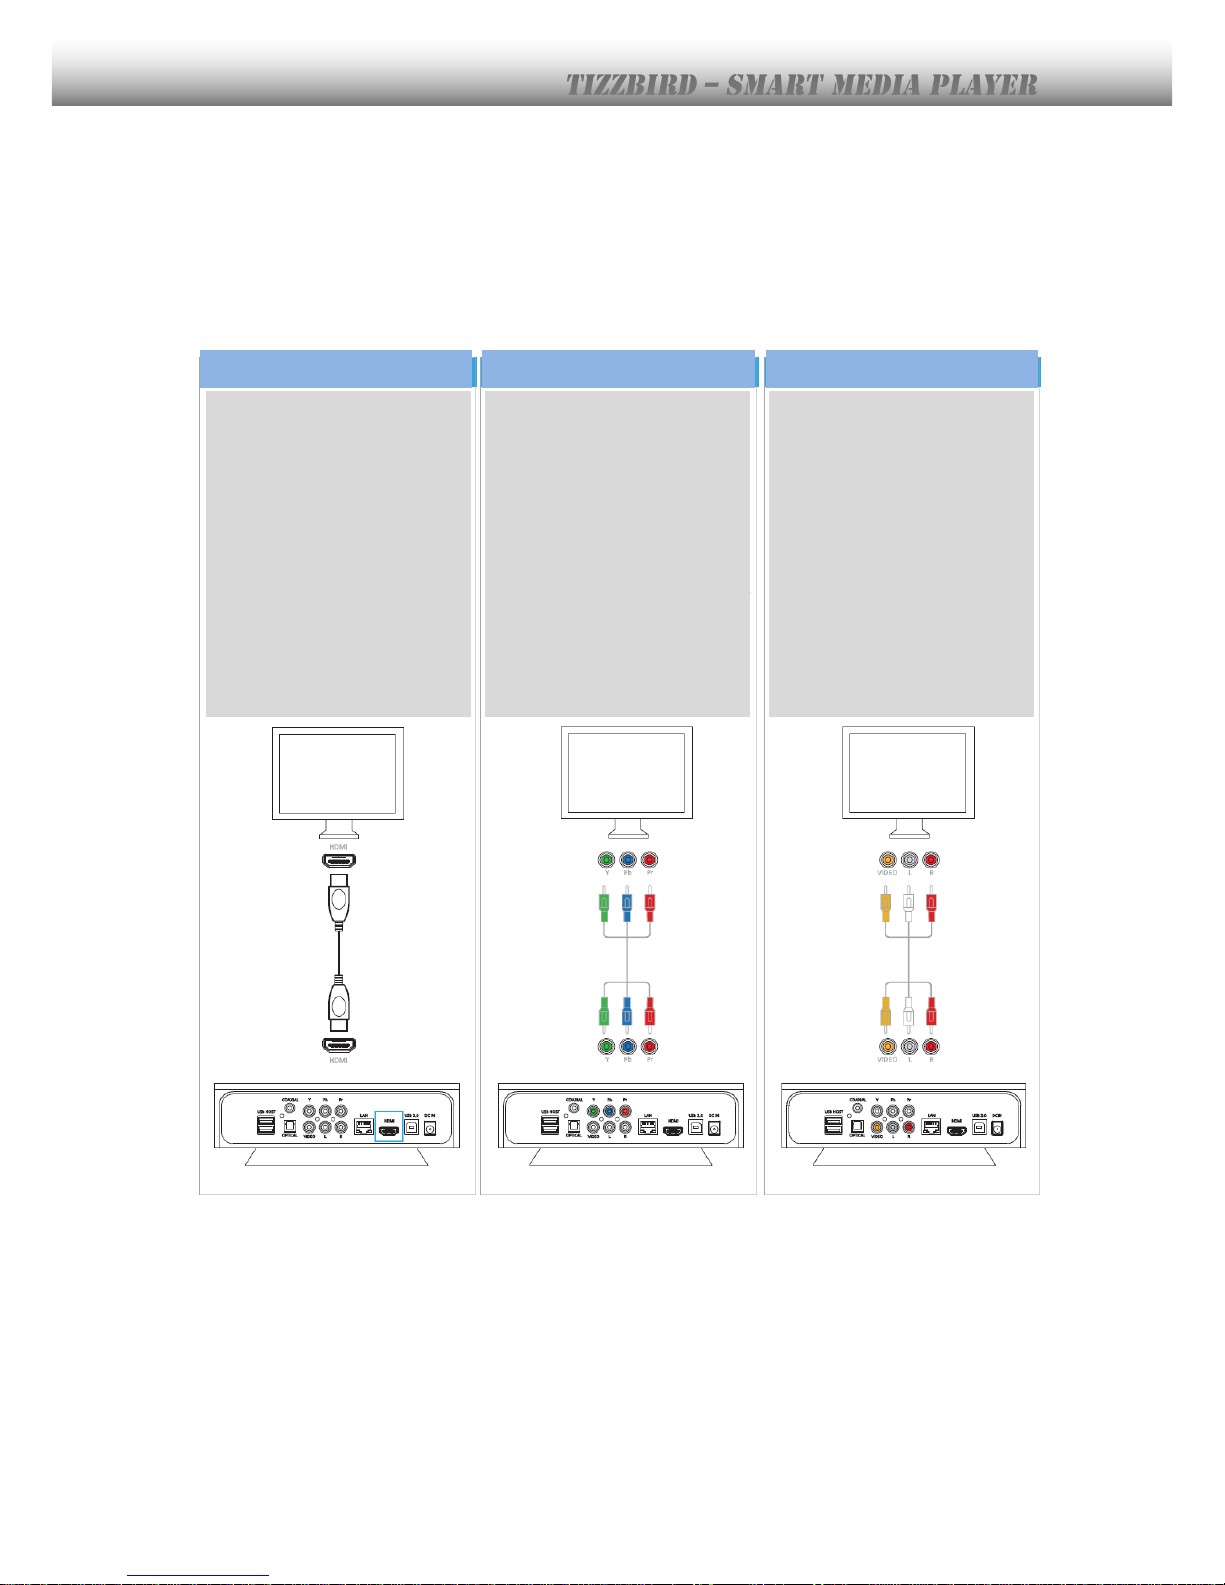
Connecting the Video
The TizzBird supports HDMI, Component and Composite video output for connection to
a TV, and each output needs to be configured in the settings browser depending on
what cable is being used.
Connection to HDMI Out
Connection to Component
Connection to Composite
Connect the TizzBird output
to your TV using an HDMI
cable. 1080p full HD
contents can be output as
1080p only thru HDMI.
HDMI can also transfer the
audio signal and no need to
connect another cable for
audio.
Connect the TizzBird output
to your TV using the
component video cable.
Select an appropriate video
input mode on you TV until
you get the main page of
the TizzBird. For the audio,
please connect the stereo
cable (Red/White one).
Connect the TizzBird output
to your TV using the
included Composite (Yellow
one) video cable. Select an
appropriate video input
mode on you TV until you
get the main page of the
TizzBird. For the audio,
please connect the stereo
cable (Red/ White one),
Page 12
12
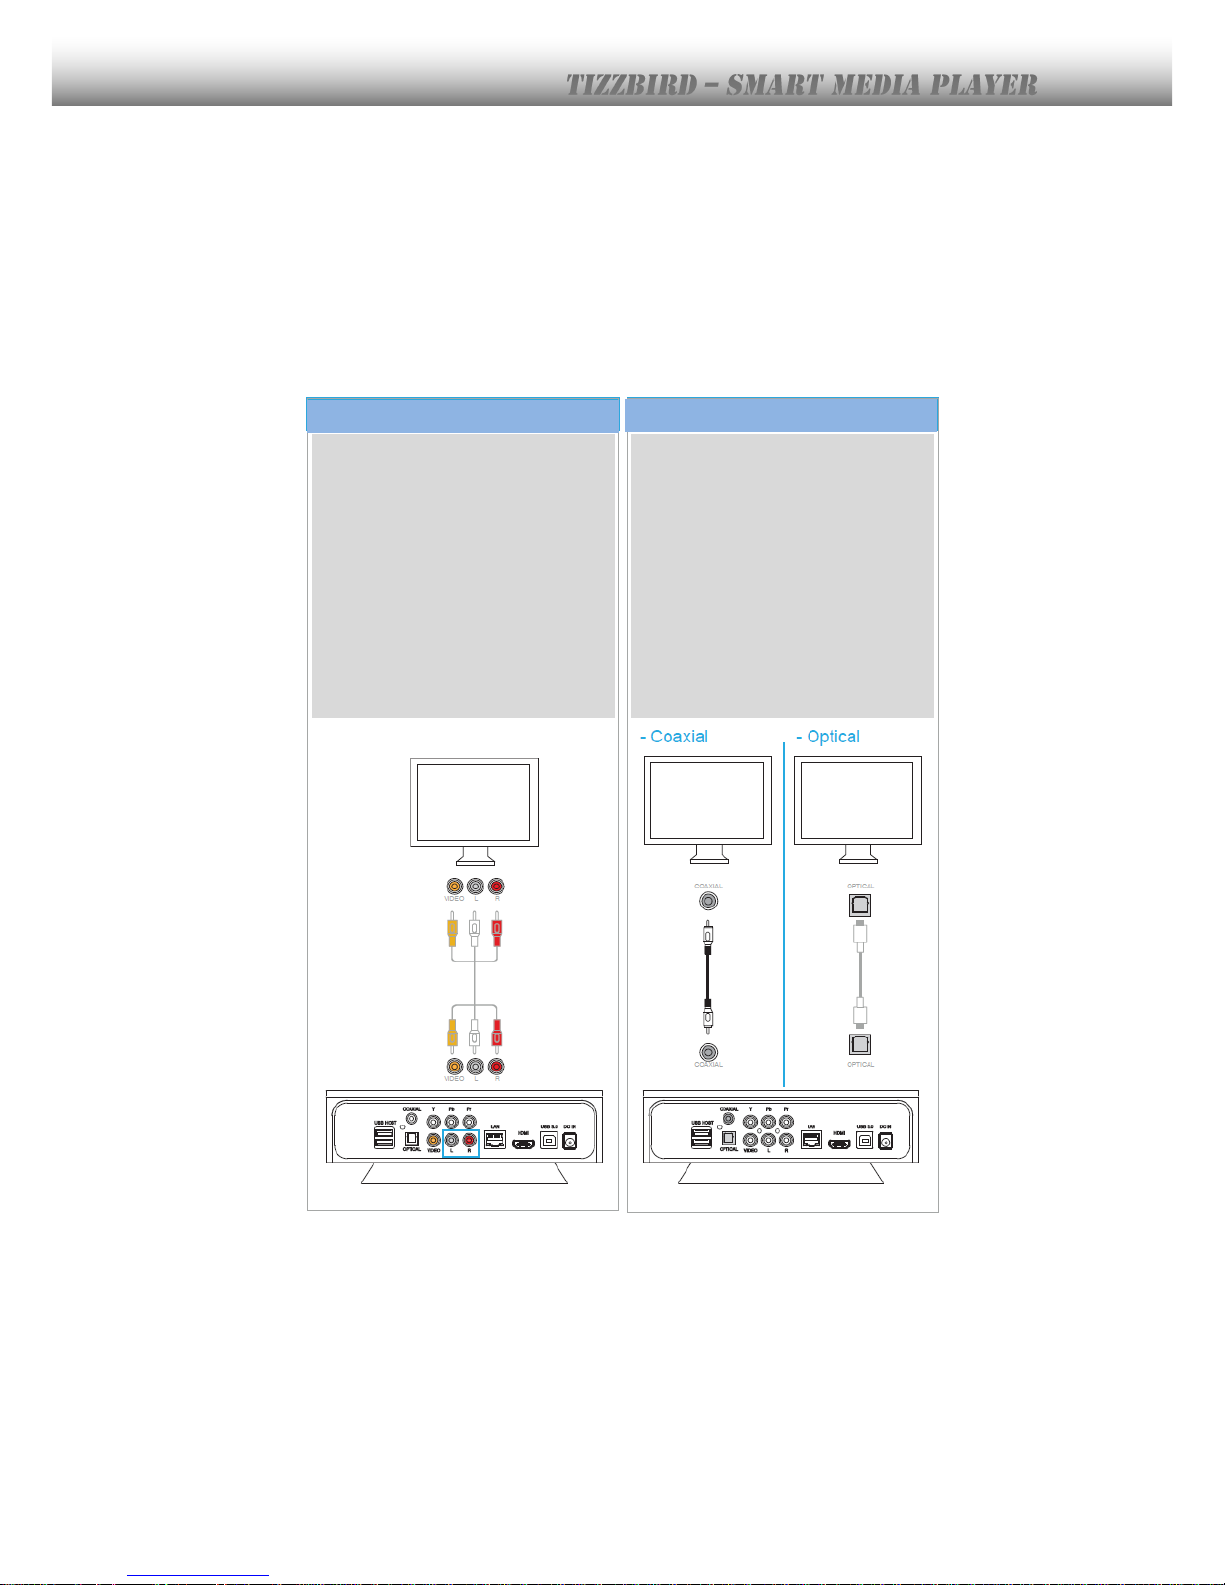
Connecting the Audio
The unit provides RCA analog stereo output, coaxial and optical digital output and HDMI
to connect the audio device like AV receiver and TV. Please connect to audio outputs to
appropriate port of audio device. Please select the appropriate input at the audio device
using remote controller after connection.
Connection to TV
Connect the two audio cables,
the white one on the left side
and the red one to the right
side, to the appropriate AUDIO
terminal on your TV.
Connection to AV Receiver
Connect the coaxial or optical
cable to multi-channel AV
receiver. The compressed audio
stream will be directly
transferred to the AV receiver
and you can enjoy the
multichannel surround sound.
Page 13
13
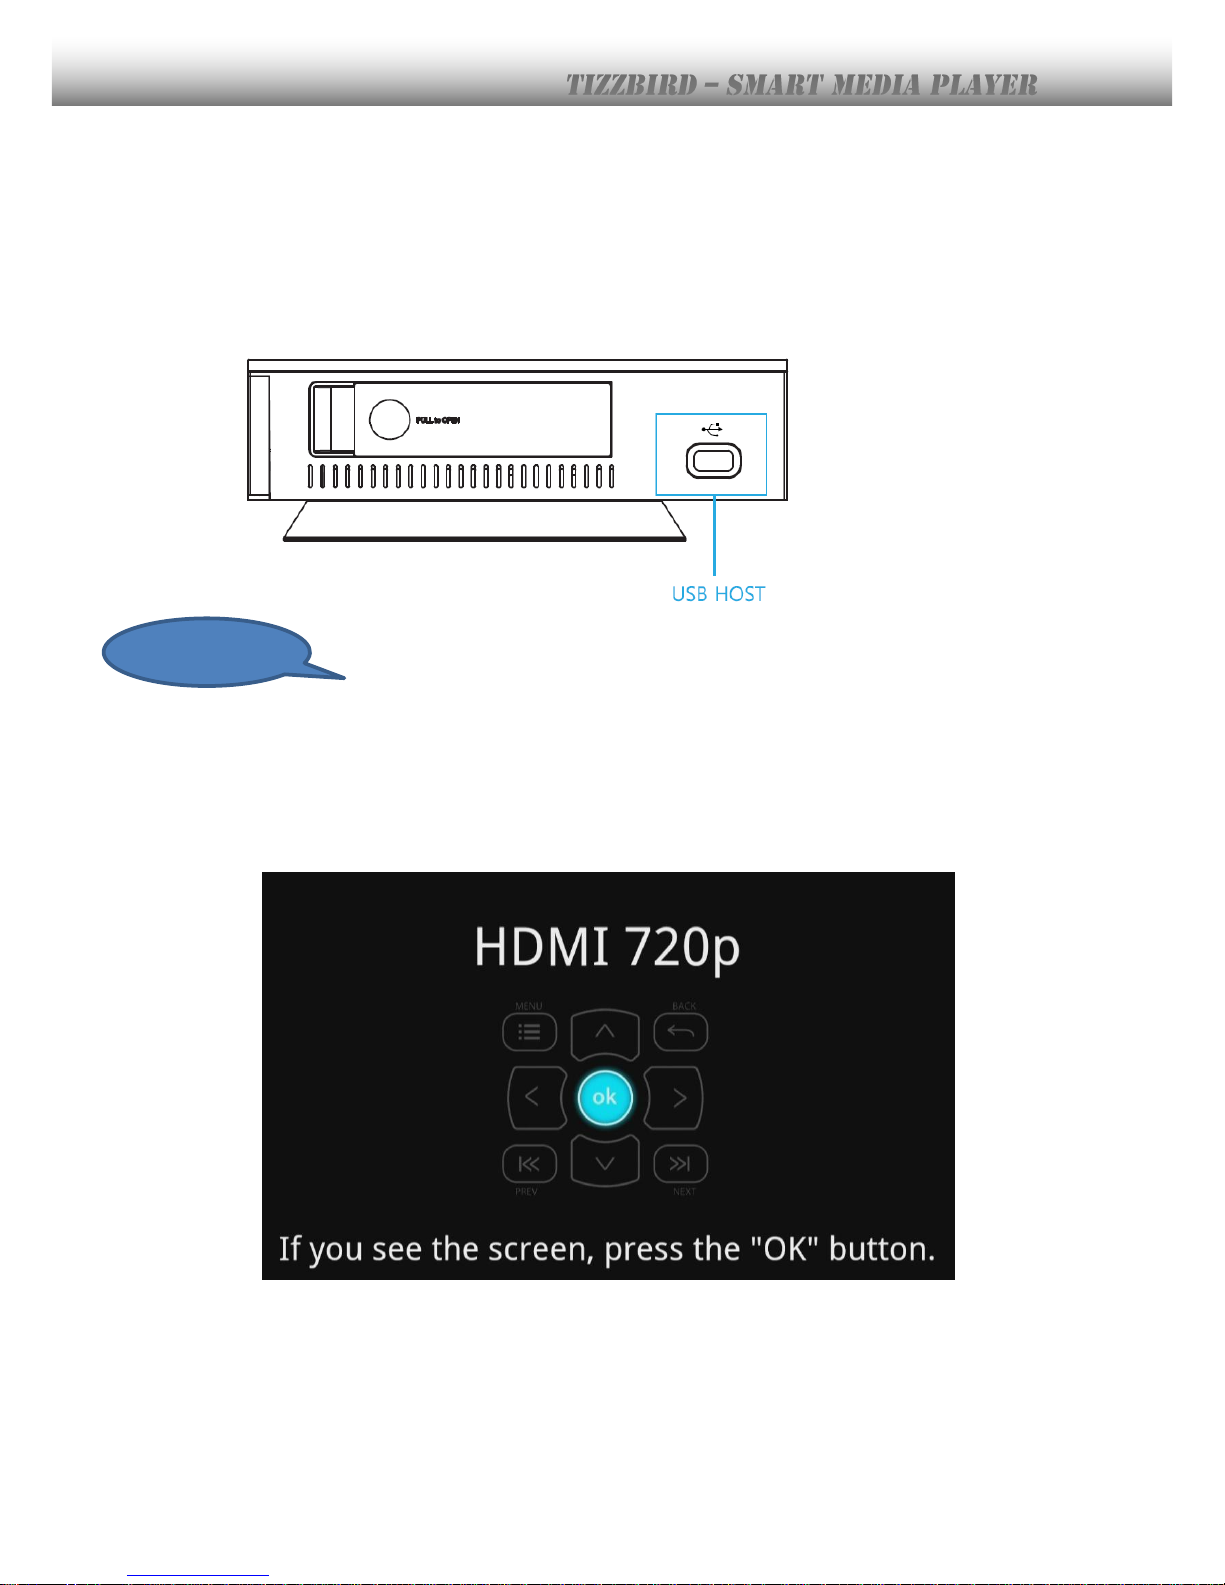
Connecting USB Device
TizzBird provides three USB 2.0 host ports to connect various external devices, such as
FLASH MEMORY drive, external USB HDD enclosure, digital camera/camcorder, keyboard &
mouse, or Wi-Fi USB dongle.
Initial Display Setup for TV
1) Please connect AV cable with TV and connect the power supply cable to the unit. Turn on
the power using
<POWER>
button on remote or POWER key on the front side of the unit.
2) Video Configuration
Wait until be able to see below screen and press <OK> button. Then select menu language.
3) If the initial TIZZBIRD screen is seen, select the “SETTINGS” browser at the home screen,
then configure the SYSTEM/ AUDIO & VISUAL SETTING, etc.
MOUSE/KBD
Page 14
14
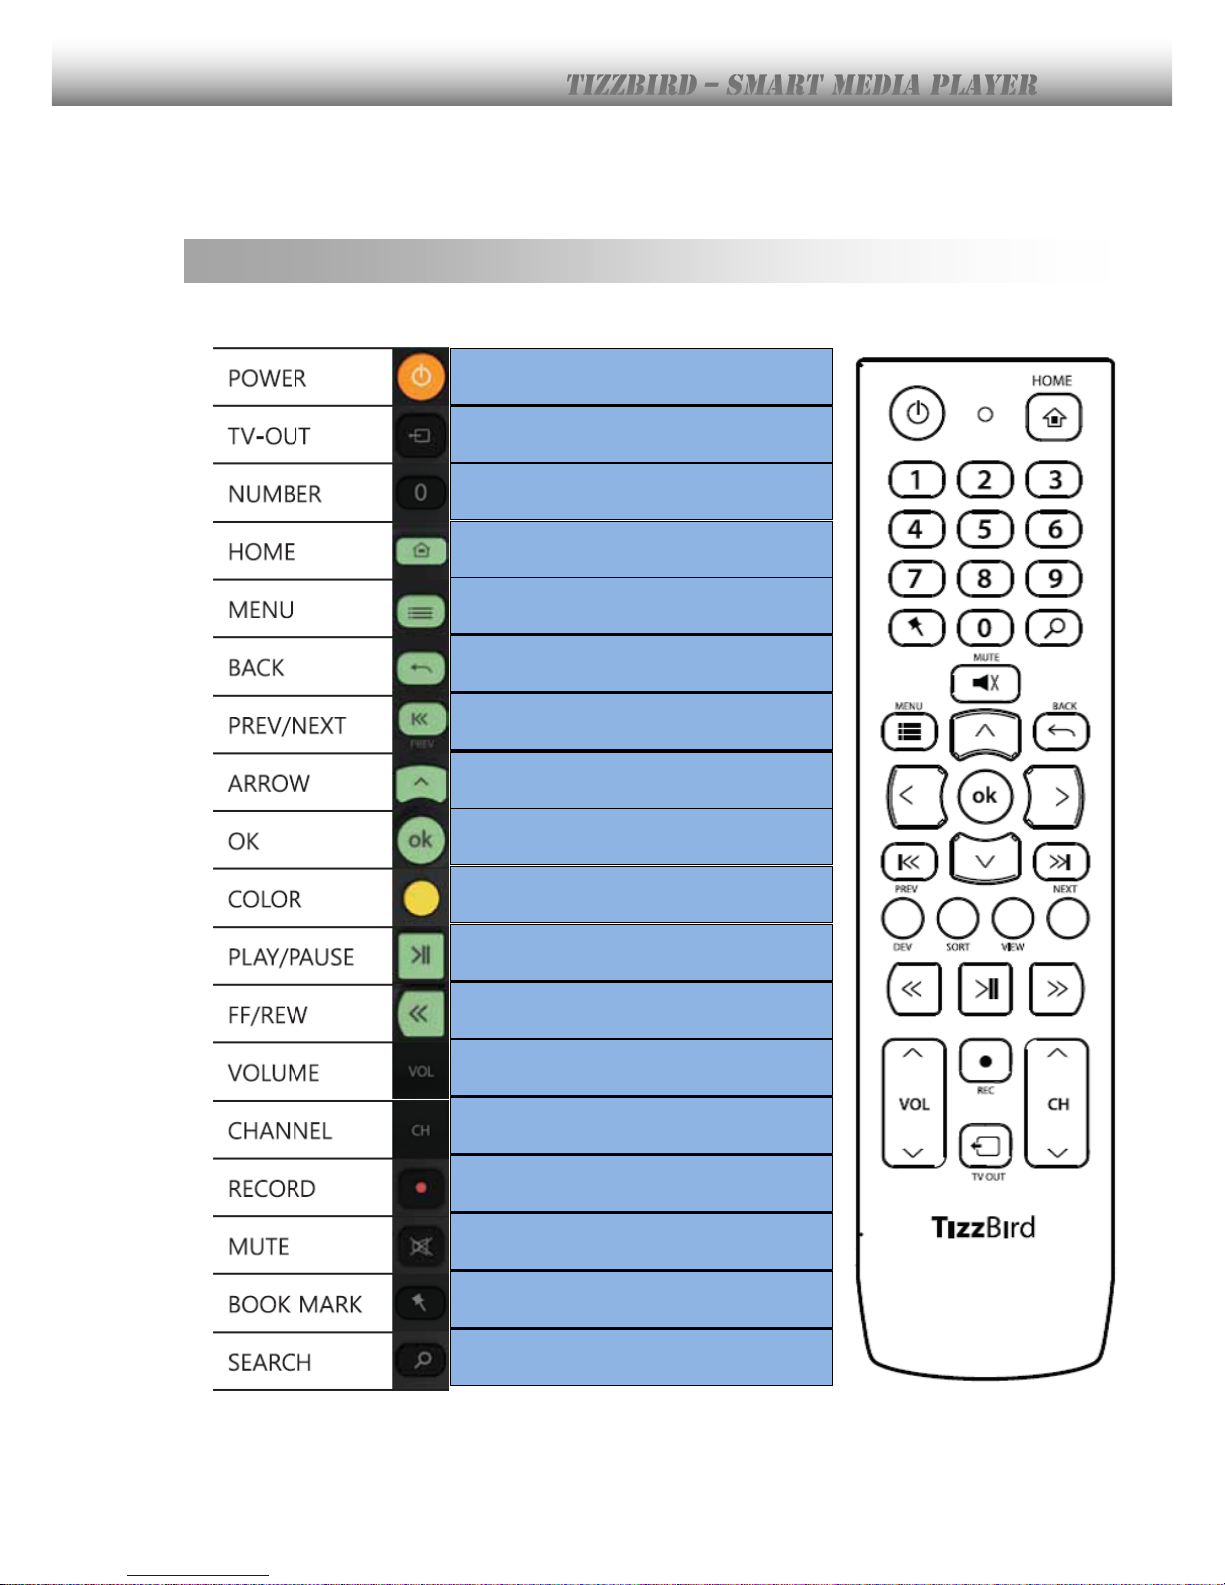
7. Using Remote Controller
Turn power ON/OFF
Change the TV Output mode
Input numbers
Go to HOME screen
Pop-up MENU screen
Resume to previous screen
Move to previous /next item (page)
Move to each directed item
Select
Optional “hot” context button
Play or Pause
Fast-Forward and Rewind
Volume Up/ Down
Channel (PVR) or Sync (Subtitle) Up/Down
Record (PVR)
Mute the audio
Bookmark the current scene
Time/ Chapter/ Bookmark Search
Page 15
15
8. Initial Screen
8.1 Turning On Power
Press
<POWER>
button on the remote or press the power key at front panel to turn on the
power. The unit will start boot-up.
LED will blink fast during the booting. LED will keep fade-in & out during normal operation
after booting.
8.2 Setting TV Output
The TV-OUTPUT selection screen will pop-up and switch various resolutions if TV-OUTPUT is
not configured yet, like chapter6 “Initial Display Setup for TV”. Press
<OK>
button if screen
is shown.
Still didn’t get the screen, try <TV-OUT> button on the remote until getting the output
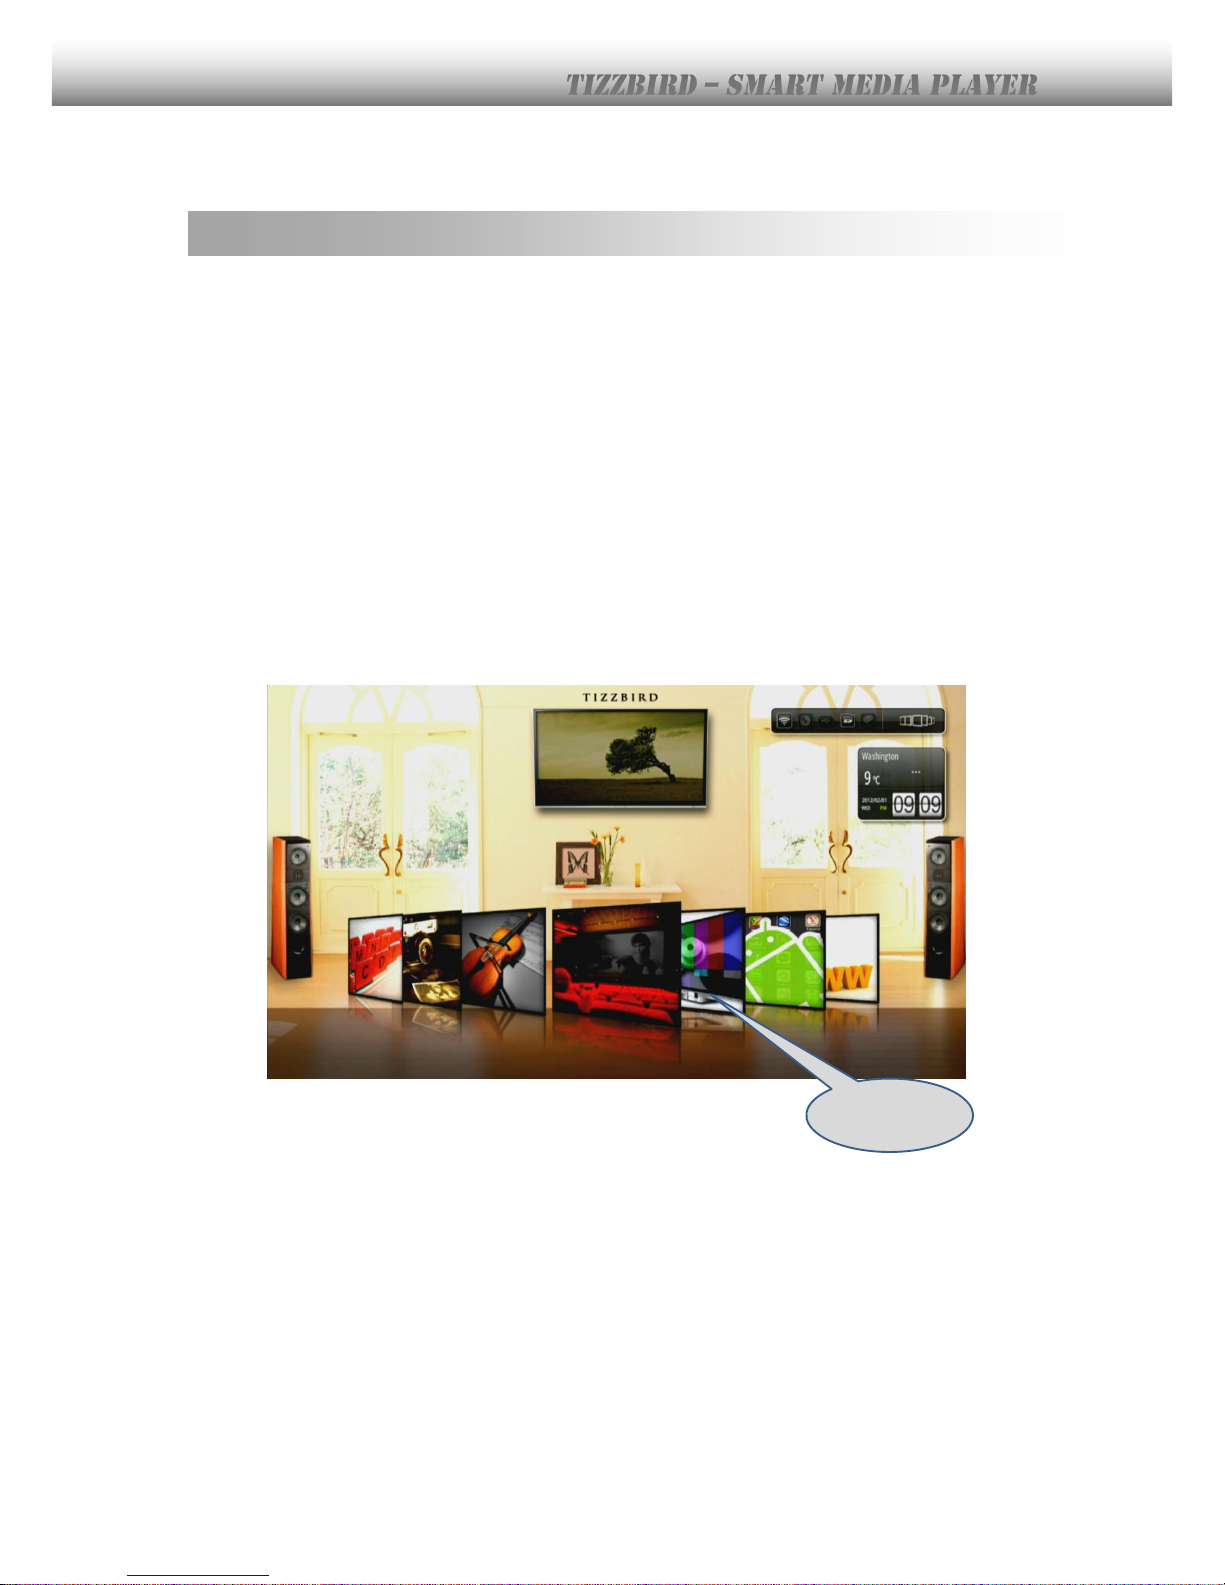
screen on TV. If TV-OUT is set correctly, HOME SCREEN will appear like below.
Settings
Page 16
16
8.3 Setting Menu Language
Please setup the menu language according to the country.
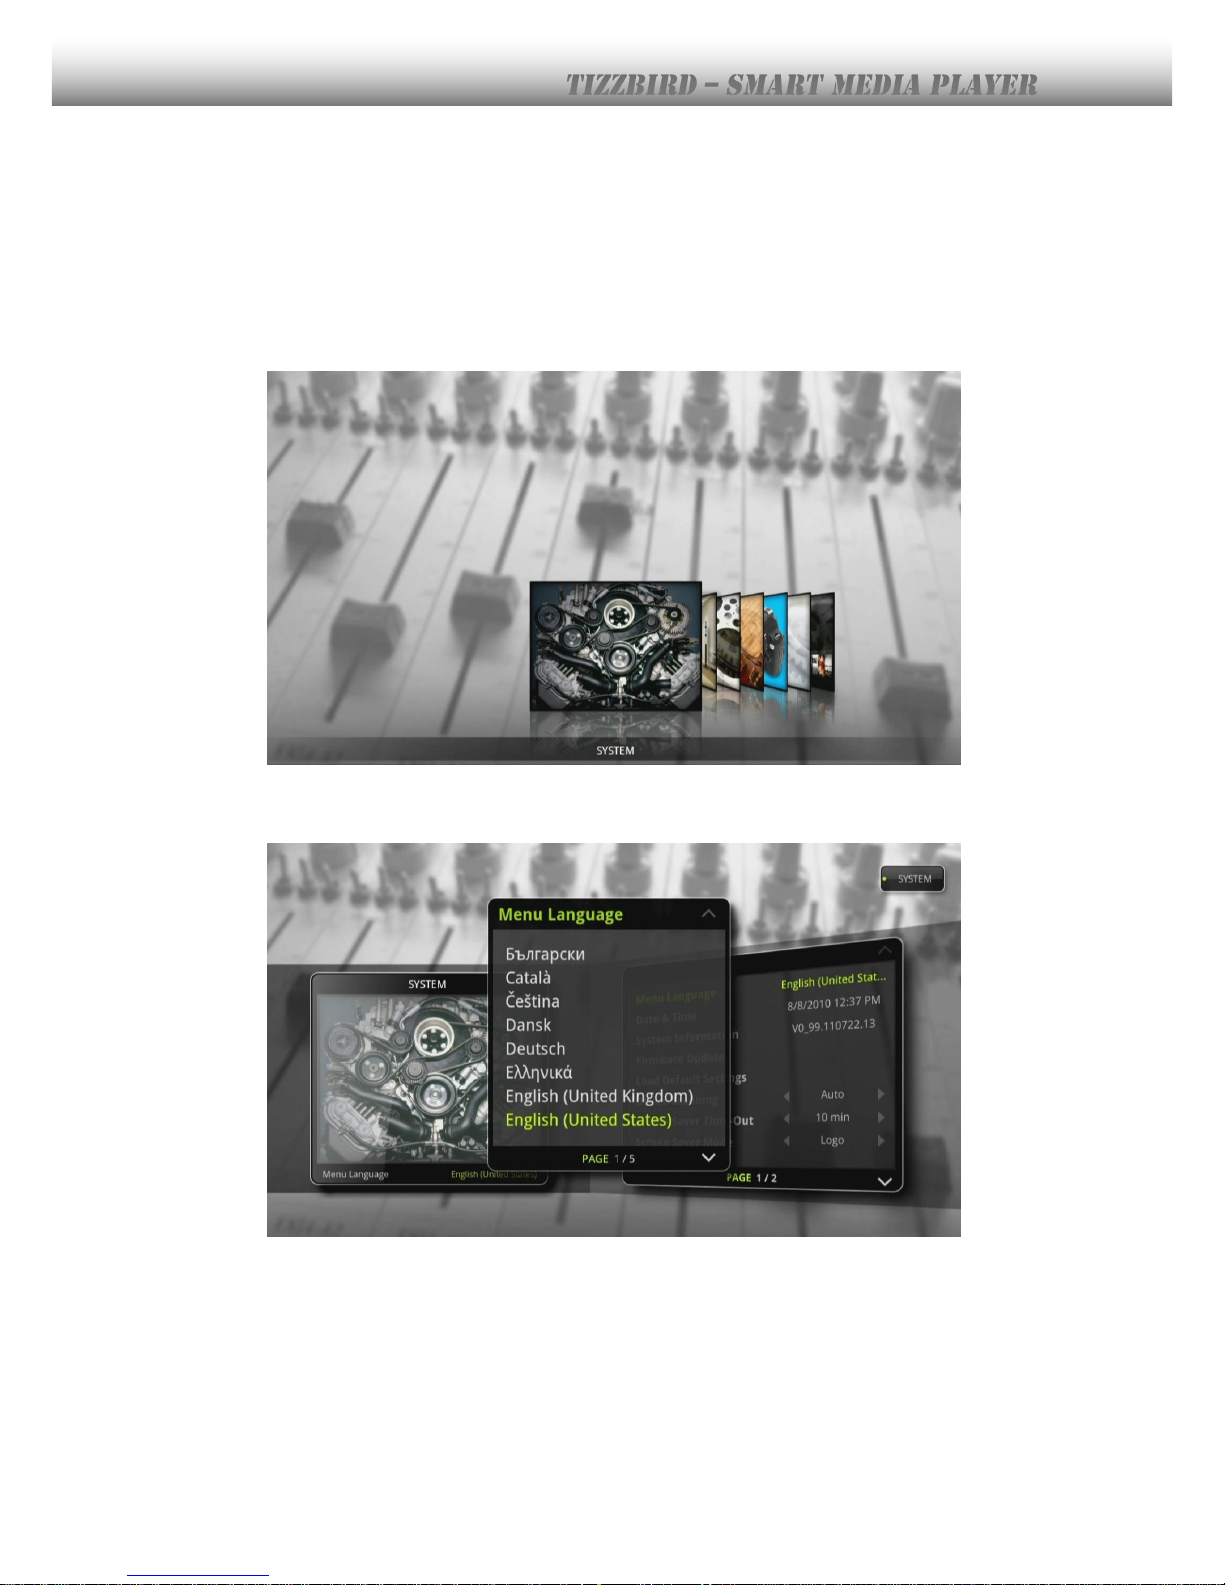
HOME SCREEN Select “Settings Browser” as previous page’s image, then press
<OK>
button. The following screen will appear. Select “System” to enter the <System> setting.
“Language” menu at the top of the right pane will be shown. Select it and press
<OK>
button to change the menu language. Select appropriate language then press
<OK>
button.
Page 17
17
8.4 Screen Alignment
Please make sure that TV output is not configured as “OVER-SCAN” mode. It should be
“ORIGINAL SCAN” or “NO OVERSCAN” mode to see the whole picture output of this unit.
This setting can be changed on TV’s video output settings.
If the whole screen cannot be seen or it’s not fit into TV screen, the screen size can be
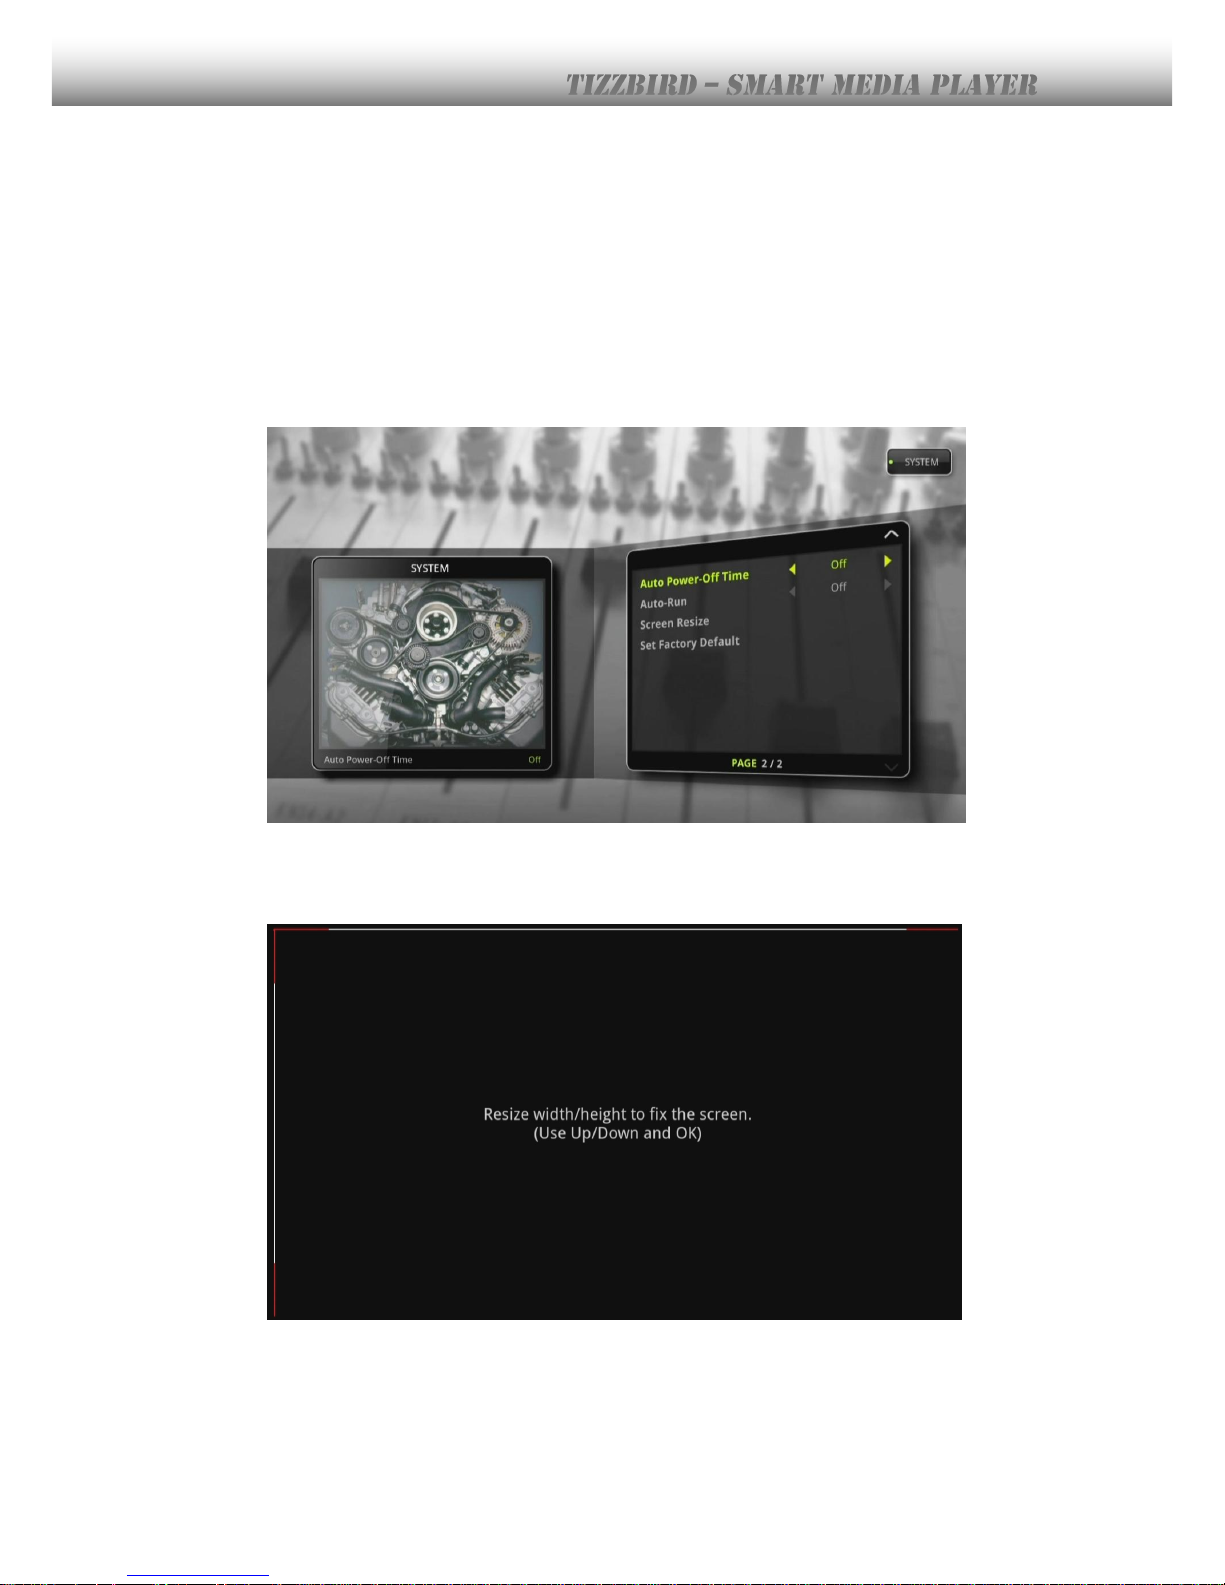
manually adjusted to fit in. Select <Settings Browser> <System> <Screen
Alignment>.
If this menu is selected, the below image will appear and screen size can be adjusted by
pressing <UP> or <DOWN> button. Please press
<OK>
button to confirm the adjustment.
Page 18
18
8.5 Audio & Visual Settings
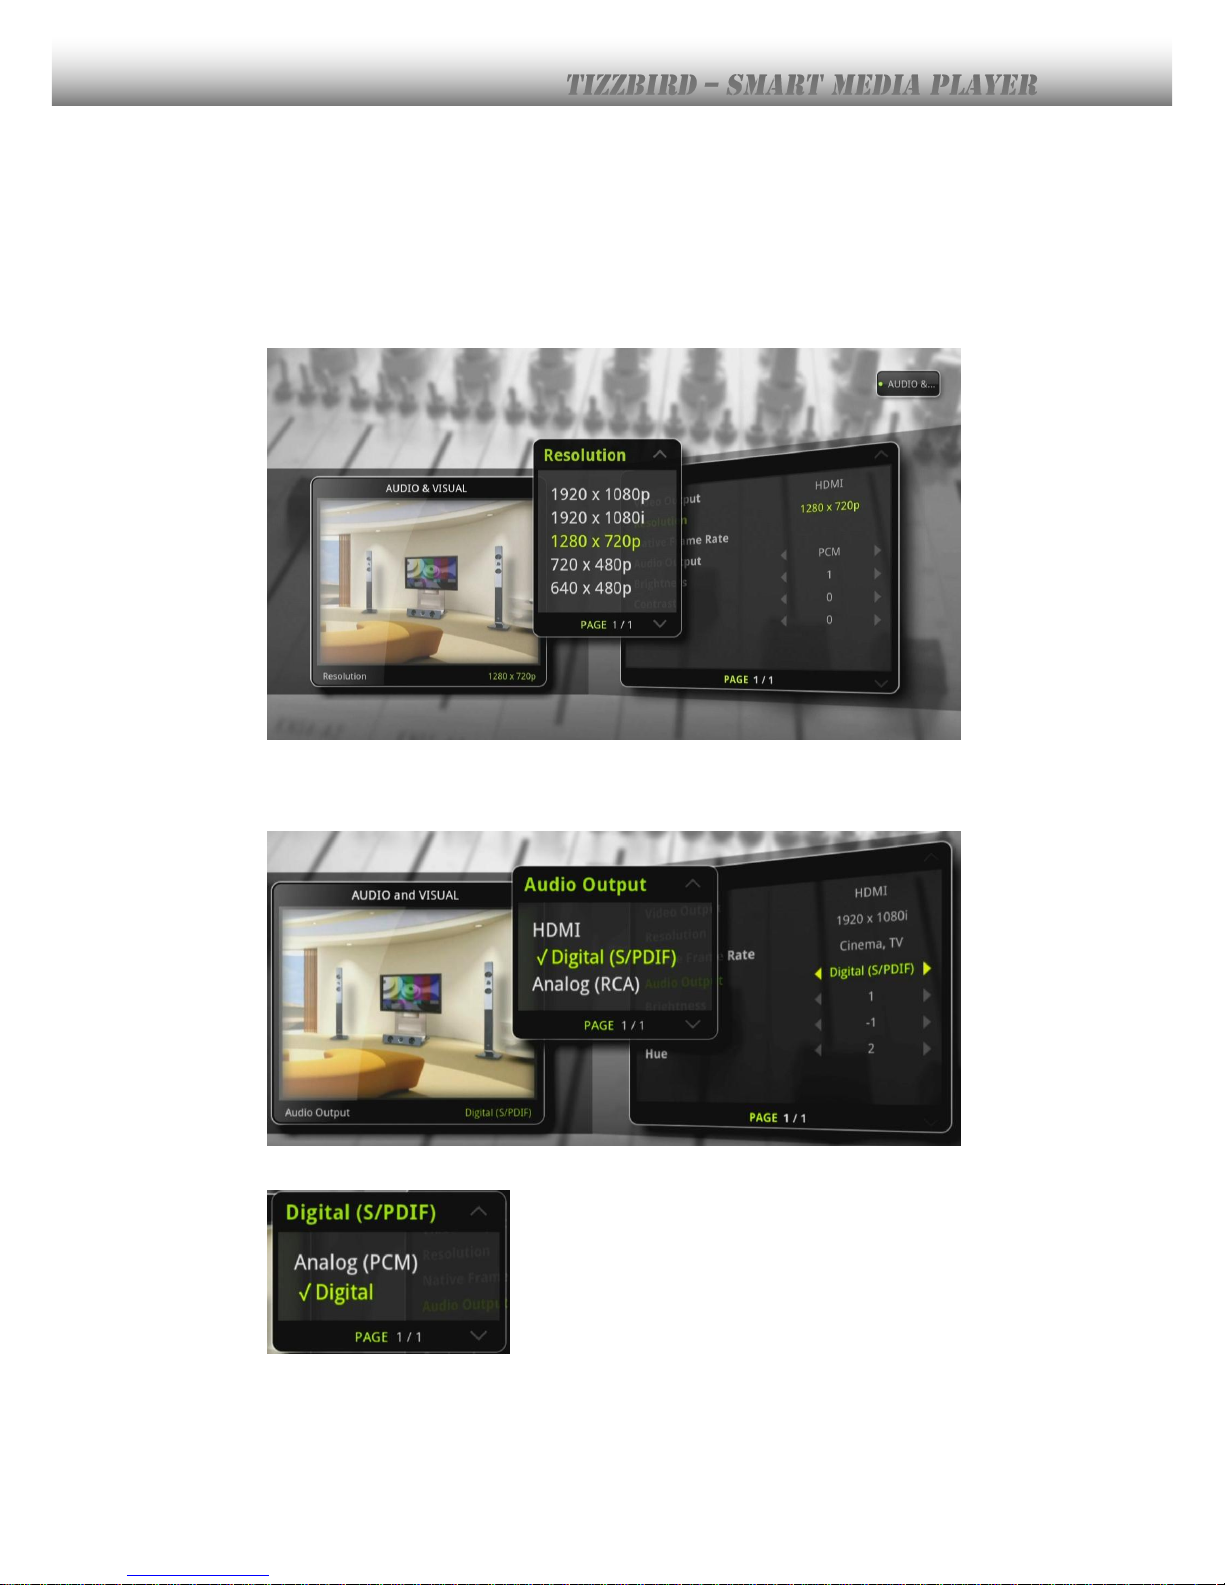
Please setup the <Screen Resolution> to select most proper video resolution for the display.
Select <Settings Browser> <Audio and Visual <Screen Resolution>, then press
<OK>
button. Select an appropriate resolution and press
<OK>
button.
Audio output should be configured as “Digital” (Compressed) mode to connect AV receiver.
Select <Settings Browser> <Audio & Visual> <Audio Output>, then press
<OK>
button. Select appropriate audio output port and then select “Digital” at that screen.
Page 19
19
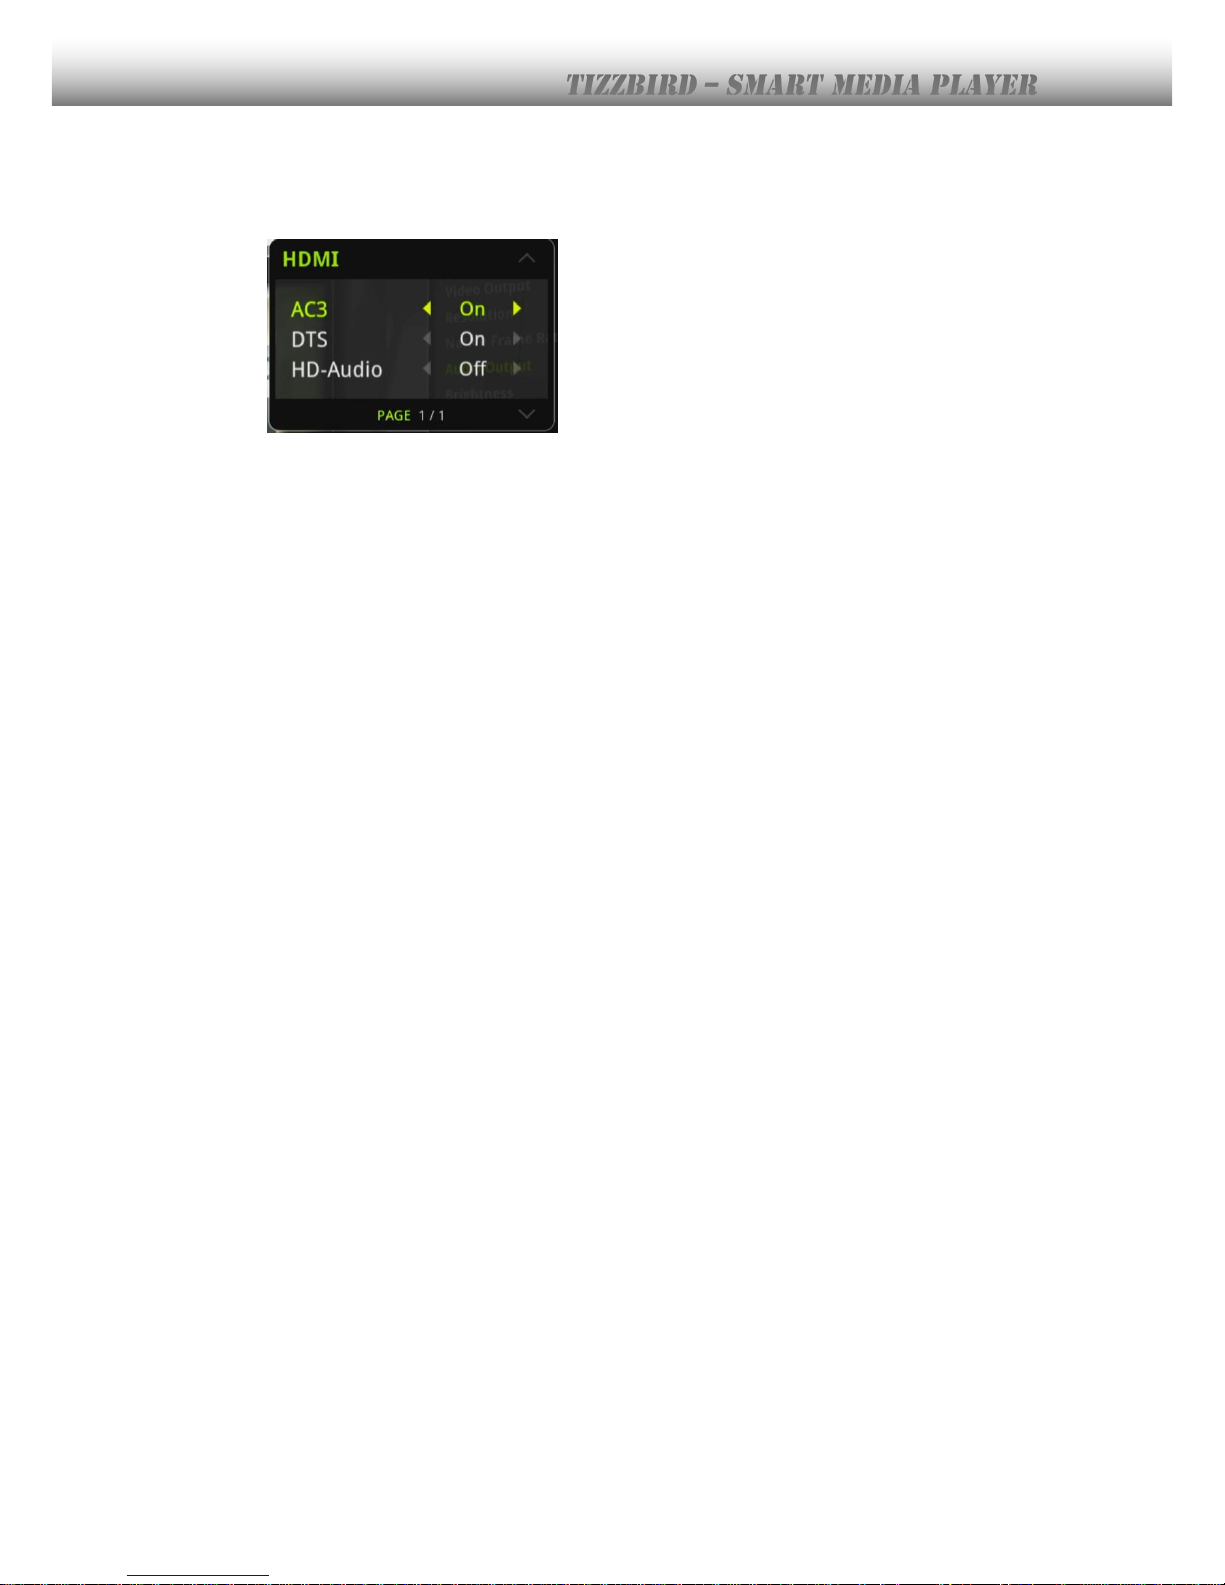
When “Digital” mode is selected, the pop-up will come out like following picture. The each
audio format can be configured as ON/ OFF of pass-thru. Please choose appropriate “On” or
“Off” status according to the capability of connected audio device.
“HD-Audio” should be turned ON only when you have HDMI 1.3 capable of AV receiver.
Page 20
20
8.6 Network Settings
Network should be configured to surf Internet and download movie poster automatically
from Internet and do network game. There are two types of network setting. One is Wi-Fi
(Wireless), the other is Ethernet (Wired).
The USB Wi-Fi dongle should be prepared to connect network thru Wi-Fi. This optional Wi-Fi
dongle can be purchased thru TizzBird local dealer, or any USB Wi-Fi module that is using
RealTEK RTL8188 or Ralink RT3070 as internal chipset can be used. Prepare it and connect
it to USB host port of the unit. Prepare keyboard or mouse if the password of Wi-Fi is string.
Below mouse or keyboard is compatible with this unit.
Keyboard: USB type or Wireless RF type
Mouse: USB type or Wireless RF type
8.6.1 Configure Wi-Fi Connection
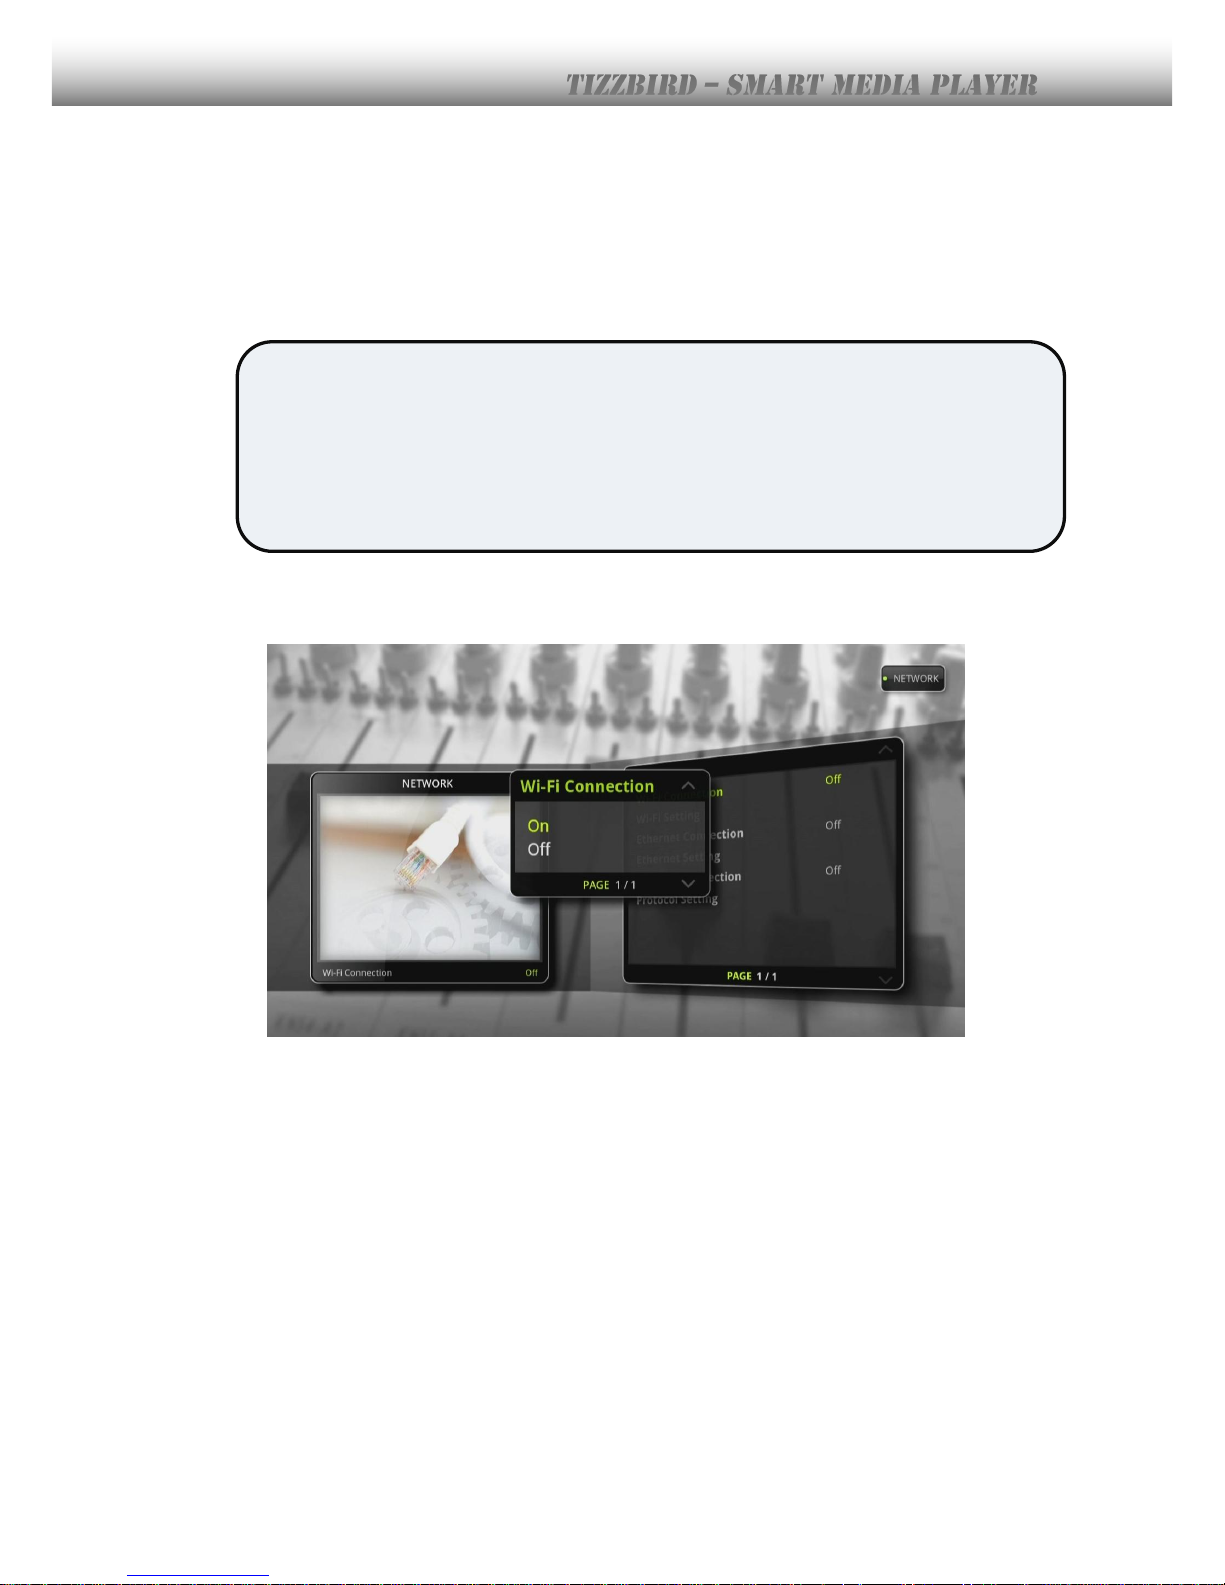
Select <Settings Browser> <Network> <Wi-Fi Connection>. If the wireless AP was
not configured before, the below <Wi-Fi setting> window will pop-up automatically.
Page 21
21
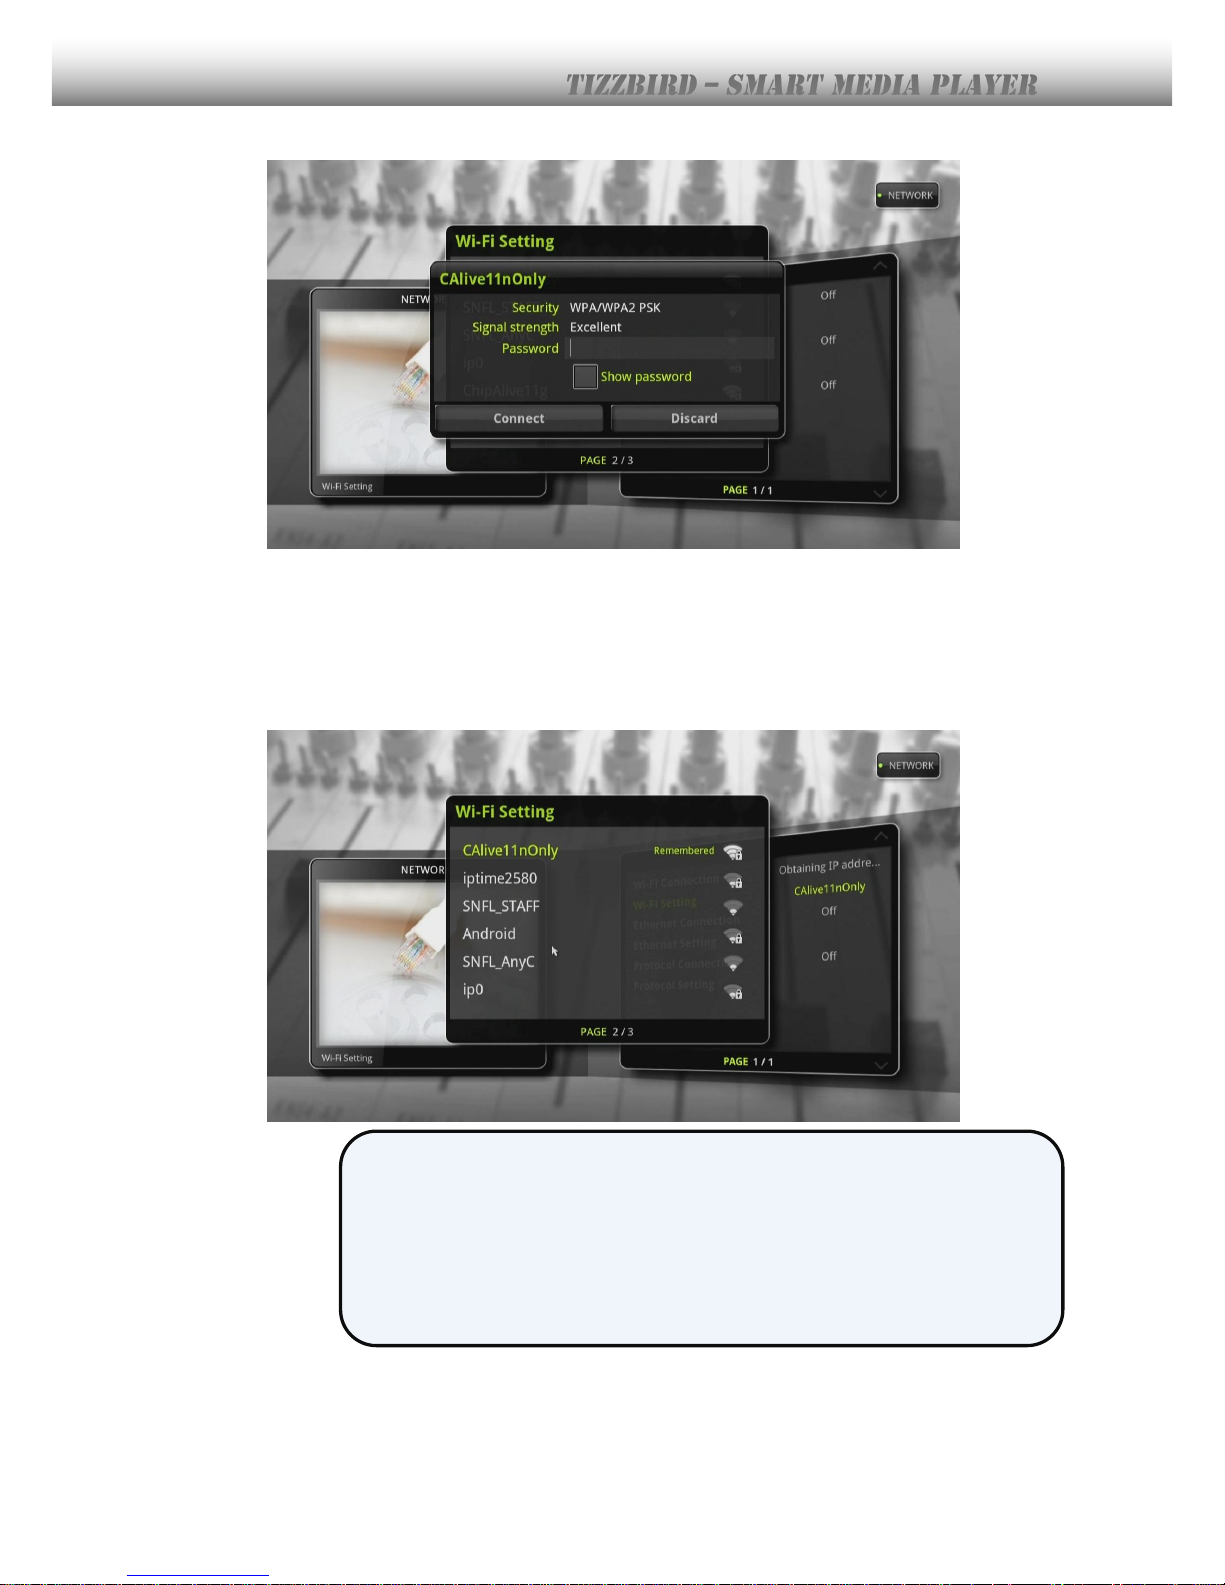
This pop-up shows the wireless access points available. Select one of them that can be
accessible. It shows the signal strength and prompts the password, if password is required
like below picture. Password can be input by remote button if it’s composed of numbers. Or
mouse or keyboard need to be used if the password is string.
To maximize the performance of wireless connection, 802.11n mode is
recommended. 1080p MKV movie or HD broadcasting stream can be
streamed without stuttering. Wireless AP should be configured like below.
Mode 11n Only
Encryption WPA/2PSK
Page 22
22
8.6.2 Configure Ethernet Connection
Gigabit Ethernet can be also used to connect wired network. Connect the network cable at
the Ethernet network port at rear side of the unit.
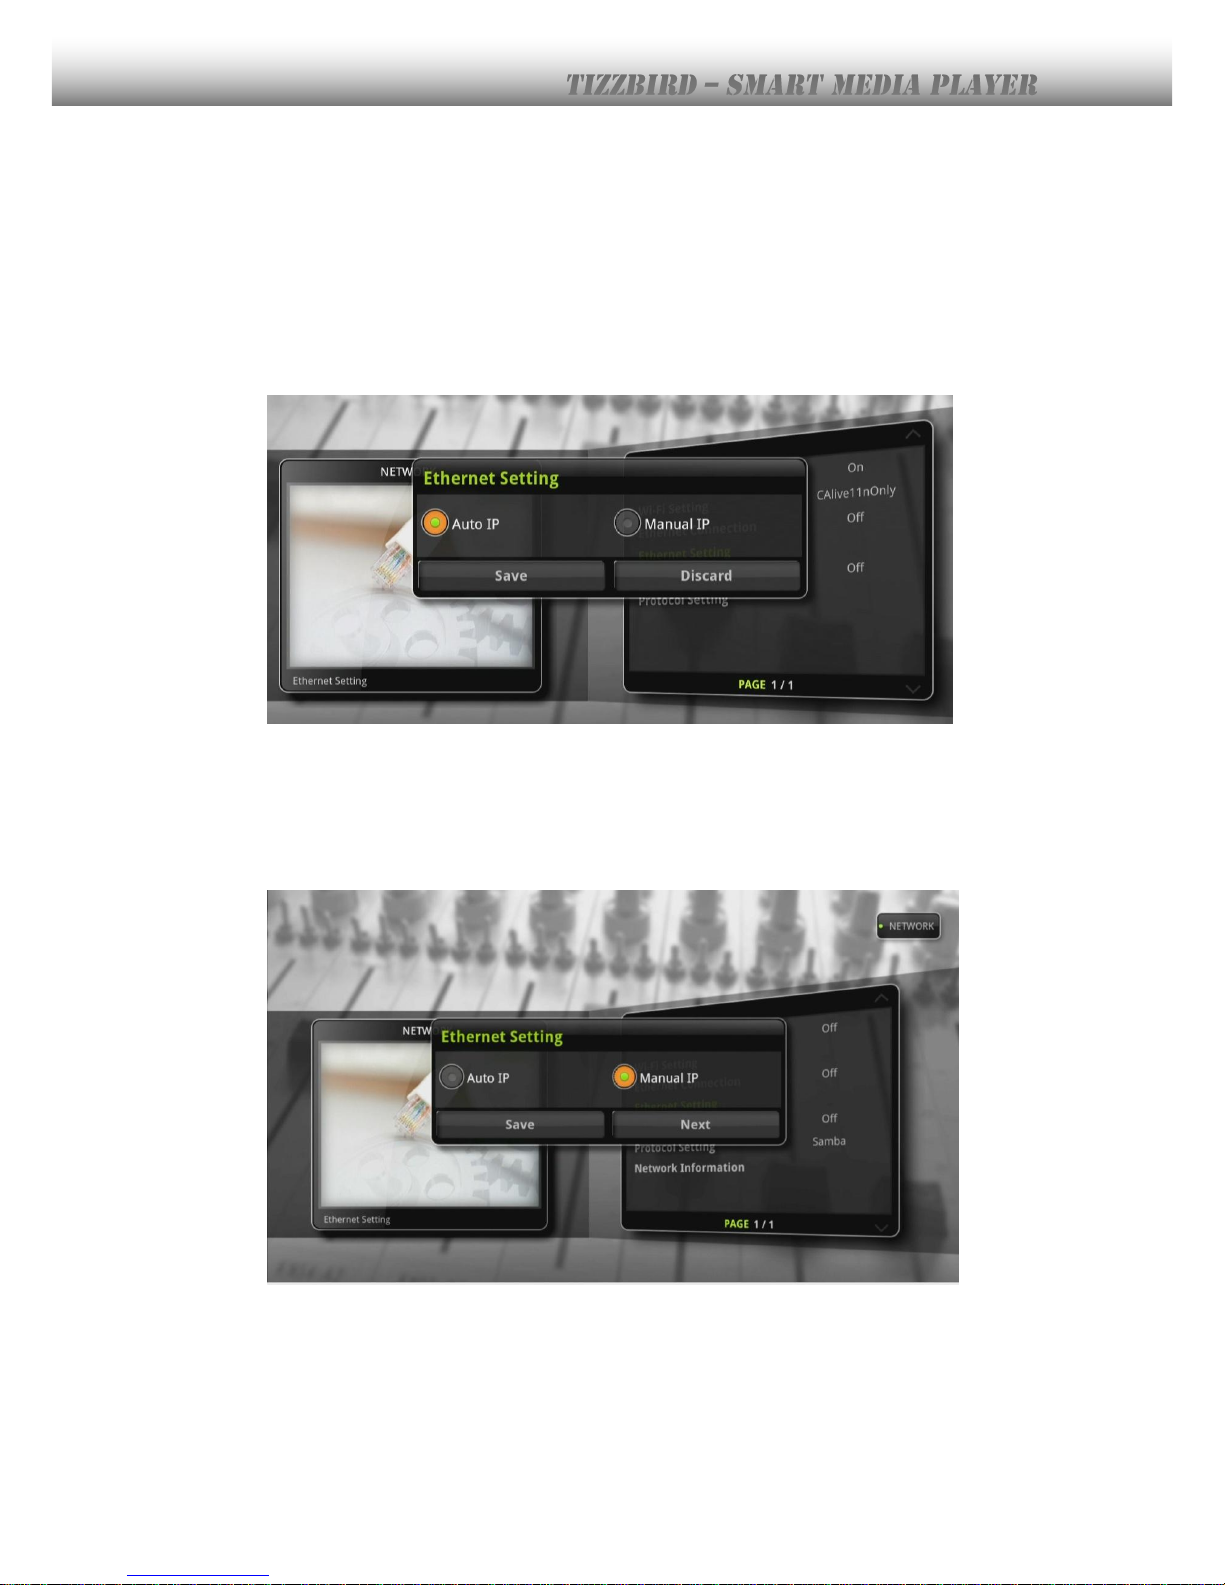
1) Select <Settings Browser> <Network> <Ethernet connection>.
2) If the configuration is “Auto IP”, the network connection will occur immediately.
3) Otherwise, network setting should be manually configured by selecting <Ethernet
Settings>.
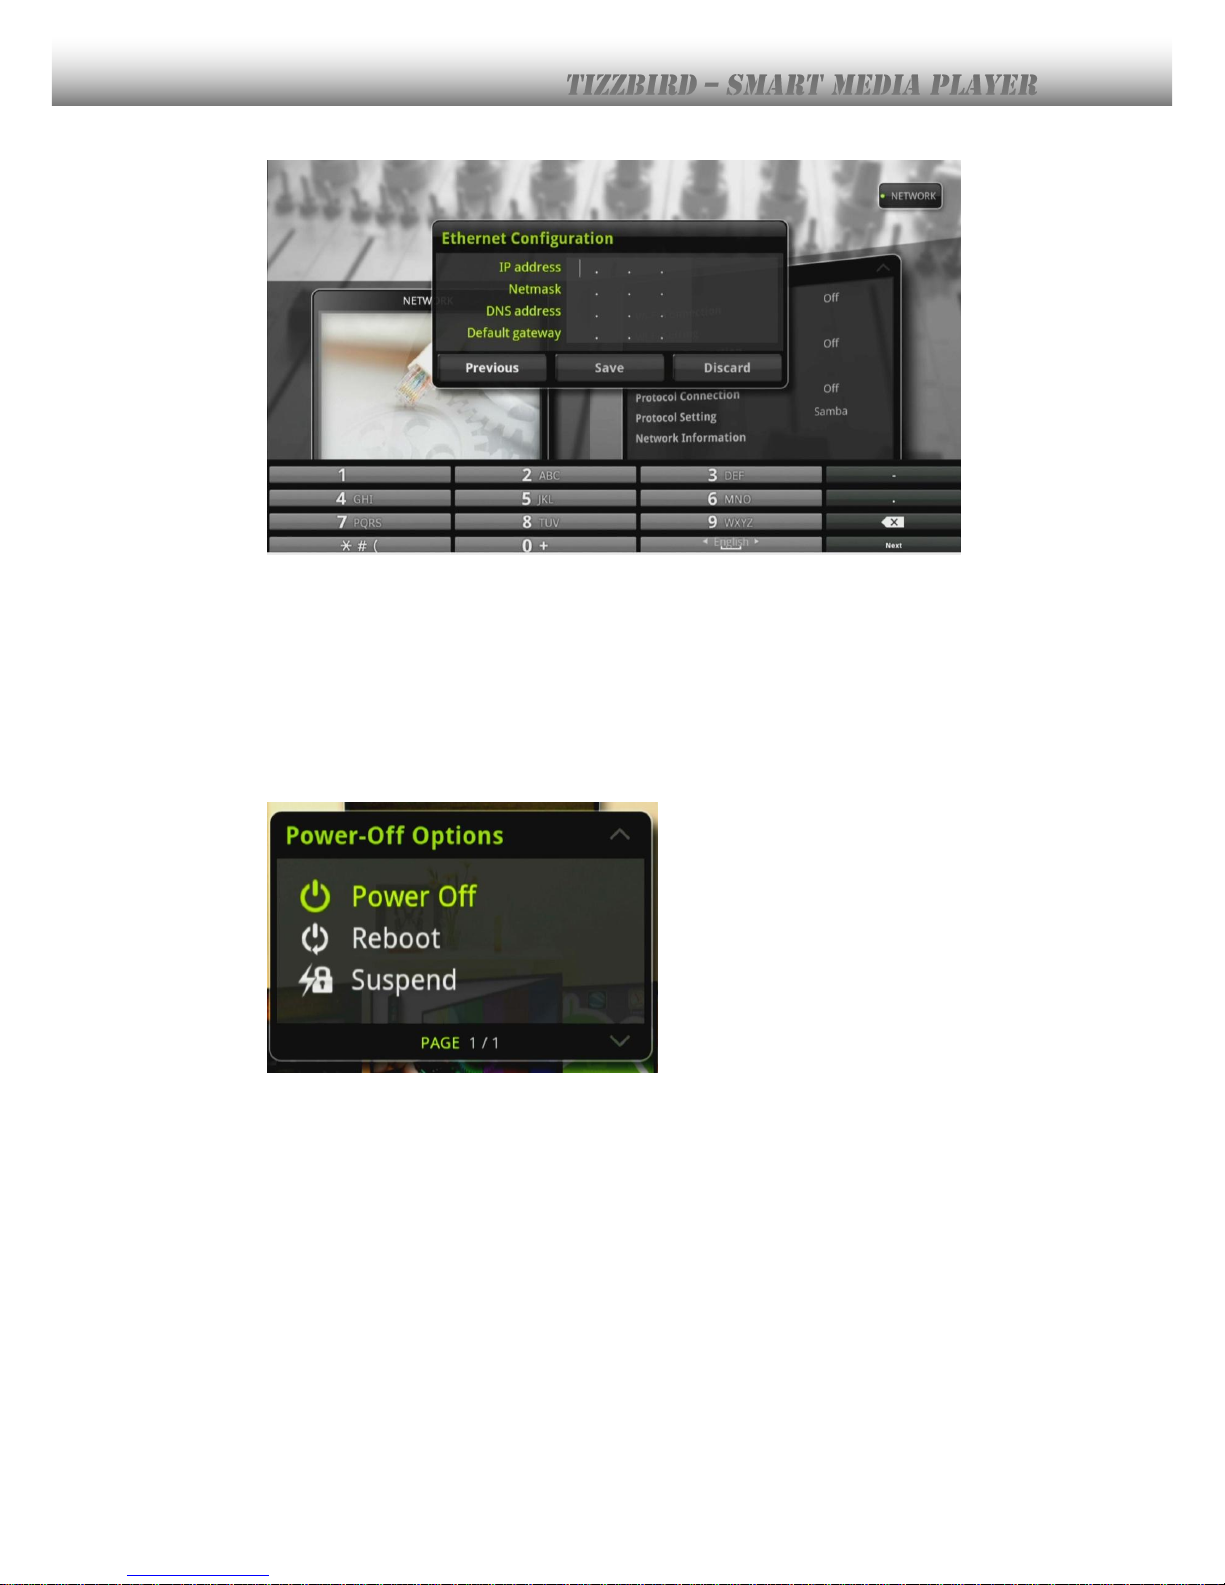
8.6.3 Configure Manual-IP Ethernet
To configure the manual-IP, select “Manual IP” like following picture then select “Next”
button.
The following dialog box will appear. Enter the each digit by pressing number buttons on
remote controller. Or you can use the mouse to enter the number. The virtual keyboard will
appear if you click the field to enter.
Page 23
23
8.7 Turning Power Off, Completely Power Off
To turn off the power, press
<POWER>
button on the remote or press power key on the
front panel. The LED will turn into slightly dimming status, and this shows the unit is in
“STAND-BY” status.
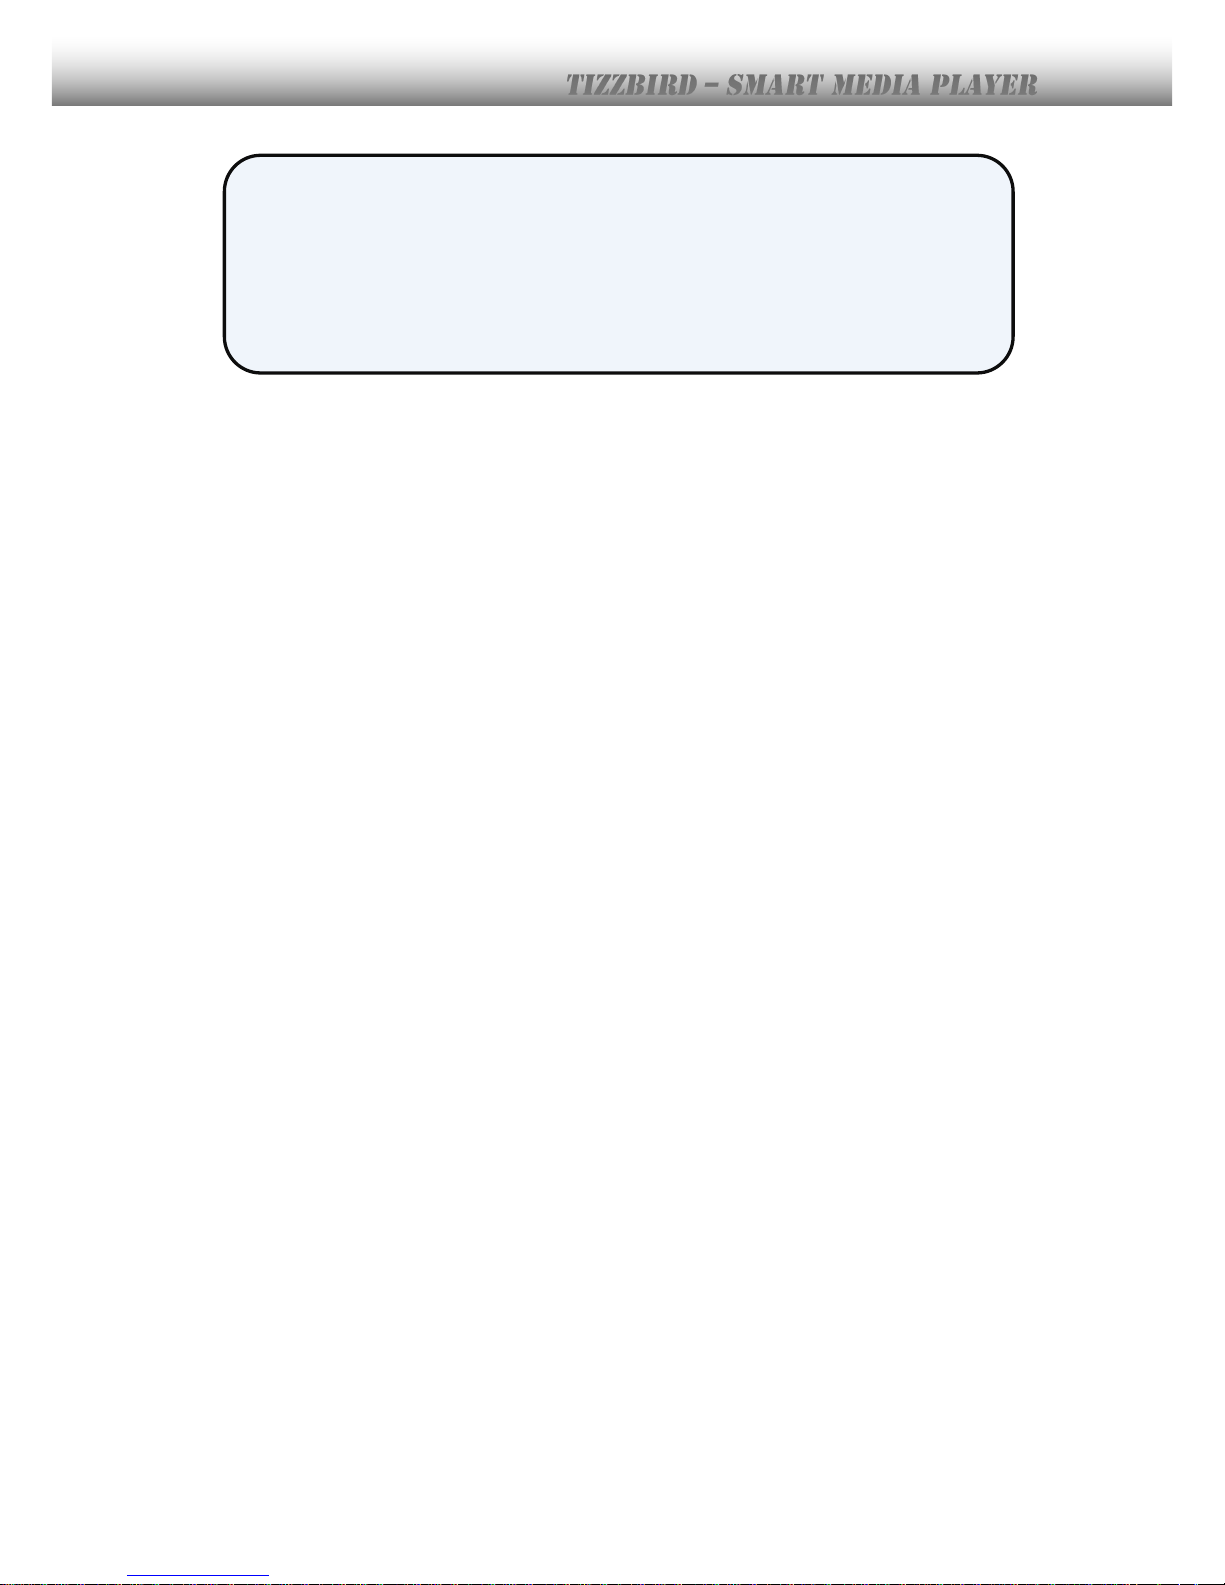
Press power button on remote control more than 1 second will bring up the following
POWER-OFF DIALOG BOX.
Power Off
Turn off power completely
Reboot
Reboot the system
Suspend
Make it suspend mode
This unit consumes quite little power which is less than 0.4W at STAND-BY mode. This can
be achieved by minimal power consumption logic. This unit supports high speed booting
mode from STAND-BY. It takes less than two seconds to resume to the normal operation
status from STAND-BY mode.
To turn power off completely, please press and hold
<POWER>
key at the front panel more
than 4 seconds. The LED will be turned off completely.
Page 24
24
※ The status of LED lighting is like below
Initial booting Blinks fast
Operation Stays at maximum bright.
Stand-by / Off Completely off
Page 25
25
9. Start-Up and Terminate
9.1 Home Screen
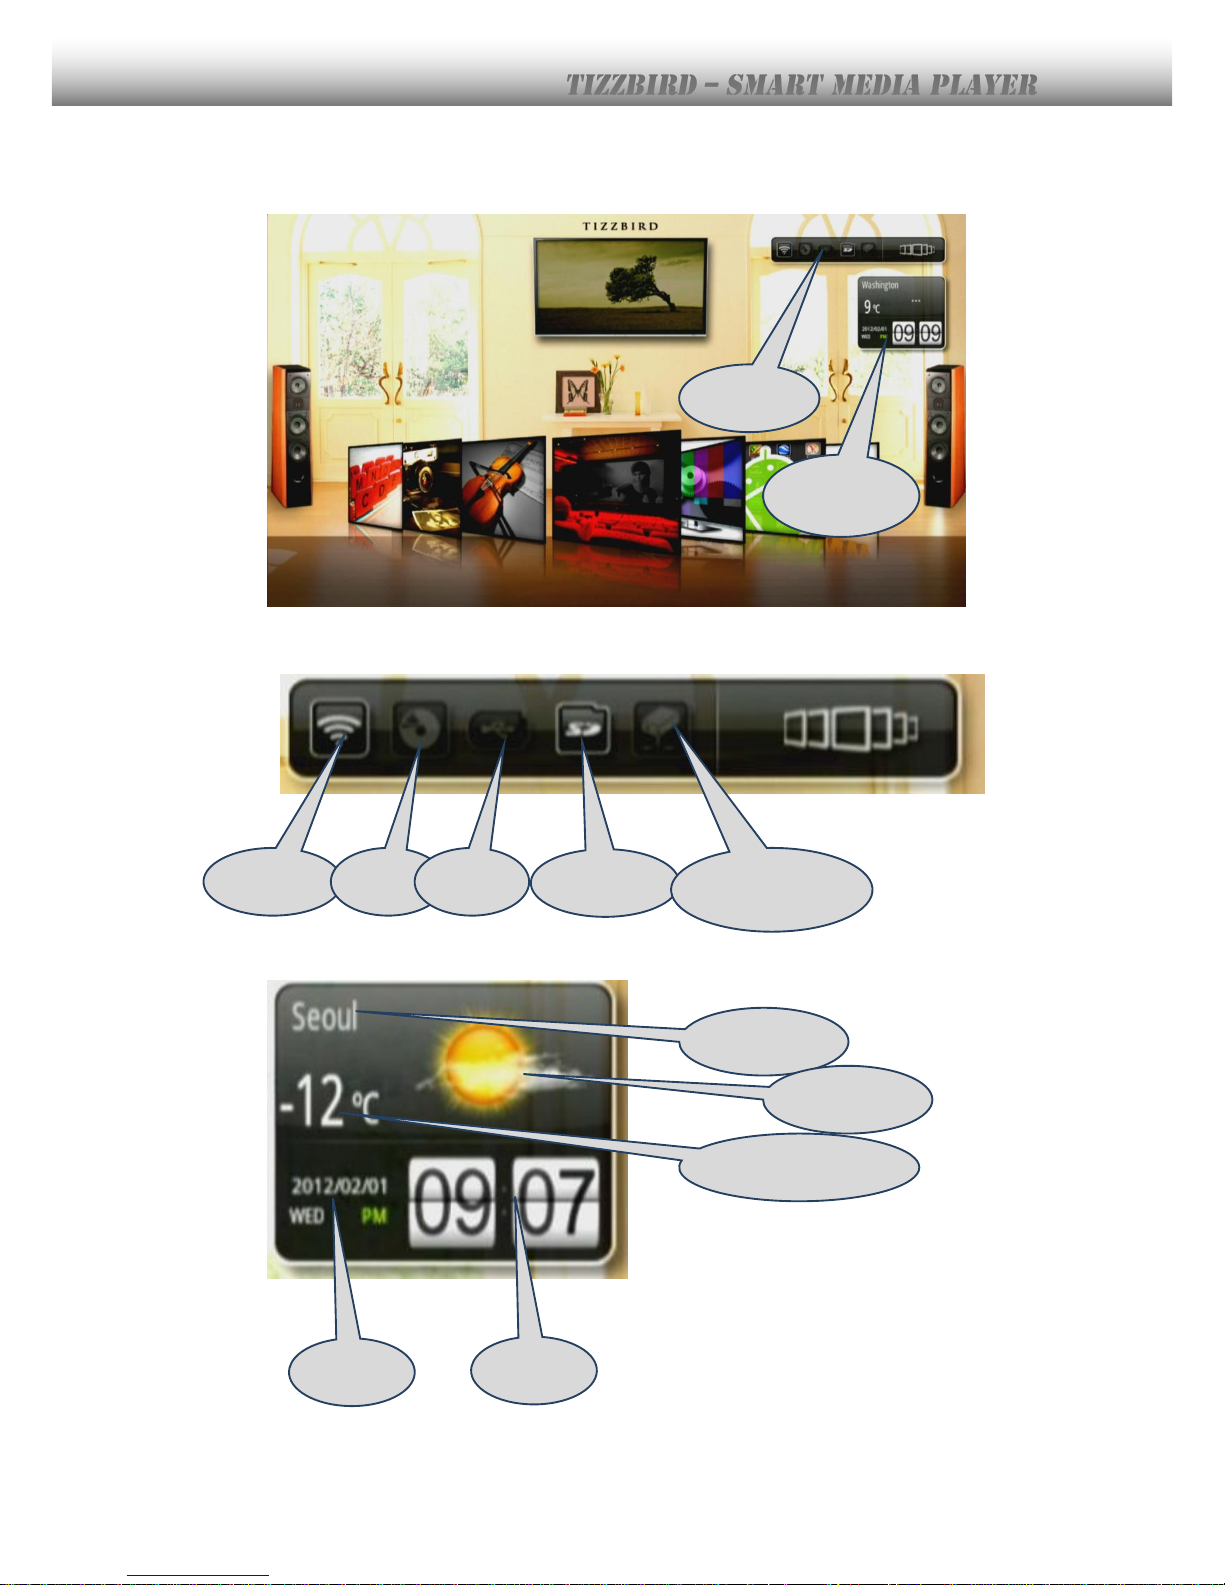
The below HOME SCREEN will appear after booting up. It shows 7 different items. The each
item can do the each designated browsing. For example, movies can be browsed at
MOVIE BROWSER. HOME SCREEN consists of 7 browsers including (from left to right) FILE/
PHOTO/ MOVIE/ MUSIC/ SETTINGS/ APP/ WEB browsers.
To execute each browser, select the browser by arrow buttons on the remote and press
<OK>
button.
The default selection would be MOVIE BROWSER at first start-up. TizzBird is the unique unit
compared to other units, since it retains consistent user-interface based on the powerful
database feature of Android OS. TizzBird provides full featured cover-view and imaged
oriented browsing, which is highly intuitive. The other units can only provide user interface,
mostly text based information with additional images.
Movie Browser: Register all movie files and let you browse them on poster based.
Music Browser: Register all music files and let you browse them on album-art based.
Photo Browser: Register all photo files and let you browse them on folder image based.
Settings Browser: Browse available settings.
App Browser: Browse registered applications and let you select and execute them.
Web Browser: Let you surf Internet.
File Browser: Browse files and folders based on the device based. (Legacy mode)
Settings
Movie
App
Internet
Music
Photo
File
Page 26
26
9.2 Status Bar and Weather Widget
Home screen also contains status bar and weather widget. The status bar shows current
status of each device. Highlighting of each icon means it’s active or mounted.
The weather widget shows current date, time and weather.
Status
Weather
Wi-Fi
HDD
USB
SD Card
Network
Server
Location
Temperature
Weather
Date
Time
Page 27
27
9.3 Change Cover-View Style
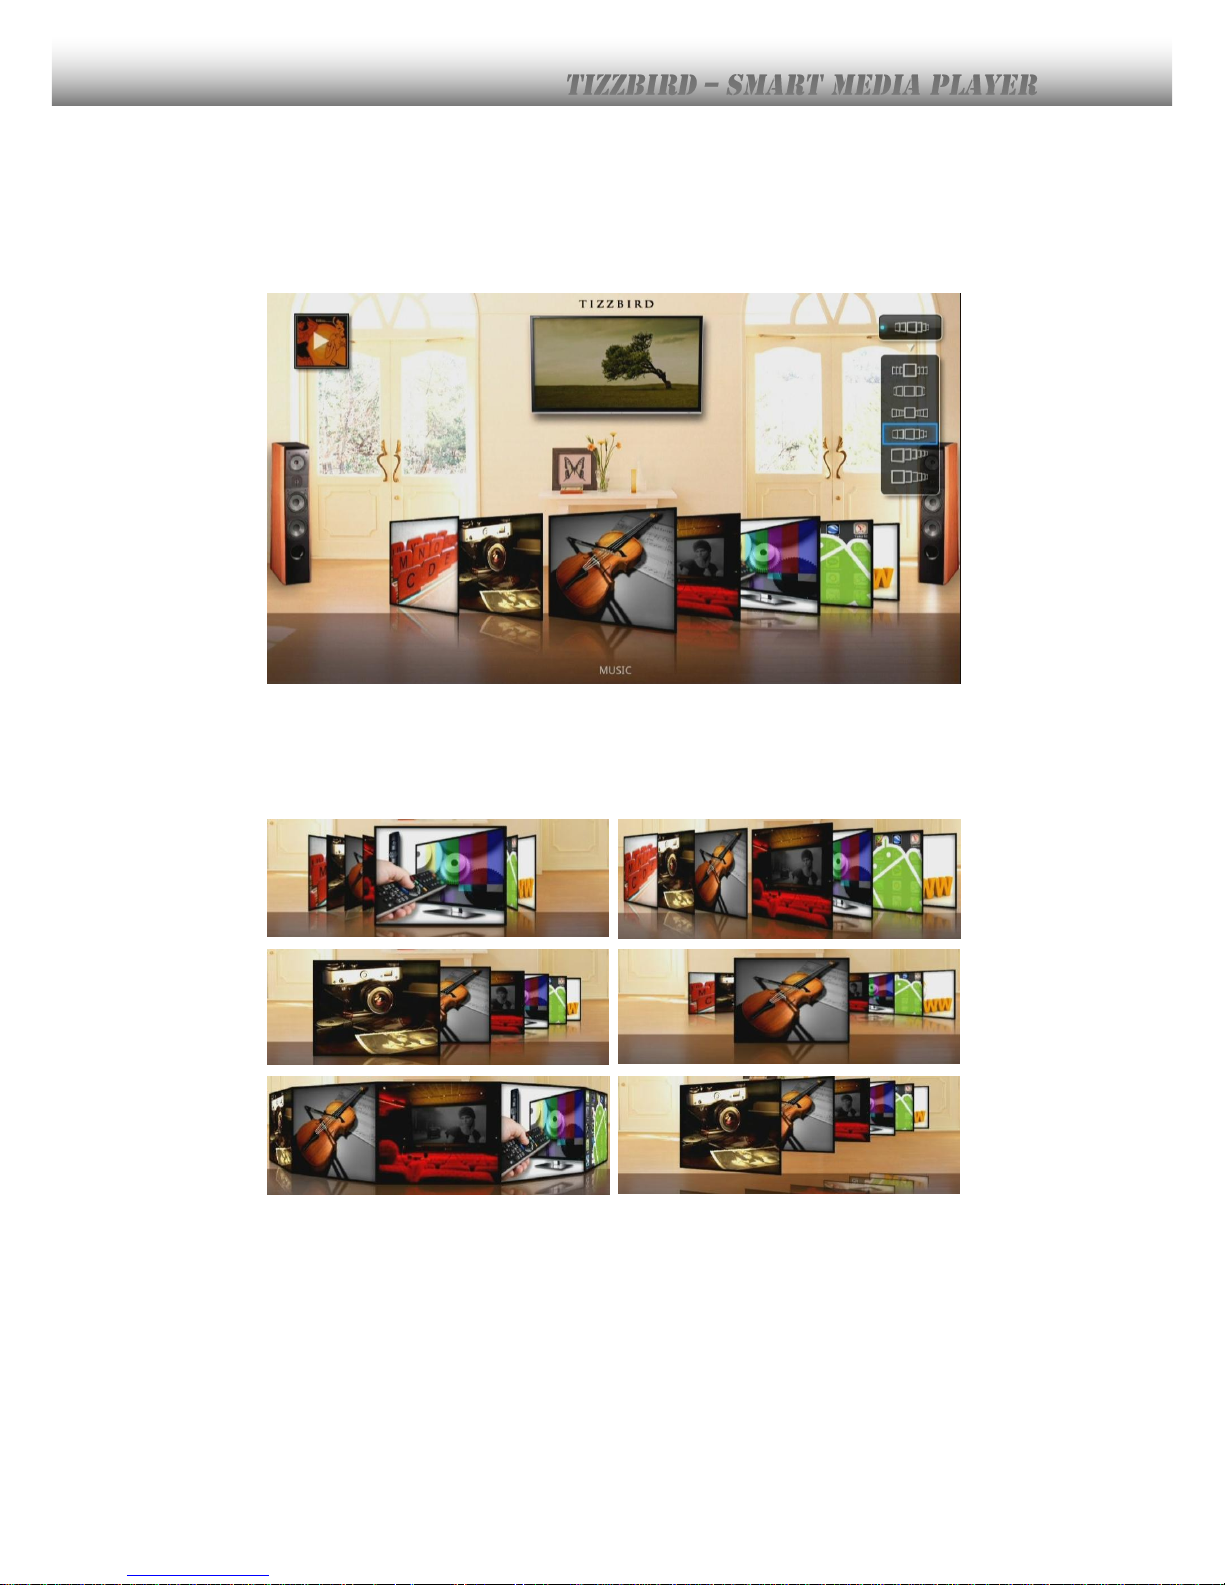
TizzBird provides Open-GL 3D based Cover-View user interface. One of six different styles of
cover-view can be selected as a view-style. Press “BLUE” color button on the remote. The
cover-view selection pane will pop-up and let you select one of them.
This kind of selection is also available at MOVIE/ MUSIC/ PHOTO/SETTINGS browser, and
one of them can be chosen always by pressing “BLUE” color button on remote.
Page 28
28
9.4 Movie Browser
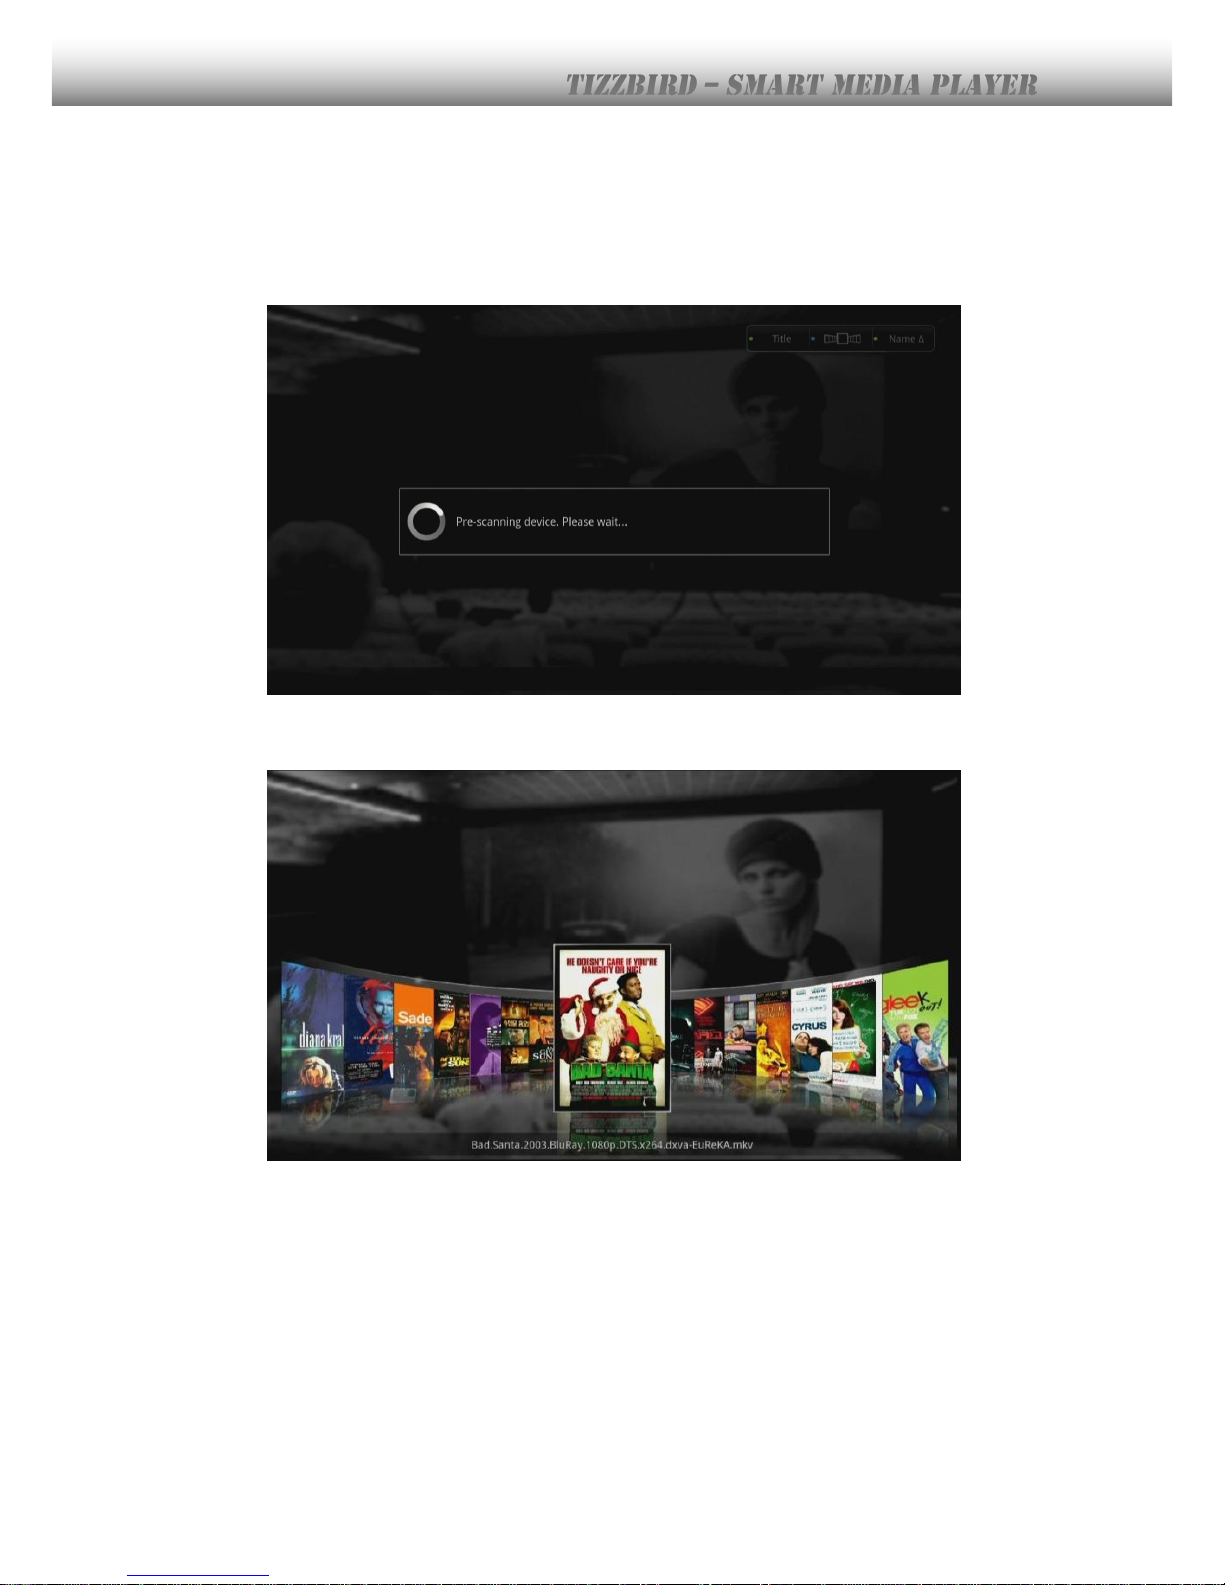
Movie browser will scan movie files on the devices when booting first or attaching external
device thru USB. It will take several minutes (depends on size of HDD) for the 1st scanning.
Once it’s scanned, it will take much less time on next boot.
If movie posters are available for the movies, then cover-view screen like below will appear.
9.5 Terminate
Press
<POWER>
button on remote or
<POWER>
key on the front will turn the unit be
into STAND-BY status. The unit will consume virtually nothing (less than 0.4W) in the
STAND-BY status. The LED will be in the dimming status.
Page 29
29
10. Watching Movie
10.1 Movie Browser
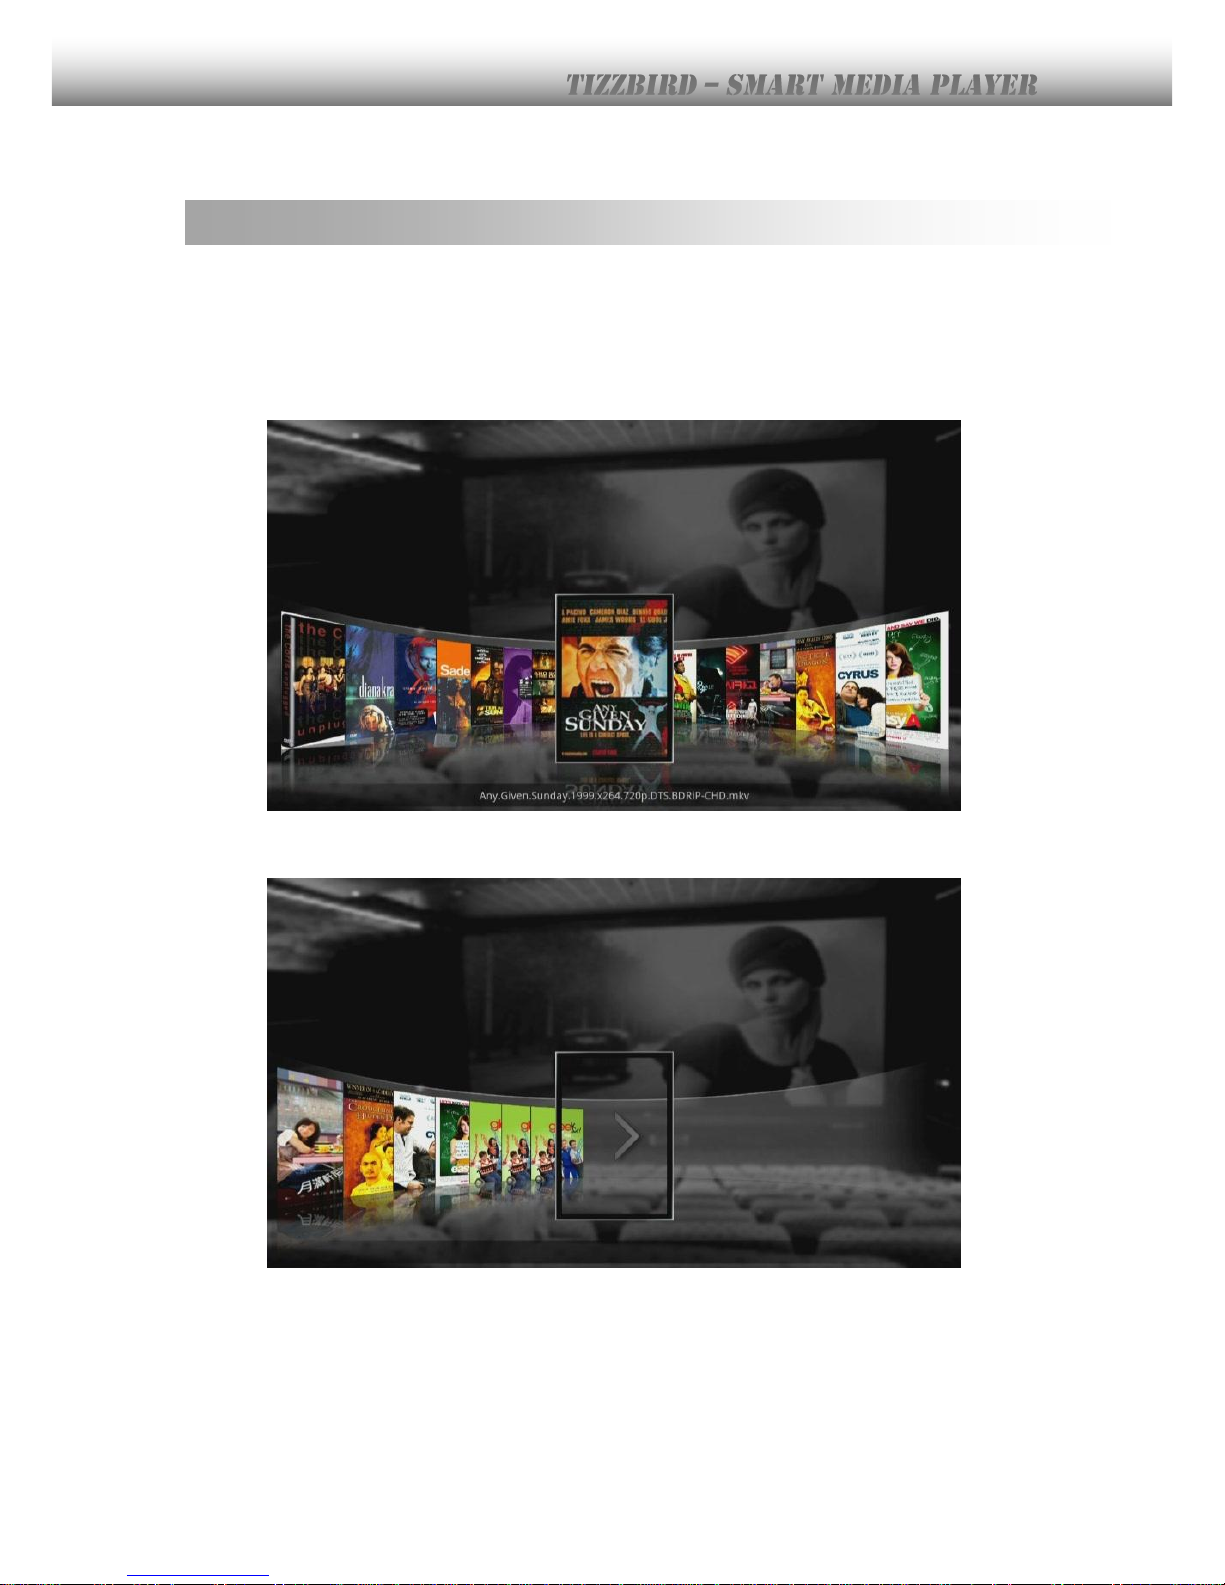
If MOVIE BROWSER is selected and if the posters were already scraped or registered for
movies, then the following screen will appear. This screen is called “MOVIE BROWSER”
screen. Up to 15 movies can be browsed at once per page. Arrow keys can be used to
navigate thru posters. Keep press arrow key to browse continuously.
Once the end of the page is reached, then arrow image will appear on the screen. Select it
to see the next page.
Page 30
30
10.2 Selecting Device and View
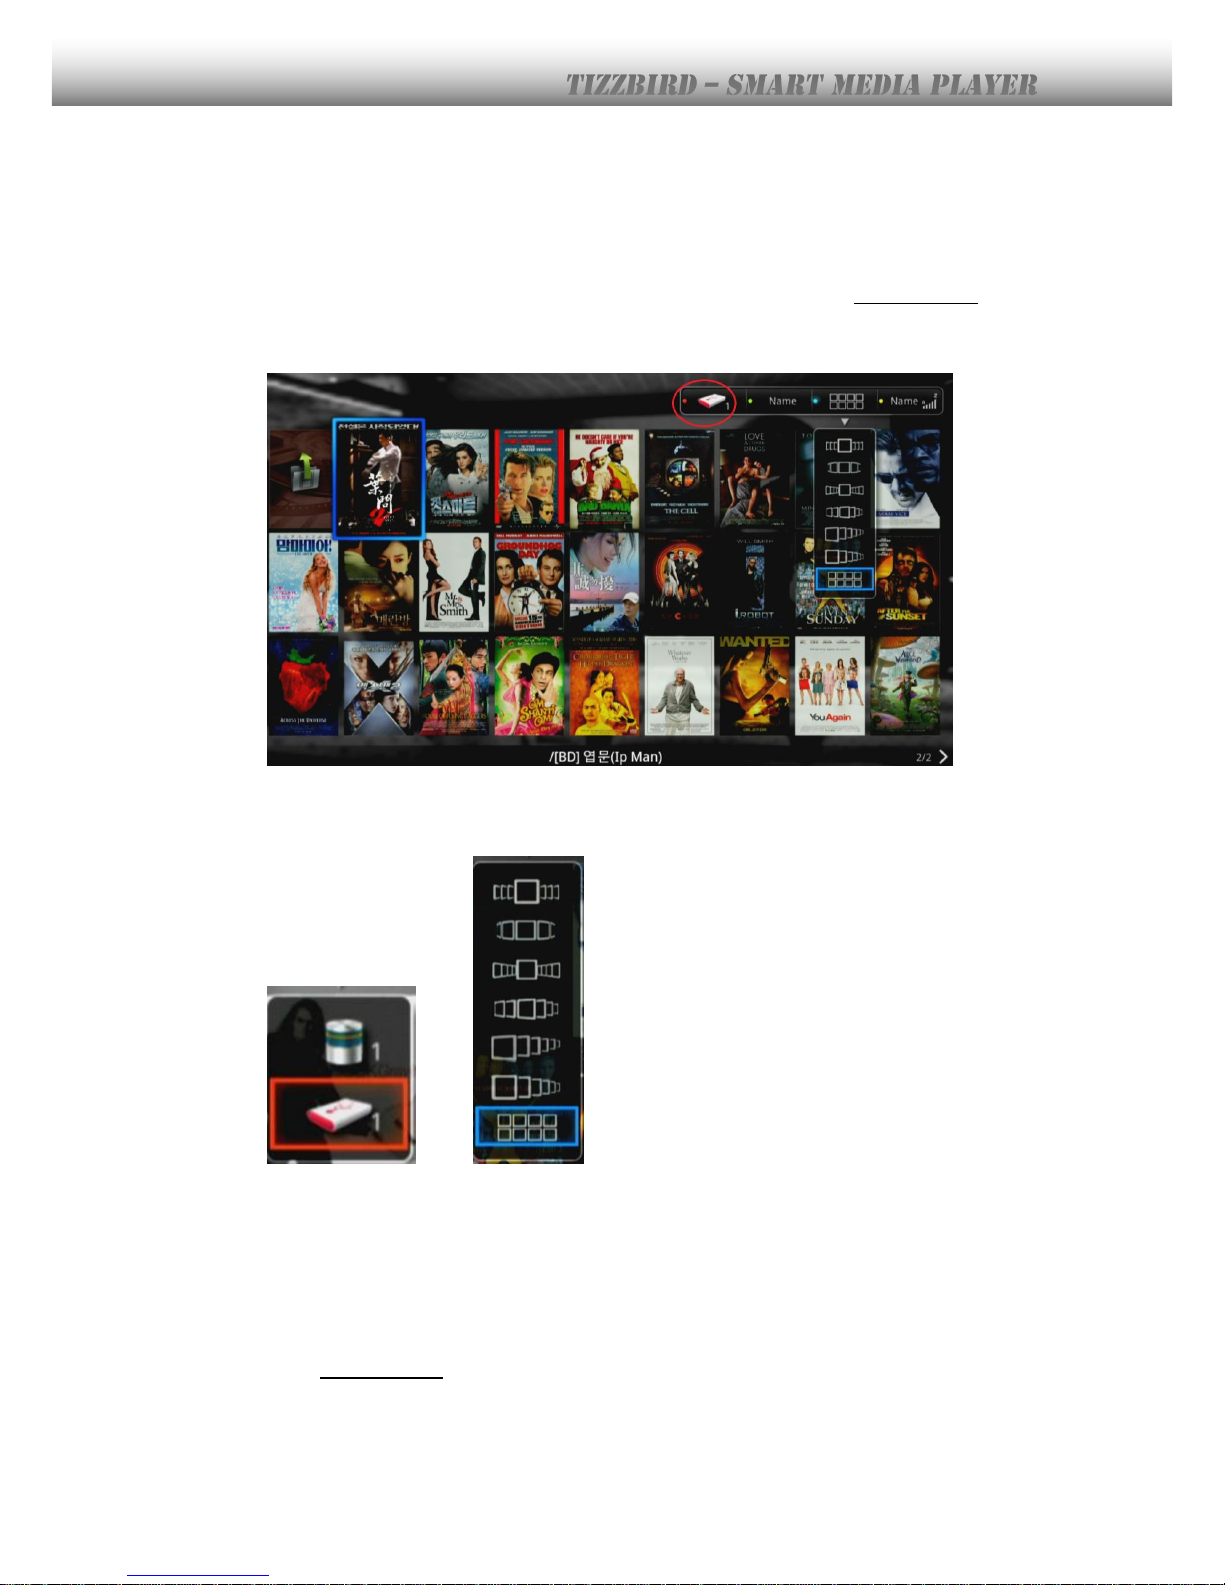
The device and view can be selected at movie browser. This type of device and view
selection can be done on music and photo browser as well. Press RED COLOR remote
button to select the device.
The RED circle on the above picture shows current selected device. The
DATABASE, HDD,
external USB
or
NETWORK DRIVE
can be selected if they are available. The top icon below
represents the DATABASE.
[Device Selection] [View Selection]
Selecting DATABASE will scan all the movie files on every device and show them. Selecting
each device like HDD, USB or NETWORK DRIVE will just show the folders on that device. It
will show the <Movie> folder on that device and will be browsed by FOLDER BASE.
Press BLUE COLOR button will bring the view menu like above [View Selection] picture.
The one of the views can be selected to show proper browsing method. The WALL type
view is recommended for general browsing.
Page 31
31
10.3 Movie Browser Menu
<MENU>
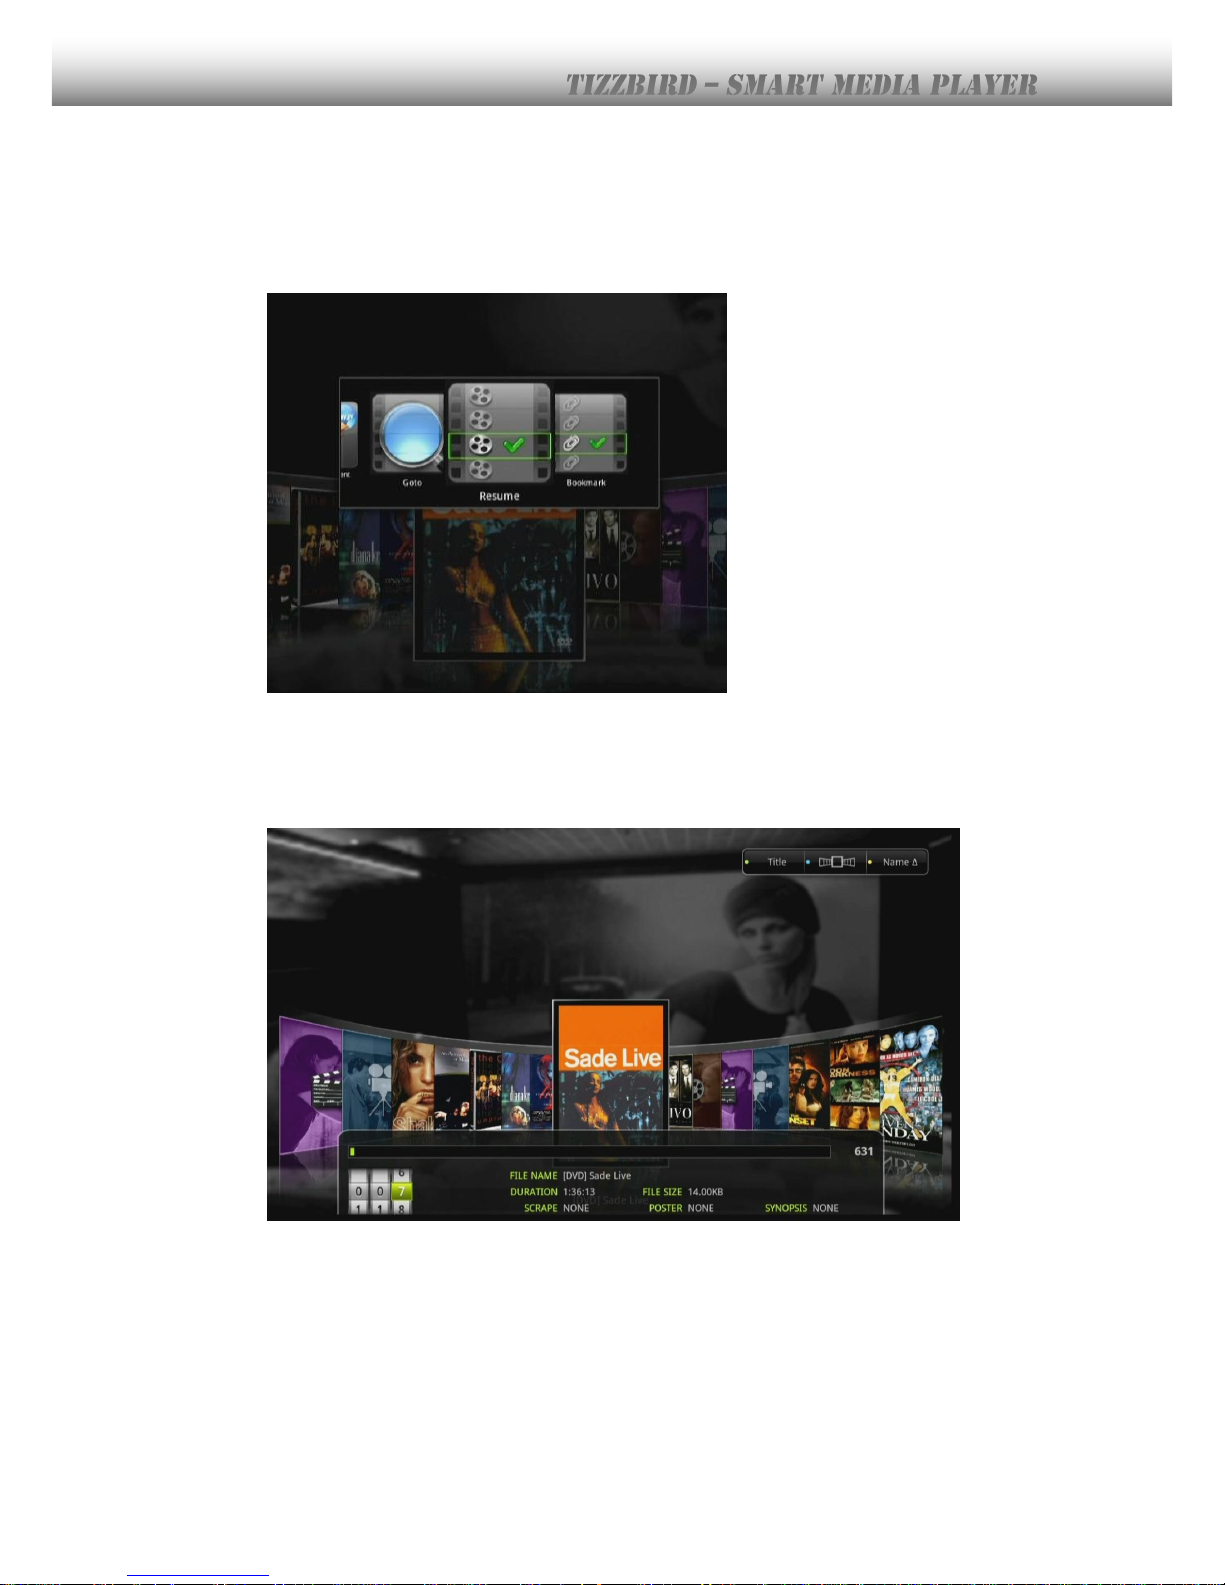
button at “MOVIE BROWSER” can be used to do various actions including
searching movies, scraping movie posters, jumping based on bookmarks & resuming lists.
Press
<MENU>
button on the remote.
“SEARCH” menu like above picture lets you search the movie quickly based on the title
names and other information. Press
<OK>
to bring the following image. Use
<UP>
or
<DOWN>
arrow key to select the index,
<LEFT> <RIGHT>
arrow key let you change the
digit of the wheel control, so titles can be browsed fast. Press
<OK>
to bring the poster of
the selected movie.
Page 32
32
10.4 To Add Movie Poster
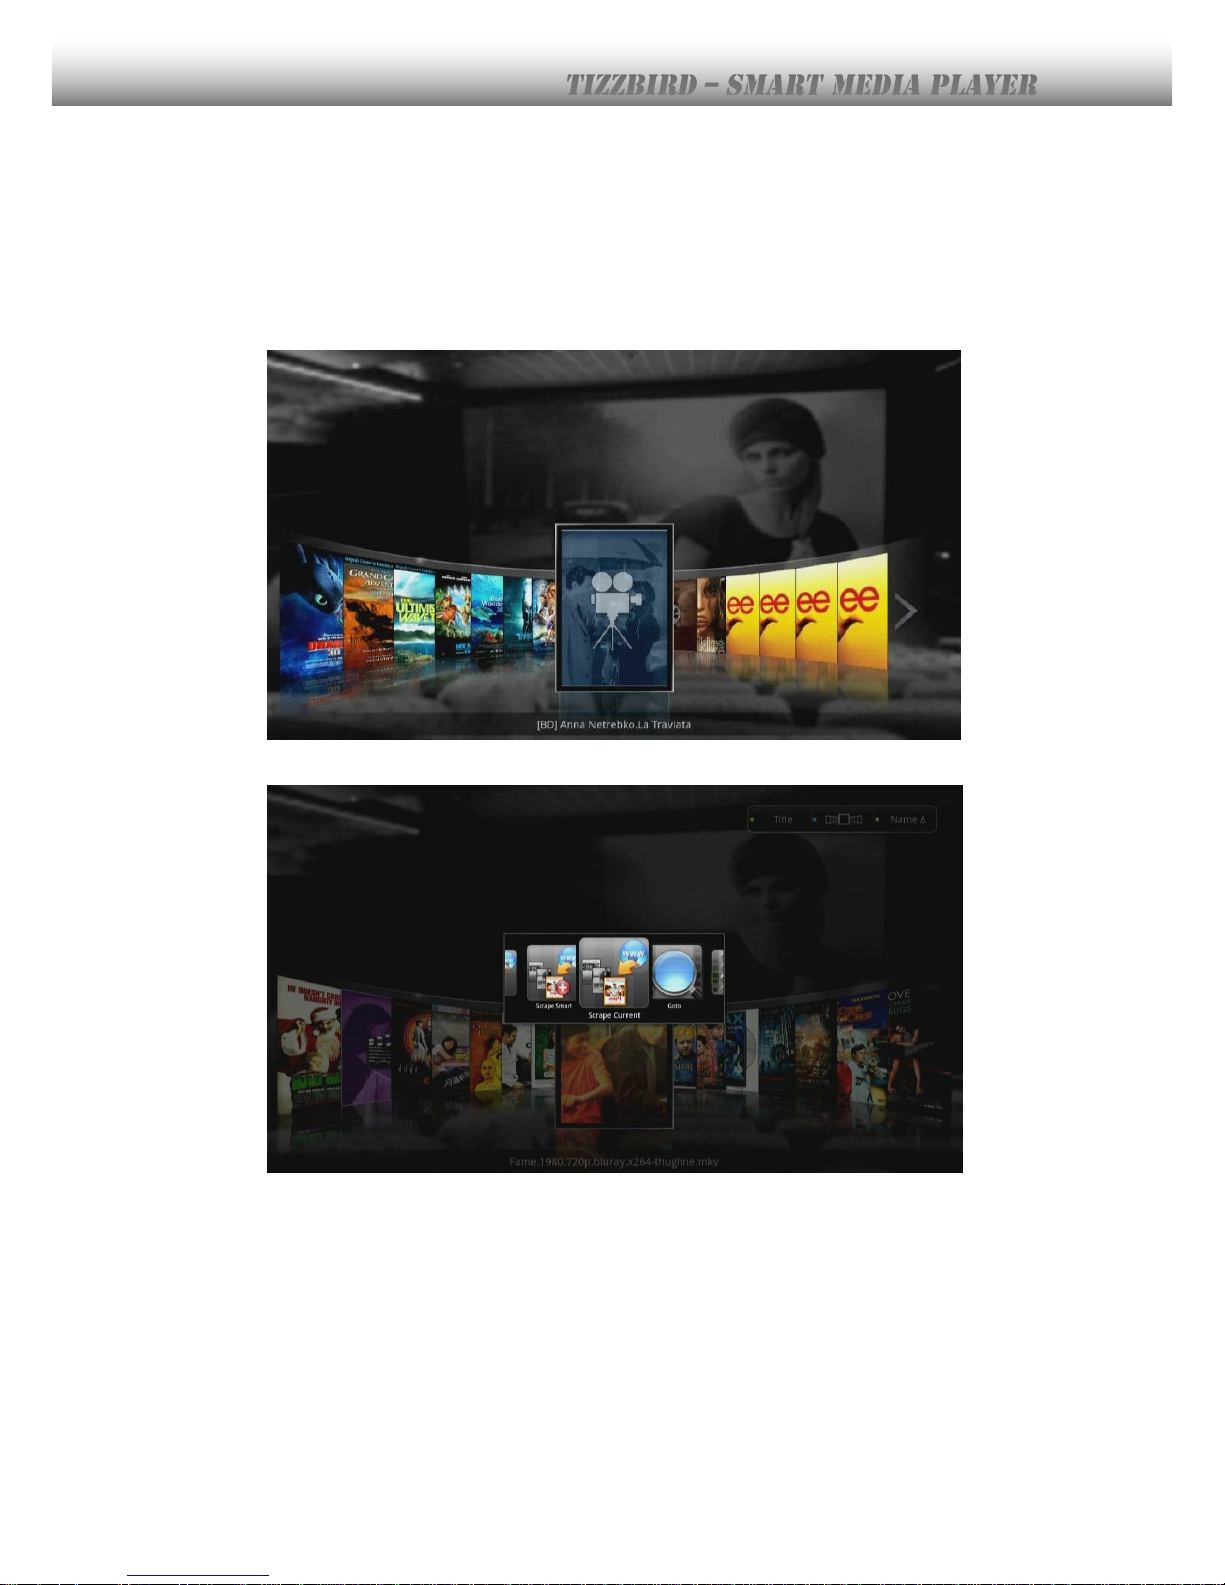
Movie posters should be added to make fancy movie browser like following screen. TizzBird
has built-in poster downloader inside called <SCRAPER> which means scraping the movie
information from network. Network should be connected before scraping movie posters.
Please refer to section 8.8 to configure network settings. If movie does not have poster, the
default image will appear like following screen. Press
<MENU>
to add movie poster.
Select <Scrape Current File > on the menu and press
<OK>
.
Page 33
33
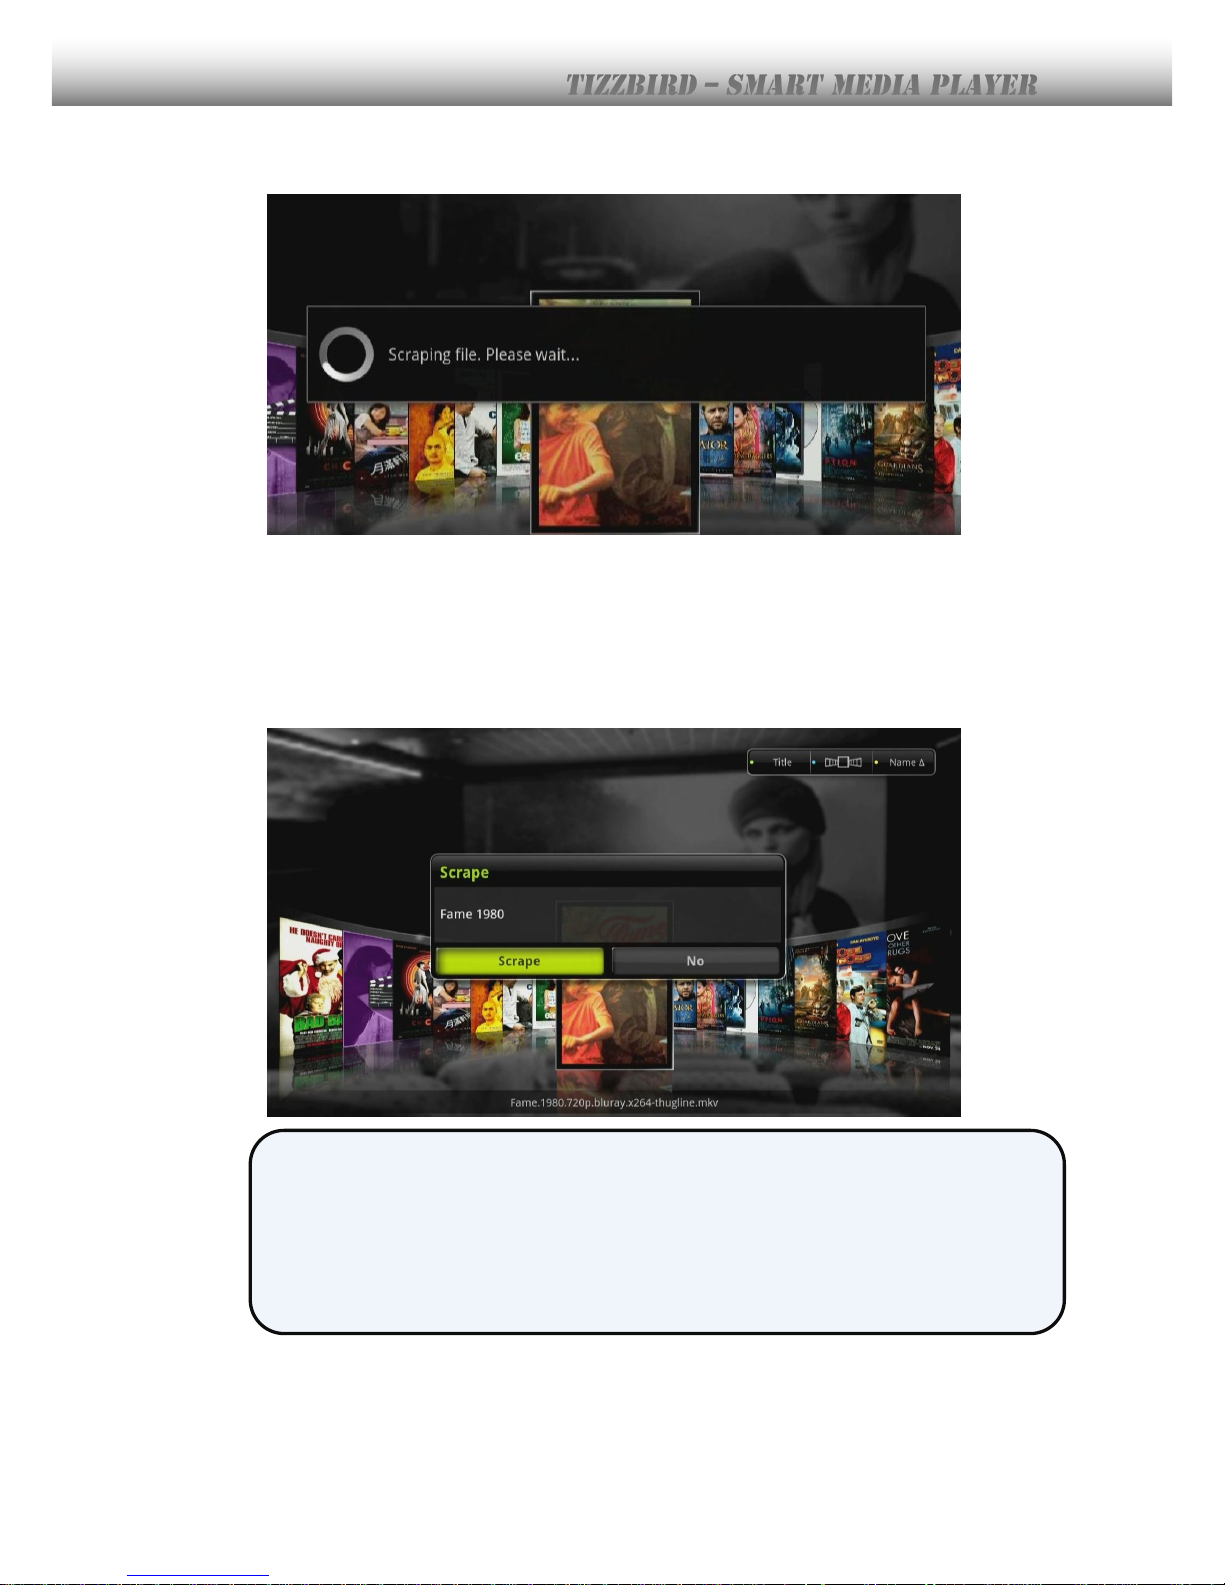
The following screen will appear when start scraping.
The scraping will be performed based on the file name, so there can be a chance the file
name is not correct or not good enough. In this case, scraping can be tried again on the
same file. The dialog box will be pop-up to enter or revise the file name to scrape. Click the
dialog box with mouse to bring the virtual keyboard, so the scraping file name can be
changed.
Press
<DOWN>
button on remote or click
<SCRAPE>
button on the dialog to restart the
scraping.
※ It’s quite tedious to do the same things on all movies. There are two menu items to
simplify those jobs. These menus will run on the background since it will take quite
long time to do the scraping. Movie can be playback still while the background job is
running.
Scrape All: Ignore previous scraping results, and restart scraping for all movies.
Smart Scrape: Find not scraped files and start scraping.
Page 34
34
10.5 Resume and Bookmark
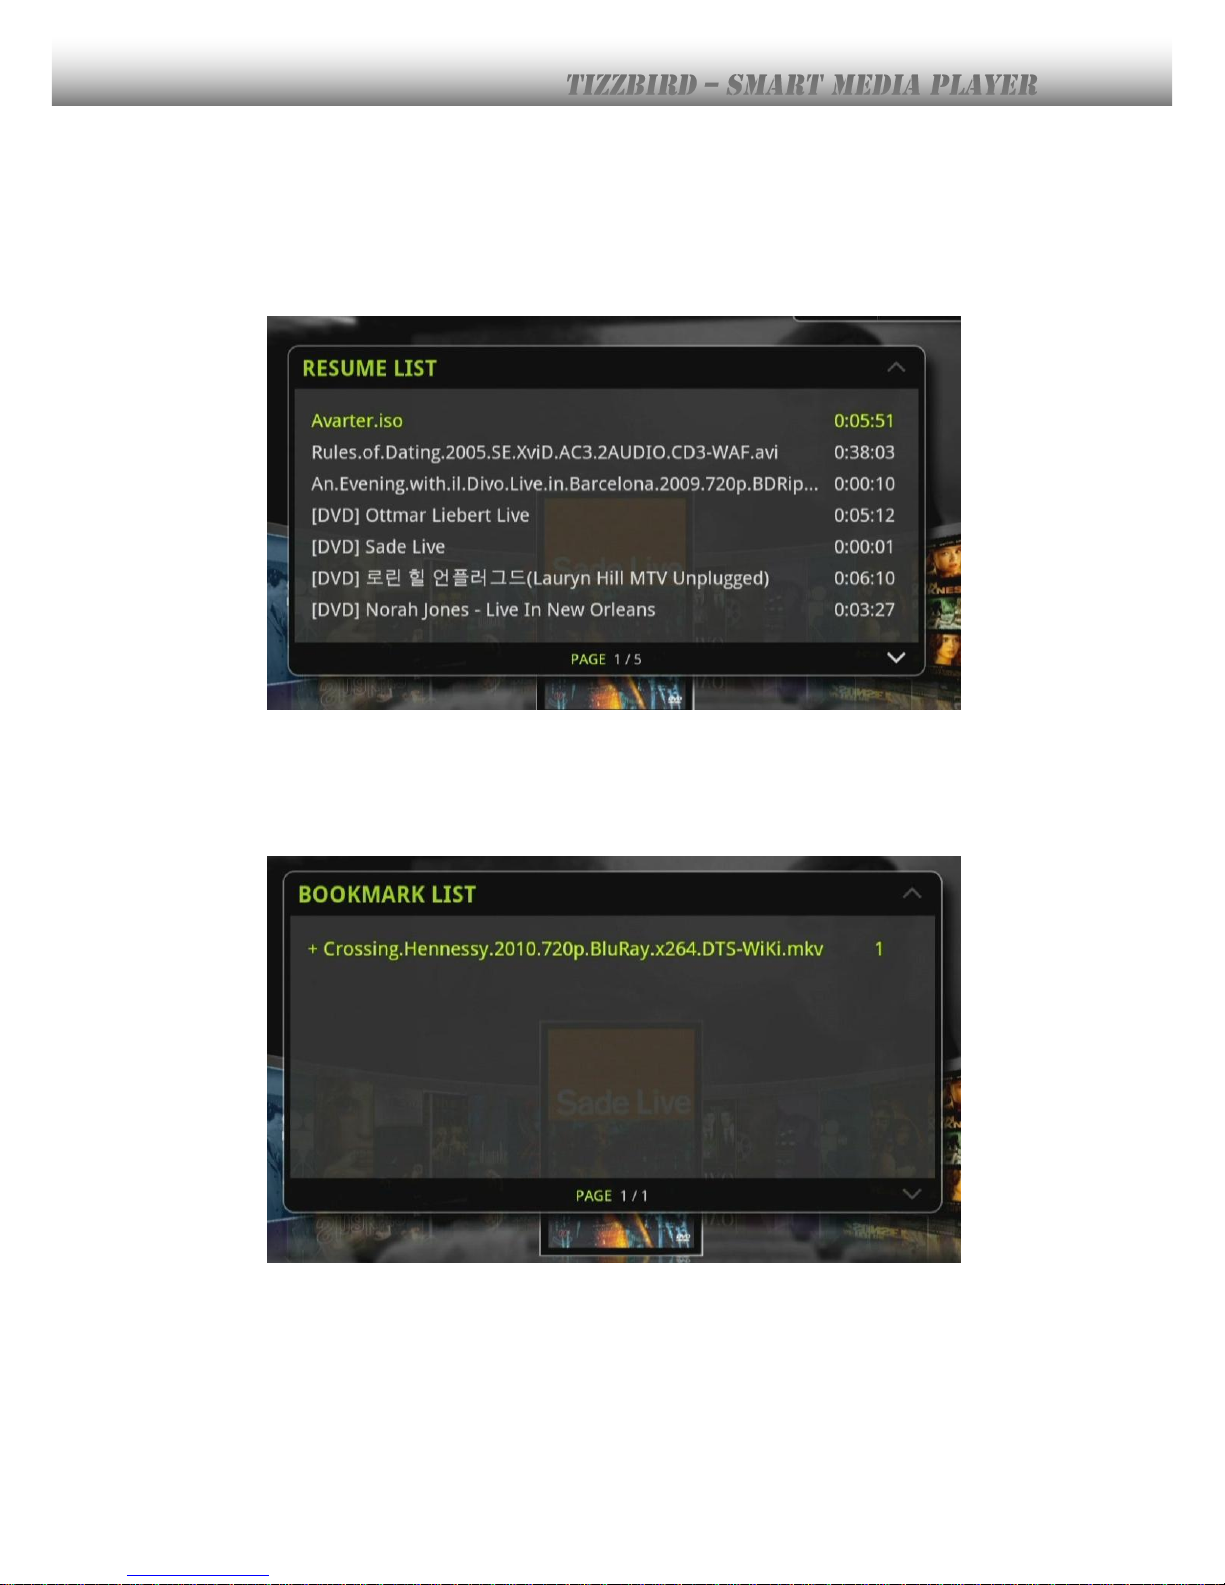
TizzBird provides RESUME function to the last playback position of movie, so it’s not
necessary to search it again manually. Press
<MENU>
button at MOVIE BROWSER and
select <RESUME> menu to pop-up the resuming list. The resume list will appear like
following image. Select wanted movie to resume to last playback position.
TizzBird also provides BOOKMARK function to memorize the scene position of movie. Press
<BOOKMARK>
button to memorize at wanted scene when playback the movie.
Press
<MENU>
button at MOVIE BROWSER and select
<BOOKMARK>
menu to pop-up the
bookmark list. The bookmark list will appear like following image. Select wanted movie and
position to resume to bookmarked position.
Page 35
35
10.6 Movie Playback Menu
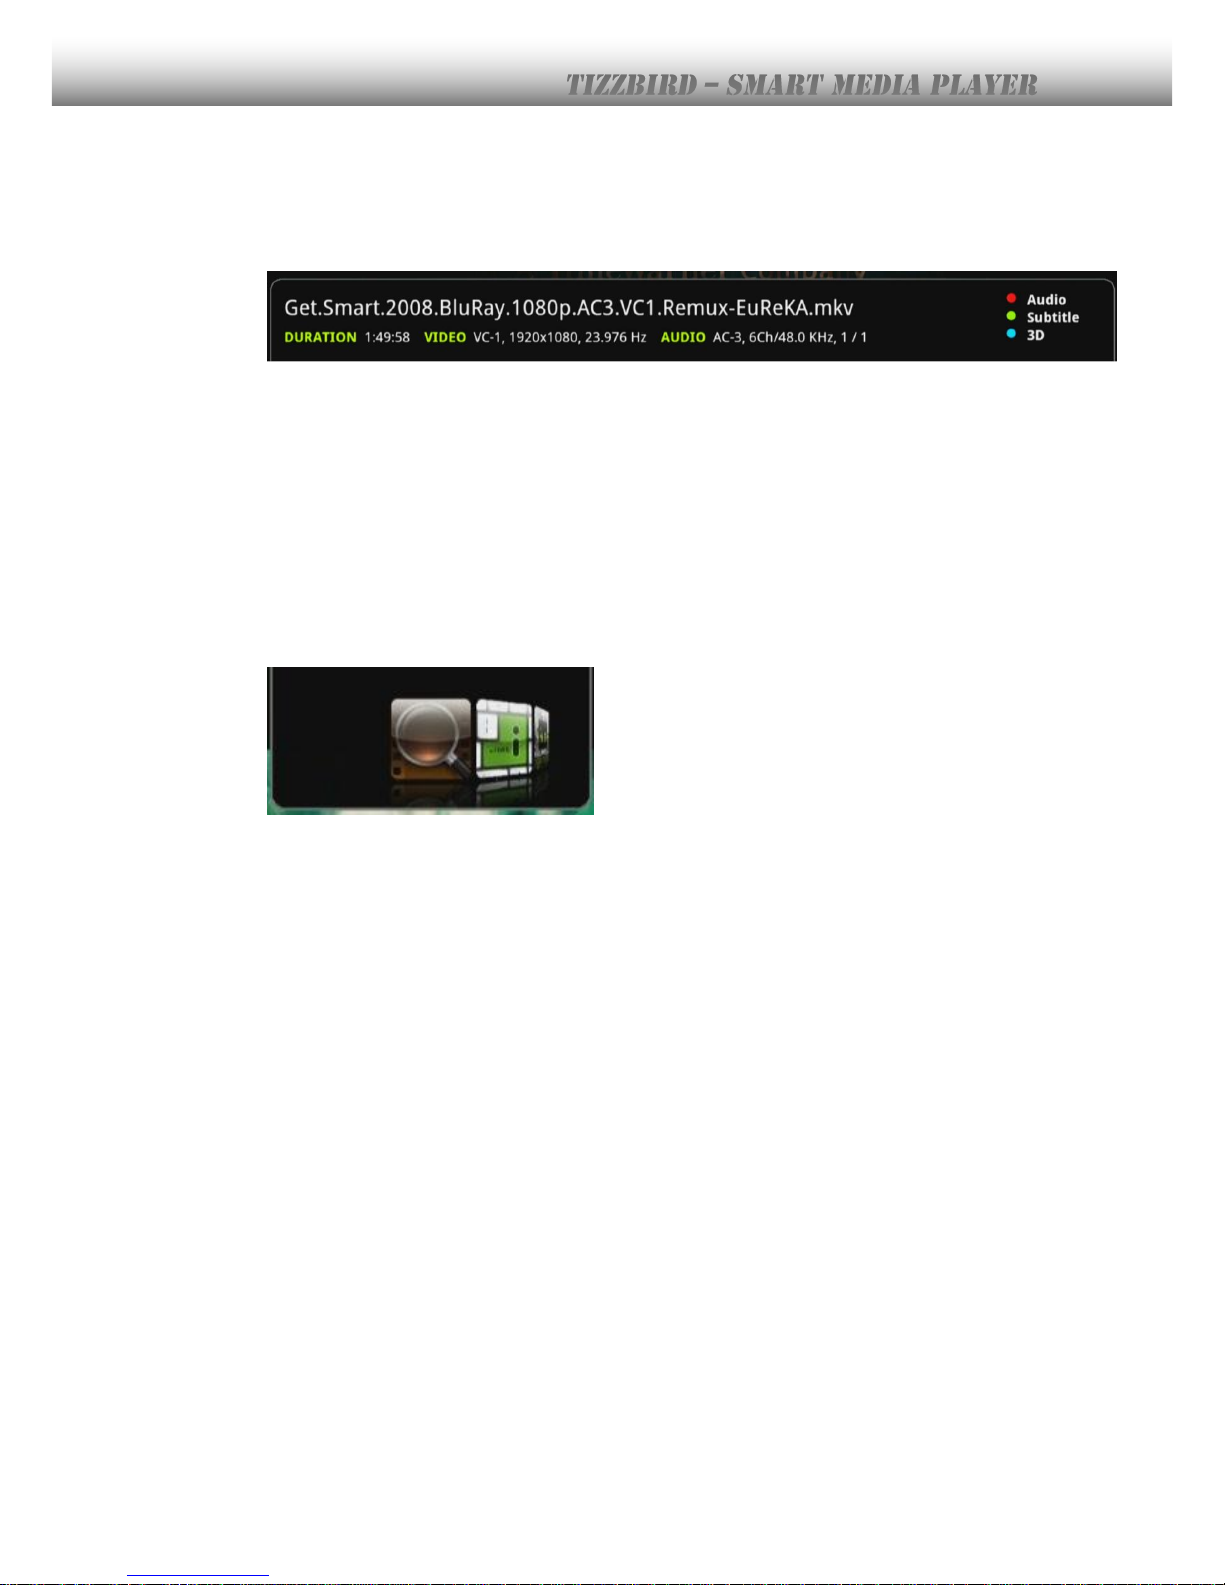
The information pane will appear at bottom side of screen as soon as movie starts like
below picture.
It will show title, running time, video and audio types. It also shows color buttons on the
remote that can be used to control movie playback.
RED color button: Select audio
GREEN color button: Select and control subtitle parameters.
BLUE color button: Select video parameters and 3D movie types.
YELLOW color button: Show movie playback information
TizzBird provides various control functions during movie playback. These functions include
<TIME/CHAPTER SEARCH>, <INFO>, <SUBTITLE>, <AUDIO> and <VIDEO> settings.
Most of functions can be activated by pressing
<MENU>
button. Press
<MENU>
button to
pop-up the following menu screen.
Page 36
36
10.7 Playback Speed Control
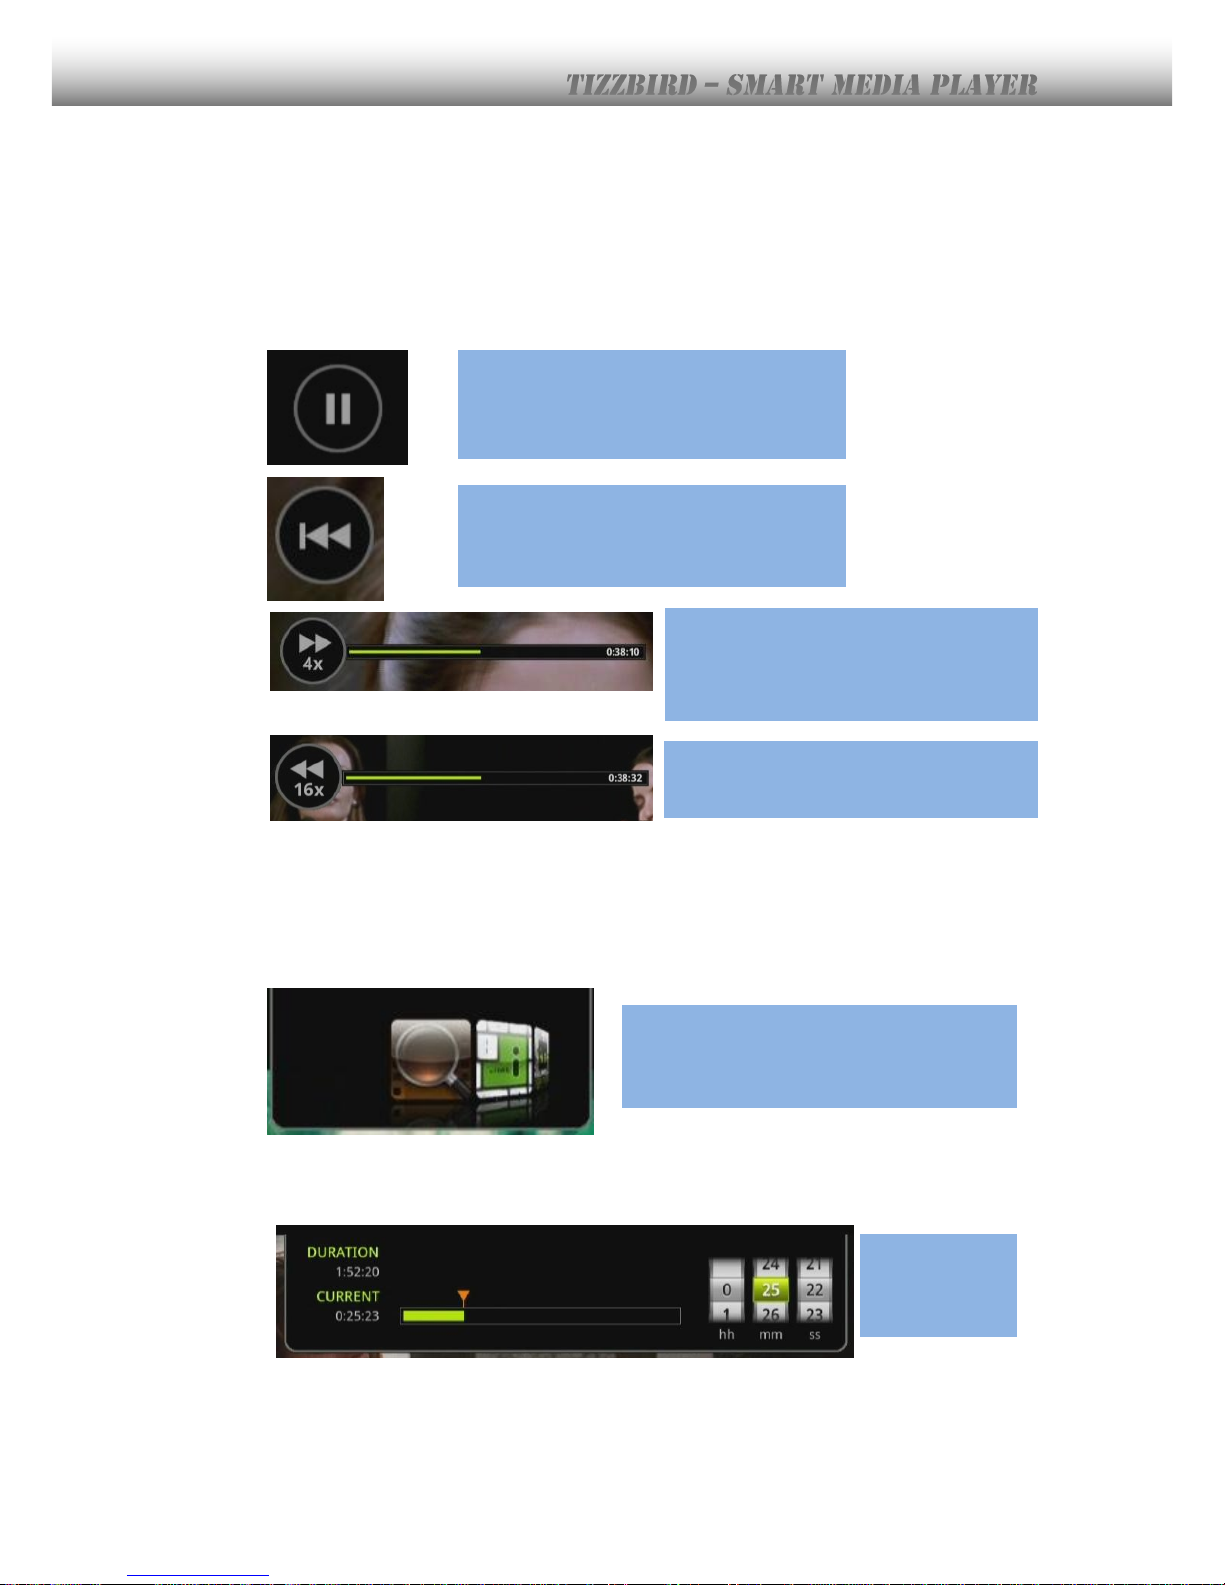
TizzBird provides various playback speeds and skip controls during playback including
PAUSE/ FAST-FORWARD/ REWIND/ PREVIOUS/ NEXT.
10.8 Searching Menu (Time, Chapter, Bookmark)
Press
<MENU>
button and select following image to search the movie by time, chapter or
bookmark.
The following screen will appear after selecting <SEARCH> menu. Playback time position
can be changed by arrows keys at wheel user interface. The CHAPTER or BOOKMARK field
can be also appeared if they are available.
Press <PLAY/PAUSE> button to play or
pause the playback.
Press <PREV> or <NEXT> button to skip
to previous or next chapter.
Press <FF> button to fast-forward
playback. It will change from 4x > 8x >
16x > 32x then again 4x if press
continuously
Press <REWIND> button to rewind
playback. It will change -4x > -8x> …
Select <SEARCH> image.
Press <UP> or
<DOWN> key
to select time.
Page 37
37
10.9 Playback Information Menu
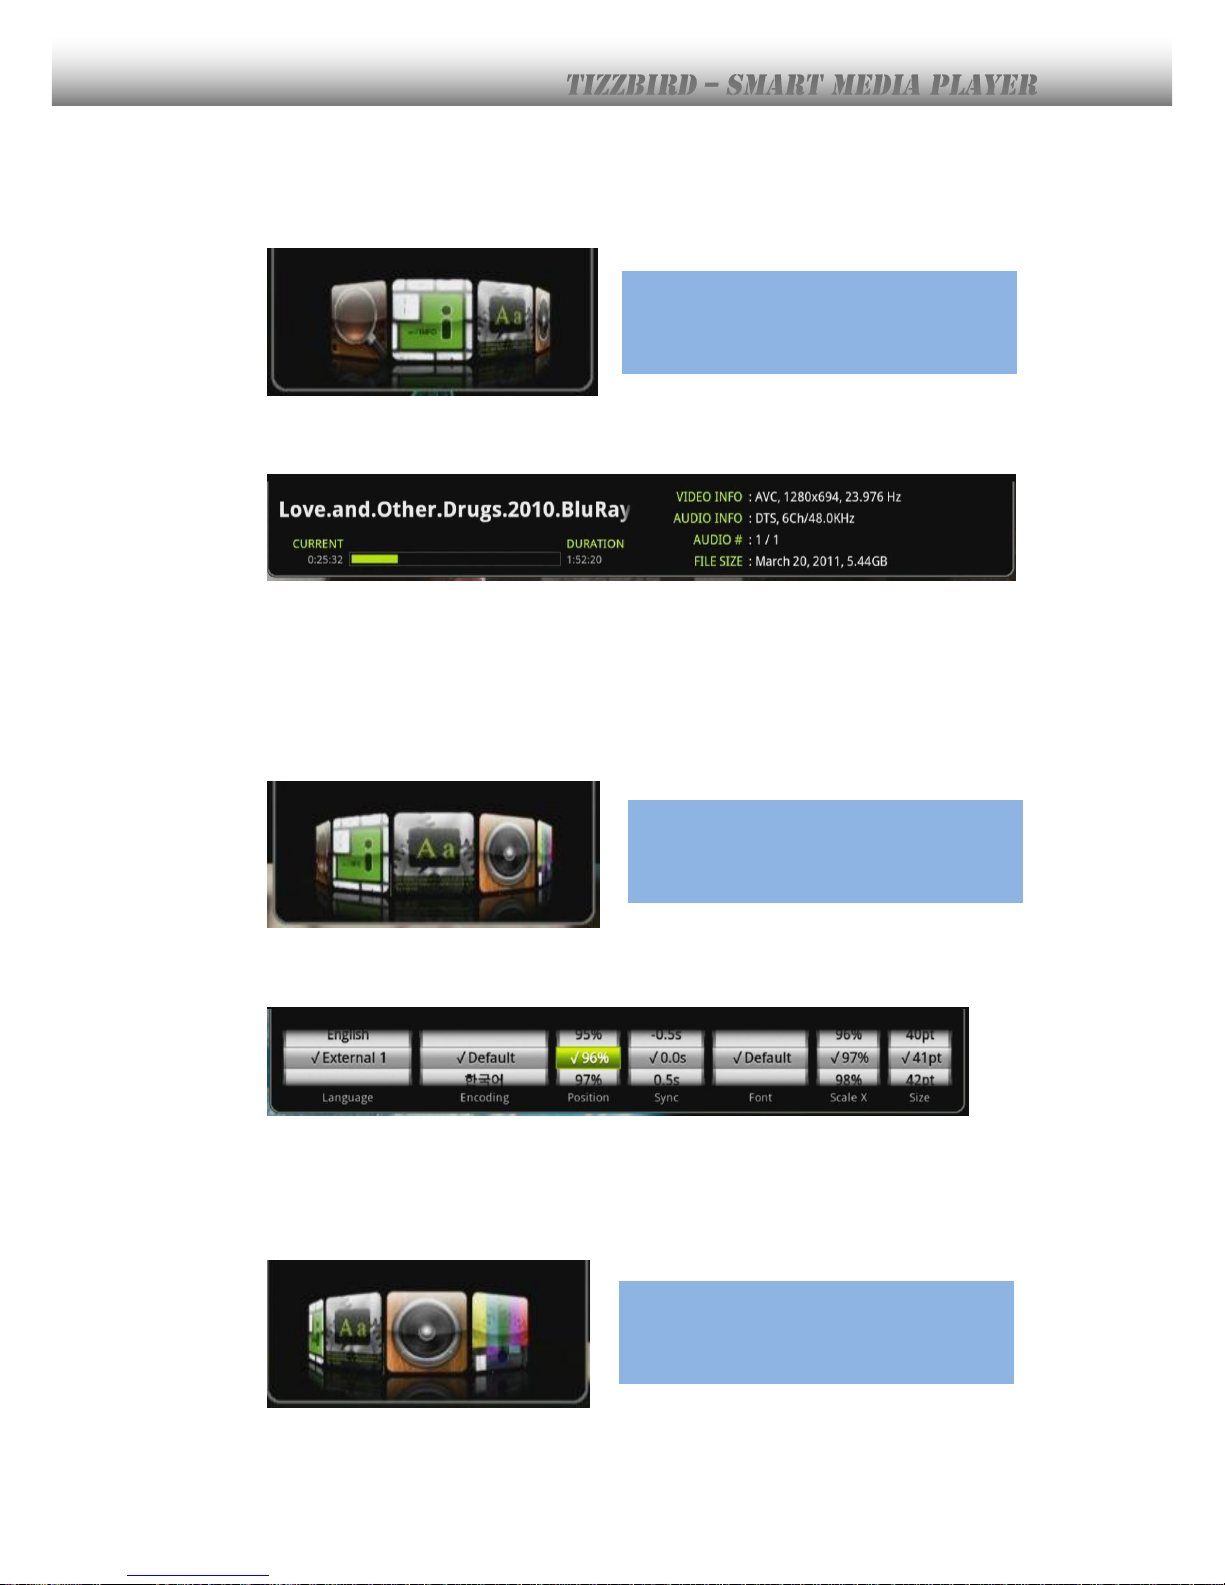
Select <INFO> image at movie playback menu to confirm the movie playback information.
The movie information and current playback position will appear like following image.
10.10 Subtitle Menu
Select <SUBTITLE> image at movie playback menu to control the subtitle language,
position, size, sync and font
The subtitle position would be lowest bottom side at 100% and would be top at 0%.
10.11 Audio Menu
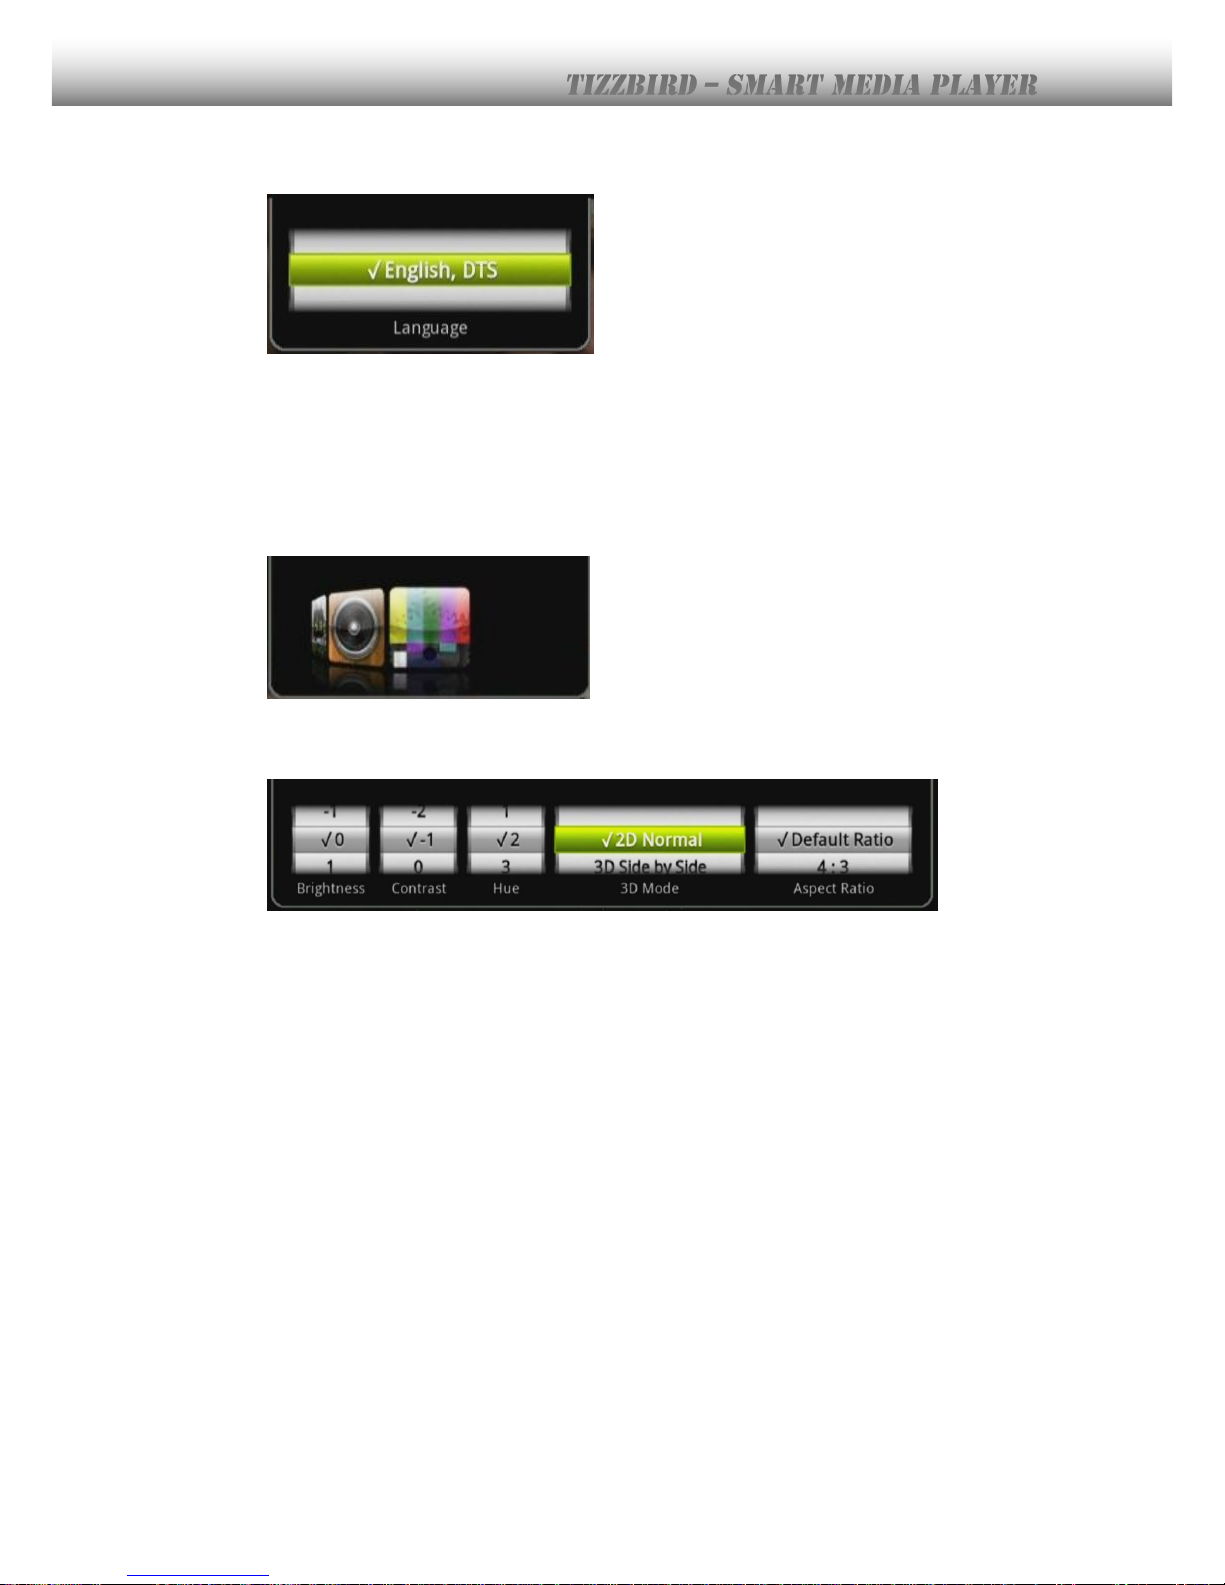
Select <AUDIO> image at movie playback menu if multiple audio tracks are available.
Select <INFO> image.
Select <SUBTITLE> image.
Select <AUDIO> image.
Page 38
38
Press
<OK>
after selecting audio format or language audio to change the audio track.
10.12 Video Parameter Menu
Select <VIDEO PARAMETER> image at movie playback to change the video parameters like
brightness, contrast or hue.
Press
<OK>
after selecting the value to apply.
10.13 Playback 3D Format Movies
TizzBird supports 3D files, if 3D display is available. The supported formats are SIDE-BYSIDE and TOP-AND-BOTTOM.
- If file name contains 3D and SBS (or TNB) string, then it will turn TV into 3D mode
automatically.
- If file name does not contain 3D string, but it contains actually 3D contents, then BLUE
button can be pressed to switch the TV into 3D mode.
- The subtitle and menu will be switched 3D mode automatically as well.
10.14 Skip Playback Position
Press
<UP>
or
<DOWN>
key during movie playback to skip movie playback position. The
skip duration can be configured at <SETTINGS BROWSER> <MOVIE> <SKIP
DURATION>. This function is quite simple to use to skip to the wanted scene
.
<UP>
button Skip forward
<DOWN>
button Skip backward
Page 39
39
11. Listening Music
11.1 Music Browser
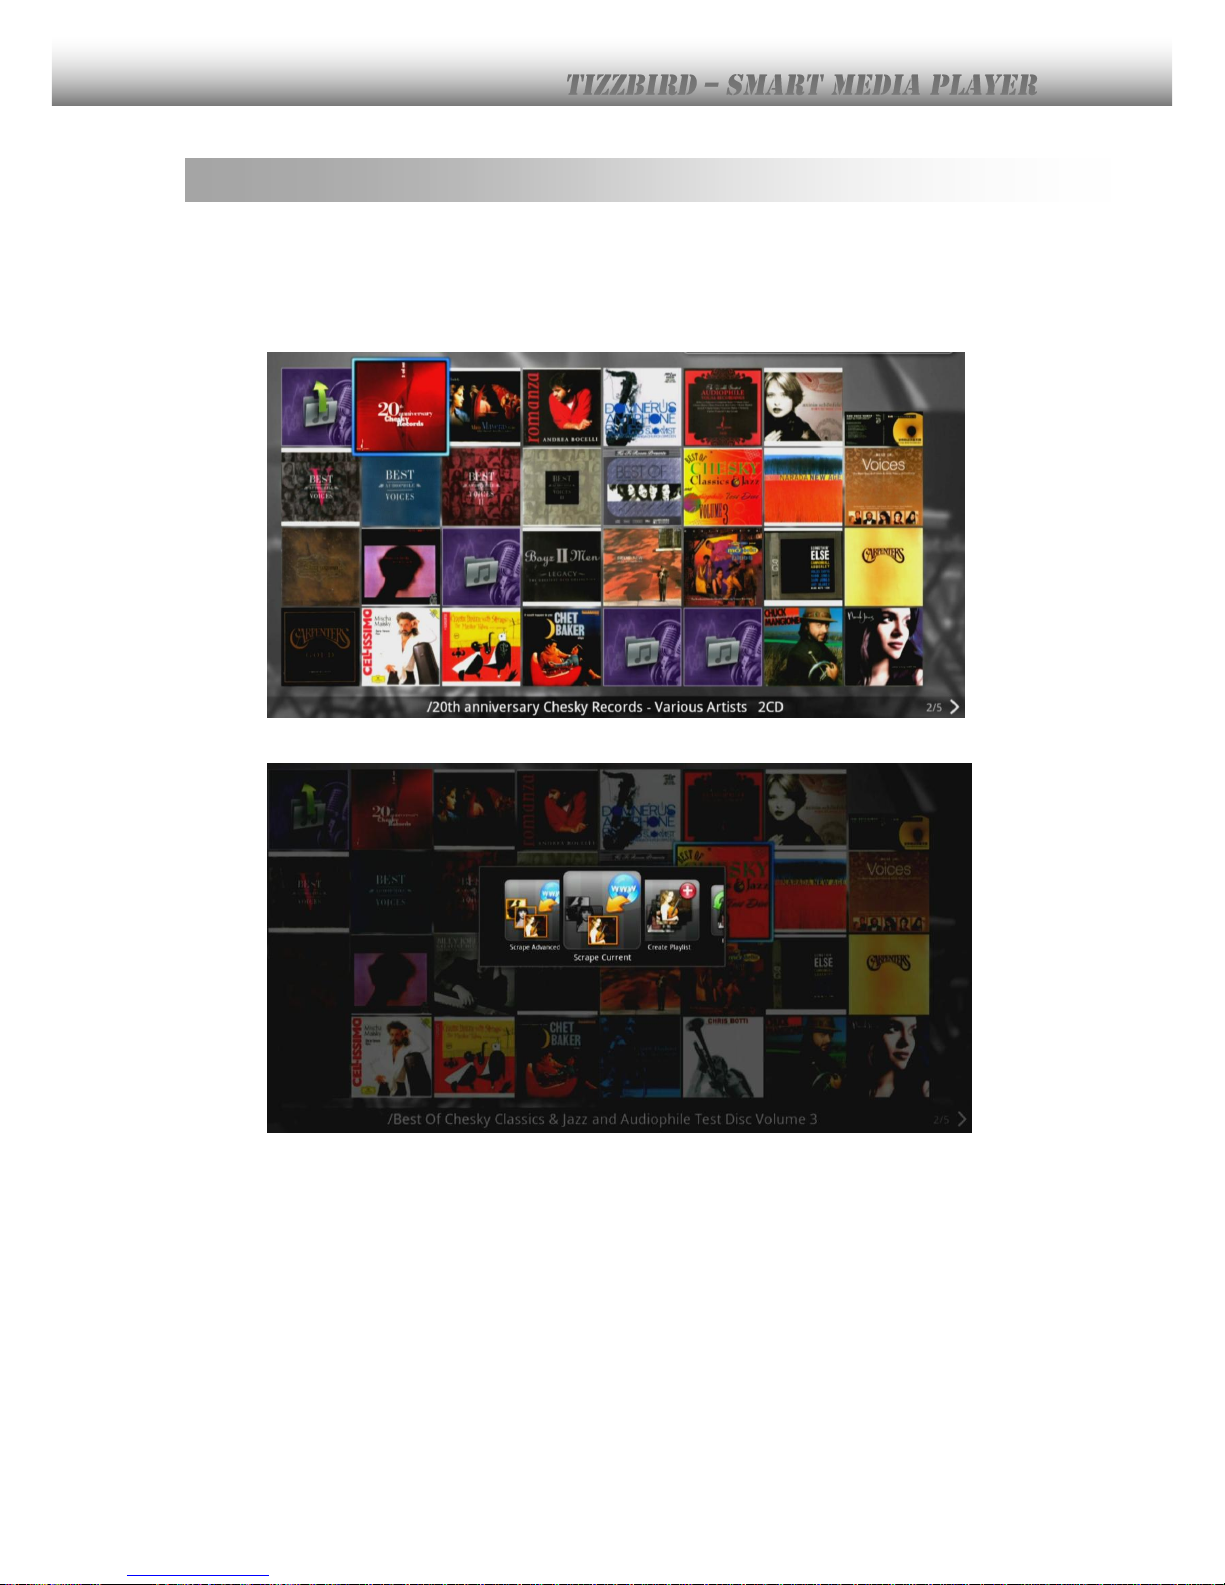
The following MUSIC BROWSER screen will appear if music files contain the album art at
their tags. Press
<LEFT>
or
<RIGHT>
keys to move each direction. Keep pressing arrow
keys to browsing continuously. The album-art screen will keep changing.
Press
<MENU>
button to bring <SEARCH> or <SCRAPE> menu just like MOVIE BROWSER.
Page 40
40
11.2 Sorting Music
Music files at large capacity hard drive need to be sorted since it’s easy to organize and
search. TizzBird provides various “SORTING” functions based on the powerful Android
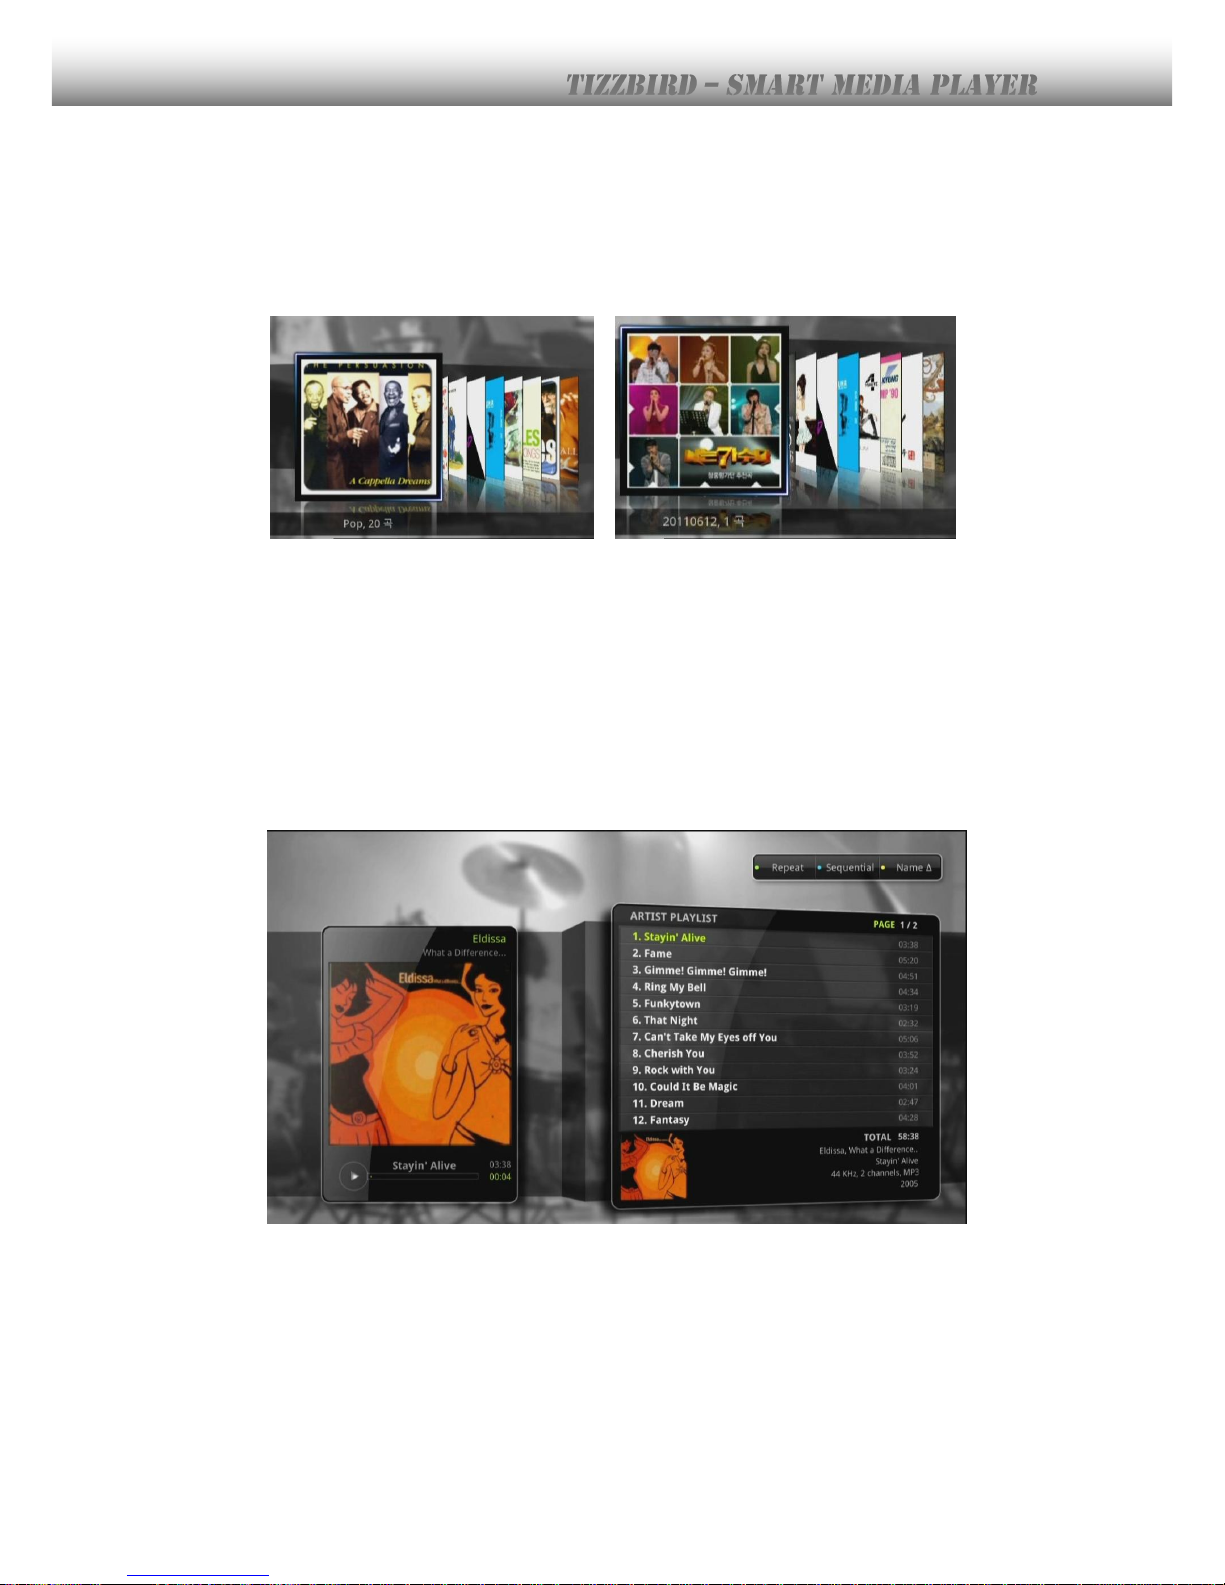
database. Press GREEN color button on remote to sort by ALBUM, ARTIST, TITLE or YEAR.
The following two images show SORT BY GENRE and SORT BY YEAR.
SORT BY GENRE SORT BY YEAR
11.3 Music Playback Screen
Select album art to playback the selected music. The following image will appear.
Left pane:
Shows album-art image, current playback status and position.
Right pane:
Shows list of songs, song information and album-art thumbnail.
Press
<UP>
or
<DOWN>
arrow key to browse songs and press
<OK>
to start playback.
Now playing music will be shown in YELLOW and selected music in LIGHT GREEN color.
Press
<PREV>
or
<NEXT>
button to turn pages, if there are more pages on the song list,
11.4 Music Playback Menu
Available button when playback music is like this:
<PLAY/PAUSE>
button: play or pause the music
<UP>
or
<DOWN>
button: skip playback position designated at settings.
Page 41
41
12. Watching Photo
12.1 Photo Browser
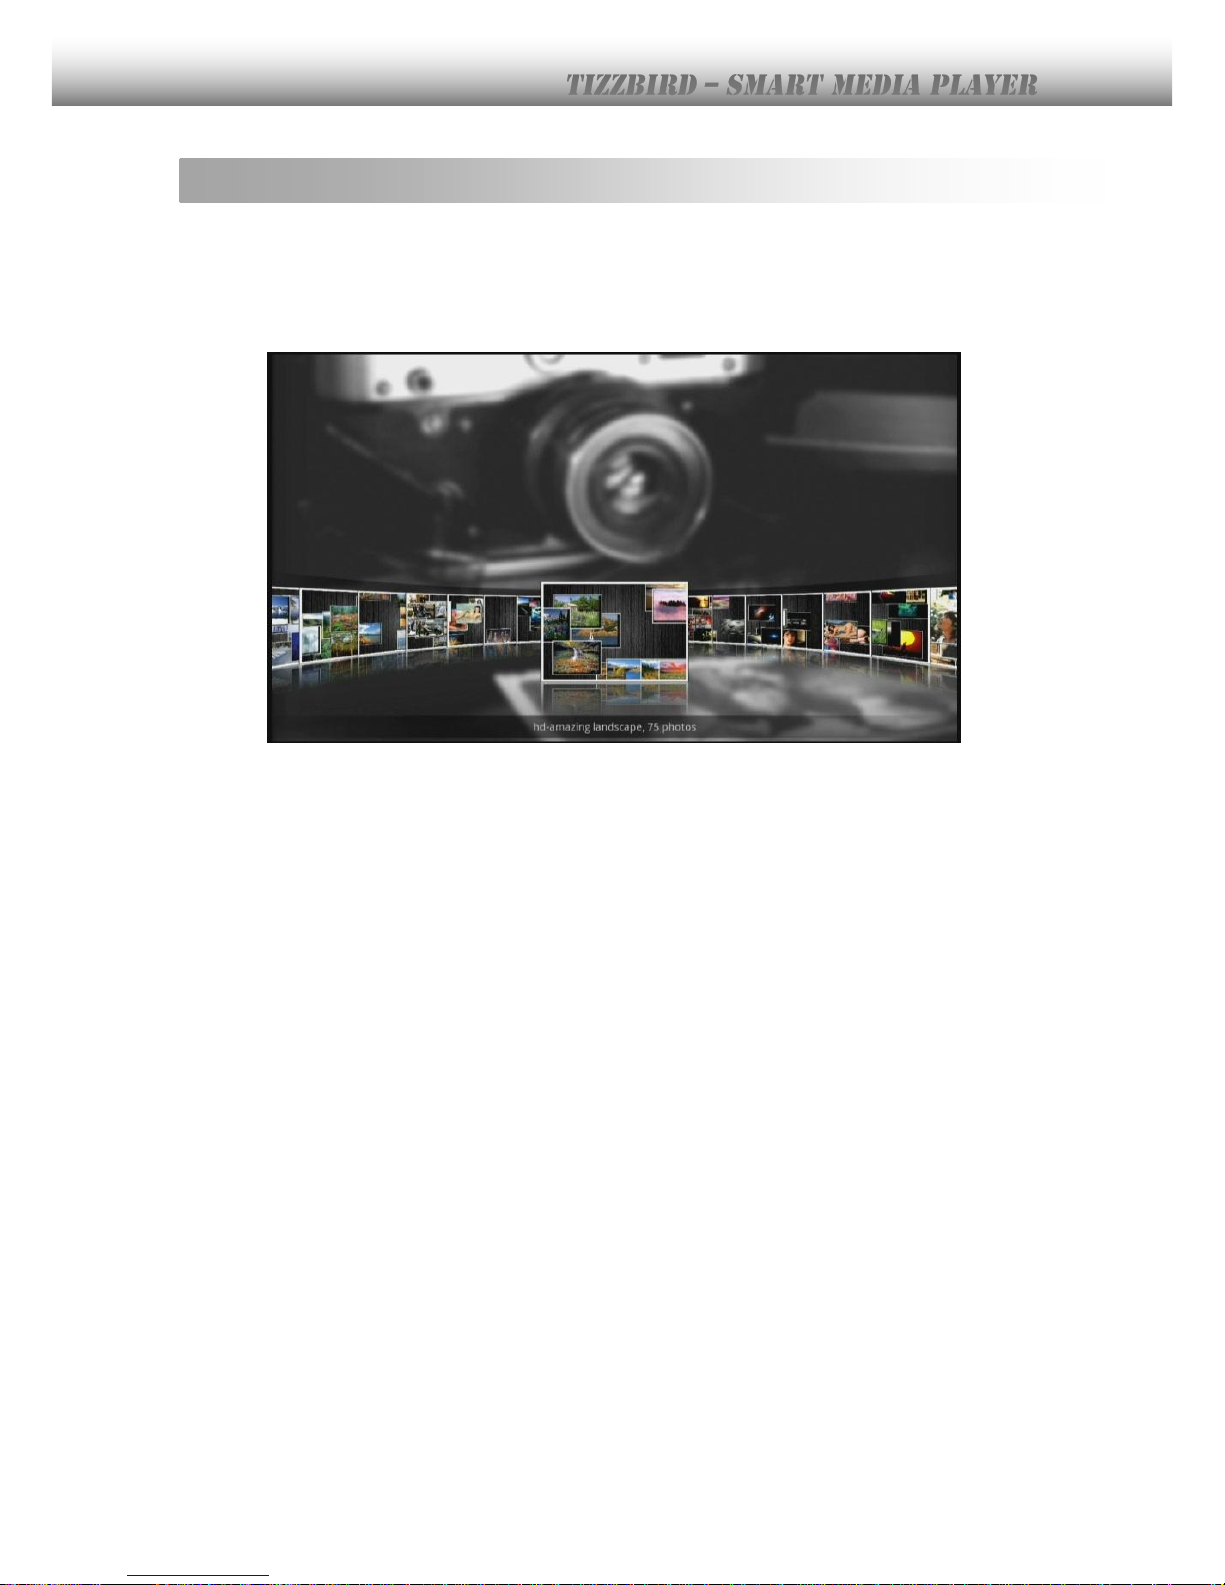
The following PHOTO BROWSER screen will appear when selecting PHOTO BROWSER. It’s
composed of superb folder thumbnails COVER-VIEW which is quite neat and intuitive. Each
image shows thumbnails of photos that folder contains.
12.2 Photo Browsing Menu
Press
<MENU>
button to bring quick <SEARCH FOLDER> function.
12.3 Photo Wall & Photo Stack
The following screen will appear after selecting one of the folder thumbnails. Photo wall can
be used to select one of photos. Use arrow buttons to navigate the photos and press
<OK>
button to see the photo at full screen.
Page 42
42
12.4 Photo Playback Screen
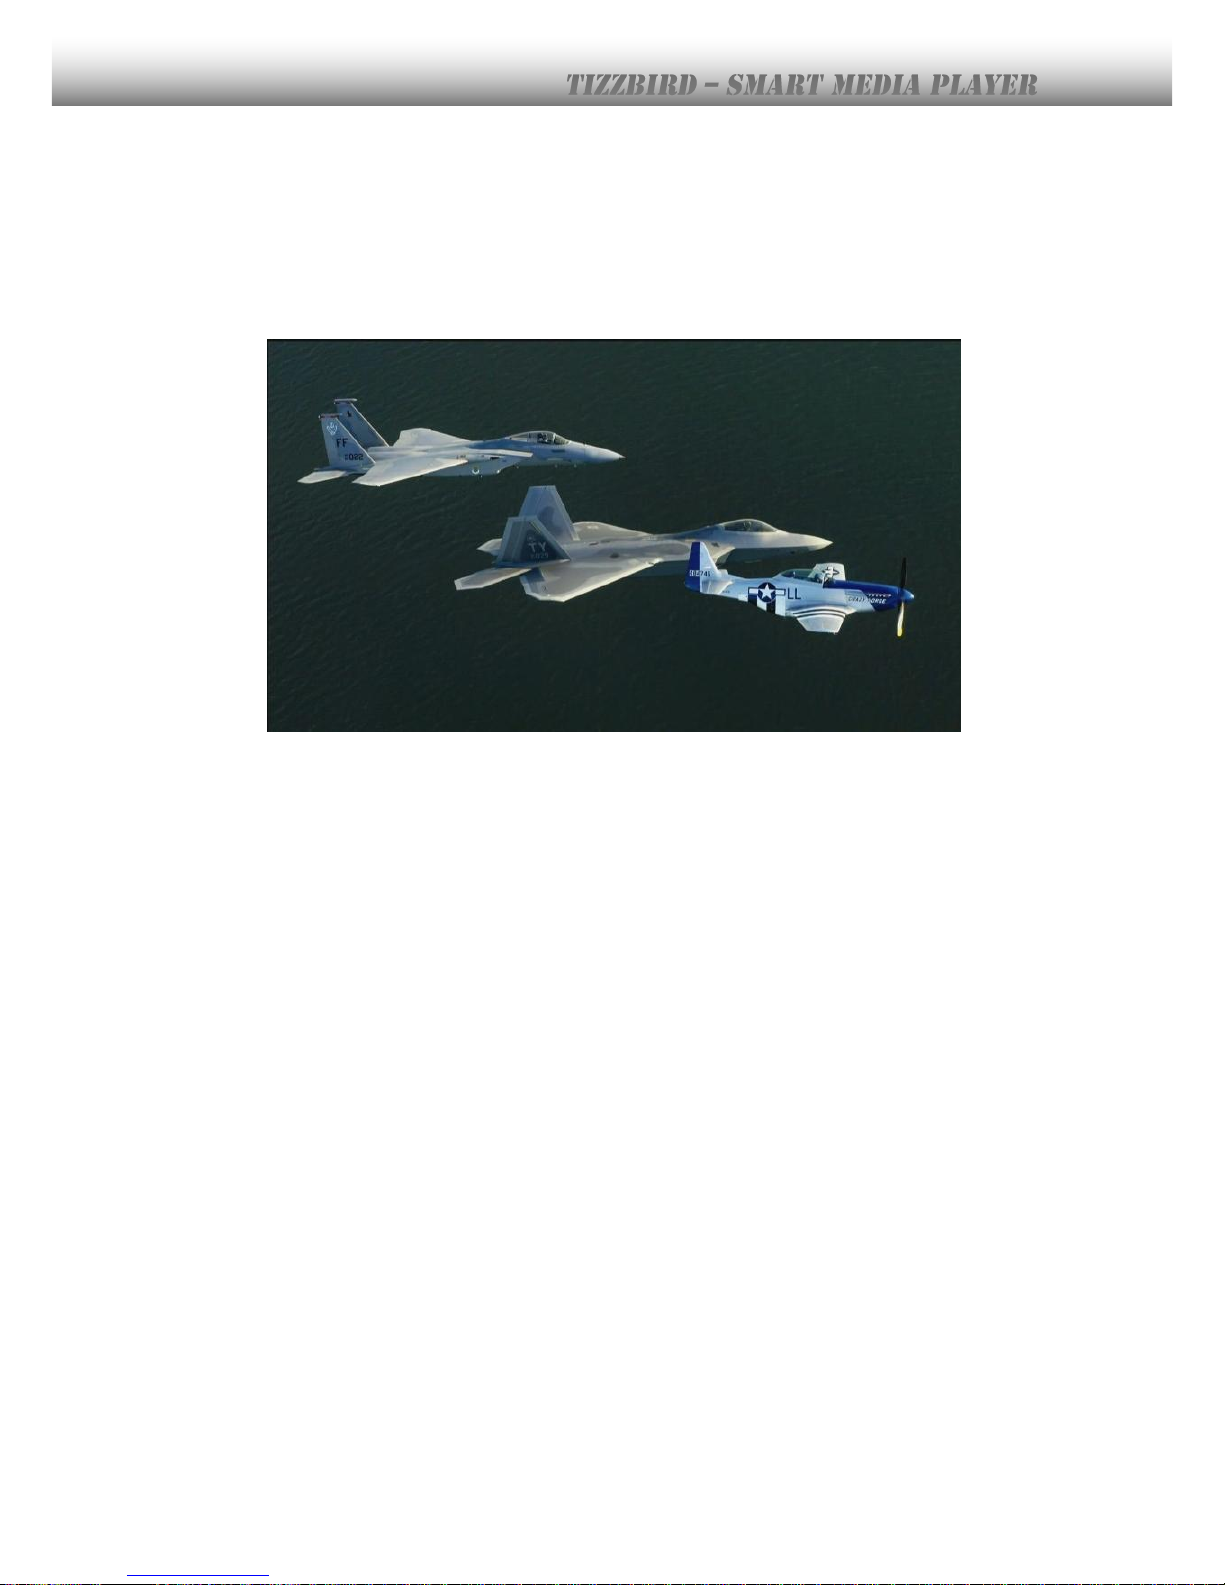
Photo slide show will start automatically, so next photos will keep appearing with transition
effect. The various TRANSITION EFFECTS can be configured at <SETTINGS BROWSER>
<PHOTO>.
12.5 Slideshow Control
Slideshow can be controlled by arrow and <PLAY/PAUSE> buttons. Press <PLAY/PAUSE>
button to pause or resume to playback. Use arrow keys to change the slide direction.
Page 43
43
13. Using File Browser
13.1 File Browser Screen
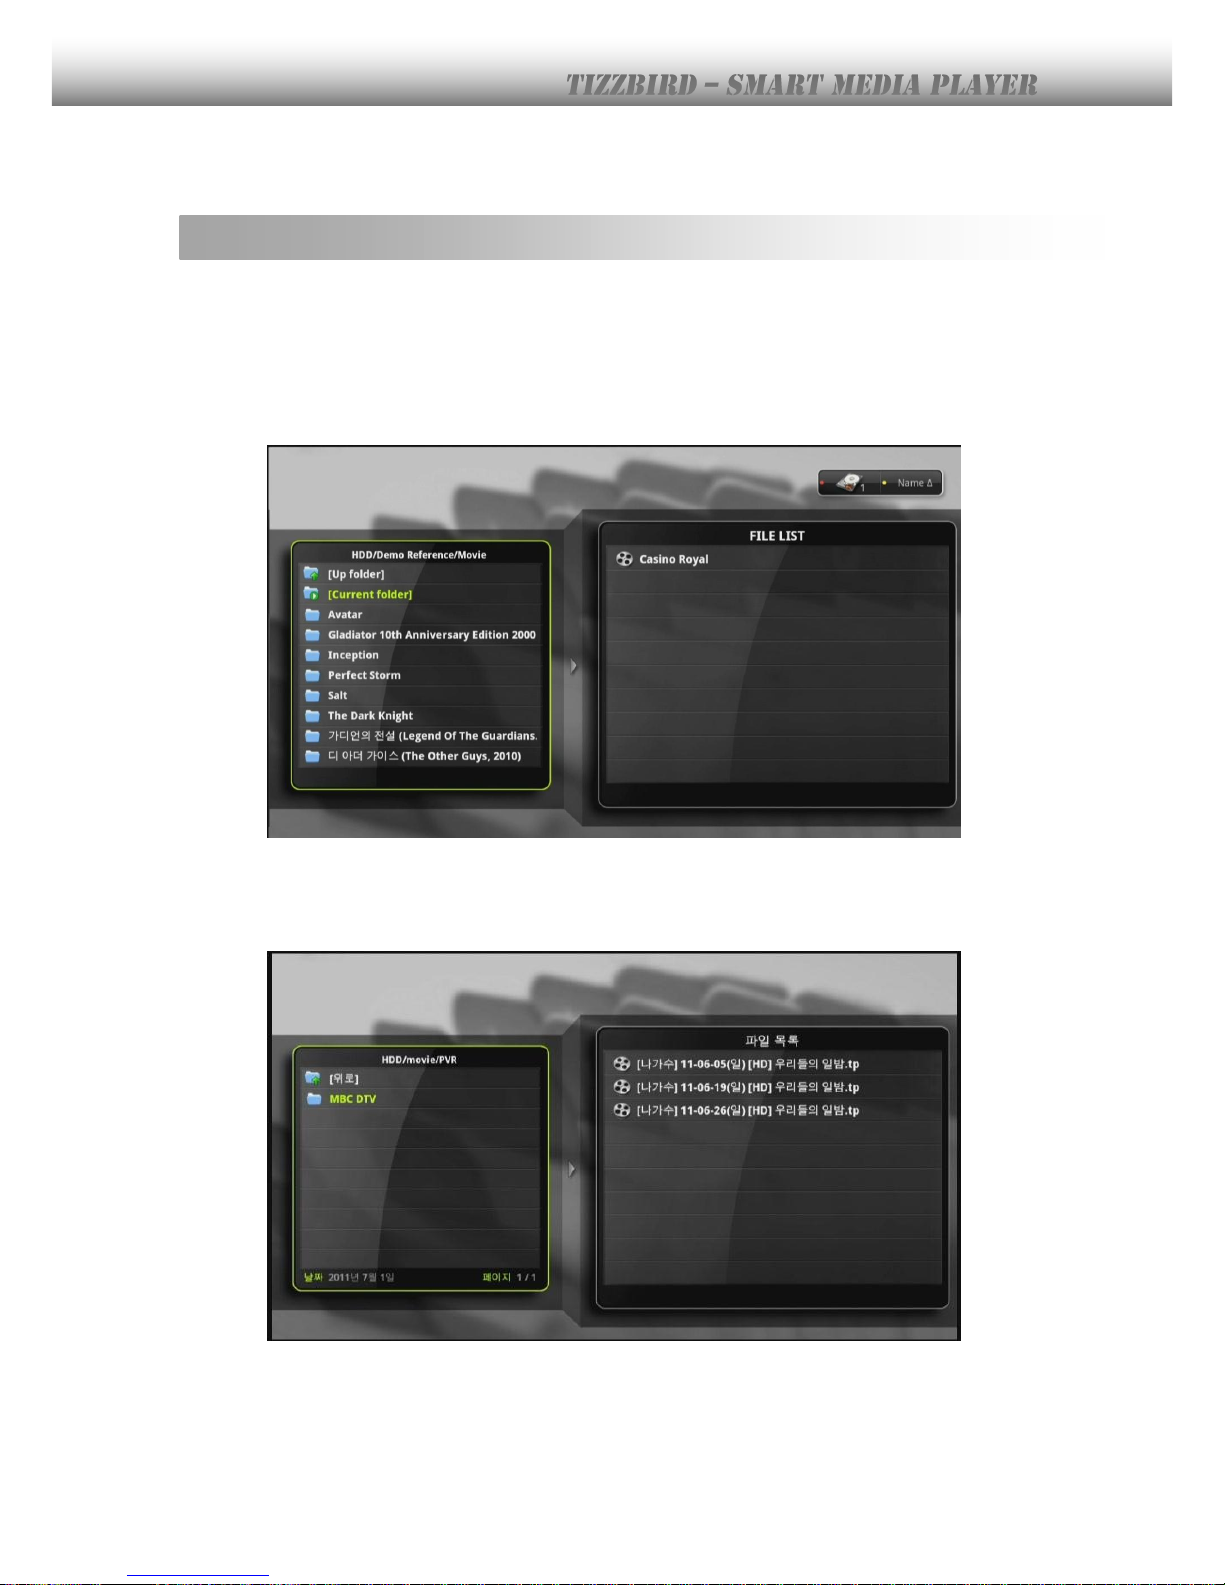
The following screen will appear when selecting FILE BROWSER. This is quite similar
browser user interface that legacy media players provided before. Folder or file based
browsing is possible on this browser, and selecting and playback the file directly.
The left pane is FOLDER PANE, and the right pane is FILE PANE.
Folders can be browsed by arrow keys and press
<OK>
button to select that folder. The
files will be appeared on the right pane if that folder contains the files. The GREEN outline
on the pane means it’s selected. Press
<RIGHT>
arrow button to move the FILE PANE and
select the file. Press
<OK>
to select and start playback that file.
Page 44
44
13.2 Selecting Device at File Browser
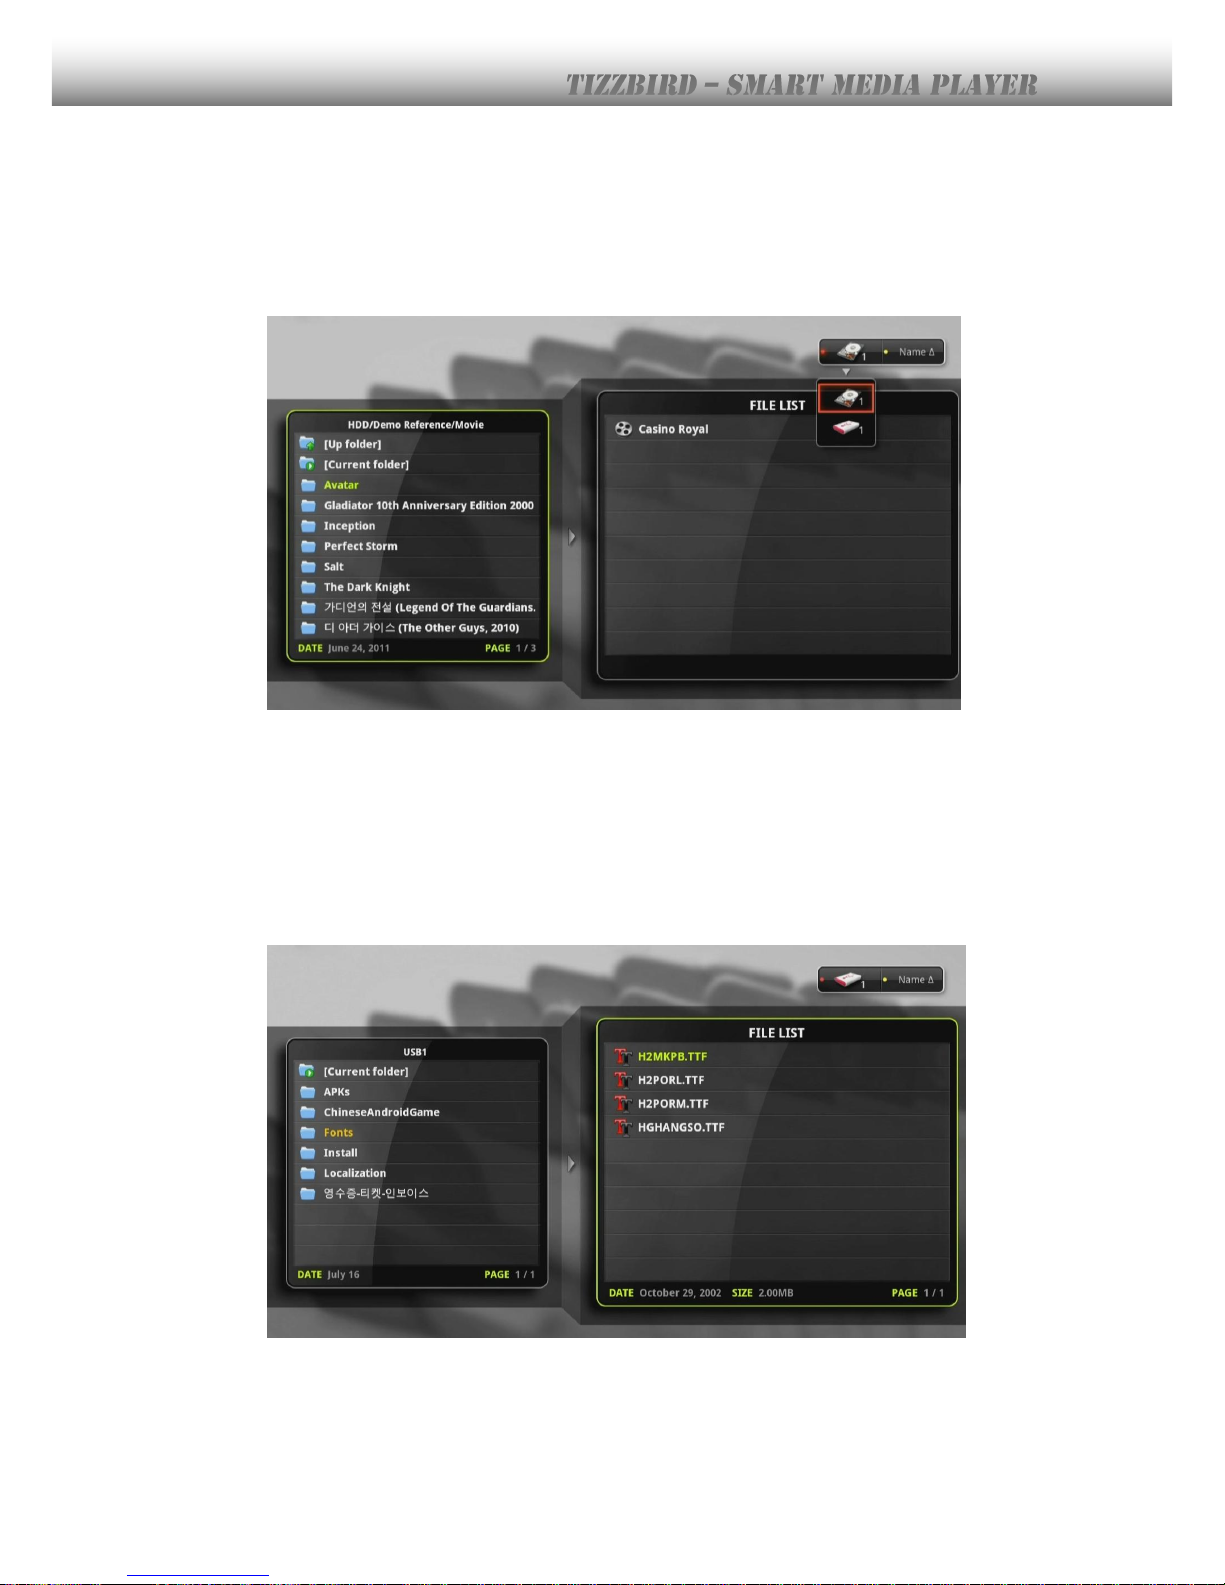
External USB, internal HDD storage device, or network drive can be selected at FILE
BROWSER. Press <RED> button on the remote and the device drop-down list will pop-up
like following image. Use
<UP>
or
<DOWN>
arrow key to browse devices. Choose one of
them then press
<OK>
to select it.
13.3 Register Subtitle Font File
Subtitle font file can be selected at file browser. Copy or move the font file (true-type font
file - .TTF extension) to the USB drive or internal HDD from PC, then connect the drive to
TizzBird. Press <RED> button to select drive and navigate into the folder that font file was
copied. The font file will appear like the following image.
Select one of the font file and press
<OK>
button to register. Several font files can be
registered at once.
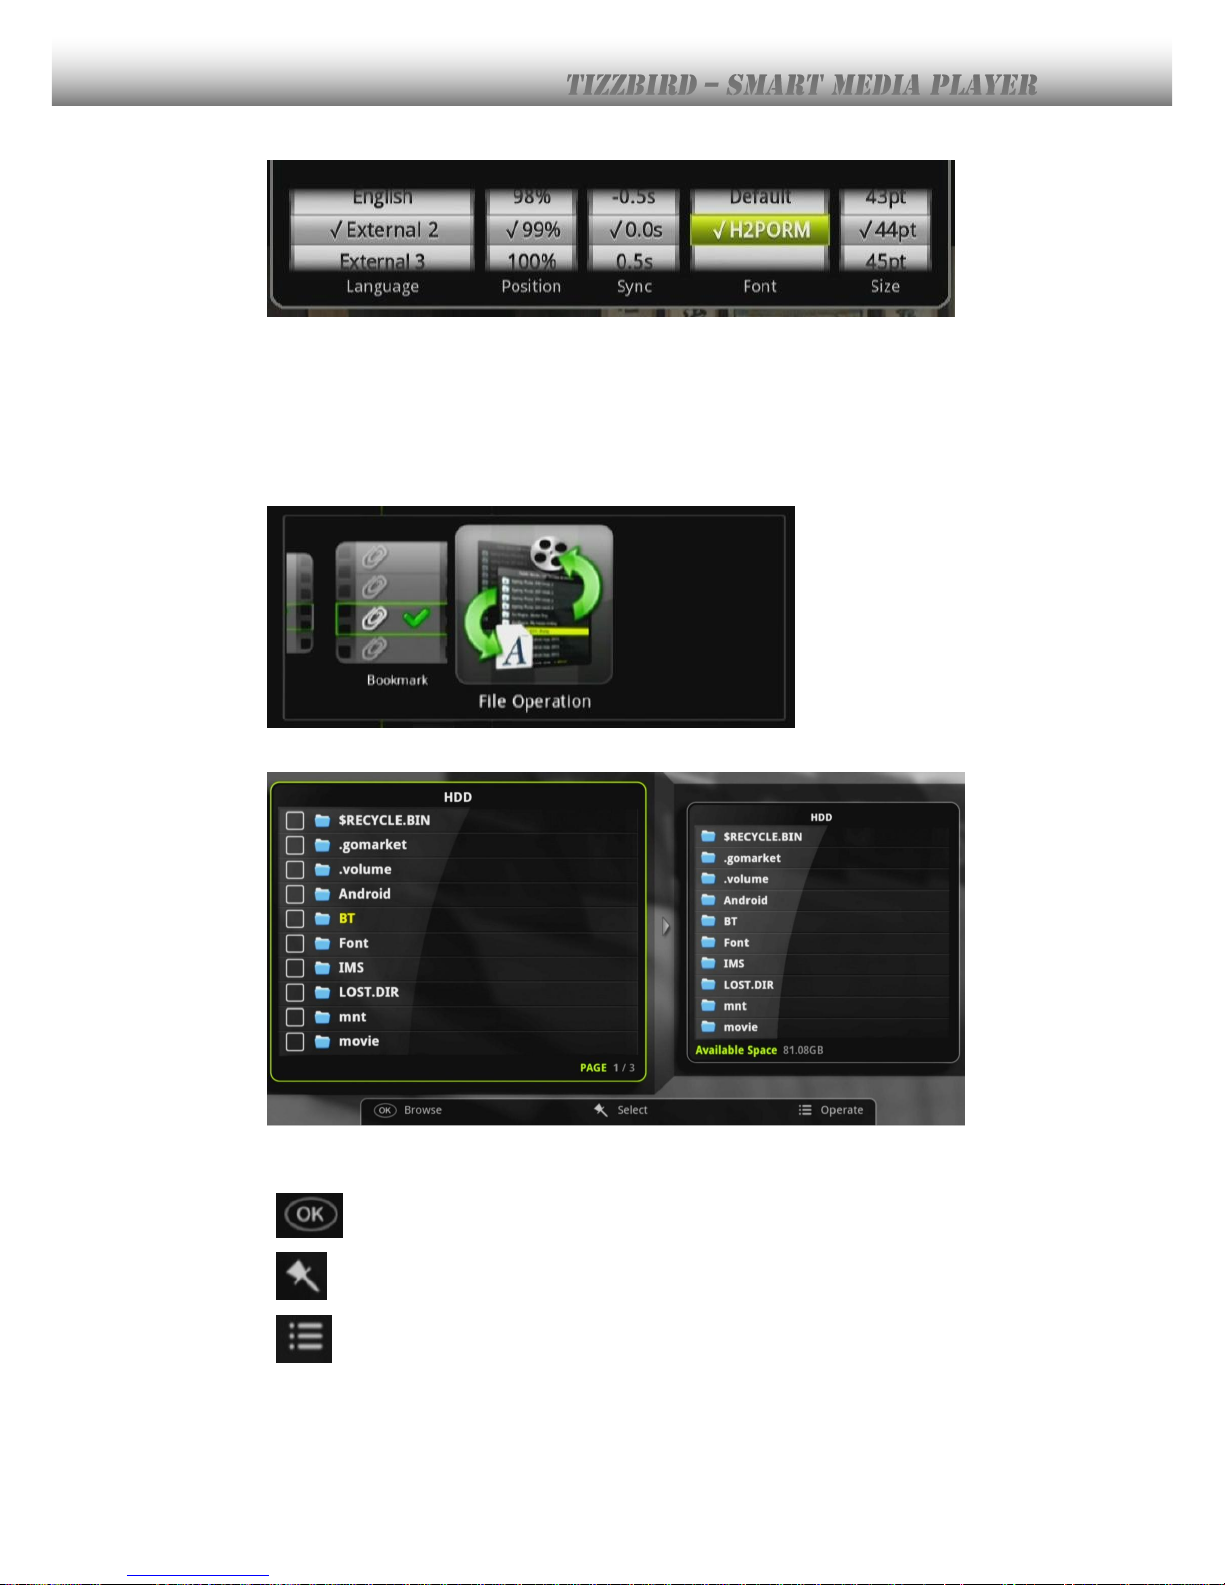
Registered font files will appear at movie playback screen menu. Press
<MENU>
button and
choose <SUBTITLE> icon.
Page 45
45
13.4 Using File Operation
Rev 1.12 firmware provides the “File Operation” capability which enables COPY, MOVE,
DELETE, RENAME and NEW FOLDER functions. Press “MENU” button on the remote then
select the “File Operation” ICON at the pop-up window to enter this mode.
This will bring the following screen.
The left pane is source window and the right pane is target window. The “File Operation”
will function from left pane to right pane. The following remote buttons can be used.
OK button Browse and enter the folder.
Bookmark button Select the item to operate.
Menu button Pop-up the FILE OPERATING ICONs.
Please use left or right arrow button to move left or right pane. The RED button can be
used to select the device at each pane. This RED button enables the selection of source or
target device at each pane.
Page 46
46
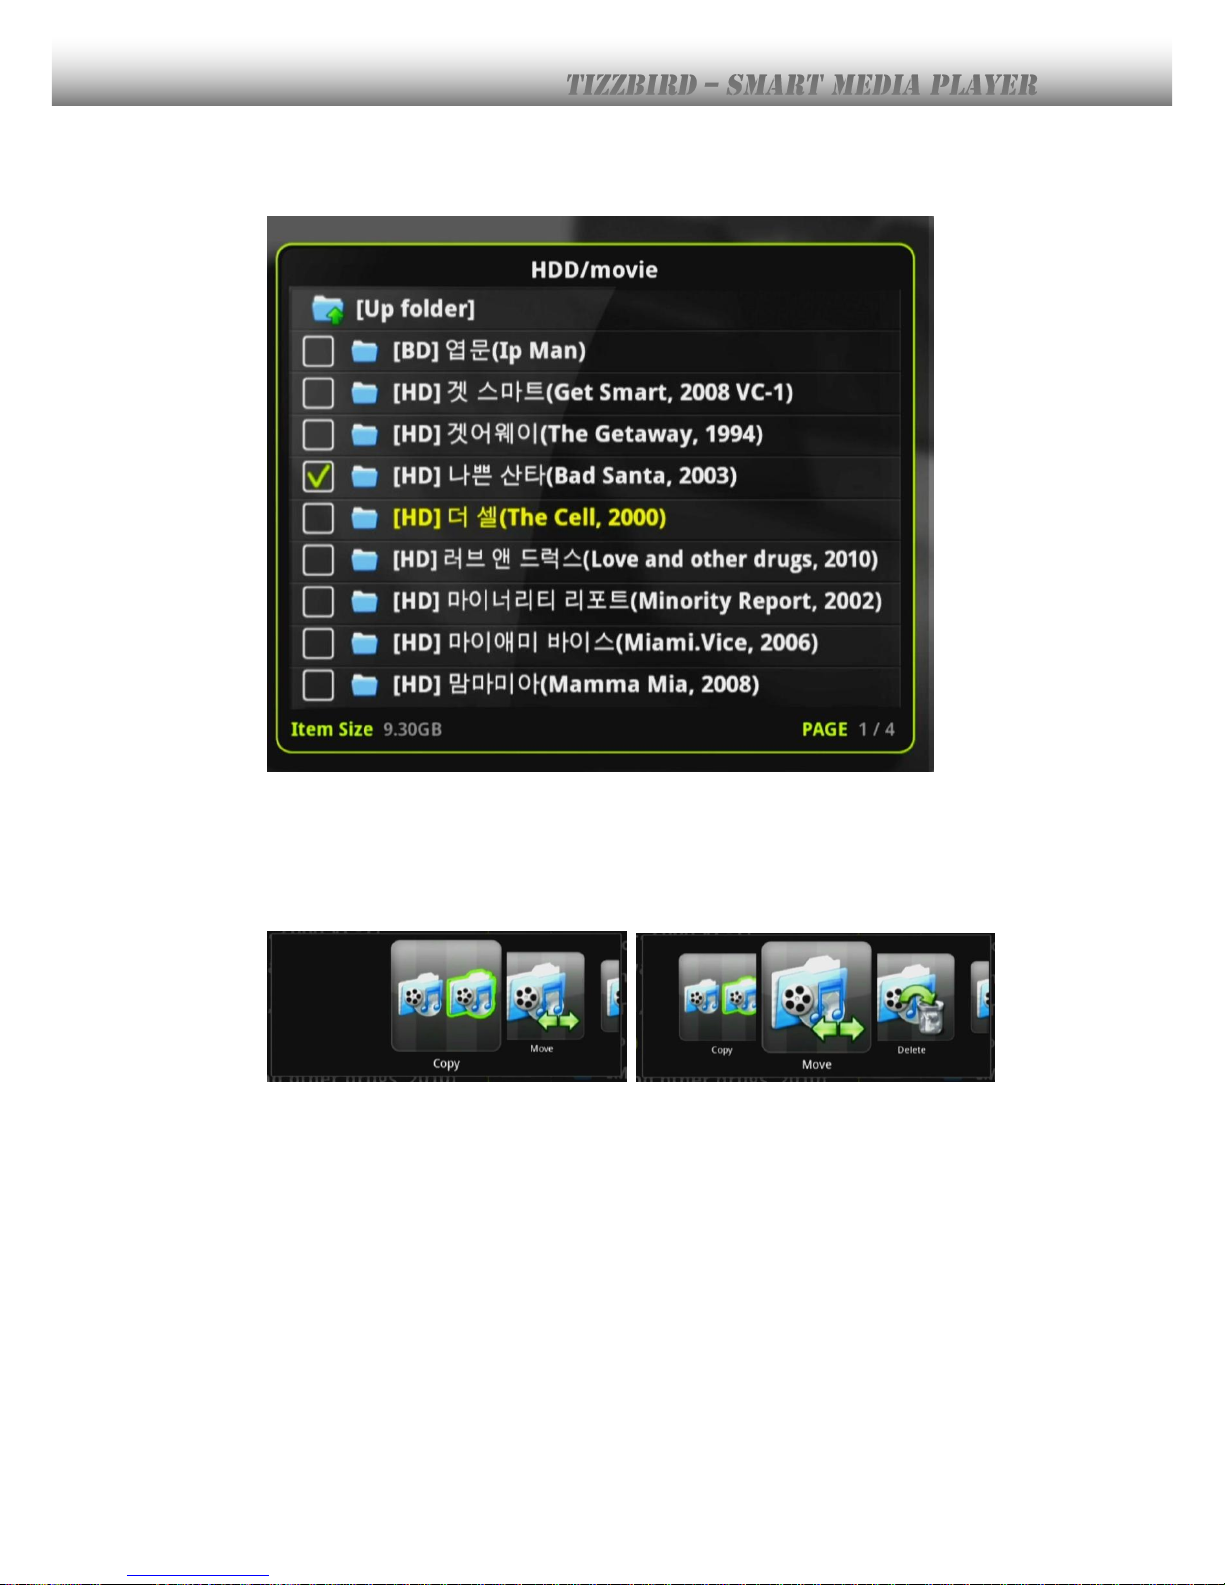
Pressing BOOKMARK button will check the selected item like below picture. The check icon
will appear on the small box at left side of item.
The total size of selected item will be also calculated whenever BOOKMARK button is
pressed. It will take some time if there are many items at selected folder.
Pressing MENU button will bring the following POP-UP menu to select the function. The
COPY, MOVE, DELETE, SELECT ALL, CANCEL, RENAME, NEW FOLDER
can be selected.
The
COPY
or
MOVE
operation will be performed always from LEFT PANE to RIGHT PANE.
The
DELETE, RENAME, SELECT ALL
and
CANCEL
will be performed always at LEFT PANE.
The
NEW FOLDER
will be performed on selected pane. Please select the wanted icon to
execute the operation.
Page 47
47
14. Connecting Internet
14.1 Execute Internet Browser
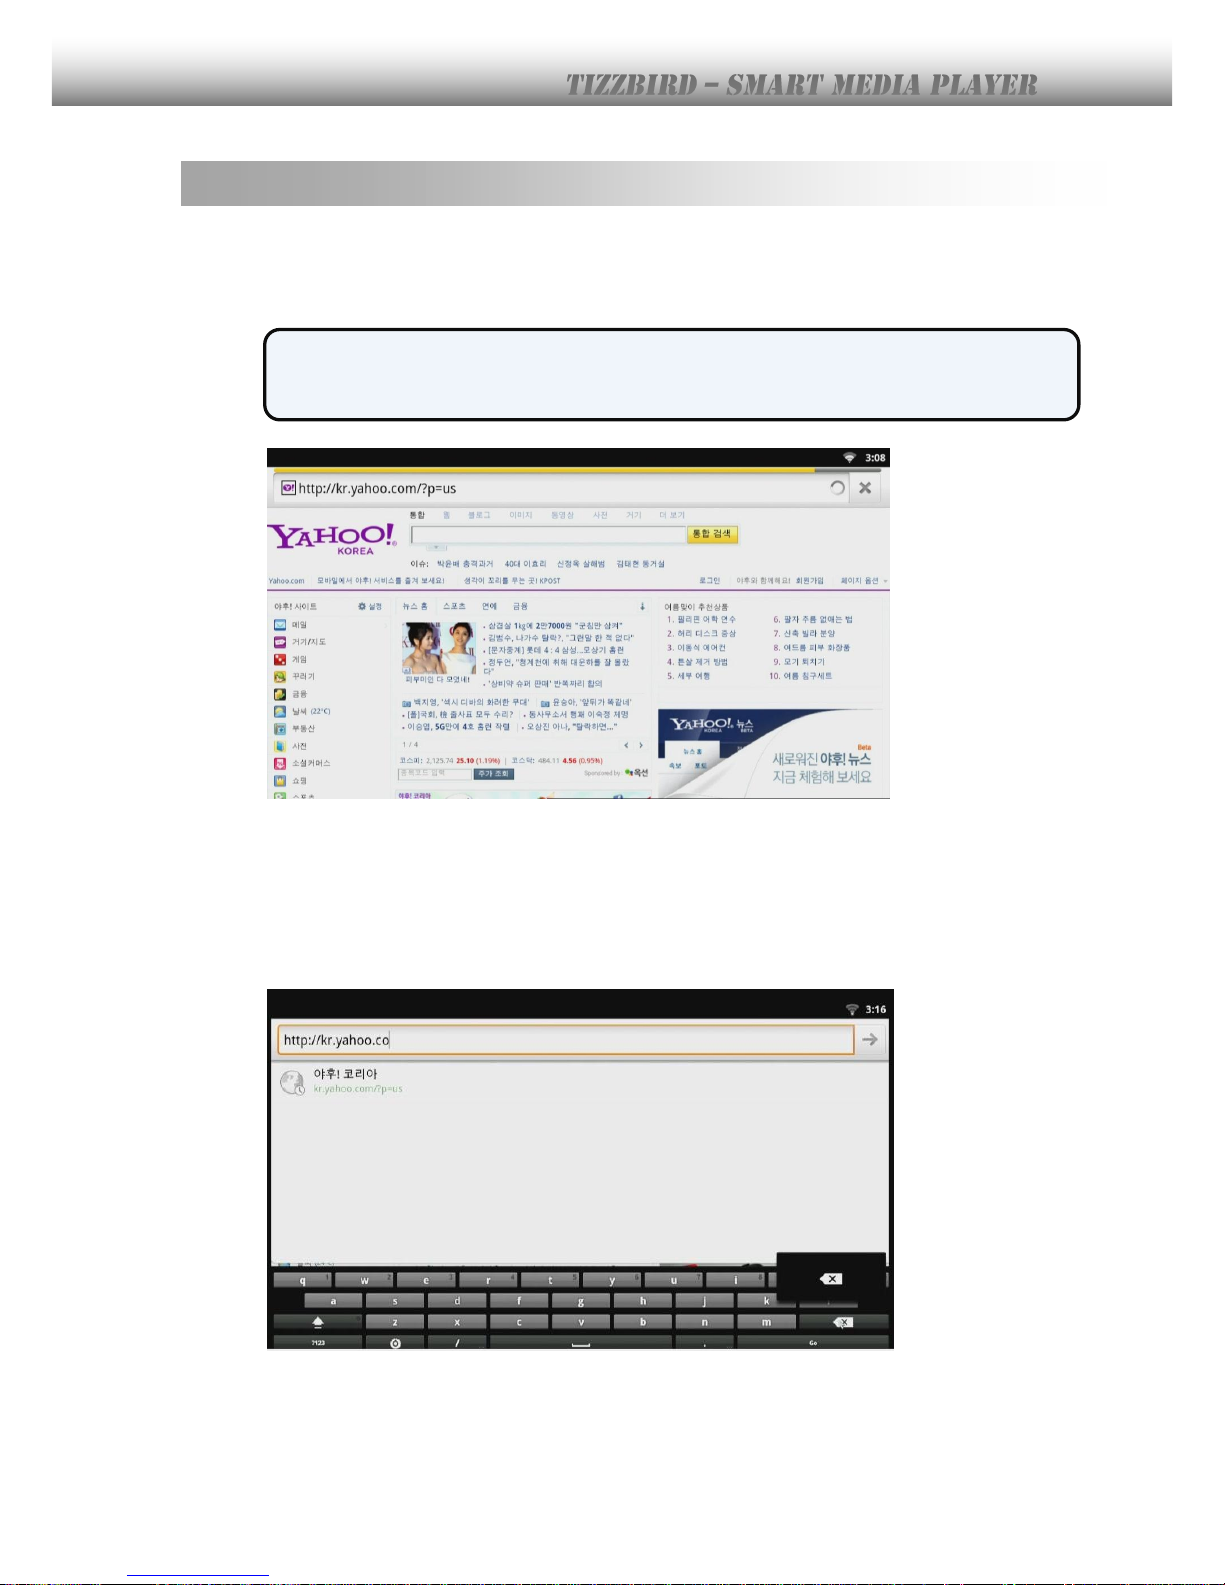
Web browser will appear if WEB BROWSER was selected at HOME SCREEN and network
was connected like following image.
※ Using mouse is highly recommended at WEB BROWSING. Wireless RF or USB
mouse can be used. Web address or other information can be entered thru virtual
keyboard with mouse. Wanted article or link can be clicked with mouse as well.
14.2 Control Internet Browser
Press <BACK> button on remote or click mouse right button to move back to the previous
screen. Press
<MENU>
button on the remote to change the home page and register at
there.
Page 48
48
15. Install & Execute Applications
The most different part of TizzBird compared to legacy devices is favorite applications can
be installed and run anytime like SMART PHONE. So it’s called SMART MEDIA PLAYER. The
genuine smart device let users install and run their own favorite applications.
15.1 Move Applications at Android Phone to TizzBird
The applications on the Android smart phone can be installed on this unit. The procedures
are like this.
1) Download or move the applications on the Android smart phone at USB flash drive.
- Move the applications on the smart phone to SD card. This can be done by
Android application like “App Monster”. This kind of application let user backup
their APP to SD card.
- Move the APP at SD card to USB flash drive. Attach the USB flash drive to the
unit.
- Run FILE BROWSER at HOME SCREEN, and select the application that you
want to install.
The APP at smart phone may have problems when installing or executing since it
requires GPS, PHONE or TOUCH function. Or it always shows in portrait mode, since the
application is just intended to use on phone.
※ Some APP requires specially touch function. In this case, mouse should be used. So
using mouse is highly recommended when running applications.
Page 49
49
15.2 Execute Application
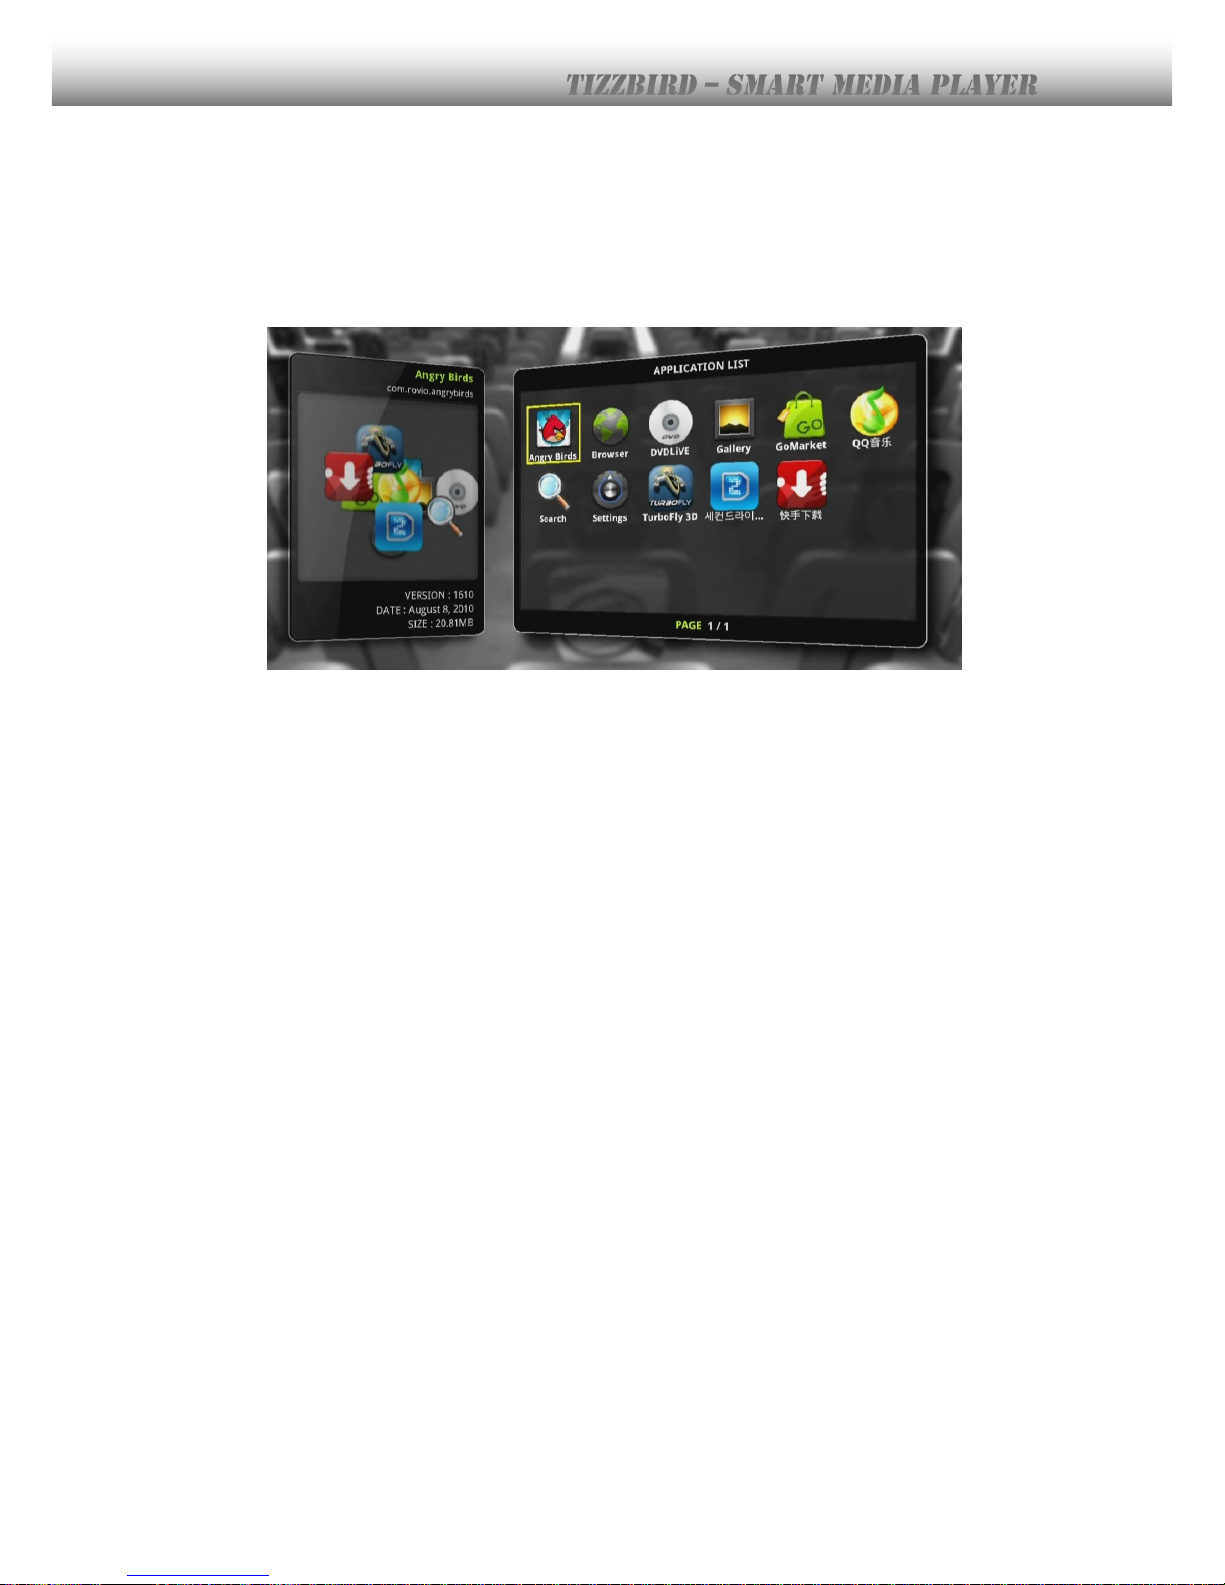
The following image will appear when run APP BROWSER at home screen.
Use arrow buttons to browse the application and press
<OK>
button to execute it.
Page 50
50
16. Settings
Various set-ups can be configured at SETTINGS BROWSER.
16.1 System
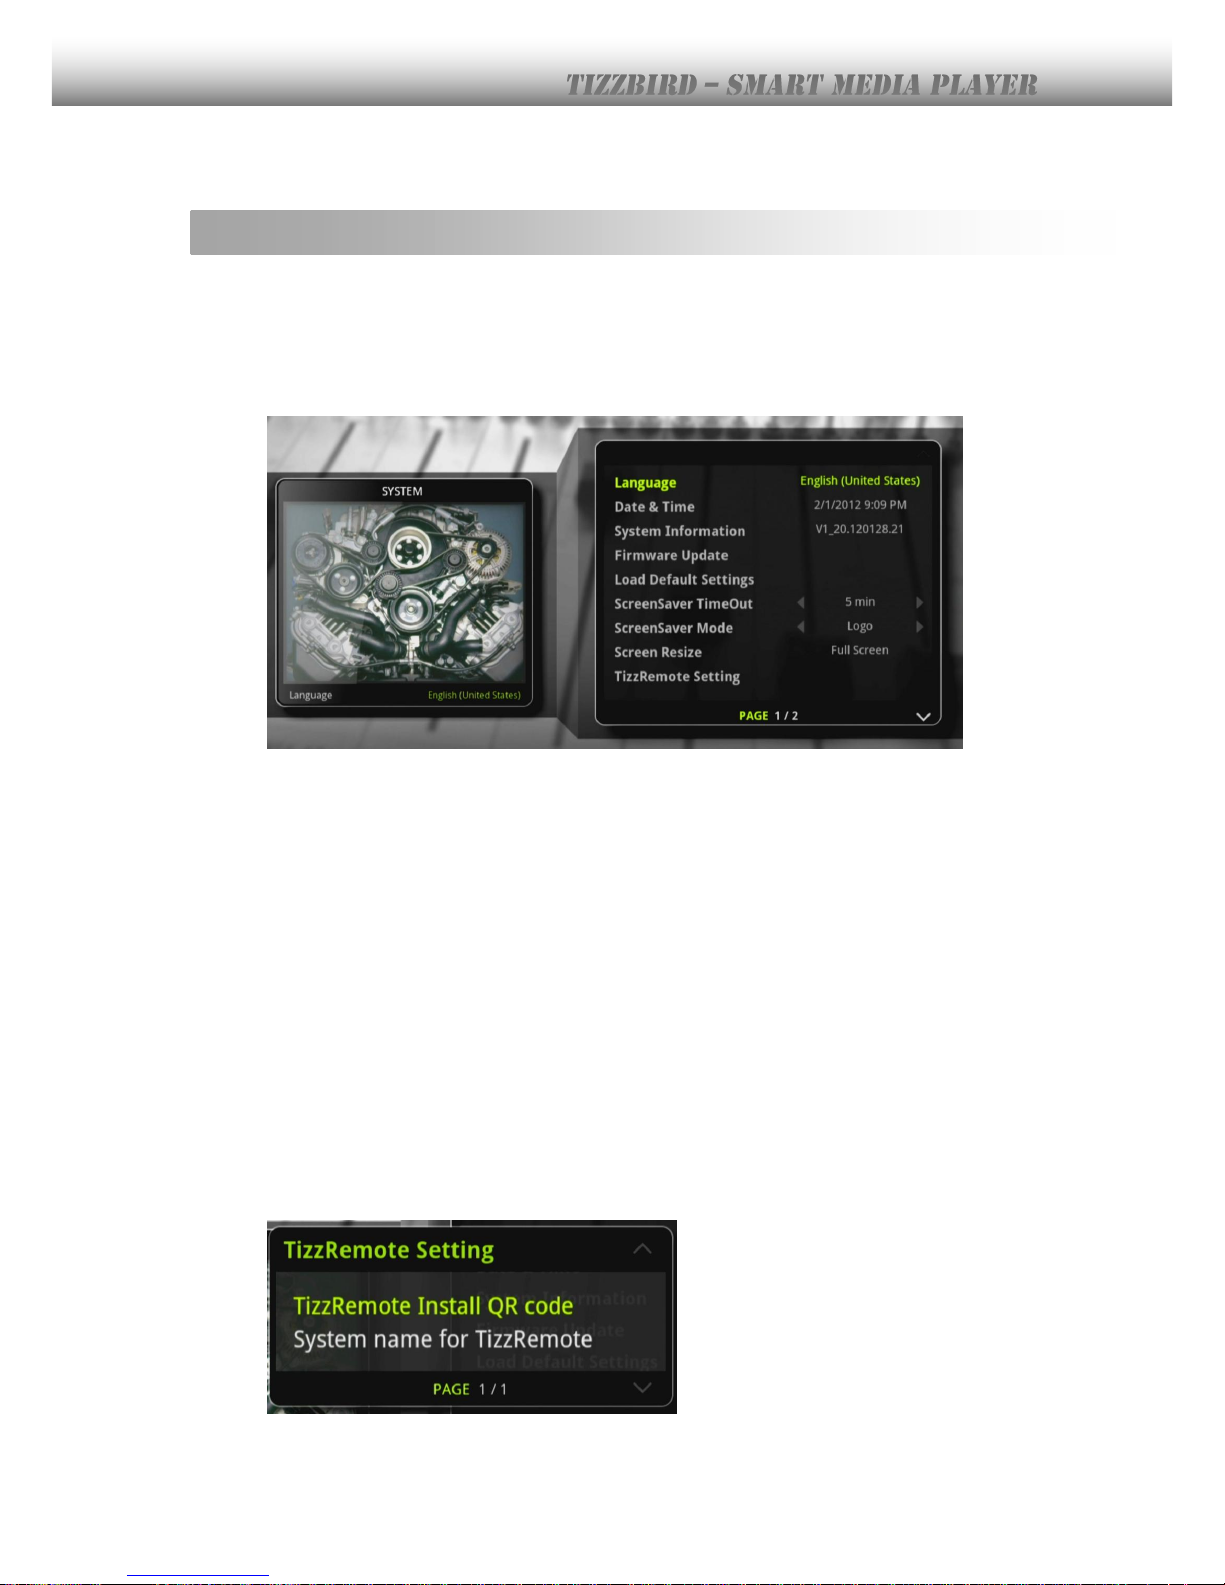
Menu language, date & time, system information, firmware information and update can be
set-up at this menu.
Language Select menu language. Press
<OK>
to bring the pop-up.
Date & Time Set up the date & time, manually or automatically.
Network should be configured and connected to get time
information automatically.
System Information Show current system information like firmware version.
Firmware Update Update the firmware.
Load Default Settings Clear the previous settings and get back to the default settings
Screen Saver Time-Out Set up the screen saver time-out.
Screen Saver Mode Configure the screen saver icon or off the saver.
Screen Resize Configure the size of graphic user interface screen.
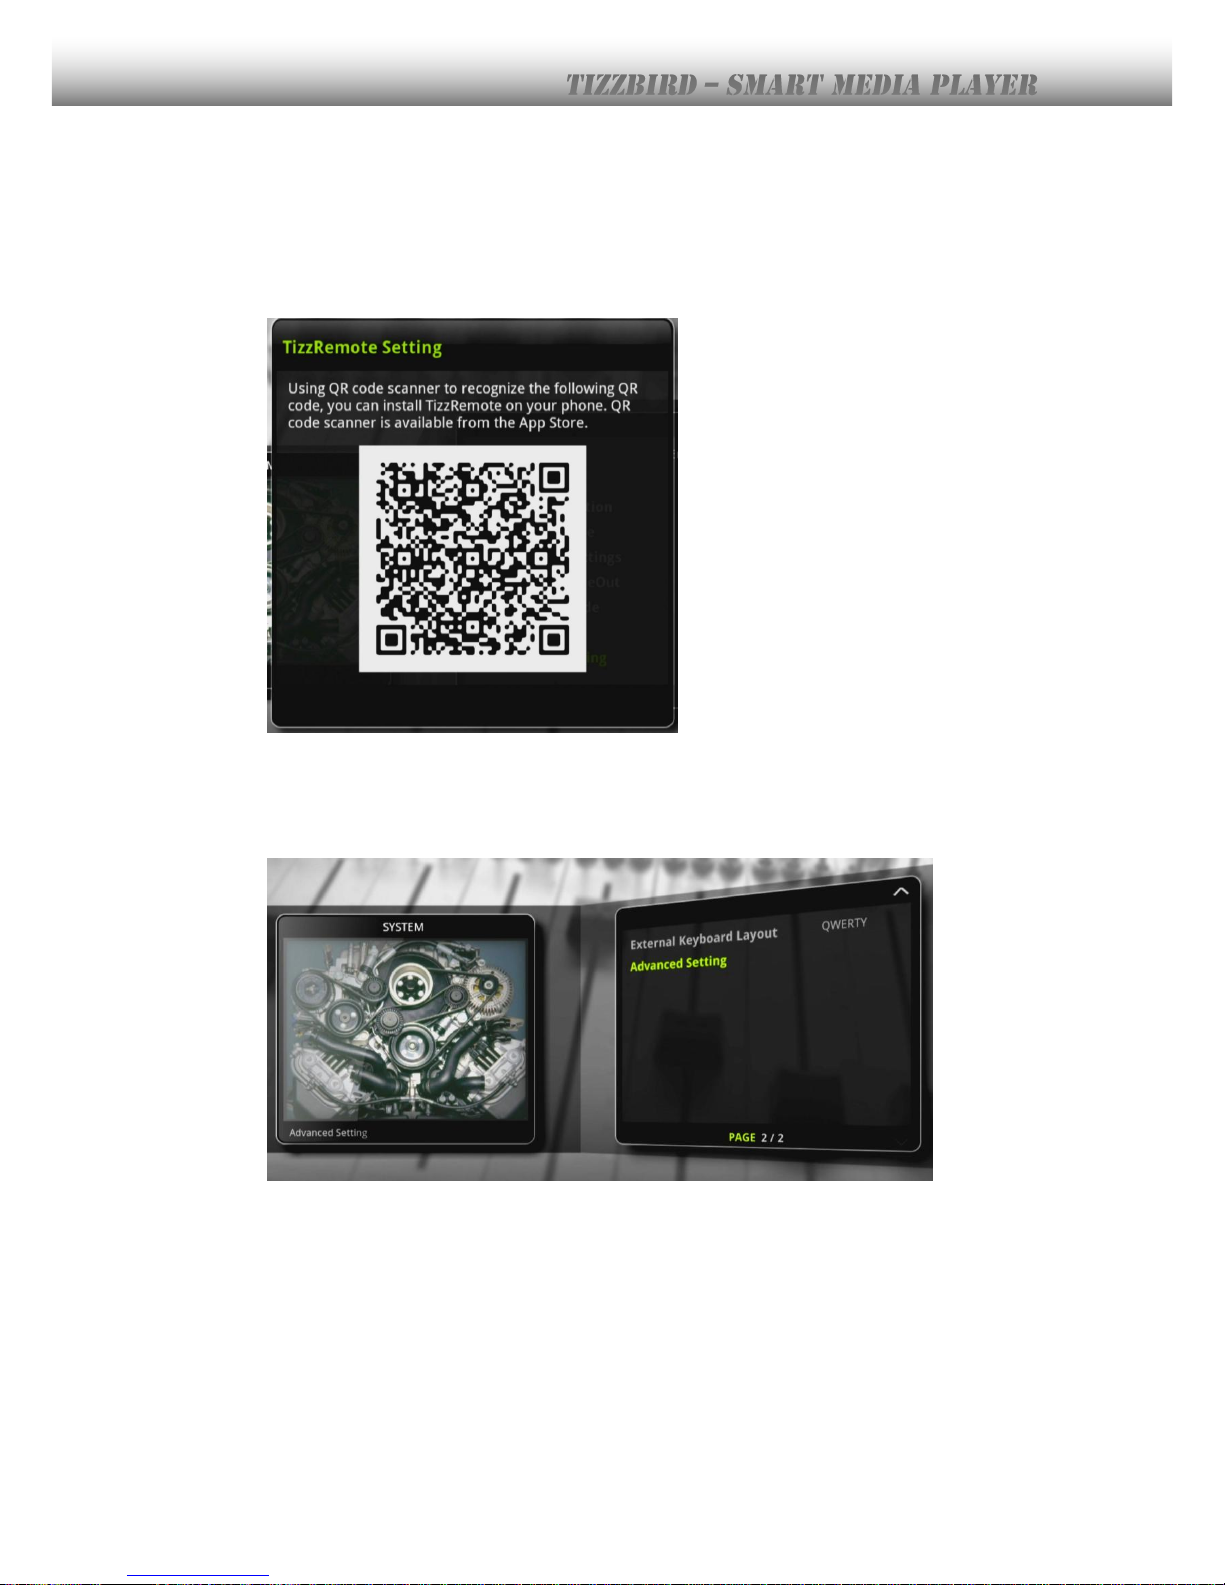
TizzRemote Setting Setup the TizzRemote by QR code and setup the System name for
TizzRemote searching.
Page 51
51
The TizzRemote™ is the remote application for TizzBird which can replace keyboard, mouse
and keyboard.
There are two methods to install the TizzRemote™. The TizzRemote™ itself is already on
the Google Market, so you can directly download it at your smart phone. The other way is
using the QR code. If you select the above item at the dialog box, the following dialog box
will pop-up.
If you have QR code scanner on your smart phone, then scan this QR code with it, the
TizzRemote™ APP will be automatically download and installed on your smart phone.
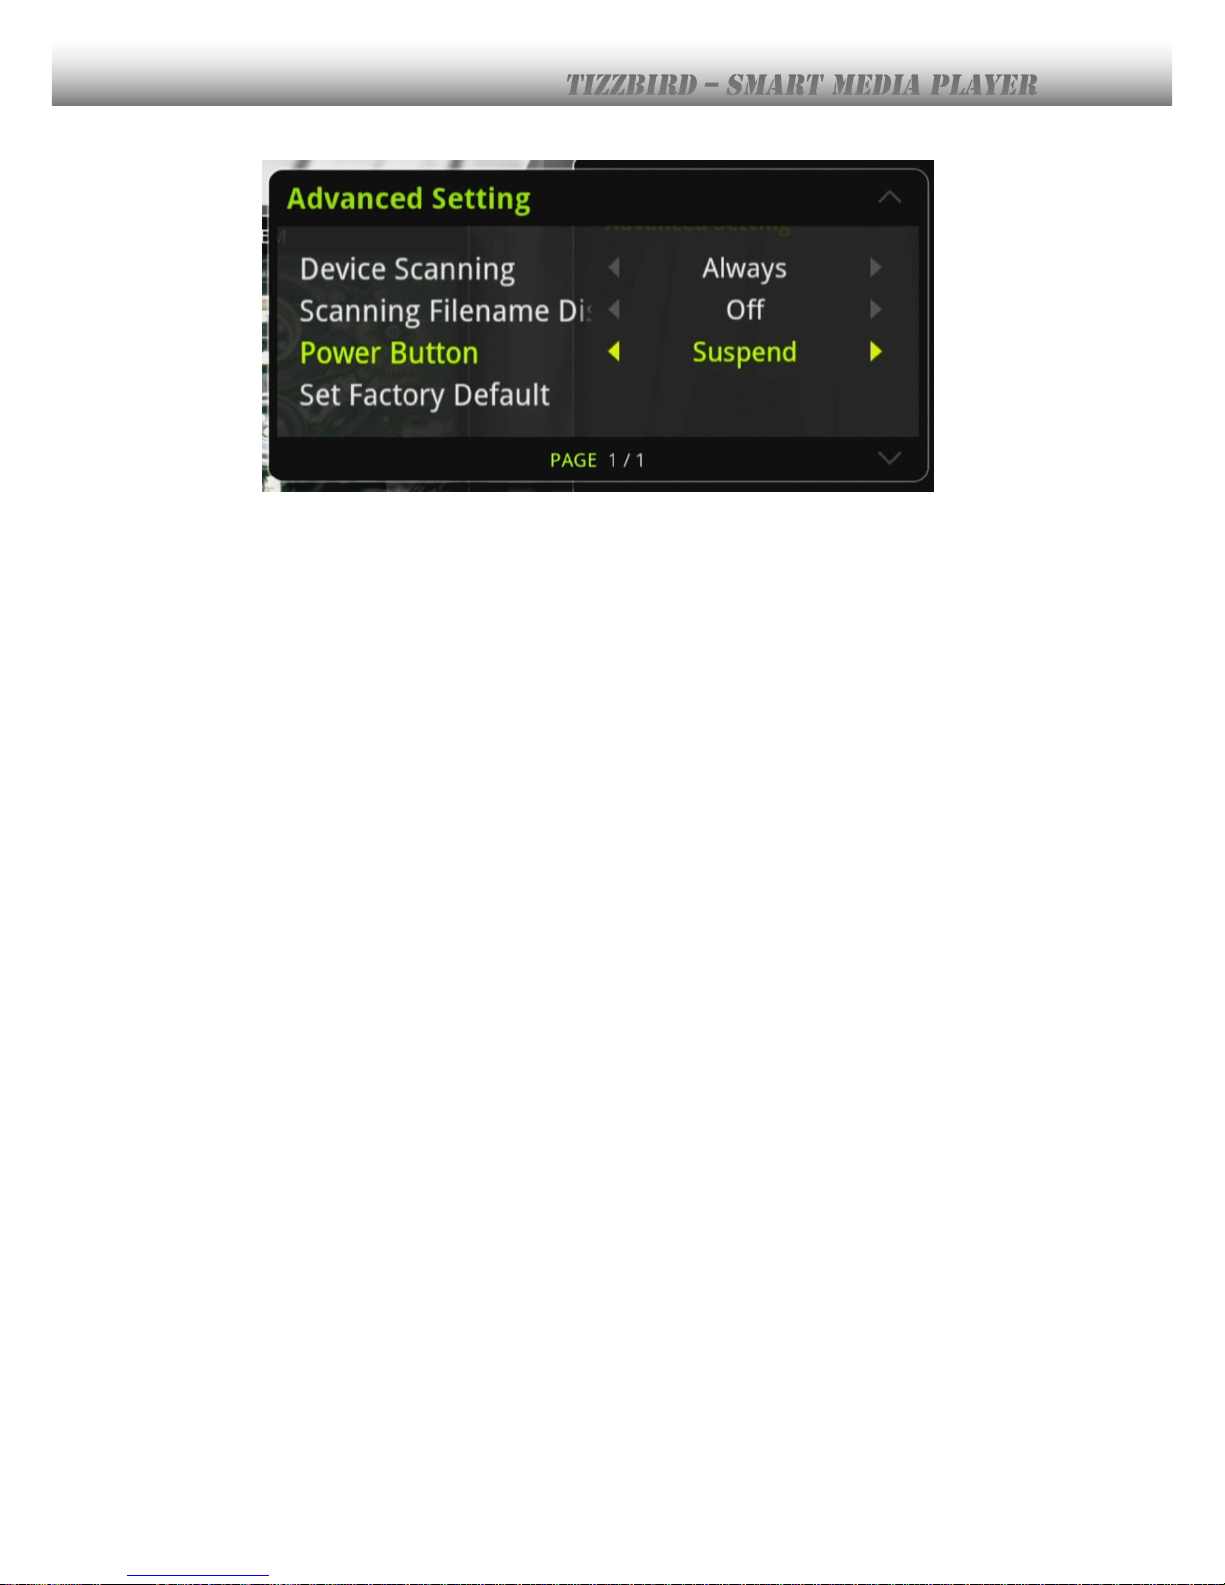
The next page contains more settings like EXNTERNAL KEYBOARD LAYOUT and ADVANCED
SETTINGS.
External Kbd Layout Select between QWERTY or AZERTY type key board.
Advanced Setting Show advanced (not for casual use) setting.
Page 52
52
Device Scanning Select between scanning device “Always”, “New Device Only” and
“Never”. It will determine the scanner for database will be applied
always or new device only or never.
Scanning Filename Display It will determine display file name during device
scanning or not.
Power Button Select between “Power Off” and “Suspend” when pressing
power button. If “Power Off” selected, the system will
completely be powered off when POWER button pressed.
System will boot up completely from initial stage when next
POWER-ON. (COLD-BOOT)
Set Factory Default Reset the internal data to original one from factory. It will reset
the TV output resolution, internal settings and database. It will
preserve the application you installed, though.
Page 53
53
16.2 Audio and Visual
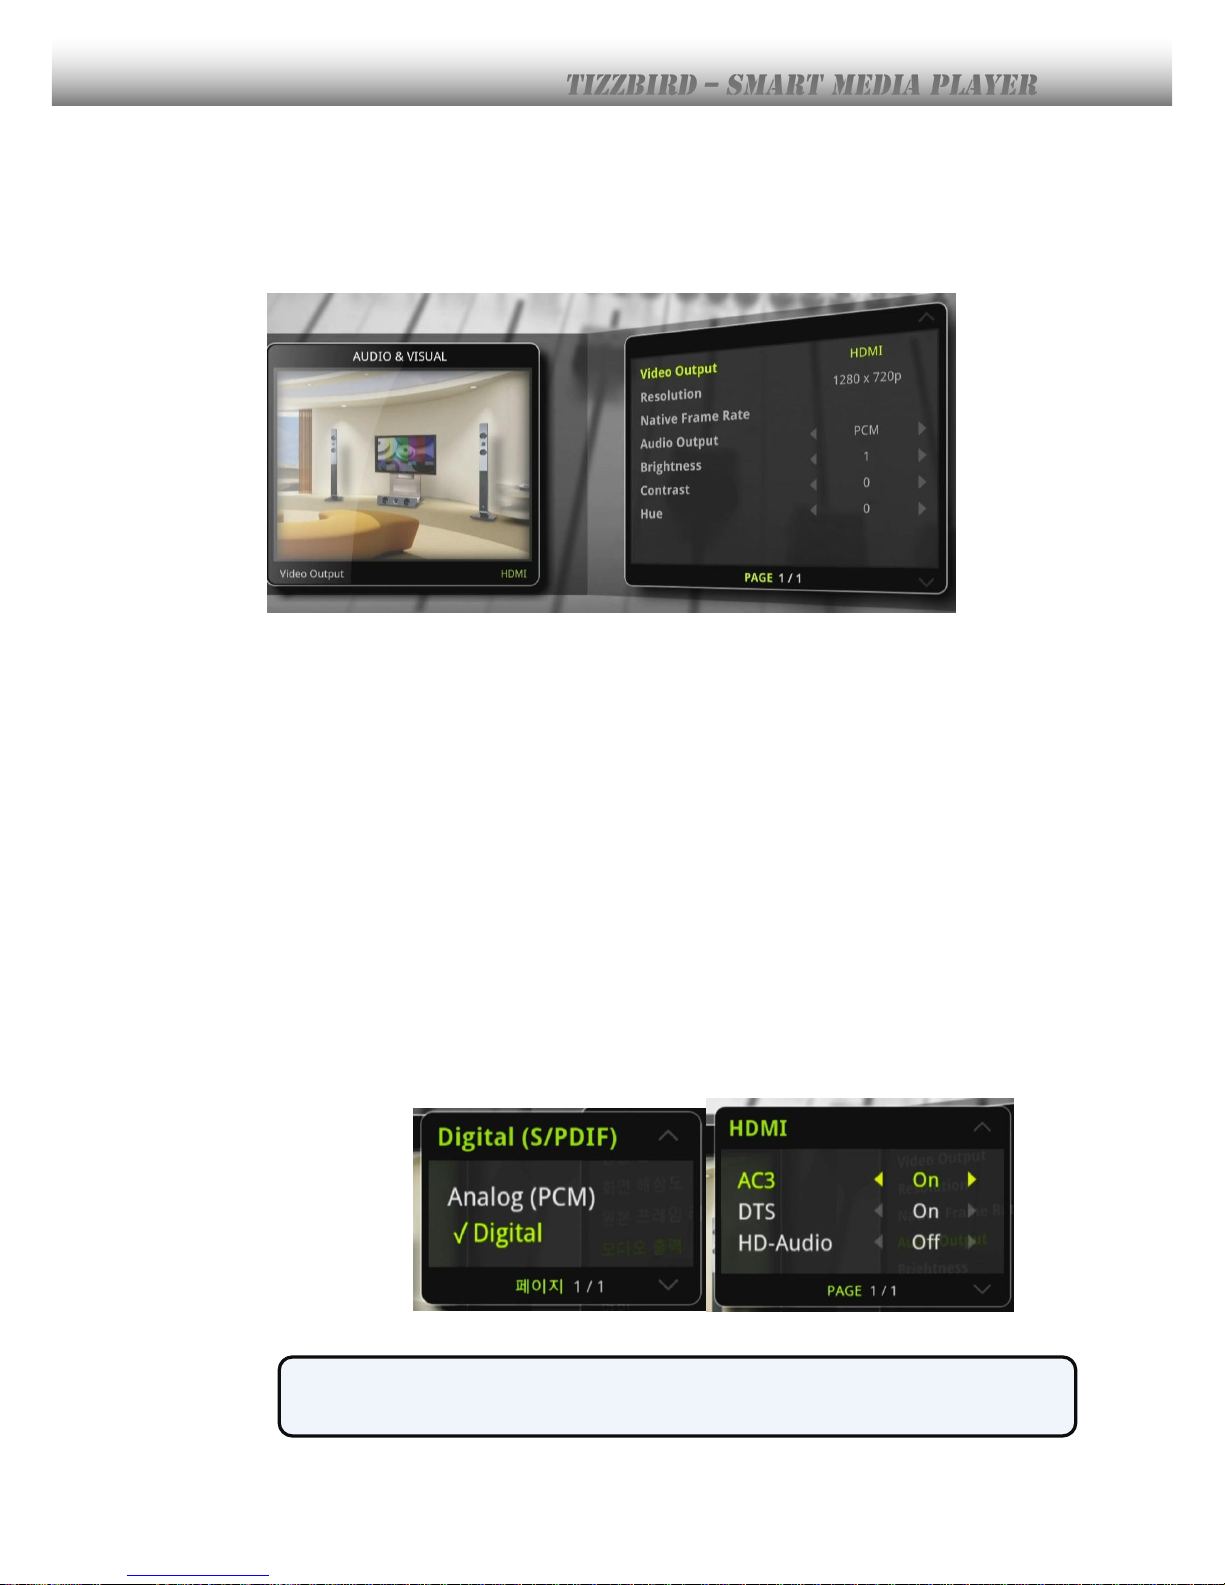
Video Output Select video output port.
Resolution Select resolution of the video output.
Native Frame Rate Turn On/Off of original frame rate of the source
Cinema Original (24p) Enable/ Disable cinema frame rate
TV Original (1080i 60Hz) Enable/ Disable TV frame rate.
Audio Output Select audio output port and format
HDMI Audio will output to HDMI port
Digital (S/PDIF) Audio will output to digital audio port (optical)
Analog (RCA) Audio will output to analog port (RCA)
For HDMI and Digital (S/PDIF) port, the format of audio can be also
configured such as ANALOG (PCM) or DIGITAL (Compressed). In “Digital Mode”,
the output can be On/Off for each format.
[Audio Format Selection] [Configuration for each format]
※ In “Digital (Compressed)” output mode, each format (AC3/ DTS/ AAC/ HD-Audio)
can be configured as On/Off independently. It’s because the capability of connected
audio device is quite different.
Page 54

54
Brightness Change brightness of video.
Contrast Change contrast of video.
Hue Change hue of video.
Page 55
55
16.3 Movie
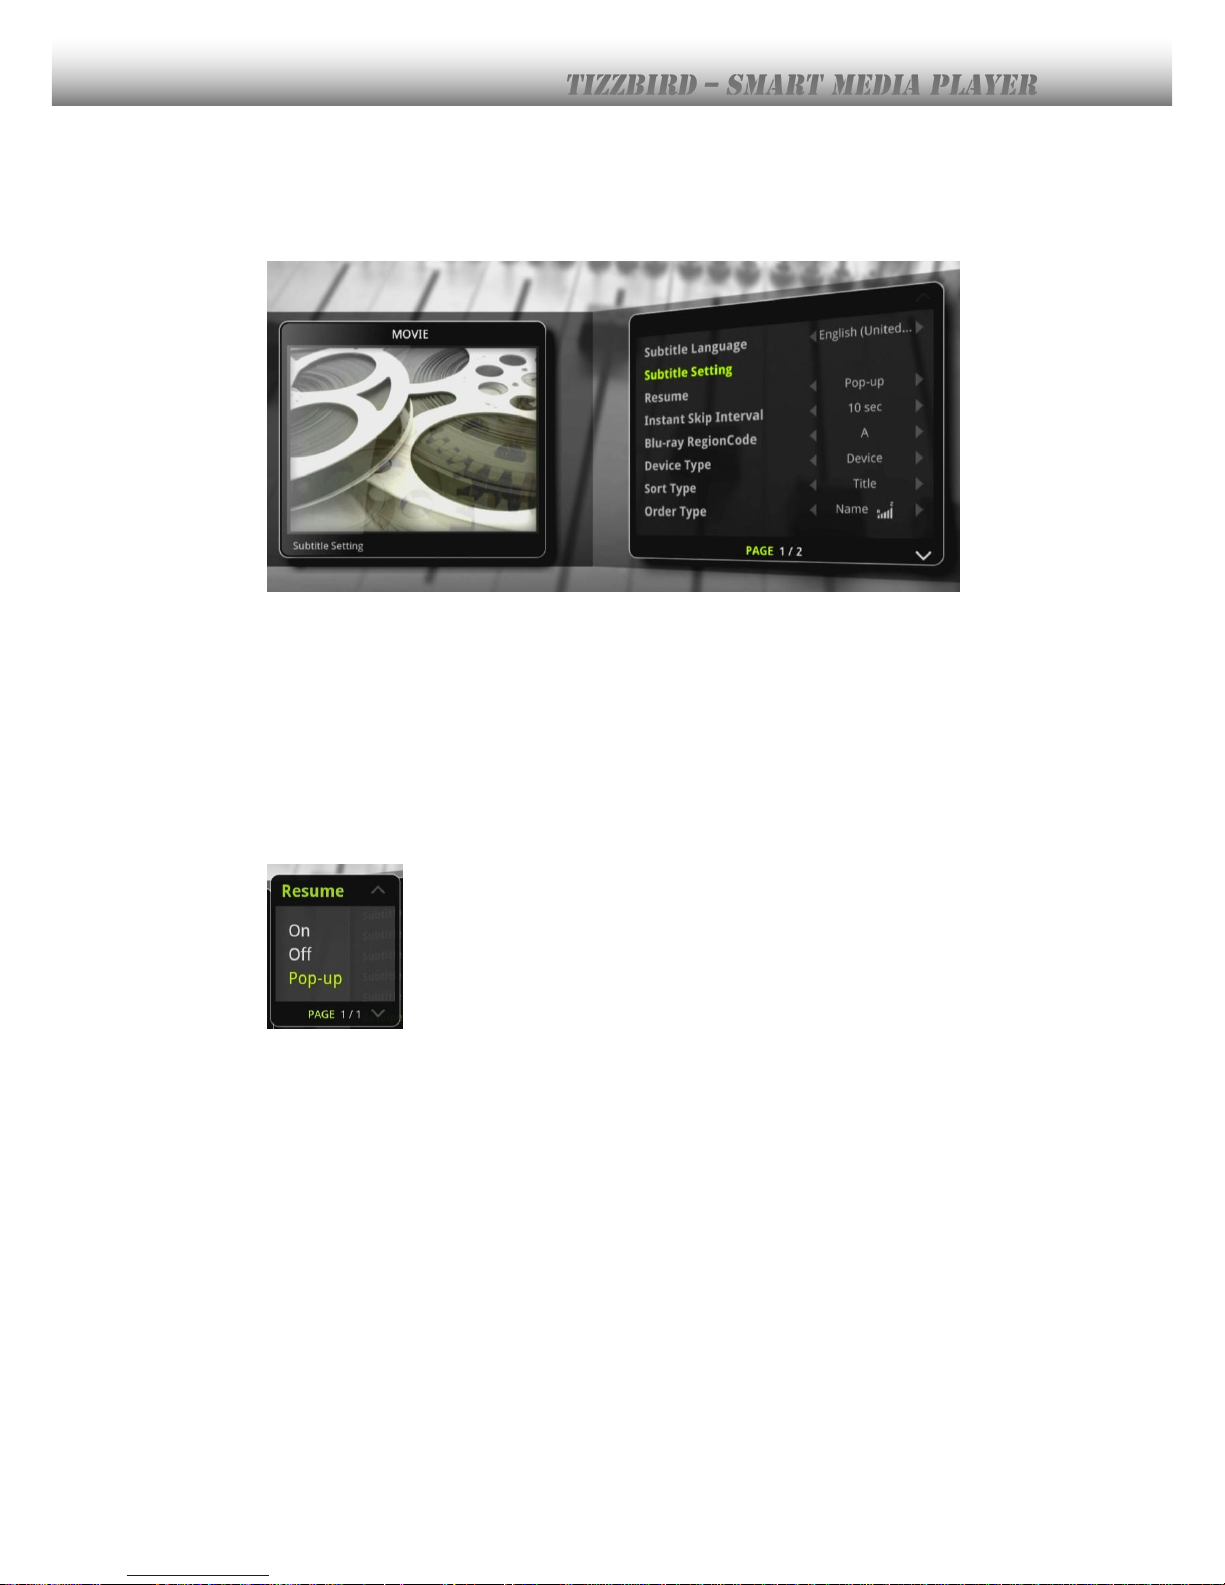
Subtitle Language Select subtitle language.
Subtitle Setting Select size, position, font, color of subtitle. Please refer 10.10.
Resume Select resume screen pop-up method.
Instant Skip Interval Select instant skip interval. Instant skip will occur when pressing
<UP>
or
<DOWN>
key at movie playback.
Sort Type Select sorting type of movie.
Order Type Select ordering type of movie browser.
Movie Scraper Select movie scraping data base.
Resume
Page 56
56
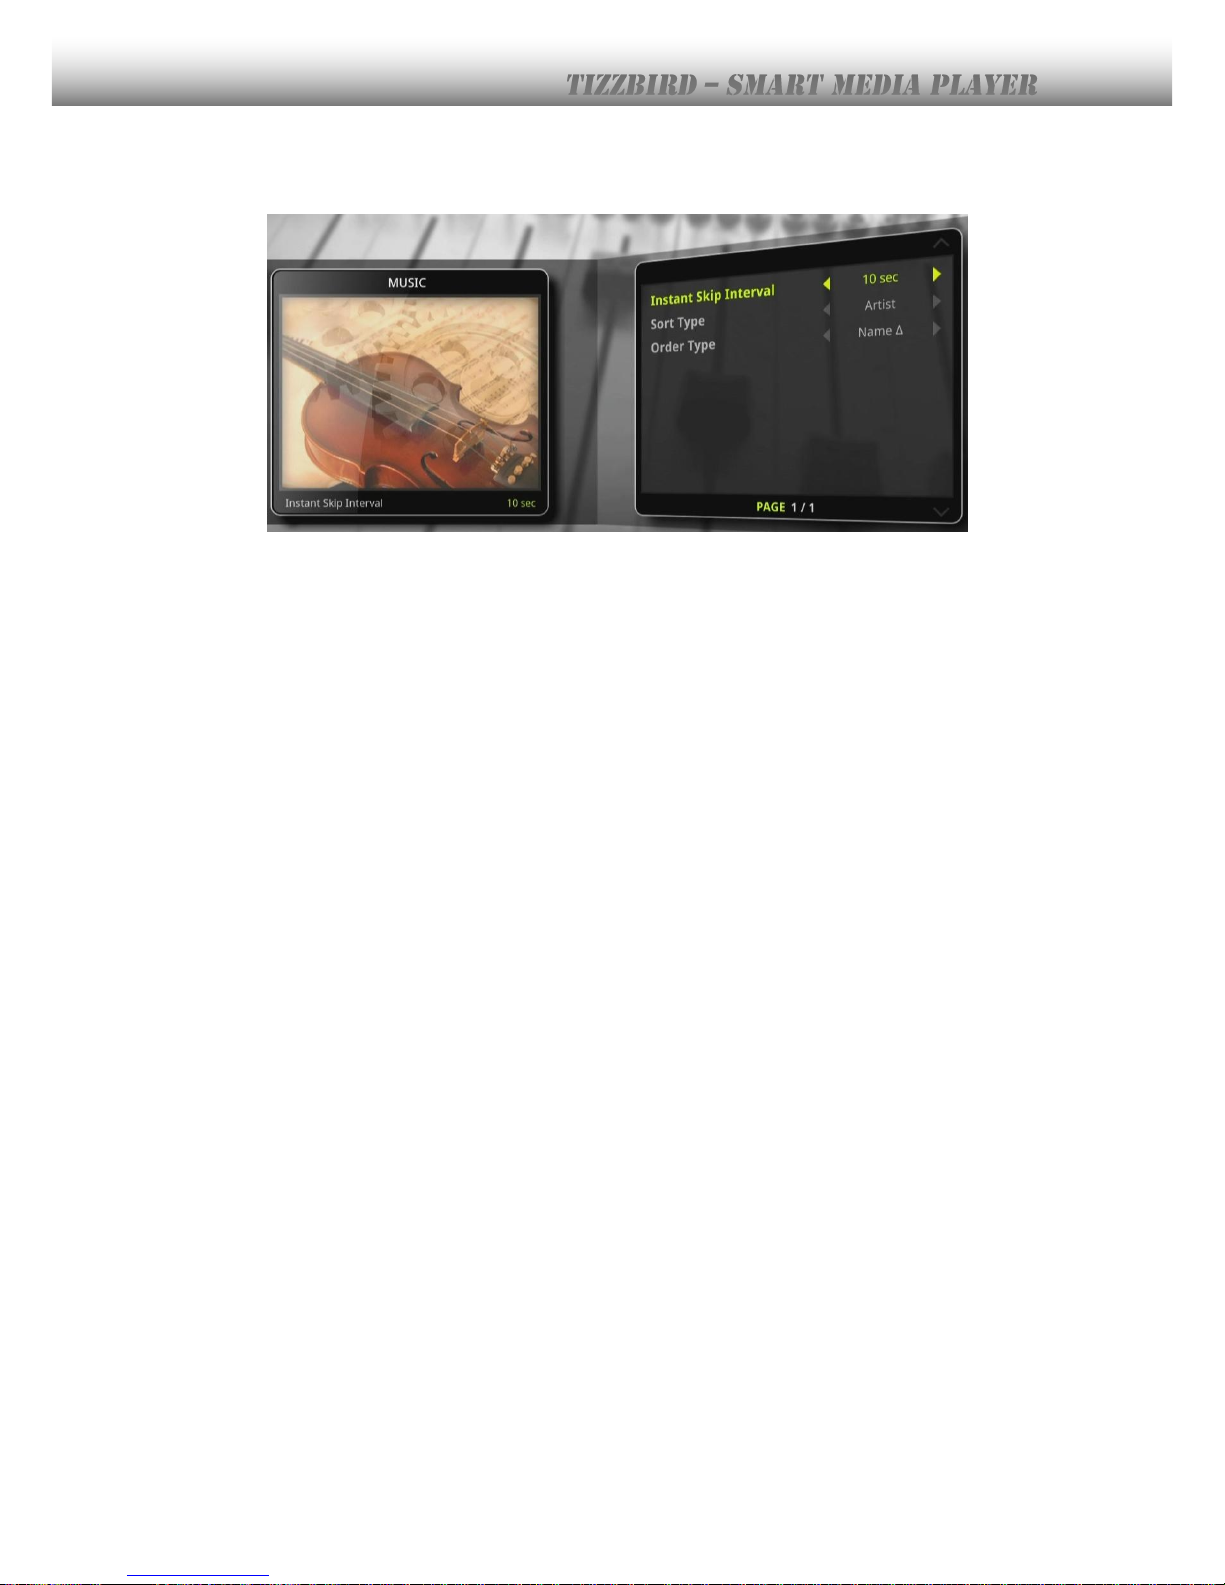
16.4 Music
Instant Skip Interval Select instant skip interval. Instant skip will occur when pressing
<UP>
or
<DOWN>
key at movie playback.
Sort Type Select sorting type of music.
Order Type Select ordering type of music browser.
.
Page 57
57
16.5 Photo
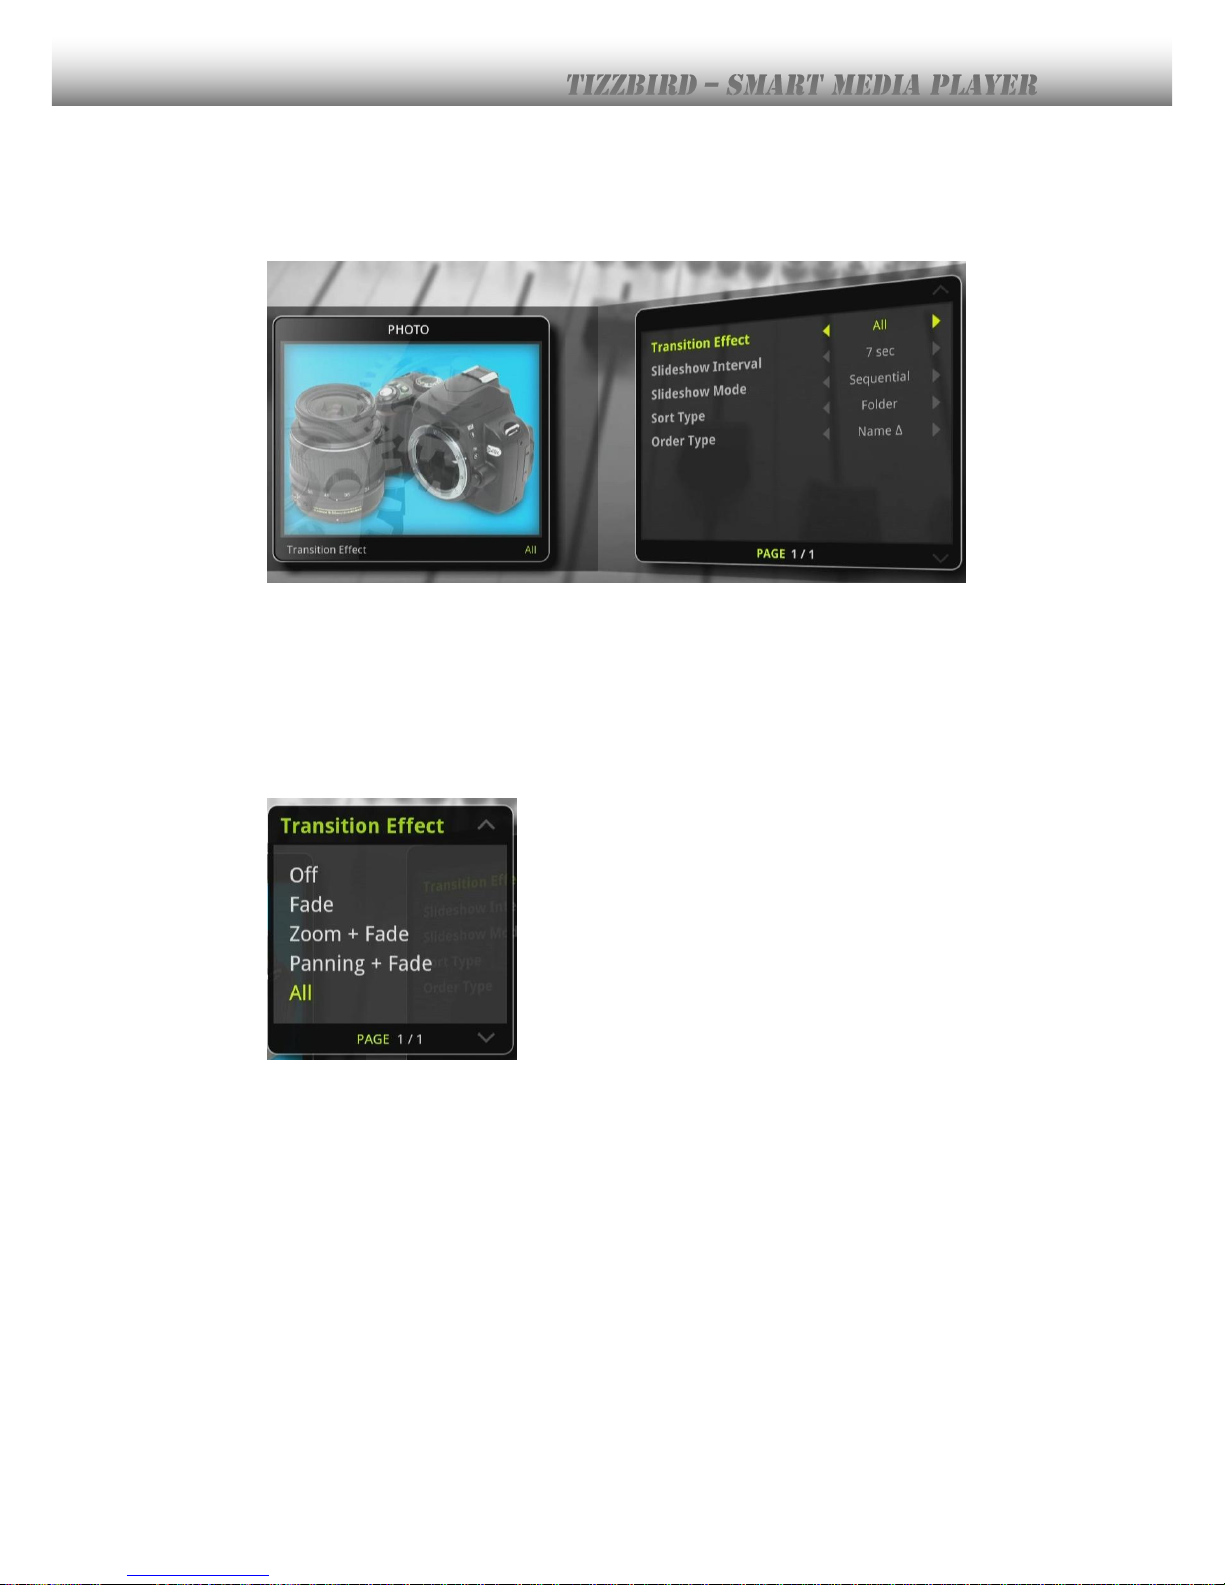
Transition Effect Select transition effects of slideshow.
Slideshow Interval Select transition interval of slideshow.
Slideshow Mode Select showing order of slideshow.
Sort Type Select sorting type of photos.
Order Type Select ordering type of photos.
Transition Effect
16.6 Network
Refer to section 8.6.
Page 58
58
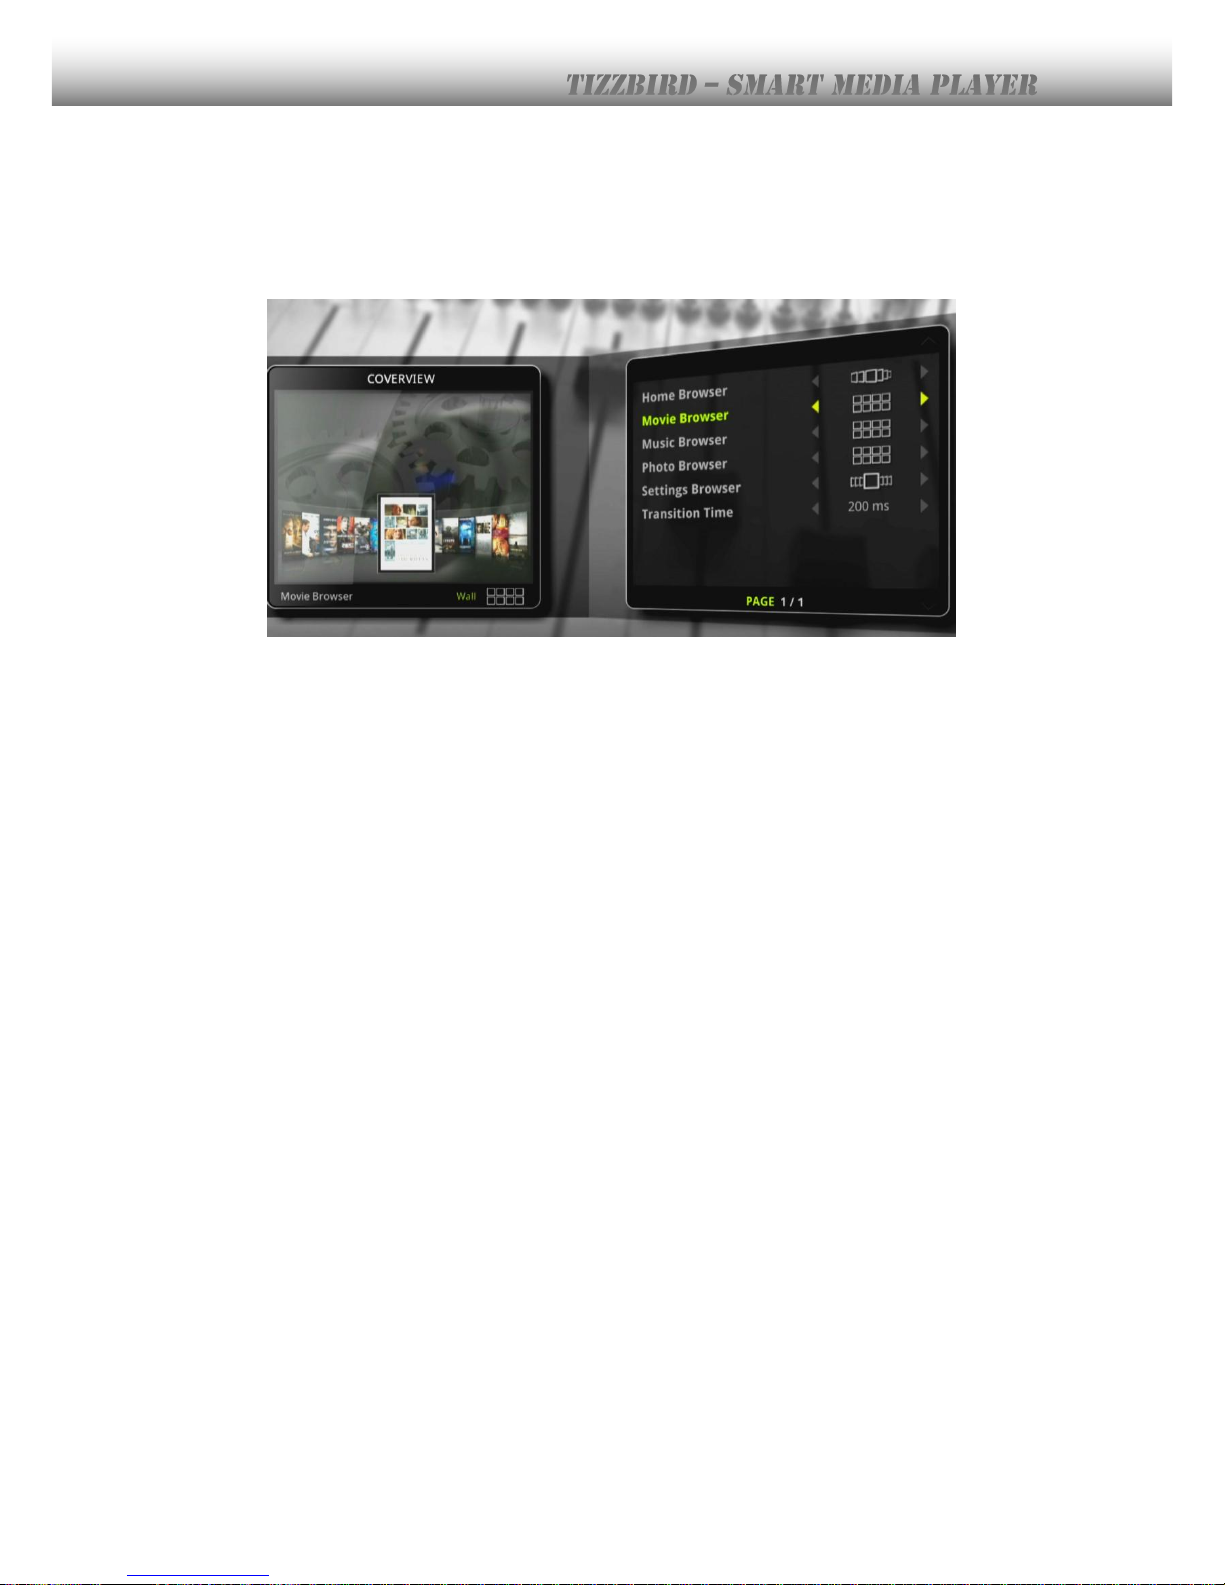
16.7 Cover-View
The cover-view style can be configured for each browser.
Page 59
59
17. Connecting Network Server or NAS
This device provides powerful network browsing and connection capability from Rev 1.12
firmware. This includes multiple mountings of network drives for both SAMBA and NFS. The
high performance NFS server software for PC, the TizzNFS will be also provided thru
TizzBird WEB-site
17.1 Network connection using NFS
The NFS (Network File System) is a simple but powerful networking file system originally
created by Sun Microsystems™. The NFS enables high performance file sharing between
network devices, so it’s most suitable for multimedia file playback via network.
The following section explains how to connect the shared PC folders using NFS server
application or NAS (Network Attached Storage) which runs NFS server.
17.1.1 Downloading TizzNFS Server
Please download the “TizzNFS” server at Internet at the PC. Please visit our WEB-site
(http://www.tizzbird.com) to download the TizzNFS program. Please install it after
downloading it. The TizzNFS has following features.
Runs on Windows™ XP/ Vista/ 7 (both 32 bit and 64bit)
Simple and intuitive user interface.
Enables sharing multiple folders thru EXPORT function.
Reliable and high performance operation
Simple or complex EXPORT name can be selectable.
Supports NFS2 and NFS3 protocol completely.
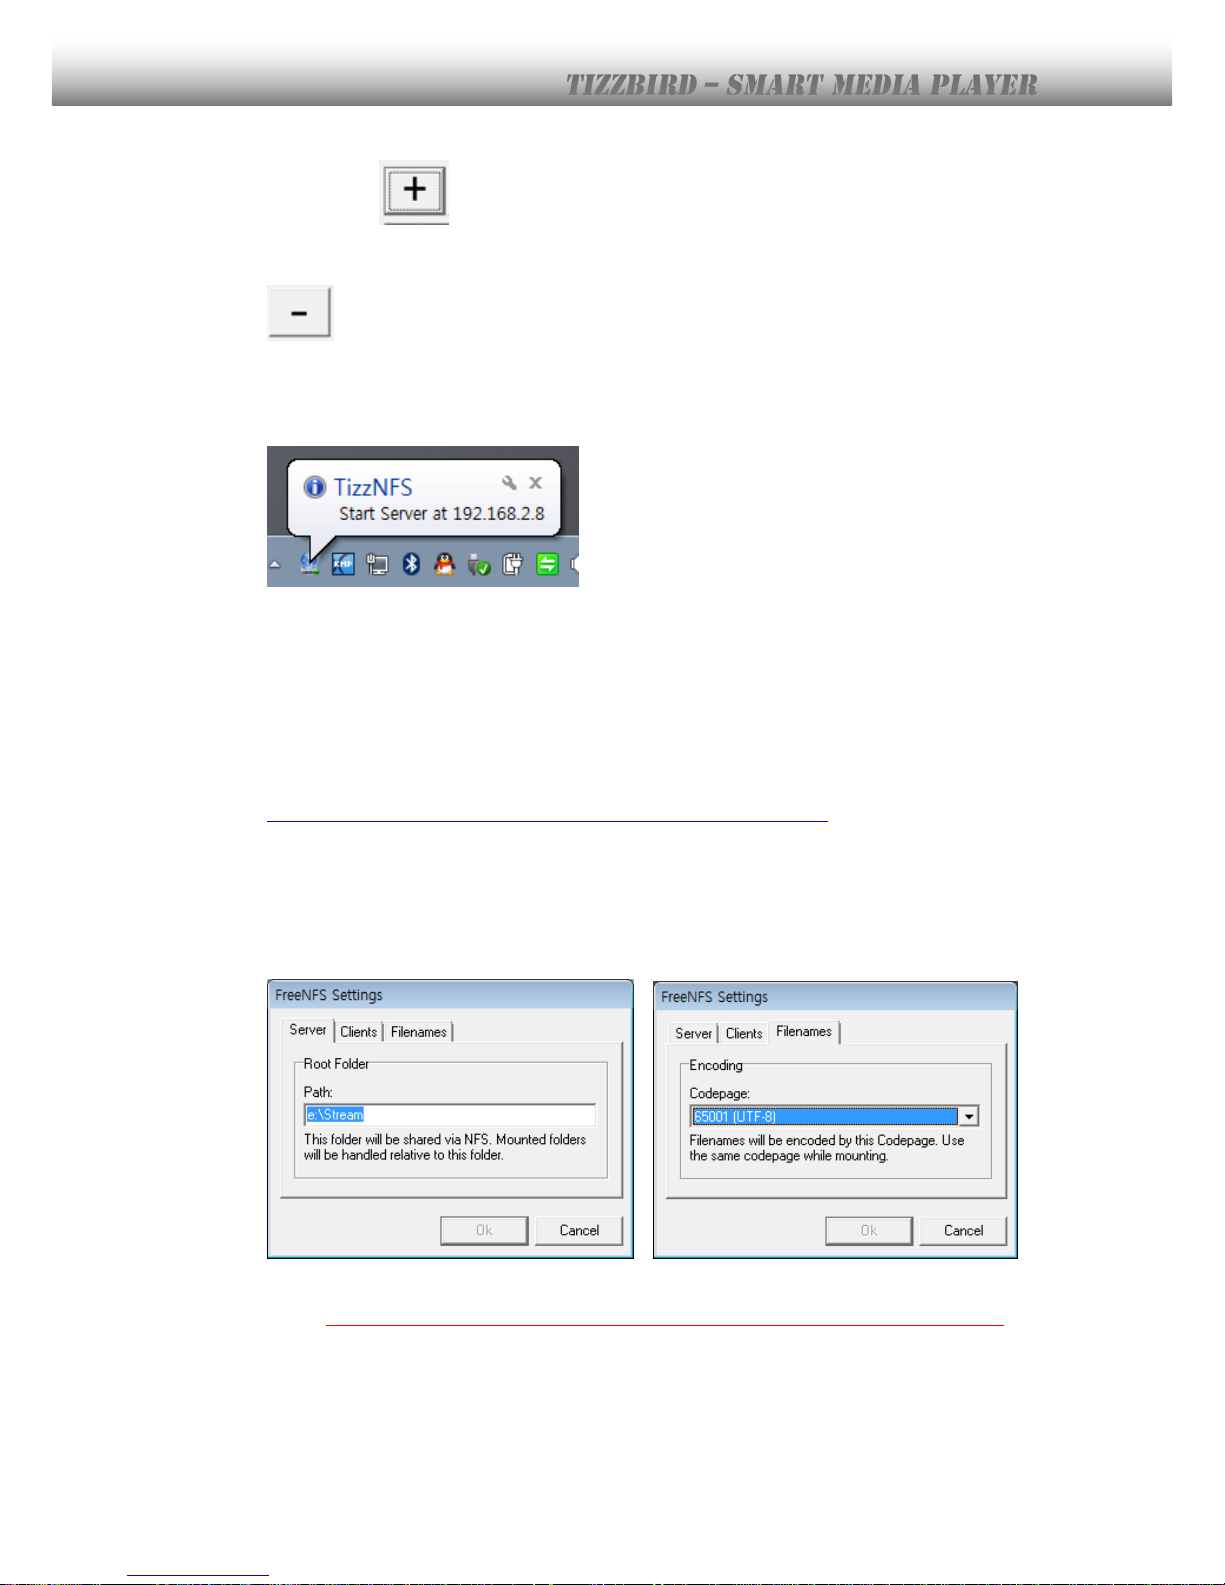
17.1.2 Executing TizzNFS Server & Configuration
Execute the TizzNFS. The TizzNFS icon will appear on Task Bar. Click the icon and
select “Settings” menu item.
Page 60
60
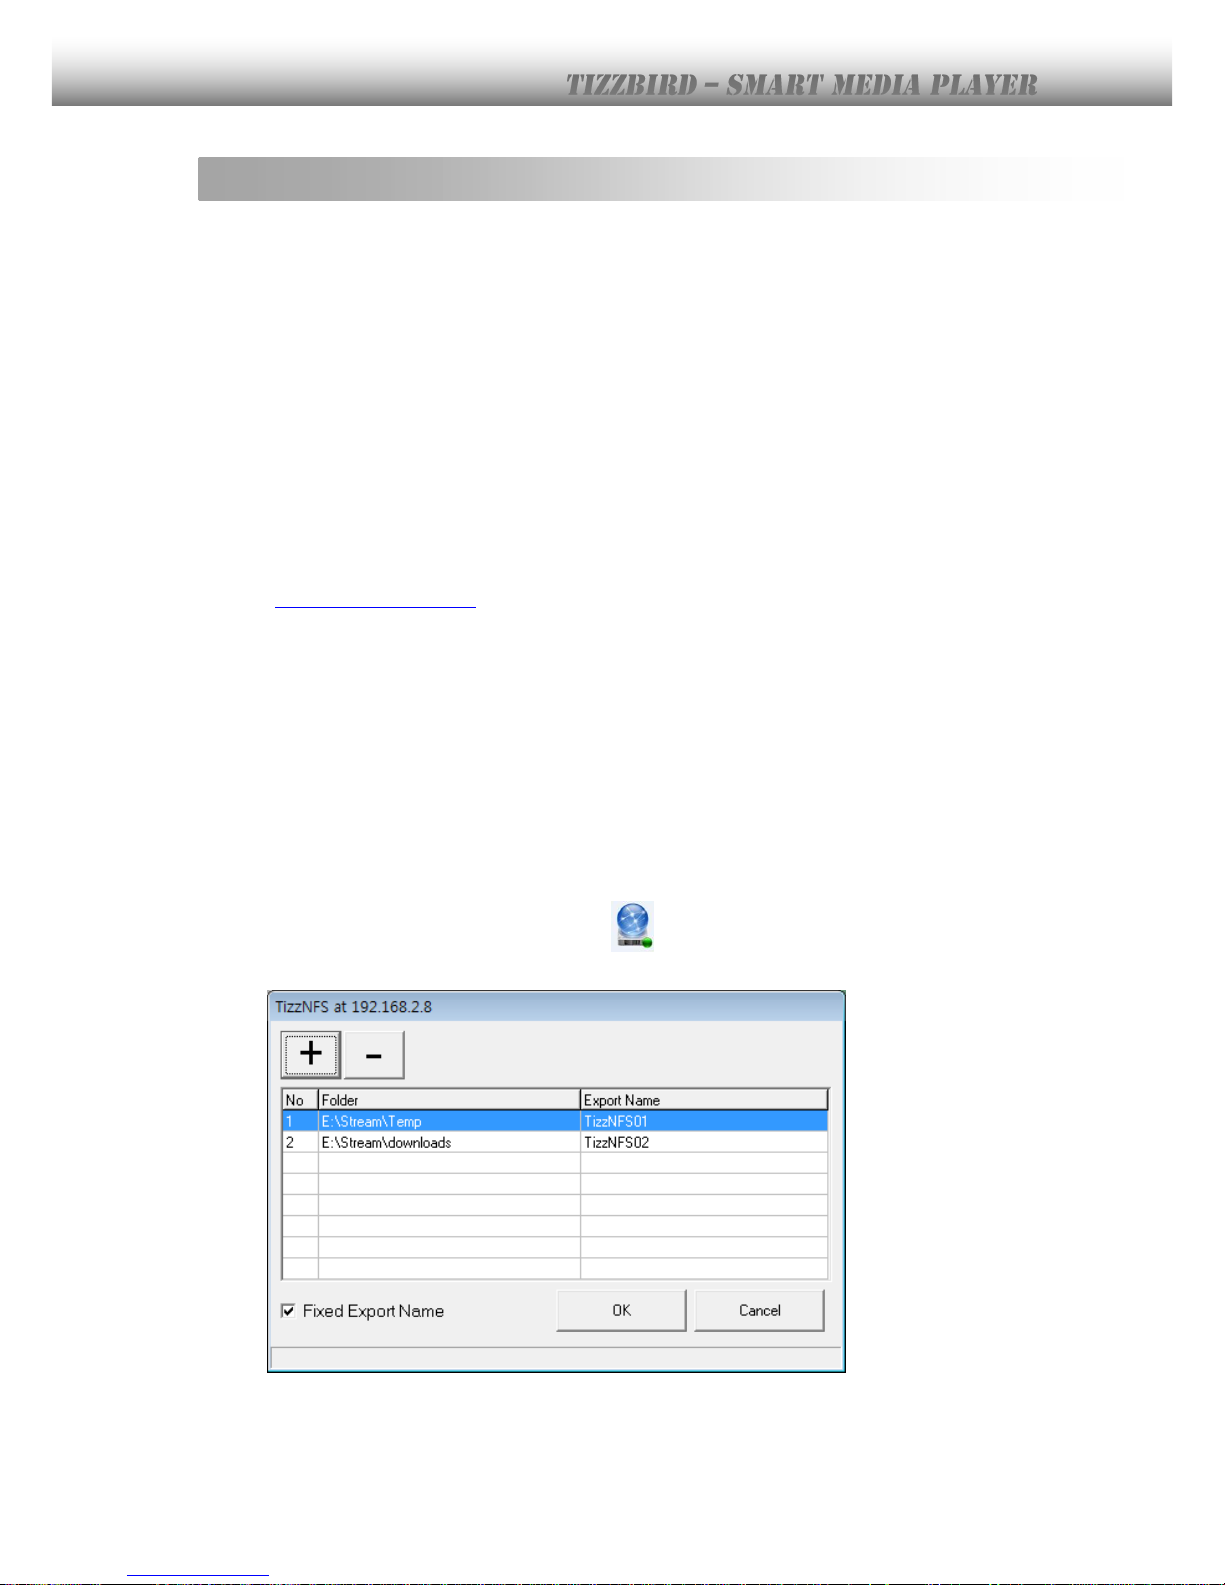
Please press button to share the folder. The folder selecting dialog box will appear
so the wanted folder can be selected.
Please repeat this procedure to select all other desirable folders to share. Please press
button to unselect the folder, after clicking the row of unwanted folder at the
dialog box.
The balloon help will pop-up when pressing OK button like below picture.
The TizzNFS will automatically run whenever log-on the PC, so shared folders will be
maintained.
17.1.3 Downloading other NFS Server
Please download the “freeNFS” or “Allegro” NFS server at Internet at the PC. The “freeNFS”
and “Allegro” NFS server was confirmed by TizzBird.
The “freeNFS” software can be downloadable at following URL:
http://sourceforge.net/projects/freenfs/files/FreeNFS.exe/download
FreeNFS can be executed without specific installation.
17.1.4 Executing freeNFS Server & Configuration
Execute the freeNFS. The freeNFS icon will appear on Task Bar. Right mouse click the icon
and select “Settings” menu item.
Please enter shared folder name at “Path” of “Server” Tab like above picture.
Please make sure that selecting “65001 (UTF-8)” at the “Codepage” of “Filennames” Tab.
Page 61
61
17.1.5 Connecting NFS Server at Device
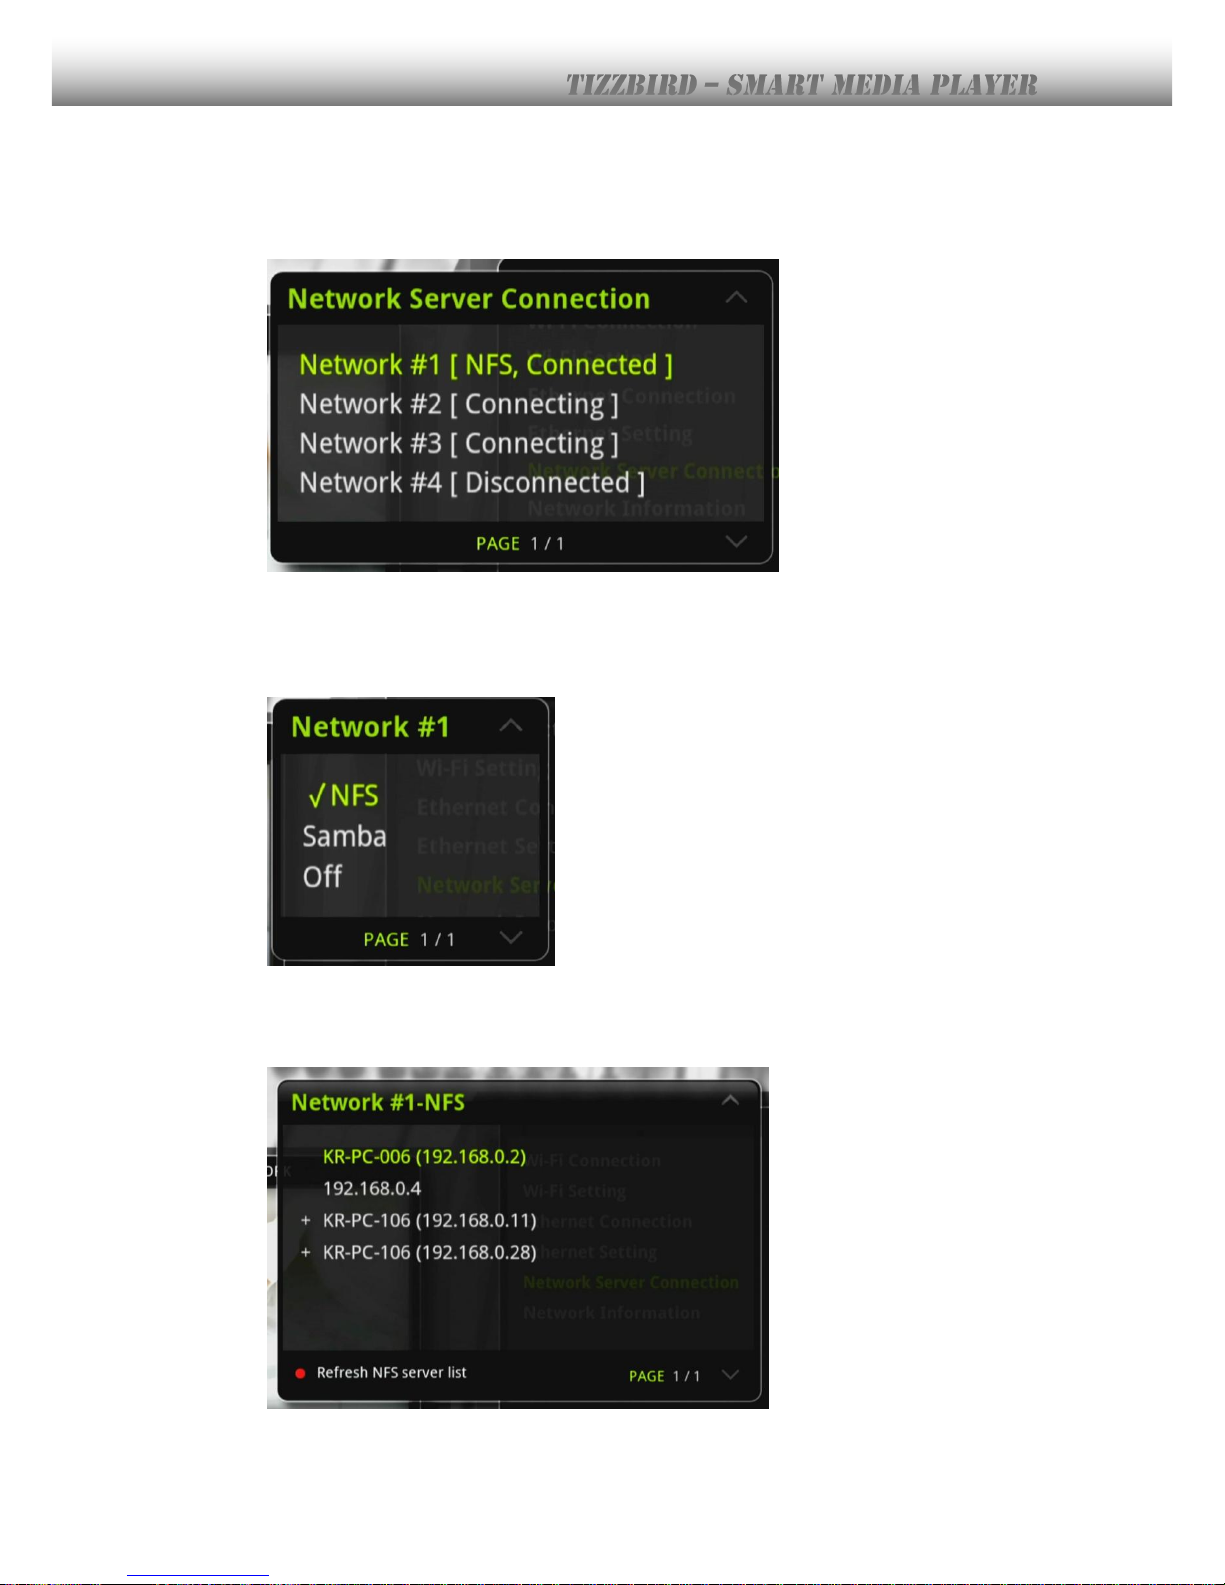
Select <Settings Browser Network Network Server Connection”. This will bring the
following dialog box.
Up to 4 network servers can be connected at this version, and the number of connectable
server will be increased at next version.
Please select one of the network drive number then press OK. This will bring the following
dialog box.
Please choose NFS. This will start the SERVER BROWSING dialog box and start browsing
of available NFS server at the local network.
Page 62
62
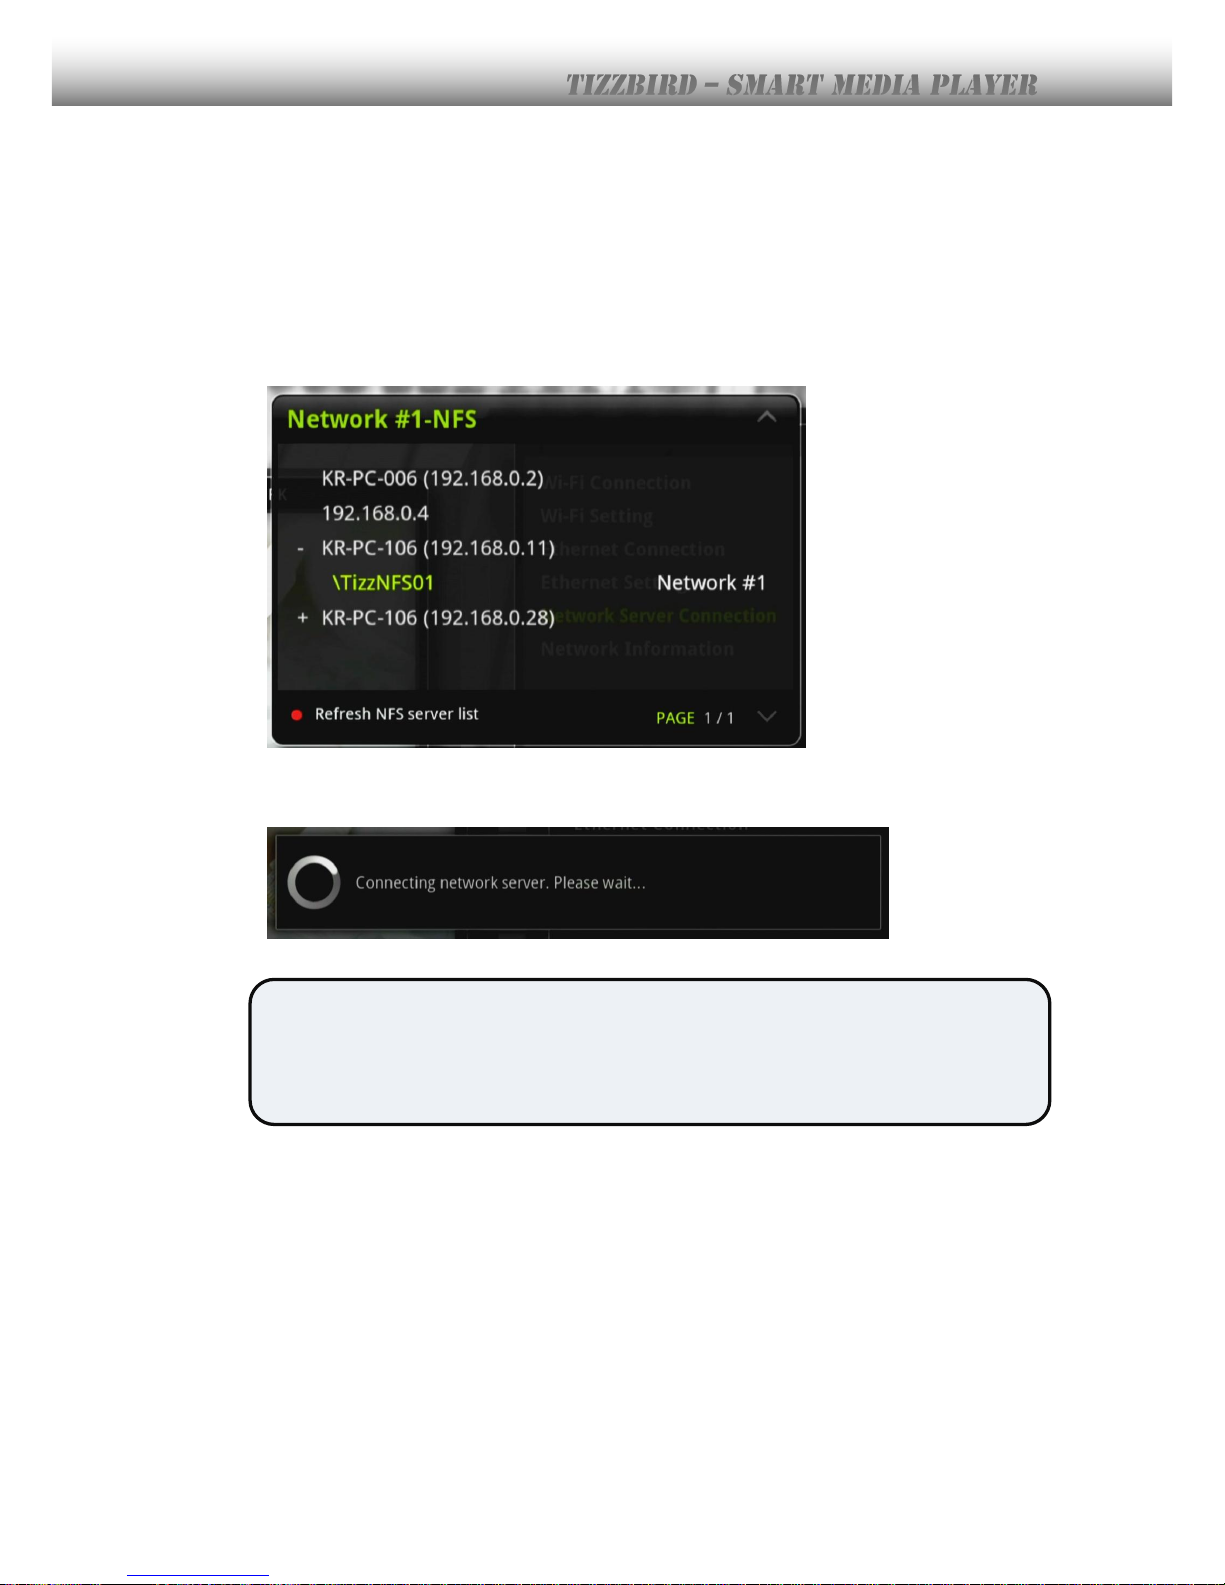
The available NFS servers will appear with names or IP addresses. The “+” sign on the left
side of server name means it has exported folders. There can be no “+” sign server which is
not exporting the EXPORT NAMES.
If PC runs Windows OS, the PC name can also appear like above picture. If the wanted
server list is not appeared, please try RED button on remote to refresh the NFS server list.
Please select one of the server then press OK, the exported folders will appear like below
picture. Please select one of those then press OK to connect.
The following dialog will appear shortly and connection will be made.
Caution:
Please use RealTEK RTL8188 Wi-Fi module for NFS thru Wi-Fi. The Ralink RT3070 Wi-Fi
driver has some problem with NFS connection. The NFS + Ethernet configuration also does
not have problem.
Page 63
63
17.2 Network Connection using Samba
The following section explains how to connect the shared PC folders or NAS (Network
Attached Storage) which runs Samba Server.
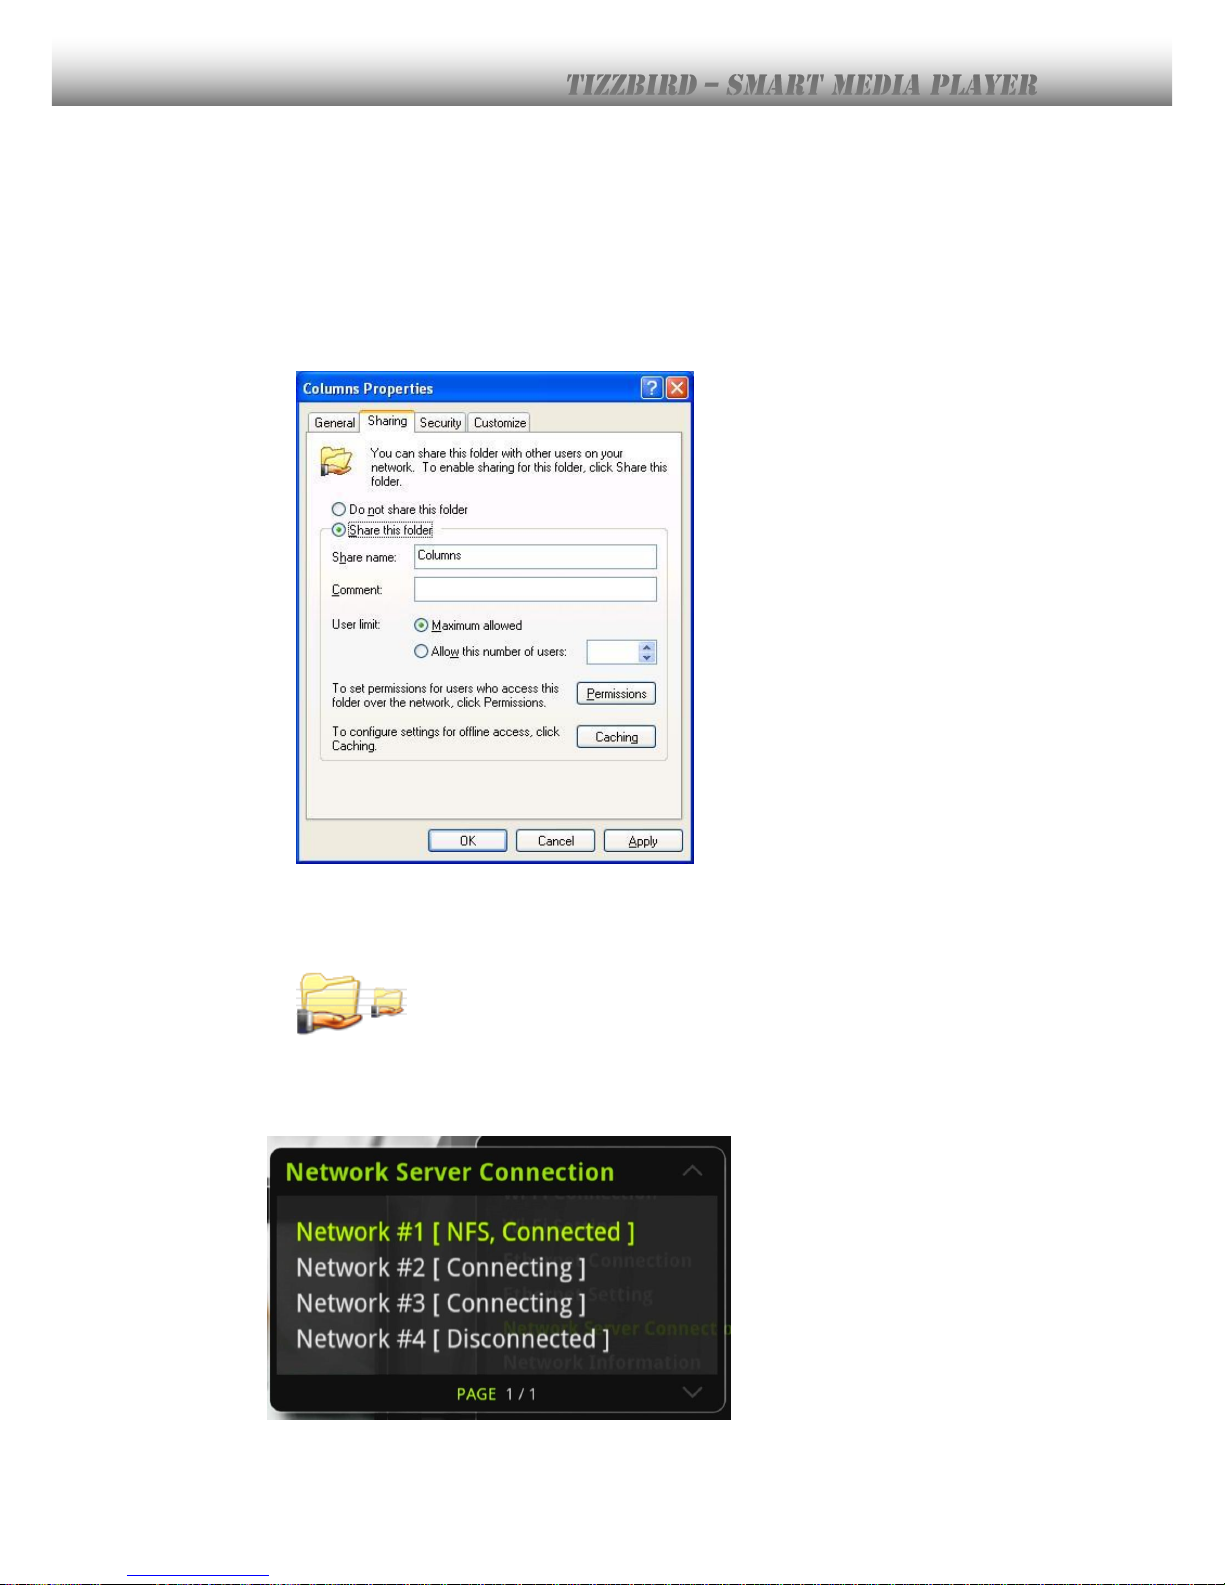
17.2.1 Activating PC Share
- Click right mouse button on the folder which will be shared. Select “Property” then
“Sharing” TAB on the dialog box.
- Select “Share this folder” button on the dialog box
- The shared folder can be notified at file explorer, since the shared icon will appear on
the left side of folder icon.
17.2.2 Connecting Samba Server at Device
Select <Settings Browser Network Network Server Connection >
Page 64
64
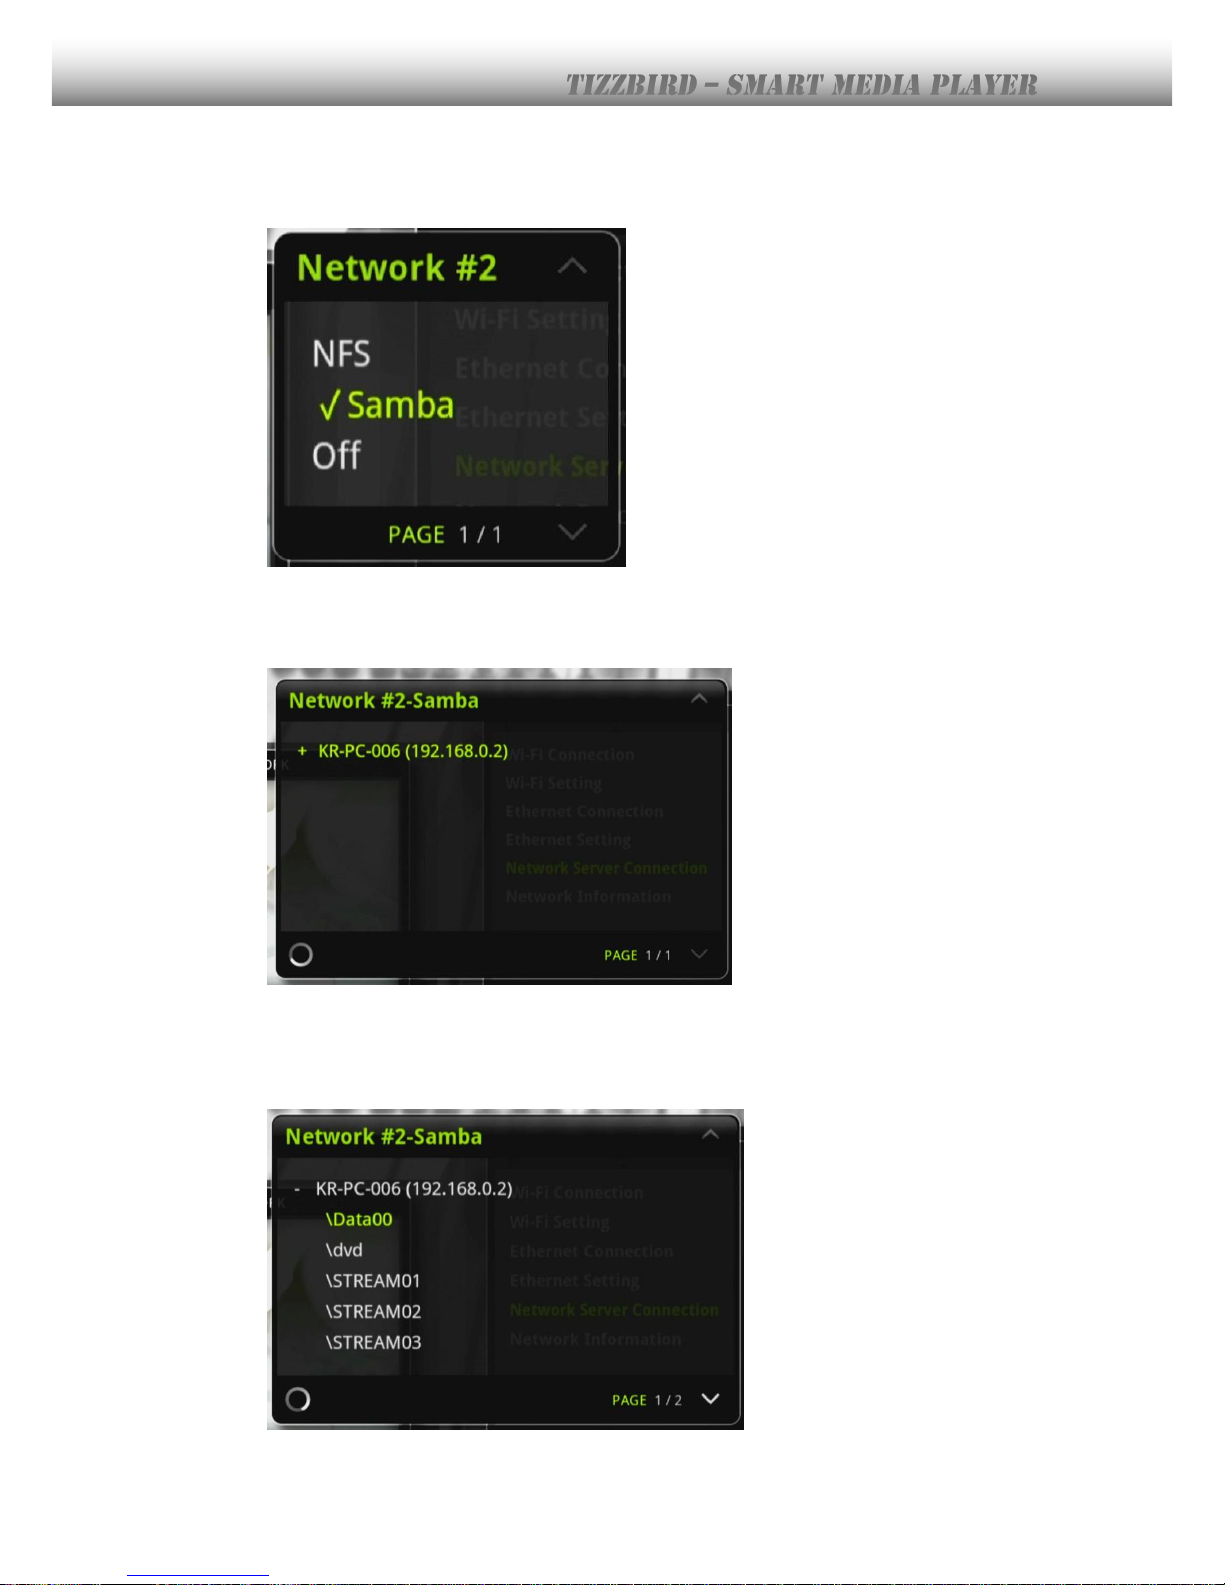
Select “Samba” at dialog box.
This will bring the SAMBA BROWSING dialog box like below. If the wanted SAMBA SERVER
name is not appeared, please press RED button on remote.
The SAMBA server list will appear according to the PC-names or IP address. The “+” sign
means it has several shared folders. Press OK button to unfold the server folder list, then
select one of the folder to connect.
Page 65
65
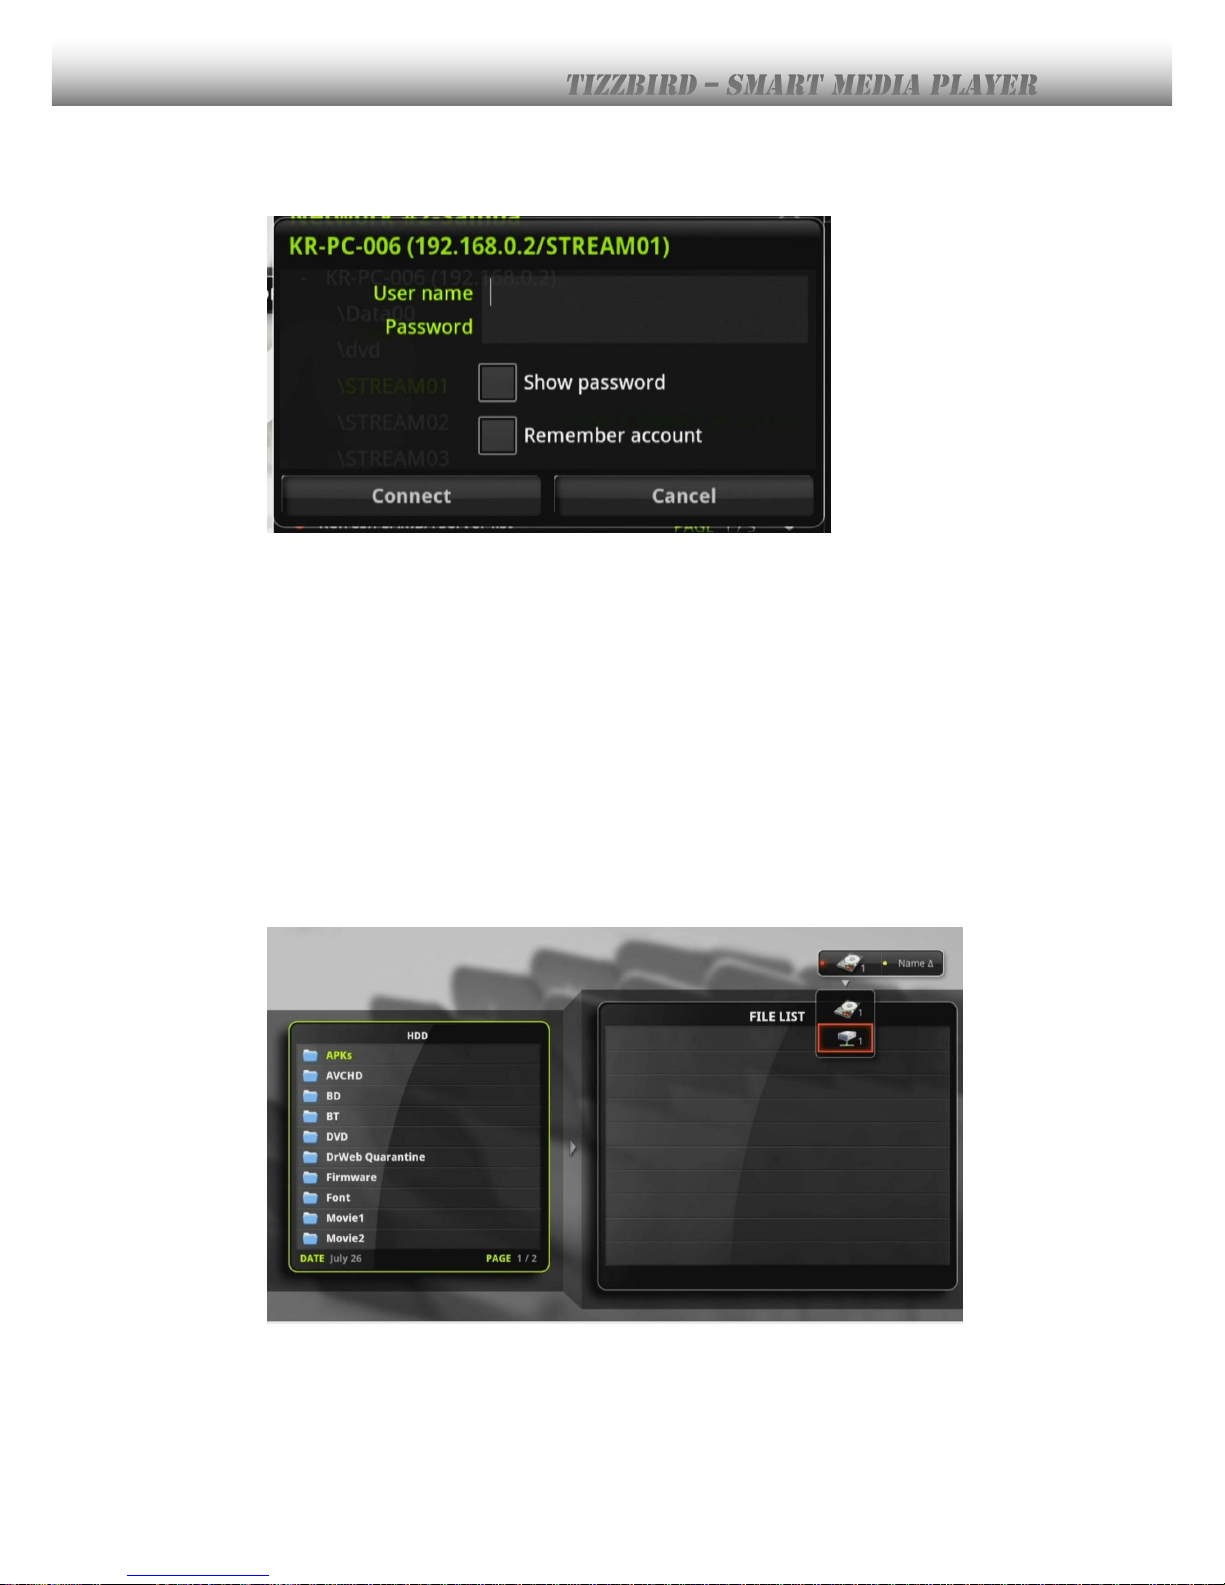
If the selected folder requires ACCESS RIGHT to connect it, the following dialog box will
pop-up to enter the log-in account information.
Input the “User name” and “Password” using virtual keyboard. Please check “Remember
account” checkbox to by-pass this log-in procedure at next connection.
The connection will be made after pressing “Connect” button.
17.3 Accessing Network Drive at File/ Media Browser
The shared folder connected thru can be accessible at <Movie/ Music/ Photo/ File Browser
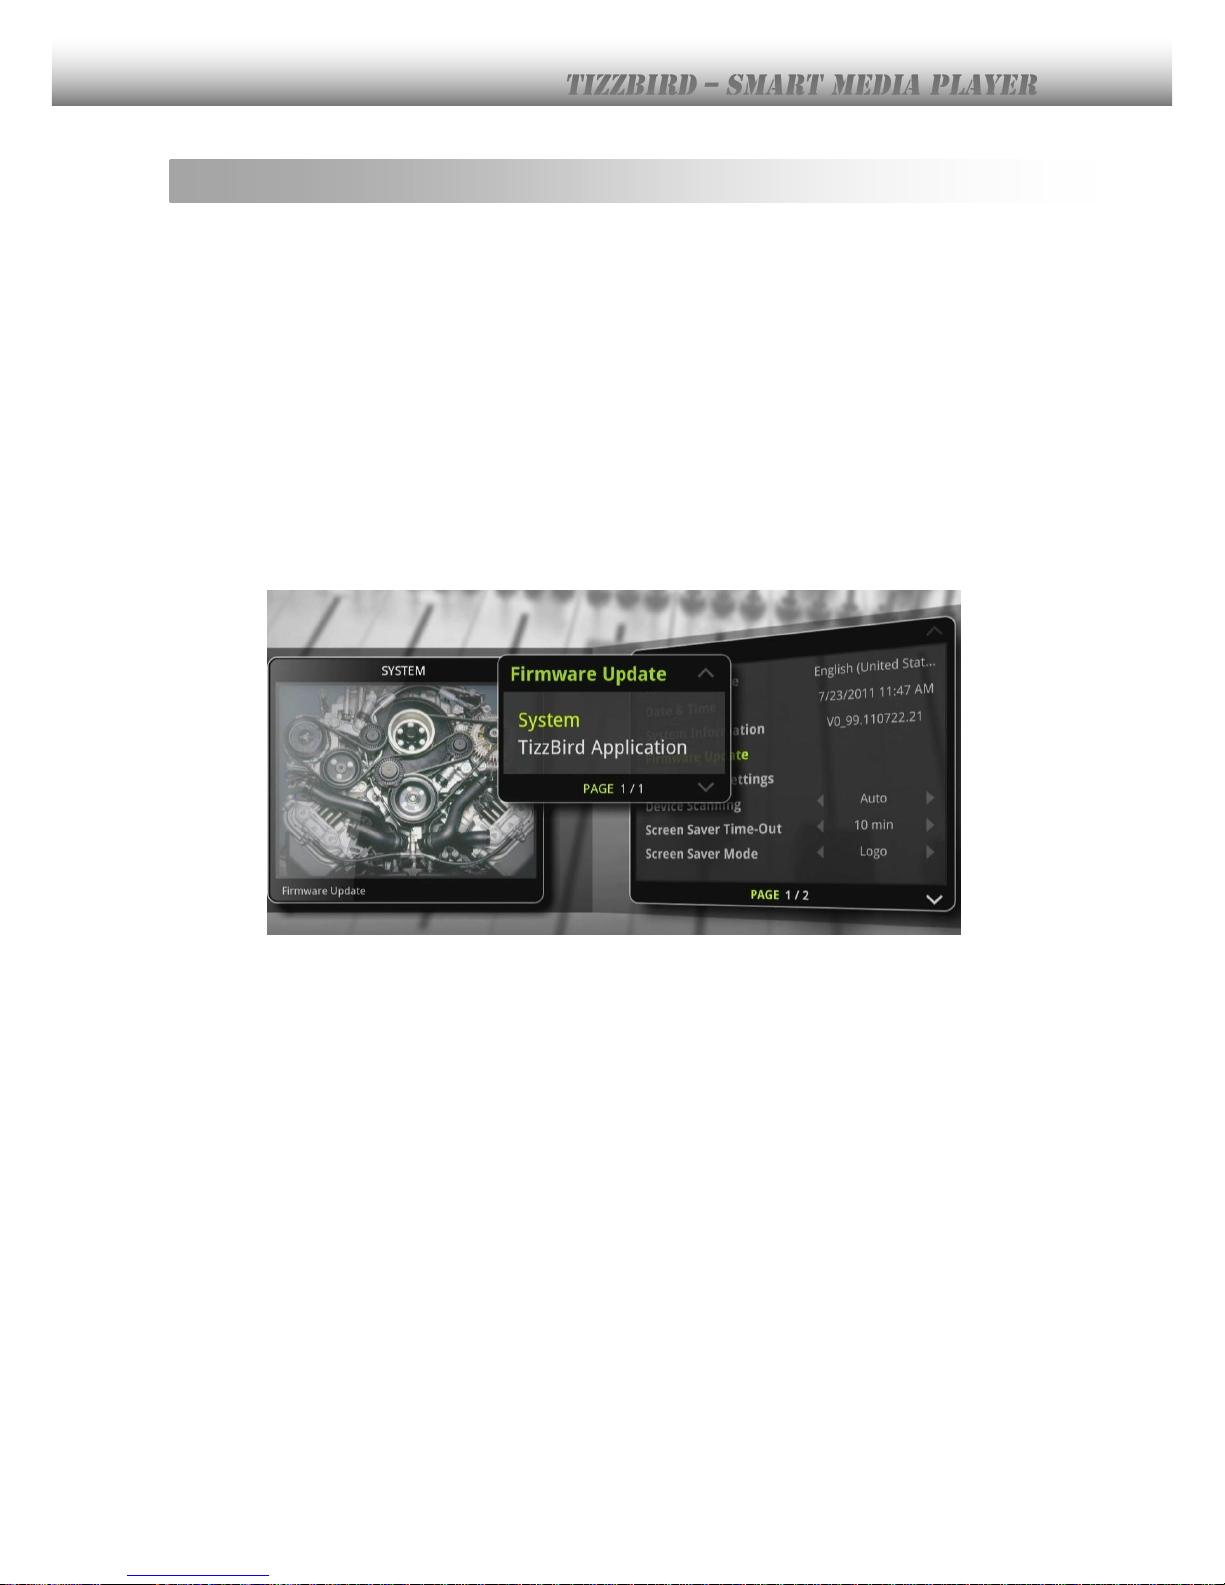
>. The below picture shows the selecting the NETWORK DRIVE at <File Browser>. Press
<RED color> button on remote at File Browser to select the network drive. Select the
network icon like following picture.
The shared folder will appeared and the files and folders can be browsed or playback.
Page 66
66
18. Firmware Upgrade
18.1 Online Upgrade (O.T.A – Over The Air Upgrade)
TizzBird will connect the firmware update server periodically (once a week) and pop-up
upgrade prompt window automatically, if new firmware is available. If TizzBird is connected
to the network, the upgrade can be performed as following.
1) Prompt the firmware if new version is available.
2) Select <SETTING BROWSER> <SYTSTEM> <FIRMWARE UPDATE>
3) Setting browser will can the new firmware available on network and pop-up the window.
4) Press <OK> to start upgrade.
5) This O.T.A function is only available Rev 1.0.8 or later. If firmware is lower than this
version, download the newest firmware from the WEB and update it manually. Please
refer to 18.2 section.
18.2 Local Upgrade
Separately downloaded firmware (thru PC) can be upgraded like below. The upgrade will
not take more than 1 minute.
18.2.1 Upgrade at Settings Screen
Copy or move the latest firmware to the root folder of USB flash or HDD drive.
- Connect the drive to USB port of the unit.
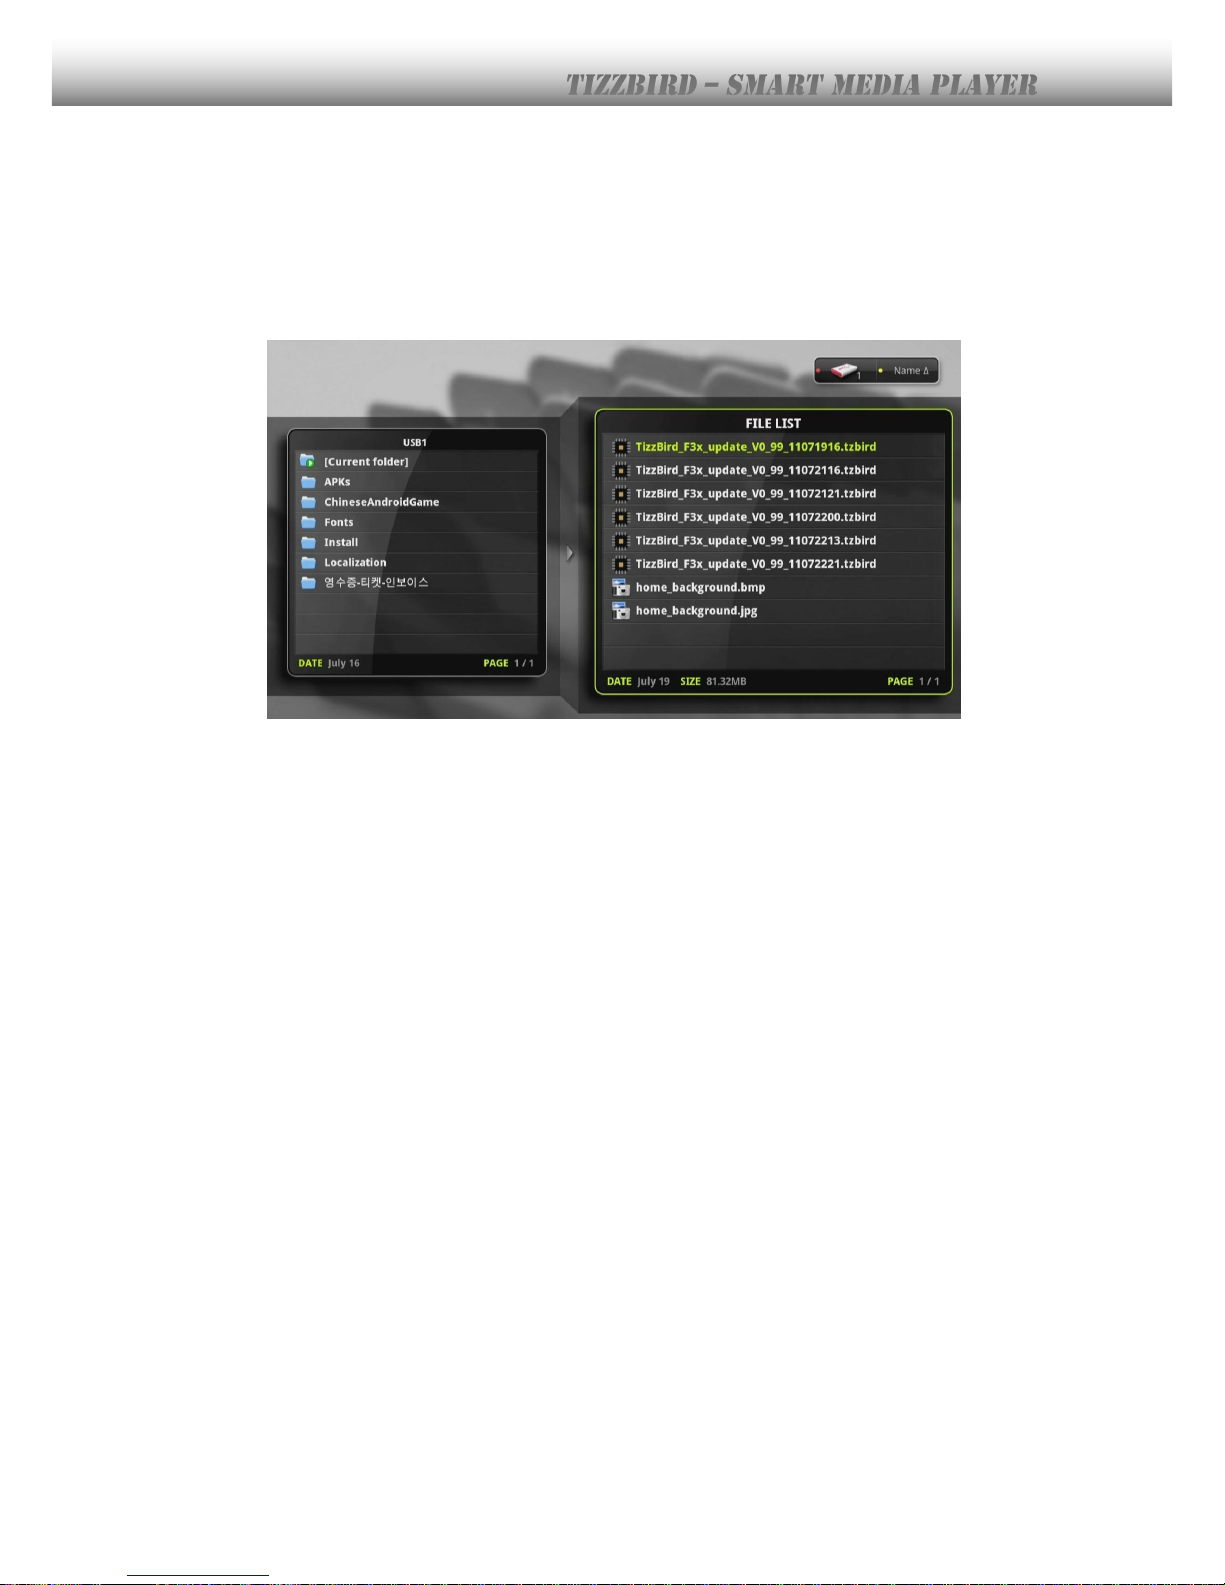
- Select <SETTING BROWSER> <SYSTEM> <FIRMWARE UPDATE>.
- SETTINGS BROWSER will scan the new firmware automatically and pop-up the window.
- Press
<OK>
button to start upgrade.
Page 67
67
18.2.2 Upgrade at File Browser
Copy or move the latest firmware to the root folder of USB flash or HDD drive.
- Connect the drive to USB port of the unit.
- Select <FILLE BROWSER> at HOME SCREEN. .
- Browse the firmware file and press
<OK>
to start upgrade.
 Loading...