

Page 1
OWNER’S MANUAL
™
+
PAL
Portable Audio Laboratory™
Portable DAB/DAB+/DMB/FM Radio
1 2 3 4 5
Page 2

Page 3

PAL+ Multilanguage Manual:
English ..................................................................................................... 4
Dansk ....................................................................................................20
Deutsch ................................................................................................. 35
Français ................................................................................................. 53
Italiano ................................................................................................... 69
Netherlands ........................................................................................... 86
Norsk ................................................................................................... 102
Declaration of Conformity ...................................................................117
Page 4

Important Safety Instructions:
1. Read these instructions.
2. Keep these instructions.
3. Heed all warnings.
4. Follow all instructions.
5. Do not use this apparatus near water. For example, do not use near a bathtub, in a wet
basement, near a swimming pool, and the like. WARNING! Do not expose this product
to rain or moisture.
6. Clean only with a dry cloth.
7.
Do not block any ventilation openings. Install in accordance with the manufacturer’s
instructions.
8. Do not install near any heat sources such as radiators, heat registers, stoves, or other
apparatus (including amplifiers) that produce heat.
9. Do not defeat the safety purpose of the polarized or grounding-type plug. A polarized
plug has two blades with one wider than the other. A grounding type plug has two
blades and a third grounding prong. The wide blade or the third prong are provided for
your safety. If the provided plug does not fit into your outlet, consult an electrician for
replacement of the obsolete outlet.
10. Protect the power cord from being walked on or pinched particularly at plugs, convenience receptacles, and the point where they exit from the apparatus.
11. Only use attachments/accessories specified by the manufacturer.
12. Use only with the cart, stand, tripod, bracket, or table specified by the
manufacturer, or sold with the apparatus. When a cart is used, use
caution when moving the cart/apparatus combination to avoid injury
from tip-over.
13. For added protection for this product during a lightning storm, or when it is left unattended and unused for long periods of time, unplug it from the wall outlet. This will
prevent damage to the product from lightning and power-line surges.
4 – ENGLISH
Page 5

14.
Operate this product only from the type of power source indicated on the rear panel. For
products using an external power supply, use an exact replacement if lost or damaged.
For products operating from battery power, refer to the user manual.
15.
Unplug this product from the wall outlet and refer servicing to qualified service personnel
under the following conditions:
a. When the power supply cord or plug is damaged.
b. If liquid has been spilled or objects have fallen into the product.
c. If the product does not operate normally by following the operating instructions.
d. If the product has been dropped or damaged in any way.
e. When the product exhibits a distinctive change in performance.
16.
Apparatus shall not be exposed to dripping or splashing and no objects filled with liquids,
such as vases, shall be placed on the apparatus
17. If the LCD becomes cracked and damaged, do not touch the liquid.
18. Keep this product a safe distance away from naked flame, such as a lit candle.
19. The recommended operating temperature range is 5˚ C to 40˚ C (41˚ F to 104˚ F).
20.
The external power supply must be positioned so it is readily accessible and not blocked
by furniture, etc.
21.
The power cord plug serves as the disconnect device and should remain readily
accessible.
22.
WARNING – The mains are not disconnected in the off position, but the circuits are
de-powered.
This product can be recycled. Products bearing this symbol must NOT
be thrown away with normal household waste. At the end of the product’s life, take it to a collection point designated for recycling of electrical and electronic devices. Find out more about return and collection
points through your local authority.
The European Waste Electrical and Electronic Equipment (WEEE) Directive was implemented to dramatically reduce the amount of waste going
to landfills, thereby reducing the environmental impact on the planet
and on human health. Please act responsibly by recycling used products. If this product is still useable, consider giving it away or selling it.
5 – ENGLISH
Page 6

PAL+ Instructions:
Congratulations on your purchase. We believe the PAL+ to be one of the finest portable
DAB/DAB+/DMB/FM radios on the market today.
We know you are eager to begin listening to your new radio, but in order to take full advantage
of what your PAL+ is capable of, please take a moment to read this owner’s manual and the
safety instructions. If you have any questions, please do not hesitate to contact your dealer
or Tivoli Audio.
Please save the carton and original packing should you ever need to ship your radio,
as shipping damage is not covered by the factory warranty.
On behalf of all of us, thank you for choosing Tivoli Audio, and enjoy your new PAL+!
About Tivoli Audio:
Tivoli Audio was founded by Tom DeVesto with the mission of bringing simple to use,
elegantly designed, high quality audio products to consumers. As CEO and head of research
and development at his former company, Cambridge SoundWorks*, Tom was responsible
for the development of many of the best selling home entertainment and multi-media products
on the market. He also held senior management positions in product development at both
Advent and Kloss Video.
*Cambridge SoundWorks is a registered trademark of Creative Labs, Singapore.
Packed with your PAL+ radio you should find:
• One (1) external power supply
• One (1) 3.5mm stereo audio cable
• One (1) NiMH battery pack (installed)
• One (1) remote control (battery installed)
• One (1) remote control holder
Please contact your dealer or Tivoli Audio if any of these items are missing.
6 – ENGLISH
Page 7
Getting Started:
1. Extend the antenna.
2. Connect the included power supply to the PAL+ and plug it into a wall outlet.
3. Press the button on the remote control or briefly press the top control wheel on the
top of the PAL+. Wait for the Auto Scan to finish.
4. Press the or buttons on the remote control to view available stations and
highlight the station you wish to listen to.
5. Press the Menu/Select button on the remote control to tune the highlighted station.
6. Press the Volume or buttons on the remote control to adjust the volume level
to your preference, or rotate the top control wheel.
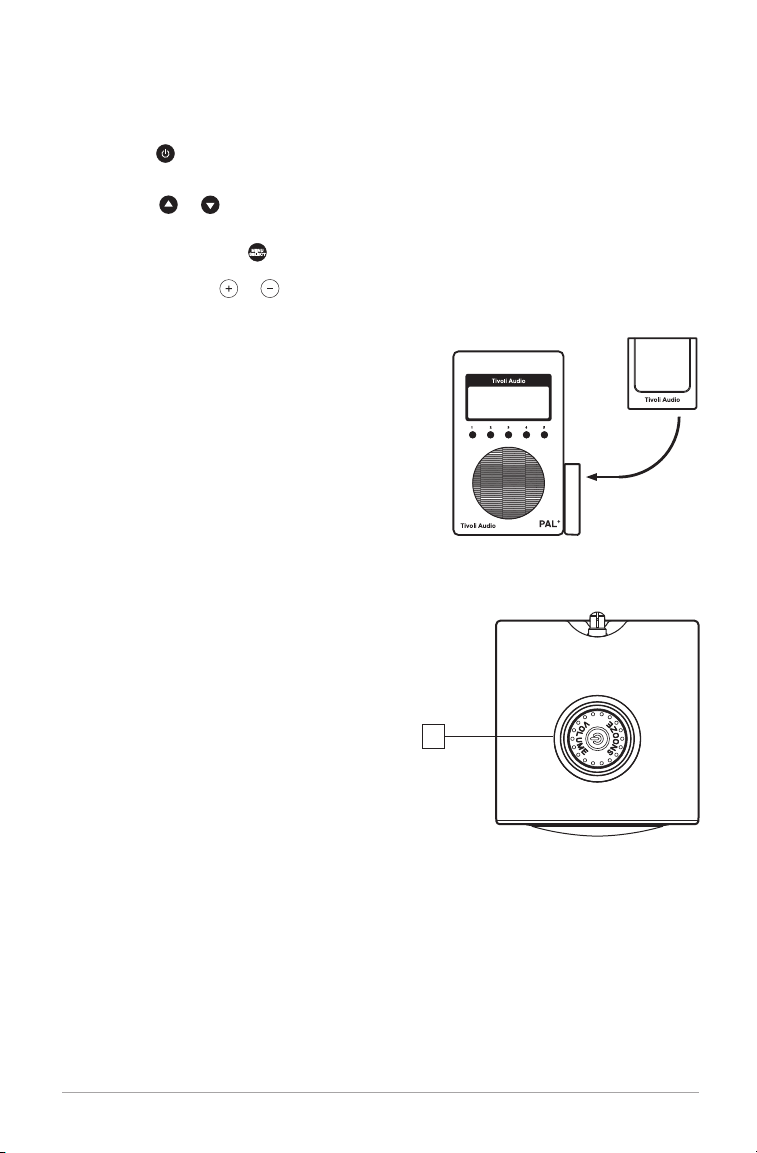
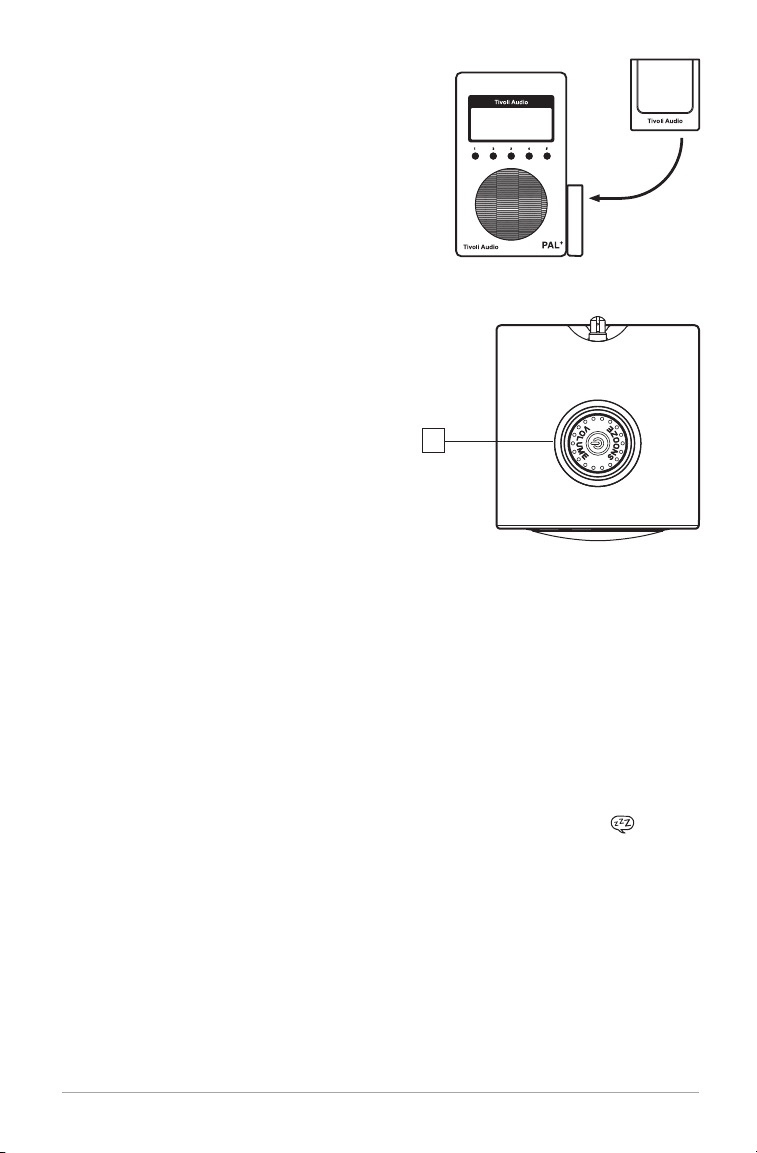
Remote Holder:
A separate holder for the remote control is included.
It incorporates adhesive tape on the backside. Peel
off the backing and apply the holder to either side of
your PAL+ and insert the remote bottom first.
1 2 3 4 5
Guide to Features
(Top and Front Panels):
1. MULTI-FUNCTION CONTROL WHEEL
(TOP):
The control wheel conveniently serves
many functions:
Power: When the PAL+ is off, press the wheel
briefly to power the unit on. When the PAL+ is
on in any source, press and hold the wheel to
power the unit off. (Note: the remote’s Power
button will not turn the PAL+ on when the
unit is off and not connected to the external
power supply.)
Volume: When the PAL+ is on in any source,
rotate the wheel clockwise to increase the volume level and counter-clockwise to
decrease the volume level.
Tuning: When the PAL+ is on in any source except Aux, press the wheel once and rotate
clockwise to manually tune up and counter-clockwise to manually tune down. Press
again to tune the station and return to the volume function. The letter “T” will show on
the display to indicate manual tuning mode. After about 7 seconds of no activity, the
control wheel will default back to the volume control function.
1
7 – ENGLISH
Page 8
Source: When the PAL+ is on in any source, press the wheel twice to see the source menu.
Rotate the wheel to the desired source and press to select the source shown. If a source is
not selected within 7 seconds, the display will default back to the last source used.
Snooze: When the alarm sounds, press the wheel to engage Snooze. A
icon will show on the display when Snooze is active. The Snooze time is fixed
at 7 minutes. Press again during Snooze to cancel the Snooze. The Snooze
function works when the PAL+ is connected to the external power supply.
When operating on battery-only power, pressing Snooze will have no effect.
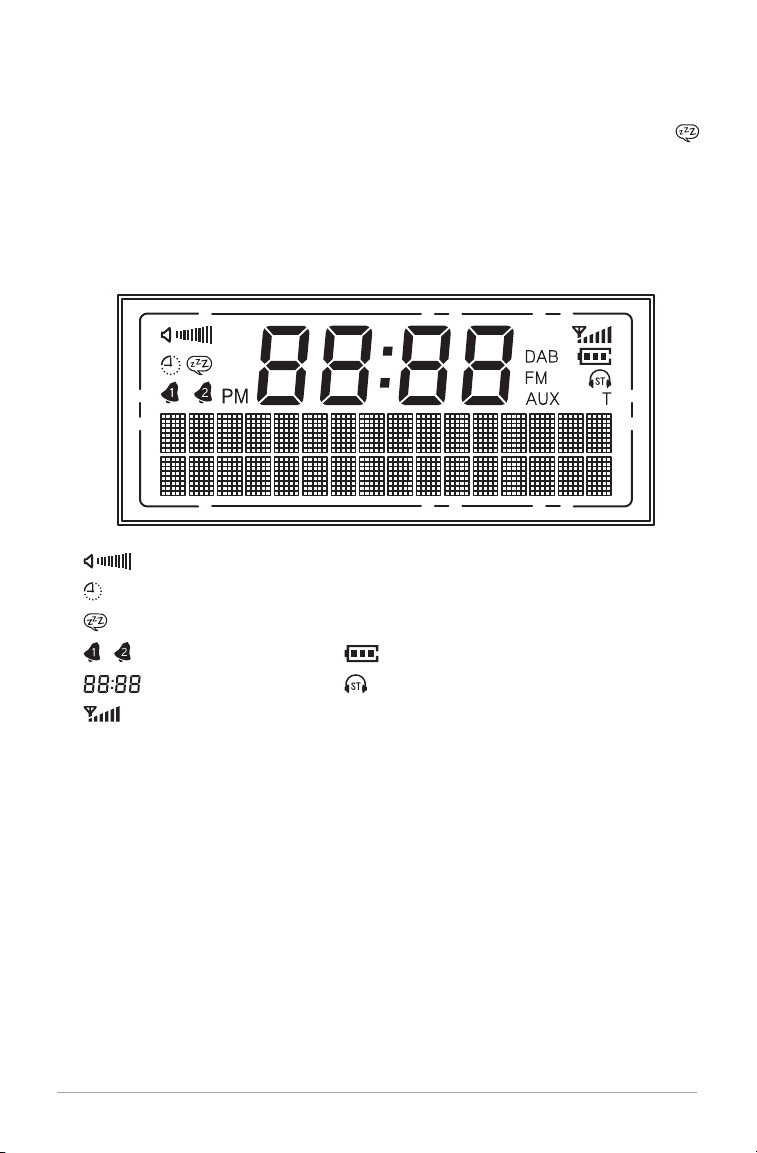
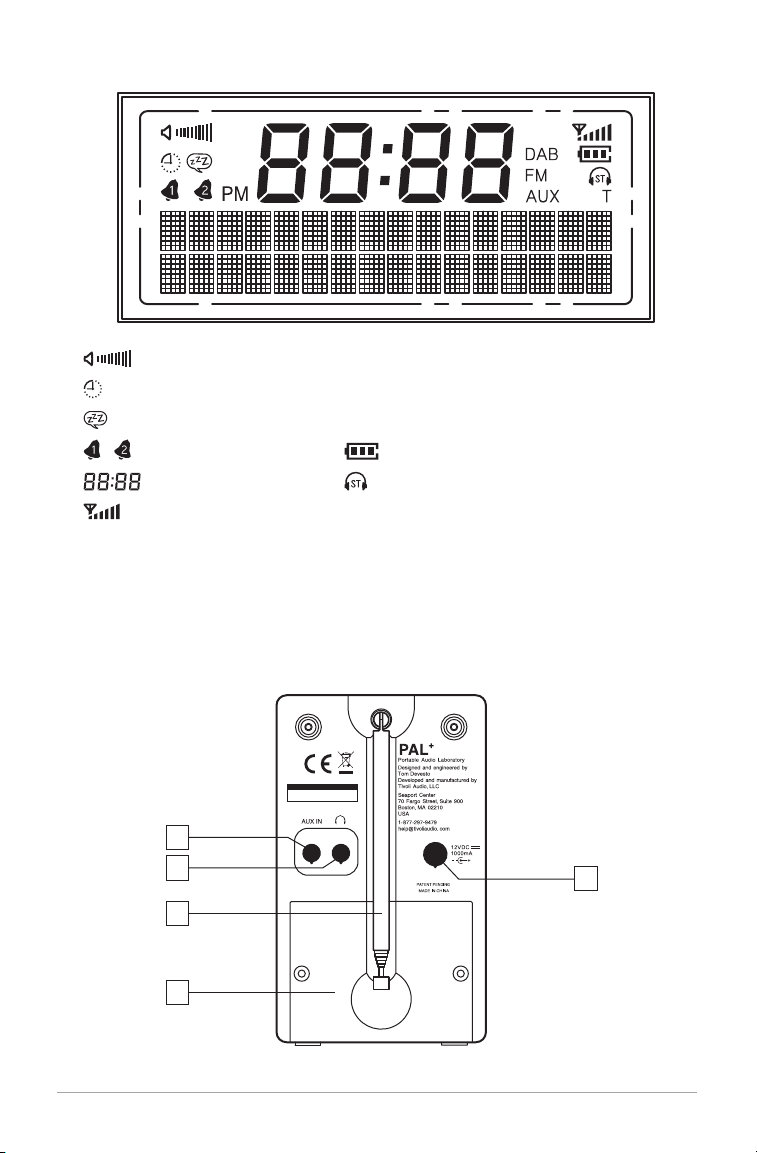
2. LCD:
: Volume level FM: FM band
: Sleep timer DAB: DAB/DAB+/DMB band
: Snooze timer AUX: Auxiliary
: Alarms 1 and 2 : Battery power/charging status
(center digits): Time : Mono/Stereo indicator for headphone output
: Reception level T: Manual tuning mode
3. PRESETS: Press and hold to store the currently tuned station. Press briefly to recall
the station associated with that specific preset. In FM mode, the preset number will
be indicated on the display. There are 5 presets for each band.
8 – ENGLISH
Page 9
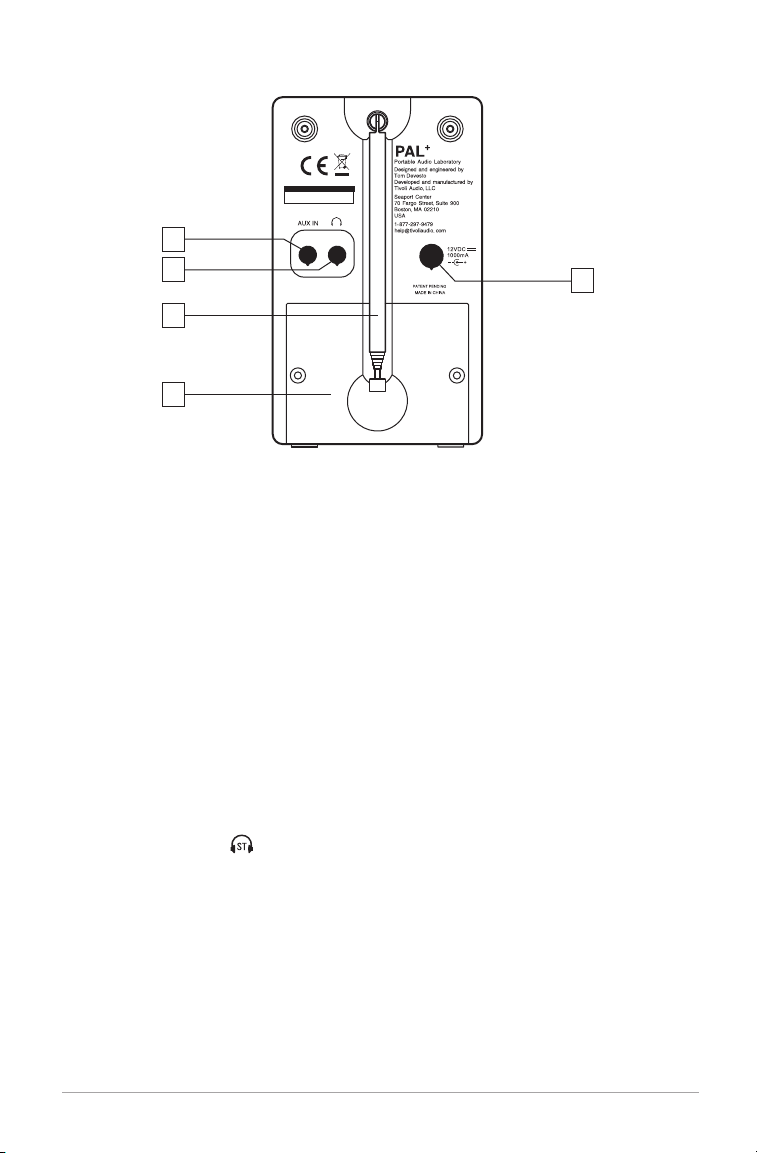
Guide to Features (Rear Panel):
4
3
2
5
1. 12VDC/1000mA: Use this input to operate the PAL+ using its included external power
supply and to charge the battery when the PAL+ is in standby. Use only the power
supply provided with this product. Should the power supply become damaged or
misplaced, use only a like replacement. Any DC adapter used must meet the requirements
of EN/IEC 60065 and be rated at 12VDC 1A and 230V 50Hz (depending on your region’s
power requirements). Use of any DC adapter not recommended by the manufacturer/not
meeting this specification may cause a safety hazard. The connector is 5.5mm/2.1mm
center positive. Keep the rubber plug inserted when this input is not in use. It is normal
for the power supply to become warm during use.
2. ANTENNA: Adjust this telescoping antenna and position it for best reception. In strong
FM signal locations, reducing the antenna’s length may provide better reception. When
the unit is not in use, keep the antenna retracted to protect it. For more, see the section
marked “Reception”.
3. HEADPHONE OUT: Connect a headset (not included) to this variable output for private
listening. Connecting a headset will mute the primary speaker. The headset’s volume
is adjusted using the top control wheel and the remote control’s volume buttons. Press
the MONO button on the remote to change the Headphone output from Mono to Stereo.
A headphone icon ( ) will appear on the display to indicate the Headphone output
is in Stereo. When listening with headphones to an FM station with noise, keeping this
output set to Mono may improve reception. This output accepts a 3.5mm stereo male
mini connector. Avoid using headphones at high volume levels to prevent possible
hearing damage. Do not wear headphones while operating a vehicle. Keep the rubber
plug inserted when this input is not in use.
4. AUX IN: To hear audio from another device, such as an iPod or other MP3 player,
connect said device’s audio output to this stereo input and change the source to
Auxiliary using the remote or the top control wheel. This stereo input accepts a 3.5mm
stereo male mini connector. Note: you may need to adjust the volume level differently
for an auxiliary device than the level used for radio listening. Keep the rubber plug
inserted when this input is not in use.
1
9 – ENGLISH
Page 10
5.
BATTERY COMPARTMENT: Houses the PAL+ NiMH battery pack. A mini-B USB interface is located behind the padding. This input is for service use only. Any other use of
this jack could damage the PAL+ which would not be covered under the warranty.
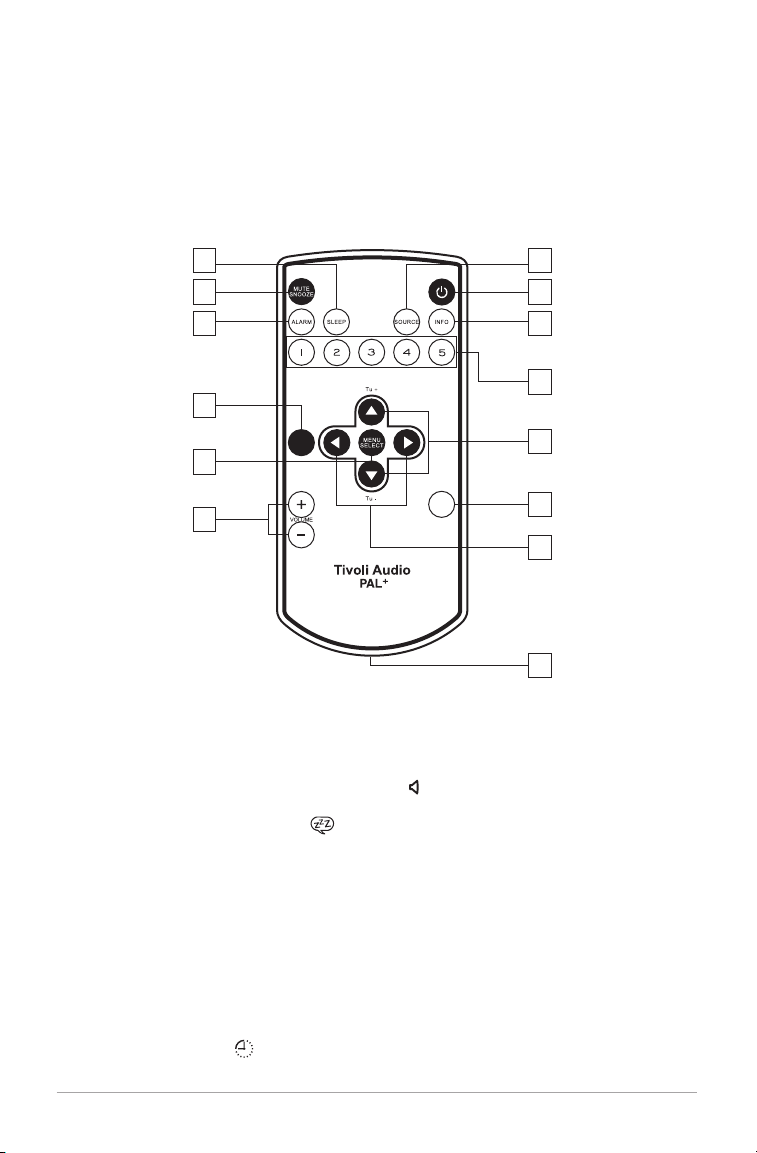
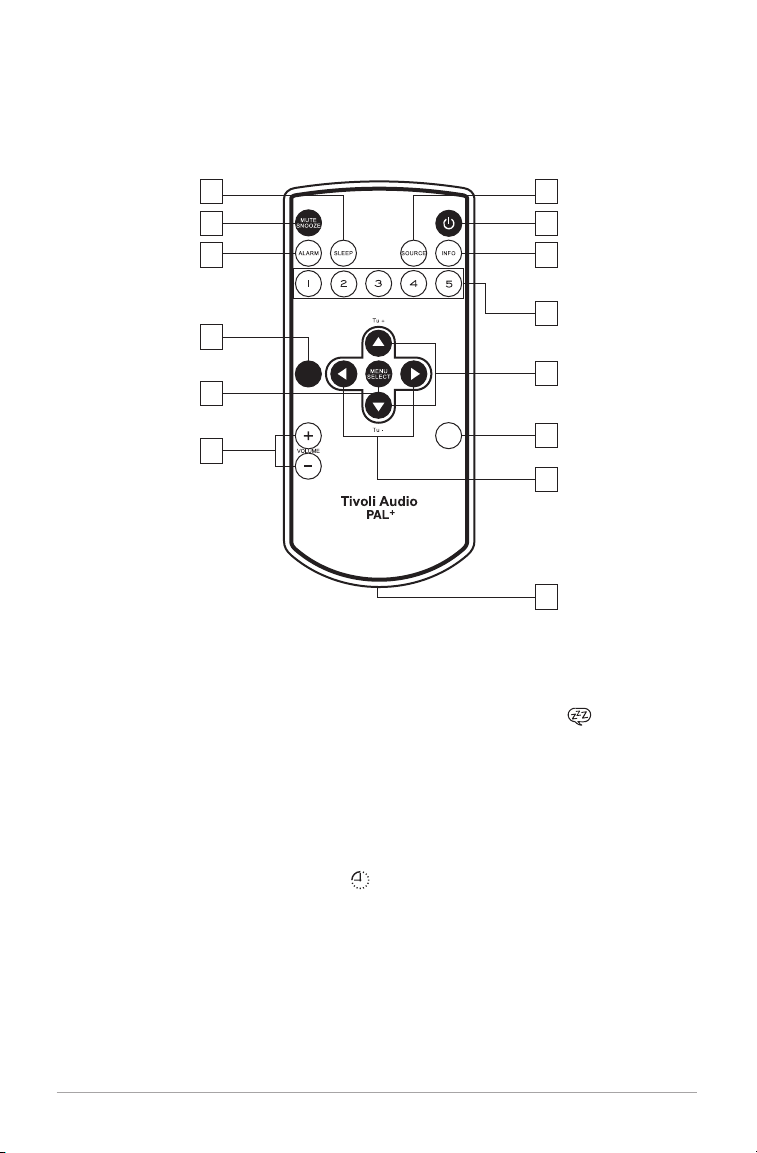
Guide to Features (Remote Control):
(A separate holder for the remote control is included. It incorporates adhesive tape on
the backside. Peel off the backing and apply the holder to either side of your PAL+.)
4
2
3
5
1
6
7
12
BACK
9
11
8
MONO
13
10
14
1. POWER: Press briefly to power the PAL+ on. The radio will power on to the last source
used. Press again to power off. The remote’s Power button will not turn the PAL+ on
when the unit is off and not connected to the external power supply.
2. MUTE/SNOOZE: Press to mute the audio (the icon will show no volume bars) while the
unit is playing and press again to restore sound, or adjust the volume. Press to mute the
alarm after the alarm sounds. A icon will show on the display when Snooze is active.
The Snooze time is fixed at 7 minutes and is not adjustable. The Snooze function works
when the PAL+ is connected to the external power supply. When operating on batteryonly power, pressing Snooze will have no effect.
3.
ALARM: Use the pq and Select buttons to adjust and set the alarms. For very
important notes and a complete step-by-step guide, refer to the section titled “How to
set the Alarm”.
4. SLEEP: Press repeatedly to view the amount of time the radio will play before it turns
off automatically and press the Select button to select that time. When the sleep timer
is active you can check the remaining time by pressing the Sleep button on the remote.
A small clock face [ ] will show on the display when the Sleep timer is active. To
cancel Sleep, press the Sleep button until the display shows “Off”. When operating
10 – ENGLISH
Page 11

on battery-only power (external adapter not plugged-in), if Sleep is engaged and the
alarm is set, after Sleep ends, the alarm will not sound. To use both Sleep and Alarm
features, please be sure the external adapter is connected.
5. SOURCE: Press repeatedly to change sources.
6. INFO: Press repeatedly to cycle through the information available depending on the
source mode. This function does not work in Auxiliary mode.
7. PRESETS 1-5: Press and hold to store the currently tuned station. Press briefly to recall
the station associated with that specific preset. In FM mode, the preset number will be
indicated on the display. There are 5 presets for each band.
8. VOLUME +/–: Press the Volume + button to raise the volume level or the Volume –
button to lower the volume level. If the audio ever sounds distorted, lower the volume
level to avoid damaging the speaker. Adjusting the volume while the PAL+ is muted
will cancel the muting.
9. pq/TUNE +/-: Press to navigate within the menus. Use these same buttons to manually
tune up or down when in FM mode and to auto scan stations. A “T” will show on the
display to indicate manual tuning mode. Press and hold to move quickly through the
frequencies. It will take a second until the frequencies begin to change. Press for 1.5
seconds and release to auto scan to the next station detected. The display will show
“Scanning…” Also refer to “Scan Setting” under the section “Menu and Specific Features”.
10. tu: The right arrow button duplicates the Select button. The left arrow button duplicates
the “Back” button in certain menu items.
11. MENU/SELECT: Press and hold to enter the main menu and press briefly to select
items within the menu. For more, see the section marked “Menu”.
12. BACK: Press to go back to the previous menu page.
13. MONO: Press to change the Stereo/Mono setting of the Headphone output. The display
will show “M” for mono and “ST” for stereo. “Mono” or “Stereo” will also be one of
the fields shown when pressing the Info button on the remote in FM mode. If you are
listening via headphones to a noisy FM station in stereo, switching to mono may improve
reception. Also see “Balance” under “Menu and Specific Features”.
14. BATTERY HOLDER: Remove the protective strip protruding from the battery holder
before using the remote control. Should you ever need to replace the remote’s battery,
use Lithium button cell battery model CR2025.
CAUTION: Danger of explosion if the battery is incorrectly replaced. Replace
only with the same or equivalent type. Dispose of spent battery according to your
country’s regulations.
11 – ENGLISH
Page 12

Menu and Specific Features:
Press and hold the Menu button on the remote to enter the main menu. Use the
remote’s pq buttons and the Select button to change the items within the menu.
Use the Back button to navigate back, or wait for 15 seconds until the timeout expires.
An asterisk (*) indicates the shown menu item is currently set.
1. SCAN SETTING (FM MODE ONLY): Press the Select button and use the pq and
Select button to choose between “Strong stations only” or “All stations” when performing an auto scan (see #9 (pq/Tune +/-) under “Remote Control”). Selecting “All
stations” increases the sensitivity of the scan, possibly resulting in the auto scan
stopping on noise. This feature is not accessible in Auxiliary mode.
2. TIVOLI EQ: Press the Select button and use the pq and Select buttons to adjust the
Bass and Treble. The adjusted values will be shown in “User EQ”. Use the pq and
Select buttons to turn Loudness On or Off. Turning Loudness on when listening at low
volume levels is recommended since it boosts high and low frequencies resulting in a
more natural sound. Use the pq and Select buttons to activate any one of the pre-set
EQ settings. Selecting a preset EQ will over-ride any adjustment made to the Bass
and Treble settings, but Loudness will be unaffected. The “Flat” EQ restores the audio
settings to the factory defaults, meaning Bass and Treble will be re-set to zero. The
“Flat” EQ also restores Loudness Off. However, if the Bass and Treble values have been
adjusted, those settings will still be shown in “User EQ”. Simply selecting “User EQ”
will reactivate the Bass and Treble settings. In the EQ menu page, the numbers to the
right hand side indicate the bass and treble settings.
3. BALANCE (FOUND UNDER TIVOLI EQ): Press the pq buttons to alter the balance.
This control only affects the Headphone Output.
4. TIME (FOUND UNDER SETTINGS):
Set 12/24 hour:
Press the Select button and use the pq and Select buttons to choose a 12 or 24 hour
clock format.
Set time/date:
Press the Select button and use the pq and Select buttons to adjust the hour and
then minutes, immediately followed by the date. You must set the Auto update to “No
update” in order to set the time manually. For more, refer to “Auto update” below.
Auto Update:
Press the Select button and use the pq and Select buttons to choose between “Update
from any”, “Update from DAB” (also DMB), or “Update from FM” (RDS). For any of the
auto updates to work, you must have consistent reception of DAB or FM RDS with a
time/date signal provided. It could take up to a minute or more for the clock to update.
Tivoli Audio is not responsible for inaccurate time/date information provided by the
auto update signal.
To set the clock manually, select “No Update”, and then select “Set Time/Date” under
the “Time” menu using the pq or tu buttons and the Select button to set the hour.
Repeat to set the minutes and press Select to save. Within this same “Time” menu are
additional options to set the date format and 12/24 hour clock mode.
12 – ENGLISH
Page 13

NOTE: During a power outage, the alarm time(s) and clock will be maintained by an integrated back-up memory. When “Auto update” is set to “Update from any”, the radio may
find the clock signal from the last listened station, even when the PAL+ is in standby.
Set date format:
Press the Select button and use the pq and Select buttons to choose the date format
you prefer.
5. BACKLIGHT (FOUND UNDER SETTINGS):
Timeout:
The backlight level is configured at the factory to be constant. However, you can
customize the backlight to automatically change to a “Dim level” setting after a fixed
period of time whenever no controls are used. Once a control on the unit or the remote
is pressed, the normal backlight level is restored.
Press Select and use the pq and the Select buttons to set the amount of time it will
take for the backlight to change to the dim level from 10, 20 ,30, 45, 60, 90, 120, or 180
seconds, or to keep the timeout feature Off.
On Level:
Press Select and use the pq and Select buttons to choose the intensity of the backlight.
Dim Level:
If you selected a time for the backlight to change to a dim setting under “Timeout”,
press Select and use the pq and Select buttons to choose the intensity of the backlight
when it changes to this dim setting. Setting the Dim level to “Off” may be desirable if
the display backlight is bothersome while sleeping. Using the Dim level feature may
also help to maximize battery playback time.
6. LANGUAGE (FOUND UNDER SETTINGS): Press Select and use pq and Select
buttons to set your language.
7. FACTORY RESET (FOUND UNDER SETTINGS): Press Select and use the pq or tu
and Select buttons to confirm (Yes) or reject (No) the factory reset. A factory reset will
restore factory defaults and cancel all your personal settings, such as station presets
and language.
8. ID (FOUND UNDER SETTINGS): Press Select to view the ID. If you contact your dealer or
Tivoli Audio with a question, you may be asked to provide the number shown in this field.
9. SLEEP (FOUND UNDER SETTINGS): Press Select and use the pq arrow and the
Select buttons to set the sleep timer to one of the available times. There is also a dedicated Sleep button on the remote control. A small clock face will show on the display
when the Sleep timer is active.
NOTE: When operating on battery-only power (external adapter not plugged-in), if Sleep
is engaged and the alarm is set, after Sleep ends, the alarm will not sound. To use both
Sleep and Alarm features, please be sure the external adapter is connected.
13 – ENGLISH
Page 14

How to Set the Alarm:
Access the alarm setting either through the main menu or by pressing the alarm button on the remote.
1. Alarm 1 is shown first. Use the pq and Select buttons to choose between Alarm 1
and Alarm 2. Note: At any point you can navigate through the alarm menu by using
the Back or t buttons, and the Select or u buttons.
2. Use the pq and Select buttons to set the alarm on or off. If the time and date are not
set, the PAL+ will prompt you to set the Time/Date first.
3. Use the pq buttons to set/change the hour, then press Select. Repeat this process to set/
change the minutes, followed by AM/PM (if time is set to 12 hour format), then press Select.
4. Use the pq buttons to select how long you want the alarm to sound, then press Select.
5. Use the pq buttons to select the source you wish to wake to, then press Select. If you
set the source to DAB (includes DAB+/DMB) or FM, use the pq buttons to select the
station preset or last listened, then press Select. If the alarm source is set to DAB and
the last listened or preset station is unavailable at the time the alarm sounds, the alarm
will default to the tone.
6. Use the pq buttons to set how often the alarm should be set to wake, then press Select.
If “Once” is selected, you must set the date you wish the one time alarm to sound.
7. Lastly, use the pq buttons to set the volume level of the alarm, then press Select.
8. Repeat this process for Alarm 2 if desired.
If you make a mistake at any point in the process, press the Back button on the remote
and begin again.
Your settings will not be saved unless you complete the entire process and the display
shows “Alarm Saved”.
important notes:
• The alarm cannot sound if the PAL+ is off and not connected to the external adapter.
• The alarm volume will ramp-up over time. It will take several seconds until the
alarm reaches the volume level set in the alarm menu.
• Should power be lost or the battery becomes discharged, the alarm time will be
saved, but the alarm cannot sound without power to the PAL+.
alarm options:
Alarm Quick Set: With the PAL+ in standby, repeatedly press the alarm button briefly to
toggle each alarm on or off.
Alarm Off: To stop the alarm, press the Alarm or Power button on the remote, or press and
hold the Multi-Function Control Wheel on top of the unit.
Snooze: To activate Snooze, press the Snooze button on the remote, or briefly press the
Multi-Function Control Wheel on top of the unit. The Snooze time is not adjustable. When
operating on battery-only power, pressing Snooze will have no effect.
14 – ENGLISH
Page 15

Note: When in snooze mode, you can see the remaining snooze time by pressing the
Snooze button on the remote. If you press the Alarm or Power button on the remote,
or if you press and hold the Multi-Function Control Wheel on top of the unit, then
the snooze countdown will be cancelled and the PAL+ will go into Standby or off if
operating on battery-only power.
Digital Radio (DAB/DAB+/DMB) Mode:
STATION LIST: Use the pq buttons on the remote, or press the Multi-Function Control
Wheel on top of the unit, to show all available DAB/DAB+/DMB stations. Use the pq
buttons to highlight a specific station and the Select button to tune that station. The Station
list will disappear between 7 and 15 seconds depending on whether it was accessed via
the top Control Wheel or the remote control.
Press and hold the Menu button on the remote to enter the main menu. Use the pq
buttons and the Select button to change the items within the menu. Use the Back
button to navigate back, or wait for 15 seconds until the timeout expires.
An asterisk (*) indicates the shown menu item is currently set.
Note: Upon entering Digital radio mode, if the Station list is empty,
an auto scan will initiate.
1. AUTO SCAN: Searches the entire frequency range. If you move the PAL+ to another
location, you must perform a new scan so the radio will find stations in the new location.
To cancel the auto scan, press the Back button on remote.
2. TIVOLI EQ: Please refer to the section marked “Menu and specific features”.
3. MANUAL TUNE: Press the pq buttons to manually tune specific DAB/DAB+/DMB
frequencies, then press Select to tune the displayed frequency.
4. DRC: Dynamic Range Control allows you change the sound level of stations to make
quiet passages louder to compensate for a noisy environment, or when listening at a
low volume level.
5. ADVANCED MODE: If the PAL+ is relocated to a different area, you may find stations
with the same name. If you enable “Advanced View”, “Long labels”, and “Show Ensemble”
under Advanced Mode, you will be able to differentiate between extended station names.
For DAB/DAB+, we suggest disabling all the Advanced Mode settings. For DMB, we
suggest enabling them.
6. UPDATE LIST: If the PAL+ is relocated to a different area, some stations may become
unavailable. Select “Update List” to remove unavailable stations from the Station list. Use
the pq or tu buttons and the Select button to confirm (Yes) or deny (No) removing
unavailable stations.
NOTE: When moving the PAL+ to another location where there may be different DAB
stations from the previous location, it is recommended to run an “Update List” to remove
unavailable stations.
dab display messages:
Secondary Services: Secondary stations will be indicated by a >> symbol next to the
station name. Secondary services may not be available in your area.
15 – ENGLISH
Page 16

“?”: If this symbol appears next to the station name, it means the station is invalid or inactive.
“Not Available”: Shown when tuning a DAB station with an insufficient signal.
About the NiMH Battery Pack:
The PAL+ uses a sealed pack of 6 high capacity Nickel Metal Hydride (NiMH) cells. Unlike
Nickel Cadmium (NiCd) batteries, NiMH batteries have no memory effect, provide a longer
operating time, and are not composed of toxic metals. The battery icon on the LCD serves
both as a power and charging indicator.
CHARGING: To charge the battery, plug the PAL+ in and place it in Standby. From full
discharge, the battery will be completely charged within approximately 3.5 hours. Because
the battery is new, it may take 4-5 full charge/discharge cycles until you experience average playback performance times. During charging, the battery icon on the LCD will flash.
The battery icon will stop flashing and all 3 bars will be shown on the LCD once the battery
is fully charged. The battery does not charge while the PAL+ is plugged in and turned on,
but the battery icon will still show the status of the battery. In short, with the PAL+ plugged in,
place it in standby whenever you want to charge the battery.
LOW BATTERY: When running solely on the battery, as the battery becomes discharged, the
battery icon will drop from 3 bars, to 2 bars, to 1 bar, and finally show an empty battery. The
audio will begin to sound distorted when the battery starts to reach a low level. This is
normal and is an audible warning the battery should be charged soon. Because the PAL+
NiMH battery has no memory, it is not necessary to wait until the battery is exhausted before
recharging, although recharging from a discharged battery will not harm the battery.
The battery icon is an approximation of power/charging status. It may also take several
seconds for the icon status to stabilize. If the battery is removed and the PAL+ operates
solely from the external adapter, the icon on the LCD will show an empty battery.
BATTERY PLAYBACK TIME: There are many variables such as volume level and program
material that determine the amount of playback time you will get from a fully charged battery.
For instance, playing the PAL+ at a low volume level will usually yield a longer playback
time than at a high volume. As you use your PAL+ you will develop a good idea of what to
expect under various conditions.
There is no harm operating your PAL+ continuously from the external adapter.
REPLACING THE BATTERY: Should you ever need to replace the battery, lift the antenna
up and use a philips-head screwdriver to remove the two screws holding the battery cover
in place. Lift the battery cover off and take note of how the lead is connected to the battery
pack prior to disconnecting. Replace the pack making sure to re-connect the leads correctly.
Replace the battery cover by inserting the bottom lip first, then screw the cover back on.
CAUTION: To reduce the risk of fire or personal injury, use an exact-replacement
battery pack available through Tivoli Audio or our authorized dealers and dispose of
the spent battery pack according to your country’s regulations. The battery pack must
not be exposed to excessive heat such as sunlight, fire, or the like. Use of a non-Tivoli
Audio battery pack could damage the PAL+.
For information about the remote control’s battery refer to Point 14 of the “Guide to Features
(Remote Control)”.
16 – ENGLISH
Page 17

Digital Radio/FM Reception:
When moving the PAL+ to another location where there may be different DAB stations from
the previous location, it is recommended to run an “Update List” to initiate a new scan to
refresh the DAB station list.
FM: In strong signal locations, reducing the antenna’s length may provide better reception.
RDS (FM band only):
The Radio Data System (RDS) transmits text data along with the audio broadcast. Not
all FM stations utilize this service, thus text may not be present with some stations. For
stations broadcasting RDS, the text still might not appear, or might appear scrambled if
the signal is too weak. This is not a fault of the PAL+. In such cases, experiment with the
position of the FM antenna. Note RDS content is determined by each individual FM station.
Handling the PAL+:
• The PAL+ is weather resistant, but it is not weather proof. It should not be
immersed in water or held under running water. It also should not be exposed
to extreme temperatures.
• The PAL+ is designed to be portable, but it is not indestructible. Do not drop it,
throw it, or subject it to strong impacts.
• Always grip the PAL+ using the side indentations to reduce the chance of it
slipping out of your hand.
Cleaning:
Never use any harsh cleansers or solvents on your radio. Normal everyday wear and tear or
damage resulting from cleaning or chemicals is not covered under the factory warranty. To
clean the PAL+ use a soft cloth and do not rub hard.
17 – ENGLISH
Page 18

Limited Warranty:
Tivoli Audio manufactures its products to very high standards and we are confident our
products will perform well. Accordingly, we provide a limited warranty on this product
against manufacturing defects in material and workmanship to the original owner. This
warranty is non-transferable.
Products purchased in the European Union and Norway have a minimum warranty term
of two years. For countries where minimum warranty terms are determined by statute, the
warranty term is the statutory period required. In all other locations, the warranty term is
one year.
This Limited Warranty covers the functionality of the product for its normal, intended use
as specified in this Owner’s Manual. It does not cover a malfunction or damage that has
resulted from improper or unreasonable use or installation, using the charger to charge
alkaline batteries, faulty ancillary equipment, modifications, unauthorized repair, shipping
damage or loss, abuse, accidents, use on improper voltage/current, power surges, lightning or other acts of God, excess moisture, normal wear and tear, commercial use, or purchase from unauthorized dealers. Proof of purchase as evidence the unit was purchased
from an authorized dealer may be required for warranty service. Please contact the dealer
of purchase or local distributor for warranty service or repair.
Please refrain from opening this product or taking it apart as doing so will void this Limited
Warranty. There are no user serviceable parts inside. Tivoli Audio will not pay for costs incurred due to correction of reception problems, elimination of externally generated static/
noise, loss of time, inconvenience, loss of use of product, or damage caused by improper
use of this product.
In the event the product is returned during the warranty term and is eligible for service under this Limited Warranty, we will repair or replace any defective parts within a reasonable
period of time and free of charge.
THIS LIMITED WARRANTY GIVES YOU SPECIFIC LEGAL RIGHTS SUBJECT TO SPECIFIED CONDITIONS. YOU MAY ALSO HAVE OTHER LEGAL RIGHTS WHICH APPLY TO
THE PRODUCT YOU HAVE ACQUIRED. THESE LEGAL RIGHTS VARY FROM COUNTRY
TO COUNTRY. SOME PLACES DO NOT ALLOW THE EXCLUSION, RESTRICTION, OR
MODIFICATION OF CERTAIN IMPLIED RIGHTS OR THEIR EFFECT. IN THOSE SITUATIONS THIS LIMITED WARRANTY WILL ONLY APPLY TO THE EXTENT THAT THE APPLICABLE LAW ALLOWS.
The laws of your country may provide you with legal claims against the seller or manufacturer
of this product. This Limited Warranty does not affect those rights.
The provisions of the Limited Warranty are in lieu of any other warranties or conditions, except those provided by law. This Limited Warranty does not affect any legal rights provided
to you by law and does not preclude any remedy you may have under law.
In countries where liability limits are not precluded by statute, the maximum liability of Tivoli Audio
shall not exceed the purchase price paid by you for the product. In countries where limitations
of liability are precluded by law, Tivoli Audio shall be liable for no more than the direct damages
for bodily injury, and/or real or personal property arising from the negligence of Tivoli Audio.
Where not prohibited by law, Tivoli Audio shall not be liable for special, incidental, consequential, or indirect damages. Some places do not allow limitations on the exclusion or
limitation of relief, special, incidental, consequential or indirect damages, or the limitation of
liability to specified amounts, so the above limitations or exclusions may not apply to you.
18 – ENGLISH
Page 19

This Limited Warranty is void if the label bearing the serial number has been removed or defaced.
If you purchased an extended service contract from your dealer and service is required
after the term of this Limited Warranty has expired, please contact your extended service
contract provider to obtain service.
For your convenience, you may register your product for warranty service online at our
website, www.tivoliaudio.com. There is no legal obligation for you to provide personal information. However, such information allows us to maintain a record of the Tivoli Audio
products acquired by you and better understand the purchasers of our products. The information collected will be used for marketing purposes by Tivoli Audio and, where permitted,
to contact you in relation to the products you have acquired or other products which might
be of interest to you from Tivoli Audio or other companies. The information that you provide
may be processed in another country.
For service, please contact your dealer or local distributor.
Specifications:
Model: PAL+
Type: Portable DAB/DAB+/DMB/FM radio
Driver: 2.5" full range, video shielded
Receiveing Bands: FM: 87.5-108.0MHz (receiving range may vary by region)
DAB (Band III)/DAB+/DMB: 174-240MHz
Power: 12VDC nominal – 15VDC maximum, 1000mA
Battery Pack: NiMH 7.2V 2200mA
Battery Current: 1000mA
Power Supply: PALP-PS-CE : 12VDC 1A 230V 50Hz
Dimensions: 15.55cm H x 9.35cm W x 9.25cm D
(6.12" H x 3.68" W x 3.64" D)
Weight: 0.84 Kg
All specifications subject to change without notice.
Tivoli Audio reserves the right to make product changes without notice.
Tivoli Audio, the Tivoli Audio logo, PAL+, and Portable Audio Laboratory are trademarks of Tivoli Audio, LLC.
19 – ENGLISH
Page 20
Vigtige Sikkerhedsinstruktioner:
1. Læs disse instruktioner.
2. Gem disse instruktioner.
3. Tag alle advarsler alvorligt.
4. Følg alle instruktioner.
5.
ADVARSEL – For at reducere risikoen for brand eller elektrisk stød må dette apparat ikke
udsættes for regn eller fugt, og det bør derfor ikke benyttes i nærheden af et badekar,
i en våd kælder, i nærheden af en swimming pool og lignende.
6. Må kun rengøres med en tør klud.
7. Ventilationsåbningerne på apparatet må ikke blokeres. Tilsluttes i overensstemmelse
med producentens instruktioner.
8.
Må ikke installeres i nærheden af varmekilder såsom radiatorer, ovne/komfurer eller
andre varmeproducerende apparater (inkl. forstærkere).
9. Omgå ikke sikkerheden ved det polariserede stik. Et polariseret stik har to ben, hvoraf
det ene er bredere end det andet. En stikprop med jord har to ben og et tredje tjener
som jordstik. Det brede ben eller den tredje gren er der af hensyn til Deres sikkerhed.
Hvis stikket ikke passer til stikkontakten, kan De tilkalde en elektriker til at udskifte det
forældede stik.
10.
Træd ikke på strømledningen og pas på, at den ikke bliver klemt - især ved stik, stikdåser
og hvor ledningen tilsluttes apparatet.
11. Benyt kun tilbehør, der er angivet af producenten.
12.
Brug kun vogn, stativ, konsol eller bord, anvist af fabrikanten eller
som sælges sammen med apparatet. Når der benyttes vogn, skal der
udvises forsigtighed ved kombinationen vogn/apparat for at undgå
skade ved at snuble.
20 –DANSK
Page 21

13.
For yderligere at beskytte dette produkt i tordenvejr, eller når det efterlades ubrugt i
længere tid, tages evt. ac-adapter fra. Dette vil forhindre beskadigelse af produktet if.
m. lynnedslag samt evt. overspænding fra stærkstrømsledninger.
14.
Dette apparat må kun benyttes med den strømkilde, der er angivet på bagpanelet.
Hvis der anvendes ekstern strømforsyning og denne bliver væk eller beskadiget, skal
der benyttes en lignende erstatning. Hvis apparatet anvender batterier, henvises der til
brugervejledningen.
15.
Træk stikket ud og tag kontakt til autoriseret forhandler under følgende omstændigheder:
a. Hvis ledning eller stik er beskadiget.
b. Hvis der er spildt væske eller tabt ting på apparatet.
c. Hvis apparatet ikke fungerer normalt i henhold til brugervejledningen.
d. Hvis apparatet er blevet tabt eller beskadiget på nogen måde.
e. Hvis apparatet udviser karakteristisk ændring i ydeevne.
16.
Apparatet må ikke udsættes for dryp eller stænk og ting der er fyldt med væske, så som
en vase, må ikke stilles på apparatet.
17. Hvis LCD displayet revner eller bliver beskadiget, må væsken ikke berøres.
18. Hold apparatet i sikker afstand fra åben ild som f.eks. et tændt stearinlys.
19. Den anbefalede temperatur for brug er mellem 5 ºC og 40 ºC (41ºF - 104ºF).
20. Radioen bør være placeret således, at AC indgangen på bagsiden samt strømkablet
er let tilgængelige.
21.
Stikket på strømkablet fungerer som en fraslutningsanordning og skal altid være let
tilgængelig.
22. ADVARSEL – Forsyningsnettet er ikke frasluttet, når det står på ”off”, men der er ingen
strøm i kredsløbene.
Dette apparat kan genbruges. Produkter med dette symbol må IKKE
smides væk med normalt husholdningsaffald. Ved udgangen af produktets levetid, bør det medbringes til en genbrugsplads, der er udpeget til
genbrug af elektrisk og elektronisk udstyr. Find ud af mere om bortskaffelse gennem din lokale kommune.
Direktivet for The European Waste Electrical and Electronic Equipment
(WEEE) var implementeret for drastisk at reducere mængden af affald
til deponering, og derved reducere de miljømæssige konsekvenser for
kloden og for menneskers sundhed. Udvis venligst ansvarlighed ved at
genanvende brugte produkter. Hvis dette produkt stadigvæk kan bruges, kan det overvejes at sælge eller forære det væk
21 – DANSK
Page 22

PAL+ Instruktioner:
Tillykke med din nye Tivoli Audio PAL+. Vi tror på, at PAL+ er en af de fineste DAB / DAB+
/ DMB / FM transportable radioer på markedet i dag.
Vi ved, at du sikkert er ivrig efter at begynde at lytte til din nye radio, men tag dig tid til at
læse denne sikkerheds- og brugervejledning for at få det fulde udbytte af dit nye produkt.
Hvis du har spørgsmål, kan du kontakte din lokale forhandler eller distributør.
Vi anbefaler, at den originale emballage gemmes, således at produktet kan pakkes korrekt
ned ved forsendelse til og fra service-værksted, da garantien ikke dækker skader påført
produktet under forsendelse, hvor årsagen skyldes dårlig eller forkert indpakning.
Tak fordi du valgte Tivoli Audio og god fornøjelse med PAL+!
Om Tivoli Audio:
Tivoli Audio blev grundlagt af Tom DeVesto med det formål at designe elegante audio produkter,
hvor kvalitet og brugervenlighed er kendetegnet. Som grundlægger og teknologi udvikler har
Tom DeVesto gennem en årrække haft succes med virksomheder som Cambridge Soundworks,
og senest med Advent og Kloss Video.
I æsken med PAL+ skal følgende være inkluderet:
• 1 ekstern strømforsyning
• 1 3,5 mm kabel
• 1 NiMH batteri (sidder i produktet)
• 1 fjernbetjening (batteri inkl.)
• 1 holder til fjernbetjening
Kontakt venligst din forhandler, hvis nogen af disse genstande mangler.
Opstart:
1. Træk antennen op.
2. Tilslut den medfølgende strømforsyning til PAL+ og sæt den i en stikkontakt.
3. Tryk på tænd-knappen på fjernbetjeningen eller tryk kortvarigt på hjulet på toppen af
PAL+. Vent til AutoScan er slut.
4. Tryk på op eller ned knapperne på fjernbetjeningen for at se tilgængelige stationer og
fremhæv den station, du ønsker at lytte til.
5. Tryk på Menu / Select-knappen på fjernbetjeningen for at indstille den markerede station.
6. Tryk på lydstyrke op eller lydstyrke ned knapperne på fjernbetjeningen for at justere
lydstyrken til dine ønsker, eller rotere hjulet øverst på PAL+.
22 –DANSK
Page 23
Holder til fjernbetjening:
En separat holder til fjernbetjeningen er inkluderet.
Den indeholder selvklæbende tape på bagsiden. Træk
tapens strip af på bagsiden og placer holderen på den
ene eller anden side af din PAL+. Sæt fjernbetjeningen
i, bunden først.
1 2 3 4 5
Guide til funktioner
(top- og frontpanel):
1. MULTI-FUNKTION KONTROLHJUL
(TOP):
Kontrolhjulet gør det muligt for dig at
benytte dig af mange funktioner:
Power: Tryk let på hjulet når PAL+ er slukket
for at tænde. Når PAL+ er tændt i en hvilken
som helst kilde tryk hjulet ned og hold det nede
indtil enheden er slukket. (Bemærk: Fjernbetjeningens Power knap tænder ikke PAL+ når
enheden er slukket og ikke er forbundet til en
ekstern strømkilde.
Volumen: Når PAL+ er tændt, roteres med
uret for at øge lydstyrken og mod uret for at sænke lydstyrken.
Tuning: Med digital radio (DAB / DAB+ / DMB) eller FM skal du trykke en gang og rotere
med uret for manuelt at tune op og mod uret for manuelt at tune ned. Tryk igen for at
vælge en station og vende tilbage til lydstyrkeregulering. Bogstavet “T” vil blive vist på
displayet for at angive manuel indstilling. Der er ingen tuning funktion med AUX. Efter ca.
7 sekunder uden aktivitet, vil kontrolhjulet som standard skifte tilbage til regulering af
volumen.
Kilde: Tryk to gange for at få adgang til kilde-menuen, hvor du kan ændre kilder ved at
dreje hjulet i begge retninger. Efter ca. 7 sekunder uden aktivitet, vil kontrolhjulet som
standard skifte tilbage til regulering af volumen.
Snooze: Tryk på hjulet når alarmen ringer for at aktivere Snooze. Et ikon vises på
radioen når Snooze er sat til. Snooze tiden er fastsat til 7 minutter. Tryk igen i Snooze
perioden for at deaktivere Snooze. Snooze fungere når PAL+ er tilsluttet en ekstern
strømkilde. Når PAL+ virker ved batteri har Snooze ingen funktion.
1
23 – DANSK
Page 24
2. DISPLAYET:
: Volumen FM: FM band
: Sleep timer DAB: DAB/DAB+/DMB
: Snooze timer AUX: Aux
: Alarms 1 og 2 : Batteristatus
: Klokkeslæt : Mono/stereo indikator til hovedtelefon udgang
: Niveau for modtagelse T: Manuel indstilling
3. PRESETS: Tryk og hold for at gemme den aktuelle station. Tryk kortvarigt for at genkalde
stationen som er lagret på den aktuelle preset. Ved FM vil preset-nummeret stå i displayet.
Der er 5 preset-muligheder ved hver frekvensbånd.
Guide til funktioner (bagpanel):
4
3
2
5
24 –DANSK
1
Page 25

1. 12VDC/1000mA: Benyt denne indgang til at betjene PAL+ med den medfølgende strøm-
forsyning og til at oplade batteriet når enheden er på standby. Benyt kun den medfølgende
strømforsyning. Hvis strømforsyningen bliver beskadiget eller bortkommer, benyt udelukkende en eksakt erstatning. Den benyttede DC-adapter skal være kompatibel med EN/IEC
60065 krav og nomineret 12VDC 1A og 230V 50HZ (afhængigt af regionens krav). Brug af
DC-adapter, der ikke er rekommanderet af producenten/ der ikke lever op til kravene kan
være en sikkerhedsrisiko. Stikket er 5,5 mm/ 2,1 mm center positive. Benyt gummistikket
når indgangen ikke er i brug. Det er normalt at strømforsyningen bliver varm ved brug.
2. ANTENNE: Justér denne teleskopantenne for bedst mulig modtagelse. Ved stærkt FM
signal kan en reduceret antennelængde give et bedre signal. Når enheden ikke benyttes
bør antennen være skubbet ned for at beskytte den. For yderligere oplysninger se
afsnittet “Modtagelse”.
3. HØRETELEFONER UDGANG: Tilslut høretelefoner (medfølger ikke) til denne variable
udgang til mere diskret lytning. Høretelefonerne vil mute den primære højttaler. Volumen
på høretelefonerne justeres via kontrolhjulet eller fjernbetjeningen. Tryk på MONO på
fjernbetjeningen for at skifte lyden i høretelefonerne fra mono til stereo. Et hovedtelefon
ikon ( ) vil fremkomme på displayet og indikerer stereo lyd. Når der lyttes til en FM
kanal med støj kan det være en fordel at lytte i mono for at opnå et bedre signal. Denne
stereo udgang passer til et 3,5 mm mini stereo jack stik. Undgå brug af hovedtelefoner
ved høj lydstyrke for at undgå eventuelle høreskader. Benyt ikke hovedtelefoner ved
brug af køretøjer. Benyt gummistikket når indgangen ikke er i brug.
4. AUX IN: Hvis du vil høre lyd fra en anden audio-enhed, såsom iPod eller MP3 afspiller,
skal du tilslutte enhedens lydudgang til denne stereo indgang og ændre kilden til AUX
ved hjælp af fjernbetjeningen eller kontrol hjulet på toppen af enheden, Denne stereo
indgang passer til et 3,5 mm mini stereo jack stik. Bemærk at det kan være nødvendigt
at justere lydstyrken på audio-enheden, da den kan afvige i forhold til lydstyrken på
PAL+ ved normal radio lytning. Benyt gummistikket når indgangen ikke er i brug.
5. BATTERIRUM: Batteripakken NiMH til PAL+ er lokaliseret her. En mini-B USB interface
er placeret bag pakningen. Dette må kun betjenes af autoriseret servicepersonale! Ved
forkert brug af dette, kan PAL+ blive beskadiget og garantien bortfalde.
25 – DANSK
Page 26
Guide til funktioner (fjernbetjening):
(En separat holder til fjernbetjeningen er inkluderet. Den indeholder selvklæbende
tape på bagsiden. Træk tapens strip af på bagsiden og placer holderen på den ene
eller anden side af din PAL+. Sæt fjernbetjeningen i, bunden først.)
4
2
3
5
1
6
7
12
BACK
9
11
8
MONO
13
10
14
1. POWER: Tryk kort for at tænde eller slukke din PAL+. Radioen kan kun tændes via fjern-
betjening hvis strømforsyning er tilsluttet.
2.
MUTE/SNOOZE: Tryk for at slå lyden fra og tryk igen for at genoptage foregående
lydstyrke. Tryk for at snooze i 7 minutter efter alarmen lyder. Et ikon vil blive vist på
skærmen, når snooze er aktiv. Snooze-tiden er ikke justerbar.
3. ALARM: Brug pq og Select-knapperne for at justere og indstille alarm. Hvis der ønskes
en komplet trin-for-trin guide henvises til afsnittet “Sådan indstilles alarmen”.
4. SLEEP: Tryk gentagne gange for at få vist mængden af tid radioen vil spille, før den
slukker automatisk, og tryk på Select-knappen for at vælge det pågældende tidspunkt.
Når Sleep timer er aktiv, kan du kontrollere den resterende tid ved at trykke på Sleep
på fjernbetjeningen. En lille urskive [ ] vil blive vist på skærmen, når Sleep timeren
er aktiv. For at annullere sleep, skal du trykke på Sleep-knappen, indtil displayet viser “Off”.
5. SOURCE: Tryk gentagne gange for at ændre lydkilde.
6. INFO: Tryk gentagne gange for at gennemgå de tilgængelige oplysninger. Denne funktion
fungerer ikke i AUX.
7. PRESETS 1-5: Tryk og hold for at gemme den indstillede station. Tryk kort for at indstille
til den ønskede station. I FM-tilstand vil det forudindstillede nummer være angivet på
displayet. Der er mulighed for at gemme 5 stationer på hvert bånd.
26 –DANSK
Page 27

8. VOLUME +/–: Tryk på Volume+ knappen for at hæve lydstyrken eller Volume- knappen
for at sænke lydstyrken. Hvis lyden forvrænges bør lydstyrken sænkes for at undgå
at beskadige højttaleren. Hvis lydstyrken justeres, mens PAL+ er på Mute, vil dette
annullere Mute.
9.
pq/TUNE +/-: Tryk her for at navigere i menupunkterne. Brug de samme knapper
til manuel indstilling op eller ned, når radioen er i FM-tilstand. Et “T” vil blive vist på
displayet for at angive manuel indstilling. Tryk og hold for at scanne hurtigt igennem
frekvenserne. Det vil tage et sekund, før frekvenserne begynder at ændre sig. Tryk
i 1,5 sekunder og slip, hvis radioen skal scanne og automatisk finde næste kanal.
Displayet vil vise “Scanning ...” Se også “Scan-indstilling” under afsnittet “Menu og
Særlige funktioner”.
10. tu: På højre pileknap duplikeres Select-knappen. Den venstre pileknap flytter dig til
den forrige side i visse menupunkter.
11.
MENU/SELECT: Tryk og hold for at åbne hovedmenuen, og tryk kort for at vælge punkter
i menuen. For mere, se afsnittet mærket “Menu”.
12. BACK: Tryk for at gå tilbage til den forrige menu side.
13.
MONO: Tryk for at ændre Stereo / Mono indstilling. Displayet viser “M” for Mono og “ST”
for Stereo. “Mono” eller “Stereo” vil også være et af de områder, der vises når du trykker
på knappen Info på fjernbetjeningen i FM-tilstand. For mere, se afsnittet “Modtagelse”.
14. BATTERIHOLDEREN: Fjern strippen som stikker ud fra batteriholderen, før du bruger
fjernbetjeningen. Skulle du nogensinde have brug for at udskifte fjernbetjeningens batteri,
brug da litium knapcelle batteri model CR2025.
FORSIGTIG: Fare for eksplosion, hvis batteriet udskiftes forkert. Udskift kun
med samme eller tilsvarende type. Bortskaf brugte batterier i henhold til dit lands
lovgivning
.
Menu og særlige funktioner:
Tryk og hold Menu/Select-knappen på fjernbetjeningen for at åbne hovedmenuen. Brug
pq knapperne og knappen Select for at ændre punkterne i menuen. Brug knappen
Tilbage for at navigere tilbage, eller vent i 15 sekunder, indtil timeout udløber.
En stjerne (*) indikerer, at det viste menupunkt er indstillet.
1. SCAN SETTING (KUN I FM MODE): Tryk på Select knappen og brug pq og Select
til at vælge imellem “Kun stærke stationer” eller “Alle stationer” når der laves en autoscanning. (se #9 (pq/Tune +/-) i afsnittet “Fjernbetjening”. Vælges “Alle stationer” øges
følsomheden af scanningen, og dette kan resultere i, at autoscan stopper på en kanal
med støj. Denne funktion fungerer ikke i AUX.
2.
TIVOLI EQ: Tryk på Select knappen og brug pq og Select til at regulere bas og diskant.
De justerede værdier vil blive vist i “Bruger EQ”. Tryk på Select knappen for at slå Loudness til eller fra. Loudness anbefales når du lytter ved lav lydstyrke, da den optimerer de
høje og lave frekvenser, hvilket resulterer i en mere naturlig lyd. Brug pq og Select til at
aktivere en hvilken som helst af de foruddefinerede EQ indstillinger. Valg af en foruddefineret EQ vil tilsidesætte enhver justering af bas og diskant-indstillinger, men Loudness
vil ikke blive påvirket. Ved at vælge “Flat” EQ gendannes fabriksindstillingerne, hvilket
betyder, at bas og diskant vil blive sat til nul. “Flat” EQ slår også automatisk Loudness
27 – DANSK
Page 28

fra. Hvis bas og diskant var blevet justeret, vil disse indstillinger stadigvæk vises i “Bruger
EQ”. Ved blot at vælge “Bruger EQ” genaktiveres bas og diskant-indstillingerne. I EQ
menuen, viser tallene i højre side bas og diskant.
3. BALANCE (FINDES I MENUEN TIVOLI EQ): Brug pq knapperne til at justere balancen
efter dit behov. Tryk derefter på knappen Select for at gemme eventuelle ændringer.
Denne funktion virker kun på hovedtelefoner.
4. TIME (FINDES I MENUEN INDSTILLINGER):
Indstil 12/24 timer:
Tryk på knappen Select og brug pq og Select for at vælge 12 eller 24 timers ur.
Indstil tid/dato:
Tryk på knappen Select og brug pq og Select for at indstille timer og minutter, umiddelbart efterfulgt af indstilling af dato. Du bør også indstille Auto Opdatering til “Ingen
opdatering”. For mere information om dette se “Auto Opdatering” nedenfor.
Auto Opdatering:
Tryk på knappen Select og brug pq og Select til at vælge imellem “Opdatering fra
alle”, “Opdatering fra DAB” (også DMB), eller “Opdatering fra FM” (RDS). For at disse
opdateringer skal virke er det nødvendigt med en ensartet modtagelse af DAB eller
FM, og derudover forudsættes det, at der er tid/dato til rådighed. Det kan tage op til et
minut eller mere for uret at opdatere. Tivoli Audio er ikke ansvarlig for ukorrekt tid / dato
i forbindelse med automatisk opdatering.
For manuelt at indstille uret vælges “Ingen opdatering”, og derefter vælges “Indstil Tid/
Dato” i menuen “Tid” ved hjælp af pq eller tu knapperne. Select bruges til indstilling
af time, og dette gentages til indstilling af minutter, hvorefter der trykkes på Select for at
gemme indstillingen. I denne menu er der yderligere mulighed for at indstille dato-format
og 12/24 timer ur mode.
BEMÆRK VENLIGST: Under et strømsvigt vil indstilling af både alarm og ur opretholdes
af en integreret backup-hukommelse. Når “Auto Opdatering” er indstillet til “Opdatering
fra alle”, kan radioen finde klokkeslæt fra den station, der sidst blev lyttet til, og det sker
selvom PAL+ er i standby.
Indstilling af dato format:
Tryk på knappen Select og brug pq og Select til at vælge det ønskede dato format.
5. BACKLIGHT (FINDES I MENUEN INDSTILLINGER):
Timeout:
Baggrundsbelysningen kan være konstant, uanset om du trykker på knapperne på din
PAL+ eller ej (det er den måde, hvorpå PAL+ er konfigureret fra fabrikken), eller du kan
tilpasse baggrundslyset, så det automatisk skifter til et dæmpet niveau efter en bestemt
periode, hvor der ikke er blevet trykket på nogen af knapperne. Når der trykkes på en
knap på apparatet eller fjernbetjeningen, bliver det normale niveau på baggrundslyset
genoprettet.
Tryk på knappen Select og brug pq og Select for at indstille hvor lang tid, der skal gå,
før baggrundslyset dæmpes. Der kan vælges imellem 10, 20, 30, 45, 60, 90, 120 eller
180 sekunder, eller timeout funktionen kan slås fra.
28 –DANSK
Page 29

On Level:
Tryk på knappen Select og brug pq og Select til at vælge intensiteten af baggrundslyset.
Dæmpning:
Hvis du har valgt et tidspunkt for dæmpning af baggrundslyset under “Timeout” trykkes
herefter på Vælg og brug pq og Select til at vælge intensiteten af baggrundsbelysningen,
når det ændres til dæmpet styrke. Man kan også indstille baggrundsbelysningen til Off,
hvis lyset generer, når man sover.
6. SPROG (FINDES I MENUEN INDSTILLINGER): Tryk på knappen Select og brug pq
og Select til at vælge indstilling af sprog.
7. RESET TIL FABRIKSINDSTILLINGER (FINDES I MENUEN INDSTILLINGER): Tryk på
knappen Select og brug pq eller tu og Select for at bekræfte (Yes) eller afvise (No)
reset til fabriksindstillinger. Et reset vil genoprette fabriksindstillingerne og annullere alle
dine personlige indstillinger, som f.eks. valgte kanaler og sprog.
8. ID (FINDES I MENUEN INDSTILLINGER): Tryk på Select for at se produktets ID. Hvis
du kontakter din forhandler eller serviceværksted med et spørgsmål, kan du blive bedt
om at opgive dette nummer.
9. SLEEP (FINDES I MENUEN INDSTILLINGER): Tryk på knappen Select og brug pq og
Select for at indstille Sleep timeren til en af de mulige tider. Der er også en Sleep-knap
på fjernbetjeningen. En lille ur vil blive vist på skærmen, når Sleep timeren er aktiv.
BEMÆRK: Når apparatet kører på batteri alene, (ekstern strømforsyning ikke tilsluttet),
SLEEP anendes og alarmen er indstillet, vil alarmen ikke lyde, når SLEEP stopper. For
at bruge både Sleep og alarmfunktioner, skal du være sikker på den eksterne strømforsyning er tilsluttet.
29 – DANSK
Page 30

Sådan indstilles alarmen:
Du kan få adgang til alarm enten gennem hovedmenuen eller ved at trykke på alarmknappen på fjernbetjeningen.
1. Alarm 1 er vist først. Tryk gentagne gange på alarm-knappen eller brug pq og Select til
at vælge imellem Alarm 1 and Alarm 2. Bemærk: På ethvert tidspunkt kan du navigere
gennem alarm menuen ved hjælp af Tilbage eller t , og Select eller u.
2. Tryk på pq og Select for at slå alarmen til eller fra. Hvis dato og klokkeslæt ikke allerede
er indstillet, vil PAL+ bede dig om at indstille Tidspunkt / Dato. Ellers indstilles alarmen
som beskrevet i næste trin.
3. Tryk på pq for at justere timetallet og tryk på Select for at gemme og gentage processen
for minuttallet, efterfulgt af AM/PM (hvis tiden er sat til 12 timers format), tryk derefter
på Select.
4. Tryk på pq for at vælge, hvor længe alarmen skal lyde, og tryk derefter på Select.
5.
Tryk på pq for at vælge den lydkilde, du vil vågne op til, og tryk herefter på Select. Hvis
du indstiller DAB (omfatter også DAB+/DMB) eller FM, skal du bruge pq for at vælge
den ønskede faste station (hvis presets er lagret) eller den station du sidst lyttede til,
og tryk derefter på Select.
6. Tryk på pq for at indstille hvor ofte alarmen skal vække dig, og tryk derefter på Select.
Hvis “Once” (én gang) er valgt, skal du angive den dato, hvor du ønsker alarmen.
7. Sidst men ikke mindst tryk på pq for at indstille lydstyrken for alarmen, og tryk derefter
på Select.
8. Gentag denne proces for Alarm 2, hvis det ønskes.
Hvis du laver en fejl på noget tidspunkt i processen, kan du altid trykke på Tilbage-knappen
på fjernbetjeningen og begynde igen.
Bemærk: Dine indstillinger gemmes ikke med mindre du har fuldført hele processen,
og displayet viser “Alarm Saved” (Alarm gemt).
vigtigt!:
• Alarmen kan ikke fungere, hvis PAL+ er slukket og ikke er tilsluttet med
ekstern strømkilde.
• Alarmen lyder med en gradvis øget volumen. Når alarmen lyder, kan du aktivere
Snooze funktionen eller slå alarmen fra.
• Strømsvigt: Skulle strømmen forsvinde, eller skulle din PAL+ blive afbrudt, vil den
indstillede alarm forblive gemt, men alarm kan ikke aktiveres, hvis der ikke er strøm.
30 –DANSK
Page 31

alarm muligheder:
Alarm Quick Indstilling: Når PAL+ er i standby, trykkes gentagne gange kort på alarm
knappen for at slå alarmen til eller fra.
Alarm fra: Du kan stoppe alarmen ved at trykke på Alarm eller Power-knappen på fjernbetjeningen, eller tryk og hold kontrolhjulet på toppen af enheden.
Snooze: For at aktivere Snooze, skal du trykke på Snooze-knappen på fjernbetjeningen
eller trykke kortvarigt på kontrolhjulet på toppen af enheden. Det er ikke muligt at indstille
Snooze tiden.
Bemærk: Når du er i Snooze tilstand, kan du se den resterende Snooze tid ved at trykke
på Snooze-knappen på fjernbetjeningen. Hvis du trykker på Alarm eller Power-knappen
på fjernbetjeningen, eller hvis du trykker på kontrolhjulet på toppen af enheden, vil
Snooze nedtællingen blive annulleret.
Digital radio (DAB/DAB+/DMB):
STATIONSOVERSIGT: Tryk på pq på fjernbetjeningen eller tryk på kontrolhjulet på toppen af
enheden for at se alle de tilgængelige DAB/DAB+/DMB stationer. Tryk på pq eller kontrolhjulet
på toppen af enheden for at se hver enkelt specifikke station. Stationslisten vil forsvinde
efter enten 7 eller 15 sekunder, alt efter om den var fremkommet via kontrolhjulet på toppen
af enheden eller via fjernbetjeningen.
Tryk på og hold Menu-knappen på fjernbetjeningen for at åbne hovedmenuen. Tryk på
pq og Select for at skifte imellem punkterne i menuen. Brug knappen Tilbage for at
navigere tilbage, eller vent i 15 sekunder indtil menuens timeout.
En stjerne (*) indikerer, at det viste menupunkt er indstillet.
Bemærk: Hvis Stationsoversigten er tom, når du slår over på DAB, vil PAL+ starte en
auto scanning.
1. AUTO SCAN: Søger hele frekvensområdet. Hvis du flytter din PAL+ til en anden lokation,
bør du udføre en ny scanning, så radioen kan finde stationer på den nye placering.
Hvis du vil annullere den automatiske scanning, skal du trykke på knappen Tilbage på
fjernbetjeningen.
2. TIVOLI EQ: Se “Menu og særlige funktioner”.
3. MANUAL TUNE: Tryk på pq for manuelt at søge efter DAB/DAB+/DMB frekvenser, og
tryk herefter på Select for at tune ind på den viste frekvens.
4.
DRC: Dynamic Range Control giver dig mulighed for at ændre lydniveauet, så stille
passager gøres kraftigere for at kompensere for evt. støjende omgivelser, eller hvis du
lytter ved lav lydstyrke.
5. ADVANCED MODE: Hvis PAL+ er flyttet til et andet område, kan du risikere at finde
stationer med samme navn. Hvis du aktiverer “Avanceret visning”, “Long labels”, og
“Show Ensemble” under Avanceret tilstand, vil du være i stand til at skelne mellem
udvidet station navne.
Ved DAB/DAB+ foreslår vi at deaktivere alle Avanceret indstillinger. For DMB foreslår
vi at slå dem til.
31 – DANSK
Page 32

6. UPDATE LIST: Flyttes PAL+ til et andet område, kan nogle stationer blive utilgængelige.
Vælg “Update List” for at fjerne utilgængelige stationer. Brug pq eller tu knapperne og
“Select” knappen for at bekræfte (Yes) eller afvise (No) at fjerne utilgængelige stationer.
BEMÆRK: Når du flytter PAL+ til et andet sted, hvor der kan være forskellige DABstationer fra den tidligere placering, anbefales det at køre en “Update List”, som starter
en ny scanning og dermed opdaterer DAB-stationslisten.
dab beskeder på display:
Sekundære tjenester: Sekundære stationer vil fremgå i form af et >> symbol ved siden af
stationens navn. Sekundære tjenester er muligvis ikke tilgængelig i dit område.
“?”: Hvis dette symbol vises ved siden af navnet på stationen, betyder det, at stationen er
ugyldig eller inaktiv.
“Not Available”: Vises når der stilles ind på en DAB-station med et utilstrækkeligt signal.
Batteripakken:
PAL+ bruger en forseglet pakke med 6 højkapacitet Nickel Metal Hydride (NiMH) celler.
I modsætning til nikkel-cadmium (NiCd) batterier, har NiMH-batterier ingen hukommelse.
Det giver en længere driftstid, og er ikke sammensat af giftige metaller. Batteriikonet på
LCD fungerer både som strøm- og opladningsindikator.
OPLADNING: For at oplade batteriet, skal du sætte PAL+ i og placere den i standby. Fra
helt tomt, vil batteriet være fuldt opladet inden for ca. 3,5 timer. Fordi batteriet er nyt, kan det
tage 4-5 fulde opladninger / afladninger, før du oplever en jævn gennemsnitlig afspilningstid.
Under opladning, vil batteriikonet på LCD-displayet blinke. Batteriikonet holder op med at
blinke og alle 3 barer vil blive vist på LCD-displayet, når batteriet er fuldt opladet. Batteriet
oplades ikke, mens PAL+ er tilsluttet og tændt, men batterietikonet vil stadig vise status
for batteriet. Kort sagt, når PAL+ er tilslutning strømforsyning, skal den stå i stand-by for
at oplade batteriet.
LAVT BATTERI: Når du kører udelukkende på batteri, og batteriet bliver afladet, vil batteriikonet falde fra 3 barer, til 2 barer, til 1 bar, og endelig vise et tomt batteri. Lyden vil begynde
at lyde forvrænget, når batteriet begynder at nå et lavt niveau. Dette er normalt og er et
signal om, at batteriet skal oplades snart. Fordi PAL+ NiMH batteri ingen hukommelse
har, er det ikke nødvendigt at vente, indtil batteriet er opbrugt, før genopladning. Dog vil det
ikke skade batteriet, at oplade et tomt batteri.
Batteriikonet er en tilnærmelse af batteriets status. Det kan tage flere sekunder før en opdatering
vises via ikonet. Hvis batteriet er fjernet, og PAL+ udelukkende kører på den eksterne
strømforsyning, vil ikonet på skærmen vise et tomt batteri.
BATTERIAFSPILNINGSTID: Der er mange variabler som lydstyrke og programmateriale,
der bestemmer hvor lang tid du kan køre på et fuldt opladet batteri. For eksempel vil PAL+
på et lavt lydniveau som regel giver en længere afspilningstid end ved høj lydstyrke. Når
du bruger din PAL+ vil du hurtigt få en god fornemmelse for, hvad du kan forvente under
forskellige forhold.
Det skader ikke din PAL+ kontinuerligt at køre på den eksterne strømforsyning.
UDSKIFTNING AF BATTERI: Skulle du nogensinde være nødt til at udskifte batteriet, løft da
antennen op og brug en Philips-skruetrækker til at fjerne de to skruer, der holder batteridækslet
32 –DANSK
Page 33

på plads. Løft batteridækslet af og noter, hvordan ledningerne er tilsluttet til batteriet før
frakobling. Udskift pakken og sørg for at du skaber kontakt. Sæt batteridækslet på igen ved
at isætte den nederste flap først, og derefter skrue dækslet på igen.
FORSIGTIG: For at mindske risikoen for brand eller personskade, skal du anvende
et korrekt batteri, tilgængeligt via Tivoli Audio eller vores autoriserede forhandlere og
bortskaffe det brugte batteri i henhold til dit lands lovgivning. Batteriet må ikke udsættes
for ekstrem varme som solskin, ild eller lignende. Brug af et ikke-Tivoli Audio batteri
kan beskadige PAL+.
For information om fjernbetjeningens batteri henvises til punkt 14 i “Guide til funktioner
(fjernbetjening)”.
Digital Radio / FM-modtagelse:
Når du flytter PAL+ til et andet sted, hvor der kan være forskellige DAB-stationer fra den
tidligere placering, anbefales det at køre en “Update List”, som starter en ny scanning og
dermed opdaterer DAB-stationslisten.
FM: På steder med et stærkt signal, kan reduktion af antennens længde giver
bedre modtagelse.
RDS (kun ved FM):
Radio Data System (RDS) sender tekst data sammen med lyden. Ikke alle FM-stationer
bruger denne service, og teksten er således ikke tilgængelig ved alle stationer. Hvis det
opleves, at RDS teksten ikke vises, eller teksten ser rystet ud, kan det skyldes, at signalet
er for svagt. I sådanne tilfælde kan man eksperimentere med placeringen af FM-antennen.
Hvis det er muligt at modtage RDS, trykkes gentagne gange på Info-knappen for at se de
tilgængelige oplysninger. Bemærk RDS indholdet bestemmes af den enkelte FM-station.
Håndtering af PAL+:
• PAL+ er modstandsdygtig, men ikke vejrbestandig. PAL+ bør ikke nedsænkes i vand
eller holdes under rindende vand. Den bør heller ikke udsættes for ekstreme temperaturer.
• PAL+ er designet som en transportabel radio, men den er ikke uovervindelig. Du må
ikke tabe den, smide den, eller udsætte den for kraftige stød.
• Tag altid fat om PAL+ ved de fordybninger som er lavet til at reducere risikoen for at
PAL+ glider ud af din hånd.
Rengøring:
Brug aldrig skrappe rengøringsmidler eller opløsningsmidler på din radio. Normal slitage
og skader som følge af rengøring eller kemikalier, er ikke dækket af fabriksgarantien. For at
rengøre PAL+ brug en blød klud og gnid ikke hårdt.
Garanti:
Tivoli Audio producerer produkter af meget høj kvalitet og standard, og vi er sikre på at det
produkt du netop købt, nok skal fungere tilfredsstillende i mange år frem. Derfor tilbyder vi
også 2 års garanti mod enhver fabrikationsfejl.
33 – DANSK
Page 34

Garantien dækker ikke fejl som følge af misbrug af produktet, eller efter hændeligt uheld
som f.eks. tab af produktet på gulvet. Endvidere gælder garantien heller ikke hvis det har
været åbnet eller på anden måde modificeret fra sin originale tilstand. Kun autoriserede
serviceværksteder må lave indgreb i produktet for at garantien bevares.
Såfremt produktet mod forventning er behæftet med en fabrikationsfejl, skal det indleveres
til det sted, hvor det er købt. Vi anbefaler, at emballagen gemmes, således at produktet kan
pakkes korrekt ned ved forsendelse til og fra service-værksted.
Garantien dækker ikke skader påført produktet under forsendelse, hvor årsagen skylden
dårlig eller forkert indpakning.
Tivoli Audio, eller dennes distributører dækker ikke forsendelsesomkostninger ved indsendelse af et produkt til reparation under garanti. Omvendt opkræves heller ikke fragtomkostninger ved returnering af produktet efter endt garanti reparation.
For yderligere informationer om garanti service, henvises til forhandleren hvor produktet er købt.
DENNE GARANTI STILLER DIG ALDRIG RINGERE END DEN TIL ENHVER TID GÆLDENDE
KØBELOV I DET LAND, HVOR PRODUKTET ER KØBT.
Denne garanti er ugyldig, hvis den etiket, der bærer serienummeret, er fjernet eller ødelagt.
Hvis du har købt en udvidet service aftale hos din forhandler, og service er påkrævet efter
denne garanti er udløbet, skal du kontakte din forhandler for at få hjælp og vejledning.
Specifikationer:
Model: PAL+
Type: Portable DAB/DAB+/DMB/FM radio
Driver: 2.5" fuldtone, magnetisk afskærmet
Frekvensbånd: FM: 87.5-108.0MHz (receiving range may vary by region)
DAB (Band III)/DAB+/DMB: 174-240MHz
Strømforsyning: 12VDC nominal – 15VDC maximum, 1000mA
Batteri: NiMH 7.2V 2200mA
Strøm: 1000mA
DC Adaptor: PALP-PS-CE : 12VDC 1A 230V 50Hz
Dimensioner: H 15,55cm x B 9,35cm x D 9,25cm
(6.12" H x 3.68" W x 3.64" D)
Vægt: 0.84 Kg
Der forbeholdes ret til at ændre specifikationer uden forudgående informationer herom.
Tivoli Audio forbeholder sig retten til at udføre produktændringer uden forudgående informationer herom.
Tivoli Audio, Tivoli Audio’s logo, PAL+ er registerede varemærker som tilhører Tivoli Audio, LLC.
34 –DANSK
Page 35

Wichtige Sicherheitshinweise:
1. Lesen Sie diese Anweisungen sorgfältig durch.
2. Bewahren Sie diese Anweisungen auf.
3. Beachten Sie alle Warnhinweise.
4. Befolgen Sie alle Anweisungen.
5.
Halten Sie dieses Gerät von Wasser fern. Verwenden Sie dieses Gerät beispielsweise nicht
in der Nähe einer Badewanne, in einem feuchten Keller, in der Nähe eines Swimmingpools
und dergleichen. ACHTUNG! Setzen Sie das Gerät nicht Regen oder Feuchtigkeit aus.
6. Reinigen Sie das Gerät nur mit einem trockenen Tuch.
7. Stellen Sie sicher, dass die Belüftungsöffnungen nicht versperrt sind. Schließen Sie das
Gerät gemäß den Anweisungen des Herstellers an.
8.
Schließen Sie das Gerät nicht in der Nähe von Wärmequellen wie z. B. Heizkörpern,
Heizauslässen, Öfen oder anderen wärmeerzeugenden Geräten (inklusive Verstärkern) an.
9.
Setzen Sie nicht die Sicherheitsfunktion des verpolungssicheren oder geerdeten Steckers außer Kraft. Ein verpolungssicherer Stecker ist mit zwei unterschiedlich breiten
Kontakten ausgestattet. Ein geerdeter Stecker ist neben den zwei Kontakten außerdem
mit einem Massekontakt ausgestattet. Der breite Kontakt bzw. der Massekontakt dienen
zu Ihrer Sicherheit. Falls der gelieferte Stecker nicht in Ihre Steckdose passt, wenden Sie
sich zum Austausch der entsprechenden Steckdose bitte an einen Elektriker.
10.
Stellen Sie sicher, dass nicht auf das Stromkabel getreten und das Kabel nicht geknickt wird,
insbesondere an Steckern, Steckdosen und an der Stelle, wo das Kabel am Gerät austritt.
11.
Verwenden Sie ausschließlich die vom Hersteller angegebenen Anbau- und
Zubehörgeräte.
12.
Verwenden Sie das Gerät nur mit Wagen, Gestellen, Stativen, Halterungen oder Tischen, die vom Hersteller angegeben bzw. mit dem
Gerät verkauft wurden. Gehen Sie bei dem Bewegen eines Wagens mit
Vorsicht vor, um Verletzungen durch ein Umstürzen der Kombination
Apparat/Wagen zu vermeiden.
35 – DEUTSCH
Page 36

13.
Schützen Sie das Gerät zusätzlich dadurch, dass Sie den Netzstecker bei einem Gewitter
oder wenn Sie das Gerät für eine längere Zeit unbeaufsichtigt lassen bzw. nicht benutzen
wollen aus der Steckdose ziehen. Dadurch verhindern Sie eine Beschädigung des Geräts
durch Blitzschlag oder Spannungsspitzen.
14.
Betreiben Sie das Gerät nur mit den auf der Rückseite angegebenen Stromquellen.
Verwenden Sie bei Geräten mit einer externen Stromversorgung im Fall von Verlust oder
Beschädigung nur ein identisches Ersatzteil. Entnehmen Sie bei Geräten mit einer Batteriestromversorgung dem Benutzerhandbuch die notwendigen Informationen.
15.
Ziehen Sie den Netzstecker und lassen Sie Wartungsarbeiten von qualifiziertem Personal
durchführen, wenn :
a. Das Netzkabel oder der Stecker beschädigt ist
b. Flüssigkeit in das Gerät gelaufen bzw. Gegenstände hineingefallen sind
c. Das Gerät bei Benutzung laut Bedienungsanweisung nicht ordnungsgemäß
funktioniert.
d. Das Gerät fallen gelassen oder auf eine andere Weise beschädigt wurde
e. Das Gerät eine deutliche Veränderung der Leistung aufweist
16. Halten Sie das Gerat von spritzender oder tropfender Flussigkeit fern. Stellen Sie keine
Gegenstande auf das Gerat, die Flussigkeit enthalten, wie beispielsweise Vasen oder
Trinkglaser.
17. Vermeiden Sie Kontakt mit der Flüssigkeit, wenn das Display einen Riss bekommt bzw.
beschädigt wird.
18. Achten Sie auf einen sicheren Abstand des Gerätes zu offenem Feuer, z.B. einer bren-
nenden Kerze
19.
Der empfohlene Temperaturbereich für den Betrieb des Radios liegt zwischen 5 °C
und 40 °C.
20. Das Netzteil muss so platziert sein, dass es problemlos zugänglich ist und nicht durch
Möbel o.ä. verdeckt wird.
21.
Der Stecker des Stromkabels dient als Trennvorrichtung und muss leicht zugänglich
bleiben.
22.
WARNUNG – Das Netz ist in der Aus-Position nicht getrennt, aber die Schaltungen
werden vom Strom getrennt.
Dieses Produkt ist recyclingfähig. Produkte mit diesem Symbol dürfen NICHT im normalen Hausmüll entsorgt werden. Entsorgen Sie das
Produkt am Ende der Nutzungsdauer bei einer ausgewiesenen Recycling-Sammelstelle für elektrische und elektronische Geräte. Weiterführende Informationen über Rücknahme- und Sammelstellen erhalten Sie
bei Ihren örtlichen Behörden.
36 – DEUTSCH
Die europäische WEEE-Richtlinie (Elektro- und Elektronikgerätegesetz)
wurde eingeführt, um die Abfallmenge auf Mülldeponien erheblich zu
verringern und so die Schäden für die Umwelt und die menschliche
Gesundheit zu reduzieren. Handeln Sie bitte verantwortungsbewusst,
indem Sie Altgeräte dem Recycling zuführen. Falls das Produkt noch
verwendbar sein sollte, sollten Sie Verschenken oder Weiterverkauf in
Betracht ziehen.
Page 37

Anleitung und Hinweise zu Ihrem PAL+:
Herzlichen Glückwunsch zum Erwerb des Geräts. Wir finden, dass das PAL+ zu den besten
tragbaren DAB/DAB+/DMB/UKW-Radios gehört, die derzeit erhältlich sind.
Wir wissen, dass Sie es kaum erwarten können, Ihr neues Radio einzuschalten. Nehmen
Sie sich bitte dennoch einen Augenblick Zeit, um diese Bedienungsanleitung sowie die
Sicherheitsanweisungen durchzulesen, damit Sie sämtliche Funktionen Ihres PAL+ nutzen
können. Bei Fragen können Sie sich jederzeit an Ihren Händler oder direkt an Tivoli Audio
wenden.
Heben Sie bitte den Versandkarton und die Originalverpackung für den Fall auf, dass
Sie Ihr Radio möglicherweise einmal verschicken müssen, da Versandschäden nicht
von der Werksgarantie abgedeckt sind.
Im Namen aller Beschäftigten möchten wir Ihnen dafür danken, dass Sie sich für Tivoli Audio
entschieden haben, und Ihnen viel Vergnügen wünschen mit Ihrem neuen PAL+.
Über Tivoli Audio:
Tivoli Audio wurde von Tom DeVesto mit der Vision gegründet, den Kunden Audioprodukte
anzubieten, die über eine einfache Bedienung, ein elegantes Design und eine hohe Qualität
verfügen. Als Geschäftsführer und Leiter der Forschungs- und Entwicklungsabteilung bei
seiner vorherigen Firma, Cambridge SoundWorks*, war Tom DeVesto verantwortlich für die
Entwicklung einer Reihe sehr erfolgreicher Homeentertainment- und Multimediaprodukte.
Des Weiteren bekleidete er Positionen im gehobenen Management der Produktentwicklung
bei Advent und Kloss Video.
*Cambridge SoundWorks ist ein eingetragenes Warenzeichen von Creative Labs, Singapur.
Zum Lieferumfang Ihres PAL+ - Radios gehört:
• Ein (1) Netzteil
• Ein (1) Stereo-Audiokabel 3,5 mm
• Ein (1) NiMH Akku (eingesetzt)
• Eine (1) Fernbedienung (inklusive Batterie)
• Eine (1) Halterung für die Fernbedienung
Wenden Sie sich bitte an Ihren Händler oder Tivoli Audio, wenn einer dieser Artikel fehlen sollte.
37 – DEUTSCH
Page 38

Erste Schritte:
1. Ziehen Sie die Antenne aus.
2. Verbinden Sie das mitgelieferte Netzteil mit dem Eingang für 12 V DC- auf der Rückseite
Ihres PAL+ und schließen Sie das Gerät an eine Steckdose an.
3. Drücken Sie den Ein-/Aussschalter der Fernbedienung bzw. kurz auf den Drehregler
auf der Oberseite Ihres PAL+. Warten Sie bis der automatische Sendersuchlauf abgeschlossen ist.
4. Über die Pfeiltasten auf der Fernbedienung (Tune +/-) können Sie sich die verfügbaren
Sender anzeigen lassen und den gewünschten Sender auswählen.
5. Durch Drücken der Menu/Select-Taste auf der Fernbedienung wird der gewählte
Sender eingestellt.
6. Durch Drücken der Taste Volume +/- auf der Fernbedienung bzw. Drehen des
Drehreglers können Sie die Lautstärke auf das gewünschte Maß einstellen.
Halterung für die Fernbedienung:
Zum Lieferumfang gehört eine separate Halterung
für die Fernbedienung. Diese ist auf der Rückseite mit einer Klebefläche versehen. Ziehen Sie den
Schutzfilm ab und befestigen Sie die Halterung an der
Seite Ihres PAL+. Stecken Sie die Fernbedienung mit
dem Sensor nach oben in die Halterung.
1 2 3 4 5
Erläuterung der Bedienelemente
(Ober- und Vorderseite):
1. MULTIFUNKTIONS-DREHREGLER
(OBEN):
Der Drehregler dient zur bequemen Ausführung mehrerer Funktionen:
Ein-/Ausschalter: Schalten Sie Ihr PAL+
durch kurzes Drücken auf den Drehregler ein.
Halten Sie den Drehregler gedrückt, um das
Gerät auszuschalten. (Hinweis: Das Gerät
kann nicht über den Ein-/Ausschalter auf der
Fernbedienung eingeschaltet werden, wenn
es ausgeschaltet und nicht an einer Steckdose
angeschlossen ist).
Lautstärke: Bei eingeschaltetem Gerät können sie durch Drehen des Reglers im Uhrzeigersinn die Lautstärke erhöhen bzw. durch Drehen in die Gegenrichtung verringern.
Sendereinstellung: Bei eingeschaltetem Gerät (außer AUX) können Sie durch Drehen
des Reglers im Uhrzeigersinn einen Sender im oberen Frequenzbereich wählen bzw.
38 – DEUTSCH
1
Page 39

durch Drehen in die Gegenrichtung einen Sender im unteren Frequenzbereich. Durch
erneutes Drücken stellen Sie den Sender ein und schalten wieder auf Lautstärkeregelung. Wenn der manuelle Einstellmodus aktiviert ist, erscheint in der Anzeige ein “T”.
Erfolgt für etwa 7 Sekunden keine Eingabe, wird der Drehregler auf Lautstärkeregelung
zurückgesetzt.
Quelle: Bei eingeschaltetem Gerät können Sie durch zweimaliges Drücken auf den Drehregler das Quellenmenü aufrufen. Drehen Sie den Regler auf die gewünschte Quelle und
wählen Sie diese durch Drücken auf den Regler aus. Wenn innerhalb von 7 Sekunden
keine Quelle ausgewählt wurde, springt die Anzeige wieder auf die zuletzt aktivierte
Quelle zurück.
Schlummerfunktion: Bei Ertönen des Wecksignals können Sie durch Drücken auf den
Drehregler die Schlummerfunktion aktivieren. Wenn die Schlummerfunktion aktiviert ist,
erscheint in der Anzeige ein Symbol. Die Zeit der Schlummerfunktion ist fest auf 7
Minuten eingestellt. Durch erneutes Drücken auf den Drehregler bei aktivierter Schlummerfunktion können Sie diese abschalten. Für die Schlummerfunktion muss Ihr PAL+ an
die Steckdose angeschlossen sein. Bei reinem Akkubetrieb kann die Schlummerfunktion
nicht genutzt werden.
2. LCD-ANZEIGE:
: Lautstärke FM: UKW
: Sleep timer DAB: DAB-/DAB+-/DMB-Frequenzbereich
: Schlummerfunktion AUX: Periphärgeräte
: Wecker 1 und 2 : Ladezustand des Akkus
(zentrale Anzeige): Zeit : Mono-/Stereo-Anzeige für Kopfhörerausgang
: Signalstärke T: Manuelle Sendereinstellung
3.
VOREINSTELLUNGEN: Halten Sie die Taste gedrückt, um den gerade eingestellten
Sender zu speichern. Drücken Sie die Taste kurz, um den Sender aufzurufen, der auf
diesem Platz gespeichert ist. Im UKW-Modus wird die Nummer des voreingestellten
Senders im Display angezeigt. Für jeden Frequenzbereich gibt es 5 Voreinstellungen.
39 – DEUTSCH
Page 40

Erläuterung der Bedienelemente (Rückseite):
4
3
2
5
1. 12VDC/1000mA: Über diesen Eingang können Sie Ihr PAL+ über das Netzteil betreiben bzw. den Akku aufladen, wenn sich das Gerät in Standby befindet. Verwenden
Sie ausschließlich das mit diesem Produkt gelieferte Netzteil. Bei Beschädigung
oder Verlust des Netzteils darf nur ein identisches Ersatzteil verwendet werden. Jedes
benutzte DC-Netzteil muss der EN/IEC 60065 entsprechen und für 12 V DC 1 A und
230 V 50 Hz ausgelegt sein (abhängig von den örtlichen Gegebenheiten). Die Verwendung eines vom Hersteller nicht empfohlenen bzw. nicht normgerechten Netzteils ist
eine potentielle Gefahrenquelle. Der Steckverbinder ist 5,5 mm/2,1 mm,. Mitte positiv.
Schützen Sie den Ausgang mit dem Gummistopfen, wenn er nicht verwendet wird.
Eine Erwärmung des Netzteils während des Betriebs ist völlig normal.
2.
ANTENNE: Stellen Sie die Teleskopantenne ein und richten Sie sie für optimalen Empfang
aus. An Orten mit einem starken UKW-Signal können Sie den Empfang durch Verkürzen
der Antenne verbessern. Bei Nichtbenutzung des Gerätes sollte die Antenne eingezogen
sein, um sie zu schützen. Weitere Informationen finden Sie im Abschnitt “Empfang”.
3. KOPFHÖRERAUSGANG: An diesen variablen Ausgang können Sie einen Kopfhörer
(nicht im Lieferumfang enthalten) anschließen. Bei angeschlossenem Kopfhörer wird der
Gerätelautsprecher deaktiviert. Die Kopfhörerlautstärke wird über den Drehregler oder
die Fernbedienung geregelt. Durch Drücken der MONO-Taste auf der Fernbedienung
können Sie den Kopfhörerausgang von Mono auf Stereo umschalten. In der Anzeige
erscheint ein Kopfhörersymbol ( ) und zeigt an, dass der Kopfhörerausgang auf Stereo
eingestellt ist. Wenn Sie über Kopfhörer ein starkes Rauschen beim UKW-Empfang
haben, kann der Empfang durch Umschalten auf Mono verbessert werden. Der Stereoausgang ist für 3,5-mm-Klinkenstecker ausgelegt. Vermeiden Sie bei Kopfhörern zu
hohe Lautstärke, um Gehörschäden zu verhindern. Tragen Sie keine Kopfhörer wenn
Sie ein Kraftfahrzeug steuern. Schützen Sie den Ausgang mit dem Gummistopfen, wenn
er nicht verwendet wird.
1
40 – DEUTSCH
Page 41

4. AUX IN: Um ein Periphärgerät wie beispielsweise einen iPod oder einen anderen MP3-
Player anzuschließen, verbinden Sie den Audioausgang des externen Geräts mit diesem
Stereoeingang und stellen über Fernbedienung oder den Drehregler als Quelle “Auxiliary”
ein. Der Stereoeingang ist für 3,5-mm-Klinkenstecker ausgelegt. Hinweis: Für die Wiedergabe eines externen Gerätes müssen Sie möglicherweise eine andere Lautstärke
einstellen als für den Radiobetrieb. Schützen Sie den Ausgang mit dem Gummistopfen,
wenn er nicht verwendet wird.
5. BATTERIEFACH: Hier ist der NiMH-Akku Ihres PAL+ untergebracht. Hinter der Verblendung
befindet sich eine Mini-USB-Schnittstelle. Dieser Eingang ist nur für den Geräteservice
bestimmt. Jede andere als die zweckbestimmte Verwendung dieser Schnittstelle kann
Ihr PAL+ beschädigen und fällt nicht unter die Garantie.
Erläuterung der Bedienelemente (Fernbedienung):
(Zum Lieferumfang gehört eine separate Halterung für die Fernbedienung. Diese ist
auf der Rückseite mit einer Klebefläche versehen. Ziehen Sie den Schutzfilm ab und
befestigen Sie die Halterung an einer Seite Ihres PAL+.)
4
2
3
5
1
6
7
12
BACK
9
11
8
MONO
13
10
14
1. EIN-/AUSSCHALTER: Drücken Sie diese Taste kurz, um Ihr PAL+ einzuschalten. Das
Radio wird eingeschaltet und die zuletzt verwendete Quelle wird aktiviert. Durch erneutes
Drücken schalten Sie das Gerät aus. Das Gerät kann nicht über den Ein-/Ausschalter
auf der Fernbedienung eingeschaltet werden, wenn es ausgeschaltet und nicht an einer
Steckdose angeschlossen ist.
2. MUTE/SNOOZE: Drücken Sie diese Taste während der Tonwiedergabe des Geräts, um
den Audioausgang zu deaktivieren ( es werden keine Lautstärkebalken angezeigt).
Drücken Sie die Taste erneut oder stellen Sie die Lautstärke ein, um die Wiedergabe
41 – DEUTSCH
Page 42

wiederherzustellen. Mit dieser Taste können Sie das Wecksignal nach Ertönen abschalten.
In der Anzeige erscheint ein Symbol, wenn die Schlummerfunktion aktiviert ist. Diese
ist auf 7 Minuten eingestellt und kann nicht verändert werden. Für die Schlummerfunktion
muss Ihr PAL+ an die Steckdose angeschlossen sein. Bei reinem Akkubetrieb kann die
Schlummerfunktion nicht genutzt werden.
3. ALARM: Mithilfe der Pfeiltasten pq und der Select-Taste können Sie die Weckfunktionen
einstellen und aktivieren. Wichtige Hinweise sowie eine ausführliche Anleitung finden
Sie im Abschnitt “Einstellen der Weckzeit”.
4. SLEEP: Durch wiederholtes Drücken sehen Sie, nach welcher Zeit sich das Radio
automatisch abschaltet. Durch Drücken der Select-Taste können Sie diese Zeit auswählen. Wenn der Sleep-Timer aktiv ist, können Sie die verbleibende Zeit durch Drücken
der Sleep-Taste auf der Fernbedienung ablesen. Bei aktiviertem Sleep-Timer erscheint
in der Anzeige ein kleines Uhrensymbol [ ]. Um den Sleep-Timer abzuschalten, drücken
Sie die Sleep-Taste bis “Off” in der Anzeige erscheint. Im reinen Akkubetrieb (kein
Netzteil angeschlossen) mit eingeschaltetem Sleep-Timer und aktiviertem Wecker ertönt
nach der automatischen Abschaltung bei Ende des Schlafmodus kein Wecksignal. Um
sowohl den Sleep-Timer als auch die Weckfunktion nutzen zu können, muss das Netzteil
angeschlossen sein.
5. SOURCE: Durch mehrmaliges Drücken dieser Taste können Sie die Quelle ändern.
6. INFO: Durch mehrmaliges Drücken können Sie je nach Quellenmodus die verfügbaren
Informationen abrufen. Diese Funktion steht nicht zur Verfügung, wenn Auxiliary
eingestellt ist.
7. VOREINSTELLUNGEN 1-5: Halten Sie die Taste gedrückt, um den gerade eingestellten
Sender zu speichern. Drücken Sie die Taste kurz, um den Sender aufzurufen, der über die
Voreinstellung gespeichert ist. Im UKW-Modus erscheint die Nummer des voreingestellten
Senders in der Anzeige. Für jeden Frequenzbereich gibt es 5 Voreinstellungen.
8. VOLUME +/–: Durch Drücken der Taste Volume + bzw. Volume - können Sie die Lautstärke
erhöhen oder verringern. Sollte der Klang verzerrt sein, verringern Sie die Lautstärke,
um eine Beschädigung des Lautsprechers zu vermeiden. Wenn Sie bei stummgeschaltetem
Gerät die Lautstärke Ihres PAL+ ändern, wird die Stummschaltung (Mute) aufgehoben.
9. pq/TUNE +/-: Über diese Tasten bewegen Sie sich innerhalb der Menüs. Mit diesen
Tasten können Sie außerdem im UKW-Modus Sender manuell einstellen oder automatisch
nach Radiosendern suchen. Wenn der manuelle Einstellungsmodus aktiviert ist, erscheint
in der Anzeige ein “T”. Halten Sie die Taste gedrückt, um die Frequenzbereiche schnell zu
durchlaufen. Es dauert etwa eine Sekunde, bis sich die Frequenzen ändern. Drücken Sie
diese Taste 1,5 Sekunden lang, und lassen Sie sie dann los, um automatisch nach dem
nächsten Sender zu suchen. In der Anzeige erscheint “Suche...”. Unter “Sucheinstellungen”
im Abschnitt “Menü und einzelne Funktionen” finden Sie weitere Informationen.
10. tu: Anstelle der Taste “Select” kann auch die rechte Pfeiltaste genutzt werden. Die
linke Pfeiltaste kann in einigen Menüpunkten anstelle der Taste “Back” genutzt werden.
11. MENU/SELECT: Drücken und halten Sie diese Taste, um das Hauptmenü aufzurufen,
und drücken Sie diese Taste dann erneut kurz, um einzelne Menüpunkte auszuwählen.
Weitere Informationen finden Sie im Abschnitt “Menü”.
12. BACK: Mit dieser Taste gelangen Sie auf die vorherige Seite des Menüs.
42 – DEUTSCH
Page 43

13. MONO: Drücken Sie diese Taste, um am Kopfhörerausgang zwischen Mono und Stereo
umzuschalten. In der Anzeige erscheint “M” für Mono und “ST” für Stereo. “Mono”
oder “Stereo” wird auch angezeigt, wenn im UKW-Modus auf der Fernbedienung die
Info-Taste gedrückt wird. Wenn Sie in Stereo über Kopfhörer ein starkes Rauschen
beim UKW-Empfang haben, kann der Empfang dadurch verbessert werden, dass Sie
auf Mono schalten. Siehe auch “Balance” im Abschnitt “Menü und einzelne Funktionen”.
14. BATTERIEFACH: Entfernen Sie vor Gebrauch der Fernbedienung den Schutzstreifen, der
aus dem Batteriefach herausragt. Falls ein Austausch der Batterie in der Fernbedienung
notwendig sein sollte, verwenden Sie eine CR2025-Knopfzelle.
VORSICHT: Bei nicht ordnungsgemäßem Wechsel der Batterie besteht Explosionsgefahr. Die Batterie darf nur durch eine gleiche oder gleichwertige Batterie
ersetzt werden. Entsorgen Sie verbrauchte Batterien gemäß den in Ihrem Land
geltenden gesetzlichen Vorschriften.
Menü und einzelne Funktionen:
Um das Hauptmenü aufzurufen, drücken und halten Sie die Taste “Menu”. Mithilfe der
Pfeiltasten pq auf der Fernbedienung und der Select-Taste können Sie zwischen
den einzelnen Menüpunkten wechseln. Um zur vorherigen Seite zu gehen, benutzen
Sie die Back-Taste oder warten Sie, bis Sie nach 15 Sekunden automatisch zurück
geführt werden.
Ein Sternchen (*) zeigt an, dass der gezeigte Menüpunkt momentan eingestellt ist.
1.
SUCHEINSTELLUNGEN (NUR UKW-MODUS): Drücken Sie die Taste “Select” und
wählen im Sie mithilfe der Pfeiltasten pq und der Taste “Select” zwischen “Nur starke
Sender” und “Alle Sender” für den automatischen Sendersuchlauf (Siehe Punkt 9 (pq/
Tune +/-) im Abschnitt “Fernbedienung”). Wenn Sie “Alle Sender” auswählen, erhöht
sich die Empfindlichkeit des Suchlaufs und es besteht die Wahrscheinlichkeit, dass der
Suchlauf auch bei Rauschen anhält. Wenn das Gerät auf Auxiliary eingestellt ist, steht
diese Funktion nicht zur Verfügung.
2.
TIVOLI EQ (EQUALIZER): Zur Einstellung der Höhen und Tiefen drücken Sie die SelectTaste und stellen Sie über die Pfeiltasten pq und “Select” die gewünschten Werte ein.
Die eingestellten Werte werden unter “Benutzer EQ” angezeigt. Mithilfe der Pfeiltasten
pq und der Select-Taste können Sie die Tonstärke ein- oder ausschalten. Es ist empfehlenswert, bei geringer Lautstärke die Tonstärke einzuschalten, da hierbei niedrige und
hohe Tonfrequenzen verstärkt werden und dadurch ein natürlicheres Klangbild erzeugt
wird. Mithilfe der Pfeiltasten pq und der Taste “Select” können Sie die voreingestellten
Equalizer-Einstellungen aktivieren. Durch die Auswahl einer Equalizer-Voreinstellung
werden alle Höhen- und Tiefeneinstellungen überschrieben. Die Tonstärke bleibt davon
jedoch unberührt. Durch die Einstellung “Flat EQ” werden die Audio-Einstellungen auf
die Werkseinstellung zurückgesetzt, d.h. dass Höhen und Tiefen auf Null gesetzt werden.
Bei “Flat EQ” wird außerdem die Tonstärke abgeschaltet. Wenn Sie jedoch für Höhen und
Tiefen individuelle Einstellungen vorgenommen haben, werden diese unter “Benutzer EQ”
angezeigt. Durch bloßes Auswählen von “Benutzer EQ” können Sie Ihre Einstellungen
für Höhen und Tiefen wieder aktivieren. Im Equalizer-Menü werden die Einstellungen für
Höhen und Tiefen durch die Zahlen auf der rechten Seite angezeigt.
3.
BALANCE (UNTER TIVOLI EQ): Drücken Sie die Pfeiltasten pq um die Balance
einzustellen. Diese Steuerung wirkt sich lediglich auf den Kopfhörer-Ausgang aus.
43 – DEUTSCH
Page 44

4. ZEIT (UNTER EINSTELLUNGEN):
Einstellung 12/24 Stunden:
Drücken Sie die Taste “Select” und wählen Sie mithilfe der Pfeiltasten pq und “Select”
die Anzeige 12 oder 24 Stunden.
Einstellung von Datum und Uhrzeit:
Drücken Sie die Taste “Select” und stellen Sie mithilfe der Pfeiltasten pq und “Select”
zuerst die Stunden, dann die Minuten und zuletzt das Datum ein. Stellen Sie die automatische Aktualisierung auf “Nicht aktualisieren” ein, um die Zeit manuell einzustellen.
Siehe untenstehenden Abschnitt “Automatisch Aktualisieren” für weitere Informationen.
Automatisch Aktualisieren:
Drücken Sie die Taste “Select” und wählen Sie über die Pfeiltasten pq und die Taste
“Select” zwischen “Aktualisieren von beliebiger Quelle”, “Aktualisieren von DAB” (auch
DMB) oder “Aktualisieren von UKW” (RDS). Für jede automatische Aktualisierung wird
ein zuverlässiger Empfang von DAB bzw. UKW/RDS mit einem Datums- und Uhrzeitsignal
benötigt. Das Aktualisieren der Uhrzeit kann bis zu einer Minute oder länger dauern.
Tivoli Audio übernimmt keine Verantwortung für ungenaue Informationen zu Datum und
Uhrzeit durch ein automatisches Signal.
Um die Uhr manuell einzustellen, wählen Sie im Menü Zeit mithilfe der Pfeiltasten pq
bzw. tu zunächst “Nicht aktualisieren” und dann “Datum/Uhrzeit einstellen” und stellen
anschließend über “Select” die Uhrzeit ein. Wiederholen Sie diese Schritte zur Einstellung
der Minuten und drücken Sie “Select” zum Speichern. Innerhalb dieses Menüs haben
Sie zusätzlich die Möglichkeit, das Datumsformat einzustellen und zwischen 12- und
24-Stunden-Anzeige zu wechseln.
HINWEIS: Bei Stromausfall bleiben die Weckzeit(en) und Uhrzeit durch einen eingebauten
Datensicherungsspeicher erhalten. Wenn unter “Automatische Aktualisierung” die Option
“Aktualisieren von beliebiger Quelle” eingestellt ist, kann das Radio das Signal des zuletzt
gehörten Senders finden, auch wenn Ihr PAL+ auf Standby geschaltet ist.
Einstellen des Datumsformats:
Drücken Sie die Taste “Select” und wählen Sie über die Pfeiltasten pq und “Select”
ein Datumsformat aus.
5. HINTERGRUNDBELEUCHTUNG (UNTER EINSTELLUNGEN):
Automatisch dimmen:
Die Hintergrundbeleuchtung ist werkseitig auf eine konstante Stärke eingestellt. Sie
kann jedoch so eingestellt werden, dass sie automatisch gedimmt wird, wenn innerhalb
einer festgelegten Zeitspanne keine Taste betätigt wird. Sobald am Gerät oder an der
Fernbedienung eine Taste gedrückt wird, schaltet die Hintergrundbeleuchtung automatisch
wieder auf volle Stärke. Drücken Sie die Taste “Select” und wählen Sie über die Pfeiltasten
pq und Select die gewünschte Zeitspanne bis zum Dimmen des Hintergrundlichtes
aus. Sie können zwischen 10, 20 ,30, 45, 60, 90, 120 und 180 Sekunden wählen oder
die automatische Dimmfunktion vollständig deaktivieren.
Hintergrundbeleuchtung ein:
Drücken Sie die Taste “Select” und wählen Sie über die Pfeiltasten pq und Select die
gewünschte Stärke der Hintergrundbeleuchtung.
Dimmstärke:
Wenn Sie unter “Automatisch dimmen” eine Zeitspanne für die Aktivierung der Dimmung
gewählt haben, drücken Sie die Taste “Select” und stellen Sie über die Pfeiltasten pq und Select für diese Einstellung die gewünschte Dimmstärke ein. Falls die
44 – DEUTSCH
Page 45

Hintergrundbeleuchtung in bestimmten Situationen stört, z.B. beim Schlafen, kann die
Stärke auf “Off” gestellt werden. Durch das Einstellen der Dimmstärke kann außerdem
die Akkulaufzeit verlängert werden.
6. SPRACHE (UNTER EINSTELLUNGEN): Drücken Sie die Taste “Select” und stellen Sie
mithilfe der Pfeiltasten pq und Select die gewünschte Sprache ein.
7.
EINSTELLUNGEN ZURÜCKSETZEN (UNTER EINSTELLUNGEN): Drücken Sie die Taste
“Select” und wählen Sie mithilfe der Pfeiltasten pq bzw. tu und Select, ob Sie auf
die Werkseinstellungen zurücksetzen wollen (Ja) oder nicht (Nein). Wenn Sie das Gerät
zurücksetzen, werden die Werkseinstellungen wiederhergestellt und alle persönlichen
Einstellungen wie Radiosender und Sprache gelöscht.
8. ID (UNTER EINSTELLUNGEN): Drücken Sie die Taste “Select” um Ihre ID-Nummer zu
sehen. Wenn Sie sich mit einer Frage an Ihren Händler oder an Tivoli Audio wenden,
wird man Sie möglicherweise nach der Nummer in diesem Feld fragen.
9. SLEEP-TIMER (UNTER EINSTELLUNGEN): Drücken Sie “Select” stellen Sie mithilfe
der Pfeiltasten pq und Select den Sleep-Timer auf eine der angegebenen Zeiten ein.
Es befindet sich auch eine Sleep-Taste auf der Fernbedienung. Bei aktivem Sleep-Timer
erscheint in der Anzeige ein kleines Uhrensymbol.
HINWEIS: Wenn im reinen Akkubetrieb (kein Netzteil angeschlossen) Sleep-Timer und
Wecker eingeschaltet sind, ertönt nach der automatischen Abschaltung bei Ende des
Sleep-Modus kein Wecksignal. Um sowohl den Sleep-Timer als auch die Weckfunktion
nutzen zu können, muss das Netzteil angeschlossen sein.
Einstellen der Weckzeit:
Zum Einstellmenü für die Weckzeiten gelangen Sie über das Hauptmenü oder durch
Drücken der Alarm-Taste auf der Fernbedienung.
1.
Wecker 1 wird zuerst angezeigt. Mithilfe der Pfeiltasten pq und Select können Sie
zwischen Wecker 1 und 2 wählen. Hinweis: Mithilfe der Pfeiltasten t und u sowie der
Select-Taste können Sie sich jederzeit durch das Weckmenü bewegen.
2. Sie können den Wecker mithilfe der Pfeiltasten pq und Select an- oder abschalten.
Wenn kein Datum und keine Uhrzeit eingestellt sind, werden Sie zuerst dazu aufgefordert,
Datum/Uhrzeit einzustellen.
3. Stellen Sie mithilfe der Pfeiltasten pq die Stunde ein und drücken Sie dann die Taste
“Select”. Wiederholen Sie diesen Schritt zum Einstellen der Minuten und, falls die Anzeige
auf 12 Stunden eingestellt ist, für AM/PM und drücken Sie dann erneut Select.
4. Stellen Sie mithilfe der Pfeiltasten pq ein, wie lange das Wecksignal ertönen soll, und
drücken Sie anschließend die Select-Taste.
5.
Wählen sie mithilfe der Pfeiltasten pq die gewünschte Quelle für Ihr Wecksignal aus. Wenn
als Quelle DAB (schließt DAB+/DMB ein) oder UKW eingestellt ist, können Sie mithilfe der Pfeiltasten pq einen voreingestellten oder den zuletzt gehörten Sender auswählen. Drücken
Sie anschließend die Taste “Select”. Wenn als Quelle für das Wecksignal DAB eingestellt
ist und der zuletzt gehörte Sender zur Weckzeit nicht empfangen werden kann, ertönt das
Standard-Wecksignal.
45 – DEUTSCH
Page 46

6. Stellen Sie mithilfe der Pfeiltasten pq ein, wie oft das Wecksignal ertönen soll, und
drücken Sie anschließend Select. Wenn “Einmal” ausgewählt ist, muss das gewünschte
Datum für das einmalige Wecksignal eingestellt werden.
7. Stellen Sie zuletzt mithilfe der Pfeiltasten pq die gewünschte Lautstärke des Wecksignals
ein und drücken Sie anschließend auf Select.
8. Wiederholen Sie diesen Vorgang wenn nötig für Wecker 2.
Wenn Ihnen während des Einstellens ein Fehler unterläuft, drücken Sie an der Fernbedienung
die Taste “Back” (Zurück), um erneut zu beginnen.
Ihre Einstellungen werden erst gespeichert, wenn der gesamte Vorgang abgeschlossen
ist und in der Anzeige die Meldung “Weckzeit gespeichert” erscheint.
wichtige hinweise:
• Wenn Ihr PAL+ abgeschaltet und nicht an das Netzteil angeschlossen ist, ertönt
kein Wecksignal.
• Das Signal wird mit zunehmender Dauer lauter. Es dauert einige Sekunden, bis
das Signal die im Menü eingestellte Lautstärke erreicht.
• Bei einem Stromausfall bzw. bei entladenem Akku wird die Weckzeit gespeichert,
jedoch kann kein Wecksignal ertönen wenn Ihr PAL+ keinen Strom bekommt.
weckfunktionen:
Schnelleinstellung: Wenn sich Ihr PAL+ im Standby-Modus befindet, drücken Sie die Taste
“Alarm” mehrmals kurz hintereinander, um die Wecker an- oder abzuschalten.
Wecker aus: Um den Wecker abzuschalten, drücken Sie eine der Tasten “Alarm” oder
“Power” an der Fernbedienung bzw. halten Sie den Multifunktions-Drehregler an der Oberseite
Ihres PAL+ gedrückt.
Schlummerfunktion: Um die Schlummerfunktion zu aktivieren, drücken Sie die “Snooze”-
Taste an der Fernbedienung bzw. tippen Sie kurz auf den Multifunktions-Drehregler auf der
Oberseite Ihres PAL+. Die Zeit der Schlummerfunktion kann nicht eingestellt werden. Bei
reinem Akkubetrieb kann die Schlum merfunktion nicht genutzt werden.
Hinweis: Wenn die Schlummerfunktion eingeschaltet ist, wird die verbleibende Zeit
durch Drücken der “Snooze”-Taste auf der Fernbedienung angezeigt. Durch Drücken
einer der Tasten “Alarm” oder “Power” auf der Fernbedienung bzw. bei längerem
Drücken auf den Multifunktions-Drehregler auf der Geräteoberseite können Sie den
Countdown für die Schlummerfunktion abschalten. Wenn Ihr PAL+ im reinen Akkubetrieb
läuft, schaltet es anschließend auf Standby oder auf Aus.
46 – DEUTSCH
Page 47

Digitaler Empfang (DAB/DAB+/DMB):
SENDERLISTE: Mithilfe der Pfeiltasten pq auf der Fernbedienung bzw. durch Drücken
auf den Multifunktions-Drehregler auf der Geräteoberseite können Sie sich alle verfügbaren
DAB-/DAB+- bzw. DMB-Sender anzeigen lassen. Mithilfe der Pfeiltasten pq können Sie
einen Sender auswählen und mit Select einstellen. Die Anzeige der Senderliste verschwindet
nach 7 bis 15 Sekunden. Die Zeit hängt davon ab, ob Sie die Liste über den MultifunktionsDrehregler oder über die Fernbedienung angewählt haben.
Um das Hauptmenü aufzurufen, drücken und halten Sie die Menu-Taste. Über die
Pfeiltasten pq und die Taste “Select” können sie zwischen den einzelnen Menüpunkten wechseln. Um zur vorherigen Seite zu gehen, benutzen Sie die Back-Taste
oder warten Sie, bis Sie nach 15 Sekunden automatisch zurück geführt werden.
Ein Sternchen (*) zeigt an, dass der gezeigte Menüpunkt momentan eingestellt ist.
Hinweis: Wenn bei leerer Senderliste das Radio auf digitalen Empfang gestellt wird,
schaltet sich der automatische Sendersuchlauf ein.
1. AUTOMATISCHER SENDERSUCHLAUF: Sucht den gesamten Frequenzbereich ab.
Wenn Sie Ihr PAL+ an einem anderen Standort verwenden, ist ein neuer Suchlauf
erforderlich, um die Sender am neuen Standort zu finden. Um den Sendersuchlauf
abzubrechen, drücken Sie die Taste “Back” auf der Fernbedienung.
2. TIVOLI EQ (EQUALIZER): Siehe Abschnitt “Menü und einzelne Funktionen”.
3. MANUELLE SENDEREINSTELLUNG: Drücken Sie die Pfeiltasten pq um eine spezielle
DAB-/DAB+- oder DMB-Frequenz auszuwählen und stellen Sie diese Frequenz mit der
Taste “Select” ein.
4. DRC: Mit der Dynamic Range Control (DRC) können Sie das Lautstärkeniveau der Sender
einstellen. Auf diese Weise können Sie bei leisen Abschnitten auch dann noch alles gut
verstehen, wenn eine hohe Umgebungslautstärke herrscht oder wenn das Gerät leiser
eingestellt ist.
5. ERWEITERTER MODUS: Wenn Sie Ihr PAL+ in ein anderes Gebiet mitnehmen, werden
Sie unter Umständen viele Sender mit dem gleichen Namen finden. Wenn Sie im Erweiterten Modus “Erweiterte Ansicht”, “Lange Beschriftungen” und “Alles anzeigen”
aktivieren, können Sie auch bei längeren Namen der Radiosender zwischen den einzelnen
Stationen unterscheiden.
Für DAB/DAB+ empfehlen wir, alle arweiterte Einstellungen abzuschalten. Für DMB
empfehlen wir, sie einzuschalten.
6. LISTE AKTUALISIEREN: Wenn Sie Ihr PAL+ in ein anderes Gebiet mitnehmen, können
einige Sender möglicherweise nicht mehr empfangen werden. Wählen Sie “Liste aktualisieren”, um alle Sender aus der Liste zu entfernen, die nicht empfangen werden können.
Sie können über die Pfeiltasten pq bzw. tu und die Select-Taste das Entfernen nicht
empfangbarer Sender bestätigen (Ja) oder abbrechen (Nein).
HINWEIS: Können am neuen Standort Ihres PAL+ auch Sender vom alten Standort
empfangen werden, löschen Sie nicht empfangbare Sender am besten über die Funktion
“Liste aktualisieren”.
47 – DEUTSCH
Page 48

meldungen auf der anzeige im dab-modus:
Sekundärdienste: Sekundärstationen werden durch >> neben dem Sendernamen angezeigt.
Möglicherweise stehen in Ihrem Gebiet keine Sekundärdienste zur Verfügung.
“?”: Dieses Zeichen neben dem Namen des Senders zeigt an, dass der Sender ungültig
bzw. nicht aktiv ist.
“Kein Empfang”: Wird angezeigt, wenn ein DAB-Sender mit einem zu schwachen Signal
ausgewählt wird.
Der Akku:
Das PAL+ ist mit einem versiegelten Akku ausgerüstet, der aus sechs NiMH (NickelMetallhydrid)-Hochleistungszellen besteht. Anders als NC- (Nickel-Cadmium-) Akkus gibt es
bei NiMH-Akkus keinen Memory-Effekt, wodurch sich die Lebensdauer erhöht. Darüber hinaus
enthalten sie keine giftigen Metalle. Das Batteriesymbol in der Anzeige dient gleichzeitig als
Betriebs- und als Ladezustandsanzeige.
AUFLADEN: Zum Laden des Akkus stecken Sie den Stecker Ihres PAL+ in die Steckdose
und schalten Sie auf Standby. Ein vollständig entladener Akku ist in etwa 3,5 Stunden wieder
aufgeladen. Bei einem neuen Akku kann es etwa 4-5 Ladezyklen dauern, bis der Akku seine
durchschnittliche Laufzeit erreicht. Während des Ladevorgangs blinkt das Batteriesymbol in der
Anzeige. Wenn der Akku vollständig geladen ist, blinkt das Symbol nicht mehr und in der Anzeige
erscheinen alle drei Balken. Wenn der Stecker Ihres PAL+ in der Steckdose ist und das Gerät
läuft, wird der Akku nicht geladen. Der Ladezustand wird jedoch weiterhin angezeigt. Zum Laden
des Akkus muss also der Stecker des Gerätes eingesteckt und Ihr PAL+ muss in Standby sein.
NIEDRIGER LADEZUSTAND: Bei reinem Akkubetrieb springt die Anzeige mit abnehmender
Ladung von drei auf zwei und dann auf einen Balken, bis sie schließlich eine leere Batterie
anzeigt. Wenn der Akku leer wird, verzerrt sich allmählich der Klang des Radios. Dies
ist absolut normal und zeigt an, dass der Akku bald aufgeladen werden sollte. Weil es
bei dem NiMH-Akku Ihres PAL+ keinen Memory-Effekt gibt, kann der Akku auch problemlos
wieder geladen werden, wenn er nicht vollständig leer ist. Er nimmt jedoch keinen Schaden,
wenn er vollständig entladen und wieder aufgeladen wird.
Das Batteriesymbol zeigt den Ladezustand des Akkus annähernd an. Es kann einige Sekunden
dauern, bis sich der Status der Anzeige stabilisiert hat. Wenn der Akku entfernt wird und Sie
Ihr PAL+ nur über das Netzteil betreiben, zeigt das Symbol in der Anzeige eine leere Batterie.
AKKULAUFZEIT: Die Laufzeit eines vollständig geladenen Akkus hängt von vielen Faktoren ab,
z.B. der Lautstärke und der Art des Programms. Wenn Sie z.B. Ihr PAL+ mit niedriger Lautstärke
betreiben, hat der Akku eine längere Laufzeit als bei höherer Lautstärke. Sie werden mit der Zeit
feststellen, was Sie unter den verschiedenen Bedingungen von Ihrem PAL+ erwarten können.
Ihr PAL+ nimmt keinen Schaden, wenn Sie es dauerhaft über das Netzteil betreiben.
AUSTAUSCH DES AKKUS: Für den Fall, dass Sie den Akku austauschen müssen, heben Sie
die Antenne an und entfernen Sie die beiden Schrauben des Batteriefaches. Entfernen Sie die
Batteriefachabdeckung und achten Sie auf die Polung, bevor Sie den Akku herausnehmen.
Tauschen Sie den Akku aus und stellen Sie sicher, dass die Polung korrekt ist. Setzen Sie die
Batteriefachabdeckung mit der unteren Führung zuerst ein und schrauben Sie die Abdeckung
wieder fest.
48 – DEUTSCH
Page 49

VORSICHT
dass Sie den richtigen Ersatzakku verwenden. Diesen können Sie über Tivoli Audio
oder autorisierte Fachhändler beziehen. Der verbrauchte Akku ist gemäß den geltenden
Gesetzen Ihres Landes zu entsorgen. Der Akku darf keiner starken Hitze ausgesetzt
werden, z.B. Feuer, direkte Sonneneinstrahlung o.ä. Wenn Sie Akkus von Fremdherstellern verwenden, kann das Schäden an Ihrem PAL+ zur Folge haben.
Informationen zu den Batterien der Fernbedienung finden Sie unter Punkt 14 im Abschnitt
“Erläuterung der Bedienelemente / Fernbedienung”.
: Achten Sie zur Vermeidung von Bränden oder Verletzungen darauf,
Digitaler und UKW-Empfang:
Wenn Sie Ihr PAL+ an einem anderen Standort betreiben, können andere Sender als
vorher empfangen werden. In diesem Falle empfiehlt es sich, über “Liste aktualisieren”
einen neuen Sendersuchlauf durchzuführen und die Liste der DAB-Sender auf den aktuellen
Stand zu bringen.
UKW: An Orten mit einem starken UKW-Signal kann der Empfang durch Verkürzen der
Antenne verbessert werden.
RDS (nur für UKW):
Das Radiodatensystem (RDS) überträgt zusammen mit dem Ton auch Textdaten. Da nicht
alle UKW-Sender diesen Dienst nutzen, wird bei manchen Sendern kein Text angezeigt.
Auch bei Sendern mit RDS kann es bei zu schwachem Signal passieren, dass kein oder
nur unleserlicher Text angezeigt wird. Hierbei handelt es sicht nicht um einen Gerätefehler
Ihres PAL+. In solch einem Fall sollten Sie versuchen, die Position der UKW-Antenne zu
verändern. Zur Beachtung: Der Inhalt des RDS wird vom jeweiligen Sender bereitgestellt.
Wie Sie Ihr PAL+ behandeln sollten:
• Das PAL+ ist wetterfest, aber nicht wasserdicht. Es sollte nicht in Wasser eingetaucht
bzw. unter fließendes Wasser gehalten werden. Ebenso sollte es keinen extremen
Temperaturen ausgesetzt werden.
• Das PAL+ ist tragbar, aber es ist nicht unzerstörbar. Lassen Sie es nicht fallen, werfen
Sie es nicht und setzen Sie es keinen heftigen Stößen aus.
• Tragen Sie Ihr PAL+ immer an den Griffmulden an den Seiten, damit es Ihnen nicht
aus der Hand rutscht.
Reinigung:
Verwenden Sie an Ihrem Radio nie aggressive Reinigungs- oder Lösungsmittel. Die Garantie erstreckt sich nicht auf normalen Verschleiß und schließt auch Schäden durch Reinigung
oder Chemikalien aus. Reinigen Sie Ihr PAL+ nur mit einem weichen Tuch und ohne heftiges Reiben.
49 – DEUTSCH
Page 50

Eingeschränkte Gewährleistung:
Tivoli Audio Produkte erfüllen einen hohen qualitativen Standard, und wir sind zuversichtlich,
dass wir auch Sie mit unserem Produkt überzeugen können. Aus diesem Grund bieten wir dem
Erstbesitzer für dieses Produkt eine eingeschränkte Gewährleistung, die Herstellungsmängel in Form von Material- und Verarbeitungsfehlern abdeckt. Diese Gewährleistung ist nicht
übertragbar.
Für Produkte, die in der Europäischen Union und Norwegen erworben werden, gilt ab Kaufdatum eine Gewährleistung mit einer Mindestlaufzeit von 2 Jahren. In Staaten mit gesetzlich festgelegten Mindestlaufzeiten für Gewährleistungen gilt die gesetzlich festgelegte
Gewährleistungsfrist. In allen anderen Staaten gelten Gewährleistungsfristen von einem Jahr.
Diese beschränkte Gewährleistung deckt die Funktionsfähigkeit des Produktes bei regulärer, bestimmungsgemäßer Verwendung gemäß den Bestimmungen im Benutzerhandbuch
ab. Sie gilt nicht für Fehlfunktionen oder Schäden, die durch Folgendes verursacht werden:
unsachgemäße oder unangemessene Verwendung oder Installation, Verwendung des Ladegeräts zum Aufladen von Alkalibatterien, fehlerhafte Zusatzgeräte, Modifikationen, eigenmächtige Reparatur, Transportschäden oder Verlust, Missbrauch, Unfälle, Verwendung
bei ungeeigneter Spannung/Stromstärke, Überspannung, Blitzeinschlag oder andere Ereignisse höherer Gewalt, übermäßige Feuchtigkeit, normale Abnutzung, kommerzielle Verwendung oder Kauf bei nicht autorisierten Händlern. Heben Sie den Kaufbeleg gut auf, um
im Falle einer Garantiewartung belegen zu können, dass Sie das Gerät bei einem zugelassenen Händler erworben haben. Sind Service- oder Reparaturarbeiten erforderlich, die
unter den Gewährleistungsschutz fallen, wenden Sie sich bitte an Ihren Verkaufshändler oder einen Lieferanten in Ihrer Nähe.
Bitte öffnen Sie das Gerät nicht selbst und schrauben Sie es nicht auseinander, da die
beschränkte Gewährleistung sonst erlischt. Im Inneren des Produkts befinden sich keine
Teile, die durch den Benutzer selbst gewartet werden könnten. Tivoli Audio kommt nicht für
Kosten auf, die durch Korrektur von Empfangsstörungen, Beseitigung von extern verursachter Statik/Geräuschen, Zeitverlust, Unannehmlichkeiten, Nutzungsausfall des Produktes
oder Schaden durch unsachgemäßen Gebrauch dieses Produktes entstanden sind.
Wird Ihr Produkt innerhalb der Gewährleistungsfrist eingereicht und besteht ein Reparaturanspruch gemäß der beschränkten Gewährleistung, werden wir alle defekten Teile
innerhalb eines angemessenen Zeitraums und für Sie kostenfrei reparieren oder ersetzen.
DIESE BESCHRÄNKTE GEWÄHRLEISTUNG GEWÄHRT IHNEN BESTIMMTE RECHTSANSPRÜCHE ZU FESTGELEGTEN BEDINGUNGEN. IN ABHÄNGIGKEIT VON DEM VON
IHNEN ERWORBENEN PRODUKT KÖNNEN WEITERE RECHTSANSPRÜCHE HINZUKOMMEN. DIESE RECHTE SIND LANDESABHÄNGIG. IN BESTIMMTEN LÄNDERN IST
AUSSCHLUSS, BESCHRÄNKUNG ODER MODIFIZIERUNG VON BESTIMMTEN IMPLIZIERTEN RECHTEN ODER IHREN AUSWIRKUNGEN NICHT ZULÄSSIG. IN SOLCHEN
FÄLLEN IST DIESE BESCHRÄNKTE GEWÄHRLEISTUNG NUR INNERHALB DES GESETZLICH VORGEGEBENEN RAHMENS GÜLTIG.
Durch die Gesetzgebung Ihres Landes stehen Ihnen unter Umständen bestimmte rechtliche Ansprüche gegenüber dem Händler oder dem Hersteller dieses Produktes zu. Diese
Rechte werden durch diese beschränkte Gewährleistung nicht beeinträchtigt.
Die Bestimmungen dieser beschränkten Gewährleistung ersetzen alle anderen Gewährleistungen oder Bedingungen, ausgenommen gesetzliche Bestimmungen. Diese beschränkte
50 – DEUTSCH
Page 51

Gewährleistung hat keinen Einfluss auf Rechtsansprüche, die Ihnen von Rechts wegen
zustehen, und schließt den Rechtsweg nicht aus.
In Ländern, in denen Haftungsbeschränkungen nicht gesetzlich ausgeschlossen sind, geht
die Haftbarkeit von Tivoli Audio nicht über den von Ihnen für das Produkt bezahlten Kaufpreis
hinaus. In Ländern, in denen Haftungsbeschränkungen gesetzlich ausgeschlossen sind,
erstreckt sich die Haftbarkeit von Tivoli Audio lediglich auf direkte Schäden bei Verletzungen
und/oder an beweglichem oder unbeweglichem Privateigentum infolge von Fahrlässigkeit
seitens Tivoli Audio.
Falls dies nicht gesetzlich ausgeschlossen ist, ist Tivoli Audio nicht für atypische, zufällige,
indirekte oder Folgeschäden haftbar. Manche Rechtssysteme erlauben keine Beschränkung
oder den Ausschluss der Haftung oder die Begrenzung von Entschädigungsansprüchen bei
atypischen, zufälligen, indirekten oder Folgeschäden, oder die Begrenzung der Haftbarkeit
auf bestimmte Beträge. Die oben genannten Beschränkungen treffen also möglicherweise
nicht auf Sie zu.
Die eingeschränkte Gewährleistung erlischt, wenn der Aufkleber mit der Seriennummer
entfernt oder beschädigt wird. Falls Sie mit Ihrem Händler oder über ihn einen erweiterten
Kundendienst-Vertrag abgeschlossen haben und nach Ende der Laufzeit dieser eingeschränkten
Gewährleistung die Erbringung von Serviceleistungen erforderlich ist, wenden Sie sich zu
diesem Zweck bitte an den Anbieter des erweiterten Kundendienstvertrags.
Sie können Ihr Produkt auf unserer Website bequem für den Garantieservice registrieren:
www.tivoliaudio.com. Sie sind nicht gesetzlich verpflichtet, persönliche Angaben zu machen.
Allerdings helfen uns diese Angaben dabei, nachzuvollziehen, welche Produkte Sie erworben
haben und Sie als unseren Kunden besser zu verstehen. Ihre Angaben werden von Tivoli
Audio lediglich zu Marketingzwecken benutzt und, falls erlaubt, um Sie in Bezug auf die von
Ihnen gekauften und weitere Produkte von Tivoli-Audio oder anderen Firmen zu kontaktieren.
Die von Ihnen angegebenen Informationen können in anderen Ländern verarbeitet werden.
Bei Kundendienstfragen wenden Sie sich bitte an Ihren örtlichen Händler.
51 – DEUTSCH
Page 52

Technische Daten:
Modell: PAL+
Typ: Tragbares Radio für DAB/DAB+/DMB/UKW
Lautsprecher: 2,5 Zoll full range, magnetisch abgeschirmt
Frequenzen: UKW: 87,5-108,0 MHz
(Frequenzbereich kann je nach Region variieren)
DAB (Band III)/DAB+/DMB: 174-240 MHz
Stromversorgung: 12 V DC nominal – 15 V DC maximal, 1000 mA
Akku: NiMH 7,2 V 2200 mA
Stromstärke des Akkus: 1000mA
Netzteil: PALP-PS-CE : 12 V DC 1 A 230 V 50 Hz
Abmessungen: 15,55cm x 9,35cm x 9,25cm (HxBxT)
(6.12" H x 3.68" W x 3.64" D)
Gewicht: 0,84 kg
Technische Änderungen vorbehalten.
Tivoli Audio behält sich technische Änderungen ohne Ankündigung vor.
Tivoli Audio, das Logo von Tivoli Audio, PAL+ und Portable Audio Laboratory sind Markenzeichen
von Tivoli Audio, LLC.
52 – DEUTSCH
Page 53

Précautions d’emploi:
1. Lisez ce mode d’emploi.
2. Conservez ce mode d’emploi.
3. Respectez toutes les mises en garde.
4. Suivez toutes les instructions.
5. N’utilisez pas cet appareil près d’une source d’eau, telle qu’une baignoire, un sous-sol
humide, ou une piscine. Attention : ne pas exposer cet appareil à la pluie ou au risque
de moisissure.
6. Nettoyez votre appareil avec un chiffon doux, n’utilisez ni savon, ni produit aérosol.
7.
Ne bloquez pas les ouvertures de ventilation. Suivez les recommandations d’installation.
8. N’exposez pas votre appareil à des sources de chaleur telles que la cheminée, le radiateur ou un amplificateur.
9. Raccordez votre appareil au secteur en respectant les normes de sécurité courantes
et spécifiques au pays.
10. Placez le câble d’alimentation de manière telle qu’il ne soit pas dans le passage.
11. N’utilisez que les accessoires fournis avec votre appareil.
12. Utilisez uniquement le chariot, un trépied, une console ou table spéci-
fiés par le fabricant, ou vendu avec l'appareil. Quand un chariot est
utilisé, soyez prudent lorsque vous déplacez l'ensemble chariot / appareil afin d'éviter toute bles sure en cas de chute.
13. Pour une sécurité accrue en cas d’orage ou lorsque l’appareil n’est pas utilisé pendant
une longue période, débranchez le câble secteur. Ceci évitera les dommages éventuels
dus à la foudre ou à une surtension électrique.
53 – FRANÇAIS
Page 54

14.
Ne branchez votre appareil que sur une source de courant conforme aux indications portées à l’arrière de l’appareil. Si votre appareil fonctionne avec une alimentation externe,
n’utilisez que l’alimentation d’origine fournie par le fabricant. Pour les appareils fonctionnant sur batterie, lisez attentivement le mode d’emploi.
15.
En cas de problème technique, débranchez votre appareil et faites le parvenir au service
technique qualifié en particulier:
a. Si le cordon d’alimentation est endommagé.
b. Si du liquide s’est introduit dans l’appareil.
c. Si votre appareil ne fonctionne pas normalement.
d. Si votre appareil est tombé ou a été endommagé.
e. Si les performances de votre appareil sont affectées d’une quelconque manière.
16. N’exposez pas cet appareil a des projections d’eau. Les objets contenant du liquide ne
doivent pas être placés à proximité de votre appareil ou au dessus.
17. Si l’afficheur se brise et si du liquide en sort, évitez tout contact avec ce liquide.
18. Veillez à éloigner votre appareil de toute flamme nue, telle que par exemple les bougies.
19. La température de fonctionnement de votre appareil est de 5 à 40° C.
20. Lors de l’installation de la radio, veillez à ce que l’alimentation secteur et la prise soient
facilement accessibles.
21.
Le cordon d'alimentation sert de dispositif de déconnexion et doit rester facilement
accessible.
AVERTISSEMENT - Les conduites ne sont pas déconnectés de la position d'arrêt, mais les
circuits ne sont pas alimentés.
Cet appareil peut être recyclé. Les produits portant ce symbole ne doivent pas être jetés avec les ordures ménagères. En fin de vie, vous devez
déposer votre appareil dans un point de collecte de produits électriques
et électroniques. Pour plus d’informations, vous pouvez contacter votre
revendeur ou l’agence locale de l’environnement.
54 – FRANÇAIS
La Directive européenne pour l’élimination des déchets d’équipements
électriques et électroniques (DEEE) a été mise en application pour
réduire de manière importante la quantité de déchets, et en diminuer
l’impact écologique sur la planète et la santé. Agissez de manière responsable en recyclant les produits usagers. Si ce produit est toujours
en état de fonctionnement, pensez à le vendre ou à le donner.
Page 55

Instructions PAL+ :
Toutes nos félicitations pour avoir choisi la radio portable PAL+ de Tivoli Audio. Vous avez
entre les mains le meilleur radio réveil portable RNT/ FM du marché, d’une qualité exceptionnelle de réception et de restitution sonore, et d’une simplicité d’utilisation remarquable.
Nous comprenons votre impatience à utiliser votre nouvelle radio, mais afin de tirer le meilleur parti de votre nouvelle radio, prenez quelques minutes pour lire le mode d’emploi et
les précautions d’emploi. Familiarisez-vous avec votre appareil. Si vous avez la moindre
question, n’hésitez pas à contacter votre revendeur agréé Tivoli Audio ou à nous contacter
directement.
Conserver votre emballage, il pourrait vous être utile si vous deviez retourner votre
réveil radio au service technique.
Encore une fois « Merci d’avoir choisi Tivoli Audio », consommez sans modération votre
radio PAL+!
A propos de Tivoli Audio:
La marque Tivoli Audio a été créée par Tom DeVesto, avec la mission de mettre à la disposition
des consommateurs des appareils de grande qualité audio, d’une utilisation simple et d’un
design élégant. En qualité de Directeur Exécutif (CEO) et Directeur du département Recherche et Développement de sa précédente entreprise Cambridge SoundWorks*, Tom
DeVesto a mis au point de très performants produits destinés aux marchés de la Haute
Fidélité ou du Multimédia. Tom a également fait partie du comité de direction d’entreprises
telles qu’Advent et Kloss Video.
*Cambridge SoundWorks est une marque déposée de Creative Labs, Singapour.
Dans votre emballage de PAL+ vous trouverez:
• Une alimentation externe
• Un câble audio stéréo min jack-mini jack (3,5 mm)
• Une batterie NiMH (installée dans l’appareil)
• Une télécommande (pile installée)
• Un support de télécommande
Si l’un quelconque de ces accessoires venait à manquer, contactez votre revendeur ou le
distributeur Tivoli Audio.
Premiers pas:
1. Déployez l’antenne.
2. Raccordez l’alimentation externe à votre appareil et raccordez l’autre extrémité à une
prise de courant.
3. Enfoncez la touche “On” de la télécommande ou appuyez brièvement dur la molette
située sur le dessus du PAL+. Patientez le temps que l’appareil effectue complètement
un “Auto Scan”.
4. Appuyez sur les touches “haut” et “bas” de la télécommande pour visualiser les stations
disponibles et mettre en surbrillance la station que vous souhaitez écouter.
55 – FRANÇAIS
Page 56

5. Appuyez sur la touche Menu/Select de la télécommande pour écouter la station
en surbrillance.
6. Utilisez les touches Volume Up ou Volume Down de la télécommande pour ajuster le
volume, ou utilisez le contrôle rotatif sur le dessus de votre appareil.
Support de télécommande:
Un support de télécommande est livré avec votre
appareil. L’adhésif double face fixé dessus vous
permettra de le positionner sur le côté ou à l’arrière
de votre radio.
1 2 3 4 5
Description des contrôles
(reglages du dessus - afficheur):
1. MOLETTE MULTI-FONCTION (DESSUS):
De manière pratique, cette molette a plusieurs
fonctions:
Mise en route: Quand votre PAL+ est éteint,
appuyez au centre de la molette située au
dessus, pour l’allumer. Lorsqu’il est en fonction,
quelque soit la source, maintenez une pression
une seconde pour l’éteindre. (Attention: si votre
PAL+ n’est pas raccordé à son alimentation,
la touche Power de votre télécommande sera
sans effet.)
Volume: Tournez le bouton dans le sens des
aiguilles de la montre pour augmenter le volume et dans le sens inverse pour le diminuer.
Tuning (Réglage stations): En FM ou RNT (DAB/DAB+/DMB), appuyez une fois au
centre et tournez la molette dans un sens ou dans l’autre pour régler manuellement
la fréquence. Appuyez à nouveau pour que l’affichage se mette à jour. Une lettre “T”
apparait dans l’afficheur pour signaler le mode de réglage manuel. Il n’y a aucune
fonction réglage sur la source Aux. Sans manipulation pendant sept secondes, la
molette redevient contrôle de volume.
Source: Appuyez deux fois au centre de la molette pour passer en mode sélection et
utilisez la rotation de la molette pour choisir votre source. Une nouvelle pression au
centre permettra de confirmer votre choix. Sans manipulation pendant sept secondes,
la source affichée sera sélectionnée.
Snooze (rappel): Lors du déclenchement du réveil, une pression enclenchera le rappel.
L’icône apparait dans l’afficheur lorsque la fonction rappel est enclenchée. Le délai de
rappel est de 7 minutes. Une nouvelle pression annulera le rappel. Attention, le réveil ne
fonctionnera qu’à la condition que le PAL+ soit raccordé à son alimentation et branché.
1
56 – FRANÇAIS
Page 57

2. AFFICHEUR:
: Volume (niveau) FM: FM (Modulation fréquences)
: Durée avant extinction (Sleep) DAB: DAB/DAB+/DMB
: Temps avant rappel (Snooze) AUX: Entrée auxiliaire
: Réveils 1 & 2 : Indication du statut de la batterie
(Chiffres): Horloge : Indication Mono ou Stéréo pour l’écoute au casque
: Niveau du signal T: Mode synthonisation manuelle
3. PRESELECTIONS: Pour mémoriser une station que vous écoutez, enfoncez et maintenez
la touche mémoire souhaitée. Pour rappeler une station appuyez brièvement sur la
touche correspondante. En mode FM, le N° de la mémoire apparaîtra dans l’afficheur.
Vous disposez de 5 présélections en FM et 5 en RNT.
57 – FRANÇAIS
Page 58

Description des contrôles (situés à l’arrière):
4
3
2
5
1. 12VDC/1000mA: Utilisez ce connecteur pour brancher l’alimentation fournie avec votre
PAL+, soit pour le faire fonctionner sur secteur, soit pour recharger la batterie lorsque
l’appareil est en mode veille. N’utilisez aucune autre alimentation que celle fournie
avec votre appareil. En cas de perte ou de dommage, vous devez impérativement
remplacer votre alimentation par une alimentation originale à l’identique de marque Tivoli
Audio. Vous devez respecter les normes de sécurité de votre pays et en Europe une
alimentation conforme à la EN/IEC 60065 (12V CC 1A et 230V 50Hz). L’utilisation d’une
alimentation autre que celle d’origine est dangereuse. Remettez en place l’obturateur
caoutchouc si vous n’utilisez pas cette connexion. Le contact doit être positif au centre
5,5 mm / 2,1 mm. Il est normal que l’alimentation chauffe pendant l’utilisation.
2.
ANTENNE: Déployez l’antenne télescopique et positionnez la de manière à obtenir
la meilleure réception. En cas de signal FM puissant, il peut être judicieux de replier
l’antenne pour réduire les interférences. Lorsque vous n’utilisez pas votre radio, replier
l’antenne pour la protéger. Pour plus d’infos, reportez vous à la section “Réception”.
3. SORTIE CASQUE: Raccordez un casque (non fourni) sur cette sortie stéréo contrôlée.
Le raccordement du casque coupe automatiquement le haut parleur principal. Le niveau
d’écoute se règle par le bouton Volume du poste ou de la télécommande. La commande
“Mono” de la télécommande vous permet de commuter cette sortie en Mono ou en
Stéréo. Un icône de casque ( ) indiquera que la sortie est commutée en stéréo. La
connexion se fait par l’intermédiaire d’un mini jack stéréo 3,5 mm. Ecoutez à un niveau
raisonnable. Remettez en place l’obturateur caoutchouc si vous n’utilisez pas cette
sortie casque.
4.
AUX IN: Pour écouter une source audio externe, telle qu’un lecteur CD ou MP3, un
ordinateur, un iPod ou un iPhone, raccordez la sortie casque de la source sur cette
entrée par l’intermédiaire d’un câble équipé d’un mini jack stéréo 3,5 mm. Remarque:
Les niveaux de cette entrée auxiliaire et de la radio peuvent être tout à fait différents.
Remettez en place l’obturateur caoutchouc si vous n’utilisez pas cette entrée.
1
58 – FRANÇAIS
Page 59

5. LOGEMENT BATTERIE: Abrite la batterie NiMH du PAL+. Le connecteur mini B USB
situé est réservé à l’utilisation par le service technique. Toute tentative de raccordement
à ce connecteur peut endommager votre PAL+ et annulerait la garantie.
Description des fonctions de la télécommande:
(Un support de télécommande est livré avec votre appareil. L’adhésif double face fixé
dessus vous permettra de le positionner sur le côté ou à l’arrière de votre radio.)
4
2
3
5
1
6
7
12
BACK
9
11
8
MONO
13
10
14
1. MISE SOUS TENSION: Appuyez sur cette touche pour allumer votre PAL+. La radio
s’allumera sur la dernière source écoutée. Appuyez à nouveau pour éteindre. La mise
en marche par la télécommande ne peut fonctionner que si votre PAL+ est raccorder
au secteur.
2. MUTE/SNOOZE: Appuyez pour passer en mode silence (Mute) pendant l’écoute, les barres
après l’icône disparaitront. En appuyant sur cette touche ou en ajustant le volume, vous
sortirez du mode silence. Lorsque le réveil se déclenche, appuyez sur cette touche pour
déclencher une pause de 7 minutes. Le réveil se déclenchera à nouveau après. Un icône
apparait dans l’afficheur lorsque la fonction rappel est enclenchée. La durée de rappel
n’est pas réglable. Les fonctions Rappel et Alarm ne sont opérantes qu’à la condition que
le PAL+ soit raccordé au secteur.
3. ALARM (RÉVEIL): Utilisez les touches pq et Select pour régler les réveils. Reportez
vous à la section “Comment régler le réveil”.
4. SLEEP: (Tempo) Appuyez plusieurs fois sur cette touche pour visualiser le temps
d’écoute avant extinction de votre radio et utilisez la touche “Select” pour valider. Une
pression sur la touche “Sleep” de la télécommande affichera le temps restant. Lorsque
la fonction Tempo est active, une icône de montre [ ] s’affiche. Pour annuler cette
59 – FRANÇAIS
Page 60

fonction appuyez plusieurs fois sur la touche “Sleep” jusqu’à afficher « Sleep off » et
validez avez “Select”. Si vous utilisez la fonction Sleep et que votre PAL+ fonctionne
sur batterie, une fois le temps écoulé, la radio s’éteindra complètement. Si vous aviez
programmée un réveil celui-ci ne fonctionnera pas. Pour utiliser sans problème les
fonctions “Sleep” et “Réveil”, n’oubliez pas de brancher votre PAL+ sur le secteur.
5. SOURCE: Pressez pour choisir la source.
6. INFO: Appuyez plusieurs fois pour afficher les différentes informations disponibles.
Aucune information n’est disponible en Aux.
7. MEMOIRES 1-5: Appuyez sur un bouton et maintenez pour enregistrer la station en
écoute. Un appui bref sur une de ces touches rappelle la mémoire correspondante. En
FM, la fréquence et le numéro de la mémoire s’affichent sur l’écran. Vous disposez de
5 mémoires en FM et 5 en RNT.
8. VOLUME +/–: Appuyez sur + pour augmenter le volume et sur – pour le baisser. Si le son
est entaché de distorsion, diminuez le volume pour éviter d’endommager le haut-parleur.
En réglant le volume pendant que le PAL+ est en mode silence, celui-ci sera annulé.
9. pq/TUNE +/-: Utilisez pour naviguer dans le menu. Utilisez ces mêmes touches pour
régler manuellement les fréquences. Appuyez et maintenez appuyé pour faire défiler
rapidement les fréquences. Un “T” dans l’afficheur indique le réglage manuel. Il faut 1
seconde avant que les fréquences ne changent. Appuyez 1,5 sec et relâchez pour lancer
la fonction scan automatique jusqu’à la détection de la prochaine station. En recherche
automatique, l’afficheur indique « Scanning… ».
10. tu: Utilisez pour naviguer dans le menu. La flèche droite duplique la touche “Menu/
Select”. Dans certains menus la flèche gauche permet de revenir à la rubrique précédente.
11. MENU/SELECT: Appuyez pour renter dans le menu et faire les sélections. Reportez
vous à la rubrique “Menu”.
12. BACK: Cette touche vous permet de revenir en arrière.
13. MONO: Appuyez sur cette touche pour sélectionner Mono ou Stéréo. L’indication “M”
ou “ST” apparait. Cette information est également fournie lors de l’utilisation de la touche
Info de la télécommande. Si à l’écoute au casque d’une station FM, vous constatez du
bruit, n’hésitez pas à commuter votre radio en Mono afin de réduire celui-ci. Pour plus
d’information, reportez vous à la rubrique “Balance”.
14. LOGEMENT DE LA PILE: Retirez le plastique isolant la pile afin de pouvoir utiliser la
télécommande. En cas de besoin, assurez vous d’utiliser exactement la même pile que
celle d’origine: pile bouton au Lithium CR2025.
ATTENTION
Soyez attentif au modèle de batterie utilisée. Respectez les règles locales concernant
les déchets et leur recyclage.
: Si la pile est incorrectement remplacée, il y a un risque d’explosion.
60 – FRANÇAIS
Page 61

Menu et particularités:
Appuyez et maintenez enfoncée la touche Menu/Select. Utilisez les touches pq et
Select pour changer de rubrique. Utilisez la touche Back pour revenir ou attendez 15
sec la sortie automatique du menu.
L’asterix (*) indique le choix qui a été validé.
1. RÉGLAGE SCAN (EN FM SEULEMENT): Appuyez sur “Menu” et utilisez pq et Select
pour choisir entre « Tout signal » et « Signal fort » lors de la recherche automatique (voir
#9 (pq/Tune +/-) dans la section TELECOMMANDE)). Le choix « Tout signal » accroit
la sensibilité et peut générer l’arrêt en recherche sur un bruit inter-station. Ceci n’est
pas disponible sur la source Auxiliaire.
2. EQ TIVOLI: Ceci vous permet de régler la tonalité de votre appareil. Avec les flèches
pq et la touches Select, vous pouvez régler comme vous le souhaitez les basses et les
aiguës. Ces réglages se trouvent sous « User EQ ». Sur le menu approprié, avec les flèches
pq et la touches Select vous pourrez mettre en fonction « On » ou supprimer « Off »
l’accentuation « Contour » (Loudness). L’accentuation « Contour » est recommandée afin
d’avoir un équilibre tonal plus naturel en écoute à faible niveau. Utilisez pq et Select
pour utilisez les courbes d’égalisation préenregistrées, ces réglages se substituent aux
réglages Graves et Aiguës personnalisés, par contre le réglage « Contour » n’est pas affecté.
Le choix « Plat » rétablit les réglages d’usine, c’est-à-dire les Graves et Aiguës à 0 et
Contour désactivé (Off). En sélectionnant « User EQ » vous retrouverez vos réglages
personnels. Dans le menu EQ Tivoli, le chiffre de gauche indique le réglage des Graves
et le chiffre de droite celui des Aiguës.
3. BALANCE (DANS LE MENU EQ TIVOLI): Utilisez les touches pq pour effectuer votre
réglage préféré. Ceci n’affecte que la sortie casque.
4. HEURE (DANS LE MENU RÉGLAGE):
12H/24H:
Appuyez sur Select et utilisez les flèches pq pour choisir le format 12h ou 24h.
Heure/Date:
Appuyez sur Select et utilisez les flèches pq pour régler l’heure, les minutes puis la
date. Pour pouvoir régler manuellement l’heure et la date, vous devez désactiver la
mise à jour automatique.
MAJ Auto:
Mise à jour automatique. Appuyez sur Select et utilisez les flèches pq pour choisir
le mode de mise à jour « MAJ de tout », « MAJ DAB » (aussi DMB) ou « MAJ FM » (de
RDS). Pour que cette mise à jour ait lieu, il faut disposer de la réception d’un signal FM
RDS ou RNT porteur de l’information d’heure et de date. Cette mise à jour peut prendre
plusieurs minutes avant d’être effective. Tivoli Audio ne saurait être tenu responsable
d’une mise à jour non exacte due à l’information reçue d’une station.
Pour régler l’heure manuellement, choisissez « Pas de MAJ », puis sélectionnez « Heure/
Date » dans le menu « Heure » et en utilisant les touches pq ou tu pour régler l’heure
et la date. Dans le même menu « Heure », vous pourrez choisir le format d’affichage de
l’heure et de la date.
REMARQUE: En cas de coupure de courant, le réglage du réveil et de l’horloge sont
conservés dans la mémoire interne. Lorsqu’il a été choisi une mise à jour automatique,
celle-ci s’effectue à partir de la dernière station écoutée, même si le PAL+ est en veille.
61 – FRANÇAIS
Page 62

Format Date:
Appuyez sur Select et utilisez les flèches pq et la touche Select pour choisir le
format souhaité.
5. ECLAIRAGE (DANS LE MENU RÉGLAGE):
Timeout:
L’éclairage de l’afficheur peut être constant que vous effectuiez ou non des commandes
(tel est le réglage d’usine). Vous pouvez programmer une atténuation de l’éclairage
après une temporisation choisie. Toute commande sur l’appareil ou la télécommande
réactive l’éclairage.
Appuyez sur Select et utilisez les flèches pq et la touche Select pour régler la temporisation 10, 20, 30, 45, 60, 90, 120 ou 180 secondes, ou Off pour désactiver l’atténuation
de l’éclairage.
Eclairage fort:
Appuyez sur Select et utilisez les flèches pq et la touche Select pour régler l’éclairage fort.
Eclairage faible:
Si vous avez choisi une temporisation pour l’atténuation de l’éclairage, appuyez sur Select
et utilisez les flèches pq pour régler l’éclairage atténué. Vous pouvez choisir « Off »
pour que l’afficheur s’éteigne et ne soit pas gênant la nuit.
6. LANGUE (DANS LE MENU RÉGLAGE): Appuyez sur Select et utilisez les flèches pq
et la touche Select pour choisir la langue.
7.
RÉGLAGE USINE (DANS LE MENU RÉGLAGE): Appuyez sur Select et utilisez les
flèches pq ou tu et la touche Select pour confirmer par « Oui » ou « Non » le retour
aux réglages d’origine. Un retour au réglage usine efface tous les réglages personnels
tels que le choix de langue ou les mémoires.
8.
ID (DANS LE MENU RÉGLAGE): Appuyez sur Select pour afficher les informations
concernant la version logiciel de votre radio. Cette information peut vous être demandée
en cas d’appel au service technique.
9. SLEEP (DANS LE MENU RÉGLAGE): Appuyez sur Select et utilisez les flèches pq et
la touche Select pour régler la temporisation avant extinction choisie. Un accès direct à
ce réglage est possible par la touche Sleep de la télécommande. L’icône d’une horloge
apparaitra dans l’afficheur lorsque la fonction Sleep est activée.
ATTENTION: Si vous utilisez la fonction Sleep et que votre PAL+ fonctionne sur batterie,
une fois le temps écoulé, la radio s’éteindra complètement. Si vous aviez programmé
un réveil celui-ci ne fonctionnera pas. Pour utiliser sans problème les fonctions “Sleep”
et “Réveil”, n’oubliez pas de brancher votre PAL+ sur le secteur.
62 – FRANÇAIS
Page 63

Comment régler le réveil:
Accédez au réveil par le menu ou appuyez sur le bouton Alarm de la télécommande.
1. « Alarm 1 » est le 1er réglage qui apparait. Appuyez à nouveau sur Alarm ou utilisez les
touches pq et Select pour choisir Réveil 1 ou Réveil 2. Remarque: vous naviguez dans
le menu Réveil avec les touches Back ou t et Select ou u.
2.
Utilisez les touches pq pour mettre en fonction le réveil. Si l’heure et la date n’ont pas encore
été réglées, le PAL+ vous y invitera. Sinon réglez le réveil en suivant les étapes suivantes.
3.
Utilisez les touches pq pour régler l’heure, puis pressez Select. Répétez la même
opération pour les minutes, ainsi que la mention AM/PM si vous utilisez le format 12h.
4. Utilisez les touches pq pour régler la durée du réveil, puis pressez Select.
5. Utilisez les touches pq pour choisir la source que vous souhaitez utiliser, puis pressez
Select. Si vous choisissez la RNT ou la FM, utilisez Tune+/- pour choisir une station en
mémoire ou la dernière station écoutée, puis pressez Select. Assurez-vous que la station
choisie émet effectivement au moment programmé. Au moment du réveil, si celui-ci est
réglé sur RNT et que ni la station choisie, ni la dernière station écoutée n’émettent, le
PAL+ vous réveillera avec le buzzer.
6. Utilisez les touches pq pour régler le type de réveil que vous souhaitez. Si votre choix
se porte sur « Une fois », vous devez choisir la date.
7. Enfin utilisez les touches pq pour régler le volume et pressez Select.
8. Répétez cette procédure pour le Réveil 2, si vous le désirez.
Si vous vous êtes trompez à une quelconque étape, utilisez la touche Back pour revenir en
arrière et recommencer.
Remarque: vos réglages ne seront sauvegardés que si vous avez été au bout du processus de réglage du réveil et qu’est apparue sur l’afficheur l’inscription « Réveil réglé ».
important:
• Le réveil ne peut fonctionner si le PAL+ est éteint et non connecté à
l’alimentation externe.
• Le niveau sonore du réveil augmente progressivement pour atteindre le
niveau programmé après quelques secondes.
• Si l’alimentation électrique n’est pas branchée ou si la batterie vient à être
complètement déchargée, les réglages de réveil seront sauvegardés mais
le réveil ne fonctionnera pas.
options reveil:
Activation rapide: Le PAL+ étant en veille, un appui bref répété sur Alarm vous permettra
d’activer ou de désactiver l’un ou l’autre des réveils ou les deux.
Couper le réveil: Pour couper le réveil lorsqu’il se met en fonction: appuyez sur Alarm ou Power
de la télécommande ou de manière prolongée au centre de la molette au dessus du PAL+.
Snooze (Répétition): Pour activer la répétition du réveil, appuyez sur le bouton Snooze
de la télécommande lorsque le réveil se déclenche ou brièvement au centre de la molette
multifonctions. Le délai de la fonction Répétition n’est pas ajustable.
63 – FRANÇAIS
Page 64

Remarque: En cours de répétition, vous pouvez voir le délai avant activation en appuyant
sur la touche Snooze de la télécommande. Si vous appuyez sur les touches Alarm ou
Power de la télécommande ou sur la molette multifonctions du PAL+, la fonction répétition sera annulée. Le PAL+ se mettra en veille ou s’éteindra s’il fonctionne sur batterie.
Radio Numérique Terrestre (DAB/DAB+/DMB):
LISTE STATION: Utilisez les touches pq de la télécommande, ou appuyez une fois sur
la molette Multifonction sur le dessus de l’appareil, pour montrer toutes les stations RNT
disponibles à l’écoute et choisir la station désirée. L’affichage de la station disparaîtra au
bout de 7 secondes si la manipulation se fait avec² la molette, au bout de 15 si vous utilisez
la télécommande.
Appuyez et maintenez enfoncée la touche Menu/Select. Utilisez les touches pq et
Select pour changer de rubrique. Utilisez la touche Back pour revenir ou attendez 15
sec la sortie automatique du menu.
Un astérisque (*) indique que l’option affichée a été sélectionnée.
Remarque: Lorsque vous activez la RNT si la liste de station est vide, une recherche
automatique se mettra en route.
1. RECHERCHE AUTOMATIQUE: Recherche toutes les stations disponibles. Si vous
déplacez le PAL+, vous devrez relancer une recherche automatique pour mettre à jour la
liste des stations disponibles. Pour annuler la recherche automatique, appuyez sur Back.
2. EQ TIVOLI: Reportez vous plus haut à la rubrique Menu et particularités.
3. RECHERCHE MANUELLE: Utilisez les touches pq pour afficher la fréquence station
spécifique et utilisez la touche Select pour l’écouter.
4.
DRC: Contrôle de la dynamique vous permet de compresser le signal de certaines
stations afin de pouvoir les écouter à faible niveau ou pour limiter le bruit de fond dans
les passages faibles.
5. MODE AVANCÉ: Si déplacez le PAL+ dans une nouvelle région, vous risquez de retrouver
des stations avec le même nom. Si vous choisissez « Vue avancée », « Long label », et
« Ensemble vu » vous serez en mesure de distinguer les différentes stations.
En DAB/DAB+, nous vous conseillons de les désactiver, en DMB au contraire, il est
conseillé de les mettre en fonction.
6. ELIMINER: Si le PAL+ est déplacé dans une nouvelle région, grâce à la fonction
« Eliminer », les stations non disponibles seront supprimées de la liste. Utilisez les
flèches pq ou tu et la touche Select pour confirmer « Oui » ou pas « Non » la
suppression de stations devenues non disponibles.
REMARQUE: Si vous déplacez votre PAL+ à un endroit où la liste de stations RNT reçues
peut avoir changé, nous vous recommandons de mettre à jour la liste en “Eliminant” les
stations non disponibles.
messages en rnt:
Service associés: La disponibilité de services associés est signalée par le symbole >>
affiché après le nom de la station. Les services associés ne sont pas forcément disponibles
dans toutes les régions.
64 – FRANÇAIS
Page 65

« ? »: Ce symbole indique que la station n’émet pas.
Non disponible: Indique que le signal de la station DAB est trop faible.
A propos de la batterie:
Le PAL+ utilise un pack scellé de 6 accus haute-capacité Nickel Métal Hydride (NiMH).
Contrairement aux accus Nickel Cadmium (NiCd), celles-ci n’ont pas d’effet mémoire, ont
une durée d’utilisation plus longue et ne contiennent pas de métaux toxiques. L’icône de pile
dans l’afficheur sert d’indicateur à la fois pour le niveau de charge et la charge de la batterie.
CHARGE: Pour recharger le PAL+, branchez-le et mettez-le en veille (Stand By). Si la batterie
est complètement déchargée, il faudra environ 3h30 pour la recharger complètement. La
batterie étant complètement déchargée lorsqu’elle est neuve, il est conseillé de faire 4
ou 5 cycle de décharge complète puis recharge pour obtenir les performances prévues
d’autonomie. L’icône de la batterie clignote pendant la charge. Il cesse de clignoter lorsque
la batterie est complètement chargée et indique 3 barres. La batterie ne se charge pas si le
PAL+ est allumé bien qu’il soit alimenté. En résumé pour charger le PAL+, il faut qu’il soit
branché et en veille.
BATTERIE FAIBLE: Au fur et à mesure de l’utilisation, l’icône va indiquer 3 puis 2 puis 1
barre puis être vide. Le son sera distordu quand la batterie atteindra un faible niveau.
Ceci est normal et est une indication audible de la nécessité de mettre rapidement la
batterie en charge. La batterie du PAL+ étant du type NiMH, elle n’a aucun effet mémoire,
il n’est donc pas nécessaire d’attendre que la batterie soit complètement épuisée pour la
remettre en charge, attendre la décharge complète ne pose toutefois pas de problèmes.
L’icône de batterie donne une approximation du statu alimentation/charge. Cela peut prendre
quelques secondes pour que l’information se stabilise. Si la batterie est retirée et que le
PAL+ fonctionne uniquement sur secteur, l’icône dans l’afficheur montre une pile vide.
TEMPS D’AUTONOMIE SUR BATTERIE: De nombreux facteurs tels que le niveau d’écoute
ou le type de programmes écoutés affectent le temps d’autonomie. Une écoute à faible
niveau offre une autonomie plus grande qu’à fort niveau. Au fur et à mesure de l’utilisation,
vous maitriserez mieux l’autonomie de la batterie.
Cela ne pose aucun problème d’utiliser constamment le PAL+ sur secteur.
REMPLACEMENT DE LA BATTERIE: S’il s’avère nécessaire de changer la batterie,
soulevez l’antenne, dévissez le cache batterie et retirez-la. Repérez comment est connectée
la batterie avant de la débrancher. Remplacez la batterie en vous assurant de l’avoir correctement raccordée. Remettez en place le couvercle en insérant d’abord la partie inférieure
et revissez-le.
ATTENTION
Tivoli Audio. Respectez les règles locales concernant les déchets et leur recyclage. La
batterie ne doit être exposé ni au rayons du soleil, ni au feu, ni à une source de chaleur
excessive. L’utilisation d’une batterie autre qu’une Tivoli Audio peut endommager
votre PAL+.
En ce qui concerne la pile de la télécommande reportez vous à la rubrique concernée dans
le paragraphe “Télécommande”.
: Pour réduire les risques, assurez vous d’utiliser une batterie d’origine
65 – FRANÇAIS
Page 66

Réception RNT/FM:
Si vous déplacez votre PAL+, il est recommandé de refaire un scan et de mettre à jour la
liste des stations disponibles.
FM: Dans les zones de signal fort, repliez l’antenne afin d’améliorer la réception.
RDS(en FM uniquement):
Le RDS (Radio Data System) transmet en même temps que le signal audio, du texte et des
informations. Toutes les stations de radio FM ne transmettent pas nécessairement des informations RDS. Si le signal RDS est trop faible, le texte affiché peut être entaché d’erreurs.
Vous pouvez essayer d’améliorer ceci en déplaçant l’antenne. La nature des informations
RDS est déterminée par la station de radio.
Utilisation du PAL+:
• Le PAL+ est prévu pour être utilisé dans un milieu humide, il n’est toutefois pas prévu
pour être utilisé en extérieur sous la pluie ou être immergé.
• Le PAL+ est une radio portable, mais il n’est pas indestructible. Evitez de le faire
tomber, de le jeter ou de le heurter.
• Attrapez toujours le PAL+ par les encoches sur les côtés afin d’éviter qu’il ne vous
échappe de la main.
Entretien:
N’utilisez jamais de produit ou de chiffon corrosif. Le revêtement est très sensible aux
produits de nettoyage. La détérioration du revêtement n’est pas couverte par la garantie.
Pour nettoyer le PAL+, utilisez un chiffon doux.
66 – FRANÇAIS
Page 67

Garantie contractuelle:
Chez Tivoli Audio nous fabriquons des produits selon des standards de qualité élevés et nous
avons pleine confiance dans les performances de nos produits. En conséquence, nous garantissons ces produits (pièces et main d’œuvre) contre tout vice caché, pendant un an à compter
de la date d’achat au profit de l’acheteur originel. Cette garantie n’est pas transférable.
Dans la Communauté européenne, en Suisse et en Norvège, cette garantie est de deux ans.
Cette garantie ne couvre pas les dommages qui pourraient résulter d’une utilisation
ou installation inappropriée, de la tentative de charge de piles alcaline, de l’utilisation
d’accessoires non adaptés, de modifications, de tentative de réparation, de dégâts subis
pendant le transport, de la perte, de la malveillance, d’accidents, de l’utilisation sur une
mauvaise tension, de surtension, de la foudre, de tout cas de force majeure, de l’usure
normale, ou d’une utilisation commerciale. Merci de vous adresser à votre revendeur pour
toute réparation. La preuve d’achat peut s’avérer indispensable.
Ne tentez pas d’ouvrir le produit. Aucune pièce ne se trouve à l’intérieur et toute tentative
de modification ou de réparation annulerait la garantie.
Tivoli Audio ne peut prendre en charge l’élimination de problèmes de réception, de bruits
parasites externes, la perte de temps, la gêne, la non-disponibilité du produit ainsi que tout
problème résultant d’une mauvaise utilisation.
Si l’Etat ou le Pays où vous avez acheté cet appareil impose des droits complémentaires
à la garantie, ceux-ci s’appliquent. Si l’Etat ou le Pays interdisent certaines limitations, ces
limitations ne sauraient s’appliquer.
Si vous avez acquis une extension de service ou de garantie, celle-ci incombe exclusivement
au revendeur auprès de qui vous l’avez souscrite.
Vous pouvez valider votre garantie dans les 30 jours qui suivent votre
achat sur le site www.tivoliaudio.com.
Pour tout problème technique, contactez votre revendeur ou le distributeur officiel Tivoli Audio
de votre pays.
67 – FRANÇAIS
Page 68

Caractéristiques:
Modèle: PAL+
Type: Portable DAB/DAB+/DMB/FM radio
Haut-parleur: 2.5" full range, video shielded
Gamme de réception: FM: 87.5-108.0MHz (receiving range may vary by region)
DAB (Band III)/DAB+/DMB: 174-240MHz
Alimentation: 12VDC nominal – 15VDC maximum, 1000mA
Batterie: NiMH 7.2V 2200mA
Intensité batterie: 1000mA
Alimentation: PALP-PS-CE : 12VDC 1A 230V 50Hz
Dimensions (l x h x p): 15.55cm x 9.35cm x 9.25cm (hors tout)
(6.12" H x 3.68" W x 3.64" D)
Poids: 0.84 Kg
Ces spécifications sont susceptibles d’être modifiées sans préavis.
Tivoli Audio se réserve le droit de modifier ses produits sans préavis.
Tivoli Audio, le logo Tivoli Audio, PAL+ et Portable Audio Laboratory sont des marques
déposées de Tivoli Audio LLC.
68 – FRANÇAIS
Page 69

Importanti Istruzioni Di Sicurezza:
1. Leggete queste istruzioni.
2. Conservate queste istruzioni.
3. Osservate tutti gli avvertimenti.
4. Seguite tutte le istruzioni.
5. ATTENZIONE - Per ridurre il rischio di shock elettrici, non esponete questo prodotto
alla pioggia o all'umidità.
6. Pulite solo con un panno secco.
7.
Non bloccate qualsiasi porta di ventilazione. Installate il prodotto in conformità alle
istruzioni del produttore.
8.
Non installate il prodotto vicino a qualsiasi fonte di calore come caloriferi, griglie di
aerazione, stufe, o altri dispositivi (inclusi gli amplificatori) che producono calore.
9. Non compromettete la funzionalità di sicurezza di una spina con messa a terra.
10. Proteggete il cavo di alimentazione In modo che non sia calpestato o pizzicato in par-
ticolare in corrispondenza delle prese di estremità, delle prese a muro, e dei punti di
uscita dal dispositivo.
11. Utilizzate solo accessori e impianti specificati dal produttore.
12. Utilizzate solo il carrello, l'appoggio, il treppiede, o il tavolo specificato
dal produttore, o venduto con il dispositivo. Quando si usa un carrello,
fate prudenza nel movimentare la combinazione di dispositivo e carrello
per evitare infortuni dovuti al rovesciamento.
13.
Per proteggere meglio questo prodotto durante un temporale, o quando lo si lascia
inutilizzato per lungo tempo, scollegatelo dalla presa a muro. Questo preverrà danneggiamenti al prodotto dovuti a fulmini o sovratensioni.
14. Utilizzate il prodotto solo con il tipo di alimentazione indicato sul pannello posteriore.
Per prodotti che usano un alimentatore esterno, utilizzate un alimentatore sostitutivo
esattamente uguale in caso di perdita o danneggiamento dell'originale. Per prodotti che
69 – ITALIANO
Page 70

utilizzano batterie, fate riferimento alle istruzioni nel manuale utente.
15. Scollegate questo prodotto dalla presa a muro e portatelo in riparazione a personale
qualificato se si verifica una delle seguenti condizioni:
a. Quando il cavo di alimentazione o la presa sono danneggiati.
b. Se del liquido è colato o degli oggetti sono caduti sul prodotto.
c. Se il prodotto è stato esposto a acqua o pioggia.
d. Se il prodotto non funziona normalmente seguendo le istruzioni di utilizzo.
e. Se il prodotto è stato fatto cadere o danneggiato in altro modo.
f. Quando il prodotto mostra un importante degrado delle prestazioni.
16. Il dispositivo non deve essere esposto a gocciolamenti o spruzzi, né oggetti con liquidi
devono essere posti sul dispositivo.
17. In caso di rottura dello schermo LCD non toccare il liquido.
18. Tenete questo prodotto a una distanza di sicurezza da fiamme vive, come una candela
accesa.
19. L'intervallo di temperature suggerito per l'utilizzo è da 5˚ C a 40˚ C (41˚ F a 104˚ F)
20.
L'alimentatore esterno deve essere posizionato in modo da essere facilmente accessibile
e di non essere bloccato da mobili, ecc.
21. La spina del cavo di alimentazione costituisce il dispositivo di scollegamento e deve
essere sempre facilmente accessibili.
22.
ATTENZIONE - La rete non venga interrotta in posizione off, ma i circuiti sono dealimentati.WARNING – The mains are not disconnected in the off position, but the
circuits are de-powered.
Questo prodotto può essere riciclato. I prodotti che riportano questo simbolo NON devo-
no essere gettati con i normali rifiuti domestici. Alla fine della vita del
prodotto portarlo ad un punto di raccolta designato per il riciclaggio dei
dispositivi elettrici ed elettronici. Informarsi in merito alla consegna e ai
punti di raccolta presso le autorità competenti locali.
70 – ITALIANO
La Direttiva Europea si Rifiuti Elettrici e sugli Apparecchi Elettronici (European Waste Electrical and Electronic Equipment Directive - WEEE) è
stata applicata allo scopo di ridurre drasticamente la quantità di rifiuti
convogliata verso le discariche riducendo quindi l'impatto ambientale
sul pianeta e sulla salute umana. Agisci con responsabilità riciclando
i prodotti usati. Se questo prodotto è ancora utilizzabile considera la
possibilità di cederlo o venderlo.
Page 71

Istruzioni PAL+ :
Complimenti per l’acquisto. Crediamo che il PAL+ sia uno dei migliori apparecchi radio
portatili DAB/DAB+ /DMB/FM oggi sul mercato.
Sappiamo che siete ansiosi di cominciare ad ascoltare la radio nuova, ma al fine di sfruttare al meglio ciò che il vostro PAL+ è in grado di offrire, vi preghiamo di leggere questo
manuale e le istruzioni di sicurezza. Se avete domande, non esitate a contattare il vostro
rivenditore o Tivoli Audio.
Conservare il cartone e l’imballaggio originale in caso di necessità di spedire la radio,
per danni causati dal trasporto che non sono coperti dalla garanzia di fabbrica.
A nome di tutti noi, grazie per aver scelto Tivoli Audio e godetevi il vostro nuovo PAL+!
A Proposito Di Tivoli Audio:
Tivoli Audio è stata fondata da Tom DeVesto con l’intenzione di dare al consumatore
prodotti di facile utilizzo, dal design elegante e con elevata qualità audio. Come CEO e
capo del dipartimento di ricerca e sviluppo nella sua precedente azienda, Cambridge
Soundworks, Tom si è occupato dello sviluppo di molti dei prodotti di home entertainement
e multimediali più venduti sul mercato. Ha inoltre occupato posizioni chiave per lo sviluppo
prodotto in Advent e Kloss Video.
*Cambridge SoundWorks è un marchio registrato di Creative Labs, Singapore.
In dotazione con PAL+ dovreste trovare:
• Un (1) alimentatore esterno
• Un (1) cavo audio stereo 3,5 mm
• Un (1) pacco batterie NiMH (installato)
• Un (1) telecomando (batterie installate)
• Un (1) porta telecomando
Si prega di contattare il proprio rivenditore o Tivoli Audio se uno di questi accessori manca.
71 – ITALIANO
Page 72

Guida Introduttiva:
1. Estendere l’antenna.
2. Collegare l’alimentatore in dotazione al PAL+ e inserirlo in una presa a muro.
3.
Premere il pulsante di accensione del telecomando o premere brevemente la manopola di
controllo sulla parte superiore del PAL+. Attendere che termini la scansione automatica.
4. Premere i pulsanti su e giù del telecomando per visualizzare le stazioni disponibili e
selezionare la stazione che si desidera ascoltare.
5.
Premere il pulsante Menu/Select del telecomando per sintonizzarsi sulla stazione
evidenziata.
6. Premere il pulsante Volume su o Volume giù del telecomando per regolare il volume
a propriopiacimento o ruotare la manopola di controllo superiore.
Supporto Per Il Telecomando:
È incluso un supporto separato per il telecomando.
Questo incorpora del nastro adesivo sul retro. Staccare la pellicola protettiva e applicare il supporto su
un lato del PAL+ e inserire il telecomando prima dalla
parte inferiore.
1 2 3 4 5
Guida Alle Funzioni
(Pannelli Superiore e Anteriore):
1. MANOPOLA Multifunzione (IN ALTO):
La manopola di controllo serve a molte
comode funzioni:
Alimentazione: Quando il PAL+ è spento,
premere brevemente il pulsante per accendere l’apparecchio. Quando il PAL+ è su una
sorgente, tenere premuta la manopola per
spegnere l’unità (nota: il pulsante Power del
telecomando non accende il PAL+ quando
l’apparecchio è spento e non è collegato alla
rete di alimentazione esterna).
Volume: Quando il PAL+ è su una sorgente, ruotare la manopola in senso orario per
aumentare il volume e in senso antiorario per diminuire il livello del volume.
Sintonia: Quando il PAL+ è su una sorgente, tranne Aux, premere la manopola una volta e
ruotare in senso orario e in senso antiorario per sintonizzare manualmente verso l’alto o verso
il basso. Premere di nuovo per sintonizzarsi sulla stazione e tornare alla funzione volume. La
lettera “T” viene visualizzata sul display per indicare la modalità di sintonizzazione manuale.
Dopo circa 7 secondi di inattività, la manopola di controllo torna per impostazione predefinita
alla funzione di controllo del volume.
1
72 – ITALIANO
Page 73

Sorgente: Quando il PAL+ è su una sorgente, premere la manopola due volte per visualizzare il menu della sorgente. Ruotare la manopola per la sorgente desiderata e premere per
selezionare la sorgente indicata. Se una sorgente non viene selezionata entro 7 secondi, il
display torna di default alla sorgente utilizzata per ultima.
Snooze: Quando la sveglia suona, premere il pulsante Snooze per abilitare la funzione.
Un’icona apparirà sul display quando Snooze è attivo. Il tempo di Snooze è fisso
su 7 minuti. Premere di nuovo per annullare la funzione Snooze. La funzione Snooze
funziona quando il PAL+ è collegato alla rete di alimentazione esterna. Durante il funzionamento a batterie, premendo Snooze non si avrà alcun effetto.
2. LCD:
: Livello del volume FM: Banda FM
: Timer di spegnimento DAB: Banda DAB/DAB+/DMB
: Timer Snooze AUX: Ausiliario
: Alarm 1 e 2 : Stato di carica/alimentazione a batteria
: Orario (cifre centrali) : Indicatore Mono/Stereo per l’uscita cuffie
: Livello di ricezione T: Modalità di sintonizzazione manuale
3. PRESET: Tenere premuto per memorizzare la stazione sintonizzata. Premere breve-
mente per richiamare la stazione associata a quel particolare Preset. In modalità FM,
il numero del Preset sarà indicato sul display. Sono disponibili 5 preset per ciascuna
banda.
73 – ITALIANO
Page 74

Guide to Features (Rear Panel):
4
3
2
5
1.
12VDC/1000mA: Usare questo ingresso per attivare il PAL+ tramite l’alimentatore
esterno incluso e per ricaricare la batteria quando il PAL+ è in standby. Usare solo
l’alimentatore fornito con il prodotto. In caso di danni all’alimentatore o di alimentatore
errato, utilizzarne solo uno uguale in sostituzione. Ogni alimentatore DC usato deve
soddisfare i requisiti della norma EN/IEC 60065 fornire 12VDC 1A collegato alla rete 230
V 50 Hz. L’uso di un alimentatore DC non consigliato dal produttore o che non soddisfi
queste specifiche può causare un pericolo per la sicurezza. Il connettore di 5,5 mm
centrale è positivo. Lasciare il tappo di gomma inserito quando questo ingresso non è
in uso. È normale che l’alimentatore si scaldi durante l’uso.
2. ANTENNA: Regolare questa antenna telescopica e posizionarla per una ricezione otti-
male. In luoghi dove il segnale FM è forte, se si riduce la lunghezza dell’antenna si può
ottenere una migliore ricezione. Quando l’apparecchio non è in uso, tenere l’antenna
retratta per proteggerla. Per ulteriori informazioni, consultare la sezione “Ricezione”.
3. USCITA CUFFIE: Collegate un auricolare (non incluso) a questa uscita regolabile per
l’ascolto privato. Il collegamento di un auricolare esclude l’altoparlante principale. Il
volume dell’auricolare si regola con la manopola di controllo e i pulsanti di volume del
telecomando. Premere il pulsante MONO del telecomando per cambiare l’uscita cuffie da
mono a stereo. Una icona cuffie( ) appare sul display per indicare che l’uscita cuffie
è in stereo. Durante l’ascolto con le cuffie di una stazione FM con rumore, mantenendo
questa uscita impostata su mono può migliorare la ricezione. Questa uscita accetta un
mini connettore maschio da 3,5 mm stereo. Evitare di usare le cuffie ad alto volume per
evitare possibili danni all’udito. Non indossare le cuffie durante la guida di un veicolo.
Mantenere il tappo di gomma inserito quando questo connettore non è in uso.
4. AUX IN: per ascoltare l’audio da un altro dispositivo, ad esempio un lettore iPod o un
altro lettore MP3, collegare l’uscita audio del dispositivo a questo ingresso stereo e
cambiare la sorgente su AUX usando il telecomando o la manopola di controllo. Questo
ingresso stereo accetta un mini connettore maschio da 3,5 mm stereo. Nota: potrebbe
essere necessario regolare il livello del volume in modo diverso per un dispositivo
1
74 – ITALIANO
Page 75

ausiliario rispetto al livello usato per l’ascolto della radio. Mantenere il tappo di gomma
inserito quando questo ingresso non è in uso.
5.
VANO BATTERIA: qui viene ospitata la batteria NiMH del PAL+. Un’interfaccia con
presa mini-USB si trova dietro l’imbottitura. Questo ingresso serve solo al servizio di
assistenza. Ogni altro uso di questa presa potrebbe danneggiare il PAL+ per cui non si
è coperti dalla garanzia.
Guida Alle Funzioni (Telecomando):
(È incluso un supporto separato per il telecomando dotato di nastro adesivo sul retro.
Rimuovere la pellicola e applicare il supporto su un lato del PAL+).
4
2
3
5
1
6
7
12
BACK
9
11
8
MONO
13
10
14
1. POWER: Premere brevemente per alimentare il PAL+. La radio si accende sull’ultima
sorgente utilizzata. Premere di nuovo per spegnere. Il pulsante di accensione del telecomando non accende il PAL+ quando l’apparecchio è spento e non è collegato alla
rete di alimentazione esterna.
2.
MUTE/SNOOZE: Premere per disattivare l’audio (l’icona mostra il volume senza barre),
mentre l’apparecchio è in riproduzione e premere di nuovo per ripristinare l’audio o
regolare il volume. Premere per disattivare l’allarme mentre suona la sveglia. L’icona
apparirà sul display quando Snooze è attivo. Il tempo di Snooze è fisso su 7 minuti
e non è regolabile. La funzione Snooze funziona quando il PAL+ è collegato alla rete di
alimentazione esterna. Durante il funzionamento a batterie, premendo Snooze non si
avrà alcun effetto.
3.
ALARM: Usare i pulsanti pq e Select per regolare e impostare gli allarmi. Per informazioni
molto importanti da leggere e una guida completa passo-passo, fare riferimento alla
sezione “Come impostare l’allarme”.
75 – ITALIANO
Page 76

4.
SLEEP: Premere più volte per visualizzare la quantità di tempo di autospegnimento della
radio, quindi premere il pulsante Select per selezionare il tempo desiderato. Quando il
timer di spegnimento è attivo è possibile controllare il tempo rimanente premendo il pulsante Sleep del telecomando. Un piccolo quadrante di orologio [ ] viene visualizzato
sul display quando il timer di spegnimento è attivo. Per annullare lo spegnimento, premere il pulsante Sleep fino a quando il display visualizza “Off”. Durante il funzionamento
a batteria (l’alimentatore esterno non è collegato), se viene inserito Sleep ed è impostato
l’allarme, al termine del tempo Sleep, la sveglia non suonerà. Per usare sia la funzione
Sleep che la funzione di allarme, assicurarsi che l’alimentatore esterno sia collegato.
5. SOURCE: Premere ripetutamente per cambiare la sorgente.
6. INFO: Premere ripetutamente per scorrere le informazioni disponibili a seconda della
modalità sorgente. Questa funzione non è disponibile in modalità ausiliaria.
7.
PRESETS 1-5: Tenere premuto per memorizzare la stazione sintonizzata. Premere
brevemente per richiamare la stazione associata a quel particolare Preset. In modalità
FM, il numero di preselezione verrà indicato sul display. Sono disponibili 5 preset per
ciascuna banda.
8.
VOLUME +/–: Premere il pulsante Volume+ per aumentare il livello del volume o il
pulsante Volumeper abbassare il livello del volume. Se l’audio risulta sempre distorto,
abbassare il livello del volume per evitare di danneggiare l’altoparlante. Se si regola il
volume quando l’audio di PAL+ è disattivato si annulla il silenziamento.
9. pq/TUNE +/-: Premere per navigare all’interno dei menu. Usare questi stessi pulsanti
per sintonizzare manualmente verso l’alto o verso il basso in modalità FM e per la scansione automatica delle stazioni. Una “T” apparirà sul display per indicare la modalità di
sintonizzazione manuale. Tenere premuto per spostarsi rapidamente tra le frequenze.
Ci vorrà un secondo prima che le frequenze comincino a cambiare. Premere per circa
1,5 secondi e rilasciare per la scansione automatica sulla stazione successiva rilevata.
Il display visualizza “Scanning...” Vedere anche “Impostazioni di scansione” sotto la
sezione “Menu e funzioni specifiche”.
10. tu: Il pulsante destro con la freccia duplica il pulsante Select. Il sinistro con la freccia
duplica il pulsante “Back” in alcune voci di menu.
11.
MENU/SELECT: Tenere premuto per accedere al menu principale, premere brevemente
per selezionare le voci del menu. Per ulteriori informazioni, vedere la sezione “Menu”.
12. BACK: Premere per tornare alla pagina precedente del menu.
13.
MONO: Premere per modificare l’impostazione Stereo/Mono dell’uscita cuffie. Il display
visualizzerà “M” per mono e “ST” per stereo. “Mono” o “Stereo” sarà anche uno dei
campi visualizzati quando si preme il pulsante Info sul telecomando in modalità FM. Se si
sta ascoltando tramite le cuffie una stazione FM rumorosa in stereo, il passaggio a mono
può migliorare la ricezione. Vedere anche “Balance” in “Menu e funzioni specifiche”.
14. PORTA BATTERIA: Togliere la striscia di protezione che sporge dal supporto della bat-
teria prima di usare il telecomando. Nel caso in cui sia necessario sostituire la batteria
al litio del telecomando, usare una batteria a bottone modello CR2025.
ATTENZIONE: la batteria può esplodere se viene sostituita in modo errato. Sos-
tituire la batteria solo con una dello stesso tipo o equivalente. Smaltire le batterie
esaurite secondo le normative in vigore
.
76 – ITALIANO
Page 77

Menu e Funzioni Specifiche:
Tenere premuto il pulsante Menu del telecomando per accedere al menu principale. Usare i pulsanti pq e il pulsante Select per modificare le voci all’interno del
menu. Usare il pulsante Back pertornare indietro o attendere 15 secondi per il Timeout (far scadere il tempo).
Un asterisco (*) indica la voce di menu visualizzata attualmente impostata.
1.
SCAN SETTING (SOLO IN FM MODE): Premere il pulsante Select e usare i pulsanti pq e Select per scegliere tra “Strong stations only” o “All stations” durante
la scansione automatica (vedere il punto 9 (pq/Tune +/-) della sezione “Telecomando”). Selezionando “All stations” si aumenta la sensibilità della scansione, questo
può comportare la scansione automatica a fermarsi sul rumore. Questa funzione non
è accessibile in modalità ausiliaria.
2.
TIVOLI EQ: premere il pulsante Select e usare i pulsanti pq e Select per regolare i
bassi e gli acuti. I valori modificati verranno mostrati in “User EQ”. Usare i pulsanti pq
e Select per attivare o disattivare Loudness. Si consiglia l’attivazione del Loudness
quando si ascolta a basso volume dato che questa funzione enfatizza le frequenze
alte e basse producendo un suono più naturale. Usare i pulsanti pq e Select per attivare una qualsiasi delle impostazioni di equalizzazione preimpostate. La selezione di una
opzione predefinita ignora le eventuali modifiche apportate ai bassi e agli acuti, mentre
Loudness rimarrà inalterato. EQ “Flat” ripristina le impostazioni audio ai valori di fabbrica,
il che significa che i bassi e gli acuti verranno nuovamente impostati a zero. EQ “Flat”
ripristina anche il Loudness. Tuttavia, se i valori dei bassi e degli acuti sono stati regolati,
tali impostazioni saranno ancora presenti in “User EQ”. Selezionando semplicemente
“User EQ” si possono riattivare i bassi e gli acuti impostati in precedenza. Nella pagina
del menu EQ, i numeri a destra indicano le impostazioni dei bassi e degli acuti.
3. BALANCE (TROVATO SOTTO TIVOLI EQ): premere i pulsanti pq per modificare il
bilanciamento. Questo controllo riguarda solo l’uscita cuffie.
4. TIME (TROVATO SOTTO SETTINGS): IMPOSTA L’ORA 12/24:
Premere il pulsante Select e usare i pulsanti pq e Select per scegliere il formato 12 o
24 ore.
Set time/date:
Premere il pulsante Select e usare i pulsanti pq e Select per regolare l’ora e poi
minuti, immediatamente seguiti dalla data. È necessario impostare l’aggiornamento
automatico per “No update” per impostare l’ora manualmente. Per ulteriori
informazioni, fare riferimento a “Auto Update” qui di seguito.
Auto Update:
Premere il pulsante Select e usare i pulsanti pq e Select per scegliere tra “Update from
any”, “Update from DAB” (anche DMB) o “Update from FM” (RDS). Per qualsiasi aggiornamento è necessaria la ricezione ottimale di un segnale di data/ora fornito da stazioni
DAB o FM RDS. L’aggiornamento dell’orologio potrebbe richiedere oltre un minuto di
tempo. Tivoli Audio non è responsabile per informazioni imprecise di data/ora fornite dal
segnale tramite l’aggiornamento automatico.
Per impostare manualmente l’orologio, selezionare “No Update”, quindi selezionare
“Set Time/Date” sotto il menu “Time” con i pulsanti pq o tu e il pulsante Select
per impostare l’ora. Ripetere la procedura per impostare i minuti e premere Select per
salvare. All’interno di questo stesso menu “Time” sono disponibili opzioni aggiuntive
per impostare il formato della data e la modalità orologio 12/24 ore.
77 – ITALIANO
Page 78

NOTA: Durante un’interruzione di corrente, l’ora della sveglia e l’orologio vengono gestiti
da un sistema interno di memoria. Quando “Auto Update” è impostato su “Update from
any”, la radio può trovare il segnale orario dall’ultima stazione ascoltata, anche quando il
PAL+ è in standby.
Set date format: Premere il pulsante Select e usare i pulsanti pq e Select per sceg-
liere il formato della data preferito.
5. BACKLIGHT (TROVATO SOTTO SETTINGS):
Timeout:
Il livello di retroilluminazione è configurato in fabbrica per rimanere costante.
Tuttavia, è possibile personalizzare la retroilluminazione per cambiarla automaticamente su una impostazione attenuata “Dim Level” dopo un determinato
periodo di tempo ogni volta che i controlli rimangono inutilizzati. Se si riprende il
controllo dell’apparecchio o del telecomando, viene ripristinato il livello di retroilluminazione normale. Premere Select e usare i pulsanti pq e Select per impostare
la quantità di tempo per il livello di attenuazione della retroilluminazione su 10, 20, 30,
45, 60, 90, 120 o 180 secondi o per mantenere la funzione su Off.
On Level:
Premere Select e usare i pulsanti pq e Select per scegliere l’intensità della
retroilluminazione.
Dim Level:
Se è stato selezionato un tempo per la retroilluminazione per modificare
un’impostazione attenuata sotto la voce “Timeout”, premere Select e usare i
pulsanti pq e Select per scegliere l’intensità della retroilluminazione quando cambia
su questa impostazione attenuata. L’impostazione del livello Dim su “Off” può essere
desiderabile se la retroilluminazione del display è fastidiosa durante il sonno. L’uso della
funzione Dim Level può aiutare anche a massimizzare la durata della batteria.
6.
LANGUAGE (TROVATO SOTTO SETTINGS): Premere Select e usare i pulsanti pq
e Select per impostare la lingua.
7.
FACTORY RESET (TROVATO SOTTO SETTINGS): Premere Select e usare i pulsanti pq
o tu e Select per confermare (Yes) o annullare (No) il reset di fabbrica. Un reset di
fabbrica ripristina le impostazioni di fabbrica e cancella tutte le impostazioni personali,
come i Preset delle stazioni e la lingua.
8.
ID (TROVATO SOTTO SETTINGS): Premere Select per visualizzare l’ID. Se si contatta il
rivenditore o Tivoli Audio con una richiesta di assistenza, è possibile che venga richiesto di
fornire il numero indicato in questo campo
9.
SLEEP (TROVATO SOTTO SETTINGS): Premere Select e usare i pulsanti pq e
Select per impostare il timer di spegnimento su uno dei tempi disponibili. C’è anche
un pulsante Sleep dedicato del telecomando. Un piccolo quadrante di orologio [ ]
apparirà sul display quando il timer di spegnimento è attivo.
NOTE: Durante il funzionamento a batteria (l’alimentatore esterno non è collegato), se
viene inserito Sleep ed è impostato l’allarme, al termine della funzione Sleep, la sveglia
non suonerà. Per usare sia la funzione Sleep che la funzione di allarme, assicurarsi che
l’alimentatore esterno sia collegato.
78 – ITALIANO
Page 79

Come Impostare la Sveglia:
Accedere all’impostazione dell’allarme sia attraverso il menu principale o premendo il pulsante Alarm del telecomando.
1.
Alarm 1 viene mostrato per primo. Usare i pulsanti pq e Select per scegliere tra Alarm
1 e Alarm 2. Nota: In qualsiasi momento è possibile navigare attraverso il menu di
allarme si possono usare i pulsanti Back o t oppure i pulsanti Select o u.
2. Usare i pulsanti pq e Select per impostare la sveglia o disattivarla. Se la data e l’ora
non sono impostate, il PAL+ chiederà di impostare prima l’ora e la data.
3. Usare i pulsanti pq per impostare/modificare l’ora, quindi premere Select. Ripetere la proce-
dura per impostare/modificare i minuti, seguito da AM/PM (se il tempo è impostato sul formato
12 ore), quindi premere Select.
4.
Usare i pulsanti pq per selezionare l’orario desiderato della sveglia, quindi premere Select.
5.
Usare i pulsanti pq per selezionare la sorgente che si desidera per la sveglia, quindi
premere Select. Se si imposta la sorgente DAB (incluso DAB+/DMB) o FM, usare i pulsanti
pq per selezionare la stazione Preset o l’ultima ascoltata, quindi premere Select. Se la
sorgente di allarme è impostata su DAB e l’ultima stazione ascoltata o la stazione Preset
non è disponibile al momento in cui suona la sveglia, l’allarme si sposta per impostazione
predefinita su un tono.
6. Usare i pulsanti pq per impostare la frequenza di allarme impostata per la sveglia, quindi
premer Select. Se è selezionato “Once”, è necessario impostare la data perché la sveglia
suoni una volta all’orario prestabilito.
7.
Infine, usare i pulsanti pq per impostare il livello del volume della suoneria, quindi
premere Select.
8. Ripetere questa procedura per Alarm 2, se lo si desidera.
Se si commette un errore in qualsiasi punto della proceduta, premere il pulsante Back del
telecomando e ricominciare.
Le impostazioni non verranno salvate se non si completa l’intero processo e il display
visualizza “Alarm Saved”.
note importanti:
• L’allarme non può suonare se il PAL+ è spento e non è collegato all’alimentatore esterno.
• Il volume della sveglia aumenta nel corso del tempo. Ci vorranno alcuni
secondi perché l’allarme raggiunga il livello di volume impostato nel menu
dell’allarme.
• In caso di mancanza alimentazione o se la batteria si scarica, l’orario della sveglia verrà salvato, ma l’allarme non potrà suonare senza fornire alimentazione al
PAL+.
opzioni di allarme:
Alarm Quick Set: Con il PAL+ in standby, premere ripetutamente il pulsante di allarme
brevemente per alternare lo spegnimento o l’accensione di ogni allarme.
Alarm Off: Per arrestare l’allarme, premere il pulsante Alarm o Power del telecomando, op-
79 – ITALIANO
Page 80

pure tenere premuta la manopola multifunzione sulla parte superiore dell’apparecchio.
Snooze: Per attivare Snooze, premere il pulsante Snooze del telecomando oppure pre-
mere brevemente il la manopola multifunzione sulla parte superiore dell’unità. Il tempo di
Snooze non è regolabile. Durante il funzionamento a batterie, premendo Snooze non si
avrà alcun effetto.
Nota: in modalità Snooze, è possibile visualizzare il tempo rimanente Snooze premendo il pulsante Snooze del telecomando. Se si preme il pulsante Alarm o Power
del telecomando, oppure se si tiene premuto la manopola multifunzione sulla parte
superiore dell’apparecchio, il conto alla rovescia di Snooze verrà annullato e il PAL+
andrà in standby o si spegnerà se è alimentato a batterie.
Modalità Digital Radio (DAB/DAB+/DMB):
STATION LIST: Usare i pulsanti pq del telecomando o premere la manopola multifunzione
sulla parte
superiore dell’apparecchio per visualizzare tutte le stazioni DAB/DAB+/DMB disponibili.
Usare i pulsanti pq per selezionare una stazione specifica e il pulsante Select per sintonizzare quella stazione. La lista delle stazioni scompare tra i 7 e 15 secondi a seconda che sia
stata selezionata tramite la manopola o dal telecomando.
Tenere premuto il pulsante Menu del telecomando per accedere al menu principale.
Usare i pulsanti pq e il pulsante Select per modificare le voci all’interno del menu.
Usare il pulsante Back per tornare indietro o attendere 15 secondi per il Timeout.
Un asterisco (*) indica la voce di menu visualizzata attualmente impostata.
Nota: una volta entrati in modalità radio digitale, se la lista delle stazioni è vuota,
verrà avviata la ricerca automatica.
1. AUTO SCAN: Avvia la ricerca in tutta la gamma di frequenze. Se si sposta PAL+ in
un’altro luogo, è necessario eseguire una nuova scansione in modo che la radio trovi
le stazioni nella nuova posizione. Per annullare la scansione automatica, premere il
pulsante Back del telecomando.
2. TIVOLI EQ: Si prega di fare riferimento alla sezione “Menu e funzioni specifiche”.
3. MANUAL TUNE: Premere i pulsanti pq per sintonizzare manualmente le frequenze
specifiche DAB/DAB+/DMB, quindi premere Select per sintonizzarsi sulla frequenza
visualizzata.
4. DRC: La funzione Dynamic Range Control consente di modificare il livello sonoro fra le
stazioni per compensare le differenze di volume o quando si ascolta a basso volume.
5.
ADVANCED MODE: Se si posiziona il PAL+ in un’area diversa, è possibile trovare stazioni
con lo stesso nome. Se si attiva “Advanced View”, “Long labels” e “Show Ensemble” in
modalità avanzata, si sarà in grado di distinguere i nomi estesi delle stazioni.
Per DAB/DAB+ si consiglia la disattivazione di tutte le impostazioni in modalità avan-
zata. Per DMB, si consiglia di attivarle.
6.
UPDATE LIST: se si posiziona il PAL+ in un’area diversa, alcune stazioni potrebbero non
essere disponibili. Selezionare “Update List” per rimuovere le stazioni non disponibili
dall’elenco. Usare i pulsanti pq o tu e il pulsante Select per confermare (Yes) o
annullare (No) la rimozione dellestazioni non disponibili.
80 – ITALIANO
Page 81

NOTA: quando si sposta il PAL+ in un altro luogo in cui ci possono essere stazioni DAB
diverse rispetto alla posizione precedente, si consiglia di eseguire “Update List” per
rimuovere le stazioni non disponibili.
Messaggi DAB Sul Display:
Secondary Services: le stazioni secondarie verranno indicate da un simbolo >> ac-
canto al nome della stazione. I servizi secondari potrebbero non essere disponibili nella
vostra zona.
“?”: se questo simbolo viene visualizzato accanto al nome della stazione, significa che
la stazione non è valida o non è attiva.
“Not Available”: appare quando ci si sintonizza su una stazione DAB con segnale insufficiente.
Informazioni Sul Pacco Batterie NIMH:
Il PAL+ utilizza un pacco sigillato di 6 celle di nichel-idruri metallici (NiMH) ad alta capacità. A differenza del Nichel-cadmio (NiCd), le batterie NiMH non hanno effetto memoria,
forniscono una durata maggiore e non contengono metalli tossici. L’icona della batteria
sul display LCD serve sia come indicatore di alimentazione che come indicatore di carica.
CARICA: per caricare la batteria, collegare il PAL+ e metterlo in standby. Se è scarica
completamente, la batteria sarà carica in 3,5 ore circa. Con la batteria nuova, possono
essere necessari 4-5 cicli completi di carica/scarica per ottenere una media di tempi di
esecuzione di riproduzione. Durante la ricarica, l’icona della batteria sul display lampeggia. L’icona della batteria smette di lampeggiare quando appaiono tutte e 3 le barre sul
display LCD, una volta che la batteria è completamente carica. La batteria non si carica
mentre il PAL+ è collegato e acceso, ma l’icona della batteria mostra ugualmente lo
stato della batteria. In pratica, quando il PAL+ collegato, è possibile metterlo in standby,
ogni volta che lo si desidera, per caricare la batteria.
BATTERIA SCARICA: durante l’uso esclusivamente a batteria, l’icona della batteria scenderà
da 3 barre a 2 barre, poi a 1 barra e, infine, mostrerà una batteria scarica. L’audio comincerà a
suonare in maniera distorta quando la batteria inizia a raggiungere un livello basso. Questo è
normale ed è un segnale acustico di avvertimento che la batteria deve essere ricaricata al più
presto. Dato che la batteria NiMH del PAL+ non ha effetto memoria, non è necessario attendere che la batteria sia scarica prima della ricarica. Tuttavia, la ricarica da una batteria scarica
non danneggia la batteria.
L’icona della batteria mostra lo stato di carica/alimentazione con un’approssimazione.
Possono essere necessari alcuni secondi prima che l’icona di stato si aggiorni. Se la batteria viene rimossa e il PAL+ opera esclusivamente con l’alimentazione esterna, l’icona
sul display LCD viene visualizzata con una batteria scarica.
DURATA DELLA BATTERIA: Ci sono molte variabili, come il livello del volume e il programma musicale che determinano la durata di una batteria completamente carica. Per
esempio, riprodurre a un livello di volume basso di solito offre un tempo più lungo di quello
di una riproduzione ad alto volume. In base a come si utilizza il PAL+ ci si potrà fare un’idea
della durata in condizioni diverse.
Non si provoca alcun danno se si fa funzionare il PAL+ continuamente tramite l’alimentatore
esterno.
81 – ITALIANO
Page 82

SOSTITUZIONE DELLA BATTERIA: nel caso si rendesse necessario sostituire la batteria,
sollevare l’antenna e usare un cacciavite a croce per rimuovere le due viti che fissano il
coperchio della batteria. Sollevare il coperchio della batteria e prendere nota di come il cavo
è collegato alla batteria prima di scollegarlo. Sostituire il pacchetto, avendo cura di ricollegare i cavi correttamente. Riposizionare il coperchio della batteria inserendo prima il lato
inferiore, poi avvitare il coperchio.
ATTENZIONE: per ridurre il rischio di incendi o di lesioni personali, sostituire il
pacco batterie esattamente uguale, disponibile tramite Tivoli Audio o i rivenditori autorizzati e smaltire la batteria secondo le norme in vigore. La batteria non deve essere
esposta a fonti di calore eccessivo, quali luce solare, fuoco o simili. L’uso di un pacco
batterie non proveniente da Tivoli Audio potrebbe danneggiare il PAL+.
Per informazioni sulla batteria del telecomando fare riferimento al punto 14 della “Guida alle
funzioni (telecomando)”.
Ricezione Digital Radio/FM:
Quando si sposta il PAL+ in un luogo diverso in cui ci possono essere stazioni DAB diverse
da quelle trovate nella precedente posizione, si consiglia di eseguire “Update List” per avviare una nuova scansione in modo da aggiornare l’elenco delle stazioni DAB.
FM: In luoghi con segnale forte, ridurre la lunghezza dell’antenna può fornire una migliore
ricezione.
RDS (Solo Banda FM):
Il Radio Data System (RDS) trasmette dati di testo insieme alla trasmissione audio. Non
tutte le stazioni FM utilizzano questo servizio, quindi il testo può non essere presente con
alcune stazioni. Anche con stazioni che diffondono dati RDS il testo potrebbe non apparire
o potrebbe apparire disturbato se il segnale è troppo debole. Questo non è un malfunzionamento del PAL+. In tali casi, sperimentare una diversa posizione dell’antenna FM. Notare
che il contenuto RDS è determinato da ogni singola stazione FM.
Come Maneggiare il PAL+:
• Il PAL+ è resistente agli agenti atmosferici, ma non deve essere immerso in acqua o
tenuto sotto l’acqua corrente. Inoltre, non deve essere esposto a temperature estreme.
• Il PAL+ è progettato per essere portatile, ma non è indistruttibile. Non lasciarlo cadere
o sottoporlo a forti urti.
• Afferrare il PAL+ usando le rientranze laterali per ridurre la probabilità che scivoli dalle
mani.
Pulizia:
Non usare mai detergenti aggressivi o solventi. La normale usura quotidiana o danni derivanti da prodotti chimici per la pulizia non sono coperti dalla garanzia di fabbrica. Per la
pulizia del PAL+ usare un panno morbido e non sfregare con eccessiva forza.
82 – ITALIANO
Page 83

Garanzia Limitata Al Di Fuori Del Nord America
Tivoli Audio produce i propri prodotti in conformità con i massimi standard qualitativi, riuscendo in tal modo a garantire prestazioni ottimali per i propri prodotti. Di conseguenza,
Tivoli Audio offre una garanzia limitata per questo prodotto a copertura di eventuali difetti
di fabbricazione dovuti a materiali o esecuzione al proprietario originale. Questa garanzia
non è trasferibile.
I prodotti acquistati all’interno dell’Unione Europea e in Norvegia hanno una garanzia minima della durata di due anni. Per i paesi all’interno dei quali i termini di garanzia minimi sono
determinati dalla legge, il termine di garanzia corrisponde al periodo richiesto dalla legge.
In tutti gli altri paesi, la durata della garanzia corrisponde a un anno.
Questa garanzia limitata copre le funzioni del prodotto nel corso del normale utilizzo previsto ed illustrato all’interno di questo manuale dell’utente. La garanzia non offre alcuna
copertura in merito a malfunzionamenti o danni risultanti dall’uso o dall’installazione impropri o irragionevoli, l’utilizzo di un caricatore per caricare batterie alcaline, accessori difettosi, modifiche, riparazioni non autorizzate, perdita o danneggiamento durante la spedizione, maneggiamento negligente, incidenti, utilizzo con tensione/corrente inappropriati,
sovratensioni, fulmini o altre cause di forza maggiore, eccessiva umidità, normale usura e
logoramento, utilizzo a fini commerciali, o acquisto da rivenditori non autorizzati. Il centro
assistenza potrebbe richiedere la presentazione di una ricevuta al fine di verificare che
l’unità sia stata acquistata da un rivenditore autorizzato.
Contattare il punto vendita o il proprio distributore locale per manutenzioni coperte
dalla garanzia o riparazioni.
Evitare di aprire o smontare questo prodotto, dal momento che tale operazione invaliderebbe questa garanzia limitata. L’interno dell’unità non contiene alcun componente che
richiede la manutenzione da parte dell’utente. Tivoli Audio non coprirà alcun costo sostenuto risultante dalla correzione di problemi di ricezione, dall’eliminazione di rumore/cariche
statiche generati esternamente o dal danneggiamento di questo prodotto provocato da un
uso improprio.
In caso di restituzione del prodotto durante il periodo di validità della garanzia e di copertura ai sensi di questa garanzia limitata, provvederemo a riparare o sostituire i componenti
difettosi entro un periodo di tempo ragionevole, senza costi aggiuntivi.
QUESTA GARANZIA LIMITATA CONCEDE ALL’UTENTE SPECIFICI DIRITTI LEGALI
SOGGETTI A DETERMINATE CONDIZIONI. L’UTENTE POTREBBE INOLTRE USUFRUIRE
DI ALTRI DIRITTI LEGALI APPLICABILI AL PRODOTTO ACQUISITO. QUESTI DIRITTI
LEGALI VARIANO DA UN PAESE ALL’ALTRO. ALCUNI PAESI NON CONSENTONO
L’ESCLUSIONE, LA RESTRIZIONE O LA MODIFICA DI CERTI DIRITTI IMPLICITI O DEI
LORO EFFETTI. IN QUESTE SITUAZIONI, QUESTA GARANZIA LIMITATA SARÀ APPLICABILE SOLO NELLA MISURA CONSENTITA DALLE LEGGI APPLICABILI.
Le leggi di un paese potrebbero fornire all’utente rivendicazioni legali nei confronti del
rivenditore o del produttore di questo prodotto. Questa garanzia limitata non ha alcun effetto su questi diritti.
Le clausole della garanzia limitata vanno a sostituire eventuali garanzie o condizioni di
diversa natura, con l’eccezione di garanzie e condizioni di natura legale. Questa garanzia
limitata non ha alcun effetto su eventuali diritti legali previsti dalla legge e non preclude
alcun ricorso garantito dalla legge.
83 – ITALIANO
Page 84

Nei paesi all’interno dei quali i limiti di responsabilità non sono preclusi dalla legge, la responsabilità massima di Tivoli Audio non potrà eccedere il prezzo di acquisto corrisposto
dall’utente per il prodotto. Nei paesi all’interno dei quali le limitazioni di responsabilità sono
precluse dalla legge, Tivoli Audio sarà responsabile per un valore complessivo non superiore ai danni diretti risultanti da lesioni fisiche e/o a proprietà reali o personali provocati
dalla negligenza di Tivoli Audio.
Laddove ciò non è proibito dalla legge, Tivoli Audio non sarà responsabile di danni incidentali, consequenziali o indiretti. Alcuni paesi non consentono limitazioni di esclusione o limitazione di riparazione, danni speciali, incidentali, consequenziali o indiretti, o limitazione di
responsabilità a somme specificate, pertanto le limitazioni ed esclusioni sopracitate potrebbero non essere applicabili all’utente.
Questa garanzia limitata perde validità in caso di rimozione o illeggibilità dell’etichetta riportante il numero seriale.
In caso di acquisto di un contratto di assistenza estesa dal proprio rivenditore, se il dispositivo richiede un intervento di manutenzione successivamente al termine del periodo
di validità di questa garanzia limitata, contattare il proprio provider del servizio esteso per
ottenere assistenza.
Per comodità, è possibile registrare il proprio prodotto sul sito del servizio di garanzia online sul nostro sito Web, www.tivoliaudio.com. Non sussiste alcun obbligo legale a fornire
i propri dati personali. Tuttavia, queste informazioni ci permettono di conservare un record
dei prodotti Tivoli Audio acquistati dall’utente e di comprendere meglio gli acquirenti dei
nostri prodotti. Le informazioni raccolte verranno utilizzate a scopo di marketing da Tivoli
Audio e, ove consentito, per contattare gli utenti in merito ai prodotti acquistati o ad altri
prodotti di possibile interesse distribuiti da Tivoli Audio o da altre aziende. Le informazioni
fornite potrebbero essere elaborate in un altro paese.
84 – ITALIANO
Page 85

Specifiche:
Modello: PAL+
Tipo: Portable DAB/DAB+/DMB/FM radio
Altoparlante: 2.5" full range, video shielded
Bande di ricezione: FM: 87.5-108.0MHz (receiving range may vary by region)
DAB (Band III)/DAB+/DMB: 174-240MHz
Alimentazione: 12VDC nominal – 15VDC maximum, 1000mA
Pacchetto batterie: NiMH 7.2V 2200mA
Corrente batterie: 1000mA
Alimentatore: PALP-PS-CE : 12VDC 1A 230V 50Hz
Dimensioni: 15.55cm H x 9.35cm W x 9.25cm D
(6.12" H x 3.68" W x 3.64" D)
Peso: 0.84 Kg
Tutte le specifiche sono soggette a modifiche senza preavviso.
Tivoli Audio si riserva il diritto di apportare modifiche ai prodotti senza preavviso.
Tivoli Audio, il logo Tivoli Audio, PAL+ e Portable Audio Laboratory sono marchi registrati di Tivoli
Audio, LLC.
85 – ITALIANO
Page 86

BELANGRIJKE VEILIGHEIDSINSTRUCTIES:
1. Lees deze instructies nauwkeurig.
2. Bewaar deze handleiding goed.
3. Sla acht op alle hierin opgenomen waarschuwingen.
4. Volg alle aanwijzingen op.
5. Waarschuwing: om brand of elektrische schokken te voorkomen, dient u dit toestel niet
bloot te stellen aan vocht.
6. Reinig het toestel uitsluitend met een droge doek.
7. Laat eventuele ventilatieopeningen vrij. Installeer het toestel overeenkomstig de aan-
wijzingen van de fabrikant.
8. Plaats het toestel niet te dicht bij een radiator, kachel of andere warmte- of hittebron,
inclusief versterkers.
9. Heeft het toestel een randaardestekker, sluit het dan aan op een geaarde wandcontactdoos. De extra contacten van deze verbinding dienen uw veiligheid.
10. Voorkom dat er over het netsnoer gelopen wordt of dat er op andere manieren kracht
op wordt uitgeoefend, vooral bij de aansluitingen. Wilt het netsnoer loskoppelen, trek
dan altijd aan de stekker of de plug en nooit aan het snoer zelf.
11.
Gebruik uitsluitend door de fabrikant geleverde accessoires en snoeren.
12.
Gebruik alleen met de wagen, het statief, de driepoot, de beugel of tafel
die door de fabrikant of verkocht met het apparaat. Als u een wagentje
gebruikt, wees dan voorzichtig bij het verplaatsen van de combinatie
wagen / apparaat en letsel door vallen te voorkomen.
13. Haal de stekker uit de wandcontactdoos bij onweer en als u het toestel voor langere
tijd niet gebruikt. Ontkoppel ook een eventuele externe antenne. Deze maatregelen
voorkomen schade door bliksem en stroomstoringen.
86 – NETHERLANDS
Page 87

14.
Gebruik uitsluitend de op het toestel gespecificeerde stroomvoorziening. Wordt een
netvoedingsadapter gebruikt, vervang deze dan alleen door exact hetzelfde model. Voor
toestellen op batterijvoeding raadpleegt u de handleiding van het betreffende toestel.
15. Ontkoppel het netsnoer en raadpleeg een gekwalificeerd technicus indien:
a. Het netsnoer of de stekker beschadigd zijn.
b. Er vloeistoffen in of objecten op het toestel terechtgekomen zijn.
c. Het toestel niet normaal lijkt te functioneren, de gebruiksaanwijzing in acht ge-
nomen.
d. Het toestel gevallen is of op een andere manier schade heeft opgelopen.
e. Als het toestel opeens duidelijk anders gaat klinken.
16. Het apparaat mag niet worden blootgesteld aan druppels of spetters en er mogen geen
objecten gevuld met water, zoals vazen, op het apparaat worden geplaatst.
17. Zou het display breken, vermijdt dan elk contact met het daarbij mogelijk vrijkomende
vocht.
18. Hou dit toestel om veiligheidsredenen uit de buurt van open vuur, inclusief kaarsen.
19. Wij adviseren u het toestel uitsluitend te gebruiken bij temperaturen van 5˚ C tot 40˚ C.
20. De externe voeding moet zo worden geplaatst dat ze gemakkelijk toegankelijk is.
21.
De stekker van het netsnoer is bedoeld om het apparaat te ontkoppelen en moet gemakkelijk bereikbaar zijn.
22.
WAARSCHUWING - de hoofdvoeding is niet afgesloten in de uit-stand maar de bedrading is stroomloos.
Dit product is geschikt voor hergebruik. Apparaten met dit symbool zijn
GEEN RESTAFVAL. Als het toestel niet meer functioneert, kunt u het
inleveren bij uw leverancier of afgeven bij een afvalpunt. Voor meer informatie en adressen kunt u terecht bij uw gemeente.
De WEEE-richtlijn (Waste Electrical and Electronic Equipment Directive:
de Europese richtlijn betreffende afvalstoffen in elektrische en elektronische apparatuur) is opgesteld om de hoeveelheid afval drastisch te
verminderen zodat schadelijke invloeden op het milieu en de volksgezondheid zoveel mogelijk voorkomen worden. Door defecte, niet meer
te repareren producten voor hergebruik aan te bieden, neemt u uw verantwoordelijkheid in deze. Mocht een apparaat nog functioneren, dan
kunt u het natuurlijk ook verkopen of weggeven.
87 – NETHERLANDS
Page 88

PAL+ Voorwoord:
Hartelijk gefeliciteerd met deze uw aanschaf van deze radio. Wij zijn ervan overtuigd dat
de PAL+ een van de beste draagbare DAB/DAB+/DMB/FM radio’s van dit moment is.
Het liefst neemt u uw nieuwe toestel waarschijnlijk direct in gebruik. Toch raden we u
beslist aan om eerst deze handleiding in z’n geheel door te lezen. Heeft u daarna nog vragen, aarzelt u dan niet om contact met uw dealer op te nemen. Hij is u graag van dienst.
Wij adviseren u om de originele verpakking te bewaren voor het geval u het apparaat
ooit zou moeten versturen. Transportschade valt niet onder de garantie.
Namens alle medewerkers van Tivoli Audio bedanken we u voor uw keuze voor dit product,
We wensen u bijzonder veel plezier met uw PAL+!
Over Tivoli Audio:
Tivoli Audio werd door Tom DeVesto opgericht met als doel om u uiterst gebruikersvriendelijke, hoogwaardige en betaalbare audioproducten te kunnen bieden. Als CEO
en hoofd van de ontwerpafdeling van zijn vorige bedrijf, Cambridge SoundWorks*, was
Tom verantwoordelijk voor de ontwikkeling van een groot aantal succesvolle audio- en
multimediaproducten. Hij werkte ook als seniormanager op de ontwerpafdelingen van
Advent en Kloss Video.
*Cambridge SoundWorks is een geregistreerde handelsnaam van Creative Labs, Singapore.
Naast de PAL+ treft u in de verpakking het volgende aan:
• Eén (1) netvoedingsadapter
• Eén (1) 3,5mm stereo audiokabel
• Eén (1) NiMH accu (geïnstalleerd)
• Eén (1) afstandsbediening met geïnstalleerde batterij
• Eén (1) afstandsbedieningshouder
Neem contact op met uw leverancier als een of meer van bovengenoemde zaken zou
ontbreken.
88 – NETHERLANDS
Page 89

Aan de slag:
1. Schuif de telescoopantenne uit.
2. Sluit de meegeleverde netstroomadapter aan en druk op de aan-/uitknop op de afstandsbediening, of zet de PAL+ aan door het multifunctionele bedieningswiel aan de
bovenzijde kort in te drukken.
3. Wacht tot de automatische scan voor DAB/DAB+/DMB radiozenders voltooid is.
4. Druk op de knoppen of op de afstandsbediening om de lijst met beschikbare
zenders op het display te tonen. Gebruik dezelfde knoppen om door deze lijst te
bladeren.
5. Kies de gewenste zender met een druk op de knop Menu/Select op de afstandsbediening.
6. Richt de antenne zo dat de ontvangst optimaal is.
7. Regel de geluidssterkte met de knoppen Volume + en – op de afstandsbediening of
draai het bedieningswiel aan de bovenzijde om de geluidssterkte te regelen.
Houder afstandsbediening:
De meegeleverde houder voor de afstandsbediening
van de PAL+ kunt u met het zelfklevende plakband
aan de linker- of rechterzijde van de radio plakken.
Verwijder de beschermstrip van de houder en bevestig hem op de radio. Plaats altijd eerst de onderzijde van de afstandsbediening in de houder.
1 2 3 4 5
Bediening (boven- en voorzijde):
1. MULTIFUNCTIONEEL BEDIENINGSWIEL:
Met het multifunctionele bedieningswiel aan
de bovenzijde van de Model 10 heeft u direct
toegang tot een aantal belangrijke functies:
Aan/uit: Als de Model 10 uitstaat, drukt u
eenmaal op de knop om het toestel aan te
zetten. Om het toestel uit te zetten, houdt
u de knop even ingedrukt. (Opmerking: als
de PAL+ uitstaat en de netnetvoedingsadapter niet aangesloten is, kunt u de radio
niet aanzetten met de knop Power van de
afstandsbediening.)
Volume: Ongeacht de gekozen klankbron kunt u het volume verhogen door de knop
met de klok mee te draaien. Draait u de knop tegen de klok in, dan verlaagt u het volume.
Zenders zoeken: Zenders met een hogere frequentie kunt u opzoeken door de knop
1
89 – NETHERLANDS
Page 90

kort in te drukken en hem met de klok mee te draaien; voor stations met een lagere
frequentie draait u de knop tegen de klok in. Dit werkt vanzelfsprekend niet als de
bronkeuzeschakelaar op Aux staat en u dus geen radiostations ontvangt. Als de knop als
afstemknop gebruikt wordt, is dat te zien aan de letter “T” (van Tuner) in het display.
Druk nogmaals op de knop om hem weer als volumeregelaar te kunnen gebruiken. Als
de knop niet gebruikt wordt, gaat hij na zeven seconden automatisch terug naar deze
functie.
Bronkeuze: Als de PAL+ aanstaat, drukt u tweemaal op de knop om in het bronkeuzemenu te komen. Draai het wiel om de gewenste bron aan te geven en bevestig uw keuze
door het wiel in te drukken. Als er binnen zeven seconden geen keuze gemaakt is, blijft
de laatst gekozen bron actief.
Sluimerknop: Als de wekker gaat, drukt u de knop eenmaal in om de sluimerfunctie
te activeren. Een icoon op het display geeft aan dat deze functie actief is. De sluimertijd bedraagt zeven minuten. Druk de knop nogmaals in om de sluimerfunctie uit
te schakelen. NB: De wekker – en daarmee ook de sluimerknop – werkt uitsluitend als
de PAL+ op de netvoedingsadapter is aangesloten.
2. DISPLAY:
: Volumeniveau FM: FM band
: Slaaptimer DAB: DAB/DAB+/DMB band
: Sluimertimer AUX: Auxiliary
: Wekker 1 en 2 : Batterijniveau/opladen
(middelste cijfers): tijd : Mono/stereo-indicator voor hoofdtelefoonuitgang
: Signaalsterkte T: Handmatig zenders zoeken
3.
PRESETS (voorkeuzeknoppen): Onder deze vijf voorkeuzeknoppen kunt u uw favoriete
radiostations opslaan. Als u op een station van uw keuze heeft afgestemd, houdt u de
gewenste voorkeuzeknop even ingedrukt. De betreffende zender wordt dan onder deze
knop opgeslagen. Een korte druk op een van deze knoppen roept het eronder vastgelegde radiostation weer op. Het display toon daarbij het betreffende voorkeuzenummer
(alleen bij FM-stations). Er zijn vijf voorkeuzemogelijkheden per band.
90 – NETHERLANDS
Page 91

Bediening (achterzijde):
4
3
2
5
1. 12VDC/1000mA: Ingang voor de externe netvoedingsadapter. Als het toestel op
stand-by staat, zal de adapter de accu opladen. Gebruik uitsluitend de bij de radio
geleverde adapter. Mocht de adapter defect raken of niet beschikbaar zijn, gebruik
dan een vergelijkbare. De gebruikte netvoedingsadapter moet in elk geval voldoen
aan de EN/IEC 60065 richtlijnen, met de specificaties 12VDC 1A en 230V 50Hz (afhankelijk van het stroomnetwerk in uw regio). Het gebruik van een adapter die niet
door de fabrikant wordt aanbevolen of niet aan deze eisen voldoet kan gevaar opleveren. De adapter moet een 5,5/2,1mm-plug met een positieve kern hebben. De
adapter wordt warm bij normaal gebruik. Gebruikt u deze ingang niet, sluit hem dan
af met de meegeleverde rubber plug.
2. ANTENNA (antenne): Trek de telescopische FM-antenne uit en richt hem zo dat u het
gekozen FM-station optimaal ontvangt. Is het signaal van de door u gekozen zender
erg sterk, dan kan de ontvangst mogelijk beter worden als u de antenne niet geheel
uittrekt. Luistert u niet naar een FM-station, dan kunt u de antenne het best inschuiven
en vergrendelen. Zie het kopje “Ontvangst” voor aanvullende informatie.
3.
HEADPHONE OUT (hoofdtelefoon): Op deze aan de linkerzijde geplaatste uitgang kunt
u een (niet meegeleverde) hoofdtelefoon aansluiten. De ingebouwde speakers worden
dan automatisch uitgeschakeld. Gebruik het bedieningswiel of de volumeknoppen van
de afstandsbediening om het volume te regelen. Met de knop MONO op de afstandsbediening kunt u van mono- naar stereoweergave schakelen. Als de stereoweergave
geactiveerd is, licht het hoofdtelefoonicoontje ( ) in het display op. Schakel de
weergave naar mono als de ontvangst van een stereo-radiostation door ruis verstoord
wordt. Deze stereo-uitgang is bedoeld voor een standaard 3.5mm stereominiplug. Bij
te hoge volumes kunnen hoofdtelefoons blijvende gehoorschade veroorzaken. Draag
geen hoofdtelefoon als u autorijdt. Gebruikt u deze uitgang niet, sluit hem dan af met
de meegeleverde rubber plug.
1
91 – NETHERLANDS
Page 92

4. AUX IN (extra ingan): Om muziek van een iPod of een andere externe klankbron
te beluisteren, sluit u de uitgang van deze bron aan op de ingang AUX IN. Activeer
deze stereo-ingang met het bedieningswiel of de afstandsbediening. Gebruik een
kabel met een standaard 3.5mm stereominiplug (mannetje). NB: Mogelijk moet u
het volumeniveau bijstellen als u van de ene naar de andere klankbron schakelt.
Gebruikt u deze ingang niet, sluit hem dan af met de meegeleverde rubber plug.
5. BATTERIJVAK: In het batterijvak bevindt zich de PAL+ NiMH accu en een mini-USB
aansluiting. Deze aansluiting is uitsluitend bedoeld voor servicewerkzaamheden.
Ander gebruik van deze aansluiting kan leiden tot schade die niet door de garantie
gedekt wordt.
Afstandsbediening:
(Een houder voor de afstandsbediening is meegeleverd. Verwijder de beschermstrip
van deze houder om hem op de zijkant van de PAL+ te kunnen plakken.)
4
2
3
5
1
6
7
12
BACK
9
11
8
MONO
13
10
14
1. POWER: Druk kort op deze knop om de PAL+ aan te zetten. Daarbij wordt automatisch
de klankbron gekozen die actief was toen u de radio uitzette. U zet de PAL+ op stand-by
door deze knop nogmaals in te drukken. Deze aan/uitknop werkt niet als de radio uitstaat
(in plaats van op stand-by) en als de radio niet op de netvoedingsadapter is aangesloten.
2. MUTE/SNOOZE: Met deze knop schakelt u de luidspreker tijdelijk uit. De volumeweer-
gave achter het luidsprekericoon op het display wordt hierbij ook uitgeschakeld. U
activeert de luidspreker weer door de knop nogmaals in te drukken of de volumeknop te
gebruiken. Als de wekker gaat, gebruikt u deze knop om de sluimerfunctie te activeren.
Een icoontje op het display laat zien dat deze functie actief is. De sluimertijd is vast
ingesteld op zeven minuten.
92 – NETHERLANDS
Page 93

3.
ALARM (wekker): Gebruik de knoppen pq en Select om de wekker in te stellen
en te activeren. Zie “Instellen van de wekker” voor belangrijke opmerkingen en een
stap-voor-staphandleiding.
4. SLEEP (slaaptimer): Druk deze knop herhaaldelijk in om te kiezen hoe lang de radio
nog speelt voordat hij zichzelf uitschakelt. Gebruik de knop Select om de gewenste
speeltijd te bevestigen. Als de slaaptimer actief is, kunt u de resterende tijd controleren
door de knop Sleep op de afstandsbediening in te drukken. Een klokicoontje [ ] op
het display geeft aan dat de slaaptimer ingeschakeld is. Om de timer uit te schakelen,
drukt u op de knop Sleep tot het woord “Off” op het display verschijnt. Als de PAL+ op
de ingebouwde accu werkt (en de netvoedingsadapter dus niet is aangesloten) en u
activeert de slaaptimer terwijl de wekker gezet is, zal de wekker niet functioneren. Om
de wekker te kunnen gebruiken, moet de netvoedingsadapter altijd aangesloten zijn.
5. SOURCE (bronkeuze): Druk deze knop herhaaldelijk in om de gewenste bron te kiezen.
6. INFO: Druk deze knop herhaaldelijk in om aanvullende informatie betreffende de gekozen
klankbron weer te geven. Als de Aux-ingang actief is, werkt deze functie niet.
7.
PRESETS 1-5 (voorkeuzeknoppen): Even ingedrukt houden om het nu spelende radiostation op te slaan. Kort indrukken om het onder een knop opgeslagen station weer op
te roepen. Bij FM-stations wordt het voorkeuzenummer in het display weergegeven. Per
band zijn vijf voorkeuzes mogelijk.
8.
VOLUME +/–: Druk op de knop Volume + om het volumeniveau te verhogen en op
Volume – om het volume te verlagen. Verlaag het volume als muziek of stemmen vervormd weergegeven worden. Zo voorkomt u dat de speaker beschadigd raakt. Bij
gebruik van de volumeknoppen wordt de mute-functie opgeheven: de luidspreker wordt
weer geactiveerd.
9. pq/TUNE +/-: Gebruik deze knoppen om door de beschikbare menu’s te navigeren.
Met dezelfde knoppen kunt u handmatig radiostations opzoeken of de autoscan-functie
activeren. Een “T” in het display geeft aan dat u handmatig zenders opzoekt. Hou de
knoppen ingedrukt om snel naar een volgende frequentie te gaan. Daarbij duurt het
even voordat het zoeken begint. Om de autoscan-functie te activeren (waarbij de PAL+
zelf het volgende radiostation opzoekt), houdt u de knop 1,5 seconde ingedrukt. Als u
de knop loslaat, toont het display de tekst “Scanning…”. Meer informatie vindt u bij
“Scan Setting” onder het kopje “Menu en speciale features”.
10. tu: Het pijltje naar rechts (►t ) heeft dezelfde functie als de knop Select. In bepaalde
menu’s heeft het pijltje naar links (►u) dezelfde functie als de knop “Back” (terug).
11.
MENU/SELECT (menu/selecteer): Hou deze knop even ingedrukt om naar het hoofdmenu te gaan. Kies voor items in het menu door de knop kort in te drukken. Meer
informatie vindt u onder het kopje “Menu en speciale features”.
12. BACK (terug): Druk deze knop in om naar de vorige pagina in het menu te gaan.
13.
MONO: Indrukken om bij weergave via een hoofdtelefoon voor mono of stereo te kiezen.
Het display geeft een “M” bij monoweergave en de letter “ST” als er voor stereo gekozen
is. Bij het herhaaldelijk indrukken van de knop Info op de afstandsbediening is “Mono”
of “Stereo” ook een van de weergegeven items, indien het toestel op een FM-station
is afgestemd. Geeft een zender bij stereoweergave veel ruis, dan kan switchen naar
monoweergave de ontvangst verbeteren. Zie ook “Balance” onder het kopje “Menu en
speciale features”.
93 – NETHERLANDS
Page 94

14.
BATTERIJHOUDER: Om de afstandsbediening te kunnen gebruiken, moet u het plastic
stripje dat onder het dekseltje van de batterijhouder uitsteekt eerst verwijderen. Als
de batterij van de afstandsbediening vervangen moet worden, koopt u een Lithiumknoopcel, model CR2025.
WAARSCHUWING: Een onjuist geplaatste batterij kan explosiegevaar opleveren. Vervang batterijen uitsluitend door exemplaren van hetzelfde type. Lever
de lege batterij in bij een inzamelpunt; respecteer de in uw regio geldende regels
voor chemisch afval.
Menu en speciale features:
Om naar het hoofdmenu te gaan, houdt u de knop Menu even ingedrukt. Gebruik de
knoppen pq op de afstandsbediening en de knop Select om keuzes in het menu te
maken en te bevestigen. Met de knop Back gaat u een stap terug, of u wacht 15 seconden: het menu wordt dan automatisch gedeactiveerd.
Gekozen instellingen worden aangegeven met een sterretje (*).
1.
SCAN SETTING (SCANNEN; ALLEEN IN FM): Druk bij een auto-scan op de knop
Select en gebruik de knoppenpq en Select om te kiezen tussen “Strong stations
only” (uitsluitend afstemmen op sterke stations) of “All stations” (alle stations). Zie punt
9 (pq/Tune +/-). onder het kopje “Afstandsbediening” voor meer informatie. Bij keuze
voor “All stations” wordt ook op zwakke stations afgestemd, waarbij in bepaalde gevallen alleen maar ruis te horen zal zijn. Auto-scan is niet mogelijk als de Aux-ingang als
bron gekozen is.
2. TIVOLI EQ (KLANKREGELING): Druk op de knop Select en gebruik de knoppen pq
en Select om de lage- en hogetonenweergave in te stellen (resp. Bass en Treble). De
gekozen waarden worden weergegeven onder de “User EQ”. Gebruik dezelfde knoppen
om de Loudness aan of uit te zetten. Gebruik Loudness bij lage volumeniveaus om de
hoge en lage frequenties iets te versterken. Dit zorgt voor een natuurlijker weergave. Als
u een voorgeprogrammeerde EQ-setting kiest, worden eerdere instellingen van Bass en
Treble genegeerd. Een ingeschakelde Loudness blijft daarbij actief. Bij keuze voor “Flat”
EQ worden de fabrieksinstellingen geactiveerd, wat betekent dat Bass en Treble beide
op 0 (neutraal) gezet worden. Hierbij wordt de Loudness uitgeschakeld. Had u andere
instellingen voor Bass en Treble gekozen, dan zijn deze instellingen via “User EQ” weer
op te roepen. De getallen aan de rechterzijde van EQ menu-pagina geven de bass- en
treble-instellingen weer.
3. BALANCE BALANS, TE VINDEN ONDER TIVOLI EQ): Gebruik de knoppen pq om
de balans tussen links en rechts in te stellen. Deze functie werkt uitsluitend bij weergave
via een.
4. TIME (TE VINDEN ONDER SETTINGS):
Set 12/24 hour (12- of 24-uurs klok):
Druk op de knop Select en gebruik de knop pq aen Select om voor een 12- of
24-uurs klok te kiezen.
Set time (date tijd en datum):
Druk op de knop Select en gebruik de knoppen pq en Select om eerst het uur en
daarna de minuten in te stellen, gevolgd door de datum. Om de tijd handmatig in te
stellen, moet u bij Auto update voor “No update” kiezen. Meer informatie over “Auto
update” vindt u in de volgende alinea.
94 – NETHERLANDS
Page 95

Auto Update:
Druk op de knop Select en gebruik de knoppen pq en Select om te kiezen tussen
“Update from any”, “Update from DAB” (ook DMB), or “Update from FM” (RDS). Om
deze automatische updates te laten werken, moet er sprake zijn van een goede DAB
of FM RDS-ontvangst met een tijd- en datumsignaal. Het updaten van de klok, waarbij de correcte tijd en datum automatisch ingesteld worden, kan een minuut of langer
duren. Tivoli Audio is niet verantwoordelijk voor het automatisch doorgeven van
onjuiste tijd- en datumsignalen.
Om de klok met de hand in te stellen, kiest u voor “No Update”. Selecteer dan “Set Time/
Date” in het “Time” menu. Gebruik de knoppen pq of tu en Select om het uur in te
stellen. Herhaal dit om de minuten in te stellen en druk op Select om de ingestelde tijd
te bevestigen. In ditzelfde menu kunt u ook kiezen voor de gewenste datumweergave
en een 12- of 24-uurs klok.
NB: Bij een stroomstoring worden de ingestelde (wek)tijden onthouden door een ingebouwde backupbatterij. Als bij “Auto update” voor “Update from any” is gekozen, kan
de radio mogelijk het kloksignaal van het laatst beluisterde radiostation oppikken, zelfs
als de PAL+ op stand-by staat.
Set date format (datumweergave):
Druk op de knop Select en gebruik de knoppen pqen Select om de gewenste
datumweergave te kiezen.
5. BACKLIGHT (DISPLAYVERLICHTING; TE VINDEN ONDER SETTINGS):
Timeout:
De sterkte van de displayverlichting is constant. Desgewenst kunt u de PAL+ zo
instellen dat de verlichting zwakker gaat branden als de radio gedurende een
vastgestelde tijdsduur niet bediend is. Zodra u een knop op de radio of de afstandsbediening gebruikt, licht het display weer op de normale sterkte op.
Druk op de knop Select en gebruik de knoppen pq en Select om de gewenste tijdsduur
in te stellen. Daarbij kunt u kiezen voor 10, 20 ,30, 45, 60, 90, 120 of 180 seconden. Als
u voor “Off” kiest, wordt de displayverlichting nooit gedimd.
On Level (sterkte displayverlichting):
Druk op de knop Select en gebruik de knoppen pq and Select buttons to choose
the intensity of the backlight.
Dim Level:
If you selected a time for the backlight to change to a dim setting under “Timeout”,
press Select and use the pq and Select buttons to choose the intensity of the
backlight when it changes to this dim setting. Setting the Dim level to “Off” may be
desirable if the display backlight is bothersome while sleeping. Using the Dim level
feature may also help to maximize battery playback time.
6.
LANGUAGE (DIMNIVEAU INSTELLEN): Druk op de knop Select en gebruik de knoppen
pq en kies uw voorkeurstaal.
7.
FACTORY RESET (FABRIEKSINSTELLINGEN, TE VINDEN ONDER SETTINGS): Druk
op de knop Select en gebruik de knoppen pq of tu en Select om de fabrieksinstel-
lingen te herstellen. Kies “Yes” om deze instellingen te herstellen of “No” om de huidige
instellingen te behouden. Bij een reset (Yes) gaan al uw persoonlijke instellingen verloren,
zoals de ingestelde voorkeuzestations en uw voorkeurstaal.
95 – NETHERLANDS
Page 96

8. ID (TE VINDEN ONDER SETTINGS): Druk op Select om de identiteitscode (ID) van uw
PAL+ op te roepen. Als u uw dealer iets over uw PAL+ wilt vragen, kan hij u verzoeken
om het hier getoonde nummer door te geven.
9. SLEEP (SLAAPTIMER, TE VINDEN ONDER SETTINGS): Druk op de knop Select
en gebruik de knoppen pq en Select op de slaaptimer in te stellen. U kunt ook de
speciale knop Sleep op de afstandsbediening gebruiken. Een afbeelding van een
klokje op het display laat zien dat de slaaptimer ingesteld is.
NB: Om de slaaptimer te gebruiken hoeft de PAL+ niet op de netvoedingsadapter aangesloten zijn. Voor de wekker is die netvoedingsadapter wél nodig.
Instellen van de wekker:
U kunt de wekker instellen via het hoofdmenu of door de knop Alarm op de
afstandsbediening te gebruiken.
1.
Werktijd 1 (Alarm 1) wordt altijd als eerste getoond. Gebruik de knoppen pq en Select
om tussen Alarm 1 en Alarm 2 te kiezen. NB: U kunt vanaf elk punt door het alarmmenu
navigeren met de knoppen Back of t en met knoppen Select of u.
2. Gebruik de knoppen pq en Select om de wekker aan of uit te zetten. Mocht de tijd nog
niet ingesteld zijn, dan zal de PAL+ u daar eerst om vragen.
3. Use the pq om het uur in te stellen. Druk dan op Select. Herhaal dit proces om de
minuten in te stellen en (als u voor een 12-uurs weergave hebt gekozen) AM of PM te
kiezen. Bevestig ook deze instellingen met Select.
4. Gebruik de knoppen pq om aan te geven hoe lang de wekker moet klinken, en bevestig
met Select.
5. Gebruik de knoppen pq om te kiezen door welke klankbron u gewekt wilt worden, en
bevestig met Select. Als u de bron op DAB (omvat ook DAB+/DMB) of FM zet, gebruik
dan de knoppen pq om het gewenste voorkeursstation of het laatst beluisterde station
te kiezen, en bevestig met Select. Als u hierbij voor DAB kiest en het laatste beluisterde
station of het voorkeursstation op de ingestelde wektijd niet beschikbaar is, dan kiest
de PAL+ automatisch door de standaard wektoon.
6. Gebruik de knoppen pq om te kiezen of de wekker elke dag, uitsluitend op werkdagen
of “Once” (eenmalig) moet afgaan. Bevestig met Select. Als u voor “Once” kiest, moet u de
gewenste wekdatum instellen.
7. Gebruik tot slot de knoppen pq om het volumeniveau van de wekker in te stellen, en
bevestig met Select.
8.
Doorloop dezelfde procedure voor een tweede wektijd (Alarm 2), als u daar gebruik
van wilt maken..
Vergist u zich tijdens het instellen van de wekker, dan brengt de knop Back op de afstandsbediening u terug naar het begin.
Uw instellingen worden uitsluitend bewaard als u alle bovengenoemde stappen doorloopt en het display de tekst “Alarm Saved” toont.
96 – NETHERLANDS
Page 97

belangrijk:
• De wekker zal niet functioneren als de PAL+ uitstaat of op de ingebouwde
accu werkt.
• Het wekvolume neemt langzaam toe. Pas na enkele seconden klinkt het op
het in het wekmenu ingestelde niveau.
• Als de stroom uitvalt blijft de ingestelde wektijd bewaard, maar de wekker
gaat niet af.
GEBRUIK VAN DE WEKKER:
Alarm Quick Set: Als de PAL+ op stand-by staat, kunt u de knop Alarm op de afstands-
bediening gebruiken om elk van beide wekkers aan of uit te zetten.
Alarm Off: Om de wekker te stoppen drukt op op de knoppen Alarm of Power op de afstandsbediening, of u houdt het bedieningswiel aan de bovenzijde van de PAL+ enige tijd
ingedrukt.
Snooze (sluimeren): Om de sluimerfunctie te activeren drukt op de knop Snooze op de
afstandsbediening, of u drukt het bedieningswiel aan de bovenzijde van de PAL+ kort in.
De sluimertijd is niet instelbaar. Als de PAL+ niet op de netvoedingsadapter is aangesloten,
zal de Snooze knop niet werken.
NB: Als de sluimerfunctie actief is, verschijnt de resterende sluimertijd in het display
als u de knop Snooze op de afstandsbediening indrukt. Drukt u op de knoppen Alarm
of Power op de afstandsbediening, of houdt u het bedieningswiel aan de bovenzijde
van de PAL+ even ingedrukt, dan wordt de sluimertijd gecanceld en zet u de PAL op
stand-by of – indien de netvoedingsadapter niet aangesloten is – uit.
Digital Radio (DAB/DAB+/DMB):
ZENDERLIJST: Gebruik de knoppen pq op de afstandsbediening, of druk het bedien-
ingswiel aan de bovenzijde van de PAL+ in voor een lijst van alle beschikbare DAB/DAB+/
DMB-stations. Gebruik de knoppen pq om de gewenste zender te highlighten en bevestig
uw keuze met Select. De zenderlijst verdwijnt na 7 of 15 seconden, afhankelijk van of u de
lijst via het bedieningswiel of met de afstandsbediening opriep.
Ga naar het hoofdmenu door de knop Menu op de afstandsbediening even ingedrukt
te houden. Gebruik de knoppen pq en Select om instellingen te wijzigen. Met de
knop Back kunt u altijd terug in het menu. Als u 15 seconden wacht wordt het menu
automatisch gedeactiveerd.
Gekozen instellingen worden aangegeven met een sterretje (*).
NB: Als u voor digitale radio kiest en de zenderlijst leeg is, wordt automatisch een
auto-scan uitgevoerd.
1. AUTO SCAN: Bij een auto-scan wordt het hele zendbereik afgezocht naar beschikbare
stations. Gebruikt u de PAL+ op een andere locatie, dan is een nieuwe scan nodig om
stations in die regio te vinden. Om de auto-scan stop te zetten drukt u op de knop Back
op de afstandsbediening.
2. TIVOLI EQ (KLANKREGELING): Zie hiervoor “Menu en speciale features”.
97 – NETHERLANDS
Page 98

3. MANUAL TUNE (HANDMATIG ZENDERS ZOEKEN): GEBRUIK DE KNOPPEN pq
om handmatig bepaalde DAB/DAB+/DMB-frequenties op te zoeken, en gebruik Select
om om de gekozen frequentie af te stemmen.
4. DRC: Met deze Dynamic Range Control kunt u zachte passages luider laten klinken,
bijvoorbeeld als u in een lawaaiige omgeving bent of op een heel laag volumeniveau
luistert.
5. ADVANCED MODE (GEAVANCEERDE MODUS): Als de PAL+ op een andere locatie
gebruikt wordt, kan het voorkomen dat verschillende radiostations met dezelfde naam
aangeduid worden. Als u in de Advanced mode kiest voor “Advanced View”, “Long
labels” en “Show Ensemble”, kunt u de verschillende stations wel weer herkennen.Voor
DAB/DAB+ bevelen we aan om alle Advanced Mode-instellingen uit te schakelen. Voor
DMB adviseren we juist om deze instellingen allemaal te activeren.
For DAB/DAB+, we suggest disabling all the Advanced Mode settings. For DMB, we
suggest enabling them.
6. UPDATE LIST: Als u de PAL+ in een ander land of een andere regio gebruikt, zijn som-
mige DAB-zenders mogelijk niet meer beschikbaar. Kies Update List om niet beschikbare
radiozenders van de Station List (zenderlijst) te verwijderen. Gebruik de knoppen pq
of tu en Select om het verwijderen van deze stations te bevestigen (Yes) of te annul-
eren (No).
dab-displayberichten:
Secondary Services: Zogenaamde “Secondary stations” zijn services of stations die in uw
regio mogelijk niet beschikbaar zijn. Ze worden aangegeven met het symbool >> naast de
naam van de zender.
“?”: Dit symbool heeft aan dat de betreffende zender niet geldig of inactief is.
“Not Available”: De tekst “Not available” verschijnt als het signaal niet sterk genoeg is om
de betreffende zender te kunnen ontvangen. .
Over de NiMH accu:
De PAL+ maakt gebruik van een verzegelde set van 6 nikkelmetaalhydride batterijen (NiMH)
met een hoge capaciteit. Anders dan nikkelcadmium batterijen (NiCd) hebben deze batterijen geen last van het zogenaamde geheugeneffect, ze bieden een langere speelduur en ze
maken geen gebruik van zware metalen. Het batterij-icoontje in het display geeft informatie
over de resterende capaciteit van de accu en het laat zien dat de accu opgeladen wordt.
OPLADEN: Om de PAL+ op te laden sluit u de netvoedingsadapter aan en zet u de radio op
stand-by. Een lege accu is na ongeveer 3,5 uur weer geheel opgeladen. Een nieuwe accu
dient 4 tot 5 keer geheel ontladen en opgeladen te worden om zijn maximale capaciteit te
bereiken. Tot die tijd is de speelduur nog niet optimaal.
Tijdens het opladen knippert het batterij-icoon in het display. Het knipperen stopt zodra de
accu volledig opgeladen is. Het batterij-icoon toont dan drie balkjes. Als de PAL+ aanstaat,
wordt de accu niet opgeladen. De status van de batterij, aangegeven met die drie balkjes,
wordt dan wel getoond. Wilt u de accu opladen, zet de PAL+ dan op stand-by.
98 – NETHERLANDS
Page 99

BATTERIJCONDITIE: Als de PAL+ op z’n ingebouwde accu werkt, zal het batterij-icoon
eerst drie balkjes aangegeven. Naarmate de accu leeg raakt ziet u daarna twee balkjes,
dan één balkje en tot slot een lege batterij. Op het moment dat de accu bijna leeg is zal
het geluid gaan vervormen. Dit kan geen kwaad: u kunt zo horen dat het tijd is om de
accu weer op te laden.
Omdat de PAL+ NiMH-accu geen last van het geheugeneffect heeft, kunt u de accu altijd
opladen – ook als hij niet helemaal leeg is. Een geheel lege accu opladen kan evenmin
kwaad.
Het batterij-icoon geeft de resterende accucapaciteit bij benadering weer. Daarbij kan het
ook enkele seconden duren voordat de weergave stabiel is. Als de accu verwijderd is en
de PAL+ uitsluitend met de netvoedingsadapter gebruikt wordt, zal het display een leeg
batterijtje tonen.
SPEELDUUR: Hoe lang de PAL+ met een volle acculading speelt, hangt van verschillende
factoren af. Vooral het volumeniveau is daarbij belangrijk: een luid spelende PAL+ doet
minder lang met een volle accu dan een zacht spelende radio. Tijdens het gebruik van uw
PAL+ ontdekt u snel genoeg hoe lang een volle accu bij uw gebruik meegaat. Overigens
kunt u de PAL+ probleemloos altijd op de netvoeding aansluiten.
ACCU VERVANGEN: Mocht de accu op een gegeven moment aan vervanging toe zijn,
gebruik dan een kruiskopschroevendraaier om de twee schroefjes van het dekseltje van
het batterijvak los te draaien. Draai de antenne omhoog, open het deksel en kijk goed hoe
de accu op het snoer is aangesloten. Neem de accu dan pas los. Sluit de nieuwe accu op
precies dezelfde manier aan. Plaats het deksel terug door eerst het lipje aan de onderkant
in de bijbehorende opening te steken. Draai dan beide schroefjes weer aan.
WAARSCHUWING
sluitend door een identiek exemplaar te vervangen. Lever de lege batterij in bij een
inzamelpunt en respecteer de in uw regio geldende regels voor chemisch afval. Stel
de accu nooit bloot aan hittebronnen zoals direct zonlicht en vuur. Het gebruik van
een accu van een andere fabrikant kan tot schade aan uw PAL+ leiden.
Meer informatie over de batterij van de afstandsbediening vindt u onder het kopje Afstandsbediening.
: Om brand en ongelukken te voorkomen dient u de accu uit-
Digitale radio/FM-ontvangst:
Als u de PAL+ meeneemt naar een locatie met een ander aanbod van DAB-stations, doet u
er goed aan om een Update List uit te voeren. Tijdens de bijbehorende scan wordt de lijst
met beschikbare DAB-stations ververst.
FM: Als het signaal van een FM-zender heel sterk is, kan de ontvangst soms verbeterd
worden door de telescoopantenne deel in te schuiven.
RDS (uitsluitend FM):
Het Radio Data System (RDS) stuurt teksten mee met het audiosignaal van bepaalde FMzenders. Als de ontvangst niet optimaal is, worden meegezonden teksten mogelijk niet
of niet goed weergegeven. Dit duidt dus niet op een tekortkoming van de PAL+. Mogelijk
verbetert de ontvangst als u de antenne opnieuw richt. De inhoud van de meegestuurde
teksten wisselt per zender.
99 – NETHERLANDS
Page 100

Gebruikstips voor uw PAL+:
• De PAL+ is weersbestendig, maar niet waterdicht. Vanzelfsprekend mag de radio niet
ondergedompeld of onder stromend water gehouden worden. Stel de PAL+ ook niet
bloot aan extreem hoge temperaturen.
• De PAL+ is ontworpen om hem makkelijk te kunnen verplaatsen en mee te kunnen
nemen, maar hij is niet onverwoestbaar. Laat hem niet vallen, gooi er niet mee en
voorkomen hevige schokken.
• Pakt u de PAL+ op, gebruik dan altijd de uitsparingen aan de zijkant voor extra grip.
Zo voorkomt u dat hij uit uw handen glipt
Reiniging:
Gebruik geen agressieve schoonmaakmiddelen of oplosmiddelen om uw radio te reinigen.
Normale slijtage door dagelijks gebruik en door schoonmaken of chemicaliën veroorzaakte
schade valt niet onder de garantiebepalingen. Gebruik uitsluitend een zachte doek om uw
PAL+ schoon te maken, en wrijf niet hard.
Garantiebepalingen
Tivoli Audio hanteert bijzonder hoge productiestandaards en we vertrouwen erop dat al
onze producten naar behoren functioneren. Daarom bieden we de eerste koper van dit
toestel een tweejarige garantie, gerekend vanaf het moment van aankoop, op fabrieks-,
productie- en materiaalfouten. Deze niet overdraagbare garantie geldt voor producten die
gekocht werden in de Europese Unie, Zwitserland en Noorwegen.
De Tivoli Audio garantie dekt de functionaliteit van het toestel onder normale gebruiksomstandigheden met inachtneming van de inhoud van de bijgevoegde gebruiksaanwijzing.
Niet gedekt wordt schade die veroorzaakt wordt door oneigenlijk of onjuist gebruik, een
incorrecte installatie, het aansluiten van niet passende accessoires, modificaties, reparaties door anderen dan gekwalificeerde technici, transport, verlies, misbruik, ongelukken,
onjuiste netspanning, stroomstoringen, bliksem en andere natuurverschijnselen, normale
slijtage, commercieel gebruik of aanschaf van het toestel bij anderen dan geautoriseerde
dealers. Bewaar altijd de originele factuur; hiermee kunt u aantonen dat u het toestel bij een
van onze dealers aanschafte. Als onderhouds- of servicewerkzaamheden noodzakelijk
zijn, stuur het toestel dan niet op zonder eerst contact met uw dealer op te nemen.
Als u het toestel zelf opent of demonteert, vervalt uw aanspraak op garantie. Er bevinden
zich geen zelf te repareren of in te stellen onderdelen in het apparaat. Tivoli Audio vergoedt
geen kosten die gemaakt worden ten gevolge van ontvangstproblemen, het elimineren
van door externe bronnen veroorzaakte storing, tijdsverlies, ongemak en het niet kunnen
gebruiken van het toestel. Ook kosten ten gevolge van schade door oneigenlijk of onjuist
gebruik van het toestel worden niet vergoed.
AAN DEZE GARANTIEBEPALINGEN KUNT U BEPAALDE RECHTEN ONTLENEN. DEZE
EN ANDERE RECHTEN KUNNEN VAN LAND TOT LAND EN VAN STAAT TOT STAAT VERSCHILLEN. IN SOMMIGE LANDEN ZIJN BEPAALDE BEPERKINGEN OF UITSLUITINGEN
IN GARANTIEBEPALINGEN NIET TOEGESTAAN. GENOEMDE BEPERKINGEN EN UITSLUITINGEN ZIJN DAAROM MOGELIJK NIET OP UW SITUATIE VAN TOEPASSING.
100 – NETHERLANDS
 Loading...