

Tivoli NetWorks Owner Manual

OWNER’S MANUAL

English
The NetWorks Radio
Table of Contents:
Safety Instructions .............................................................................................................................3
Introduction; Getting Started (Setup); WiFi Reception ...................................................................... 5
Top control; Remote control functions .............................................................................................. 7
Rear panel controls ........................................................................................................................... 9
Bottom inputs and outputs .............................................................................................................10
Tuning Internet stations; Adding new stations; SuperBuffer™ ......................................................... 11
Tivoli EQ; Favorites, My Added Stations; Station Search ............................................................... 12
Podcasts; Local Stations; Setting the clock and date; Languages; Re-set ....................................12
Info; Software Upgrade; Setting the alarms ....................................................................................13
Streaming music files from a computer ..........................................................................................14
Display Off ; Placement; Cleaning; Troubleshooting ....................................................................... 16
Display messages ...........................................................................................................................17
Warranty ..........................................................................................................................................18
Specifications ..................................................................................................................................20
2

English
Important Safety Instructions
1. Read these instructions.
2. Keep these instructions.
3. Heed all warnings.
4. Follow all instructions.
5. Do not use this apparatus near water. For example, do not use near a bathtub, in a wet
basement, near a swimming pool, and the like. WARNING! Do not expose this product to rain
or moisture.
6. Clean only with a dry cloth.
7. Do not block any ventilation openings. Install in accordance with the manufacturer’s instructions.
8. Do not install near any heat sources such as radiators, heat registers, stoves, or other apparatus
(including amplifiers) that produce heat.
9. Do not defeat the safety purpose of the polarized or grounding-type plug. A polarized plug has
two blades with one wider than the other. A grounding type plug has two blades and a third
grounding prong. The wide blade or the third prong are provided for your safety. If the provided
plug does not fit into your outlet, consult an electrician for replacement of the obsolete outlet.
10. Protect the power cord from being walked on or pinched particularly at plugs, convenience
receptacles, and the point where they exit from the apparatus.
11. Only use attachments/accessories specified by the manufacturer.
12. Use only with the cart, stand, tripod, bracket, or table specified by the
manufacturer, or sold with the apparatus. When a cart is used, use caution
when moving the cart/apparatus combination to avoid injury from tip-over.
13. Unplug this apparatus during lightning storms or when unused for long
periods of time.
3

English
14. Refer all servicing to qualified service personnel. Servicing is required when the apparatus
has been damaged in any way, such as power-supply cord or plug is damaged, liquid has
been spilled or objects have fallen into the apparatus, the apparatus has been exposed to
rain or moisture, does not operate normally, or has been dropped.
15. The radio must be located such that the bottom AC socket and connected power cord are
readily accessible.
16. This Class B digital device complies with the Canadian ICES-003.
17. For added protection for this product during a lightning storm, or when it is left unattended
and unused for long periods of time, unplug it from the wall outlet. This will prevent damage to
the product to lightning and power-line surges.
18. Operate this product only from the type of power source indicated on the bottom panel.
For products using an external power supply, use an exact replacement if lost or damaged.
For products operating from battery power, refer to the user manual.
19. Unplug this product from the wall outlet and refer servicing to qualified service personnel
under the following conditions:
a. When the power supply cord or plug is damaged.
b. If liquid has been spilled or objects have fallen into the product.
c. If the product has been exposed to water or rain.
d. If the product does not operate normally by following the operating instructions.
e. If the product has been dropped or damaged in any way.
f. When the product exhibits a distinctive change in performance.
20. If the LCD becomes cracked and damaged, do not touch the liquid.
21. Keep this product a safe distance away from naked flame, such as a lit candle.
22. Do not expose this product to splashing or dripping. Objects containing liquid, such as vases
or drinking glasses, should not be placed on top of this product.
23. The recommended operating temperature range is 41˚ F to 104˚ F (5˚ C to 40˚ C).
This product can be recycled. Products bearing this symbol must NOT be thrown
away with normal household waste. At the end of the product’s life, take it to
a collection point designated for recycling of electrical and electronic devices.
Find out more about return and collection points through your local authority.
The European Waste Electrical and Electronic Equipment (WEEE) Directive was
implemented to dramatically reduce the amount of waste going to landfills,
thereby reducing the environmental impact on the planet and on human health.
Please act responsibly by recycling used products. If this product is still useable,
consider giving it away or selling it.
4

English
NetWorks Instructions
Congratulations on your purchase of the NetWorks radio. We believe the NetWorks is one of the
finest table radios on the market. Its sound quality, ease of use, unique features, and distinctive
design are unmatched.
We’ve taken the liberty of saving some diverse Internet radio stations to the station presets. After
you connect your NetWorks to your network, please explore each preset and enjoy listening as
you read through this owner’s manual.
In order to take full advantage of what your new radio is capable of, please take a moment to read
this owner’s manual and the safety instructions. If you have any questions, please do not hesitate
to contact your dealer or distributor.
Please save the carton and original packing should you ever need to ship your radio, as
shipping damage is not covered by the factory warranty.
On behalf of all of us, thank you for choosing Tivoli Audio and enjoy your new NetWorks radio.
About Tivoli Audio
Tivoli Audio was founded by Tom DeVesto with the mission of bringing simple to use, elegantly
designed, high quality audio products to consumers. As CEO and head of research and development at his former company, Cambridge SoundWorks, Tom was responsible for the development
of many of the best selling home entertainment and multi-media products on the market. He also
held senior management positions in product development at both Advent and Kloss Video.
*Cambridge SoundWorks is a registered trademark of Creative Labs, Singapore.
Packed with your NetWorks you should find one each:
•2.74meter(9')powercord
•Remotecontrol(batteryinstalled)
•USBaccessorycable
Before you use your NetWorks, you’ll need:
•AbroadbandInternetconnection.
•Awireless(WiFi)networkconnectedtoyourbroadbandInternet,preferablyviaarouter;
•OranEthernetcable(notincluded)fortheEthernetconnectionifWiFiisunavailable
Getting Started:
1. Be sure your wireless network is powered on and connected to your broadband Internet.
2. Connect the included power cord to the power input on the bottom of NetWorks and plug
the other end of the cord into a wall outlet.
3. Press the power button on the remote control or the center of the top control wheel to turn
the NetWorks on.
4. Select “Internet Radio” from the list of sources.
5. Select the WLAN country region nearest you even if WiFi won’t be used.
6. The NetWorks will automatically scan for all wireless networks. After the scan it shows names
of the wireless networks found in addition to offering options to rescan, select a wired connection
(Ethernet)*, or set up the wireless configuration manually. Use the pq buttons on the remote
5

English
control to highlight the network you want and then press Select. The display will show
“Connecting”. After connecting you may begin using your NetWorks.
* If you prefer to connect using a direct Ethernet cable, connect the cable (not included) to
the Ethernet input located on the bottom of NetWorks.
7. If you are prompted to enter a password, your network uses a security encryption system.
You must enter the correct code to allow NetWorks to communicate with your network.
The codes are case sensitive so be sure to enter the code exactly as it is configured in your
wireless network. Use the pq buttons to change character pages. Use the tu buttons to
highlight characters and the Select button to enter the character. After you’ve selected all the
characters for your password, press the ‘ ’ character to enter your password.
a) the ‘<’ symbol = back space if you make an error
b) the ‘ ’ symbol = enter completed password
c) the ‘C’ symbol = cancel process and return to previous menu
When selecting a blank space it will be represented by a blank space
followed by an underscore indicating the position of the next character.
NetWorks will now connect to your network.
If the NetWorks fails to connect with the first attempt and you are sure you entered your password
correctly, press the enter ‘ ’ character to repeat the connection rather than re-enter your password all over again.
If your network uses an encryption system, Tivoli Audio strongly advises against turning it off.
You should maintain proper security of your network. If several networks are available, you should
connect only to the network you have an agreement to use.
If you experience difficulty connecting to your network, consult our website (http://tivoliportal.com)
or contact your dealer/distributor for further assistance.
Should you ever need to manually initiate a network scan you can do so by entering the “Internet
Setup” menu and selecting “Scan for networks”. The “Internet Setup” menu will also allow you
to view and edit current settings.
Wired/Wireless connection: When changing from wireless to wired, after connecting the Ethernet
cable to the input on the bottom of your NetWorks radio, enter the “Internet Setup” in the main menu,
access the “Manual Settings” option and select “Wired”. Be sure the cable is connected first before
switching to Wired mode. The wireless connection is now disabled and no signal strength will be
shown on the display. When changing from wired to wireless, rather then selecting “Wireless”,
select “Scan for networks” in the “Internet Setup” menu and pick up from Step #6 under “Getting
Started”.
WiFi Signal Reception: The WiFi antenna is incorporated inside the NetWorks. Locate the NetWorks
for best WiFi signal reception. Reception can be affected by your home’s type of construction as
well as other causes of interference. In Internet radio and music player modes the display will show
WiFi signal reception in the lower right corner. This will not be shown when using an Ethernet cable.
Note: WiFi networks can sometimes impart very low level random noise into the audio signal. This
is not a fault of the NetWorks radio.
6
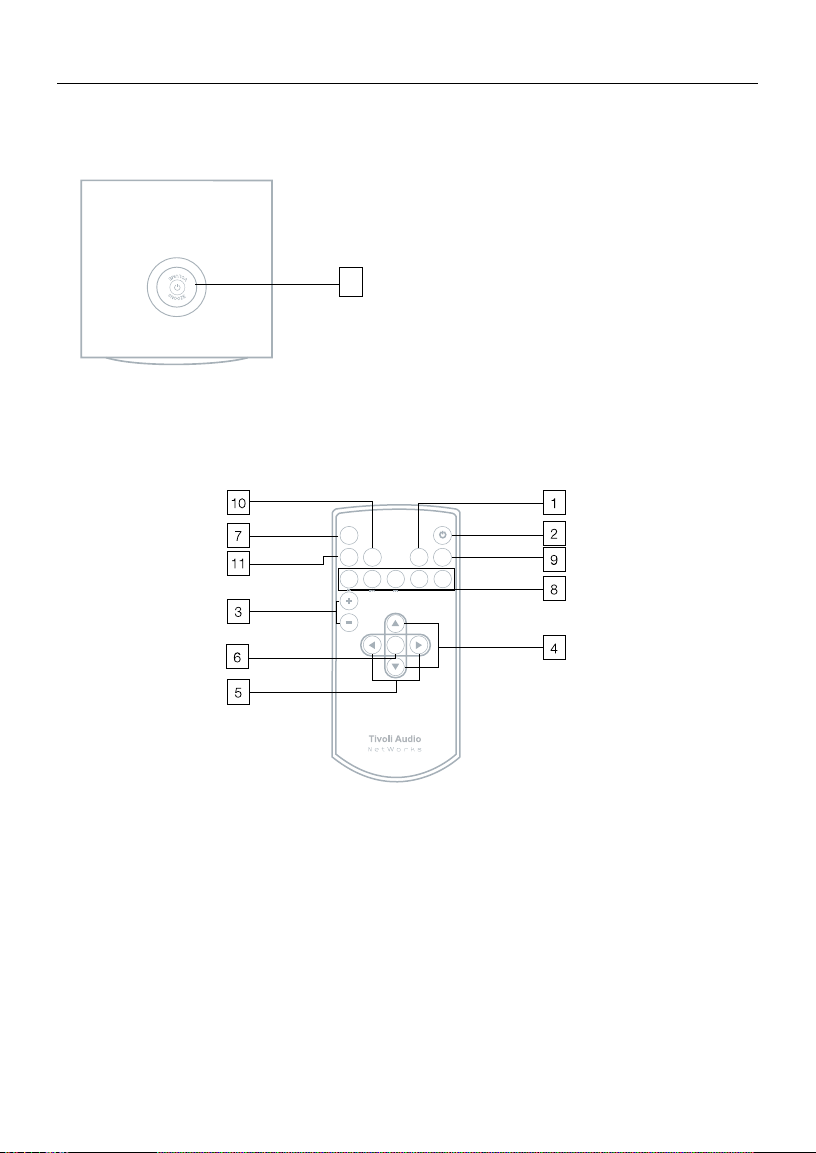
Guide to Features (Top):
1. POWER/VOLUME/SNOOZE/MUTE: Briefly
press the center of the control wheel to power
NetWorks on. Press and hold the center of the
control wheel to power NetWorks off. Rotate
the wheel clockwise to increase the volume and
counterclockwise to decrease the volume. Press
1
the center of the wheel to activate Snooze after
the alarm activates. The Snooze time is fixed
at 7 minutes. Press the center of the wheel to
mute the audio. The display will show an icon of
a speaker with a line through it. Press again to
restore audio output or adjust the volume.
Guide to Features (Remote Control):
MUTE
SNOOZE
ALARM SLEEP SOURCE INFO
2 3 4
1
VOLUME
MENU
SELECT
English
5
1. SOURCE: Press to view the master source list (Internet radio, Music Player, Auxiliary) and use
the pq buttons and the Select buttons to select the desired source. When the NetWorks is
set to Internet radio, the display will show the last station tuned.
2. POWER: Press to power the NetWorks on or off. The radio will power on to the last source used.
3. VOLUME +/–: Press the + button to raise the volume level or the – button to lower the volume
level. If the audio ever sounds distorted, lower the volume level to avoid damaging the speaker.
Adjusting the volume while the NetWorks is muted will cancel the muting.
4. pq: Press these buttons briefly to move up or down through the menu.
5. tu: Press to navigate back or forward through pages while in the main menu. Also used for
highlighting characters when entering an Internet station’s name or entering your password
(if required by your network). Also, press and hold the right arrow button to save a tuned Internet
station to Favorites.
7
 Loading...