

Tivoli iSongBook Owner Manual

OWNER’S MANUAL
iSongBook
™

2

Important Safety Instructions
1. Read these instructions.
2. Keep these instructions.
3. Heed all warnings.
4. Follow all instructions.
5. Do not use this apparatus near water. For example, do not use near a bathtub, in a wet basement,
near a swimming pool, and the like. WARNING! Do not expose this product to rain or moisture.
6. Clean only with a dry cloth.
7. Do not block any ventilation openings. Install in accordance with the manufacturer’s instructions.
8. Do not install near any heat sources such as radiators, heat registers, stoves, or other apparatus
(including amplifiers) that produce heat.
9. Do not defeat the safety purpose of the polarized or grounding-type plug. A polarized plug has
two blades with one wider than the other. A grounding type plug has two blades and a third
grounding prong. The wide blade or the third prong are provided for your safety. If the provided
plug does not fit into your outlet, consult an electrician for replacement of the obsolete outlet.
10. Protect the power cord from being walked on or pinched particularly at plugs, convenience
receptacles, and the point where they exit from the apparatus.
11. Only use attachments/accessories specified by the manufacturer.
12. Use only with the cart, stand, tripod, bracket, or table specified by the
manufacturer, or sold with the apparatus. When a cart is used, use caution
when moving the cart/apparatus combination to avoid injury from tip-over.
13. Unplug this apparatus during lightning storms or when unused for long periods of time.
14. Refer all servicing to qualified service personnel. Servicing is required when the apparatus
3

has been damaged in any way, such as power-supply cord or plug is damaged, liquid has
been spilled or objects have fallen into the apparatus, the apparatus has been exposed to
rain or moisture, does not operate normally, or has been dropped.
15. This product has been tested and found to comply with the limits for Part 15 of the FCC rules.
These limits are designed to provide reasonable protection against harmful interference in a
residential installation. This product generates, uses, and can radiate radio frequency energy
and, if not installed and used in accordance with the instructions, may cause harmful interference
with radio communications. However, there is no guarantee that interference will not occur in
a particular installation. If this equipment does cause harmful interference to radio or television
reception, which can be determined by turning the product on and off, the user is encouraged
to try to correct the interference by one or more of the following measures:
• Reorient or relocate the receiving antennas.
• Increase the separation between the equipment and the receiver.
• Connect the equipment to an outlet on a circuit different from that to which
the receiver is connected.
16. This Class B digital device complies with Canadian ICES-300.
17. For added protection for this product during a lightning storm, or when it is left unattended
and unused for long periods of time, unplug it from the wall outlet. This will prevent damage to
the product to lightning and power-line surges.
18. An outside antenna system should not be located in the vicinity of overhead power lines or
other electric light or power circuits, or where it can fall into such power lines or circuits.
When installing an outside antenna system, extreme care should be taken to keep from
touching such power lines or circuits as contact with them might be fatal.
19. Operate this product only from the type of power source indicated on the rear panel.
For products using an external power supply, use an exact replacement if lost or damaged.
For products operating from battery power, refer to the user manual.
20. Unplug this product from the wall outlet and refer servicing to qualified service personnel
under the following conditions:
a. When the power supply cord or plug is damaged.
b. If liquid has been spilled or objects have fallen into the product.
c. If the product has been exposed to water or rain.
d. If the product does not operate normally by following the operating instructions.
e. If the product has been dropped or damaged in any way.
f. When the product exhibits a distinctive change in performance.
21. If the LCD becomes cracked and damaged, do not touch the liquid.
22. Keep this product a safe distance away from naked flame, such as a lit candle.
23. Do not expose this product to splashing or dripping. Objects containing liquid, such as vases
or drinking glasses, should not be placed on top of this product.
24. The recommended operating temperature range is 41˚ F to 104˚ F (5˚ C to 40˚ C).
25. The 12VDC input is suited for operating this product in a boat or camper using an optional
12VDC, 2A fused adaptor.
4

About Tivoli Audio
Tivoli Audio was started by Tom DeVesto with the goal of bringing simple to use, high quality
audio products to the consumer at reasonable prices. His long professional association with
Henry Kloss includes co-founding Cambridge SoundWorks*. As CEO and head of research and
development at his former company, Tom was responsible for the development of many of the
best selling home entertainment and multi-media products on the market. He also held senior
management positions in product development at both Advent and Kloss Video.
*Cambridge SoundWorks is a registered trademark of Creative Labs, Singapore.
iSongBook Instructions
Congratulations on your purchase of Tivoli Audio’s iSongBook portable FM/AM radio with built-in
iPod dock. We believe the iSongBook to be one of the finest sounding “Made for iPod” stereo
audio systems on the market today.
In order to take full advantage of what your new radio is capable of, please take a moment to read
this owner’s manual and the Safety Instructions. If you have any questions, please do not hesitate
to contact your dealer or Tivoli Audio.
Please save the carton and original packing should you ever need to ship your radio, as
shipping damage is not covered by the factory warranty.
On behalf of all of us, thank you for choosing Tivoli Audio and enjoy your new iSongBook!
Packed with your iSongBook you should find:
• 1 External Power Supply
• 1 Remote Control (battery installed)
• 7 iPod Dock Adapters
• 1 Warranty Registration Card
Please contact your dealer/distributor or Tivoli Audio if any of these items are missing.
Getting Started
1. Set the iSongBook on a flat, stable surface. Attach the male mini plug from the secondary
speaker cable into the jack marked “R CH” on the side of the iSongBook and position the
speaker and main unit as desired.
2. With the iSongBook Off, connect the external power supply to the rear jack on the iSongBook
labeled 12VDC/1A and then plug it into a wall outlet.
3. Flip down the iPod docking station and insert the appropriate iPod adapter cup based on the
iPod model you own. Install your iPod in the dock by fitting the dock’s connector into the jack
on the bottom of the iPod.
4. Turn the iSongBook’s front source knob to the iPod/Aux position and set the volume control
to the desired level. The iPod will power On to its last state.
Note: Low (bass) frequencies place a heavy strain on speakers and amplifiers. The iSongBook
was engineered to reproduce the maximum amount of low frequencies for its size and power.
Therefore, we recommend setting your iPod’s EQ to “Off” for best overall performance.
5
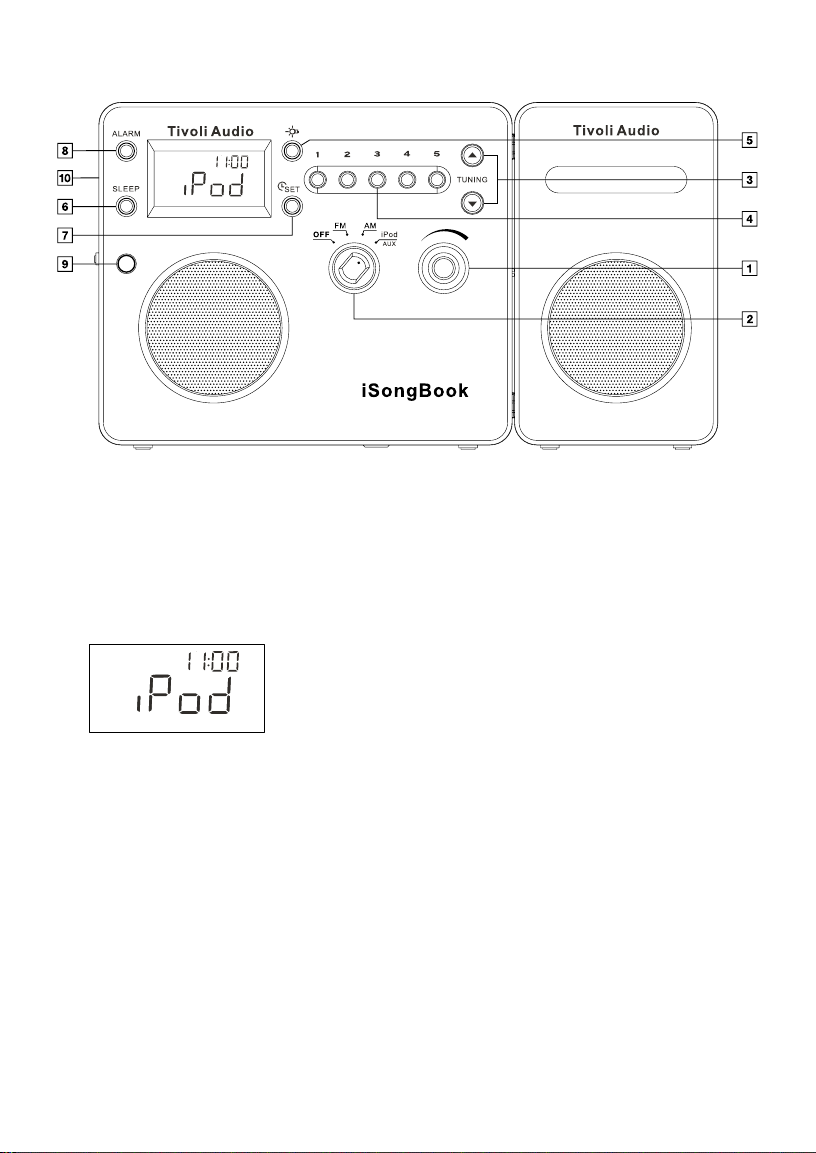
Guide To Features (Front Panel)
1. VOLUME KNOB: Rotate the volume knob to the right to increase the volume or to the left
to decrease the volume. This knob also controls the volume of the headphone output. The
volume level display ranges from 0 (no audio) to 30 (maximum output) and will appear
momentarily each time the volume is adjusted. If the volume ever sounds distorted, reduce
the level to prevent damage to the speakers. Since recording levels vary, you may need to
adjust the volume level when switching from the radio to the iPod and vise versa.
Figure 1
2. OFF/FM/AM/iPod/AUX KNOB: Turn the source knob one click to the right to hear the FM
band, two clicks to the right to hear the AM band, or three clicks to the right for the iPod/
Auxiliary input. When the iSongBook is switched to FM or AM the display will show the station
which was last tuned. When switched to the iPod/Auxiliary input, the display will show iPod
when an iPod is docked (Figure 1). Otherwise, the display will show “AU”. In Off mode the
clock will be shown in a larger format.
3. TUNE ˆ/ˇ BUTTONS: Press the Tune Up button briefly to increase the frequency steps or
the Tune Down button briefly to decrease the frequency steps. Press and hold the Tune Up/
Down buttons to rapidly scan through the stations. To Auto Search, press, hold for more
about .5 seconds, and release the Tune Up or Down button and the tuner will automatically
stop on the next strongly received station. When the tuner locks on to an FM stereo signal
the display will show a pair of headphones with the letters “ST”. These buttons are also used
to set the clock and alarm times.
4. #1-5: With the iSongBook set to FM or AM, press and hold to set the currently tuned radio
station. The Preset number will flash and a beep will be heard confirming the station has
6
 Loading...