

Page 1
DAB/DAB+/DMB/FM Clock Radio
OWNER’S MANUAL
®
Page 2

Page 3

DAB/DAB+/DMB/FM Clock Radio
MULTI-LANGUAGE MANUAL
English ................................................................................................................................ 4
Dansk ............................................................................................................................... 20
Deutsch ............................................................................................................................ 35
Français ............................................................................................................................ 53
Italiano .............................................................................................................................. 69
Nederlands ....................................................................................................................... 86
Norsk .............................................................................................................................. 103
Page 4

DAB/DAB+/DMB/FM Clock Radio
TABLE OF CONTENTS
Safety Instructions .............................................................................................................. 5
Introduction; About Tivoli Audio ......................................................................................... 8
Front panel controls ........................................................................................................... 8
Rear panel controls .......................................................................................................... 10
Remote control ................................................................................................................. 11
Digital Radio / FM / Auxiliary Menus ................................................................................ 12
How to set alarm .............................................................................................................. 14
Alarm options ................................................................................................................... 15
Bluetooth Operation ......................................................................................................... 15
Digital Radio/FM Reception; RDS; Placement; Cleaning ................................................. 16
Warranty ........................................................................................................................... 17
Specifications ................................................................................................................... 19
4 – ENGLISH
Page 5
Important Safety Instructions
1. Read these instructions.
2. Keep these instructions.
3. Heed all warnings.
4. Follow all instructions.
5. CAUTION – Danger of explosion if battery is incorrectly replaced. Replace only with
the same or equivalent type.
6. Warning: Batteries shall not be exposed to excessive heat such as sunshine, fire, or
the like.
7.
WARNING: DO NOT INGEST BATTERY, CHEMICAL BURN HAZARD. The remote
control supplied with this product contains a coin/button cell battery. If the coin/button
cell battery is swallowed, it can cause severe internal burns in just 2 hours and can lead
to death. Keep new and used batteries away from children. If the battery compartment
does not close securely, stop using the product and keep it away from children. If you
think batteries might have been swallowed or placed inside any part of the body, seek
immediate medical attention.
8.
WARNING – To reduce the risk of fire or electric shock, do not expose this apparatus to rain
or moisture.
9. Clean only with a dry cloth.
10. Do not block any ventilation openings. Install in accordance with the manufacturer’s
instructions.
11. Do not install near any heat sources such as radiators, heat registers, stoves, or other
apparatus (including amplifiers) that produce heat.
12. Do not defeat the safety purpose of the polarized or grounding-type plug. A polarized
plug has two blades with one wider than the other. A grounding type plug has two
blades and a third grounding prong. The wide blade or the third prong are provided for
your safety. If the provided plug does not fit into your outlet, consult an electrician for
replacement of the obsolete outlet.
13.
Protect the power cord from being walked on or pinched particularly at plugs,
convenience receptacles, and the point where they exit from the apparatus.
5 – ENGLISH
Page 6

14. Only use attachments/accessories specified by the manufacturer.
15. Use only with the cart, stand, tripod, bracket, or table specified by
the manufacturer, or sold with the apparatus. When a cart is used,
use caution when moving the cart/apparatus combination to avoid
injury from tip-over.
16.
Unplug this apparatus during lightning storms or when unused for long peri ods of time.
17. Operate this product only from the type of power source indicated on the rear panel.
For products using an external power supply, use an exact replacement if lost or
damaged. For products operating from battery power, refer to the user manual.
18.
Unplug this product from the wall outlet and refer servicing to qualified service personnel
under the following conditions:
a. When the power supply cord or plug is damaged.
b. If liquid has been spilled or objects have fallen into the product.
c. If the product has been exposed to water or rain.
d. If the product does not operate normally by following the operating instructions.
e. If the product has been dropped or damaged in any way.
f. When the product exhibits a distinctive change in performance.
When replacement parts are required, be sure your service technician has used replacement
19.
parts specified by the manufacturer or have the same characteristics as the original part.
Unauthorized substitutions may result in fire, electric shock, or other hazards.
20. Upon completion of any service, ask the service technician to perform safety checks
to confirm the product is in proper operating condition.
21. If the LCD becomes cracked and damaged, do not touch the liquid.
22. Keep this product a safe distance away from naked flame, such as a lit candle.
23.
Do not expose this product to splashing or dripping. Objects containing liquid, such as
vases or drinking glasses, should not be placed on top of this product.
24. The recommended operating temperature range is 5˚ C to 40˚ C (41˚ F to 104˚ F).
25. WARNING – The mains are not disconnected in the off position, but the circuits are
de-powered.
26. The external power supply serves as the disconnect device and should remain readily
accessible.
WARNING: THE ALBERGO+ EXTERNAL ANTENNA IS NOT INTENDED TO BE
DETACHED.
6 – ENGLISH
Page 7

This product can be recycled. Products bearing this symbol must
NOT be thrown away with normal household waste. At the end of the
product’s life, take it to a collection point designated for recycling of
electrical and electronic devices. Find out more about return and collection points through your local authority.
The European Waste Electrical and Electronic Equipment (WEEE) Directive was implemented to dramatically reduce the amount of waste going
to landfills, thereby reducing the environmental impact on the planet
and on human health. Please act responsibly by recycling used products. If this product is still useable, consider giving it away or selling it.
7 – ENGLISH
Page 8

Albergo+ Instructions
Congratulations on your purchase. We believe the Albergo+ to be one of the finest
DAB/DAB+/DMB/FM table radios on the market today. We know you are eager to begin
listening to your new radio, but in order to take full advantage of what your radio is capable
of, please take a moment to read this owner’s manual and the safety instructions. If you
have any questions, please do not hesitate to contact your dealer or Tivoli Audio.
Please save the carton and original packing should you ever need to ship your radio,
as shipping damage is not covered by the factory warranty.
On behalf of all of us, thank you for choosing Tivoli Audio, and enjoy your Albergo+!
About Tivoli Audio
Tivoli Audio was founded by Tom DeVesto with the mission of bringing simple to use, elegantly designed, high quality audio products to consumers. As CEO and head of research
and development at his former company, Cambridge SoundWorks, Tom was responsible
for the development of many of the best selling home entertainment and multi-media
products on the market. He also held senior management positions in product development at both Advent and Kloss Video.
*Cambridge SoundWorks is a registered trademark of Creative Labs, Singapore.
Packed with your Albergo+ you should find one each:
• 1 External Power Supply
• 1 Remote Control (battery installed)
Please contact your dealer or Tivoli Audio if any of these items are missing.
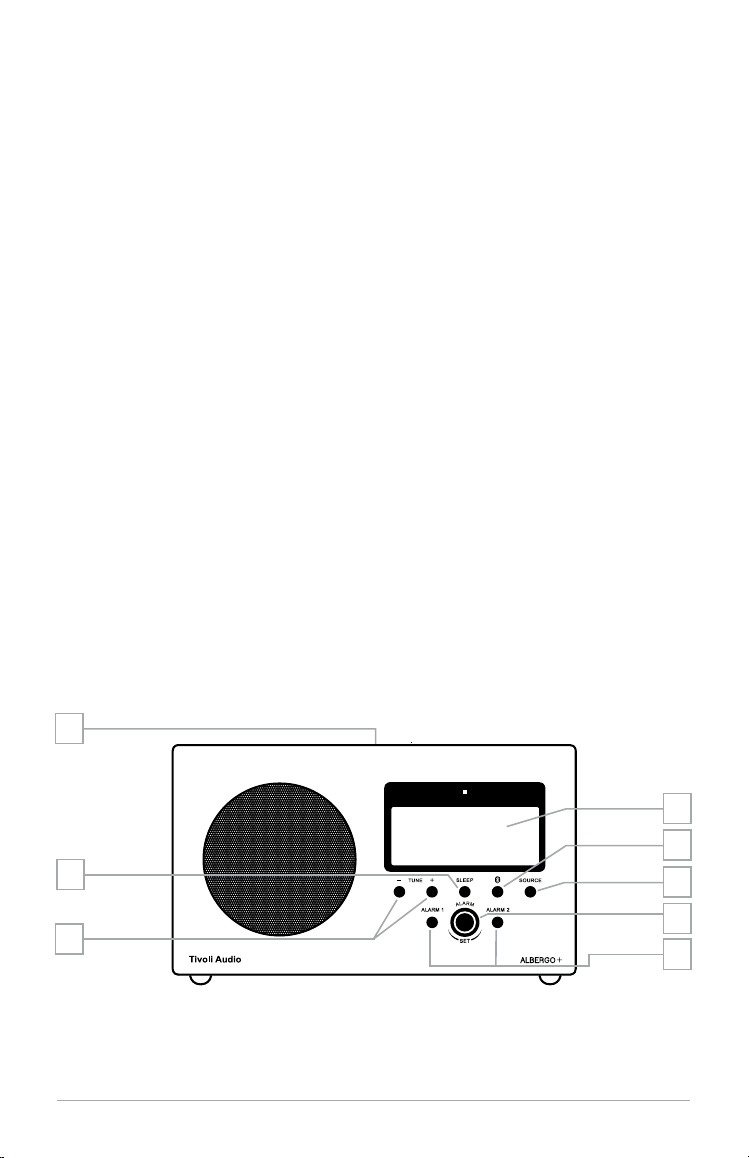
Guide to Features (Front Panel)
1
4
3
8 – ENGLISH
2
5
6
8
7
Page 9

1. MULTI-FUNCTION CONTROL WHEEL (TOP): The control wheel conveniently serves
many functions:
a. Power: When the Albergo+ is off, press to power the unit on. When the Albergo+
is on in any source, press to power the unit off.
b. Volume: When the Albergo+ is on in any source, rotate clockwise to increase
the volume level and counter-clockwise to decrease the volume level.
c. Snooze: Press to engage Snooze when the alarm sounds. An icon will show on
the display when Snooze is active. The Snooze time is fixed at 10 minutes. Pressing
the Snooze button again while still in Snooze mode will re-set the Snooze timer back
to 10 minutes. While the alarm is sounding, press and hold down the Snooze button
to turn off the alarm and the unit, or press the respective alarm button.
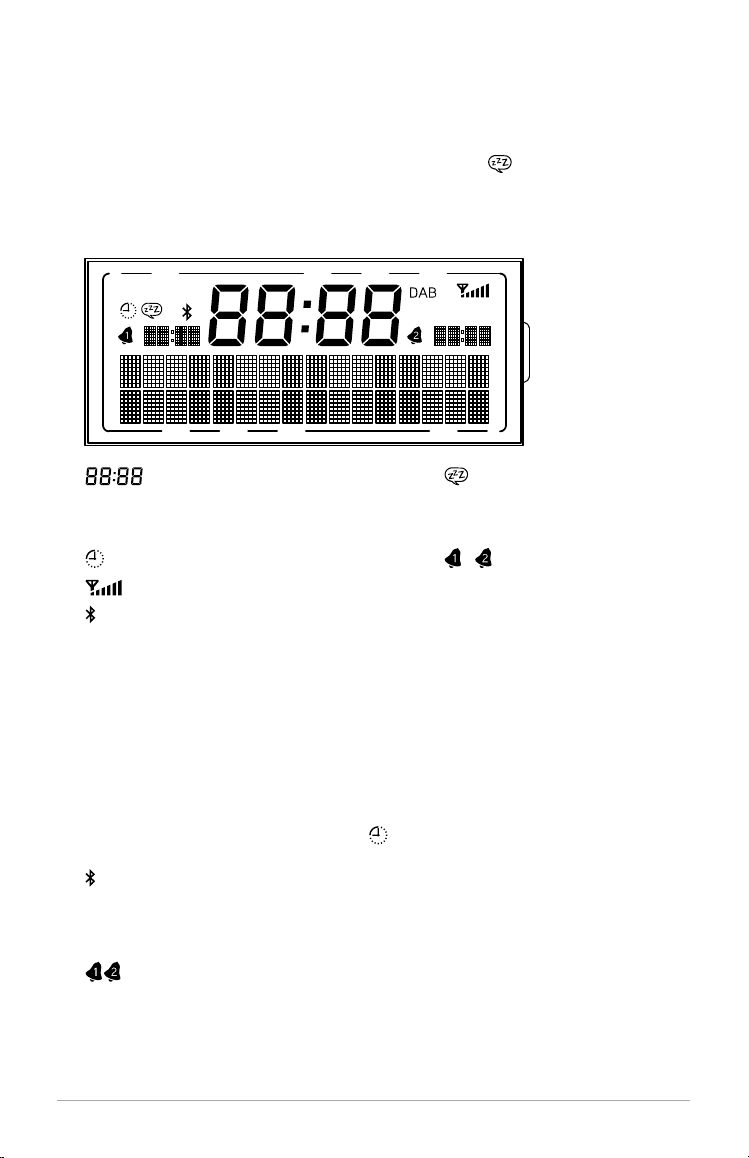
2. LCD:
PMTM
FM AUX
P
P
: (center digits): Time
AUX: Auxiliary
FM: FM band
: Sleep timer
: Reception level
: Bluetooth mode
: Snooze timer
DAB: DAB/DAB+ band
M: Mono
: Alarms 1 and 2
PM: When 12 hour clock is selected
T: Manual tuning mode
3. TUNE +/-: In DAB mode, use these buttons to show all available DAB/DAB+ stations.
Use the +/- buttons to highlight specific stations and the highlighted DAB station will
tune automatically after 3 seconds, or press the Enter button on the remote control.
FM: Press the Tune +/- buttons briefly to Auto Scan to the next station detected. See
“Auto Scan” under “FM Menu” on how to disable Auto Scan and tune stations manually.
4. SLEEP: Press repeatedly to activate the amount of time the radio will play before it
turns off automatically, and or press the Select button on the remote control to select
that time. A small clock face will show on the display when the Sleep timer is active.
To cancel Sleep, press the Sleep button until the display shows “Off”.
5. BLUETOOTH: Press to enter Bluetooth mode. See “Bluetooth Operation” for more
information. Press and hold the Bluetooth button to clear the memory of all paired
devices. The display will show “Memory Cleared”.
6. SOURCE: Press repeatedly to change sources.
7.
ALARM 1 AND 2: Press to set the desired wake time for either alarm and
automatically set the alarm to wake.
8. ALARM KNOB: After pressing either Alarm button, rotate this knob to set the hour and
push the knob in to Enter, then do the same for the minutes and press the knob in when
done, or the alarm time will set automatically after 3 seconds. The alarm will be set to
9 – ENGLISH
Page 10
wake. Each alarm’s wake time will be shown in the display. Press the respective Alarm
button again to cancel the alarm. Please also see “How to Change Alarm Settings
and Set the Alarm Via the Main Menu” for additional very important Alarm settings.
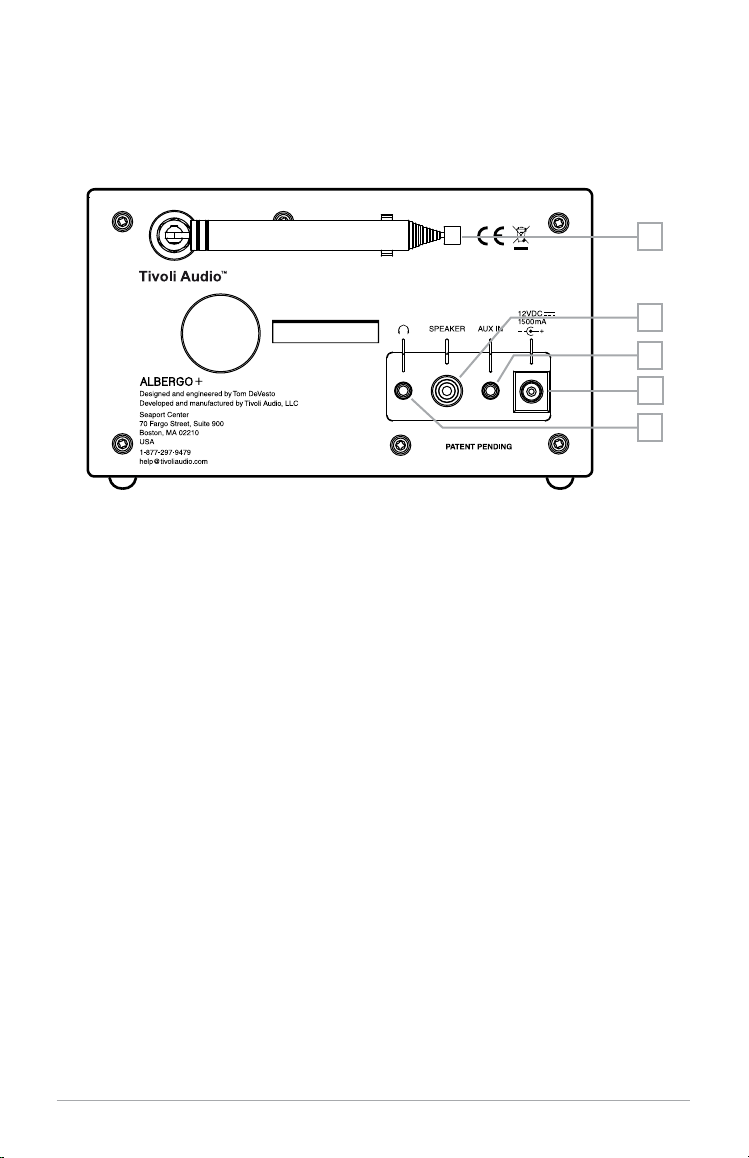
Guide to Features (Rear Panel)
2
5
4
1
3
1.
12VDC/1500mA: Use this input to operate the Albergo+ using its included external
power supply. Use only the power supply provided with this product. Should the
power supply become damaged or misplaced, use only a like replacement. Any DC
adapter used must meet the requirements of EN/IEC 60065 and be rated at 12VDC
1500mA and 230V 50Hz (depending on your region’s power requirements). Use of any
DC adapter not recommended by the manufacturer/not meeting this specification may
cause a safety hazard. The connector is 5.5 mm/2.1 mm center positive. It is normal for
the power supply to become warm during use.
2. EXTERNAL ANTENNA: An external telescoping antenna is affixed to this input and
is not intended to be detached. Adjust for best reception. For more, see the section
marked “Digital Radio/FM Reception”.
3. HEADPHONE OUT: Connect a headset (not included) to this variable stereo output for
private listening. The headset will mute the primary speaker. The headset’s volume is
adjusted using the control wheel or the remote control. The remote’s “Mono” button also
affects this output. This stereo output accepts a 3.5 mm stereo male mini connector.
Avoid using headphones at high volume levels to prevent possible hearing damage.
4. AUX IN: To hear audio from another device, such as Tivoli Audio’s Model CD, a MP3
player, or TV, connect said device’s audio output to this stereo input and change the
source to Auxiliary. This stereo input accepts a 3.5 mm stereo male mini connector.
Note: you may need to adjust the volume level differently for an auxiliary device
than the level used for radio listening.
5.
Speaker: Connect the male RCA cable from the optional Tivoli Audio Albergo
Speaker to this female RCA output. Make sure the Stereo/Mono setting is set to
Stereo by pressing the Mono button on the remote control and be sure the display
doesn't show “M” for mono.
10 – ENGLISH
Page 11

Guide to Features (Remote Control)
1.
POWER: Press briefly to
power the Albergo+ off or on.
The radio will power on to the
last source used.
2.
MUTE/SNOOZE: Press to mute
the audio while the unit is playing; press again or adjust the
volume to restore sound. Press
to mute the alarm for 10 minutes after the alarm sounds. A
icon will show on the display when Snooze is active. The
Snooze time is not adjustable.
Pressing the Snooze button
again while still in Snooze mode
will re-set the Snooze timer
back to 10 minutes.
ALARM: With the Albergo+
3.
powered on, use the pq and
Select buttons to adjust and
set the alarms. Please also
see “How to Change Alarm Settings and Set the Alarm Via the Main Menu” for
additional very important Alarm settings.
4. SLEEP: Press repeatedly to activate the amount of time the radio will play before it
turns off automatically, and or press the Select button on the remote control to select
that time. A small clock face will show on the display when the Sleep timer is active.
To cancel Sleep, press the Sleep button until the display shows “Off”.
5. SOURCE: Press repeatedly to change sources.
6. INFO: Press repeatedly to cycle through the information available depending on the
source mode you are in.
7. PRESETS 1-5: Press and hold to store the currently tuned station. Press briefly to
recall the station associated with that specific preset. In FM mode, the preset number
will be indicated on the display. There are 5 presets for each band.
8. VOLUME +/–: Press the Volume + button to raise the volume level or the Volume –
button to lower the volume level. If the audio ever sounds distorted, lower the volume
level to avoid damaging the speaker. Adjusting the volume while the Albergo+ is muted
will cancel the muting.
9.
pq/TUNE +/-: Press to adjust menu items when in the Menu. In DAB mode, use these
buttons to show all available DAB/DAB+ stations. Use the pq buttons to highlight
specific stations and the highlighted DAB station will tune automatically after 3 seconds,
or press the Enter button on the remote control. FM: Press the Tune +/- buttons briefly
to Auto Scan to the next station detected. See “Auto Scan” under “FM Menu” on how
to disable Auto Scan and tune stations manually.
10. tu: The right arrow button duplicates the Select button. The left arrow button moves
you to the previous page in certain menu items.
11
13
4
2
3
8
5
1
6
7
9
12
10
11 – ENGLISH
Page 12

11. MENU/SELECT: Press and hold to enter the main menu within each source mode
and press briefly to select items within the menu. For more, see the sections below
marked “Menu” for DAB, FM, and Auxiliary Menus.
12. MONO: Press to change the Stereo/Mono setting. The display will show “M” for
mono. This setting also affects the headphone output. For more, see the section
marked “Digital Radio/FM Reception”.
13. BACK: Press to go back to the previous menu page.
Note: With the Albergo+ in standby, you can control the display's backlight without having
to turn the Albergo+ on and accessing the menu. Press the remote's p button twice to
turn the backlight off. Press the remote's p button to turn the backlight on for 10 seconds.
Press the remote's p button two more times to restore the backlight.
Digital Radio (DAB/DAB+) Menu
In DAB mode, press and hold the Menu button on the remote to enter the main menu.
Use the pq buttons and the Select button to change the items within the menu. Use the
Back button to navigate back.
An asterisk (*) indicates the shown menu item is currently set.
Note: Upon entering Digital radio mode, if the Station List is empty, an auto scan will initiate.
Note: The Main Menu will time out if no action is taken after nine seconds.
1.
AUTO SCAN: Searches the entire frequency range. If you move the Albergo+ to
another location, you must perform a new scan so the radio will find stations in the
new location. To cancel the auto scan, press the Back button on the remote.
2.
TIVOLI EQ: Press the Select button and use pq and Select buttons to adjust the Bass
and Treble. The adjusted values will be shown in “User EQ”. Press the Select button
to turn Loudness On or Off. Turning Loudness on when listening at low volume levels
is recommended since it boosts high and low frequencies resulting in a more natural
sound. Use the pq and Select buttons to activate any one of the pre-set EQ settings.
Selecting a preset EQ will over-ride any adjustment made to the Bass and Treble
settings, but Loudness will be unaffected. The “Flat” EQ restores the audio settings
to the factory defaults, meaning Bass and Treble will be re-set to zero. The “Flat” EQ
also restores Loudness Off. However, if the Bass and Treble had been adjusted, those
settings will still be shown in “User EQ”. Simply selecting “User EQ” will reactivate the
Bass and Treble settings. In the EQ menu page, the numbers to the right hand side
indicate the bass and treble settings.
3.
MANUAL TUNE: Press the pq buttons to manually tune specific DAB/DAB+
frequencies. The highlighted DAB station will tune automatically after 3 seconds, or
press the Enter button on the remote control.
4.
DRC: Dynamic Range Control allows you change the sound level of stations to make
quiet passages louder to compensate for a noisy environment, or when listening at a low
volume level.
5. SETTINGS (A-F):
A. ALARM: See “How to Change Alarm Settings and Set the Alarm Via the Main Menu.”
B. TIME:
Set Time/Date: Press the Select button and use pq and Select buttons to ad-
just the hour and then minutes. You must also set the Auto update to “No update”.
For more, refer to “Auto update” below.
12 – ENGLISH
Page 13

Auto Update: Press the Select button and use pq and Select buttons to choose
between “Update from any”, “Update from DAB”, or “Update from FM” (RDS). For
any of the auto updates to work, you must have consistent reception of DAB or
FM RDS with a time/date signal provided. It could take up to a minute or more for
the clock to update. Tivoli Audio is not responsible for inaccurate time/date information provided by the auto update signal. To set the clock manually, select “No
Update”, and then select “Set Time/Date” under the “Time” menu using the pq
buttons and the Select button to set the hour. Repeat to set the minutes and press
Select to save.
Set 12/24 Hour: Press the Select button and use the pq and Select buttons to
choose 12 or 24 hour clock format.
Set Date Format: Press the Select button and use the pq and Select buttons to
choose the date format you prefer.
C. BACKLIGHT:
Timeout: The backlight level can be constant regardless of whether you are
using any controls on the Albergo+ or not (this is the way the Albergo+ is configured from the factory), or you can customize the backlight to automatically
change to a “Dim level” setting after a fixed period of time for as long as no
controls are being used. Once a control on the unit or the remote is pressed, the
normal backlight level is restored. Press Select and use the pq and the Select
buttons to set the amount of time it will take for the backlight to change to the
dim level from 10, 20 ,30, 45, 60, 90, 120, or 180 seconds, or to keep the timeout feature Off.
On Level: Press Select and use the pq and Select buttons to choose the inten-
sity of the backlight.
Dim Level: If you selected a time for the backlight to change to a dim setting
under “Timeout”, then press Select and use the pq and Select buttons to
choose the intensity of the backlight when it changes to this dim setting.
D. LANGUAGE: Press Select and use the pq and Select buttons to set your lan-
guage.
E. FACTORY RESET: Press Select and use the pq and Select buttons to confirm
(Yes) or reject (No) the factory reset. A factory reset will restore factory defaults
and cancel all your personal settings such as presets and language. Also see the
section marked “Digital Radio/FM Reception”.
F. ID: Press Select to view the ID. If you contact your dealer or Tivoli Audio with a
question, you may be asked to provide the number shown in this field.
FM Menu
In FM mode, press and hold the Menu/Select button on the remote to enter the main
menu. Use the pq buttons and the Select button to change the items within the menu.
Use the Back button to navigate back. An asterisk (*) indicates the shown menu item is
currently set.
Note: The Main Menu will time out if no action is taken after nine seconds.
1.
SCAN SETTING: Press the Select button and use pq and Select button to choose
between “Strong stations only” or “All stations” when performing an auto scan
(see #9 (pq/Tune +/-) under “Remote Control”. Selecting “All stations” increases
the sensitivity of the scan, possibly resulting in the auto seek stopping on noise.
13 – ENGLISH
Page 14

2.
AUTO SCAN (NOT IN AUX MENU): Press the Select button and use pq and Select
buttons to enable or disable Auto Scan. When enabled, Auto Scan will automatically
tune the next station received each time the Tune +/- buttons are pressed. When
disabled, the Tune +/- buttons can be used to manually navigate the frequencies.
3.
RDS: Press the Select button and use the pqand Select buttons to choose
between Enabling or Disabling FM RDS text. For more, see “RDS”.
4. TIVOLI EQ: See the description under “Digital Radio Menu”.
5. SETTINGS: See the description under “Digital Radio Menu”.
Auxiliary Menu
In Auxiliary mode, press and hold the Menu/Select button on the remote to enter the main
menu. Use the pq buttons and the Select button to change the items within the menu.
Use the Back button to navigate back. An asterisk (*) indicates the shown menu item is
currently set.
Note: The Main Menu will time out if no action is taken after nine seconds.
1. TIVOLI EQ: See the description under “Digital Radio Menu”.
2. ALARM 2: If you do not expect to use Alarm 2 or are afraid Alarm 2 may be set in
error, press the Select button and use the pq and Select buttons to Disable Alarm 2.
3. SETTINGS: See the description under “Digital Radio Menu”.
4. VOLUME LIMIT: If you wish to reduce the maximum volume level so as not to disturb
others, press the Select button and use the pq and Select buttons to choose between
Volume limit 26 or 22. Selecting “Off” keeps the maximum volume at the factory default
setting of 30. Note reducing the overall volume level will also reduce the level of the
alarm’s volume when the alarm sounds.
5.
BLUETOOTH LEVEL: Use the pq and Select buttons to select “Low” should
you wish to reduce the range of the Bluetooth signal. This may be desirable if the
Bluetooth feature will only be used when you are in very close proximity to the radio.
We recommend this setting remain in the “Normal” position.
How to Change Alarm Settings and Set the Alarm Via
the Main Menu
1. With the Albergo+ powered on, access the alarm setting through the main menu in
DAB, FM, or Aux modes by pressing and holding the Menu button on the remote. Once
in the Menu, select “Settings” and “Alarm”.
2. Alarm 1 is shown first. Use the pq and Select buttons to choose between Alarm 1
and Alarm 2. Note: At any point you can navigate through the alarm menu by using the
back or left arrow buttons, and the Select or right arrow buttons.
3. Use the pq and Select buttons to set the alarm on or off.
4.
Use the pq buttons to set/change the hour, then press Select. Repeat this process
to set/change the minutes, followed by AM/PM (if time is set to 12 hour format), then
press Select.
5. Use the pq buttons to select the source you wish to wake to, then press Select. If
you set the source to DAB (includes DAB+) or FM, use the pq buttons to select the
station preset (if presets have been stored) or last listened, then press Select.
14 – ENGLISH
Page 15

6.
Use the pq buttons to set how often the alarm should be set to wake, then press Select.
7. Lastly, use the pq buttons to set the volume level of the alarm, then press Select. To
ensure there is sound when the alarm activates, the alarm’s volume level cannot be set
below a minimum level. Also, if enabled, the “Volume Limit” feature under the Auxiliary
Menu will affect the alarm volume.
8. Repeat this process for Alarm 2 if desired.
If you make a mistake at any point in the process, press the Back button on the remote and
begin again.
Note: Your settings will not be saved unless you complete the entire process and the
display shows “Alarm Saved”.
Note: If you set the alarm source to DAB and the last listened or preset station is unavailable at the time the alarm sounds, the alarm will default to the tone.
Power Loss: Should power be lost, or the Albergo+ becomes disconnected, the
alarm time will be saved but the Albergo+ alarm cannot sound if there is no power.
Alarm Options
The alarm sounds with a gradual volume increase. When the alarm sounds you can activate the Snooze feature or shut the alarm off.
Snooze: To activate Snooze while the alarm is sounding, press the Snooze button on the
remote, or briefly press the Multi-Function Control Wheel on top of the unit. The Snooze time
is not adjustable. Pressing the Snooze button again while still in Snooze mode will re-set
the Snooze timer back to 10 minutes. While the alarm is sounding, press and hold down the
Snooze top wheel to turn off the alarm and the unit, or press the respective alarm button.
Alarm off: To stop the alarm while it is sounding, press the Alarm button on the unit or
remote, or press and hold the Multi-Function Control Wheel on top of the unit. You can
also press the Power button on the remote.
Alarm Quick Set: With the Albergo+ in Standby, repeatedly press the alarm button on the
remote briefly to toggle each alarm on or off.
Bluetooth Operation
Prior to pairing, verify your device supports Bluetooth 2.1+EDR A2DP and your device is
not connected to any other Bluetooth product. Devices may pair differently. Below is a
general guide.
1. Press the Albergo+'s front panel Bluetooth button or change the source to Bluetooth.
This will power on the Bluetooth. Turn the volume up about ¼ to start. Also turn up the
volume on the source device (the device you are streaming from).
2. Turn on the Bluetooth wireless technology on your enabled device.
3.
Select “Tivoli Bluetooth (Not Paired)” when it appears on your device’s screen to
initiate searching. Some devices may prompt you for a PIN. If so, enter “0000”. “Tivoli
Bluetooth” will change from “Not Paired” to “Connected”.
4. You will hear a ring tone from the Albergo+ confirming connection and you can begin
playing your music files wirelessly. Adjust the volume level on your device. You should
not have to pair your device again. Depending on your device, you may need to
make multiple attempts at Pairing and/or Connecting to the Albergo+, but please
give your device adequate time to Pair or Connect before repeating the process.
15 – ENGLISH
Page 16

Pairing A Bluetooth Wireless Technology Enabled
iPhone/iPod Touch/iPad
1. Press the Albergo+'s front panel Bluetooth button or change the source to Bluetooth.
This will power on the Bluetooth. Turn the volume up about ¼ to start. Also turn up the
volume on the source device (the device you are streaming from).
2. Select “Settings” (depending on software version).
3. Select “General”.
4. Select “Bluetooth”.
5. Switch Bluetooth “On” to initiate searching.
6.
Select “Tivoli Bluetooth (Not Paired)” when it appears on the display. If you are
prompted to enter a PIN, enter “0000”. “Tivoli Bluetooth” will change from “Not Paired”
to “Connected”.
7.
You will hear a ring tone from the Albergo+ and you can begin playing your music files
wirelessly. Adjust the volume level on your device. You should not have to pair your iPhone/
iPod/iPad again.
The volume output level of music files varies. If you prefer an even higher output level, check
the settings in your iPhone/iPod touch/iPad: Set the EQ Off, the SoundCheck Off, and the
Volume limit Off.
If you encounter a problem Pairing, press the small arrow to the right of “Tivoli Bluetooth” on
your iPhone/iPod touch/iPad display and select “Forget this Device”, then repeat the Pairing
process. Depending on your device, you may need to make multiple attempts at Pairing
and/or Connecting to the Albergo+, but please give your device adequate time to Pair or
Connect before repeating the process.
When streaming music, you can press the blue arrow to the right of the next track button
>>/ on the iPhone/iPod touch/iPad display to alternate between the iPhone/iPod/iPad and
Bluetooth.
NOTE:
• The Albergo+ will remember pairing information for up to 8 devices. Additional de-
vices can be paired, but the least-recently used device will be replaced by the newly
paired device.
• If the audio drops out or stops during playback, move your device closer to the Al-
bergo+, or check to be sure another wireless device is not interfering with the signal.
• When switching from Bluetooth to DAB or FM, you may need to re-adjust (lower) the
radio’s volume level.
Digital Radio/FM Reception
The included external antenna will provide good reception. In strong FM signal locations,
reducing the antenna’s length may provide better reception.
If you are using the Albergo+ together with the optional Albergo Speaker for stereo sound
and you are listening to a noisy FM station, press the Mono button on the remote control, as
this might make the FM station more listenable. The display will show an “M” when in mono
Buildings made with concrete, steel, or aluminum siding will hinder reception. Household
appliances, electric blankets, computers, CD players, and other electronic devices can also
16 – ENGLISH
Page 17

adversely affect reception or inject noise. If you experience this, move the Albergo+ further
from the offending device or plug it into an electrical outlet not shared by another device.
Note: When moving the Albergo+ to another location where there may be different DAB
stations from the previous location, it is recommended to perform a factory reset to initiate
a new scan to refresh the DAB station list.
DAB Display Messages
Secondary Services: Secondary stations will be indicated by a >> symbol next to the
station name. Secondary services may not be available in your area.
“?”: If this symbol appears next to the station name, it means the station is invalid or inactive.
“Not Available”: Shown when tuning a DAB station with an insufficient signal.
RDS (FM Band only)
The Radio Data System (RDS) transmits text data along with the audio broadcast. Not all
FM stations utilize this service, thus text may not be present with some stations. For stations broadcasting RDS, the text still might not appear, or might appear scrambled if the
signal is too weak. In such cases, experiment with the position of the FM antenna. If RDS
is being received, repeatedly press the Info button to see the information available. Note
RDS content is determined by each individual FM station.
Placement
Place the Albergo+ on a flat, stable surface. For proper bass and ventilation, do not obstruct
the rear bass port. The Albergo+ is not video shielded and should be kept at minimum of
127 mm away from a computer monitor or television set. Placement in a bookcase, cabinet, or close to walls or corners may inflate the bass, creating an unnatural sound.
Cleaning
Never use any harsh cleansers or solvents on your radio.
Limited Warranty
Tivoli Audio manufactures its products to very high standards and we are confident our
products will perform well. Accordingly, we provide a limited warranty on this product
against manufacturing defects in material and workmanship to the original owner. This
warranty is non-transferable.
Products purchased in the European Union and Norway have a minimum warranty term of
two years. For countries where minimum warranty terms are determined by statute, the warranty term is the statutory period required. In all other locations, the warranty term is one year.
This Limited Warranty covers the functionality of the product for its normal, intended use
as specified in this Owner’s Manual. It does not cover a malfunction or damage that has
resulted from improper or unreasonable use or installation, using the charger to charge
alkaline batteries, faulty ancillary equipment, modifications, unauthorized repair, shipping
damage or loss, abuse, accidents, use on improper voltage/current, power surges, lightning or other acts of God, excess moisture, normal wear and tear, commercial use, or
purchase from unauthorized dealers. Proof of purchase as evidence the unit was purchased from an authorized dealer may be required for warranty service.
17 – ENGLISH
Page 18

Please contact the dealer of purchase or local distributor for warranty service or repair.
Please refrain from opening this product or taking it apart as doing so will void this Limited Warranty. There are no user serviceable parts inside. Tivoli Audio will not pay for
costs incurred due to correction of reception problems, elimination of externally generated static/noise, loss of time, inconvenience, loss of use of product, or damage caused
by improper use of this product.
In the event the product is returned during the warranty term and is eligible for service
under this Limited Warranty, we will repair or replace any defective parts within a reasonable period of time and free of charge.
THIS LIMITED WARRANTY GIVES YOU SPECIFIC LEGAL RIGHTS SUBJECT TO SPECIFIED
CONDITIONS. YOU MAY ALSO HAVE OTHER LEGAL RIGHTS WHICH APPLY TO THE PRODUCT YOU HAVE ACQUIRED. THESE LEGAL RIGHTS VARY FROM COUNTRY TO COUNTRY.
SOME PLACES DO NOT ALLOW THE EXCLUSION, RESTRICTION, OR MODIFICATION OF
CERTAIN IMPLIED RIGHTS OR THEIR EFFECT. IN THOSE SITUATIONS THIS LIMITED WARRANTY WILL ONLY APPLY TO THE EXTENT THAT THE APPLICABLE LAW ALLOWS.
The laws of your country may provide you with legal claims against the seller or manufacturer of this product. This Limited Warranty does not affect those rights.
The provisions of the Limited Warranty are in lieu of any other warranties or conditions,
except those provided by law. This Limited Warranty does not affect any legal rights provided to you by law and does not preclude any remedy you may have under law.
In countries where liability limits are not precluded by statute, the maximum liability of
Tivoli Audio shall not exceed the purchase price paid by you for the product. In countries
where limitations of liability are precluded by law, Tivoli Audio shall be liable for no more
than the direct damages for bodily injury, and/or real or personal property arising from the
negligence of Tivoli Audio.
Where not prohibited by law, Tivoli Audio shall not be liable for special, incidental, consequential, or indirect damages. Some places do not allow limitations on the exclusion or
limitation of relief, special, incidental, consequential or indirect damages, or the limitation of
liability to specified amounts, so the above limitations or exclusions may not apply to you.
This Limited Warranty is void if the label bearing the serial number has been removed
or defaced.
If you purchased an extended service contract from your dealer and service is required
after the term of this Limited Warranty has expired, please contact your extended service
contract provider to obtain service.
For your convenience, you may register your product for warranty service online at
our website www.tivoliaudio.com. There is no legal obligation for you to provide personal
information. However, such information allows us to maintain a record of the Tivoli Audio
products acquired by you and better understand the purchasers of our products. The
information collected will be used for marketing purposes by Tivoli Audio and, where
permitted, to contact you in relation to the products you have acquired or other products
which might be of interest to you from Tivoli Audio or other companies. The information
that you provide may be processed in another country.
18 – ENGLISH
Page 19
Specifications
Model: Tivoli Audio Albergo+
Type: DAB/DAB+/DMB/FM clock radio
with Bluetooth wireless technology
Drivers: 76.2 mm (3") full range driver
Receiving bands: FM:87.5-108MHz
DAB (Band III)/DAB+: 174-240MHz
(Receiving ranges vary by region)
Power: 12VDC nominal - 15 VDC maximum, 1500 mA
Power Supply: Tivoli Audio 1.5A- CE
FM De-Emphasis: 50uSec or 75uSec (depending upon region)
Dimensions: 110 mm H x 186 mm W x 129 mm D
(4.34"H x 7.32"W x 5.22"D)
Weight: 1.0 kg (2.2 lbs.)
All specifications subject to change without notice. Tivoli Audio reserves the right to make product
changes without notice. Tivoli Audio, the Tivoli Audio logo, Albergo, Albergo+, and the Albergo Speaker
are trademarks of Tivoli Audio, LLC. The Bluetooth word mark and logos are registered trademarks
owned by Bluetooth SIG, Inc. and any use of such marks by Tivoli Audio is under license. iPod, iPod
touch, iPhone, and iPad are trademarks of Apple Inc., registered in the U.S. and other countries. Other
trademarks and trade names are those of their respective owners.
19 – ENGLISH
Page 20

DAB/DAB+/DMB/FM Clock Radio
INDHOLDSFORTEGNELSE
Sikkerhedsinstruktioner .................................................................................................... 21
Introduktion; Om Tivoli Audio ........................................................................................... 23
Guide til funktioner på frontpanel ..................................................................................... 23
Guide til funktioner på bagpanel ...................................................................................... 25
Fjernbetjening ................................................................................................................... 26
Menuerne Digital radio/FM/Auxilliary ............................................................................... 27
Sådan indstilles alarm ...................................................................................................... 30
Alarm muligheder ............................................................................................................. 30
Bluetooth Brug ................................................................................................................. 31
Digital Radio / FM Modtagelse; RDS; Placering; Rengøring ............................................ 32
Garanti .............................................................................................................................. 33
Specifikationer .................................................................................................................. 34
20 – DANSK
Page 21
Vigtige Sikkerhedsinstrukser
1. Læs disse instrukser.
2. Gem disse instrukser.
3. Lyt til alle advarsler.
4. Følg alle instrukser.
5. FORSIGTIG – Der er eksplosionsfare, hvis batteriet udskiftes forkert. Udskift kun et
batteri med et andet af samme eller tilsvarende type.
6.
ADVARSEL: Undlad at udsætte batterier for stærk varme som f.eks. direkte sol, ild
eller lignende.
7.
ADVARSEL: SLUG IKKE BATTERIET – FARE FOR KEMISKE FORBRÆNDINGER.
Fjernbetjeningen, der følger med dette produkt, indeholder et mønt-/knapcellebatteri.
Hvis mønt-/knapcellebatteriet sluges, kan det forårsage alvorlige indre forbrændinger på
blot 2 timer, hvilket kan være livsfarligt. Opbevar nye og brugte batterier utilgængeligt for
børn. Hvis batterirummet ikke lukker ordentligt, skal du ophøre med at bruge produktet
og opbevare det utilgængeligt for børn. Hvis du har mistanke om, at batteriet kan være
blevet slugt eller er kommet ind et andet sted i kroppen, skal du straks søge læge.
8. ADVARSEL – For at nedsætte risikoen for brand eller elektrisk chok, må dette apparat
ikke udsættes for regn eller fugt.
9. Rengøres kun med en tør klud.
10.
Bloker ikke ventilationsåbninger. Installer i overensstemmelse med fabrikantens instrukser.
11.
Må ikke installeres nær andre varmekilder så som radiatorer, varmeriste, ovne eller
andre apparater (inklusive forstærkere) som producerer varme.
12.
Omgå ikke sikkerhedsformålet med et polariseret eller jordforbindelsesstik. Et polariseret
stik har to blade og det ene blad er bredere end det andet. Et jordforbindelsesstik har
to blade og et tredje jordforbindelsesben. Det brede blad på det tredje ben er der for
din sikkerhedsskyld. Hvis det medførende stik ikke passer ind i din stikkontakt, bedes
du kontakte en elektriker for at udskifte den forældede stikkontakt.
13.
Beskyt strømkablet så man ikke kan træde på det eller klemme det især ved stik,
stikdåser og der hvor de er tilsluttet apparatet.
14. Brug kun de vedhæftelser/tilbehør som fabrikanten har specificeret.
21 – DANSK
Page 22
15. Må kun bruges sammen med det rullebord, den stand, det stativ, det
beslag eller bord som fabrikanten har specificeret, eller som blev solgt
sammen med apparatet. Når man bruger et rullebord skal man være
forsigtig, når man flytter apparatet på rullebordet, så man undgår
skade hvis det tipper.
16. Træk stikket ud på apparatet i tordenvejr eller hvis det ikke bruges
i længere tid.
17.
Brug kun dette produkt fra den type strømkilde, som er indikeret på bagpanelet.
For produkter som bruger en ekstern strømforsyning skal man erstatte den med en
identisk strømforsyning, hvis den forsvinder eller beskadiges. For produkter som bruger
batteristrøm henvises til brugermanualen.
18.
Træk produktet ud af stikkontakten og kontakt en kvalificeret servicetekniker for service
i følgende tilfælde:
a. Hvis strømkablet eller stikket er beskadiget.
b. Hvis der er spildt væske eller hvis der er kommet noget i produktet.
c. Hvis produktet er blevet udsat for vand eller regn.
d. Hvis produktet ikke fungerer normalt, når man følger brugsanvisningerne.
e. Hvis man har tabt produktet, eller det på nogen måde er blevet beskadiget.
f. Når produktets performance ændrer sig i betydelig grad.
19.
Når det er nødvendigt at bruge reservedele, skal du sørge for at serviceteknikeren
bruger de reservedele, som fabrikanten specificerer eller at de har samme karakteristika
som den originale del. Uautoriserede erstatninger kan forårsage brand, elektrisk chok
eller andre farer.
20.
Når der er blevet udført service, skal du bede serviceteknikeren om at udføre
sikkerhedstjek for at bekræfte at produktet fungerer korrekt.
21. Hvis LCD displayet revner eller bliver beskadiget, må væsken ikke berøres.
22. Hold sikker afstand mellem dette produkt og åben ild så som et tændt stearinlys.
23. Apparatet må ikke udsættes for dryp eller stænk og ting der er fyldt med væske, så
som en vase, må ikke stilles på apparatet.
24. Den anbefalede temperatur for brug er mellem 5 ºC og 40 ºC (41ºF - 104ºF).
25. ADVARSEL – Forsyningsnettet er ikke frasluttet, når det står på “off”, men der er ingen
strøm i kredsløbene.
26. Den eksterne strømforsyning fungerer som afbryder og skal være let tilgængelig.
ADVARSEL: DEN EKSTERNE ANTENNE PÅ ALBERGO+ BØR IKKE
AFMONTERES.
Dette produkt kan genbruges. Produkter med dette symbol må IKKE
smides væk sammen med almindeligt husholdningsaffald. Når du vil
smide produktet ud, bedes du tage det til et indsamlingssted for genbrug af elektriske og elektroniske anordninger. Få mere information om
steder for returnering og indsamling hos din lokale myndighed.
Det europæiske direktiv om affald af elektrisk og elektronisk udstyr
(WEEE) blev implementeret for at stærkt nedsætte mængden af affald
som ender på i lodsepladsen og derved nedsætte den miljømæssige
påvirkning på jorden og på menneskers helbred. Udvis venligst ansvarlighed ved at genbruge brugte produkter. Hvis dette produkt stadigt
kan bruges, bedes du overveje at forære det væk eller sælge det.
22 – DANSK
Page 23
Albergo+ - Instruktioner
Tillykke med din nye Tivoli Audio Albergo+. Vi tror på, at Albergo+ er en af de fineste DAB
/ DAB + / DMB / FM bordradioer på markedet i dag. Vi ved, at du sikkert er ivrig efter at
begynde at lytte til din nye radio, men tag dig tid til at læse denne sikkerheds- og brugervejledning for at få det fulde udbytte af dit nye produkt. Hvis du har spørgsmål, kan du
kontakte din lokale forhandler eller distributør.
Vi anbefaler, at den originale emballage gemmes, således at produktet kan pakkes korrekt ned ved forsendelse til og fra service-værksted, da garantien ikke dækker skader
påført produktet under forsendelse, hvor årsagen skylden dårlig eller forkert indpakning.
Tak fordi du valgte Tivoli Audio og god fornøjelse med Albergo+!
Om Tivoli Audio
Tivoli Audio blev startet af Tom DeVesto som havde en mission om at bringe brugervenlige
og elegant designede audioprodukter af høj kvalitet til forbrugerne. Som administrerende
direktør og chef for forskning og udvikling på hans tidligere arbejdsplads, Cambridge
SoundWorks*, var Tom ansvarlig for at udvikle mange af de home entertainment og
multimedie produkter, der sælger bedst på markedet. Han arbejdede også i topledelsesstillinger indenfor produktudvikling hos både Advent og Kloss Video.
*Cambridge SoundWorks er et registreret varemærke tilhørende Creative Labs, Singapore.
I æsken med Albergo+ skal følgende være inkluderet:
• 1 ekstern strømforsyning
• 1 Fjernbetjening (batteri inkl.)
Kontakt venligst din forhandler, hvis nogen af disse genstande mangler.
Guide Til Funktioner (Front)
1
4
3
23 – DANSK
2
5
6
8
7
Page 24
1.
MULTI-FUNKTION KONTROLHJUL (TOP): Kontrolhjulet gør det muligt for dig at
benytte dig af mange funktioner:
a. Power: Enheden tændes og slukkes her.
b. Volume: Når Albergo+ er tændt, roteres med uret for at øge lydstyrken og mod
uret for at sænke lydstyrken.
c. Snooze: Tryk for at snooze, når alarmen er sat til. Et ikon vises på displayet,
når snooze er aktiveret. Snooze time er sat til 7 minutter. Tryk igen for at annullere snooze.
2. LCD:
PMTM
FM AUX
P
P
: (center digits): Klokkeslæt
AUX: Auxiliary
FM: FM-båndet
: Sleep-timer
: Niveau for modtagelse
: Bluetooth-tilstand
3.
TUNE +/-: I DAB-tilstand skal du bruge disse knapper til at vise alle tilgængelige
: Snooze-timer
DAB: DAB/DAB+ band
M: Mono
: Alarm 1 og 2
PM: Når 12-timers uret er valgt
T: Manuel tuning-tilstan
DAB/DAB+ stationer. Brug knapperne +/- til at fremhæve bestemte stationer, hvorefter
den fremhævede DAB-station tunes automatisk efter 3 sekunder, eller tryk på Enterknappen på fjernbetjeningen. FM: Tryk kort på Tune +/- knapperne for at bruge Auto
Scan til at gå til den næste station, der registreres. Se “Auto Scan” under “FM menu”
for hvordan du deaktiverer Auto Scan og stiller ind på stationer manuelt.
4. SLEEP: Tryk gentagne gange for at få vist mængden af tid radioen vil spille, før den
slukker automatisk, og tryk på Select knappen for at vælge det pågældende tidspunkt.
En lille urskive vil blive vist på skærmen når Sleep timeren er aktiv. For at annullere
sleep, skal du trykke på Sleep-knappen, indtil displayet viser “Off”.
BLUETOOTH: Tryk på knappen Bluetooth for at aktivere Bluetooth-tilstand. Se
5.
"Bluetooth Brug" for yderligere oplysninger. Tryk og hold Bluetooth-knappen nede for
at rydde al hukommelse om parrede anordninger. Displayet vil vise “Memory Cleared”.
6.
SOURCE: Tryk gentagne gange for at ændre lydkilde.
7.
ALARM 1 OG 2: Tryk på denne knap for at indstille det ønskede klokkeslæt for
hvert af de to vækkeurer og automatisk indstille vækkeuret til at ringe.
8.
ALARM-KNAP: Tryk på en vilkårlig alarm-knap og drej knappen for at indstille
klokkeslættet. Tryk på knappen igen for at bekræfte. Gentag for at indstille minutter, og
tryk på knappen igen, når du er færdig. Vækkeurets klokkeslæt bekræftes automatisk efter
3 sekunder. Vækkeuret er nu indstillet til at vække. Klokkelslættet for hvert vækkeur vises
24 – DANSK
Page 25

på displayet. Tryk på den respektive Alarm-knap igen for at annullere vækkeuret. Se også
afsnittet: "Ændring af vækkeurets indstillinger og klokkeslæt via hovedmenuen" for
yderligere meget vigtige indstillinger af vækkeuret.
Guide Til Funktioner (Bagpanel)
2
5
4
1
3
1. 12VDC/1500mA: Benyt denne indgang til at betjene Albergo+ med den medfølgende
strømforsyning. Benyt kun den medfølgende strømforsyning. Hvis strømforsyningen
bliver beskadiget eller bortkommer, benyt udelukkende en eksakt erstatning. Den
benyttede DC-adapter skal være kompatibel med EN/IEC 60065 krav og nomineret
12VDC 1500mA og 230V 50HZ (afhængigt af regionens krav). Brug af DC-adapter,
der ikke er rekommanderet af producenten/ der ikke lever op til kravene kan være
en sikkerhedsrisiko. Stikket er 5,5 mm/ 2,1 mm center positive. Det er normalt at
strømforsyningen bliver varm ved brug.
2. EKSTERN ANTENNE: En ekstern teleskop-antenne er fastgjort til denne indgang og
er ikke beregnet til at blive afmonteret. Justeres for bedste modtagelse. For mere se
afsnittet mærket “Digital Radio / FM modtagelse”.
3. HØRETELEFONER UDGANG: Tilslut høretelefoner (medfølger ikke) til denne stereo-
udgang til mere diskret lytning. Høretelefonerne vil mute den primære højttaler. Volumen
på høretelefonerne justeres via kontrolhjulet eller fjernbetjeningen. Fjernbetjeningen’s
“Mono” knap påvirker også denne udgang. Denne stereo udgang passer til et 3.5mm
mini stereo jack stik. Undgå brug af hovedtelefoner ved høj lydstyrke for at undgå
eventuelle høreskader.
4. AUX IN: Hvis du vil høre lyd fra en anden audio-enhed, såsom Tivoli Audio’s Model
CD, en MP3-afspiller eller dit TV, skal du tilslutte enhedens lydudgang til denne stereo
indgang og ændre til AUX. Denne stereo indgang passer til et 3.5mm mini stereo jack
stik. Bemærk: at det kan være nødvendigt at justere lydstyrken på audio-enheden,
da den kan afvige i forhold til lydstyrken på Albergo+ ved normal radio lytning.
5.
Speaker: Tilslut RCA-kabelet fra Tivoli Audio Albergo Stereo Speaker til denne RCA
udgang. Sørg for at Stereo/Mono er sat til stereo ved at trykke på Mono-knappen på
fjernbetjeningen og vær sikker på, at displayet viser “ST” for stereo og ikke “M” for mono.
25 – DANSK
Page 26

Guide Til Funktioner (Fjernbetjening)
1.
POWER: Tryk kort for at tænde
eller slukke din Albergo+. Når
radioen tændes vises den
sidst anvendte kilde.
2.
MUTE/SNOOZE: Tryk for
at slå lyden fra og tryk igen
for at genoptage foregående
lydstyrke. Tryk for at snooze i
10 minutter efter alarmen lyder.
Et ikon vil blive vist på
skærmen, når snooze er aktiv.
Snooze-tiden er ikke justerbar.
Når du trykker på Snoozeknappen igen, mens du stadig
i Snooze-tilstand, nulstilles
Snooze-timeren til 10 minutter.
3.
ALARM: Tænd for Albergo+ og
brug pq og Select-knappen
til at justere og indstille vækkeuret. Se også "Ændring
af vækkeurets indstillinger
og klokkeslæt via hovedmenuen" for yderligere meget vigtige indstillinger af vækkeuret.
4. SLEEP: Tryk gentagne gange for at få vist mængden af tid radioen vil spille, før den
slukker automatisk, og tryk på Select knappen for at vælge det pågældende tidspunkt.
En lille urskive vil blive vist på skærmen, når Sleep timeren er aktiv. For at annullere
sleep, skal du trykke på Sleep-knappen, indtil displayet viser “Off”.
5. SOURCE: Tryk gentagne gange for at ændre lydkilde.
6.
INFO: Tryk gentagne gange for at bladre gennem de tilgængelige oplysninger afhængig
af den kilde, du befinder dig i.
7.
PRESETS 1-5: Tryk og hold for at gemme den indstillede station. Tryk kort for at indstille
til den ønskede station. I FM-tilstand vil det forudindstillede nummer være angivet på
displayet. Der er mulighed for at gemme 5 stationer på hvert bånd.
8.
VOLUME +/–: Tryk på Volume + knappen for at hæve lydstyrken eller Volume - knappen
for at sænke lydstyrken. Hvis lyden forvrænges bør lydstyrken sænkes for at undgå at
beskadige højttaleren. Hvis lydstyrken justeres, mens Albergo+ er på Mute, vil dette
annullere Mute.
9. pq/TUNE +/-: Tryk her for at navigere i menupunkterne. I DAB-tilstand skal du bruge
disse knapper til at vise alle tilgængelige DAB/DAB+ stationer. Brug knapperne pq
til at fremhæve bestemte stationer, hvorefter den fremhævede DAB-station tunes
automatisk efter 3 sekunder, eller tryk på Enter-knappen på fjernbetjeningen. FM: Tryk
kort på Tune +/- knapperne for at bruge Auto Scan til at gå til den næste station, der
registreres. Se “Auto Scan” under “FM menu” for hvordan du deaktiverer Auto Scan
og stiller ind på stationer manuelt.
10. tu: På højre pileknap dublikeres Select knappen. Den venstre pileknap flytter dig til
den forrige side i visse menupunkter.
11
13
4
2
3
8
5
1
6
7
9
12
10
26 – DANSK
Page 27

11. MENU/SELECT: Tryk for at åbne hovedmenuen, og tryk kort for at vælge punkter
i menuen. Se afsnittet "Menu" for menuerne AM, FM, Bluetooth, and Auxiliary
nedenfor for yderligere oplysninger.
12. MONO: Tryk for at ændre Stereo/Mono-indstilling. Displayet viser "M" for Mono og
"ST" for Stereo. Denne indstilling påvirker også hovedtelefonudgangen. For mere,
se afsnittet “Digital Radio / FM Modtagelse”.
13. BACK: Tryk for at gå tilbage til den forrige menu side.
Bemærk: Når Albergo+ er på standby, kan du kontrollere displayets baggrundslys uden at
skulle tænde for Albergo+ og gå ind på menuen. Tryk på p knappen på fjernbetjeningen
to gange for at slukke for baggrundslyset. Tryk på p knappen på fjernbetjeningen for at
tænde for lyset i 10 sekunder. Tryk på p knappen på fjernbetjeningen to gange til for at
tænde for baggrundslyset igen.
Digital Radio (DAB/DAB+) Menuen
I DAB-tilstand skal du trykke på og holde Menu-knappen på fjernbetjeningen nede for
at åbne hovedmenuen. Tryk på pq og Select for at skifte imellem punkterne i menuen.
Brug knappen Tilbage for at navigere tilbage.
En stjerne (*) indikerer, at det viste menupunkt er indstillet.
Bemærk: Hvis funktionen Digital radio aktiveres og Station List er tom startes en automa-
tisk scanning.
Bemærk: Hovedmenuen forsvinder automatisk efter ni sekunder, hvis der ikke trykkes på
nogen knapper.
1. AUTO SCAN: Søger hele frekvensområdet. Hvis du flytter din Albergo+ til en anden
lokation, bør du udføre en ny scanning, så radioen kan finde stationer på den nye
placering. Hvis du vil annullere den automatiske scanning, skal du trykke på knappen
Tilbage på fjernbetjeningen.
2.
TIVOLI EQ: Tryk på Select knappen og brug pq og Select til at regulere bas og
diskant. De justerede værdier vil blive vist i “Bruger EQ”. Tryk på Select knappen for
at slå Loudness til eller fra. Loudness anbefales når du lytter ved lav lydstyrke, da den
optimerer de høje og lave frekvenser, hvilket resulterer i en mere naturlig lyd. Brug pq
og Select til at aktivere en hvilken som helst af de foruddefinerede EQ indstillinger.
Valg af en foruddefineret EQ vil tilsidesætte enhver justering af bas og diskantindstillinger, men Loudness vil ike blive påvirket. Ved at vælge “Flat” EQ gendannes
fabriksindstillingerne, hvilket betyder, at bas og diskant vil blive sat til nul. “Flat” EQ
slår også automatisk Loudness fra. Hvis bas og diskant var blevet justeret, vil disse
indstillinger stadigvæk vises i “Bruger EQ”. Ved blot at vælge “Bruger EQ” genaktiveres
bas og diskant-indstillingerne. I EQ menuen, viser tallene i højre side bas og diskant.
3. MANUAL TUNE: Tryk på pq for manuelt at søge efter DAB/DAB+/DMB frekvenser.
Den fremhævede DAB-station tunes automatisk efter 3 sekunder. Alternativt kan du
trykke på Enter-knappen på fjernbetjeningen
4.
DRC: Dynamic Range Control giver dig mulighed for at ændre lydniveauet, så stille
passager gøres kraftigere for at kompensere for evt støjende omgivelser, eller hvis
du lytter ved lav lydstyrke.
27 – DANSK
Page 28

5. SETTINGS (A-F):
A. ALARM: Se "Ændring af vækkeurets indstillinger og klokkeslæt via hovedmenuen."
B. TIME:
Indstil tid/dato: Tryk på knappen Select og brug pq og Select for at indstille
timer og minutter. Du bør også indstille Auto Opdatering til “Ingen opdatering”.
For mere information om dette se “Auto Opdatering” nedenfor.
Auto Opdatering: Tryk på knappen Select og brug pq og Select til at vælge
imellem “Opdatering fra alle”, “Opdatering fra DAB” (også DMB), eller “Opdatering fra FM” (RDS). For at disse opdateringer skal virke er det nødvendigt med en
ensartet modtagelse af DAB eller FM, og derudover forudsættes det, at der er tid/
dato til rådighed. Det kan tage op til et minut eller mere for uret at opdatere. Tivoli
Audio er ikke ansvarlig for ukorrekt tid / dato i forbindelse med automatisk opdatering. For manuelt at indstille uret vælges “Ingen opdatering”, og derefter vælges
“Indstil Tid/Dato” i menuen “Tid” ved hjælp af pq eller tu knapperne. Select bruges til indstilling af time, og dette gentages til indstilling af minutter, hvorefter der
trykkes på Select for at gemme indstillingen.
Indstil 12/24 timer: Tryk på knappen Select og brug pq og Select for at vælge
12 eller 24 timers ur.
Indstilling af dato format: Tryk på knappen Select og brug pq og Select til at
vælge det ønskede dato format.
C. BACKLIGHT:
Timeout: Baggrundsbelysningen kan være konstant, uanset om du trykker på
knapperne på din Albergo+ eller ej (det er den måde, hvorpå Albergo+ er konfigureret fra fabrikken), eller du kan tilpasse baggrundslyset, så det automatisk
skifter til et dæmpet niveau efter en bestemt periode, hvor der ikke er blevet
trykket på nogen af knapperne. Når der trykkes på en knap på apparatet eller
fjernbetjeningen, bliver det normale niveau på baggrundslyset genoprettet. Tryk
på knappen Select og brug pq og Select for at indstille hvor lang tid, der skal
gå, før baggrundslyset dæmpes. Der kan vælges imellem 10, 20, 30, 45, 60, 90,
120 eller 180 sekunder, eller timeout funktionen kan slåes fra.
On Level: Tryk på knappen Select og brug pq og Select til at vælge intens-
iteten af baggrundslyset.
Dæmpning: Hvis du har valgt et tidspunkt for dæmpning af baggrundslyset
under “Timeout” trykkes herefter på Vælg og brug pq og Select til at vælge intensiteten af baggrundsbelysningen, når det ændres til dæmpet styrke.
D. SPROG: Tryk på knappen Select og brug pq og Select til at vælge indstilling
af sprog.
E. RESET TIL FABRIKSINDSTILLINGER: Tryk på knappen Select og brug pq og
Select for at bekræfte (Yes) eller afvise (No) reset til fabriksindstillinger. Et reset vil
genoprette fabriksindstillingerne og annullere alle dine personlige indstillinger, som
f.eks valgte kanaler og sprog. Se også afsnittet "Digital radio/FM-modtagelse".
F. ID: Tryk på Select for at se produktets ID. Hvis du kontakter din forhandler eller
serviceværksted med et spørgsmål, kan du blive bedt om at opgive dette nummer.
28 – DANSK
Page 29

FM-menuen
I FM-tilstand skal du trykke på og holde Menu/Select-knappen på fjernbetjeningen
nede for at åbne hovedmenuen. Tryk på pq og Select for at skifte imellem punkterne i
menuen. Brug knappen Tilbage for at navigere tilbage. En stjerne (*) indikerer, at det viste
menupunkt er indstillet.
Bemærk: Hovedmenuen forsvinder automatisk efter ni sekunder, hvis der ikke trykkes på
nogen knapper.
1. SCAN SETTING: Tryk på Select knappen og brug pq og Select til at vælge imellem
“Kun stærke stationer” eller “Alle stationer” når der laves en autoscanning. (se #9 (pq/
Tune +/-) i afsnittet “Remote Control”. Vælges “Alle stationer” øges følsomheden af
scanningen, og dette kan resultere i, at autoscan stopper på en kanal med støj.
AUTO SCAN (IKKE PÅ AUX MENU): Tryk på Select knappen og brug pq knapperne
2.
for at vælge mellem “Strong stations only”, “All stations”, eller “Off” når du udfører
et auto scan (se punkt 9 (Tune +/-) under “Remote Control”). Hvis man vælger “All
stations” forøges sensitiviteten af scanningen og det kan muligvis resultere i at auto
scan stopper ved støj. Hvis man vælger “Off” bliver Auto Scan slukket og man kan
stille ind på stationer manuelt.
3. RDS: Tryk på Select-knappen, og brug pq og Select- knapperne til at vælge mellem
"Enabling" eller "Disabling" FM RDS-tekst. Se afsnittet "RDS" for yderligere oplysninger.
4. TIVOLI EQ: Se beskrivelsen under "Digital radio-menu".
5. SETTINGS: Se beskrivelsen under "Digital radio-menu".
Auxiliary-menuen
I Auxiliary-tilstand skal du trykke på og holde Menu/Select-knappen på fjernbetjeningen
nede for at åbne hovedmenuen. Tryk på pq og Select for at skifte imellem punkterne i
menuen. Brug knappen Tilbage for at navigere tilbage. En stjerne (*) indikerer, at det viste
menupunkt er indstillet.
Bemærk: Hovedmenuen forsvinder automatisk efter ni sekunder, hvis der ikke trykkes på
nogen knapper.
1. TIVOLI EQ: Se beskrivelsen under "Digital radio-menu".
2.
ALARM 2: Hvis du ikke regner med, at du vil bruge Alarm 2 eller er bange for, at
Alarm 2 utilsigtet indstilles, skal du trykke på Select-knappen og bruge pq og Selectknapperne til at deaktivere Alarm 2.
3. SETTINGS: Se beskrivelsen under "Digital radio-menu.
4. VOLUME LIMIT: Hvis du vil skrue ned for den maksimale lydstyrke for ikke at forstyrre
andre, skal du trykke på Select-knappen og bruge pq og Select-knapperne for at vælge
mellem lydstyrkegrænse 26 eller 22. Hvis du vælger "Off" vil den maksimale lydstyrke
være standardindstillingen på 30. Bemærk: Hvis du skruer ned for den samlede lydskyrke,
skrues der også automatisk ned for vækkeurets lydstyrke, når det ringer.
BLUETOOTH NIVEAU: Brug pq og Select-knapperne til at vælge “Low” hvis du ønsker
5.
at nedsætte Bluetooth signalets rækkevidde. Det kan være ønskværdigt hvis du kun
bruger Bluetooth featuren når du er meget tæt på radioen. Vi anbefaler at denne indstilling
forbliver i “Normal” positionen.
29 – DANSK
Page 30

Ændring Af Vækkeurets Indstillinger Og Klokkeslæt Via
Hovedmenuen
1. Tænd for Albergo+ og tryk på og hold Menu-knappen på fjernbetjeningen nede for at
komme ind i indstillingen af vækkeuret gennem hovedmenuen i DAB, FM eller Auxtilstand. Når du er inde i menuen, skal du vælge "Settings" og "Alarm".
2.
Alarm 1 er vist først. Brug pq og Select-knappen til at vælge mellem Alarm 1 og Alarm
2. Bemærk: På ethvert tidspunkt kan du navigere gennem alarm menuen ved hjælp af
Tilbage eller venstre piletast, og Select eller højre piletast.
3. Tryk på pq og Select for at slå alarmen til eller fra.
4.
Tryk på pq for at justere timetallet og tryk på Select for at gemme og gentage
processen for minuttallet, efterfulgt af AM/PM (hvis tiden er sat til 12 timers format),
tryk derefter på Select.
5. Tryk på pq for at vælge den lydkilde, du vil vågne op til, og tryk herefter på Select.
Hvis du indstiller DAB (omfatter også DAB+/DMB) eller FM, skal du bruge pq for at
vælge den ønskede faste station (hvis presets er lagret) eller den station du sidst lyttede
til, og tryk derefter på Select.
6. Tryk på pq for at indstille hvor ofte alarmen skal vække dig, og tryk derefter på Select.
7. Sidst men ikke mindst tryk på pq for at indstille lydstyrken for alarmen, og tryk derefter
på Select. For at være sikker på at lyden virker når alarmen aktiveres, kan alarmens
lydniveau ikke sættes under et minimumsniveau. Hvis man aktiverer “Volume Limit”
featuren under AUX menuen vil det også påvirke alarmens lydstyrke.
8. Gentag denne proces for Alarm 2, hvis det ønskes.
Hvis du laver en fejl på noget tidspunkt i processen, kan du altid trykke på Tilbage-knappen
på fjernbetjeningen og begynde igen.
Bemærk: Dine indstillinger gemmes ikke med mindre du har fuldført hele processen, og
displayet viser “Alarm Saved” (Alarm gemt).
Bemærk: Hvis du vil indstille alarmen til DAB, og den sidst lyttede eller forudindstillede
station er ikke tilgængelig på det tidspunkt alarmen lyder, vil alarmen i stedet lyde i form
af en standard tone.
Strøm svigt: Skulle strømmen forsvinde, eller skulle din Albergo+ blive afbrudt, vil den
indstillede alarm forblive gemt, men alarm kan ikke aktiveres, hvis der ikke er strøm.
Alarm Muligheder
Alarmen lyder med en gradvis øget volumen. Når alarmen lyder, kan du aktivere Snooze
funktionen eller slå alarmen fra.
Snooze: Snooze: For at aktivere Snooze, skal du trykke på Snooze-knappen på fjernbetjeningen eller trykke kortvarigt på kontrolhjulet på toppen af enheden. Det er ikke
muligt at indstille Snooze tiden. Når du trykker på Snooze-knappen igen, mens du stadig
i Snooze-tilstand nulstilles Snooze-timeren til 10 minutter. Når vækkeuret ringer, skal du
trykke på og holde tophjulet Snooze nede for at slå vækkeuret fra og slukke enheden, eller
trykke på den pågældende alarm-knap.
Alarm fra: Du kan stoppe alarmenved at trykke på Alarm eller Power-knappen på fjernbetjeningen, eller tryk og hold kontrolhjulet på toppen af enheden.
Alarm Quick Indstilling: Når Albergo+ er i standby, trykkes gentagne gange kort på alarm
knappen for at slå alarmen til eller fra.
30 – DANSK
Page 31

Bluetooth Brug
Før parring skal du tjekke at din anordning understøtter Bluetooth 2.1+EDR A2DP, og at
din anordning ikke er tilsluttet et andet Bluetooth produkt. Forskellige anordninger kan
parre forskelligt. Nedenstående er en general guide.
1. Tryk på knappen Bluetooth på frontpanelet på Albergo+ eller skift kilde til Bluetooth.
Dette vil tænde for din Bluetooth. Start med at skrue ¼ op for lyden. Skru også op for
lyden på kildeenheden (den enhed du streamer fra).
2. Tænd den Bluetooth trådløse teknologi på din aktiverede anordning.
3. Vælg “Tivoli Bluetooth (Ikke parret)” når den kommer op på din anordnings skærm for
at begynde søgningen. Nogle anordninger beder dig om et PIN nummer. I så tilfælde
indtaster du “0000”. “Tivoli Bluetooth” vil skifte fra “Ikke parret” til “Forbundet”.
Du vil høre en ringetone fra din Albergo+ som bekræfter forbindelsen, og du kan nu begynde
4.
at spille dine musikfiler trådløst. Juster lydstyrken på din anordning. Det skulle ikke være
nødvendigt at parre din anordning igen. Afhængigt af hvilken enhed du bruger kan det
være nødvendigt at prøve parring og/eller forbindelse til Albergo+ flere gange, men
giv venligst enheden tid nok til at parre eller forbinde før du gentager processen.
Parre En Bluetooth Trådløs Teknologi Aktiveret iPhone/
iPod Touch/iPad
1. Tryk på knappen Bluetooth på frontpanelet på Albergo+ eller skift kilde til Bluetooth.
Dette vil tænde for din Bluetooth. Start med at skrue ¼ op for lyden. Skru også op for
lyden på kildeenheden (den enhed du streamer fra).
2. Vælg “Indstillinger” (afhænger af anordningens softwareversion).
3. Vælg “Almindelig”.
4. Vælg “Bluetooth”.
5. Sæt Bluetooth til “On” for at begynde søgningen.
6. Vælg “Tivoli Bluetooth (Ikke parret)” når det vises på displayet. Hvis du bliver bedt om
at indtaste et PIN nummer, indtaster du “0000”. “Tivoli Bluetooth” vil skifte fra “Ikke
parret” til “Forbundet”.
7.
Du vil høre en ringetone fra din Albergo+, og du kan nu begynde at spille dine musikfiler
trådløst. Juster lydstyrken på din anordning. Det skulle ikke være nødvendigt at parre
din iPhone/iPod/iPad igen.
Output niveauet af lydstyrken på musikfiler varierer. Hvis du foretrækker et endnu højere
output niveau kan du tjekke indstillingerne på din iPhone/iPod touch/iPad: Sæt EQ til Off,
SoundCheck til Off, og lydstyrkegrænsen til Off.
Hvis du har problemer med at parre, trykker du på den lille pil til højre for “Tivoli Bluetooth”
på dit iPhone/iPod touch/iPad display og vælg “Glem denne anordning”, og gentag så
parringsprocessen. Afhængigt af hvilken enhed du bruger kan det være nødvendigt at
prøve parring og/eller forbindelse til Albergo+ flere gange, men giv venligst enheden
tid nok til at parre eller forbinde før du gentager processen.
Når du streamer musik kan du trykke på den blå pil til højre for knappen for det næste spor
>>/ på dit iPhone/iPod touch/iPad display for at skifte mellem iPhone/iPod/iPad og Bluetooth.
31 – DANSK
Page 32

VIGTIGT:
• Albergo+ vil huske parringsoplysninger for op til 8 anordninger. Yderligere anordninger kan parres, men den anordning, som det er længst siden den blev brugt, vil
blive erstattet af den nyeste parrede anordning.
• Hvis lyden forsvinder eller stopper mens der spilles, skal du flytte din anordning tættere på din Albergo+, eller tjek for at sikre at der ikke er en anden trådløs anordning
som forstyrrer signalet.
• Når du skifter fra Bluetooth til AM eller FM, kan det være nødvendigt at genjustere
(sænke) radioens lydniveau.
Digital Radio / FM Modtagelse
Den medfølgende eksterne antenne vil give en god modtagelse. I områder med stærkt FM
signal, kan reducering af antennens længde give bedre modtagelse.
Hvis du bruger Albergo+ sammen med Albergo Stereo Speaker, og du lytter til en støjende
FM station, kan du med fordel trykke på Mono-knappen på fjernbetjeningen, da dette kan
gøre FM stationen mere støjfri og lyttevenlig. Displayet vil vise et “M”, når Albergo+ er i
mono og et “ST”, når den er i stereo. Denne information vil også blive vist i FM-tilstand,
når du bruger knappen Info på fjernbetjeningen.
Bygninger der indeholder beton, stål eller aluminium vil hindre modtagelse. Husholdningsapparater, elektriske tæpper, computere, cd-afspillere og andre elektroniske enheder kan
også have en negativ indflydelse på modtagelsen eller give anledning til støj. If you experience this, move the Albergo+ further from the offending device or plug it into an electrical
outlet not shared by another device.
Bemærk: Når du flytter Albergo+ til et andet sted, hvor der kan være forskellige DABstationer fra den tidligere placering, anbefales det at udføre en fabriksnulstilling, således
at der indledes en ny scanning for at opdatere DAB-stationslisten.
Dab Beskeder På Display
Sekundære Tjenester: Sekundære stationer vil fremgå i form af et >> symbol ved siden af
stationens navn. Sekundære tjenester er muligvis ikke tilgængelig i dit område.
“?”: Hvis dette symbol vises ved siden af navnet på stationen, betyder det, at stationen
er ugyldig eller inaktiv.
“Not Available”: Vises når der stilles ind på en DAB-station med et utilstrækkeligt signal.
RDS (kun ved FM)
Radio Data System (RDS) sender tekst data sammen med lyden. Ikke alle FM-stationer
bruge denne service, og teksten er således ikke tilgængelig ved alle stationer. Hvis det
opleves, at RDS teksten ikke vises, eller teksten ser rystet ud, kan det skyldes, at signalet
er for svagt. I sådanne tilfælde kan man eksperimentere med placeringen af FM-antennen.
Hvis det er muligt at modtage RDS, trykkes gentagne gange på Info-knappen for at se de
tilgængelige oplysninger. Bemærk: RDS indholdet bestemmes af den enkelte FM-station.
32 – DANSK
Page 33

Placering
Placer Albergo+ på en flad, stabil overflade. For fuld udnyttelse af bas og ventilation, må den
bageste basport ikke dækkes til. Albergo+ er ikke video afskærmet og bør holdes mindst
127 mm (5 ") væk fra en computer skærm eller et fjernsyn. Placering i en reol, et skab eller
tæt på vægge eller hjørner kan indvirke på bassen og dermed skabe en unaturlig lyd.
Rengøring
Benyt aldrig skrappe rensemidler eller opløsningsmidler på Albergo+.
Begrænset Garanti
Tivoli Audio laver produkter af meget høj standard, og vi er sikre på, at vore produkter
fungerer godt. Derfor yder vi en begrænset garanti på dette produkt mod fabrikationsfejl
ved materialer og håndværk til den oprindelige ejer. Denne garanti kan ikke overføres.
Produkter som er købt i EU og Norge har en minimumsgaranti på to år. I lande hvor
varigheden af minimumsgarantien er vedtægtsbestemt, er garantiperioden den påkrævede vedtægtsperiode. Alle andre steder er garantiperioden et år.
Denne begrænsede garanti dækker dette produkts funktionalitet for normal, tilsigtet brug
som specificeret i denne manual. Den dækker ikke fejlfunktion eller skade, der er opstået
ved upassende eller urimelig brug eller installering, ved at bruge opladeren til at oplade
alkaline batterier, fejl ved tilknyttet udstyr, modifikationer, uautoriseret reparation, skade
eller tab under forsendelse, mishandling, uheld, brug af forkert spænding/strøm, strømstød,
lynnedslag eller andre naturfænomener, for megen fugt, normal slidtage, kommercielt brug
eller køb fra uautoriserede forhandlere. Det kan være nødvendigt at vise dit købsbevis ved
garantiservice for at bevise at enheden blev købt hos en autoriseret forhandler.
Kontakt venligst din forhandler eller en lokal distributør for garantiservice eller -reparation.
Hvis du åbner eller skiller dette produkt ad, vil den begrænsede garanti være ugyldig. Der
er ingen dele inden i, som brugeren kan servicere. Tivoli Audio betaler ikke for omkostninger ved korrigering af problemer med modtagelsen, eliminering af eksternt genereret
statisk støj/støj, tidstab, ubekvemmelighed, tab af brugen af produktet, eller skade forårsaget ved upassende brug af dette produkt.
Hvis produktet returneres i garantiperioden og service er berettiget i følge denne begrænsede
garanti, vil vi reparere eller erstatte alle defekte dele gratis og indenfor en rimelig tidsfrist.
DENNE BEGRÆNSEDE GARANTI GIVER DIG SPECIFIKKE LOVMÆSSIGE RETTIGHEDER
UNDERLAGT DE SPECIFICEREDE FORHOLD. DER KAN OGSÅ VÆRE ANDRE GÆLDENDE LOVMÆSSIGE RETTIGHEDER FOR DET KØBTE PRODUKT. DISSE LOVMÆSSIGE
RETTIGHEDER VARIERER FRA LAND TIL LAND. NOGLE STEDER ER EKSKLUDERING,
RESTRIKTION ELLER MODIFICERING AF VISSE UNDERFORSTÅEDE RETTIGHEDER
ELLER DERES EFFEKT IKKE TILLADT. I EN SÅDAN SITUATION VIL DENNE BEGRÆNSEDE
GARANTI KUN GÆLDE I DEN UDSTRÆKNING SOM GÆLDENDE LOV TILLADER.
Dit lands love kan give dig retten til lovmæssige krav mod sælgeren eller producenten af
dette produkt. Denne begrænsede garanti påvirker ikke disse rettigheder.
Bestemmelserne i den begrænsede garanti træder i stedet for alle andre garantier eller
forhold, bortset fra dem der er lovbestemt. Denne begrænsede garanti påvirker ikke dine
lovgivne rettigheder og udelukker ikke noget retsmiddel, som du har lovmæssigt ret til.
I lande hvor ansvarlighedsgrænsen ikke udelukkes af vedtægter skal Tivoli Audio højeste ansvarlighed ikke overstige den pris du betalte for produktet. I lande hvor ansvarlighedsgrænsen
33 – DANSK
Page 34

er udelukket af loven, skal Tivoli Audio ikke være ansvarlig for mere end direkte kropsskade,
og/eller skade på ejendom eller personlige ejendele som følge af Tivoli Audios uagtsomhed.
Hvis det ikke er forbudt i følge loven, skal Tivoli Audio ikke være ansvarlig for specielle,
uhelds-, konsekvens- eller indirekte skader. Nogle steder tillader ikke begrænsninger af
eksklusion eller begrænsninger af afhjælpning, specielle, uhelds-, konsekvens- eller indirekte skader eller ansvarsbegrænsning til særlige beløb, så ovenstående begrænsninger
eller eksklusioner gælder måske ikke dig.
Denne begrænsede garanti er ugyldig, hvis mærkatet med serienummeret er blevet fjernet
eller ødelagt.
Hvis du har købt en forlænget servicekontrakt fra din forhandler og service er nødvendig
efter den begrænsede garanti er udløbet, bedes du kontakte vores udbyder af den forlængede kontrakt for at blive serviceret.
For nemheds skyld kan du registrere dit produkt for garantiservice online på vores
hjemmeside www.tivoliaudio.com. Du er ikke lovmæssigt forpligtet til at give personlige
oplysninger. Men sådanne oplysninger lader os registrere hvilke Tivoli Audio produkter
du køber, så vi bedre kan forstå dem der køber vores produkter. Tivoli Audio vil bruge
de indsamlede oplysninger til markedsføring, og hvor det er tilladt vil vi kontakte dig om
de produkter du har købt eller andre produkter du kunne være interesseret i fra Tivoli
Audio eller andre firmaer. De oplysninger du giver os kan blive bearbejdet i et andet land.
Specifikationer
Model: Tivoli Audio Albergo+
Type: DAB/DAB+/DMB/FM bordradioer med
Bluetooth trådløs teknologi
Højttalere: 76,2 mm (3") driver med fuld rækkevidde
Frekvensbånd: FM:87.5-108MHz
DAB (Band III)/DAB+: 174-240MHz
(Kan variere fra land til land)
Strømforsyning: 12VDC nominal - 15 VDC maximum, 1500 mA
DC Adaptor: Tivoli Audio 1.5A- CE
FM De-Emphasis: 50uSec or 75uSec (Kan variere fra land til land)
Dimensioner: 110 mm H x 186 mm W x 129 mm D
(4,34"H x 7,32"W x 5,22"D)
Vægt: 1,0 kg (2,2 lbs)
Der forbeholdes ret til at ændre specifikationer uden forudgående informationer herom. Tivoli Audio
forbeholder sig retten til at udføre produktændringer uden forudgående informationer herom. Tivoli
Audio, Tivoli Audio’s logo, Albergo, Albergo+ og Albergo Speaker er registerede varemærker som
tilhører Tivoli Audio, LLC. Bluetooth ordmærket og logoer er registrerede varemærker som ejes af
Bluetooth SIG, Inc. og enhver form for brug af Tivoli Audio er under licens. iPod, iPod touch, iPhone, og
iPad er varemærker tilhørende Apple Inc., som er registreret i USA og andre lande. Andre varemærker
og varenavne tilhører deres respektive ejere.
34 – DANSK
Page 35

DAB/DAB+/DMB/FM Clock Radio
INHALT
Sicherheitshinweise .......................................................................................................... 36
Einführung; Über Tivoli Audio ........................................................................................... 39
Bedienelemente an der Vorderseite ................................................................................. 39
Bedienelemente an der Rückseite.................................................................................... 41
Fernbedienung ................................................................................................................. 42
Digitalradio / FM / Auxiliary-Menüs .................................................................................. 43
Alarmeinstellung ............................................................................................................... 46
Alarmoptionen .................................................................................................................. 47
Bluetooth Betrieb ............................................................................................................. 48
Empfang; RDS; Aufstellung; Reinigung ............................................................................ 49
Garantie ............................................................................................................................ 50
Spezifikationen ................................................................................................................. 52
35 – DEUTSCH
Page 36

„
Wichtige Sicherheitsanweisungen
1. Lesen Sie diese Anweisungen sorgfaltig durch.
2. Bewahren Sie diese Anweisungen auf.
3. Beachten Sie alle Warnhinweise.
4. Befolgen Sie alle Anweisungen.
5.
ACHTUNG – Explosionsgefahr, wenn Batterie falsch eingesetzt wird. Nur mit derselben
Batterie oder einem gleichwertigen Typ ersetzen.
6.
WARNUNG: Batterien dürfen nicht starker Hitze wie Sonnenschein, Feuer oder
dergleichen ausgesetzt werden.
7.
WARNUNG: NICHT VERSCHLUCKEN, ES BESTEHT DIE GEFAHR VON VERÄTZUNGEN.
Die mit diesem Produkt gelieferte Fernbedienung enthält eine Knopfzellenbatterie.
Wenn die Knopfzellebatterie verschluckt wird, kann diese in nur 2 Stunden zu schweren
inneren Verätzungen und sogar zum Tod führen. Bewahren Sie neue und gebrauchte
Batterien für Kinder unzugänglich auf. Wenn sich das Batteriefach nicht sicher schließen
lässt, verwenden Sie das Produkt nicht länger und halten Sie es von Kindern fern. Sollte
der Verdacht bestehen, dass Batterien möglicherweise verschluckt oder im Körper
platziert wurden, ziehen Sie sofort einen Arzt hinzu.
8.
Halten Sie dieses Gerat von Wasser fern. Verwenden Sie dieses Gerat beispielsweise nicht
in der Nahe einer Badewanne, in einem feuchten Keller, in der Nahe eines Swimmingpools
und dergleichen. ACHTUNG! Setzen Sie das Gerat nicht Regen oder Feuchtigkeit aus.
9. Reinigen Sie das Gerät nur mit einem trockenen Tuch.
10.
Stellen Sie sicher, dass die Belüftungsöffnungen nicht versperrt sind. Schließen Sie
das Gerät gemäß den Anweisungen des Herstellers an.
11.
Schließen Sie das Gerät nicht in der Nähe von Wärmequellen wie z. B. Heizkörpern,
Heizauslässen, Öfen oder anderen wärmeerzeugenden Geräten (inklusive Verstärkern) an.
12.
Setzen Sie nicht die Sicherheitsfunktion des verpolungssicheren oder geerdeten
Steckers außer Kraft. Ein verpolungssicherer Stecker ist mit zwei unterschiedlich breiten
Kontakten ausgestattet. Ein geerdeter Stecker ist neben den zwei Kontakten außerdem
mit einem Massekontakt ausgestattet. Der breite Kontakt bzw. der Massekontakt dienen
zu Ihrer Sicherheit. Falls der gelieferte Stecker nicht in Ihre Steckdose passt, wenden
Sie sich zum Austausch der entsprechenden Steckdose bitte an einen Elektriker.
36 – DEUTSCH
Page 37

13.
Stellen Sie sicher, dass nicht auf das Stromkabel getreten oder das Kabel geknickt wird,
insbesondere an Steckern, Steckdosen und der Stelle, wo das Kabel am Gerat austritt.
14.
Benutzen Sie ausschließlich die vom Hersteller angegebenen Anbau -und Zubehör Geräte.
15. Verwenden Sie nur Wagen, Ständer, Stativ, Halter oder Tische, die
vom Hersteller benannt oder im Lieferumfang des Geräts. Wenn
Sie einen Wagen benutzen, seien Sie vorsichtig beim Bewegen der
Wagen / Gerät, um Verletzungen durch Umkippen zu vermeiden.
16.
Zur zusätzlichen Sicherheit dieses Produkts, stecken Sie das Gerät
während eines Gewitters, wenn es unbeaufsichtigt ist oder längere Zeit
nicht verwendet wird, aus. Dadurch vermeiden Sie Schäden am Gerät durch Blitzschlag
oder Überspannung.
17. Betreiben Sie das Gerät nur mit den auf der Rückseite angegebenen Stromquellen.
Verwenden Sie bei Geräten mit einer externen Stromversorgung im Fall von Verlust
oder Beschädigung nur ein identisches Ersatzteil. Entnehmen Sie bei Geräten mit
einer Batteriestromversorgung dem Benutzerhandbuch die notwendigen Informationen.
18. Ziehen Sie das Gerat von der Steckdose ab und lassen Sie die Wartungsarbeiten von
qualifiziertem Fachpersonal durchfuhren, wenn Folgendes passiert ist:
a. Das Stromversorgungskabel oder der Stecker ist beschadigt.
b. Flussigkeit wurde auf das Gerat verschuttet oder Gegenstande sind hineingefallen.
c. Das Gerat wurde Wasser oder Regen ausgesetzt.
d. Das Gerat funktioniert nicht ordnungsgemas, obwohl die Bedienungsanleitung
befolgt wird.
e. Das Gerat wurde fallen gelassen oder auf andere Weise beschadigt.
f. Das Gerat weist eine deutliche Veranderung der Leistung auf.
19. Wenn Ersatzteile benötigt werden, stellen Sie sicher, dass Servicetechniker Original-
Ersatzteile vom Hersteller angegeben werden oder die die gleichen Eigenschaften
wie die Originalteile. Falsche Ersatzteile können zu Feuer, Stromschlag oder andere
Gefahren entstehen.
20.
Nach Beendigung einer Dienstleistung, bitten Sie den Techniker, einen Sicherheitscheck
durchzuführen, um zu bestätigen das Produkt ist in einem einwandfreien Betriebszustand.
21.
Berühren Sie nicht die Flüssigkeit, wenn die LCD einen Riss bekommt oder beschädigt wird.
22.
Halten Sie das Gerät in sicherer Entfernung zu offenen Flammen wie z. B. brennenden Kerzen.
23.
Halten Sie das Gerat von spritzender oder tropfender Flussigkeit fern. Stellen Sie keine
Gegenstande auf das Gerat, die Flussigkeit enthalten, wie beispielsweise Vasen oder
Trinkglaser.
24.
Der empfohlene Betriebstemperaturbereich liegt zwischen 5 °C und 40 °C (41 °F und 104 °F).
25. WARNUNG – Das Netz ist in der Aus-Position nicht getrennt, aber die Schaltungen
werden vom Strom getrennt.
26. Das externe Netzteil dient als Trennvorrichtung und sollte stets erreichbar sein.
WARNUNG: DIE ANGEBRACHTE ALBERGO+ EXTERNE TELESKOP-
ANTENNE SOLL NICHT GELÖST WERDEN.
37 – DEUTSCH
Page 38

Entsorgung von Elektrogeräten durch Benutzer in privaten Haushalten
in der EU Dieses Symbol auf dem Produkt oder dessen Verpackung
gibt an, dass das Produkt nicht zusammen mit dem Restmüll entsorgt
werden darf. Es obliegt daher Ihnen, das Gerät an einer entsprechenden
Stelle für die Entsorgung oder Wiederaufbereitung von Elektrogeräten
aller Art abzugeben (Bsp. Wertstoffhandel).
Die separate Sammlung und das Recyceln Ihrer alten Elektrogeräte
zum Zeitpunkt Ihrer Entsorgung trägt zum Schutz der Umwelt bei
und gewährleistet, dass Sie auf eine Art & Weise recycelt werden, die
keine Gefährdung für die Gesundheit des Menschen und der Umwelt
darstellt. Weitere Informationen darüber, wo Sie alte Elektrogeräte zum
Recyceln abgeben können, erhalten Sie bei den örtlichen Behörden,
Wertstoffhöfen und dort, wo Sie das Gerät erworben haben.
38 – DEUTSCH
Page 39

Anleitung und Hinweise zu Albergo+
Herzlichen Glückwunsch zum Erwerb des Geräts. Wir glauben, dass Albergo+ eines der
besten DAB/DAB+/DMB/FM-Tisch-Uhrenradios ist, die derzeit im Handel erhältlich sind.
Wir wissen, dass Sie mit Ihrem neuen Radio Musik hören möchten. Nehmen Sie sich
jedoch bitte einen Augenblick Zeit, um diese Bedienungsanleitung sowie die Sicherheitsanweisungen durchzulesen, damit Sie sämtliche Funktionen des Radios nutzen können.
Zögern Sie nicht, sich bei Fragen an Ihren Händler oder direkt an Tivoli Audio zu wenden.
Heben Sie bitte den Versandkarton und die Originalverpackung für den Fall auf, Ihren
Lautsprecher möglicherweise einmal verschicken zu müssen, da Versandschäden
nicht von der Werksgarantie gedeckt sind.
Im Namen aller Beschäftigten möchten wir uns dafür bedanken, dass Sie sich für Tivoli
Audio entschieden haben, und wünschen Ihnen viel Vergnügen mit Ihrem Albergo+!
Über Tivoli Audio
Tivoli Audio wurde von Tom DeVesto mit der Vision gegründet, den Kunden Audioprodukte
anzubieten, die über eine einfache Bedienung, ein elegantes Design und eine hohe Qualität
verfügen. Als Geschäftsführer und Leiter der Forschungs- und Entwicklungsabteilung bei
seiner vorherigen Firma, Cambridge SoundWorks*, war Tom verantwortlich für die Entwicklung einer Vielzahl der am meisten verkauften Homeentertainment- und Multimediaprodukte
auf dem Markt. Des Weiteren bekleidete er Positionen im gehobenen Management der
Produktentwicklung bei Advent und Kloss Video.
*Cambridge ist ein eingetragenes Warenzeichen von Creative Labs, Singapore.
Im Lieferumfang Ihres Albergo+ sollte Folgendes enthalten sein:
• Ein (1) Netzteil
• 1 Fernbedienung (inklusive Batterie)
Wenden Sie sich bitte an Ihren Händler oder Tivoli Audio, wenn einer dieser Artikel fehlen
sollte.
Erläuterung der Bedienelemente (Vorderseite)
1
2
5
4
3
39 – DEUTSCH
6
8
7
Page 40

1.
MEHRZWECK-DREHREGLER (OBEN): Der Drehregler dient zur bequemen
Ausführung mehrerer Funktionen:
a. Ein-/Ausschalten: Wenn Albergo+ ausgeschaltet ist, den Drehregler drücken,
um das Gerät einzuschalten. Wenn Albergo+ über eine der Quellen eingeschaltet
ist, den Drehregler gedrückt halten, um das Gerät auszuschalten.
b. Lautstärke: Wenn Albergo+ über eine der Quellen eingeschaltet ist, den Dreh-
regler im Uhrzeigersinn drehen, um die Lautstärke zu erhöhen, und gegen den
Uhrzeigersinn, um die Lautstärke zu verringern.
c. Schlummerfunktion: Den Drehregler drücken, um die Schlummerfunktion zu
aktivieren, wenn der Alarm ertönt. An der Anzeige wird das Symbol angezeigt, wenn die Schlummerfunktion aktiviert ist. Die Schlummerzeit ist auf 10
Minuten eingestellt. Wenn die Schlummertaste im Schlummermodus erneut gedrückt wird, wird der Schlummer-Timer auf 10 Minuten zurückgesetzt. Wenn der
Weckalarm ertönt, die Schlummertaste gedrückt halten, bis der Alarm und das
Gerät ausgeschaltet sind oder die entsprechende Alarmtaste drücken.
2. LCD:
PMTM
FM AUX
P
P
: (mittlere Ziffern): Zeit
AUX: Auxiliary
FM: FM-band
: Abschaltfunktion
: Empfangsniveau
: Bluetooth-Modus
: Schlummerfunktion
DAB: DAB/DAB+ band
M: Mono
: Alarme 1 und 2
PM: Bei Auswahl des
12-Stunden-Formats
T: Manueller Einstellungsmodus
3.
TUNE +/-: Verwenden Sie diese Tasten im DAB-Modus, um alle verfügbaren DAB/DAB+Sender anzuzeigen. Verwenden Sie die ( +/- )-Tasten, um bestimmte Sender zu markieren.
Der markierte DAB-Sender schaltet sich automatisch nach 3 Sekunden ein. Sie können
auch die Eingabetaste auf der Fernbedienung drücken. FM: Drücken Sie kurz die Tune
(+/-) Tasten, um mit der automatischen Sendersuche zum nächsten erkannten Sender
zu wechseln. Siehe “Auto Scan” (automatische Sendersuche) unter „FM-Menü“, um
herauszufinden, wie Sie die automatische Sendersuche deaktivieren und Sender manuell
einstellen können.
4.
SLEEP: Drücken Sie diese Taste wiederholt, um die Zeitspanne, die das Radio spielt,
zu aktivieren, bevor das Radio automatisch ausgeschaltet wird. Oder wählen Sie diese
Zeitspanne auf der Fernbedienung mit der „Select“-Taste aus. Eine kleine Uhrenansicht
wird auf dem Display angezeigt, wenn die Abschaltfunktion (Sleep) aktiv ist. Zum Löschen
der Abschaltfunktion drücken Sie die “Sleep”-Taste, bis das Display “Off” anzeigt.
40 – DEUTSCH
Page 41

5.
BLUETOOTH-SIGNALSTÄRKE: Drücken Sie diese Taste, um den Bluetooth-Modus
aufzurufen. Drücken und halten Sie die Bluetooth-Taste, um den Speicher für alle gekoppelten
Geräte zu löschen. Das Display zeigt “Memory Cleared” (Speicher gelöscht) an.
6. SOURCE (QUELLE): Mehrmals hintereinander drücken, um die Quellen zu ändern.
7.
8.
ALARM 1 UND ALARM 2: Drücken Sie diese Tasten, um die gewünschte
Alarmzeit automatisch für eine der beiden Alarmfunktionen einzustellen.
ALARM-DERHKNOPF: Nachdem Sie eine der beiden Alarmtasten gedrückt haben, drehen
Sie diesen Knopf, um die Stunde einzustellen, und drücken ihn ein, um die Einstellung zu
fixieren. Gehen Sie gleichermaßen für die Einstellung der Minuten vor und drücken Sie
den Knopf ein, um die Einstellung zu fixieren, oder die Alarmzeit wird automatisch nach 3
Sekunden eingestellt. Der Weckalarm ist jetzt eingestellt. Die Weckzeit für jeden Alarm wird
auf dem Display angezeigt. Drücken Sie die entsprechende Alarmtaste erneut, um den
Alarm zu deaktivieren. Weitere wichtige Alarmeinstellungen finden Sie unter „Einstellung
des Alarms über das Hauptmenü“.
Erläuterung der Bedienelemente (Rückseite)
2
5
4
1
1.
12 VDC/1500 mA: Über diesen Eingang können Sie Ihr Albergo+ über das Netzteil
betreiben. Verwenden Sie ausschließlich das mit diesem Produkt gelieferte Netzteil.
Bei Beschädigung oder Verlust des Netzteils darf nur ein identisches Ersatzteil verwendet
werden. Jedes benutzte DC-Netzteil muss der EN/IEC 60065 entsprechen und für 12VDC
1500mA und 230V 50Hz ausgelegt sein (abhängig von den örtlichen Gegebenheiten). Die
Verwendung eines vom Hersteller nicht empfohlenen bzw. nicht normgerechten Netzteils
ist eine potentielle Gefahrenquelle. Der Steckverbinder ist 5,5 mm/2,1 mm,. Mitte positiv.
Eine Erwärmung des Netzteils während des Betriebs ist völlig normal.
2.
EXTERNE ANTENNE: An diesem Eingang ist eine externe, ausziehbare Antenne
installiert, die nicht abnehmbar ist. Für besten Empfang ausrichten. Für weitere
Informationen lesen Sie den Abschnitt “Digitalradio/FM-Empfang”.
3.
KOPFHÖRERAUSGANG: An diesen Stereoanschluss können Sie einen Kopfhörer
(nicht im Lieferumfang enthalten) anschließen. Bei angeschlossenem Kopfhörer wird der
Gerätelautsprecher deaktiviert. Die Kopfhörerlautstärke wird über den Drehregler oder die
Fernbedienung geregelt. Der Ausgang kann auch über die Taste “Mono” der Fernbedienung
gesteuert werden. Der Stereoausgang ist für 3,5-mm-Klinkenstecker ausgelegt. Vermeiden
Sie beim Tragen von Kopfhörern zu hohe Lautstärke, um Gehörschaden zu verhindern.
41 – DEUTSCH
3
Page 42

4. AUX IN: Um ein externes Gerät wie beispielsweise Model CD von Tivoli Audio, einen
MP3-Spieler oder ein Fernsehgerät anzuschließen, verbinden Sie den Audioausgang
des externen Geräts mit diesem Stereoeingang und stellen die Quelle auf “Auxiliary”.
Der Stereoeingang ist für 3,5-mm-Klinkenstecker ausgelegt. Beachten Sie: Sie die
Lautstärke für die Wiedergabe eines externen Geräts anders einstellen müssen
als im Radiobetrieb.
5.
Speaker: Schließen Sie den RCA-Kabelstecker des optionalen Tivoli Audio Albergo+
Speaker an diese RCA-Ausgangsbuchse an. Achten Sie darauf, dass für Stereo/Mono
„Stereo“ eingestellt ist, indem Sie die Mono-Taste auf der Fernbedienung drücken.
Das Display darf nicht „M“ für Mono anzeigen.
Funktionsbeschreibung (Fernbedienung)
1.
Power (Ein-/Ausschalter):
Drücken Sie kurz diese Taste,
um Albergo+ einzuschalten.
Das Radio wird eingeschaltet,
und die zuletzt verwendete
Quelle wird aktiviert.
2.
MUTE/SNOOZE: Drücken Sie
diese Taste während der Tonwiedergabe des Geräts, um
den Audioausgang zu deaktivieren (die Balken zur Anzeige
der Lautstärke verschwinden
vom Symbol) Drücken Sie die
Taste erneut oder stellen Sie
die Lautstärke ein, um die Wiedergabe wiederherzustellen.
Drücken Sie diese Taste, um
den Alarm 10 Minuten lang zu
deaktivieren, nachdem dieser
ertönt. An der Anzeige wird
Symbol angezeigt, wenn die
Schlummerfunktion aktiviert ist.
Die Zeit der Schlummerfunktion ist nicht einstellbar. Wenn die Schlummertaste im Schlummermodus erneut gedrückt wird, wird der Schlummer-Timer auf 10 Minuten zurückgesetzt.
3. ALARM: Verwenden Sie die Pfeiltasten pq und die Taste “Select” (Auswählen), um
Einstellungen vorzunehmen und die Alarme einzustellen. Weitere wichtige Alarmein-
stellungen finden Sie unter „Einstellung des Alarms über das Hauptmenü“.
4.
SLEEP: Drücken Sie diese Taste wiederholt, um die Zeitspanne, die das Radio spielt,
zu aktivieren, bevor das Radio automatisch ausgeschaltet wird. Oder wählen Sie diese
Zeitspanne auf der Fernbedienung mit der „Select“-Taste aus. Eine kleine Uhrenansicht
wird auf dem Display angezeigt, wenn die Abschaltfunktion (Sleep) aktiv ist. Zum Löschen
der Abschaltfunktion drücken Sie die “Sleep”-Taste, bis das Display “Off” anzeigt.
5. SOURCE (QUELLE): Mehrmals hintereinander drücken, um die Quellen zu ändern.
6.
INFO: Drücken Sie mehrmals, um durch die Informationen, die je nach gewähltem
Modus vorhanden sind, zu schalten.
11
13
4
2
3
8
5
1
6
7
9
12
10
42 – DEUTSCH
Page 43

7.
VOREINSTELLUNGEN 1–5: Halten Sie die Taste gedrückt, um den gerade eingestellten
Sender zu speichern. Drücken Sie die Taste kurz, um den Sender aufzurufen, der über
die Voreinstellung gespeichert ist. Die Nummer des voreingestellten Senders wird an
der Anzeige angezeigt. Es gibt 5 Voreinstellungen pro Band.
8.
VOLUME +/–: Drücken Sie die Plustaste (+), um die Lautstärke zu erhöhen, oder die
Minustaste (–), um die Lautstärke zu verringern. Sollte der Klang verzerrt sein, verringern Sie
die Lautstärke, um eine Beschädigung des Lautsprechers zu vermeiden. Wenn die Lautstärke
verstellt wird, während Albergo+ deaktiviert ist, wird die Deaktivierung aufgehoben.
9.
pq/TUNE +/-: Drücken Sie die Taste, um die Menüpunkte einzustellen, wenn Sie im Menü
sind. Verwenden Sie diese Tasten im DAB-Modus, um alle verfügbaren DAB/DAB+-Sender
anzuzeigen. Verwenden Sie die pq-Tasten, um bestimmte Sender zu markieren. Der
markierte DAB-Sender schaltet sich automatisch nach 3 Sekunden ein. Sie können auch
die Eingabetaste auf der Fernbedienung drücken. FM: Drücken Sie kurz die Tune +/- Tasten,
um mit der automatischen Sendersuche zum nächsten erkannten Sender zu wechseln.
Siehe “Auto Scan” (automatische Sendersuche) unter „FM-Menü“, um herauszufinden,
wie Sie die automatische Sendersuche deaktivieren und Sender manuell einstellen können.
10.
tu: Die rechte Pfeiltaste dupliziert die Wahltaste. Die linke Pfeiltaste führt Sie unter
bestimmten Menü-Objekten auf die vorherige Seite zurück.
11.
MENU/SELECT (MENÜ/AUSWAHL): Drücken und halten Sie die Taste, um das
Hauptmenü auszuwählen. Drücken Sie kurz, um einzelne Punkte innerhalb des Menüs
auszuwählen. Weitere Informationen finden Sie im Abschnitt “Menü”. Weitere Hinweise
finden Sie in den Abschnitten unten: „Menü für DAB, FM und Auxiliary-Menüs.
12. MONO: Drücken Sie diese Taste, um die Stereo/Mono-Einstellung zu ändern. An der
Anzeige wird “M” für Mono oder “ST” für Stereo angezeigt. Diese Einstellung beeinflusst
auch den Kopfhörerausgang. Weitere Informationen finden Sie im Abschnitt “Digital
Radio/FM- Empfang”.
13.
BACK (ZURÜCK): Drücken Sie die Taste, um zur vorhergehenden Menüseite
zurückzugelangen.
Hinweis: Mit dem Albergo+ im Standby-Modus können Sie die Hintergrundbeleuchtung
des Displays regulieren, ohne das Albergo+ einzuschalten und das Menü aufzurufen.
Drücken Sie zweimal auf die p-Taste auf der Fernbedienung, um die Hintergrundbeleuchtung auszuschalten. Drücken Sie auf die p-Taste auf der Fernbedienung, um die
Hintergrundbeleuchtung für 10 Sekunden einzuschalten. Drücken Sie zwei weitere Male auf
die p-Taste auf der Fernbedienung, um die Hintergrundbeleuchtung wiederherzustellen.
Digitalradio (DAB/DAB+/DMB) Modus
Halten Sie die „Menu“-Taste im DAB-Modus auf der Fernbedienung gedrückt, um das
Hauptmenü aufzurufen. Benutzen Sie die pq Tasten und die Select-Taste für Einstellungsänderungen im Menü. Verwenden Sie die Back-Taste, um zurück zu navigieren.
Ein Sternchen (*) zeigt an, dass das angezeigte Menü aktuell eingestellt ist.
Hinweis: Wenn Sie den Digitalradio-Modus aufrufen und die Senderliste leer ist, wird ein
automatischer Scan gestartet.
Hinweis: Das Hauptmenü wird nicht mehr angezeigt, wenn nach neun Sekunden keine
Handlung erfolgt.
1.
AUTO SCAN: Durchsucht den gesamten Frequenzbereich. Wenn Sie das Albergo+ an
einem anderen Standort aufstellen, müssen Sie eine neue Sendersuche durchführen,
43 – DEUTSCH
Page 44

damit das Radio am neuen Standort Sender finden kann. Zum Löschen der
automatischen Sendersuche drücken Sie die “Back”-Taste auf der Fernbedienung.
2.
TIVOLI EQ: Drücken Sie die Select-Taste und verwenden Sie pq und die Select-
Taste, um Bass und Treble (Bass und Höhen) einzustellen. Die eingestellten Werte
werden unter “User EQ” angezeigt. Drücken Sie die Select-Taste zum Ein- oder
Ausschalten der Lautstärke. Es wird empfohlen, die Lautstärke beim Hören auf niedriger
Lautstärke einzuschalten, da dies die hohen und niedrigen Frequenzen erhöht und
zu einem natürlicheren Klang führt. Verwenden Sie die pq Tasten und die SelectTaste zur Aktivierung einer der drei voreingestellten EQ-Einstellungen. Die Wahl
eines voreingestellten EQ hebt alle Einstellungen auf, die zuvor für Bass und Treble
vorgenommen wurden; die Lautstärke wird hiervon jedoch nicht betroffen. Der “Flat”
EQ setzt die Klangeinstellungen auf die Werkseinstellungen zurück. Das bedeutet,
dass Bass und Treble auf null zurückgesetzt werden. Der “Flat” EQ setzt auch die
Einstellung “Loudness Off” (Lautstärke aus) zurück. Wenn Bass und Treble jedoch
eingestellt wurden, werden diese Anzeigen weiterhin unter “User EQ” angezeigt. Das
einfache Anwählen von “User EQ” reaktiviert die Bass- und Treble-Einstellungen wieder.
Auf der EQ-Menüseite zeigen die Zahlen rechts die Bass- und Höheneinstellungen an.
3. MANUELLE EINSTELLUNG: Drücken Sie die pq Tasten zur manuellen Einstellung
spezifischer DAB/DAB+/DMB-Frequenzen. Der markierte DAB-Sender schaltet sich
automatisch nach 3 Sekunden ein oder wenn die Eingabetaste auf der Fernbedienung
gedrückt wird.
4.
DRC: Die Dynamic Range Control ermöglicht die Änderung der Klangebenen der Sender,
so dass leise Passagen lauter werden, um damit laute Umgebungen auszugleichen,
oder wenn die Lautstärke niedrig eingestellt ist.
5. EINSTELLUNGEN (A-F):
A. ALARM: Siehe „Alarm-Einstellung über das Hauptmenü.“
B. TIME
Zeit/Datum einstellen: Drücken Sie die Select-Taste und verwenden Sie die pq
Tasten und die Select-Taste, um die Stunden und Minuten und direkt danach das
Datum einzustellen. Weiters müssen Sie das Auto Update auf “No Update” (kein
Update) einstellen. Für weitere Informationen siehe “Auto Update” unten.
Auto Update: Drücken Sie die Select-Taste und verwenden Sie die pq Tasten
und die Select-Taste, um unter “Update from any” (Update von beliebig), “Update
from DAB” (Update von DAB oder DMB) oder “Update from FM” (Update von FM
RDS) zu wählen. Damit die automatischen Aktualisierungen funktionieren, benötigen Sie einen durchgängigen DAB- oder FM RDS-Empfang mit Zeit-/Datumsignal.
Die Uhr kann eine Minute oder länger für die Aktualisierung benötigen. Tivoli Audio
ist nicht für falsche Zeit-/Datumsangaben durch das automatische Update-Signal
verantwortlich. Zum manuellen Einstellen der Uhr wählen Sie “No Update” und
danach “Set Time/Date” unter dem “Time”-Menü mittels der pq oder tu Tasten
und der Select-Taste zum Einstellen der Stunden. Wiederholen Sie den Vorgang
zum Einstellen der Minuten und drücken Sie auf “Select” zum Speichern.
12/24 Std.-Anzeige: Drücken Sie die Select-Taste und verwenden Sie die
Aufwärts-/Abwärtspfeile und die Select-Taste, um das 12- oder 24-Std.-Format
einzustellen.
Datumsformat Einstellen: Drücken Sie die Select-Taste und verwenden Sie die
pq Tasten und die Select-Taste, um das von Ihnen bevorzugte Datumsformat
zu wählen.
44 – DEUTSCH
Page 45

C. BACKLIGHT:
Timeout (Zeitbeschränkung): Die Hintergrundbeleuchtung kann konstant sein,
unabhängig davon, ob Sie Schalter am Albergo+ bedienen oder nicht (das ist die
Werkseinstellung des Albergo+) oder Sie können die Hintergrundbeleuchtung so
einstellen, dass sie automatisch nach einer festgelegten Zeitdauer, in der keine
Schalter bedient werden, abdunkelt. Sobald ein Schalter am Gerät oder an der
Fernbedienung gedrückt wurde, wird die normale Helligkeit der Hintergrundbeleuchtung wieder hergestellt. Drücken Sie Select und verwenden Sie die pq
Tasten und die Select Taste, um die Zeitspanne von 10, 20, 30, 45, 60, 90, 120
oder 180 Sekunden einzustellen, nach der die Hintergrundbeleuchtung abdunkelt
oder um die Zeitbeschränkungsfunktion auszuschalten.
Einschalten: Drücken Sie Select und verwenden Sie die pq Tasten und die
Select-Taste, um die Helligkeit der Hintergrundbeleuchtung zu wählen.
Abdunkeln: Wenn Sie unter “Timeout” eine Zeitspanne gewählt haben, nach der
die Hintergrundbeleuchtung abdunkelt, drücken Sie Select und verwenden Sie
die pq Tasten und die Select-Taste, um die Helligkeit der Hintergrundbeleuchtung beim Wechsel in den abgedunkelten Modus zu wählen.
D. SPRACHE: Drücken Sie Select und verwenden Sie die Aufwärts-/Abwärts-Tasten,
um Ihre Sprache einzustellen.
E. ZURÜCKSTELLEN AUF WERKSEINSTELLUNG: Drücken Sie Select und ver-
wenden Sie pq oder tu und die Select-Taste, um die Zurücksetzung auf die
Werkseinstellung zu bestätigen (Ja) oder abzulehnen (Nein). Ein Zurücksetzen auf
die Werkseinstellungen stellt die Grundeinstellungen wieder her und löscht Ihre
persönlichen Einstellungen, wie z.B. alle Voreinstellungen und die Sprachauswahl.
F. ID: Drücken Sie Select zum Ansehen der ID. Wenn Sie Ihren Händler oder Tivoli
Audio mit einer Frage kontaktieren, wird man Sie nach der Nummer fragen, die in
diesem Feld angezeigt wird
FM-Menü
Halten Sie die Menu/Select-Taste im FM-Modus auf der Fernbedienung gedrückt, um das
Hauptmenü aufzurufen. Benutzen Sie die pq Tasten und die Select-Taste für Einstellungsänderungen im Menü. Verwenden Sie die Back-Taste, um zurück zu navigieren. Ein
Sternchen (*) zeigt an, dass das angezeigte Menü aktuell eingestellt ist.
Hinweis: Das Hauptmenü wird nicht mehr angezeigt, wenn nach neun Sekunden keine
Handlung erfolgt.
1. SUCHEINSTELLUNG: Drücken Sie die Select-Taste und verwenden Sie pq und die
Select-Taste, um zwischen “Strong Stations Only” (nur Sender mit gutem Empfang)
oder “All Stations” (alle Sender) zu wählen, wenn Sie eine automatische Sendersuche
ausführen (siehe Punkt 9 (pq/Tune +/-) unter “Fernbedienung”. Die Wahl von “All
Stations” erhöht die Suchempfindlichkeit, so dass die automatische Suche eventuell
auf einem Rauschen stehenbleibt.
2.
AUTOMATISCHER SCAN (NICHT IN DEN AUX-MENÜS): Drücken Sie auf die Select-Taste
und verwenden Sie pq und die Select-Tasten, um zwischen „Strong Stations only“ (Nur
starke Sender), „All Stations“ (Alle Sender) oder „Off“ (Aus) auszuwählen, wenn Sie einen
Auto Scan(siehe Punkt 9 (Tune +-) unter „Remote Control“ (Fernbedienung) durchführen.
Bei Auswahl von „All Stations“ (Alle Sender) wird die Empfindlichkeit des Scans erhöht, was
möglicherweise dazu führt, dass Auto Scan bei Geräuschen anhält. Bei Auswahl von „Off“
wird Auto Scan deaktiviert und die Sender können manuell eingestellt werden.
45 – DEUTSCH
Page 46

3. RDS: Halten Sie die Select-Taste gedrückt und verwenden Sie die - und Select-
Tasten, um den FM RDS-Text zu aktivieren oder zu deaktivieren. Weitere Hinweise
finden Sie unter „RDS“.
4. TIVOLI EQ: Siehe Beschreibung unter „Digitalradio-Menü“.
5. EINSTELLUNGEN: Siehe Beschreibung unter „Digitalradio-Menü“.
Auxiliary-Menü
Halten Sie die Menu/Select-Taste im Auxiliary-Modus auf der Fernbedienung gedrückt,
um das Hauptmenü aufzurufen. Benutzen Sie die pq Tasten und die Select-Taste für Einstellungsänderungen im Menü. Verwenden Sie die Back-Taste, um zurück zu navigieren.
Ein Sternchen (*) zeigt an, dass das angezeigte Menü aktuell eingestellt ist.
Hinweis: Das Hauptmenü wird nicht mehr angezeigt, wenn nach neun Sekunden keine
Handlung erfolgt.
1. TIVOLI EQ: Siehe Beschreibung unter „Digitalradio-Menü.
2.
ALARM 2: Wenn Sie den Alarm 2 wahrscheinlich nicht benutzen oder befürchten, dass
der Alarm 2 möglicherweise falsch eingestellt ist, drücken Sie die Select-Taste und
deaktivieren Sie den Alarm mit den pq- und Select-Tasten.
3. EINSTELLUNGEN: Siehe Beschreibung unter „Digitalradio-Menü“.
4.
LAUTSTÄRKENEINSCHRÄNKUNG: Wenn Sie die maximale Lautstärke reduzieren
möchten, um die anderen nicht zu stören, halten Sie die Select-Taste gedrückt und wählen
mit den pq-Tasten den Lautstärkengrenzwert 26 oder 22 aus. Bei Auswahl von „Off“
verbleibt die maximale Lautstärke auf der Werkseinstellung 30. Beachten Sie bitte, dass
beim Reduzieren der Gesamtlautstärke auch die Lautstärke des Weckalarms reduziert wird.
5.
BLUETOOTH-SIGNALSTÄRKE: Verwenden Sie pq und die Select-Taste, und wählen
Sie “Low”, wenn Sie die Reichweite des Bluetooth-Signals verringern möchten. Dies
kann erwünscht sein, wenn die Bluetooth-Funktion nur dann verwendet wird, wenn Sie
sich in unmittelbarer Nähe zum Radio aufhalten. Wir empfehlen, dass diese Einstellung
in “Normal”-Stellung bleibt.
Ändern der Alarmeinstellungen und Einstellen des Alarms
über das Hauptmenü
1.
Wenn Sie sich im DAB-, FM- oder Aux-Modus befinden und wenn Albergo+ eingeschaltet
ist, können Sie die Alarmeinstellung aufrufen, indem Sie die Menu-Taste auf der Fernbedienung gedrückt halten. Wählen Sie im Menü die Optionen „Settings“ und „Alarm“ aus.
2. Alarm 1 wird zuerst angezeigt. Drücken Sie die Taste “Alarm” oder verwenden Sie die
Tasten pq und die Taste “Select”, um Alarm 1 oder Alarm 2 zu wählen. Hinweis: Sie
können jederzeit durch das Alarmmenü navigieren, indem Sie die Tasten “Back” oder
Pfeil links betätigen und die Tasten “Select” oder right Pfeil rechts.
3.
Verwenden Sie die Tasten pq und die Taste “Select”, um den Alarm ein- oder
auszuschalten.
4.
Verwenden Sie die Tasten pq, um die Stunde(n) einzustellen oder zu ändern, und
drücken Sie dann “Select”. Wiederholen Sie diesen Ablauf zum Einstellen/Ändern der
Minuten, gefolgt von AM/PM (wenn die Zeit auf das 12-Std. Format eingestellt wurde)
und drücken Sie dann Select.
46 – DEUTSCH
Page 47

5.
Benutzen Sie die pq Tasten, um die Quelle für das Aufwecken zu wählen und
drücken Sie dann Select. Wenn Sie als Quelle DAB (umfasst DAB+/DMB) oder FM
wählen, verwenden Sie die Aufwärts-/Abwärts-Tasten zur Auswahl des Senders, der
voreingestellt war (falls Voreinstellungen gespeichert wurden) oder zuletzt gehört wurde
und drücken Sie dann auf Select.
6. Benutzen Sie die pq Tasten, um festzulegen, wie oft der Alarm auf Wecken eingestellt
werden soll und drücken Sie dann Select.
7. Verwenden Sie als Letztes die Tasten pq, um die Lautstärke des Alarms einzustellen,
dann drücken Sie “Select”. Um sicherzustellen, dass der Alarmton hörbar ist, wenn
der Weckruf beginnt, kann die Lautstärke nicht unter einen bestimmten Minimalwert
eingestellt werden. Auch die “Volume Limit”-Funktion (Lautstärkebegrenzung) im
Auxiliary-Menü beeinflusst die Lautstärke des Alarms.
8. Wiederholen Sie diesen Vorgang wenn nötig für Alarm 2.
Wenn Sie in diesem Ablauf einen Fehler machen, drücken Sie die “Back” (Zurück) Taste auf
der Fernbedienung und beginnen Sie erneut.
Hinweis: Ihre Einstellungen werden erst gespeichert, wenn Sie den gesamten Ablauf
abgeschlossen haben und das Display “Alarm Saved” (Alarm gespeichert) anzeigt.
Hinweis: Wenn Sie die Alarmquelle auf DAB einstellen und der zuletzt gehörte oder voreingestellte Sender zum Zeitpunkt des Alarms nicht verfügbar ist, wird der Alarm auf den
Standardton zurückgesetzt.
Stromverlust: Sollte ein Stromverlust auftreten oder Albergo+ vom Netz getrennt
werden, wird die Alarmzeit gespeichert – allerdings kann Albergo+ keinen Alarm
geben, wenn die Stromversorgung unterbrochen ist.
Alarmoptionen
Der Alarm erklingt mit einer stufenweise ansteigenden Lautstärke. Wenn der Alarm erklingt, können Sie die Schlummerfunktion aktivieren oder den Alarm abschalten.
Snooze (Schlummerfunktion): Um die Schlummerfunktion zu aktivieren, während der
Alarm ertönt, drücken Sie an der Fernbedienung die Taste “Snooze”, oder drücken Sie
kurz den Mehrzweck-Drehregler, der sich an der Oberseite des Geräts befindet. Die
Schlummerzeit lässt sich nicht einstellen. Wenn die Schlummertaste im Schlummermodus
erneut gedrückt wird, wird der Schlummer-Timer auf 10 Minuten zurückgesetzt. Wenn der
Weckalarm ertönt, den oberen Schlummer-Drehregler gedrückt halten, bis der Alarm und
das Gerät ausgeschaltet ist oder die entsprechende Alarmtaste drücken.
Alarm Aus: Um den Alarm zu stoppen, drücken Sie an der Fernbedienung die Taste
“Alarm” oder die Taste “Power”, oder halten Sie den Mehrzweck-Drehregler gedrückt, der
sich an der Oberseite des Geräts befindet.
Alarm-Schnelleinstellung: Drücken Sie mehrmals kurz auf die Alarmtaste, während das
Albergo+ im Standby-Modus ist, um den jeweiligen Alarm ein- oder auszuschalten.
47 – DEUTSCH
Page 48

Bluetooth Betrieb
Vor dem Koppeln überprüfen Sie ob Ihr Gerät Bluetooth 2.1+EDR A2DP unterstützt und
ob es nicht schon an einem anderen Bluetooth-Gerät angeschlossen ist. Geräte können
unterschiedlich koppeln. Unten ist eine allgemeine Anleitung.
1.
Drücken Sie die Bluetooth-Taste auf der Vorderseite des Albergo+ oder ändern Sie
die Quelle zu Bluetooth. Dies schaltet Bluetooth ein. Erhöhen Sie die Lautstärke zu
Beginn um etwa ein Viertel. Drehen Sie außerdem die Lautstärke des Quellgeräts auf
(das Gerät, von dem Sie streamen möchten).
2. Schalten Sie die Bluetooth Funktechnik an Ihrem Bluetooth-fähigen Gerät ein.
3.
Wählen Sie auf Ihrem Gerät “Tivoli Bluetooth (Not Paired)” wenn es angezeigt wird, um die
Suche zu initiieren. Einige Geräte werden Sie nach einer PIN fragen. In diesem Fall geben
Sie „0000“ ein. “Tivoli Bluetooth” wird von “Not Paired” auf “Connected” umschalten.
4. Das Albergo+ wird einen Klingelton abgeben der die Verbindung bestätigt. Sie können
nun anfangen Ihre Musik-Dateien drahtlos abzuspielen. Stellen Sie die Lautstärke auf
Ihrem Gerät ein. Es sollte nicht nötig sein Ihr Gerät erneut zu koppeln. Je nach Gerät
ist es möglich, dass Sie mehrere Versuche benötigen, um eine Kopplung und/
oder Verbindung mit dem Albergo+ herzustellen, aber lassen Sie Ihrem Gerät zum
Koppeln oder Verbinden bitte genügend Zeit, bevor Sie den Vorgang wiederholen.
Verbinden Eines Bluetooth-fähigen iPhone/iPod touch/iPad
1.
Drücken Sie die Bluetooth-Taste auf der Vorderseite des Albergo+ oder ändern Sie
die Quelle zu Bluetooth. Dies schaltet Bluetooth ein. Erhöhen Sie die Lautstärke zu
Beginn um etwa ein Viertel. Drehen Sie außerdem die Lautstärke des Quellgeräts auf
(das Gerät, von dem Sie streamen möchten).
2. Wählen Sie “Settings” (abhängig von der Software-Version Ihres Gerätes).
3. Wählen Sie “General”.
4. Wählen Sie “Bluetooth”.
5. Schalten Sie Bluetooth auf “On”, um die Suche zu initiieren.
6.
Wählen Sie “Tivoli Bluetooth (Not Paired)” , sobald es auf dem Display erscheint. Wenn
Sie aufgefordert werden, eine PIN einzugeben, geben Sie „0000“ ein. “Tivoli Bluetooth”
wird von “Not Paired” auf “Connected” umschalten.
7. Das Albergo+ wird einen Klingelton abgeben der die Verbindung bestätigt. Sie können
nun anfangen Ihre Musik-Dateien drahtlos abzuspielen. Stellen Sie die Lautstärke auf
Ihrem Gerät ein. Es sollte nicht nötig sein Ihr iPhone / iPod / iPad erneut zu koppeln.
Der Lautstärkepegel von Musik-Dateien variiert. Wenn Sie einen noch höheren Ausgangspegel bevorzugen, überprüfen Sie die Einstellungen in Ihrem iPhone / iPod touch / iPad:
Stellen Sie den EQ aus, den Soundcheck ab, und die Lautstärkebegrenzung aus.
Wenn Sie beim Koppeln jemals auf Probleme stoßen, drücken Sie auf Ihrem iPhone / iPod
touch / iPad Display auf den kleinen Pfeil rechts neben “Tivoli Bluetooth” und wählen
Sie “Forget this Device”. Dannach können Sie die Kopplung erneut versuchen. Je nach
Gerät ist es möglich, dass Sie mehrere Versuche benötigen, um eine Kopplung und/
oder Verbindung mit dem Albergo+ herzustellen, aber lassen Sie Ihrem Gerät zum
Koppeln oder Verbinden bitte genügend Zeit, bevor Sie den Vorgang wiederholen.
Beim Streamen von Musik können Sie auf dem iPhone / iPod touch / iPad-Display auf den
blauen Pfeil auf der rechten Seite des nächsten Titels Taste >>/ drücken, um zwischen
dem iPhone / iPod / iPad und Bluetooth abzuwechseln.
48 – DEUTSCH
Page 49

WICHTIGER HINWEIS:
• Das Albergo+ wird die Kopplungs-Informationen von bis zu 8 Geräten behalten.
Zusätzliche Geräte können gekoppelt werden, aber das am längsten nicht verwendete Gerät wird von dem neu gekoppelten Gerät ersetzt werden.
• Wenn während der Wiedergabe die Audio ausfällt oder aufhört, bewegen Sie das
Gerät näher an das Albergo+, oder prüfen Sie, ob nicht andere drahtlose Geräte das
Signal stören.
• Beim Umschalten von Bluetooth auf AM oder FM, müssen Sie eventuell die Laut-
stärke des Radios anpassen.
Digital Radio/FM- Empfang
Die mitgelieferte externe FM-Antenne sorgt für einen guten Empfang. An Orten mit einem
starken FM-Signal kann die Länge der Antenne verringert werden, um den Empfang zu
verbessern.
Wenn Sie Albergo+ zusammen mit dem optionalen Albergo+ Speaker für Stereoklang verwenden und einen FM-Sender hören, der durch Geräusche gestört wird, drücken Sie an
der Fernbedienung die Taste “Mono”, um die Hörqualität zu verbessern. Das Display zeigt
ein “M” für Mono und ein “ST” für Stereo an.
Gebäude aus Beton-, Stahl- oder Aluminiumfassaden behindert den Empfang. Haushaltsgeräte, Heizdecken, Computer, CD-Player und andere elektronische Geräte können den
Empfang beeinträchtigen oder zu einem Rauschen führen. Wenn dies der Fall sein sollte,
stellen Sie das Albergo+ weiter von der Störquelle entfernt auf oder stecken es in eine
andere Steckdose ein, die nicht von einem anderen Gerät belegt wird.
Hinweis: Wenn Albergo+ an einen anderen Ort mit möglicherweise anderen DAB-Sendern
verlagert wird, wird die Rücksetzung auf die werkseitige Einstellung empfohlen, um einen
neuen Scan zur Aktualisierung der DAB-Senderliste zu initiieren.
DAB DISPLAY-NACHRICHTEN
Untergeordnete Dienste: Untergeordnete Sender werden durch ein >> Symbol neben
dem Sendernamen gekennzeichnet. Untergeordnete Dienste sind in Ihrer Gegend möglicherweise nicht verfügbar.
“?”: Wenn dieses Symbol neben dem Sendernamen erscheint, bedeutet dies, dass der
Sender ungültig oder nicht aktiv ist.
“Not Available”: Wird angezeigt, wenn ein DAB-Sender mit zu schwachem Signal eingestellt wird.
RDS/RBDS (nur FM-Frequenzbereich)
Das Funkdatensystem überträgt Textdaten zusammen mit der Tonübertragung. Da dieser
Dienst nicht von allen FM-Sendern genutzt wird, wird bei manchen Sendern kein Text
angezeigt. Auch bei Sendern, die RDS senden, ist es möglich, dass kein Text oder unleserlicher Text angezeigt wird, wenn das Signal zu schwach ist. In solch einem Fall sollten
Sie versuchen, die Position der FM-Antenne zu verändern. Beachten Sie, dass der RDSInhalt der einzelnen FM-Sender unterschiedlich ist.
49 – DEUTSCH
Page 50

Aufstellung
Stellen Sie Albergo+ auf einer ebenen, stabilen Fläche auf. Um den Bassbereich nicht
zu beeinträchtigen und ausreichende Belüftung zu gewährleisten, nicht den hinteren
Bassport verstellen. Albergo+ ist nicht gegen Bildsignale abgeschirmt und sollte daher
in einem Abstand von mindestens 127 mm von Computern und Fernsehgeräten entfernt
aufgestellt werden. Durch Aufstellen der Lautsprecher in Bücherregalen, Schränken oder
nahe an Wänden oder Raumecken kann es zur Verstärkung des Basses kommen und
hierdurch ein unnatürlicher Klang entstehen.
Reinigung
Verwenden Sie an Ihrem Radio nie aggressive Reinigungs- oder Lösungsmittel.
Garantie
Tivoli Audio Produkte erfüllen einen hohen qualitativen Standard. Wir sind sicher, dass
wir auch Sie mit dem Produkt überzeugen können. Sollten Sie trotzdem einen Sachmangel feststellen, ist dieser durch die 24monatige Gewährleistungsfrist ab Kaufdatum
abgedeckt. Bitte heben Sie daher Ihren Kaufbeleg auf. Die Garantie ist bei Weiterverkauf
nicht übertragbar.
Für Produkte, die in der Europäischen Union und in Norwegen erworben wurden,
besteht eine MIndestgarantiedauer von zwei Jahren. In Ländern, in denen eine Mindestgewährleistungsfrist per Gesetz festgelegt ist, besteht die Garantie über den gesetzlich
vorgeschriebenen Zeitraum. In allen anderen Ländern beträgt die Garantiedauer ein Jahr.
Diese beschränkte Garantie umfasst die Funktionsfähigkeit des Produkts im Rahmen
seiner normalen, bestimmungsgemäßen Verwendung, wie in dieser Betriebsanleitung
beschrieben. Sie umfasst keine Funktionsstörungen oder Schäden, die durch unsachgemäße und unangemessene Verwendung oder Montage, durch Verwendung des
Ladegeräts zum Aufladen von Alkalibatterien, durch defekte Zusatzgeräte, Veränderungen,
unberechtigte Reparaturen, Beschädigung oder Verlust beim Transport, missbräuchliche
Verwendung, Unfälle, Betrieb mit unzulässiger Spannung/Stromstärke, Stromschwankungen, Blitzeinschlag oder andere Risiken höherer Gewalt, übermäßige Feuchtigkeit,
normalen Verschleiß, gewerbliche Nutzung oder durch den Erwerb von nicht autorisierten
Händlern verursacht wurden. Für den Garantieservice ist ein Kaufbeleg als Nachweis,
dass der Artikel bei einem autorisierten Händler gekauft wurde, erforderlich.
Für Reparaturen oder den Garantieservice kontaktieren Sie bitte den Händler, bei dem Sie
den Artikel gekauft haben oder Ihren Händler vor Ort.
Bitte schrauben Sie das Gerät niemals auf. Es befinden sich keine Serviceteile im Inneren,
die durch Sie ausgetauscht werden müssten. Tivoli Audio kommt nicht für Kosten auf, die
durch die Korrektur von Empfangsstörungen, Beseitigung von Störungen/Geräuschen,
durch Zeitverlust, Unannehmlichkeiten, Nutzungsausfall des Produkts oder durch
Schäden, die durch den unsachgemäßen Gebrauch dieses Produkts verursacht wurden,
entstanden sind.
Für den Fall, dass das Produkt während der Garantiedauer zurückgegeben wird und
es unter diese beschränkte Garantie fällt, werden defekte Teile von uns innerhalb eines
angemessenen Zeitraums kostenlos repariert oder ersetzt.
DIESE BESCHRÄNKTE GARANTIE ERTEILT IHNEN BESTIMMTE RECHTE, DIE FESTGELEGTEN BEDINGUNGEN UNTERLIEGEN. SIE VERFÜGEN MÖGLICHERWEISE AUCH
ÜBER WEITERE RECHTSANSPRÜCHE, DIE FÜR DAS PRODUKT, DAS SIE ERWORBEN
50 – DEUTSCH
Page 51

HABEN, GELTEN. DIESE RECHTE SIND VON LAND ZU LAND VERSCHIEDEN. IN MANCHEN LÄNDERN IST DER AUSSCHLUSS, DIE BESCHRÄNKUNG ODER VERÄNDERUNG
BESTIMMTER STILLSCHWEIGENDER RECHTE ODER IHRER GÜLTIGKEIT NICHT GESTATTET. IN DIESEN FÄLLEN GILT DIESE BESCHRÄNKTE GARANTIE NUR INSOWEIT,
ALS DAS GELTENDE GESETZ DIES ERLAUBT.
Durch die Gesetze Ihres Landes verfügen Sie über Rechtsansprüche gegenüber dem
Verkäufer oder Hersteller dieses Produkts. Diese beschränkte Garantie hat keine Auswirkungen auf diese Rechte.
Die Bestimmungen der beschränkten Garantie bestehen an Stelle von anderen Garantien
oder Bestimmungen, mit Ausnahme der vom Gesetz vorgegebenen. Diese beschränkte
Garantie wirkt sich nicht auf Rechte aus, die Ihnen gesetzlich zustehen und schließt keine
Rechtsmittel aus, die Ihnen laut Gesetz zur Verfügung stehen.
In Ländern, in denen Haftungsbeschränkungen nicht gesetzlich ausgeschlossen sind, darf
die Haftungshöchstgrenze von Tivoli Audio den Kaufpreis, den Sie für das Produkt bezahlt
haben, nicht überschreiten. In Ländern, in denen Haftungsbeschränkungen von Gesetzes
wegen ausgeschlossen sind, haftet Tivoli Audio nur für den direkten Schaden bei Körperverletzungen und/oder an beweglichem und unbeweglichem Eigentum, der durch die
Nachlässigkeit von Tivoli Audio entstanden ist.
Wenn dies nicht gesetzlich untersagt ist, haftet Tivoli Audio nicht für besondere, indirekte,
Neben- oder Folgeschäden. In einigen Ländern sind Haftungsbeschränkungen sowie der
Ausschluss und die Beschränkung von Rechtsmitteln bei besonderen, indirekten, Nebenoder Folgeschäden sowie die Beschränkung der Haftungssumme nicht gestattet, so dass die
oben aufgeführten Beschränkungen oder Ausschlüsse möglicherweise nicht für Sie gelten.
Diese Garantie ist ungültig, wenn das Etikett mit der Seriennummer entfernt oder beschädigt wurde.
Wenn Sie bei Ihrem Händler einen erweiterten Servicevertrag abgeschlossen haben und
nach Ablauf der Frist dieser beschränkten Garantie ein Service erforderlich ist, wenden
Sie sich bitte an den Anbieter Ihres erweiterten Servicevertrags, um die Serviceleistung
zu erhalten.
Sie können Ihr Produkt ganz bequem online auf unserer Website, www.tivoliaudio.com,
für den Garantieservice registrieren. Sie sind gesetzlich nicht verpflichtet, persönliche
Daten zur Verfügung zu stellen. Diese Daten gestatten es uns jedoch, einen Nachweis
über die von Ihnen erworbenen Produkte von Tivoli Audio zu führen und die Käufer unserer
Produkte besser zu verstehen. Die erfassten Daten werden von Tivoli Audio zu Marketingzwecken verwendet und, wenn es zulässig ist, werden wir Sie anhand der Daten in
Bezug auf die Produkte, die Sie erworben haben und andere Produkte, die für Sie interessant sein könnten, kontaktieren. Die Daten, die Sie zur Verfügung stellen, dürfen in einem
anderen Land weiterverarbeitet werden.
51 – DEUTSCH
Page 52

Spezifikationen
Modell: Tivoli Audio Albergo+
Typ: DAB/DAB+/DMB/FM Radiowecker mit
Bluetooth-Wireless-Technologie
Treiber: 76,2 mm (3") Treiber für gesamten Bereich
Empfangsbänder: FM:87.5-108MHz
DAB (Band III)/DAB+: 174-240MHz
(Empfangsbänder variieren je nach Region)
Stromversorgung: 112VDC nominal – 15VDC maximal, 1500 mA
Netzteil: Tivoli Audio 1.5A- CE
FM De-Emphasis: 50 uSek oder 75 uSek (regionsabhängig)
Abmessungen: 110 mm H x 186 mm W x 129 mm D
(4,34"H x 7,32"W x 5,22"D)
Gewicht: 1,0 kg (2.2 lbs.)
Änderungen an technischen Daten vorbehalten. Tivoli Audio behält sich das Recht vor, ohne vorherige
Ankündigung Änderungen am Produkt vorzunehmen. Tivoli Audio, das Tivoli Audio-Logo,Albergo,
Albergo+ und Albergo Speaker sind Warenzeichen von Tivoli Audio, LLC. Die Bluetooth Wortmarke
und-Logos sind eingetragene Warenzeichen der Bluetooth SIG, Inc. und jede Verwendung dieser
Marken durch die Tivoli Audio erfolgt unter Lizenz. iPod, iPod touch, iPhone, und iPad sind Marken der
Apple Inc., die in den USA und weiteren Ländern eingetragen sind.
52 – DEUTSCH
Page 53

DAB/DAB+/DMB/FM Clock Radio
TABLE DES MATIÈRES
Précautions d’emploi ....................................................................................................... 54
Introduction. A propos de Tivoli Audio ............................................................................. 57
Réglages sur le dessus. Afficheur .................................................................................... 57
Réglages à l’arrière ........................................................................................................... 59
Télécommande ................................................................................................................. 60
Menus en mode radio numérique, FM et auxiliaire .......................................................... 61
Comment régler le réveil .................................................................................................. 64
Options de réveil .............................................................................................................. 64
Utilisation De Bluetooth .................................................................................................... 65
Réception FM RDS Placement. Entretien ........................................................................ 66
Garantie ............................................................................................................................ 67
Caractéristiques ............................................................................................................... 68
53 – FRANÇAIS
Page 54

Précautions D’emploi
1. Lisez ce mode d’emploi.
2. Conservez ce mode d’emploi.
3. Respectez toutes les mises en garde.
4. Suivez toutes les instructions.
5. ATTENTION - Danger d'explosion si les piles ne sont pas remplacées correctement.
Ne remplacer qu'avec des piles identiques ou de type équivalent.
6.
AVERTISSEMENT: Les piles ne doivent pas être exposées à une chaleur excessive
comme par exemple aux rayons du soleil, au feu, ou autres éléments de ce genre.
7. AVERTISSEMENT: NE PAS PORTER LA PILE À LA BOUCHE, DANGER DE BRÛLURE
CHIMIQUE. La télécommande fournie avec ce produit contient une pile bouton. Le fait
d'avaler une pile bouton peut provoquer de sérieuses brûlures internes en seulement 2
heures et peut présenter un danger de mort. Ne pas laisser les piles neuves ou usagées
à la portée des enfants. Si le compartiment batterie ne ferme pas de façon sûre, arrêtez
d'utiliser le produit et gardez-le hors de portée des enfants. Si vous suspectez que des
piles ont été avalées ou placées dans une quelconque cavité du corps, consultez un
médecin immédiatement.
8. N’utilisez pas cet appareil près d’une source d’eau, telle qu’une baignoire, un sous-sol
humide, ou une piscine. Attention: ne pas exposer cet appareil à la pluie ou au risque
de moisissure.
9. Nettoyez votre appareil avec un chiffon doux, n’utilisez ni savon, ni produit aérosol.
10.
Ne bloquez pas les ouvertures de ventilation. Suivez les recommandations d’installation.
11.
Ne pas installer à proximité de sources de chaleur telles que des radiateurs, des
bouches d’air chaud, des poêles, ou d’autres appareils qui dégagent de la chaleur (y
compris des amplificateurs).
12.
Ne pas compromettre la sécurité en modifiant la polarité ou la mise à la terre de la fiche.
Une fiche polarisée comporte deux broches plates dont l’une est plus large que l’autre.
Une fiche avec terre comporte deux broches plates avec une troisième broche pour la
terre. La broche plate large ou la troisième broche est prévue pour votre sécurité. Si la
fiche livrée avec votre appareil ne correspond pas à votre prise, consulter un électricien
pour remplacer toute prise obsolète.
54 – FRANÇAIS
Page 55

13.
Éviter de marcher sur le câble d’alimentation ou de le pincer tout particulièrement
au niveau des fiches, des prises de courant, et à l’endroit où il émerge de l’appareil.
14. N’utiliser que des équipements/accessoires spécifiés par le fabricant.
15.
N’utiliser qu’avec le chariot, la station d’accueil, le trépied, le support
ou la table spécifiée par le fabricant, ou vendu avec l’appareil. En
cas d’utilisation d’un chariot, il y a lieu de faire preuve de prudence
au moment de déplacer l’ensemble chariot/appareil pour éviter tout
risque de blessure qui pourrait être occasionné par le renversement
de celui-ci.
16.
Débranchez votre appareil en cas de risque de foudre ou pendant une absence
prolongée de votre domicile.
17. Ne faire fonctionner ce produit qu’avec le type de source électrique spécifiée sur le
panneau arrière. Pour les produits faisant appel à une alimentation externe, utiliser
un équivalent exact pour le remplacement en cas de perte ou de dommage. Pour les
produits fonctionnant avec des piles, consulter le manuel d’utilisation.
18.
Débrancher ce produit du secteur et confier les interventions de service à un technicien
qualifié dans les cas suivants:
a. Lorsque le cordon d’alimentation ou la fiche est endommagé.
b. Lorsque du liquide ou des objets ont pénétré dans le produit.
c. Si le produit ne fonctionne pas normalement lorsque toutes les instructions
d’utilisation ont été observées.
d. En cas de chute ou si le produit à été endom magé d’une quelconque façon.
e. En cas de changement perceptible des perfor mances du produit.
19. Lorsque des pièces de rechange sont nécessaires, assurez-vous de votre technicien
a utilisé des pièces de rechange spécifiées par le fabricant ou ayant les mêmes
caractéristiques que la pièce d’origine. Des substitutions non autorisées peuvent causer
un incendie, de choc électrique, ou d’autres dangers.
20. À la fin de tout service, demandez au technicien d’effectuer des contrôles de sécurité
pour confirmer que le produit est en bon état de fonctionnement.
21. Si l’afficheur se brise et si du liquide en sort, évitez tout contact avec ce liquide.
22. Evitez la proximité d’une flamme nue telle qu’une bougie par exemple.
23. N’exposez pas cet appareil à des projections d’eau. Les objets contenant du liquide
ne doivent pas être placés à proximité de votre appareil ou au dessus.
24. La température de fonctionnement de votre appareil est de 5 à 40° C.
25.
AVERTISSEMENT - Les conduites ne sont pas déconnectés de la position d’arrêt, mais
les circuits ne sont pas alimentés.
26. Le bloc d’alimentation externe permet de mettre l’appareil hors tension et doit donc
rester facilement accessible
ATTENTION: L’ANTENNE DU ALBERGO+ NE DOIT PAS ÊTRE DÉTACHÉE
55 – FRANÇAIS
Page 56

Cet appareil peut être recyclé. Les produits portant ce symbole ne doivent pas être jetés avec les ordures ménagères. En fin de vie, vous
devez déposer votre appareil dans un point de collecte de produits
électriques et électroniques. Pour plus d’informations, vous pouvez
contacter votre revendeur ou l’agence locale de l’environnement.
La Directive européenne pour l’élimination des déchets d’équipements
électriques et électroniques (DEEE) a été mise en application pour
réduire de manière importante la quantité de déchets, et en diminuer
l’impact écologique sur la planète et la santé. Agissez de manière
responsable en recyclant les produits usagers. Si ce produit est toujours en état de fonctionnement, pensez à le vendre ou à le donner.
56 – FRANÇAIS
Page 57

Albergo+: Instructions D’utilisation
Toutes nos félicitations pour avoir choisi le radio réveil Albergo+ de Tivoli Audio. Vous avez
entre les mains le meilleur réveil radio numérique/ FM du marché, d’une qualité exceptionnelle de réception et de restitution sonore, et d’une simplicité d’utilisation remarquable. Nous
comprenons votre impatience à utiliser votre nouvelle radio, mais afin de tirer le meilleur parti
de votre nouvelle radio, prenez quelques minutes pour lire le mode d’emploi et les précautions
d’emploi. Familiarisez-vous avec votre appareil. Si vous avez la moindre question, n’hésitez
pas à contacter votre revendeur agréé Tivoli Audio ou à nous contacter directement.
Conserver votre emballage, il pourrait vous être utile si vous deviez retourner votre
réveil radio au service technique.
Encore une fois « Merci d’avoir choisi Tivoli Audio », consommez sans modération votre
radio Albergo+!
A Propos De Tivoli Audio
La marque Tivoli Audio a été créée par Tom DeVesto, avec la mission de mettre à la disposition des consommateurs des appareils de grande qualité audio, d’une utilisation simple et d’un
design élégant. En qualité de Directeur Exécutif (CEO) et Directeur du département Recherche et
Développement de sa précédente entreprise Cambridge SoundWorks*, Tom DeVesto a mis au
point de très performants produits destinés aux marchés de la Haute Fidélité ou du Multimédia.
Tom a également fait partie du comité de direction d’entreprises telles qu’Advent et Kloss Video.
*Cambridge SoundWorks est une marque déposée de Creative Labs, Singapour.
Dans votre emballage de Albergo+ vous trouverez:
• Une alimentation externe
• Une télécommande (pile installée)
Si l’un quelconque de ces accessoires venait à manquer, contactez votre revendeur ou le
distributeur Tivoli Audio.
Reglages Du Dessus - Afficheur
1
2
5
4
3
1. MOLETTE MULTI-FONCTION (Dessus): De manière pratique, cette molette fait
service de plusieurs fonctions:
57 – FRANÇAIS
6
8
7
Page 58

a. Mise en route: Appuyez au centre de la molette située au dessus de votre Al-
bergo+, pour l’allumer. Procédez de la même manière pour l’éteindre lorsqu’il est
allumé, quelle que soit la source sélectionnée.
b. Volume: Tournez le bouton dans le sens des aiguilles de la montre pour aug-
menter le volume et dans le sens inverse pour le diminuer.
c. Snooze (rappel): Lors du déclenchement du réveil, une pression enclenchera
le rappel. L’icône apparait dans l’afficheur lorsque la fonction rappel est
enclenchée. La temporisation du rappel est fixée à 10 minutes. Si la fonction
rappel est toujours enclenchée, une nouvelle pression sur ce bouton réinitialisera
le temporisateur, et une nouvelle pause de 10 minutes s’ensuivra. Pour arrêter
le réveil lorsqu’il sonne et éteindre l’appareil, appuyez de manière prolongée au
centre de la molette, ou appuyez sur le bouton de réveil correspondant.
2. AFFICHEUR:
PMTM
FM AUX
P
P
: (Chiffres): Heure
AUX: Entrée auxiliaire
FM: FM (Modulation fréquences)
: Durée avant extinction (Sleep)
: Niveau du signal
: Mode Bluetooth
: Temps avant rappel (Snooze)
DAB: DAB/DAB+/DMB
M: Mono
: Réveils 1 & 2
PM: lorsque le format 12 heures
est sélectionné
T: Réglage manuel fréquences
3. TUNE +/-: En mode DAB, utilisez ces boutons pour faire apparaître toutes les stations
DAB/DAB+ disponibles. Appuyez sur les boutons +/- pour sélectionner la station de
votre choix. Attendez 3 secondes et la diffusion commencera automatiquement, ou
alors appuyez sur le bouton « Enter » de la télécommande. FM: Appuyez brièvement sur
les boutons de syntonisation Tune +/- pour avancer jusqu'à la station suivante détectée
par la recherche automatique Auto Scan. Voir « Auto Scan » (recherche automatique)
sous le menu FM « FM Menu » pour la procédure de désactivation du dispositif Auto
Scan et procéder à la syntonisation manuelle des stations.
4.
SLEEP: Appuyez de façon répétée sur ce bouton pour définir la durée durant laquelle la
radio restera allumée avant son extinction automatique. Sinon, appuyez sur le bouton «
Select » de la télécommande pour sélectionner cette durée. Lorsque la fonction Tempo
est active, une icône de montre s’affiche. Pour annuler cette fonction appuyez
plusieurs fois sur la touche “Sleep” jusqu’à afficher <Sleep off> et validez avez “Select”.
5. BLUETOOTH: Appuyez sur cette touche pour activer le mode Bluetooth. Reportez-
vous à la section « Utilisation de Bluetooth » pour en savoir plus. Appuyez le bouton
Bluetooth et maintenez-le enfoncé pour effacer de la mémoire tous les périphériques
appairés. « Memory cleared » (mémoire effacée) s'inscrira sur l'affichage.
58 – FRANÇAIS
Page 59

6. SOURCE: Pressez pour choisir la source.
7.
8. MOLETTE DE RÉGLAGE DU RÉVEIL : Après avoir pressé l’une des deux touches
ALARM 1 AND 2 (RÉVEILS 1 ET 2): Appuyez sur l’une de ces deux touches pour
régler les réveils qui leur sont associés. Ils seront automatiquement activés.
de réveil, faites tourner cette molette pour régler l’heure, puis appuyez dessus pour
confirmer. Procédez de même pour les minutes et appuyez sur la molette quand
vous avez terminé (sans cela, l’heure du réveil sera automatiquement validée après 3
secondes). Votre réveil sera alors activé. L’heure de chaque réveil sera indiquée sur
l’afficheur. Appuyez à nouveau sur le bouton de réveil pour annuler le réveil qui lui est
associé. Veuillez également consulter la section « Comment régler le réveil à partir
du menu principal » pour d’autres réglages très importants concernant le réveil.
Description Des Contrôles (Situés À L’arrière)
2
5
4
1
3
1.
12VDC/1500mA: Utilisez ce connecteur pour brancher l’alimentation fournie avec votre
Albergo+, soit pour le faire fonctionner sur secteur. N’utilisez aucune autre alimentation
que celle fournie avec votre appareil. En cas de perte ou de dommage, vous devez
impérativement remplacer votre alimentation par une alimentation originale à l’identique de
marque Tivoli Audio. Vous devez respecter les normes de sécurité de votre pays et en Europe
une alimentation conforme à la EN/IEC 60065 (12V CC 1500mA et 230V 50Hz). L’utilisation
d’une alimentation autre que celle d’origine est dangereuse. Le contact doit être positif au
centre 5,5 mm / 2,1 mm. Il est normal que l’alimentation chauffe pendant l’utilisation.
2.
ANTENNE EXTERNE 75 OHM « F » : Une antenne télescopique FM est raccordée à cette
entrée. Pour plus d’information reportez vous à la rubrique “Digital Radio/FM Réception”.
3.
Casque: Raccordez un casque (non fourni) sur cette sortie stéréo contrôlée. Le
raccordement du casque coupe automatiquement le haut parleur principal. Le niveau
d’écoute se règle par le bouton Volume du poste ou de la télécommande. La commande
“Mono” de la télécomande affecte également cette sortie. La connexion se fait par
l’intermédiaire d’un mini jack stéréo 3,5 mm. Ecoutez à un niveau raisonnable.
4.
AUX IN: Pour écouter une source audio externe, telle qu’un lecteur CD ou MP3, un
ordinateur, un iPod ou un iPhone, raccordez la sortie casque de la source sur cette entrée
par l’intermédiaire d’un câble équipé d’un mini jack stéréo 3,5 mm. Remarque: Les
niveaux de cette entrée auxiliaire et de la radio peuvent être tout à fait différents.
59 – FRANÇAIS
Page 60

5.
Speaker: Raccordez la prise RCA mâle du câble de l’enceinte complémentaire
Albergo Stereo Speaker. Grâce au contrôle sur la télécommande, assurez vous
d’avoir sélectionné la fonction “stéréo”. Contrôlez sur l’afficheur la présence du
sigle “ST” indiquant stéréo et non “M” pour mono.
Description Des Fonctions De La Télécommande
1. MISE SOUS TENSION:
Appuyez sur cette touche pour
allumer votre Albergo+. La
radio s’allumera sur la dernière
source écoutée. Appuyez à
nouveau pour éteindre.
2.
MUTE/SNOOZE: Appuyez
pour passer en mode silence
(Mute) pendant l’écoute, les
barres après l’icône disparaitront. En appuyant sur cette
touche ou en ajustant le
volume, vous sortirez du mode
silence. Lorsque le réveil se
déclenche, appuyez sur cette
touche pour déclencher une
pause de 10 minutes. Le réveil
se re-déclenchera après. Un
icône apparait dans
l’afficheur lorsque la fonction
rappel est enclenchée. La
durée de rappel n’est pas réglable. Si la fonction rappel est toujours enclenchée,
une nouvelle pression sur ce bouton réinitialisera le temporisateur, et une nouvelle
pause de 10 minutes s’ensuivra.
3. ALARM (Réveil): Utilisez les touches pq et Select pour régler les réveils. Veuillez
également consulter la section « Comment régler le réveil à partir du menu
principal » pour d’autres réglages très importants concernant le réveil.
4.
SLEEP (Tempo): Appuyez plusieurs fois sur cette touche pour visualiser le temps
d’écoute avant extinction de votre radio et utilisez la touche “Select” pour valider.
Lorsque la fonction Tempo est active, une icône de montre s’affiche. Pour annuler
cette fonction appuyez plusieurs fois sur la touche “Sleep” jusqu’à afficher <Sleep
off> et validez avez “Select”.
5. SOURCE: Pressez pour choisir la source.
6. INFO: Appuyez plusieurs fois pour afficher les différentes informations disponibles.
7. MEMOIRES 1-5: Appuyez sur un bouton et maintenez pour enregistrer la station en
écoute. Un appui bref sur une de ces touches rappelle la mémoire correspondante.
En FM, la fréquence et le numéro de la mémoire s’affichent sur l’écran. Vous disposez
de 5 mémoires en FM et 5 en RNT.
8. VOLUME +/–: Appuyez sur + pour augmenter le volume et sur – pour le baisser. Si le
son est entaché de distorsion, diminuez le volume pour éviter d’endommager le hautparleur. En réglant le volume pendant que le Albergo+ est en mode silence, celui-ci
sera annulé.
11
13
4
2
3
8
5
1
6
7
9
12
10
60 – FRANÇAIS
Page 61

9. pq/TUNE +/-: Utilisez ces touches pour sélectionner une option lorsque vous êtes
dans le menu. En mode DAB, utilisez ces boutons pour faire apparaître toutes les stations
DAB/DAB+ disponibles. Appuyez sur les boutons pq pour sélectionner la station de
votre choix. Attendez 3 secondes et la diffusion commencera automatiquement, ou
alors appuyez sur le bouton « Enter » de la télécommande. FM: Appuyez brièvement sur
les boutons de syntonisation Tune +/- pour avancer jusqu'à la station suivante détectée
par la recherche automatique Auto Scan. Voir « Auto Scan » (recherche automatique)
sous le menu FM « FM Menu » pour la procédure de désactivation du dispositif Auto
Scan et procéder à la syntonisation manuelle des stations.
10. tu: Utilisez pour naviguer dans le menu. La flèche droite duplique la touche “Menu/
Select”. Dans certains menus la flèche gauche permet de revenir à la rubrique précédente.
11. MENU/SELECT: Appuyez pour renter dans le menu et faire les sélections. Pour plus
d’information, consultez les sections « Menu DAB », « Menu FM » et « Menu auxiliaire ».
12.
MONO: Appuyez sur cette touche pour sélectionner Mono ou Stéréo. L’indication
“M” ou “ST” apparait. Ce réglage affecte également la sortie casque. Pour plus
d’information, reportez vous à la rubrique “Digital Radio/FM Réception”.
13. BACK: Cette touche vous permet de revenir en arrière.
Remarque: Lorsque l’Alebergo est en mode veille, vous pouvez contrôler le rétro-éclairage de
l’affichage sans avoir à mettre en marche l’Albergo+ et accéder au menu. Appuyez deux fois
sur le bouton p de la télécommande pour éteindre le rétro-éclairage. Appuyez sur le bouton
p de la télécommande pour allumer le rétro-éclairage pendant 10 secondes. Appuyez encore
deux fois sur le bouton p de la télécommande pour rétablir le rétro-éclairage.
Menu du mode radio numérique (DAB/DAB+)
En mode DAB, appuyez de façon prolongée sur la touche « Menu » de la télécommande
pour entrer dans le menu principal. Utilisez les touches pq et Select pour changer de
rubrique. Utilisez la touche Back pour revenir.
Un astérisque (*) indique que l’option affichée a été sélectionnée.
Remarque: Si la liste de stations est vide lorsque vous activez le mode radio numérique,
un balayage automatique des stations démarrera.
Remarque: Sans action de votre part, le menu principal se fermera automatiquement
après 9 secondes.
1.
RECHERCHE AUTOMATIQUE: Recherche toutes les stations disponibles. Si vous
déplacez le Albergo+, vous devrez relancer une recherche automatique pour mettre à jour
la liste des stations disponibles. Pour annuler la recherche automatique, appuyez sur Back.
2. TIVOLI EQ: Ceci vous permet de régler la tonalité de votre appareil. Avec les flèches
pq et la touche Select, vous pouvez régler comme vous le souhaitez les basses
et les aiguës. Ces réglages se trouvent sous <User EQ>. Sur le menu approprié,
avec la touche “Select” vous pourrez mettre en fonction <On> ou supprimer <Off>
l’accentuation <Contour> (Loudness). L’accentuation <Contour> est recommandée afin
d’avoir un équilibre tonal plus naturel en écoute à faible niveau. Utilisez pq et Select
pour utilisez les courbes d’égalisation pré-enregistrées, ces réglages se substituent
aux réglages Graves et Aiguës personnalisés, par contre le réglage <Contour> n’est
pas affecté. Le choix <Plat> rétablit les réglages d’usine, c’est-à-dire les Graves et
Aiguës à 0 et Contour désactivé (Off). En sélectionnant <User EQ> vous retrouverez vos
réglages personnels. Dans le menu EQ Tivoli, le chiffre de gauche indique le réglage
des Graves et le chiffre de droite celui des Aiguës.
61 – FRANÇAIS
Page 62

3.
RECHERCHE MANUELLE: Utilisez les touches pq pour afficher la fréquence station
spécifique et utilisez la touche Select pour l’écouter. Attendez 3 secondes et la diffusion
commencera automatiquement, ou alors appuyez sur le bouton « Enter » de la télécommande.
4. DRC: Contrôle de la dynamique vous permet de compresser le signal de certaines
stations afin de pouvoir les écouter à faible niveau ou pour limiter le bruit de fond dans
les passages faibles.
5. REGLAGES (A-F):
A. RÉVEIL: Consultez la section « Comment régler le réveil à partir du menu principal ».
B. HEURE
Heure/Date: Appuyez sur Select et utilisez les flèches pq pour régler l’heure
puis les minutes. Vous devez également désactiver la mise à jour automatique
en sélectionnant « No update ». Pour en savoir plus, reportez-vous à la section «
MAJ Auto » ci-dessous.
MAJ Auto: Mise à jour automatique. Appuyez sur Select et utilisez les flèches
pq pour choisir le mode de mise à jour “Update from any”, “Update from
DAB”,ou “Update from FM” (RDS). Pour que cette mise à jour ait lieu, il faut
disposer de la réception d’un signal FM RDS ou RNT porteur de l’information
d’heure et de date. Cette mise à jour peut prendre plusieurs minutes avant d’être
effective. Tivoli Audio ne saurait être tenu responsable d’une mise à jour non
exacte due à l’information reçue d’une station.Pour régler l’heure manuellement,
choisissez “No Update”, puis sélectionnez “Set Time/Date” dans le menu “Time”
et en utilisant les touches pq ou tu pour régler l’heure et la date.
12h/24h: Appuyez sur Select et utilisez les flèches pq pour choisir le format
12h ou 24h.
Format Date: Appuyez sur Select et utilisez les flèches pq et la touche Select
pour choisir le format souhaité.
C. BACKLIGHT (ECLAIRAGE):
Timeout: L’éclairage de l’afficheur peut être constant que vous effectuiez ou
non des commandes (tel est le réglage d’usine). Vous pouvez programmer une
atténuation de l’éclairage après une temporisation choisie. Toute commande sur
l’appareil ou la télécommande réactive l’éclairage. Appuyez sur Select et utilisez
les flèches pq et la touche Select pour régler la temporisation 10, 20, 30, 45,
60, 90, 120 ou 180 secondes, ou Off pour désactiver l’atténuation de l’éclairage.
Eclairage Fort: Appuyez sur Select et utilisez les flèches pq et la touche Se-
lect pour régler l’éclairage fort.
Eclairage Faible: Si vous avez choisi une temporisation pour l’atténuation de
l’éclairage, appuyez sur Select et utilisez les flèches pq pour régler l’éclairage
atténué.
D. LANGUE: Appuyez sur Select et utilisez les flèches pq et la touche Select pour
choisir la langue.
E. RÉGLAGE USINE: Appuyez sur Select et utilisez les flèches pq ou tu et
la touche Select pour confirmer par <Oui> ou <Non> le retour aux réglages
d’origine. Un retour au réglage usine efface tous les réglages personnels tels
que le choix de langue ou les mémoires. Voir aussi la section “Radio Numérique/
Réception FM”.
F. ID: Appuyez sur Select pour afficher les informations concernant la version logi-
ciel de votre radio. Cette information peut vous être demandée en cas d’appel
au service technique.
62 – FRANÇAIS
Page 63

Menu du mode FM
En mode FM, appuyez de façon prolongée sur la touche « Menu/Select » de la télécommande pour
entrer dans le menu principal. Utilisez les touches pq et Select pour changer de rubrique. Utilisez la touche Back pour revenir. Un astérisque (*) indique que l’option affichée a été sélectionnée.
Remarque: Sans action de votre part, le menu principal se fermera automatiquement
après 9 secondes.
1.
RÉGLAGE SCAN: Appuyez sur “Menu” et utilisez pq et Select pour choisir entre
“Strong stations only” et “All stations” lors de la recherche automatique (Consultez le
paragraphe 9 ( pq/Tune +/-) de la section « Télécommande »). Le choix “All stations”
accroit la sensibilité et peut générer l’arrêt en recherche sur un bruit inter-station.
RECHERCHE AUTOMATIQUE (PAS DANS LE MENU AUX): Appuyez sur le bouton
2.
de sélection « Select » et à l'aide de pq et des boutons « Select » choisissez entre les
station à signal fort seulement « Strong stations only », toutes les stations « All stations »,
ou arrêt « Off » lorsque vous invoquez la recherche automatique auto-scan (voir le Point
#9 - Syntonisation (Tune +/-) sous « Tlélécommande »). Choisir toutes les stations « All
stations » augmente la sensibilité de la détection, ce qui peut avoir pour conséquence que le
dispositif de recherche automatique s'arrête sur une source de bruit. Choisir « Off » désactive
la recherche automatique « Auto Scan » et permet de rechercher les stations manuellement.
3.
RDS: Appuyez sur la touche « Select » puis, à l’aide des touches , choisissez l’une des
options : « Enabling » (activer le texte RDS FM) ou « Disabling » (le désactiver). Validez
votre choix en appuyant sur « Select ». Pour en savoir plus, consultez la section « RDS ».
4. TIVOLI EQ: Reportez-vous à la description correspondante dans la section « Menu
du mode radio numérique ».
5. RÉGLAGES: Reportez-vous à la description correspondante dans la section « Menu
du mode radio numérique ».
Menu du mode auxiliaire
En mode auxiliaire, appuyez de façon prolongée sur la touche « Menu/Select » de la télécommande pour entrer dans le menu principal. Utilisez les touches pq et Select pour
changer de rubrique. Utilisez la touche Back pour revenir. Un astérisque (*) indique que
l’option affichée a été sélectionnée.
Remarque: Sans action de votre part, le menu principal se fermera automatiquement
après 9 secondes.
1. TIVOLI EQ: Reportez-vous à la description correspondante dans la section « Menu
du mode radio numérique ».
2. ALARM 2: Si vous n’avez pas l’intention d’utiliser cette fonction, ou si vous craignez
de la mettre en route par erreur, vous pouvez la désactiver en appuyant sur la touche «
Select » puis en utilisant les touches pq . Validez en appuyant à nouveau sur « Select ».
3. REGLAGES: Reportez-vous à la description correspondante dans la section « Menu
du mode radio numérique ».
4.
LIMITE DU VOLUME : Si vous désirez diminuer le niveau de volume maximal afin
de ne pas déranger les personnes autour de vous, appuyez sur la touche « Select ».
Sélectionnez ensuite la limite de volume de votre choix (26 ou 22) à l’aide des touches
pq . Validez en appuyant à nouveau sur « Select ». Si l’option « off » est sélectionnée,
le volume maximal est réglé par défaut sur 30. Remarque : lorsque l’on diminue le
niveau de volume général, le niveau de volume de la sonnerie du réveil diminue aussi.
63 – FRANÇAIS
Page 64

5. NIVEAU BLUETOOTH: Niveau Bluetooth : À l'aide de la flèche pq et des boutons
Select sélectionnez « Low » si vous souhaitez réduire la portée du signal Bluetooth.
Cela peut être souhaitable si la fonction Bluetooth ne sera utilisée que lorsque vous
vous trouvez dans la proximité immédiate de la radio. Nous recommandons de garder
ce paramètre sur la position « Normal ».
Comment régler le réveil à partir du menu principal
1.
Lorsque votre Albergo+ est allumé, vous pouvez accéder aux réglages du réveil depuis
le menu principal, quel que soit le mode sélectionné (DAB, FM ou Aux). Commencez
par presser la touche « Menu » de votre télécommande en la maintenant enfoncée.
Une fois le menu affiché, sélectionnez « Settings » (réglages) puis « Alarm » (réveil).
2. <Alarm 1> est le 1er réglage qui apparait. Appuyez à nouveau sur Alarm ou utilisez
les touches pq et Select pour choisir Réveil 1 ou Réveil 2. Remarque: vous naviguez
dans le menu Réveil avec les touches Back ou et Select ou tu.
3. Utilisez les touches pq pour mettre en fonction le réveil.
4. Utilisez les touches pq pour régler l’heure, puis pressez Select. Répétez la même
opération pour les minutes, ainsi que la mention AM/PM si vous utilisez le format 12h.
5.
Utilisez les touches pq pour choisir la source que vous souhaitez utiliser, puis pressez
Select. Si vous choisissez la RNT ou la FM, utilisez Tune +/- pour choisir une station
en mémoire ou la dernière station écoutée, puis pressez Select.
6.
Utilisez les touches pq pour régler le type de réveil que vous souhaitez et pressez Select.
7. Enfin utilisez les touches pq pour régler le volume et pressez Select. Pour assurer
la présence de son lorsque l'alarme se déclenche, le niveau du volume de l'alarme
ne peut pas être réglé en-dessous d'un niveau minimum. Aussi, si elle est activée, la
fonction « Volume Limit » (limite de volume) dans le menu auxiliaire « Auxiliary Menu »
aura une incidence sur le volume de l'alarme.
8. Répétez cette procédure pour le Réveil 2, si vous le désirez.
Si vous vous êtes trompez à une quelconque étape, utilisez la flèche gauche t pour revenir en arrière et recommencer.
Remarque: Vos réglages ne seront sauvegardés que si vous avez été au bout du processus de réglage du réveil et qu’est apparue sur l’afficheur l’inscription <Réveil réglé>.
Remarque: Si vous avez choisi la source DAB pour le réveil et que la dernière station
écoutée ou programmée n’est pas disponible au moment où le réveil doit sonner, la sonnerie par défaut retentira à sa place.
Coupure de Courant: Si le courant est coupé les réglages de réveil seront sauvegardés mais le réveil ne fonctionnera pas.
Options Reveil
Au moment d’un réveil, le volume augmentera progressivement. Quand un réveil s’active,
vous pouvez soit enclencher la répétition, soit arrêter le réveil.
Snooze (Répétition): Pour activer la répétition du réveil, appuyez sur le bouton Snooze de la télécommande lorsque le réveil se déclenche ou brièvement au centre de la molette multi-fonctions.
Le délai de la fonction Répétition n’est pas ajustable. Si la fonction rappel est toujours enclenchée, une nouvelle pression sur ce bouton réinitialisera le temporisateur, et une nouvelle pause
de 10 minutes s’ensuivra. Pour arrêter le réveil lorsqu’il sonne et éteindre l’appareil, appuyez de
manière prolongée au centre de la molette, ou appuyez sur le bouton de réveil correspondant.
64 – FRANÇAIS
Page 65

Couper le Réveil: Pour couper le réveil lorsqu’il se met en fonction: appuyez sur Alarm ou Power
de la télécommande ou de manière prolongée au centre de la molette au dessus du Albergo+.
Activation rapide: La radio étant en veille, un appui bref répété sur Alarm vous permettra
d’activer ou de désactiver l’un ou l’autre des réveils ou les deux.
Utilisation De Bluetooth
Avant de chercher à vous connecter, vérifiez la compatibilité de votre appareil avec la technique Bluetooth 2.1+EDR A2DP. Assurez-vous que votre appareil n’est pas déjà couplé à
un autre accessoire Bluetooth. Selon les appareils, le mode d’appairage peut varier.
1. Appuyez sur le bouton « Bluetooth » situé sur le panneau avant de votre Albergo+, ou
sélectionnez Bluetooth en tant que source Ceci activera le Bluetooth. Réglez le volume
à ¼ au début. Veillez également à augmenter le volume de votre périphérique source
(le périphérique à partir duquel vous transmettez).
2. Activez le Bluetooth sur votre appareil.
3.
Sélectionnez « Tivoli Bluetooth (non connecté) » lorsqu’il apparait sur l’écran de votre appareil
afin de démarrer la recherche. Si votre appareil vous demande une clé de connexion, tapez
« 0000 ». L’indication devant Tivoli Bluetooth passera de « Non connecté » à « Connecté ».
4. La connexion sera confirmée par l’émission d’un bip sonore au niveau du Albergo+.
Vous pouvez maintenant envoyer « sans fil » vos fichiers musicaux. Ajustez le niveau
sonore de votre appareil. Vous ne devriez pas avoir à effectuer de nouveau cette
procédure pour retrouver la connexion. Selon le modèle de votre périphérique, il
se peut qu'il soit nécessaire de faire plusieurs tentatives d'Appairage et/ou de
Connexion au Albergo+ ; veillez cependant à laisser suffisamment de temps à
votre périphérique pour l'Appairage ou la Connexion avant de répéter l'opération.
Couplage D’un iPhone, iPad Ou iPod Touch En Bluetooth
1. Appuyez sur le bouton « Bluetooth » situé sur le panneau avant de votre Albergo+, ou
sélectionnez Bluetooth en tant que source Ceci activera le Bluetooth. Ceci activera le
Bluetooth. Réglez le volume à ¼ au début. Veillez également à augmenter le volume de
votre périphérique source (le périphérique à partir duquel vous transmettez).
2. Sélectionnez « Réglages » (selon la version du logiciel de votre appareil).
3. Sélectionnez « Général ».
4. Sélectionnez « Bluetooth ».
5. Commutez le réglage sur « Activé » pour démarrer la recherche.
6.
Choisissez « Tivoli Bluetooth (non connecté) » sur l’écran. Si l’entrée d’un PIN est requis,
entrez « 0000 ». « Connecté » s’affichera en face de « Tivoli Bluetooth ».
7. La connexion sera confirmée par l’émission d’un bip sonore au niveau du Albergo+.
Vous pouvez maintenant envoyer « sans fil » vos fichiers musicaux. Ajustez le niveau
sonore de votre appareil. Vous ne devriez pas avoir à effectuer de nouveau cette
procédure pour retrouver la connexion iPhone, iPod ou iPad.
Le niveau sonore des fichiers musicaux peuvent être très différents. En fonction de vos
préférences, modifiez les réglages de votre iPhone, iPod ou iPad : Réglez Egaliseur de
volume « off », Egaliseur « désactivé » et Volume maximum « non ».
Si vous rencontrez des difficultés de connexion, dans le menu Bluetooth, utilisez la flèche
à droite de « Tivoli Bluetooth » pour accéder à l’écran suivant et « Oublier cet appareil »,
65 – FRANÇAIS
Page 66

puis recommencez la procédure de couplage. Selon le modèle de votre périphérique,
il se peut qu'il soit nécessaire de faire plusieurs tentatives d'Appairage et/ou de
Connexion au Albergo+; veillez cependant à laisser suffisamment de temps à votre
périphérique pour l'Appairage ou la Connexion avant de répéter l'opération.
Pendant l’écoute de musique sur votre iPhone, iPod ou iPad, vous pouvez utiliser la flèche à droite
de la touche « next » de votre écran pour alterner l’écoute entre votre appareil et le Bluetooth.
REMARQUE:
• Le Albergo+ garde en mémoire le couplage de 8 appareils. Si vous tentez de coupler
un appareil complémentaire, il viendra remplacer l’appareil le moins utilisé.
• En cas de problème de connexion, par exemple des drop-outs ou arrêts, rapprochez
votre appareil source du Albergo+ et assurez vous qu’aucun autre appareil sans fil
n’est présent à proximité et pourrait générer des interférences.
• Lorsque vous basculez de l’écoute de la radio au signal Bluetooth, il vous faudra
peut-être ajuster le niveau.
Radio Numérique/Réception FM
L’antenne FM télescopique livrée avec le Albergo+ offre une très bonne réception. Dans le cas
où le signal FM serait très fort, le fait de replier l’antenne peut améliorer la qualité de réception.
Si vous utilisez le Albergo+ en stéréo avec l’enceinte optionnelle Albergo+, et que l’écoute
de la station est entachée de bruit de fond, le passage en Mono peut rendre l’écoute plus
silencieuse et audible. Lorsque vous êtes en Mono, un M s’inscrit dans l’afficheur et un
ST en stéréo. Cette information est également donnée lorsque l’on active la fonction Info
à partir de la télécommande.
Les bâtiments en béton, en acier ou en aluminium perturbent la propagation des ondes.
Les appareils électroménagers, les ordinateurs, les lecteurs CD, les routeurs Wifi et de
nombreux autres appareils électroniques peuvent affecter la réception et/ou générer des
parasites. Si vous rencontrez ce type de problèmes, essayez de déplacer votre radio et de
changer de prise électrique pour l’alimentation.
Remarque: Si vous emportez votre Albergo+ dans un nouvel endroit, il est possible que les
stations DAB disponibles ne soient plus les mêmes. Il est alors recommandé de réinitialiser
l’appareil afin de démarrer un nouveau balayage qui mettra à jour la liste des stations.
Messages en RNT
Service Associés: La disponibilité de services associés est signalée par le symbole >>
affiché après le nom de la station. Les services associés ne sont pas forcément disponibles dans toutes les régions.
<?>: Ce symbole indique que la station n’émet pas.
“Not Available”: Indique que le signal de la station DAB est trop faible.
RDS (en FM Uniquement)
Le RDS (Radio Data System) transmet en même temps que le signal audio, du texte et
des informations. Toutes les stations de radio FM ne transmettent pas nécessairement
des informations RDS. Si le signal RDS est trop faible, le texte affiché peut être entaché
d’erreurs. Vous pouvez essayer d’améliorer ceci en déplaçant l’antenne. La nature des
informations RDS est déterminée par la station de radio.
66 – FRANÇAIS
Page 67

Positionnement
Placez vote Albergo+ sur une surface plate et stable. Pour une ventilation correcte et une
bonne reproduction des basses, évitez d’obstruer l’évent arrière. Le Albergo+ n’est pas
magnétiquement blindé et doit en conséquence être positionner au minimum à 127 mm
d’un ordinateur ou d’un téléviseur. Le positionnement dans une bibliothèque, un meuble
ou près d’un mur peut augmenter les basses et rendre le son désagréable.
Entretien
N’utilisez jamais de produit ou de chiffon corrosif. Le revêtement est très sensible aux
produits de nettoyage.
Garantie
Tivoli Audio fabrique des produits de très grande qualité et nous vous assurons que nos
produits fonctionneront correctement. Si nécessaire, nous offrons à l’acquéreur initial une
garantie limitée sur ce produit contre les défauts de fabrication au niveau des matériaux et
de la main d’oeuvre. Cette garantie est non transférable.
Les produits achetés dans l’Union européenne et en Norvège sont sous couvert d’une
garantie minimale de deux ans. Pour les pays où la garantie minimale est déterminée par
la loi, les termes de la garantie sont applicables selon la période légale requise. Pour tout
autre emplacement géographique, la garantie dure un an.
Cette garantie limitée couvre le fonctionnement du produit dans le cadre d’une utilisation
normale telle que celle prévue par le manuel de l’utilisateur. Elle ne couvre pas les disfonctionnements ou les dommages provenant d’une mauvaise utilisation ou installation,
de l’utilisation du chargeur pour recharger les piles alcalines, d’équipements auxiliaires
défectueux, d’une réparation non autorisée, de dégâts ou d’une perte lors du transport
du produit, d’une détérioration, d’une utilisation avec une tension/un courant non adapté,
d’une surtension, de la foudre ou autre cas de force majeure, d’une humidité excessive,
d’un degré d’usure normal, d’une utilisation commerciale ou d’un achat à des revendeurs
non autorisés. Il peut être nécessaire de fournir une preuve d’achat indiquant que le
produit a bien été acquis chez un revendeur certifié pour bénéficier de la garantie.
Veuillez contacter le point de vente ou le distributeur local pour tout service ou toute réparation couverte par la garantie.
Veuillez éviter d’ouvrir ce produit ou d’en détacher les composants sous peine d’annuler la
garantie limitée. Les composants internes de produit ne sont pas réparables par l’utilisateur.
Tivoli Audio ne prendra pas à sa charge les frais induits en cas de correction d’un problème
de réception, pour l’élimination du bruit/bruit de fond, de retard, de gêne, de perte fonctionnelle du produit, ou de dommage causé par une mauvaise utilisation du produit.
Si le produit devait être renvoyé au cours de la période de garantie et que cette dernière
couvre la maintenance nécessaire, nous réparerons ou remplacerons toute pièce
défectueuse dans des délais raisonnables et sans frais.
CETTE GARANTIE LIMITÉE VOUS CONFÈRE DES DROITS LÉGAUX SPÉCIFIQUES
SUJETS À DES CONDITIONS DÉFINIES. D’AUTRES DROITS LÉGAUX S’APPLIQUANT
AU PRODUIT QUE VOUS AVEZ ACHETÉ PEUVENT ÉGALEMENT VOUS ÊTRE CONFÉRÉS. CES DROITS LÉGAUX VARIENT D’UN PAYS À L’AUTRE. CERTAINS PAYS
INTERDISENT L’EXCLUSION, LA RESTRICTION OU LA MODIFICATION DE CERTAINS
DROITS TACITES OU DE LEURS EFFETS. DANS CE CAS, CETTE GARANTIE LIMITÉE NE
S’APPLIQUERA QUE DANS LA MESURE OÙ LA LOI APPLICABLE LE PERMET.
67 – FRANÇAIS
Page 68

Les lois de votre pays peuvent vous permettre d’exercer une réclamation légale contre le
vendeur ou le fabricant de ce produit. Cette garantie limitée n’affecte en rien ces droits.
Les dispositions légales de cette garantie limitée prévalent sur les autres garanties ou
conditions, exception faite de celles prévues par la loi. Cette garantie limitée n’affecte
aucun droit légal qui vous est conféré par la loi et ne constitue aucun obstacle aux actions
légales auxquelles vous pouvez recourir.
Dans les pays où la limite de responsabilité n’est pas affectée par la loi, la responsabilité
maximale de Tivoli Audio ne dépasse pas le prix de vente de ce produit. Dans les pays où
la limite de responsabilité est affectée par la loi, Tivoli Audio ne peut être tenu responsable
que dans les cas de dommages directs à la personne et/ou à la propriété personnelle
réelle provenant d’une négligence de Tivoli Audio.
Si la loi ne l’interdit pas, Tivoli Audio ne saurait être reconnu responsable en cas de dommages
spéciaux, accessoires, accidentels ou indirects. Certaines zones géographiques n’autorisent
pas la limite sur l’exclusion ou la limitation des dommages spéciaux, accessoires, accidentels
ou indirects, ou la limite de responsabilité relative aux quantités définies. Le cas échéant, les
limites ou exclusions précédemment mentionnées ne s’appliquent pas à votre cas.
Cette garantie limitée est annulée si l’étiquette où figure de numéro de série a été retirée
ou abimée.
Si vous avez acquis auprès de votre point de vente un contrat de maintenance prolongé et
qu’une maintenance est nécessaire une fois la période de garantie terminée, veuillez contacter le fournisseur de votre contrat de maintenance prolongé pour pouvoir en bénéficier.
Caractéristiques
Modèle: Tivoli Audio Albergo+
Type: Radio réveil RNT (DAB/DAB+/DMB) et FM
avec technologie sans fil Bluetooth
Haut-parleur: 76,2mm (3") d'attaque pleine gamme
Gamme de réception: FM: 87,5 – 108 MHz
DAB (Bande III)
DAB+/DMB: 174 – 240 MHz
(Les plages de réception varient selon les régions)
Alimentation: 12VDC nominal – 15VDC maximum, 1500mA
Alimentation: Tivoli Audio 1.5A- CE
Désaccentuation: 50uSec or 75uSec (selon votre région)
Dimensions (l x h x p): 110 mm H x 186 mm W x 129 mm D
(4,34"H x 7,32"W x 5,22"D)
Poids: 1,0 kg (2,2 lbs.)
Tivoli Audio se réserve le droit de modifier ses produits sans préavis. Tivoli Audio, les logos Tivoli Audio,
Albergo, Albergo+ et Albergo Speaker sont des marques déposées, propriétés de Tivoli Audio LLC.
Produits et design protégés par des brevets. La marque Bluetooth et les logos sont des marques déposées
appartenant à Bluetooth SIG, Inc et toute utilisation de ces marques par Tivoli Audio est sous licence. iPod,
iPod touch, iPhone, et iPad sont des marques d’Apple Inc. déposées aux États-Unis et dans d’autres pays.
68 – FRANÇAIS
Page 69

DAB/DAB+/DMB/FM Clock Radio
INDICE
Importanti Istruzioni Di Sicurezza ..................................................................................... 70
Istruzioni Albergo+; A Proposito Di Tivoli Audio ............................................................... 73
Guida Alle Caratteristiche (Pannello Anteriore) ................................................................ 73
Guida Alle Caratteristiche (Pannello Posteriore)............................................................... 75
Telecomando .................................................................................................................... 76
Menu Digital Radio / FM / Auxiliary .................................................................................. 77
Come impostare l'allarme ................................................................................................ 80
Opzioni dell'allarme .......................................................................................................... 80
Operazioni Bluetooth ........................................................................................................ 81
Digital Radio/FM Ricezione; RDS; Posizione; Pulizia ....................................................... 82
Garanzia Limitata.............................................................................................................. 83
Specifiche Tecniche.......................................................................................................... 85
69 – ITALIANO
Page 70

Importanti Istruzioni Di Sicurezza
1. Leggete queste istruzioni.
2. Conservare queste istruzioni.
3. Rispettare tutte le avvertenze.
4. Seguite tutte le istruzioni.
5.
ATTENZIONE – Rischio di esplosione della batteria se sostituita in modo errato.
Sostituire esclusivamente con una batteria di tipo uguale o equivalente.
6. AVVERTENZA: non esporre le batterie a un calore eccessivo, ad esempio al sole, al
fuoco o simili.
7.
AVVERTENZA: NON INGERIRE LA BATTERIA, RISCHIO DI USTIONI CHIMICHE. Il
telecomando fornito con il prodotto contiene una pila a bottone. Se la pila a bottone
viene ingoiata, potrebbe comportare gravi ustioni interne in sole 2 ore, causando la
morte. Tenere le batterie, nuove e usate, lontano dai bambini. Se il vano batteria non si
chiude saldamente, interrompere l'uso del prodotto e tenerlo lontano dalla portata dei
bambini. Se si ritiene che le batterie siano siate ingerite o introdotte in qualsiasi altra
parte del corpo, consultare immediatamente un medico.
8. ATTENZIONE - Per ridurre il rischio di shock elettrici, non esponete questo prodotto
alla pioggia o all’umidita.
9. Pulire solo con un panno asciutto.
10.
Non bloccare le aperture di ventilazione. Installare secondo le istruzioni del produttore.
11.
Non installare vicino a fonti di calore come radiatori, termosifoni, stufe o altri apparecchi
(inclusi amplificatori) che producono calore.
12. Non annullare l'obiettivo di sicurezza della spina polarizzata o di terra spina. Una spina
polarizzata ha due lame, una più larga dell'altra. Una spina con messa a terra ha due
lame e un terzo polo di terra. La lama larga o le punte terzi sono forniti per la vostra
sicurezza. Se la spina fornita non entra nella presa, consultare un elettricista per la
sostituzione della presa obsoleta.
13. Proteggere il cavo elettrico da calpestamento o pieghe in particolare su spine, spazi
di comodo, punto di uscita dall’apparecchio.
14. Utilizzare solo annessi/accessori specificati dal produttore.
70 – ITALIANO
Page 71

15.
Utilizzate solo il carrello, l’appoggio, il treppiede, o il tavolo specificato
dal produttore, o venduto con il dispositivo. Quando si usa un carrello,
fate prudenza nel movimentare la combinazione di dispositivo e
carrello per evitare infortuni dovuti al rovesciamento.
16. Per maggiore sicurezza, scollegare l’apparecchio dalla presa a muro
in caso di temporali o di non utilizzo per lunghi periodi.
17. Utilizzate il prodotto solo con il tipo di alimentazione indicato sul pannello posteriore.
Per prodotti che usano un alimentatore esterno, utilizzate un alimentatore sostitutivo
esattamente uguale in caso di perdita o danneggiamento dell’originale. Per prodotti
che utilizzano batterie, fate riferimento alle istruzioni nel manuale utente.
18. Scollegate questo prodotto dalla presa a muro e portatelo in riparazione a personale
qualificato se si verifica una delle seguenti condizioni:
a. Quando il cavo di alimentazione o la presa sono danneggiati.
b. Se del liquido è colato o degli oggetti sono caduti sul prodotto.
c. Se il prodotto è stato esposto a acqua o pioggia.
d. Se il prodotto non funziona normalmente seguendo le istruzioni di utilizzo.
e. Se il prodotto è stato fatto cadere o danneggiato in altro modo.
f. Quando il prodotto mostra un importante degrado delle prestazioni.
19.
Quando parti di ricambio sono necessari, assicurarsi che il tecnico abbia utilizzato parti
di ricambio specificate dal produttore o aventi le stesse caratteristiche di quelli originali.
Sostituzioni non autorizzate possono causare incendi, scosse elettriche o altri pericoli.
20.
Al termine di qualsiasi servizio, chiedere al tecnico di eseguire controlli di sicurezza per
confermare il prodotto è in perfette condizioni operative.
21. In caso di rottura dello schermo LCD non toccare il liquido.
22. Tenere il prodotto lontano da fiamme libere come ad esempio candele accese.
23. Non esporre il dispositivo a spruzzi o liquidi colanti. Oggetti contenenti liquidi come
vasi o bicchieri non devono essere collocati sopra il prodotto.
24. La temperatura di utilizzo raccomandata va da 5 °C a 40 °C (41˚ F a 104˚ F).
25.
ATTENZIONE - La rete non venga interrotta in posizione off, ma i circuiti sono
de-alimentati.
26.
L'alimentazione esterna funge da dispositivo di scollegamento e deve essere facilmente
accessibile.
ATTENZIONE: IL APPOSTO ALBERGO+ ANTENNA TELESCOPICA ESTERNA
NON DEVE ESSERE STACCATO.
71 – ITALIANO
Page 72

Questo prodotto può essere riciclato. I prodotti che mostrano questo
simbolo NON devono essere buttati via con i normali rifiuti domestici.
Alla fine della vita utile del prodotto, portatelo in un punto di conferimento designato al riciclo di dispositivi elettrici ed elettronici. Chiedete
al servizio pubblico più vicino a voi informazioni sui punti di riconsegna
e di raccolta.
La Direttiva Europea sui rifiuti di apparecchiature elettriche ed elettroniche (RAEE) è stata realizzata per ridurre drasticamente il volume di
rifiuti interrati riducendo di conseguenza l’impatto ambientale sul pianeta e sulla salute umana. Agite responsabilmente riciclando i prodotti
usati. Se questo prodotto è ancora utilizzabile, prendete in considerazione la possibilità di consegnarlo ad altri o venderlo.
72 – ITALIANO
Page 73

Istruzioni Albergo+
Congratulazioni per il tuo acquisto. Siamo convinti che Albergo+ sia una delle migliori radio
sveglie DAB/DAB+/DMB/FM da tavolo oggi sul mercato. Sappiamo che sei ansioso di
poter ascoltare al meglio la tua nuova radio ma per poter sfruttare appieno le capacità di
questo dispositivo prenditi un po’ di tempo per leggere questo manuale d’uso e le istruzioni
di sicurezza. Non esitare a contattare il tuo rivenditore o Tivoli Audio per qualsiasi dubbio.
Conserva la scatola e l’imballo originale nel caso in cui fosse necessario rispedire indietro la radio dato che i danni di trasporto non sono coperti dalla garanzia di fabbrica.
A nome di tutti noi ti ringraziamo per aver scelto Tivoli Audio e ci auguriamo di goderti al
meglio il tuo Albergo+!
A Proposito Di Tivoli Audio
Tivoli Audio è stata fondata da Tom DeVesto con l’intenzione di dare al consumatore
prodotti di facile utilizzo, dal design elegante e con elevata qualità audio. Come CEO e
capo del dipartimento di ricerca e sviluppo della sua precedente azienda, Cambridge
Soundworks, Tom si è occupato dello sviluppo di molti dei prodotti di home entertainment e multimediali più venduti sul mercato. Ha inoltre occupato posizioni chiave per lo
sviluppo prodotto in Advent e Kloss Video.
*Cambridge SoundWorks è un marchio registrato di Creative Labs, Singapore.
Nella confezione del tuo Albergo+ sono inclusi:
• 1 cavo di alimentazione da 9'
• 1 telecomando (batteria installata)
Contatta il tuo rivenditore o Tivoli Audio in caso di mancanza di uno di questi componenti.
Guida Alle Caratteristiche (Pannello Anteriore)
1
4
3
73 – ITALIANO
2
5
6
8
7
Page 74

1. GHIERA DI CONTROLLO MULTIFUNZIONE (ALTO): La ghiera di controllo ha
diverse funzioni:
a. Alimentazione: Quando Albergo+ è spento, premerla per accendere l’unità.
Quando Albergo+ è impostato su qualsiasi sorgente, premerla e tenerla premuta
per spegnere l’unità
b. Volume: Quando Albergo+ è impostato su una qualsiasi fonte, ruotare in senso
orario per aumentare il volume ed in senso antiorario per diminuirlo.
c. Snooze: Premere per attivare la funzione Snooze quando si attiva l’allarme. Sul
display comparirà l’icona quando è attiva la funzione Snooze. La durata della
funzione Snooze è impostata su 10 minuti. Premendo nuovamente il pulsante
Snooze durante la modalità Snooze, il timer della funzione sarà posticipato di 10
minuti. Mentre l'allarme suona, tenere premuto il pulsante Snooze per spegnere
l'allarme e l'unità, oppure premere il rispettivo pulsante di allarmen.
2. LCD:
PMTM
FM AUX
P
P
: (Carattere centrale): ora
AUX: Auxiliary
FM: Banda FM
: Timer funzione Sleep
: Livello segnale
: Modalità Bluetooth
: Timer funzione Snooze
DAB: Banda DAB/DAB+
M: Mono
: Sveglia 1 e 2
PM: Se l'orologio a 12 ore
è selezionato
T: Modalità di regolazione manuale
3. TUNE +/-: In modalità DAB, servirsi di questi pulsanti per visualizzare tutte le stazioni
DAB/DAB+ disponibili. Utilizzare i pulsanti +/- per evidenziare le stazioni specifiche. La
stazione DAB evidenziata si sintonizzerà automaticamente dopo 3 secondi, altrimenti
premere il pulsante Enter sul telecomando. FM: Premere brevemente i pulsanti Tune
+/- per eseguire una Scansione automatica fino alla successiva stazione rilevata. Fare
riferimento a “Scansione automatica” nella sezione “Menu FM” per scoprire come
disabilitare la Scansione Automatica e sintonizzare manualmente le stazioni.
4.
SLEEP: Premere ripetutamente per impostare il tempo di riproduzione della radio prima
dello spegnimento automatico, oppure premere il pulsante Select sul telecomando per
selezionare tale durata. Una piccola icona a orologio indicherà sul display che la
funzione Sleep è attiva. Per annullare la funzione Sleep, premere il pulsante Sleep fino
a quando il display mostra la scritta “Off”.
5.
BLUETOOTH: Premere per entrare nella modalità Bluetooth. Per ulteriori informazioni, si
veda la sezione “Operazioni Bluetooth”. Tenere premuto il pulsante Bluetooth per cancellare
la memoria di tutti i dispositivi associati. Il display visualizzerà “Memoria cancellata”.
74 – ITALIANO
Page 75

6. SOURCE: Premere per modificare le sorgenti.
7.
8.
ALARM 1 AND 2 (ALARM 1 E 2: Premere per regolare l'orario di sveglia desiderato
relativo a ciascun allarme e impostare automaticamente l'allarme di sveglia.
MANOPOLA DELL'ALLARME: Dopo aver premuto il pulsante Alarm, ruotare la
manopola per regolare l'ora e spingere per confermare. Successivamente, eseguire
la stessa operazione con i minuti e premere la manopola al termine, altrimenti l'orario
dell'allarme sarà automaticamente impostato dopo 3 secondi. L'allarme sarà impostato
sulla sveglia. L'orario di sveglia di ciascun allarme è mostrato sul display. Premere
nuovamente il rispettivo pulsante Alarm per annullare l'allarme. Consultare anche la
sezione "Impostare l'allarme mediante il Menu principale" per altre importanti
informazioni relative alle impostazioni dell'allarme.
Guida Alle Caratteristiche (Pannello Posteriore)
2
5
4
1
3
1.
12VDC/1500mA: Questa alimentazione deve essere impiegata per far funzionare
Albergo+ utilizzando l'alimentatore esterno incluso. Utilizzare solo l'alimentatore
fornito con il presente prodotto. Qualora l'alimentatore fosse danneggiato o non
appropriato, utilizzare esclusivamente ricambi simili. Qualsiasi adattatore DC utilizzato
deve soddisfare i requisiti EN/IEC 60065 e deve essere alimentato a 12VDC 1500mA
e 230V 50Hz (a seconda dei requisiti di alimentazione della propria regione). L'utilizzo
di un adattatore DC non raccomandato dal produttore o che non rispetta le presenti
specifiche potrebbe costituire un rischio per la sicurezza. Il connettore è da 5,5 mm/2,1
mm con il centro positivo. Il surriscaldamento dell'alimentatore durante l'uso è normale.
2.
ANTENNA ESTERNA: Un'antenna telescopica esterna è montata all'ingresso e
non deve essere rimossa. Regolare per ottenere una migliore ricezione. Per ulteriori
informazioni, consultare la sezione “Digital Radio/FM Ricezione”.
3. USCITA CUFFIE: Collegare le cuffie (non incluse) a questa uscita variabile stereo per
ascolto privato. L’utilizzo di cuffie blocca la riproduzione degli altoparlanti primari. Il
volume delle cuffie si regola utilizzando la ghiera di controllo col telecomando. Questa
uscita stereo è adatta ad un connettore stereo mini da 3.5 mm. Evita di utilizzare le cuffie
a volume troppo alto per evitare danni all’udito.
4. AUX IN: Per ascoltare l’audio proveniente da un altro dispositivo come ad esempio
Model CD di Tivoli Audio, un lettore MP3 o una tv collegare l’uscita del suddetto
dispositivo audio a questo ingresso e modificare la sorgente per la funzione Auxiliary.
75 – ITALIANO
Page 76

Questo ingresso stereo accetta un connettore stereo mini da 3.5mm. Si noti: che
potrebbe essere necessario regolare diversamente il volume per un dispositivo
ausiliario rispetto al volume utilizzato per l’ascolto della radio.
5.
Speaker: Collegare il cavo RCA dall’altoparlante opzionale Tivoli Audio Albergo Stereo
Speaker alla presa di uscita RCA. Assicurarsi che l’impostazione Stereo/Mono sia
impostata su Stereo utilizzando il tasto Mono sul telecomando. Verificare che sul display
non sia visualizzata la “M” di mono.
Guida Alle Caratteristiche (Telecomando)
1.
POWER: Premere brevemente
per accendere Albergo+. La
radio si accenderà sull’ultima
sorgente utilizzata. Premere
nuovamente per spegnere
Albergo+.
2.
MUTE/SNOOZE: Premere
questo ta sto per eliminar e l’audio
(l’icona lampeggia) mentre
l’unità e riproduzione; premere
nuovamente i tasti di regolazione del volume per ripristinare
la riproduzione audio. Premere
per interrompere un allarme per
10 minuti dopo che questo si è
attivato. Sul display comparirà
l’icona quando la funzione
Snooze è attiva. La durata dello
Snooze non è regolabile. Premendo nuovamente il pulsante
Snooze durante la modalità
Snooze, il timer della funzione
sarà posticipato di 10 minuti.
3. ALARM: Utilizzare i tasti pq e Select per regolare ed impostare gli allarmi. Please also
see “How to Change Alarm Settings and Set the Alarm Via the Main Menu” for additional
very important Alarm settings.
4.
SLEEP: Premere ripetutamente per impostare il tempo di riproduzione della radio prima
dello spegnimento automatico, oppure premere il pulsante Select sul telecomando per
selezionare tale durata. Una piccola icona a orologio indicherà sul display che la
funzione Sleep è attiva. Premere di nuovo per cancellare la funzione sleep.
5. SOURCE: Premere per modificare le sorgenti.
6.
INFO: Premere ripetutamente per visualizzare le informazioni dell’impostazione di base.
7.
PRESETS 1-5: Premere e tenere premuto per salvare la stazione al momento in riproduzione.
Premere brevemente per richiamare la stazione associata alla memoria specifica. Il numero
di preselezione viene indicato sul display. Sono presenti 5 preselezioni per ogni banda.
8. VOLUME +/–: Premere il tasto + per aumentare il volume o il tasto - per abbassarlo.
Se la riproduzione audio risulta distorta abbassare il volume per evitare di danneggiare
gli altoparlanti. Regolare il volume quando Albergo+ è in modalità mute deseleziona
questa opzione.
11
13
4
2
3
8
5
1
6
7
9
12
10
76 – ITALIANO
Page 77

9.
pq/TUNE +/-: Premere per regolare gli elementi del menu all'interno del Menu.
In modalità DAB, servirsi di questi pulsanti per visualizzare tutte le stazioni DAB/
DAB+ disponibili. Utilizzare i pulsanti pq per evidenziare le stazioni specifiche. La
stazione DAB evidenziata si sintonizzerà automaticamente dopo 3 secondi, altrimenti
premere il pulsante Enter sul telecomando. FM: Premere brevemente i pulsanti Tune
+/- per eseguire una Scansione automatica fino alla successiva stazione rilevata. Fare
riferimento a “Scansione automatica” nella sezione “Menu FM” per scoprire come
disabilitare la Scansione Automatica e sintonizzare manualmente le stazioni.
10. tu: Premere questi tasti per navigare avanti e indietro nel menù.
11.
MENU/SELECT: Premere per accedere al menù principale e per selezionare le
voci all’interno del menù. Per ulteriori informazioni, consultare le seguenti sezioni
contrassegnate con “Menu” relative ai menu DAB, FM, e Auxiliary.
12.
MONO: Premere per modificare le impostazioni Stereo/Mono. Sul display sarà
visualizzata la “M” di mono. Questa impostazione interessa anche l'uscita delle cuffie.
Per ulteriori informazioni, consultare la sezione “Digital Radio/FM Ricezione”.
13. BACK: Premere per tornare alla pagina precedente del menu.
Nota: Con Albergo+ in standby, è possibile regolare la retroilluminazione del display senza
accendere Albergo+ e accedere al menu. Premere due volte il pulsante p sul telecomando per disattivare la retroilluminazione. Premere il pulsante p sul telecomando per
attivare la retroilluminazione per 10 secondi. Premere altre due volte il pulsante p sul
telecomando per ripristinare la retroilluminazione.
Menu Digital Radio (DAB/DAB+)
In modo DAB, tenere premuto tenere premuto il pulsante Menu del telecomando per
accedere al menu principale. Usare i tasti pq e il pulsante Select del telecomando, per
aggiornare gli elementi del menu. Utilizzare il pulsante Back per tornare indietro.
L'asterisco (*) indica che l'elemento visualizzato nel menu è attualmente impostato.
Note: Dopo essere entrati in modalità Digital radio, se l'Elenco delle stazioni risulta vuoto
si avvia la scansione automatica.
Note: Se non viene intrapresa alcuna azione per nove secondi, il Menu principale si
disconnetterà.
1.
RICERCA AUTOMATICA: Ricerca sull’intera gamma di frequenze. Se spostate il
Albergo+ in un’altra località, allora dovete realizzare una nuova ricerca in modo che la
radio trovi le stazioni nella nuova zona. TPer annullare la scansione automatica, premere
il pulsante Back sul telecomando.
2. TIVOLI EQ: Premere il pulsante Select e utilizzare i pulsanti pq e Select per regolare i
Bassi e gli Alti. I valori regolati saranno mostrati in “User EQ”. Premere il pulsante Select
per attivare o disattivare il Loudness. L'attivazione del Loudness è consigliata quando
l'ascolto avviene a bassi livelli di volume, poiché aumenta le frequenze alte e basse
favorendo un suono più naturale. Utilizzare i pulsanti pq e Select per attivare una delle
impostazioni della preselezione EQ. La scelta di una preselezione EQ sostituirà qualsiasi
modifica effettuata alle impostazioni dei Bassi e degli Alti, mentre non interesserà il
Loudness. “Flat” EQ ripristina le impostazioni audio ai valori di fabbrica, quindi i Bassi
e gli Alti saranno reimpostati a zero. Inoltre, “Flat” EQ ripristina l'opzione Loudness Off.
Tuttavia, se i Bassi e gli Alti sono stati regolati, le impostazioni saranno ancora visualizzate
in “User EQ”. Selezionando “User EQ”, le impostazioni di Bassi e Alti saranno riattivate.
Nella pagina del menu EQ, i numeri sul lato destro indicano le impostazioni di bassi e alti.
77 – ITALIANO
Page 78

3.
SINTONIZZAZIONE MANUALE: Premere i pulsanti per sintonizzare manualmente
le frequenze specifiche DAB/DAB+. La stazione DAB evidenziata si sintonizzerà
automaticamente dopo 3 secondi, altrimenti premere il pulsante Enter sul telecomando.
4.
DRC: Il Dynamic Range Control permette di cambiare il livello sonoro per alzare il
volume durante passaggi quieti, oppure quando si ascolta a basso volume.
5. IMPOSTAZIONI (A-F):
A. ALLARME: Consultare la sezione “Impostare l'allarme mediante il Menu principale”.
B. ORA
Impostazione data/ora: Premere il pulsante Select e utilizzare i pulsanti pq e Se-
lect per regolare l'ora e i minuti. Impostare la funzione Auto update su “No update”.
Per ulteriori informazioni, fare riferimento alla sezione “Auto update” seguente.
Auto Update: Premere il pulsante Select e utilizzare i pulsanti pq e Select
per scegliere tra le opzioni “Update from any”, “Update from DAB”, o “Update from FM” (RDS). Affinché tutti gli aggiornamenti automatici funzionino, è
necessaria una ricezione DAB o FM RDS costante con un segnale ora/data.
L'aggiornamento dell'orologio potrebbe richiedere un minuto o più. Tivoli Audio
non è responsabile delle informazioni inesatte di ora/data fornite dal segnale di
aggiornamento automatico. Per impostare manualmente l'orologio, selezionare
“No Update”, e poi “Set Time/Date” nel menu “Time” utilizzando i pulsanti pq
,e poi il pulsante Select per regolare l'ora. Ripetere l'operazione per regolare i
minuti e premere Select per salvare.
Impostazione formato 12/24: Premere il pulsante Select e utilizzare i pulsanti
e Select per scegliere il formato dell'orologio a 12 o 24 ore.
Impostazione formato data: Premere il pulsante Select e utilizzare i pulsanti
pq e Select per scegliere il formato data preferito.
C. RETROILLUMINAZIONE:
Timeout: Il livello di retroilluminazione può essere costante indipendentemente
dall'utilizzo dei comandi di Albergo+ (configurazione di fabbrica di Albergo+),
oppure è possibile personalizzare la retroilluminazione affinché passi automaticamente all'impostazione “Dim level” dopo un certo periodo di tempo durante il
quale i comandi non sono stati utilizzati. Quando il comando sull'unità o sul telecomando è premuto, il normale livello di retroilluminazione è ripristinato. Premere
Select e utilizzare i pulsanti pq e Select per impostare la quantità di tempo che
impiegherà la retroilluminazione per passare al livello meno intenso tra 10, 20
,30, 45, 60, 90, 120, o 180 secondi, o per disattivare la funzione timeout.
On Level: Premere Select e utilizzare i pulsanti pq e Select per scegliere
l'intensità della retroilluminazione.
Dim Level: Se in “Timeout” è stato selezionato un tempo di passaggio
all'impostazione più debole della retroilluminazione, premere Select e utilizzare i
pulsanti pq e Select per determinare l'intensità della retroilluminazione quando
si passa a tale impostazione.
D. LINGUA: Premere Select e utilizzare i pulsanti pq e Select per impostare la lingua.
E. REIMPOSTAZIONE DEI VALORI DI FABBRICA: Premere Select e usare i
pulsanti pq o tu sul telecomando per confermare (Si) o rifiutare (No) la reim-
postazione dei valori di fabbrica. Questa operazione cancellerà tutte le vostre
impostazioni personalizzate come i Preset. Consultare anche la sezione “Digital
Radio/FM Ricezione”.
78 – ITALIANO
Page 79

F. ID: Premere Select per visualizzare l'ID. Qualora si contattasse il distributore o
Tivoli Audio per porre una domanda, potrebbe essere richiesto il numero che
compare in questo campo.
Menu FM
In modalità FM, tenere premuto il pulsante Menu/Select sul telecomando per entrare nel
menu principale. Utilizzare i pulsanti pq e Select per cambiare gli elementi all'interno del
menu. Utilizzare il pulsante Back per tornare indietro. L'asterisco (*) indica che l'elemento
visualizzato nel menu è attualmente impostato.
Nota: Se non viene intrapresa alcuna azione per nove secondi, il Menu principale si
disconnetterà.
1.
IMPOSTAZIONI SCANSIONE: Premere Select e utilizzare pq e il pulsante Select per
scegliere tra “Strong stations only” o “All stations” durante la scansione automatica
(fare riferimento a 9 ( pq/Tune +/-) nella sezione “Telecomando”. La selezione di “All
stations” aumenta la sensibilità della scansione, che potrebbe causare interruzioni della
ricerca automatica in caso di interferenze.
2. SCANSIONE AUTOMATICA (NON NEI MENU AUX): Premere Select e utilizzare pq e il
pulsante Select per scegliere tra “Strong stations only”, “All stations” oppure “Off” durante
la scansione automatica (fare riferimento al punto 9 (Tune +/-) nella sezione “Telecomando”).
La selezione di “All stations” aumenta la sensibilità della scansione, che potrebbe causare
interruzioni della ricerca automatica in caso di interferenze. Selezionando “Off”, la Scansione
automatica sarà interrotta e sarà possibile sintonizzare manualmente le stazioni.
RDS: Premere il pulsante Select e utilizzare i pulsanti pq e Select per scegliere se abilitare
3.
o disabilitare il testo FM RDS. Per ulteriori informazioni, fare riferimento alla sezione “RDS”.
4. TIVOLI EQ: Fare riferimento alla descrizione nel “Menu Digital Radio”.
5. IMPOSTAZIONI: Fare riferimento alla descrizione nel “Menu Digital Radio”.
Menu Auxiliary
In modalità Auxiliary, tenere premuto il pulsante Menu/Select sul telecomando per entrare
nel menu principale. Utilizzare i pulsanti pq e Select per cambiare gli elementi all'interno
del menu. Utilizzare il pulsante Back per tornare indietro. L'asterisco (*) indica che
l'elemento visualizzato nel menu è attualmente impostato.
Nota: Se non viene intrapresa alcuna azione per nove secondi, il Menu principale si disconnetterà.
1. TIVOLI EQ: Fare riferimento alla descrizione nel “Menu Digital Radio”.
2. ALARM 2: Se non è previsto l'utilizzo della seconda sveglia Alarm 2 o se si teme che
Alarm 2 possa essere impostata in modo errato, premere il pulsante Select e utilizzare
i pulsanti pq e Select per disattivare la seconda sveglia Alarm 2.
3. IMPOSTAZIONI: Fare riferimento alla descrizione nel “Menu Digital Radio”.
4. LIMITE VOLUME: Se si desidera ridurre il livello massimo di volume in modo da non
disturbare gli altri, premere il pulsante Select e utilizzare i pulsanti pq e Select per
scegliere tra il limite di Volume 26 o 22. La selezione di “Off” mantiene il livello massimo
a 30, il valore di fabbrica. Si noti che la riduzione del volume generale ridurrà anche il
volume di riproduzione dell'allarme.
79 – ITALIANO
Page 80

5.
LIVELLO BLUETOOTH: Utilizzare i pulsanti pq e Select per selezionare “Basso” se si
desidera ridurre la portata del segnale Bluetooth. Quest’operazione è opportuna se la
funzione Bluetooth è utilizzata solamente quando ci si trova nelle immediate vicinanze
della radio. Consigliamo di lasciare questa impostazione sulla posizione “Normale”.
Modificare le impostazioni dell'allarme e impostare
l'allarme mediante il Menu principale
1.
Con Albergo+ alimentato, accedere alle impostazioni dell'allarme mediante il menu
principale in modalità DAB, FM, o Aux tenendo premuto il pulsante Menu del telecomando. Nel Menu, selezionare “Settings” e “Alarm”
2.
Il primo viene visualizzato l’allarme 1.Utilizzare pq e Select per scegliere tra Alarm1 e Alarm2.
Nota: è sempre possibile navigare all’interno del menù della sveglia utilizzando i tasti tu.
3. Utilizzare pq e il tasto Select per attivare disattivare la sveglia.
4.
Utilizzare pq e impostare/modificare l’ora puoi premere Select. ripetere questa
procedura per impostare/modificare i minuti, fseguito da AM/PM (se l'ora è impostata
nel formato 12 ore), poi premere Select.
5. Utilizzare i tasti pq e Select per impostare la sorgente con la quale si desidera essere
svegliati. Se si imposta la sorgente DAB (incluso DAB+) o FM, utilizzare i pulsanti
per selezionare le preselezioni delle stazioni (se memorizzate) o le stazioni ascoltate
recentemente e premere Select.
6. Utilizzare pq e Select per impostare la programmazione dell’allarme (la frequenza con
cui si vuole essere svegliati).
7.
Infine utilizzare i tasti pq per impostare il volume della sveglia. Per garantire la presenza
del suono quando si attiva l’allarme, il livello di volume dell’allarme non può essere
impostato al di sotto del livello minimo. Inoltre, se attivata, la funzione “Limite di volume”
del Menu Auxiliary inciderà sul volume dell’allarme.
8. Ripetere questa procedura per impostare la seconda sveglia Alarm 2.
Se si compie un errore in qualsiasi momento del processo, premere il pulsante Back sul
telecomando e ricominciare
Nota: Le impostazioni saranno salvate quando tutto il processo sarà completato e se il
display mostrerà la scritta “Alarm Saved.
Nota: Se si imposta la sorgente dell'allarme su DAB e le stazioni preselezionate o ascoltate
recentemente non sono disponibili quando l'allarme suona, l'allarme passerà automaticamente al segnale acustico.
Mancanza di corrente: in caso di mancanza di alimentazione o se Albergo+ viene scollegato l’orario della sveglia viene salvato ma Albergo+ non potrà attivare la sveglia se non
viene ripristinata l’alimentazione.
Le Opzioni Della Sveglia
Il volume dell'allarme aumenta gradualmente. Quando l'allarme suona, è possibile attivare
la funzione Snooze o spegnere l'allarme.
Snooze: Per attivare la funzione Snooze quando la sveglia suona premere il tasto Snooze
o premere brevemente la ghiera di controllo multifunzione in alto sull’unità. La durata dello
Snooze non è regolabile. Premendo nuovamente il pulsante Snooze durante la modalità
Snooze, il timer della funzione sarà posticipato di 10 minuti. Quando l'allarme suona,
80 – ITALIANO
Page 81

tenere premuta la rotella superiore della funzione Snooze per spegnere l'allarme e l'unità,
oppure premere il rispettivo pulsante di allarme.
Alarm Off: Per spegnere la sveglia premere il tasto Alarm o Power sul telecomando o
premere e tenere premuta la ghiera multifunzione in alto sull’unità.
Attivazione rapida dell'allarme: Con Albergo+ in Standby, premere ripetutamente e brevemente il pulsante di allarme sul telecomando per attivare o disattivare ciascun allarme.
Operazioni Bluetooth
Accendere la Albergo+ nella posizione di ingresso ausiliario. Questa operazione attiva
il Bluetooth. Alzare il volume di circa ¼ per iniziare. Aumentare il volume sul dispositivo
sorgente (il dispositivo da cui si sta effettuando lo streaming).
1.
Premere il pulsante Bluetooth del pannello frontale di Albergo+ oppure cambiare la
sorgente su Bluetooth. Alzare il volume di circa ¼ per iniziare. Aumentare il volume sul
dispositivo sorgente (il dispositivo da cui si sta effettuando lo streaming).
2. Attivare la tecnologia wireless Bluetooth sul dispositivo abilitato.
3.
Iniziare la ricerca e selezionare “Tivoli Bluetooth (Not Accoppiato)” quando questo
messaggio appare sullo schermo del tuo dispositivo. Alcuni dispositivi possono
richiedere un PIN. In tal caso, inserire “0000”. “Tivoli Bluetooth” cambierà da “Non
Accoppiato” a “Connesso”.
4.
Sentirete un tono dalla Albergo+ a conferma del collegamento e si potrà iniziare a riprodurre
i vostri file musicali in modalità senza fili. Regolare il livello del volume del dispositivo.
Non dovrebbe essere necessario accoppiare lo stesso dispositivo un’altra volta. In
base al dispositivo utilizzato, potrebbe essere necessario effettuare più tentativi di
Accoppiamento e/o Connessione del Albergo+. Concedere al dispositivo il tempo
necessario per l’Accoppiamento o la Connessione prima di ripetere il procedimento.
Abbinamento Di Un iPhone/iPod Touch/iPad, Ablitato Alla
Tecnologia Wireless Bluetooth
1.
Premere il pulsante Bluetooth del pannello frontale di Albergo+ oppure cambiare la
sorgente su Bluetooth. Alzare il volume di circa ¼ per iniziare. Aumentare il volume sul
dispositivo sorgente (il dispositivo da cui si sta effettuando lo streaming).
2.
Selezionare “Impostazioni” (secondo la versione software installata sul proprio dispositivo).
3. Selezionare “Generali”.
4. Selezionare “Bluetooth”.
5. Attivare Bluetooth per avviare la ricerca.
6.
Selezionare “Tivoli Bluetooth (Non Abbinato)” quando appare sul display. Se viene
richiesto di immettere un PIN, immettere “0000”. “Tivoli Bluetooth” cambierà da “Not
Connesso” a “Connesso”.
7.
Sentirete un tono dalla Albergo+ a conferma del collegamento e si potrà iniziare a riprodurre
i vostri file musicali in modalità senza fili. Regolare il livello del volume del dispositivo. Non
dovrebbe essere necessario accoppiare l’iPhone / iPod / iPad un’altra volta.
Il livello di uscita del volume dei file musicali varia. Se si preferisce un livello di uscita più
elevato, controllare le impostazioni del vostro iPhone / iPod touch / iPad: Impostare EQ
Off, SoundCheck Off, e il limite di volume Off.
81 – ITALIANO
Page 82

Se dovesse incontrare un problema, premere la piccola freccia a destra di “Tivoli Bluetooth”
sul suo iPhone / iPod touch / iPad display e selezionare “Ignora questo dispositivo”, quindi
ripetere la procedura di abbinamento. In base al dispositivo utilizzato, potrebbe essere
necessario effettuare più tentativi di Accoppiamento e/o Connessione del Albergo+.
Concedere al dispositivo il tempo necessario per l’Accoppiamento o la Connessione
prima di ripetere il procedimento.
Durante lo streaming musicale, è possibile premere la freccia blu a destra del pulsante >>/
prossima traccia / su iPhone / iPod touch / iPad display per alternare tra l'iPhone / iPod /
iPad e Bluetooth.
NOTA:
• La Albergo+ ricorderà le informazioni di associazione per un massimo di 8 dispositi-
vi. Dispositivi aggiuntivi possono essere accoppiati, ma il dispositivo utilizzato meno
di recente sarà sostituito dall’ultimo dispositivo abbinato.
• Se l'audio si sente a tratti o si arresta durante la riproduzione, spostare il dispositivo
in una posizione più vicina alla Albergo+, o controllare per essere sicuri che un altro
dispositivo senza fili non interferisca con il segnale.
• Quando si passa dal Bluetooth al AM o FM, potrebbe essere necessario regolare di
nuovo il volume della radio.
Digital Radio/FM Ricezione
L’antenna insieme esterna consente una buona ricezione. Nelle località in cui il segnale FM
è forte, la riduzione della lunghezza dell'antenna potrebbe consentire una migliore ricezione.
Se si utilizza Albergo+ insieme all’altoparlante opzionale Albergo Stereo Speaker della
modalità stereo e nel caso in cui la riproduzione di stazioni F.M. sia disturbata, premere il
tasto Mono sul telecomando, questo potrebbe rendere l’ascolto della stazione più piacevole. Sul display è visualizzata la “M” quando l'unità si trova in modalità mono.
Gli edifici in cemento, acciaio o alluminio in ibisco dalla ricezione. Le apparecchiature
domestiche, coperte elettriche, computer, lettori CD o altri apparecchi elettronici possono
avere un’influenza negativa sulla ricezione o causare interferenze. In questo caso allontanare Albergo+ dal dispositivo fonte di disturbo o collegarlo ad un’uscita elettrica non
condivisa da altri dispositivi.
Nota: Spostando Albergo+ in un'altra posizione con stazioni DAB differenti da quelle
precedenti, è consigliabile reimpostare i valori di fabbrica e avviare una nuova scansione
per aggiornare l'elenco delle stazioni DAB.
Messaggi DAB Sul Display
Stazioni Secondarie: Le stazioni secondarie saranno indicate con il simbolo >> accanto al
nome della stazione. I servizi secondari potrebbero non essere disponibili nella propria area.
“?”: Se appare questo simbolo vicino al nome della stazione, allora significa che la stazi-
one non è disponibile o attiva.
“Not disponibile”: Visibile quando si sintonizza una stazione con un livello di segnale
insufficiente.
82 – ITALIANO
Page 83

RDS/RBDS (Solo Banda FM)
Il Radio Data System trasmette dati testuali insieme alla trasmissione audio. Non tutte le stazioni FM utilizzano questo servizio, quindi il testo può non essere presente in alcune stazioni.
Per le stazioni che trasmettono in modalità RDS il testo potrebbe non comparire o apparire
disturbato se il segnale troppo debole. In questi casi provare a modificare la posizione del
antenna FM. Se si riceve in RDS, premere ripetutamente il pulsante Info per visualizzare le
informazioni disponibili. Si noti: Contenuto RDS è determinato da ogni singola stazione FM.
Posizione
Collocare Albergo+ su una superficie piana e stabile. Per un’adeguata diffusione dei passi
e per favorire la ventilazione non ostruire la porta dei bassi posteriore. Albergo+ non è
schermato dalle interferenze video e deve essere tenuto almeno a 127mm (5") di distanza
da monitor di computer e televisori. Collocare l’apparecchio in librerie, armadietti o vicino
a pareti o angoli potrebbe influire sui bassi creando un suono innaturale.
Pulizia
Non utilizzare mai detergenti o solventi aggressivi sulla propria radio.
Garanzia Limitata
Tivoli Audio produce i propri prodotti in conformità con i massimi standard qualitativi, riuscendo
in tal modo a garantire prestazioni ottimali per i propri prodotti. Di conseguenza, Tivoli Audio
offre una garanzia limitata per questo prodotto a copertura di eventuali difetti di fabbricazione
dovuti a materiali o esecuzione al proprietario originale. Questa garanzia non è trasferibile.
I prodotti acquistati all’interno dell’Unione Europea e in Norvegia hanno una garanzia
minima della durata di due anni. Per i paesi all’interno dei quali i termini di garanzia minimi
sono determinati dalla legge, il termine di garanzia corrisponde al periodo richiesto dalla
legge. In tutti gli altri paesi, la durata della garanzia corrisponde a un anno.
Questa garanzia limitata copre le funzioni del prodotto nel corso del normale utilizzo previsto ed illustrato all’interno di questo manuale dell’utente. La garanzia non offre alcuna
copertura in merito a malfunzionamenti o danni risultanti dall’uso o dall’installazione
impropri o irragionevoli, l’utilizzo di un caricatore per caricare batterie alcaline, accessori difettosi, modifiche, riparazioni non autorizzate, perdita o danneggiamento durante la
spedizione, maneggiamento negligente, incidenti, utilizzo con tensione/corrente inappropriati, sovratensioni, fulmini o altre cause di forza maggiore, eccessiva umidità, normale
usura e logoramento, utilizzo a fini commerciali, o acquisto da rivenditori non autorizzati. Il
centro assistenza potrebbe richiedere la presentazione di una ricevuta al fine di verificare
che l’unità sia stata acquistata da un rivenditore autorizzato. Contattare il punto vendita
o il proprio distributore locale per manutenzioni coperte dalla garanzia o riparazioni.
Evitare di aprire o smontare questo prodotto, dal momento che tale operazione invaliderebbe questa garanzia limitata. L’interno dell’unità non contiene alcun componente
che richiede la manutenzione da parte dell’utente. Tivoli Audio non coprirà alcun costo
sostenuto risultante dalla correzione di problemi di ricezione, dall’eliminazione di rumore/
cariche statiche generati esternamente o dal danneggiamento di questo prodotto provocato da un uso improprio.
In caso di restituzione del prodotto durante il periodo di validità della garanzia e di copertura ai sensi di questa garanzia limitata, provvederemo a riparare o sostituire i componenti
difettosi entro un periodo di tempo ragionevole, senza costi aggiuntivi.
83 – ITALIANO
Page 84

QUESTA GARANZIA LIMITATA CONCEDE ALL’UTENTE SPECIFICI DIRITTI LEGALI
SOGGETTI A DETERMINATE CONDIZIONI. L’UTENTE POTREBBE INOLTRE USUFRUIRE
DI ALTRI DIRITTI LEGALI APPLICABILI AL PRODOTTO ACQUISITO. QUESTI DIRITTI
LEGALI VARIANO DA UN PAESE ALL’ALTRO. ALCUNI PAESI NON CONSENTONO
L’ESCLUSIONE, LA RESTRIZIONE O LA MODIFICA DI CERTI DIRITTI IMPLICITI O DEI
LORO EFFETTI. IN QUESTE SITUAZIONI, QUESTA GARANZIA LIMITATA SARÀ APPLICABILE SOLO NELLA MISURA CONSENTITA DALLE LEGGI APPLICABILI.
Le leggi di un paese potrebbero fornire all’utente rivendicazioni legali nei confronti del
rivenditore o del produttore di questo prodotto. Questa garanzia limitata non ha alcun
effetto su questi diritti.
Le clausole della garanzia limitata vanno a sostituire eventuali garanzie o condizioni di diversa
natura, con l’eccezione di garanzie e condizioni di natura legale. Questa garanzia limitata non
ha alcun effetto su eventuali diritti legali previsti dalla legge e non preclude alcun ricorso garantito dalla legge.
Nei paesi all’interno dei quali i limiti di responsabilità non sono preclusi dalla legge, la
responsabilità massima di Tivoli Audio non potrà eccedere il prezzo di acquisto corrisposto
dall’utente per il prodotto. Nei paesi all’interno dei quali le limitazioni di responsabilità sono
precluse dalla legge, Tivoli Audio sarà responsabile per un valore complessivo non superiore
ai danni diretti risultanti da lesioni fisiche e/o a proprietà reali o personali provocati dalla
negligenza di Tivoli Audio.
Laddove ciò non è proibito dalla legge, Tivoli Audio non sarà responsabile di danni incidentali, consequenziali o indiretti. Alcuni paesi non consentono limitazioni di esclusione o
limitazione di riparazione, danni speciali, incidentali, consequenziali o indiretti, o limitazione di responsabilità a somme specificate, pertanto le limitazioni ed esclusioni sopracitate
potrebbero non essere applicabili all’utente.
Questa garanzia limitata perde validità in caso di rimozione o illeggibilità dell’etichetta
riportante il numero seriale.
In caso di acquisto di un contratto di assistenza estesa dal proprio rivenditore, se il dispositivo richiede un intervento di manutenzione successivamente al termine del periodo
di validità di questa garanzia limitata, contattare il proprio provider del servizio esteso per
ottenere assistenza.
Per comodità, è possibile registrare il proprio prodotto sul sito del servizio di garanzia online sul nostro sito Web, www.tivoliaudio.com. Non sussiste alcun obbligo legale a fornire
i propri dati personali. Tuttavia, queste informazioni ci permettono di conservare un record
dei prodotti Tivoli Audio acquistati dall’utente e di comprendere meglio gli acquirenti dei
nostri prodotti. Le informazioni raccolte verranno utilizzate a scopo di marketing da Tivoli
Audio e, ove consentito, per contattare gli utenti in merito ai prodotti acquistati o ad altri
prodotti di possibile interesse distribuiti da Tivoli Audio o da altre aziende. Le informazioni
fornite potrebbero essere elaborate in un altro paese.
84 – ITALIANO
Page 85

Specifiche Tecniche
Modello: Tivoli Audio Albergo+
Tipo: DAB/DAB+/DMB/FM
radiosveglia con tecnologia wireless Bluetooth
Drivers: 76,2 mm (3") gamma completa
Bande di ricezione: FM:87.5-108MHz
DAB (Band III)/DAB+: 174-240MHz
(La ricezione varia in base alla regione)
Corrente: 12VDC nominal - 15 VDC maximum, 1500 mA
Alimentazione: Tivoli Audio 1.5A- CE
Riduzione enfasi FM: 50uSec o 75uSec (in base alla regione)
Dimensioni: 110 mm H x 186 mm W x 129 mm D
(4,34"H x 7,32"W x 5,22"D)
Peso: 1,0 kg (2,2 lbs.)
Tutte le specifiche sono soggette a modifiche senza obbligo di preavviso. Tivoli Audio si riserva il diritto
di modificare il prodotto senza preavviso. Tivoli Audio, il logo Tivoli Audio, Albergo, Albergo+ e Albergo
Speaker sono marchi registrati di Tivoli Audio, LLC. Il marchio e il logo Bluetooth sono marchi registrati
di proprietà di Bluetooth SIG, Inc. e qualsiasi utilizzo di tali marchi da Tivoli Audio è sotto licenza. iPod,
iPod touch, iPhone, e iPad sono marchi di Apple Inc., registrati negli Stati Uniti e in altri paesi.
85 – ITALIANO
Page 86

DAB/DAB+/DMB/FM Clock Radio
TABLE OF CONTENTS
Veiligheidsinstructies ........................................................................................................ 87
Instructies; A Proposito Di Tivoli Audio ............................................................................ 90
Bediening (boven- en voorzijde) ....................................................................................... 90
Bediening (achterzijde) ..................................................................................................... 92
Afstandsbediening ............................................................................................................ 93
Menu Digitale radio / FM / Aux ......................................................................................... 94
De wekker instellen .......................................................................................................... 97
Wekkeropties .................................................................................................................... 98
Bluetooth Gebruiken......................................................................................................... 98
Digitale radio/FM Ontvangst; RDS; Plaatsing; Reinigen .................................................. 99
Garantie .......................................................................................................................... 100
Specificaties ................................................................................................................... 102
86 –NEDERLANDS
Page 87

Belangrijke Veiligheidsinstructies
1. Volg deze instructies op.
2. Bewaar deze instructies.
3. Neem alle waarschuwingen in acht.
4. Volg alle instructies op.
5. LET OP - Gevaar voor explosie wanneer de batterij niet correct is geplaatst. Vervang
batterijen uitsluitend met dezelfde of gelijkwaardige batterijen.
6.
WAARSCHUWING: Batterijen mogen niet worden blootgesteld aan bovenmatige hitte,
zoals zonneschijn, brand of soortgelijke omstandigheden.
7.
WAARSCHUWING: DE BATTERIJ NIET INSLIKKEN, RISICO OP CHEMISCHE
BRANDWONDEN. De bijgeleverde afstandsbediening bij dit product bevat een munt-/
knoopcelbatterij. Als de munt-/knoopcelbatterij wordt ingeslikt, kunnen er na slechts 2
uur ernstige interne brandwonden worden veroorzaakt en dit kan leiden tot de dood.
Bewaar nieuwe en gebruikte batterijen uit het zicht en bereik van kinderen. Als het
batterijvakje niet correct kan worden gesloten, gebruik het product dan niet langer en
bewaar het uit het zicht en bereik van kinderen. Als u denkt dat de batterijen werden
ingeslikt of zich in het lichaam bevinden, raadpleeg dan onmiddellijk een arts.
8. WAARSCHUWING - Stel dit apparaat niet bloot aan regen of vocht om het risico van
brand of elektrische schokken te verminderen.
9. Alleen reinigen met een droge doek.
10. De ventilatiegaten niet blokkeren. Installeer het apparaat volgens de instructies van
de fabrikant.
11. Niet installeren in de buurt van hittebronnen, zoals radiatoren, verwarmingsroosters,
ovens of ander apparaten (waaronder versterkers) die warmte afgeven.
12. De veiligheidskenmerken van de gepolariseerde of geaarde stekker niet beschadigen.
Een gepolariseerde stekker heeft twee bladen, waarbij er een breder is dan de ander.
Een geaarde stekker heeft twee pinnen en een derde aardepin. Het brede blad of
de derde pen zijn bedoeld voor uw veiligheid. Als de geleverde stekker niet in uw
stopcontact past, moet u een elektricien raadplegen om het stopcontact te vervangen.
87 –NEDERLANDS
Page 88

13. Bescherm de netkabel, zodat men er niet over kan lopen en hij niet bekneld raakt. Let
vooral op de nabijheid van stekkers, stopcontacten en het punt waar de kabel op het
apparaat is aangesloten.
14. Gebruik alleen aanhangsels/accessoires die worden aangegeven door de fabrikant.
15.
Gebruik alleen met de wagen, standaard, driepoot, beugel of tafel die
worden aangegeven door de fabrikant of die bij het apparaat wordt
verkocht. Bij het gebruik van een wagen moet de wagen/apparaatcombinatie voorzichtig worden verplaatst om letsel door vallen te
voorkomen.
16. Verwijder de stekker van dit apparaat uit het apparaat tijdens onweer
of wanneer het gedurende een langere periode niet wordt gebruikt.
17.
Gebruik dit product uitsluitend in combinatie met het type voeding dat op de achterkant
is aangegeven. Gebruik bij producten met een externe voeding een exacte vervanging
als deze verloren of beschadigd is. Zie de handleiding voor producten met batterijen.
18.
Trek de stekker uit het stopcontact en laat het apparaat door vakkundig personeel
onderhouden onder de volgende omstandigheden:
a. Als het netsnoer of de stekker beschadigd is.
b. Als vloeistof is gemorst of voorwerpen in het apparaat zijn gevallen.
c. Als het apparaat is blootgesteld aan water of regen.
d. Als het product niet normaal werkt volgens de gebruiksaanwijzing.
e. Als het apparaat is gevallen of op andere wijze beschadigd is.
f. Als het apparaat duidelijk anders presteert.
19. Als vervangende onderdelen nodig zijn, moet u controleren of de onderhoudsmonteur
onderdelen heeft gebruikt die door de fabrikant zijn opgegeven of die dezelfde
kenmerken hebben als de oorspronkelijke onderdelen. Ongeautoriseerde vervanging
kan brand, schokken of andere gevaren opleveren.
20.
Na uitvoeren van onderhoud moet u de onderhoudsmonteur vragen om een
veiligheidscontrole uit te voeren ter bevestiging dat het product goed werkt.
21. Zou het display breken, vermijdt dan elk contact met het daarbij mogelijk vrijkomende
vocht.
22. Houd dit apparaat op een veilige afstand van open vuur zoals een aangestoken kaars.
23.
Het apparaat mag niet worden blootgesteld aan druppels of spetters en er mogen geen
objecten gevuld met water, zoals vazen, op het apparaat worden geplaatst.
24. De aanbevolen werktemperatuur ligt tussen 5ºC en 40ºC.
25.
WAARSCHUWING - de hoofdvoeding is niet afgesloten in de uit-stand maar de
bedrading is stroomloos.
26.
De externe voedingsadapter is bedoeld om het apparaat te ontkoppelen en moet
gemakkelijk bereikbaar zijn.
WAARSCHUWING: DE GEMONTEERDE ALBERGO+-ANTENNE IS NIET
BEDOELD OMTE WORDEN LOSGEMAAKT.
88 –NEDERLANDS
Page 89

Dit product kan gerecycled worden. Producten met dit symbool mogen
NIET worden weggeworpen met het normale huisvuil. Aan het eind van
de levensduur van het product moet u het naar een aangewezen verzamelpunt voor elektrische apparatuur brengen. De gemeente kan u meer
informatie verstrekken over deze verzamelpunten.
De Europese richtlijn voor afval van elektrische en elektronische apparaten
(WEEE) is geïmplementeerd om de hoeveelheid afval drastisch te beperken
die naar afvalhopen gaat, waardoor ook de invloed op het milieu en op de
gezondheid beperkt wordt. Ga verantwoordelijk te werk bij het recyclen
van gebruikte producten. Als dit product nog bruikbaar is, overweeg dan
het weg te geven of te verkopen.
89 –NEDERLANDS
Page 90

Albergo+ Instructies
Hartelijk gefeliciteerd met deze aanschaf. Wij zijn ervan overtuigd dat de Albergo+ een van
de beste DAB/DAB+/DMB/FM-wekkerradio’s van dit moment is. Het liefst neemt u uw
nieuwe radio waarschijnlijk direct in gebruik. Toch raden we u beslist aan om eerst deze
handleiding in z’n geheel door te lezen. Heeft u daarna nog vragen, aarzelt u dan niet om
contact met uw dealer op te nemen. Hij is u graag van dienst.
Wij adviseren u om de originele verpakking te bewaren voor het geval u het apparaat
ooit zou moeten versturen. Transportschade valt niet onder de garantie.
Namens alle medewerkers van Tivoli Audio bedanken we u voor uw keuze voor dit product,
we wensen u bijzonder veel plezier met uw Albergo+!
Over Tivoli Audio
Tivoli Audio is opgericht door Tom DeVesto met als doel het leveren van eenvoudig te
gebruiken, elegant ontworpen audio-producten van een hoge kwaliteit aan consumenten.
Als CEO en hoofd onderzoek en ontwikkeling bij zijn vorige bedrijf, Cambridge SoundWorks*, was Tom verantwoordelijk voor de ontwikkeling van een groot aantal van de best
verkopen de home entertainment- en multimediaproducten op de markt. Hij bezette ook
senior management functies voor productontwikkeling bij zowel Advent als Kloss Video.
*Cambridge SoundWorks is een geregistreerd handelsmerk van Creative Labs, Singapore.
Naast de Albergo+ treft u in de verpakking het volgende aan:
• 1 netsnoer (2,74 meter)
• 1 afstandsbediening met geïnstalleerde batterij
Neem contact op met uw leverancier als een of meer van bovengenoemde zaken zou
ontbreken.
Bediening (Boven- En Voorzijde)
1
4
3
90 –NEDERLANDS
2
5
6
8
7
Page 91

1. MULTIFUNCTIONEEL BEDIENINGSWIEL: Met het multifunctionele bedieningswiel aan
de bovenzijde van de Albergo+ heeft u direct toegang tot een aantal belangrijke functies:
a. Aan/uit: Als de Albergo+ uitstaat, drukt u eenmaal op de knop om het toestel
aan te zetten. Om het toestel uit te zetten, houdt u de knop even ingedrukt.
b. Volume: Ongeacht de gekozen klankbron kunt u het volume verhogen door de
knop met de klok mee te draaien. Draait u de knop tegen de klok in, dan verlaagt
u het volume.
c. Sluimerknop: Als de wekker gaat, drukt u de knop eenmaal in om de sluimerfunc-
tie te activeren. Een icoon op het display geeft aan dat deze functie actief is.
De sluimertijd bedraagt 10 minuten. Als u nogmaals op de sluimerknop drukt terwijl
het apparaat nog in de sluimermodus is, wordt de sluimertimer weer op 10 minuten
ingesteld. Terwijl de wekker afgaat, houdt u de sluimerknop ingedrukt om de wekker en het apparaat uit te zetten, of drukt u op de knop van de respectieve wekker.
2. LCD:
PMTM
FM AUX
P
P
: Tijd
AUX: Auxiliary
FM: FM-band
: Slaaptimer
: Signaalniveau
: Bluetooth-modus
: Sluimertimer
DAB: DAB/DAB+ band
M: Mono
: Wekker 1 en 2
PM: Wanneer de 12-uurs klok
is geselecteerd
T: Handmatige zenderkeuze
3. TUNE +/-: In de DAB-modus kunt u met deze knoppen alle beschikbare DAB/DAB+
stations aangeven. Gebruik de knoppen +/- om specifieke stations te markeren; het
gemarkeerde DAB-station wordt na 3 seconden automatisch ingeschakeld, of druk op
de knop Enter op de afstandsbediening. FM: Druk kort op de afstemknoppen (Tune +/-)
om automatisch naar de volgende gevonden zender over te schakelen (Auto Scan).
Zie “Auto Scan” onder “FM Menu” als u Auto Scan wilt uitschakelen en handmatig op
zenders wilt afstemmen.
4.
SLEEP: Druk herhaaldelijk op deze knop om in te stellen hoe lang de radio zal spelen voordat
hij automatisch wordt uitgeschakeld, en/of druk op de knop Select op de afstandsbediening
om die tijd te selecteren. Er verschijnt een klokje op het display als de slaaptimer actief
is. Om Slaap te annuleren, drukt u op de knop Sleep totdat er "Off" op het display staat.
5. BLUETOOTH-BEREIK: Druk op deze knop om naar de Bluetooth-modus te gaan.
Zie "Bluetooth gebruiken" voor verdere informatie. Druk op de knop Bluetooth en houd
deze ingedrukt om alle gekoppelde apparaten uit het geheugen te wissen. Op het scherm
wordt “Memory Cleared” (geheugen gewist) weergegeven.
91 –NEDERLANDS
Page 92

6. SOURCE: Druk op deze knop om een andere klankbron te kiezen.
7.
8. KNOP ALARM: Druk op een van beide knoppen en draai deze knop om het uur in te
ALARM 1 AND 2: Druk op deze knop(pen) om de gewenste wektijd(en) in te
stellen zodat de wekker automatisch zal afgaan.
stellen, druk op de knop om dit in te voeren, en doe dan hetzelfde voor de minuten en
druk op de knop als u klaar bent, anders wordt de wektijd na 3 seconden automatisch
ingesteld. De wekker is nu ingesteld om af te gaan. Beide wektijden worden op het
display weergegeven. Druk opnieuw op de respectieve knop Alarm om het wekken
te annuleren. Zie ook "De wekker via het hoofdmenu instellen" voor verdere zeer
belangrijke wekkerinstellingen.
Bediening (Achterzijde)
2
5
4
1
3
1. 12VDC/1500mA: Gebruik deze ingang om de Albergo+ te bedienen via de bijgeleverde
externe voedingsadapter. Gebruik uitsluitend de voeding die met dit product is
meegeleverd. Als de voeding beschadigd of verloren is, gebruik dan uitsluitend een
gelijkwaardige vervanging. Iedere gebruikte gelijkstroomadapter moet voldoen aan
de eisen van EN/IEC 60065 en een nominale waarde van 12 VDC 1500 mA en 230
V 50 Hz hebben (afhankelijk van de lokale stroomvereisten). Het gebruik van een
gelijkstroomadapter die niet door de fabrikant is aanbevolen of niet aan deze specificatie
voldoet, kan gevaar opleveren. De adapter moet een 5,5/2,1mm-plug met een positieve
kern hebben. Het is normaal dat de voedingsadapter tijdens het gebruik warm wordt.
2.
EXTERNE ANTENNE: Er is een externe telescoopantenne aan deze ingang bevestigd;
het is niet de bedoeling dat deze wordt verwijderd. Stel hem bij voor de beste ontvangst.
Zie ook de paragraaf “Digitale radio/FM-ontvangst".
3.
HOOFDTELEFOON UIT: Sluit op deze instelbare stereo-uitgang een hoofdtelefoon aan
(niet meegeleverd) voor ongestoord luisteren. De hoofdtelefoon schakelt de luidspreker uit.
Gebruik het bedieningswiel of de volumeknoppen van de afstandsbediening om het volume
te regelen. Deze uitgang wordt ook beïnvloed door de knop "Mono" op de afstandsbediening.
Deze stereo-uitgang is bedoeld voor een standaard 3.5mm stereominiplug. Voorkom
gehoorschade door het volume bij gebruik van de hoofdtelefoon te matigen.
4.
AUX IN: Om audio van een ander apparaat, zoals Tivoli Audio’s Model CD, een MP3-speler
92 –NEDERLANDS
Page 93

of tv te kunnen horen, sluit u de audio-uitgang van het betreffende apparaat aan op deze
stereo-ingang en zet u de bron op Aux. Deze stereo-ingang is bedoeld voor een 3,5 mm
stereo mini connector. Mogelijk moet u het volumeniveau afwijkend instellen voor een
extra apparaat van het niveau voor het luisteren naar de radio.
5. Speaker: Sluit het mannetje van het bij de optionele Tivoli Audio Albergo Stereo
Speaker meegeleverde RCA-snoer aan op deze vrouwelijke uitgang. Zorg dat de
instelling Stereo/Mono op Stereo staat door op de knop Mono op de afstandsbediening
te drukken en controleer of er geen "M" voor mono op het display staat.
Afstandsbediening
1. POWER: Druk deze knop in
om de Albergo+ aan te zetten.
De laatst gekozen klankbron
zal actief zijn.
2.
MUTE/SNOOZE: Druk eenmaal
om de luidspreker(s) tijdelijk uit
te schakelen als de Model 10
speelt. Druk nogmaals of wijzig
de volume-instelling om de
weergave te hervatten. Als de
wekker gaat, gebruikt u deze
knop om de sluimerfunctie te
activeren. De wekker zal 10
minuten later opnieuw afgaan.
Een icoon op het display
geeft aan dat de sluimerfunctie
actief is. De sluimertijd is niet
instelbaar. Als u nogmaals op
de sluimerknop drukt terwijl het
apparaat nog in de sluimermodus is, wordt de sluimertimer
weer op 10 minuten ingesteld.
3. ALARM: Terwijl de Albergo+ is ingeschakeld, kunt u met de knoppen pq en Select
de wekkers afstellen en instellen. Zie ook "De wekker via het hoofdmenu instellen"
voor verdere zeer belangrijke wekkerinstellingen.
4.
SLEEP: Druk herhaaldelijk op deze knop om in te stellen hoe lang de radio zal
spelen voordat hij automatisch wordt uitgeschakeld, en/of druk op de knop Select op
de afstandsbediening om die tijd te selecteren. Er verschijnt een klokje op het display
als de slaaptimer actief is. Om Slaap te annuleren, drukt u op de knop Sleep totdat er
"Off" op het display staat.
5. SOURCE: Druk op deze knop om een andere klankbron te kiezen.
6. INFO: Druk herhaaldelijk op deze knop om de beschikbare informatie te doorlopen,
afhankelijk van de bronmodus waarin u bent.
7.
PRESETS 1-5 (Voorkeuzeknoppen): Even ingedrukt houden om het nu spelende
radiostation op te slaan. Kort indrukken om het onder een knop opgeslagen station weer
op te roepen. Bij FM-stations wordt het voorkeuzenummer in het display weergegeven.
Per band zijn vijf voorkeuzes mogelijk.
11
13
4
2
3
8
5
1
6
7
9
12
10
93 –NEDERLANDS
Page 94

8. VOLUME +/–: Druk op de knop Volume + om het volumeniveau te verhogen en op
Volume – om het volume te verlagen. Verlaag het volume als muziek of stemmen
vervormd weergegeven worden. Zo voorkomt u dat de speaker beschadigd raakt.
Bij gebruik van de volumeknoppen wordt de mute-functie opgeheven: de luidspreker
wordt weer geactiveerd.
9. pq/TUNE +/-: Druk hierop om menu-items bij te stellen als u in het Menu bent. In de
DAB-modus kunt u met deze knoppen alle beschikbare DAB/DAB+ stations aangeven.
Gebruik de knoppen pq om specifieke stations te markeren; het gemarkeerde DABstation wordt na 3 seconden automatisch ingeschakeld, of druk op de knop Enter op de
afstandsbediening. FM: Druk kort op de afstemknoppen (Tune +/-) om automatisch naar
de volgende gevonden zender over te schakelen (Auto Scan). Zie “Auto Scan” onder
“FM Menu” als u Auto Scan wilt uitschakelen en handmatig op zenders wilt afstemmen.
10. tu: Het pijltje naar rechts (t) heeft dezelfde functie als de knop Select. In bepaalde
menu’s heeft het pijltje naar links (u) dezelfde functie als de knop “Back” (terug).
11.
MENU/SELECT: Houd deze knop ingedrukt om in elke bronmodus naar het
hoofdmenu te gaan en druk er kort op om items in het menu te selecteren. Zie ook
de paragrafen hieronder met "Menu" voor de menu's DAB, FM en Aux.
12. MONO: Druk op deze knop om voor mono of stereo te kiezen. Op het display staat
"M" voor mono. Deze instelling beïnvloedt ook de hoofdtelefoonuitgang. Zie ook de
paragraaf “Digitale radio/FM-ontvangst".
13. BACK (Terug): Druk deze knop in om naar de vorige pagina in het menu te gaan.
N.B. Terwijl de Albergo+ in stand-by staat, kunt u de achtergrondverlichting van het dis-
play regelen zonder dat u de Albergo+ hoeft aan te zetten of het menu hoeft te openen.
Druk tweemaal op de knop p op de afstandsbediening om de achtergrondverlichting
uit te zetten. Druk op de knop p op de afstandsbediening om de achtergrondverlichting
gedurende 10 seconden aan te zetten. Druk nogmaals tweemaal op de knop p om de
achtergrondverlichting te herstellen.
Menu Digitale radio (DAB/DAB+)
Houd in de DAB-modus de knop Menu op de afstandsbediening ingedrukt om naar het
hoofdmenu te gaan. Gebruik de knoppen pq op de afstandsbediening en de knop Select
om keuzes in het menu te maken en te bevestigen. Met de knop Back gaat u een stap terug.
Gekozen instellingen worden aangegeven met een sterretje (*).
NB: Als u naar de modus Digitale radio gaat, en de stationslijst leeg is, begint een automa-
tische scan.
NB: Het hoofdmenu wordt na negen seconden uitgeschakeld als er geen actie wordt
ondernomen.
1. AUTO SCAN: Zoekt het frequentiebereik af. Wanneer u de Albergo+ verplaatst naar
een andere locatie dient u een nieuwe scan uit te voeren opdat de radio de zenders
op die locatie kan vinden. Om het automatische scannen te annuleren, drukt u op de
knop Back op de afstandsbediening.
2.
TIVOLI EQ (Klankregeling): Druk op de knop Select en gebruik de knoppen pq
en Select om de lage- en hogetonenweergave in te stellen (resp. Bass en Treble). De
gekozen waarden worden weergegeven onder de “User EQ”. Gebruik dezelfde knoppen
om de Loudness aan of uit te zetten. Gebruik Loudness bij lage volumeniveaus om de
hoge en lage frequenties iets te versterken. Dit zorgt voor een natuurlijker weergave.
Met de knoppen pq en Select kunt u een van de vooringestelde EQ-instellingen
94 –NEDERLANDS
Page 95

activeren. Bij selectie van een vooringestelde EQ worden alle veranderingen aan de
instellingen van Bass en Treble (lage en hoge tonen) opgeheven, maar dit heeft geen
invloed op Loudness (luidheid). Bij keuze voor “Flat” EQ worden de fabrieksinstellingen
geactiveerd, wat betekent dat Bass en Treble beide op 0 (neutraal) gezet worden.
Hierbij wordt de Loudness uitgeschakeld. Had u andere instellingen voor Bass en
Treble gekozen, dan zijn deze instellingen via “User EQ” weer op te roepen. De getallen
aan de rechterzijde van EQ menu-pagina geven de bass- en treble-instellingen weer.
3.
MANUAL TUNE (Handmatig Zenders Zoeken): Gebruik de knoppen pq om
handmatig bepaalde DAB/DAB+/DMB-frequenties op te zoeken. Het gemarkeerde
DAB-station wordt na 3 seconden automatisch ingeschakeld, of u kunt op de knop
Enter op de afstandsbediening drukken.
4.
DRC: Met deze Dynamic Range Control kunt u zachte passages luider laten klinken,
bijvoorbeeld als u in een lawaaiige omgeving bent of op een heel laag volumeniveau luistert.
5. SETTINGS (A-F):
A. ALARM: Zie "De wekker via het hoofdmenu instellen".
B. TIME
Tijd Instellen: Druk op de knop Select en gebruik de knoppen pq en Select
om eerst het uur en daarna de minuten in te stellen. Om de tijd handmatig in te
stellen, moet u bij Auto update voor “No update” kiezen. Meer informatie over
“Auto update” vindt u in de volgende alinea.
Auto Update: Druk op de knop Select en gebruik de knoppen pq en Select
om te kiezen tussen “Update from any”, “Update from DAB” (ook DMB), or “Update from FM” (RDS). Om deze automatische updates te laten werken, moet er
sprake zijn van een goede DAB of FM RDS-ontvangst met een tijd- en datumsignaal. Het updaten van de klok, waarbij de correcte tijd en datum automatisch
ingesteld worden, kan een minuut of langer duren. Tivoli Audio is niet verantwoordelijk voor het automatisch doorgeven van onjuiste tijd- en datumsignalen.
Om de klok met de hand in te stellen, kiest u voor “No Update”. Selecteer dan
“Set Time/Date” in het “Time” menu. Gebruik de knoppen pq of tu en Select
om het uur in te stellen. Herhaal dit om de minuten in te stellen en druk op Select
om de ingestelde tijd te bevestigen.
Set 12/24 Hour (12- of 24-uurs klok): Druk op de knop Select en gebruik de
knop pq en Select om voor een 12- of 24-uurs klok te kiezen.
Set Date Format (Datumweergave): Druk op de knop Select en gebruik de
knoppen pq en Select om de gewenste datumweergave te kiezen.
C. BACKLIGHT:
Timeout: De displayverlichting kan een constant niveau hebben, ongeacht of
u knoppen op de Albergo+ gebruikt (zo is de Albergo+ op de fabriek geconfigureerd), of u kunt de displayverlichting zo aanpassen dat deze na een vaste
tijdsduur automatisch wordt "gedimd" zolang er geen knoppen worden gebruikt.
Zodra u een knop op de radio of de afstandsbediening gebruikt, licht het display
weer op de normale sterkte op. Druk op de knop Select en gebruik de knoppen
pq en Select om de gewenste tijdsduur in te stellen. Daarbij kunt u kiezen voor
10, 20 ,30, 45, 60, 90, 120 of 180 seconden. Als u voor “Off” kiest, wordt de displayverlichting nooit gedimd.
On Level: Druk op de knop Select en gebruik de knoppen pq en Select om de
intensiteit van de displayverlichting te kiezen.
95 –NEDERLANDS
Page 96

Dim Level: Als u onder "Timeout" een tijdsduur heeft geselecteerd waarna de displayverlichting wordt gedimd, drukt u op Select en gebruikt u de knoppen pq
en Select om de intensiteit van de displayverlichting te kiezen wanneer deze wordt
gedimd.
D. LANGUAGE: Druk op de knop Select en gebruik de knoppen pq en kies uw
voorkeurstaal.
E. FACTORY RESET: Druk op de knop Select en gebruik de knoppen pq en
Select om de fabrieksinstellingen te herstellen. Kies “Yes” om deze instellingen
te herstellen of “No” om de huidige instellingen te behouden. Bij een reset (Yes)
gaan al uw persoonlijke instellingen verloren, zoals de ingestelde voorkeuzestations en uw voorkeurstaal. Zie ook de paragraaf "Digitale radio/FM-ontvangst".
F. ID: Druk op Select om de identiteitscode (ID) van uw Albergo+. Als u met uw
dealer of Tivoli Audio contact opneemt met een vraag, kan men u verzoeken om
het nummer in dit veld op te geven.
FM-menu
Houd in de FM-modus de knop Menu/Select op de afstandsbediening ingedrukt om naar
het hoofdmenu te gaan. Gebruik de knoppen pq op de afstandsbediening en de knop
Select om keuzes in het menu te maken en te bevestigen. Met de knop Back gaat u een
stap terug. Gekozen instellingen worden aangegeven met een sterretje (*).
NB: Het hoofdmenu wordt na negen seconden uitgeschakeld als er geen actie wordt
ondernomen.
1. SCAN SETTING (Scannen): Druk bij een auto-scan op de knop Select en gebruik de
knoppen pq en Select om te kiezen tussen “Strong stations only” (uitsluitend afstemmen
op sterke stations) of “All stations” (alle stations). Zie punt 9 (pq/Tune +/-). onder het
kopje “Afstandsbediening” voor meer informatie. Bij keuze voor “All stations” wordt ook op
zwakke stations afgestemd, waarbij in bepaalde gevallen alleen maar ruis te horen zal zijn.
2. AUTO SCAN (NIET IN DE MENU’S AUX OF BLUETOOTH): Druk op de knop Select
en gebruik pq en de knop Select om te kiezen tussen zoeken naar alleen sterke
zenders (“Strong stations only”) of alle zenders (“All stations”) tijdens Auto Scan of
zet Auto Scan uit (“Off”). (Zie punt 9 [Tune +/-] onder “Afstandsbediening”.) Als u “All
stations” selecteert, neemt de gevoeligheid van de scan toe. Het kan zijn dat Auto
Scan dan soms stopt op ruis. Als u “Off” selecteert, wordt Auto Scan uitgeschakeld.
U kunt de radio dan handmatig afstemmen.
3. RDS: Druk op de knop Select en gebruik de knoppen pq en Select om te kiezen
tussen het in- en uitschakelen van FM RDS-tekst. Zie ook "RDS.
4. TIVOLI EQ: Zie de beschrijving onder "Menu Digitale radio".
5. SETTINGS: Zie de beschrijving onder "Menu Digitale radio"..
Auxiliary Aux
Houd in de Aux-modus de knop Menu/Select op de afstandsbediening ingedrukt om
naar het hoofdmenu te gaan. Gebruik de knoppen pq op de afstandsbediening en de
knop Select om keuzes in het menu te maken en te bevestigen. Met de knop Back gaat u
een stap terug. Gekozen instellingen worden aangegeven met een sterretje (*).
NB: Het hoofdmenu wordt na negen seconden uitgeschakeld als er geen actie wordt
ondernomen.
96 –NEDERLANDS
Page 97

1. TIVOLI EQ: Zie de beschrijving onder "Menu Digitale radio".
2. ALARM 2: Als u niet verwacht Alarm 2 (wektijd 2) te gebruiken of als u bang bent dat
Alarm 2 misschien verkeerd is ingesteld, kunt u op de knop Select drukken en de
knoppen pq en Select gebruiken om Alarm 2 uit te schakelen.
3. SETTINGS: Zie de beschrijving onder "Menu Digitale radio".
4.
VOLUME LIMIT: Als u het maximale volumeniveau wilt verlagen om anderen niet te
storen, kunt u op de knop Select drukken en met de knoppen pq en Select kiezen
tussen Volumelimiet 26 en 22. Als u "Off" selecteert, blijft het maximumvolume op de
fabrieksinstelling van 30. N.B.: als u het totale volumeniveau vermindert, wordt ook het
volumeniveau van de wekker verminderd wanneer de wekker afgaat.
5.
BLUETOOTH-BEREIK: Gebruik pq en de knop Select om het bereik van het
Bluetooth-signaal desgewenst te verlagen (kies “Low”). Dit kan wenselijk zijn als
de Bluetooth-functie alleen wordt gebruikt als u zich zeer dicht bij de radio bevindt.
Aanbevolen wordt deze instelling op de normale stand (“Normal”) te houden.
Wekkerinstellingen veranderen en de wekker via het
hoofdmenu instellen
1. Met de Albergo+ ingeschakeld, gaat u naar de alarm instellingen via het hoofdmenu in
DAB, FM of Aux modus door de knop Menu op de afstandsbediening in te drukken.
Eenmaal in het menu selecteert u ‘’Settings’’ en ‘’Alarm’’.
2.
Werktijd 1 (Alarm 1) wordt altijd als eerste getoond. Gebruik de knoppen pq en Select
om tussen Alarm 1 en Alarm 2 te kiezen. NB: U kunt vanaf elk punt door het alarmmenu
navigeren met de knoppen Back of t en met knoppen Select of u.
3. Gebruik de knoppen pq en Select om de wekker aan of uit te zetten.
4.
Gebruik de knoppen pq om het uur in te stellen. Druk dan op Select. Herhaal dit proces
om de minuten in te stellen en (als u voor een 12-uurs weergave hebt gekozen) AM of
PM te kiezen. Bevestig ook deze instellingen met Select.
5. Gebruik de knoppen pq om te kiezen door welke klankbron u gewekt wilt worden, en
bevestig met Select. Als u de bron op DAB (omvat ook DAB+/DMB) of FM zet, gebruik
dan de knoppen pq om het gewenste voorkeursstation of het laatst beluisterde station
te kiezen, en bevestig met Select.
6. Met de knoppen pq kunt u instellen hoe vaak de wekker moet worden ingesteld om af
te gaan, waarna u op Select drukt.
7. Gebruik tot slot de knoppen pq om het volumeniveau van de wekker in te stellen,
en bevestig met Select. Om er zeker van te zijn dat er geluid is wanneer de wekker
afgaat, kan het wekkervolume niet onder een minimaal niveau worden ingesteld. Het
wekkervolume wordt ook beïnvloed door de volumelimiet als “Volume Limit” onder het
menu Auxiliary is ingeschakeld.
8. Doorloop dezelfde procedure voor een tweede wektijd (Alarm 2), als u daar gebruik
van wilt maken.
Vergist u zich tijdens het instellen van de wekker, dan brengt de knop Back op de afstandsbediening u terug naar het begin.
NB: Uw instellingen worden uitsluitend bewaard als u alle bovengenoemde stappen doorloopt en het display de tekst “Alarm Saved” toont.
97 –NEDERLANDS
Page 98

NB: Als u hierbij voor DAB kiest en het laatste beluisterde station of het voorkeursstation
op de ingestelde wektijd niet beschikbaar is, dan kiest de Albergo+ automatisch voor de
standaard wektoon.
Stroomuitval: Als de stroom uitvalt blijft de ingestelde wektijd bewaard, maar de wekker
gaat niet af.
Wekkeropties
Terwijl de wekker afgaat, wordt het volume geleidelijk hoger. Als de wekker afgaat, kunt u
de sluimerfunctie activeren of de wekker uitzetten.
Snooze (sluimeren): Om de sluimerfunctie te activeren drukt op de knop Snooze op de
afstandsbediening, of u drukt het bedieningswiel aan de bovenzijde van de Albergo+ kort
in. De sluimertijd is niet instelbaar. Als u nogmaals op de sluimerknop drukt terwijl het
apparaat nog in de sluimermodus is, wordt de sluimertimer weer op 10 minuten ingesteld.
Terwijl de wekker afgaat, houdt u het sluimerwiel boven op het apparaat ingedrukt om de
wekker en het apparaat uit te zetten, of drukt u op de respectieve knop Alarm.
Alarm off: Om de wekker te stoppen terwijl hij afgaat, drukt u op de knop Alarm op het
apparaat of de afstandsbediening, of houdt u het multifunctionele bedieningswiel boven op
het apparaat ingedrukt. U kunt ook op de aan/uit-knop op de afstandsbediening drukken.
Alarm Quick Set: Als de Albergo+ op stand-by staat, kunt u de knop Alarm op de
afstandsbediening gebruiken om elk van beide wekkers aan of uit te zetten.
Bluetooth Gebruiken
Controleer voor het koppelen of uw apparaat Bluetooth 2.1+EDR A2DP ondersteund en of
het niet is gekoppeld aan een ander Bluetooth-apparaat. Apparaten kunnen op verschillende manieren koppelen. Hieronder volgt een algemene gids.
1. Druk op de knop Bluetooth op het voorpaneel van de Albergo+ of verander de bron
In Bluetooth. Hierdoor wordt Bluetooth ingeschakeld. Draai het volume tot ongeveer
¼ om te beginnen. Verhoog ook het volume op het bronapparaat (het apparaat van
waaraf u streamt).
2. Schakel Bluetooth in op de ingeschakelde apparaten.
3.
Selecteer “Tivoli Bluetooth (Not Paired (niet gekoppeld))” als dit op het scherm van
uw apparaat verschijnt om het zoeken te starten. Sommige apparaten kunnen om
een PIN-code vragen. Typ in dat geval “0000”. “Tivoli Bluetooth” veranderd van “Not
Paired” (Niet gekoppeld) in “Connected” (Verbonden.)
4. U hoort een beltoon van de Albergo+ als bevestiging van de verbinding en u kunt uw
muziekbestanden draadloos afspelen. Pas het volume op het apparaat aan. U hoeft het
apparaat niet opnieuw te koppelen. Afhankelijk van uw apparaat moet u mogelijk
meerdere pogingen ondernemen voor paren en/of verbinden met de Albergo+,
maar geef het apparaat voldoende tijd om te Paren of Verbinden voordat u het
proces herhaalt.
98 –NEDERLANDS
Page 99

Een iPhone/iPod Touch/iPad Met Bluetooth Koppelen
1. Druk op de knop Bluetooth op het voorpaneel van de Albergo+ of verander de bron
In Bluetooth. Hierdoor wordt Bluetooth ingeschakeld. Draai het volume tot ongeveer
¼ om te beginnen. Verhoog ook het volume op het bronapparaat (het apparaat van
waaraf u streamt).
2. Selecteer “Settings” (Instellingen) (afhankelijk van uw softwareversie).
3. Selecteer "General" (Algemeen).
4. Selecteer “Bluetooth”.
5. Schakel Bluetooth in om het zoeken te starten.
6.
Selecteer “Tivoli Bluetooth (Not Paired (Niet gekoppeld))” als dit op het scherm
verschijnt. Als u gevraagd wordt om een PIN-code in te voeren, typt u "0000". “Tivoli
Bluetooth” veranderd van “Not Paired” (Niet gekoppeld) in “Connected” (Verbonden).
7.
U hoort een beltoon van de Albergo+ en u kunt uw muziekbestanden draadloos
afspelen. Pas het volume op het apparaat aan. U hoeft uw iPhone/iPod/iPad niet
opnieuw te koppelen.
Het volumeniveau van de muziekbestanden kan verschillen. Als u voorkeur hebt voor
een hoger uitvoerniveau, controleer dan de instellingen van de iPhone/iPod touch/iPad:
Schakel de EQ uit, de SoundCheck uit en de Volume limit (Volumebegrenzing) uit.
Als u bij het koppelen een probleem ondervindt, drukt u op het pijltje rechts van "Tivoli
Bluetooth" op het scherm van uw iPhone/iPod touch/iPad en selecteert u "Dit apparaat
vergeten", waarna u het koppelingsproces herhaalt. Afhankelijk van uw apparaat moet
u mogelijk meerdere pogingen ondernemen voor paren en/of verbinden met de
Albergo+, maar geef het apparaat voldoende tijd om te Paren of Verbinden voordat
u het proces herhaalt.
Bij het streamen van muziek kunt u op het blauwe pijltje rechts van de knop voor het volgende nummer >>/ op het scherm van de iPhone/iPod touch/iPad om te schakelen tussen
de iPhone/iPod touch/iPad en Bluetooth.
OPMERKING:
• De Albergo+ onthoudt koppelgegevens voor maximaal 8 apparaten. Er kunnen meer
apparaten gekoppeld worden, maar het minst recent gebruikte apparaat wordt dan
vervangen door het nieuw gekoppelde apparaat.
• Als het geluid wegvalt of stopt tijdens het afspelen, plaatst u het apparaat dichter bij
de Albergo+ of controleert u of een ander draadloos apparaat het signaal niet stoort.
• Bij het omschakelen van Bluetooth naar AM of FM moet u mogelijk het volumen-
iveau van de radio aanpassen.
Digital Radio/FM Ontvangst
De telescopische FM-antenne zorgt voor een goede ontvangst. Erg sterke FM-stations
worden soms beter ontvangen als de antenne niet helemaal uitgeschoven is.
Als u de Albergo+ samen met de optionele Albergo Speaker in stereo gebruikt en een
FM-radiostation in die opstelling veel ruis geeft, kunt u de ontvangst verbeteren door met
de knop Mono op de afstandsbediening voor monoweergave kiezen. Op het display staat
een "M" in mono.
99 –NEDERLANDS
Page 100

Gebouwen met beton-, staal- of aluminiumconstructies kunnen een goede ontvangst
verhinderen. De ontvangst kan ook negatief beïnvloed worden door elektrische dekens,
computers, cd-spelers, magnetrons en andere elektrische apparaten, die tevens ruis en
brom kunnen genereren. Deze verschijnselen zijn vaak met succes tegen te gaan door de
Albergo+ verder uit de buurt van het betreffende apparaat te plaatsen of door het toestel
op een wandcontactdoos van een andere elektrische groep aan te sluiten.
NB: Als u de Albergo+ meeneemt naar een locatie met een ander aanbod van DAB-stations, doet u er goed aan om een Update List uit te voeren. Tijdens de bijbehorende scan
wordt de lijst met beschikbare DAB-stations ververst.
DAB Berichten Weergave
Secundaire Diensten: Secundaire zenders worden weergegeven met een >> symbool
naast de zendernaam. Secundaire diensten worden niet in alle gebieden weergegeven.
“?”: Wanneer naast de zendernaam dit symbool verschijnt, is de zender ongeldig of
inactief.
“Not Available”: Dit bericht verschijnt wanneer u op een DAB zender met onvoldoende
signaal ingechakeld bent.
RDS (Uitsluitend FM)
Het RDS (Radio Data System) stuurt teksten met de radio-uitzending mee. Niet alle FMstations bieden deze service; bij deze stations zal het display dergelijke teksten dus niet
weergeven. Als het ontvangen signaal zwak is, kan dit ook voorkomen bij stations die wel
RDS bieden. In zulke gevallen is het ook mogelijk dat de tekst niet optimaal weergegeven
wordt. Herpositioneren van de FM-antenne kan verbetering brengen. NB: de inhoud van
de meegezonden tekst wordt door elke FM-station zelf bepaald.
Plaatsing
Plaats de Albergo+ op een vlakke, stabiele ondergrond. Voor een goede laagweergave en voldoende ventilatie mag de baspoort aan de achterzijde niet geblokkeerd worden. De Albergo+
heeft geen videoafscherming en moet minimaal op 127 mm van computermoni¬tors of televisies geplaatst worden. Plaatsing in een (boeken)kast of te dicht bij een muur of in een hoek
kan de basweergave zodanig versterken dat de weergave onnatuurlijk wordt.
Reinigen
Gebruik geen agressieve schoonmaakmiddelen of oplosmiddelen om de Albergo+ schoon
te maken.
Beperkte Garantie
Tivoli Audio maakt zijn producten volgens zeer hoge standaarden en we hebben er alle
vertrouwen in dat onze producten goed presteren. Daarom geven we een beperkte garantie op dit product voor fabricagefouten in materiaal en vakmanschap voor de eerste
eigenaar. Deze garantie kan niet worden overgedragen.
De minimum garantieperiode voor producten aangeschaft in de Europese Unie en Noorwegen is twee jaar. Voor landen waar de voorwaarden voor de minimale garantie wettelijk
zijn vastgelegd, is de garantieperiode de wettelijk vereiste periode. Overal elders is de
garantieperiode één jaar.
100 –NEDERLANDS
 Loading...