

TiVo Series2 DT User Manual
I
I
n
n
f
f
o
o
T
T
V
V
I
I
n
n
p
p
u
u
t
t
T
T
V
V
L
L
i
i
v
v
e
e
G
G
u
u
i
i
d
d
e
e
P
P
o
o
w
w
e
e
r
r
T
T
V
V
S
S
e
e
l
l
e
e
c
c
t
t
W
W
i
i
n
n
d
d
o
o
w
w
®
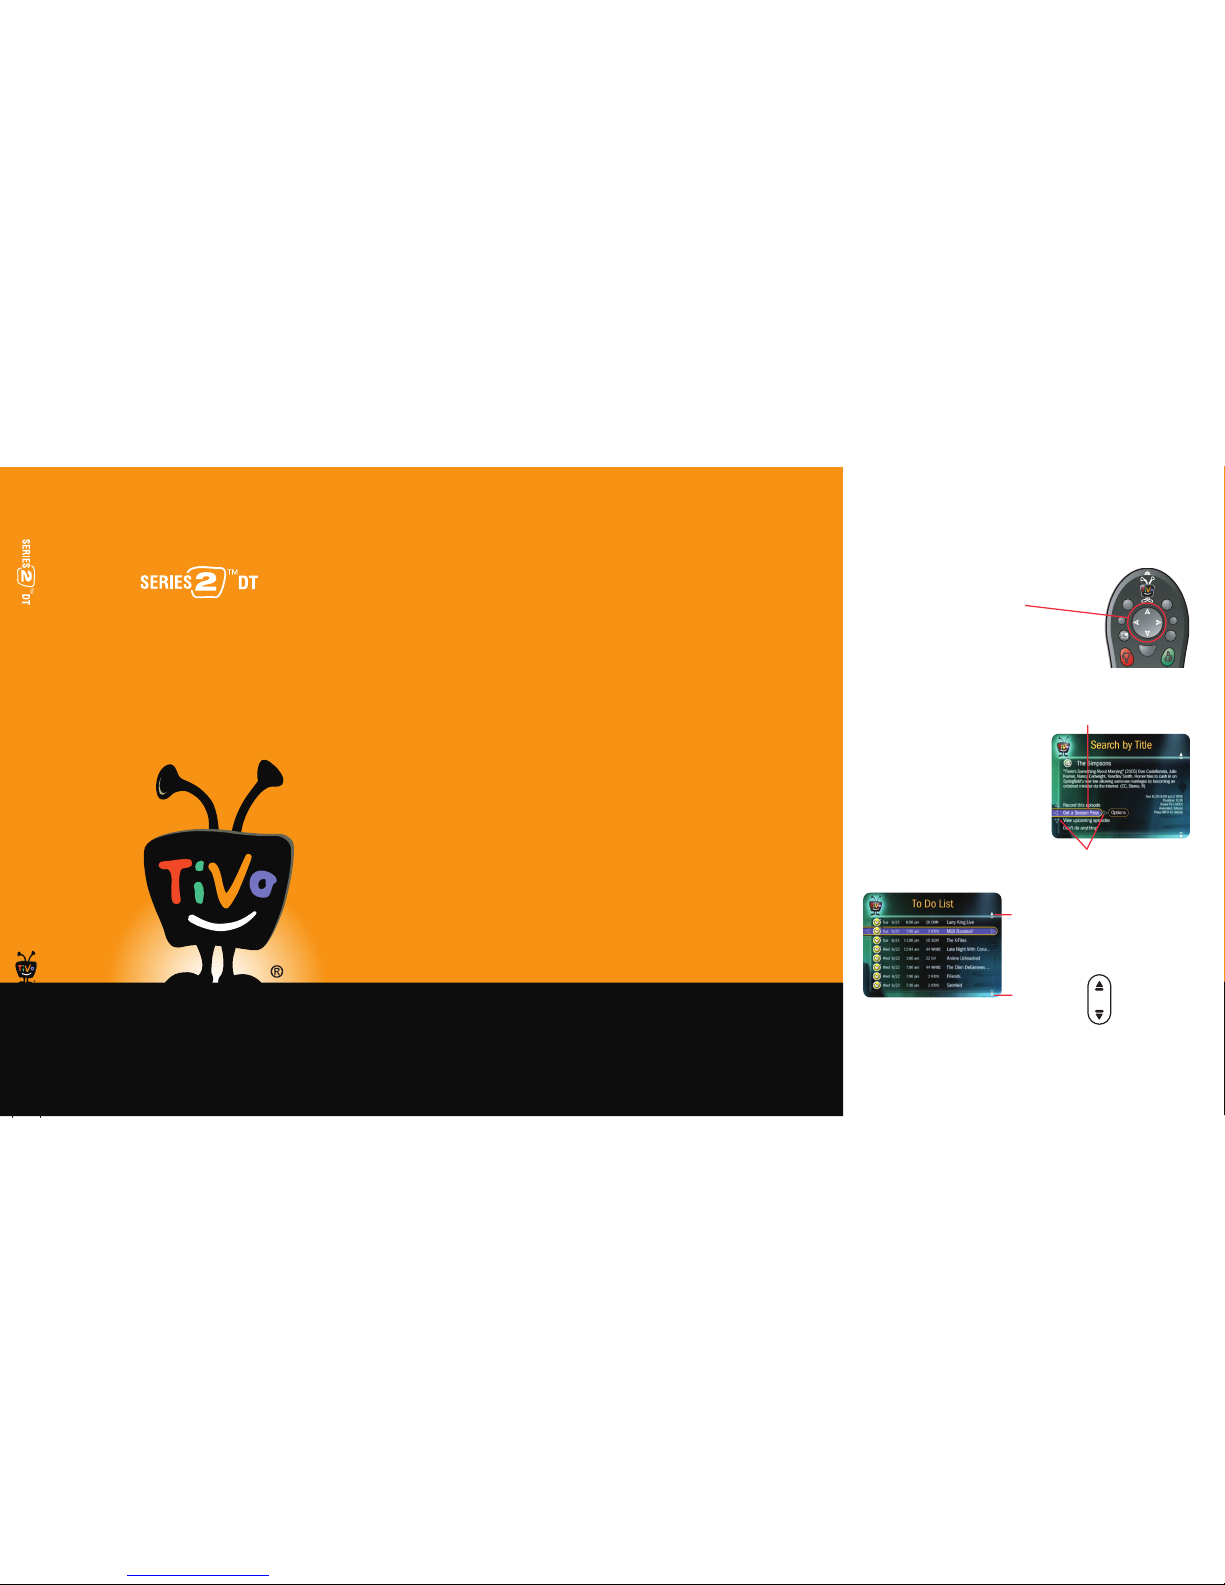
To navigate the TiVo® DVR’s on-screen menus,
use the remote control
’s arrow buttons
to move to the option you want, then press SELECT.
The LEFT arrow button often takes you to the
previous screen.
Two Types of On-Screen Arrows
On-Screen Menus & the Remote Control
The arrows that appear beside or near the
highlight bar show the directions it can
move. For example, on this screen, you
could press the RIGHT arrow to highlight
Options or the DOWN arrow to highlight
“View upcoming episodes.”
When you see page up or page
down arrows at the top or bottom
of the screen (or a list), press the
CHAN UP/DOWN button to jump
an entire page at a time.
CHAN UP/DOWN
Button
P
a
g
e
Chan
Highlight Bar
Arrows near the
Highlight Bar
Page Up
Arrow
Page Down
Arrow
TiVo Viewer’s Guide
Viewer’s Guide
Discover and enjoy the TiVo® Service
Learn more about your TiVo
®
Digital Video Recorder
Inserting Batteries into the Remote Control
Hold the remote with the battery door facing you. Slide the door towards you
to open it.
Insert two AA batteries (supplied). Match the + and - marks on the batteries
to the + and - marks in the compartment.
Replace the battery door.
Remote Control Tips
R
e
c
o
r
d
M
u
t
e
II
n
f
o
T
V
I
n
p
u
t
W
i
n
d
o
w
P
a
g
e
21
DVR
C
l
e
a
r
E
n
t
e
r
/
L
a
s
t
Vol
Chan
G
u
i
d
e
S
e
l
e
c
t
P
o
w
e
r
T
V
T
V
L
i
v
e
S
l
o
w
P
l
a
y
12
3
798
465
0
P
o
w
e
r
T
V
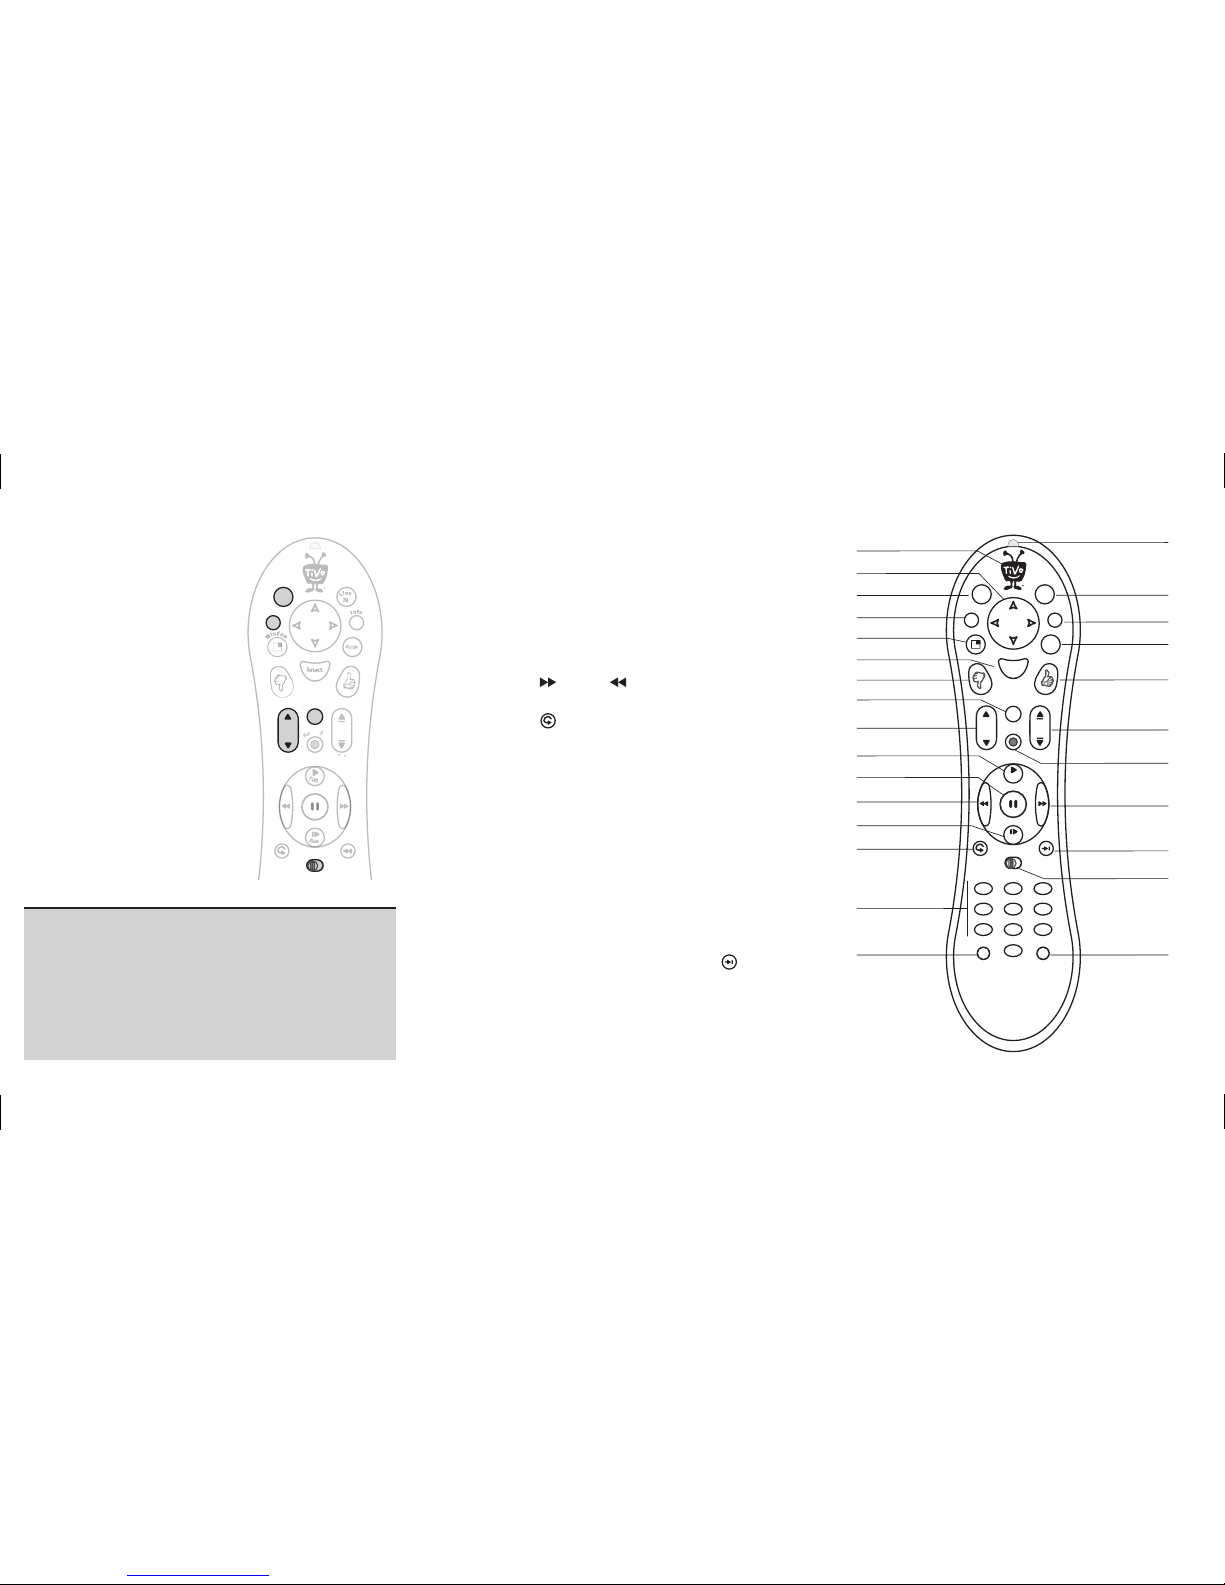
TiVo Button
TV Power
Arrow Buttons
TV Input
Window*
Select
Thumbs Down
Mute
Volume
Play
Pause
Back (rewind)
Slow
Instant Replay
Number Buttons
Clear
Remote Active Light
Live TV
Info
Guide
Thumbs Up
Chan (Page) Up/Down
Record
Forward
Advance
DVR Switch
Enter/Last
*Window button: not
active; functionality may
be added in a future
TiVo service update.
Some buttons on your TiVo remote
are programmable:
TV POWER
TV INPUT
VOLUME & MUTE (can control sound
on your TV or A/V receiver)
DVR SWITCH (useful if you have more
than one TiVo DVR)
To program your remote, press the TiVo
button to go to TiVo Central
®
and select
Messages & Settings, then Settings, then
Remote Control. Follow the easy on-screen
instructions.
See Chapter 5 of this guide for more on
programming the remote.
c
o
r
d
M
u
t
e
T
V
I
n
p
u
t
P
a
g
e
21
DVR
Vol
Cha
n
G
u
i
d
e
P
o
w
e
r
T
V
l
l
o
w
P
l
l
a
y
y
P
o
w
e
r
T
V
Customize Your
TiVo
®
Remote
Program your TiVo remote to control your TV or A/V receiver. See Customize
Your TiVo Remote to the left.
Press the TiVo button once to go to the TiVo Central
®
screen, or twice to go
to the Now Playing List—your list of recorded programs.
Press LIVE TV to switch between tuners. See page 3 for more about
watching live TV with dual tuner.
Press FORWARD and BACK up to 3 times for 3 speeds. Press a
fourth time to resume normal play.
INSTANT REPLAY
®
replays the last 8 seconds of a program.
Press CLEAR to delete a title in a list (like the Now Playing list) or to hide
things that aren’t part of the program you’re watching (like the TiVo
channel banner).
INFO brings up the TiVo channel banner. Press the RIGHT arrow
to switch among three versions of the banner, each with a different
amount of information.
Press GUIDE to see the TiVo program guide, then press INFO (while the guide
is visible) to see Guide Options and change the way channels display, or
show only a certain types of programs.
CHAN UP/DOWN does more than change the channel—it also pages up or
down through lists of programs or menu items.
When you’re watching “behind” live TV (for example, if you pause live TV and
later resume watching from the paused spot), ADVANCE
®
catches
you up to the live broadcast. In a recorded program, press it once to jump
to the end of the program, then again to jump to the beginning.
If programmed, the DVR Switch lets you control two different TiVo
®
Digital
Video Recorders (DVRs) with the same remote. See Chapter 5 of this guide
for more on programming the remote.

®
Welcome
Gemini.book Page i Monday, April 10, 2006 11:06 AM

ii
This Viewer’s Guide describes features of the TiVo
®
service
running on the TiVo
®
brand Series2TM DT Digital Video Recorder.
© 2006 TiVo Inc. Reproduction in whole or in part without written
permission is prohibited. All rights reserved. Printed in Mexico.
TiVo, the TiVo logo, TiVo, TV Your Way, TiVo Central, WishList,
Season Pass, TiVoToGo, Series2, the Series2 logo, the Advance
logo, the Instant Replay Logo, the Thumbs Up logo, the Thumbs
Down logo, Overtime Scheduler, Overlap Protection, Ipreview and
the sounds used by the TiVo service are trademarks or registered
trademarks of TiVo Inc. or its subsidiaries, 2160 Gold Street, P.O.
Box 2160, Alviso, CA 95002-2160. All other trademarks are the
properties of their respective owners. All rights reserved.
TiVo product and service protected by U.S. Pat. Nos. 5,241,428;
6,233,389; 6,327,418; 6,385,739; 6,490,722; 6,642,939; 6,643,798;
6,728,713; 6,757,837; 6,757,906; 6,792,195; 6,847,778; 6,850,691;
D424,577; D435,561; D445,801. Other patents pending.
Gemini.book Page ii Monday, April 10, 2006 11:06 AM

iii
Table of Contents
Using This Guide . . . . . . . . . . . . . . . . . . . . . . . . . . . . . . . . . .iv
Chapter 1: The Basics in 5 Short Tours . . . . . . . . . . . . . 1
Tour One: Playing with Live TV . . . . . . . . . . . . . . . . . . . . . . 2
Tour Two: Recording Programs . . . . . . . . . . . . . . . . . . . . . . . 4
Tour Three: Your List of Recordings . . . . . . . . . . . . . . . . . . . 6
Tour Four: Finding Great Entertainment . . . . . . . . . . . . . . . . 8
Tour Five: Beyond the TiVo
®
Box . . . . . . . . . . . . . . . . . . . . 10
More Cool Things You Can Do . . . . . . . . . . . . . . . . . . . . . . 12
Chapter 2: Pick Programs to Record . . . . . . . . . . . . . . 13
Finding Programs to Record . . . . . . . . . . . . . . . . . . . . . . . . . 14
Finding Programs Using a WishList
®
Search . . . . . . . . . . . 19
Season Pass
TM
and Repeating Recordings . . . . . . . . . . . . . . 23
Setting Recording Options . . . . . . . . . . . . . . . . . . . . . . . . . . 25
Managing Recordings with the To Do List . . . . . . . . . . . . . 27
Chapter 3: Watching Programs . . . . . . . . . . . . . . . . . . 29
The Status Bar . . . . . . . . . . . . . . . . . . . . . . . . . . . . . . . . . . . 30
The Channel Banner . . . . . . . . . . . . . . . . . . . . . . . . . . . . . . . 31
The Program Guide . . . . . . . . . . . . . . . . . . . . . . . . . . . . . . . 32
Saving Programs to Other Devices . . . . . . . . . . . . . . . . . . . . 35
Chapter 4: TiVo® Desktop & Home Media Features . . 37
Connecting Your TiVo® DVR to a Home Network . . . . . . . 38
TiVoToGo
TM
Transfers . . . . . . . . . . . . . . . . . . . . . . . . . . . . 39
Music & Photos . . . . . . . . . . . . . . . . . . . . . . . . . . . . . . . . . . 41
Multi-Room Viewing . . . . . . . . . . . . . . . . . . . . . . . . . . . . . . 43
Chapter 5: Settings . . . . . . . . . . . . . . . . . . . . . . . . . . . 45
Audio Settings . . . . . . . . . . . . . . . . . . . . . . . . . . . . . . . . . . . 46
Channel Settings . . . . . . . . . . . . . . . . . . . . . . . . . . . . . . . . . . 47
Display Settings . . . . . . . . . . . . . . . . . . . . . . . . . . . . . . . . . . 50
Parental Controls . . . . . . . . . . . . . . . . . . . . . . . . . . . . . . . . . 51
Recording Settings . . . . . . . . . . . . . . . . . . . . . . . . . . . . . . . . 53
Remote Control Settings . . . . . . . . . . . . . . . . . . . . . . . . . . . 55
Video Settings . . . . . . . . . . . . . . . . . . . . . . . . . . . . . . . . . . . 58
Phone & Network Settings . . . . . . . . . . . . . . . . . . . . . . . . . . 59
Messages . . . . . . . . . . . . . . . . . . . . . . . . . . . . . . . . . . . . . . . 64
Account & System Information . . . . . . . . . . . . . . . . . . . . . . 65
Restart or Reset System . . . . . . . . . . . . . . . . . . . . . . . . . . . . 66
Standby . . . . . . . . . . . . . . . . . . . . . . . . . . . . . . . . . . . . . . . . . 67
Chapter 6: Copy Protection, Privacy,
& the TiVo® Service . . . . . . . . . . . . . . . . . . . . . . . . . . . 69
Chapter 7: Troubleshooting . . . . . . . . . . . . . . . . . . . . . 95
Appendix A: Additional Setup Examples . . . . . . . . . 123
Appendix B: Back Panel Reference,
Warranty & Specifications . . . . . . . . . . . . . . . . . . . . 133
Index . . . . . . . . . . . . . . . . . . . . . . . . . . . . . . . . . . . . . 141
Glossary of Icons . . . . . . . . . . . . . . . . Inside Back Cover
Gemini.book Page iii Monday, April 10, 2006 11:06 AM

iv
Using This Guide
Thank you for choosing the TiVo® Series2TM DT Digital Video
Recorder (DVR). This Viewer’s Guide helps you learn about the
smart-recording features of the TiVo
®
service and home networking
capabilities of your TiVo DVR.
Getting Started
Here’s what you need to do first:
1. Activate the TiVo service. The TiVo service is what makes your
DVR smart. It includes everything from your program listings to
Season Pass
TM
recordings and WishList® searches. If you
haven’t yet activated, visit www.tivo.com/activate
or
call 1-877-367-8486.
2. Connect your TiVo DVR. If the TiVo service is the brains, the
TiVo DVR is the body. Use the Start Here poster to connect the
DVR to your TV programming source and your television. You
can find more connecting information in Appendix A of this
Viewer’s Guide.
3. Complete Guided Setup. After connecting your DVR, follow the
steps in on-screen Guided Setup. This customizes the DVR for
your home.
4. Take a Tour! Once you’re done with Guided Setup, the Tours in
Chapter 1 of this guide introduce you to the best features of the
TiVo service. You may also find helpful videos already recorded
for you on the Now Playing List.
Basic Terms
If this is your first TiVo DVR, you’re about to completely change
the way you watch television. When we talk about the TiVo service,
here are some terms you should know:
Live TV. If you’re watching a program as it’s being broadcast,
you’re watching live TV. With the TiVo service, you can pause
live TV for up to 30 minutes. When you resume watching,
you’re “behind” live TV.
Dual tuner. A tuner is a device found inside DVRs, TVs, VCRs,
cable boxes—anything designed to receive TV signals. A tuner
picks one channel to display from all the channels you receive; it
“tunes” to that channel. The TiVo
®
Series2TM DT is a “dual
tuner” DVR, meaning that it has two tuners inside.
Program screen. When you select a program (from the Now
Playing List or a list of upcoming programs), you’ll see a screen
with information about the program and actions you can take.
Service updates. From time to time, your DVR may receive
updates to the TiVo service including features not described in
this guide. Details are always available at www.tivo.com/guides
.
Notes and Tips. In the side columns of some pages in this guide
you’ll find helpful Notes and Tips .
If you have any questions or need any help, check out the
Troubleshooting in Chapter 7. Now, let’s start with the first Tour!
®
Gemini.book Page iv Monday, April 10, 2006 11:06 AM

®
1
The Basics in 5 Short Tours
Tour One: Playing with Live TV 2
Tour Two: Recording Programs 4
Tour Three: Your List of Recordings 6
Tour Four: Finding Great Entertainment 8
Tour Five: Beyond the TiVo
®
Box 10
More Cool Things You Can Do 12
Gemini.book Page 1 Monday, April 10, 2006 11:06 AM

The Basics in 5 Short Tours
2
1
Tour One: Playing with Live TV
When you’re watching a program as it’s broadcast, you’re watching live TV. In this tour, we’ll
take a look at how you can control live TV. So turn on your TV and grab your TiVo remote!
Press the LIVE TV button to go to live TV from any TiVo screen.
Moving Around in Time
1. First, press the PAUSE button. You can pause live TV for up to 30 minutes!
When you pause live TV, you see a status bar
showing a one-hour period. The green segment
shows the portion of the current hour that has
been saved by your DVR. The white line marks your current point in time. When the white
line is back in the green segment, you’re “behind” live TV.
Whenever you change channels, the saved portion of the old program is cleared, and the
DVR starts saving the program on the new channel.
2. Press PLAY to continue watching the program. Next, press BACK —the
program rewinds. Press BACK a second time to rewind faster, and a third time to go faster
still! Press BACK a fourth time (or press PLAY at any time) to return to normal speed.
3. Press PAUSE once more, then press FORWARD to move a small step forward.
Press BACK to move a small step back. Press PLAY to resume watching at normal speed.
4. Press the INSTANT REPLAY
®
button. The program jumps back 8 seconds—useful
for when you miss a great sports play or a bit of dialog, or for when you fast forward too far.
5. Press INSTANT REPLAY again, then immediately press SLOW . You’ll see your own
slow-motion replay!
6. Finally, press the ADVANCE
®
button. Presto! You’re caught up to live TV.
New DVRs may have tutorial
videos on the Now Playing List
corresponding to the Tours in this
chapter. Select Now Playing List from
the TiVo Central®screen.
See page 30 for more on the status bar.
Both the FORWARD and BACK
buttons have three speeds.
P
l
a
y
When you fast forward too far, press
INSTANT REPLAY to jump back eight
seconds. Press it again if you really missed
the mark.
®
S
l
o
w
Gemini.book Page 2 Monday, April 10, 2006 11:06 AM

The Basics in 5 Short Tours
3
1
Watching and Recording Two Shows At Once
The TiVo® Series2TM DT (dual tuner) DVR is capable of recording two different live TV
channels at the same time—one on each of its 2 tuners. Go ahead, try it:
1. First, press PAUSE to pause the live TV program you’re watching.
2. Press LIVE TV to switch to the other tuner. (It’s just like changing the channel.)
3. Watch the program for a few moments, then press PAUSE .
4. Press LIVE TV again to switch back to the first tuner. Notice that the first program
you were watching is still paused. You can pause for up to 30 minutes on each tuner!
Press PLAY to continue watching the program.
Now you really can watch two programs at the same time! Press RECORD while watching
either tuner—or on both tuners to record two programs at the same time.
Changing Channels
• To go to a specific channel, use the numbers on your remote control, then press ENTER/
LAST. (If you don’t press ENTER/LAST, the channel changes automatically after a few
seconds.) To clear the number before the channel changes, press CLEAR.
• To jump back to the previous channel on the same tuner, press ENTER/LAST.
• To move one channel at a time, press CHAN UP/DOWN on the TiVo remote.
• Tired of channel surfing? Press GUIDE to display the program guide. Move the highlight to
any program and press SELECT. If the program is on now, the channel changes. If the
program is on later, you’ll see options to record that program. Learn more on page 31.
• Press LIVE TV to switch to the other tuner. Changing channels works the same way no
matter which tuner you’re watching.
The TiVo Series2 DT (dual tuner) DVR
can record two basic cable channels
at the same time, or one basic and one digital
cable channel at the same time (if you have a
digital cable box).
A digital cable box receives both basic cable
channels (typically 1-99) and digital cable
channels (typically 100 and above).
When you connect the RF splitter as shown
on the Start Here poster, you are sending
basic cable channels directly to the TiVo DVR,
and digital cable channels to the cable box.
Digital cable channels are encoded and need
the cable box to decode them. Because the
cable box decodes and sends only one digital
cable channel at a time, the TiVo DVR can
record only one digital cable channel at a
time.
See page 107 for more.
T
V
L
i
v
e
T
V
L
i
v
e
P
a
g
e
Chan
Gemini.book Page 3 Monday, April 10, 2006 11:06 AM

The Basics in 5 Short Tours
4
1
Tour Two: Recording Programs
You can always record the program you’re watching by pressing RECORD on your TiVo®
remote control. Beyond that, the TiVo
®
service provides many ways to quickly search through
TV programs, find your favorites, and schedule recordings in advance.
What’s more, if a program is part of a series, you can get a Season Pass
TM
recording of the
series. A Season Pass recording automatically records every episode of the series that airs on the
selected channel—even if the time slot changes!
Search by Title
Know the title of a program you want to record? Finding it is easy. Grab your TiVo remote!
1. Press the TiVo button to see the TiVo Central
®
screen. Press DOWN to highlight Pick
Programs to Record, and press SELECT. The Pick Programs to Record screen appears.
2. Highlight Search by Title and press SELECT. A list of categories which you could use to
limit your search appears, but for now select All Programs.
The next screen has a grid of letters. Use the RIGHT, LEFT, UP, and DOWN arrows to
move the white selection box among the letters.
3. Let’s find “The Simpsons.” Move to the letter S and press SELECT. (The Search By Title
list alphabetizes without “A” or “The.”) A list of programs that begin with “S” appears on
the right side of the screen.
4. Move to the letter I and press SELECT again. The TiVo service searches through all
available programs (usually, those airing within the next two weeks) to find those that begin
with SI, and lists those programs.
5. Keep entering letters until you see “Simpsons, The” in the list. You may see multiple listings
if the program airs on more than one channel.
If you just completed Guided Setup,
the DVR is still organizing program
information, and some programs might not
yet appear.
If you make a mistake entering text,
select DEL on the screen, or press
BACK on the remote. To clear all text, use
CLR on the screen or press the CLEAR
button. Selecting SP on the screen enters a
space.
®
Gemini.book Page 4 Monday, April 10, 2006 11:06 AM

The Basics in 5 Short Tours
5
1
6. Press RIGHT arrow until you move off the grid of letters to the list of programs. Press the
UP or DOWN arrow to highlight “Simpsons, The” and press SELECT.
A program information screen appears. You can use this screen to record the episode, view
upcoming episodes, or get a Season Pass recording.
Getting a Season PassTM Recording
1. On the Program Information screen for The Simpsons, highlight Get a Season Pass and press
SELECT. A confirmation screen appears. Press SELECT again—and after a short pause you
have a Season Pass to The Simpsons! Every episode airing on that channel will be recorded
automatically.
When you set up a Season Pass recording, you can choose how many episodes to keep and
how long to keep them using Recording Options. Choose “First Run Only” if you want to
skip the re-runs. See page 25 for more about using Recording Options.
2. After setting the Season Pass recording, you return to the Search by Title screen. Press
LEFT to return to Pick Programs to Record, then select the To Do List. You can see all your
scheduled recordings here.
3. In the To Do List, notice the upcoming episodes of The Simpsons are marked with a double
check mark , indicating they are part of a Season Pass.
You can cancel the recording of any episode by highlighting the title in the To Do List and
pressing CLEAR. You can delete the entire Season Pass or change recording options using
the Season Pass Manager. See “Using the Season Pass Manager” on page 24 for more
information.
Gemini.book Page 5 Monday, April 10, 2006 11:06 AM

The Basics in 5 Short Tours
6
1
Tour Three: Your List of Recordings
All the programs recorded by your TiVo® DVR appear on the Now Playing List—your
complete list of recordings. No more searching through unlabeled videotapes!
1. To go to the Now Playing list, press the TiVo button twice, or select Now Playing List from
the TiVo Central
®
screen. Your new DVR may already contain some short programs.
2. Highlight any title on the Now Playing List (even a program that’s still recording) and press
PLAY. The program plays from the beginning.
Program Information
If you prefer, you can highlight any title in Now Playing and press SELECT to see the program
information screen, which offers these options:
• Play or Resume playing (if you’re returning to a partially watched program).
• Keep until... By default, programs you record are saved until space is needed for new
recordings. The oldest ones may be deleted to make room for new recordings. However, you
always have the option to keep a program for as long as you want. Just select Keep Until...
and on the next screen you can choose Keep Until I Delete, or specify a date.
• Delete Now or Stop Recording (if recording is in progress.)
• Save to VCR. See page 35 for details.
Now Playing Tips
• From any program information screen, press INFO (or DISPLAY if your remote doesn’t
have an INFO button) to see program details.
• When a program ends, you have the option to delete it. If you don’t delete it, the program is
available to watch again from the beginning on the Now Playing List.
Icons to the left of the program’s title tell you the
recording’s current status. See the Glossary of
Icons on the inside back cover for details.
Programs appear on the Now
Playing List the moment recording
begins, so you can start watching a show
while it’s still being recorded!
Gemini.book Page 6 Monday, April 10, 2006 11:06 AM

The Basics in 5 Short Tours
7
1
Sorting Programs
You can view the Now Playing List either alphabetically by title (from A to Z) or by date
recorded. To change how the list is sorted:
1. From Now Playing, press ENTER on your TiVo remote to see Now Playing List Options.
2. Highlight Sort, then press LEFT button to choose By Date Recorded.
Then select View
Now Playing List.
When you return to Now Playing, programs are listed by the date they were recorded, with
the most recent at the top and the oldest at the bottom. TiVo Suggestions always appear at
the bottom of the list.
Grouping Programs
When Groups are on, programs are organized into folders, and a number in parentheses to the
right of each folder shows how many programs it contains. To turn Groups on:
1. From Now Playing, press ENTER on your TiVo remote to see Now Playing Options.
2. Select Groups, then press RIGHT button to choose On. Then select View Now Playing List.
When you return to Now Playing, you’ll see a folder for:
• Each television series with more than one recorded episode.
• Each auto-recording WishList
®
search with a recorded program.
• TiVo Suggestions (if you have auto-recording of TiVo Suggestions turned on).
A program’s title may appear in more than one folder, even though there is only one recording
of the program. For example, you might have an auto-recording WishList search for an actor
who also appears in a series, and you have a Season Pass
TM
for that series. Each episode of the
series will appear in two folders—one for the WishList search and one for the Season Pass
recording. If you delete the program in one folder, the title also disappears from the other.
From the Now Playing List, press 1
on the remote to change the sort
order of programs, or press 2 to turn
groups on or off.
®
A note at the bottom of the Now Playing List tells
you which sorting option you are using and
whether groups are on.
Gemini.book Page 7 Monday, April 10, 2006 11:06 AM

The Basics in 5 Short Tours
8
1
Tour Four: Finding Great Entertainment
The TiVo service makes it easy for you to find what you want to watch by responding to your
interests and collecting the best the television networks have to offer.
WishList® Searches
A WishList search finds programs that match your search criteria on any channel you receive—
and it keeps on searching for as long as you keep the WishList search.
1. From the Pick Programs to Record screen, choose WishList Search, then Create New
WishList. The Create WishList screen shows the different kinds of WishList searches you
can create. For now, select Actor WishList. You’ll see a letter grid.
2. Move to the letter D and press SELECT. Then select the letters E and P. Each time you
choose a letter, the list of actors on the right changes. You should see DEPP, JOHNNY on
the list now.
3. Press RIGHT to move to the list of names, then highlight DEPP, JOHNNY and press
SELECT.
4. On Select Category screen, select Movies. The next screen gives you a chance to select
subcategories of movies, but for now select Don’t Specify A Sub-Category.
The final WishList screen lets you view all upcoming Johnny Depp movies, or choose to
automatically record them. If you choose Auto-Record WishList Programs, any Johnny
Depp movie on any channel at any time in the future will be recorded!
TiVo Suggestions
You can rate any program—whether it’s live, recorded, or listed in the program guide—by
pressing the THUMBS UP
®
or THUMBS DOWN
®
button on your remote. You can
give a program up to three Thumbs Up (great!) or three Thumbs Down (terrible!).
When you choose to auto-record a
WishList search, you can set how
many episodes to keep and how long to
keep them using Recording Options. See
page 25.
®
Gemini.book Page 8 Monday, April 10, 2006 11:06 AM

The Basics in 5 Short Tours
9
1
TiVo Suggestions uses these ratings to create a list of programs you might like. The more shows
you rate over time, the better TiVo Suggestions will get at finding the right programs for you.
Auto-Recording TiVo Suggestions. When your DVR has available space, it automatically records
TiVo Suggestions. But you don’t ever need to worry about recorded Suggestions taking up
space—here’s why:
• TiVo Suggestions never replace shows you request, or prevent your requested shows from
being recorded.
• TiVo Suggestions are always the first programs deleted to make room for recordings you
request.
Suggestions List. You can also review a list of TiVo Suggestions:
1. Press the TiVo button to go to the TiVo Central
®
screen. Select Pick Programs to Record,
then TiVo Suggestions to view a list of programs the TiVo service suggests you might like.
The list of programs is ranked, so shows you’re more likely to enjoy are near the top.
2. To record a program, highlight it and press either SELECT or RECORD on your remote. Or
use THUMBS UP and THUMBS DOWN to rate programs to improve future Suggestions.
Showcases
Showcases is an interactive content area which often includes opportunities to schedule
recordings of featured programs, or allows you to watch previews of upcoming movies or TV
shows. Programs in Showcases are grouped in theme packages, giving you “one-stop shopping”
convenience when browsing for shows to record.
Showcases may include exclusive content, the inside scoop on hit movies, exciting miniseries,
special events, popular series, and shows featuring the biggest stars of the screen and stage.
From TiVo Central, select Showcases & TV Guide
®
.
Any time you choose to record a
program, it automatically gets one
Thumbs Up.
You can turn off auto-recording of
TiVo Suggestions if you prefer. See
page 54.
®
Gemini.book Page 9 Monday, April 10, 2006 11:06 AM

The Basics in 5 Short Tours
10
1
Tour Five: Beyond the TiVo® Box
By now you've gotten a sense of how your TiVo® DVR is constantly working to find you all of
your favorite entertainment. But the TiVo
®
service is about more than just recording
programs—much more. Connecting your DVR to a home network opens up a whole new world
of digital home entertainment.
Music, Photos, & More
When you connect your DVR to your home network, it becomes a digital home entertainment
center, with access to even more features. You can find many of these features by selecting
Music, Photos, & More from the TiVo Central
®
screen.
• Digital Music & Photos. Watch slideshows of your digital photos on your big screen TV,
listen to playlists of your MP3s on your stereo system—and control it all with your TiVo
DVR remote.
• Home Network Applications. Access other applications inside and outside your home
network (broadband Internet connection required). Home Network Applications are
indicated on the Music, Photos, & More screen by a computer icon:
You must enable the DVR to access Home Network Applications. To do this, select Enable
Home Network Applications, then press THUMBS UP
®
three times, then ENTER.
• TiVo To Go
TM
Transfers. Transfer programs between your DVR and your computer—now
you can watch your favorite shows on your laptop while you’re on a business trip.
• Multi-Room Viewing. If you have more than one TiVo DVR connected to your home
network, you can transfer programs between them. That’s right, you can record programs in
the living room and watch them in the bedroom—or vice versa! You’ll find other TiVo
DVRs connected to your home network at the bottom of the Now Playing List.
If you have a home network,
connecting your DVR to it is easy.
See the Start Here poster or page 38 of this
guide for more information.
Applications available over your home
network (identified by a computer
icon) may not conform to TiVo’s Privacy
Policy. If you are concerned about the privacy
of your personal information, we suggest that
you avoid entering any sensitive information
when using any application unless it is from
a source you trust.
Gemini.book Page 10 Monday, April 10, 2006 11:06 AM

The Basics in 5 Short Tours
11
1
Get TiVo® Desktop
TiVo Desktop is a software application for your home computer. It allows you to publish digital
music and digital photos (which makes them available to your DVR), transfer programs
between your DVR and your computer or laptop, and convert TiVo recordings for playback on
your Apple iPod or Sony PSP.
TiVo Desktop is free, and you can download it from www.tivo.com/desktop
. It’s a good idea to
download a copy of TiVo Desktop for each computer connected to your home network.
Home Media Features Guide
Consult the Home Media Features Guide at www.tivo.com/guides to learn more about using
these features and connecting to your DVR to your home network. You can also find the Home
Media Features Guide by selecting TiVo Desktop Help from TiVo Desktop’s Help menu.
Gemini.book Page 11 Monday, April 10, 2006 11:06 AM

The Basics in 5 Short Tours
12
1
More Cool Things You Can Do
Schedule for Overtime. Programs sometimes start before they’re supposed to, and often end later
than scheduled. You can adjust your recording times to account for these variations using the
Overtime Scheduler
®
feature. See page 26.
Schedule Recordings at Home—from the Web. Your co-worker just told you about a must-see
program that’s on tonight, but you won’t make it home in time to set up a recording. No
problem! If your DVR is connected to a home network with a broadband Internet connection,
you can use TiVo Central Online (www.tivo.com/tco
) to schedule the recording.
Online Scheduling also works if your DVR is connected to a phone line. See page 18 for details.
When Programs Overlap, Get Both. Even when two programs overlap by a few minutes, you can
still record both of them. With Overlap Protection, the DVR automatically clips just enough
from one recording to allow both shows to record. Now that’s smart recording technology!
See page 53 for details.
Reduce Remote Control Clutter. Now that you’re using your TiVo remote to change channels
and control live TV, don’t you want to put your TV’s remote in storage? You probably can. See
the inside front cover of this guide for instructions on programming your TiVo remote to control
the power, volume, and input selection on your TV.
Record From a Preview. See a good preview, record the show! If you’re watching live TV and a
promotion comes on for an upcoming program, you may see an Ipreview
®
icon:
Press THUMBS UP
®
while the icon is visible to see options for recording for the program.
Clear the Way. Use the CLEAR button to hide the status bar, the program guide, channel banner,
and anything else on the screen that is not part of the program. It clears text entered when using
the letter grid. In the Now Playing List, press CLEAR to delete a program. In the To Do List,
CLEAR cancels a recording.
Gemini.book Page 12 Monday, April 10, 2006 11:06 AM

®
2
Pick Programs to Record
Finding Programs to Record 14
Finding Programs Using a WishList® Search 19
Season PassTM and Repeating Recordings 23
Setting Recording Options 25
Managing Recordings with the To Do List 27
Gemini.book Page 13 Monday, April 10, 2006 11:06 AM

Pick Programs to Record
14
2
Finding Programs to Record
The TiVo service makes it easy to find programs you know you like, and to find new programs
you might not even know about. You can search for programs by title, by channel, by time, or
search for keywords, actors, or directors.
Recording the Program You’re Watching
You can always record the program you’re watching—just press the RECORD button. On
the screen that appears, select Record This Showing (Best Quality). Or select Season Pass &
Other Options for more choices, or to change the recording quality.
Recording the Saved Portion
Up to 30 minutes of the current channel’s broadcast is always being saved, even when you’re
not recording. When you change channels, the DVR clears the saved portion on the tuner you’re
watching and starts saving again on the new channel. So, if the saved portion is important to
you, either record the program or don’t change the channel.
To record the saved portion in addition to the rest of the program, you must choose Record This
Showing (Best Quality). If you change the Recording Quality (by selecting Season Pass &
Other Options), the saved portion of the program won’t be recorded.
Stopping a recording
You can stop any recording in either of two ways: select the title in Now Playing, then select
Stop Recording; or, press the RECORD button in live TV, then choose Stop the Current
Recording.
Some programs may not be
recorded or may have other
recording restrictions due to copy
protection rights over the content. See
“Copy Protection and the TiVo® Service”
on page 70 for more information.
Gemini.book Page 14 Monday, April 10, 2006 11:06 AM

Pick Programs to Record
15
2
Using the Guide to Find Programs
The program guide displays up to two weeks of TV programming at the touch of a button—just
press the GUIDE button on your TiVo remote. Use the guide to find programs and set up
recordings quickly.
To record a program from the guide, highlight its title in the guide, then press RECORD. On the
screen that appears, select Record This Showing. After the TiVo service schedules the
recording, you’ll return to the guide.
Filter the Guide to Find Programs
Press the GUIDE button, then press ENTER to display the Guide Options. Highlight Choose
Filter and press SELECT. Choose category and subcategory filters to highlight certain types of
programs in the guide.
When filtering is on, the guide shows only channels that have a program in the category you
chose. Programs that fit the category are highlighted; other program titles are dimmed.
Finding More Showings
For a comprehensive list of all upcoming showings of a program, including repeats (multiple
showings of the same program), select the program from the grid, then select Season Pass and
Other Options, and View Upcoming Episodes. You can use this list to choose the showing that
is most convenient for you to record.
Gemini.book Page 15 Monday, April 10, 2006 11:06 AM

Pick Programs to Record
16
2
Search by Title
If you know the name of the program you’re looking for, or even the first part of the name, press
the TiVo button to go to the TiVo Central
®
screen, select Pick Programs to Record then Search
By Title, and follow these steps:
1. Choose whether to narrow the search to a particular category and subcategory, or select
All Programs.
2. Use the grid to spell out the title. Use the arrow buttons to move around, then press SELECT
on each letter you want. (Skip “a,” “an,” or “the.”) As you select letters, an alphabetical list
of programs appears on the right. Keep selecting letters until you see your program.
Other buttons on the TiVo remote have special functions on the grid. The CLEAR button
erases everything; BACK erases one letter at a time; FORWARD inserts a space.
3. When you see your program, press RIGHT arrow to move to the list. Then use the
UP/DOWN arrows or CHAN UP/DOWN to highlight your program, and press SELECT.
The Program Information screen shows your available options.
Record by Time or Channel
If you don’t remember the exact name of a program, but you know what time or channel it’s on,
use Record by Time or Channel. You’ll have three options:
Browse by Time. Browse programs on a specified day and time. You can filter the list to see only
programs in a particular category. For example, you can browse all movies airing on Saturday
night. To browse by time:
1. Use the arrow buttons to highlight a category (for example, Movies), then press SELECT.
2. Press the UP/DOWN arrows to select the date you want to see, then press RIGHT arrow to
move to the time column, and press the UP/DOWN arrows to select a time.
If you only know one word in the title,
and it isn’t the first word, try a Title
Wishlist search to find the program. See
page 20.
®
Replace hyphens ( - ), slashes ( / )
and periods ( . ) with spaces. For
example, use 20 20 to search for the title
“20/20.” Any other marks, such as
apostrophes ( ’ ), asterisks ( * ) and
ampersands ( & ) are ignored.
For example, use 6 OCLOCK NEWS to
search for the title “6 O’Clock News.”
®
Gemini.book Page 16 Monday, April 10, 2006 11:06 AM

Pick Programs to Record
17
2
3. Press SELECT to see the list of programs without leaving the time selector, or press RIGHT
arrow to see the list of programs and move to the list.
4. When you find a program you want to record, highlight it and press SELECT.
Browse by Channel. Browse through programs airing on a particular channel. You can start with
all channels, or just your favorites. To browse by channel:
1. Choose either All Channels, which includes all the channels you receive, or Favorite
Channels, which includes just the channels you have selected as your favorites.
2. Press the UP/DOWN arrows to select the date you want to see, then press RIGHT arrow to
move to the channel column.
3. Press the UP/DOWN arrows to select a channel. (You can also use the numbers on the
remote to enter a channel, then press ENTER.)
4. Press SELECT to see the list of programs without leaving the channel selector, or press
RIGHT arrow to see the list of programs and move to the list.
5. When you find a program you want to record, highlight it and press SELECT.
Manually Record Time/Channel. Schedule a recording on a specific channel at a specific time
(just as you would with a VCR). To create a manual recording:
1. Choose the recording type, using the UP/DOWN arrows to select whether the recording will
be One Time or Repeating, then press RIGHT arrow.
2. Choose the day(s) for the recording, using the UP/DOWN arrows to change the current
selection. If you chose Repeating, you can choose to repeat the recording on a specified day
of the week (Every Tuesday) or several times a week (Every M - F or Every Day).
3. Press RIGHT arrow and choose a channel using the UP/DOWN arrows (or by entering a
number with the remote, then pressing ENTER).
Use a Manual Repeating Recording
to record things like just the opening
monologue of a late night talk show.
®
Gemini.book Page 17 Monday, April 10, 2006 11:06 AM

Pick Programs to Record
18
2
4. Press RIGHT arrow and set the hour, minute, and am/pm for the start and stop time, using
the UP/DOWN arrows to change the current selection. Press RIGHT arrow or SELECT.
5. You’ll see a confirmation screen. The DVR shows a “best guess” program title based on
guide listings for that time and channel. Select Record This Showing.
Finding Programs Using TiVo Central® Online
Schedule recordings on your DVR at home from any computer with Internet access and a
standard web browser. Use TiVo Central Online at www.tivo.com/tco to search for shows by
time, title, keyword, or actor/director. Schedule a single episode, or set up a Season Pass
recording with all the options you have on your DVR at home. You can even set the program
not to record if it conflicts with a recording already scheduled on your DVR.
You can use Online Scheduling whether your DVR uses a phone line or broadband Internet
connection to connect to the TiVo service. However, if your DVR is connected via a broadband
Internet connection, it will check the TiVo service for your recording requests much more often.
With a broadband connection, you can schedule a recording within an hour of its air time from
any place that you have access to the Internet!
To Use Online Scheduling:
1. Go to www.tivo.com/tco and sign in.
2. On the Welcome page of TiVo Central Online, select the name of the DVR for which you
want to schedule recordings.
3. Use the simple or advanced search of your TV listings, or browse by channel.
4. From the list of search results, click the name of a program and choose either Record This
Episode or Get a Season Pass.
5. Choose whether to receive a confirmation e-mail sent to the e-mail address you provide.
Each time your DVR connects to the
TiVo service, it checks TiVo Central
Online and schedules any recording requests
you’ve made.
®
Gemini.book Page 18 Monday, April 10, 2006 11:06 AM

Pick Programs to Record
19
2
Finding Programs Using a WishList® Search
A WishList search finds programs that match your interests, tastes, and whims on any channel
you receive. And it keeps on searching for as long as you keep the WishList search.
For example, you could create a Category Only WishList search for the category Movies and
subcategory Comedy. You could then occasionally browse a list of all comedy movies airing in
the next two weeks. The list is updated each time your DVR connects to the TiVo service.
You could search for something more specific by creating an Actor WishList search for Sean
Connery, and then include the category Movies, and subcategory Action. This WishList search
would find action movies starring Sean Connery.
With a Keyword WishList search, you can search for something very specific. For example, the
Keyword GIANTS with category Football would find Giants football games, but not Giants
baseball games.
Can the WishList Feature Do More Than Search?
Yes it can! You can set a WishList search to auto-record, and it will record every show it finds,
on any channel you receive. For example, with the Sean Connery Actor WishList search, you
would automatically collect Sean Connery action movies in Now Playing.
Some WishList searches are better suited auto-recording than others. For example, a Category
Only WishList search for the category Documentary would find every upcoming documentary.
You might not want to record them all, but you could occasionally browse the search results list
and choose the ones you do want to record.
The more specific a WishList
search is, the better suited it is to
auto-recording.
®
Gemini.book Page 19 Monday, April 10, 2006 11:06 AM

Pick Programs to Record
20
2
Creating a WishList Search
From Pick Programs to Record, select WishList Search, then Create New WishList. Next, select
the type of WishList search you want to create:
• Category Only. Use the UP/DOWN arrows to highlight a category, then press SELECT or
RIGHT arrow to see a subcategories list. Either highlight a subcategory, then press SELECT
or RIGHT arrow, or select Don’t Specify a Subcategory.
• Actor or Director. Spell the last name by moving around the grid and pressing SELECT to
enter a letter. As you select letters, a list of names appears to the right of the grid.
When you see the person’s name, press RIGHT arrow until you move to a name in the list.
Use the UP/DOWN arrows to highlight the name you want and press SELECT.
• Keyword or Title. For a Keyword WishList search, the TiVo service checks for your
keywords in the program or episode title, description, actor, director, year, and category
information. A Title WishList search looks only at program and episode titles.
Spell your keyword(s) using the arrow buttons to move around the grid; then press SELECT
to enter the highlighted letter. You can enter as many characters as will fit on the screen.
When you’re finished, highlight Done Creating Keywords, then press SELECT.
Using the Asterisk (*) in WishList searches
To search for similar words in a Keyword or Title WishList, use the asterisk (*) as a wild card
symbol that replaces the endings of words. For example, the keyword AIRP* would find shows
containing “airport,” “airplane,” “airplanes,” as well as the movie “Airplane!” To enter an
asterisk, press the SLOW button on the remote.
You can use the asterisk only at the end of a keyword; not to omit letters at the beginning or in
the middle of a word. (For example, keywords like AIR*NE or *PLANE will not work.)
Not all actor or director names may be
listed. To search for a name that is not
on the list, enter the name in the format:
LAST NAME, FIRST NAME. You must match
the spelling of the name exactly, and you
must use a comma (available in the grid
under the letter W).
®
When using the asterisk (*), be as
specific as possible. For example, do
not use keywords like TH*. There will not
be enough room to show all the results of a
keyword that is too general.
®
S
l
o
w
Gemini.book Page 20 Monday, April 10, 2006 11:06 AM

Pick Programs to Record
21
2
Tips for Entering Keywords
• Use quotation marks to specify an exact phrase in a Keyword or Title WishList search (to
enter quotation marks, press PAUSE . For example, the keyword PAUL SIMON might
turn up a documentary about Simon Bolivar with a director named Paul. Use “PAUL
SIMON” to be certain you find only programs that feature Paul Simon.
• If you include an exact phrase and additional keywords, place a space between the final
quotation mark and the beginning of the next word (for example, “GEENA DAVIS” FLY).
Enter a space by selecting SP or pressing FORWARD .
• If you enter more than one keyword, the search finds programs that match all of the
keywords.
• Replace hyphens ( - ), slashes ( / ) and periods ( . ) with spaces. For example, use the
keyword 20 20 to search for the title “20/20.” For an Actor WishList for Catherine ZetaJones, use ZETA JONES, CATHERINE.
• Any other marks, such as apostrophes ( ’ ) and ampersands ( & ), are ignored. For example,
you would use the keyword phrase 6 OCLOCK NEWS to search for the title “6 O’Clock
News.” (Note that commas ( , ) are also ignored, except in an actor or director WishList
search, where they are essential.)
• For dollar signs ( $ ) substitute the letter S. For example, to find “$100,000 Pyramid,” use
S100000. (In Search by Title, skip the dollar signs to find these titles.)
If you like music performances, try a
keyword WishList search for
Concert. Choose the category Arts and the
Sub-Category Music.
®
Gemini.book Page 21 Monday, April 10, 2006 11:06 AM

Pick Programs to Record
22
2
Browsing WishList Search Results
Select View All Upcoming WishList Programs to display a list of up to 10 upcoming programs
from each of your WishList searches—up to 200 programs total (so it may take a while to
display). To record a program, highlight its title and press SELECT.
To browse a single WishList search, select the search, then select View Upcoming Programs to
see a list of up to 200 unique programs that match. To record a program, highlight its title and
press SELECT.
Each auto-recording WishList search and its upcoming recordings are marked with a star .
If you want to be sure that all matching programs are recorded, give the auto-recording
WishList search a high priority in the Season Pass Manager. See page 24 for details.
Editing a WishList Search
You can change a WishList search—for example, to correct a misspelling, or to add a category
or subcategory to narrow the results. Just select the WishList search, then select Edit WishList.
As you browse the upcoming
program titles found by WishList
searches, remember that the CHAN UP/
DOWN button pages quickly through lists.
®
Gemini.book Page 22 Monday, April 10, 2006 11:06 AM

Pick Programs to Record
23
2
Season PassTM and Repeating Recordings
With your TiVo DVR, you can set up three types of recordings to repeat automatically:
Season Pass Recording. Records every episode of a series that airs on a certain channel—
even if the day or time changes! Just select a program from the guide or a list of search
results and choose Get a Season Pass.
Manual Repeating Recording. Records on a specific channel at a specific time, just like a
VCR. See page 17 for details.
Auto-recording WishList
®
search. Records all programs found by a WishList search. See
page 20 for details.
Repeating recordings have the following traits in common:
• Parental Controls. If Parental Controls are on when you schedule a repeating recording, the
DVR checks its current program information to see if any upcoming program violates a
Parental Control. If it does, the DVR requires the password to continue.
• Set Your Priorities. The TiVo service resolves scheduling conflicts between scheduled
repeating recordings by comparing recording priorities. You can change recording priorities
with the Season Pass Manager. See page 27 for details.
• Conflict Resolution. If a scheduling conflict occurs while setting up a new repeating
recording, you’ll see which programs are involved, and have options to resolve the conflict:
• Record only those episodes that don’t conflict with other programs scheduled to record.
This makes the new repeating recording the lowest priority in the Season Pass Manager.
• Record all episodes. This makes the new repeating recording the highest priority in the
Season Pass Manager.
Gemini.book Page 23 Monday, April 10, 2006 11:06 AM

Pick Programs to Record
24
2
Using the Season Pass Manager
Use the Season Pass Manager to set priorities and resolve conflicts among your scheduled
repeating recordings. Say you have a Season Pass to ER and an auto-recording WishList search
for movies with Julia Roberts. What if a Julia Roberts movie happens to conflict ER? The TiVo
service uses the Season Pass Manager to decide which program to record. If the Julia Roberts
WishList search has a higher priority than the ER Season Pass recording, the Julia Roberts
movie will be recorded, and ER will not.
Because the TiVo
®
Series2TM DT is a dual tuner DVR, recording conflicts should be minimized.
If you have a cable box, there are limitations to the DVR’s ability to record two different
channels at the same time. See page 107 for more details.
To open the Season Pass Manager, use the TiVo button to go to the TiVo Central
®
screen and
choose Pick Programs To Record, then Season Pass Manager.
Changing the Priority Order
If you don’t change priorities, repeating recordings are prioritized by the order in which you set
them up: the first has highest priority, and so on. To change the priority order, use the
UP/DOWN arrows to highlight a repeating recording. Then press RIGHT arrow to highlight the
arrows to the right of the title, and use the UP/DOWN arrows to move the selected title up or
down in the list.
If you have Overlap Protection
TM
turned on (see page 53), lower priority recordings will be
clipped instead of canceled when they overlap with higher priority programs by a few minutes.
Canceling a Repeating Recording
To cancel a Season Pass or other repeating recording, just highlight the program’s title in the
Season Pass Manager and press CLEAR. Or, from a Program Information screen, select Cancel/
Edit the Season Pass, then Cancel This Season Pass.
Gemini.book Page 24 Monday, April 10, 2006 11:06 AM
 Loading...