

Page 1
Start Here
®
1
2
3
Activate and Connect
Add a VCR (optional)
Complete Guided Setup
We’re here to help!
Online Customer Support www.tivo.com/support
Page 2
STEP 1
Activate and Connect
Let’s Get Started!
Activating and connecting a basic system takes less than half an hour.
After connecting, completing on-screen Guided Setup should take less
than an hour. See the
explanations.
Installation Guide for additional examples and
Activate the TiVo Service
To activate the TiVo service, visit www.tivo.com/activate.
Don't have Internet access? Call TiVo Customer Support at 1-877-367-8486.
You'll need the 15-digit TiVo service number of your DVR. (You can find the
number by looking at the label on the back of your DVR.)
Write your service number here for reference: _______________________.
Connect your TiVo DVR
Question: Do you have a cable or satellite box?
No
I don't have a cable or satellite box
Option A
page 3
Yes
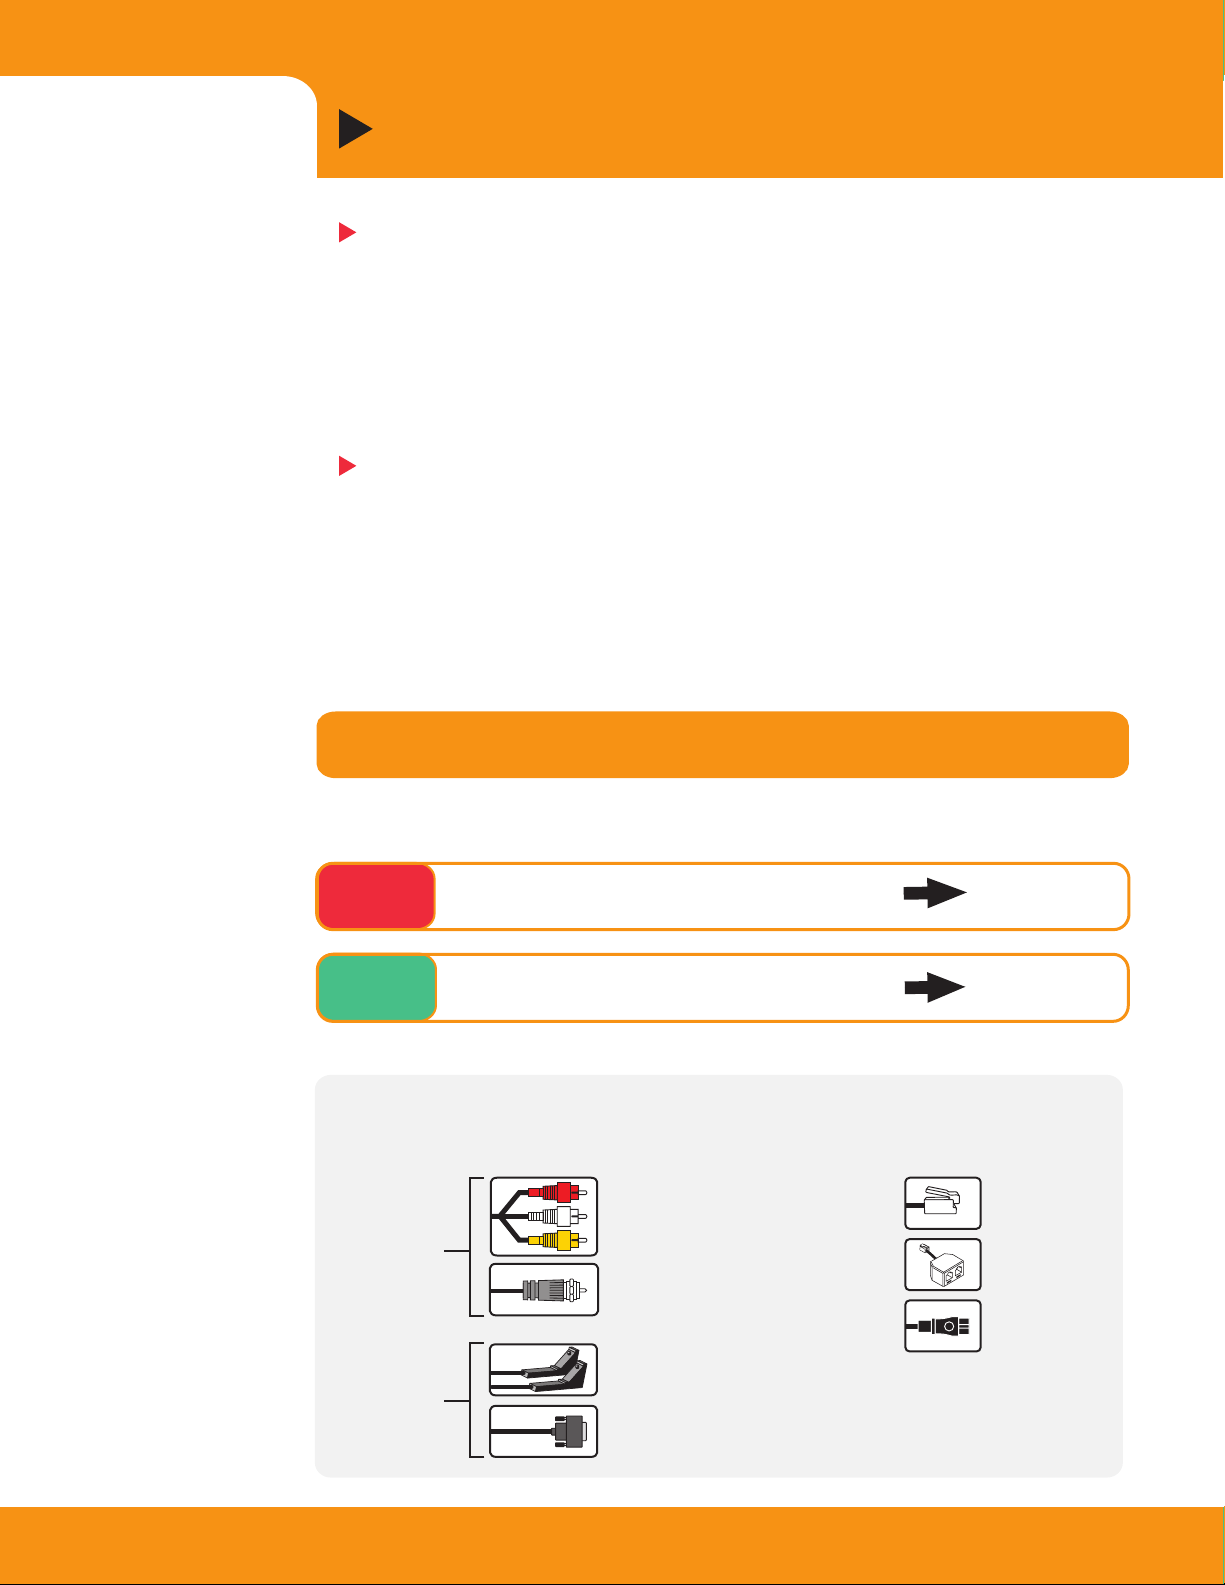
Get to know your cables
I do have a cable or satellite box
Option B
page 4
(Don’t worry if you don’t use all of them.)
Composite cable with L/R Audio
(red and white) and Video (yellow)
Audio/Video
Cables
RF Coaxial cable
Control Cables
(allow the DVR to
change channels
on a cable or
satellite box)
IR Control cable
Serial (Data) Control cable (for DIRECTV® satellite receiver or
Motorola/General Instruments DCT2000 digital cable box)
2
Phone cord
Phone splitter
Power cord
Page 3

0
Option A
No Cable or Satellite Box
If you have a cable or satellite box, see Option B on the next page.
Before you begin: Unplug the connections
to your VCR if you have one. The TiVo DVR
replaces your VCR in this setup.
After you’ve completed these steps, go to
page 6 if you want to add your VCR;
otherwise, go to page 7 to complete setup.
For additional setups, check the Installation
Guide.
Connect program source to DVR
®
TiVo
DVR
2BTCD2X0
120 V~60Hz
0.75A
IN
Connect the RF Coaxial cable coming out of
the wall (from your antenna or cable) to the
jack labeled RF In on the DVR.
Connect DVR to TV
Connect the Composite A/V cables from the
DVR’s audio/video output to the TV’s
audio/video input.
[Alternate: If your TV doesn’t have
Composite A/V connectors, connect the RF
Coaxial cable from the RF Out connector on
the DVR to the Antenna In connector on the
TV. Set the 3/4 switch on the back of the
DVR, and tune your TV to the same channel.]
Connect phone line to DVR
To connect your phone and the DVR to the
same phone jack, use the provided phone
splitter.
Plug in DVR power cord
Tune TV (if necessary) to see the
Welcome screen
Turn on your TV. If you do not see the
Welcome screen displayed, use the Input,
Source, or TV/Video button on your TV to
select the correct audio/video source. Press
the button until the Welcome screen is
displayed.
[Alternate: If you used RF Coaxial cable in
Step 2, tune your TV to the same channel
(either 3 or 4) that the 3/4 switch on the
back of the DVR is set to. The Welcome
screen should appear.]
Now go to page 6
Television
INPUT
Antenna
In
Tips and Alternatives
This setup shows Composite A/V cables . If your TV
•
doesn’t have Composite A/V connectors, use an RF Coaxial
cable instead. If your TV has an S-Video connector, you might
prefer to use an S-Video cable (not supplied) for your video
connection. See the Installation Guide for details.
Remember to connect the OUT connector
•
of one device to the IN connector of the next.
After you complete Guided Setup, you’ll be able to connect
•
your DVR to a home network and use a shared broadband
Internet connection instead of a phone line to make connections
to the TiVo service. See the TiVo Viewer’s Guide for details.
R
VIDEO
L
OUT IN
3
Page 4

Option B
Cable or Satellite Box
If you don't have a cable or satellite box, see Option A on the previous page.
Cable or
Satellite Box
RF In
TiVo
DVR
®
120 V~60Hz
0.75A
RF Out
Serial
Audio/Video Out
Before you begin: Unplug the connections to your
VCR if you have one. The TiVo DVR replaces your
VCR in this setup.
After you’ve completed these steps, go to page 6 if
you want to add your VCR; otherwise, go to page 7
to complete setup.
For additional setups, check the Installation Guide.
Make sure that the cable from the wall is
connected to the cable or satellite box
Connect cable or satellite box to DVR
Connect the Composite A/V cables from the cable
IN
or satellite box’s audio/video output to the DVR’s
audio/video input.
Connect DVR to TV
Connect the Composite A/V cables from the DVR’s
audio/video output to the TV’s audio/video input.
[Alternate: If your TV doesn’t have Composite A/V
connectors, connect the RF Coaxial cable from the
RF Out connector on the DVR to the Antenna In
connector on the TV. Set the 3/4 switch on the back
of the DVR, and tune your TV to the same channel.]
Television
INPUT
Antenna
In
Connect phone line to DVR
Note: Your cable box or satellite receiver may also
require a phone line. To connect both the DVR and
the cable or satellite box to the same phone jack,
use the provided phone splitter.
Choose a Control cable for channel changing
R
VIDEO
L
To record shows or display live TV, the DVR must
change the channel on your cable or satellite box.
To do so, it sends a signal through either the IR
(infrared) Control cable or the Serial Control cable.
See the Installation Guide for details.
What kind of satellite or cable box do you have?
DIRECTV® satellite box
with 9-pin data connector
Motorola/General Instruments
DCT2000 series cable box
Any other satellite or
cable box
Go to Serial Control
step
Go to Serial Control
step
Go to IR Control
step
Continue to page 5
4
Page 5

Serial Control
Connect Serial Control cable
Plug the Serial Control cable into
the 9-pin Serial (Data) connector:
on the back of your cable or satellite box (see
in the setup diagram on page 4). Plug the other
end into the Control Out/Serial connector (the
upper mini-jack) on your DVR.
Now skip to step .
IR Control
Connect IR Control cable
If you didn’t use Serial Control (step ), plug the
purple end of the IR Control cable into the Control
Out/IR connector (the lower mini-jack) on the DVR.
This cable allows the DVR to change channels by
sending infrared (IR) signals to the cable or
satellite box.
Locate IR sensor on cable or satellite box
You must locate the IR sensor on the front of the
cable or satellite box. It’s a tiny round bulb; if you
shine a flashlight into the plastic “window,” you
can see it.
Mount IR emitters onto cable or satellite box
Mount the emitters in front of the IR sensor (one on
top of the box and one on bottom). Be sure both
emitters stick out about 1 ½ inches directly in
front of the IR sensor. Then use the adhesive strips
provided to keep them in place.
Now continue with step .
Cable or
Satellite Box
Connect the IR Control cable,
shown below, if you didn't use the
Serial Control cable. See step
extends 1½ "
TiVo
DVR
®
.
Plug in all power cords
Tune TV (if necessary) to see the Welcome
screen
Turn on your TV. If you do not see the Welcome
screen displayed, use the Input, Source, or
TV/Video button on your TV to select the correct
audio/video source. Press the button until the
Welcome screen is displayed.
[Alternate: If you used RF Coaxial cable in Step 3,
tune your TV to the same channel (either 3 or 4)
that the 3/4 switch on the back of the DVR is set to.
The Welcome screen should appear.]
Now go on to page 6
Tips and Alternatives
This setup shows Composite A/V cables . If your TV
•
doesn’t have Composite A/V connectors, use an RF Coaxial
cable instead. If your TV has an S-Video connector, you might
prefer to use an S-Video cable (not supplied) for your video
connection. See the Installation Guide for details.
Remember to connect the OUT connector
•
of one device to the IN connector of the next.
After you complete Guided Setup, you’ll be able to connect
•
your DVR to a home network and use a shared broadband
Internet connection instead of a phone line to make connections
to the TiVo service. See the TiVo Viewer’s Guide for details.
OUT IN
5
Page 6

STEP 2
Add a VCR (Optional)
First complete Step 1, Option A or B
®
TiVo
DVR
120 V~60Hz
0.75A
VCR
(optional)
Before You Begin
Complete Option A (p. 3) or
Option B (pp. 4-5).
Before you begin: You will be using this
diagram for VCR connections only
(highlighted in red). You must complete
Option A (p. 3) or Option B (pp. 4-5) before
connecting a VCR.
The Installation Guide contains additional
IN
pictures of completed VCR setups (with and
without a cable or satellite box, and for a TV
with only one input).
Connect DVR to VCR
Connect an RF Coaxial cable from the RF Out
connector on the DVR to the Antenna In
connector on the VCR.
Connect VCR to TV
Connect another RF Coaxial cable from the
RF Out connector on the VCR to the Antenna
In connector on the TV.
[If your TV only has one input, see the
Installation Guide for the appropriate setup
including a VCR.]
Television
INPUT
R
Antenna
In
L
VIDEO
Tune TV (if necessary) to see the
Welcome screen
Press the Input, Source, or TV/Video button
on your TV until the Welcome screen is
displayed. Now you’re ready to begin
Guided Setup.
How do I add a DVD player?
Your TiVo DVR usually does not change the
way you connect a DVD player to your TV.
Connect the audio/video cable that came
with your DVD player from the DVD player’s
audio/video output to the audio/video
input on the TV. To add both a DVD player
(or game console) and a VCR, see the
setups in the Installation Guide.
How do I watch video tapes on my VCR?
Press the Input, Source, or TV/Video button
on your TV until you see channel numbers
displayed. Then use the buttons on the
front of your TV to go to channel 3 or 4,
depending on how the Channel 3/4 switch
on your VCR is set.
Now go to page 7
6
Page 7

STEP 3
Complete Guided Setup
Guided Setup is Easy!
When you see the Welcome screen, you are ready to begin Guided
Setup. During Guided Setup you will be asked simple questions
about your program source, ZIP code, and time zone. Use the
SELECT button on the remote to select or deselect options or to
move to the next screen. Use the LEFT arrow to go back to the
previous screen.
Helpful Hints (see the Viewer's Guide for more information)
Select Begin! to start Guided Setup
Phone
What if your phone jack isn’t close to the TiVo DVR? Use the included 25-foot phone cord to complete
Guided Setup. Afterwards, you’ll be able to connect your DVR to a home network and use a shared
broadband Internet connection instead of a phone line to make connections to the TiVo service. See the
TiVo Viewer’s Guide for details.
Having trouble with the Guided Setup phone calls? Go back to the Phone Dialing Options screen and try
these steps: If you have call waiting, take out any prefix you inserted. Turn off dial tone detection. Turn off
phone availability detection. (See the TiVo Viewer’s Guide for details.)
If you need to use your phone while a Guided Setup call is in progress, pick up the phone, hang up, and
wait about 45 seconds. When you pick up the phone again, the line should be free. You can complete
Guided Setup later.
Channels
During Guided Setup, you select a channel lineup. A channel
lineup is the set of channels you subscribe to–like “Digital
Extended Basic” or “DIRECTV-Boston, MA.” If you aren’t sure
Sc
of your lineup, check your channel lineup card, your cable bill,
or make your best guess. Guided Setup includes a Channels
You Receive screen where you can check to make sure that
channel numbers shown match your lineup. If your guess was
wrong, go back and select a different lineup.
You can use the Channels You Receive screen to remove check marks for channels you don't receive or
never watch. (You can change your channel selections later, even after you complete Guided Setup.)
Account and Billing
You can view, change, and manage your TiVo account information online using Manage My Account.
Activate TiVo service, purchase Home Media Option, name your DVRs, and more! If you want to change your
billing option, or update your address or credit card information at any time, visit www.tivo.com/manage.
7
Page 8

Have fun!
TiVo, TV your way.
™
TiVo Central® and Now Playing
The TiVo button takes you to TiVo Central,
where you can access all of the features
unique to the TiVo service. Press the TiVo
button twice to go to Now Playing on TiVo
and see all of your recorded programs.
Control Your TV and Stereo
You can program the POWER, VOLUME,
MUTE, and TV INPUT buttons on the TiVo
remote to control your TV and A/V stereo
system. See the Installation Guide for
instructions.
Tell TiVo What You Like
Rate programs using the THUMBS buttons.
Then check out TiVo Suggestions (in Pick
Programs to Record) and watch for
suggestions in Now Playing on TiVo.
Watch Live TV
e
®
v
i
L
V
V
T
r
e
P
o
w
p
u
n
I
t
V
T
o
d
w
n
i
W
T
o
f
n
I
e
d
G
i
u
t
c
e
l
e
S
To see what’s on now, press LIVE TV.
Find What’s on TV
Press the GUIDE button to display the TiVo
Live Guide. You can browse up to two weeks
of program information, choose a program
to watch or record, and select from two
different guide styles.
e
t
u
M
Chan
r
d
o
c
e
R
Vol
e
g
a
P
y
P
a
l
w
S
o
l
DVR
21
3
2
1
4
7
r
a
e
l
C
6
5
9
8
L
/
a
r
s
e
t
t
n
E
0
Control Live TV
Pause TV for up to 30 minutes, rewind and
fast forward at three speeds, and instant
replay–all at the touch of a button.
Take a Tour to Learn More
TM
To learn more about TiVo service features such as Season Pass
WishList
TM
searches, and Parental Controls, take the tours in Chapter 2 of the TiVo
Viewer’s Guide. And that's just the beginning! Purchase the Home Media Option
recordings,
TM
premium feature package for your Series2 DVR and enjoy the best in networked
home entertainment. See the Viewer’s Guide or www.tivo.com/media for details.
Need some help?
Check out the Installation Guide and TiVo Viewer's Guide for more information about setting up your TiVo DVR, and activating and using the TiVo
service. If you still need help, visit www.tivo.com/support, where you'll find Installation Self-Help, Frequently Asked Questions, step-by-step
troubleshooting, and the ability to get live interactive help from expert users. See the Installation Guide for complete Customer Support contact
information.
www.tivo.com/support
©2003 by TiVo Inc. Reproduction in whole or in part without written permission is prohibited. All rights reserved. Printed in Mexico. TiVo, the TiVo logo, TiVo Central, and TiVolution are registered trademarks of TiVo Inc.
"TiVo, TV your way", WishList, Season Pass, Home Media Option, the Series2 logo, the Thumbs Down logo and text, and the Thumbs Up logo and text are trademarks of TiVo Inc. DIRECTV is a trademark of DIRECTV, Inc., a
unit of Hughes Electronics Corp. All other trademarks are the properties of their respective owners.
SDOC-00074-100 Rev. A
 Loading...