

Page 1

Discover and enjoy the TiVo
®
service
TiVo
®
Media Device
Viewer’s Guide
Page 2
Remote Control Tips
Your TiVo
®
Remote
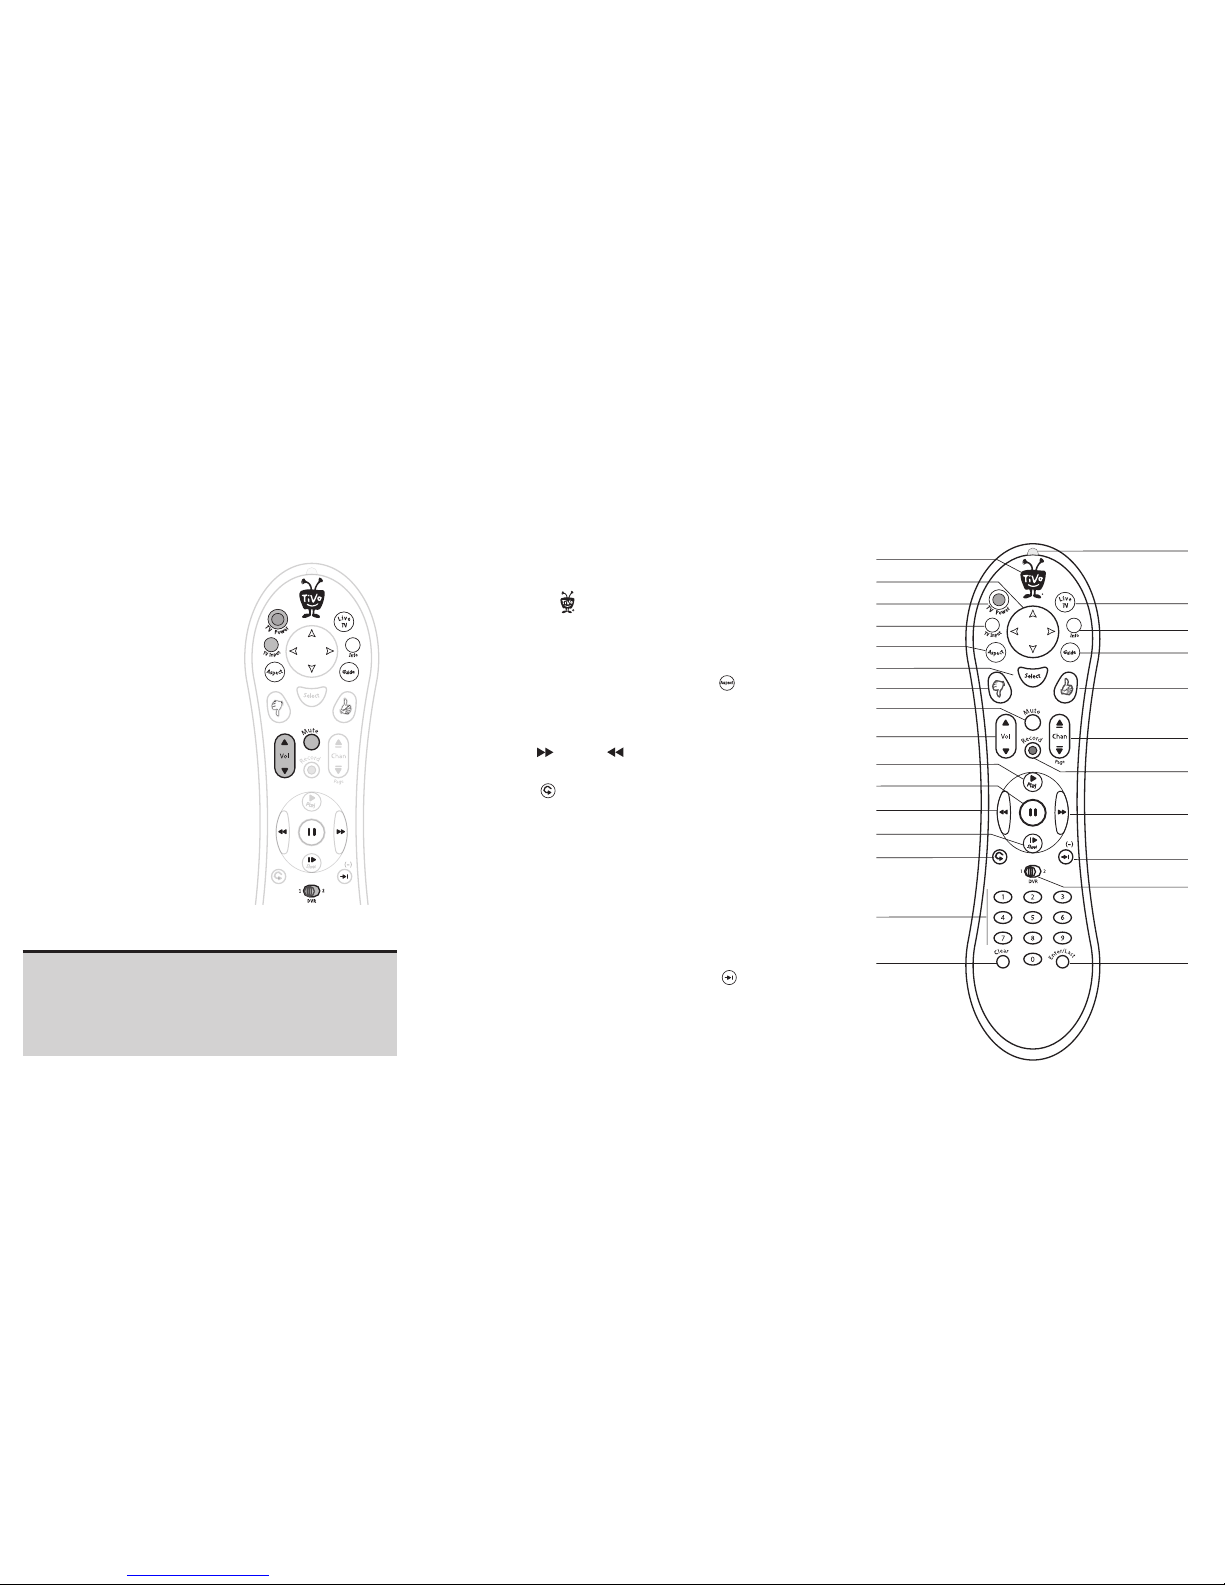
Program your TiVo remote to control your TV or A/V receiver. See Your TiVo
Remote to the left.
Press the TiVo button once to go to the TiVo Central
screen, or twice to go
to the Now Playing List—your list of recorded programs.
Press LIVE TV to switch between tuners. See page 3 for more about watching
live TV with dual tuner.
With certain TiVo-to-TV video connections pressing ASPECT once displays
the current mode. Press again to change the Aspect Correction mode to
Full, Panel, or Zoom. Use this feature to quickly adjust the picture to your
liking.
Press FORWARD and BACK up to 3 times for 3 speeds. Press a
fourth time to resume normal play.
INSTANT REPLAY
TM
replays the last 8 seconds of a program.
Press CLEAR to delete a title in a list (like the Now Playing list) or to hide
things that aren’t part of the program you’re watching (like the TiVo channel
banner).
Press GUIDE to see the TiVo program guide, then press INFO (while the guide
is visible) to see Guide Options and change the way channels display, or
show only a certain types of programs.
CHAN UP/DOWN does more than change the channel—it also pages up or
down through lists of programs or menu items.
When you’re watching “behind” live TV (for example, if you pause live TV and
later resume watching from the paused spot), ADVANCE
TM
catches
you up to the live broadcast. In a recorded program, press it once to jump
to the end of the program, then again to jump to the beginning.
If programmed, the DVR Switch lets you control two different TiVo media
devices with the same remote.
Inserting the Batteries
Hold the remote with the battery door facing you. Slide the door toward you to open.
Insert two AA batteries (supplied). Match the + and - marks on the batteries to the +
and - marks in the compartment.
Replace the battery door.
Some buttons on your TiVo remote
are programmable:
TV POWER
TV INPUT
VOLUME & MUTE (can control sound
on your TV or A/V receiver)
DVR SWITCH (useful if you have more
than one TiVo media device)
To program your TiVo remote, press the
TiVo button to go to the TiVo Central
®
screen and select Messages & Settings,
then Settings, then Remote. Follow the
easy on-screen instructions.
Due to the wide variety of brands and
models available, some TVs and A/V
receivers are not compatible with the TiVo
remote. See Chapter 5 for more on
programming the TiVo remote control.
TiVo Button
TV Power
Arrow Buttons
TV Input
Aspect
Select
Thumbs Down
TM
Mute
Volume
Play
Pause
Back (rewind)
Slow
Instant Replay
Number Buttons
Clear
Remote Active Light
Live TV
Info
Guide
Thumbs Up
TM
Channel Up/Down
Record
Forward (fast forward)
Advance
DVR Switch
Enter/Last
®
Page 3

Please note:
To operate the TiVo® Media Device you will need:
1. To connect the media device to your home broadband internet service.
Depending on the setup of your home network, this will require an Ethernet
cable or the purchase of a TiVo Wireless Adaptor or other compatible wireless
adapter. ISP charges are additional unless you have an unmetered service
2. In Australia: to have a digital terrestrial antenna at your home, and to live
within a free-to-air digital coverage area. In New Zealand: to have an external
UHF aerial at your home, and to live within a Freeview HD coverage area.
(Note: this media device will not connect to pay TV services.)
3. To activate your TiVo service, and receive your on-screen guide data free of
charge, go to www.mytivo.com.au/activate
(Australia) or www.mytivo.co.nz/
activate (New Zealand) and subject to terms and conditions.
4. To connect the media device to your television by using the cables included in
this carton or by purchasing an HDMI cable (sold separately).
5. To follow the guidelines in this manual. This will ensure continued access to
all of your TiVo features.
6. To go to www.mytivo.com.au/support
(Australia) or www.mytivo.co.nz/
support (New Zealand) for assistance if you have any problems or questions
about your TiVo unit or TiVo service.
Page 4

Page 5

®
Welcome
Page 6

ii
This Viewer’s Guide describes features of the TiVo
®
service running on
the TiVo
®
brand media device.
© 2009 Hybrid Television Services (ANZ) Pty Limited. All rights
reserved.
TiVo, the TiV
o logo, TiVo Central, TiVoToGo, WishList, Season Pass,
Overtime Scheduler, the A
dvance logo, the Instant Replay logo, the
Thumbs Up mark and logo, the Thumbs Down mark and logo, the TiVo
Smile logo, and the sounds used by the TiVo service are trademarks or
registered trademarks of TiVo Inc. or its subsidiaries worldwide.
Macrovision Copyright Protection
This product incorporates copyright protection technology that is
protected by U.S. patents and other intellectual property rights. Use of
this copyright protection technology must be authorized by Macrovision,
and is intended for home and other limited consumer uses only unless
otherwise authorized by Macrovision. Reverse engineering or
disassembly is prohibited.
Manufactured under license from Dolby Laboratories. “Dolby” is a
trademark Dolby Laboratorie
s.
Australian Patent Application No. 2005306362, Australian Registered
Design Nos. 143161, 148775, and 149474,
and United States Patent Nos.
5,241,428; 6,215,526; 6,233,389; 6,310,886; 6,327,418; 6,385,739;
6,487,646; 6,490,722; 6,535,253; 6,642,939; 6,643,798; 6,728,713;
6,757,837; 6,757,906; 6,792,195; 6,847,778; 6,850,691; 6,868,225;
6,965,730; 7,055,031; 7,158,531; 7,200,321; 7,216,235; 7,228,556;
7,321,716; 7,409,546; 7,484,234; 7,493,015; 7,529,465; 7,543,325;
7,558,472; 7,590,240; D434,043; D435,561; D445,801; D517,059. The
TiVo Remote Control device is protected under U.S. Pat. Nos. D424,061;
D424,577; D431,552; D433,403 and D463,788. Other patents pending.
All other trademarks are the properties of their respective owners.
Content and Copyright
The TiVo service gives you the ability to access, record, copy, transfer,
display,
view, and/or listen to audio, video, and other
media over which
we exercise no editorial or programming control (“Third Party Content”).
You understand that: (a) we do not guarantee access to or the ability to
record, copy, transfer, display, view, and/or listen to any particular
program or other content; (b) programming is not under our control; (c)
Third Party Content providers may restrict or limit the ability to record,
copy, transfer, display, view, and/or listen to particular programs or other
content by using a variety of copy protection mechanisms; (d) Third
Party Content providers may restrict or revoke access to their content at
any time; (e) we are not responsible for and have no editorial control over
any Third Party Content; and (f) we have no control over the distribution
of such content.
The content that you are able to record on, download to or transfer to or
from you
r TiVo Media Device (inclu
ding Third Party Content) is
protected by copyright. Unless you own the copyright in, or are licensed
by the copyright owner to do a particular act with respect to that content,
you are only allowed under Australian and New Zealand copyright law to
record broadcast content for private and domestic use for watching or
listening to that content at a more convenient time than the time when the
broadcast was made, or may otherwise use that or other content
(including broadband content) as expressly permitted or otherwise in
accordance with the "fair dealing" provisions of the Australian Copyright
Act (in respect of Australian resident customers) or any permitted use in
accordance with the provisions of the New Zealand Copyright Act (in
respect of New Zealand resident customers). Nothing in these Terms
permits, and we do not permit, you to use or deal with content recorded
on, downloaded to or transferred to or from your TiVo Media Device for
any other purpose. If you are not the owner or licensee of content and
you distribute or otherwise make it available to anyone else, you may be
infringing copyright, and this will be treated as misuse of the TiVo
service.
Page 7

iii
Table of Contents
Using This Guide. . . . . . . . . . . . . . . . . . . . . . . . . . . . . . . . . . . . . v
Understanding HDTV . . . . . . . . . . . . . . . . . . . . . . . . . . . . . . . . . vi
Chapter 1: The Basics in 4 Short Tours . . . . . . . . . . . . . . . 1
Tour One: Playing with Live TV. . . . . . . . . . . . . . . . . . . . . . . . . 2
Tour Two: Recording Programs . . . . . . . . . . . . . . . . . . . . . . . . . 5
Tour Three: Your List of Recordings . . . . . . . . . . . . . . . . . . . . . 8
Tour Four: Finding Great Entertainment. . . . . . . . . . . . . . . . . . 11
More Cool Things You Can Do . . . . . . . . . . . . . . . . . . . . . . . . 14
Chapter 2: Finding Programs. . . . . . . . . . . . . . . . . . . . . . 17
Finding Programs to Record . . . . . . . . . . . . . . . . . . . . . . . . . . . 18
Finding Programs Using a WishList
™
Search. . . . . . . . . . . . . . 23
Season Pass
™
and Repeating Recordings . . . . . . . . . . . . . . . . . 27
Managing Recordings with the To Do List. . . . . . . . . . . . . . . . 30
Setting Recording Options . . . . . . . . . . . . . . . . . . . . . . . . . . . . 31
Chapter 3: Watching Programs . . . . . . . . . . . . . . . . . . . . 33
The Status Bar . . . . . . . . . . . . . . . . . . . . . . . . . . . . . . . . . . . . . . 34
The Channel Banner . . . . . . . . . . . . . . . . . . . . . . . . . . . . . . . . . 35
The Program Guide . . . . . . . . . . . . . . . . . . . . . . . . . . . . . . . . . . 36
Chapter 4: Doing More with Your Media Device . . . . . . . 39
Entertainment at Your Fingertips—Home Networking Package40
Multi-Room Viewing . . . . . . . . . . . . . . . . . . . . . . . . . . . . . . . . 42
Listening to Music. . . . . . . . . . . . . . . . . . . . . . . . . . . . . . . . . . . 44
Viewing Photos . . . . . . . . . . . . . . . . . . . . . . . . . . . . . . . . . . . . . 45
Transferring Recordings to Your PC or Mac . . . . . . . . . . . . . . 47
Transferring Videos to Your Media Device . . . . . . . . . . . . . . . 49
Converting Shows for Your Portable Device . . . . . . . . . . . . . . 53
Expanding Your Recording Capacity . . . . . . . . . . . . . . . . . . . . 56
Additional Features . . . . . . . . . . . . . . . . . . . . . . . . . . . . . . . . . . 57
Chapter 5: Settings . . . . . . . . . . . . . . . . . . . . . . . . . . . . . 59
Audio Settings . . . . . . . . . . . . . . . . . . . . . . . . . . . . . . . . . . . . . . 60
Channel Settings . . . . . . . . . . . . . . . . . . . . . . . . . . . . . . . . . . . . 61
Display Settings. . . . . . . . . . . . . . . . . . . . . . . . . . . . . . . . . . . . . 63
Parental Controls . . . . . . . . . . . . . . . . . . . . . . . . . . . . . . . . . . . . 64
Network Settings . . . . . . . . . . . . . . . . . . . . . . . . . . . . . . . . . . . . 66
Recording Settings . . . . . . . . . . . . . . . . . . . . . . . . . . . . . . . . . . 68
Remote & Device Settings . . . . . . . . . . . . . . . . . . . . . . . . . . . . 70
Video Settings . . . . . . . . . . . . . . . . . . . . . . . . . . . . . . . . . . . . . . 74
TiVo
®
KidZone . . . . . . . . . . . . . . . . . . . . . . . . . . . . . . . . . . . . . 77
Messages . . . . . . . . . . . . . . . . . . . . . . . . . . . . . . . . . . . . . . . . . . 81
Account & System Information . . . . . . . . . . . . . . . . . . . . . . . . 82
Restart or Reset System. . . . . . . . . . . . . . . . . . . . . . . . . . . . . . . 83
Standby . . . . . . . . . . . . . . . . . . . . . . . . . . . . . . . . . . . . . . . . . . . 84
Chapter 6: Accessories . . . . . . . . . . . . . . . . . . . . . . . . . . 85
Home Networking . . . . . . . . . . . . . . . . . . . . . . . . . . . . . . . . . . . 86
TiVo
®
Expander Drive . . . . . . . . . . . . . . . . . . . . . . . . . . . . . . . 88
TiVo
®
Wireless Adaptor . . . . . . . . . . . . . . . . . . . . . . . . . . . . . . 89
Chapter 7: Troubleshooting . . . . . . . . . . . . . . . . . . . . . . 91
Appendix: Safety & Specifications . . . . . . . . . . . . . . 115
Index . . . . . . . . . . . . . . . . . . . . . . . . . . . . . . . . . . . . . 123
Page 8

iv
HDMI. The best quality AV connection which enables High Definition (HD)
pictures and digital sound. HDMI cables are sold separately.
Please note that
in New Zealand HDMI is the only connection that provides HD picture
quality out of the TiVo
®
Media Device.
Page 9

v
Using This Guide
Thank you for choosing the TiVo
®
Media Device. This Viewer’s
Guide helps you learn about the smart-recording features of the
TiVo
service and home networking capabilities of your TiVo Media
Device.
Getting Started:
Activate the TiVo service. The TiVo service is what makes your
media device smart. It includes everything from your program
listings to Season Pass™ recordings and WishList™ searches.
To activate your TiVo service, which is available free of charge
and subject to terms and conditions, visit www.mytivo.com.au/
activate (Australia) or www.mytivo.co.nz/activate (New
Zealand).
TiVo service is required. No functionality is represented or
should be expected without activating your free subscription to
the TiVo service.
2. Connect your TiVo Media Device. If the TiVo service is the
brains, the TiVo Media Device is the body. Use the Start Here
poster to connect the media device to your TV programming
source and your television.
3. Complete Guided Setup. After connecting your media device,
follow the steps in the on-screen Guided Setup procedure. This
customises the media device for your home.
4. Take a Tour! Once you’re finished with Guided Setup, the Tours
in Chapter 1 of this guide introduce you to the best features of
the TiVo service. You may also find helpful videos already
recorded for you in the Now Playing List.
Basic Terms
When we talk about the TiVo service, here are some terms you
should know:
Live TV. If you’re watching a program as it’s being broadcast,
you’re watching live TV. With the TiVo service, you can pause
live TV for up to 30 minutes. When you resume watching,
you’re “behind” live TV.
Dual tuner. A tuner is a device found inside media devices, TVs,
VCRs—anything designed to receive TV signals. A tuner picks
one channel to display from all the channels you receive; it
“tunes” to that channel. The TiVo Media Device is a “dual
tuner” device, meaning that it has two tuners inside.
Service updates. From time to time, updates to the TiVo service
will be delivered to your media device via its broadband
connection. Details regarding new features are always available
at www.mytivo.com.au
(Australia) or www.mytivo.co.nz (New
Zealand).
Notes and Tips. In the side columns of some pages in this guide
you’ll find helpful Notes and Tips .
®
Page 10

Understanding HDTV
High-definition television combines high-resolution digital
television with digital sound. It is bigger, sharper, and better than
anything you have previously experienced in home entertainment.
If you’re new to the world of HDTV, here are a few basic terms and
concep
ts to help you get the m
ost out of the experience.
HDTV Receiver. An HDTV receiver decodes high-definition
video signals for display on your TV. The TiVo
®
Media Device
combines an HDTV receiver with a digital video recorder.
Dolby
®
Digital Audio. Programs broadcast with Dolby Digital
audio have six audio channels, each of which can be heard on
one of six separate speakers. To hear Dolby Digital audio, use an
optical digital audio cable (sold separately) or an HDMI cable
(sold separately) to connect your TiVo Media Device to an A/V
receiver or home theatre system that supports Dolby Digital
audio.
Aspect Ratio. A TV’s aspect ratio is the comparison of the
screen’s width to its height: either the standard 4:3 screen or
16:9 widescreen. For information about adjusting the aspect
ratio, see “
TV Aspect Ratio” in Chapter 5.
Aspect Correction. Aspect correction is required when the aspect
ratio of the broadcast picture and the screen size of the TV don’t
match. Aspect correction offers three modes to fit the broadcast
picture to your TV screen: Full stretches the picture, Panel adds
letterbox or side bars to the picture, and Zoom expands and crops
the picture, eliminating bars that may be in the broadcast. For
tips on using Aspect Correction, see page “
Aspect Correction
Mode” in Chapter 5.
Video Formats
TV programs are broadcast in a variety of formats, and TV
equipment receives and displays video in a variety of formats. For
any given program, the format in which a program is broadcast may
or may not match a format that your TV is capable of displaying.
The TiVo Media Device receives video signals
in any of the four
broadcast format
s (1080i, 720p, 576p, and 576i). Each video format
is named with a number and a letter: 1080i and 720p are highdefini
tion formats, 576p is known as enhan
ced-definition, and 576i
is standard-definition.
The
number indicates video resolution: ho
w many horizontal
lines of information make up a single frame of video. Generally,
bigger numbers mean sharper, more detailed images.
The letter indicates the type of scanning used: interlaced or
progressive. With interlaced scanning (1080i & 576i), the
horizontal lines in a video frame are divided into two groups. If
you were to number the lines from the top to the bottom of the
screen, one group would be the odd numbered lines, and the
Page 11

other would be the even numbered lines. All the odd lines, then
all the even lines, are refreshed 50 times per second, alternating
between the two. This means the whole video frame refreshes 25
times per second. This is fine for smaller screens but can result
in flickering on larger screens.
Progressive scanning (720p & 576p) refreshes the whole video
frame (all even and odd horizontal lines) 50 times per second.
This eliminates flicker but requires the TV to process more
information since twice as many frames are displayed each
second.
Native, Hybrid, and Fixed Formats
The TiVo® Media Device offers three types of form ts that control
how broadcast signals are converted—if at all—for display on your
TV.
If your TV supports all formats, choose the Nat
ive option. If yo
ur
TV supports a limited number of formats, choose the Fixed or Hybrid
format that best matches your TV’s capabilities:
Native. When
you use th
e native format, the media device does
not convert broadcast signals. It displays the signals in whatever
format they were originally broadcast. Native is recommended if
your TV supports all four video formats (1080i, 720p, 576p, and
576i).
Hybrid. When you use a hybrid format, the media device
converts standard broadcast signals to 576p. It converts HD
broadcasts to the HD format you choose. Hybrid is
recommended if your TV supports either 720p or 1080i, but not
both.
Fixed. When you use a fixed format, the media device converts
signals broadcast in other formats to the fixed format you
choose, and video is always displayed in this format. Choose the
fixed format that matches your TV’s highest resolution. Using a
fixed format eliminates any screen flicker associated with
switching formats automatically.
See
“Video Settings” in Chapter 5 for more.
Choose What Looks Best to You
Choose the video output format you want the media device to use
based on the formats your TV can display. Check your TV’s
owner’s manual to be sure of your TV’s capabilities. Then go to the
TiVo Central
™
screen and select Messages & Settings, then
Settings, then Video, then Video Output Format.
You should feel free to experiment
with all the different vid
eo
formats that your TV and the TiVo Media Device support. You may
find that some formats are better suited to certain programs than
others.
Page 12

Page 13

®
1
The Basics in 4 Short Tours
Tour One: Playing with Live TV 2
Tour Two: Recording Programs 5
Tour Three: Your List of Recordings 8
Tour Four: Finding Great Entertainment 11
More Cool Things You Can Do 14
Page 14

The Basics in 5 Short Tours
2
1
Tour One: Playing with Live TV
When you’re watching a program as it’s broadcast, you’re watching live TV. In this tour, we’ll
take a look at how you can control live TV. So turn on your TV and grab your TiVo
®
remote!
Press the LIVE TV button to go to live TV from any TiVo screen.
Moving Around in Time
1. First, press the PAUSE button. You can pause live TV for up to 30 minutes!
When you pause live TV, you see a status bar
showing a one-hour period. The green segment
shows the portion of the current hour that has
been saved by your media device. The white line marks your current point in time. When the
white line is back in the green segment, you’re “behind” live TV.
Whenever you change channels, the saved portion of the old program is cleared, and the
media device starts saving the program on the new channel.
2. Press PLAY to continue watching the program. Next, press BACK —the
program rewinds. Press BACK a second time to rewind faster, and a third time to go faster
still! Press BACK a fourth time (or press PLAY at any time) to return to normal speed.
3. Press PAUSE once more, then press FORWARD to move a small step forward.
Press BACK to move a small step back. Press PLAY to resume watching at normal speed.
4. Press the INSTANT REPLAY
™
button. The program jumps back 8 seconds—useful
for when you miss a great sports play or a bit of dialogue, or for when you fast forward too
far.
Before you begin, take a few
moments to make sure the TiVo®
Media Device’s video settings are
optimised for your TV. From the TiVo
Central™ screen, select Messages &
Settings, then Settings, then Video. See
“Video Settings” in Chapter 5 for more.
®
Fine-tune your HD viewing! Use the
ASPECT button on the TiVo
remote control to change how the picture is
displayed on your TV. See “Aspect
Correction Mode” in Chapter 5 for more.
®
See “The Status Bar” in Chapter 3 for more on this ba
r
Page 15

The Basics in 5 Short Tours
3
1
5. Press INSTANT REPLAY again, then immediately press SLOW . You’ll see your
own slow-motion replay!
6. Finally, press the ADVANCE
™
button. Presto! You’re caught up to live TV.
Watching and Recording Two Shows At Once
The TiVo® Media Device is capable of recording two different live TV channels at the same
time—one on each of its two tuners. Go ahead, try it:
1. First,
press PAUSE to pause the live TV program you’re watching.
2. Press LIVE TV to switch to
the other tuner. (It’s just like changing the channel.)
3. Watch the program for a few moments, then press PAUSE .
4. Press LIVE TV again to switch back to the first tuner. Notice that the first program
you were watching is still paused. You can pause for up to 30 minutes on each tuner!
Press PLAY to continue watching the program.
Now you really can watch two programs at the same tim
e! Press RECORD while watchi
ng
either tuner—or on both tuners to record two programs at the same time.
Changing Channels
• Press LIVE TV to switch to the other tuner. Changing channels works the same way no
matter which tuner you’re watching.
• To go to a specific channel, use the numbers on your remote control, then press ENTER. (If
you don’t press ENTER, the channel changes automatically after a few seconds.)
• To jump back to the previous channel on the same tuner, press ENTER.
• To move one channel at a time, press CHAN UP/DOWN on the TiVo remote.
To see what’s showing on the other
tuner, press INFO to view the
channel banner, and select Swap Tuners.
®
T
V
L
i
v
e
T
V
L
i
v
e
Page 16

The Basics in 5 Short Tours
4
1
• Tired of channel surfing? Press GUIDE to display the program guide. Highlight any
program and press SELECT. If the program is on now, the channel changes. If the program
is on later, you’ll see options to record that program. See “
The Program Guide” in Chapter 3
to learn more.
Page 17

The Basics in 5 Short Tours
5
1
Tour Two: Recording Programs
You can always record the program you’re watching by pressing RECORD on your TiVo®
remote control. Beyond that, the TiVo service provides many ways to
quickly search through
TV programs, find your favourites, and schedule recordings in advance.
What’s more, if a program is part of a series, you can get a Season Pass
™
recording of the series.
A Season Pass recording automatically records every episode of the series that airs on the
selected channel—even if the time slot changes!
Search by Title
Know the title of a program you want to record? Finding it is easy. Grab your TiVo remote!
1. Press the TiVo button to see the TiVo Central™ screen. Press DOWN to highlight Find
Programs, and press SELECT. The Find Programs screen appears.
2. Highlight Search by Title and press SELECT. A list of categories you could use to limit your
search appears, including searching only HD programs, but for now select All Programs.
The next screen has a grid of letters. Use the RIGHT, LEFT, UP, and DOWN arrows to
move around the grid.
3. Let’s find “Mythbusters.” Move to the letter L and press SELECT. A list of programs that
begin with “M” appears on the right side of the screen. (Remember: when searching by title,
you do not have to enter “A” or “The.”)
4. Move to the letter “Y” and press SELECT again. The TiVo service searches through all
available programs (usually, those airing within the next week) to find those that begin with
MY, and lists those programs.
If
you make a mistake entering text,
select DEL on the screen, or press
BACK on the remote. To clear all text, select
CLR on the screen or press the CLEAR button.
Selecting SP on the screen enters a space, as
does pressing FORWARD on the remote.
®
If you just completed Guided Setup, the
media device is still organising
program information, and some programs
might not yet appear in the guide.
Page 18

The Basics in 5 Short Tours
6
1
5. Keep entering letters until you see “Mythbusters” in the list. You may see multiple listings if
the program airs on more than one channel.
6. Press the RIGHT arrow until you move off the grid of letters to the list of programs. Press
the UP or DOWN arrow to highlight “Mythbusters” and press SELECT.
A program information screen appears. You can use this screen to record the episode, view
upcoming episodes, or get a Season Pass recording.
Getting a Season Pass™ Recording
Note: Season Pass functionality is only available for channels which display guide data in the
Guide. Check website for the latest information.
1. On the Program Information screen for “Mythbusters”, highlight Get a Season Pass and
press SELECT. A confirmation screen appears. Press SELECT again—and after a short
pause you have a Season Pass to “Mythbusters”! Every episode airing on that channel will
be recorded automatically.
When you set up a Season Pass recording, you can choose how many episodes to keep and
how long to keep them using Recording Options. Choose “First Run Only” if you want to
skip the re-runs. See “
Setting Recording Options” in Chapter 2 for more about using
Recording Options.
2. After setting the Season Pass recording, you return to the Search by Title screen. Press
LEFT to return to Find Programs, then select To Do List. You can see all your scheduled
recordings here.
3. In the To Do List, notice the upcoming episodes of “Mythbusters” are marked with a double
check mark , indicating they are part of a Season Pass.
Page 19

The Basics in 5 Short Tours
7
1
You can cancel the recording of any episode by highlighting the title in the To Do List and
pressing CLEAR. You can delete the entire Season Pass or change recording options using
the Season Pass Manager. See “
Using the Season Pass Manager” in Chapter 2 for more
information.
Page 20

The Basics in 5 Short Tours
8
1
Tour Three: Your List of Recordings
All the programs recorded by your TiVo® Media Device appear in the Now Playing List—your
complete list of recordings. No more searching through unlabeled videotapes!
1. To go to the Now Playing list, press
the TiVo button twice, or select No
w Playing List from
the TiVo Central
™
screen. Your new media device may already contain some short
programs.
2. Highlight any title in the Now Playing List (even a program that’s still recording) and press
PLAY. The program plays from the beginning.
3. If your programs are grouped into folders (see “Grouping Programs” below), highlight the
folder name and press PLAY to play all of the programs in the folder in sequence, beginning
with the oldest first. To delete a folder, highlight the folder name and press CLEAR.
Program Information
If you prefer, you can highlight any title in Now Playing and press SELECT to see the program
information screen, which offers these options:
• Play or Resum
e playing (if you’re return
ing to a partially watched program).
• Keep until... By default, programs you record are saved until space is needed for new
recordi
ngs. The oldest ones may be deleted to make room for new recordings. However, you
always have the option to keep a program for as long as you want. Just select Keep Until...
and on
the next screen you can ch
oose Keep Until I Delete, or specify that the program be
kept until at least the date you choose.
• Delete Now or Stop Recording (if recording is in progress.)
New TiVo Media Devices have
tutorial videos in the Now Playing
List corresponding to the Tours in this
chapter.
Icons to the left of the program’s title tell you the
recording’s current status. See the Glossary of Icons
on the inside back cover for details.
Deleted programs go to the Recently
Deleted folder, where they remain
until space is needed for new recordings.
Page 21

The Basics in 5 Short Tours
9
1
• More Options. Select this item to view upcoming episodes or to create or modify a Season
Pass for this program.
Sorting Programs
You can view the Now Playing List either alphabetically by title (from A to Z) or by date
recorded. To change how the list is sorted:
1. Fr
om Now Playing, press ENTER on your TiVo
®
remote to see Now Playing Options.
2. Highlight Sort, then press the RIGHT arrow to choose Alphabetically.
Then select View
Now Playing List With These Options. When you return to Now Playing, programs are
listed alphabetically by title.
Grouping Programs
When Groups are on, programs are organised into folders, and a number in parentheses to the
right of each folder shows how many programs it contains. Even if Groups is turned off, you’ll
see the Recently Deleted folder at the bottom of the Now Playing list. To turn Groups on:
1. Fr
om Now Playing, press ENTER on your TiVo remote to see Now Playing Options.
2. Select Groups, then press the RIGHT arrow
to choose On. Then select View Now Playing
List With These Options. When you return to Now Playing, you’ll see a folder for:
• Each television series with more than one recorded episode.
• Each auto-recording WishList™ search with a recorded program.
• TiVo Suggestions (if you have auto-recording of TiVo Suggestions turned on).
A program’s title may appear in more than one folder, even though there is only one recording
o
f the program. For example, y
ou might have an auto-recording WishList search for an actor
A note at the bottom of the Now Playing List tells
you which sorting option you are using and
whether groups are on.
Page 22

The Basics in 5 Short Tours
10
1
who also appears in a series, and you have a Season Pass for that series. Each episode of the
series will appear in two folders—one for the WishList search and one for the Season Pass
recording. If you delete the program in one folder, the title also disappears from the other.
Page 23

The Basics in 5 Short Tours
11
1
Tour Four: Finding Great Entertainment
The TiVo® service makes it easy for you to find what you want to watch by responding to your
interests and collecting the best the television networks have to offer.
WishList™ Searches
A WishList search finds programs that match your search criteria on any channel you receive—
and it keeps on searching for as long as you keep the WishList search.
Note: WishList functionality is only available for channels which display guide data in the
Guide. Check webs
ite for the latest information
.
1. From the Find Programs screen, choose WishList Search, then Create a WishList Search.
The Create WishList screen shows the different criteria to include in your WishList search.
For now, start by selecting Actor. You’ll see a letter grid.
2. Move to the letter D and press SELECT. Then select the letters E and P. Each time you
choose a letter, the list of actors on the right changes. You should see DEPP, JOHNNY on
the list now.
3. Press RIGHT to move to the list of names, then highlight DEPP, JOHNNY and press
SELECT.
You’ll return to the Create WishList screen, and you’ll see that DEPP, JOHNNY appears
next to Actor.
4. Select Category. On the Pick Category screen, select Movies. The next screen gives you a
chance to select subcategories of movies, but for now select Don’t Specify Sub-Category.
Page 24

The Basics in 5 Short Tours
12
1
5. You’ll return again to the Create WishList screen. Select Done Creating this WishList
Search.
6. On the confirmation screen, press SELECT to continue.
7. The final WishList search screen lets you view all upcoming Johnny Depp movies, or
choose to automatically record them. If you choose Auto-Record WishList Programs, any
Johnny Depp movie on any channel at any time in the future will be recorded!
TiVo® Suggestions
You can rate any program—whether it’s live, recorded, or listed in the program guide—by
pressing the THUMBS UP
™
or THUMBS DOWN
™
button on your remote. You can
give a program up to three Thumbs Up (great!) or three Thumbs Down (terrible!
).
TiVo Suggestions uses these ratings to create a list of programs you m
ight like. The more shows
you rate over time, the better TiVo Suggestions will get at finding interesting programs for you.
Auto-Recording TiVo Suggestions. When your media device has available space, it automatically
records TiVo Suggestions. But you don’t ever need to worry about recorded Suggestions taking
up space—here’s
why:
• TiVo Suggestions
never replace shows you request,
or prevent your requested shows from
being recorded.
• TiVo Suggestions
are always the first programs deleted to make room for recordings you
request.
Watching TiVo Suggestions. Recorded suggestions appear in the TiVo Suggestions folder inside
the No
w Playing List.
Reviewing the Sugg
estions List. You can also review a list of upcoming TiVo Suggestions:
When you choose to auto-record a
WishList™ search, you can set how
many programs to keep and how long to
keep them using Recording Options. See
“Setting Recording Options” in Chapter 2.
®
Any time you choose to record a
program, it automatically gets one
Thumbs Up.
Y
ou can turn off auto-recording of
TiVo® Suggestions if you prefer. See
“TiVo Suggestions” in Chapter 5.
®
Page 25

The Basics in 5 Short Tours
13
1
1. Press the TiVo button to go to the TiVo Central screen. Select Find Programs, then TiVo
Suggestions to view a list of programs the TiVo service suggests you might like.
The list of programs is ranked, so shows you’re more likely to enjoy are near the top.
2. To record a program, highlight it and press either SELECT or RECORD on your remote. Or
use the THUMBS UP and THUMBS DOWN buttons to rate programs and improve future
Suggestions.
Reviewing your Ratings. To display a list of all programs that you have rated, select Find
Programs, then TiVo
®
Suggestions. Press ENTER to bring up the Review Thumbs screen. Then,
highlight a program and use the THUMBS UP and THUMBS DOWN buttons on your remote
to change its rating.
Showcases
Showcases is an interactive content area that gives you the ability to instantly set up Season Pass
recordings for the hottest TV shows, and movies.
Page 26

The Basics in 5 Short Tours
14
1
More Cool Things You Can Do
A Safe Place for Kids. Never be surprised by what your kids are watching. TiVo® KidZone gives
you total control over what your kids see on TV, and keeps parents’ shows separate from kids’
shows. Personalise KidZone with only shows and channels you pre-approve. See
“TiVo®
KidZone” in Chapter 5.
Schedule for Overtime. Programs sometimes start before they’re supposed to, and often end later
than scheduled. Your media device can automatically adjust recording times for these variations
usin
g the Extend Recordings setting, or you can adjust recording times manually using the
Extend Live Recording setting. See
“Recording Settings” in Chapter 5.
Schedule Recordings from the Web using TiVo Genie. Your co-worker just told you about a mustsee program
that’s on tonight, but you won’t make it home in time to set up a recording. No
problem! You can go online (
www.mytivo.com.au for Australia or www.mytivo.co.nz for New
Zealand) to schedule the recording.
Note: TiVo Genie remote scheduling functionality is only available for channels which display
gui
de data in the Guide.
When Programs Overlap, Get Both.
Even with a dual tuner media device, you’ll sometimes get
reco
rding conflicts. But
with Overlap Protection turned on, shows that conflict by just a few
minutes are no problem. The media device automatically clips just enough from one recording
to allow both shows to record. Now that’s smart recording technology! See
“Recording
Settings” in Chapter 5 for details.
Reduce Remote Control Clutter. Now that you’re using your TiVo remote to change channels
and control live TV, don’t you want t
o put your TV’s remote in storage? You probably can. See
Page 27

The Basics in 5 Short Tours
15
1
the inside front cover of this guide for instructions on programming your TiVo remote to control
the power, volume, and input selection on your TV.
Record From a Preview. See a good preview? Record the show! If
you’re watching live TV
and
a promotion comes on for an upcoming program, you may see an iPreview
™
icon: .
To see options for recording this program, press the THUMBS UP
™
button while the icon
is visible to see options for recording for the program.
Page 28

The Basics in 5 Short Tours
16
1
Page 29

®
2
Finding Programs
Finding Programs to Record 18
Finding Programs Using a WishList™ Search 23
Season Pass™ and Repeating Recordings 27
Managing Recordings with the To Do List 30
Setting Recording Options 31
Page 30

Finding Programs
18
2
Finding Programs to Record
The TiVo® service makes it easy to find programs you know you like, and to find new programs
you might not even know about. You can search for programs by title, by channel, or by time; or
you can search for keywords, actors, or directors.
Recording the Program You’re Watching
You can always record the program you’re watching—just press the RECORD button. On
the screen that appears, select Record This Showing, or select Season
Pass™ & Other Options
for more choices.
Recording the Saved Portion
A portion of the current channel’s broadcast is always being saved, even when you’re not
recording. When you change channels on the tuner you’re watching, the media device clears the
saved portion and starts saving again on the new channel. So, if the saved portion is important to
you, either record the program or don’t change the channel.
To record the saved portion in addition to the rest
of the program, choose Record Th
is Showing.
When you swap between tuners using the LIVE TV button, the saved portion of the
program on the both tuners is retained.
Stopping a recording
You can stop any recording in either of two ways: select the title in Now Playing, then select
Stop Recording; or, press the RECORD button in live TV, then choose Stop the Current
Recording.
Some programs may not be
recorded or may have other
recording restrictions due to copy
protection rights over the content.
T
V
L
i
v
e
Page 31

Finding Programs
19
2
Using the Guide to Find Programs
The program guide displays up to a week of TV programming at the touch of a button. Use the
guide to find programs and set up recordings quickly.
1. Press the GUIDE button on your TiVo® remote.
2. Use the UP/DOWN arrows or the CHAN UP/DOWN buttons to highlight the channel you
want to browse. A listing of programs on that channel appears on the right side of the screen.
3. Press the RIGHT arrow to move to the program listing.
4. Highlight the program’s title in the list, then press SELECT to watch the program or
RECORD to record it.
5. If recording, on the screen that appears, select Record This Showing. After the TiVo service
schedules the recording, you’ll return to the guide.
Filter the Guide to Find Programs
Press the GUIDE button, then press ENTER to display the Guide Options. Highlight Choose
Filter and press SELECT. Choose category and subcategory filters to highlight certain types of
programs in the guide.
When filtering is on, the guide shows only channels that have a program in the category you
chose. Programs
that fit the category are highlighted
; other program titles are dimmed.
Finding More Showings
For a comprehensive list of all upcoming showings of a program, including repeats (multiple
showings of the same program), select the program from the grid, then select Season Pass and
Other Options, and View Upcoming Episodes. You can use this list to choose the showing that
is most convenient for you to record.
Page 32

Finding Programs
20
2
Search by Title
If you know the name of the program you’re looking for, or even the first part of the name, use
the Search By Title function to easily schedule recordings.
1. Press the TiVo® button to go to the TiVo Central™ screen, select Find Programs, then select
Search By Title.
2. Decide how you want to limit your search (if at all). Select All Programs if you want to
search for the title in all available programs, regardless of the type. Select Movies to search
only movies, Kids to search only children’s programs, and so on.
3. Use the letter grid to spell out the title. Use the arrow buttons to move around, then press
SELECT on each letter you want. (Skip “a,” “an,” or “the.”) As you select letters, an
alphabetical list of programs appears on the right. Keep selecting letters until you see your
program.
Other buttons on the TiVo remote have special functions on the grid. The CLEAR button
erases everything; BACK erases one letter at a time; FORWARD inserts a space.
4. When you see your program, press the RIGHT arrow to move to the list. Then use the
UP/DOWN arrows or CHAN UP/DOWN to highlight your program, and press SELECT.
The Program Information screen shows your available options.
If you only know one word in the
title, and it isn’t the first word, try a
Title Wishlist™ search to find the program.
See “Creating a WishList Search” in this
chapter for details.
®
Replace hyphens ( - ), slashes ( / )
and periods ( . ) with spaces. For
example, use 20 20 to search for the title
“20/20.” Any other marks, such as
apostrophes ( ’ ), asterisks ( * ) and
ampersands ( & ) are ignored.
For example, use 6 OCLOCK NEWS to
search for the title “6 O’Clock News.”
®
Page 33

Finding Programs
21
2
Record by Time or Channel
If you don’t remember the exact name of a program, but you know what time or channel it’s on,
use Record by Time or Channel. Press the TiVo
®
button to go to the TiVo Central™ screen,
select Find Programs, then Record by Time or Channel. From there, you’ll have three options:
Browse by Time. Browse programs on a specified day and time.
You can filter the list to see on
ly
programs in a particular category. For example, you can browse all movies airing on Saturday
night. To browse by time:
1. Us
e the arrow buttons to highlight a category (for example, Movies), then press SELECT.
2. Press the UP/DOWN arrows to select the
date you want to see, then press the RIGHT arrow
to move to the time column, and press the UP/DOWN arrows to select a time.
3. Press SELECT to see the list of programs without leaving the time selector, or press the
RIGHT arrow to see the list of programs and move to the list.
4. When you find a program you want to record, highlight it and press SELECT.
Browse by Channel. Browse through programs airing on a particular channel. You can start with
al
l channels, or just your favo
urites. To browse by channel:
1. Choose either All Channels, which includes all the channels you receive, or Favourite
Channels, which includes just the channels you have selected as your favourites. See
“
Customising Your Channel List” in Chapter 5 to learn about selecting favourite channels.
2. Press the UP/DOWN arrows to select the date you want to see, then press the RIGHT arrow
to move to the channel column.
3. Press the UP/DOWN arrows to select a channel. (You can also use the numbers on the
remote to enter a channel, then press ENTER.)
Page 34

Finding Programs
22
2
4. Press SELECT to see the list of programs without leaving the channel selector, or press the
RIGHT arrow to see the list of programs and move to the list.
5. When you find a program you want to record, highlight it and press SELECT.
Set Up Manual Recording. Schedule a recording on a specific channel at a specific time. To
create a manual recording:
1. Cho
ose the recording type, using the UP/DOWN arrows to select whether the recordin
g will
be One Time or Repeating, then press the RIGHT arrow.
2. Choose the day(s) for the recording, using the UP/DOWN arrows to change the current
selection. If you chose Repeating, you can choose to repeat the recording on a specified day
of the week (Every Tuesday) or several times a week (Every M - F).
3. Press the RIGHT arrow and choose a channel using the UP/DOWN arrows (or by entering a
number with the remote, then pressing ENTER).
4. Press the RIGHT arrow and set the hour, minute, and am/pm for the start and stop time,
using the UP/DOWN arrows to change the current selection. Press the RIGHT arrow or
SELECT.
5. You’ll see a confirmation screen. The TiVo
®
Media Device shows a “best guess” program
title based on guide listings for that time and channel. Select Record This Showing.
Use a repeating manual recording to
record things like just the opening
monologue of a late night talk show.
®
Page 35

Finding Programs
23
2
Finding Programs Using a WishList™ Search
A WishList search finds programs that match your interests, tastes, and whims on any channel
you receive, and it keeps on searching for as long as you keep the WishList search.
For example, you could create a Category Only WishList search for the category Movies and
subcate
gory Comedy. You could then occasionally brows
e a list of all comedy movies airing in
the next week. The list is updated each time your media device connects to the TiVo
®
service.
You could search for something more specific by creating an Actor WishList search for Sean
Connery, and then include the category Movies, and subcategory
Action. This WishList search
would find action movies starring Sean Connery.
Note: WishList functionality is only available for channels which display guide data in the
Guide.
Can the WishList Feature Do More Than Search?
Yes it can! You can set a WishList search to auto-record, and it will record every show it finds,
on any channel you receive. For example, with the Sean Connery Actor WishList search, you
would automatically collect Sean Connery action movies in the Now Playing List.
Some WishList searches are better suited to
auto-recording than others. For example, a
Category Only WishList s
earch for the category Documentary w
ould find every upcoming
documentary. You might not want to record them all, but you could occasionally browse the
search results list and choose the ones you do want to record.
Creating a WishList Search
Creating a WishList Search is simple:
The more specific a WishList
search is, the better suited it is to
auto-recording.
®
Page 36

Finding Programs
24
2
1. From Find Programs, select WishList Search, then Create a Wishlist Search.
2. Next, start choosing criteria for your WishList Search. You can choose any or all of the
following:
• Keyword. Search for programs with specific words in the program or episode title,
description, actor, director, year, or category information.
• Title Keyword. Search for programs with specific words in the program or episode title.
• Actor. Search for programs with your favourite actor.
• Director. Search for programs by director.
• Category. Search for specific categories and sub-categories of programs (for example,
action movies or nature documentaries).
3. After entering your initial search criteria, you’ll return to the Create WishList
™
Search page.
Continue adding as many search criteria to your WishList search as you like. For instance,
you could create a WishList search like this:
• Keyword: 007
• Actor: Sean Connery
• Category: Movies
Your results would include James Bond movies starring Sean Connery as Agent 007!
4. The TiVo
®
service automatically assigns a name to your WishList search. If you’d like to
assign a different name, select WishList Name.
5. When you are finished entering search criteria, select Done Creating This Wishlist Search. A
confirmation screen will appear; press SELECT to continue.
Not all actor or director names may
be listed. To search for a name that is
not on the list, enter the name in the format:
LAST NAME, FIRST NAME. You must match
the spelling of the name exactly, and you
must use a comma (available in the grid
under the letter W).
®
Page 37

Finding Programs
25
2
6. On the final WishList Search screen, you can view upcoming episodes matching your search
criteria, set up your Wishlist search to auto-record programs matching your search criteria,
or edit or delete your Wishlist search.
Using the Asterisk (*) in WishList™ searches
To search for similar words in a Keyword or Title WishList, use the asterisk (*) as a wild card
symbol that replaces the endings of words. For example, the keyword OFF* would find shows
containing “office” and “offer,” as well as the movie “An Officer and a Gentleman.” To enter an
asterisk, press the SLOW button on the remote.
You can use the asterisk only at the end of a keyword; not to omit letters at the beginning or in
t
he middle of a word. (For exam
ple, keywords like AIR*NE or *PLANE will not work.)
Tips for Entering Keywords
• Use quotation marks to specify an exact phrase in a Keyword or Title WishList search (to
enter quotation marks, press PAUSE . For example, the keyword PAUL SIMON might
turn up a documentary about Simon Bolivar with a director named Paul. Use “PAUL
SIMON” to be certain you find only programs that feature Paul Simon.
• If you include an exact phrase and additional keywords, place a space between the final
quotation mark and the beginning of the next word (for example, “GEENA DAVIS” FLY).
Enter a space by selecting SPC or pressing FORWARD .
• If you enter more than one keyword, the search finds programs that match all of the
keywords.
• Replace hyphens ( - ), slashes ( / ) and periods ( . ) with spaces. For example, use the
keyword 20 20 to search for the title “20/20.” For an Actor WishList for Catherine ZetaJones, use ZETA JONES, CATHERINE.
When using the asterisk (*), be as
specific as possible. For example, do
not use keywords like TH*. There will not
be enough room to show all the results of a
keyword that is too general.
®
Page 38

Finding Programs
26
2
• Any other marks, such as apostrophes ( ’ ) and ampersands ( & ), are ignored. For example,
you would use the keyword phrase 6 OCLOCK NEWS to search for the title “6 O’Clock
News.” (Note that commas ( , ) in titles and keywords are also ignored, except in an actor or
director WishList
™
search, where they are essential.)
• For dollar signs ( $ ) substitute the letter S. For example, to find “$100,000 Pyramid,” use
S100000. (In Search by Title, skip the dollar signs to find these titles.)
Browsing WishList Search Results
Select View All Upcoming WishList Programs to display a list of up to 10 upcoming programs
from each of your WishList searches—up to 200 programs total (so it may take a while to
display). To record a program, highlight its title and press SELECT.
To browse a single WishList search, select the search, then s
elect View Upcoming Programs
to
see a list of up to 200 unique programs that match. To record a program, highlight its title and
press SELECT.
Each auto-recording WishList search and its upco
ming recordings are marked with a
star .
If you want to be sure that all matching programs are recorded, give the auto-recording
WishLis
t search a high priority in the Season Pass
™
Manager. See “Using the Season Pass
Manager” in this chapter for details.
Editing a WishList Search
You can change a WishList search—for example, to correct a misspelling, or to add a category
or subcategory to narrow the results. Just select the WishList search, then select Edit this
WishList.
As you browse the upcoming
program titles found by WishList™
searches, remember that the CHAN UP/
DOWN button pages quickly through lists.
®
Page 39

Finding Programs
27
2
Season Pass™ and Repeating Recordings
With your TiVo® Media Device, you can set up three types of recordings to repeat
automatically:
Season Pass Recording. Records every episode of a series that airs on a certain channel—
even if the day or time changes! Just select a program from the guide or a list of search
results, and choose Get a Season Pass.
Note: Season Pass functionality is only available for channels which display guide data in
the Guide. Check website for the latest information.”
Manual Repeating Recording. Records on a specific channel at a specific time, just like a
VCR. See “
Record by Time or Channel” in this chapter for more.
Auto-recording WishList
™
search. Records all programs found by a WishList search. See
“
Creating a WishList Search” in this chapter for more.
Repeating recordings have the following traits in common:
• Parental Controls. If Parental Controls are on when you schedule a repeating recording, the
media device checks its current program information to see if any upcoming program
violates a Parental Control. If it does, the media device requires the password to continue.
• Set Your Priorities. The TiVo service resolves scheduling conflicts between scheduled
repeating recordings by comparing recording priorities. Change recording priorities with the
Season Pass Manager. See “
Using the Season Pass Manager” in this chapter for more.
• Conflict Resolution. If a scheduling conflict occurs while setting up a new repeating
recording, you’ll see which programs are involved, and have options to resolve the conflict:
• Record only those episodes that don’t conflict with other programs scheduled to record.
This makes the new repeating recording the lowest priority in the Season Pass Manager.
Page 40

Finding Programs
28
2
• Record all episodes. This makes the new repeating recording the highest priority in the
Season Pass Manager.
Using the Season Pass Manager
Say you have a Season Pass to Mythbusters and an auto-recording WishList
™
search for movies
with Julia Roberts. What if a Julia Roberts movie happens to conflict with Mythbusters?
Use the Season Pass Manager to set priorities
and resolve conflicts am
ong your scheduled
repeating recordings. If the Julia Roberts WishList search has a higher priority than the
Mythbusters Season Pass recording, the Julia Roberts movie will be recorded, and Mythbusters
will not.
Changing the Priority Order
If you don’t change priorities, repeating recordings are prioritised by the order in which you set
them up: the first has highest priority, and so on. To change the priority order from the Season
Pass Manager:
1. Press the TiVo
®
button to go to the TiVo Central™ screen, then choose Find Programs, then
Season Pass Manager.
2. Use the UP/DOWN arrows to highlight a repeating recording, and press the RIGHT arrow to
highlight the arrows to the right of the title.
3. Use the UP/DOWN arrows to move the selected title up or down in the list.
Because the TiVo Media Device is a dual tuner
media device, recording conflicts should be
minimi
sed. If you have Overlap Protection turned on (see
“Overlap Protection” in Chapter 5),
when programs do conflict by a few minutes, lower priority recordings will be clip
ped instead
of cancelled when they overlap with higher priority programs by a few minutes.
Page 41

Finding Programs
29
2
Editing a Repeating Recording
You can also view/change recording options, view upcoming episodes, or cancel Season Passes
or auto-recording WishList
™
searches with the Season Pass™ Manager. Highlight the program
title and press SELECT to view available options.
Page 42

Finding Programs
30
2
Managing Recordings with the To Do List
The To Do List shows all your scheduled recordings and lets you change recording options or
cancel recordings.
Viewing the To Do List
View the To Do list by pressing the TiVo® button to go to the TiVo Central™ screen, then select
Find Programs, then To Do List. You’ll see a list of all programs scheduled to record in the next
week or so. Press SELECT on any program to see available options.
Cancelling a Recording
To cancel a recording, just highlight the program title on the To Do List and press CLEAR.
View Recording History
Use the View Recording History option on the To Do List if you’re curious why a particular
program or episode was not recorded, why it’s not scheduled to record, or when it was deleted
from Now Playing. The Recording History is organised by date. Use the UP/DOWN arrows to
browse the programs in the list. Select the program’s title from the Recording History for more
information about it.
In the To Do List, individual
recordings are marked with a single
check mark:
Season Pass™ recordings and manual
repeating recordings have a double
check mark:
Auto-recording WishList™ searches are
marked with a star:
®
Page 43

Finding Programs
31
2
Setting Recording Options
Recording options let you customise each recording, so you always get the results you want.
You can set recording options when you first schedule a recording, or by selecting a program
title from the To Do List or the Season Pass
™
Manager. To view or change recording options:
1. On the Program Information s
creen, select either Record This Episode or Get a Season Pass.
Then use the RIGHT arrow to highlight Options, and press SELECT.
2. On the Recording Options screen, use the UP/DOWN arrows to highlight an option, then the
RIGHT and LEFT arrows to change the setting.
3. When you’re finished, press SELECT or highlight Record Program With These Options.
Press SELECT again to schedule the recording with the new options.
4. To cancel your changes, press the LEFT arrow, or highlight Don’t Change Recording
Options and press SELECT.
Recording Options include:
Keep At Most. Set the maximum number of episodes to be saved. (This option is available
only for a repeating recording.)
Show Type. Skip reruns or watch them all? Choose from Repeats & First Run, First Run
Only, or All (With Duplicates). (This option is available only for a repeating recording.)
Keep Until. For a repeating recording, choose how long to keep each episode. Space Needed
is the default setting, or choose Until I Delete.
Start Recording. Adjust the start time of your recording (for instance, if you want to start
recording a little bit early or a little bit later than the official starting time.) This option is
available only before recording starts.
Page 44

Finding Programs
32
2
Stop Recording. Set a recording to continue—for a few minutes or up to three hours—after
it’s scheduled to end. For example, you can extend a recording of a live sports event and be
sure to catch the whole game—even if it goes into overtime. You can change this setting
when you set up the recording, or while the recording is in progress!
If the Extend Recordings setting is turned on, the values displayed for the last two recording
options—Start Recording and Stop Recording—will be based on schedule information the
TiVo
®
service receives from the program guide. You can still adjust the Start Recording and
Stop Recording settings to a start and end time of your choice. This can be especially helpful for
live events like sporting events or award shows, where unscheduled overtime will not be
accounted for by the Extend Recordings setting. See
“Extend Recordings” and “Extend Live
Recordings” in Chapter 5 for more.
Page 45

®
3
Watching Programs
The Status Bar 34
The Channel Banner 35
The Program Guide 36
Page 46

Watching Programs
34
3
The Status Bar
When you press PLAY, PAUSE, FORWARD, or BACK, the status bar appears at the bottom of
the screen. In live TV, the status bar represents one ho
ur and the white tick marks are 15
minutes apart. In recorded programs, the bar shows the program’s length. The tick marks are 15,
30, or 60 minutes apart depending on the length of the program.
The green segment represents the part of the pro
gram saved by the m
edia device. The media
device automatically saves up to 30 minutes of live TV. You can move backward and forward
through the saved portion of a live
program.
In live TV, the right edge of the green segment represents the
current time. A white ve
rtical line
shows where you are in the recording. If the white line is anywhere back in the green segment,
you’re behind live TV. If you’re behind live TV, press ADVANCE
™
to catch up.
Press the CLEAR button to hide the
status bar, the program guide, the
channel banner, and anything else that is
not part of the program.
®
You can only rewind live TV up to 30
minutes, or to the point where you
last changed the channel on that tuner
(whichever is less). When you change the
channel, you skip ahead to the current time
on the new channel and start saving again.
If you’re behind live TV and watching
something you still want to see, you should
avoid changing the channel.
This end is where you
catch up with live TV and
the current time.
Tick marks (15 min. apart)
This symbol shows you
are controlling live TV
(here, live TV is paused).
Status Bar for live TV
This recorded program
is two hours long.
This shows that the BACK button
has been pressed twice.
Status Bar for a two-
hour recording
The white line indicates
where you are now.
Tick marks (15 min. apart)
Page 47

Watching Programs
35
3
The Channel Banner
The channel banner appears whenever you change the channel, but you can also view it while
you’re watching a program. It has information about the program you’re watching, and
shortcuts to other useful features of the TiVo
®
service.
To view the channel banner while watching a live or recorded program, press INFO.
Channel Banner Icons
Icons in the large version of the channel banner are shortcuts that take you to the corresponding
feature. Use the UP/DOWN arrows while the large channel banner is visible to highlight an
icon, then press SELECT.
Record. Select this icon to record the program you’re watching. If a recording is in
progress, select this icon to stop the recording.
Tuner Swap.
When you sele
ct this icon, the channel banner displays the channel
number and program title currently airing on the other tuner. Press SELECT to
switch to the other tuner.You can also switch to the other tuner by pressing the LIVE
TV button.
Audio. Select this icon for alternate audio tracks, if
available. These alternate tracks
may in
clude Dolby
®
Digital audio tracks. See “Audio Settings” in Chapter 5.
Parental Controls. If Parental Controls are off, the lock icon app
ears unlocked and
dim. If they are on, the icon is locked and bright (as shown). If they are temporarily
off, the icon is unlocked and bright. (When KidZone is turned on, the KidZone icon
is displayed instead of the lock icon.)
Captions (Australia). Select this icon to turn captioning on or off.
Captions (New Zealand). Select this icon to turn captioning on or off.
The channel banner includes the
program’s title, description,
classifications, and other information.
You can also press the RIGHT arrow
to display the channel banner. Keep
pressing RIGHT arrow to change the size of
the channel banner. There are three sizes.
Press the LEFT arrow or CLEAR to hide it.
®
Page 48

Watching Programs
36
3
The Program Guide
The TiVo® Media Device’s program guide lets you see what’s on, change channels, schedule
recordings, and more—all while you’re watching live TV.
Program Guide Data is available for most but not a
ll channels in New Zealand. See website for
the latest
information.
Choosing a Program to Watch or Record
1. Press the GUIDE button to display the program guide.
While viewing the guide, you can press FORWARD to move the displayed time
ahead. To go back in time, press BACK . Press ADVANCE
TM
to jump 24 hours
ahead; press INSTANT REPLAY TM to jump 24 hours back.
2. Use the UP, DOWN, LEFT, and RIGHT arrows to highlight a program title.
If you select a program in progress, the channel changes and the program guide disappears.
(Remember, whenever you change channels, the saved portion of the old program is cleared,
and the media device starts saving the new program.)
If you select an upcoming program, you’ll see a screen with recording options. Choose an
option or press the LEFT arrow to go back to the guide. See “
Recording the Program You’re
Watching” in Chapter 2 for more on recording from live TV.
Customising the Program Guide
Guide Options lets you display channels and programs in the guide according to your
preferences. Press ENTER while the guide is displayed to set guide options.
Page 49

Watching Programs
37
3
To change an option, move to it using the UP/DOWN arrows, then press the LEFT or RIGHT
arrow to change the setting. Save your changes by pressing SELECT or GUIDE, or selecting
Finished Changing Options. To cancel your changes, press CLEAR.
Guide Options
Choose filter. Choose category and subcategory filters to highlight certain types of programs in
the guide. When filtering is on, the guide shows only channels that have a program in the
category you chose. Programs that fit the category are highlighted; other program titles are
dimmed.
Filtering. A filter excludes some programs from the guide, so you can easily find the shows you
w
ant. When you wa
nt to see all channels and programs in the guide, turn filtering off.
Style. Choose between the TiVo
®
Live Guide and Grid Guide styles, shown on the next page.
Time and Day. See what’s on at a particular day and time.
Channels. Choose which channels to display in the guide. The choices are:
• All. Display all available channels.
• You Receive. Display only the channels you receive (see “
Channel List” in Chapter 5 for
more on received channels in your Channel List).
• Favourites. Display only your favourite channels. To select favourites, give your favourite
channels THUMBS UP
™
in the Channel List. See “Channel List” in Chapter 5 for more
about choosing favourite channels.
To see all the channels again, go to Guide Options (press GUIDE, then ENTER). Highlight
Filtering, press the LEFT arrow to set it to Off, and then press SELECT.
Page 50

Watching Programs
38
3
Program listings
Grid Guide
Program description
Day and time slots
Channel list and
category filter
currently in use
Title, date, time the
program airs, and classification
Channel numbers and
channel call letters
Guide options (Press ENTER to set)
TiVo® Live Guide
Programs during
this time period
Upcoming programs on
the selected channel
Guide options (Press ENTER to set)
Channel list and
category filter
currently in use
Title, date, time the
program airs, and classification
Program description
Day and time
Selected channel
Channel numbers and
channel call letters
Page 51

®
4
Doing More with Your Media
Device
Entertainment at Your Fingertips—
Home Networking Package 40
Multi-Room Viewing 42
Listening to Music 44
Viewing Photos 45
Transferring Recordings to Your PC or
Mac 47
Transferring Videos to Your Media
Device 49
Converting Shows for Your Portable
Device 53
Expanding Your Recording Capacity 56
Additional Features 57
Page 52

Optional Features
40
4
Entertainment at Your Fingertips—Home
Networking Package
By now you have a sense of how your TiVo® Media Device is constantly working to find you
all of your favourite entertainment. But there’s more to your TiVo Media Device than just
recording programs—much more. Your media device is really a powerful entertainment centre,
providing you with access to a whole new world of digital entertainment, both broadcast and
broadband!
Getting the most out of your TiVo Media Device begins with purchasing the Home Networking
Package at
www.mytivo.com.au/shop (Australia) or www.mytivo.co.nz/shop (New Zealand).
The Home Networking Package will enable you to:
• Transfer content between the TiVo Media Devices in your household (Multi-Room
Viewing).
• Transfer recordings to your PC or Mac* to watch (TiVoToGo™ transfers).
• Convert recordings for viewing on your mobile device (requires Desktop Plus key, included
when you purchase the Home Networking Package).
• Access music and photos stored on your home computer via the TV.
• Access and transfer home videos stored on your PC or Mac* (requires Desktop Plus key,
included when you purchase the Home Networking Package).
Note: When you purchase the Home Networking Package you receive one licence key for
TiVo Desktop Plus. You may purchase extra licence keys for additional computers on your
home network from www.mytivo.com.au/shop
(Australia) or www.mytivo.co.nz/shop (New
Zealand).
Page 53

Optional Features
41
4
Steps required to use your Home Networking Features:
1. Purchase the Home N
etworking Package.
2. Receive a confirmation email with your token.
3. Click on the link within the email to activate Home Networking on your account.
4. Log in to ‘My TiVo’ using the details created when you activated your TiVo Media Device.
5. Follow the on-screen steps to complete activation of your Home Networking Package.
Note: If you have not activated your TiVo Media Device you will need to do this first. If you
purchased the Home Networking Package and a TiVo Media Device at the same time you
will need to wait until you receive the TiVo Media Device before continuing.
6. Download and install TiVo Desktop for PC or for Mac from your My TiVo account.
7. Run the TiVo Desktop program and enter your Media Access Key (MAK) and TiVo
Desktop Plus Key when prompted.
8. The MAK will be displayed on your TiVo within 24 hours of activating your Home
Networking Package. The MAK must be available on your TiVo Media Device for the
Home Networking Package to function. The MAK can be found by going to ‘TiVo Central’
> ‘Messages & Settings’ > ‘Account & System Information’ > ‘Media Access Key.’
* Mac users will need to purchase third-party software called Roxio Toast 10 Titanium or
Pop
corn to enable these features.
Page 54

Optional Features
42
4
Multi-Room Viewing
Say you recorded a show in the living room, but you want to watch it on the TV in your
bedroom. Now you can! When you have more than one TiVo
®
Media Device connected to your
home network, you can transfer shows between them.
1. Ensure you have purchased the Home Networking Package at www.mytivo.com.au/shop
(Australia) or www.mytivo.co.nz/shop
(New Zealand) (see page 40 for more information).
2. Go to the media device that you want to transfer shows to. For this example, let’s call it the
Bedroom media device.
3. At the bottom of the Bedroom media device’s Now Playing List, highlight the media device
you want to transfer shows from. Let’s call this the Living Room media device. Remember,
media devices in your home network are marked on the Now Playing List by the media
device icon: .
4. Press SELECT to see the Living Room media device’s Now Playing List.
5. Find the show you want to transfer from the Living Room media device to the Bedroom
media device. Highlight it and press SELECT.
6. You can then choose to watch the show as it is transferring, or continue browsing the Living
Room media device's Now Playing List.
Note: If you watch the show as it is transferring, you might experience intermittent delays in
the transfer, depending on your network speed.
Page 55

Optional Features
43
4
Transferring from a Paused Location
Now let’s say you’ve watched the first half of a show in one room, and want to finish it in
another. You don’t need to transfer only the part you haven’t watched. (You have to press
PAUSE on the program you were watching before opting to transfer from a paused location.)
1. From the
receiving media device’s “Now Playing List,” select the sending media device.
2. Press S
ELECT on the show you want to transfer, then select “Transfer from the paused
point.”
Stopping a Transfer in Progress
To stop a transfer in progress, select the show title from the Now Playing List on the receiving
media device, then select Stop Transferring.
Page 56

Optional Features
44
4
Listening to Music
Using TiVo® Desktop (available for both PC users and Mac users) and your TiVo Media
Device, you can enjoy your digital music collection on the best sound system in the house!
To enable this feature, you need to install the Australian
or New Zealand version of the TiV
o
Desktop application (see page
40) on a home computer that is connected to the same home
network as your TiVo Media Device. We do not support or authorise the use of the particular
TiVo Desktop application that is av
ailable for download by US customers in the US.
Note: TiVo Desktop provides a link between your computer and your TiVo Media Device, while
TiVo
Desktop Plus opens ot
her additional features. Visit
www.mytivo.com.au/support
(Australia) or
www.mytivo.co.nz/support (New Zealand) to learn more.
To listen to music on your TiVo Media Device, you must first “publish” MP3 files stored on
your computer. Publishing your music means making MP3 files available to stream over your
hom
e network to
your TiVo Media Device. Published music does not use any of your media
device's recording space.
1. On yo
ur home computer, open TiVo Desktop and click the Share Music, Photos, &
Videos
icon: .
2. Click the Music tab, then click Add Music.
3. Navigate to
the folder containing the music you want to stream. When you select a folder,
any MP3 files within that folder are listed in the right frame of the Add Music window.
4. To publish a whole folder of music, select the folder and click Add. To publish individual
MP3 files, select them from the list on the right, then click Add.
Published music and photos aren’t
copied to your media device, so they
don’t consume space used by your
recordings. Publishing simply allows your
media device to stream the music and
photos stored on your computer.
Page 57

Optional Features
45
4
Now you’re ready to listen!
5. On your TiVo
®
Media Device, select Music, Photos, & Showcases from the TiVo Central™
screen.
6. Select the menu item that resembles “Music on [Computer name].” The exact name will
differ depending on how your computer is named.
7. You will see any playlists or folders that you have published. Highlight one and press
PLAY. In a few seconds, music starts playing. After the first song ends, the second song in
the playlist or folder begins.
Viewing Photos
View photos and slideshows stored on your computer from the comfort of your couch!
Just like you need to publish your music to listen to it on your TiVo Media Device, you must
also publish
your photos to view them on your TV. Publishing your photos means making photo
files available to stream over your home network to your TiVo Media Device. Published photos
do not use any of your media device's recording space.
1. O
n your home computer, open TiVo Desktop and select the Share Music, Photos, & Video
icon .
2. Click the Photos tab, then click Add Photos.
3. Navigate to the folder containing the photos you want to view. When you select a folder, any
photo files within that folder are listed in the right frame of the Add Photos window.
Page 58

Optional Features
46
4
4. To publish a whole folder of photos, select the folder and click Add. To publish individual
photo files, select them from the list on the right, then click Add.
Your photos are available for viewing!
5. On your TiVo
®
Media Device, select Music, Photos, & Showcases from the TiVo Central™
screen.
6. Select the menu item that resembles “Photos on [Computer name].” The exact name will
differ depending on how your computer is named.
7. Highlight a folder and press PLAY to view a slideshow.
Page 59

Optional Features
47
4
Transferring Recordings to Your PC or Mac
For PC users, the TiVoToGo™ feature requires the purchase of the Home Networking Package
(see page
40) on a home computer that is connected to the same home network as your TiVo®
Media Device and the installation of the Australian or
New Zealand version of TiVo Desktop,
as well as the installation of a third party media player (such as Windows Media Player 11).
Transferring Recordings to your PC
Using the TiVo Desktop application, the TiVoToGo feature enables you to transfer a program
that you have recorded on a TiVo Media Device to your PC so you can watch your favourites on
your PC. Here's how:
1. O
n your PC, launch TiVo Desktop.
2. Select TiVo R
ecordings and then click Pick Recordings to Transfer. A window showing
your TiVo Media Device’s Now Playing List appears. If you have more than one TiVo
Media Device in your home network, their names appear in a pull-down list at the top of the
screen. Select the media device that has the recording you want to transfer.
Note: Shows that cannot be transferred due to copy protection restrictions are marked with a
red circle slash.
3. Highlight any title in the list to see more information about the show—the same show
information you have on your TiVo Media Device.
4. Tick the box next to the title of the show (or shows) you want to transfer.
5. Click Start Transfer.
That’s it! While transferri
ng recordings, TiVo Deskto
p displays the status and the time
remaining. Click the Transfer Status status button to view details of transfers in progress:
Page 60

Optional Features
48
4
. Transfer times vary, but may take as long as the show’s duration (i.e., up to one
hour for a one hour show) to complete the transfer.
Setting up Auto-Transfers
If the show is part of a series, the Auto-Transfer this Series button is available on TiVo®
Desktop: . Click this button, and TiVo Desktop will transfer each episode
automati
cally as soon as it’s available on your media device’s Now Playing List.
Transferring Recordings to your Mac
For Mac users, the TiVoToGo™ feature requires the purchase of the Home Networking Package
(see page
40) and the installation of third-party software called Roxio Toast 10 Titanium or
Popcorn on a Mac that is connected to the same home network as you
r TiVo Media Device. We
are not responsible for and do not warrant the use, behaviour, or performance of such third party
software.
To find out how to transfer your recordings
to a Mac, go to
www.mytivo.com.au/support
(Australia) or
www.mytivo.co.nz/support (New Zealand).
Watching Recordings on your PC or Mac
Recordings you transfer to your computer are listed in TiVo Desktop’s Now Playing List. To
reach the Now Playing List in TiVo Desktop, click TiVo Recordings.
To watch a recording, select any t
itle from the li
st (even one that’s still transferring) and click
Play. Your computer’s default media pl
ayer starts automatically. Refer to your media player’s
instructions for more about playing recordings.
Note: You may need to install TiVo Desktop Plus to watch recordings on your PC.
Page 61

Optional Features
49
4
Transferring Videos to Your Media Device
PC users can use TiVo Desktop Plus to access home movies and other video files stored on your
home computer, provided they are in a compatible format. Mac users can use Roxio Toast 10
Titanium or Popcorn to access home movies and other video files stored on your home
computer, provided they are in a compatible format. Using these features, you get the added
benefit of being able to have your favourite personal videos and video podcasts delivered to
your Now Playing List automatically.
Mac users, see
“Transferring Videos from your Mac to your TiVo® Media Device” on page 52.
Transferring Videos from your PC to your TiVo® Media Device (TiVo
Desktop only)
With TiVo Desktop, you can access videos stored in the My TiVo Recordings folder on your PC
and transfer them to your TiVo Media Device for viewing.
1. Locate the videos on your PC that you’d like to view on your TiVo Media Device. These can
be home movies, videos downloaded from the web, or any other video files, as long as they
are either MPEG-2 or .tivo files. Other file formats require TiVo Desktop Plus (see below).
2. Copy these videos into the My TiVo Recordings folder inside the My Documents folder on
your PC.
3. Launch TiVo Desktop. The videos you copied into the My TiVo Recordings folder will
appear in TiVo Desktop’s Now Playing List.
4. On your TiVo Media Device, go to your Now Playing List.
5. Select your PC. It is marked with the computer icon: .
Page 62

Optional Features
50
4
6. Select any title.
7. Choose Transfer This Recording to start the transfer. When the transfer starts, you have the
option of watching the video immediately, or choosing additional videos to transfer.
If you did not begin watching the video in Step 7, you can watch at any time from your Now
Playing List.
Transferring Videos from your PC to your TiVo® Media Device (TiVo
Desktop Plus)
With TiVo Desktop Plus, you don’t have to store your videos in My TiVo Recordings to access
them from your TiVo Media Device. Instead, you can access videos in any folder (like podcast
or music video folders) and watch them on your TiVo Media Device. And, if you have video
files or podcasts that automatically download to your PC, you can use TiVo Desktop Plus to
deliver these videos directly to your TiVo Media Device’s Now Playing List–automatically.
1. Launch TiVo Desktop Plus.
Note: When you purchase the Home Networking Package (see page 40
) you receive one
licence key for TiVo Desktop Plus. You may purchase additional licence keys for additional
computers on your home network from www.mytivo.com.au/shop
(Australia) or
w
ww.mytivo.co.nz/shop (New Zealand).
2. Select the Share Music, Photos, & Videos icon: .
3. Click the Video tab, then click Add Video.
4. Select the folder containing the videos you want to add. These can be home movies, videos
downloaded from the web, or any other video files, as long as they are one of the following
formats:
• Windows Media Video (.wmv)
Page 63

Optional Features
51
4
• QuickTime Movie (.mov)
• MPEG-4 / H.264 (.mp4, .m4v, .mp4v)
•MPEG-2
• DivX or Xvid (.avi, .divx, encoded with the DivX codec, version 4 or higher, or with the
Xvid codec. No other video formats are supported within .AVI files.)
• .tivo files.
5. Click Add.
Note: You cannot select individual files within a folder.
6. On the Video Folder Properties popup window, set the folder properties, including:
• Whether to auto-transfer videos from this folder to your media device. If you choose to
auto-transfer videos, you MUST make sure that your TiVo
®
account is linked to TiVo
Desktop Plus. To do this, click File > Link to my TiVo Account in TiVo Desktop Plus.
• How many videos from this folder to keep on the media device (if auto-transferring)
• Which media device(s) will get videos from this folder (if auto-transferring)
7. Click OK.
8. To watch videos contained in folders that are set to auto-transfer:
• From your media device’s Now Playing List, select the folder you set up to auto-transfer.
• Select any title to watch.
9. To watch videos contained in folders that are NOT set to auto-transfer:
• From your media device’s Now Playing list, select your PC. It is marked with the
computer icon . Then select any title.
Page 64

Optional Features
52
4
• Choose Transfer this recording to start the transfer. When the transfer starts, you have
the option of watching the video immediately, or choosing additional videos to transfer.
If you did not begin watching immediately, you can watch at any time from your Now
Playing List.
Transferring Videos from your Mac to your TiVo® Media Device
For Mac users, this feature requires the purchase of the Home Networking Package (see
page
40) and the installation of third party software called Roxio Toast 10 Titanium or Popcorn
on a Mac that is connected to the same home network as your TiVo Media Device. We are not
responsib
le for and do not warrant the use, behaviour, or performance of such third party
software.
To find out how to transfer videos from
a Mac to your media device, go to
www.mytivo.com.au/support (Australia) or www.mytivo.co.nz/support (New Zealand).
Note: When you purchase the Home Networking Package (see page
40) you receive one licence
key for TiVo Desktop Plus. You may purchase additional licence keys for additional computers
on your home network from
www.mytivo.com.au/shop (Australia) or www.mytivo.co.nz/shop
(New Zealand).
Page 65

Optional Features
53
4
Converting Shows for Your Portable Device
Converting Shows for Your Portable Device (PC Users)
Once a program has been transferred to your PC using the TiVo® Desktop Plus application
(provided to you at the time of activation of your Home Networking Package; see page
40), you
can also select the program for viewing on selected mobile devices.
With TiVo Desktop Plus
software, you can automatically prepare each transferred TiVo
recording for use
with a portable video player, either by adding the recording to your media
library or converting it to your player’s preferred video format.
If your portable device syncs with Windows Media Player, see
"Transferring TiVo Recordings
to your Windows-Based Device" below.
If your portable device does not sync with Windows Media Player, recordings transferred to
TiVo Desktop’s Now Playing List need to be converted to a format t
hat your portable device
can read. You can convert individual recordings, or you can set this to happen automatically to
all recordings in the Now Playing List.
1. Launch TiVo Desktop Plus.
Note: When you purchase the Home Networking Package (see page 40
) you receive one
licence key for TiVo Desktop Plus. You may purchase additional licence keys for additional
computers on your home network from www.mytivo.com.au/shop
(Australia) or
w
ww.mytivo.co.nz/shop (New Zealand).
2. To convert a single recording manually:
• Highlight a recording in TiVo Desktop's Now Playing List.
• Right mouse-click the recording and select Convert For…, then select your device.
Page 66

Optional Features
54
4
3. To convert all recordings automatically:
• Choose File > Preferences.
• Select the Portable Devices tab.
• Select Convert for Use with My: and use the drop-down menu to select your portable
device.
• If you want TiVo Desktop to delete the original recording from the My TiVo Recordings
folder after the conversion for your portable device is complete, check the box next to
Delete the Original Transferred Files After Conversion. This avoids storing multiple
copies of the same recording on your computer.
• Click OK.
Note: These settings apply only to new shows transferred to TiVo
®
Desktop’s Now Playing
List; items currently in the Now Playing List will need to be converted manually (as
described above).
4. Refer to the documentation that accompanies your portable device for instructions on
transferring videos to your device.
Transferring TiVo Recordings to your Windows-Based Device
If your portable media player is Windows-compatible, TiVo Desktop can add recorded shows to
your Windows Media Library automatically:
1. Launch TiVo Desktop.
2. Choose File > Preferences.
3. Select the Portable Devices tab.
Page 67

Optional Features
55
4
4. Select Add to my Windows Media Library.
5. Click OK.
6. Refer to the documentation that accompanies your portable device for instructions on
transferring videos to your device.
Converting Shows for Your Portable Device (Mac Users)
For Mac users, this feature requires the purchase of the Home Networking Package (see
page
40) and the installation of third party software called Roxio Toast 10 Titanium or Popcorn
on a Mac that is connected to the same home
network as your TiVo® Media Device. We are not
responsible for and do not warrant the use, behaviour, or performance of such third party
software.
Once a show has been transferred to your Mac usi
ng Roxio Toast 10 Titanium
or Popcorn, you
can later convert the show for viewing on selected mobile devices.
To find out how to convert shows on a Mac, go to
www.mytivo.com.au/support (Australia) or
www.mytivo.co.nz/support (New Zealand).
Page 68

Optional Features
56
4
Expanding Your Recording Capacity
To find out how to increase your recording capacity go to www.mytivo.com.au/support
(Australia) or
www.mytivo.co.nz/support (New Zealand). You can search using the key word
“expand.”
Page 69

Optional Features
57
4
Additional Features
Your TiVo
®
Media Device will automatically check-in with the TiVo service from time to time.
If there are any new features available for your TiVo Media
Device these will be automatically
downloaded and installed. These features can be anything from additional free games and
applications, to additional content and programming and other services that may be charged on
a per use basis.
Note: Software updates will be supplied by the TiVo service as a free service—you will not need
t
o pay for these software updates
(normal internet charges will still apply). These regular
updates future-proof your TiVo and ensure that it will always have the latest offerings available.
For more information on new features and applications please visit
www.mytivo.com.au
(Australia) or
www.mytivo.co.nz (New Zealand).
Ensure that you have the latest features, you can manual
ly connect your TiVo Media Device to
connect to the TiVo service outside of its normal scheduled connection. To do this, from the
TiVo Central
™
screen, select Messages & Settings, then Settings, then Network, then Connect
to the TiVo service now. (Normally, you don’t need to select this option—the media device
connects to the TiVo service automatically, usually once a day).
After you start the connection, the status of the connection is displayed. You can then return to
w
atching live
TV.
Page 70

Optional Features
58
4
Page 71

®
5
Settings
Audio Settings 60
Channel Settings 61
Display Settings 63
Parental Controls 64
Network Settings 66
Recording Settings 68
Remote & Device Settings 70
External Storage 73
Video Settings 74
TiVo® KidZone 77
Account & System Information 82
Restart or Reset System 83
Standby 84
Page 72

Settings
60
5
Audio Settings
From the TiVo Central™ screen, select Messages & Settings, then Settings, then Audio.
• Alternate Audio. Some programs are broadcast with more than one audio track. Often, the
additional audio tracks are Dolby Digital (see below) or alternate language tracks. When
alternate audio tracks are available, you’ll see a bright alternate audio icon in the channel
banner:
.
The Default Audio Language setting lets you choose which audio language track is recorded.
• Dolby
®
Digital. If you have an A/V receiver or home theatre system that supports Dolby
Digital audio, use this setting to choose how the media device will record and output digital
audio. Check your A/V receiver or home theatre system manual for its capabilities.
If the alternate audio icon
in the channel banner (described above) is bright, one of the
available alternate audio tracks may be a Dolby Digital track. Select the bright icon for
options.
• Sound Effects Volume. Change the volume or turn off the media device’s sound effects (the
tones played when you press buttons on the remote control). The default is Medium.
Page 73

Settings
61
5
Channel Settings
From the TiVo Central™ screen, select Messages & Settings, then Settings, then Channels.
Add a Channel
This setting allows you to select a frequency on which you’d like to find a channel. The media
device will scan that frequency to find any available channels, and you can add them to your
channel list.
Channel List
The Channel List is a list of free-to-air channels you are currently receiving, compiled when the
media device performs a channel scan. (The media device performs a channel scan the first time
you set it up; you can re-run a channel scan at any time. See
“Channel Scan” below for details.)
The media device adds channels found during the scan to the Channel List, and, in most cases,
selects them as one of the channels you receive. (A channel is selected if
it has a check mark
next to it.) At times, the
media device may find multiple channels with the same channel
number. When this happens, both channels are added to the channel list, but only the channel
with the higher signal strength is selected as one of your received channels.
Only channels you receive are displayed
in the guide and are available for recording programs.
Features such
as Search By Title and WishList
™
searches look for programs only on channels
you receive.
If a channel is in the list but is not selected as
a channel you receive, you can select it manually
(see
“Customising Your Channel List” below). Alternatively, you can always tune to it while
watching Live TV by entering the channel number on your remote control and pressing
ENTER.
Page 74

Settings
62
5
Customising Your Channel List
You can add or remove received channels on the Channel List: highlight the channel and press
SELECT to add or remove the check mark.
You can also indicate your Favourite Channels by highlighting each
and pressing the THUMBS
UP b
utton. Include only a few channels in this list, so that you can quickly look at what’s
coming up on them using the guide. See
“Customising the Program Guide” in Chapter 3.
Channel Scan
Channel scanning identifies all the channels that the antenna is currently receiving. Signals
received via antenna are subject to weather conditions and other environmental factors, so the
availability of certain channels may vary. This means that you may see channels appear and
disappear from the channel list each time you perform a channel scan.
Signal Quality
The Signal Quality screen allows you to bring up a signal strength meter over live TV. The
meter indicates how well a particular digital TV channel is being received. The signal strength
meter can help you make adjustments to your antenna position to optimise the reception of
antenna channels.
If the Signal Strength Meter displays green boxes, the signal level and video quality are optimal.
If th
e meter displays or
ange boxes, the signal level and video quality are moderate. If the meter
displays red boxes, the signal level is either too low (four red boxes) or too high (all red boxes).
For help improving the signal quality, go to the TiVo Central screen, then click Messages &
Settings, then Troubleshooting.
Page 75

Settings
63
5
Display Settings
From the TiVo Central™ screen, select Messages & Settings, then Settings, then Displays.
• Channel Banner. Control how the channel banner is displayed. Normally, when you change
channels, the channel banner is displayed for a few seconds. If you want it to disappear
quickly, select Clear Banner Quickly.
• Displays on the Front of the Media Device. You can change the display of the media device’s
LEDs (the lights on the media device’s front panel). The LEDs (light emitting diodes)
indicate when the media device is receiving power, recording, or receiving information over
the broadband connection, as well as which video output format is selected. You can choose
to turn off all the LED lights, or just the video format indicators.
Even if you choose to turn off the front
panel lights, one of the LEDs on the
front panel will flash briefly when a button on
the remote is pressed. This indicates that the
media device is receiving a signal from the
remote.
Page 76

Settings
64
5
Parental Controls
Use Parental Controls to set limits on movie and television classifications, to lock specific
channels, and to prevent viewing of recorded programs that violate Parental Controls. From the
TiVo Central
™
screen, select Messages & Settings, then Settings, then Parental Controls.
The padlock icon in the channel banner shows the current state of Parental Controls.
Off. No password or controls are set. The icon
is dim and unlocked.
On. Password and controls are set. The icon is bright and locked.
Temporarily Off. Controls are set but turned off. The icon is bright and unlocked.
Changing Parental Controls Settings
You must enter your Parental Controls password to change any Parental Controls settings.
• Turn on Parental Controls. Use the number buttons on the remote control to enter a four-digit
password, then enter the same password again for confirmation.
• Turn off Parental Controls. Enter the password, and press SELECT. When Parental Controls
are off, the password is deleted and anyone can view any programs or watch any channels.
• Temporarily turn off Parental Controls. Either enter the password to watch a program or
channel, or select Temporarily Turn Off Parental Controls from the Parental Controls
screen. When Parental Controls are temporarily turned off, any program or channel can be
viewed, but the password is still required to change Parental Controls settings.
When you turn Parental Controls off,
your password is deleted. You may
prefer to temporarily turn off Parental
Controls, so that another person in your
household does not choose a new
password.
®
The large version of the channel
banner has a shortcut to Parental
Controls, indicated by the padlock icon.
Select this icon to easily access Parental
Controls settings from live TV or recorded
programs. Note that when KidZone is turned
on, this icon becomes a KidZone icon.
®
Page 77

Settings
65
5
• Auto Re-lock. When Parental Controls are temporarily turned off, they re-lock automatically
after four hours of no remote control activity. Parental Controls won’t re-lock in the middle
of a show. Use this setting to disable Auto Re-lock.
• Change the Password. While Parental Controls are on, select Change Password from the
Parental Controls screen. Enter a new password, then re-enter the new password to confirm.
Managing Classification Settings and Locked Channels
These settings allow you to restrict viewing to certain channels or classification limits, and to
block programs that are unclassified.
Classification Settings
Select Classification Settings from the Parental Controls menu to access these settings.
• Classification Limits. When you select this setting, you’ll see a box listing all classifications.
Classifications shaded in green are not locked; classifications in red are locked. Use the UP/
DOWN arrows to adjust which classifications are locked.
• Block Unclassified. Some programs are unclassified. Use this setting to block all unclassified
programs.
Channel Locks
Select Channel Locks from the Parental Controls menu to access this setting. Then press
SELECT to lock or unlock a channel.
Page 78

Settings
66
5
Network Settings
From the TiVo Central™ screen, select Messages & Settings, then Settings, then Network. From
this screen you have the following options:
• Connect to the TiVo® service now. Normally, you don’t need to select this option—the media
device connects to the TiVo service automatically, usually once a day. After you start the
connection, the status of the connection is displayed. You can watch live TV, set up
recordings, and search for programs while the connection is in progress.
• Change network settings. You can use this option to manually change your network settings
if needed. The settings available to you will vary depending on if you are using a wired or
wireless network.
– If you are using a Wired network, see “
Wired (Ethernet) Network Settings” below.
– If you are using a Wireless network, see “
Wireless Network Settings” below.
• View network status. This option lets you see information related to your network
connection.
• View network diagnostics. This option lets you test your connection to the TiVo service, see
a history of your video downloads and transfers, and run other diagnostic tests related to
your network connection.
For more information about connecting your media device to a home network, see
www.mytivo.com.au/support (Australia) or www.mytivo.co.nz/support (New Zealand).
The media device makes regular
connections to the TiVo® service to
get updated program listings and other
information. The connection usually lasts
less than five minutes. From time to time,
your media device may receive service
updates. In such cases, the connection
time may be longer.
The Network screen includes details about
the last successful connection to the TiVo
service.
Page 79

Settings
67
5
Wired (Ethernet) Network Settings
Most of the time, you will not need to configure these settings, as they are usually configured
automatically when you first set up your media device. However, if necessary, you can use this
page to configure how
the TiVo
®
Media Device receives an IP address, or you can assign a
static IP address and other network information manually. Follow the on-screen instructions to
configure your wired network.
Wireless Network Settings
To connect to your wireless network, you may need the name (SSID) of your wireless network
and its password/key (if any).
• Enter Wireless Network Name. This screen lists the names of nearby wireless networks that
your media device has been able to identify. If you have a wireless router (or wireless
access
point) and you di
d not set a network name, your network is probably using a name supplied
by the router’s manufacturer.
If your network’s name is listed, select it. (You may be able to see more network names by
p
ressing CHAN DOW
N to scroll down the screen.)
Otherwise, select Enter Network Name, then select Finished Entering Text when you are
finished.
• Enter Network Password. If your network has a password, enter it and
then select Finished
Entering Netw
ork Password. If your network does not have a password, select My Network
Doesn’t Have a Password.
You must use capital and lowercase
letters appropriately when entering a
network name and password. To find a
network named “My Network” you must
capitalize the “M” and “N”; entering “my
network” won’t work. Use the THUMBS UP
and THUMBS DOWN buttons to change to
uppercase or lowercase.
®
Page 80

Settings
68
5
Recording Settings
From the TiVo Central™ screen, select Messages & Settings, then Settings, then Recording.
Extend Recordings
Programs often run longer than their scheduled end time. When the Extend Recordings setting is
turned on, the TiVo
®
service automatically adds extra time to the end of scheduled recordings
based on data it receives from the program guide. This helps to ensure that you won’t miss the
endings when programs run later than the advertised finish time. The TiVo service also
automatically adjusts the start time of programs following extended programs. The Extend
Recordings setting applies to all recordings. In addition, you can always adjust the start and end
times of individual recordings using Recording Options.
Overlap Protection
Being able to record two programs at the same time doesn’t eliminate all possible recording
conflicts. The Overlap Protection feature gives you additional options for dealing with
recording conflicts when they occur.
• If Overlap Protection is turned
off, when two pro
grams overlap by a few minutes (for
example, one program ends at 8:33, while the next program begins at 8:30), the lower
priority recording is cancelled.
• With Overlap Protection turned on, the media device automatically clips the lower priority
recording by just enough minutes to allow both programs to record.
Overlap Protection works by determining the priority of each progra
m scheduled to record. For
repeating recordings, it uses the Season Pass Manager to learn whic
h programs have higher or
lower priorities (see
“Using the Season Pass Manager” in Chapter 2). One-time recordings are
Page 81

Settings
69
5
not listed on the Season Pass Manager; these individual recordings that you schedule receive the
highest priority. In fact, the most recent individual recording that you requested always has the
highest priority. (TiVo
®
Suggestions always have the lowest priority.)
When scheduling new recordings, the media device notifies you of any recordi
ng conflict and
gives you options for resolving it. If Overlap Protection is on, your options include clipping the
lower priority program.
Extend Live Recordings
Sometimes, live events (like sporting events) may go into overtime; this unscheduled overtime
will not be accounted for by the Extend Recordings setting. When the Extend Live Recordings
setting is turned on, the media device will remind you to add extra time when recording live
events.
TiVo Suggestions
Use this screen to turn automatic recording of TiVo Suggestions on or off. When automatic
recording is on (the default), TiVo Suggestions may be recorded if there’s available space.
Reme
mber, recordings you schedule will never be deleted to make room for TiVo Suggestions.
Also, if space is needed for your recordings, TiVo Suggestions are the first programs to be
deleted. For more about TiVo Suggestions, see
“TiVo® Suggestions” in Chapter 1.
Page 82

Settings
70
5
Remote & Device Settings
From the TiVo Central™ screen, select Messages & Settings, then Settings, then Remote &
Device Settings.
Remote Control
Programmable Buttons
Some buttons on the TiVo® remote are programmable. To program the buttons:
1. Follow the instructions on the Remote Control Setup screen. You have options to control
power, volume and mute on your TV, volume and mute on your A/V receiver (stereo
system
), and input selection on your TV.
2. Press and hold the buttons indicated on the screen for about 5 seconds—until the red light at
the end of the remote lights up and stays on.
3. Try entering the first code listed on the screen. The red light on the remote flashes to indicate
it received the code. Test the button. If it doesn’t work, repeat the steps using the next code
on the list.
Network Remote Control
• The network remote control feature allows your TiVo Media Device to be integrated with
home-automation and entertainment control devices on your network. If your home is
equipped with touch panel remotes, network-connected mobile phones, or other network
based remote control devices, select Enabled to turn this function on.
Due to the great variety of TVs and
A/V receivers available, some makes
and models may not be compatible with
your TiVo® remote control.
If you’re unable to program the TiVo remote
to work with your equipment, go to
www.mytivo.com.au/support (Australia) or
www.mytivo.co.nz/support (New Zealand)
for help.
Page 83

Settings
71
5
Resetting the Programmable Buttons
You can reset all the programmable buttons (TV POWER, VOLUME, MUTE, INPUT, and the
media device SWITCH) at once. All the remote's buttons will return to the unprogrammed state
of a new remote. To reset the buttons:
1. Point the remote away from your media device.
2. Press and hold the TV POWER and TiVo buttons simultaneously until the red light at the
end of the remote lights, and remains lit when you release the buttons.
3. Press the THUMBS DOWN button three times, then press ENTER.
Controlling Two Media Devices with the DVR Switch
If you have two media devices, you can set up the remote so that it will only send signals to one
of them at a time. This will prevent the remote control from changing channels on both media
devices, and prevent you from accidentally deleting programs you want to keep.
Programming the DVR SWITCH
1. Cover the front of either media device (call this device #2) to prevent it from receiving
signals from the remote. Use a dark piece of cloth or a magazine—or anything else thick and
opaque.
2. Point the remote control at the other media device (device #1) and press the TiVo
®
button.
From TiVo Central
™
, select Messages & Settings, then Account & System Information, then
System Information. Press the DOWN arrow until you see Remote Address.
3. Move the DVR SWITCH to 1, then point the remote away from media device #1 and cover
the front end of the remote with your hand.
Fixed Native Hybrid 576i 576p 720p
HD
Digital Video Recorder
Shield the front
of media device
#2
Page 84

Settings
72
5
4. Press and hold the PAUSE and TiVo buttons simultaneously until the red light at the end of
the remote control comes on, remains steady, then stays on when you release the buttons
(about 5 seconds).
5. Point the remote control at media device #1. Use the number buttons on the remote control
to enter the number “1.” Press the RIGHT arrow. On screen, the Remote Address changes to
“1.”
6. Side 1 now controls media device #1 only. You can test this by pressing the TiVo button.
7. Set up side 2 of the DVR SWITCH (or side 2 might still control both media devices). First,
make sure your TV is displaying media device #2. Then remove the cover you placed in
from of media device #2 and cover the front of media device #1.
8. Go to the System Information screen of media device #2, and press the DOWN arrow until
you see Remote Address displayed.
9. Move the media device SWITCH to 2. Repeat steps 4 and 5, above. Assign the number “2”
to media device #2, then press the TiVo
®
button to go to the TiVo Central™ screen.
Now when you set the DVR SWITCH to 1, it will only control media device #1—and when you
set it to 2, it will only control media device #2.
Resetting the DVR SWITCH
1. Move the DVR SWITCH to 1.
2. Press and hold the PAUSE and TiVo buttons simultaneously for about three seconds, until
the red light at the end of the remote control comes on and remains steady.
3. Using the number buttons on the remote control, enter 0 (zero). The red light at the end of
the remote control will flash to indicate that DVR SWITCH 1 is reset.
By default, all media devices and
remote controls have a Remote
Address of “0” (zero). A remote control with
a Remote Address of “0” will control any
TiVo Media Device, even one with an
assigned code. A media device set to “0”
will respond to any remote control, even
one with an assigned code. This prevents
you from becoming accidentally “locked
out” of controlling your media devices.
Page 85

Settings
73
5
4. To complete the reset, move the DVR SWITCH to 2 and repeat steps 2 and 3.
External Storage
Use this screen when you want to add or remove an external storage device. Visit
www.mytivo.com.au/expand (Australia) or www.mytivo.co.nz/expand (New Zealand) for more
information on external storage solutions.
Page 86

Settings
74
5
Video Settings
From the TiVo Central™ screen, select Messages & Settings, then Settings, then Video.
Aspect Correction Mode
This screen displays the current setting. Aspect Correction is applied when the aspect ratio of
the program you’re watching doesn’t match the aspect ratio of your TV. Use the ASPECT
button on the TiVo
®
Media Device remote to cycle through three modes:
•In FULL mode, the p
icture is stretched to fill the entire TV screen, which may result in some
distortion. In the picture of the bears shown here, notice that black bars appear at the top and
bottom of the screen, and the bears look a bit squished. Since the Aspect Correction is Full,
you know that the letterbox bars are included in the broadcast.
•In PANEL mode, letterbox bars or side bars are added to the picture as necessary to fill the
screen, preserving the broadcast aspect ratio. This mode is useful if you’re watching a
program broadcast in 4:3 on a 16:9 TV, or vice-versa. In the picture of the bears, notice that
when the Aspect Correction is Panel, the bears no longer look squished, but the picture size
is dramatically decreased.
•In ZOOM mode, the picture is stretched without distortion. The edges of the picture are
cropped to fit the TV screen. This mode is useful if you’re watching a program broadcast
with letterbox bars or side bars. Zoom mode crops the letterbox bars out of the picture. The
picture of the bears looks best in Zoom mode.
Letterbox Colour
Choose which colour the TiVo Media Device should use when it adds letterbox or side bars to
the picture: gray or black. Changing the colour of the bars can be useful if you’re trying to
Page 87

Settings
75
5
determine whether bars on the screen are being added by the media device, or by the
broadcaster.
TV Aspect Ratio
Aspect ratio refers to the proportions of your TV screen. A standard TV screen ratio is 4:3.
Widescreen TVs are 16:9. Select the type of screen your TV has.
• Some TVs automatically change their display bas
ed on the type of signal they receive: high-
d
efinition or standard. If your 4:3 TV has this feature, you probably notice that it adds bars
to the top and bottom of an HD picture. If so, select 4:3 Smart Screen.
• If your TV does not have this feature, you may notice that it squeezes an HD picture into the
4:3 shape. If so, select 4:3 Standard Screen. Check your TV’s manual for its capabilities.
Video Output Format
The TiVo® Media Device receives video signals in any of the four broadcast formats (1080i,
720p, 576p and 576i). Use this screen to choose which format you want the TiVo Media Device
to use when sending video to your TV. Consult your HDTV’s owner’s manual for the formats it
supports.
• If your TV supports all four video formats, and if you’re an HDTV novice, Na
tive format
is
recommended. This ensures that your TV will display exactly the digital broadcast format it
receives.
• If your TV supports a limited number of formats, choose the Fixed or Hybrid format that best
matches your TV’s capabilities.
See
“Understanding HDTV” and “Video Formats” at the beginning of this guide.
Page 88

Settings
76
5
Using the Format Button
You can press the Format button on the front of the media device to change the Video Output
format. When you first press the Format button, the current Video Output format will be
displayed on the front of the media device. Continue to press the Format button until you see the
desired format displayed.
Fixed Native Hybrid 576i 576p 720p 1080i 1080p
Page 89

Settings
77
5
TiVo® KidZone
TiVo KidZone creates a child-friendly environment on your TiVo Media Device. In KidZone,
only age-appropriate channels and recordings are available, and children cannot set up new
recordings or change any settings on the media device.
Note that KidZone and Parental Co
ntrols cannot be used
together. Setting up KidZone clears all
Parental Controls settings and turns off Parental Controls.
Turning on KidZone
To get started with KidZone, go to the TiVo Central™ screen, select Messages & Settings, then
Get TiVo KidZone. Create a password, and you’re ready to go. Initially, in Australia, only
programs (in the Now Playing List and Live TV) with classifications of P, C, and G
(recommended for children 10 and under) will be allowed (in New Zealand, your children will
only be able to see programs with the classification of G, which are recommended for audiences
of any age). They will not be able to see or delete your programs, or set up any new recordings.
You’ll be able to further customise which programs shoul
d appear in KidZone
from within
KidZone itself or by selecting KidZone Settings from the Messages & Settings screen after
KidZone is turned on. See
“Adjusting KidZone Settings” below.
Watching Shows in KidZone
To enter KidZone, select Enter TiVo KidZone from the top of the Now Playing List. KidZone
Now Playing contains your kid-friendly list of recorded programs. It also contains options for
adding programs and changing settings.
Now Playing List
KidZone Now Playing List
Page 90

Settings
78
5
• The KidZone Now Playing List contains only those programs allowed by the KidZone
settings you choose.
• While watching live TV in KidZone:
– The only channels available are those your children have permission to watch. Pressing
the CHAN UP and CHAN DOWN buttons on the remote changes the channel only to
allowed channels, skipping channels that are not allowed in KidZone.
– On allowed programs, the channel banner displays program information only. You
cannot expand the channel banner to access other information or settings (for instance, to
switch tuners). On programs that are not allowed, the channel banner displays only the
current channel, without program information.
– You cannot use the numbered buttons to change channels, and you cannot use the Live
TV button on the remote control to switch between the media device’s tuners.
Adding Programs to KidZone
From KidZone Now Playing, select Add Programs and Change Settings. You’ll find the
following options for adding programs:
• Add Programs from the Now
Playing List. Use this
option to add programs from your Now
Playing list to the KidZone Now Playing list. Use the SELECT button on your remote
control to check the boxes next to each program you want to add to KidZone. (You can also
use the SELECT button to uncheck the boxes next to programs that you want to hide.)
• Find Programs to Record or Hide. Use this option to find programs just as you would outside
of K
idZone. When y
ou select a program to record, select Options and set the Allow in
TiVo
®
KidZone option to “Yes.”
Page 91

Settings
79
5
Hiding Programs in KidZone
From KidZone Now Playing, select Add Programs and Change Settings. You’ll find the
following options for hiding programs:
• Add Programs
from the Now Playing List. Us
e this option to hide programs previously added
from your Now Playing list. Use the SELECT button on your remote control to uncheck the
boxes next to programs that you want to hide.
• Find Programs to Record or Hide. Use this option to find programs just as you would outside
of KidZone.
When you select a program to hide, select
Options and set the Allow in TiVo
®
KidZone option to “No.”
Adjusting KidZone Settings
KidZone settings include the following:
• KidZone Channels. Select channels to allow or block when watching live TV in KidZone.
• Change Passwo
rd. Change your password for KidZone.
• Modify Classification Settings. These settings allow you to restrict viewing depending a
program’s classification, and to block programs that are unclassified.
– Classification Limits. In Australia, when you first set up KidZone, only programs with
classifications of P, C, and G (recommended for children 10 and under) are allowed
(in New Zealand, your children will only be able to see programs with the classification
of G, which are recommended for audiences of any age). Use this setting to adjust
which classifications to allow or block. Classifications shaded in green are not locked;
classifications in red are locked. Use the UP/DOWN arrows to adjust which
classifications are locked.
Page 92

Settings
80
5
– Block Unclassified. Some programs are unclassified. Use this setting to block all
unclassified programs.
• Clear KidZone Program Settings. Use this setting to clear any choices you have made about
hiding or adding programs. This setting will not clear the classification settings or the
KidZone channels list.
Exiting KidZone
Select Exit TiVo® KidZone from the top of KidZone Now Playing. You must enter the
password to exit KidZone.The media device automatically re-enters KidZone after 4 hours of no
TiVo remote activity.
Turning off KidZone
If KidZone is not for you, then you can turn it off from the KidZone Settings screen. From
KidZone Settings, select Turn off KidZone. You can always get KidZone again if you change
your mind. Turning off KidZone clears any choices you have made about the age range,
channels, or rating limits used in KidZone. If you later decide to get KidZone again, you will be
prompted to make these choices again.
Page 93

Settings
81
5
Messages
From time to time, you may receive messages from the TiVo® service or internal alerts from
your media device. Messages may alert you to new TiVo service features, important TV
schedule changes, or other information.
When you receive a new message, the TiVo Central
™
screen will display the option Read New
Messages & Settings.
To read messages:
1. Go to the TiVo
Central screen and se
lect Read New Messages & Settings.
2. Select Read New Messages. A list of all of your messages appears. Messages you have not
yet read are marked with an envelope icon:
.
3. Use the UP/DOWN arrows to highlight a message, then press SELECT to read it. Use
CHAN UP/DOWN to page through a message if it doesn’t fit on the screen.
Page 94

Settings
82
5
Account & System Information
The Account & System Information screen provides general information about your media
device and your TiVo
®
service account. From the TiVo Central™ screen, select Messages &
Settings, then Account & System Information.
• System Information. You’ll need
some of the
information provided here if you contact
online support. Select System Information to find your TiVo service number, software
version, and information about recent connections to the TiVo service. Use the CHAN UP/
DOWN button to see the rest of the screen.
• Media Access Key. Your Media Access Key keeps your TiVo recordings secure, and
prevents th
em from be
ing played or transferred outside your home network. Do not share
this key with anyone outside your household. You will need to enter this key when you
install TiVo Desktop or use other home networking features of your TiVo Media Device.
• Copyright & Trademarks. This screen contains copyright, trademark, and other information
related to the TiVo service.
• Media Device Diagnostics. This screen contains information about tuners and other
components of your system.
Page 95

Settings
83
5
Restart or Reset System
From the TiVo Central™ screen, select Messages & Settings, then Restart or Reset System.
Options on this screen allow you to restart your media device, erase information, or restore
original factory settings. Selecting any of these options displays a warning. To continue, press
the THUMBS DOWN button three times, then ENTER.
• Restart the TiVo® Media Device. Shuts down the media device and starts it up again. This
will not affect recorded programs, Season Pass
™
recordings, WishList™ searches, or TiVo
Suggestions. You may need to restart your media device as a routine troubleshooting step.
• Repeat Guided Setup. Repeating Guided Setup will reset your Channel Lists. This will not
affect recorded programs, Season Pass recordings, WishList searches, or TiVo Suggestions.
• Clear Thumb Ratings and Suggestions. Removes all Thumbs Up and Thumbs Down ratings
and deletes the list of upcoming TiVo Suggestions. This does not delete TiVo Suggestions
that have already been recorded.
• Clear program information & To Do List. Clears all program information, cancels all Season
Pass recordings and everything in the To Do List, and removes all Thumbs Up and Thumbs
Down ratings. This does not delete programs in the Now Playing List. The media device
acquires new program information during the next connection to the TiVo service.
Completing this process may take over an hour.
• Clear & delete everything. This option restores the media device’s original factory settings. It
clears all Season Pass recordings, WishList searches, Thumbs Up and Thumbs Down
ratings, TiVo Suggestions, Now Playing List recordings, program information, the To Do
List, and setup information, including channel lists and Parental Controls. Completing this
process may take over an hour.
Operations like Clear & Delete
Everything may take over an hour.
During this time, it is recommended that
you turn off your TV to avoid “burn-in” of
static images on sensitive video displays.
Page 96

Settings
84
5
Standby
You can put your media device in Standby mode by selecting Standby from Messages &
Settings. To return to normal mode from Standby, press the TiVo
®
button or the LIVE TV
button on the remote, or the FORMAT button on the front of the media device.
When the media device is in Standby:
• Your TV shows a black screen, and the lights on the front of the media device go out.
• Programs that are being recorded or are scheduled to record will still be recorded.
• The media device will still connect to the TiVo service.
• If you temporarily turned off Parental Controls, Standby mode re-enables them. See
“
Parental Controls” in this chapter for more on Parental Controls.
• If live TV is paused when Standby is selected, the media device will remain paused for up to
30 minutes.
• If the program guide was set to display a category filter, filtering will be turned off.
Page 97

®
6
Accessories
Home Networking 86
TiVo® Expander Drive 88
TiVo® Wireless Adaptor 89
Page 98

Accessories
86
Home Networking
The Home Networking Package turns your television into an interactive media centre by
connecting your TiVo
®
Media Device with the power and functionality of your PC or Mac.
The Home Networking Package enables you to start using your TiVo Media Device with your
computer. Share pr
ogramming between your TiVo Media Device and your computer, stream
music and photos to your TiVo Media Device, and take TiVo recordings on the road with
compatible portable devices, such as an iPod or PlayStation Portable.
Note: Mac users also need to install t
hird part
y software called Roxio® Toast 10 Titanium to take
full advantage of the Home Networking Package. At this time TiVo Desktop for Mac only
supports streaming of photos and music.
The Home Networking Package also gives you
Multi-Room Viewing
capabilities by enabling
any TiVo Media Devices within your household to share recordings with ease. Watch a program
recorded in your living room on the TiVo Media Device in your bedroom!
Please observe copyright laws.
With the Multi-Room Viewing feature you can:
• Connect multiple TiVo Media Devices within the same household
•
Share recordings between Ti
Vo Media Devices within the same household with the click of
a button.
With the TiVo
Desktop feature you can:
• Stream music and photos to your TiVo Media De
vice from your PC or Mac
• Transfer TiVo recordings to your PC
Page 99

Accessories
87
• Transfer home videos (MPEG-2) from your PC to your TiVo Media Device.
• Auto-transfer home videos and video RSS feeds to your TiVo Media Device
• Convert files for use with compatible portable devices: Apple iPod, Nokia N80, Palm Treo
650, and any H.264 or MPEG-4 compatible device.
• Expand your transferable video files to include the following formats:
• Windows Media Video (.wmv)
• QuickTime Movie (.mov)
• MPEG-4/H.264 (.mp4, .m4v, .mp4v)
• MPEG-2 (.mpg, .mpeg, .mpe, .mp2, .mp2v, .mpv2)
Note: After your purchase of the Home Networking Package, it will take between 2 and 24 hours
for your TiVo Media Device to receive the Media Access Key. This can be found by navigating
on your TiVo to TiVo Central > Messages & Settings > Account & System Information >
Media Access Key. Once the Media Access Key appears on your TiVo, your Home Networking
Package is ready to use! See
Chapter 4 for more details on the Home Networking Package.
Page 100

Accessories
88
TiVo
®
Expander Drive
When the hard drive storage on board is not enough–there is a solution! The TiVo Expander
Drive from Western Digital. Now you can add 1TB of additional space to the existing storage
on your TiVo Media Device.
For Australia, the addition of the TiVo Expander Drive will increase your recording
capacity by
up to 200 hou
rs* of HD or 400 hours of SD recordings for Australia, and by up to 400 hours* of
HD or 800 hours of SD recordings for New Zealand. Visit
http://support.mytivo.com.au/ or
http://support.mytivo.co.nz for step-by-step instructions on how to install your TiVo Expander
Drive.
With an easy plug-and-play design, the TiVo Expander Drive is the perfect addition to your
TiVo
home set up. Unobtrusive and easy to use, t
he TiVo Expander Drive will seamlessly
install 1TB of additional space on your TiVo Media Device, no need for formatting or
partitioning.
Note: Only the official 1TB TiVo Expander Drive by Western Digital will work with your TiVo
Media Device.
 Loading...