

Page 1
TIVO DVR UPGRADE INSTRUCTIONS (#49)
(c) 2001-2005, weaKnees. All rights reserved.
Instructions for TwinBreeze® Gen2 / DIRECTV R10 and similar architectures
Instructions are available online (in COLOR) at http://www.weaknees.com
A FEW WORDS OF CAUTION:
Upgrading a TiVo DVR presents a few physical hazards. As with most consumer electronics devices, components in the TiVo may still
carry a lethal charge, even after disconnecting from your power supply. Be aware of this while working inside your TiVo. Allow
sufficient time for discharging of components and avoid contact as much as possible with potential hazards. While we have done
everything we can to provide accurate, easy-to-follow instructions, we cannot be responsible for any damage done to your TiVo or to
yourself as a result of your upgrade. By opening your TiVo, you agree that neither weaKnees nor any of its members or affiliates is
responsible in any way for any harm done. Please be VERY careful when upgrading. NEVER open the TiVo while the unit is plugged in
and NEVER operate the TiVo if the lid is not securely fastened.
IF YOU NEED TECHNICAL SUPPORT:
If you have purchased an upgrade kit that included one or two pre-configured hard drives: We are more than happy to answer any
questions that you might have regarding your installation. We answer email very frequently, and can often be reached that way at night or even
on weekends. We encourage you to try email first, but you are also free to call us any time if you have questions about your installation or these
instructions.
If you have purchased a TwinBreeze Bracket package (without a pre-configured drive): These kits are designed for people who already
know how to prepare a drive (or drives) for use in a TiVo. We unfortunately do not have the resources to teach our bracket customers how to
upgrade their TiVos.
Required Tool (not included): Phillips-head screwdriver.
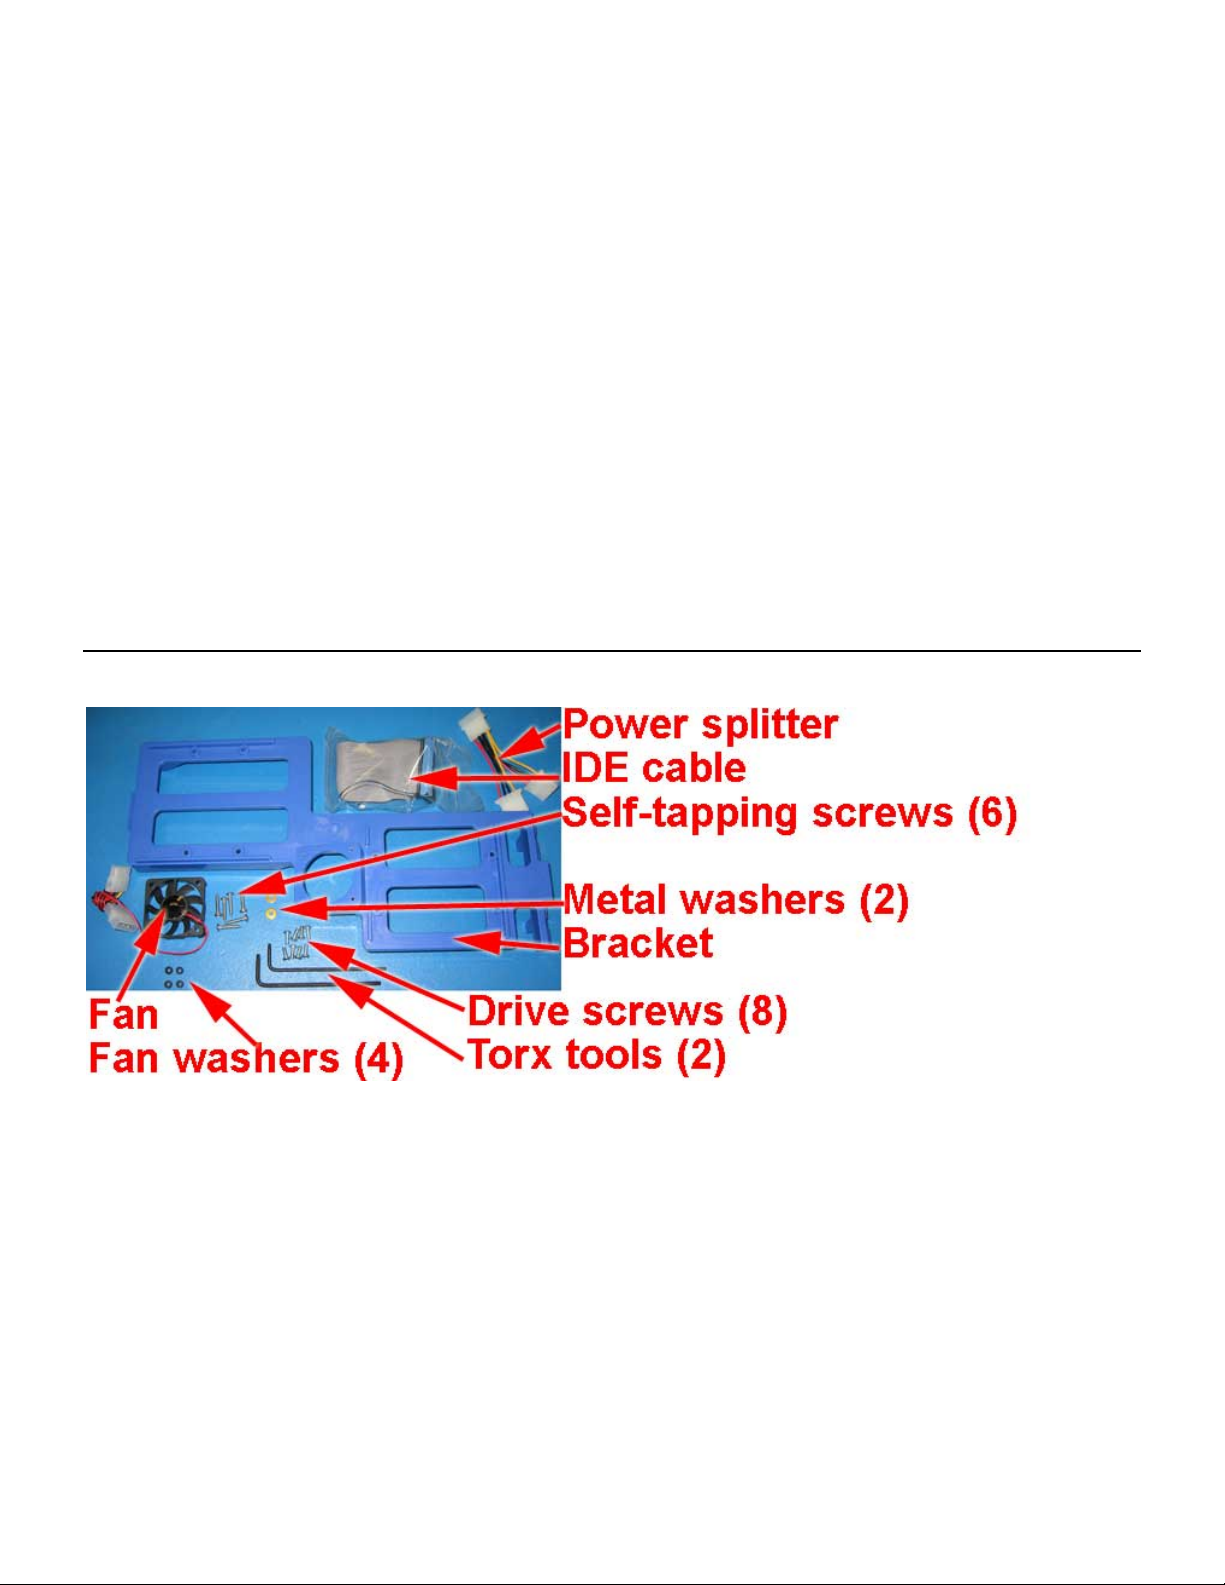
Kit includes all items shown below.
PLEASE NOTE: Opening the TiVo voids the warranty.
Figure 1
Not shown:
(1) Set of printed instructions
(1) Upgrade hard drive(s) (if applicable)
1. OVERVIEW
Upgrading your TiVo entails just five basic steps:
(a) Open the TiVo (Section 2)
(b) Remove the factory drive (Sections 3 through 5)
(c) Install drives on the mounting bracket (Sections 6 through 9)
(d) Install bracket and cables (Sections 10 and 11)
(e) Close the TiVo (Section 12)
1 of 6
Page 2
2. OPENING THE TIVO
Unplug the power cord from your electrical outlet and wait five minutes for the
TiVo to discharge. Do not plug the TiVo back in until you are completely
finished. Be very careful of static electricity, which can destroy your TiVo’s
internal parts. You should not perform this upgrade on carpet. You may want to
label the wires that you remove from your TiVo so that you can easily locate
where they belong.
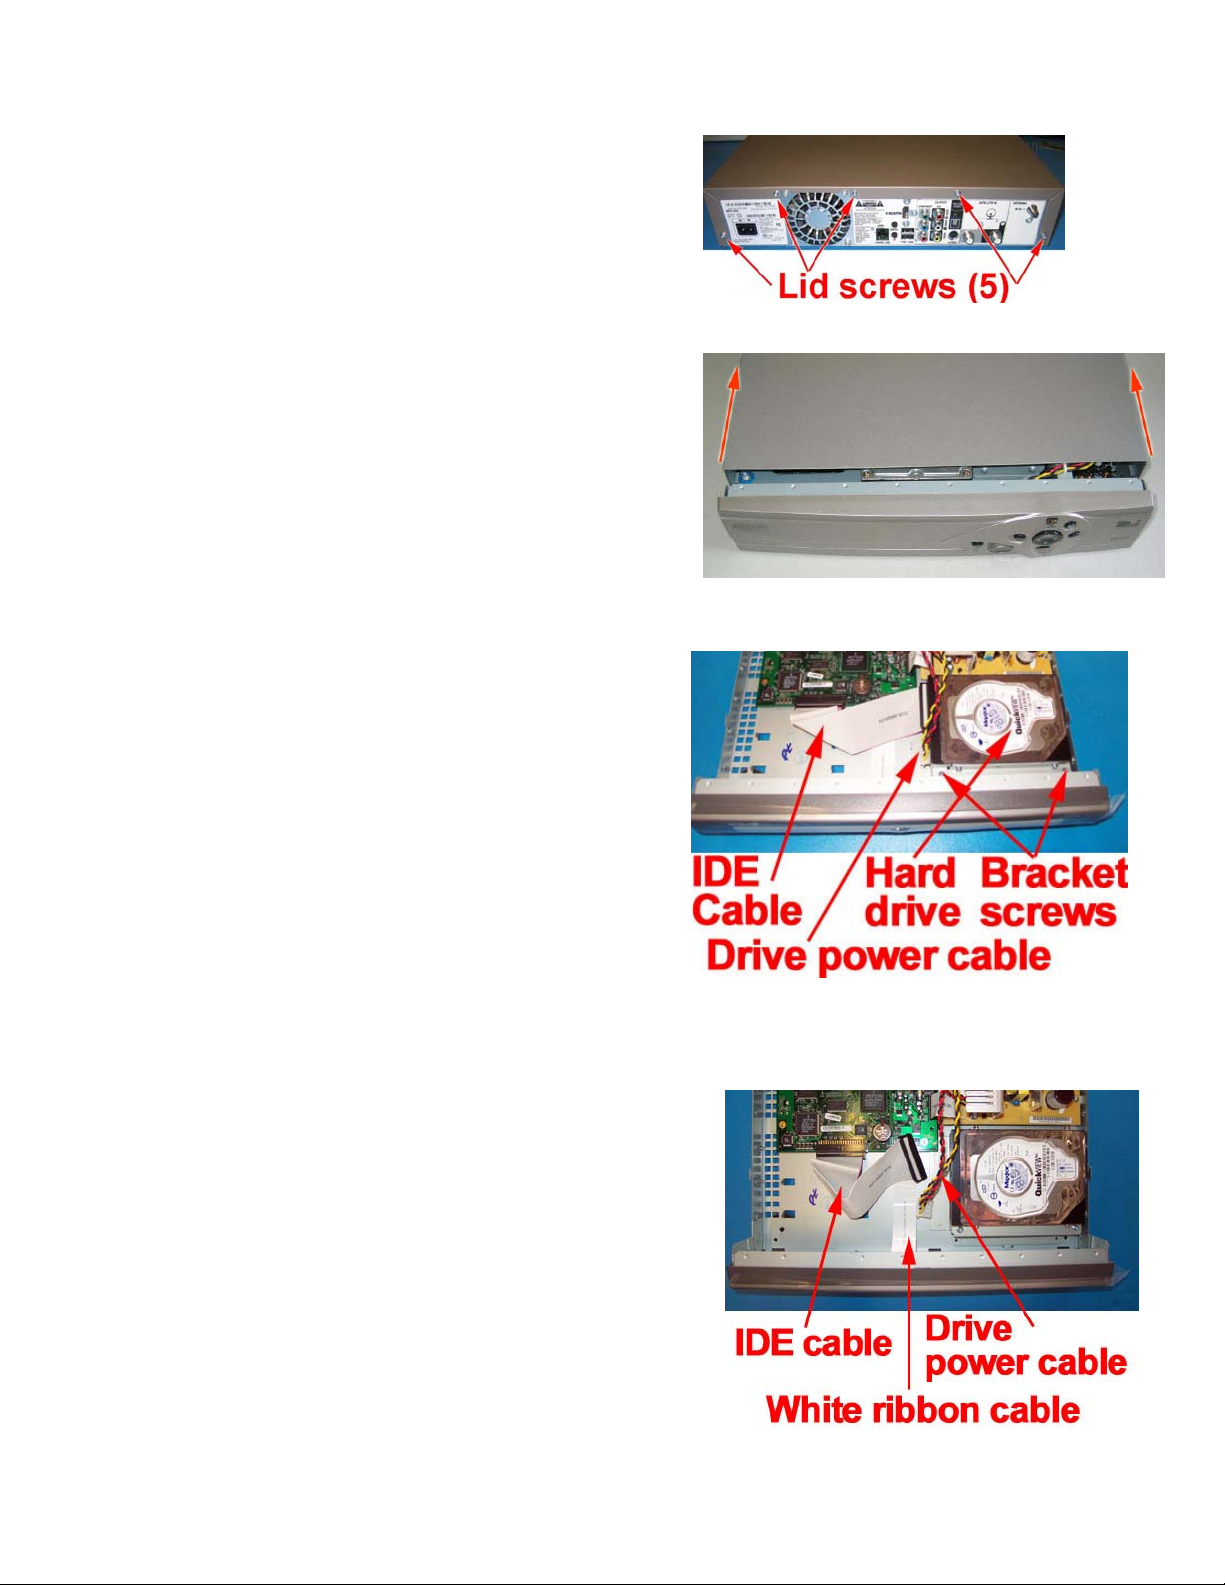
Using the Torx T-10 (smaller of the two) L-key included with your kit, unscrew
the five Torx screws on the back of your TiVo. The five screws are surrounded by
gray from the top of the TiVo’s case. See Figure 2.
Set aside (to be used again): Five TiVo lid screws.
Once the five screws are removed, remove the lid. Place your palms on the top
side edges of the TiVo, toward the back and push toward the back of the TiVo
(this occasionally requires a bit of patience). The cover should slide back and then
up. Remove the cover from the TiVo. See Figure 3.
Set aside (to be used again): TiVo lid.
3. DISCONNECTING THE EXISTING DRIVE BAY
With the cover off, you will be able to see (a) one hard drive, (b) a gray IDE
ribbon cable that runs from the greenish motherboard to the hard drive, (c) a
multi-colored (red/black/yellow) power cable that runs from the power supply to
the hard drive, and (d) two bracket screws that connect the hard drive and its
bracket to the TiVo. See Figure 4. Note: Your TiVo’s green motherboard might
be slightly different than the one pictured; specifically, it may be larger and the
IDE cable connector may be closer to the front of the unit.
Using your Torx T-10 screwdriver, unscrew and remove the two bracket screws
that connect the hard drive bracket to the lower bracket (part of the bottom of
the unit). These screws are located at the front-right of the TiVo. As you look
down into the TiVo, you will see the two screw heads. See Figure 4.
Set aside (not reused): Two bracket screws.
Figure 2 (above) Back view
Figure 3 (above) Top view
Figure 4. Front/top view
4. REMOVING THE POWER CABLE AND IDE RIBBON CABLE
Remove the IDE cable from the hard drive by pulling on the plastic connector.
Then remove the drive power cable by pulling on the plastic connector. As you
pull the connectors out, be careful not to dislodge (even partially) the white
ribbon cable shown in Figure 5. If this cable is dislodged even slightly and you
power on your TiVo, you can cause permanent damage. See Figure 5.
Next, remove the other end of the IDE cable from the TiVo by pulling it toward
the front of the TiVo.
With both cables removed from the factory drive, slide the drive and bracket back
slightly toward the back of the TiVo and then lift it out of the TiVo.
Set aside (not reused): One IDE cable.
Figure 5 Front/top view
2 of 6
Page 3

5. REMOVING THE EXISTING DRIVE
Once the hard drive and bracket are out of the TiVo, remove the IDE ribbon cable from the
motherboard by lifting straight up and out.
Now, using the larger (T-15) Torx tool, unscrew the four Torx drive screws that connect the hard
drive to the hard drive bracket. See Figure 6. You will not re-use these four screws or the metal
drive bracket, but you should save the screws and bracket, together with the ribbon cable you
removed.
Set aside (not reused): Four drive mounting screws; one IDE cable; one metal bracket
NOTE: Your factory drive might appear different than the one pictured in Figure 6.
Figure 6
6. SETTING THE JUMPER (ONLY APPLIES TO “ADD” KITS – “REPLACE” KIT INSTALLERS
CAN SKIP TO STEP 7)
Pick up the factory hard drive and look at the hard drive with the label facing up and the empty power/IDE
cable connectors facing you. Your TiVo’s hard drive has one or two small white or black plastic
“jumper(s)” that are located between the IDE cable and the power cable connectors. Follow the steps
below (depending on your drive manufacturer) to confirm that your factory drive is set to Master. DO
NOT MAKE ANY JUMPER CHANGES TO ANY DRIVE(S) THAT YOU RECEIVED IN YOUR
UPGRADE KIT.
If your TiVo’s original drive is a Quantum or Maxtor hard drive: If your drive has one jumper, then you
will see a total of four pairs of pins (and, therefore, 4 possible vertical places for the jumper). Ignore the
single pin located closest to the IDE cable connector. If your drive has two jumpers, then your drive has a
total of 5 sets of two pins. See Figs 7 and 8.
In a one-jumper Quantum or Maxtor hard drive, the jumper should be moved to the furthest left-hand
position (again, ignoring the single pin). Gently remove the jumper with the end of a paper clip or your
fingernail and move it to the proper position. NOTE: the jumper must be vertical and must be carefully
inserted so that the jumper fits inside the left-hand most pins. See Figure 7. In a two-jumper Maxtor hard
drive, the jumper should be set properly, and should be in the shape of an "L" turned 90° clockwise. See
Figure 8.
If your TiVo’s original drive is a Western Digital hard drive:
You will notice a total of five pairs of pins (and, therefore, 5 possible vertical places for the jumper). In a
Western Digital hard drive, the jumper should be moved to the center position. Gently remove the jumper
with the end of a paper clip or your fingernail and move it to the proper position. NOTE: the jumper must
be vertical and must be carefully inserted so that the jumper fits inside center pins vertically. See Figure 9.
Figure 7 (above)
Figure 8 (above)
7. CONNECTING THE BRACKET FAN
Your kit includes a small bracket fan. Look at the edges of the fan and locate the two
airflow directional arrows printed in black on one side of the fan. Once you have
located the arrows, insert a self-tapping screw into each fan hole, in the opposite
direction of the airflow arrow. See Figure 10. (When installed on the bracket, the air
flow should be moving from under the bracket up toward the lid of the TiVo.) Once
you have the four screws through the fan holes, screw a small rubber washer onto the
end of each screw. You need only turn each washer one or two turns. See Figure 10.
Figure 9 (above)
Figure 10 (above)
3 of 6
Page 4

Place the fan on the bracket as shown in Figure 11. Screw in the four fan screws
(through the fan and into the bracket) until they are tight; do not overtighten.
8. CONNECTING THE HARD DRIVES TO THE DRIVE BRACKET
Using four of the hard drive screws included with your kit, screw your A/Master
drive to the bracket (the screws connect to the drives from the underside of the
bracket). In an "ADD" kit (in which you are retaining your factory drive), the
A/Master drive will be the factory drive. Be sure to orient the drive as shown in
Figure 12. The "A" drive should be connected near the bracket tab shown in Figure
12. In Figure 12, the IDE and power ports on the A drive are facing left. Do not
overtighten the screws.
Next, connect your new upgrade drive (or “B” drive) to the drive bracket using the
remaining four hard drive screws. Be sure to orient the drive on the bracket as
shown in Figure 12. When the B/Slave drive is connected and screwed in properly,
the back of the drive will hang off the end of the bracket. In Figure 12, the IDE and
power ports on the B drive are facing up. Do not overtighten the screws.
Figure 11(above)
9. PREPARING THE CABLES
Once you have the drives and fan on the bracket, connect one end of the fan’s power passthrough to the B/Slave drive (only one end will fit). Attach the other end to the power
splitter cable included with your kit. Attach the other end of the power splitter to the
A/Master drive. You should now have the fan cable and power cables running to each
drive on the bracket. See Figure 13.
Take the IDE cable included with your kit and attach the BLUE connector to the
motherboard. NOTE: Be careful to insert the cable in the proper direction – each
connector on the cable has a notch that aligns to ensure it is not installed upside-down. See
Figure 14. Drape the remainder of the cable over the front of the unit.
Move the TiVo's internal red/yellow/black power connector over the back side of the
TiVo, as shown in Figure 14. You might have to flex or bend the power cable a bit to get
it to stay in place.
Figure 12
Figure 13
Figure 14
4 of 6
Page 5

10. INSTALLING THE TWINBREEZE BRACKET INTO THE TIVO AND ATTACHING THE
CABLES
From the front of the unit, hold the bracket in your left hand near
the B/Slave drive (being careful not to touch the circuit board of the
drive) and use your right hand to guide the bracket tab (located near
the edge of the A drive) into the metal bracket base where the old
drive bracket had been mounted. You should be able to gently
lower the bracket into place with your left hand. You can gently
move the white cable near the fan toward the power supply to keep
it from obstructing airflow under the fan.
Once the bracket is down, connect the gray end of the IDE cable
into the B/Slave drive. Make sure to line up the IDE connector so
that the notch in the cable is facing up. Then, insert the black end of
the IDE cable into the A/Master/Factory drive. With the fan
connected, this is a tight fit. To insert the cable, start with the pins
closer to the front of the TiVo, then rock the cable into the IDE port
on the A drive. By rocking the cable in this way, you will be able to
install the cable without hitting the side of the fan. Be sure that the
cable is fully inserted and that the notch is facing up. See
Figure 15.
Next, connect the open end of the power splitter to the TiVo’s
power connector. You can then tuck the cables under the front lip
of the TiVo—but be careful not to dislodge the white panel ribbon
cable. See Figure 16.
Figure 15 (above) Front/top view
Figure 16 (above) Front/top view
5 of 6
Page 6

11. SECURING THE TWINBREE ZE BRACK ET TO THE BASE OF THE TIVO
Insert a metal washer onto each of the two remaining selftapping screws. Use one hand to push the bracket down.
Using your other hand, lift the left edge of the TiVo. Using
Figure 17 as a guide, locate the pre-drilled holes in the
bracket feet, which should be visible through the grates.
Be sure that the bracket mounts are aligned properly –
counting from the gap between the sets of holes, you should
be screwing into the fourth hole towards the back, and the
third hole towards the front. If the bracket isn’t sitting there,
you may need to adjust its position a bit to get it there.
Once you have the bracket aligned, insert the self-tapping
screws through correct hole in the bottom of the TiVo and
into the pre-drilled holes in the bracket.
Gently tighten the screws in place. Do not overtighten.
Once you have secured the bracket using the two selftapping screws, your TiVo should look like Figure 18.
Figure 17 (above) Bottom left side view
Figure 18 (above)
12. RE-ATTACHING THE TIVO LID
Place the TiVo lid back over the TiVo. Align the clips on each side
of the lid so that they clip down on the sides of your TiVo. Slide the
lid toward you while simultaneously pushing gently down on the
top of the lid. See Figure 19. Once the lid is in place, reattach the
five Torx screws. Plug in your TiVo and enjoy!
You can verify your new capacity by looking in the System
Information screen of your TiVo. The System Information screen is
located in the “Messages and Setup” menu. Once in the System
Information screen, you will see “Variable up to XXX hours” (you
may have to scroll down the page using the “channel down”
button). This message gives you the maximum capacity of your
unit, after the upgrade..
Figure 19
We thank you very much for your purchase and hope that you enjoy your newly-enhanced TiVo. Please email us
with
any comments, suggestions or complaints. If you found the upgrade easy to install (or even if you found it more
difficult than you expected), we’d love to know. If you found our service to be excellent (or awful), we want to know
that too. We’re always looking to improve our products and services…the more we hear from you, the better. Thanks
very much!
6 of 6
 Loading...