

Page 1

A
Appendix: Additional Setup
Examples
Cables and Accessories 124
Safety Instructions 125
Connecting your DVR to a Phone Line or to the Internet 127
Connections for a Satellite Box (with optional Basic Cable) 128
130
®
Page 2
Appendix: Additional Setup Examples
A
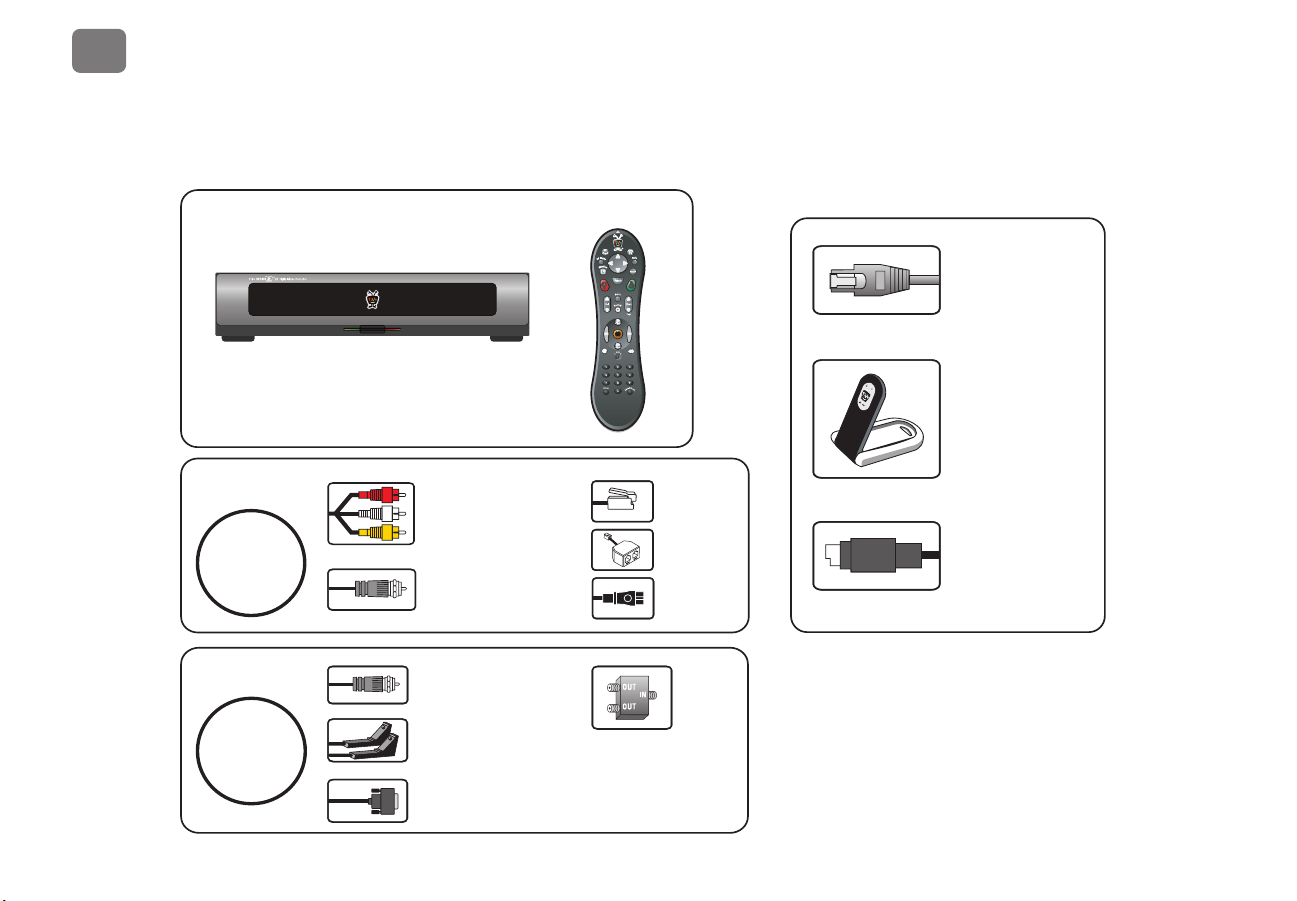
Cables and Accessories
Inside the carton, you’ll find:
your TiVo® Series2TM DT DVR
Cable bag
A
Cable bag
B
Composite A/V cable for
stereo audio (red & white
ends) and video (yellow end)
Coaxial RF cable
for audio & video
Coaxial RF cable
for audio & video
IR (infrared) Control cable
(works with ANY cable box)
Serial Control cable (works
with Motorola or General Inst.
DCT2000 series cable boxes)
You might wish to purchase
®
remote
your TiVo
Phone cord
Phone splitter
Power cord
RF splitter (splits your
incoming cable signal
to enable dual tuner
with a cable box)
these additional accessories:
Ethernet cable (connects
®
DVR’s Ethernet
your TiVo
jack to your wired home
network)
®
TiVo
Wireless USB
adapter (connects your
®
TiVo
DVR to your
wireless home network)
S-Video cable for high
quality video (connects
®
your TiVo
DVR to your
TV or hometheater)
124
Page 3

Safety Instructions
Appendix: Additional Setup Examples
A
BEFORE YOU BEGIN
Make sure all your equipment is turned off and the DVR is unplugged.
The TiVo DVR is not designed to support a heavy load, such as a TV. Your
DVR is only capable of supporting the weight of one or two common A/V
components such as VCRs, DVD players, or A/V receivers (provided they
have four good, broad, padded feet that distribute of the weight near the
corners of the DVR).
Also, avoid stacking your DVR on top of other electronic components—
such as DVD players, A/V receivers—or the vents of your TV.
SAFETY INFORMATION
This product was designed and manufactured to meet strict quality and
safety standards. There are, however, some installation and operation
precautions of which you should be particularly aware. Please read these
instructions before operating the equipment and save them for future
reference.
1. Read Instructions—All the safety and operating instructions should be
read and understood before the appliance is operated.
2. Retain Instructions—The safety and operating instructions should be
retained for future reference.
3. Heed Warnings—All warnings on the appliance and in the operating
instructions should be followed.
4. Follow Instructions—All operating and use instructions should be
followed.
5. Water and Moisture—The appliance should not be used near water - for
example, near a bathtub, washbowl, kitchen sink, laundry tub, in a wet
basement or near a swimming pool, etc.
6. An appliance and cart combination should be moved with care. Quick
stops, excessive force, and uneven surfaces may cause the appliance and
cart combination to overturn.
7. Tilt/Stability—All televisions must comply with recommended
international global safety standards for tilt and stability properties of their
cabinet design. Do not compromise these design standards by applying
excessive pull force to the front, or top, of the cabinet, which could
ultimately overturn the product. Also, do not endanger yourself, or children,
by placing electronic equipment/toys on top of the cabinet. Such items
could unexpectedly fall from the top of the set and cause product damage
and/or personal injury.
8. Ventilation—The appliance should be situated so that its location or
position does not interfere with its proper ventilation. For example, the
appliance should not be situated on a bed, sofa, rug, or similar surface that
may block the ventilation openings; or, placed in a built-in installation, such
as a bookcase or cabinet that may impede the flow of air through the
ventilation openings.
9. Heat—The appliance should be situated away from heat sources such as
radiators, heat registers, stoves, or other appliances (including amplifiers)
that produce heat.
10. Power Cord Protection—Power supply cords should be routed so that
they are not likely to be walked on or pinched by items placed upon or
against them, paying particular attention to cords and plugs, convenience
receptacles, and the point where they exit from the appliance.
11. Object and Liquid Entry—Never push objects of any kind into this
product through cabinet slots, as they may touch dangerous voltage points
125
Page 4

Appendix: Additional Setup Examples
A
or short the parts, resulting in the risk of fire or electric shock. Never spill
liquid of any kind on this product.
12. Damage Requiring Service—The appliance should be serviced by
qualified service personnel when:
A.
THE POWER SUPPLY CORD OR PLUG IS DAMAGED OR FRAYED;
LIQUID HAS SPILLED INTO THE PRODUCT;
B.
C. THE PRODUCT HAS BEEN EXPOSED TO RAIN OR WATER;
D. THE PRODUCT DOES NOT OPERATE NORMALLY WHEN YOU
FOLLOW THE OPERATING INSTRUCTIONS (ADJUST ONLY THOSE
CONTROLS THAT ARE DISCUSSED IN THIS GUIDE, AS IMPROPER
ADJUSTMENT OF OTHER CONTROLS MAY RESULT IN DAMAGE,
OFTEN REQUIRING EXTENSIVE WORK BY A QUALIFIED TECHNICIAN
TO RESTORE THE PRODUCT TO NORMAL PERFORMANCE);
THE PRODUCT HAS BEEN DROPPED OR THE CABINET DAMAGED;
E.
F. THE PRODUCT EXHIBITS A DISTINCT CHANGE IN PERFORMANCE.
13. Servicing—The user should not attempt service to the appliance beyond
that described in the Troubleshooting section of this guide. All other
servicing should be referred to qualified service personnel.
14. Cleaning—Unplug this product from the wall outlet before cleaning. Do
not use liquid cleaners or aerosol cleaners; use a damp cloth for cleaning. If
the product comes in contact with any liquid, unplug the phone line and the
power adapter and let the unit dry thoroughly before plugging it back in.
15. Power Source—This product should be operated only from the type of
power source indicated on the marking label or in this guide. If you are not
sure of the type of power supply to your home, consult your dealer or local
power company.
16. Overloaded Power Outlets—do not overload wall outlets and extension
cords, as this can result in the risk of fire or electric shock.
17. Electric Shock—To reduce the risk of electric shock, do not disassemble
this product. Take it to a qualified service person when service or repair
work is required. Opening or removing covers may expose you to
dangerous voltage or other risks. Incorrect reassembly can cause electric
shock when this product is subsequently used.
18. Telephone Usage—When using your telephone equipment, basic safety
precautions should be always followed to reduce the risk of fire, electric
shock and injury to persons. To reduce the risk of fire, use only No. 26
AWG or larger telecommunication line cord.
19. Moving—Avoid moving the unit while it is plugged in to avoid
accumulative shock and vibration damage to the internal hard disk drive.
20. CAUTION—Danger of explosion if battery is incorrectly replaced.
Replace only with the same or equivalent type recommended by the
manufacturer. Dispose of used batteries according to the manufacturer’s
instructions.
126
Page 5

Appendix: Additional Setup Examples
Connecting your DVR to a Phone Line or to the Internet
A
The TiVo® DVR needs to connect to the TiVo® service to complete
Guided Setup. After Guided Setup, the DVR connects to the TiVo
service about every other day or so (more frequently if it connects
via broadband Internet). When it connects to the TiVo service, the
DVR may receive:
• Updated program information, including episode titles, plot
descriptions, ratings, and schedule information.
• Any available updates to the DVR service, including content for
Showcases. (See page 9 for more information about Showcases.)
• Any recording requests you made using TiVo Central Online.
(See page 18 for more information about Online Scheduling.)
Choosing how your DVR connects to the TiVo service
Your TiVo DVR can connect to the TiVo service using:
• A standard analog phone line (with the provided phone cord).
• A broadband Internet connection (as part of an existing home
network; USB network adapter sold separately).
Phone Line. If you don’t have a home network with a broadband
Internet connection, the DVR must use a standard analog phone line
to connect to the TiVo service. You should leave the phone cord
plugged in continuously in order to keep your DVR’s program
information up to date.
Internet. Connecting your DVR to a home network with a shared
broadband Internet connection gives you access to a whole new set
of features. In addition to making brief connections to the TiVo
service, a DVR connected to a home network can:
• Access digital music and photos stored on your home computer.
• Transfer recordings between DVRs and PCs within your home
network.
• Access third-party software applications designed for your TiVo
DVR.
For more information about the benefits of connecting your TiVo
DVR to a home network see page 10, or view the TiVo Home
Media Features Guide at www.tivo.com/guides
Built-In Ethernet Jack. This TiVo DVR is equipped with an Ethernet
jack (see the Start Here poster, or the “Back Panel Reference” on
page 134). Use an Ethernet cable (sold separately) to connect your
DVR to a wired (Ethernet) home network.
USB Network Adapters. If you have a wireless home network, you’ll
need to purchase a compatible USB wireless network adapter.
Connect it to one of the DVR’s USB ports. (See the Start Here
poster for details.) Visit www.tivo.com/adapters
compatible adapters.
.
for the latest list of
127
Page 6

Appendix: Additional Setup Examples
A
a
A
Connections for a Satellite Box (with optional Basic Cable)
Use cable bag
A
and cable bag
B
Connect all cables from the OUT jack
of one device to the IN jack of the next.
OUT IN
Never connect OUT to OUT or IN to IN.
OUT OUT
TiVo
DVR
Satellite Box
RF Out
RF InAudio/Video Out
Connect your satellite
cable from the wall to your
satellite box
This is probably already connected.
Connect your satellite
box to the DVR
Connect a Composite A/V cable (red,
white, and yellow) from the satellite
box’s Audio/Video OUT jacks to the
®
DVR’s Audio/Video IN jacks.
(Optional) Connect your
basic cable from the wall
If you have basic cable (with no
cable box) in addition to a satellite
box, connect the cable from the wall
to the DVR’s CABLE RF IN jack.
If you don’t subscribe to basic cable,
skip this step.
Connect your TV
Connect a Composite A/V cable (red,
white, and yellow) from the DVR’s
OUT jacks to your TV’s Audio/Video
Television
INPUT
INPUT.
Alternate: If your TV doesn’t have
Composite A/V (red, white, and
yellow) input jacks, connect a
Coaxial RF cable from the RF OUT
jack on the DVR to the Antenna In
jack on your TV. Then set the
Channel 3/4 switch on the back of
the DVR, and tune your TV to the
same channel.
Continue with Step
.
ntenn
VIDEO
R
L
128
Page 7

Appendix: Additional Setup Examples
A
Connect to the TiVo® service
Your TiVo DVR needs to connect to the TiVo service to receive program listings, service updates,
and other information. Choose how your DVR will connect:
®
TiVo
DVR
Connect a Channel Changing cable – Choose one from cable bag
The DVR uses one of these cables to tell your satellite box when to change the channel.
Use the Serial Cable if:
your satellite box has a 9-pin Serial (Data) jack.
Plug the Serial cable into the 9-pin Serial (Data) jack
on the back of your satellite box.
Network OR Phone
Use the IR Cable if:
you tried the Serial cable and it didn’t work with your
satellite box.
If you’re not using the Serial cable, plug
the purple end of the IR cable into the
CHANNEL CHANGING/IR jack (the lower
control jack) on the back of the DVR.
Network
Choose this option if you have a home network with a broadband Internet connection.
Use the connection that works with your type of home network: Wired or Wireless
Wired (Ethernet) – Connect an Ethernet cable (sold
separately) from your home network to the TiVo DVR’s
Ethernet jack (the upper jack pictured here).
Wireless – Connect a wireless USB network adapter
(sold separately) to one of the DVR’s
The TiVo Wireless USB adapter pictured here is available
www.tivo.com/store.
at
Phone
Choose this option if you don’t have a home network with a
broadband Internet connection. Connect the provided
phone cord from the DVR to a nearby wall jack.
Use the provided phone line splitter if the DVR is sharing
the wall jack with a telephone.
Positioning the IR cable on your satellite box
a
B
The IR cable’s emitters beam channel change signals to the IR sensor on your satellite
box–just like a remote control does.
Place the emitters in front of the cable box’s IR sensor (one on top of the satellite box
and one on bottom). Be sure both emitters stick out about 1 ½ inches directly in front
of the IR sensor. Use the adhesive strips provided to keep them in place.
OR
USB ports.
Satellite Box
Plug the other end into the CHANNEL CHANGING/SERIAL
jack (the upper control jack) on the back of the DVR.
Then continue with Step
on the next page.
Then go to Step for positioning the other
ends of the IR cable on your satellite box.
a
Then continue with Step on the next page.
129
Page 8

Appendix: Additional Setup Examples
A
Plug in the DVR’s
power cord.
Lights on the front panel
show that it’s powered on.
Tune your TV (if necessary)
to see the Welcome screen
Turn on your TV.
Tip: If you don’t see the Welcome screen, use the
Input, Source, or TV/Video button on your TV remote
or TV to select the correct audio/video source.
Press the button until you see the Welcome screen.
Alternate: If you used a Coaxial RF cable in Step
(either 3 or 4) that the CHANNEL 3/4 switch on the back of the DVR is set to.
When you see the Welcome screen, you’re ready to begin
customizes the DVR for your home. If you need help, visit
, tune your TV to the same channel
Guided Setup, which
www.tivo.com/setup.
130
Page 9

Appendix: Additional Setup Examples
Connecting a VCR, DVD Recorder, or Other Equipment
A
You probably have other A/V equipment in your home
entertainment center in addition to your TiVo
®
DVR and your TV.
If you have a VCR or DVD recorder, connect it to your DVR and
save your favorite recordings to video tape or DVD.
Other equipment, such as DVD players or game consoles, do not
connect directly to your DVR. Instead, these devices should be
connected to additional inputs on your TV or an A/V receiver.
Connecting a VCR or DVD Recorder
VCRs and DVD recorders tend to offer many different audio and
video input and output jacks, giving you a variety of setup options.
Refer to your VCR or DVD recorder’s owner’s manual for details
about setup and operation.
This example is the easiest way to connect a VCR or DVD recorder
to your DVR. (It works even if your TV only has one input.) For
best results, use the best connections available on your equipment.
Before you connect a VCR or DVD recorder, make all the basic
connections shown on the Start Here poster or on page 128.
Connect a Coaxial RF cable from the RF Out jack on the DVR to
the Antenna-RF In jack on the VCR or DVD recorder.
Connect another Coaxial RF cable from the RF Out jack on the
VCR or DVD recorder to the Antenna In jack on your TV.
If you use Coaxial RF cables as pictured below, make sure the
Channel 3/4 switches on the back of each device are set to the
same channel.
®
TiVo
DVR
VCR or
DVD Recorder
Television
INPUT
Antenna
VIDEOR
L
In
To watch a video tape or DVD, change your TV’s input setting by
pressing the Input, Source, or TV/Video button on your TV’s
remote control until the correct input is displayed.
To save recordings from your DVR to a video tape or recordable
DVD, use the “Save to VCR” feature. See page 35.
131
Page 10

Appendix: Additional Setup Examples
A
Connecting Other A/V Equipment
You may have other devices in your home entertainment system
which don’t necessarily connect to your TiVo DVR. These tips can
help you complete your home entertainment setup, but be sure to
consult your other devices’ owner’s manuals for setup information.
Connecting an A/V Receiver. An A/V receiver “receives” audio and
video signals from your electronic devices, and lets you send those
signals to other devices (usually, video to a TV and audio to a set of
loud speakers). You can add an A/V receiver to any of the setups
described here and on the Start Here poster.
Instead of connecting audio and video from the DVR to your TV as
shown in the setup diagrams, connect audio and video from your
DVR to an available input on your A/V receiver. If your A/V
receiver is already connected to your TV, your setup is done.
Connecting other A/V equipment. Other kinds of A/V equipment,
such as a DVD player or game console, do not connect to your TiVo
DVR. You should connect your other devices to additional inputs on
your TV or A/V receiver.
132
 Loading...