


Alpha Plus
User Guide


Contents
Contents i
1 Introduction 1
1.1 Features . . . . . . . . . . . . . . . . . . . . . . . . . . . . . . 1
1.2 Accessories . . . . . . . . . . . . . . . . . . . . . . . . . . . . 2
1.3 The Remote Control . . . . . . . . . . . . . . . . . . . . . . . 3
1.4 Getting Started . . . . . . . . . . . . . . . . . . . . . . . . . . 5
1.5 The Apps Screen . . . . . . . . . . . . . . . . . . . . . . . . . 6
Customizing the Apps Screen . . . . . . . . . . . . . . . . . . 7
2 Installation 8
2.1 Aerial Connections . . . . . . . . . . . . . . . . . . . . . . . . 9
Satellite Dish Connection . . . . . . . . . . . . . . . . . . . . 9
Aerial Connection . . . . . . . . . . . . . . . . . . . . . . . . . 9
2.2 TV Connections . . . . . . . . . . . . . . . . . . . . . . . . . . 9
HDMI Connection . . . . . . . . . . . . . . . . . . . . . . . . . 10
Component Connection . . . . . . . . . . . . . . . . . . . . . 11
SCART Connection . . . . . . . . . . . . . . . . . . . . . . . . 11
Composite Connection . . . . . . . . . . . . . . . . . . . . . . 12
2.3 AV Receiver Connection . . . . . . . . . . . . . . . . . . . . . 12
2.4 Network Connections . . . . . . . . . . . . . . . . . . . . . . 13
3 Scanning Channels 14
3.1 Understanding Satellite TV . . . . . . . . . . . . . . . . . . . 14
3.2 Satellite Dish Settings . . . . . . . . . . . . . . . . . . . . . . 15
LNB Settings . . . . . . . . . . . . . . . . . . . . . . . . . . . . 15
Unicable Settings . . . . . . . . . . . . . . . . . . . . . . . . . 17
3.3 Using a Motorized Dish . . . . . . . . . . . . . . . . . . . . . 17

Using DiSEqC 1.2 . . . . . . . . . . . . . . . . . . . . . . . . . 18
Using USALS . . . . . . . . . . . . . . . . . . . . . . . . . . . . 19
3.4 Scanning Satellite TV Channels . . . . . . . . . . . . . . . . . 20
Scanning for Every Channel . . . . . . . . . . . . . . . . . . . 21
Scanning a Specific Transponder . . . . . . . . . . . . . . . . 21
Scanning for One Channel . . . . . . . . . . . . . . . . . . . . 22
3.5 Scanning Terrestrial TV Channels . . . . . . . . . . . . . . . . 22
3.6 Scanning Cable TV Channels . . . . . . . . . . . . . . . . . . 23
4 Watching TV 24
4.1 Channel List . . . . . . . . . . . . . . . . . . . . . . . . . . . . 24
Channel List Preferences . . . . . . . . . . . . . . . . . . . . . 25
4.2 TV Programme Guide . . . . . . . . . . . . . . . . . . . . . . . 26
Programme Guide Preferences . . . . . . . . . . . . . . . . . 27
4.3 Controlling Audio . . . . . . . . . . . . . . . . . . . . . . . . . 28
4.4 Displaying Subtitles . . . . . . . . . . . . . . . . . . . . . . . 28
4.5 Watching Two Channels Simultaneously . . . . . . . . . . . . 29
4.6 Viewing Teletext . . . . . . . . . . . . . . . . . . . . . . . . . 29
4.7 Watching Pay Channels . . . . . . . . . . . . . . . . . . . . . 29
4.8 Watching Subchannels . . . . . . . . . . . . . . . . . . . . . . 30
4.9 Setting Up Timers . . . . . . . . . . . . . . . . . . . . . . . . . 31
Wake-Up Timer . . . . . . . . . . . . . . . . . . . . . . . . . . 31
Sleep Timer . . . . . . . . . . . . . . . . . . . . . . . . . . . . 31
4.10 Managing Channels . . . . . . . . . . . . . . . . . . . . . . . 31
Organizing the Channel List . . . . . . . . . . . . . . . . . . . 31
Organizing the Favourites List . . . . . . . . . . . . . . . . . . 32
4.11 HbbTV . . . . . . . . . . . . . . . . . . . . . . . . . . . . . . . 33
5 Recording TV 34
5.1 Recording TV Programmes . . . . . . . . . . . . . . . . . . . 34
Scheduling TV Recordings Using the Programme Guide . . . 34
Manually Scheduling TV Recordings . . . . . . . . . . . . . . 35
5.2 Time-Shifting . . . . . . . . . . . . . . . . . . . . . . . . . . . 35
C

5.3 Playing Recordings . . . . . . . . . . . . . . . . . . . . . . . . 36
5.4 Recording Preferences . . . . . . . . . . . . . . . . . . . . . . 36
6 Playing Media Files 39
6.1 Managing Storage Devices . . . . . . . . . . . . . . . . . . . 39
6.2 Managing Files . . . . . . . . . . . . . . . . . . . . . . . . . . 40
6.3 Playing Recordings and Videos . . . . . . . . . . . . . . . . . 41
6.4 Viewing Photos . . . . . . . . . . . . . . . . . . . . . . . . . . 42
6.5 Playing Music . . . . . . . . . . . . . . . . . . . . . . . . . . . 43
6.6 Playing Media files from Other Devices . . . . . . . . . . . . 43
Accessing Other Devices . . . . . . . . . . . . . . . . . . . . . 44
Allowing Other Devices to Access the Receiver . . . . . . . . 44
7 Apps 45
7.1 Webzeal . . . . . . . . . . . . . . . . . . . . . . . . . . . . . . 45
Viewing a Webpage . . . . . . . . . . . . . . . . . . . . . . . 45
Navigating Webpages . . . . . . . . . . . . . . . . . . . . . . 46
Bookmarks . . . . . . . . . . . . . . . . . . . . . . . . . . . . . 46
Entering Text . . . . . . . . . . . . . . . . . . . . . . . . . . . 47
7.2 Free TV+ . . . . . . . . . . . . . . . . . . . . . . . . . . . . . . 47
Playing Videos . . . . . . . . . . . . . . . . . . . . . . . . . . . 48
Free TV+ Preferences . . . . . . . . . . . . . . . . . . . . . . . 48
7.3 iTV+ . . . . . . . . . . . . . . . . . . . . . . . . . . . . . . . . 48
7.4 iRadio+ . . . . . . . . . . . . . . . . . . . . . . . . . . . . . . . 49
7.5 Weather . . . . . . . . . . . . . . . . . . . . . . . . . . . . . . 50
7.6 TV Portal+ . . . . . . . . . . . . . . . . . . . . . . . . . . . . . 50
7.7 Sync Player . . . . . . . . . . . . . . . . . . . . . . . . . . . . 51
7.8 T Apps . . . . . . . . . . . . . . . . . . . . . . . . . . . . . . . 51
8 Preference Settings 53
8.1 Language Settings . . . . . . . . . . . . . . . . . . . . . . . . 53
Using Different Fonts . . . . . . . . . . . . . . . . . . . . . . . 53
8.2 Network Settings . . . . . . . . . . . . . . . . . . . . . . . . . 54
C

Proxy Server Settings . . . . . . . . . . . . . . . . . . . . . . . 54
DDNS Settings . . . . . . . . . . . . . . . . . . . . . . . . . . 54
8.3 Clock Settings . . . . . . . . . . . . . . . . . . . . . . . . . . . 55
8.4 Audio and Video Settings . . . . . . . . . . . . . . . . . . . . 55
8.5 On-Screen Display Settings . . . . . . . . . . . . . . . . . . . 56
8.6 Parental Control . . . . . . . . . . . . . . . . . . . . . . . . . . 57
8.7 Maintaining the Digital TV Receiver . . . . . . . . . . . . . . 58
8.8 Updating the Digital TV Receiver . . . . . . . . . . . . . . . . 59
Online Update . . . . . . . . . . . . . . . . . . . . . . . . . . . 59
A Universal Remote Control 60
B Legal Notices 82
Index 84
C

1 Introduction
1.1 Features
Beyond simply receiving satellite signals, this digital TV receiver has many
convenient and advanced features:
• Users can watch cable and terrestrial channels as well as satellite stations.
• This receiver has four slots for CA modules and pay-TV cards. Users can
use CI+ modules as well as conventional CA modules. See Watching Pay
Channels on page 29.
• Users can use the built-in hard drive or removable storage devices to
record TV programmes. It is possible to schedule this receiver to record
not only a single TV programme but also every episode of a series using
the programme guide. See Recording TV on page 34.
• Users can pause and resume a live programme. See Time-Shifting on
page 35.
• Under ideal conditions, users can watch 2 different channels at the same
time while recording 3 other channels. It is also possible to watch a live
channel while playing a recorded programme. See Watching Two Chan-
nels Simultaneously on page 29.
• This receiver can play many kinds of media files, including photos, music,
and videos. See Playing Media Files on page 39.
• This receiver can play media files from other devices, such as comput-
ers and network-attached storages. See Playing Media files from Other
Devices on page 43.
• This receiver provides a variety of apps, including YouTube. See The Apps
Screen on page 6.
1
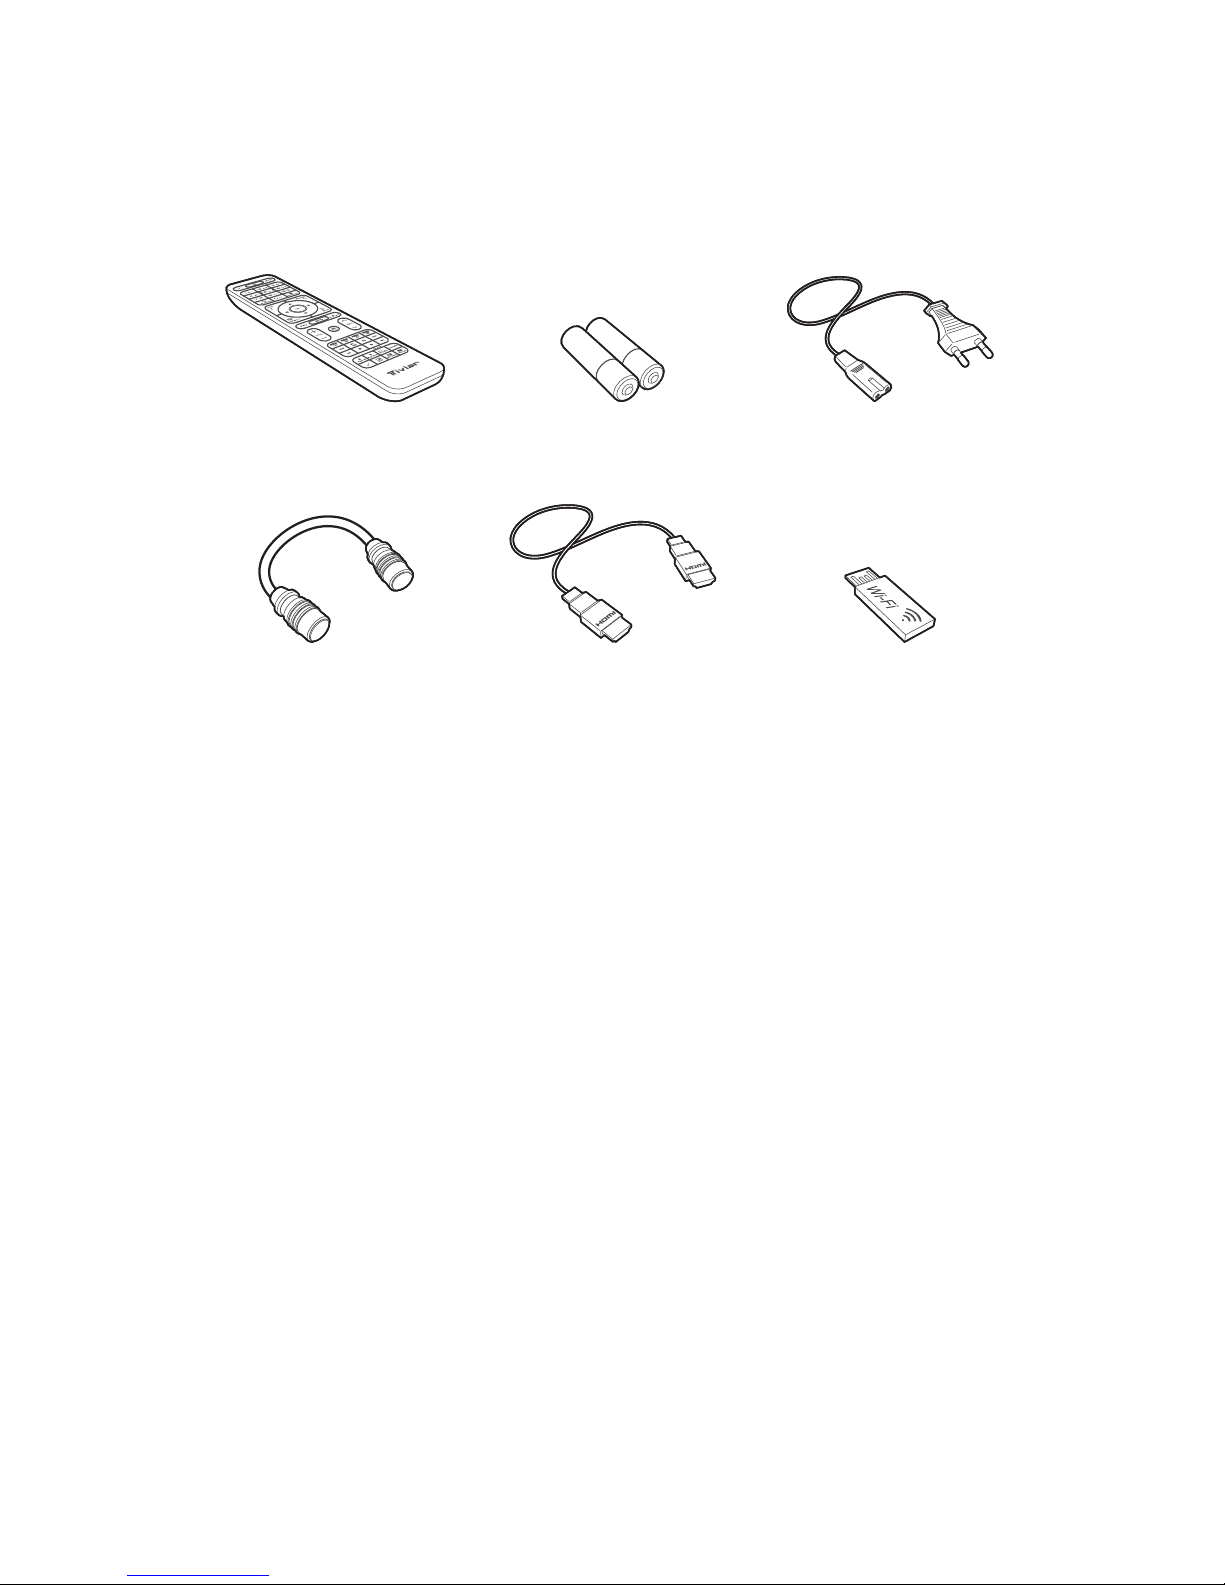
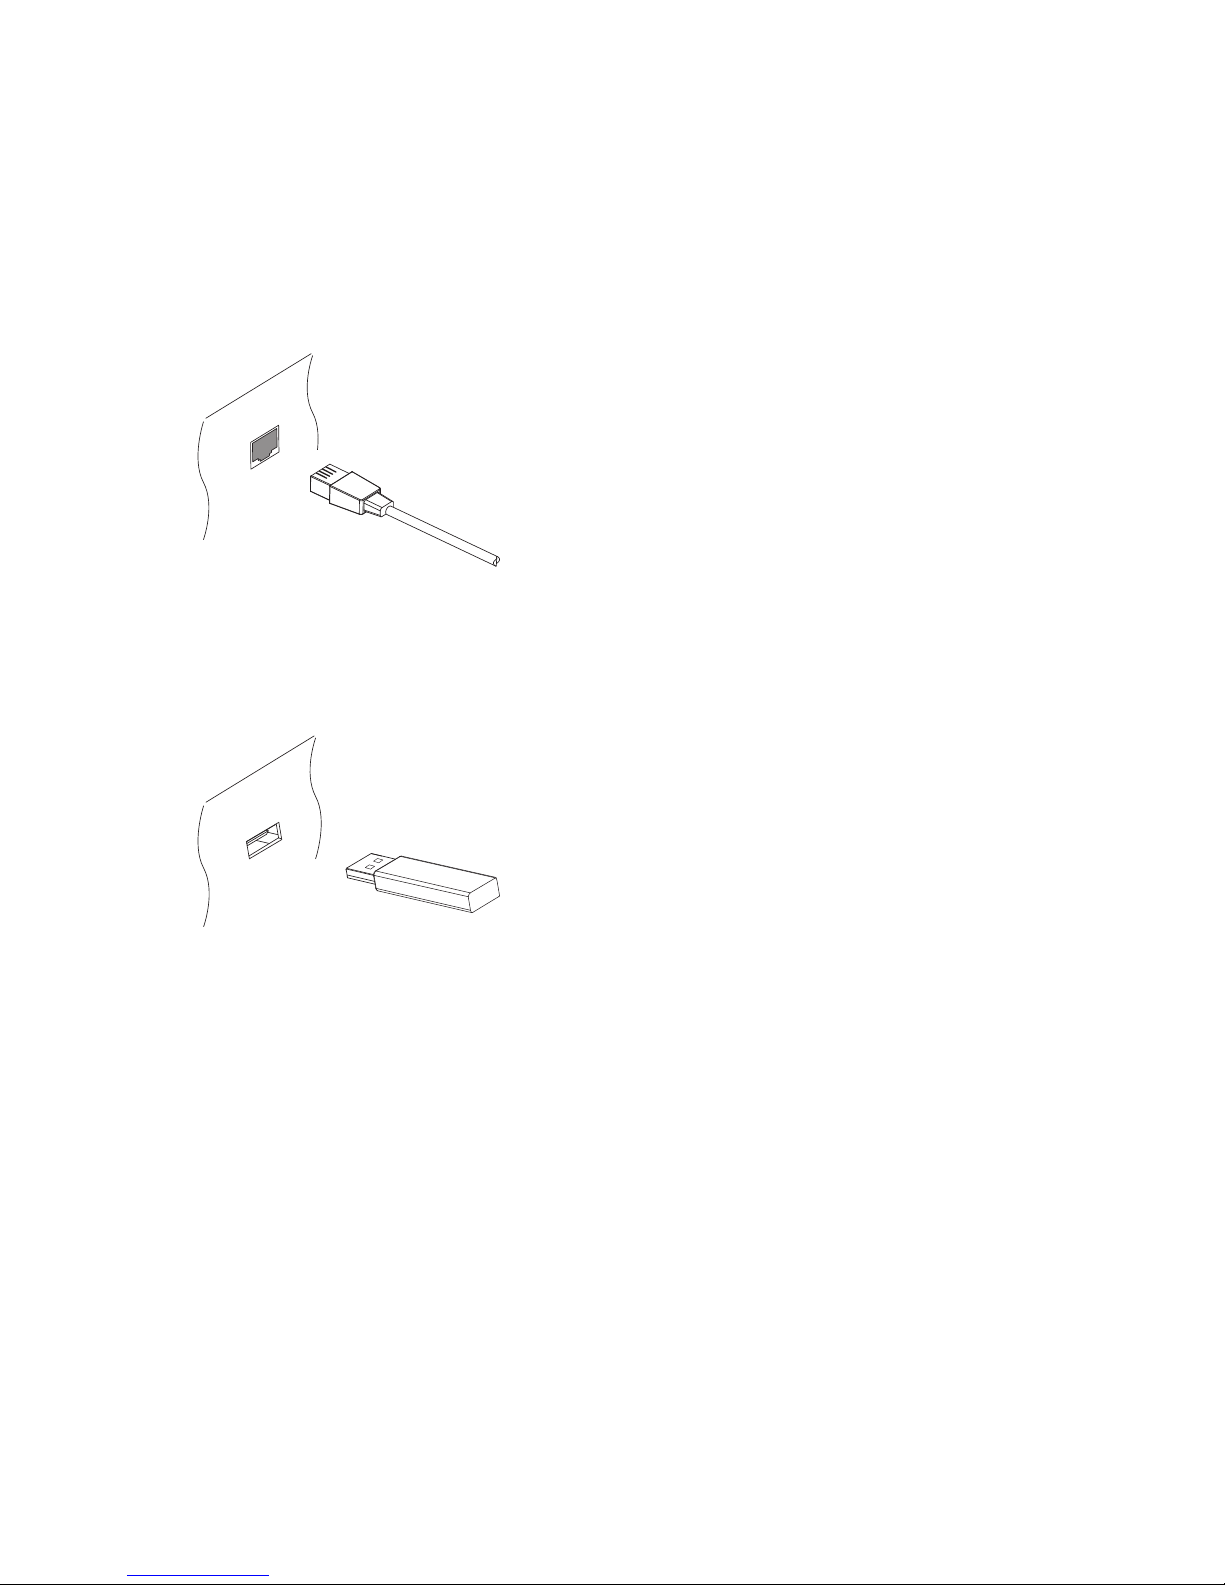
1.2 Accessories
The following accessories are included with the digital TV receiver.
Remote control Batteries Power cord
Loop-through cable HDMI cable Wi-Fi dongle
Use the Wi-Fi dongle to connect the receiver to a wireless network. See Net-
work Connections on page 13.
2 1.2 A
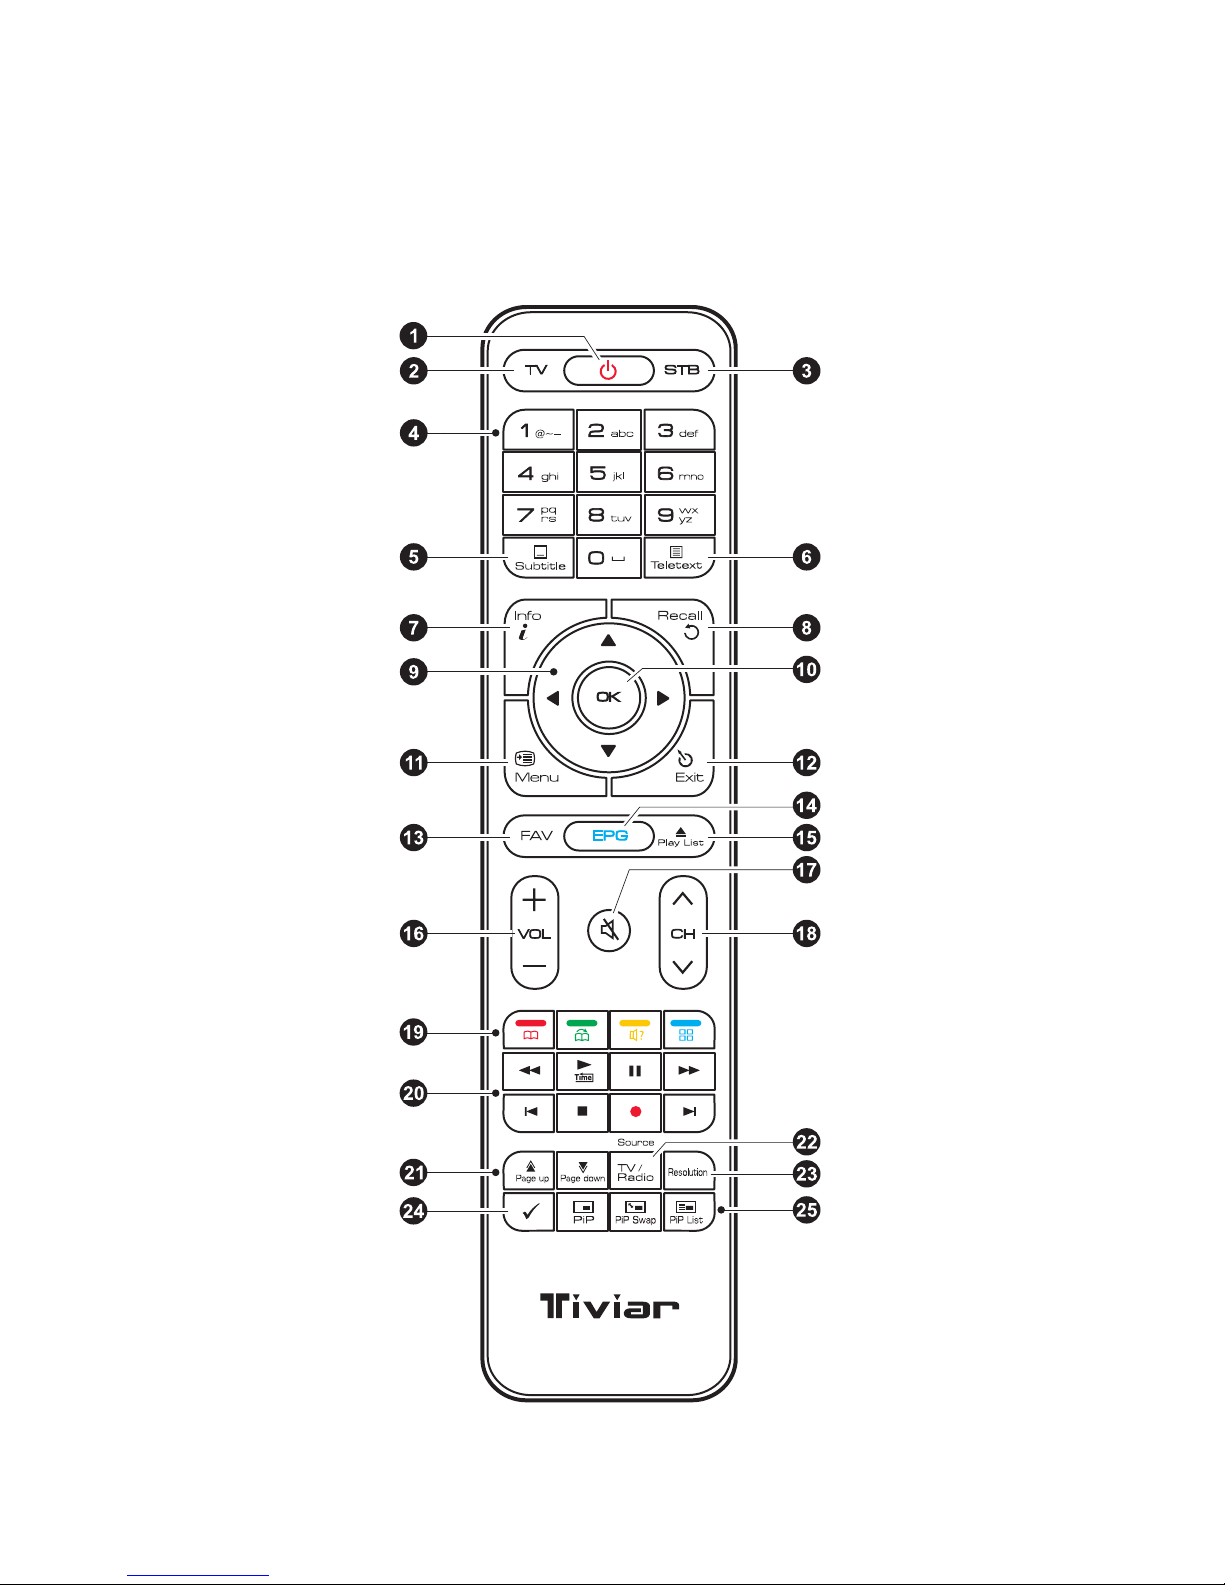
1.3 The Remote Control
Use the remote control to control the digital TV receiver. Make sure that bat-
teries are installed correctly in the remote control.
I 3

...
1
: Turn the digital TV receiver on or off.
...
2
TV: Switch the remote control to TV control mode.
...
3
STB: Switch the remote control to receiver control mode.
...
4
Use the numeric buttons to enter numbers.
...
5
Subtitle: Display subtitles. See Displaying Subtitles on page 28.
...
6
Teletext: Display teletext pages. See Viewing Teletext on page 29.
...
7
Info: Display information about the current programme.
...
8
Recall: Display the list of recently-viewed channels.
...
9
Use these navigation buttons to navigate the menus and interactive
screens.
...
10
OK: Select an item. In addition, use this button to display the channel
list. See Channel List on page 24.
...
11
Menu: Display apps. See The Apps Screen on page 6. In addition, use
this button to return to the higher menu level.
...
12
Exit: Return to the previous screen or close the current list or dialogue
box.
...
13
FAV: Display the list of favourite channels.
...
14
EPG: Display the programme guide. See TV Programme Guide on page
26.
...
15
Play List: Display the list of files stored in the built-in hard drive or in a
removable storage device. See Playing Media Files on page 39.
...
16
Use these volume buttons to adjust the volume.
...
17
: Mute the sound.
...
18
Use these channel buttons to change channels.
...
19
These colour buttons perform different functions, depending on what
the digital TV receiver is currently doing.
...
20
Use these buttons to control recording and playback. See Recording TV
on page 34 and Playing Media Files on page 39.
4 1.3 T R C

...
21
Use these buttons to scroll lists.
...
22
TV/Radio: Switch between TV channels and radio stations.
...
23
Resolution: Change the picture resolution.
...
24
: This button performs different functions, depending on the function
the receiver is currently doing.
...
25
Use these buttons to watch two different channels at the same time. See
Watching Two Channels Simultaneously on page 29.
1.4 Getting Started
Install the digital TV receiver properly, referring to Installation on page 8.
Turn on the main power switch on the rear of the receiver, and press the
power button on the remote control to turn on the receiver.
When turning on the receiver for the first time, the initial setup process au-
tomatically starts. Follow the on-screen instructions to finish the process. At
each step, either make a choice or skip the step:
1. Choose a language for the user interface.
2. Configure the network settings. See Network Connections on page 13
and Network Settings on page 54.
3. Install add-ons to internet-related apps, such as Free TV+ and iRa-
dio+, when an internet connection is available. Additionally, determine
whether to restore the receiver using the stored settings and channels,
if there is any backup data.
4. Set the clock. See Clock Settings on page 55.
5. Choose a broadcast media type and scan for channels. See Scanning
Channels on page 14.
I 5
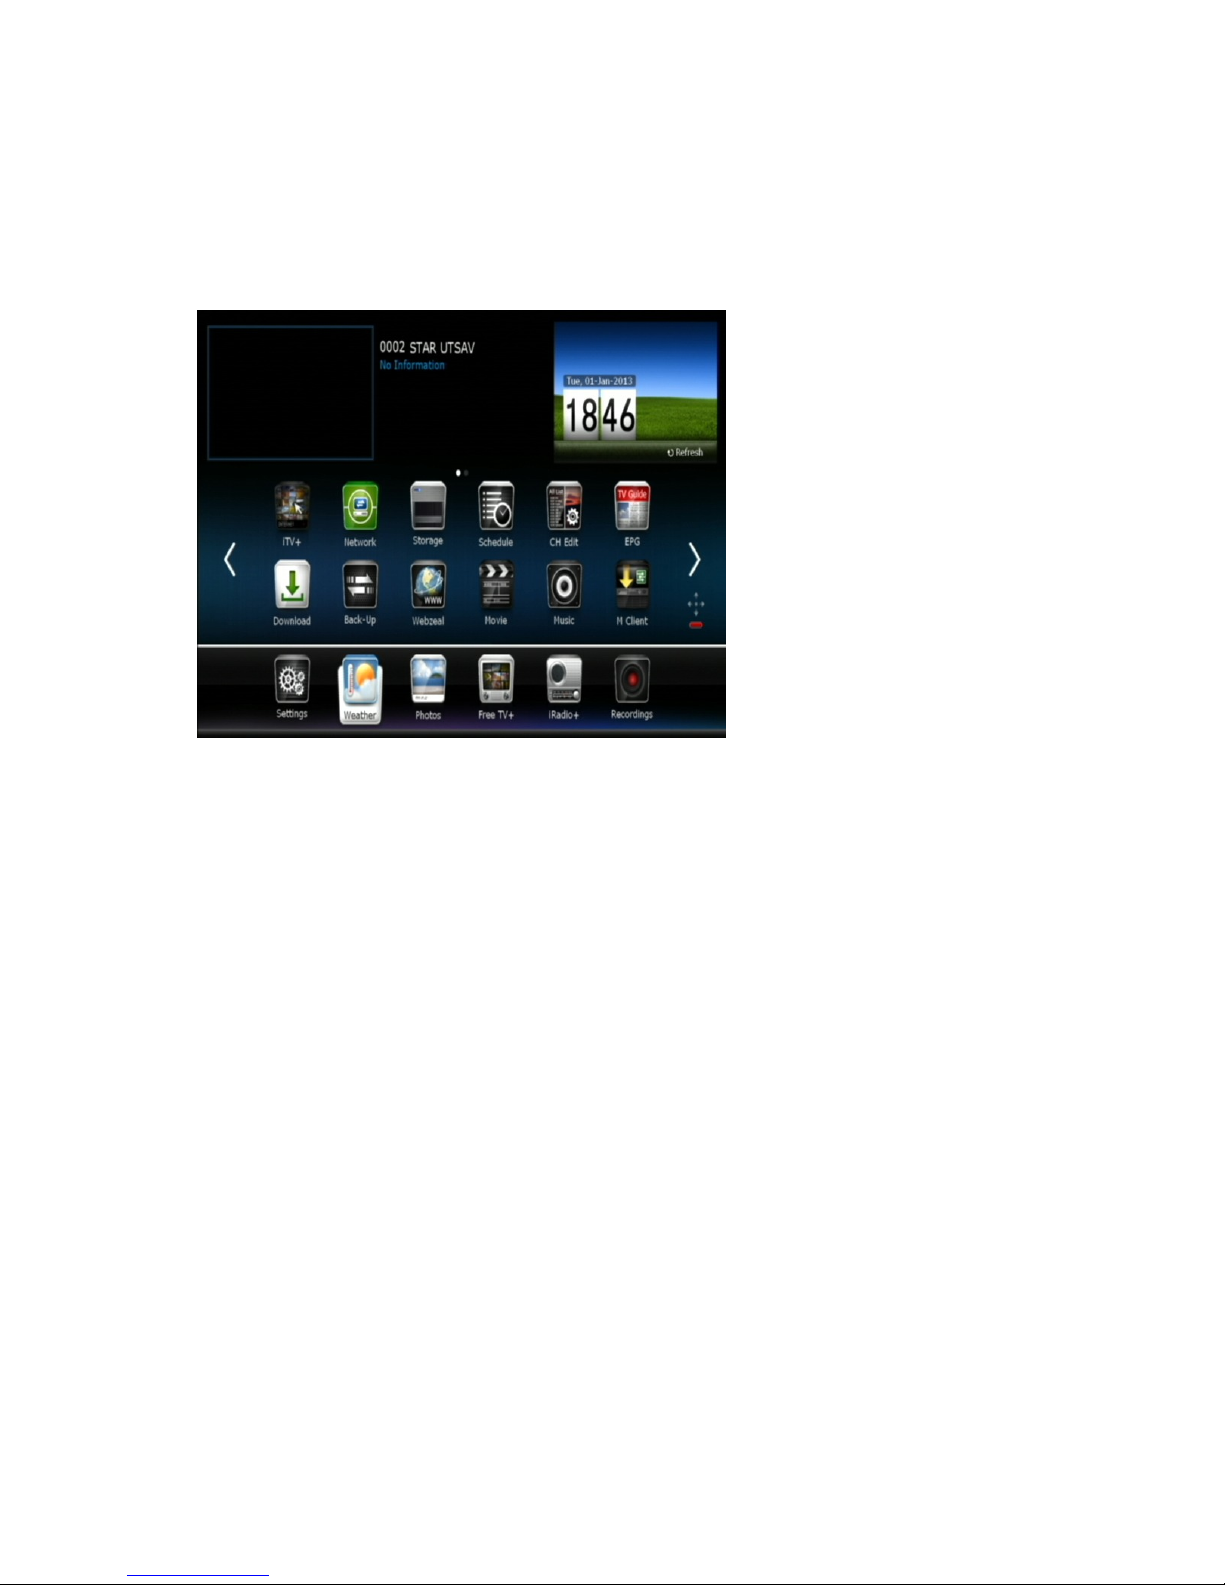
1.5 The Apps Screen
Pressing the Menu button displays app icons at the bottom of the screen. To
view more apps, press the up navigation button.
To access the customary menus, select Settings.
Some apps allow users to quickly access frequently-used setting menus and
functions.
• Back-Up: Open the Settings > System Tools > Data Transfer menu. See
Maintaining the Digital TV Receiver on page 58.
• CH Edit: Open the Settings > System Tools > Service List Manager
menu. See Managing Channels on page 31.
• Download: See Online Update on page 59.
• EPG: Open the programme guide. See TV Programme Guide on page 26.
• M Client: See Accessing Other Devices on page 44.
• M Server: See Allowing Other Devices to Access the Receiver on page 44.
• Movie: Display the list of videos stored on the storage device most re-
cently accessed. See Playing Media Files on page 39.
• Music: Display the list of songs stored on the storage device most re-
6 1.5 T A S

cently accessed. See Playing Media Files on page 39.
• Network: Select this to open the Settings > Installation > Network Set-
ting menu. See Network Settings on page 54.
• Photos: Display the list of photos stored on the storage device most re-
cently accessed. See Playing Media Files on page 39.
• Recordings: Display the list of TV recordings stored on the storage de-
vice most recently accessed. See Playing Media Files on page 39.
• Schedule: Open the Settings > System Tools > Schedule menu. See
Manually Scheduling TV Recordings on page 35.
• Storage: Open the Settings > System Tools > Storage Manager menu.
See Managing Storage Devices on page 39.
• YouTube: See Free TV+ on page 47.
For other apps, see Apps on page 45.
Customizing the Apps Screen
Users can rearrange app icons. Place the focus on an icon and press the red
button. Move the icon to a new location using the navigation buttons, and
then press the OK button to fix it in place.
Put frequently-used apps in the bottom line for faster access.
I 7
2 Installation
Install the digital TV receiver, limited by the specifications shown in the table
below.
Input voltage AC 100–250 V, 50/60 Hz
Maximum power consumption 55 W when in operation
1 W when in standby mode
Size 340 mm × 60 mm × 2450 mm
Weight 2 kg with no hard drive
Operating temperature 32–113 °F, 0–45 °C
Storage temperature 14–158 °F, -10–70 °C
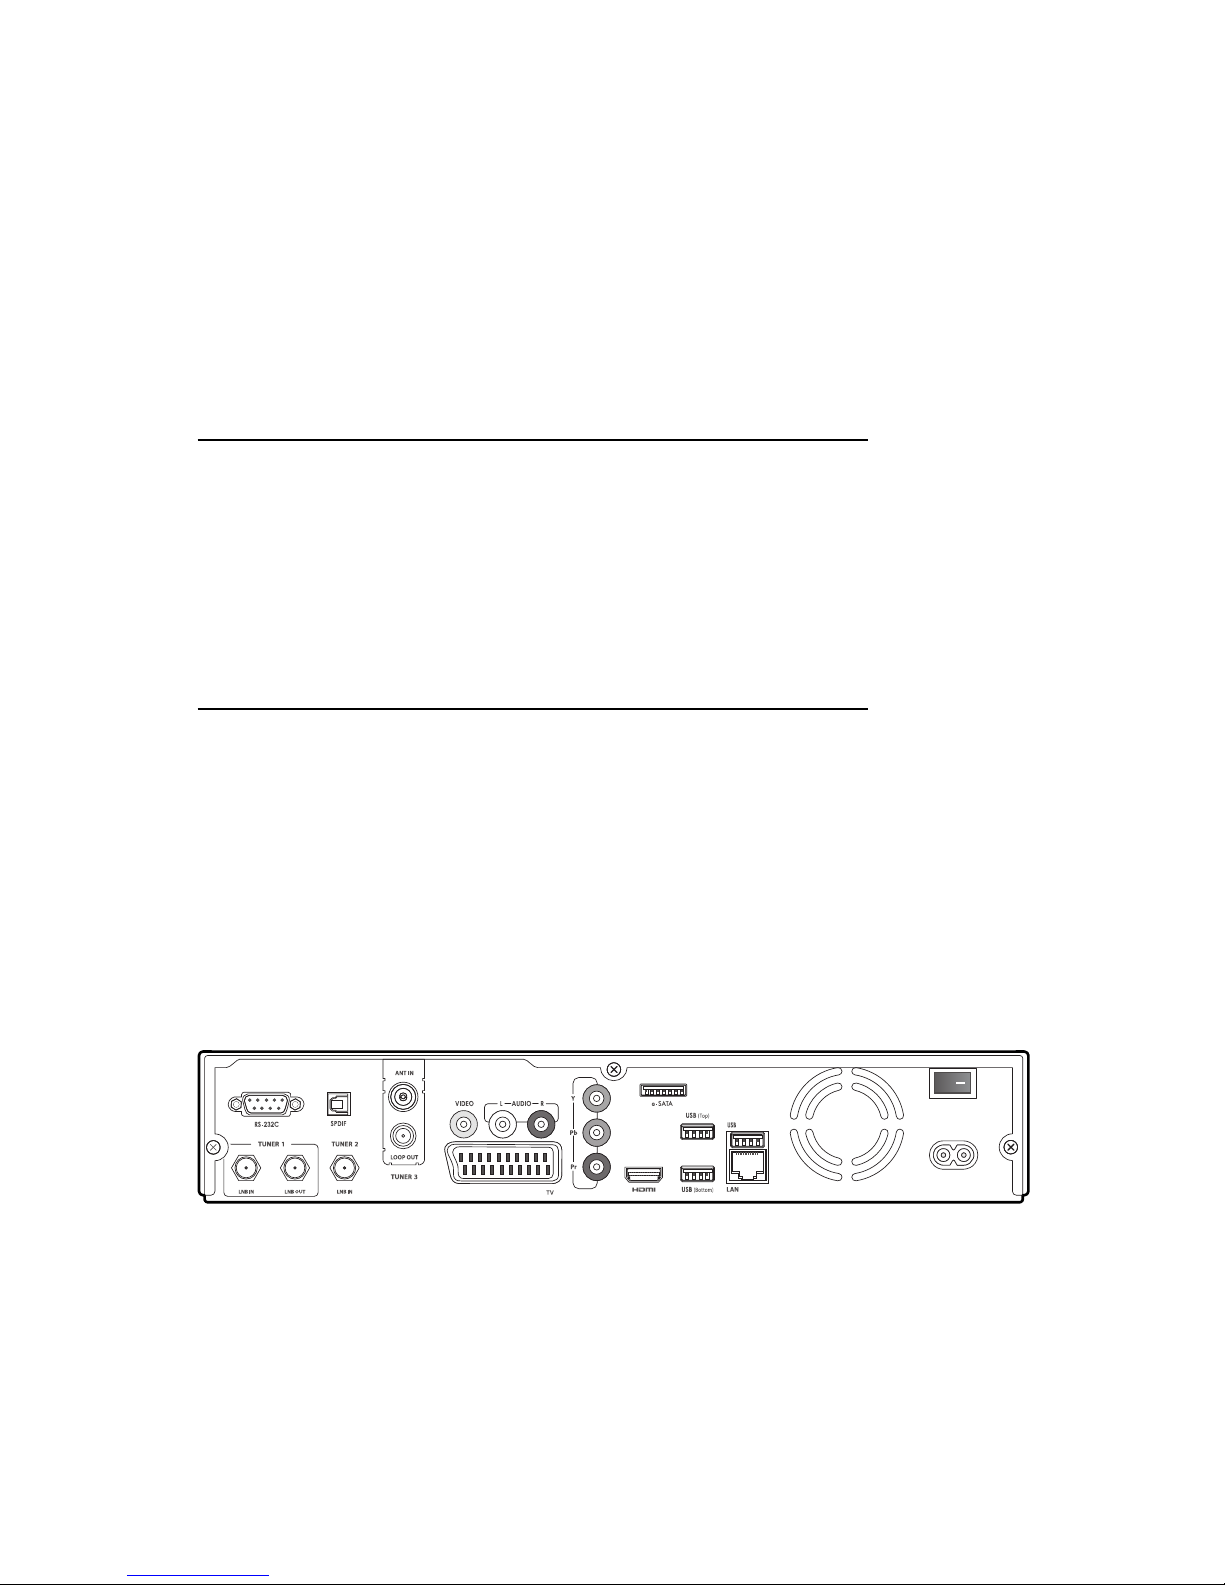
This digital TV receiver has a variety of connectors:
• Aerial connectors
• AV connectors for a TV and an AV receiver
• USB ports for removable storage devices and the Wi-Fi dongle
• An e-SATA port for a removable hard drive
The RS-232C port may be used only by an engineer for installation or service.
8
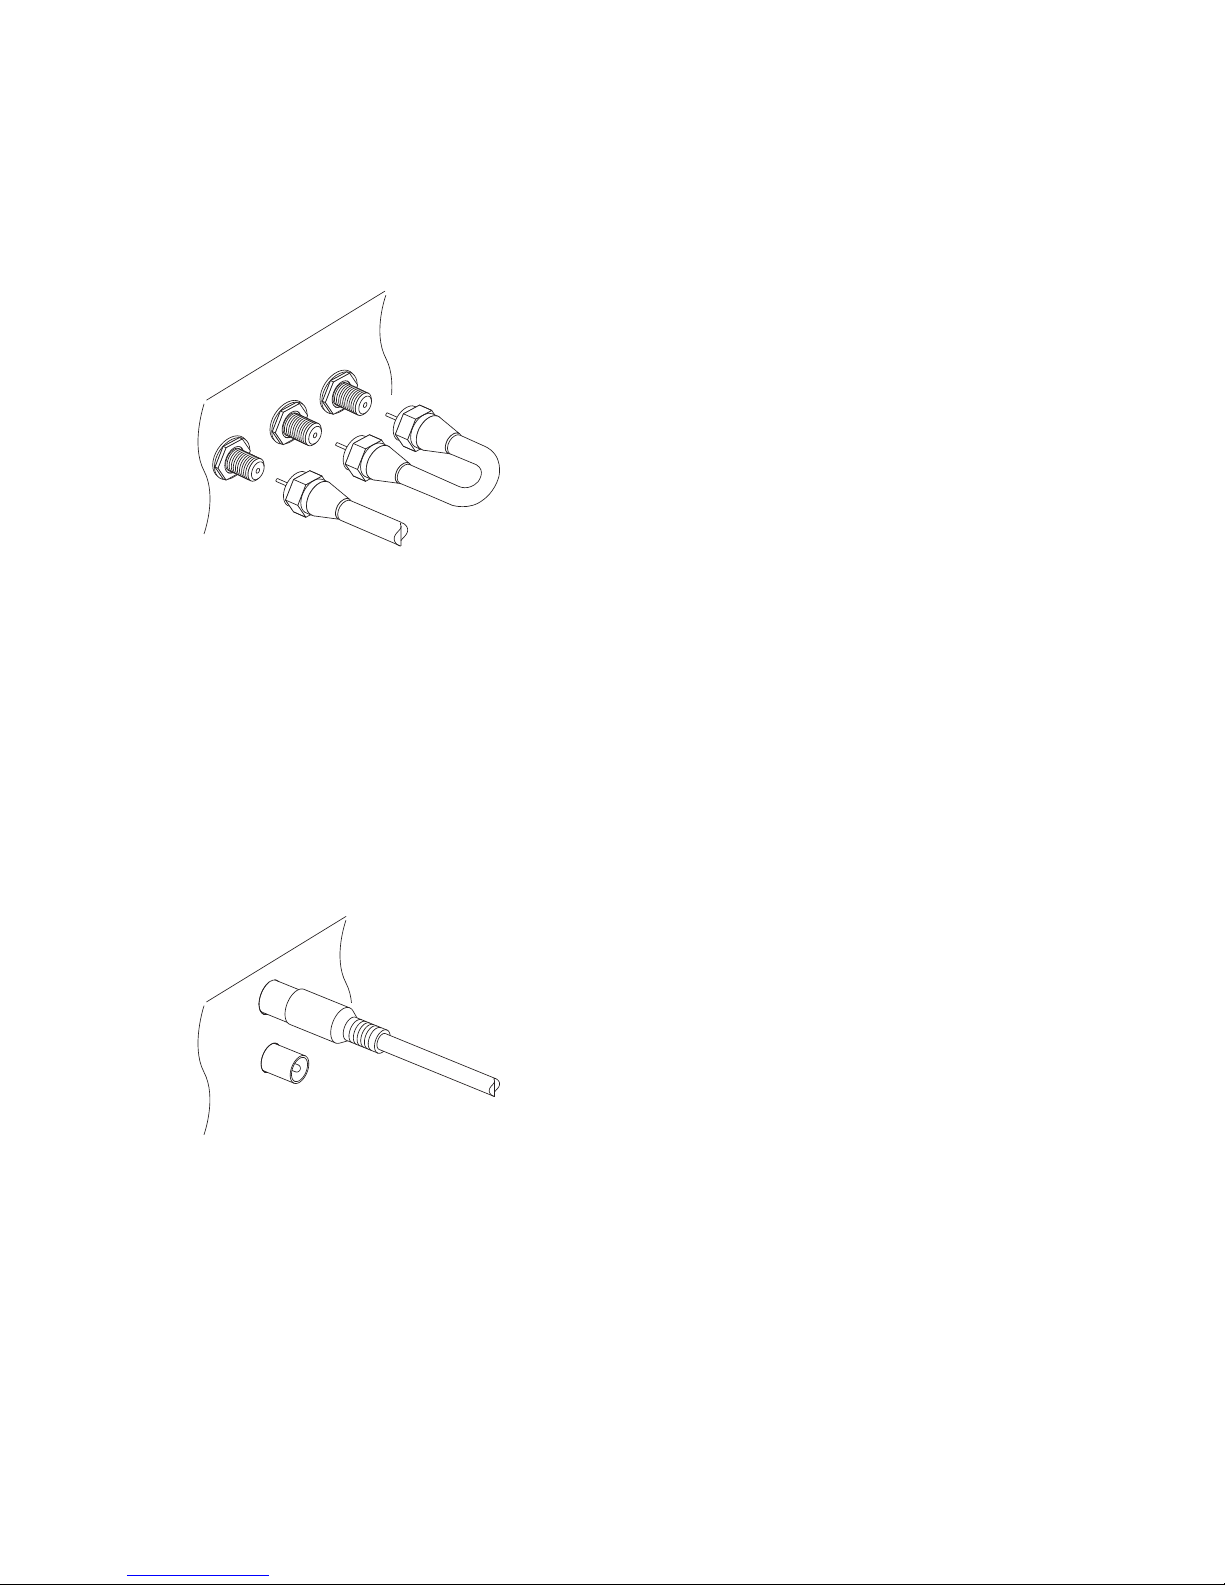
2.1 Aerial Connections
Satellite Dish Connection
Connect the cable from the satellite dish to LNB IN of TUNER 1. In most
situations, connect LNB OUT of TUNER 1 to LNB IN of TUNER 2 using the
loop-through cable. Only when two satellite dishes are available without
any multi-dish switch, users should connect the cable from the other dish to
LNB IN of TUNER 2.
Aerial Connection
Connect the cable from the aerial or cable TV outlet to ANT IN.
2.2 TV Connections
This digital TV receiver has a wide range of connectors available for use by
a TV. The list below shows video connectors in the order of picture quality,
I 9
from the highest to the lowest.
• HDMI
• Component
• SCART
• Composite
Use an HDMI connector to connect the receiver to a TV for the best available
picture quality. If the TV has no available HDMI connector, try the next best
connection type.
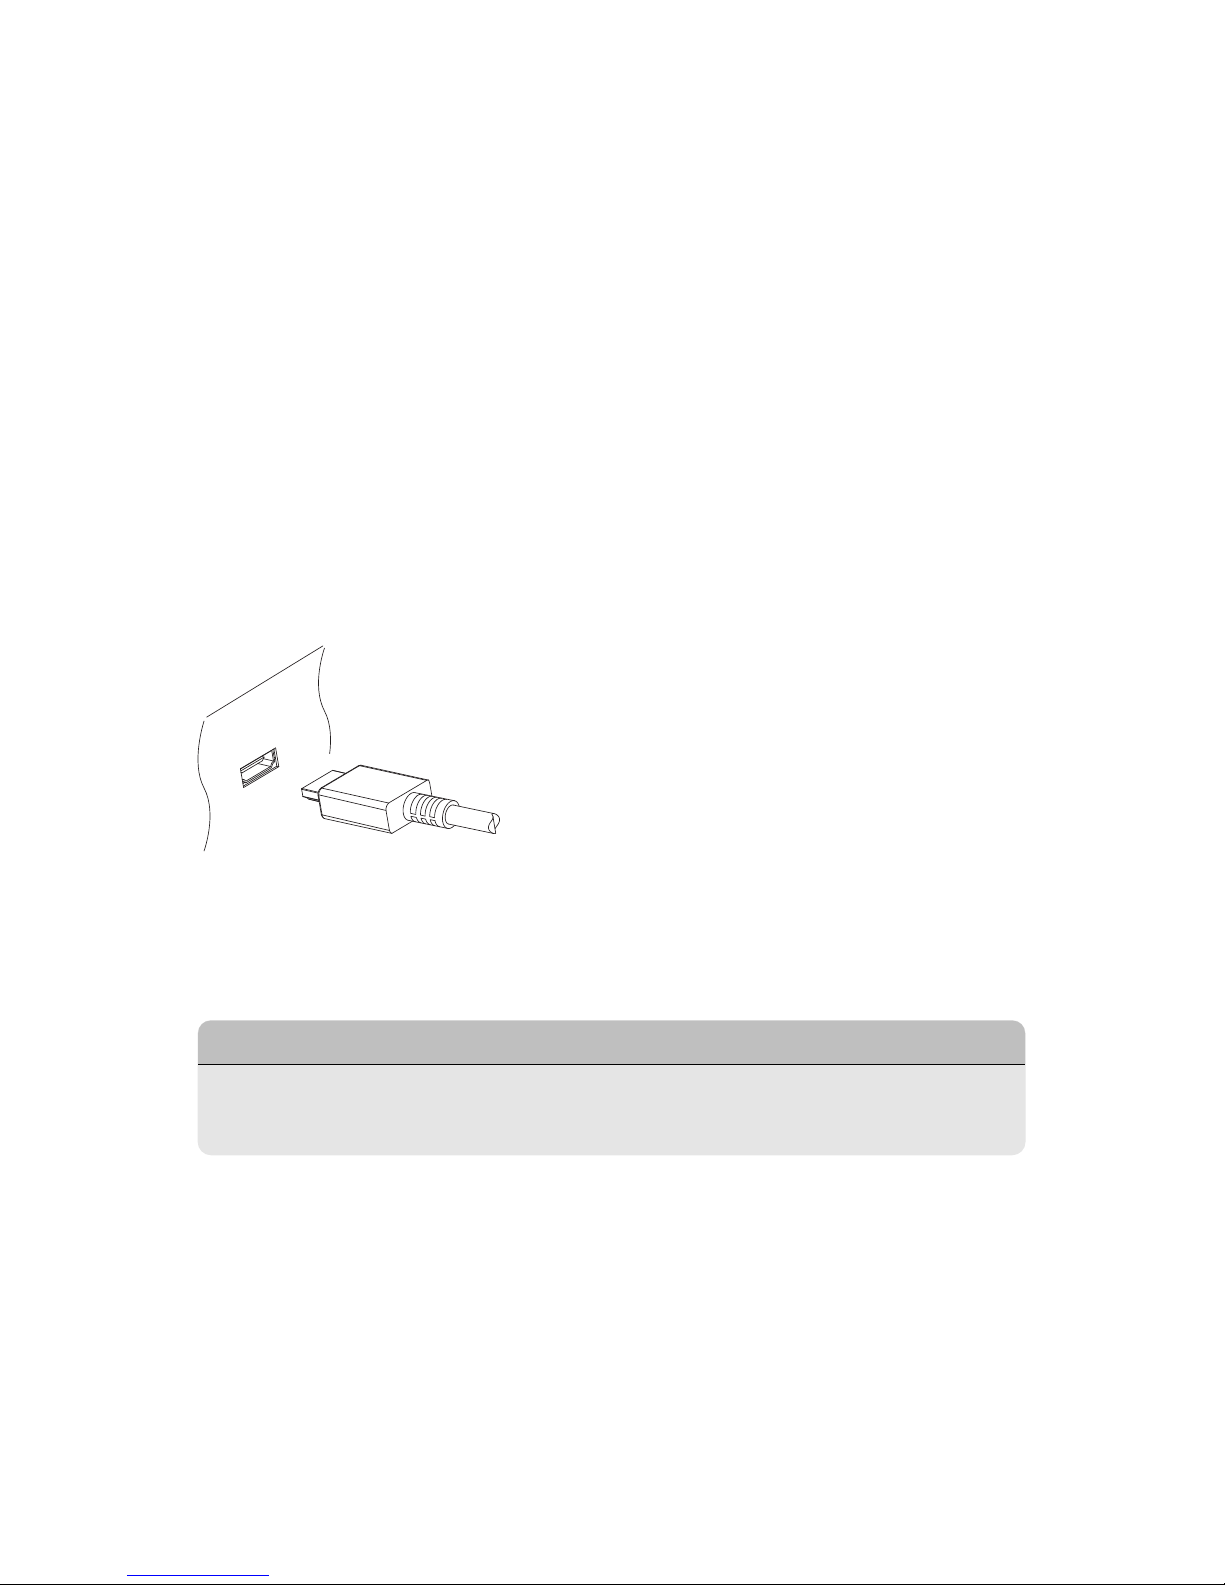
HDMI Connection
Connect the receiver’s HDMI output connectors to the TV’s HDMI input con-
nector using an HDMI cable. An extra audio connection is not needed be-
cause HDMI also carries audio.
..
Note
.
Some HDMI cables and TVs may not be compatible with the receiver due
to differing HDMI specifications.
10 2.2 TV C
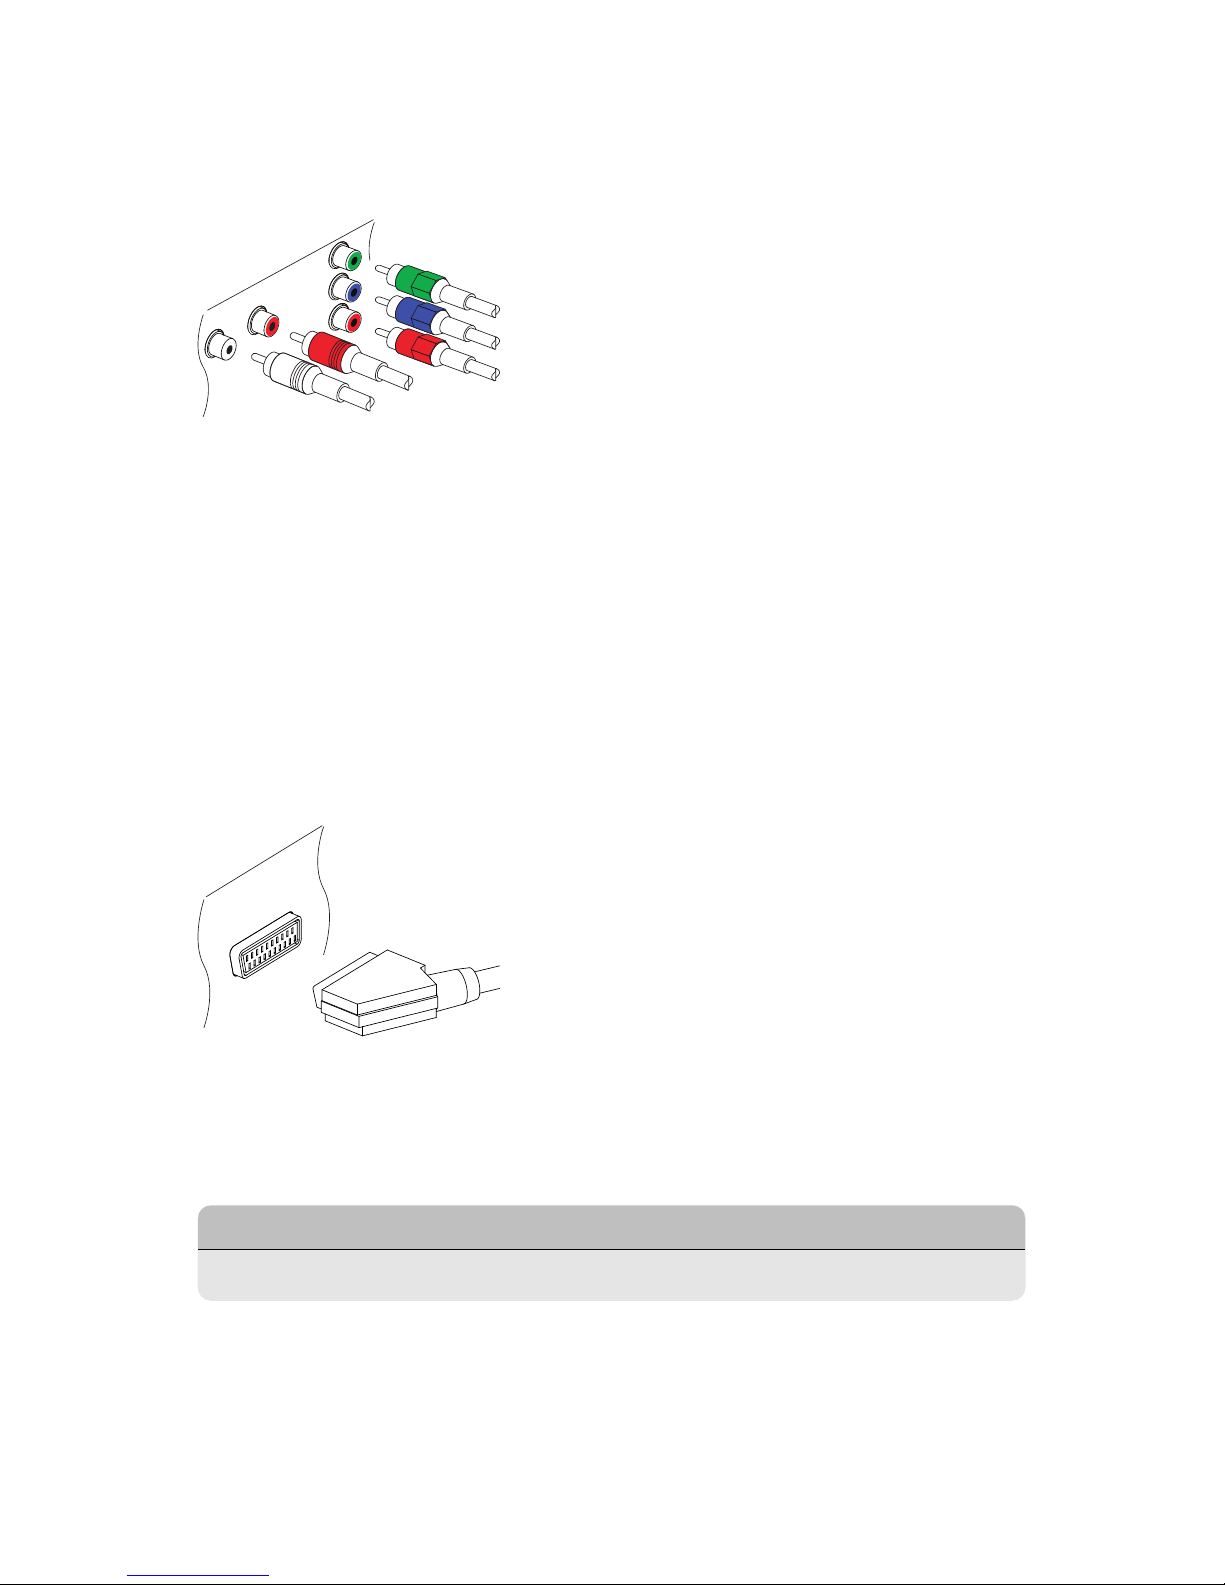
Component Connection
The receiver’s component video connectors are labelled Y, Pb, and Pr, and
their companion audio connectors are labelled L and R. Each of them is
coloured differently. A typical component cable has five connectors. Con-
nect the receiver’s component video and audio output connectors to the
TV’s component video and audio input connectors using a component ca-
ble, so that the connectors of the same colour connect to each other.
SCART Connection
Connect the receiver’s SCART output connector to the TV’s SCART input con-
nector using a SCART cable. An extra audio connection is not needed be-
cause SCART also carries audio.
..
Note
.
SCART connectors cannot carry HD video.
I 11
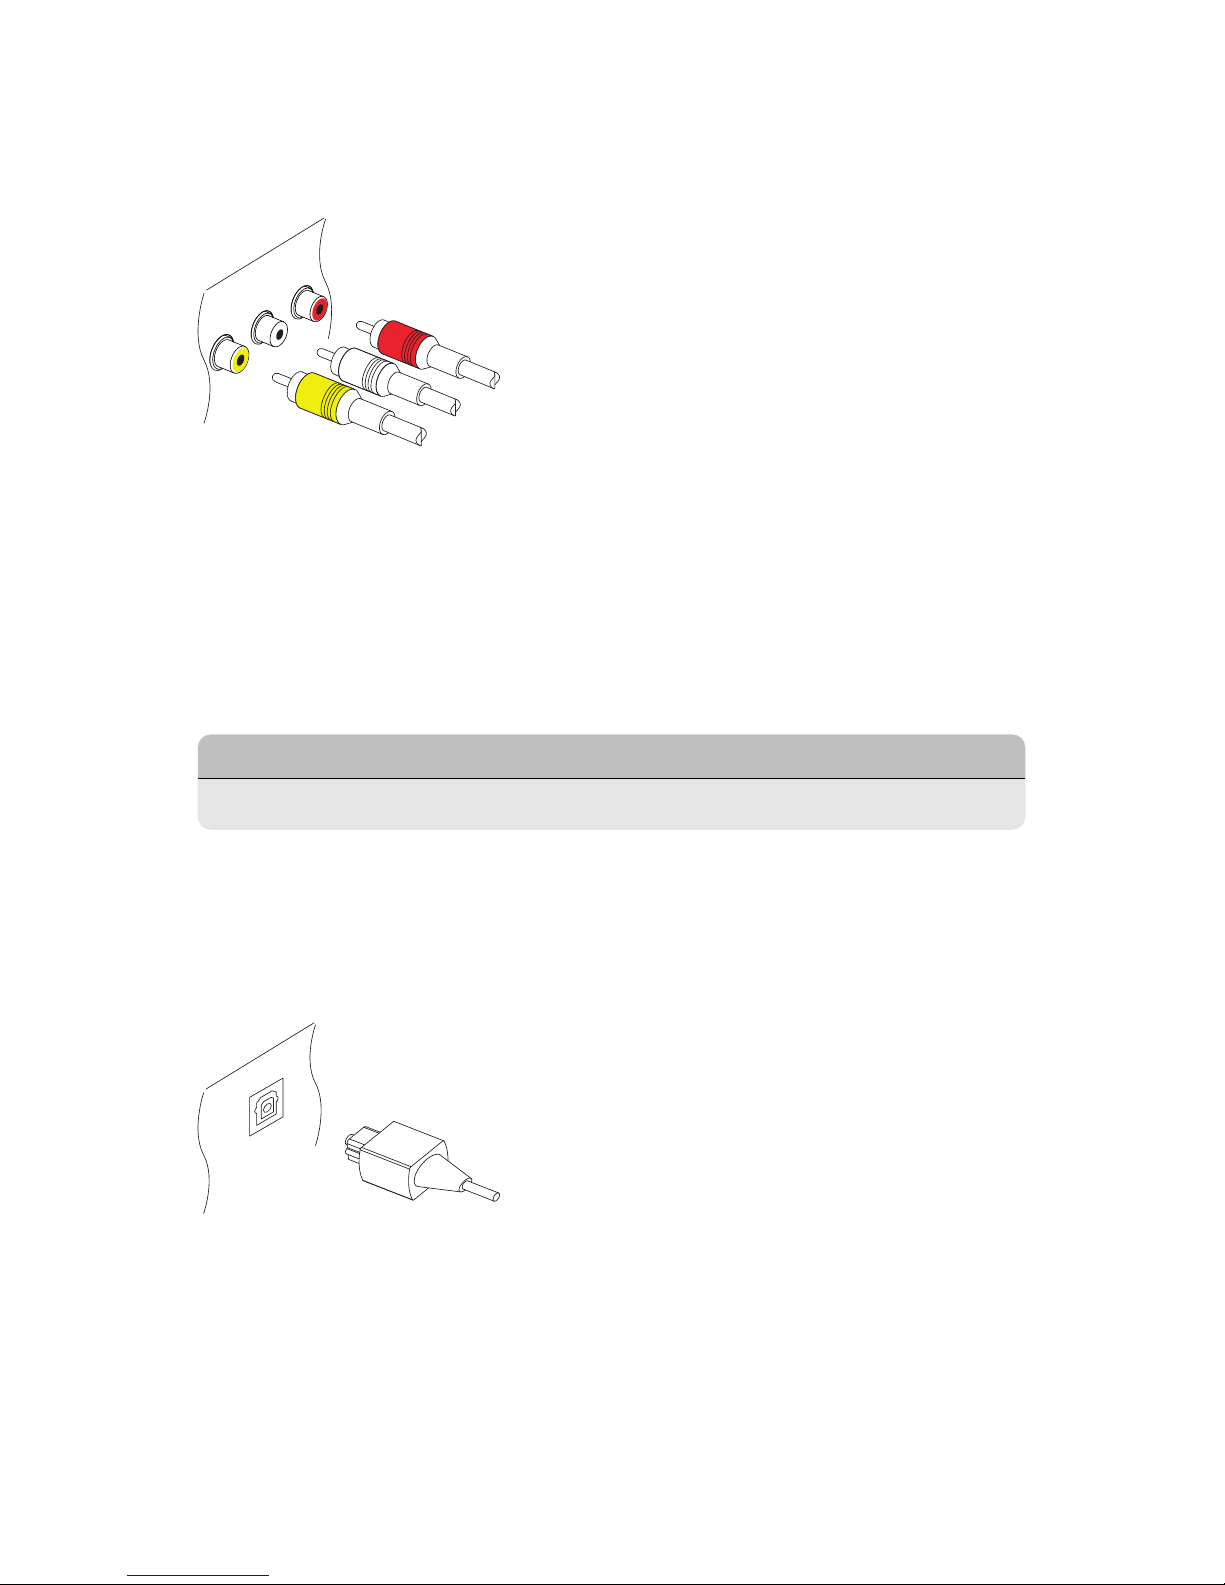
Composite Connection
The composite video connector shares the audio connectors with the com-
ponent video connectors. A typical composite cable has three connectors.
The yellow connector is for the video connection. Connect the receiver’s
composite video and audio output connectors to the TV’s composite video
and audio input connectors using a composite cable, so that the connectors
of the same colour connect to each other.
..
Note
.
Composite video connectors cannot carry HD video.
2.3 AV Receiver Connection
It is good to use an AV receiver for better audio quality. Connect the re-
ceiver’s SPDIF connector to the AV receiver’s digital audio input connector
using an optical audio cable.
12 2.3 AV R C
2.4 Network Connections
Connect the receiver to the wired or wireless network.
If a network cable is available, connect the receiver’s LAN port to the router
using a network cable.
If no network cable is available, use the Wi-Fi dongle for wireless network
connections. When the receiver is off, plug the Wi-Fi dongle into one of the
USB ports on the rear of the receiver.
For details on how to configure the network settings, see Network Settings
on page 54.
I 13

3 Scanning Channels
3.1 Understanding Satellite TV
A broadcast satellite’s channels are called transponders. A transponder gath-
ers signals over a range of uplink frequencies and retransmits them on a dif-
ferent set of downlink frequencies to receivers on Earth. Multiple TV chan-
nels are broadcast through a transponder. A transponder has three main
components: frequency, symbol rate, and polarization.
To get the latest information about satellite TV transponders, visit http://
www.lyngsat.com.
An LNB is the receiving device on a satellite dish. It downconverts a block of
frequencies to a lower block of intermediate frequencies, ranging from 950
MHz to 2150 MHz, so that the signal can be carried to a satellite TV receiver.
An LNB produces a particular frequency to do this. For example, an LNB
producing 5150 MHz is supposed to receive a frequency band that ranges
from 3000 to 4200 MHz, so that the absolute difference between the LNB
frequency and any frequency within the band falls within the range of the
intermediate frequencies.
LNB
14
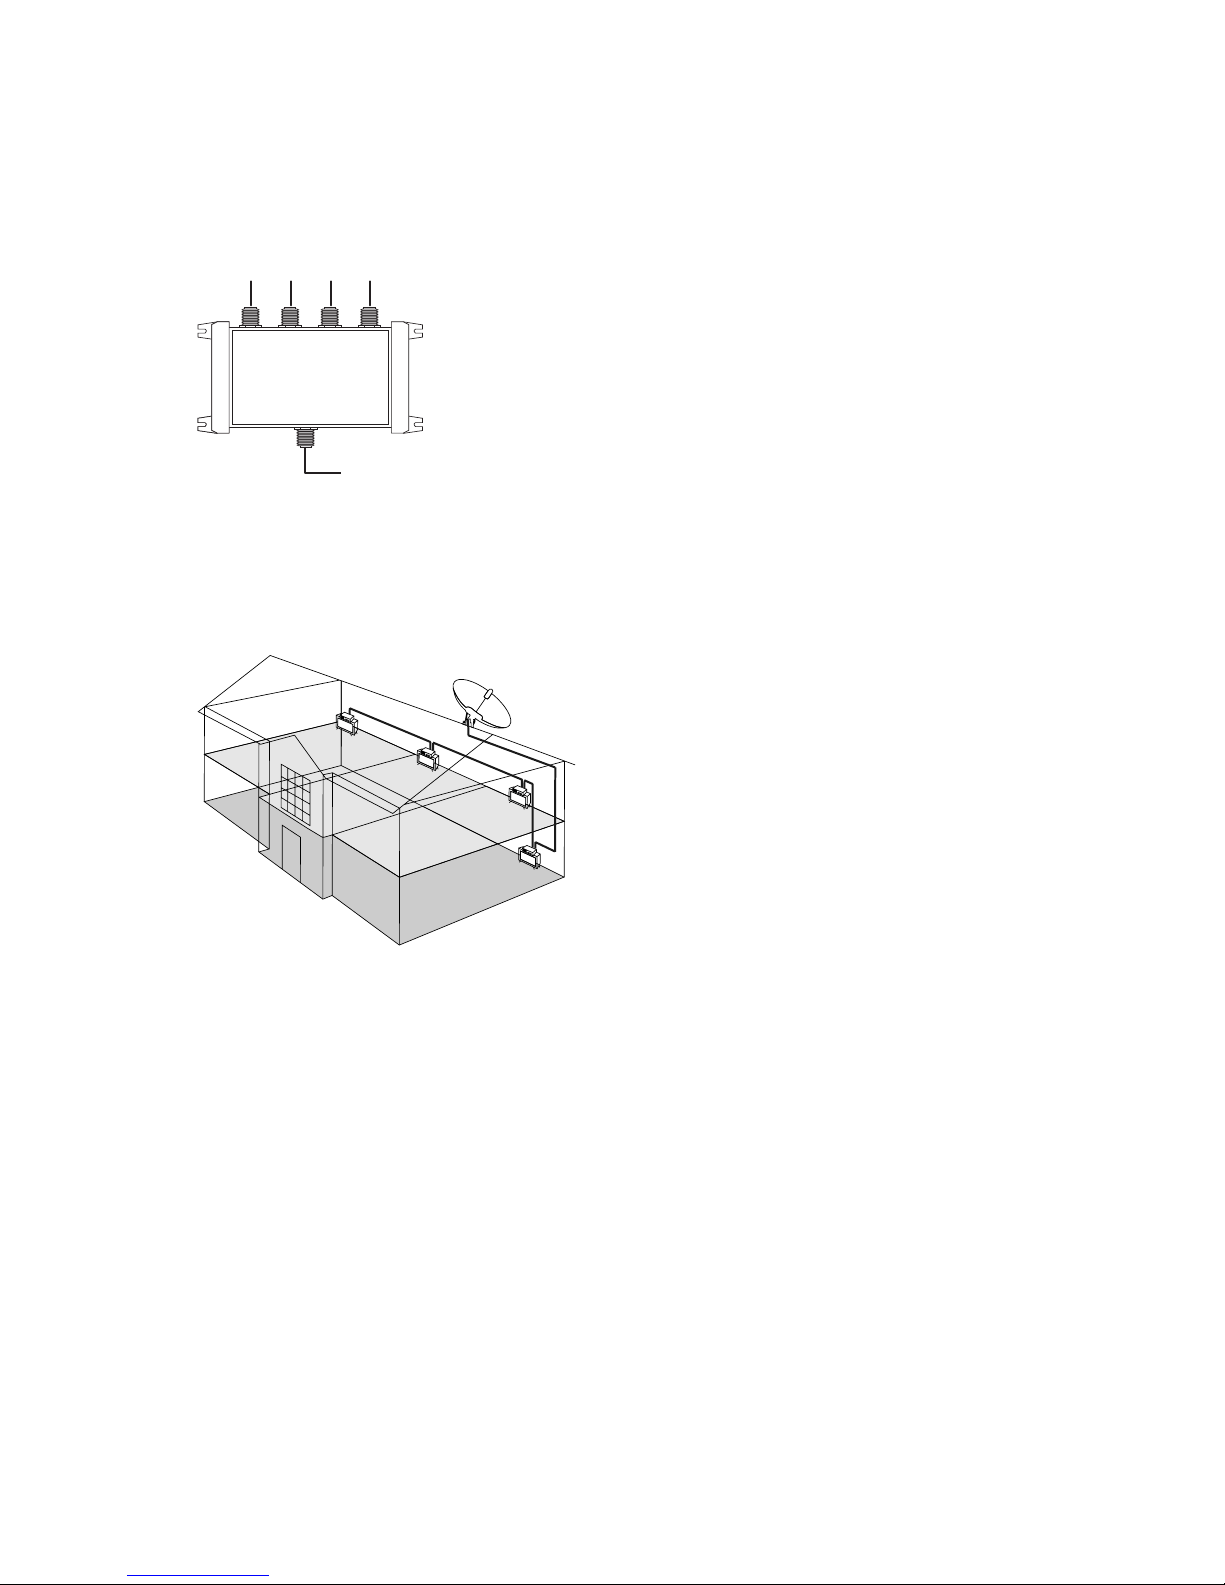
A DiSEqC is a switching device that selectively connects one of several satel-
lite dishes to a satellite TV receiver. A 4-way switch is the most commonly
used type of DiSEqC switch.
Digital TV Receiver
1 2 3 4
DiSEqC
Single cable distribution, also called unicable, is a satellite TV technology
that enables the delivery of broadcast signals to multiple receivers over a
single coaxial cable.
3.2 Satellite Dish Settings
LNB Settings
A set of satellite dish settings must be properly configured for each desired
satellite before performing a channel scan.
Open the Settings > Installation > Dish Setting menu.
There are two signal bars on the lower part of the screen. The signal level bar
indicates how strong the signal is, and the signal quality bar indicates how
easy it is to pick up. To view an enlarged signal bar display, press the blue
S C 15

button.
Configure the following settings properly using the signal bars.
• Satellite: Either choose a target satellite from the list of satellites or add
a new one.
• Tuner Connection: Specify whether the receiver’s satellite dish connec-
tors are connected to two different dishes separately or to the one same
dish via the loop-through cable. This option is available only when both
connectors are connected by any means.
• Tuner: Determine which of the dish connectors to use. This option is not
available when Tuner Connection is set to Loop-Through.
• Frequency: Choose a target transponder from the list of transponders.
• LNB Power: An LNB must be supplied with power to operate. Turn this
on to supply the LNB with power if it doesn’t have its own power supply.
• LNB Type: Specify what type of LNB is used.
• LNB Frequency: Specify what frequency the LNB generates. A dual-
band LNB, also called universal LNB, generates two alternative frequen-
cies to receive a wider band of satellite frequencies.
• LNB 22 kHz: Either turn this on or off to pick up a higher or lower fre-
quency band.
• DiSEqC Switch: If one or more typical DiSEqC switches are used, this op-
tion must be set properly. Specify which of the DiSEqC ports is connected
to the intended dish.
On this screen, users can add or change satellite and transponder data.
Rename a satellite: Choose Satellite and select a satellite. Press the red
button and then enter a new name using the on-screen keyboard.
Edit a satellite’s longitude: Choose Satellite and select a satellite. Press the
green button and then Modify the longitude.
Clear all transponders of a satellite: Choose Satellite and select a satellite.
Press the yellow button and then confirm to clear them.
16 3.2 S D S

Add a transponder: Place the focus on Frequency and press the green but-
ton. Specify the frequency, symbol rate, and polarization.
Edit a transponder: Choose Frequency and select a transponder. Press the
yellow button and then modify the transponder’s details.
Delete a transponder: Choose Frequency and select a transponder. Press
the red button and then confirm to delete it.
Unicable Settings
If the user’s house is equipped with a single cable router, configure unicable
settings properly.
Open the Settings > Installation > Dish Setting menu. Set LNB Type to Uni-
cable and then choose Unicable Setting. Choose Config Mode and deter-
mine whether to scan for all available channels or a specific channel. Specify
the details, such as port and predetermined intermediate frequency.
3.3 Using a Motorized Dish
While a fixed dish usually only picks up one satellite, a motorized dish can
pick up multiple satellites.
There are two control methods for motorized dishes: DiSEqC 1.2 and USALS.
With DiSEqC 1.2, the user must manually operate the dish to locate satellites
one by one. The digital TV receiver stores each satellite position for later use.
With USALS, the receiver can pinpoint all visible satellites through calcula-
tions using the dish coordinates and the built-in database of satellite posi-
tions.
S C 17

Using DiSEqC 1.2
Open the Settings > Installation > Dish Setting > Positioner Setting menu,
and then set Positioner to DiSEqC 1.2.
Repeat these steps for every desired satellite.
1. Choose Go to Reference from Positioner Command for the dish to re-
turn to the reference point at the highest point in its arc. The dish’s
movement accuracy may decrease over long-time use. To correct move-
ment errors, choose (Re-) Calculate from Positioner Command.
2. Choose Satellite and choose a target satellite.
3. Choose Tuner and determine which of the dish connectors to use. This
option is not available when Tuner Connection is set to Loop-Through
under Settings > Installation > Dish Setting.
4. Choose Frequency and select any available transponder.
5. Choose Go to Stored Position from Positioner Command to rotate the
dish, so that it faces the target satellite.
6. Place the focus on Move and press the left or right navigation button
to finely drive the dish east or west for the best signal. The dish rotates
continuously as long as either of these buttons is held down.
7. Choose Store Satellite Position from Positioner Command to save the
dish’s current position for the target satellite.
18 3.3 U M D

It may be useful to set limits to the movement scope of the dish for easier
manipulation. Repeat these steps two times to set a limit position for the
east and the west.
1. Choose Go to Reference from Positioner Command for the dish to re-
turn to the reference point.
2. Place the focus on Move and press the left or right navigation button to
drive the dish.
3. Choose Set East (soft) Limit or Set West (soft) Limit from Positioner
Command to save the dish’s current position to use it as a limit position.
Choosing Disable (soft) Limits from Positioner Command clears these limit
positions.
Using USALS
Open the Settings > Installation > Dish Setting > Positioner Setting menu,
and then set Positioner to USALS. Specify these items correctly:
• Dish Longitude: Enter the longitude where the dish is located.
• Dish Latitude: Enter the latitude where the dish is located.
Give the dish a test run to see if it works properly. Repeat these steps for
every desired satellite.
1. Choose Go to Reference from Positioner Command for the dish to re-
turn to the reference point.
2. Choose Satellite and choose a target satellite.
3. Choose Tuner and determine which of the dish connectors to use. This
option is not available when Tuner Connection is set to Loop-Through
under Settings > Installation > Dish Setting.
4. Choose Frequency and select any available transponder.
5. Choose Go to to rotate the dish so that it faces the target satellite.
S C 19

3.4 Scanning Satellite TV Channels
Open the Settings > Installation > Satellite Search menu.
Three methods are available for scanning for satellite TV channels.
• Scanning all available transponders for every channel
• Scanning for multiple channels that a specific transponder carries.
• Scanning for a specific one of multiple channels that a specific trans-
ponder carries.
Some option items, including Satellite and Tuner, are used in common in
two or more scanning methods, as follows:
• Satellite: Choose a target satellite from the list of satellites.
• Tuner: Determine which of the dish connectors to use.
• Search Type: Determine which types of channels to scan for.
• All Service: Scan for all available TV and radio channels.
• FTA Only: Scan only for free TV and radio channels.
• TV Only: Scan only for free and pay TV channels.
• Network Search: A transponder usually has information about other
transponders provided by the same satellite TV service provider. It is bet-
ter to turn on this option so that the receiver uses broadcast network in-
formation for faster and more precise scanning.
When any dish settings need to be reconfigured, select Dish Setting or Po-
sitioner Setting to jump to the relevant menu. To return to this menu, select
Service Search.
Particular LNBs have a indicator light to show if the signal strength is good
enough for the receiver to perform a channel scan. This may be useful when
installing a new satellite dish. To activate this function, press the green but-
ton and then confirm to use it.
20 3.4 S S TV C

Scanning for Every Channel
Three methods are available for scanning for every channel.
• Set Search Mode to Auto. With this method, the receiver uses its numer-
ous database of transponders when scanning for channels. Choose Time
Calibration and determine how long the receiver should wait to get time
information from each transponder.
• Set Search Mode to Blind. Transponders occasionally change, so the re-
ceiver may happen to miss some channels when scanning for channels
using the transponder database. With this method, the receiver scans
all potential transponders using every possible combination of trans-
ponder elements not to miss any channel in a scan. However, it takes
much longer time.
• Set Search Mode to Fast Scan. Particular satellite TV service providers
manage dedicated transponders to provide up-to-date transponder in-
formation. With this method, the receiver uses that sort of transponder
for faster and more precise scanning. Choose Select Operator and select
a satellite TV service provider.
Make sure that the common options are properly configured before select-
ing Service Search to start channel scan.
Scanning a Specific Transponder
Generally, one transponder carries multiple TV channels. To scan a specific
transponder for the channels it carries, set Search Mode to Manual. Users
need to get several details about a target transponder.
• Frequency: Choose a target transponder from the list of transponders.
• Symbol rate: Specify the transponder’s symbol rate.
• Polarity: Specify the transponder’s polarization.
S C 21

• Transmission: Specify the modulation method used for the transponder.
DVB-S2 is usually used for HD channels.
Make sure that the common options are properly configured before select-
ing Service Search to start channel scan.
Scanning for One Channel
To scan for only one specific channel, set Search Mode to Advanced. Each
satellite TV channel has unique packet IDs used to distinguish between
channels. In addition to the information about a target transponder, users
need to know what packet IDs a target channel uses.
• Video PID: Specify the channel’s video packet ID.
• Audio PID: Specify the channel’s audio packet ID.
• PCR PID: Specify the channel’s PCR (programme clock reference) packet
ID. This is usually identical to video PID. If the video PID setting doesn’t
work, try 8191.
Make sure that the common options are properly configured before select-
ing Service Search to start channel scan.
3.5 Scanning Terrestrial TV Channels
Open the Settings > Installation > Terrestrial Search menu.
There are two signal bars on the lower part of the screen. The signal level bar
indicates how strong the signal is, and the signal quality bar indicates how
easy it is to pick up.
To scan for all available channels, set Search Mode to Auto. Choose Search
Type and determine which types of channels to scan for.
• All Service: Scan for all available TV and radio channels.
• FTA Only: Scan only for free TV and radio channels.
22 3.5 S T TV C

• TV Only: Scan only for free and pay TV channels.
To scan for a specific channel, set it to Manual, and then choose Channel
and specify the channel’s number.
If the aerial needs power supply, turn on Antenna 5V.
Select Service Search to start channel scan.
3.6 Scanning Cable TV Channels
Open the Settings > Installation > Cable Search menu.
There are two signal bars on the lower part of the screen. The signal level bar
indicates how strong the signal is, and the signal quality bar indicates how
easy it is to pick up.
To scan for all available channels, set Search Mode to Auto. Choose Search
Type and determine which types of channels to scan for.
• All Service: Scan for all available TV and radio channels.
• FTA Only: Scan only for free TV and radio channels.
• TV Only: Scan only for free and pay TV channels.
To scan for a specific channel, set Search Mode to Manual. Set these options
for the channel.
• Frequency: Specify the channel’s frequency.
• Symbol rate: Specify the channels’ symbol rate.
• QAM Mode: Specify the modulation method used for the channel.
Select Service Search to start channel scan.
S C 23

4 Watching TV
Use the channel buttons or the numeric buttons to change channels. When
changing channels, a dialogue box appears showing information about the
current programme on the current channel, such as programme title and
running time. Pressing the Info button also displays the programme infor-
mation dialogue box.
The following symbols may appear on the dialogue box to indicate what the
current channel and programme features.
• : This is a pay channel. See Watching Pay Channels on page 29.
• : Teletext pages are available. See Viewing Teletext on page 29.
• : Subtitles are available. See Displaying Subtitles on page 28.
• : Dolby audio is available. See Audio and Video Settings on page 55.
• : This is an HD channel. See Audio and Video Settings on page 55.
• : Subchannels are available. See Watching Subchannels on page 30.
Use the left and right navigation buttons to view information about the pre-
vious and following programmes. To view more information about the cur-
rent programme, press the Info button again.
Pressing the FAV button displays the list of channel groups, including
favourites groups. Once a group is chosen, users can change only between
the channels that belong to the group.
4.1 Channel List
Use the channel list to change channels more easily.
Pressing the up or down navigation button displays the group’s simplified
24

channel list. These buttons can be configured to perform differently. See
On-Screen Display Settings on page 56.
Press the OK button to open the channel list.
Switch to a specific channel: Place the focus on a channel entry using the
navigation or numeric buttons, and then press the OK button.
Skip through a channel list: Use the up and down navigation buttons or,
alternatively, the Page up and Page down buttons.
Display specific channels: Press the red button to sort or filter the channel
list. A list of channel categories is displayed on the middle of the screen.
Repeatedly pressing the red button displays different channel categories.
Choose a channel category and then a subcategory.
Add a channel to favourites groups: Place the focus on a channel entry and
press the green button. A list appears showing multiple favourites groups.
Select one or more groups, and then press the Exit button to finish.
View a favourites group’s channels: Press the FAV button and choose a
favourites group.
Search for channels: Press the yellow button and enter search criteria using
the on-screen keyboard.
Channel List Preferences
Press the blue button and set these options properly.
• Service preview: With this enabled, selecting a channel entry displays
the channel’s picture in the inset window on the upper right of the screen.
Select it once more to switch to the channel. With this option disabled,
selecting a channel entry immediately switches to the channel.
• Keep viewing service when exit: With this disabled, pressing the Exit
button switches to the channel that was focused on. With this option en-
abled, pressing the Exit button closes the channel list without changing
channels.
W TV 25

• View only filtered list: With this enabled, choosing a channel category
filters out channels that are not in the chosen category.
• Logical channel number: Some channels have their own channel num-
bers, and others don’t. With this option enabled, the receiver uses the
proper numbers. Channels that don’t have proper numbers are num-
bered from 1000. With this option disabled, channels are numbered in
the order in which they are found.
• HD service grouping: With this option enabled, HD channels are
grouped at the top of the channel list.
• Copy Service: Channels are associated with the dish connector that was
used when scanning for them. If the first dish connector is linked with
the second one, it’s usually best to associate all channels with both dish
connectors. Use this function to duplicate the channels associated with
the first dish connector so that the second one is also associated with
them, or vice versa.
4.2 TV Programme Guide
The TV programme guide (EPG) provides schedule information for current
and upcoming TV programmes.
26 4.2 TV P G

Before using the programme guide, make sure that the clock is set correctly
under Settings > Configuration > Time Setting.
Press the EPG button to open the programme guide. Use the navigation
buttons to browse the channel timeline.
Skip backward or forward by a day: Press the red button or the green but-
ton.
Change the timeline view: Pressing the EPG button alternates the timeline
view between channel-based view and time-based view.
Change the time unit: Press the FAV button and set EPG Time scale shorter
or longer.
View a programme’s information: Press the Info button on a programme
entry.
Schedule a programme to watch: Select a programme entry and choose
Play.
Schedule a programme to record: Select a programme entry and choose
either Once Record or Series Record. For details, see Scheduling TV Record-
ings Using the Programme Guide on page 34.
Cancel a scheduled event: Select a programme entry that is scheduled to
watch or record.
Search for programmes: Press the yellow button. Choose Search event
name and enter search criteria. It is also possible to search by programme
genre. Choose Content code and choose a genre.
Programme Guide Preferences
While most TV stations provide programme information for only a couple
of days in each transponder, some TV stations, such as Canal+ and Sky, use
a dedicated transponder to provide programme information for 7 or more
days.
W TV 27

Press the blue button and determine which type of programme guide to use.
It takes a rather longer time for the receiver to get programme information
from the MediaHighway programme guide due to the large amount of infor-
mation. Users can set the receiver to access the MediaHighway programme
guide when the receiver turns on, to save time. Press the FAV button and set
Start MHW-Epg Automatically to Auto.
4.3 Controlling Audio
When watching a channel, press the yellow button to control audio using
these options.
• Audio Track: A TV programme may provide audio in two or more lan-
guages. Choose a different audio language if available.
• Sound Mode: Generally, an audio track has two sound channels. Deter-
mine which sound channel to use.
• Sound Level: The volume may vary depending on channel. Use this to
make the volume even at every channel. With this set to High, for exam-
ple, the volume is automatically adjusted to the level that is higher 30%
than the current channel’s.
4.4 Displaying Subtitles
When the subtitle symbol is highlighted on the programme information
dialogue box, it indicates that subtitles are available in one or more lan-
guages for the current programme. Press the Subtitle button and choose
a subtitle language to display subtitles.
28 4.3 C A

4.5 Watching Two Channels Simultaneously
Users can simultaneously watch two different channels with one channel
shown in an inset window. It is also possible to watch a channel while play-
ing a recording.
Press thePiPbutton, and a window appears atacornerofthescreen, display-
ing another channel. Pressing the PiP button again displays the two pictures
side by side at the same size. To close the window, press the PiP button once
more.
Change channels for the foreground picture: Press the PiP List button and
select a channel from the channel list that appears.
Swap the background picture with the foreground picture: Press the PiP
Swap button.
Change the location of the foreground picture: Press the Page up or Page
down button.
4.6 Viewing Teletext
The teletext symbol highlighted on the programme information dia-
logue box indicates that teletext pages are available with the current chan-
nel. Press the Teletext button to display the teletext page.
Each teletext page has a page number. Enter a page number to view a dif-
ferent teletext page.
4.7 Watching Pay Channels
Paychannelsareencrypted to prevent non-subscribers from watchingthem.
Make sure to buy a correct pay-TV card, and additionally a CA module in
many cases, to watch certain pay channels.
W TV 29

This receiver has four slots on the right front side. Open the flap by pulling
the right edge. The upper two slots accommodate Conax pay-TV cards, and
the lower two slots accommodate CA modules.
To watch Conax-scrambled pay channels, insert a Conax pay-TV card into
one of the upper two slots. To watch pay channels scrambled with non-
Conax, insert a pay-TV card into a CA module, and then insert the CA module
into one of the lower two slots.
To view the information about the pay-TV card, open the Settings > Utili-
ties > CAS menu. Select the slot in which the pay-TV card or CA module is
installed.
4.8 Watching Subchannels
Particular channels, such as sports channels or film channels, may have sub-
channels (multi-feed). For example, a film channel may use subchannels to
air a single film with regular minutes-long intervals at the same time.
The subchannel symbol highlighted on the programme information di-
alogue box indicates that the current channel has multiple subchannels.
Press the blue button, and a list appears showing available independent pro-
grammes. Select a programme to watch it.
30 4.8 W S

4.9 Setting Up Timers
Wake-Up Timer
This receiver can be set to turn on at a specific time and tune in to a specific
channel.
Open the Settings > Configuration > Time Setting menu. Determine how
frequently to run the wake-up timer by setting Wake Up Mode to anything
other than Off. According to this setting, specify the date, days of the week,
time, and channel.
Sleep Timer
This receiver can be set to turn off at a specific time.
Open the Settings > Configuration > Time Setting menu. Determine how
frequently to run the sleep timer by setting Sleep Mode to anything other
than Off. According to this setting, specify the date, days of the week, and
time.
4.10 Managing Channels
Organizing the Channel List
Open the Settings > System Tools > Service List Manager menu.
Sort channels: Repeatedly pressing the red button sorts channels by a dif-
ferent category.
Search for channels: Press the yellow button and enter search criteria using
the on-screen keyboard.
Lock or unlock channels: Press the blue button and select Lock/Unlock
Services. Select one or more channels. Once a channel is selected, it appears
W TV 31

in the list of locked channels on the middle of the screen. Selecting a channel
from the list of locked channels unlocks it.
Rearrange channels: Press the blue button and select Move Services. Se-
lect one or more channels. Place the focus on a channel entry to move the
selected channels above it, and then press the green button.
Delete channels from the channel list: Press the blue button and select
Delete Services. Select one or more channels. Press the green button and
then confirm to delete them.
Hide channels from the channel list: Press the blue button and select Skip
Services. Select one or more channels. Once a channel is selected, it ap-
pears in the list of hidden channels on the middle of the screen. Selecting a
channel from the list of hidden channels makes it visible.
Add a new channel: Press the blue button, select Edit Services, and then
press the green button. Specify the channel details, including frequency and
channel name. Select Yes when finished.
Modify a channel’s attributes: Press the blue button and select Edit Ser-
vices. Select a channel and modify its attributes, such as channel name, for
example.
Organizing the Favourites List
Open the Settings > System Tools > Service List Manager menu.
Add channel to a favourites group: Press the blue button, select Set Fa-
vorites, and then choose a favourites group. Select one or more channels.
Once a channel is selected, it appears in the favourites group on the middle
of the screen. To select a different favourites group, press the green button
and select a favourites group.
Remove channels from a favourites group: Press the blue button, select
Set Favorites, and then choose a favourites group. Select one or more chan-
nels from the favourites group.
32 4.10 M C

Add a favourites group: Press the blue button and select Set Favorites.
Press the yellow button and enter a group name using the on-screen key-
board.
Rename a favourites group: Press the blue button and select Set Favorites.
Place the focus on a favourites group and press the green button. Enter a
new name using the on-screen keyboard.
Rearrange favourites groups: Press the blue button and select Set Fa-
vorites. Place the focus on a favourites group, press the FAV button, and
then move it to a new location.
Delete a favourites group: Press the blue button and select Set Favorites.
Place the focus on a favourites group, press the blue button, and then con-
firm to delete it.
4.11 HbbTV
HbbTV combines TV services delivered via broadcast with services delivered
via broadband. HbbTV services include video on demand, interactive adver-
tising, voting, games, social networking, programme-related services, and
more.
When watching a channel, a rounding circle may appear in the upper-right
corner of the screen to indicate that HbbTV services are available. Press the
red button to access the channel’s HbbTV services via the Internet.
..
Note
.
The receiver must be connected to the Internet to use HbbTV services.
HbbTV services may not be available, depending on the TV station.
W TV 33

5 Recording TV
This digital TV receiver can record TV programmes onto the built-in hard
drive as well as a removable hard drive or flash drive. However, flash drives
are not recommended for recording.
The receiver is set to use the built-in hard drive for recording by default. To
use a removable hard drive, see Recording Preferences on page 36.
..
Note
.
The receiver may not be equipped with a built-in hard drive, depending
on the product options.
5.1 Recording TV Programmes
Under ideal conditions, users can watch 2 different channels at the same
time while recording 3 other channels. When using time-shifting, at most
2 different channels can be recorded simultaneously. For details on time-
shifting, see Time-Shifting on page 35.
Press the record button to instantly begin recording the current pro-
gramme.
Scheduling TV Recordings Using the Programme Guide
Use the programme guide to schedule TV recordings. Open the programme
guide, and press the OK button on a programme entry scheduled to air later.
Either choose Once Record to record the programme only once, or choose
Series Record to record its every episode.
34

At the scheduled time, the receiver turns on if it is off, and begins recording
the programme. Even if the receiver is set to turn off before the time that the
recording is supposed to finish, the receiver does not turn off until recording
is done.
Manually Scheduling TV Recordings
Manual scheduling of programmes is sometimes needed because the pro-
gramme guide is not always consistent with the actual broadcasting time.
There may be changes in broadcast schedules or delays due to other pro-
gramming.
Open the Settings > System Tools > Schedule menu.
Add a recording event: Press the green button. Specify the program de-
tails, including channel and start time. To display the programme at the
scheduled time without recording, set Type to Play. With Alarm Confirm
Message enabled, a message appears to notify that the event will start in 3
minutes. Select Yes when finished.
View recording events by date: Press the yellow button to open the calen-
dar. Select a date to view its recording events.
Edit a recording event: Place the focus on an event entry, press the OK
button.
Delete a recording event: Place the focus on an event entry, press the red
button, and then confirm to delete it. To delete all events at once, press the
blue button.
5.2 Time-Shifting
Time-shifting temporarily records the current programme. Using this fea-
ture, users can pause and resume a live programme and even scan through
it backward or forward. For example, simply pause or skip backward in the
R TV 35

current live programme to replay missed crucial scenes when answering a
phone call, when having gone to the bathroom, or when wondering what a
character in a drama just mumbled.
Before using this feature, make sure that TimeShift Start is set to Auto or
Manual under Settings > Configuration > Recording Option. For details,
see Recording Preferences on page 36.
Pause the live programme: Press the pause button . Press it again to
resume.
Skip backward or forward: Press the play button to display the progress
bar. Press the left or right navigation button. Repeatedly pressing the yellow
button changes the skip interval from 10 seconds to 10 minutes.
Jump to the beginning of the time-shift recording: Press the previous but-
ton .
Return to the live programme: Press the stop button .
5.3 Playing Recordings
Press the Play List button to access the recordings stored on the built-in hard
drive or removable storage devices. For details, see Playing Recordings and
Videos on page 41.
..
Note
.
TV recordings cannot be played by any receiver other than the receiver
that made them.
5.4 Recording Preferences
Open the Settings > Configuration > Recording Option menu.
36 5.3 P R

• Alarm Confirm Message: With this enabled, a message appears to notify
users that a scheduled recording event will begin in 3 minutes.
• Recording Stop Message: With this disabled, pressing the stop button
stops the current recording immediately without asking for confirma-
tion.
• Extra Recording Time Before Start: It is good to begin recording a few
minutes earlier than the scheduled start time to avoid missing the begin-
ning of a programme. Specify how much earlier the receiver should begin
recording.
• Extra Recording Time After Finish: It is good to finish recording a few
minutes later than the scheduled end time to avoid missing the end of
a programme. Specify how much later the receiver should finish record-
ing.
• TimeShift Start: With this set to Auto, the receiver begins time-shift
recording whenever changing channels. With this set to Manual, press-
ing the pause button begins time-shift recording. With this set to Off,
time-shifting is disabled.
• TimeShift Duration: Specify the maximum duration for time-shift
recording. For example, if this is set to 30 minutes, only the last 30
minutes of the programme are temporarily preserved for playback.
• Playback Position Jump: When playing a recording, users can use the
left and right navigation buttons to skip backward and forward. Spec-
ify the amount of time to skip at a time. With this set to Auto, it varies
from 10 seconds to 4 minutes, depending on running time.
• Playback Numeric Function: When playing a recording, users can use
the numeric buttons to skip to a specific point. With this set to Percent-
age Move, the unit for user-entered numbers is percentage. For example,
to skip to the 35-percent point of the recording, enter “35”. With this set
to Commercial skip, users can enter 0 to 9, and the unit is minute. For
example, to skip forward 5 minutes, enter “5”. To skip backward 1 minute,
enter “0”.
R TV 37

• TimeShift Device: Determine which storage device to use for time-shift
recording by default.
• Record Device: Determine which storage device to use for recording by
default.
38 5.4 R P

6 Playing Media Files
This digital TV receiver can play not only TV recordings but also many kinds
of media files, including photos, music, and videos.
6.1 Managing Storage Devices
Connect a removable hard drive or flash drive to one of the USB ports on the
front or rear of the receiver.
It is better to use the eSATA connector than USB ports when connecting a
removable hard drive to the receiver, because eSATA transfers data five times
faster than USB 2.0.
To manage the built-in hard drive and removable storage devices connected
to the receiver, open Settings > System Tools > Storage Manager menu.
View a storage device’s state: Choose Current Device and select a storage
device.
Format a storage device: Storage devices must be formatted in FAT32 or
NTFS for use with this receiver. Choose Current Device and select a storage
device. Choose Format, choose File System, and then choose a file system.
Select Format and then confirm to format it.
Test the speed of a storage device: Choose Current Device, select a storage
device, and then press the green button.
39

Open the file list of a storage device for playback: Choose Current Device,
select a storage device, and then select Play List.
Remove a removable storage device from the receiver: Choose Current
Device and select a removable storage device. Press the red button and then
confirm to remove it.
Check a storage device: Choose Current Device, select a storage device,
and then choose Storage Check. If any faults are found, they are automati-
cally repaired.
Access a shared folder on a computer: Choose Current Device and se-
lect Network Drive. Choose Network settings, choose Folder, and then
specify the path to the folder. A good example of shared folder paths is
“192.168.1.25/media”.
View the state of the user-available memory: Choose Current Device and
select User.
6.2 Managing Files
Press the Play List button to access the built-in hard drive or removable stor-
age devices.
Display only files of a specific type: Press the left navigation button and
choose a file type from the left pane that extends out. To display all files, re-
gardless of file type, select Play List. Imported Files stands for videos except
TV recordings.
View files on another storage devices: Press the Play List button and
choose a different storage device.
Sort files: Press the yellow button and choose a category.
Create a folder: Press the blue button and select New Folder.
Rename a file or folder: Place the focus on a file or folder, press the blue
button, and then select Rename. Enter a new name using the on-screen
40 6.2 M F

keyboard.
Move files or folders into another folder: Select one or more files or folders
using the red button, and press the blue button. Select Move to Folder and
choose a subfolder or the upper folder.
Copy files or folders onto another storage device: Select one or more files
or folders using the red button, and press the blue button. Select Copy to
Device and choose a different storage device.
Delete files or folders: Select one or more files or folders using the red but-
ton, and press the blue button. Select Delete and confirm to delete them.
6.3 Playing Recordings and Videos
Select one or more recordings or videos using the red button, and then press
the OK button to play them.
..
Note
.
Some videos may not play properly, depending on how they are en-
coded.
Pressing the play button displays the progress bar. Use the progress bar
to navigate through the video. To hide the progress bar, press the play but-
ton again.
Pause and resume playback: Press the pause button , and press it again
to resume.
Skip backward or forward: Press the left or right navigation button. To
continuously skip, press and hold these buttons. Repeatedly pressing the
yellow button changes the skip interval from 10 seconds to 10 minutes.
Skip to a specific point: Press the play button to display the progress
bar, and then enter a number. This action can be configured to perform dif-
ferently. See Recording Preferences on page 36.
P M F 41

Play fast forward or backward: Press the forward button or the back-
ward button . Repeatedly pressing theses buttons changes the playback
speed.
Skip to the previous or next recording or video: Press the previous button
or the next button .
Add a bookmark to a recording: When playing a recording, users can add
bookmarks to the recording for easier navigation. Press the red button to
place a vertical marking bar at the current point on the progress bar. Book-
marks are preserved with the recording for later use.
..
Note
.
Only TV recordings can be bookmarked.
Jump to a bookmark: Press the green button.
Remove a bookmark: Jump to a bookmark using the green button, and
then press the red button to remove the bookmark.
Change subtitle display: When a video is playing, press the Menu button
and change subtitle display options, such as letter size and colour. Fordetails
on how to add font files, see Using Different Fonts on page 53.
..
Note
.
SMI and SRT subtitle formats are only supported by the receiver.
6.4 Viewing Photos
Select one or more photos using the red button, and then press the OK but-
ton to view them.
View the previous or next photo: Press the left or right navigation button.
42 6.4 V P

Start slideshow: Press the green button. To pause and resume the slide-
show, use the pause button .
Set a photo as wallpaper for radio channels: Press the red button when a
photo is displayed. The photo is displayed while users listen to a radio chan-
nel.
6.5 Playing Music
Select one or more songs using the red button, and then press the OK button
to play them.
Skip to the previous or next song: Press the previous button or the next
button .
Shuffle or repeat playback: Press the red button. Repeatedly pressing the
red button changes the play mode.
• : Songs are randomly played.
• : Songs are played only once.
• : All songs are repeated.
• : The current song is only repeated.
Add songs to the current playlist: Press the green button. Select more
songs using the red or green button, and then press the yellow button.
Remove a song from the current playlist: Place the focus on a song entry
and press the yellow button.
6.6 Playing Media files from Other Devices
This receiver can play media files from computers or other DLNA-enabled
devices, such as TVs and tablets, connected to the receiver via a network.
For example, when a computer and the receiver is connected to the same
P M F 43

network, the receiver accesses the computer to play the computer’s media
files, or vice versa.
Accessing Other Devices
Press the Menu button to open the apps screen. Select M Client, and the file
list screen appears with the list of detected devices. Select a device and then
select a file to play it.
Fordetailsonhowto play videos, see Playing RecordingsandVideos on page
41, for music, see Playing Music on page 43, and for viewing photos, see
Viewing Photos on page 42.
Allowing Other Devices to Access the Receiver
Use one of the following methods:
• Press the Menu button to open the apps screen. Select M Server and
then select Start.
• Open the Settings > Installation > Network Setting menu. Choose Me-
dia Server and then select Start.
When Start Type is set to Auto, other devices can access the receiver at any
time when the receiver is on.
44 6.6 P M O D

7 Apps
Press the Menu button to open the apps screen. Most apps requires an in-
ternet connection for proper operation.
7.1 Webzeal
Webzeal is a web browser. Use it to surf the Internet.
..
Note
.
Webzeal cannot play flash video, which is heavily used on the web.
Pressing the Menu button displays a toolbar, including a web address field
and several icons, at the bottom of the screen.
Viewing a Webpage
Webzeal takes up the lower part of the screen so that users can watch live
TV on the upper part.
Adjust the vertical view size: Presstheredbuttonor, alternatively, press the
Menu button and select the vertical view icon . Repeatedly pressing the
red button changes the view size from full screen to half and then to quarter.
Adjust the horizontal view size: Press the green button or, alternatively,
press the Menu button and select the horizontal view icon .
Zooming in a webpage: Press the yellow button.
Zooming out a webpage: Press the blue button.
45

Navigating Webpages
A pointer is available to help users navigate webpages. Use the navigation
buttons to move the pointer. To see another webpage, move the pointer
over a link and press the OK button.
Enter a web address: Press the Menu button, select the web address field,
and then enter a web address using the on-screen keyboard.
Refresh a webpage: Press the Menu button and select the refresh icon .
Halt a webpage from downloading: Press the Menu button and select the
stop icon .
Move between the series of webpages that have already been veiwed:
Press the Menu button and select the back icon or the forward icon .
View the web browsing history: Press the Recall button to display the list
of recently-visited webpage. Select a webpage to open it.
Bookmarks
Bookmark the current webpage: Press the FAV button and press the red
button.
Open a bookmarked webpage: Press the FAV button to display the list of
bookmarked webpages. Alternatively, press the Menu button and select the
bookmark icon . Select a bookmark to open it.
Delete a bookmark: Press the FAV button and place the focus on a book-
mark. Press the yellow button and confirm to delete it.
Edit a bookmark: Press the FAV button and place the focus on a bookmark.
Press the blue button and edit the web address using the on-screen key-
board.
Set the current webpage as home page: Press the FAV button and press
the green button.
46 7.1 W

Open the home page: Press the Menu button and select the home page
icon .
Entering Text
Switch to a different language keyboard: Press the Menu button and se-
lect the keyboard icon . A list appears, showing available keyboard lay-
outs. Choose a keyboard layout, and then choose a keyboard language.
Restart Webzeal to put the chosen keyboard into use.
Switch between the numeric keypad and the normal keyboard: Press the
Menu and press the green button.
Enter text into a field: When the pointer is over a text field, pressing the OK
button displays available typing actions. Choose Input Text and enter text
using the on-screen keyboard.
7.2 Free TV+
Free TV+ allows users to view videos from a variety of video-sharing web
services, such as YouTube and Dailymotion. Users can either view videos
online or download them for later enjoyment.
Choose a video-sharing web service to access it.
View videos in a specific category: Press the green button and choose a
category.
Search for videos: Press the yellow button and enter search criteria using
the on-screen keyboard.
Download a video: Place the focus on a video entry and press the record
button .
View the list of downloaded videos: Press the red button. Alternatively,
select Download List from the list of video-sharing web services.
A 47

Playing Videos
Select a video from the list of videos to play it.
..
Note
.
Some videos may not play properly, depending on how they are en-
coded.
View in full screen: Press the OK button. To exit full screen, press it again.
Pause and resume playback: Press the pause button , and press the play
button to resume.
Skip backward or forward: Press the backward button or the forward
button
Free TV+ Preferences
Press the blue button, and set these options properly.
• Seek Time: Specify the amount of time to skip at a time.
• YouTube Picture Quality: Determine what quality level to use to view
YouTube videos.
• YouTube Location: To view only videos from a specific country, choose
a country.
• Parental Control: Lock specific video-sharing web services to prevent
children from watching them.
7.3 iTV+
Use iTV+ to watch internet TVs.
Tune in to a TV station: Select a TV station.
View in full screen: Press the green button. To exit full screen, press it again.
48 7.3 TV+

Add a TV station: Press the red button. Specify the TV station’s details,
including name and web address. Select Add when finished.
..
Note
.
The web address must include “http://” and indicate the media itself, not
the webpage that contains it.
Edit a TV station: Place the focus on a TV station entry and press the blue
button. Change the details, and select OK to finish.
Delete a TV station: Place the focus on a TV station entry and press the blue
button. Select Delete and confirm to delete it.
Search for TV stations: Press the yellow button and enter search criteria
using the on-screen keyboard.
View information about a TV station: Place the focus on a TV station entry
and press the Info button.
7.4 iRadio+
Use iRadio+ to listen to internet radios.
Tune in to a radio station: Select a radio station.
View radio stations in a specific category: Press the red button and choose
a category.
Add a radio station: Press the green button. Specify the TV radio’s details,
including name and web address. Select Add when finished.
..
Note
.
The web address must include “http://” and indicate the media itself, not
the webpage that contains it.
A 49

Edit a radio station: Place the focus on a radio station entry and press the
yellow button. Change the details, and select OK to finish.
Delete a radio station: Place the focus on a radio station entry, press the
blue button, and then confirm to delete it.
7.5 Weather
Use Weather to get weather forecasts for thousands of places around the
world.
Add a city: Pressthe yellow button to display a list showingcountries. Select
a country and then select one of its cities.
Alternatively, press the green button and enter search criteria using the on-
screen keyboard. Select a city from search results.
Delete cities: Press the blue button and select Delete history list. Select
one or more cities using the red button, press the OK button, and then con-
firm to delete them.
Set a city as start point: Place the focus on a city entry and press the FAV
button.
7.6 TV Portal+
TV Portal+ is a web portal, run by this receiver’s manufacturer, that brings to-
gether web content dedicated for consumer electronics from diverse web-
sites.
There are multiple web categories, including news and multimedia.
Use the navigation buttons to navigate the web categories and the OK but-
ton to select an item. Press the Recall or Exit button to return to the previous
screen.
50 7.5 W

..
Note
.
Web categories and items in each category may change.
7.7 Sync Player
Many people use µTorrent, a peer-to-peer file sharing program, to share me-
dia files. Sync Player can communicate with µTorrent on a computer to play
media files downloaded by µTorrent.
Before using Sync Player, make sure that µTorrent is installed on a computer
on the same network as the receiver.
Start Sync Player, and a list appears showing computers on which µTorrent
is running and computers that have been connected to Sync Player. Select
a computer to connect it to Sync Player. If this is the first connection, enter
the number displayed on the receiver’s screen into µTorrent’s dialogue box.
Selecting a media category displays a list of files of the same type that are
currently managed by µTorrent. Select a media category, and then select a
file to play it.
The Torrent category displays the torrents list. Selecting a torrent shows all
the files contained in it. Select a file to play it.
..
Note
.
It is not possible to play files that are not completely downloaded.
7.8 T Apps
Use T Apps to get various apps provided by this receiver’s manufacturer.
Download new apps: Press the blue button, then press the OK button. A
list appears showing new available apps. Select one or more apps using the
A 51

OK button, and press the red button to start downloading.
Play an app: Place the focus on an app and press the green button.
Delete an app: Place the focus on an app, press the yellow button, and then
confirm to delete it.
52 7.8 T A

8 Preference Settings
8.1 Language Settings
Open the Settings > Configuration > Language Setting menu.
• Menu Language: Determine what language to use for the interface.
• Audio Language: A TV programme may provide audio in two or more
languages. Determine what audio language to use by default.
• Audio Language2: Determine what audio language to use as an alter-
native when the default language is not available.
• Subtitle Language: A TV programme may provide subtitles in one or
more languages. Determine what subtitle language to use by default.
• Subtitle Language2: Determine what subtitle language to use as an al-
ternative when the default language is not available.
• Teletext Language: A TV channel may provide teletext pages in one or
more languages. Determine what teletext language to use by default.
Using Different Fonts
Users can install truetype font files in the receiver to use them with subtitles
and displays.
On the computer, open Windows Explorer to access the receiver. Enter the
receiver’s IP address into the Address Bar. Once it’s connected, move to the
“root/var/font” directory. If the “font” directory is not found, create it under
the “var” directory. Copy font files into the “font” directory.
Open the Settings > Configuration> Language Setting menu. Choose User
Font File and choose a font to use it for text display.
53

8.2 Network Settings
A wired or wireless network connection is required to perform internet tasks.
• Using media apps, such as Weather and Free TV+
• Accessing a computer to play media files stored on it
• Acquiring software updates
Open the Settings > Installation > Network Setting menu.
It is better to set the router for dynamic IP addresses so that the receiver can
automatically connect to the network. Turn on DHCP if DHCP is enabled on
the router.
If DHCP is not available, specify the network details, including IP address and
gateway.
Proxy Server Settings
If a proxy server is used for internet connections, the settings for the proxy
server must be configured properly. Open the Settings > Installation > Net-
work Setting menu, and choose Proxy Server. Specify the proxy server’s
details, including port number and user account.
DDNS Settings
A DDNS account allows the receiver to create a web address that points to
the user’s local network, so anyone can access the receiver from anywhere
in the world.
If a DDNS account is available, configure the DDNS settings properly. Open
the Settings > Installation > Network Setting menu, and press the red but-
ton. Specify the DDNS account’s details, including web address and user ac-
count.
54 8.2 N S

8.3 Clock Settings
Open the Settings > Configuration > Time Setting menu.
• Local Offset: Specify the time zone where the receiver is located.
• Daylight Saving: To apply daylight saving time, specify the country
where the receiver is located.
• Clock Mode: Determine which to use between 12-hour and 24-hour
clock formats.
For Wake Up Mode and Sleep Mode, see Setting Up Timers on page 31.
8.4 Audio and Video Settings
Open the Settings > Configuration > A/V Output Setting menu.
• TV Type: Determine which TV standard to use.
• TV Aspect Ratio: Determine which aspect ratio to use by default.
• Display Resolution: Determine which resolution to use by default. Tech-
nically, 1080p is better than 1080i, but the difference is only slight to most
people.
• Display Format: Determine how to display 4:3 pictures on the 16:9
screen, or vice versa.
• Pillar Box: 4:3 pictures fit the height of the 16:9screenwith black bars
on the sides.
• Full: 4:3 pictures blow up to fit the width of the 16:9 screen with the
top and bottom edges cut off.
• Letter Box: 16:9 pictures fit the width of the 4:3 screen with black
bars on the top and bottom.
• Pan Scan: 16:9 pictures blow up to fit the height of the 4:3 screen
with the sides cut off.
P S 55

• Video Output Mode: Determine which colour space to use for the
SCART output. RGB is much higher quality than CVBS.
• HDMI Dolby Digital: Determine whether or not to pass through Dolby
audio via HDMI when available.
• Dolby Digital Default: Determine whether or not to use Dolby audio
when available.
• Sound Mode: Generally, an audio track has two sound channels. Deter-
mine which sound channel to use by default.
• Power Saving in Standby Mode: With this enabled, the receiver’s front
display shows nothing when in standby mode. With this disabled, it dis-
plays the current time.
• Audio Sync Delay: If the sound and picture don’t match up, adjust this
until they match.
8.5 On-Screen Display Settings
Open the Settings > Configuration > Display Setting menu.
• Info Box Position: Specify how much to raise or lower the position of the
programme information dialogue box.
• Info Box Display Time: Specify how long to display the programme in-
formation dialogue box when changing channels.
• Volume Bar Display Time: Specify how long to display the volume bar
when adjusting the volume.
• Zapping Mode: Determine what to display when changing channels.
With this set to Black Screen, the receiver displays nothing. With this set
to Freeze, the receiver displays the last still picture of the previous chan-
nel.
• Up/Down Key: Determine for what to use the up and down naviga-
tion buttons when watching a channel. With this set to Simple Service
56 8.5 O-S D S

List, the simplified channel list is displayed. With this set to HD Service
Change, a channel change is made between HD channels. With this set
to Service Change, a channel change is made.
• Front Display Scroll: The receiver’s front display shows the current pro-
gramme’s title or the current menu item. Determine how the display
scrolls to show longer strings. With this set to Continuous, it repeatedly
scrolls the string. With this set to Off, it never scrolls the string. With this
set to Once, it scrolls the string only once.
• Front LED Brightness: Adjust the brightness of the front light properly.
• Screen Change Effect: Choose one of the screen change effects.
8.6 Parental Control
TV programmes are rated according to their level of violence, nudity, and
restricted language. It is possible to set the receiver to block programmes
rated a certain class or higher to prevent children from watching them. It
is also possible to lock specific menu items so that children or others can’t
access them. Users must enter the passcode to watch a blocked programme
or access a locked menu.
Open the Settings > Configuration menu, choose Parental Control menu,
and then enter the passcode.
• Censorship: Specify a programme rating.
• Change PIN code: Change the passcode. The default is “0000”.
• System: With this selected, the passcode is required when turning on the
receiver.
• Installation: With this selected, the Installation menu is locked.
• Configuration: With this selected, the Configuration menu is locked.
• Edit Services: With this selected, the Service List Manager menu is
locked under System Tools.
P S 57

8.7 Maintaining the Digital TV Receiver
The internal flash memory is used for maintaining the preference settings
and channel data.
Open the Settings > Installation > System Recovery menu.
Use these to reset the digital TV receiver.
• System restore to factory default: Reset all settings to factory defaults
and clear all channels.
• Reset configuration data: Reset all settings to factory defaults.
• Reset service data: Clear all channels.
Use these to back up and restore the receiver.
• System restore to stored position: Restore the receiver using the stored
settings and channels.
• Store system data: Back up all settings and channels.
• Delete stored position: Clear all stored settings and channels.
It is also possible to share the receiver’s settings and channel data with other
receivers of the same kind, using a flash drive. Connect a flash drive to one
of the receiver’s USB ports.
Open the Settings > System Tools > Data Transfer menu.
• Transfer All System data to USB storage: Export all settings and chan-
nel data to the flash drive.
• Transfer Service data to USB storage: Export all channel data to the
flash drive.
• Data download from USB storage: Import settings and channel data
from the flash drive.
58 8.7 M D TV R

8.8 Updating the Digital TV Receiver
Software updates for this digital TV receiver become available from time to
time. Software updates may improvethereceiver’s performance or deal with
any outstanding issues.
Open the Settings > Installation > System Information menu to check the
current version of the receiver. Visit http://www.tiviar.com to download
the latest update file. Make sure that the available version is newer than the
currently installed version before downloading it.
Decompress the update fileandcopyit into the root directory of a flash drive.
Connect the flash drive to one of the receiver’s USB ports. A dialogue box
appears showing available update files. Select an update file and press the
red button. Never turn off the receiver until the update process is complete.
Online Update
Online software updates may be available, depending on the country.
Open the Settings > Installation > Network Setting menu, and choose Soft-
ware Upgrade. Choosing the server name displays a list of availableupdates.
Select one or more items, and press the red button to download and install
them.
P S 59

Appendix A
Universal Remote Control
The remote control can expand its capabilities, allowing users to control the
TV connected to the receiver.
A user can transform the remote control into a universal remote control by
entering a 4-digit remote control code for the TV. Turn on the TV, and follow
these steps:
1. Find the TV’s brand name from the list of remote control codes.
2. Press the TV button and the OK button for 2 seconds simultaneously.
The TV button blinks twice.
3. Enter one of the available codes. If the code is not correct, the TV button
blinks once. Try the others until the TV turns off.
4. Press the OK button to finish. The TV button blinks twice.
If all of the codes appear not to work, follow these steps:
1. Press the TV button and the OK button for 2 seconds simultaneously.
The TV button blinks twice.
2. Press the up or down navigation button repeatedly within 10 seconds
at each attempt until the TV turns off.
3. Press the OK button to finish. The TV button blinks twice.
60

It is possible to identify what code is set for TV. Press the TV button and
the OK button for 2 seconds simultaneously, and then press the Info but-
ton within 3 seconds. The TV button blinks as much as the number of each
digit of the code. To indicate “0”, it blinks 10 times.
...
A
A.R. Systems 8644, 7213, 6896, 5090, 7014
Accent 7647, 8644, 6896, 3637
Acer 3857
Action 4523, 5510, 3637, 4648
Adcom 4884
ADL 7855
Admiral 3193, 2438, 5553, 5605,
3488, 3637, 4648,
Adventura 5874
Adventuri 5874
Adyson 4469, 4523, 4648
AEA 8644, 6896
AEG 5952, 6305, 5319
Agashi 4469, 3488
AGB 8568
Aiko 7647, 8644, 6896, 4469,
4530, 6482, 5739, 3350,
3518, 3488, 3637
Aim 8644, 6764, 6896, 3036,
7910, 8435, 8484,
Aiwa 5448, 7733, 6736
Akai 3350, 7910, 4530, 3011,
8644, 5739, 6669, 3518,
6482, 7647, 3036, 4016,
2429, 8060, 5605, 8568,
6381, 2810, 6896, 4783,
8020, 8394, 4469, 3488,
5393, 2796, 6305, 3840,
7733, 4659, 3451, 5905,
4925, 4523, 3802, 3637,
5874, 4648
Akashi 7314, 7647
Akiba 4016, 5896, 7014, 8644, 6896
Akira 5553
Akito 8644, 6896
Akura 8644, 6896, 5355, 6764,
7647, 4016, 5896, 3488,
8060, 7066, 3637, 4648
Alaron 4469
Alba 8644, 3840, 6896, 8060,
7647, 5553, 7287, 4530,
5355, 7384, 4016, 4469,
5531, 5605, 6230, 6812,
7733, 5119, 4925, 3637, 4648
Alfa 4648
Alkos 6482
Allstar 8644, 6896, 4648
All-Tel 4677
American High 5510
Americana 5510
Amplivision 7287
Amstrad 7647, 8568, 3488, 4530,
4016, 8644, 6896, 5739,
6764, 8377, 3840, 3451,
7066, 3637
Anam 8644, 6896, 7647, 4526
Anam National 8644, 6896, 4526
Andersson 5319, 7660
Anglo 7647, 3488, 3637
U R C 61

Anitech 7647, 3488, 8644, 6896,
5896, 4523, 3637, 4648
Ansonic 7287, 8644, 6896, 7647,
5355, 5090, 5090, 2620,
5531, 4917, 3637
AOC 4523, 4648
Apollo 4659
Arcam 4469
Arc en Ciel 7430
Ardem 2590, 8060, 8644, 5613, 6896
Aristona 6896, 8644, 4648
ART Tech 4648
Arthur Martin 5605
ASA 4819, 6092, 4265
Asberg 8644, 6896, 4648
Asora 7647, 3637
Astra 8644, 6896, 3637
Asuka 4016, 4469, 3488, 5896
ATD 2924
Atlantic 8644, 6896, 4469, 4648
Atori 7647, 3637
Atoro 3637
Auchan 5605
Audiosonic 7647, 8644, 5090, 8033,
6896, 7430, 8060, 6381,
7287, 3488, 4016, 2590,
3637, 4648
Audioton 2590, 7287, 3488, 3637
Audiovox 4648
Audioworld 2924
Autovox 5531
AVP 7733
AWA 7507, 6812, 7647, 5090,
6764, 8644, 6896, 4469,
6305, 5620, 3488, 4698, 3637
Axxent 7647
Axxon 8060
...
B
B&D 7855
Baird 7430, 6127, 6982, 5301,
7910, 3453
Barco 5605
Basic Line 3637, 4648, 5090, 8644,
5605, 5355, 6896, 7647,
4016, 5896, 7014, 6559, 3840
Bauer 8484, 7647
Baur 7647, 6640, 5265, 3835,
8644, 6896, 3518, 3350,
6736, 3637, 5874, 4648
Beaumark 5393
BEC 4648
Becrese 4523, 3802, 5874, 4648
Beko 8060, 6482, 2590, 7287,
8644, 5553, 3840, 6896,
6305, 6381, 7361, 4648
Bell & Howell 4648
Belson 4156, 4706
Benchmark-Beaumark 4523, 5510, 3637,
4648
Bennett 6896, 8644
BenQ 8016
Beon 8644, 6896, 5553, 4648
Berthen 5355
Best 7287
Bestar 8644, 6896, 7287, 5090, 4648
Bestar-Daewoo 5090
Bigston 3637
62

Black Diamond 5319, 8033, 3840, 6896,
7837, 3036
Black Star 5531
Black Strip 6482, 3802, 5510
Black Way 5896, 4016
Blaupunkt 3518, 6640, 5265, 6538,
7839, 5186, 7014, 4849, 6812
Blue Sky 8644, 8060, 3840, 6230,
5355, 6381, 2499, 6896,
4016, 5896, 7014, 7733,
4156, 7361, 6685, 4648
Blue Star 5896
Bondstec 5531
Boots 7647
Bosch 7839
BPL 8644, 6896, 5896
Brandt 4884, 7430, 4422, 3270,
6982, 3847
Brandt Electronique 4422, 3270
Brend Star 3637
Brinkmann 8644, 6896, 5355, 7350,
5553, 2590
Brionvega 8644, 6896, 8377, 4648
Briorryega 4648
Britannia 4469
Brockwood 4523, 3802, 5874
Broksonic 4523, 3802, 5874
Brother 3488
Bruns 2590
BSR 5605, 3350
BTC 4016
Bush 5355, 4016, 5605, 7647,
6812, 8644, 4530, 5896,
7384, 2438, 5090, 7350,
3488, 3350, 3840, 6230,
7910, 5952, 5905, 2924,
6896, 8060, 5832, 7733,
5453, 3802, 4648
...
C
Cample 4523, 3802, 5874
Candle 4523
Canton 4016
Capehart 4523, 3802, 4648
Capsonic 3488
Carad 2696, 8644, 6896, 5355, 3840
Carena 7014, 8644, 6896
Carrefour 6812, 4265, 8644, 6896, 4648
Carver 4849, 4648
Cascade 7647, 8644, 6896
Casio 8644, 6896, 5605, 4648
Cathay 8644, 6896
CCE 8644, 6896
Celestial 6498, 8033, 7837
Centrex 7046, 5397
Centrum 3840
Centurion 8644, 6896, 4648
Century 5531
CGE 4752, 6634, 5553, 5531,
7287, 5605, 3637
CGM 3637
CIE 3637
Cihan 4648
Cimline 7647, 4016, 3637
U R C 63

Cinex 3451, 5952
Circuit City 4523, 3802, 5874
Citizen 4523, 5510, 4648
City 7647, 3637
Clarivox 5553, 8644, 6896, 4265
Clatronic 8644, 7287, 4530, 8060,
4016, 3488, 6896, 5531,
7647, 3451, 6305, 5319, 3637
Clayton 3840
CMS 4469
Cobolt 5397
Colortyme 5510, 4648
Combitech 7733
Computron 3637
Concorde 7647, 3637
Condor 8644, 6896, 7287, 4469,
7647, 5896, 5531, 5553,
2620, 5605, 3488, 3637, 4648
Conia 3491, 7837, 4706, 8033
Conic 4523, 3802, 4648
Conrac 7361
Conrad 8644, 6896
Contec 4469, 7647, 7507, 6812,
3488, 8644, 6896, 3802, 3637
Continental Edison 7430, 4422, 6230
Coronado 4523
Cosmel 7647, 8644, 6896, 3637
Craig 4648
Crosley 5531, 4752, 6634, 5605,
3802, 5874, 4648,
Crown 7647, 5716, 7287, 2590,
8644, 6896, 6230, 8060,
6305, 6381, 5553, 7910,
4638, 6559, 3840, 4523,
3637, 4648
Crystal 4648
CS Electronics 4469, 4016, 5531
CTC 5531
CTX 8016
Curtis Mathes 4523, 3802, 5510, 4648, 3193
Cybertron 4016, 3802
Cytronix 3191
...
D
Daewoo 5295, 5090, 2499, 4874,
3876, 8644, 6896, 7647,
4469, 4016, 6286, 7733,
3118, 2016, 3620, 4677,
4523, 3637, 4648
Daichi 3637
Dainichi 4016, 4469
Daitsu 4201
Dansai 8644, 6896, 3488, 6482,
4469, 7647, 6812, 7910, 4523
Dansette 6764
Dantax 7287, 2590, 8060, 6305,
6381, 7733
Datsura 7910
Dawa 7647, 8644, 6896, 4648
Daytek 2924, 4979, 8435, 4698
Dayton 4979
Daytron 7647, 5090, 8644, 6896,
4523, 3637
DEC 4167, 7314, 5397
Decca 8568, 8644, 6896, 6286,
7733, 4648
de Graaf 7910, 5605, 4783, 2438
Deitron 8644, 6896, 5090, 4016
Denko 3488
64

Denver 8644, 6896, 6305, 4485,
8299, 3637
DER 6127
Desmet 8644, 6896, 7647, 3637, 4648
Diamant 8644, 6896
Diamond 3488, 2924, 7647, 4777,
4469, 4530, 7314, 8033, 3637
Digatron 8644, 6896
Digihome 7660
Digiline 8644, 6896, 4819, 5355
DigiLogic 8644, 6896
Digitek 8033
Digitor 8644, 6896, 6641
Digivision 3350
DigiX 3118
DiK 8644, 6896
Dixi 7647, 8644, 6896, 5531,
3637, 4648
DL 5397, 7046, 8644, 8299, 4677
Domeos 5355
Domland 3158
Dream Vision 8561
DSE 6641, 5952, 8033
DTS 7647, 3637
Dual 6982, 7350, 8644, 6896,
7213, 3158, 5605, 6286,
8394, 7660, 3840, 4648, 3637
Dumont 4265, 4523, 3802, 5874
Dunai 5605
Durabrand 8644, 4917, 6896
Dux 8644, 6896
D-Vision 8644, 7066, 6896
DVX 5397
Dynamic 3637
Dynatech 4523, 3802, 5874
Dynatron 8644, 6896
...
E
Easy Living 4596, 5905
Eaton 5510
Ecco 2335, 8435
ECR 3802
Edison-Minerva 6230
Elbe 3444, 8377, 7287, 5605,
8644, 6896, 4016, 3518,
2620, 2696, 8568, 3350
Elbe-Sharp 8568
Elbit 4648
Elcit 5531, 8568, 5605
Elecs 4648
Electratune 4523
Electro Tech 3637
Electrobrand 5874
Electrohome 4523, 3802, 5874
Electronika 4648
Elekta 7647, 8644, 6896, 3488,
5896, 3637
Elfunk 3573, 3840
ELG 8644, 6896
Elin 4469, 8644, 6896, 4819,
4783, 3350, 5605, 7647,
3637, 4648
Elite 4016, 8644, 6896, 4523,
3802, 5510, 4648,
Elta 7647, 3488, 4469, 3637
Emco 5531
U R C 65

Emerson 8060, 5393, 5531, 8644,
6896, 4530, 4265, 5896,
3350, 2499, 2590, 7287,
5605, 5355, 4523, 3802, 5874
Emperor 5896
Enzer 3036
EON 3802, 5510
Erres 8644, 6896, 4648
Estèle 5605
Etron 4709, 8644, 6896, 7647,
5605, 8033, 3637,
Eurofeel 3488
EuroLine 8644
Euroman 4469, 3488, 8644, 6896, 7287
Euromann 4648
Europa 8644, 6896
Europhon 8644, 8568, 5605, 6896,
5531, 4469, 4648,
Evesham 4596
Excel 8644, 6896
Expert 5605
Exquisit 8644, 6896, 5531
...
F
Fagor 8644, 6896
Fairtec 4156
Family Life 8644, 6896
Fast 3634
Fenner 5090, 7647, 3637
Ferguson 5301, 4884, 4422, 3270,
6127, 7430, 3847, 8644,
6896, 6482, 6982, 4638,
5620, 3350, 4783, 5119,
3840, 4648
Fidelis 3637
Fidelity 5605, 3835, 2438, 8644,
6896, 4530, 6764, 6127,
4469, 3488, 7733, 3350
Filsai 3637
Finlandia 7910, 6092, 4783, 3350,
5605, 2438, 4422, 6982
Finlux 4819, 8644, 6896, 8060,
6092, 5605, 8568, 6381,
4265, 2620, 8394, 6753,
8020, 5952, 4659, 5553,
6305, 7361, 3637, 4648
Firstline 8644, 6896, 5090, 5355,
8060, 5605, 7647, 4469,
5531, 2499, 2620, 7910,
3350, 3840, 4156, 7361,
6685, 5319, 3637, 4648
Fisher 6812, 7910, 7287, 3350,
5605, 3802
Flint 8644, 6896, 2696, 4016,
7014, 3488, 4648,
Force 7660
Forgestone 6127
Formenti 5605, 8644, 6896, 2590,
4469, 4648
Formenti-Phoenix 4469
Fortress 3193, 4523, 3802
Fraba 8644, 6896, 7287
Friac 7647, 8644, 6896, 7287,
4874, 2696
Frontech 5531, 3488, 2438, 7647,
5605, 3637
Fujimaro 4677
Fujitsu 5605, 7647, 7213, 8644,
6896, 3350, 8360, 4523,
3802, 5874
Fujitsu General 7647, 5605
66

Fujitsu Siemens 3191, 5905, 5319
Funai 5355, 3488, 6764, 4523,
3802, 5874
Furichi 7314
Futronic 3488, 4167, 7314
Future 8644, 6896
...
G
Galaxi 8644, 6896, 3350, 5605
Galaxis 7287, 5553, 8644, 6896
Galeria 7647, 3637
GBC 5605, 7647, 5090, 4016,
2438, 3637
GE 6982, 5393, 5896, 3847,
4422, 7430, 3270, 4884
Geant Casino 5605
GEC 5605, 3350, 8644, 8568, 6896
Geloso 5531, 7647, 2438, 5605,
5090, 3637
Gemsound 3637
General 7430, 4422, 3637
General Electric 6982, 4422
General Technic 3637, 7647
Genesis 7647, 8644, 6896
Genexxa 4016, 8644, 6896, 6764,
5605, 7647, 4648,
Gericom 4677, 3191, 7855, 3118
Gitem 4648
GM 3637
GMG 3637
Goldfunk 5355
Goldhand 4469, 3637
GoldStar 8644, 7647, 7287, 4709,
2796, 5393, 5531, 4469,
6896, 5605, 3350, 7430,
2438, 6305, 8060, 6381,
7014, 4523, 5510, 4648
Gooding 6230
Goodmans 5295, 5905, 3840, 8644,
4874, 6896, 8060, 5355,
2499, 5090, 6812, 3488,
8568, 7647, 6230, 4530,
6982, 6482, 8020, 3847,
3270, 4016, 7733, 3876,
5832, 3118, 6948, 8299,
4698, 3637, 4648,
Gorenje 7287
GPM 4016, 3637
Gradiente 4638, 4849, 8644, 6896
Gradin 3637, 4648
Graetz 8060, 3350, 4530, 5605,
8644, 6559, 6896, 5319
Granada 8644, 6896, 3001, 5620,
4659, 3270, 3847, 5605,
7910, 6812, 6559, 8568,
2438, 3952, 6982, 4783, 4648
Grandin 8644, 6896, 7647, 5605,
5090, 5896, 4016, 7014,
2696, 8060, 6381, 5355,
3840, 4677, 4156, 3118
Granprix 3451
Grenadier 3637
Gronic 5605
Grundig 5265, 4679, 6640, 3518,
8435, 6896, 8299, 7647,
4265, 6230, 8644, 5119,
6812, 7287, 4925, 7733,
6948, 5393, 4698, 6982
Grunkel 5319
GTT 3637
U R C 67

...
H
H&B 7361
Haaz 8435
Haier 2924, 3488
Halifax 3488, 4469
Hallmark 4523, 3802, 5874
Hammerstein 3488
Hampton 4469
Hanimex 4016, 7733
Hanseatic 8644, 6896, 4874, 7350,
5605, 3350, 5896, 3158,
5295, 7287, 3876, 7647,
7361, 2590, 3637, 4648,
2796, 8060
Hantarex 7647, 8644, 6896, 8568,
3637, 4648
Hantor 8644, 6896
Harley Davidson 4523, 3802, 5510, 5874
Harrad 4523, 3802, 5874
Harsper 4677
Harvard 4523, 3802, 5874
Harwa 2335, 3453, 7789
Harwood 7647, 6764, 8644, 6896, 6230
Hauppauge 8644, 6896
HCM 7647, 6764, 8644, 6896,
4016, 5553, 5896, 3488, 3637
Heathkit 5874, 4648
Hedzon 6896, 8644
Hema 7647
Hicon 2519
Hifivox 7430
Higashi 4469
Highline 3488, 8644, 6896
Hikona 4016
Hiline 3637
Hinari 7910, 8644, 6896, 7647,
4016, 6812, 5605, 7384,
5119, 6230, 3488, 7733,
3802, 3637, 4648,
Hisawa 5896, 4016, 7014, 2696,
7733, 8060
Hisense 6685, 7910
Hitachi 3952, 6069, 4889, 6812,
6896, 7430, 2438, 4783,
5620, 4659, 5605, 6982,
6619, 5295, 7040, 5393,
8568, 6972, 4874, 8644,
6286, 4819, 6753, 4737, 4648
Hitachi Fujian 5620, 3952
Hitsu 7647, 2696, 7014, 4016
HMV 6127
Höher 8060, 5952, 4677
Home Electronics 6305
Horizont 4648
Hornyphon 8644, 6896, 4648
Hoshai 4016, 7014, 5896
Huanyu 5090, 4469
Hugoson 3094, 7855
Hygashi 4469
Hyper 7647, 4469, 5531, 3637, 4648
Hypersonic 3350
Hypson 8644, 6896, 8060, 6381,
3488, 5896, 7014, 7733,
3840, 5355, 2590, 3637, 4648
Hyundai 8644, 4677, 6896, 8435,
7314, 3036, 3620, 5952
...
I
68

Iberia 8644, 6896
ICE 3488, 8644, 4530, 7647,
6896, 4016, 4469, 3637, 4648
Ices 4016, 4469
Ict 8644, 6286, 6896
IISonic 4698
Iiyama 7855, 3094
IMA 4523, 3802, 5874
Imperial 8644, 5605, 7287, 4752,
6634, 6896, 2620, 3350,
5553, 5531, 4648
Indiana 8644, 6896, 4648
Infinity 4648
InFocus 3251
Ingelen 6230, 2696, 8060, 5605, 3350
Ingersoll 7647, 3637
Inno Hit 7647, 8644, 6896, 4016,
3637, 4648, 5896, 5319,
8568, 5531
Innovation 7350, 8644, 6896
Innowert 4677, 3191
Inotech 2335, 8033
Interactive 8644, 6896, 3835, 7839,
5605, 3350, 7287, 7430, 2620
Interbuy 7647, 8644, 3488, 5531,
3835, 6896, 3637,
Interdiscount 4648
Interfunk 8644, 6896, 3835, 7839,
5605, 3350, 7287, 7430,
5531, 6538, 4648
Internal 8644, 6896, 4874, 5090, 2499
International 4469
Intervision 5896, 7014, 8644, 4530,
2796, 7350, 2590, 7287,
3488, 5531, 7647, 6896,
3158, 6230, 4016, 5605
Irradio 7647, 8644, 6896, 4016,
5531, 4530, 3637, 4648
IST 4648
Isukai 4016, 8644, 6896, 5896,
7014, 4648
ITL 3637
ITS 8644, 4530, 4016, 5896,
3488, 4469, 7647, 6896, 3637
ITT 5605, 8020, 3350, 4659,
4783, 6127, 6092, 6559,
7910, 2696
ITT Nokia 3350, 4783, 5605, 4659,
6305, 2696, 8394, 2438,
8020, 6092, 7910, 6559
ITV 3488, 8644, 6896, 5531, 5090
...
J
JBL 4648
JCB 5874
JDV 7066
Jean 6812
JEC 6482
Jetpoint 5510, 4648
JMB 8644, 4874, 5295, 5090,
6896, 5119, 7733,
Jocel 5716
Jubilee 6896
Jumbotroic 4648
JVC 4638, 6812, 6127, 4530,
4016, 6305, 5553, 3193,
4526, 3802, 4648
U R C 69

...
K
Kaiser 4648
Kaisui 4016, 5896, 8644, 6896,
4469, 7014, 7647, 3637, 4648
Kambrook 2796
Kamp 4469
Kapsch 5605, 3350
Karcher 8644, 6896, 7287, 2696,
5605, 5896, 3488, 5453,
8060, 5952, 6305, 3637, 4648
Kathrein 6896, 8644
Kawa 4530
Kawasho 4469
KB Aristocrat 5605
Kendo 2696, 8644, 6896, 5605,
7350, 3835, 7287, 2796,
2438, 2620, 5531, 8377,
3451, 3840, 4917, 2590,
3637, 4648
Kendwood 4523
Kennedy 5605, 3444
Kennex 3840
Kenwood 4819
Kingsley 4469
Kiota 4709, 3637
Kiton 6896, 8644, 5355
KLH 4523, 3802, 5874
Kloss 5510
Kneissel 8644, 7287, 2696, 2620,
5090, 4874, 6896, 3444,
8377, 7733
Kobic 3637
Kobra 2519
Kolster 8644, 6896, 5531, 4016, 4648
Konichi 7647, 3637
Konka 8644, 6896, 4530, 8060,
5553, 4016, 8485, 8299,
3491, 4706
Kontakt 6230
Korpel 8644, 6896, 4648
Korting 7287
Kosmos 8644, 6896
Kotron 6764, 3488
Koyoda 7647
KTV 4523, 3802, 5874
Kuasho 4523, 4648
Kuba 5605
Kuba Electronic 5605
Kyoshu 6764, 5553, 3488
Kyoto 5605, 4469
...
L
L&S Electronic 4677, 8060
LaSAT 2590, 7287
Lavis 3840, 8644, 5605
Leader 7647, 3637
Lecson 8644, 6896
Legend 7647, 3637
Lemair 2620
Lenco 8644, 7647, 5605, 5090,
6896, 8299, 3840, 3637, 4648
Lenoir 3637, 7647
Lesa 5531
Levis Austria 8644, 6896
Lexsor 3453
Leyco 3488, 8644, 6896, 4648
70

LG 8644, 5393, 7287, 7647,
7430, 2924, 6381, 8265,
2796, 5447, 4709, 6896,
4156, 6944, 4312, 5531,
8060, 4469, 5605, 6305, 3350
Liesenkötter 7839, 8644, 6896, 4648,
8644, 7839, 5186, 6896
Life 3637
Lifetec 8644, 7647, 7350, 5090,
5355, 3835, 3840, 6286,
6896, 4016, 3488, 4596,
8060, 3637, 4648,
Linitron 4523, 3802
Lloyd 4523, 3802, 3637, 5874
Lloyd’s 4709, 7647
Lodos 3840, 7660
Loewe 3835, 5613, 7337, 8644,
6896, 7287, 8377, 8568, 4648
Logik 7507, 2924, 2335, 7647,
6127, 3488, 4530, 4709,
3118, 7855, 3840
Logix 5355, 7350
Luker 7066
Luma 8644, 2438, 5605, 2620,
6896, 5090, 7647, 8377,
3637, 4648
Lumatron 2438, 8644, 6896, 8377,
5605, 3350, 3488, 5301
Lux May 4648, 8644, 7647, 6896
Luxor 5319, 2438, 8020, 6753,
6092, 4659, 3840, 8394,
3350, 7910, 4783, 5605
LXI 5393, 4648
...
M
M Electronics 3637, 4648
Macys 4523, 3802
Madison 8644, 6896
Magnadyne 5531, 8568, 5605, 3637, 4648
Magnafon 4648, 8568, 4469, 5301
Magnasonic 4523, 3637, 4648
Magnavox 8644, 6896, 6812, 7046,
3802, 4648
Magnum 3451, 8060, 8644, 6896,
6381, 3730
Mandor 3488
Manesth 8644, 6896, 3488, 6482,
5605, 2438, 4648,
Manhattan 8644, 6896, 5355, 3840,
4201, 5605, 5453,
Marantz 8644, 6896, 6764, 4648
Marcys 3802
Mark 8644, 6896, 4469, 5090,
7647, 8060, 6381, 4648
Master’s 4874, 8644
Masuda 4016, 4530, 7647, 3488,
8644, 6896
Matsui 8644, 6896, 6230, 7647,
5605, 8568, 6482, 7910,
7507, 7384, 6812, 4530,
5265, 3518, 3270, 8060,
5739, 5119, 2438, 7014,
7733, 3840, 3637, 4648
Matsushita 4526
Matsuviama 8299
Mava 4523
Max-Multi 4648
Max-Tip1 3637
Max-Tip4 4648
Maxam 3488, 3637
Maxdorf 2335
U R C 71

Maxell 3637
Maxim 7066, 5952
MCE 7647, 3637
Mediator 8644, 6896, 4648
Medion 8644, 8060, 7361, 7350,
2924, 7733, 3840, 4917,
5355, 6896, 3835, 6286,
5832, 4596, 3118, 3730
Megas 2696
Megatron 5393
MEI 3840, 8644, 6896
Melectronic 6092, 8644, 3835, 7430,
2620, 5605, 4422, 6896,
6982, 5531, 4819, 5090,
5295, 3350, 3518, 5265,
7647, 8020, 6753, 4469,
3876, 8060
Memorex 7647, 5393, 4526, 3637
Memphis 3637, 7647
Mercury 4709, 8644, 7647, 6896, 3637
Merritt 4783, 3350, 5605
Metz 2769, 6975, 5313, 2410,
8644, 6896, 8299, 5355,
5319, 5265, 6640, 3518,
3840, 7324
MGA 5393, 8644, 6896, 4016
Micromaxx 8644, 6896, 5355, 3840, 7361
Microstar 7361
MicroTEK 8033
Midland 4523
Mikomi 7660
Minato 8644, 6896
Minerva 6230, 6640, 5265, 4265,
3518, 8568, 5620,
Minoka 6764, 8644, 6896, 4648
Mirror 5832
Mistral Electronics 6127
Mitsubishi 5620, 3193, 3835, 8644,
5393, 6812, 6127, 6640,
6896, 7910, 3840, 3802,
3637, 4648
Mitsuri General 5605
Mivar 7287, 4469, 4318, 8568
Monaco 7647
Monitor 5510
Morgan’s 8644, 6896
Motorola 3193, 4648
MTC 7287, 3835, 5605, 4469,
3350, 4523, 5510,
MTlogic 8060, 6948
Multibroadcast 6127
Multitec 8644, 6896, 2590, 5355,
3840, 5952
Multitech 7647, 2438, 2590, 8644,
7287, 6896, 4469, 5531,
3488, 4523, 3802, 3637,
5874, 4648
Murphy 4469, 5605
Musikland 8644, 4016, 5531, 6896
MyCom 4698, 5393
Myryad 6896, 8644
...
N
NAD 5393, 3350, 5605, 3802
Naiko 8644, 7066, 6305, 6896
Nakimura 5090, 8644, 6896
Namsunc 3637
Naonis 2438, 5605
NAP 4648
72

Narita 7066
NAT 3001
National 3001, 4648
NEC 4849, 8299, 7976, 3726,
8644, 6896, 7507, 8561,
6812, 7014, 7647, 5090,
4874, 4638, 3876, 3637,
3802, 5510
Neckermann 8644, 3518, 7287, 6736,
5553, 5531, 2620, 2438,
6538, 6896, 5605, 7839,
3835, 3637, 5874, 4648
NEI 8644, 6896, 4530, 5605, 4648
Neovia 4677, 4698
Nesco 5531, 7733
Netsat 8644, 6896
Neufunk 8644, 7647, 6896, 2696,
4016, 5896, 8060, 8644,
7647, 6896, 6982, 3637, 4648
New World 4016
Nicamagic 4469
Nikkai 4016, 8644, 6896, 3488,
6482, 4469, 7647, 6812,
4523, 4648
Nikkei 8060
Nikko 5393
Nissan 5510
Noblex 3637
Nobliko 4265, 4469
Nogamatic 7430
Nokia 3350, 5605, 8020, 4783,
5090, 8394, 6305, 6092,
6753, 4659, 6559, 7910,
2696, 7430, 5510, 3637, 4648
Noname 4648
Nordmende 7430, 8060, 5397, 4422,
6896, 3270, 5605, 5905,
3847, 6982, 5265, 8644, 4648
Norfolk 5605
Normerel 8644, 6896
Novabeam 4648
Novak 8644, 6896
Novatronic 8644, 4819, 5090, 6896,
3637, 4648
Nurnberg 5605, 3350
NU-TEC 7014, 2924
...
O
O Genteral 3637
Oceanic 5605, 3350, 7910, 4659,
4783, 8020
Odeon 3488
Okano 7287, 8644, 6896, 3488,
7647, 3637
Olidata 4698
Olympic 3637
Omega 3488
Omni 7046, 5397, 2924
Onceas 3637
Onwa 4530, 2810, 4016, 5739
Opera 8644, 6896, 4648
Optimus 4526
Optonica 3193
Orava 4648
Orbit 8644, 6896, 4648
Orcom 4262
Orient 3637
U R C 73

Orion 8644, 5119, 7384, 6896,
6764, 8568, 7733, 3118,
8060, 7507, 7647, 3488,
3453, 3637, 5874, 4648,
4523, 3802
Orline 8644, 4016, 6896
Ormond 5355, 3840, 8644, 6896
Orsowe 8568
Osaki 4016, 3488, 8644, 6764,
5090, 7384, 6896,
Osio 8644, 6896
Oso 4016
Osume 6812, 4016, 8644, 6896
OTF 3637
Otto Versand 3802, 3637, 5874, 7350,
3518, 3350, 7430, 3001,
6736, 6812, 3193, 3835,
5531, 7647, 5896, 6982,
8644, 6896, 6640, 5265, 8568
OVP 4648
...
P
Pace 7733
Pacific 8644, 6896, 6286, 8060,
3840, 5119
Pael 4469
Palladium 7287, 8644, 2620, 8060,
5553, 6896, 5531, 7839,
6286, 3518, 6736, 6538,
5605, 7350, 2438, 4648
Palsonic 3488, 6764, 8644, 2796,
4709, 5553, 5453, 3453,
4016, 2924, 6896, 2335
Panama 7647, 3488, 4469, 8644,
6896, 5531, 3637,
Panashiba 4709, 3637
Panasonic 4526, 5620, 3001, 3350,
5605, 4783, 7605, 4709,
2410, 8568, 8644, 6896,
8360, 5393, 4648,
Panavision 8644, 2620, 6896
Panavox 3637
Panorma 3637
Papouw 8644, 6896
Pathe Cinema 5605, 4469, 7287
Pathe Marconi 7430
Pausa 7647, 3637
PCE/PEC 4523, 3802, 5510
Penney 4523, 5510
Perdio 5605, 8644, 4469, 5896, 6896
Perfekt 8644, 6896, 4648
Performance 3802, 5874
Philco 6634, 4752, 5553, 5531,
5605, 7287, 8644, 6896,
3802, 3637, 4648, 7350
Philex 6127, 5605
Philips 6896, 8644, 3518, 6127,
6538, 8016, 3802, 5874,
6982, 5090, 3350, 7647, 4648
Phocus 3730, 6948, 8060
Phoenix 8644, 6896, 7287, 2590,
5605, 4469, 4648,
Phonola 8644, 6896, 6127, 4469, 4648
Pilot 6896, 8644, 5716, 8435, 5510
Pioneer 4174, 7507, 8644, 4849,
3350, 7430, 5605, 4422,
6896, 8209, 7287, 6982,
2590, 3835, 4648, 7287, 2590
Plantron 8644, 6896, 3488, 7647,
3637, 4648
Playsonic 8060, 8644, 6559, 6381
74

Policom 7430, 3350, 5605, 4265,
4752, 6634, 6640,
Polytron 5896
Poppy 7647, 3637
Portland 5090, 2499, 4523, 5874, 4648
Powerpoint 6230, 8644, 6896, 2924
Prandoni-Prince 5531, 8568, 3350, 2438
Premier 7647, 3488
President 7314
Prima 7647, 3488, 6764, 7789,
4523, 3802, 5510, 3637, 4648
Princess 2924, 3637
Prinston 3840
Prinz 3350
Proelco 4648
Profex 7647, 5605, 3350, 2438, 3637
Profi 7647
Profitronic 8644, 6896, 4648
Proline 8644, 6896, 4884, 5295,
2620, 4698
Proscan 5510
Prosonic 8644, 6896, 7287, 5090,
4530, 5355, 8060, 4469
Protec 3637, 4648
Protech 8644, 6896, 7647, 5531,
3488, 5553, 5355, 5896,
5605, 2590, 3840
Proton 5393, 4523, 3637
Provision 4874, 8644, 6896, 3840, 8060
Pulser 4523, 5510, 3637, 4648, 4156
Pye 8644, 6896, 5090, 6764, 4648
Pymi 7647, 3637
...
Q
Qty1 4648
Quadral 4016
Quasar 5531, 4526, 4677, 7647,
6634, 5186, 4265, 4819
Quelle 8644, 6736, 7507, 7430,
5355, 6896, 5265, 6538,
3835, 6640, 3518, 3350,
3488, 3840, 6092, 7647,
6812, 5531, 4752, 7839,
4523, 3802, 3637, 5874, 4648
Questa 6812, 3802
...
R
R Line 4648
Radialva 7430, 4016, 5605, 8644,
6896, 4422
Radio Shock 4523
Radiola 8644, 6896, 4648
Radiomarelli 8568, 5531, 8644, 6896
RadioShack 8644, 6896, 5393
Radiotone 7647, 8644, 6896, 7287,
3488, 3840, 3637, 4648,
5553, 6764, 3451, 5355
Rank 4265
Rank Arena 6812, 2810, 3036
RBM 4265
RCA 4884, 3193, 3847, 3270,
6982, 3036, 5510,
Realistic 5393
Recor 8644, 5553, 6896, 4648
Record 4648
Rectiligne 8644, 6896
Rediffusion 3350, 4783, 6812, 6092
Redstar 8644, 6896
U R C 75

Reflex 8644, 6896, 3840, 5355
Regente 3637
Relisys 4677, 2108, 4979, 3191
Reoc 8060, 5295, 2499
Revox 8644, 6896, 7287, 4648
Revox/Studer 4648
Rex 2438, 2620, 5531, 5605, 3488
RFT 7287, 3488, 8644, 6896, 2590
Rhapsody 4469
Rice Club 5510
Ricoh 8644, 6896
Rinex 2335, 5553
R-Line 8644, 6896, 5605
RMB 4523
Roadstar 3840, 7647, 5553, 8644,
3488, 5896, 4485, 5832,
6896, 8060, 5355, 4016, 3637
Rodex 8644, 6896
Rosita 3637
Royal 3637
Royal Lux 7287, 6764, 3270
Rukopir 6896, 8644
Runco 5510
...
S
Saba 4884, 7430, 3847, 6982,
2104, 3270, 4783, 4526,
4422, 5605, 8568, 3350, 8060
Sagem 2696, 7014, 5896, 2820, 2517
Saisho 8568, 7647, 7507, 5605,
3488, 4648
Saivod 8644, 7066, 6896, 5319,
5355, 5716, 3840
Sakaï 5605
Sakio 3637
Sakura 3637
Sakyno 7014
Salora 5605, 3350, 8568, 2438,
4783, 6559, 7910, 8020
Salsa 3270
Sambers 8568
Sampo 4523
Samsung 2517, 8299, 8644, 5393,
7910, 7350, 5605, 4884,
6896, 7736, 3193, 4495,
4523, 5510, 3637, 4648,
7647, 7287, 3488, 4469
Samsux 4523
Sandra 4469
Sanky 4523
Sansui 8644, 2429, 6896, 8435,
4530, 2810, 7014, 6641,
3036, 4523, 5510, 3637, 4648
Santon 7647
Sanyo 7910, 3573, 6812, 7507,
5605, 8644, 5620, 6896,
7287, 6559, 4469, 7647,
2590, 4849, 3802, 3637
Save 8644, 6896
Saville 7733
SBR 8644, 6896, 6127, 4648
Schaub Lorenz 4783, 8060, 3350, 6305,
2590, 5090, 4156,
Schneider 6286, 8644, 6896, 7350,
3840, 5605, 3451, 8060,
3158, 7213, 6982, 5531,
2499, 7733, 7066, 4265,
4530, 3350, 4016, 5355,
3637, 4648
Scotland 5605
76

Scott 4485, 5393, 4523, 3802, 5874
Sears 5393
Seaway 5295
Seelver 6896, 3840, 8644
SEG 8644, 6896, 3840, 4917,
8377, 4469, 5319, 4016,
5355, 6230, 7647, 5605,
2499, 3634, 8060, 3637,
3488, 5295, 6812, 5531,
4523, 3802
SEI 6736, 5605, 8568, 8644, 6896
Sei-Sinudyne 8568, 6736, 8644, 6896,
5874, 4648
Seitech 7855
Seleco 2438, 8377, 5605, 2620,
3444, 3488, 6092, 6812, 4530
Semua 4523
Sencora 7647, 3637
Sentra 6482, 4016, 7647
Serino 2696, 7014, 4469, 3193
Sharp 3193, 7138, 6812, 4638,
6127, 8568, 6538, 4174,
7409, 5319, 4523, 3802
Shintom 5874
Shintoshi 8644, 6896
Shivaki 8644, 6896, 5119, 5090, 5393
Show 5553, 7647, 3637
Siarem 5605, 8568
Siemens 3518, 6640, 6538, 5265,
7839, 5186, 8644, 6896, 3350
Siemes 4523, 4648
Siera 8644, 6896, 8299
Sierra 4648
Siesta 7287
Sigmax 5510
Signature 5874
Silma 4648
Silva 8644, 6896, 4469, 3350,
3451, 3637
Silva Schneider 5952
Silver 6812, 8644, 7014, 3350,
6896, 6381, 5605, 3802
SilverCrest 3840, 8644, 6896
Singer 7647, 3011, 8644, 6896,
5531, 3444, 3270, 5605,
3637, 4648
Sinotec 2335
Sinudyne 5605, 3350, 8568, 6736,
8644, 6896, 7733,
Sky 8644, 5896, 3118, 5393,
6896, 4262
Skymaster 4819
Skysonic 3036
Sliding 4677, 3118
SLX 5355
Smaragd 6230
Snyder 4648
Soemtron 4677, 3191
Solavox 3350, 5605, 4783, 8644, 6896
Sonawa 4016
Soniko 8644, 6896
Soniq 2519
Sonitron 7910, 7287, 6559
Sonneclair 8644, 6896
Sonoko 8644, 6896, 7647, 3488,
3637, 5896, 4648,
Sonolor 7910, 5605, 6736, 4783,
3350, 5896
Sontec 8644, 6896, 7287, 7647, 4648
U R C 77

Sony 6736, 2762, 7507, 6219,
3193, 4849, 4752, 5874,
3078, 6812, 8644, 6896, 3802
Sound & Vision 4016, 5090, 8644, 6896
Soundesign 4523, 3802, 5510, 5874, 5393
Soundmaster 3637
Soundwave 8644, 6896, 5553, 6381
Soyea 2335
Specrician 4523, 4648
Spectra 7647
Ssangyong 7647
Staksonic 7647
Standard 8644, 6896, 3840, 4016,
7647, 5090, 3637,
Starlite 7647, 5605, 8644, 6896,
3488, 6764, 3637,
Starlux 3637
Stenway 5896, 4016
Stern 5605, 2438, 3488, 2620, 3444
Stevision 7066, 5952
Strato 8644, 6896, 3488, 7647
Strong 5319, 7660, 3840, 8644, 6896
Sunic Line 8644, 6896
Sunkai 7384, 7014, 4016, 2696,
8644, 6896, 6230, 4677
Sunstar 4530, 8644, 6896, 7647,
3488, 3637
Sunwatt 7014
Sunwood 8644, 6896, 7647, 3637, 4648
Superla 8568, 4469
Supersonic 7910, 6896, 2924, 3488,
8484, 7014
Supertec 3637, 4648
Supertech 7647, 8644, 6896, 4469,
4016, 3637
Supra 5393, 5090, 7647, 3637
Supremacy 4523, 3802
Supreme 5874
Susumu 3270, 4016, 4422
Sutron 7647, 3637
Svasa 8484
Swissline 5531
Swisstec 4262, 3118
SYC Line 3637
Sydney 4469
Sylvania 4648
Symphonic 4523, 3802, 5874
Sysline 8644, 6896
Sytong 4469
...
T
T+A 6975
Tandberg 2410, 2620, 7430, 8377,
3350, 5605
Tandy 4016, 5531, 3193, 5605
Tashiko 6812, 4849, 4469, 5605,
2438, 3802
Tatung 5952, 8644, 6896, 8568,
7507, 7733, 8016, 5905,
4156, 4648
TCM 8060, 3730, 7361
Teac 2924, 3835, 8644, 4917,
5393, 7647, 6764, 5896,
3840, 6896, 5716, 5355,
5553, 4849, 8060, 7660,
7014, 8435, 3488, 2499, 5991
Teak 3637
TEC 7647, 5531, 3270, 8644,
6896, 3350, 5605, 3637, 3637
78

Techica 4016
Tech Line 8644, 6896, 5355, 4917, 5319
Techlux 4485
Technica 7066
Technics 4526, 4648
Techniland 4648
TechniSat 8644, 6896, 5605, 4201
Technisson 8060, 3730
Technosonic 8644, 6896
Techwood 5319, 5510, 5874
Tecnimagen 6896
Tecnison 3637
Tedelex 5553, 6305, 3011, 7647,
8435, 7910, 2924, 8299,
5397, 8644, 6896, 3637
Tehnol 3637
Teiron 7647
Teknant 3637, 4648
Teknika 4523, 5510
Tekon 5510, 3637
Teleavia 7430, 4422, 6982
Telecor 8644, 6896, 5605, 4016, 3158
Telefac 3637
Telefunken 4884, 3847, 4752, 8299,
4262, 4422, 6634, 3270,
7430, 2924, 6982, 5716,
5301, 8644, 6896, 2590,
2104, 8033, 2707, 3491,
8060, 5952, 6092, 7837
Telefusion 8644, 6896
Telegazi 8644, 5605, 4016, 3488, 6896
Telemeister 8644, 6896
Teleopta 3637
Telesonic 8644, 6896
Telestar 7647, 8644, 6896, 6764, 3637
Teletech 8644, 6896, 5355, 7647,
5531, 3840, 3637,
Teleton 5605, 6812, 2438
Televideon 5605, 4469
Teleview 8644, 6896
Tempest 7647, 8644, 6896, 3488, 3637
Tennessee 8644, 6896
Tensai 4016, 8644, 6896, 7647,
4819, 5090, 4530, 2796,
5531, 6381, 5605, 3840,
3637, 4648
Tenson 3637, 7647
Tesla 8644, 4648
Tesla Orava 4648
Tevion 7350, 4706, 5905, 3191,
3451, 5355, 6286, 8060,
8644, 5952, 6896, 7361,
3840, 4596, 3730,
Texet 5090, 7647, 4469, 4016
Thomas 4523, 5510, 3637, 5874, 4648
Thomson 4884, 3847, 6982, 4422,
7430, 3270, 8644, 6896, 4469
Thorn 5620, 6127, 7430, 5301,
8644, 6896, 7507, 3270,
3952, 6982, 3350, 6736,
3835, 6812, 5090, 6482,
4752, 6634, 4874, 6640,
4265, 3802
Thorn-Ferguson 5620, 7430, 6127, 3350,
3270, 4874, 5301, 6482
Tiny 3453, 7789, 5393, 5510
Tobishi 4016
Tobo 3637
Tokai 8644, 6896, 5355, 5605,
5090, 7647, 3840, 4648
U R C 79

Tokaido 3840
Tokyo 4469, 6482, 5510
Tomashi 5896, 4016
Tongtel 7046, 8299
Topline 3840, 5355
Toshiba 4679, 4081, 6482, 3730,
7733, 7647, 2924, 8644,
6812, 4265, 8060, 7430,
3251, 5319, 4925, 5952,
4940, 5265, 3518, 2517,
5447, 4526, 8561, 3802, 5510
Tosonic 4523, 5510
Totevision 4523
Toyoda 7647, 4530, 3488
Trakton 7647, 3488
TRANS-continents 5355, 3840, 8644, 6896,
2590, 4677
Transonic 8644, 6896, 7014, 8299,
3835, 3488, 2924, 5716,
5553, 7647
Transtec 4469
TRC 3637
Trevi 3637
Triad 8644, 6896, 4016, 4648
Trident 8568
Trilux 4648
Tristar 3488, 4016, 6127
Triumph 8568, 6092, 6896, 8644
Trivision 3637
Tsoschi 5896
TVTEXT95 6896
...
U
Uher 8644, 6896, 5090, 5553,
2590, 7287, 8020, 4648
Ultravox 5090, 5531, 4469, 5605,
8644, 6896
UMA 4648
Unic Line 8644, 6896, 4659, 7014
Unimor 4648
United 8060, 8644, 6381, 6896,
7733, 3840, 8299, 7066
Universal 8644, 6896
Universum 6092, 4819, 5265, 4659,
2620, 4752, 7839, 5186,
6640, 3350, 5531, 6753,
6736, 5355, 7430, 8377,
8020, 7287, 6538, 5553,
8394, 7647, 6634, 3634,
7507, 8644, 3835, 6812,
3840, 4917, 4849, 5319,
4265, 5605, 3488, 6896,
7660, 2517, 3637, 4648
Univox 8644, 6896, 5605
Uranya 3637
Utax 5605
...
V
V7 Videoseven 5991, 5393, 3118, 4698,
7855
Vanguard 3637
Veco 3637
Vestel 8644, 5605, 6896, 5355,
3840, 5319, 4648,
Vexa 7647, 8644, 6896, 3637, 4648
Victor 4638
Video System 4648
Videologic 4016, 4469
Videologique 4469, 4016
Videosat 5531
80

VideoSystem 8644, 6896
Videotechnic 4469, 5090
Videoton 5605
Vidion 3637
Vidtech 6812, 5393
ViewSonic 5991
Visiola 4469
Vision 8644, 3488, 6896, 3637, 4648
Vistar 3350
Vocson 4648
Vortec 8644, 6896, 4648
Voxson 8644, 6896, 2438, 5553,
5605, 5393
...
W
Waltham 5553, 4422, 8644, 6896,
5355, 7430, 3840, 5605, 5119
Wards 4648
Watson 3840, 4596, 8644, 6896,
5605, 7647, 5355, 4016,
4698, 7839, 3637, 4648,
7350, 3158, 7733, 4917
Watt Radio 5605, 4469
Wega 8644, 6896, 6812, 3802
Wegavox 7647, 8644, 6896, 3637, 4648
Welltech 8060
Weltblick 8644, 6896, 4648
Weston 8644, 6896
Wharfedale 8644, 6641, 7350, 2707,
6896, 5952
White Westinghouse 4648, 4469, 8644,
6896, 2499
Windsor 5355, 3840
Windstar 5896
Windy Sam 6896
Winston 3637, 4648
Wintel 8060
Winternitz 3637
Word-of-Vision 3118, 3094, 4677, 3730,
3191, 2108, 7855,
Worldview 7014, 3637, 4648
...
X
Xenius 5295
XLogic 2924, 7314
Xoro 3453, 7855
Xrypton 8644, 6896
X-View 4156
...
Y
Yamaha 4526, 8374
Yamishi 5896, 7014, 4016, 8644, 6896
Yokan 8644, 6896
Yoko 8644, 6896, 4016, 3488,
7647, 7287, 6559, 4469,
5531, 3637, 4648
York 4648
Yorx 4016
...
Z
Zanussi 2438
Zenith 2499, 5874, 4648
Zenor 6559
ZX 7733
U R C 81

Appendix B
Legal Notices
HDMI, the HDMI logo, and High-Definition Multi-
media Interface are trademarks or registered trade-
marks of HDMI Licensing LLC.
Manufactured under license from Dolby Laborato-
ries. Dolby and the double-D symbol are trademarks
of Dolby Laboratories.
82

Correct disposal of this product
This marking shown on the product or its literature indicates that
it should not be disposed with other household wastes at the end
of its working life. To prevent possible harm to the environment or
human health from uncontrolled waste disposal, please separate
this from other types of wastes and recycle it responsibly to pro-
mote the sustainable reuse of material resources.
Household users should contact either the retailer where they pur-
chased this product or their local government office for details of
where and how they can dispose this product for environmentally
safe recycling.
Business users should contact their supplier and check the terms
and conditions of the purchase contract. This product should not
be mixed with other commercial wastes for disposal.
L N 83

Index
(Re-) Calculate, 18
µTorrent, 51
A
A/V Output Setting, 55
Advanced, 22
Alarm Confirm Message, 35, 37
All Service, 20, 22, 23
ANT IN, 9
Antenna 5V, 23
Audio Language, 53
Audio Language2, 53
Audio PID, 22
Audio Sync Delay, 56
Audio Track, 28
Auto, 21–23, 37
B
Back-Up, 6
Black Screen, 56
Blind, 21
C
Cable Search, 23
CAS, 30
Censorship, 57
CH Edit, 6
Change PIN code, 57
Channel, 23
Clock Mode, 55
Commercial skip, 37
Config Mode, 17
Configuration, 57
Content code, 27
Continuous, 57
Copy Service, 26
Copy to Device, 41
Current Device, 39
D
Data download from USB storage, 58
Data Transfer, 6, 58
Daylight Saving, 55
Delete, 41
Delete history list, 50
Delete Services, 32
Delete stored position, 58
DHCP, 54
Disable (soft) Limits, 19
DiSEqC 1.2, 18
DiSEqC Switch, 16
Dish Latitude, 19
Dish Longitude, 19
84

Dish Setting, 15, 17–20
Display Format, 55
Display Resolution, 55
Display Setting, 56
Dolby Digital Default, 56
Download, 6
Download List, 47
DVB-S2, 22
E
Edit Services, 32, 57
EPG, 4, 6, 26, 27
EPG Time scale, 27
Exit, 4
Extra Recording Time After Finish, 37
Extra Recording Time Before Start, 37
F
Fast Scan, 21
FAV, 4, 25, 46
File System, 39
Folder, 40
Format, 39
Free TV+, 47, 54
Freeze, 56
Frequency, 16–19, 21, 23
Front Display Scroll, 57
Front LED Brightness, 57
FTA Only, 20, 22, 23
Full, 55
G
Go to, 19
Go to Reference, 18, 19
Go to Stored Position, 18
H
HbbTV, 33
HD Service Change, 57
HD service grouping, 26
HDMI Dolby Digital, 56
High, 28
I
Imported Files, 40
Info, 4, 24, 27
Info Box Display Time, 56
Info Box Position, 56
Input Text, 47
Installation, 57
iRadio+, 49
iTV+, 48
K
Keep viewing service when exit, 25
L
L, 11
LAN, 13
Language Setting, 53
Letter Box, 55
LNB, 14
LNB 22 kHz, 16
LNB Frequency, 16
LNB IN, 9
LNB OUT, 9
LNB Power, 16
LNB Type, 16, 17
Local Offset, 55
Lock/Unlock Services, 31
Logical channel number, 26
Loop-Through, 16, 18, 19
I 85

M
M Client, 6, 44
M Server, 6, 44
Manual, 21, 23, 37
Media Server, 44
Menu, 4, 6
Menu Language, 53
Move, 18, 19
Move Services, 32
Move to Folder, 41
Movie, 6
multi-feed, 30
Music, 6
N
Network, 7
Network Drive, 40
Network Search, 20
Network Setting, 7, 44, 54, 59
Network settings, 40
New Folder, 40
O
Off, 37, 57
OK, 4, 7, 35, 41–43, 47
Once, 57
Once Record, 27, 34
P
Page down, 25, 29
Page up, 25, 29
Pan Scan, 55
Parental Control, 48, 57
Pb, 11
PCR PID, 22
Percentage Move, 37
Photos, 7
Pillar Box, 55
PiP, 29
PiP List, 29
PiP Swap, 29
Play, 27, 35
Play List, 4, 36, 40
Playback Numeric Function, 37
Playback Position Jump, 37
Polarity, 21
Positioner, 18, 19
Positioner Command, 18, 19
Positioner Setting, 18–20
Power Saving in Standby Mode, 56
Pr, 11
Proxy Server, 54
Q
QAM Mode, 23
R
R, 11
Recall, 4, 46
Record Device, 38
Recording Option, 36
Recording Stop Message, 37
Recordings, 7
Rename, 40
Reset configuration data, 58
Reset service data, 58
Resolution, 5
RS-232C, 8
S
Satellite, 16, 18–20
Satellite Search, 20
Schedule, 7, 35
Screen Change Effect, 57
86 I

Search event name, 27
Search Mode, 21
Search Type, 20, 22, 23
Seek Time, 48
Select Operator, 21
Series Record, 27, 34
Service Change, 57
Service List Manager, 6, 31, 32
Service preview, 25
Service Search, 20
Set East (soft) Limit, 19
Set Favorites, 32, 33
Set West (soft) Limit, 19
Settings, 6
Simple Service List, 57
Skip Services, 32
Sleep Mode, 31, 55
Software Upgrade, 59
Sound Level, 28
Sound Mode, 28, 56
Start MHW-Epg Automatically, 28
Start Type, 44
STB, 4
Storage, 7
Storage Check, 40
Storage Manager, 7, 39
Store Satellite Position, 18
Store system data, 58
Subtitle, 4, 28
Subtitle Language, 53
Subtitle Language2, 53
Symbol rate, 21, 23
Sync Player, 51
System, 57
System Information, 59
System Recovery, 58
System restore to factory default, 58
System restore to stored position, 58
T
T Apps, 51
Teletext, 4, 29
Teletext Language, 53
Terrestrial Search, 22
Time Calibration, 21
Time Setting, 27, 31, 55
TimeShift Device, 38
TimeShift Duration, 37
TimeShift Start, 37
Torrent, 51
Transfer All System data to USB stor-
age, 58
Transfer Service datato USB storage, 58
Transmission, 22
transponder, 14
Tuner, 16, 18–20
TUNER 1, 9
TUNER 2, 9
Tuner Connection, 16, 18, 19
TV, 4
TV Aspect Ratio, 55
TV Only, 20, 23
TV Portal+, 50
TV Type, 55
TV/Radio, 5
Type, 35
U
Unicable, 17
Unicable Setting, 17
Up/Down Key, 56
I 87

USALS, 19
User, 40
User Font File, 53
V
Video Output Mode, 56
Video PID, 22
View only filtered list, 26
Volume Bar Display Time, 56
W
Wake Up Mode, 31, 55
Weather, 50, 54
Webzeal, 45
Y
Y, 11
YouTube, 7
YouTube Location, 48
YouTube Picture Quality, 48
Z
Zapping Mode, 56
88 I


This product is under continuous development. Due to changes or improvements,
some descriptions and illustrations in this guide may differ slightly from the actual
product.
 Loading...