

Page 1
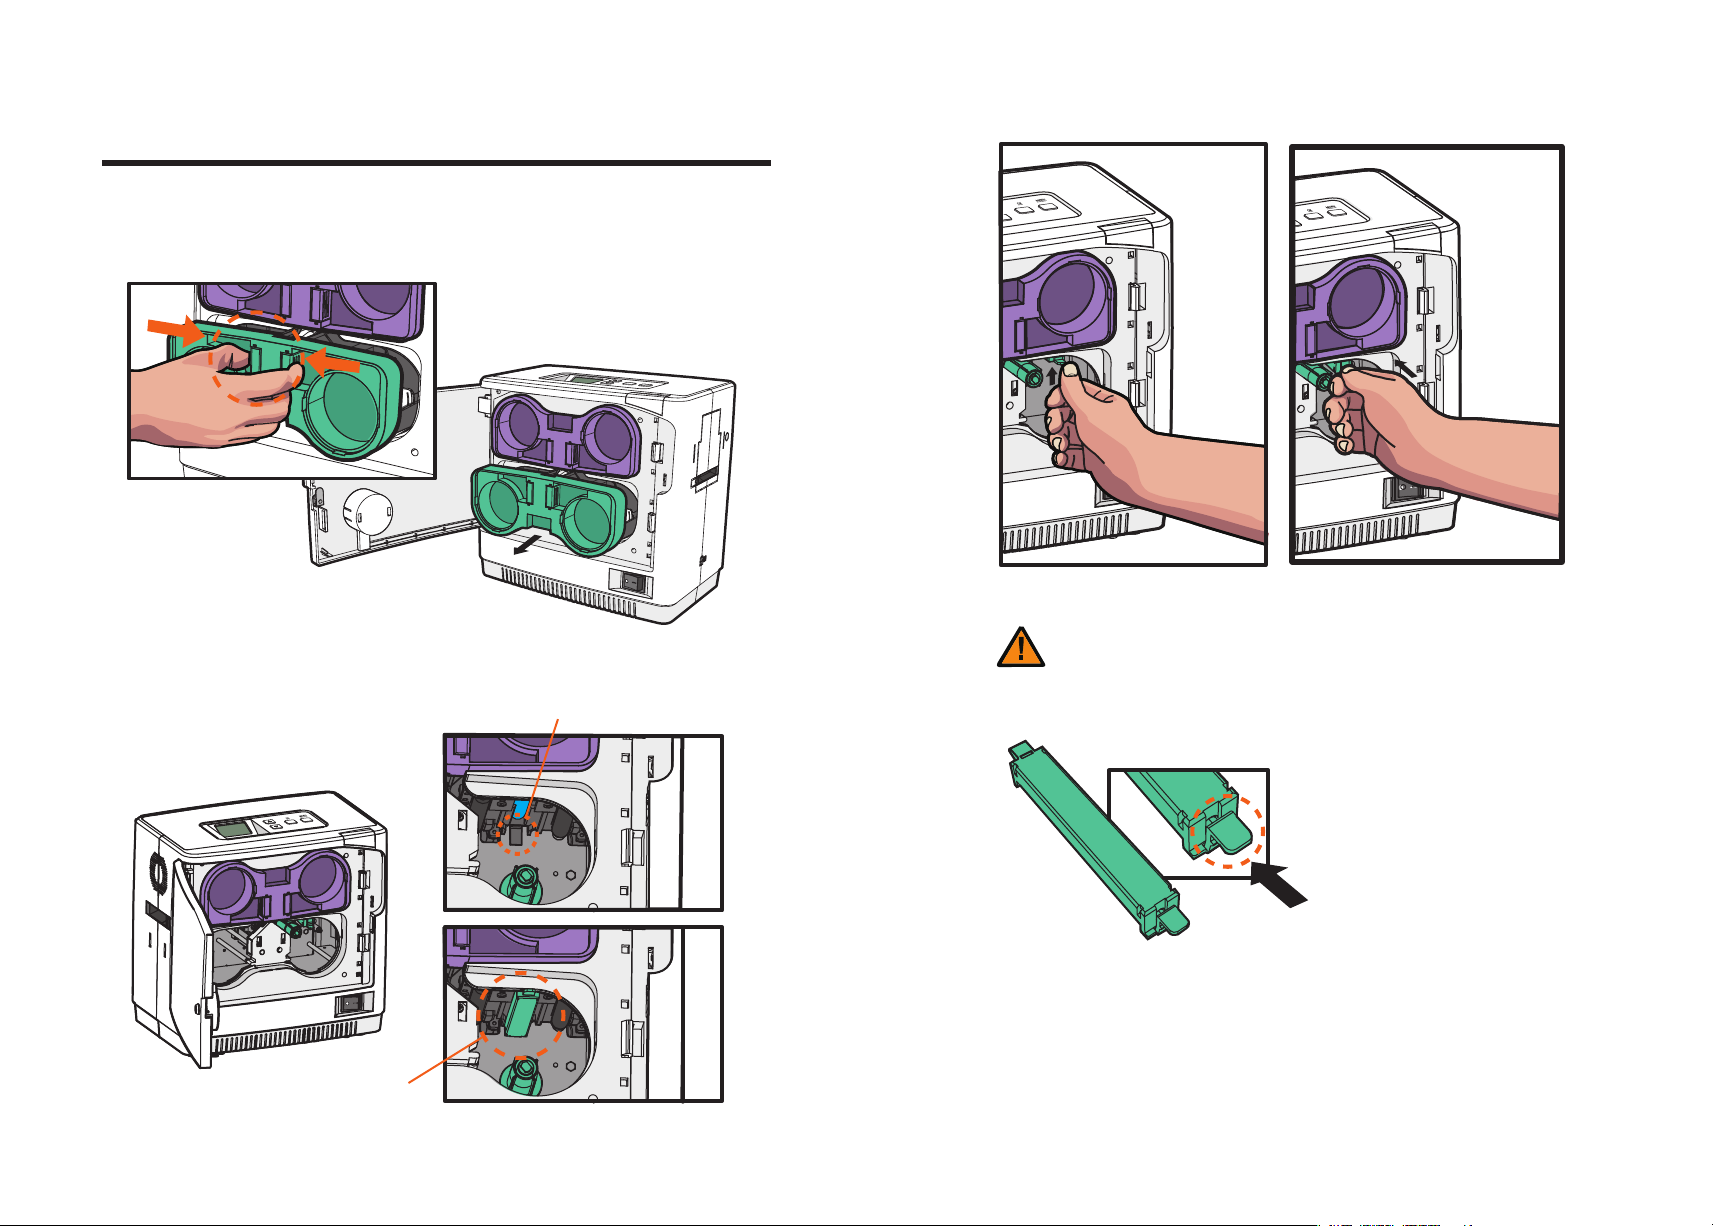
Load Lower Cleaning Roller & Films
- Load Lower Cleaning Roller
1. Pull the cartridge out while pressing the Cartridge Load/Eject Button to
remove it from the laminator as shown in the image below.
2. Align the Cleaning Roller with its hole and push it up until it clicks.
Cleaning roller hole
After installation
of cleaning roller
©2017 T.I.TENG Co., Ltd. All rights reserved POINTMAN LAMINATOR NL200 User Manual
24 25
- Make sure that it is fully inserted into the Cleaning Roller Hole before pushing the indicated area.
Important
Page 2
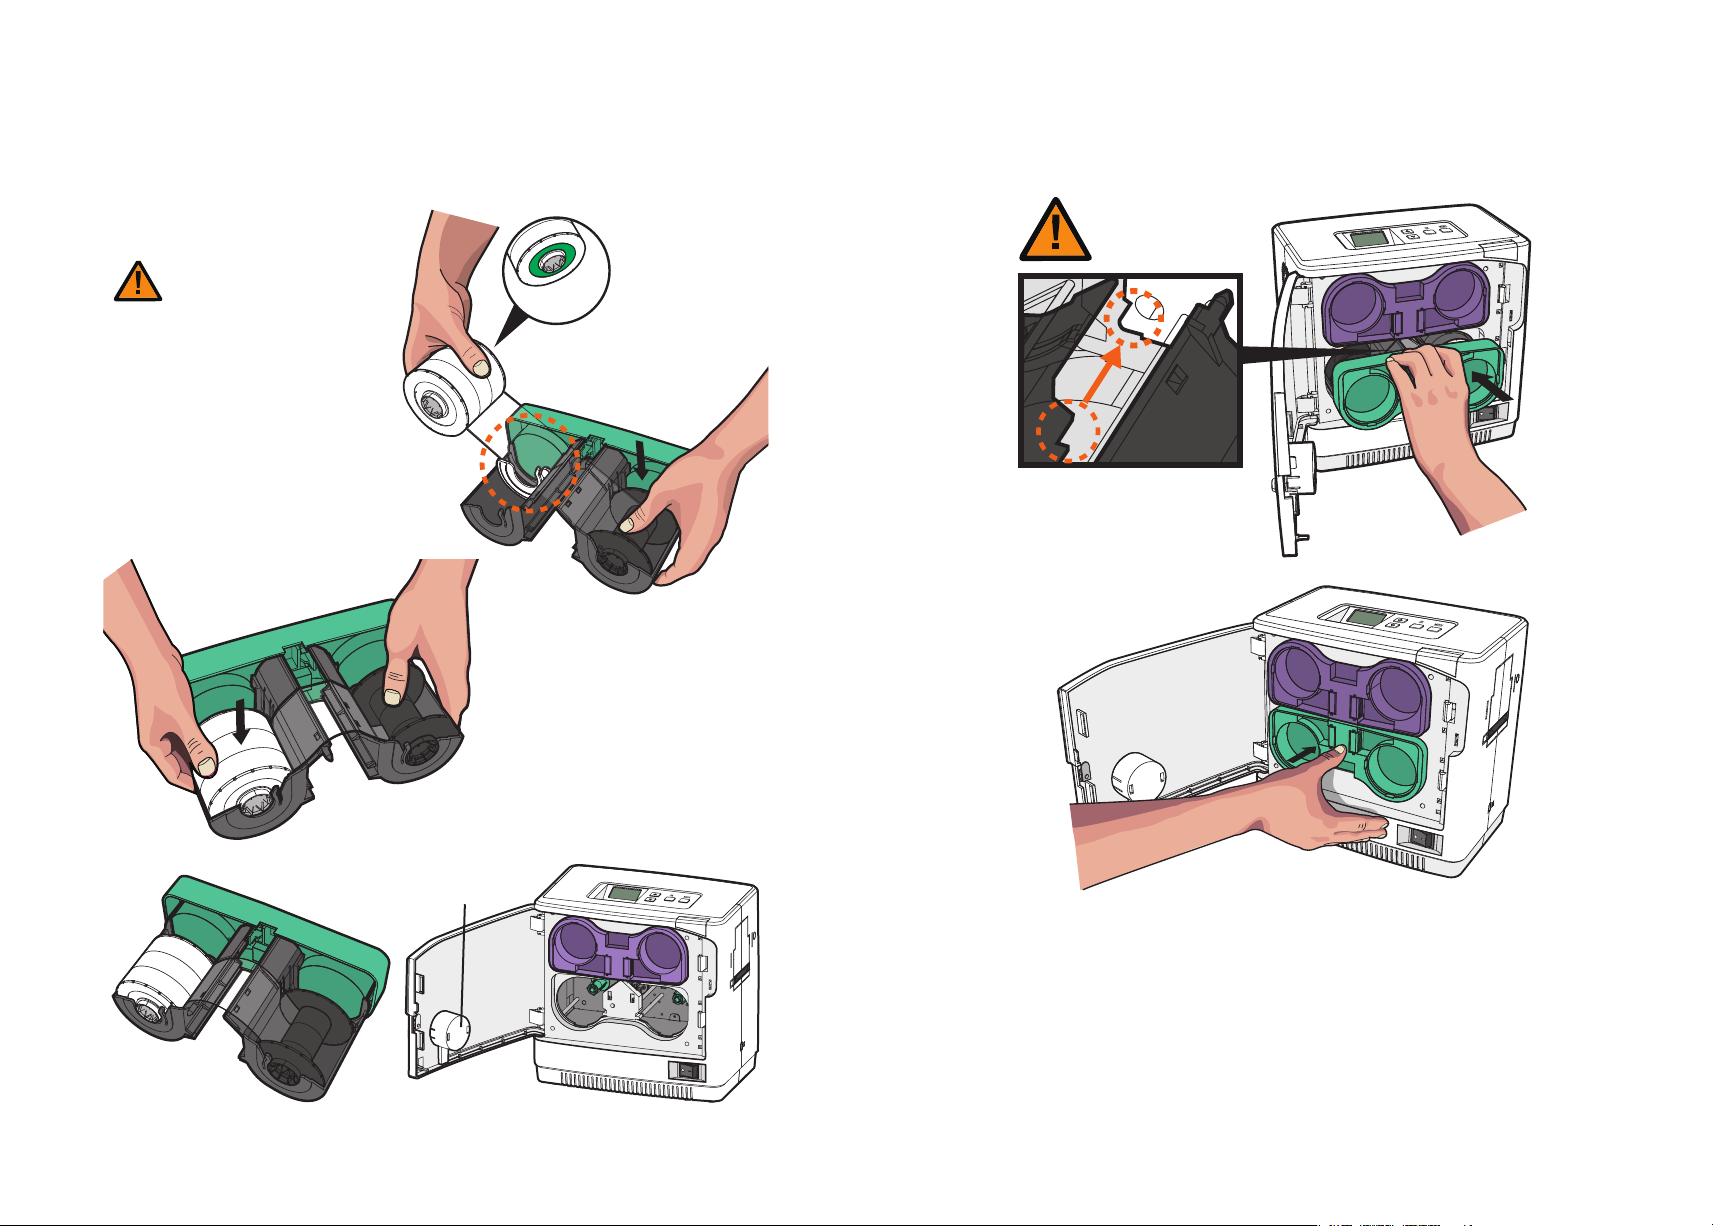
- Load Films to Lower Cartridge
1. Load the films for lamination and rewinding in the correct position as
shown in the image below.
2. Check the position of the Lower Film Cartridge and films for
rewinding and push the cartridge in until it clicks.
Important
- Place the white film core on the core guide.
- The white film core does not fit the black
film core guide.
- Do not force the film core in as it can
damage the cartridge.
- Check the position of the RFID tag.
RFID Tag
RFID Tag Reader
©2017 T.I.TENG Co., Ltd. All rights reserved POINTMAN LAMINATOR NL200 User Manual
26 27
Page 3
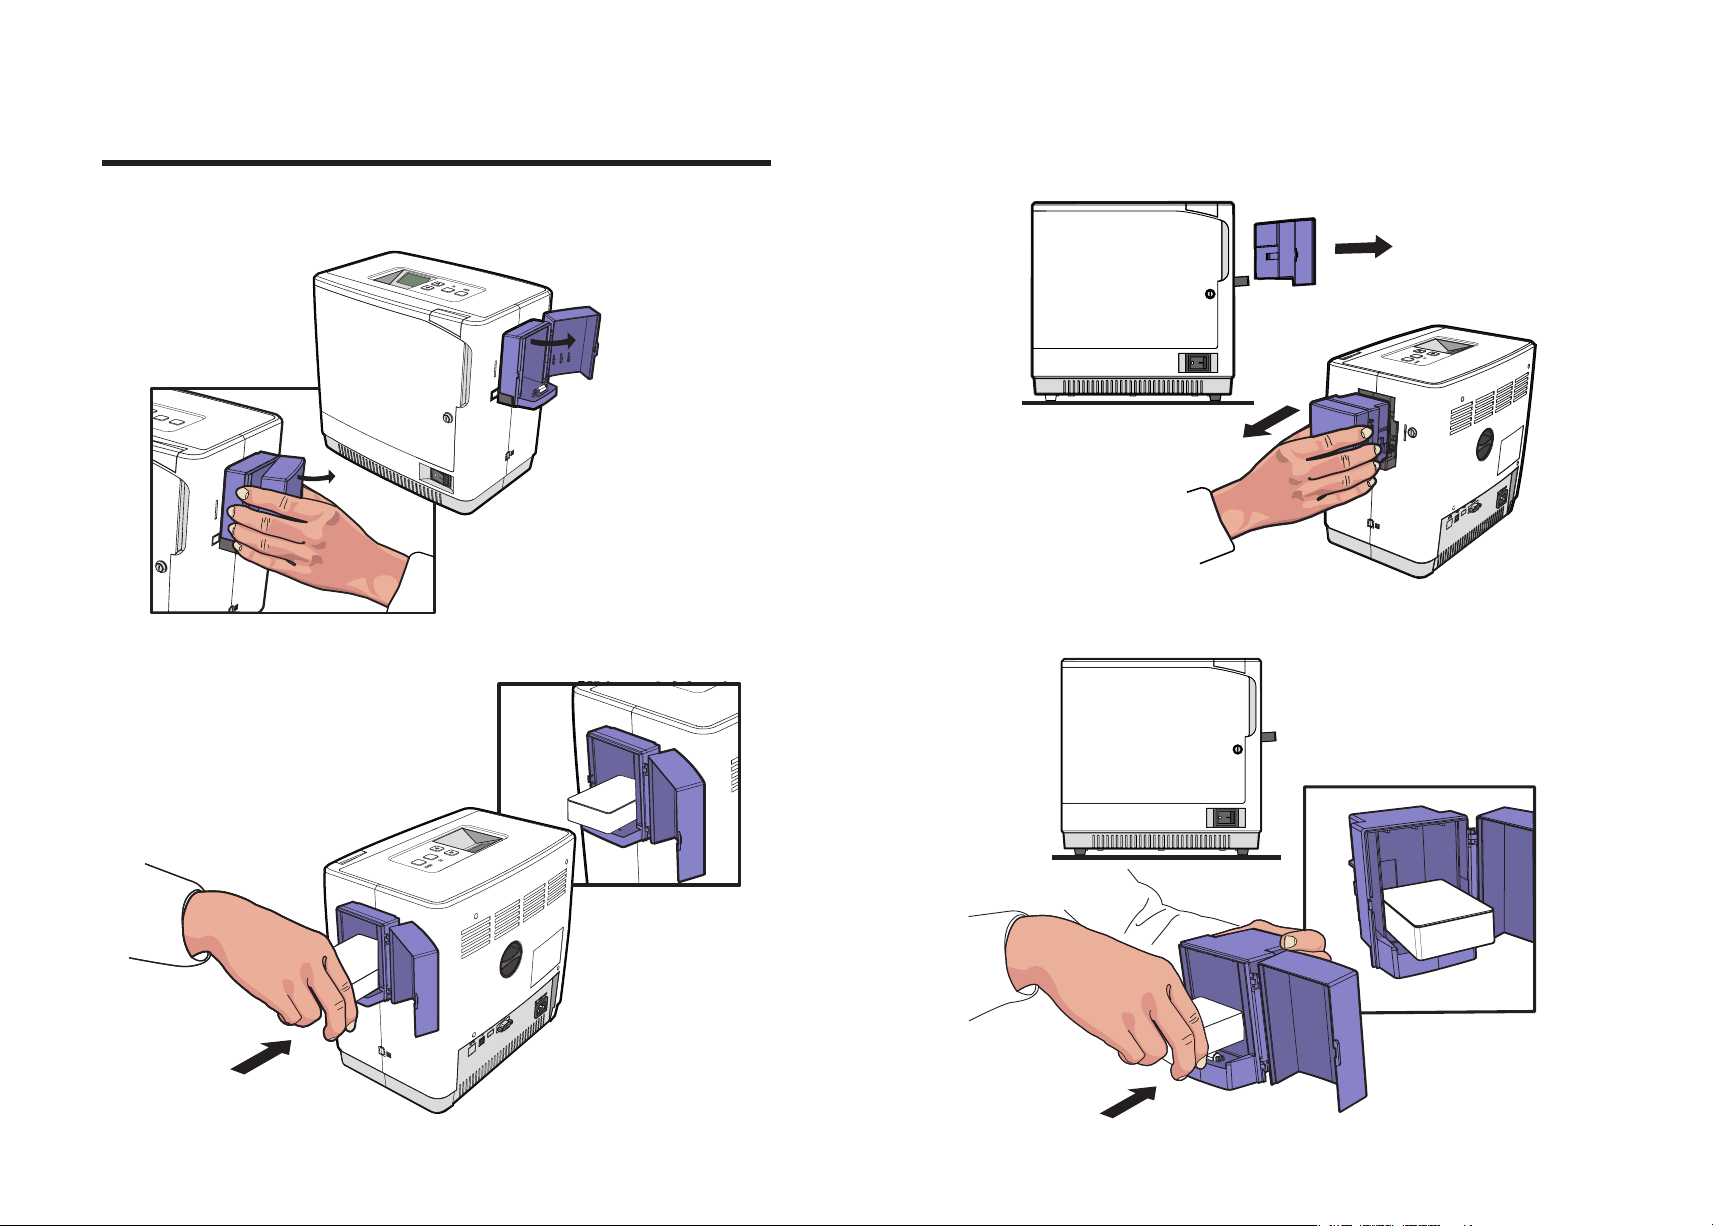
Load Cards
- Place cards in the Input Hopper
1. Open the Card input hopper by pulling it sideway.
2. Place the cards inside the card input hopper as shown in the picture.
- Load Cards after taking out the Card Input Hopper
1.Hold the side of the card input hopper and pull it backward to remove it .
2. Hold the backside of the card input hopper with one hand and open the
cover with the other. Then, place the cards inside as shown in the picture.
©2017 T.I.TENG Co., Ltd. All rights reserved POINTMAN LAMINATOR NL200 User Manual
28 29
Page 4
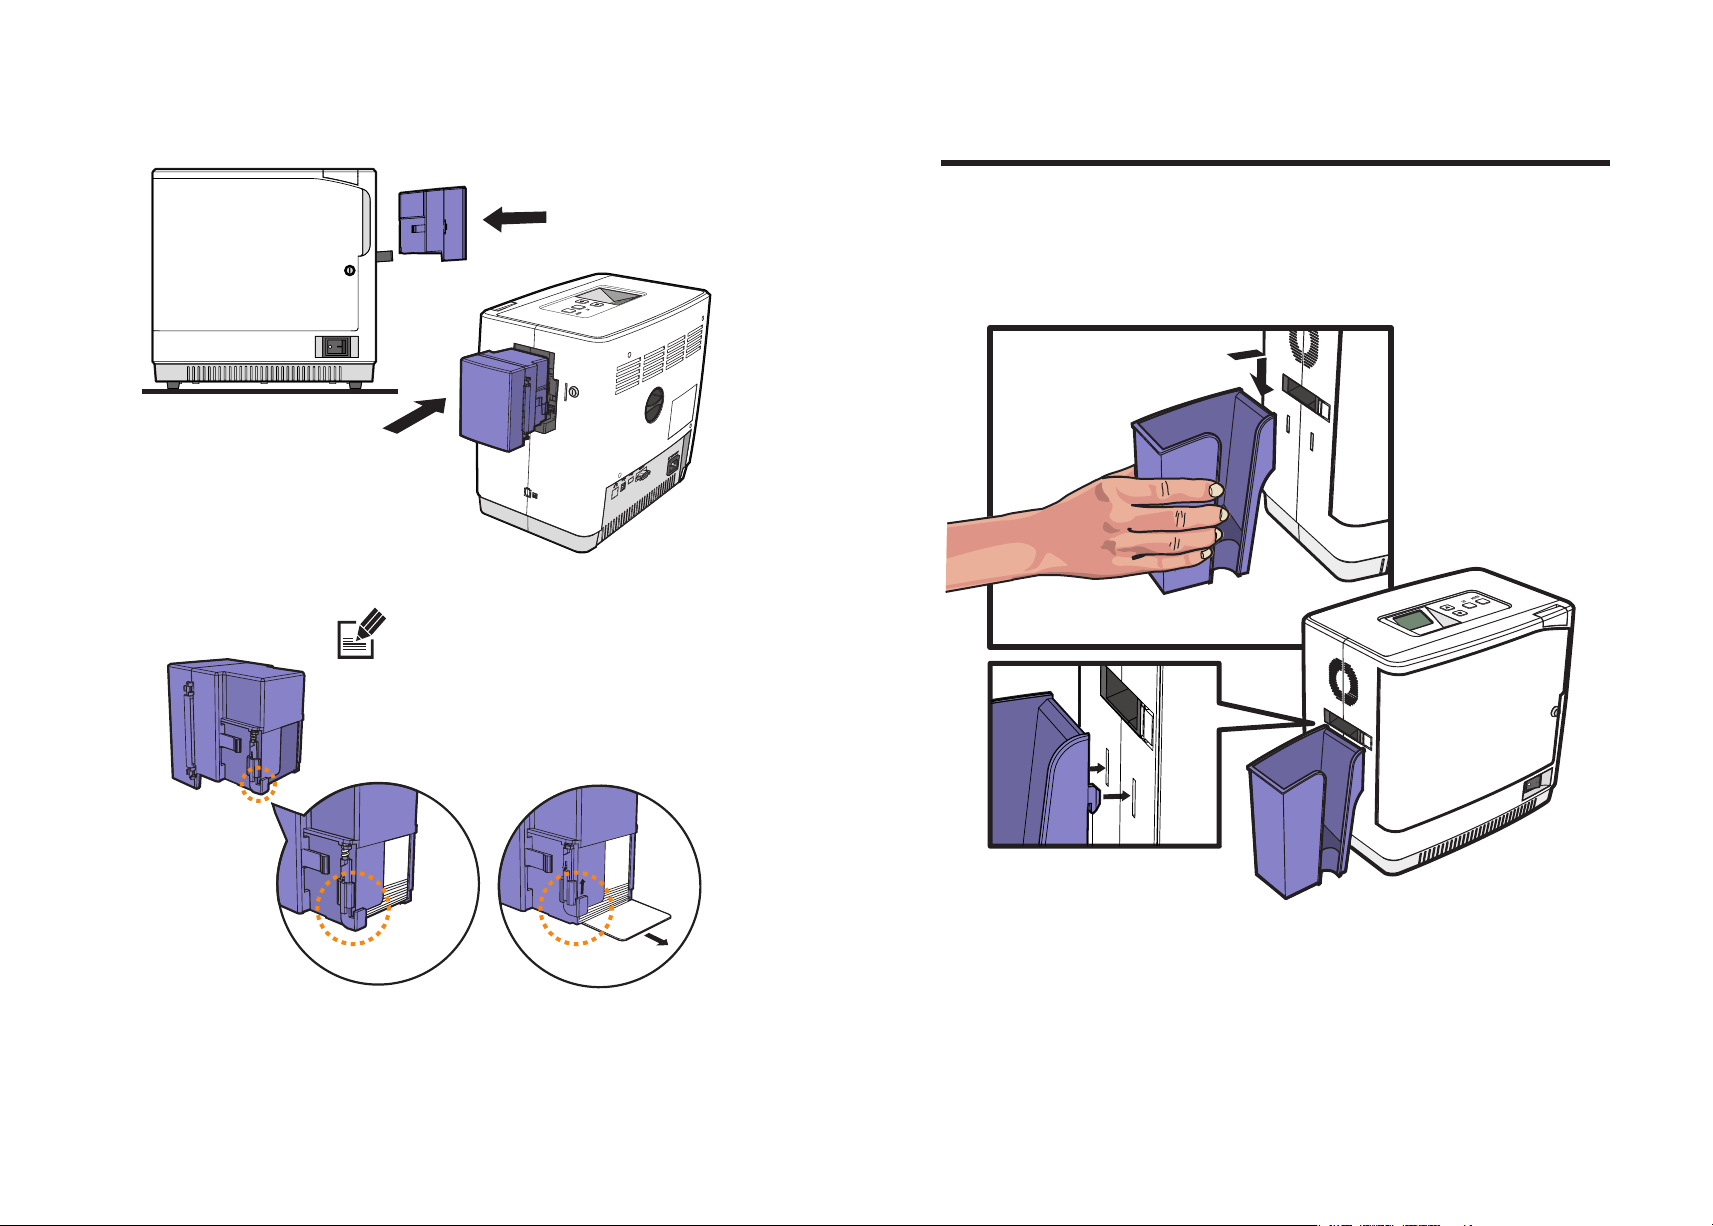
3. Close the cover and place the card input hopper in the tray.
Note
- The hinge is located where the card is loaded into the path to
prevent displacement.
- The hinge is lifted when the card is loaded into the laminator.
Load/Unload Card Stacker to Laminator
- Load Card Stacker to Laminator
Insert the hook on the Card Stacker and push it down in the side
of the laminator. (Max. 150 cards can be loaded at once.)
Before the card is loaded When the card is loading
©2017 T.I.TENG Co., Ltd. All rights reserved POINTMAN LAMINATOR NL200 User Manual
30 31
Page 5
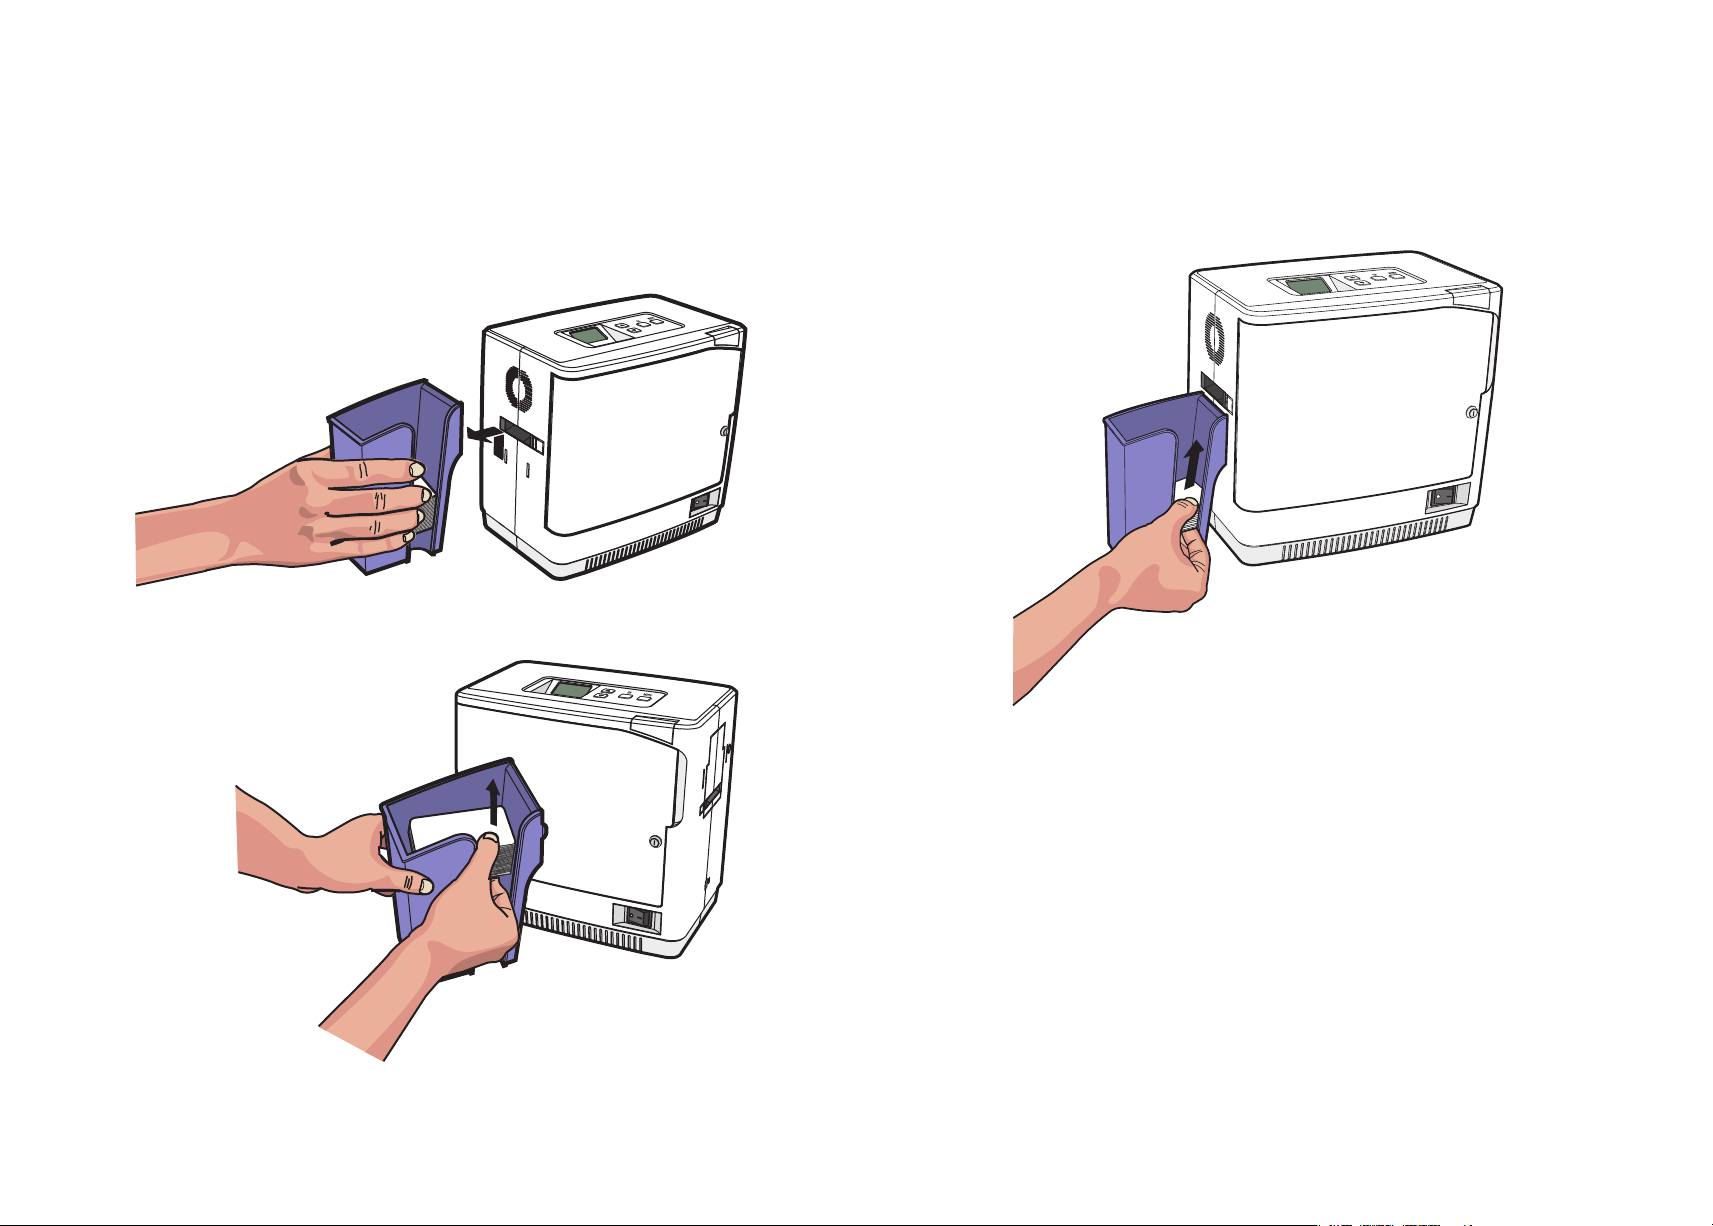
- Remove Cards after Taking Out
- Remove Cards without Taking Out Card Stacker
Card Stacker
Hold the side of Card Stacker and pull it up to remove as shown in
the image.
Use your thumb and index finger to take out 60 or fewer cards
from the Card Stacker without removing it from the laminator.
©2017 T.I.TENG Co., Ltd. All rights reserved POINTMAN LAMINATOR NL200 User Manual
32 33
Page 6
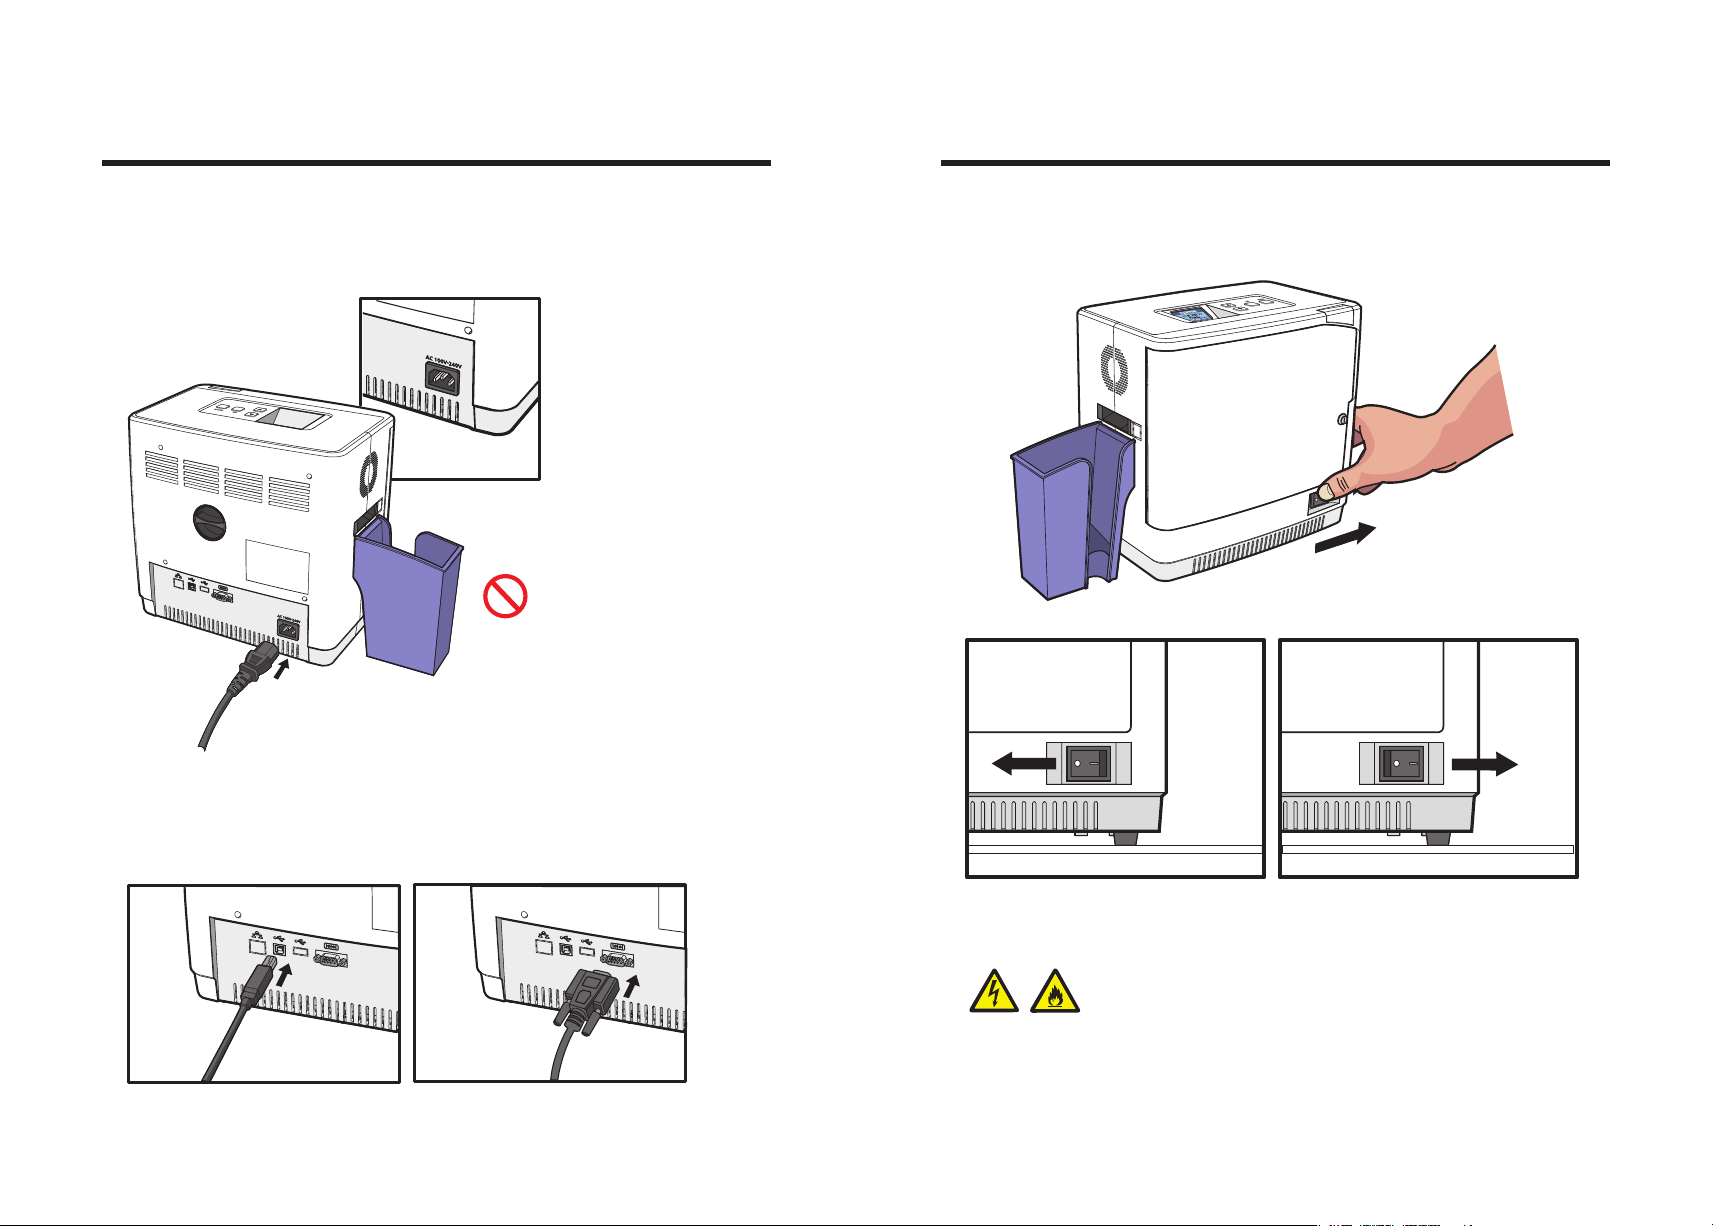
Connect Power & Communication Cables
Power On
- Connect Power Cable
Make sure that the Power Switch is off and connect the AC Power Cable to
the Power Port on the back of the laminator.
Prohibition
- The product must be used with AC power
with rated label.
- Check whether the Power Cable is
plugged in before use.
Press the Power Switch (‘―’) to turn the laminator on.
- Connect Communication Cable
To download the firmware, connect the laminator to a PC using either
RS232C or USB Port.
Power ON -> OFF Power OFF -> ON
Electrical Hazard / Fire Hazard
If the product is exposed to rain or liquid, please turn off and unplug the cable, and contact an authorized
service representative.
RS232C PortUSB Port
©2017 T.I.TENG Co., Ltd. All rights reserved POINTMAN LAMINATOR NL200 User Manual
34 35
Page 7
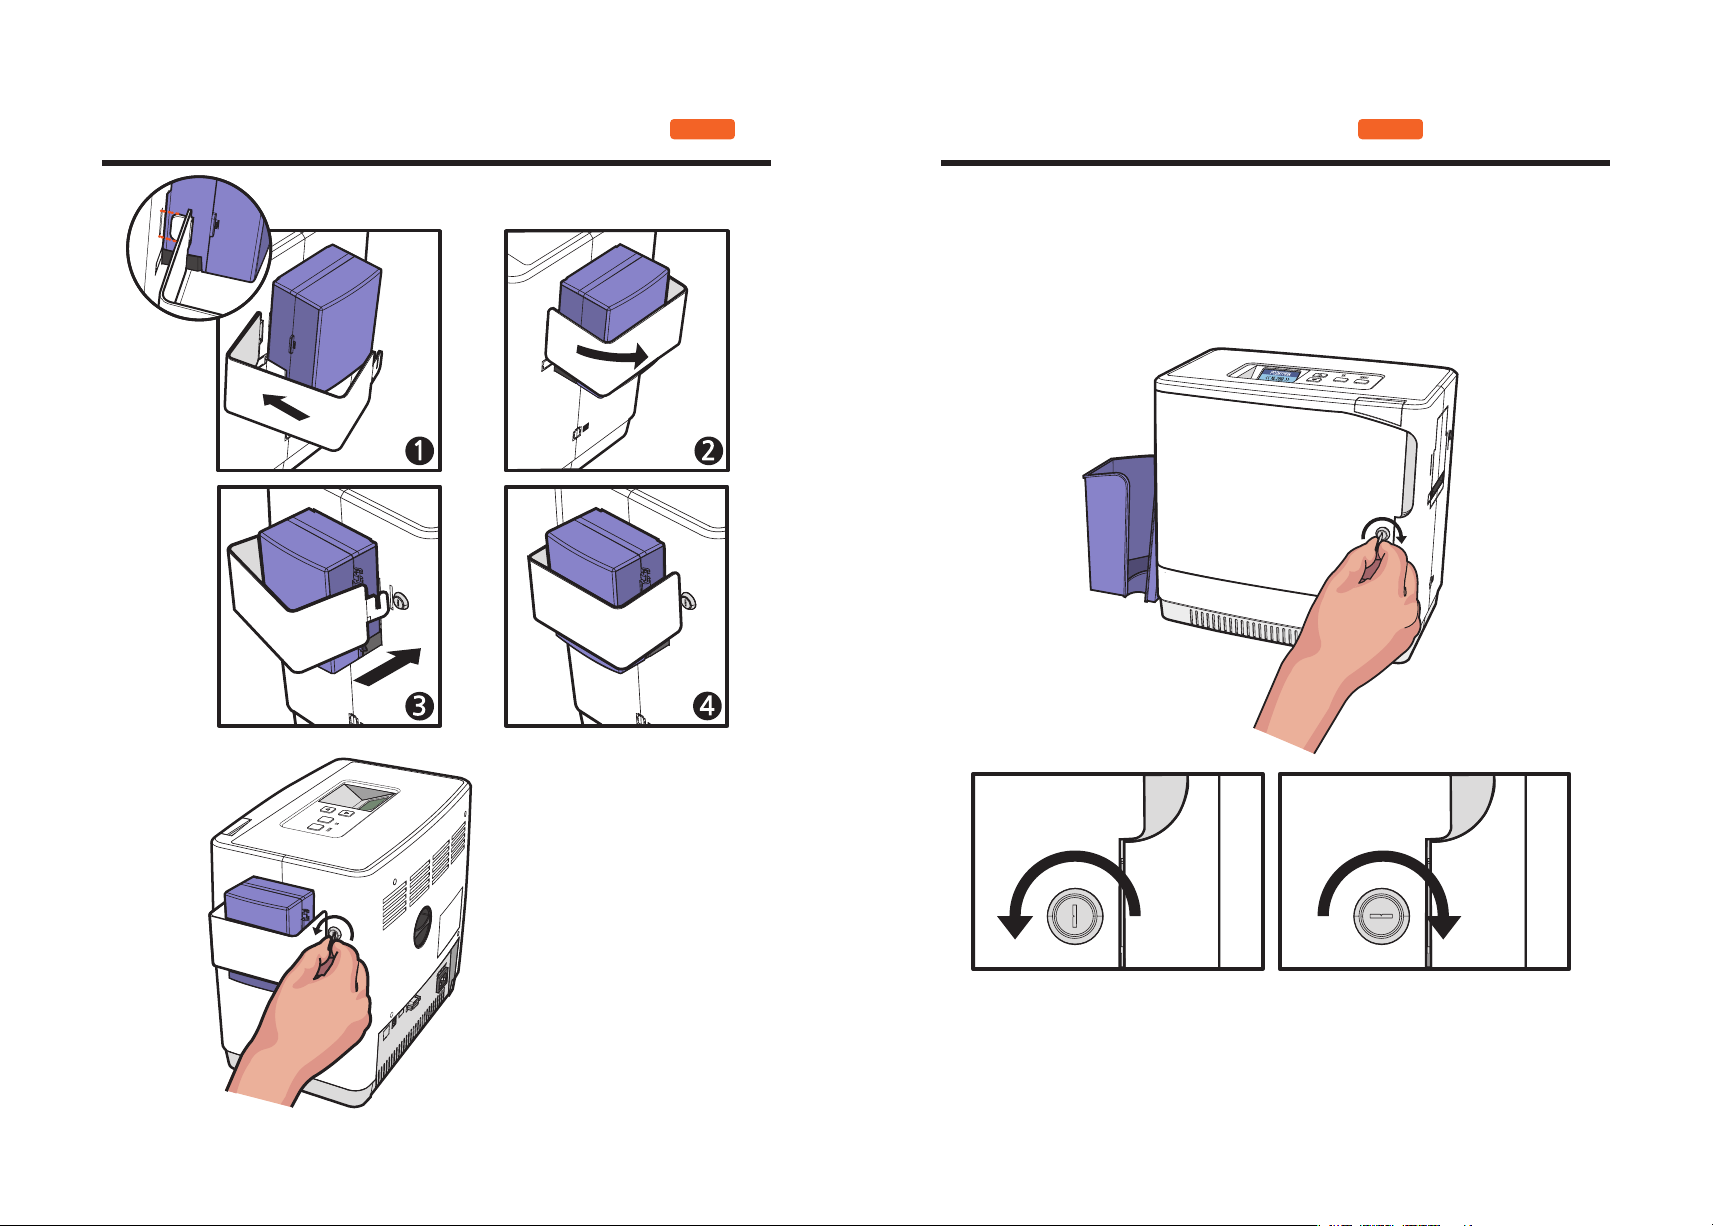
Card Input Hopper Lock
OPTION
Front Cover Lock
Turn the key clockwise to lock the Front Cover.
The key cannot be pulled out if the Front Cover is not closed. Do not force it
out as it can damage the Front Cover.
OPTION
Insert the left side of card input
hopper lock and mount the other
side pulling to the sideway. Then,
use the Lock Key to lock it .
Locked -> Unlocked Unlocked -> Locked
©2017 T.I.TENG Co., Ltd. All rights reserved POINTMAN LAMINATOR NL200 User Manual
36 37
Page 8
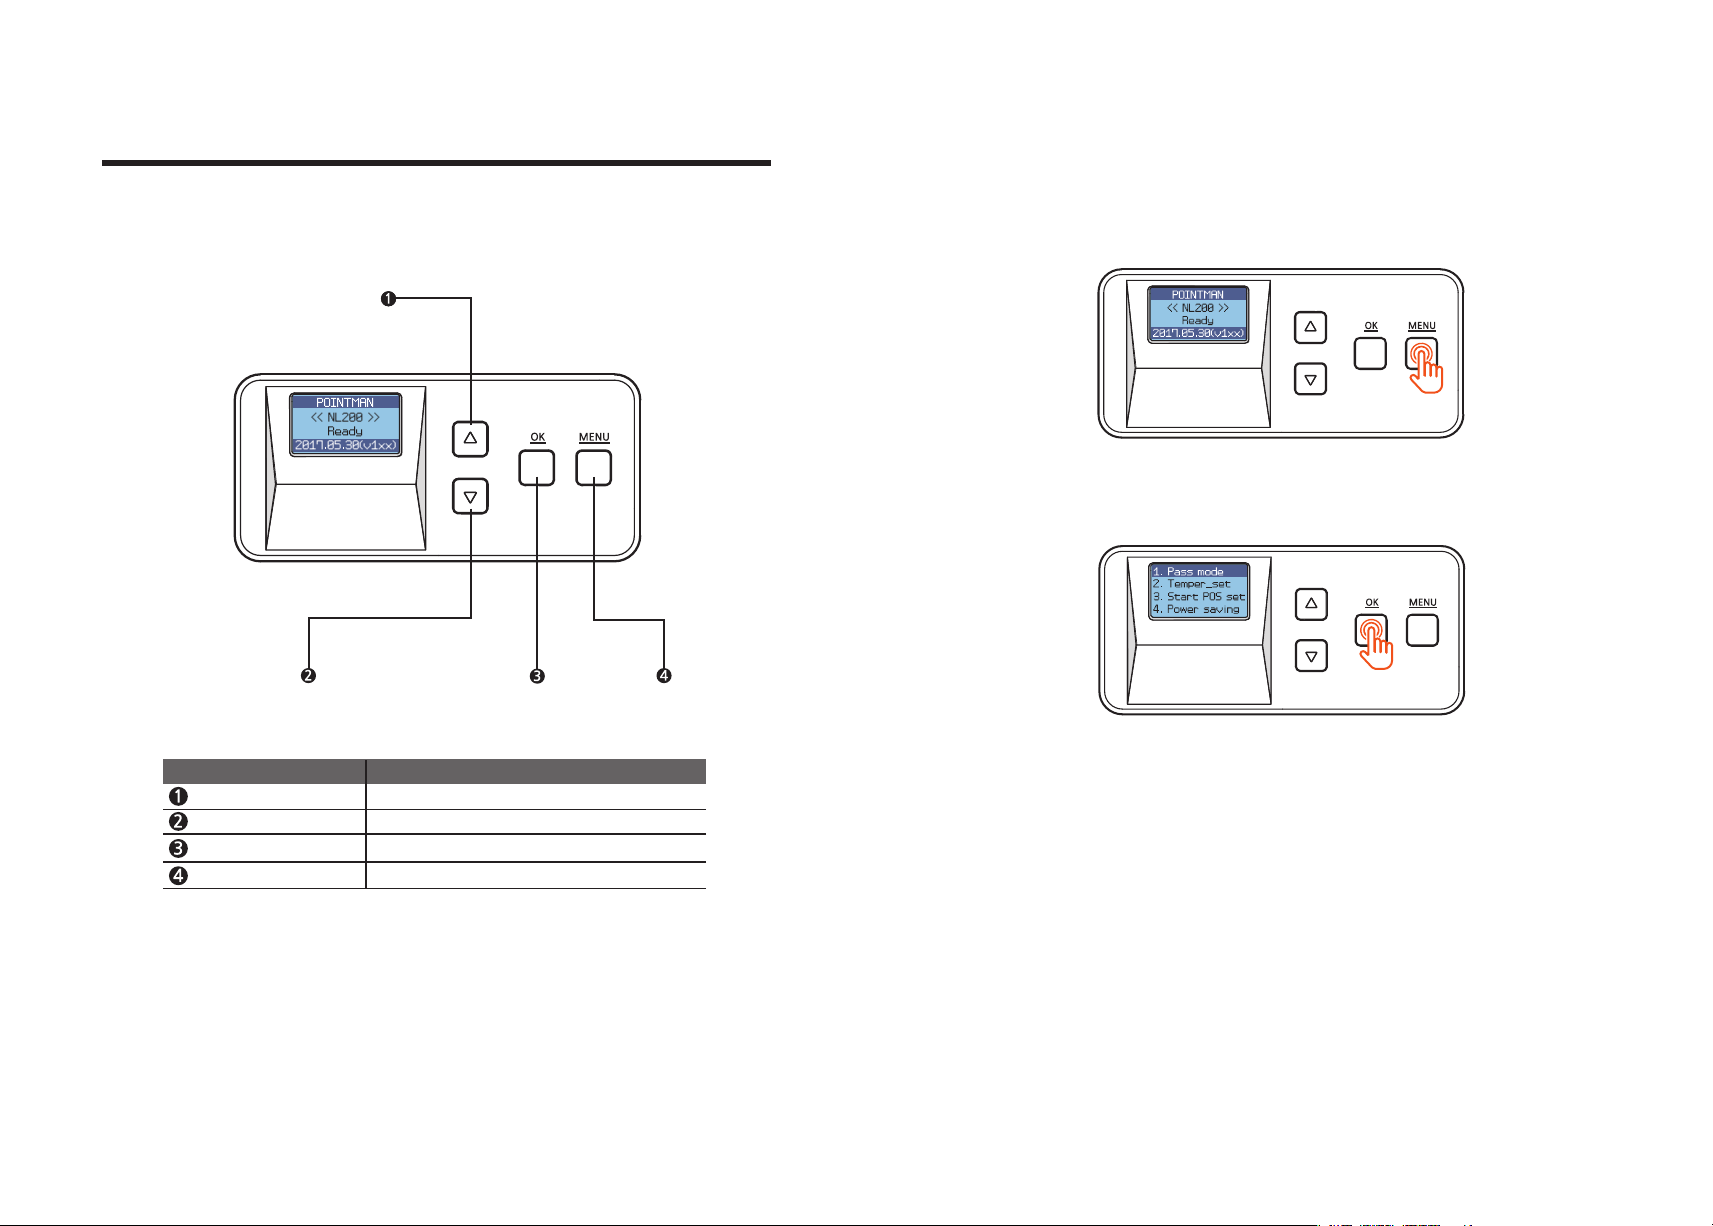
Button Control & Menu
- Pass Mode
Function : Set pass mode
- Buttons
Menu Navigation (Up)
Menu Navigation (Down)
OK
Menu
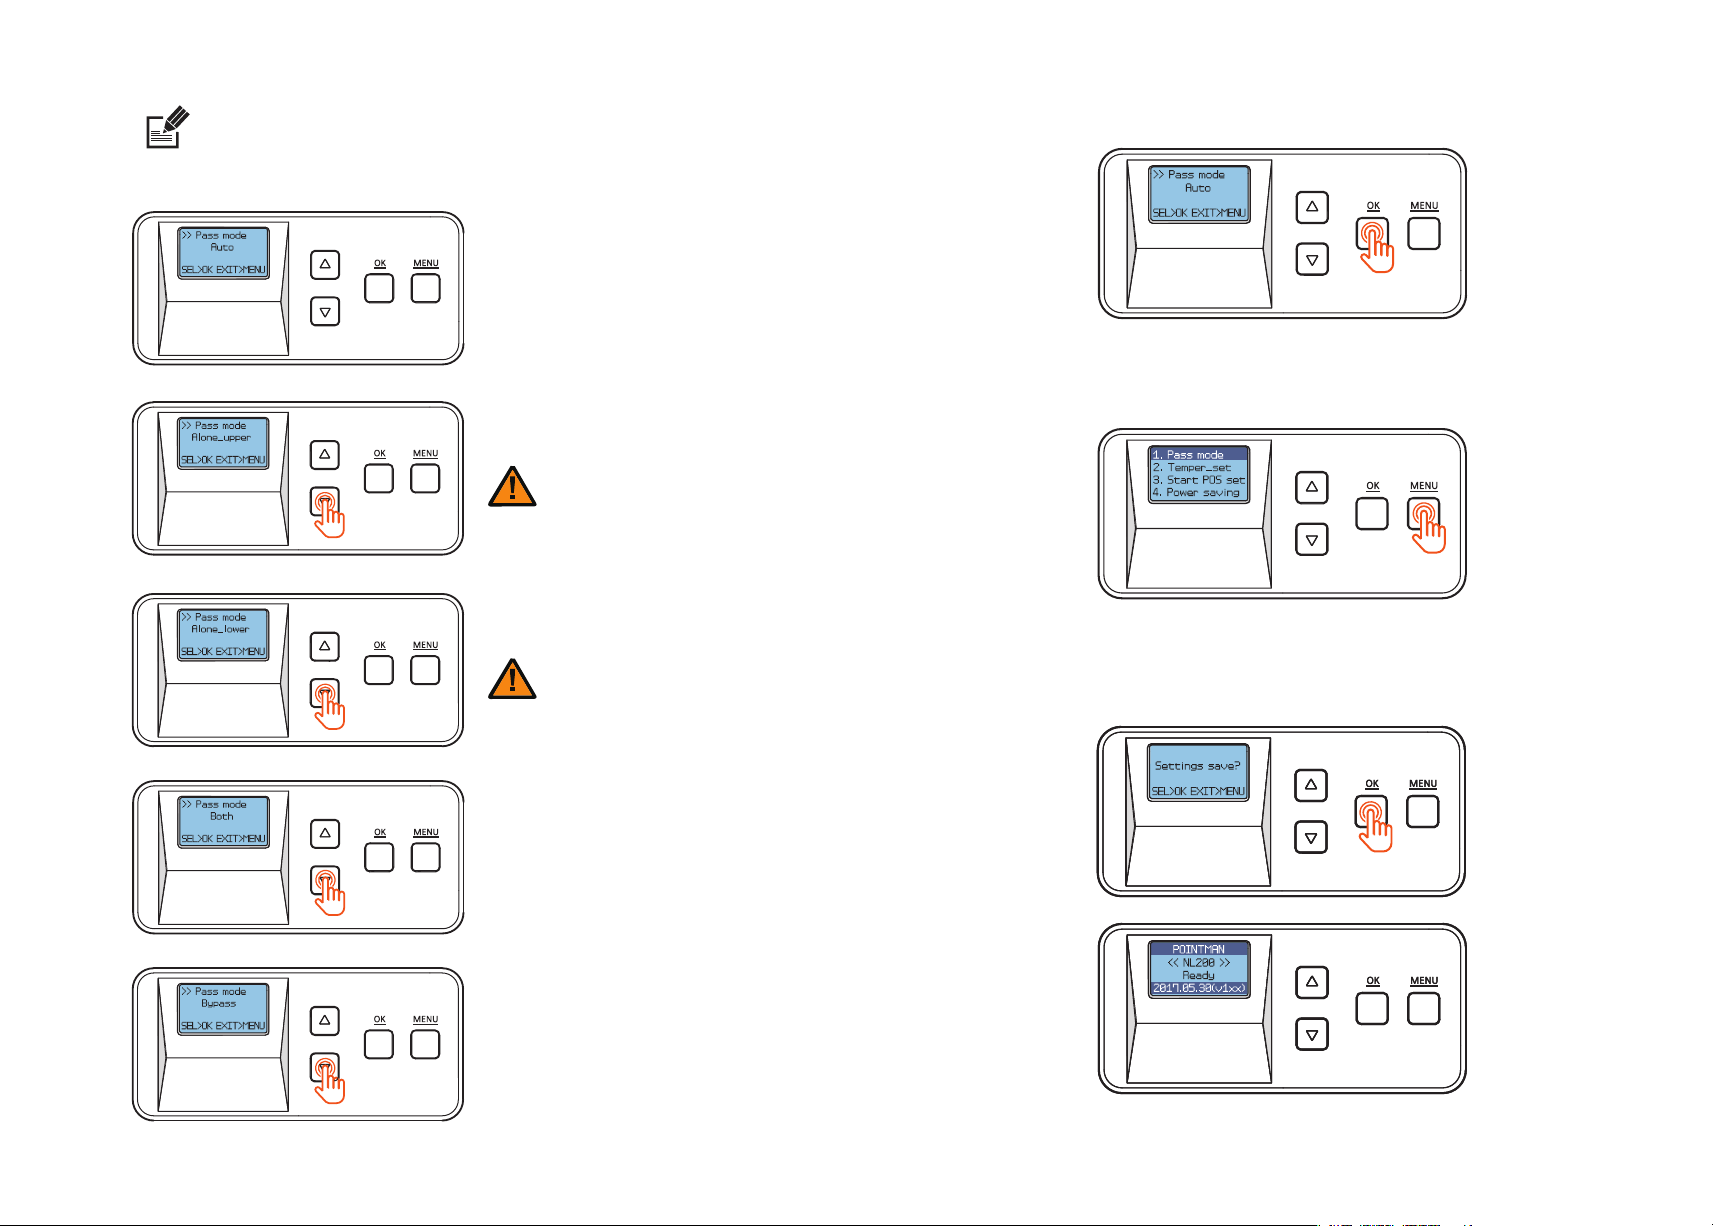
1. Press ‘MENU’ to enter the menu mode.
2. Press ‘OK’ when ‘1. Pass mode’ appears on the LCD display.
Name Description
Increase the value or navigate the menu.
Decrease the value or navigate the menu.
Set the value.
Enter or exit the menu.
©2017 T.I.TENG Co., Ltd. All rights reserved POINTMAN LAMINATOR NL200 User Manual
38 39
Page 9
Note
Auto mode
- In the Pass mode, you can choose ‘Auto’, ‘Alone_uppper’,
‘Alone_lower’, ‘Both’ or ‘Bypass’.
Use the menu navigation buttons to navigate the menu.
Select this option to start
laminating automatically when
the card is inserted.
3. After selecting the pass mode, press ‘OK’ to go back to the previous step.
Alone_uppper
Alone_lower
Both
Bypass
Select this option to laminate
only the upper side.
Caution
- In the Alone Upper Mode, an error occurs
if any film is loaded at the lower cartridge
Select this option to laminate
only the lower side.
Caution
- In the Alone Upper Mode, an error occurs
if any film is loaded at the lower cartridge
Select this option to laminate
both upper and upper sides.
4. Press ‘MENU’ to go into the standby mode.
5. If any changes have been made, you will be prompted to save the changes.
Press ‘OK’ to save the new settings or ‘MENU’ if you do not want to save them.
Select this option to pass
without laminating either
upper or lower side.
©2017 T.I.TENG Co., Ltd. All rights reserved POINTMAN LAMINATOR NL200 User Manual
40 41
Page 10
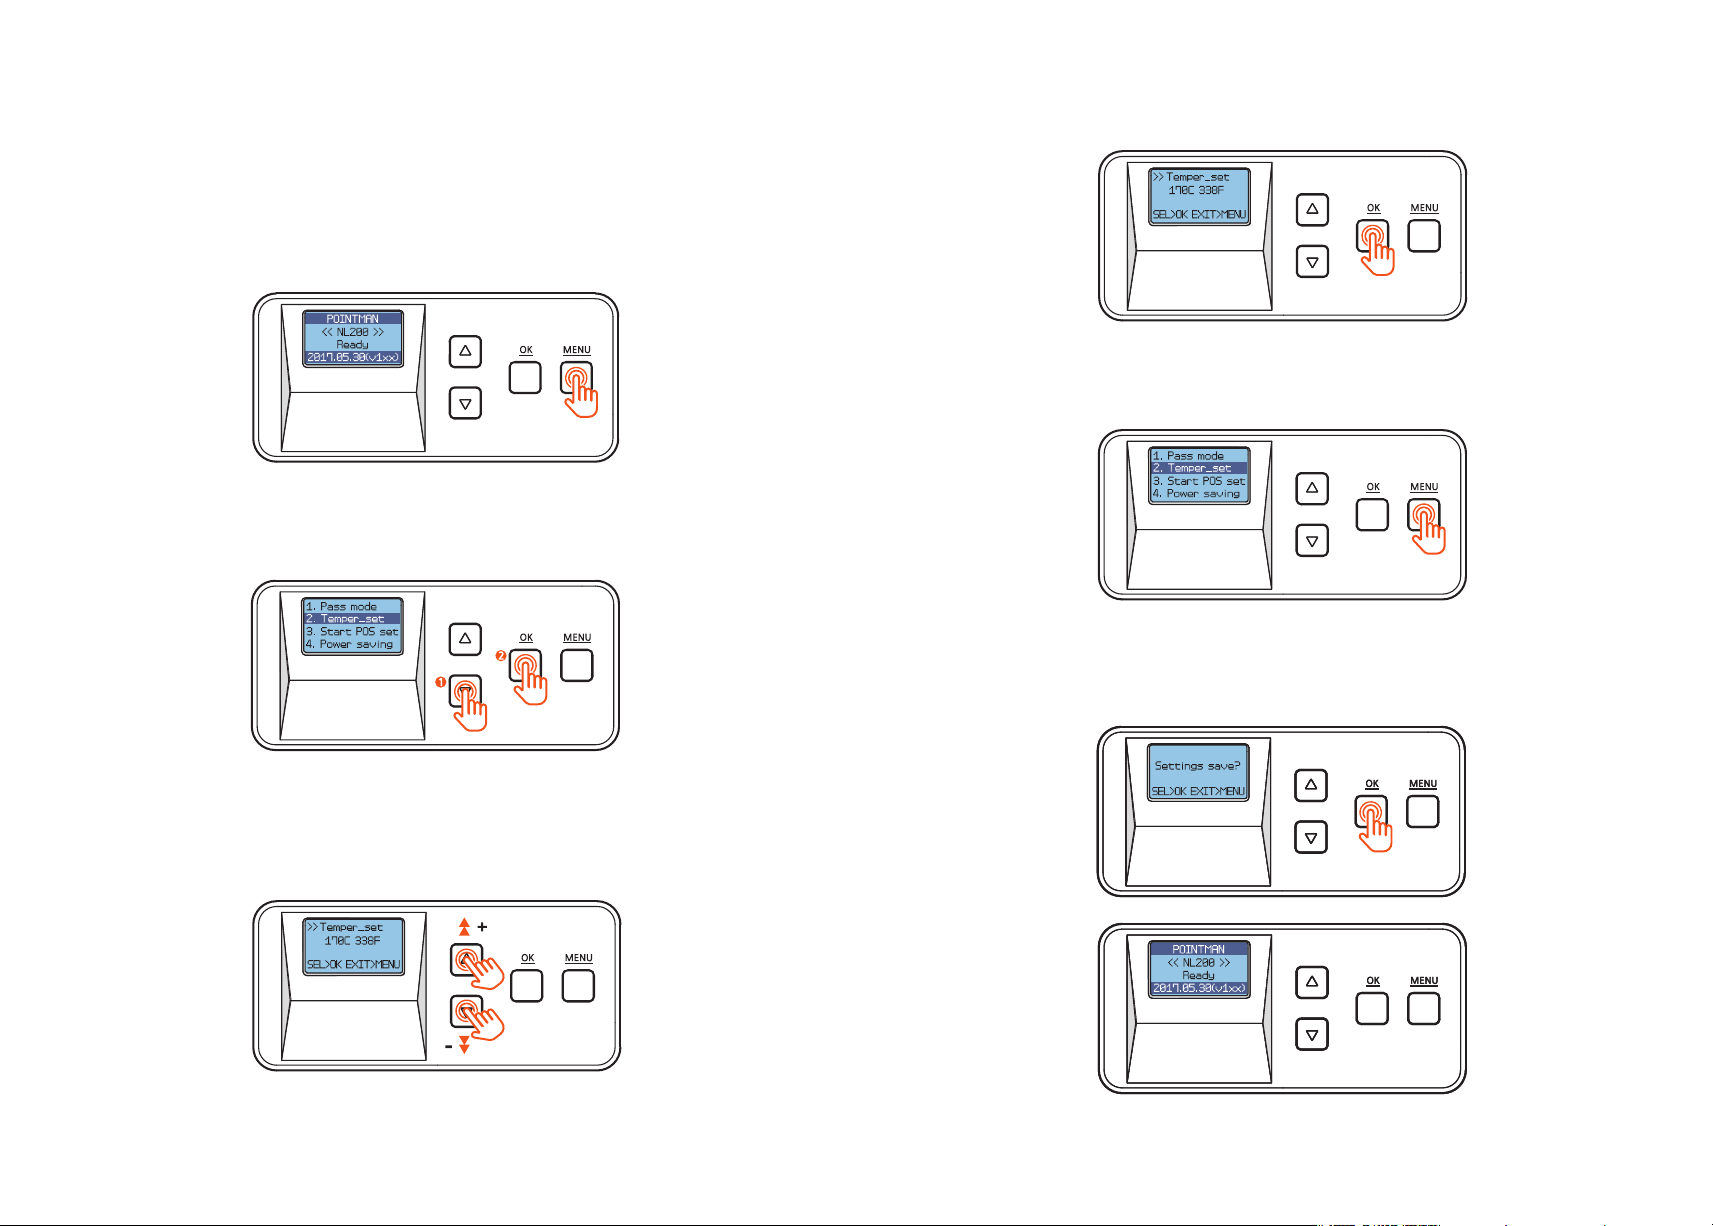
- Lamination Temperature (Temper_set)
Function: Set the temperature of the lamination heater.
You can set the temperature between 120℃ and 190℃(248℉ and 374℉)
+/- increments of 5℃(9℉)
1. Press ‘MENU’ to enter the menu mode.
2. Press the menu navigation button to select ‘2. Temper_set’ and press ‘OK’.
4. Press ‘OK’ to set the temperature and go back to the previous step.
5. Press ‘MENU’ to go into the standby mode.
6. If any changes have been made, you will be prompted to save the changes.
Press ‘OK’ to save the new settings or ‘MENU’ if you do not want to save them.
3. Use the menu navigation button to adjust the temperature for the
lamination heater.
(It can be set between 120℃ and 190℃(248℉ and 374℉) +/- increments of
5℃(9℉).)
©2017 T.I.TENG Co., Ltd. All rights reserved POINTMAN LAMINATOR NL200 User Manual
42 43
Page 11
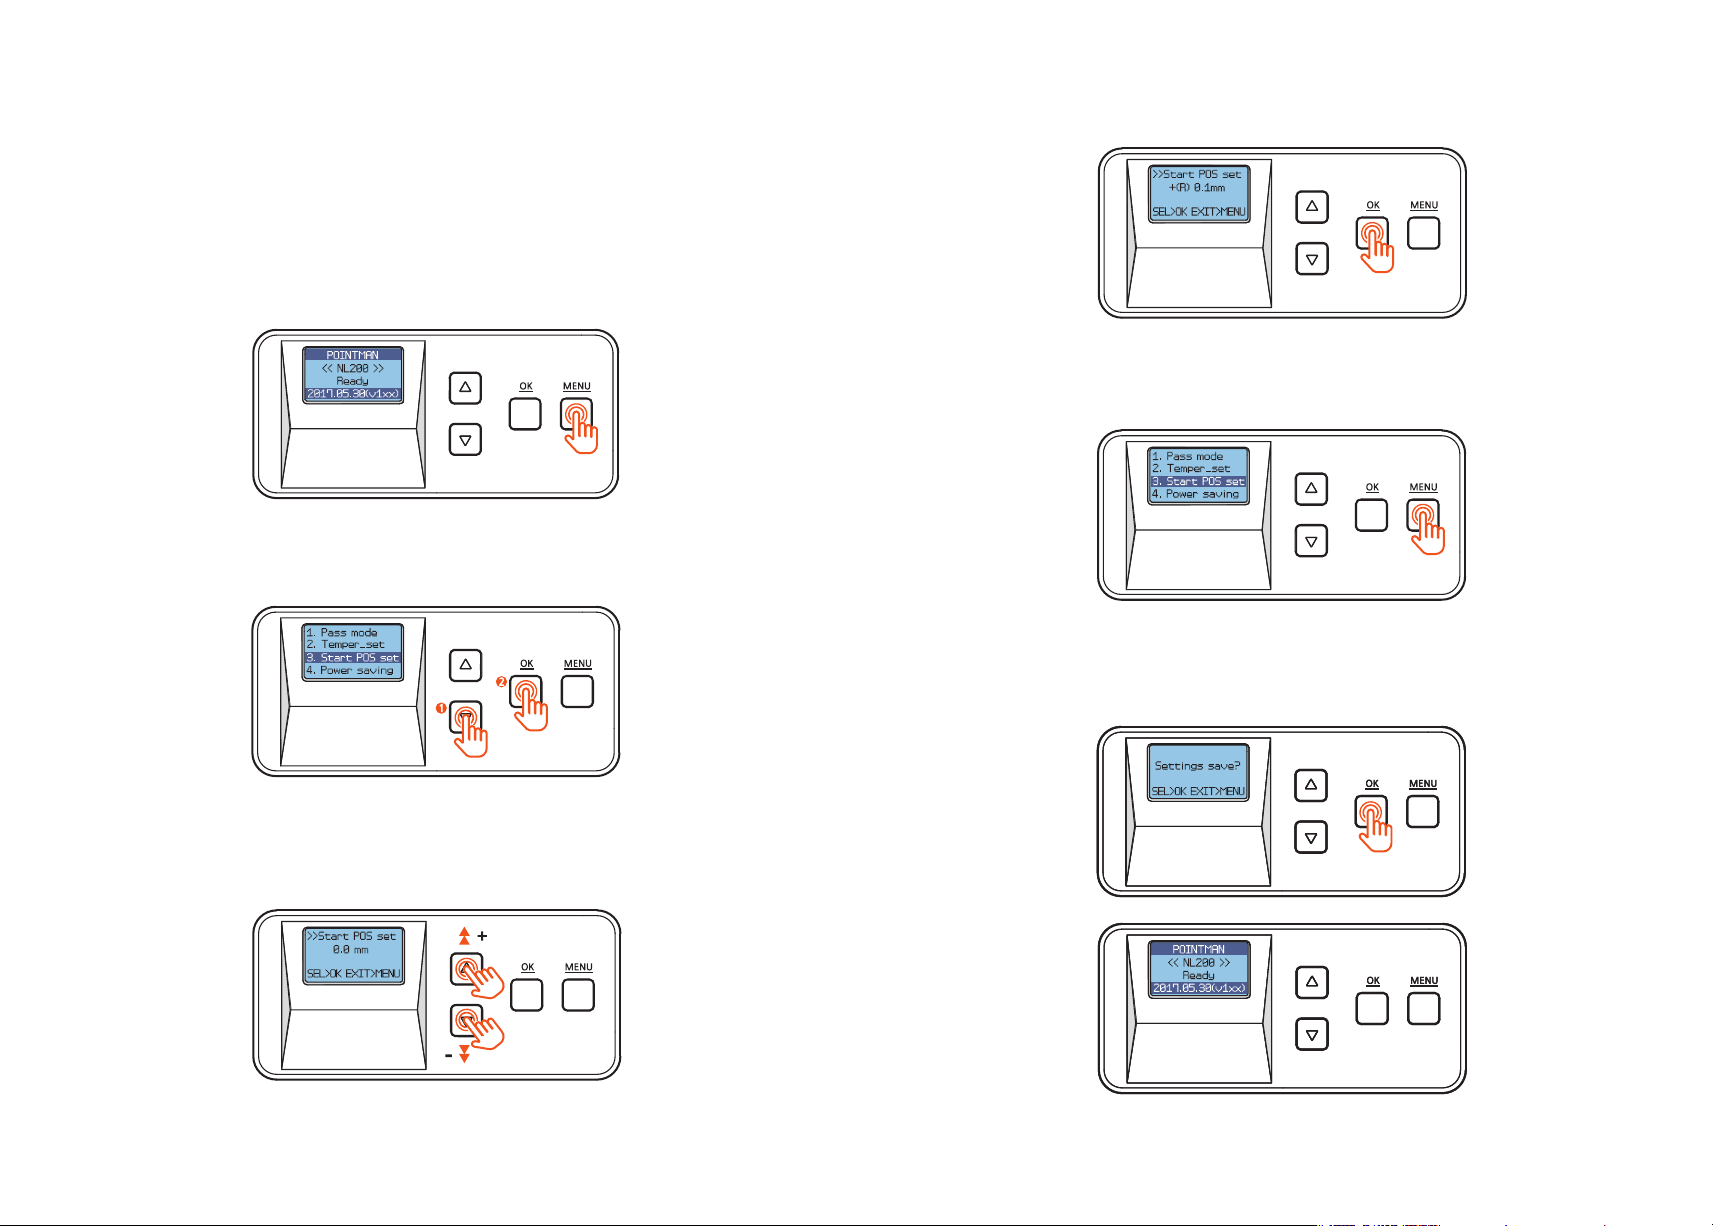
- Film Position (Start POS set)
Function : Set the position of film and card for lamination.
- It can be set between -1.0mm ~+1.5mm +/- increments of 0.1mm.
From the direction of inserting the card, it moves back by ‘– (L)‘ value and for-
ward by ‘+(R)’.
1. Press ‘MENU’ to enter the menu mode.
2. Press the Menu Navigation Button to select ‘3. Start POS set’ and press ‘OK’.
4. Press ‘OK’ to set the position and go back to the previous step.
5. Press ‘MENU’ to go into the standby mode.
6. If any changes have been made, you will be prompted to save the changes.
Press ‘OK’ to save the new settings or ‘MENU’ if you do not want to save them.
3. Use the Menu Navigation Button to adjust the position to laminate.
(It can be set between -1.0mm ~+1.5mm +/- increments of 0.1mm.)
©2017 T.I.TENG Co., Ltd. All rights reserved POINTMAN LAMINATOR NL200 User Manual
44 45
Page 12
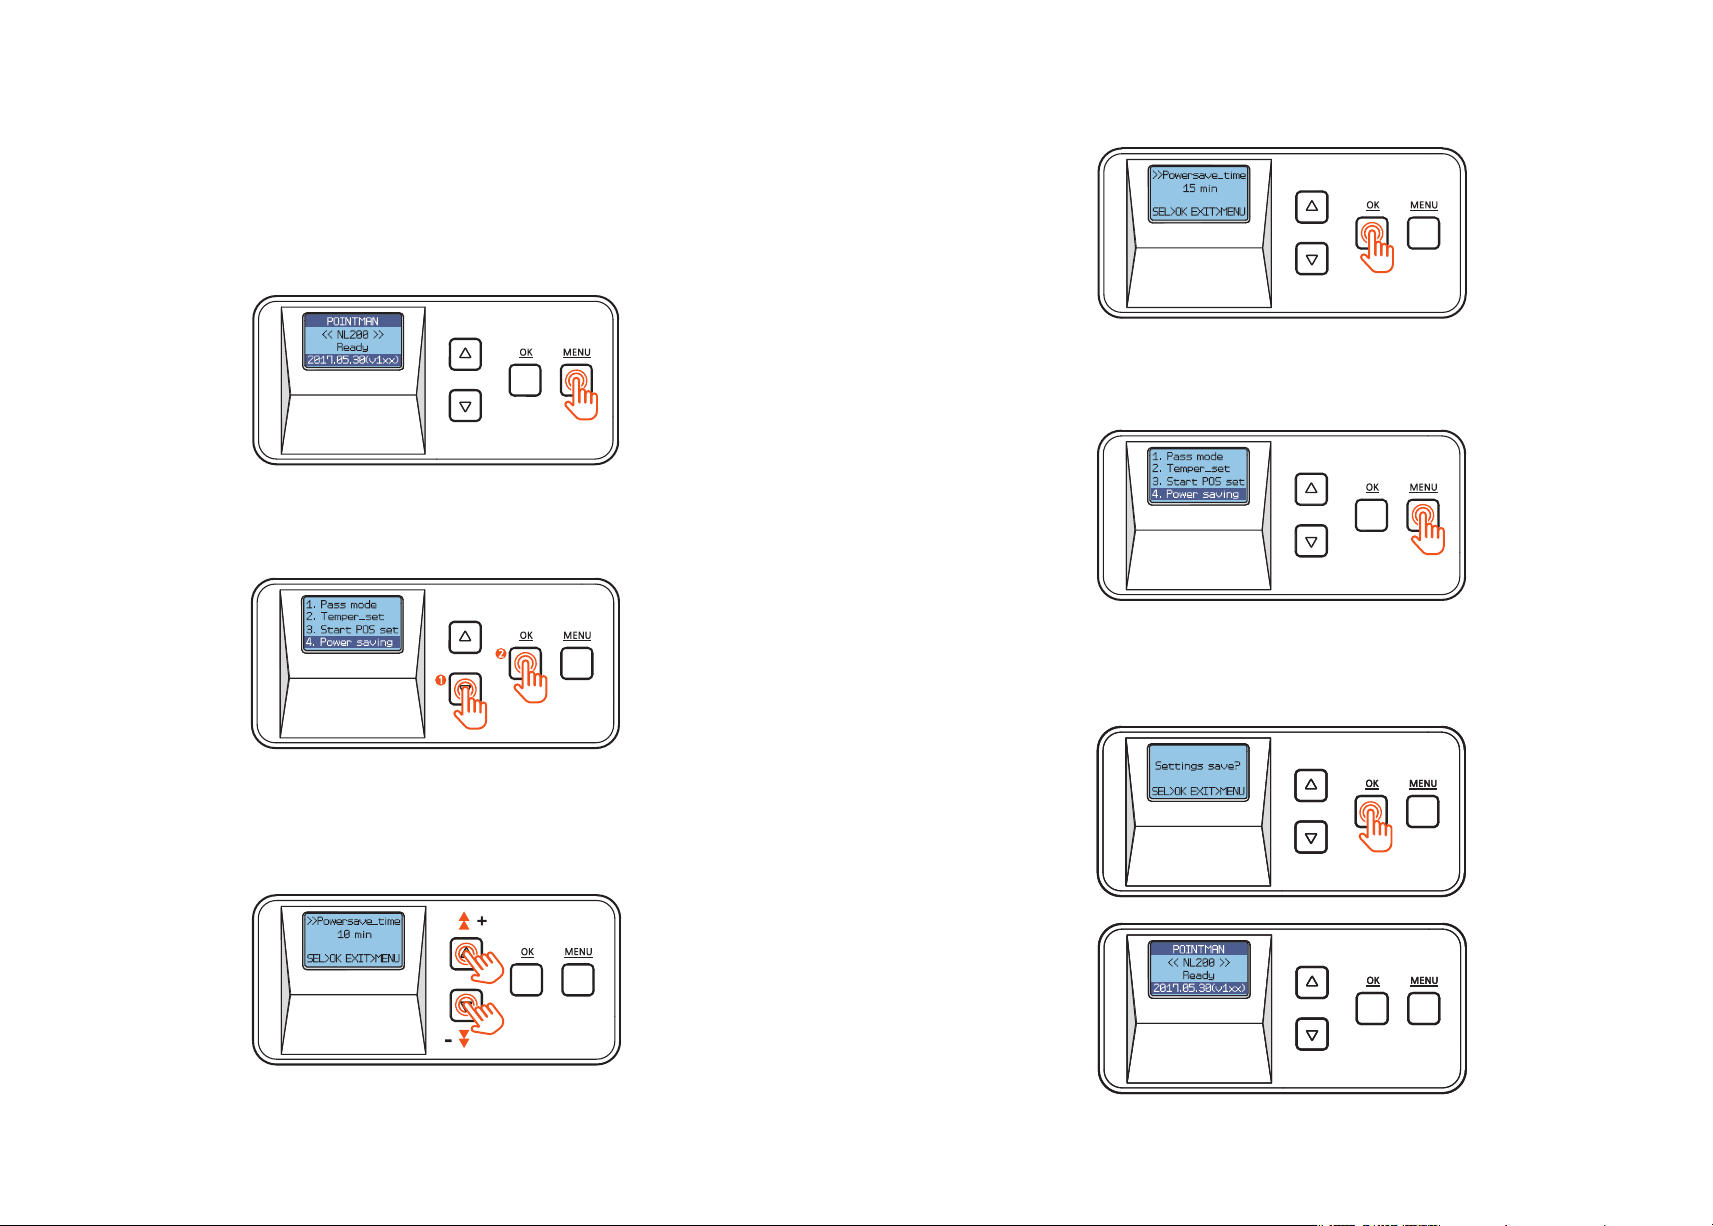
- Power Saving Mode
Function : The system turns off if it is inactive for a set duration of time.
It can be set between 5 and 60 minutes +/- increments of 5 minutes.
1. Press ‘MENU’ to enter the menu mode.
2. Press the Menu Navigation Button to select ‘4. Power saving’ and press ‘OK’.
4. Press ‘OK’ to set the power saving mode and go back to the previous step.
5. Press ‘MENU’ to go into the standby mode.
6. If any changes have been made, you will be prompted to save the changes.
Press ‘OK’ to save the new settings or ‘MENU’ if you do not want to save them.
3. Use the Menu Navigation Button to set the power saving mode.
(It can be set between 5 and 60 minutes +/- increments of 5 minutes.)
©2017 T.I.TENG Co., Ltd. All rights reserved POINTMAN LAMINATOR NL200 User Manual
46 47
Page 13
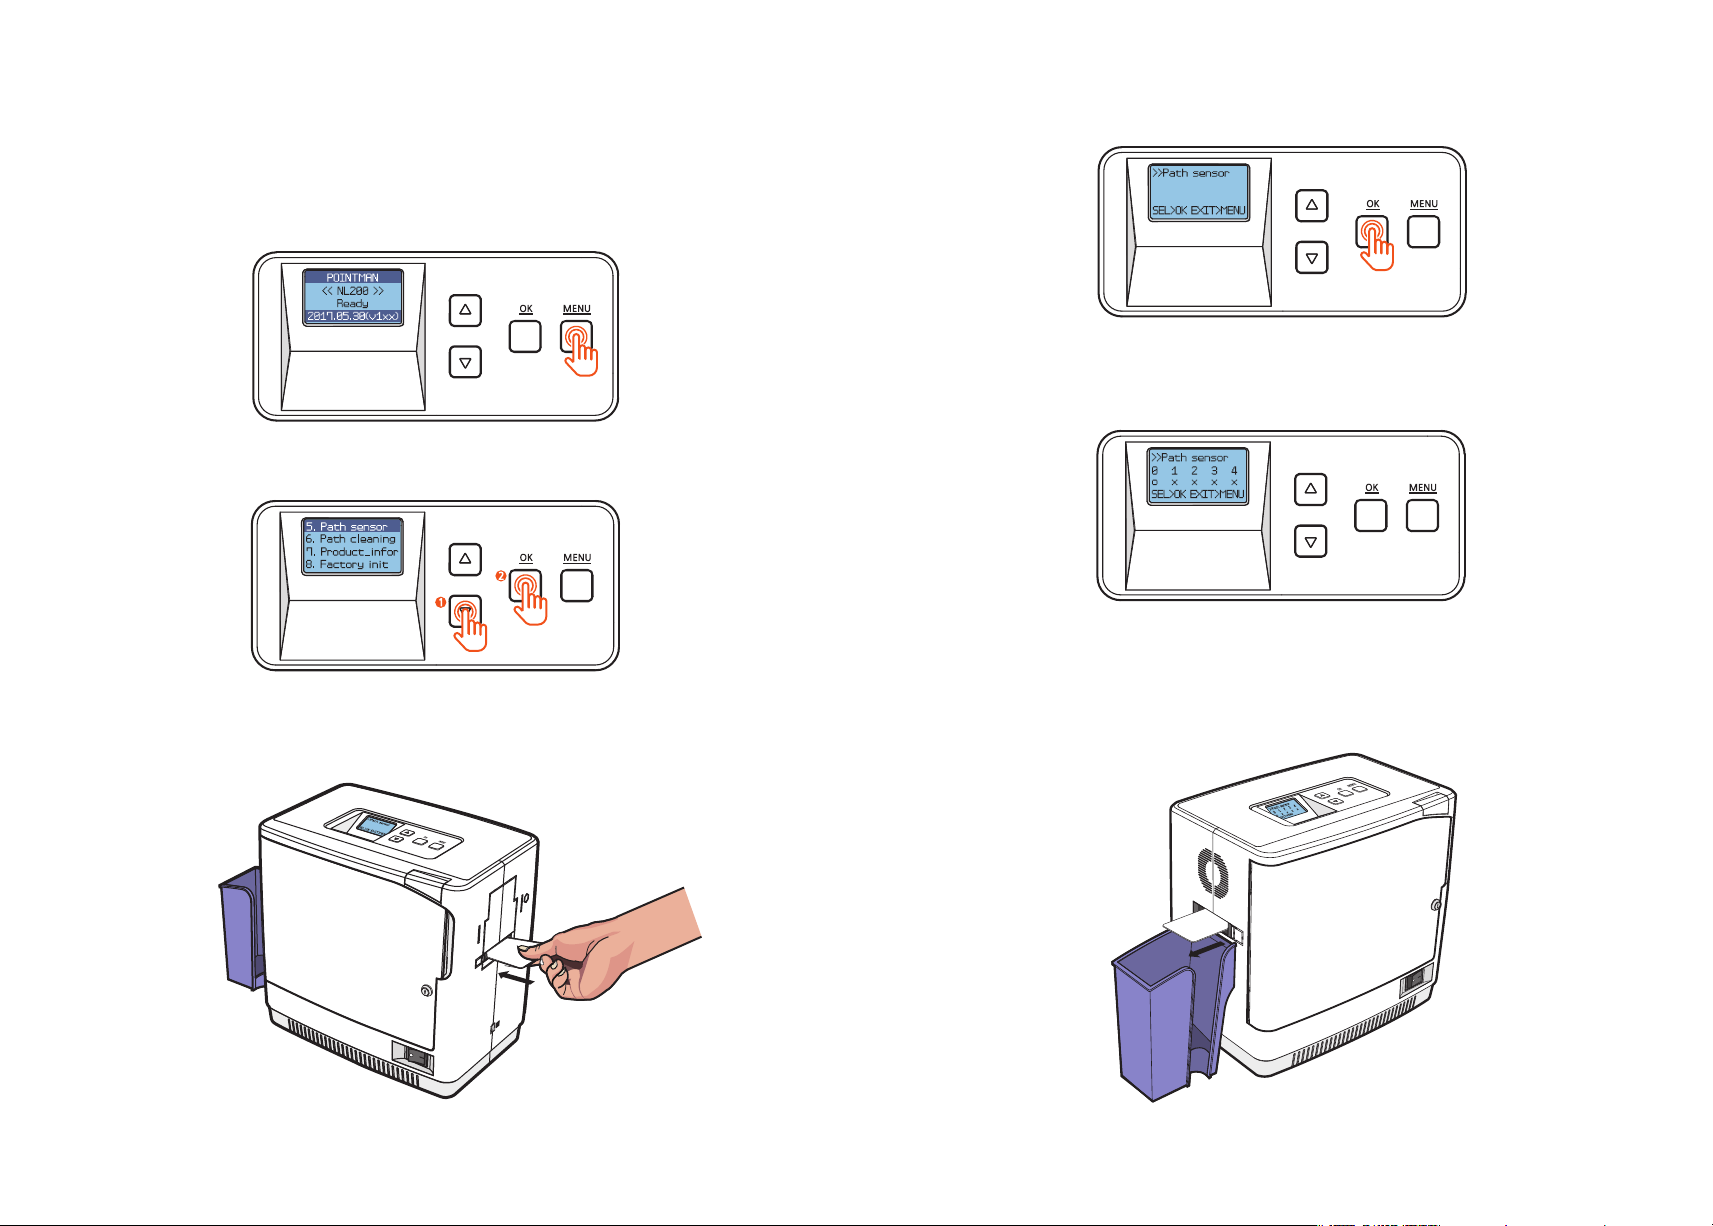
- Path Sensor
Function : Check whether the path sensor works correctly.
1. Press ‘MENU’ to enter the menu mode.
2. Press the Menu Navigation Button to select ‘5. Path sensor’ and press ‘OK’.
4. Press ‘OK’ while holding the card and it goes in.
5. The card will move back and forth 5-6 times. Each time the card passes
the sensor, the indicator changes from X to O.
6. The laminator releases the card upon completion.
3. Insert a card that is not printed into the Card Slot.
(Make sure to hold the card until the operation starts.)
©2017 T.I.TENG Co., Ltd. All rights reserved POINTMAN LAMINATOR NL200 User Manual
48 49
Page 14
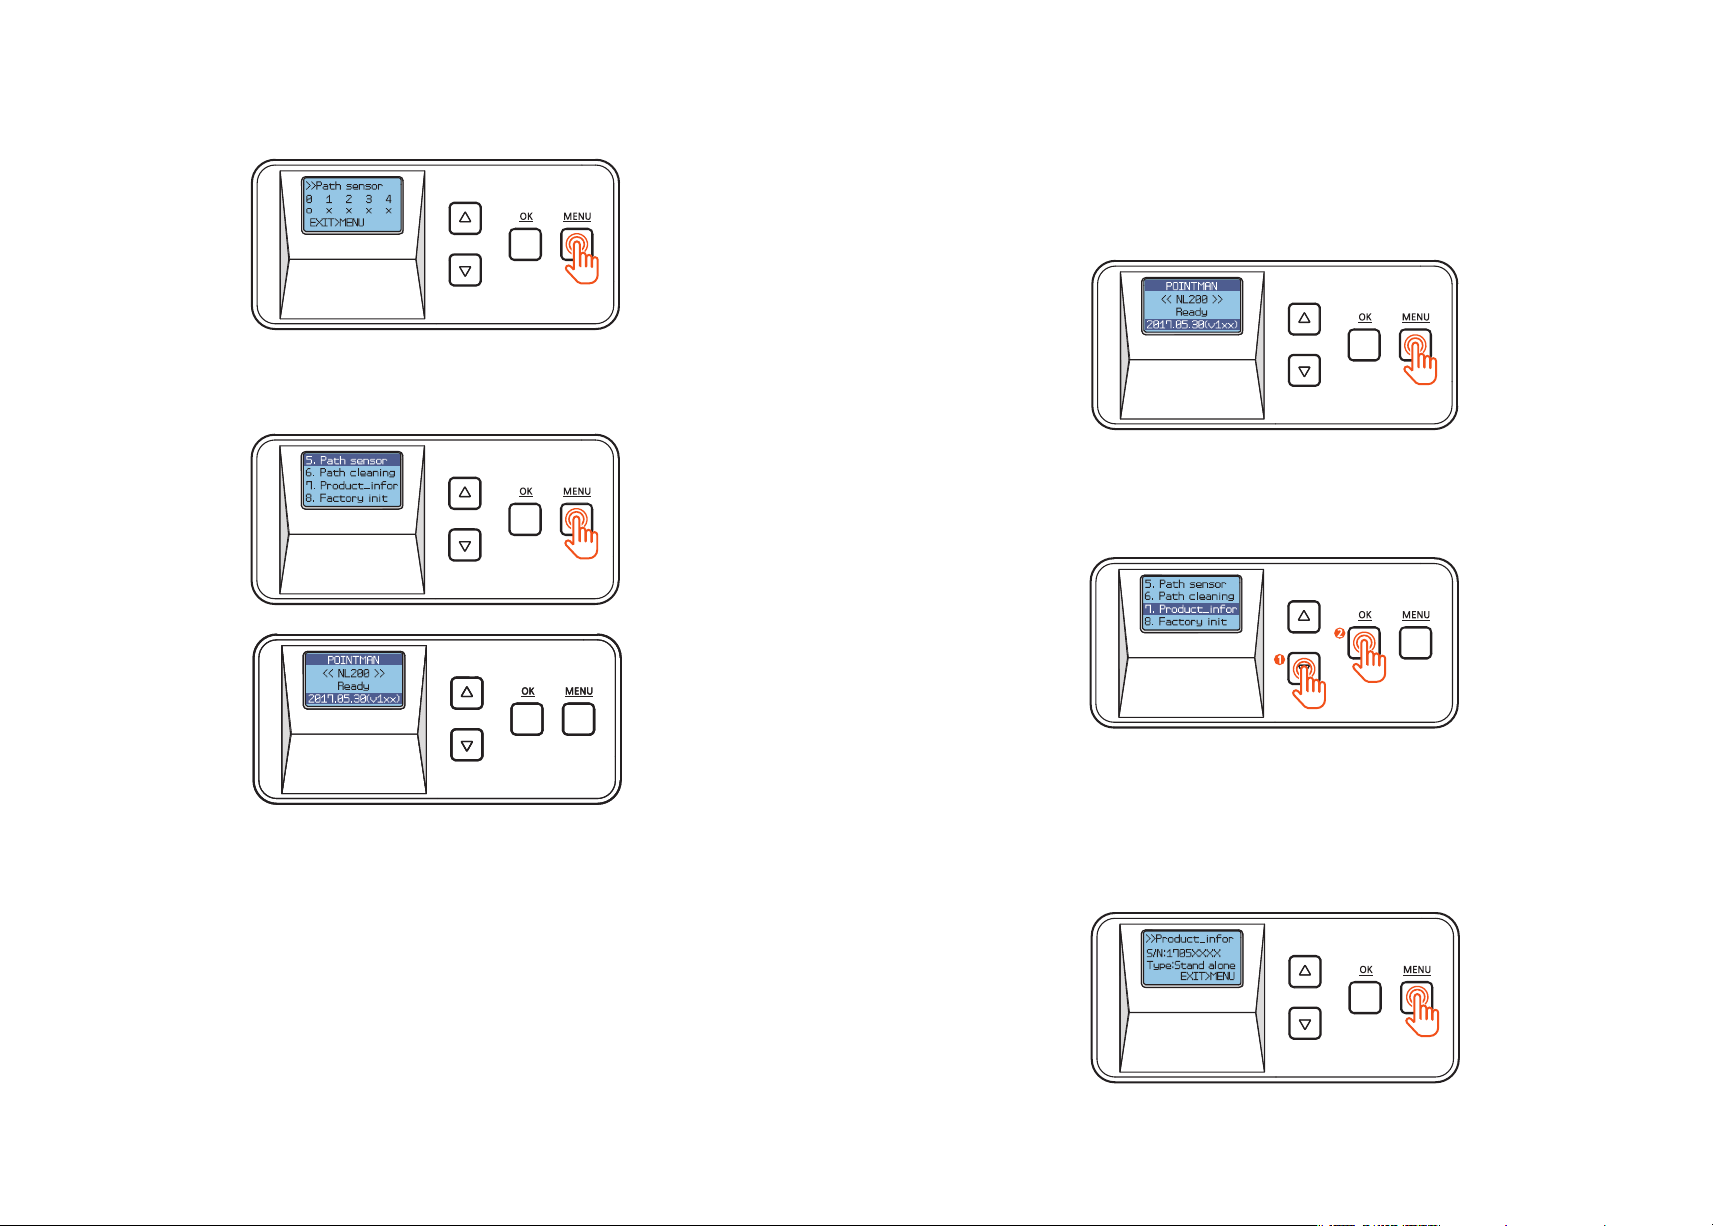
7. Press 'OK' to go back to the previous step.
8. Press ‘MENU’ to go into the standby mode.
- Serial No. (Product_infor)
Function : check the serial number of the product.
1. Press ‘MENU’ to enter the menu mode.
2. Press the menu navigation button to select ‘7. Product_infor’ and press ‘OK’.
3. Check the serial number.
The first 4 digits indicate the year and month of manufacture and the last
4 digits mean production lot number.
©2017 T.I.TENG Co., Ltd. All rights reserved POINTMAN LAMINATOR NL200 User Manual
50 51
Page 15
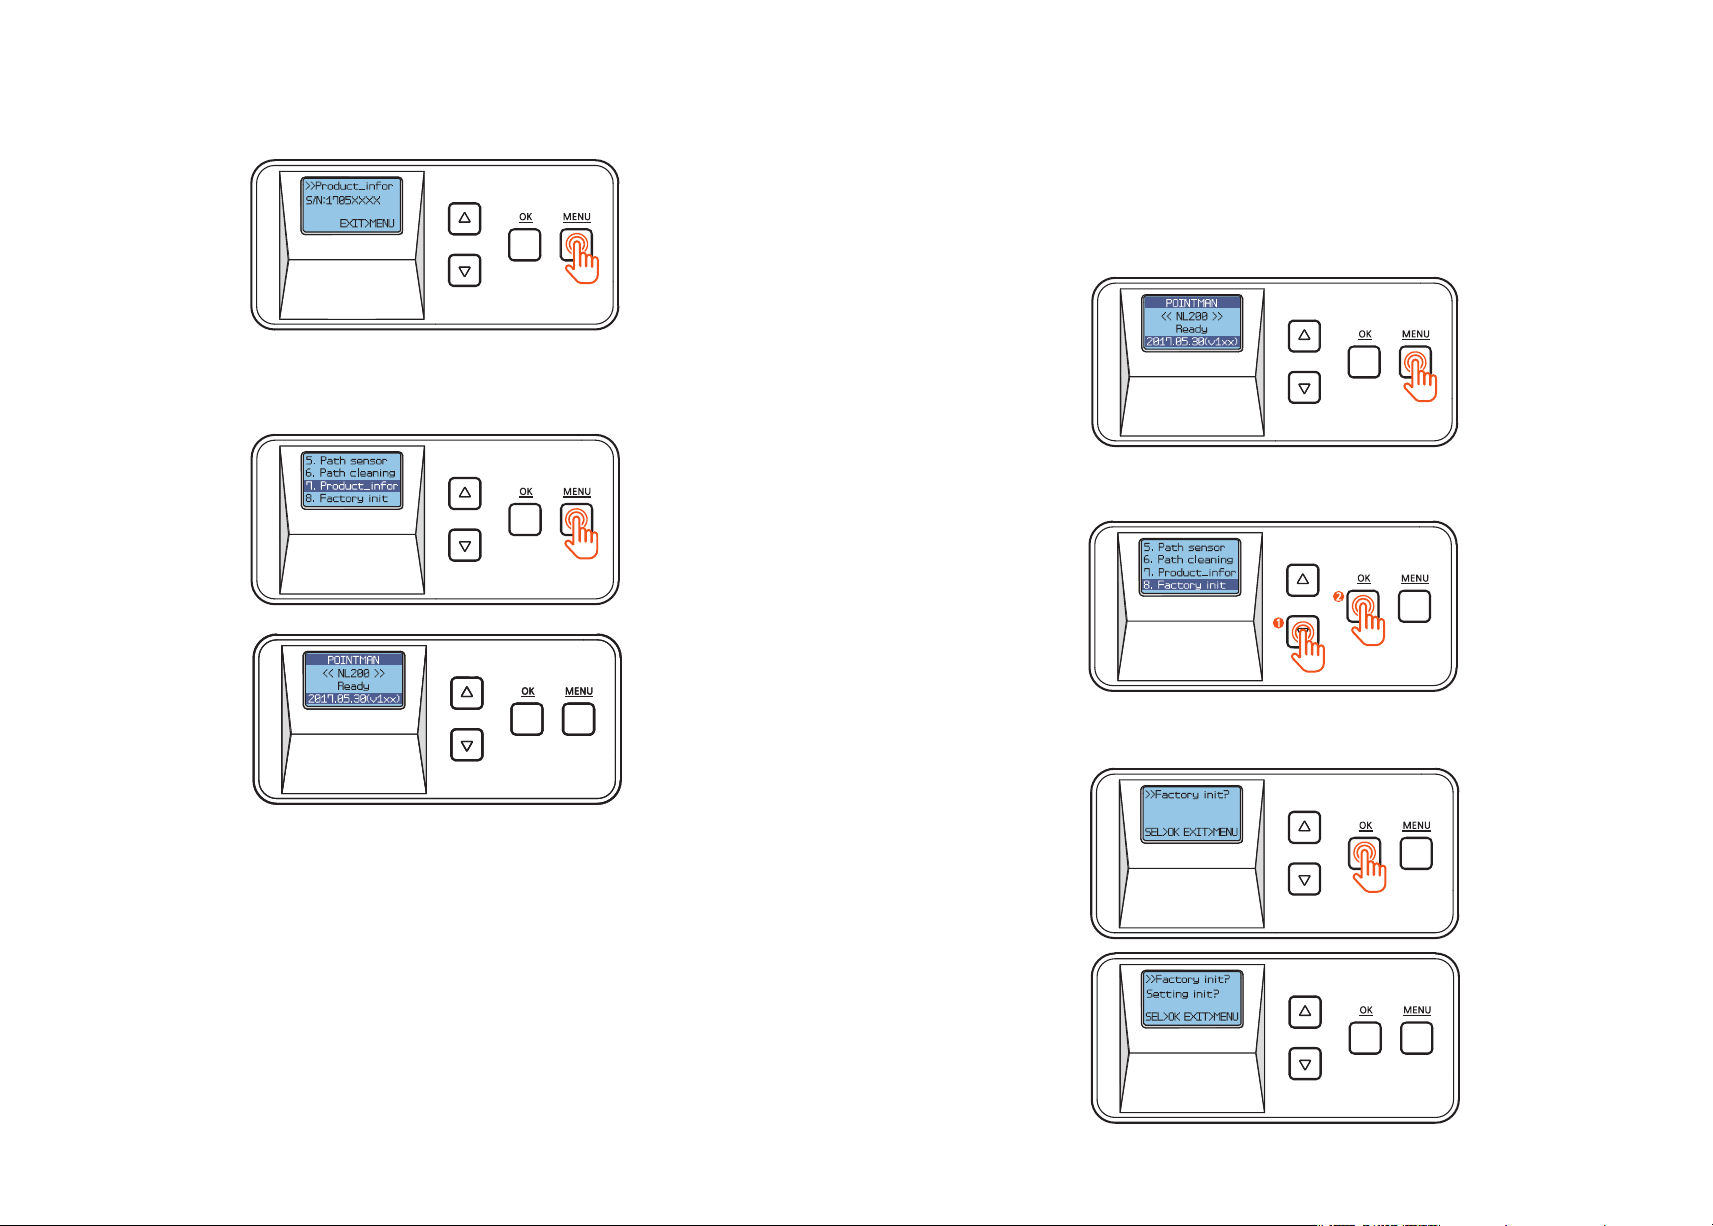
6. Press 'MENU' to go back to the previous step.
7. Press ‘MENU’ to go into the standby mode.
- Factory Reset (Factory init)
Function : Reset the system to factory default settings.
Default Settings: Pass mode : Auto, Temper_set: 150℃(302℉),
Start_POS set : 0mm, Power_saving: 5min
1. Press ‘MENU’ to enter the menu mode.
2. Press the Menu Navigation Button to select ‘8. Factory init’ and press ‘OK’.
3. Press ‘OK’ and ‘Setting init?’ appears on the screen.
©2017 T.I.TENG Co., Ltd. All rights reserved POINTMAN LAMINATOR NL200 User Manual
52 53
Page 16
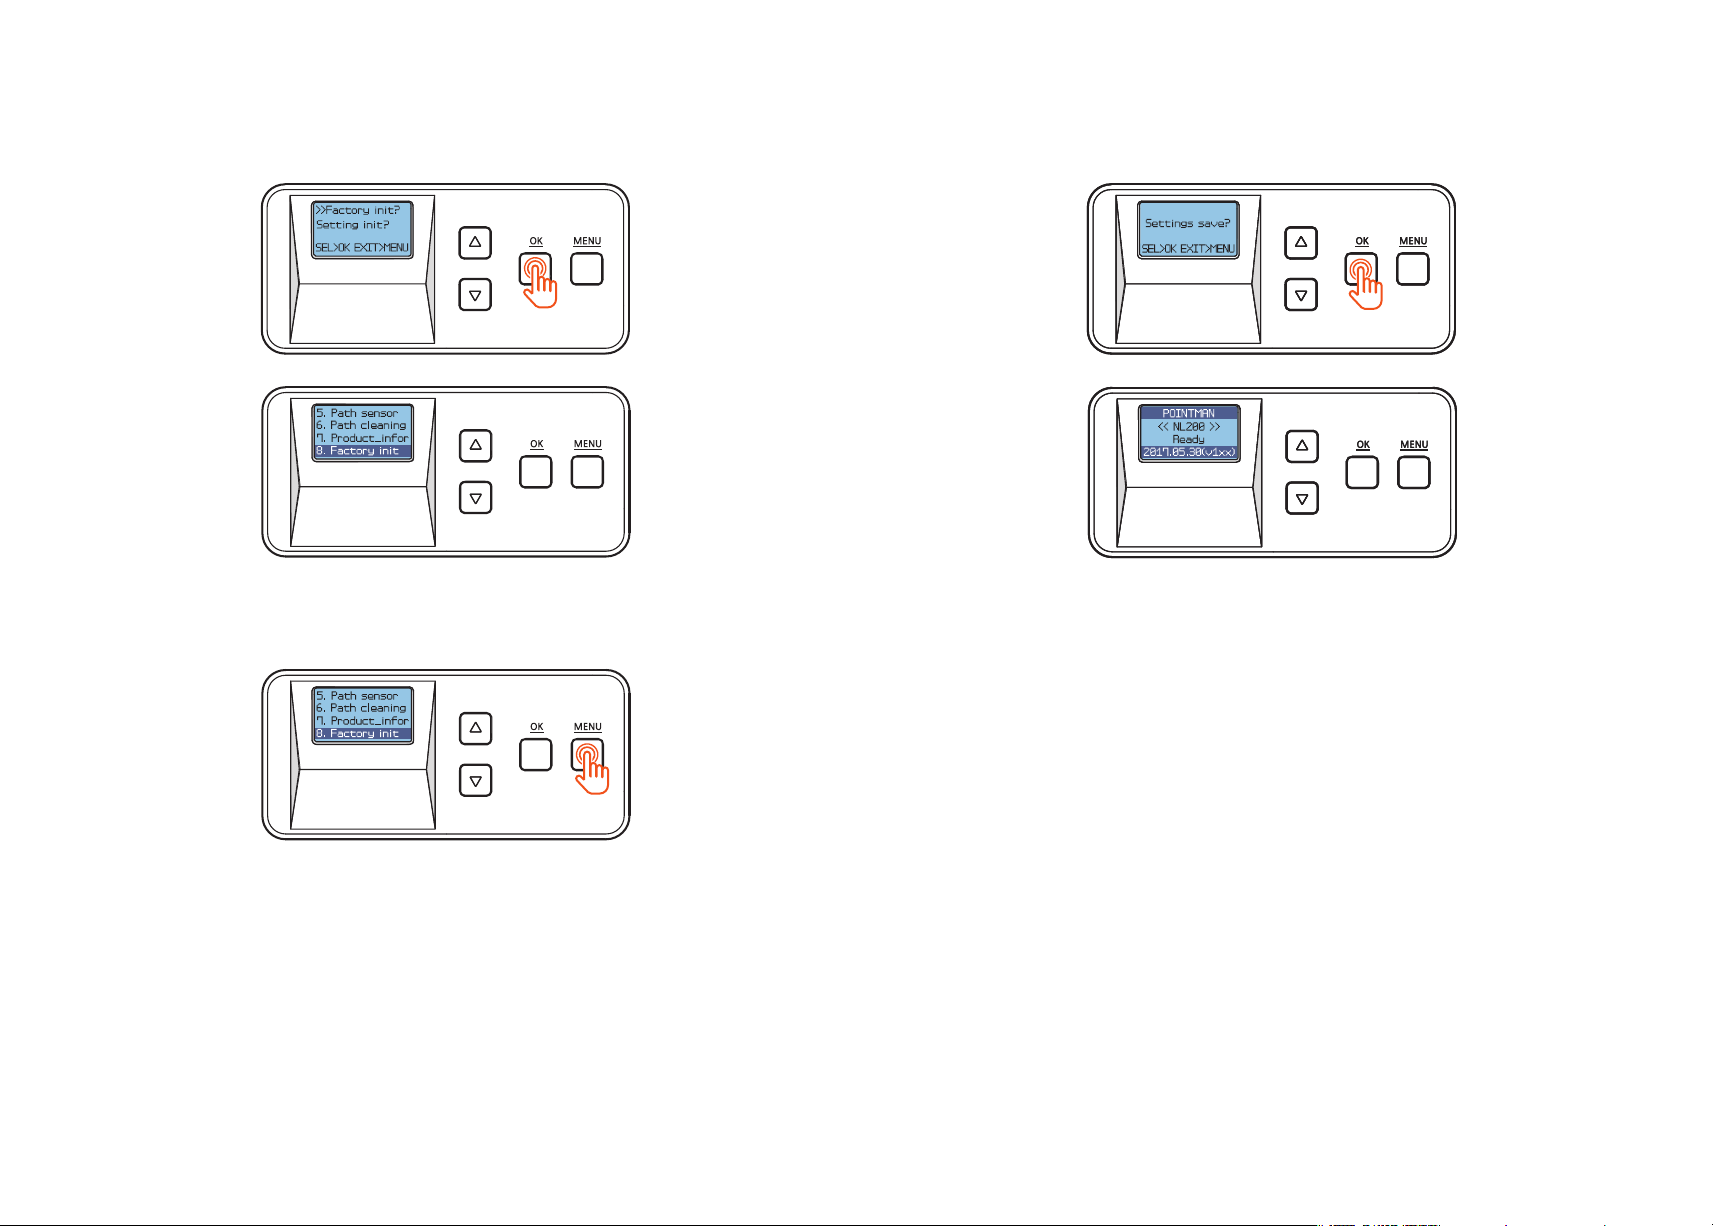
4. Press ‘OK’ to proceed or ‘MENU’ to cancel the action. (You will be directed
to the previous step when you press either ‘OK’ or ‘MENU’.)
5. Press ‘MENU’ to go into the standby mode.
6. If any changes have been made, you will be prompted to save the changes.
Press ‘OK’ to save the new settings or ‘MENU’ if you do not want to save them.
©2017 T.I.TENG Co., Ltd. All rights reserved POINTMAN LAMINATOR NL200 User Manual
54 55
Page 17
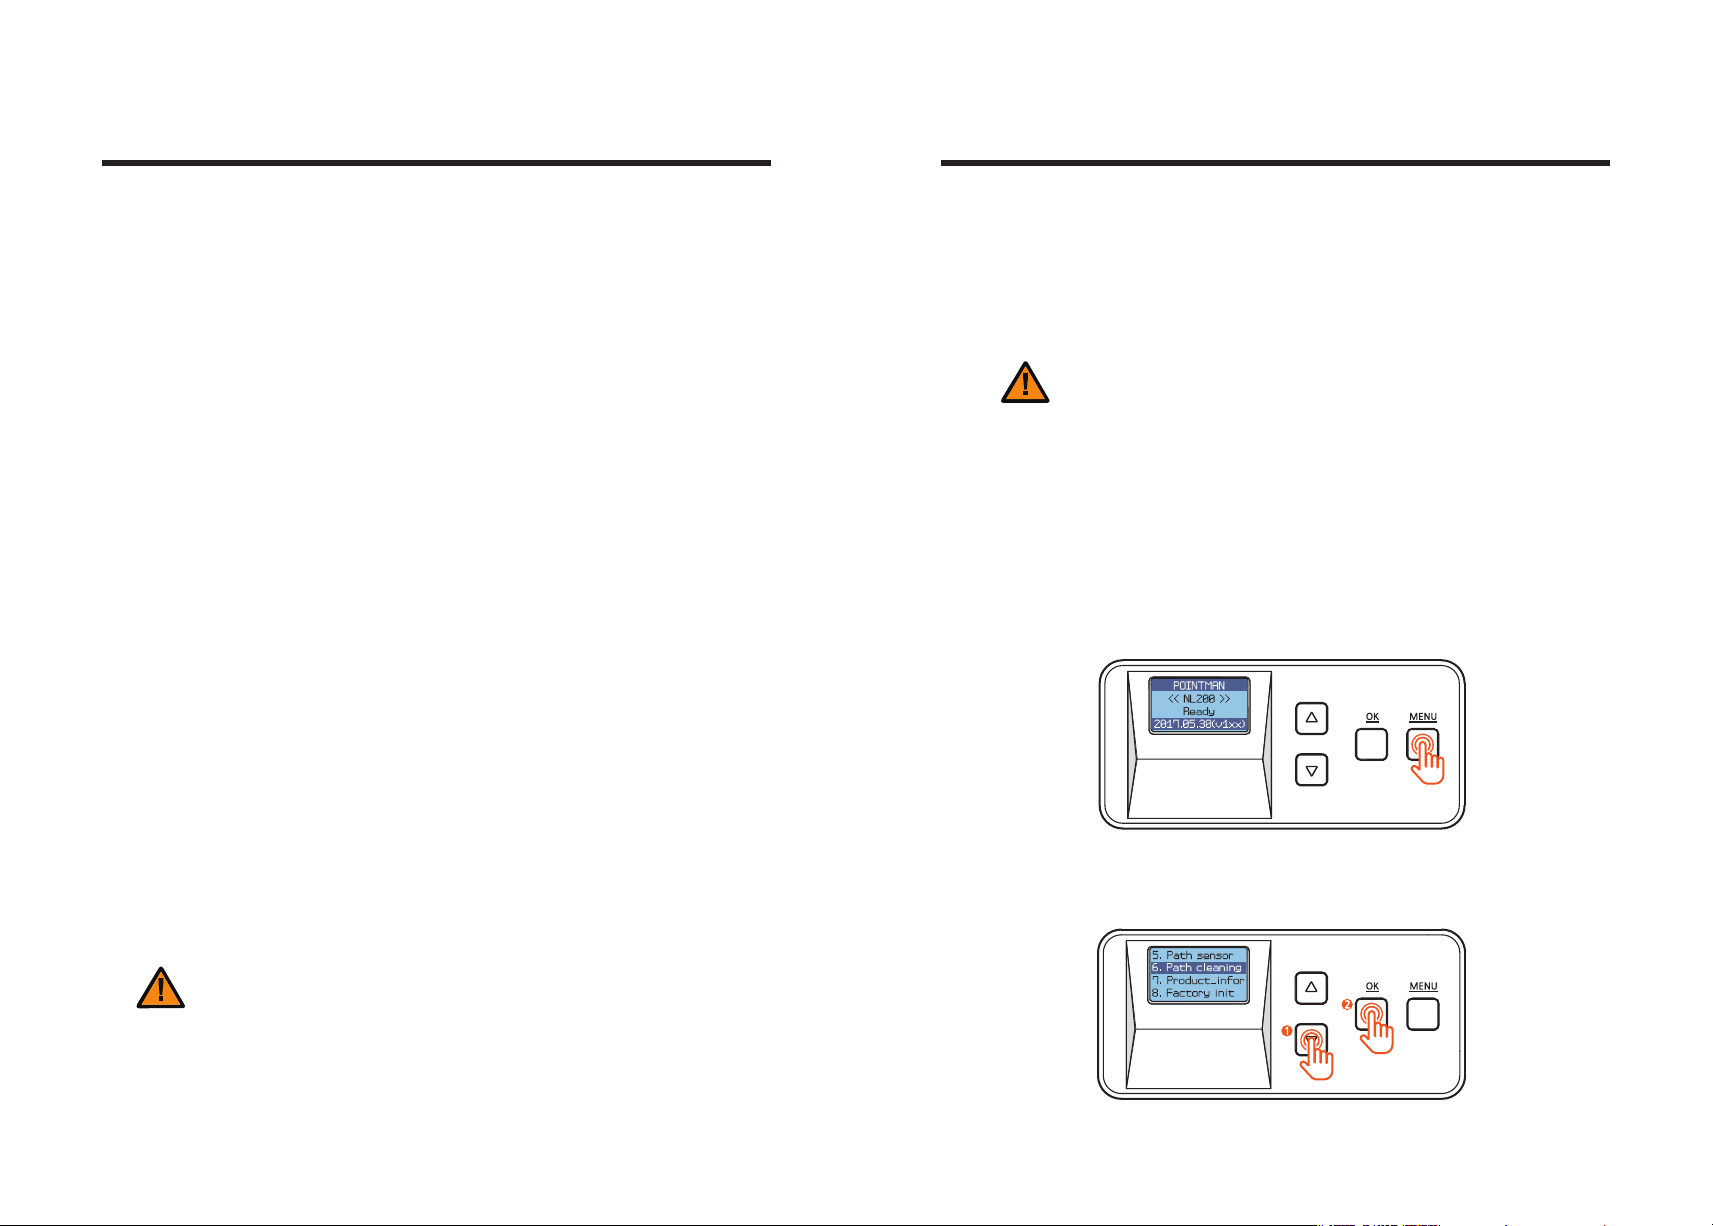
Maintenance Instructions
Clean the Laminator
- Supported Cards
The following cards are recommended for the prevention of jams
and the best results.
① Size
- International Standard (CR-79, CR-80 ISO 7810)
- 53.98mm (W) x 85.60mm (L)/3.375"x2.215"
② Thickness
- Standard : 0.76mm~1.0mm (30mil~40mil)
③ Acceptable Cards
- Glossy white
- Free of dirt or grease
- Not contaminated
- Free of scratches or dents
- Completely flat
- Static Free
④ Unacceptable Cards
- Clean the Exterior
- Make sure to turn off the laminator and unplug the power cable
before cleaning it with a soft cloth slightly dampened with water.
- Do not allow any liquid to drip inside the printer.
- Make sure that the printer is dry before turning it on.
Caution
Do not use any liquid / gel containing a high content of alcohol or solvent to
clean the printer as it may cause discoloration or fissure on its surface.
- Clean Roller Using Cleaning Card
It is recommended to clean the laminator using the cleaning card every month
or each time 500 cards are laminated in order to maintain quality and prevent
damage to the important parts.
1. Press ‘MENU’ to enter the menu mode.
- Heavily damaged
- Stained or contaminated
- Scratched
- Bent or deformed
- Embossed
2. Press the menu navigation button to select ‘6. Path cleaning’ and press ‘OK’.
Caution
Do not use cards considered unacceptable
as they may damage the parts.
©2017 T.I.TENG Co., Ltd. All rights reserved POINTMAN LAMINATOR NL200 User Manual
56 57
Page 18
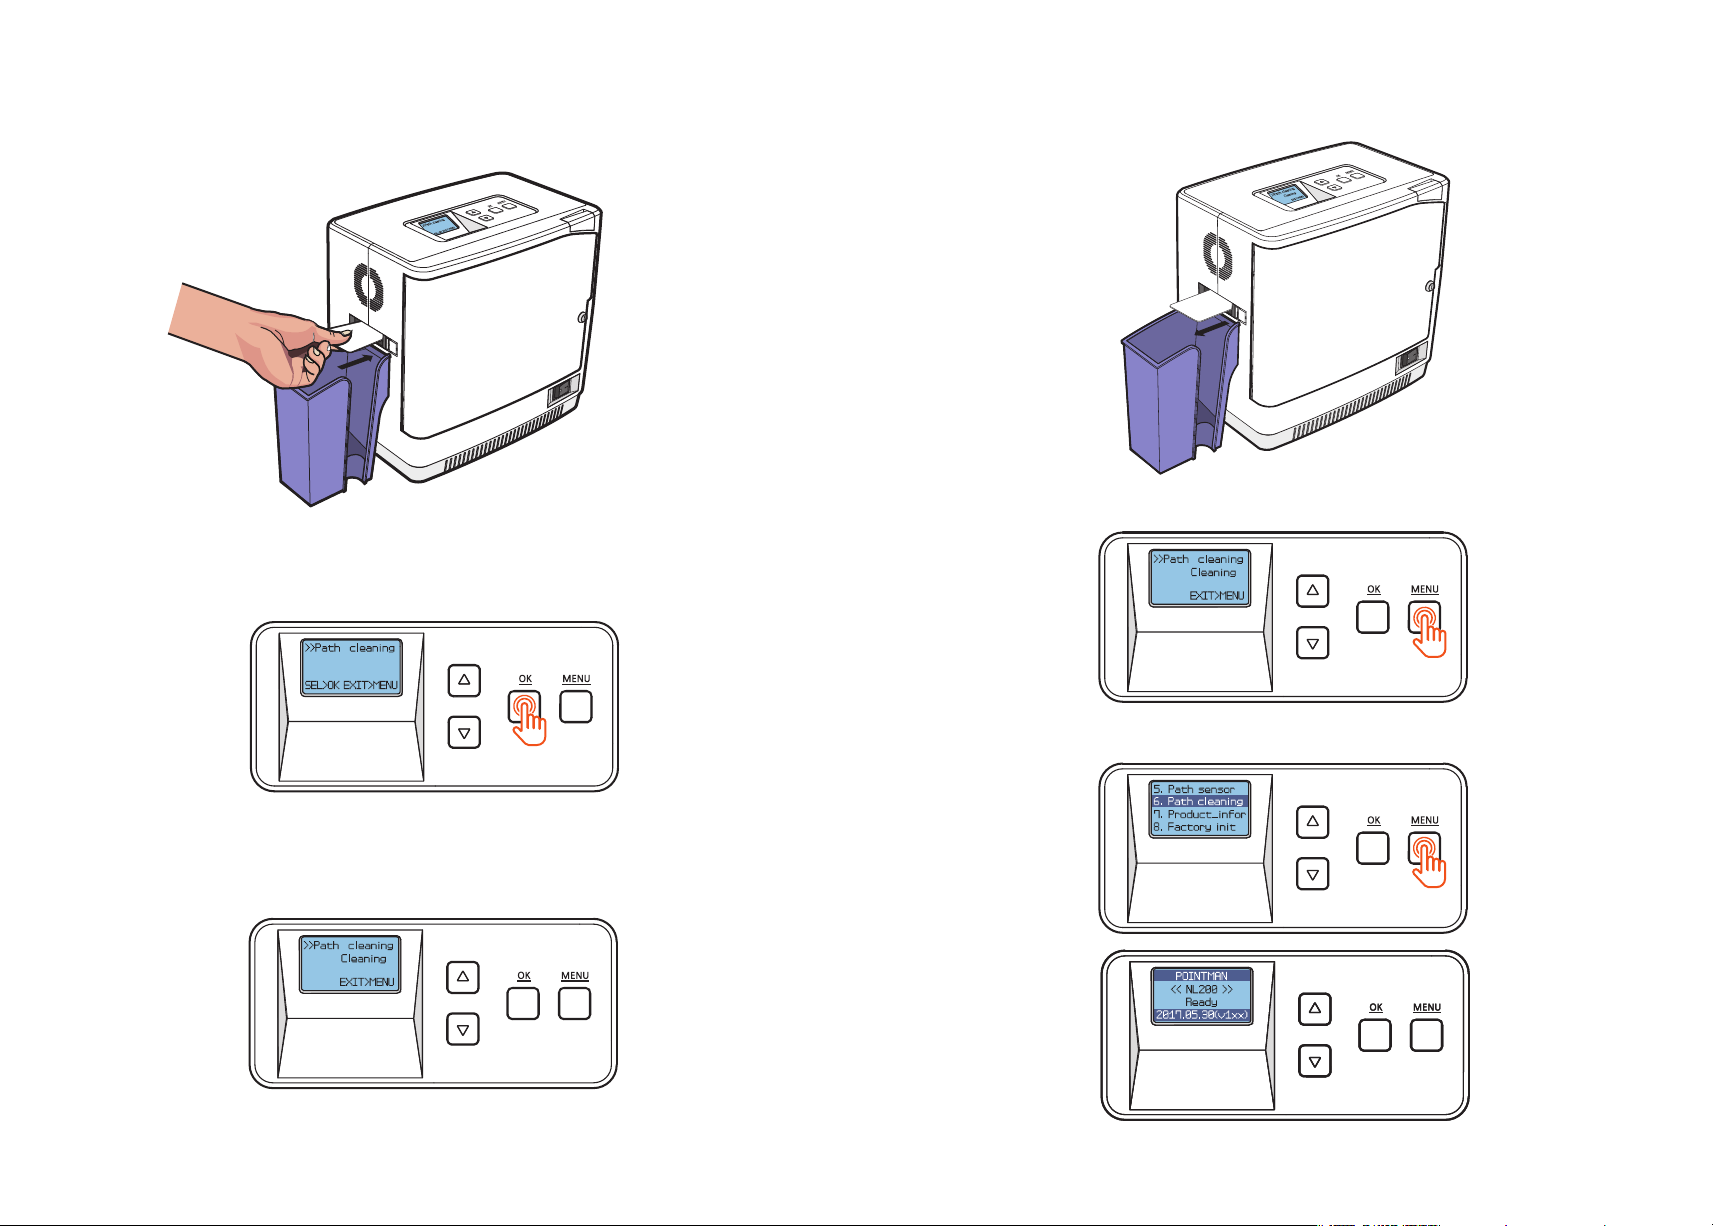
3. Insert the cleaning card to the card ejector.
(Make sure to hold the card until the operation starts.)
4. Press ‘OK’ while holding the card and it goes in.
6. The card will be released once the cleaning process is complete.
7. Press 'MENU' to go back to the previous step.
8. Press ‘MENU’ to go into the standby mode.
5. The card will move back and forth 3-4 times while cleaning the roller.
©2017 T.I.TENG Co., Ltd. All rights reserved POINTMAN LAMINATOR NL200 User Manual
58 59
Page 19
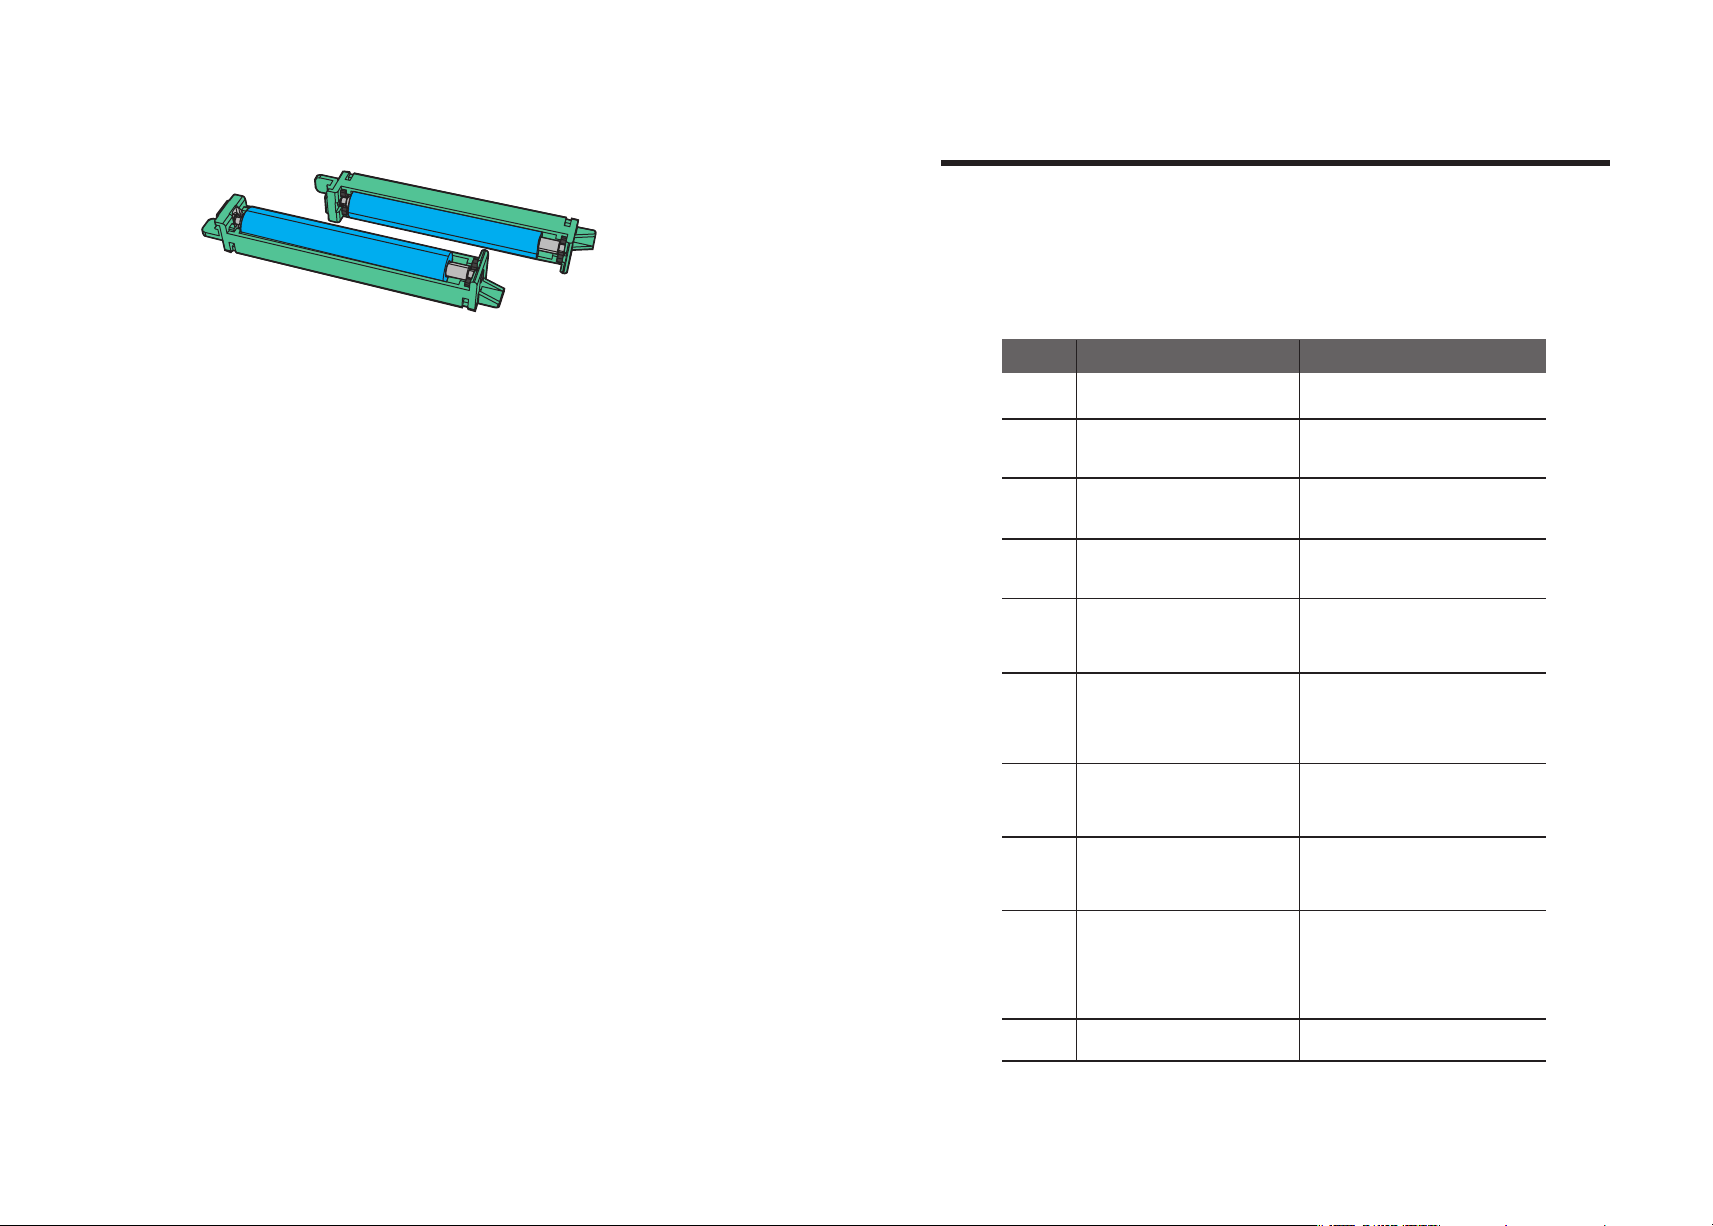
- Clean the Blue Cleaning Roller
Troubleshooting
Some of the problems you may encounter while using the printer can be
fixed by referring to the following troubleshooting guide.
If the problem persists, then please contact your local dealer.
- Error Messages & Solutions
Blue Cleaning Roller
This cleaning tool is designed to remove any unwanted materials from
the surface of cards, and it can be used semi-permanently since it can be
washed.
It is recommended to clean it at least once every two weeks. If more than
400 cards are laminated within a month, it is recommended to clean it every
200 times of use.
1. Remove the cleaning roller from the laminator
2. Wash it under running water.
3. Make sure that it is fully dried before installing it into the laminator.
Error
Messages
E11
E13
E20
E21
E22
E24
E25
E26
E42
W10
Description Solution
The temperature of the heater not in
use is too high.
The card loader is empty.
The Front Cover is open
No cartridge is loaded.
There is no film. The tag cannot be
recognized.
The Pass Mode does not match how
the cartridge ribbon is loaded.
(ex. Pass Mode is set to Both in the
menu settings and only the lower
cartridge has films.)
The sensor does not recognize the
ribbon mark while lamination is in
process.
Jam occurs when there is no
lamination process.
The heater module fails to return to
its original position.
There are 40 or fewer ribbon films.
해결
Leave the laminator for a while to cool it
off. (Power off)
If the error message persists when the
cards are loaded, please contact the
service representative for assistance.
Check whether the cover is closed. If the
problem persists, please contact the service
representative for assistance.
Check the cartridge. If the problem persists,
please contact the service representative
for assistance.
Check if there are films. If there are
enough films, check whether the tag can
be recognized. If not, please contact the
service representative for assistance.
Check if there are films. If there are
enough films, check whether the tag can
be recognized. If not, please contact the
service representative for assistance.
Check the ribbon mark on the film. If
there is no problem with the ribbon mark,
please contact the service representative
for assistance.
If there is no card inside the laminator or
slot, the system goes back to normal. If the
problem persists, please contact the service
representative for assistance.
Restart the system 2-3 times. If the
problem persists, please contact the service
representative for assistance.
(This is caused by overheating. Please
contact the service representative promptly
to avoid injuries.)
Replace the films.
©2017 T.I.TENG Co., Ltd. All rights reserved POINTMAN LAMINATOR NL200 User Manual
60 61
Page 20
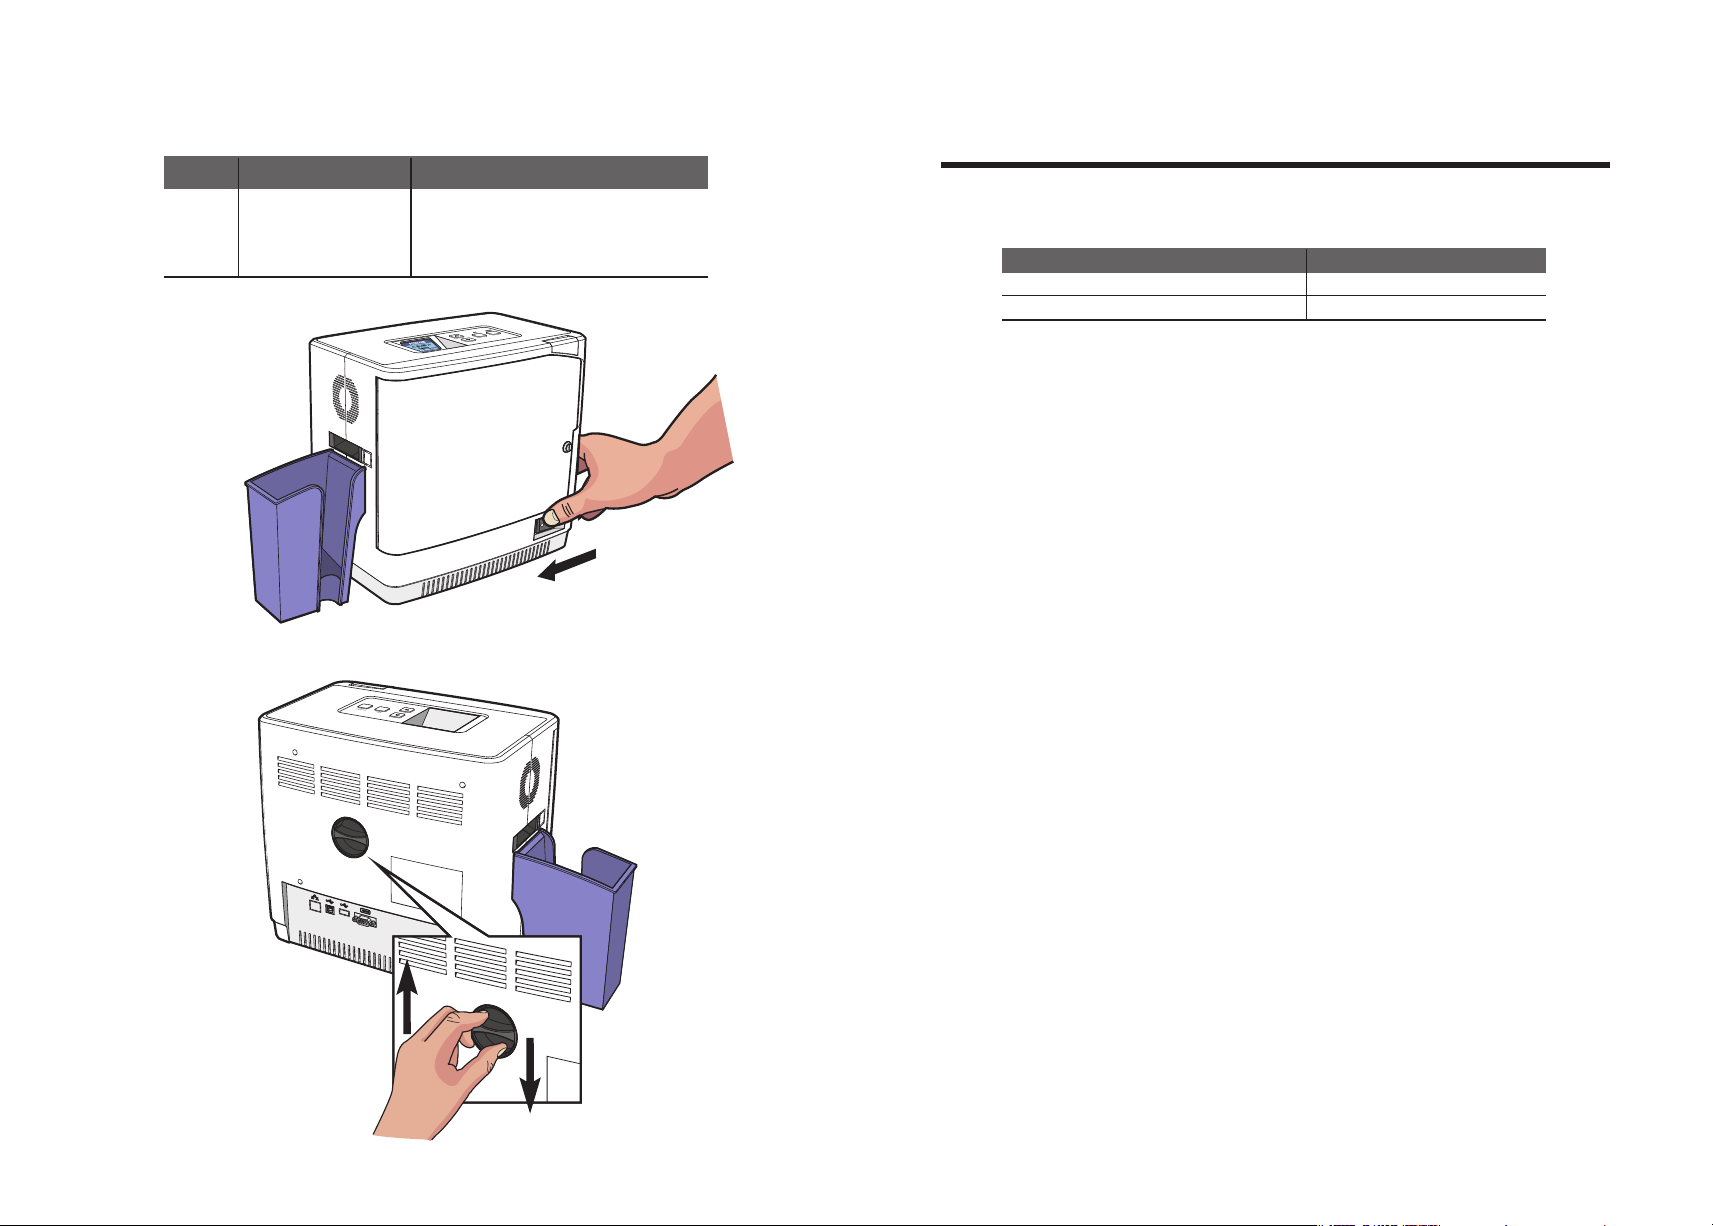
- Remove Jammed Card
Error
Messages
E31
1. Turn the power off.
2. Rotate the knob and remove the jammed card as shown in the image.
Description
Jam occurs while laminating.
Solution
Turn the power off and release the card
(using the handle on the back).
If the problem persists after changing the settings,
please contact the service representative for assistance.
Film Specifications
- Patch-Type Film
Clear (1.0mil)
Hologram(1.0 mil)
SpecificationsType
500 Prints/Roll
500 Prints/Roll
MENU
OK
©2017 T.I.TENG Co., Ltd. All rights reserved POINTMAN LAMINATOR NL200 User Manual
62 63
Page 21

Laminator Specifications
- Features
Quick heating process and laminating performance
- After initialization, the system is ready within 40 seconds and laminates both
sides within 20 seconds.
Easy operation and configuration
- Easy to operate and configure the quality settings
- Easy to load the film cartridge thanks to door-type front cover
- Designed with a knob for removing jammed card
Wide display and convenient button control (4Line MONO LCD, 4 Control Buttons)
-
High level of security
- The front cover can be locked to protect the films inside (optional feature).
Large amount of laminator films
- Up to 500 laminator films (Dual sides) are supported.
- Standard Specifications
① Laminating Type
- Heat Roller +Halogen Lamp Type
② Laminating Function
- Edge to edge, Dual/single sided lamination
③ Laminating Speed
- 8mm/s (for both Dual and single sided lamination)
⑥ Film Patch Dimensions
- Size: 81mm x 51mm (CR-79, CR-80)
- Thickness : 1.0 mil
⑦ Film Patch Capacity
- 500 patches / roll (1.0mil)
- Optional Specifications
- Card Stacker: 150 cards (0.76mm)
- Front Cover Lock (for the protection of films)
- Cradle (for connecting to a card/retransfer printer)
- Laminator Specifications
① Product Dimensions(Width x Length x Height) and Weight
1) NL200 (Standard)
- Dimensions : 216.5mm(W) x 320mm(L) x 313.5mm(H)
- Weight : 9.45kg
2) NL200 (Standard, Card Stacker)
- Dimensions : 216.5mm(W) x 443.4mm(L) x 313.5mm(H)
- Weight : 9.65kg
3) NL200H (Standard, Card Input Hopper)
- Dimensions : 216.5mm(W) x 377.2mm(L) x 313.5mm(H)
- Weight : 10kg
4) NL200H (Standard, Card Input Hopper, Card Stacker)
- Dimensions : 216.5mm(W) x 500.6mm(L) x 313.5mm(H)
- Weight : 10.2kg
④ Laminating Temperature
- 120℃ to 195℃(248℉ to 383℉)
② Power Supply
- AC 110V ~ 240V
- Single 600W / Dual 600W
⑤ Supported Card Size
- CR-79, CR-80
©2017 T.I.TENG Co., Ltd. All rights reserved POINTMAN LAMINATOR NL200 User Manual
64 65
③ Interface
- USB 2.0
- RS-232
Page 22
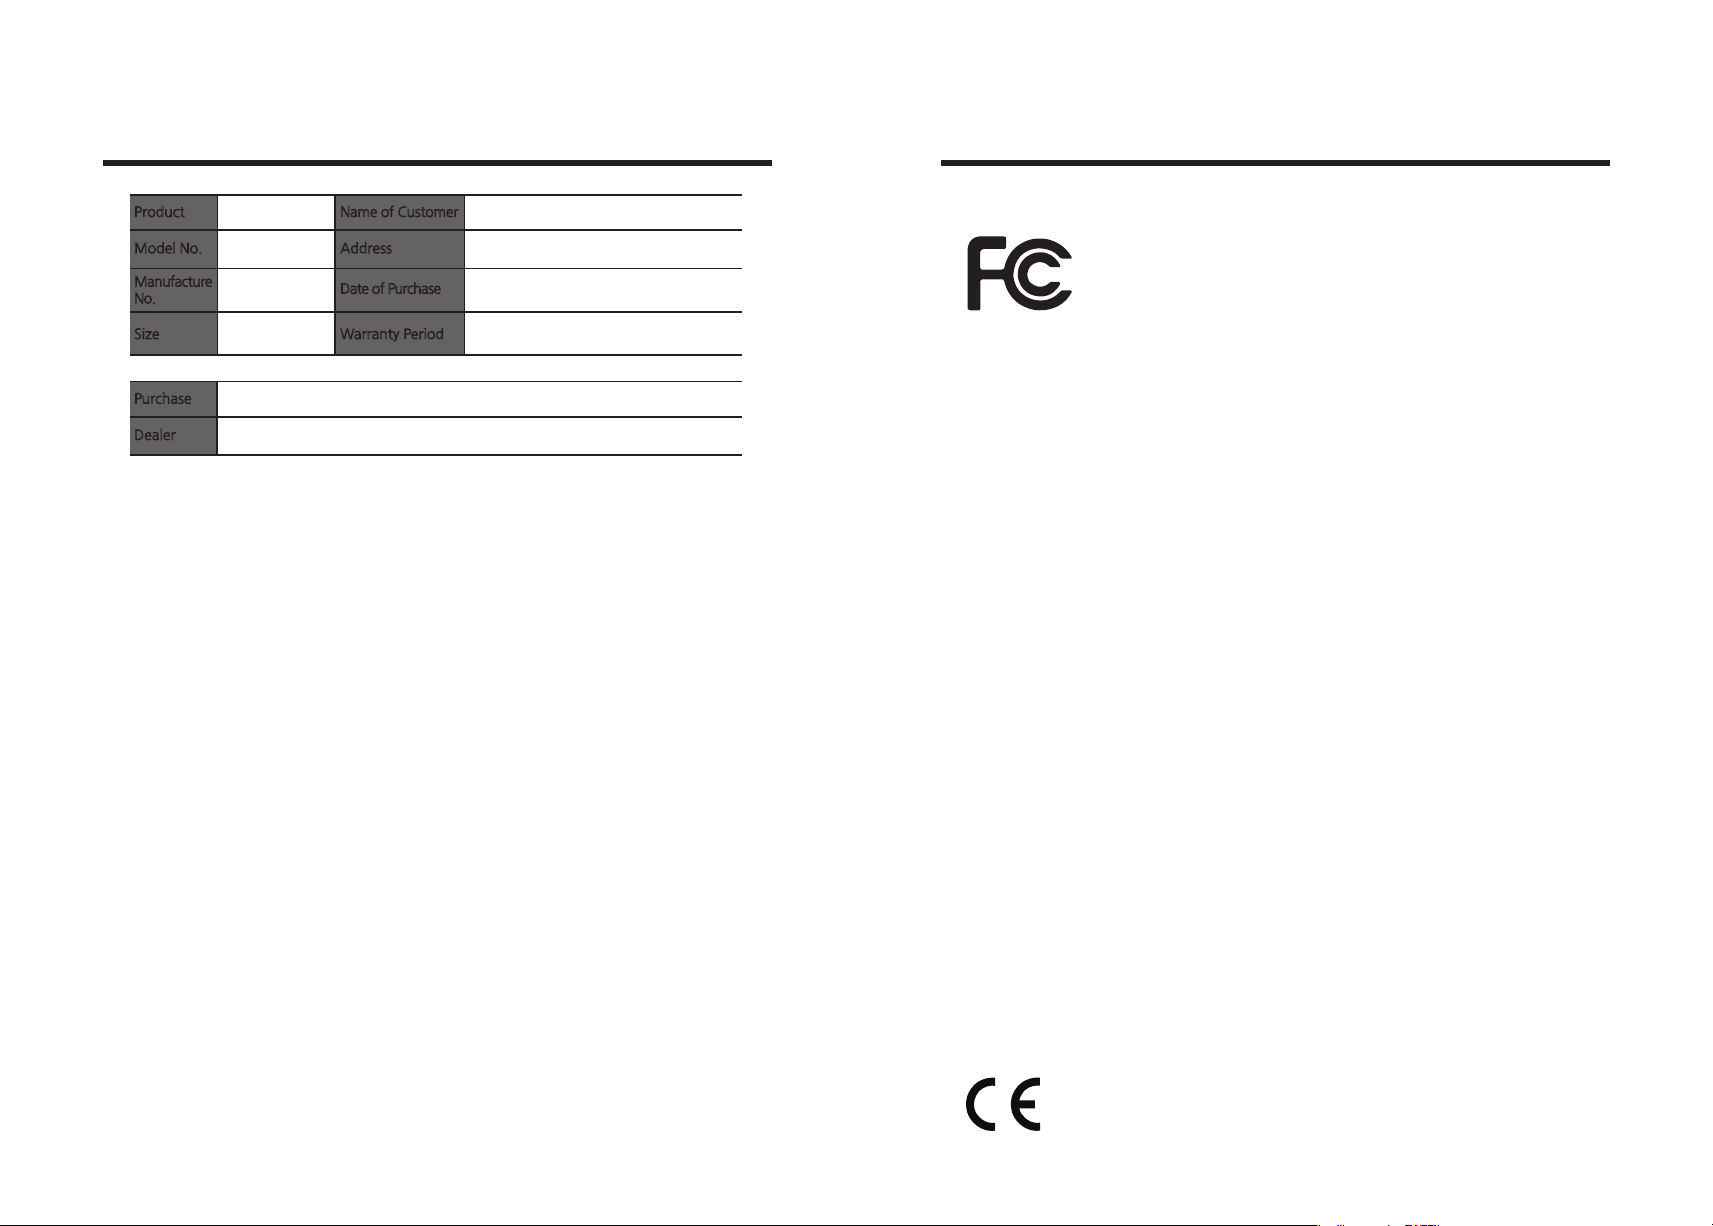
Warranty Certificate
Regulatory
Product
Model No.
Manufacture
No.
Size
Purchase
Dealer
Address: TEL)
Name of Customer
Address
Date of Purchase
Warranty Period
(YYYY/MM/DD)
(30 months) from the date of purchase
- Repaired at cost if any of the following apply.
- The warranty has expired.
- The product is damaged by the negligence or misuse of the consumer
(e.g. impact, water, fire).
- The product is damaged by a natural disaster (e.g. earthquake, flood).
- The product is damaged from unauthorized repair or modification.
- Consumable parts are consumed (according to the company policy).
- The product is damaged by the use of unsupported cards.
-FCC
FCC IDENTIFIER : XTNNL200
Name of Grantee : TIT ENG Co.,Ltd.
Equipment Class : Part 15 Low Power Communication Device Transmitter
Notes :
FCC Statement
CAUTION: Changes or modifications not expressly approved by the party
responsible for compliance could void the user`s authority to operate the
equipment.
NOTE: This equipment has been tested and found to comply with the limits
for a Class B digital device, pursuant to P
limits are designed to installation. This equipment generates uses and can
radiate radio frequency energy and, if not installed and used in accordance
with the instructions, may cause harmful interference to radio communications.
However, there is no guarantee that interference will not occur in a particular
installation. If this equipment does cause harmful interference to radio television
reception, which can be determined by turning the equipment off and
on, the user is encouraged to try to correct the interference by one or more
of the following measures.
- Reorient or relocate the receiving antenna.
- Increase the separation between the equipment and receiver.
- Connect the equipment into an outlet on a circuit different from
that to which the receiver is connected.
- Consult the dealer or an experienced radio/TV technician for help.
art 15 of the FCC Rules. These
This device should be installed and operated with minimum 20 cm
between the radiator and your body.
- EU
This product is CE marked according to the provision of the R&TTE Directive (99/5/EC).
Here by T.I.T ENG Co., Ltd. Declares that this product is in compliance with the essential
requirement and other relevant provisions of Directive 1999/5/EC.
©2017 T.I.TENG Co., Ltd. All rights reserved POINTMAN LAMINATOR NL200 User Manual
66 67
Page 23

-RoHS
We hereby guarantee that all products that POINTMAN will deliver directly or
through any third party to you, do not contain Pb, Cd, Hg, CR+6, PBB, PBDE
to the beat of our knowledge, Thereby our products are in accordance with
RoHS2 Directive.
- Directive 2002/95/EC
- Directive 2005/717/EC
- Directive 2005/747/EC
©2017 T.I.TENG Co., Ltd. All rights reserved
68
Page 24
This document is the copyright of T.I.T ENG Co., Ltd. and may not be reproduced in
full or in part by any means, electronic or otherwise, without the prior written consent
of T.I.T ENG Co., Ltd.
The Company would be very grateful if any accidental inaccuracies could be pointed
out to us, as well as any other constructive criticism which might lead to a better
understanding.
T.I.T ENG Co.,Ltd.
7th floor, Shin-do B/D, 215, Jungdae-ro, Songpa-gu, Seoul, Korea (ZIP: 05702)
POINTMAN Technologies Inc.
260 Maple Court Suite 277, Ventura, CA 93003,
TEL: +1 844 384 3279, www.pointmanusa.com
POINTMAN Trading Co.,Ltd
Room 10G, Building B, Zhongyangdadao, Baoyuan Road 2004,
Xixiang Street, Bao an district, Shenzhen, China (ZIP: 518102)
 Loading...