

titathink TT520PW, TT522PW, TT520G, TT521G, TT522G Quick User Manual
...
Quick User's Guide
Apply to TT520PW, TT521PW, TT522PW
and 3G series TT520G, TT521G, TT522G.
www.titathink.com

2
www.titathink.com
Thank you for choosing
Titathink Spy Video Monitor
The video monitor is designed for the people who
want to view and monitor their baby, their employees
or their pets througth Android, iOS Devices or PC,
when they are away.
The image sensor unit with its miniature size design
which enables easy integration into any hidden
places. Almost impossible to discover, which keeps it
protected from vandalism.
Watch live or see recorded events from an internetenabled smartphone or computer, keeps you in touch
with what matters most.
Never miss any important moment! Camera detects
motion and send alerts to keep you updated, whilst
simultaneously recording and storing clips in to your
MicroSD card so that you can view later.
This guide applies to the following models
TT520PW / TT520G
Come with a HD 720P
pinhole sensor and multiple
type mounting brackets.
Applicable for indoor.
TT521PW / TT521G
Come with a IP66 HD
pinhole sensor. It is
Applicable for indoor and
outdoor.
TT522PW / TT522G
Come with a IP67 HD
wide angle pinhole sensor
Applicable for Indoor,
outdoor and in water (less
than 1m)

3
www.titathink.com
TABLE OF CONTENTS
Key features. . . . . . . . . . . . . . . . . . . . . . . . . . . . . . . 4
What's in the box . . . . . . . . . . . . . . . . . . . . . . . . . . . .4
Technical information . . . . . . . . . . . . . . . . . . . . . . . . .5
Software. . . . . . . . . . . . . . . . . . . . . . . . . . . . . . . . . . 6
Quick Start Connection. . . . . . . . . . . . . . . . . . . . . .13
Quick Start for iOS or Android Device . . . . . . . . . . .14
Quick Start for Windows PC or Mac . . . . . . . . . . . . 18
Access camera advanced setting web page. . . . . 22
Mounting instructions . . . . . . . . . . . . . . . . . . . . . . .25
Mounting the sensor . . . . . . . . . . . . . . . . . . . . . . . .26
Wi-Fi Setup . . . . . . . . . . . . . . . . . . . . . . . . . . . . . . 28
Motion Detection Setup . . . . . . . . . . . . . . . . . . . . . .31
Push notication . . . . . . . . . . . . . . . . . . . . . . . . . . .32
Motion Detection Recording. . . . . . . . . . . . . . . . . .32
Send Motion Detection alarm via email. . . . . . . . .34
Storage(MicroSD card, NAS or PC). . . . . . . . . . .37
Store to MicroSD card. . . . . . . . . . . . . . . . . . . . 37
Store to NAS or PC. . . . . . . . . . . . . . . . . . . . . . 40
NVR, NAS(Support Onvif),Third-party software. . . 45
Video Stream information. . . . . . . . . . . . . . . . . . . . .46
Video Stream setting . . . . . . . . . . . . . . . . . . . . . . . 47
Storage task. . . . . . . . . . .. .. . . . . . . . . . . . . . . . . . 49
Schedule of task. . . . . . . . . . . . . . . . . . . . . . . . . . 49
Browse, view, download and manage record les. .50
Back up the sd card les to your FTP server . . . . . 52
How to assign a static IP to the camera . . . . . . . . .54
Camera Watchdog . . . . . . . . . . . . . . . . . . . . . . . . . 54
How to connect external sound pick-up . . . . . . . . .55
3G Setup(Just for 3G series camera). . . . . . . . . . . 57
FAQ . . . . . . . . . . . . . . . . . . . . . . . . . . . . . . . . . . . . 59
4
www.titathink.com
Key Features
• See what's happening live.
• Custom motion detection settings.
• Instant motion alerts by push notication.
• Motion clips recorded into your MicroSD Card.
• Customisable recording and alert schedules.
• Watch from your smartphone, tablet, PC and Mac.
• Can work over Wi-Fi, LAN Or POE
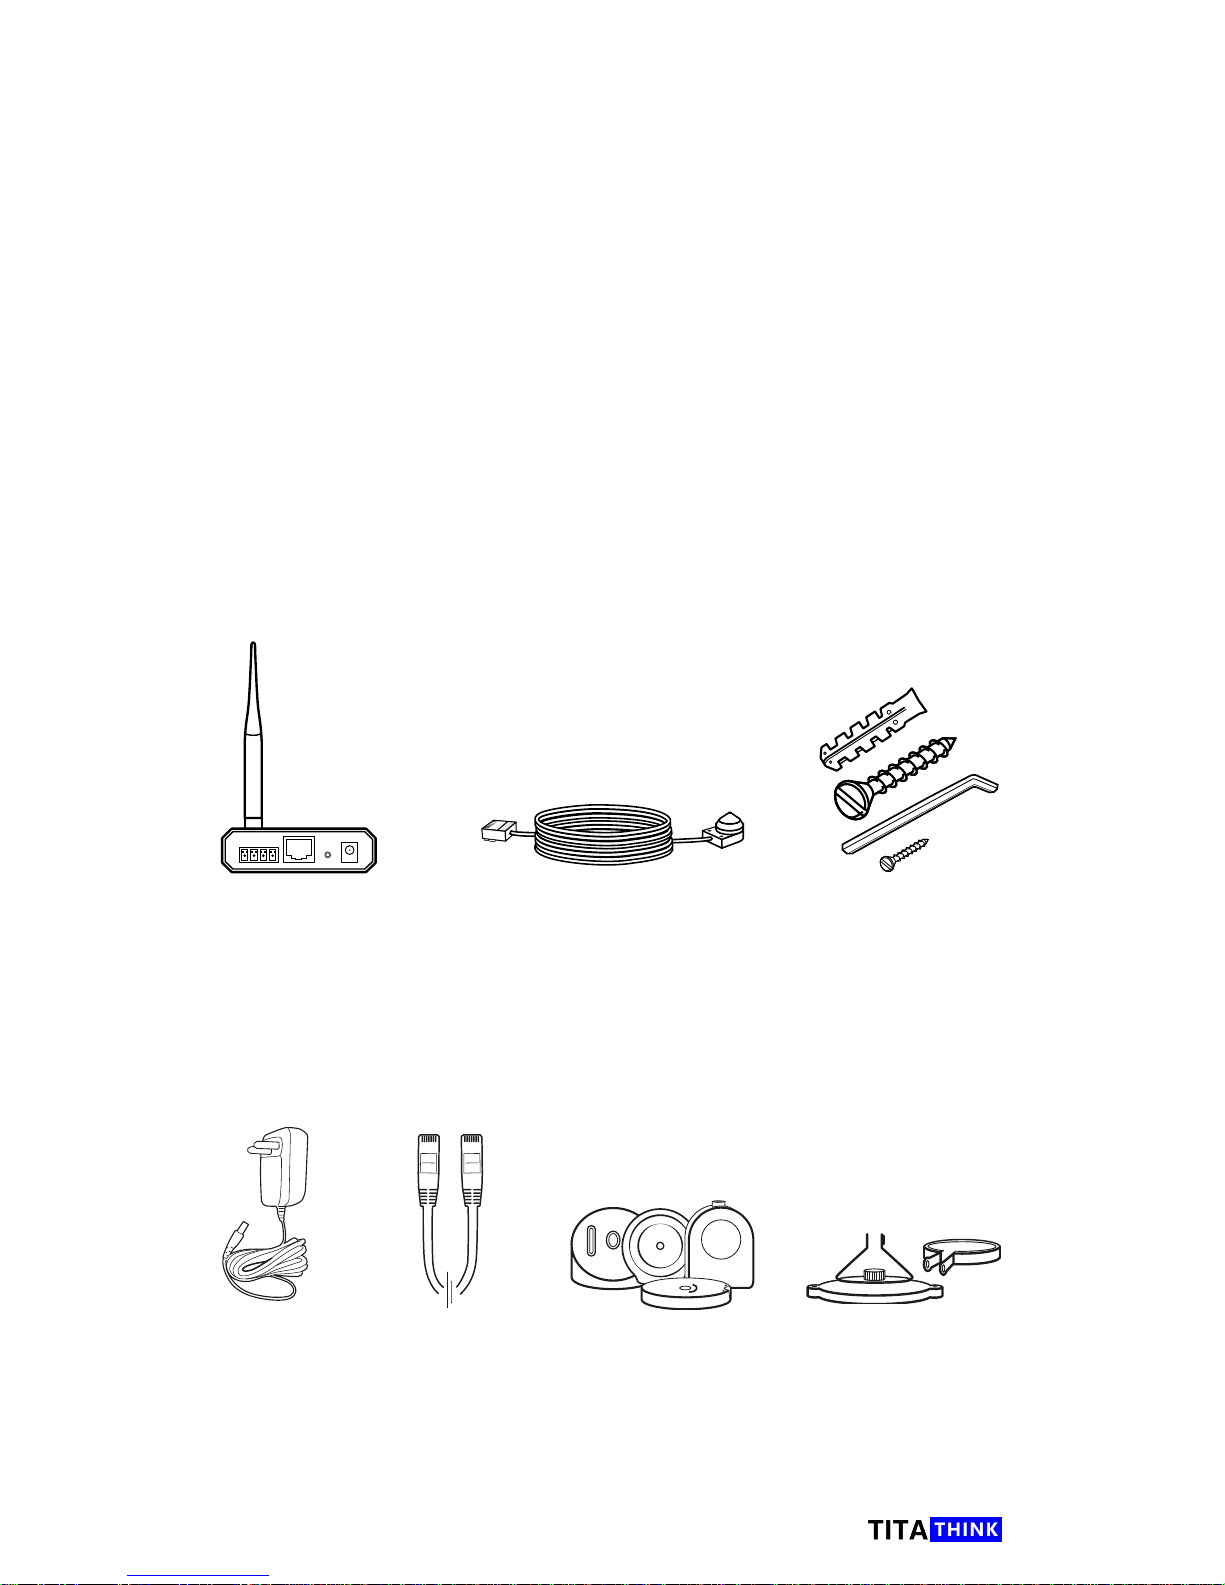
What's in the box
Main Unit
The main unit contains all
the main features, such
as Wi-Fi, MicroSD card
Recording, transmission
of video data, etc
Sensor Unit
The Senor Unit consists of a
smaller pinhole lens and a 6
meter(20ft) RJ11 cable
Screws & tools
2x screws and
anchors for xing,
Screw and Allen
key for mount
Power supply
3m/10ft
power supply
Ethernet cable
Use to setup
the Main unit
TT520PW sensor Bracket
There are two types of
bracket for TT520PW
sensor unit, one is Wall
mount, another is
pinhole mount
TT521PW / TT522PW
sensor Bracket
This Sensor bracket
just for TT521PW
and TT522PW

5
www.titathink.com
Technical information
Main Unit
General I/O
You can connect external
alarm devices to this port.
Such as PIR senor, Gas
detector and etc.
RJ45 LAN Port
Ethernet cable port for
setting up the camrea
or to stay connected via
cable(LAN or POE mode)
Notice: Don't plug the
Sensor Unit cable into
this port
WPS/Reset button
Short press this button to
easily connect with your
WPS compatible Wi-Fi
Router.
Long press(More than 10
sec) to reset the camera.
Front
Rear
Power cable
socket
RCA Audio Line-In
Port
You can connect external
Sound pick-up for sound
monitoring
RJ11 CAM Port
Plug the Sensor Unit
cable into this port
MicroSD Card slot
Max support 128G Class10
MicroSD memory card
Wi-Fi antenna
Port socket
Sensor Unit
720P Mini Pinhole camera
Small size: Φ 0.74 x 1 inches
6 meters(20ft) cable
Providing exibility to place
the sensor unit in one area
RJ11 Connector
Plug this connector to
Main Unit CAM Port
Power
DO
DI
GND
SIM CARD slot
Just for TT520G, TT521G, TT522G 3G Spy camera

6
www.titathink.com
AnyScene is Titathink APP for your
iOS or Android smart phone or tablet.
You can view the camera live feed and
manage Titathink camera by your iOS
or Android smart phone via Titathink
App 'AnyScene'.
You can nd "Anyscene" in App store
or Google Play.
Software
CameraLive
AnyScene
CameraLive Titathink application
software for your windows PC or
MAC.You can view the camera live
feed and manage Titathink camera by
your windows PC or MAC.
You can find the 'CameraLive'
software in the provided CD, or
download it from Titathink website
http://support.titathink.com/
knowledge-base/camera-live-software
APP for your iOS or Android phone or tablet
Application software for your windows PC or
MAC

7
www.titathink.com
APP "AnyScene" for iOS or Android
phone or tablet Introductions
Operation interface
Camera List interface
1, Add New camera
2, View the app version
3, Alarm records
The Camara alarm log
4, Video & Photos
You can view your video recording
stream and the capture photo here
5, My Camera
The list of your Titathink camera
Add Camera interface
6, Back to the Previous Level
7, Search
Search Cameras on the same local
area network(LAN)
8, Add camera UID manually
9, QRCode
You can Scan UID QR code to add it
10, Name of Camera
11, UID
12, Account the default: admin
13, Password the default: admin
14, Connect connect the camera
14.1, Save save the camera
You can find "Anyscene" in the App
store(iOS) or Google Play(Android).
AnyScene
8
www.titathink.com
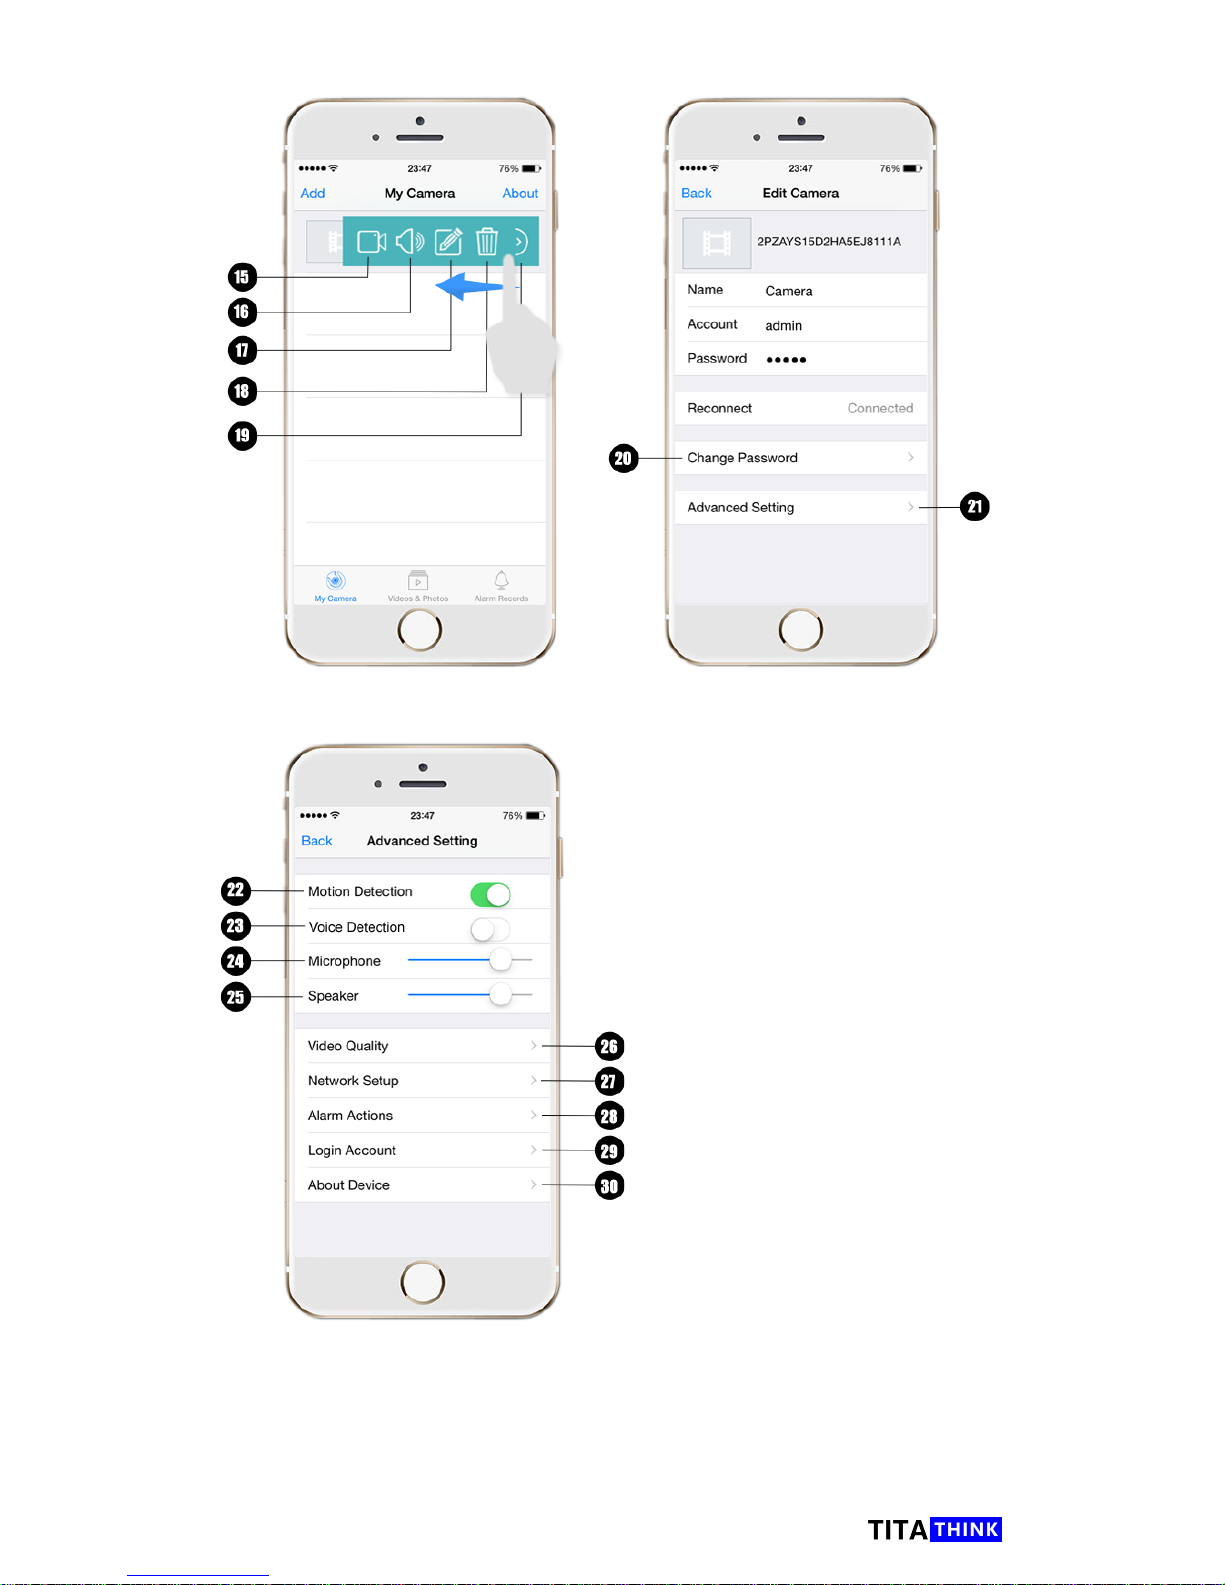
Operations for multi menu
15, Live View
16, Speaker
17, Edit Camera
18, Delete Camera
19, Hidden the multi menu
Edit Camera interface
20, Change Password
Change the login password
21, Advanced Setting
Camera Advanced setting, Such as
Motion Detection, Video Quality, etc.
Advanced setting interface
22, Motion Detection
On/Off the motion detection function
23, Voice Detection
On/Off the Voice detection, only for
some models
24, Microphone
Camera Microphone value
25, Speaker
Camera Speaker value, only for
some models
26, Video Quality
Setting the Video parameters, Such as
Quality, Orientation and so on
27, Network Setup
WiFi, Date&Time and FTP Upload setting
28, Alarm Actions Setting motion detection
window, Alarm Recording, and Alarm Email
29, Login Account Add user Account
30, About Device The information of the
camera, Such as Local IP address, remote IP
address, MicroSD card infor and so on
9
www.titathink.com
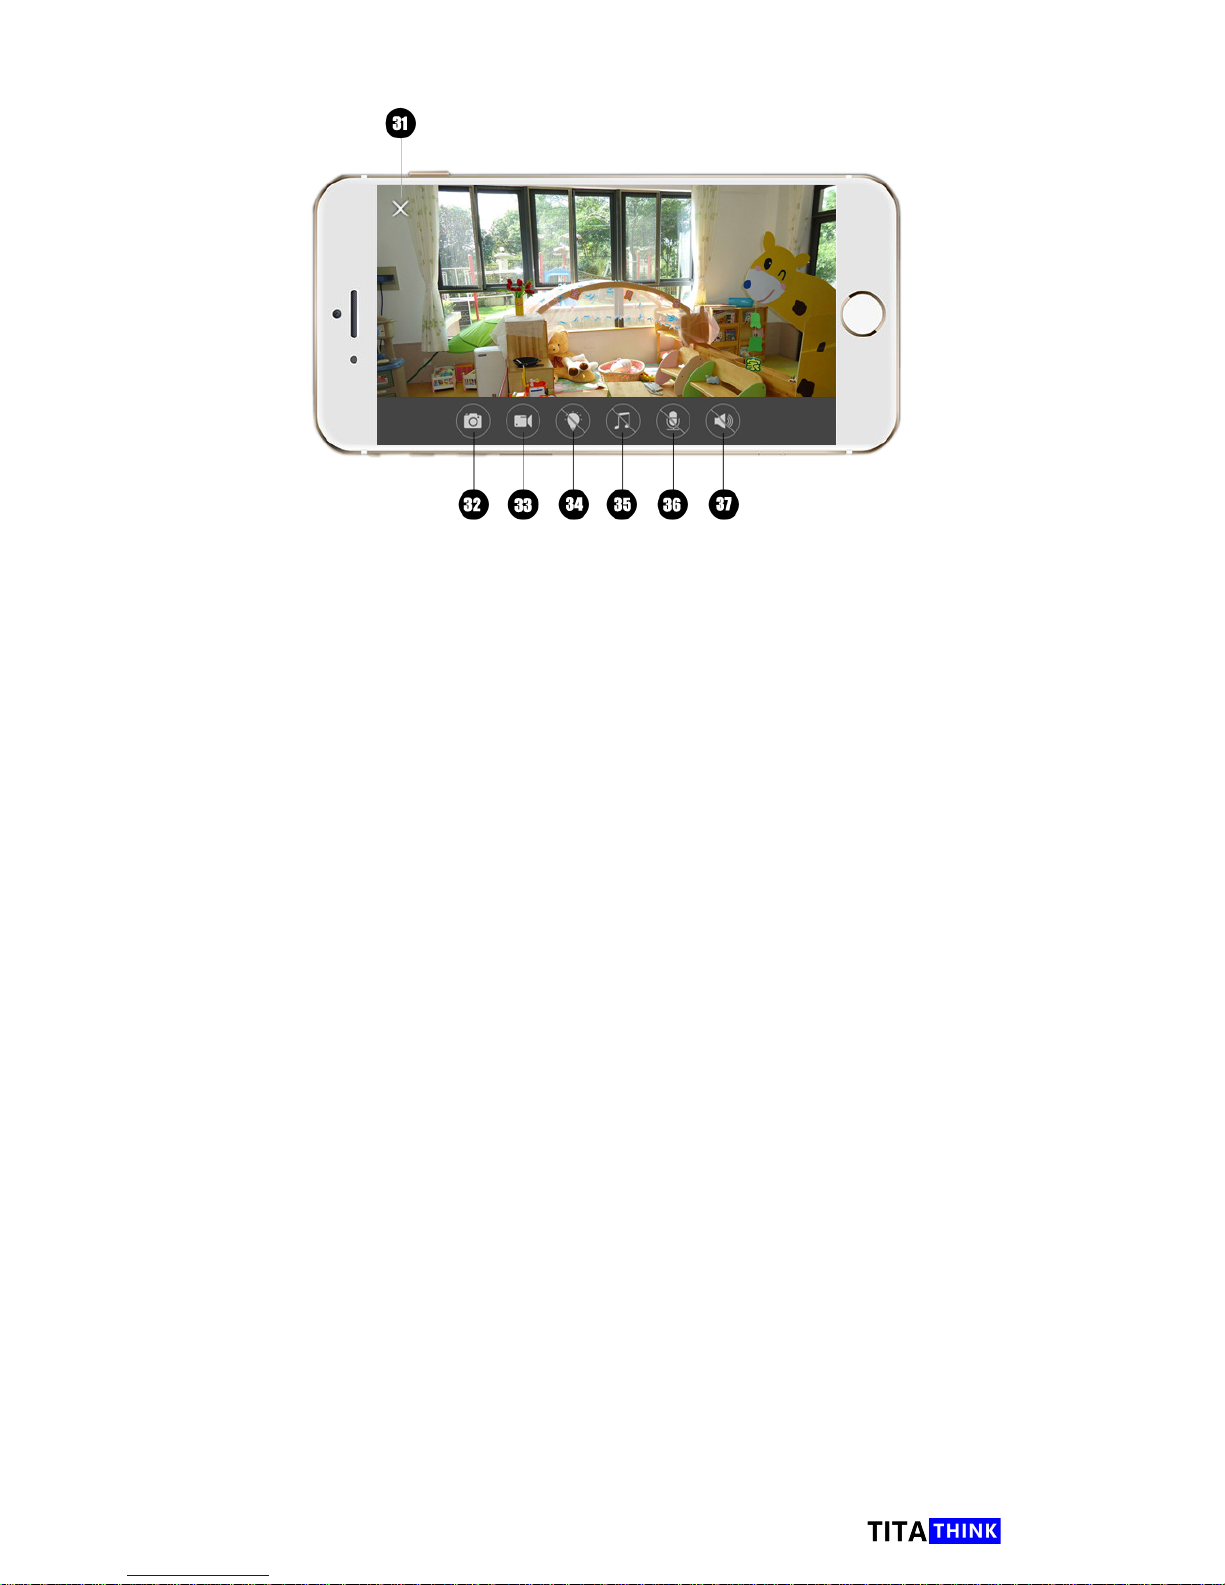
Screen interface
31, Close video screen
The video screen will be closed when someone click on it.
32, Photo capture
Capture a photo of the current video to your smart device.
33, Start recording / Stop recording
Enable the video recording to your smart device.
34, On/Off the light
Turn on/off the camera light. only for some models.
35, Music
Turn on/off the playing music function of Titathink camera.only for some models.
36. Speaker
Enable or disable the speaker.
37. Microphone
Enable or disable the microphone of the camera.
In order to provide a better user experience for our customers, we are
continuing to improve our APP. For the latest APP information, Visit:
http://www.titathink.com/anyscene
10
www.titathink.com
Application software "CameraLive" for
windows PC or MAC Introductions
CameraLive
You can find in the provided CD, or
dowload from Titathink website:
http://support.titathink.com/knowledgebase/camera-live-software
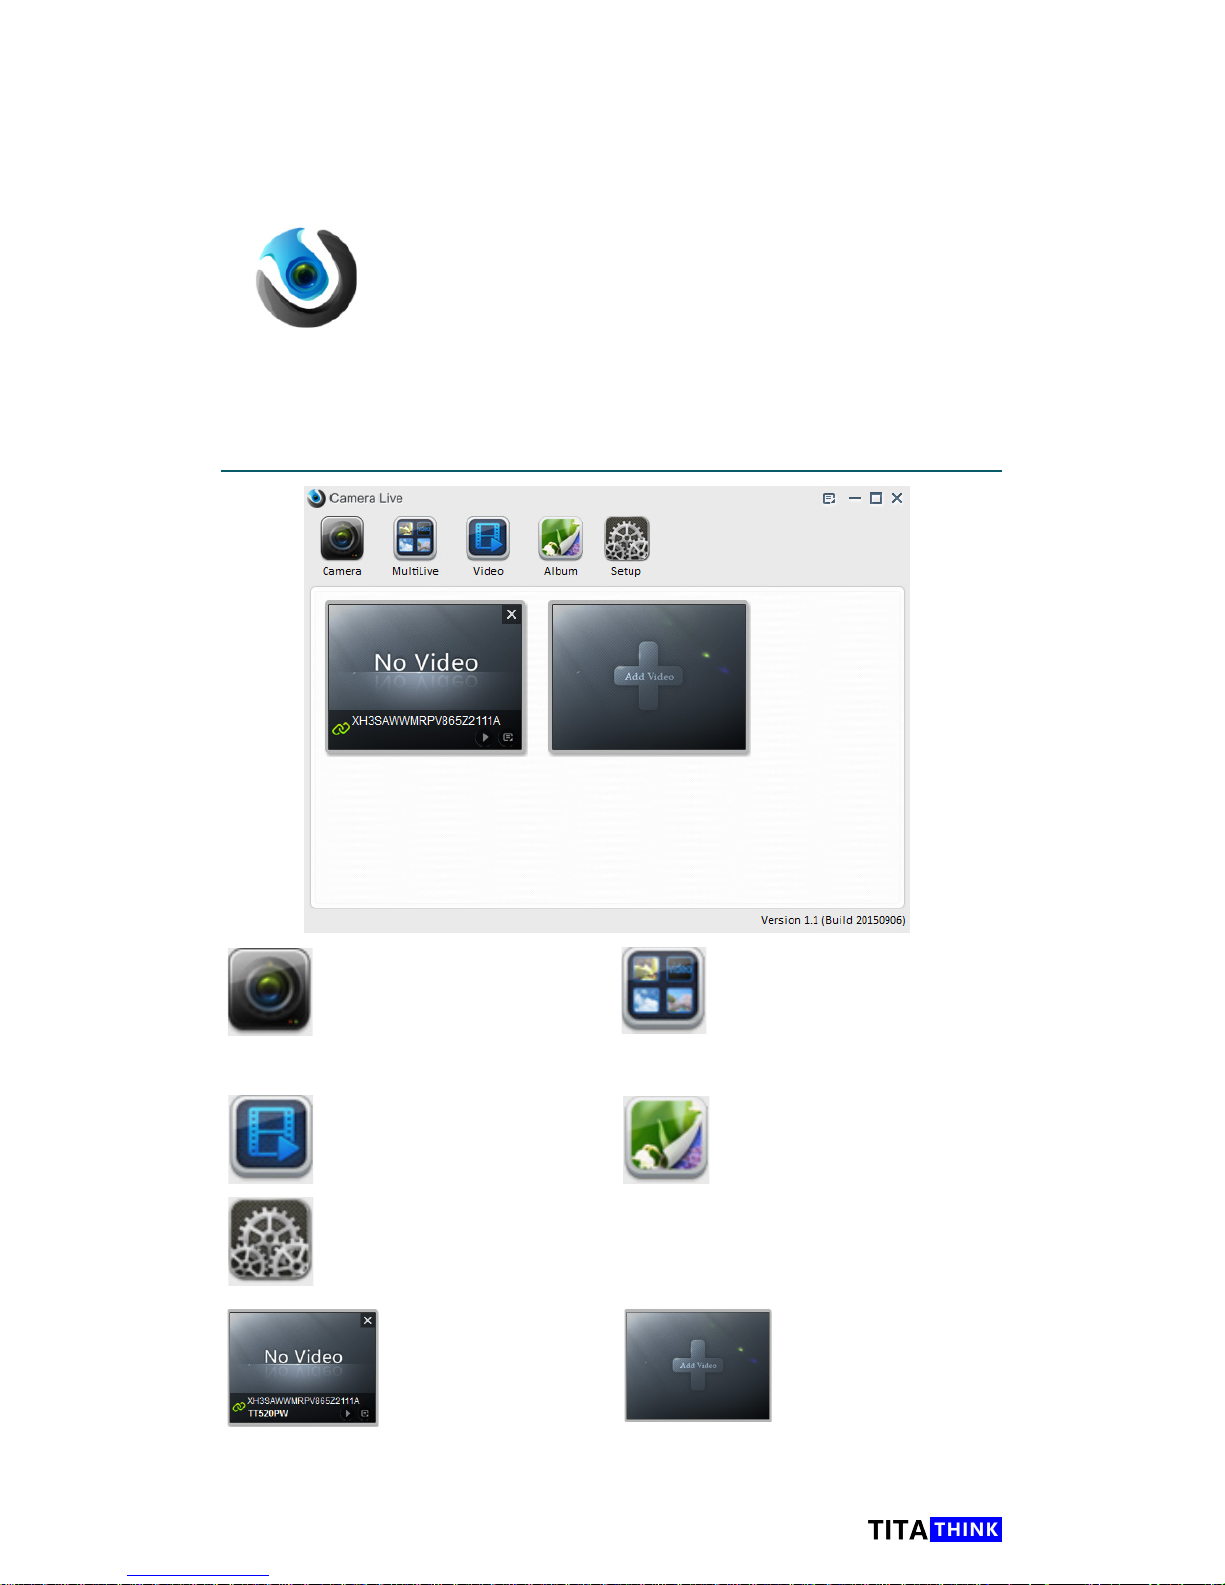
Operation interface
Camera list
List of All your cameras
MultLive
View all titathink cameras
on One Screen, and make
them recording or viewing
together
Video
Playback the recorded video
les on the PC
Album
View the snapshots,
which created by you
Setup
For camera advanced setting. Or search the online camera in a local
network (Intranet). And you can jump to the web application of camera
for advanced setup.
Add Camera
Click it for adding your
camera to CameraLive
Camera
If you have already
add your camera to
CameraLive, this icon
will appear. you can
double-click to view your
camera.
11
www.titathink.com
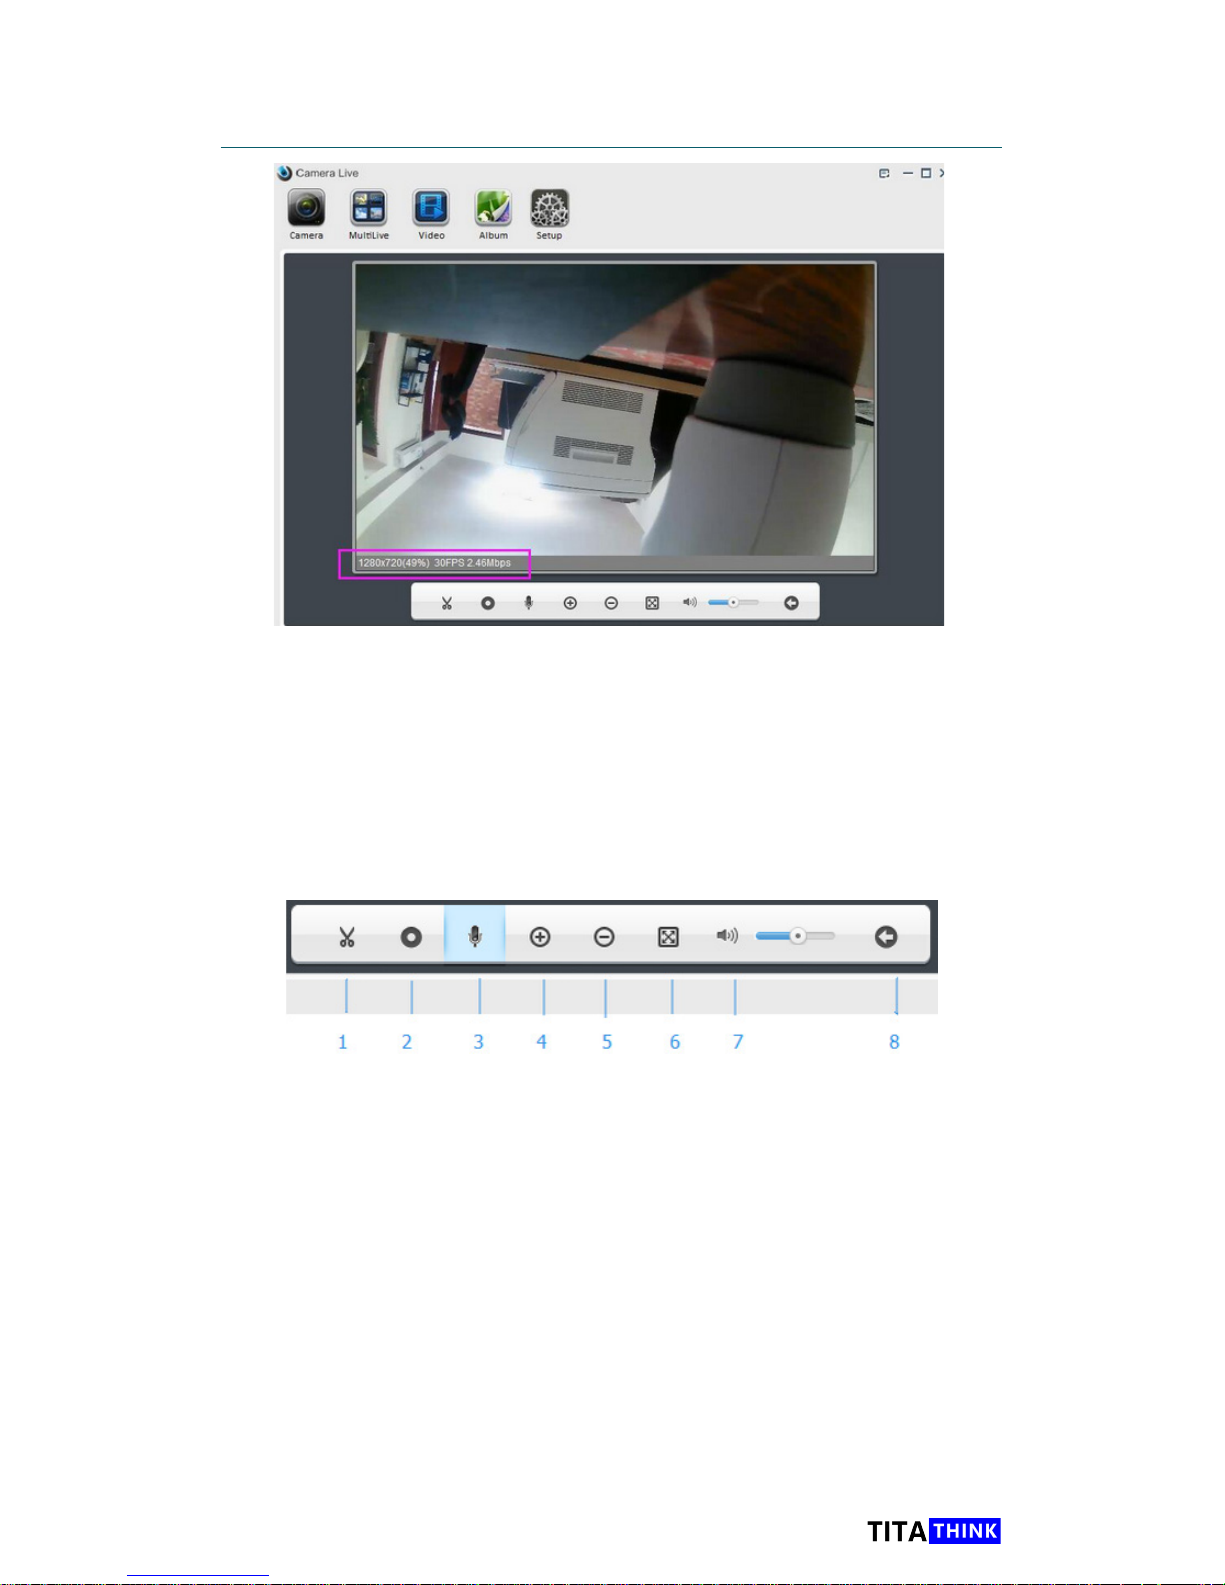
Playing interface
status bar on the bottom of view screen.
[1280×720] means the resolution of live view
.
[49%] This percentage gure is used to indicate the size of current live view screen is
49% of original resolution of camera. This percentage gure could be changed when
you change the size of Camera Live’s window.
[30FPS] The frame rate in real-time.
[2.46Mbps] The Bit rate of current live view.
1. Snapshot: Capture the current video stream as a photo. If you click the button, the
current video picture will be displayed in the Album, click the Album button and you will
nd it.
2. Record: Start/Stop recording video. Click once to start recording, when it’s recording,
the record button turns blue, click again to stop recording and the button turns black.
The video you recorded is displayed in the Video. Click the Video button and you will
nd it.
3. Microphone: Turn on/off the microphone.
4. Zoom in: Zoom in the display screen.
5. Zoom out: Zoom out the display screen.
6. Full screen: Display the live video with full screen.
7. Volume: Turn up/down the audio volume.
8. Return: Turn back to the camera list.
12
www.titathink.com
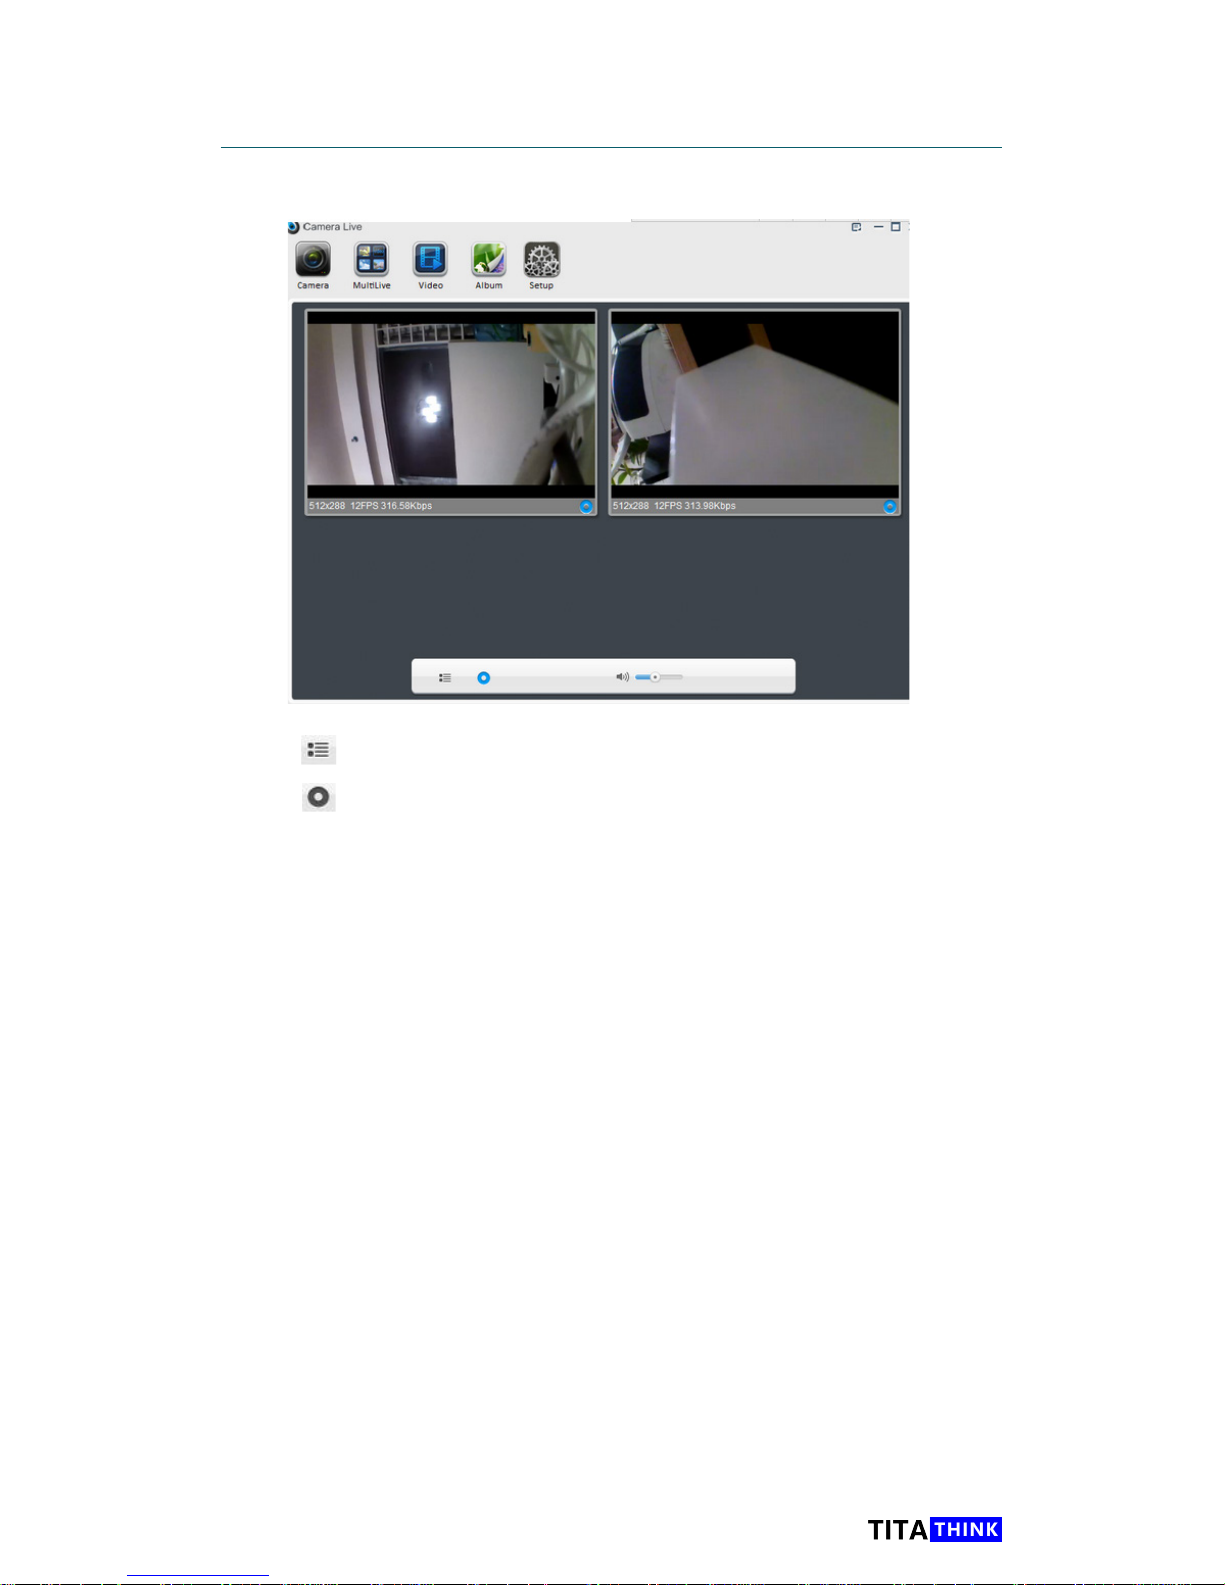
Click on, then select cameras you want to multi-view.
Click on, when you has added cameras in Multilive interface, then
select cameras you want to multi-record, then click OK to start
recording these cameras.
In order to provide a better user experience for our customers, we
are continuing to improve our CameraLive For the latest CameraLive
information, Visit:
http://support.titathink.com/knowledge-base/camera-livesoftware
MultiLive interface
13
www.titathink.com
Quick Start
You will also need:
********
Password:
A smart device
Smartphone or tablet running
iOS or Android System
A spare Ethernet port on
your router
If you want the camera
work with your wi network,
this spare ethernet port Just
for setup.
Your Wi-Fi Password to
your home network
The Wi-Fi password of
the same router your
camera is plugged into.
For the camera Wi-Fi
connection.
OR
OR
A windows PC / MAC
A Windows PC or Mac
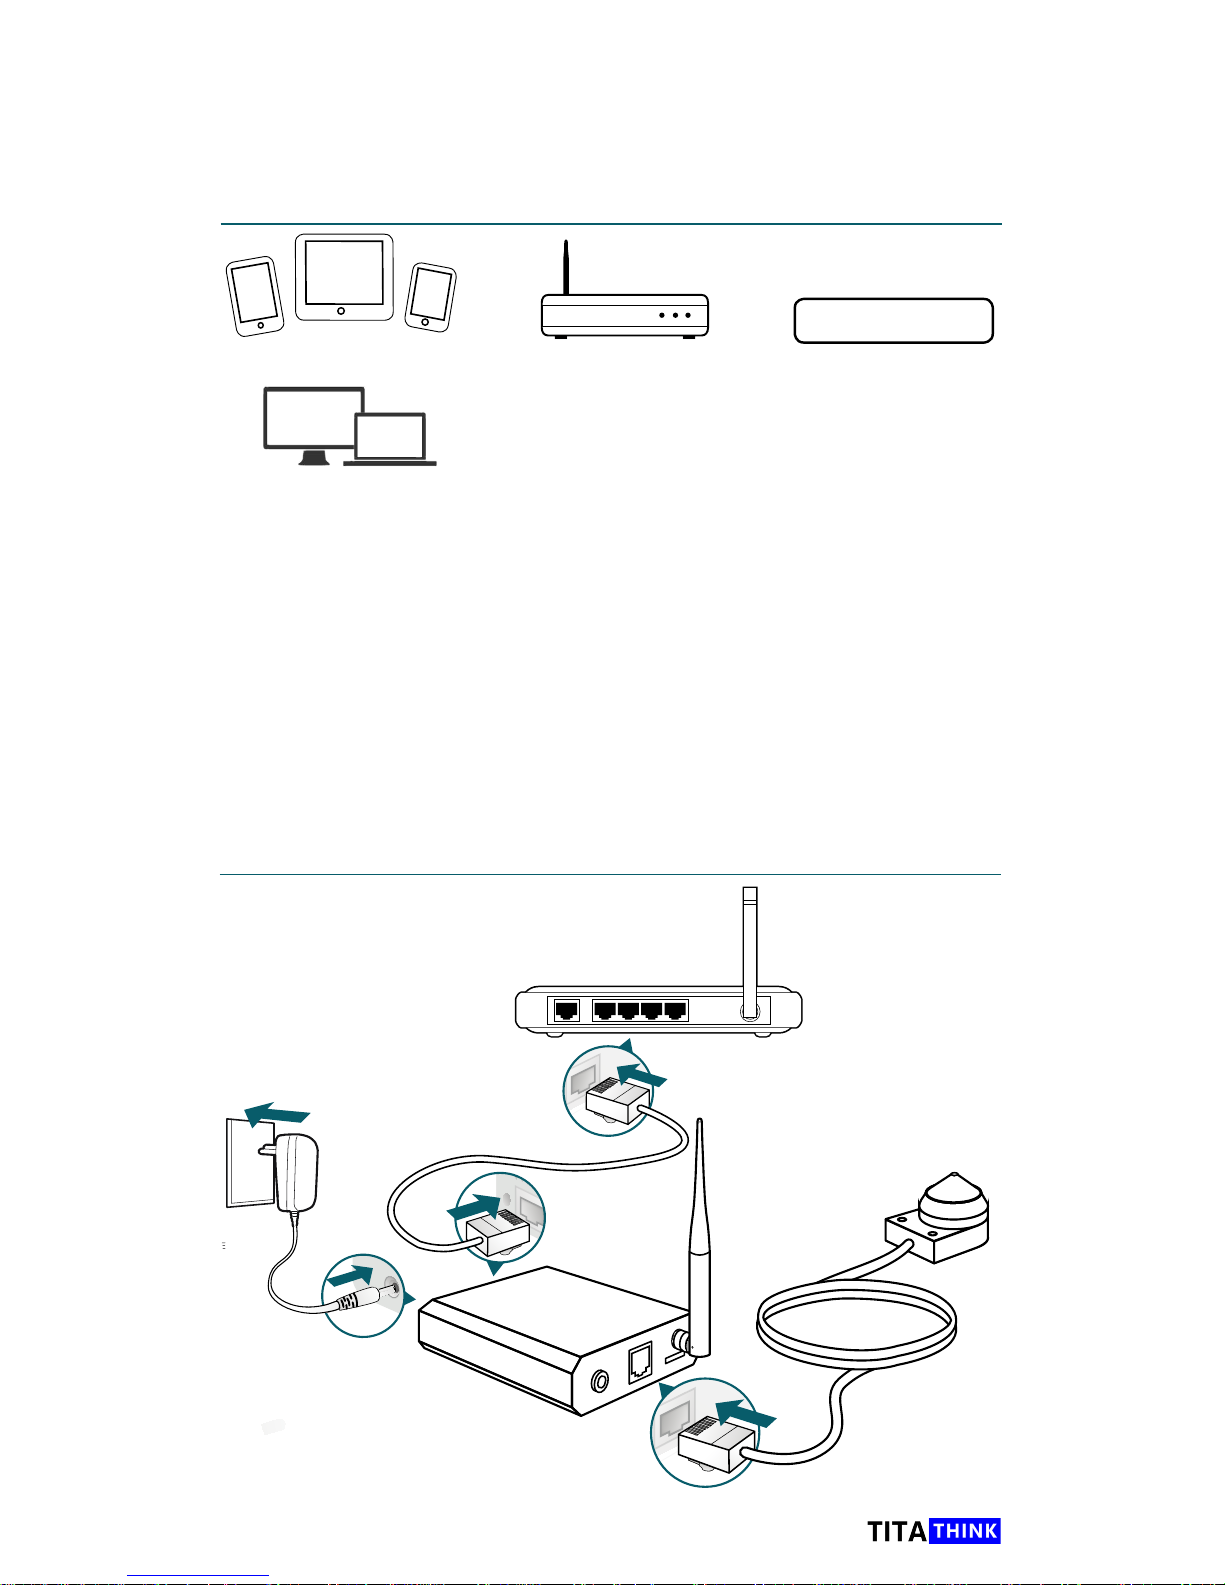
Connection
1, Connect the sensor unit to the main unit,
2, Connect the main unit to your rounter
3, Power up
2
Plug the provided Ethernet
cable into your router spare
Ethernet port, Plug the end of
the cable into Main Unit LAN
port
1
Plug the Sensor unit cable
into the Main Unit CAM port
Notice: Don't plug the Sensor
Unit cable into The Main Unit
LAN port
3
Power On
Connection Diagram
Note: if you want camera to connect to Internet, the router or switch device which
broadcasts WiFi signal should connect to Internet.
14
www.titathink.com
1. Install the APP on your Smart Device
Search the 'AnyScene' app in the App
store or Google Play. and install it on
your smartphone or tablet running iOS
or Android System
AnyScene
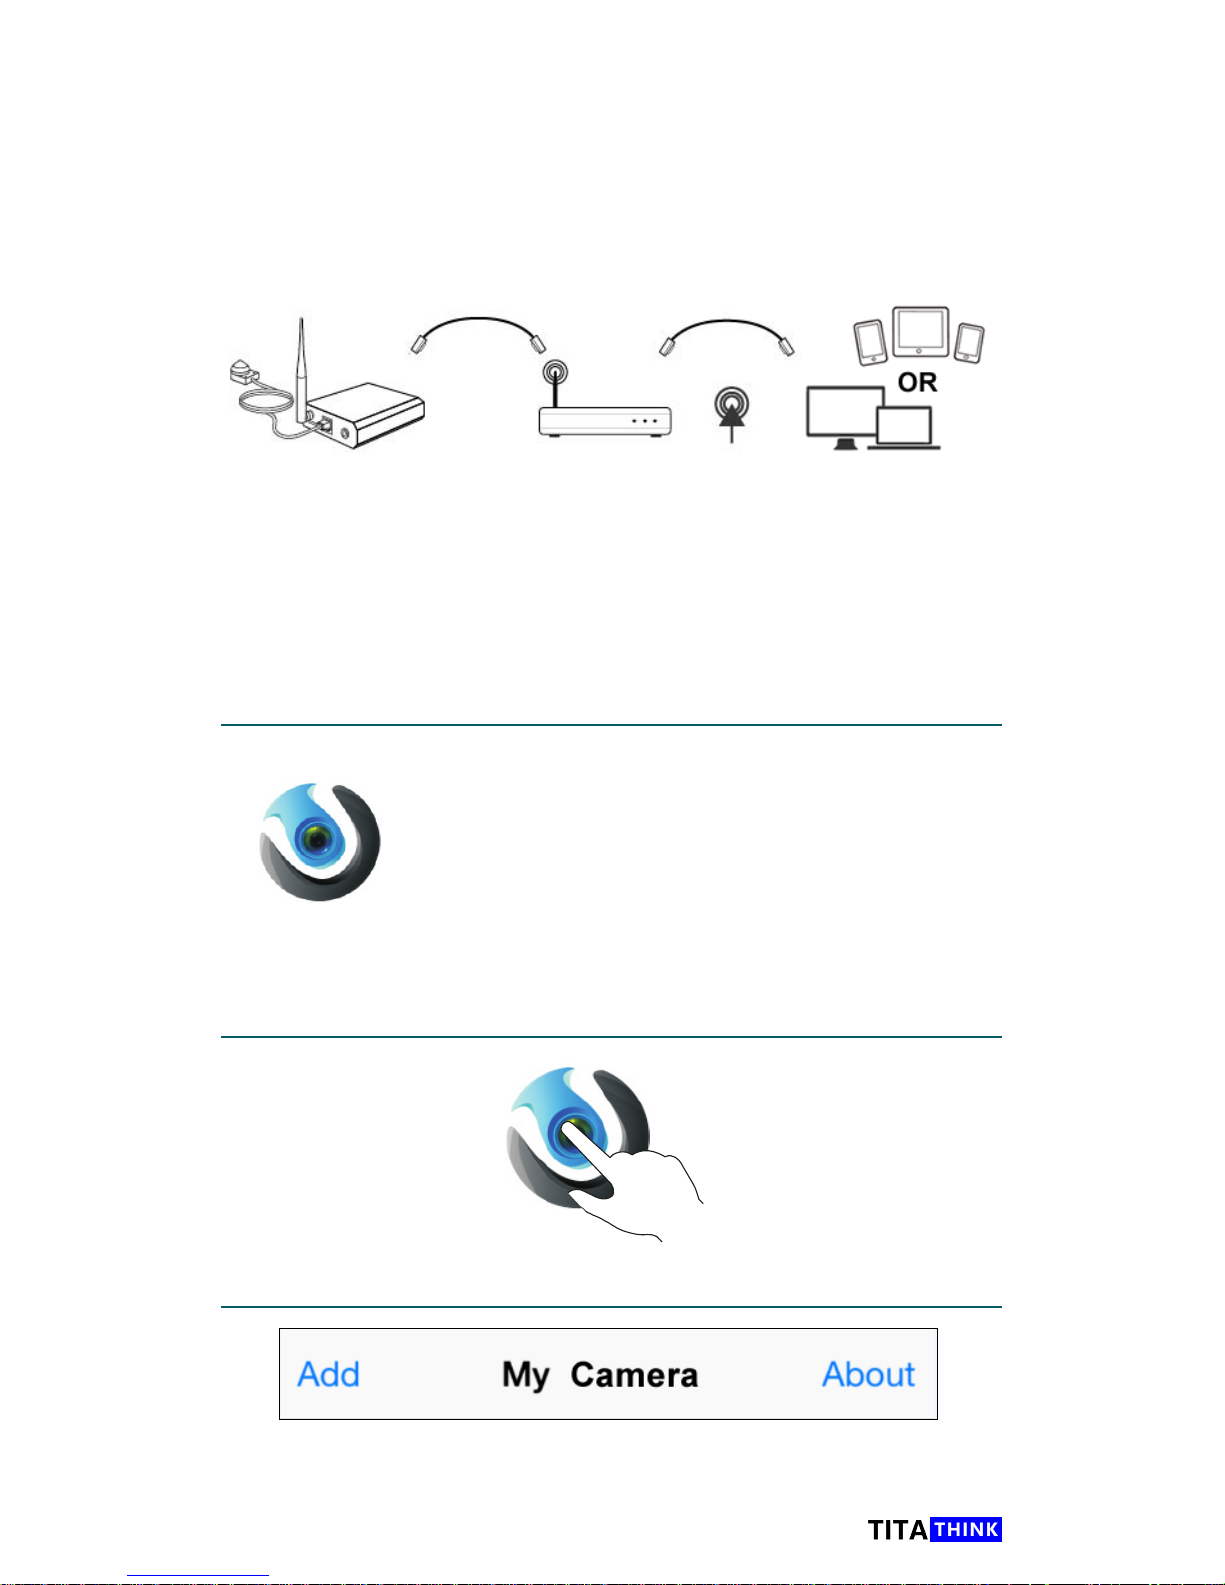
2. Run the AnyScene APP
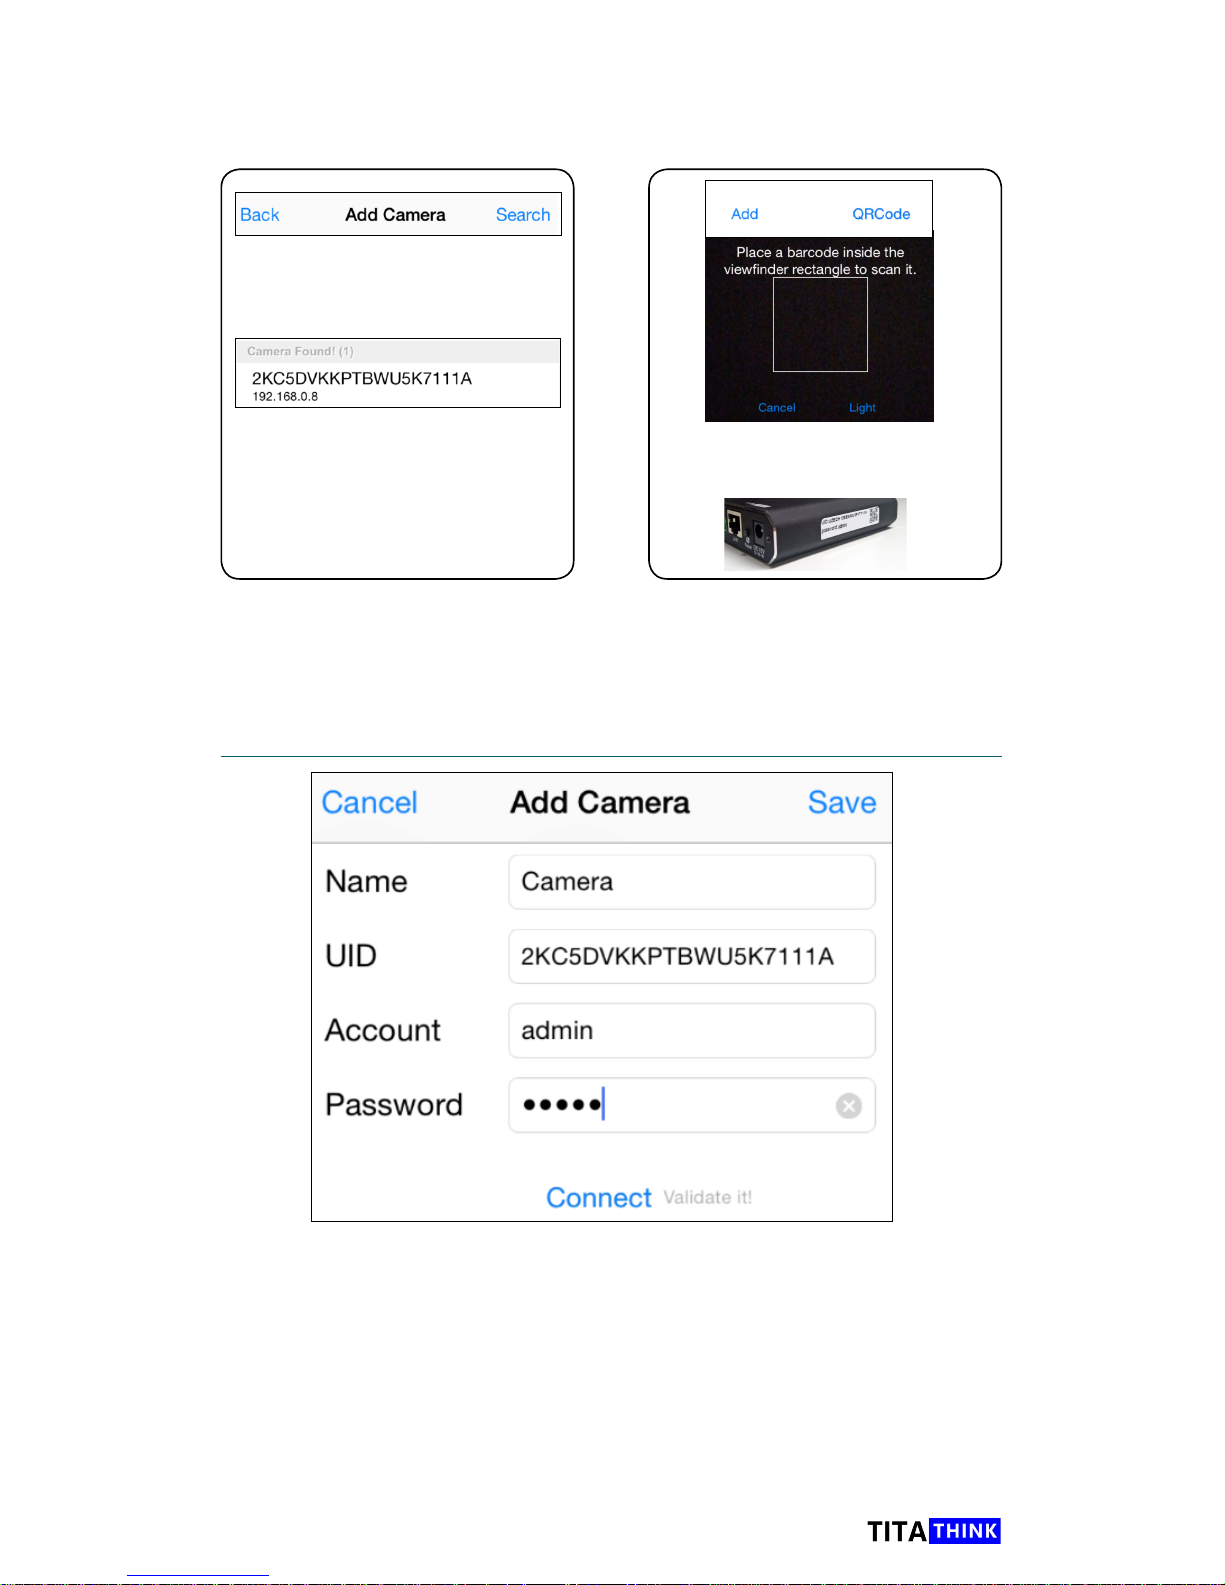
3. Add your camera Press “Add” button
Quick Start for iOS or Android Device
Camera
Ethernet Cable Your Rounter
Ethernet Cable
or Wi-Fi
Your iOS/Android
Device OR
Windows PC/Mac
Please make your camera and your terminal devices
are in the same Local area network( it means that
your camera and your terminal devices are connected
to same router )
15
www.titathink.com
Press "Search" to scan the Camera
on the same local area network
Press the camera you found to
connecting
There are two ways to add your camera
OR
Press "QRCode" to your camera's
QRCode, The Camera QRCode
was on the side of the Main Unit.
We recommand the frist way to add the camera, it can let you
know whether the camera is working properly and whether the
connection between your camera and your router is well.
4. Enter the password & Press “Connect“
Default password is "admin"
Enter password and press connect, when it show connected, your
camera has connected to your smart phone successfully. If you
just need wired connection, Pls click 'Save' and start to use. If you
need wireless Wi-Fi connection, Please see the following.
16
www.titathink.com
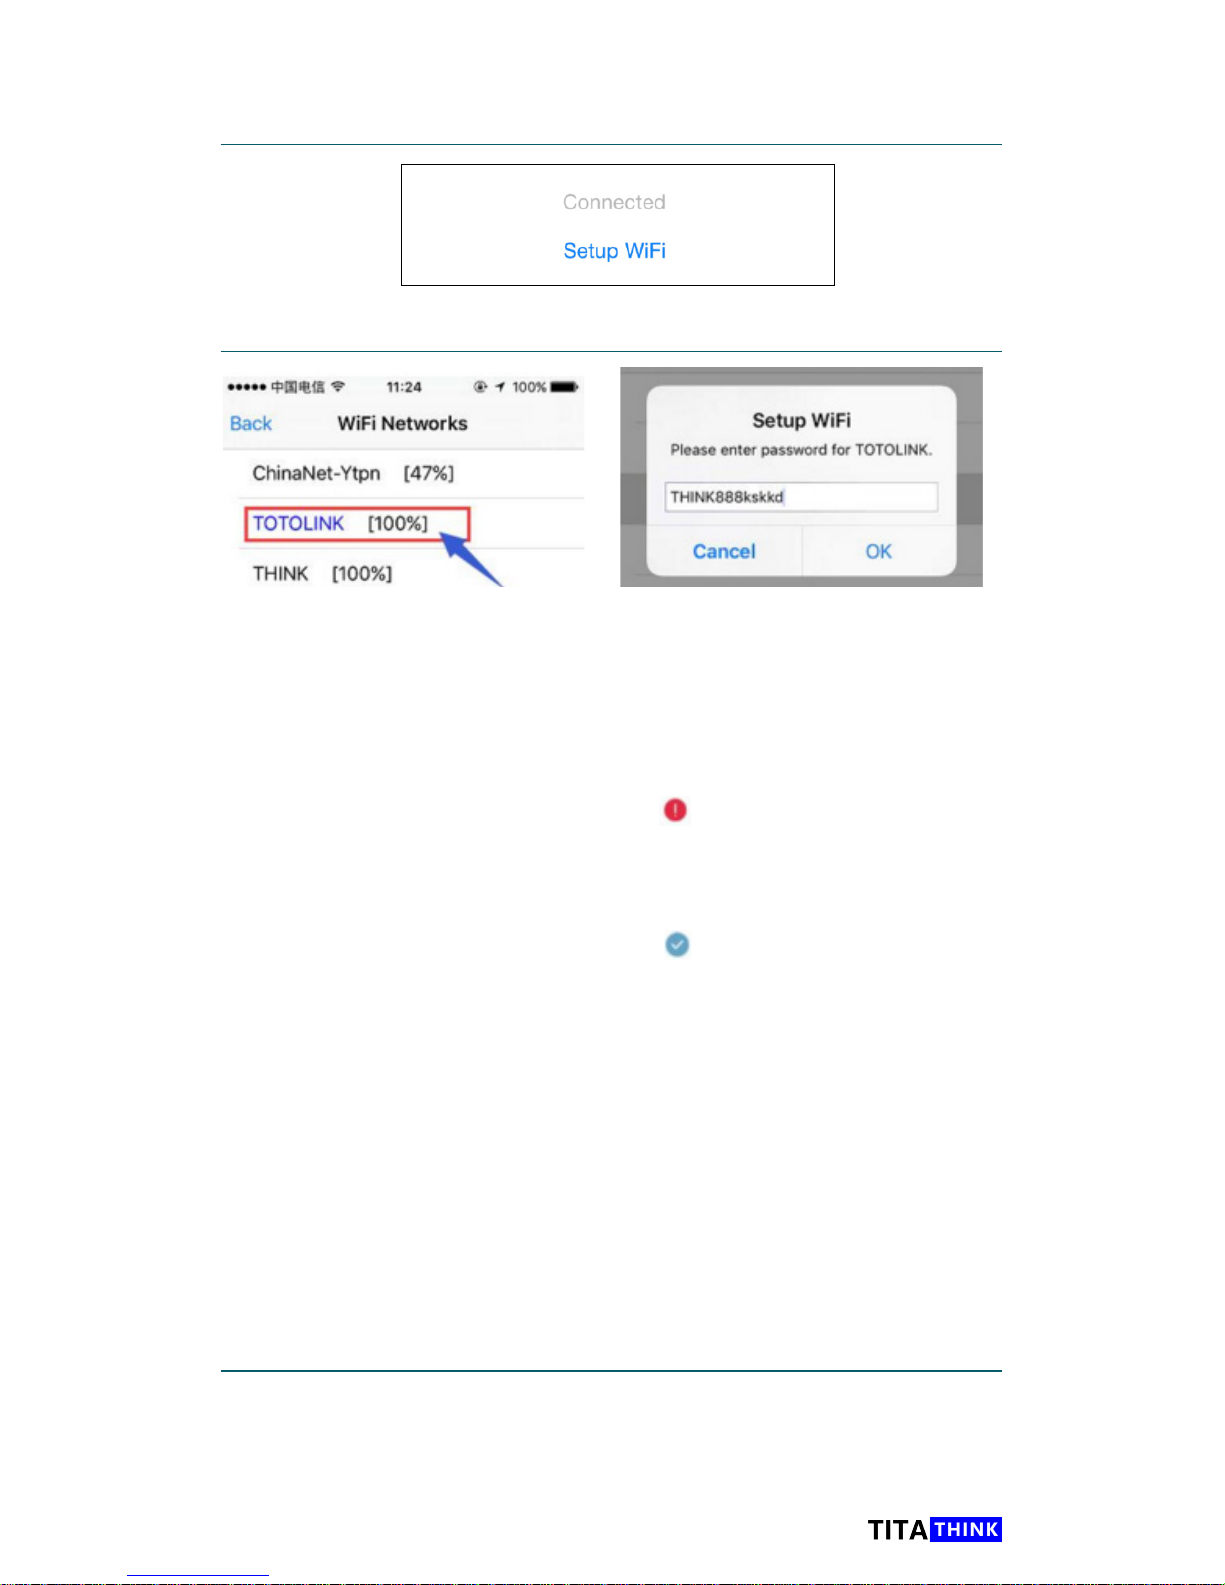
5. Press”Setup Wi-Fi” to Setup Wi Connection
6. Select your Wi-Fi SSID
7. Save your settings, Press “Save“
Type the WiFi password to the eld of “Setup WiFi” popup window. And
then please tap “OK” button.(Please note: The password can be any
mixture of lower and uppercase alpha-numeric characters. Extended
characters are not permitted. Do not use a wireless password with
spaces or punctuation in it. For example, " T & T's Wi-Fi#321" may
not work unless you change it to something like "TTWIFI321")
If you type a wrong password, there will be icon on the right side of WiFi
network. That means your password is incorrect or the WiFi connection
failed! Please move the camera main unit closer to the source of WiFi
signal. Tap the WiFi network password again to recheck it.
If you type a correct password, there will be icon on the right side of WiFi
network. Thar means the WiFi password is correct.
Please note: The strength of Wi-Fi signal at the camera main unit
location should be no less than 80%. Any less than that may be
unreliable, so you may want to move your router or the camera, or
adjust the angle of your router's antennas.
Keep in mind that the wireless signal travels easily through common
building materials such as wood, glass, sheet rock, and vinyl siding, but
does not go at all through metal, if there are any big metal objects such as
fridge, lling cabinet or HVAC ducting in between the Wi-Fi router and the
camera, try to reposition either the camera or the router so that the metal
object doesn't block the signal.
Please tap “Save” to finish the adding operations. WARNING: If you
don’t tap “Save” button, you will be unable to list this camera to “My
camera” interface.
17
www.titathink.com
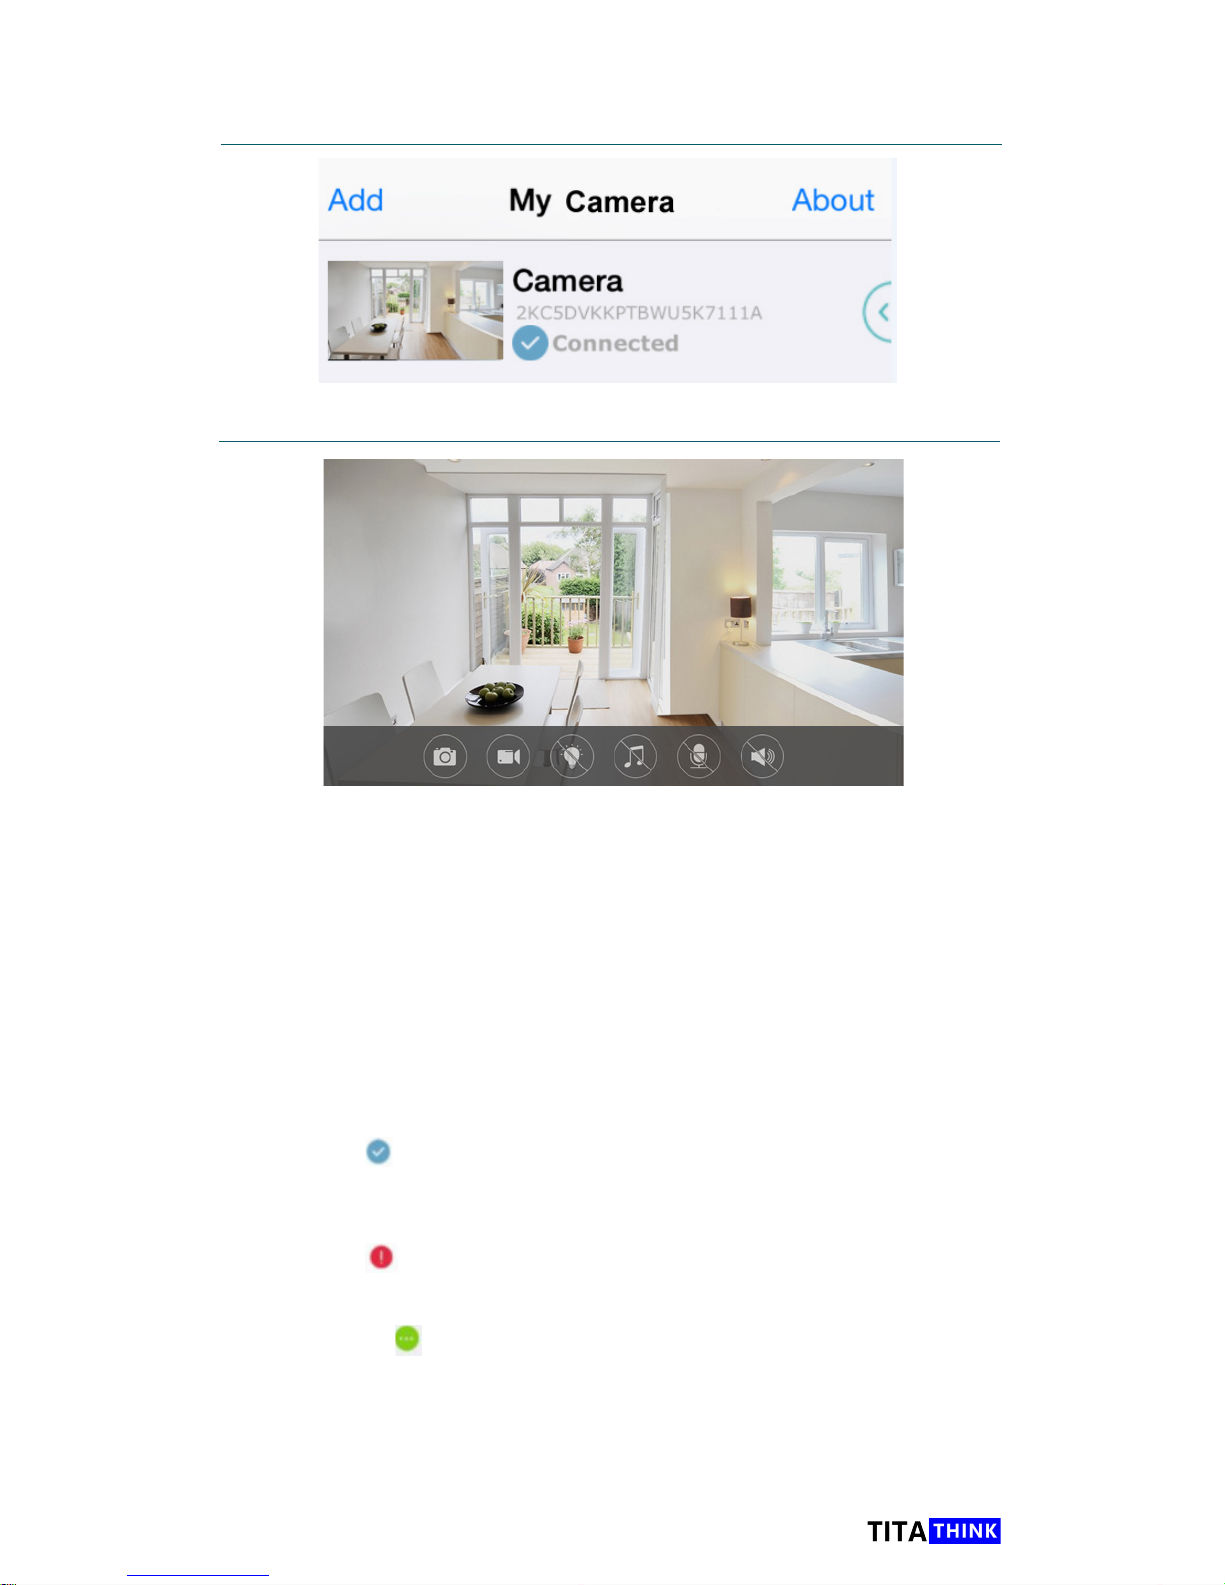
8. Press the camera to view it
9. You are now ready to use the camera
10, Unplug the network cable for Wi-Fi
Once you have finished the camera Wifi setting, you can take a try to
unplug the LAN cable from router, and move the camera to your desired
position.
NOTE: If you don’t unplug the LAN cable, the camera will preferentially
use LAN cable to transmit the data and the WiFi module of camera will be
standby.
After you unplug the LAN cable, please recheck the status of camera:
1, Open Anyscene APP, and go to “My Camera” interface.
2, Check the status icon on the camera title.
The blue dot means that camera has successfully worked with WiFi.
The camera can connect to Internet if the router is connected to
Internet.
The Red dot means that camera connected to WiFi unsuccessfully.
Please recheck the WiFi settings according to this document.
The Green dot means that camera is trying to connect WiFi. This
progress may take about 1 minute. If connection successful, this dot will
switch to blue dot. otherwise, it will switch red dot. You have to recheck the
WiFi setting.
18
www.titathink.com
Quick Start for Windows PC or Mac
1. Install CameraLive on your PC or MAC
CameraLive
Find the 'CameraLive' software in the provided CD, or
download it from titathink website
( http://support.titathink.com/knowledge-base/camera-live-software
)
.
Install the CameraLive software on your PC or MAC.
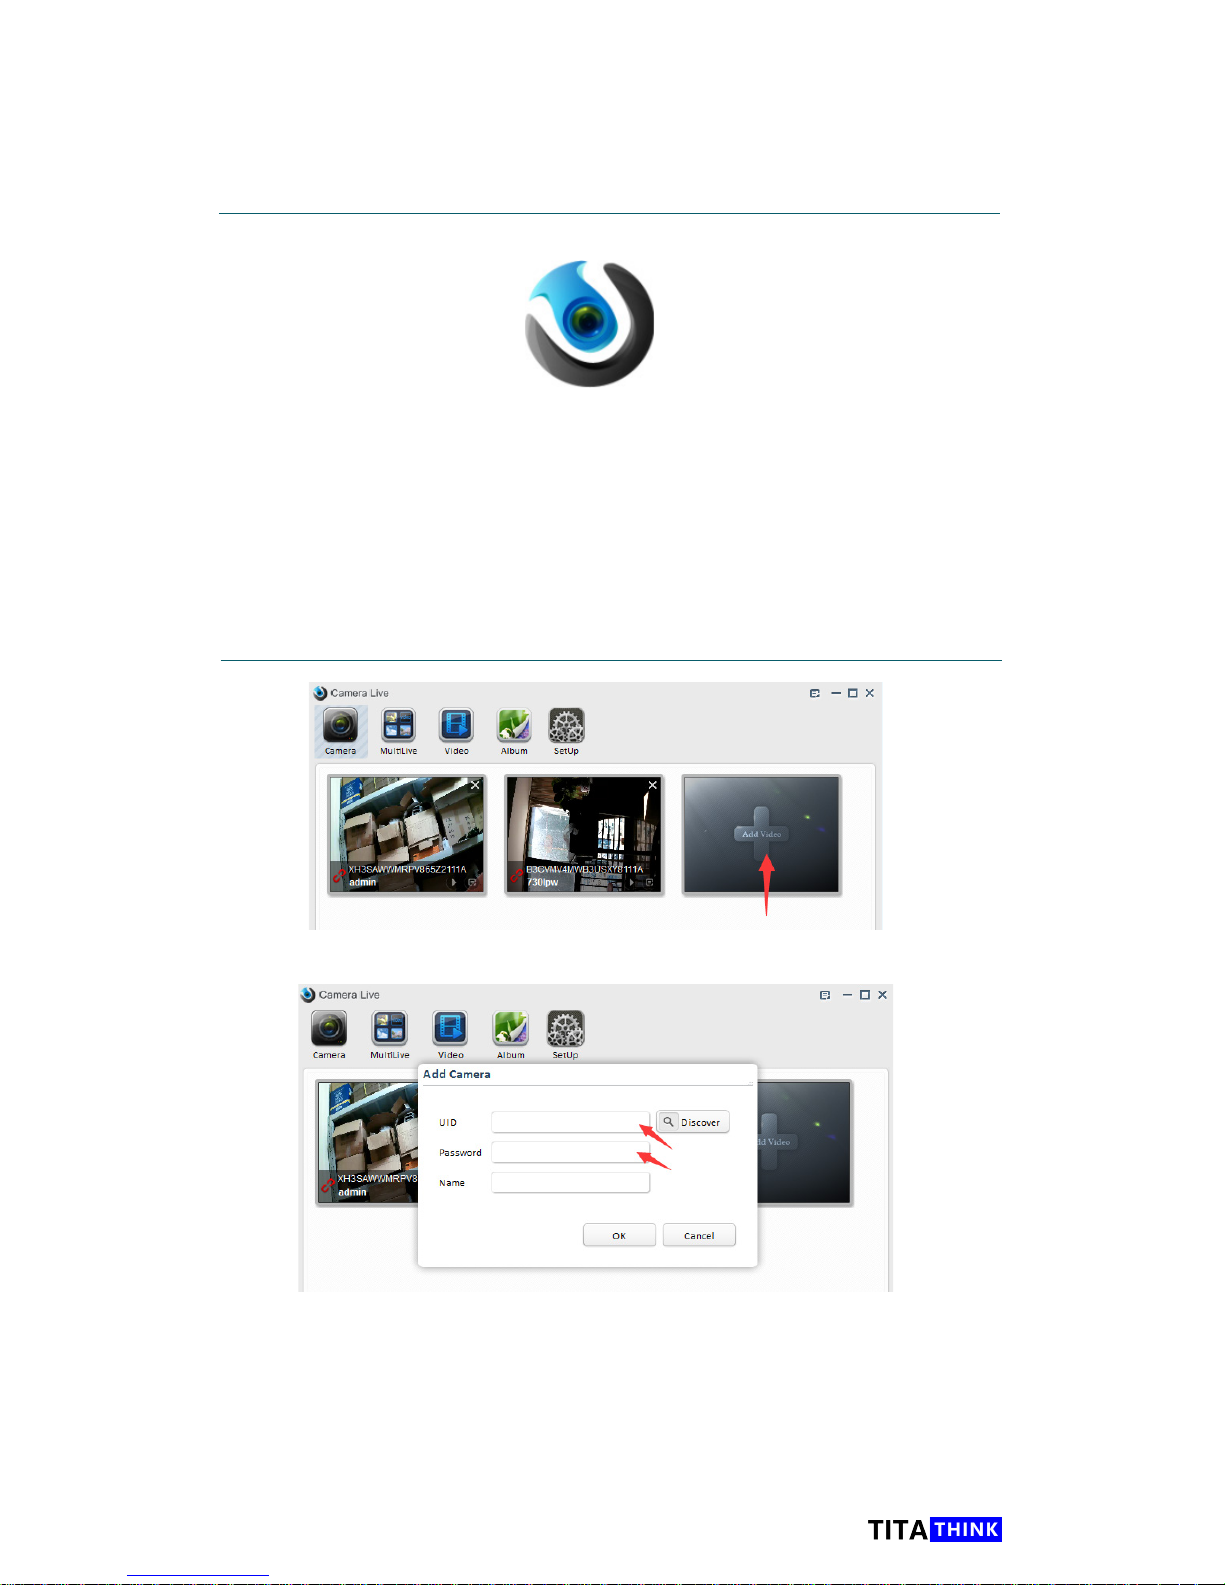
2. Add camera to CameraLive and view it
Click on "Add Video" to add the Camera
There are two ways to ll the camera UID number,
1, You can get the camera UID number from the camera main unit,
and type the UID number into the UID text box.
2, Click the ‘ Discover ‘ button, If your camera and your MAC are in
the same local area network, the camera can nd out the camera.
19
www.titathink.com
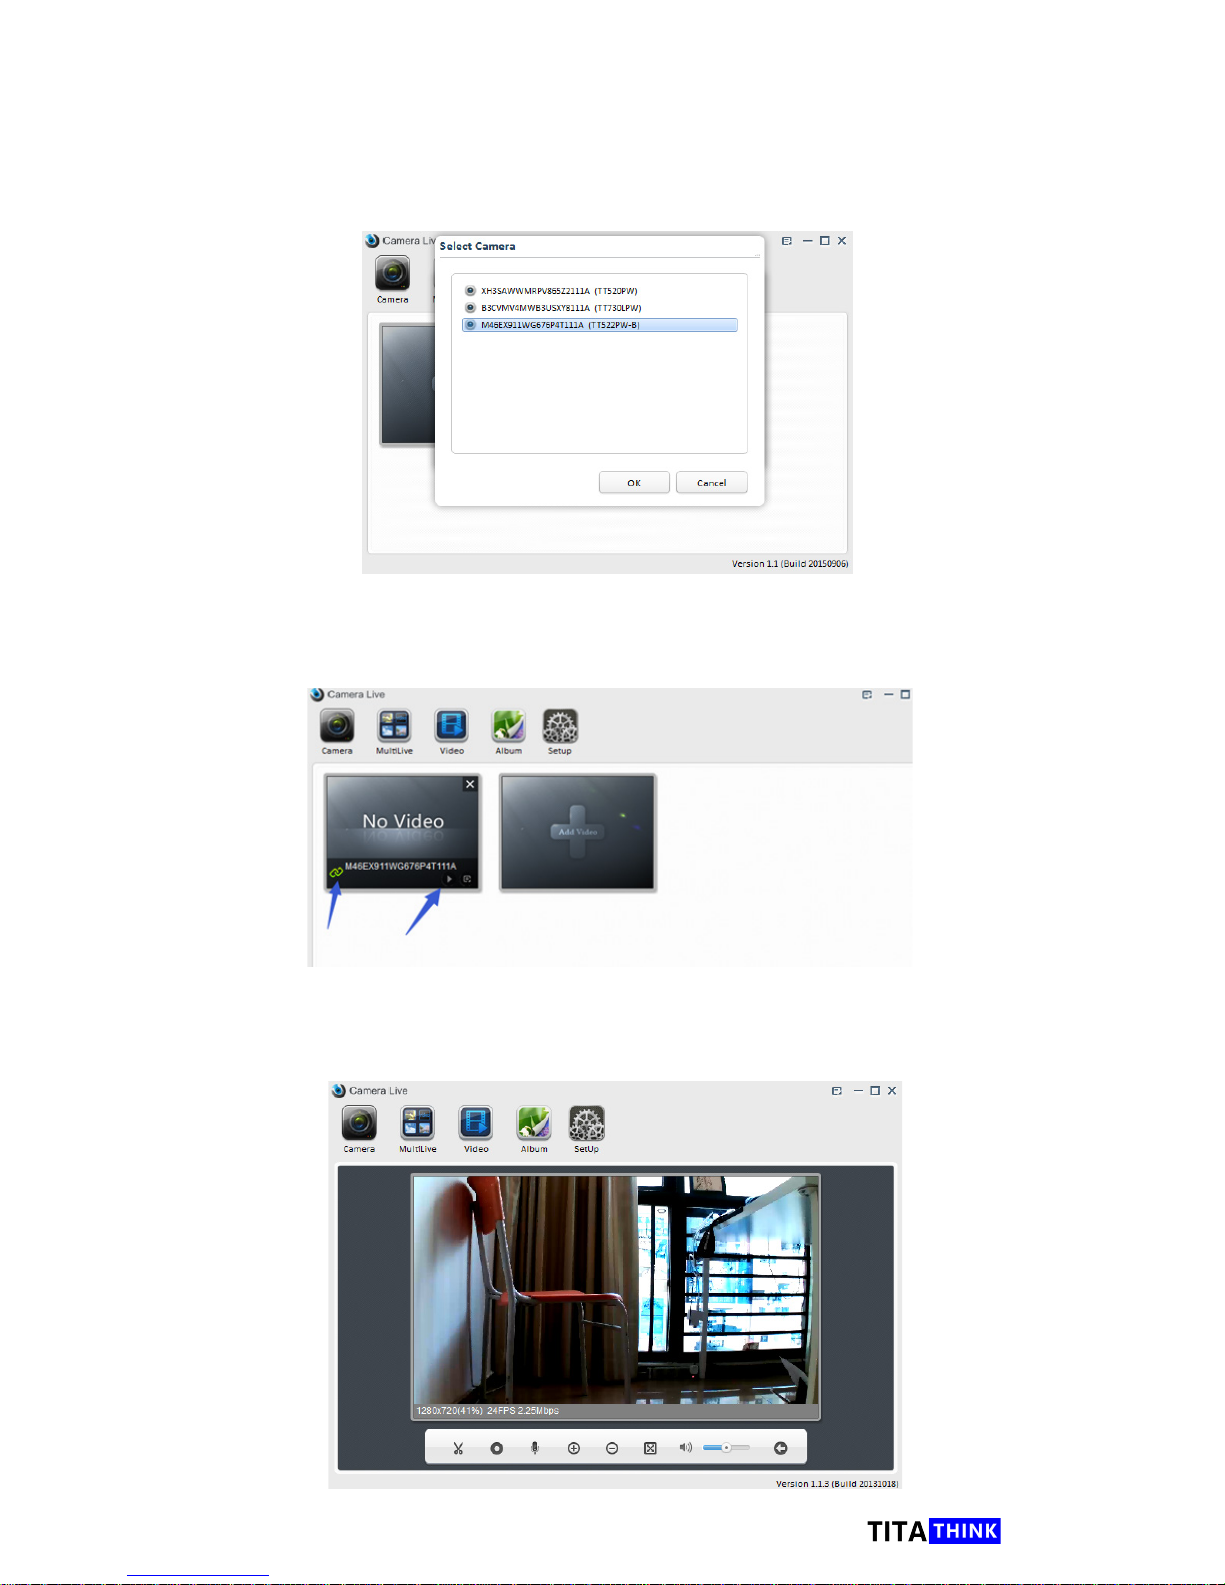
In here we use the second way to ll the UID number, Click the
‘ Discaover ‘ button, the CameraLive will nd out all Titathink
cameras in the local area network, then select your camera and
click ok.
Then the cameralive will require you enter username and
password, the factory default For User name and Password are ‘
admin ’. Click ok, your camera will be added to your cameralive.
When the chain icon is green, it means that your camera has
connected to your computer successfully. You can click the play
icon or double click the big icon to start viewing.
 Loading...