

Page 1

http://www.titanjet.com.cn
Tel:+86-760-88667089 / 88667090
Fax:+86-760-88667096
Web: http://www.titanjet.com.cn
email:sales@titanjet.com.cn
Add:No.6-2,Jin Hua Zhong Road,Zhongshan City,Guangdong,China - 1 -
Integrity Excellence Profession
Tao Tech Digital Technology CO.,LTD is a professional manufacturer and supplier engaged
in R&D, Manufacture and Distribution of digital inkjet printer equipment. We research and
development the high speed, high resolution and stable printing control system in many kinds
of industry printing application by USA TRIDENT and Japan EPSON print-head ,such as
textile ,ceramic ,solvent, water base, UV printing.
PDF created with pdfFactory Pro trial version www.pdffactory.com
Page 2

http://www.titanjet.com.cn
Tel:+86-760-88667089 / 88667090
Fax:+86-760-88667096
Web: http://www.titanjet.com.cn
email:sales@titanjet.com.cn
Add:No.6-2,Jin Hua Zhong Road,Zhongshan City,Guangdong,China - 2 -
Titan-jet 1626 water base & eco-solvent piezo printer
Instruction manual
Statement of responsibility and copyrights
The manual is just for assembling the printer after you purchased the Titan-jet 1626. Our
company does not responsible for any expression and obligation on content. Maybe there are
many writing errors and careless omission of technical description even if detailed examination,
we would like to accept advice to improve our service. All works by Tao Tech Digital
Technology CO.,LTD , and the work copyright law by the People’s Republic of China
Copyright Law protection. Do not engage in part or all in of the manual additions and deletions,
adapt, excerpt, reproduce or imitate behavior without agreement.
Index
Page
Foreword introduction-------------------------------------------------------------------------------- 01
Chapter I Brief introduction
1) Power Supplier safety------------------------------------------------------------------------------------04
2) The Do’s and The Don’ts--------------------------------------------------------------------------------04
3) Safety location and use of environment---------------------------------------------------------04
4) Ink Location and use precautions--------------------------------------------------------------------05
5) Performance parameters--------------------------------------------------------------------------------05
Chapter II Installation of Printer
1 、To know about TITAN JET Printer ---------------------------------------------------------------07
2 、Operating instructions of Keypad -----------------------------------------------------------08
3 、Installation -------------------------------------------------------------------------------------------08
4 、Electrify、Carriage reset、outer setup、material forward and backward-----------11
Chapter III Use of MainTop
1 、 Installation--------------------------------------------------------------------------------------12
1), How to Install Maintop-------------------------------------------------------------------------12
2) Setup of printer driver and printing interface ----------------------------------------------13
2 、 How to use Maintop------------------------------------------------------------------------16
3 、 Printing images----------------------------------------------------------------------------19
4 、 Others about Maintop ----------------------------------------------------------------------22
Chapter IV Printing Control System
1 、Installation of software and USB driver----- ------------------------------------------22
2 、Main Menu--------- ----------------------------------------------------------- -------------------28
PDF created with pdfFactory Pro trial version www.pdffactory.com
Page 3

http://www.titanjet.com.cn
Tel:+86-760-88667089 / 88667090
Fax:+86-760-88667096
Web: http://www.titanjet.com.cn
email:sales@titanjet.com.cn
Add:No.6-2,Jin Hua Zhong Road,Zhongshan City,Guangdong,China - 3 -
1) File Menu ------------------------------------------------------------------------------------------------------28
2) Printing Menu -----------------------------------------------------------------------------------29
3) Tools ----------------------------------------------------------------------------------------29
4) Help ------------------------------------------------------------------------------------------29
3 、 Tool Bar Introduction------------------------------------------------------------------------29
4 、 Printing -----------------------------------------------------------------------------------------30
5 、General settings ---------------------------------------------------------------------------------30
6 、 Status information--------------------------------------------------------------------------------30
7 、 Other information about Printing control system------------------------------------------31
1) Print head Printing Parameter ---------------------------------------------------------------------------------31
2) Print calibration -------------------------------------------------------------------------------------------------31
3) Other parameters calibration----------------------------------------------- -------------------------------33
8、Adjust after control software installed----------------------------------------------------36
Chapter V Maintenance guide-------------------------------------------------40
PDF created with pdfFactory Pro trial version www.pdffactory.com
Page 4

http://www.titanjet.com.cn
Tel:+86-760-88667089 / 88667090
Fax:+86-760-88667096
Web: http://www.titanjet.com.cn
email:sales@titanjet.com.cn
Add:No.6-2,Jin Hua Zhong Road,Zhongshan City,Guangdong,China - 4 -
Chapter I Brief Introduction
Summary
Thank you very much for purchasing our product, this manual can help you to assemble and
use the printer, through the index, you can find the topic related quickly. Please place the
reference manual easy to reach.
This manual is made up of four parts: 1):How to operate the Printer ,
2):How to use Printing control software
3):How to use Maintop software,
4):Daily Maintenance of Printer
The machine have passed the strict inspection before delivery and attached labels .To avoid
damage to the printer,please read the manual carefully before you use the printer。
1. Power supplier safety
Attention: For safety of the operator and Printer, ground wire must be connected! The printer
should be installed by qualified maintenance technician。
A. Power supply: single-phase 220V AC /50HZ. Max power: 1000W, Print power: 100W
B. Using only the power type that the printer label identified. You can choose 110V AC or 220V AC
power supply according to your countries or regions’ applications.
C. Connecting all equipments to a properly ground outlet to avoid the use of sockets with those in the
frequent switching between on and off the device (such as: photocopiers, air-conditioning systems) in
the same circuit.
D. Avoid to use of wall-board switch or autotimer controlled outlet, always turn off your printer by the
power switch which is on the right side of printer.
E. Do not use damaged or broken power wire.
F. If additional power wire has to be used, make sure the sum of amperage of other device and the
additional power device can not exceed the rated amperage of the power supply. Do remember the
sum of amperage of other devices and the additional power wire plugged into the wall can not exceed
the wall outlet’s rated amperage of power supply.
G. Keep your computer system away from electromagnetic interference source(s) such as
loudspeaker or wireless telephone. Do not try to repair printer by yourself while meet problems,
seeking for help from printer maintenance technicians in time.
2. Attentions for operating printer
A、Don’t plug off printer power supply or other related data cable before printer power supply has been turned
off.
B、To avoid the unnecessary loss caused by behind cleaning the tools or other articles which put on the print
table or cover of printer by careless after machine running., Do not put tools or other articles on printer
table or cover.
C、Make sure the carriage has been fixed on the original place before moving printer.
PDF created with pdfFactory Pro trial version www.pdffactory.com
Page 5

http://www.titanjet.com.cn
Tel:+86-760-88667089 / 88667090
Fax:+86-760-88667096
Web: http://www.titanjet.com.cn
email:sales@titanjet.com.cn
Add:No.6-2,Jin Hua Zhong Road,Zhongshan City,Guangdong,China - 5 -
3. Attentions for installation and use environment
The printer should be positioned stably and levelly, and well for ventilation, for easier plug on/off, Place
your printer close to wall outlet. Don’t exposure printer under sunlight, highlight or other heat sources to keep
a good temperature and humidity environment. Using temperature:18-30 ℃; Humidity:40%-80%. For best
printing status, air conditioner and thermometer are required. Printer must far away from strong radiation
interference source.UPS and power stabilizer (power above 1500W) is suggested to adopt.
4. Attentions for Ink placement and using
Ink should be out of reach of children to prevent them touch or inhale in, washing with soap and water if ink
contact with skin; washing with fluid water immediately if ink contact with eyes; to avoid ink leakage, don’t
shaking the ink bottle; after a period (2 months) of using, ink bottle should been cleaned and dry in the air,
cleaning printer before replace new ink bottle to make sure printing quality. Store ink in a cool place and
don’t exposure under sunlight
5、Parameter
Print-head Epson DX6 Resolution 1440 DPI
Number of
print head
2
Number of
Nozzle
1080 (9 * 60*2)
Color C M Y K Lc Lm Color Range 16.7million
Print table
width
1720 MM Print width 1600 MM
2 PASS 24 m2 /hr
4 PASS 12 m2 /hr
6 PASS 8 m2 /hr
Speed
8 PASS 6 m2 /hr
Ink
Aqueous, pigment,
Eco-solvent,sublimaiton
Color
Management
ICC or density curve
RIP Software MAINTOP 5.3
Operation
System
Windows2000, XP
Interface USB 2.0 Power Supplier
50HZ/60HZ,220V/110V,
10A
Heating Front heating Dry Fun
Material
Paper, Frontlit, Flex banner,
mesh, leather…
Image format Bmp,TIF,Jpg,Pdf…
Media
Handling
Roll to roll, sheet by sheet Humidity 40% - 70%
Dimension 2.7M * 0.76M * 0.74M Weight 250 KG
PDF created with pdfFactory Pro trial version www.pdffactory.com
Page 6

http://www.titanjet.com.cn
Tel:+86-760-88667089 / 88667090
Fax:+86-760-88667096
Web: http://www.titanjet.com.cn
email:sales@titanjet.com.cn
Add:No.6-2,Jin Hua Zhong Road,Zhongshan City,Guangdong,China - 6 -
Chapter II Installation and Acquaintance of Printer
1、Acquaintance of Printer
Illustration of Titan-jet 1626 water base & eco-solvent piezo printer
2.Keypad operating instruction of Titan-jet 1626 water base & eco-solvent piezo printer
Clean: Automatic Ink suction button
Roller Start: Automatic material feeding, take up button
Print/Pause: Printing start, pause,continue button
Fan: Fun button for drying
Move Up: Material move backward button
Move Down: Material move forward button
PDF created with pdfFactory Pro trial version www.pdffactory.com
Page 7

http://www.titanjet.com.cn
Tel:+86-760-88667089 / 88667090
Fax:+86-760-88667096
Web: http://www.titanjet.com.cn
email:sales@titanjet.com.cn
Add:No.6-2,Jin Hua Zhong Road,Zhongshan City,Guangdong,China - 7 -
3. Installation of Titan-jet 1626 water base & eco-solvent piezo printer
Installation steps after unpacking:
3.1:unpacking: Remove the Buffer foam and dustproof plastic wrap after unpack, take out of all spare parts, check
Attention:Check carefully to confirm no spare parts lost!!!
3.2:installing the stand
Take out 2 stander, stabilize beam。to fix stander with 10pcs M6*10 inner hexagon screw。Fix the Square stabilize beam on the stander
with 8pcs M5*10 cross screw.(See illustration)
Installation illustration of Stander and Square stabilize beam
3.3 Installation of material holder and fans
3.3.1. Installation of material holder
A: Fix the material holder on standers with 16 pcs M4*10 cross screw(each side 8 pcs screw)。
PDF created with pdfFactory Pro trial version www.pdffactory.com
Page 8

http://www.titanjet.com.cn
Tel:+86-760-88667089 / 88667090
Fax:+86-760-88667096
Web: http://www.titanjet.com.cn
email:sales@titanjet.com.cn
Add:No.6-2,Jin Hua Zhong Road,Zhongshan City,Guangdong,China - 8 -
B: Wear the material holder tray on steel roller, fix the square metal and steel roller with 10 pcs M4*10 cross screw
onto stander(each side 5 pcs screw),Install it well so as to material feeding can be controlled well when printing.
3.3.2,Installation of fans.
Fix the fan on stander with 6 pcs M5*10 cross screw(each side 3 pcs screw) See illustration below:
Overall view of printer stander :
PDF created with pdfFactory Pro trial version www.pdffactory.com
Page 9

http://www.titanjet.com.cn
Tel:+86-760-88667089 / 88667090
Fax:+86-760-88667096
Web: http://www.titanjet.com.cn
email:sales@titanjet.com.cn
Add:No.6-2,Jin Hua Zhong Road,Zhongshan City,Guangdong,China - 9 -
3.4. Installation of body (printing part)
Remove the Buffer foam and dustproof plastic wrap after unpack, put on stander in right position by forklift and fix
with 4 pcs M5*20 cross screw
Assembling illustration
Attention:Be careful when assembling to make sure every step is accurate and screw fix well
Overall view of printer:
PDF created with pdfFactory Pro trial version www.pdffactory.com
Page 10

http://www.titanjet.com.cn
Tel:+86-760-88667089 / 88667090
Fax:+86-760-88667096
Web: http://www.titanjet.com.cn
email:sales@titanjet.com.cn
Add:No.6-2,Jin Hua Zhong Road,Zhongshan City,Guangdong,China - 10 -
4 、Electrify, reset of carriage and others
4.1. take out the power wire from spare parts box and connect printer to 220V AC power supplier,
main board will release a bee sound when press the switch on, and the 6 lights on the carriage will
lighting, see illustration:
6 Lights
4.2.The carriage will move to right slowly when turn on the printer, then to left a little while the limit stopper
which on the right front of the carriage move to the upside position of the yellow limit switch and at least arrived at the
middle of limit switch, during this action, the red light on limit switch will gleam,at the same time, the main board will
respond a sound, this actions mean the carriage reset normal, otherwise you need to check if the connections of
machinery and limit switch connect well or not.
Limited switch
4.3 press the fun button on the key panel ,turn on the power button in the front of the printer.
PDF created with pdfFactory Pro trial version www.pdffactory.com
Page 11

http://www.titanjet.com.cn
Tel:+86-760-88667089 / 88667090
Fax:+86-760-88667096
Web: http://www.titanjet.com.cn
email:sales@titanjet.com.cn
Add:No.6-2,Jin Hua Zhong Road,Zhongshan City,Guangdong,China - 11 -
check all funs work well or not, turn on the button for front, middle, back heating, check heating system
work well or not。
4.4 press move down ,move up button to check material feeding and backward function work
well or not, press one time for action, second time for pause
4.5 move the wiper front and back slightly to testing the wipe motor, if the wiper can not move freely; apply
some lubricating oil to the small guide rail.
PDF created with pdfFactory Pro trial version www.pdffactory.com
Page 12

http://www.titanjet.com.cn
Tel:+86-760-88667089 / 88667090
Fax:+86-760-88667096
Web: http://www.titanjet.com.cn
email:sales@titanjet.com.cn
Add:No.6-2,Jin Hua Zhong Road,Zhongshan City,Guangdong,China - 12 -
Chapter III Using of Maintop software
1.Installation of RIP software:
1.1、Installing software:
Insert the Maintop CD into CD-Rom of your computer, double-clicking the SETUP.EXE icon,
the software will install automatically:
PDF created with pdfFactory Pro trial version www.pdffactory.com
Page 13

http://www.titanjet.com.cn
Tel:+86-760-88667089 / 88667090
Fax:+86-760-88667096
Web: http://www.titanjet.com.cn
email:sales@titanjet.com.cn
Add:No.6-2,Jin Hua Zhong Road,Zhongshan City,Guangdong,China - 13 -
Click first one to start install
Choose installing root and click OK
PDF created with pdfFactory Pro trial version www.pdffactory.com
Page 14

http://www.titanjet.com.cn
Tel:+86-760-88667089 / 88667090
Fax:+86-760-88667096
Web: http://www.titanjet.com.cn
email:sales@titanjet.com.cn
Add:No.6-2,Jin Hua Zhong Road,Zhongshan City,Guangdong,China - 14 -
1.2、Maintop printer Setup and installing:
A、after installed the software,operate as following step: start-procedure-maintop-open software-file- printer setup
B、dialogue box will appears after opening printer setup:
PDF created with pdfFactory Pro trial version www.pdffactory.com
Page 15

http://www.titanjet.com.cn
Tel:+86-760-88667089 / 88667090
Fax:+86-760-88667096
Web: http://www.titanjet.com.cn
email:sales@titanjet.com.cn
Add:No.6-2,Jin Hua Zhong Road,Zhongshan City,Guangdong,China - 15 -
C、C、Click the button: installing maintop printer
D, Choose self deification printer
E: Choose the right icc for Eco solvent or water base
PDF created with pdfFactory Pro trial version www.pdffactory.com
Page 16

http://www.titanjet.com.cn
Tel:+86-760-88667089 / 88667090
Fax:+86-760-88667096
Web: http://www.titanjet.com.cn
email:sales@titanjet.com.cn
Add:No.6-2,Jin Hua Zhong Road,Zhongshan City,Guangdong,China - 16 -
F、Set the installed Model No. as default printer, installation finished.
2、Using of software
a、New file:Open software—file—new file
PDF created with pdfFactory Pro trial version www.pdffactory.com
Page 17

http://www.titanjet.com.cn
Tel:+86-760-88667089 / 88667090
Fax:+86-760-88667096
Web: http://www.titanjet.com.cn
email:sales@titanjet.com.cn
Add:No.6-2,Jin Hua Zhong Road,Zhongshan City,Guangdong,China - 17 -
b、Setup the paper size in dialogue box。
C、Import picture:file—Import picture
d 、 you’ll see the dialogue box: Import graph file, choose the wanted picture- open
PDF created with pdfFactory Pro trial version www.pdffactory.com
Page 18

http://www.titanjet.com.cn
Tel:+86-760-88667089 / 88667090
Fax:+86-760-88667096
Web: http://www.titanjet.com.cn
email:sales@titanjet.com.cn
Add:No.6-2,Jin Hua Zhong Road,Zhongshan City,Guangdong,China - 18 -
e、choose the imported picture and click the mouse right button, click picture property.
f、modify the size of picture, choose change picture proportional then click OK
PDF created with pdfFactory Pro trial version www.pdffactory.com
Page 19

http://www.titanjet.com.cn
Tel:+86-760-88667089 / 88667090
Fax:+86-760-88667096
Web: http://www.titanjet.com.cn
email:sales@titanjet.com.cn
Add:No.6-2,Jin Hua Zhong Road,Zhongshan City,Guangdong,China - 19 -
3.printing Image:
a、open file—printing
b、in printing dialogue box, click printer setup button into the setting interface before printing
PDF created with pdfFactory Pro trial version www.pdffactory.com
Page 20

http://www.titanjet.com.cn
Tel:+86-760-88667089 / 88667090
Fax:+86-760-88667096
Web: http://www.titanjet.com.cn
email:sales@titanjet.com.cn
Add:No.6-2,Jin Hua Zhong Road,Zhongshan City,Guangdong,China - 20 -
First set the resolution of the picture to be printing, then choose the matched paper type from paper type pull down menu,
click OK. See illustration below:
Attention: the paper type of indoor water base will show as synthesis frontlit, outdoor oil base will show as self adhesive vinyl.
c、we have 2 way for printing(to make sure the print port is Epson 5)
①Printing after RIP
PDF created with pdfFactory Pro trial version www.pdffactory.com
Page 21

http://www.titanjet.com.cn
Tel:+86-760-88667089 / 88667090
Fax:+86-760-88667096
Web: http://www.titanjet.com.cn
email:sales@titanjet.com.cn
Add:No.6-2,Jin Hua Zhong Road,Zhongshan City,Guangdong,China - 21 -
First, select the printing resolution and paper type you wanted, then click AUTOMATIC SETUP PAPER button, click OK,
click print to file button, save file(format as *.prn)
②printing and RIP at same time:
PDF created with pdfFactory Pro trial version www.pdffactory.com
Page 22

http://www.titanjet.com.cn
Tel:+86-760-88667089 / 88667090
Fax:+86-760-88667096
Web: http://www.titanjet.com.cn
email:sales@titanjet.com.cn
Add:No.6-2,Jin Hua Zhong Road,Zhongshan City,Guangdong,China - 22 -
select the printing resolution and paper type you wanted, then click AUTOMATIC SETUP PAPER button, click OK, click
printing。
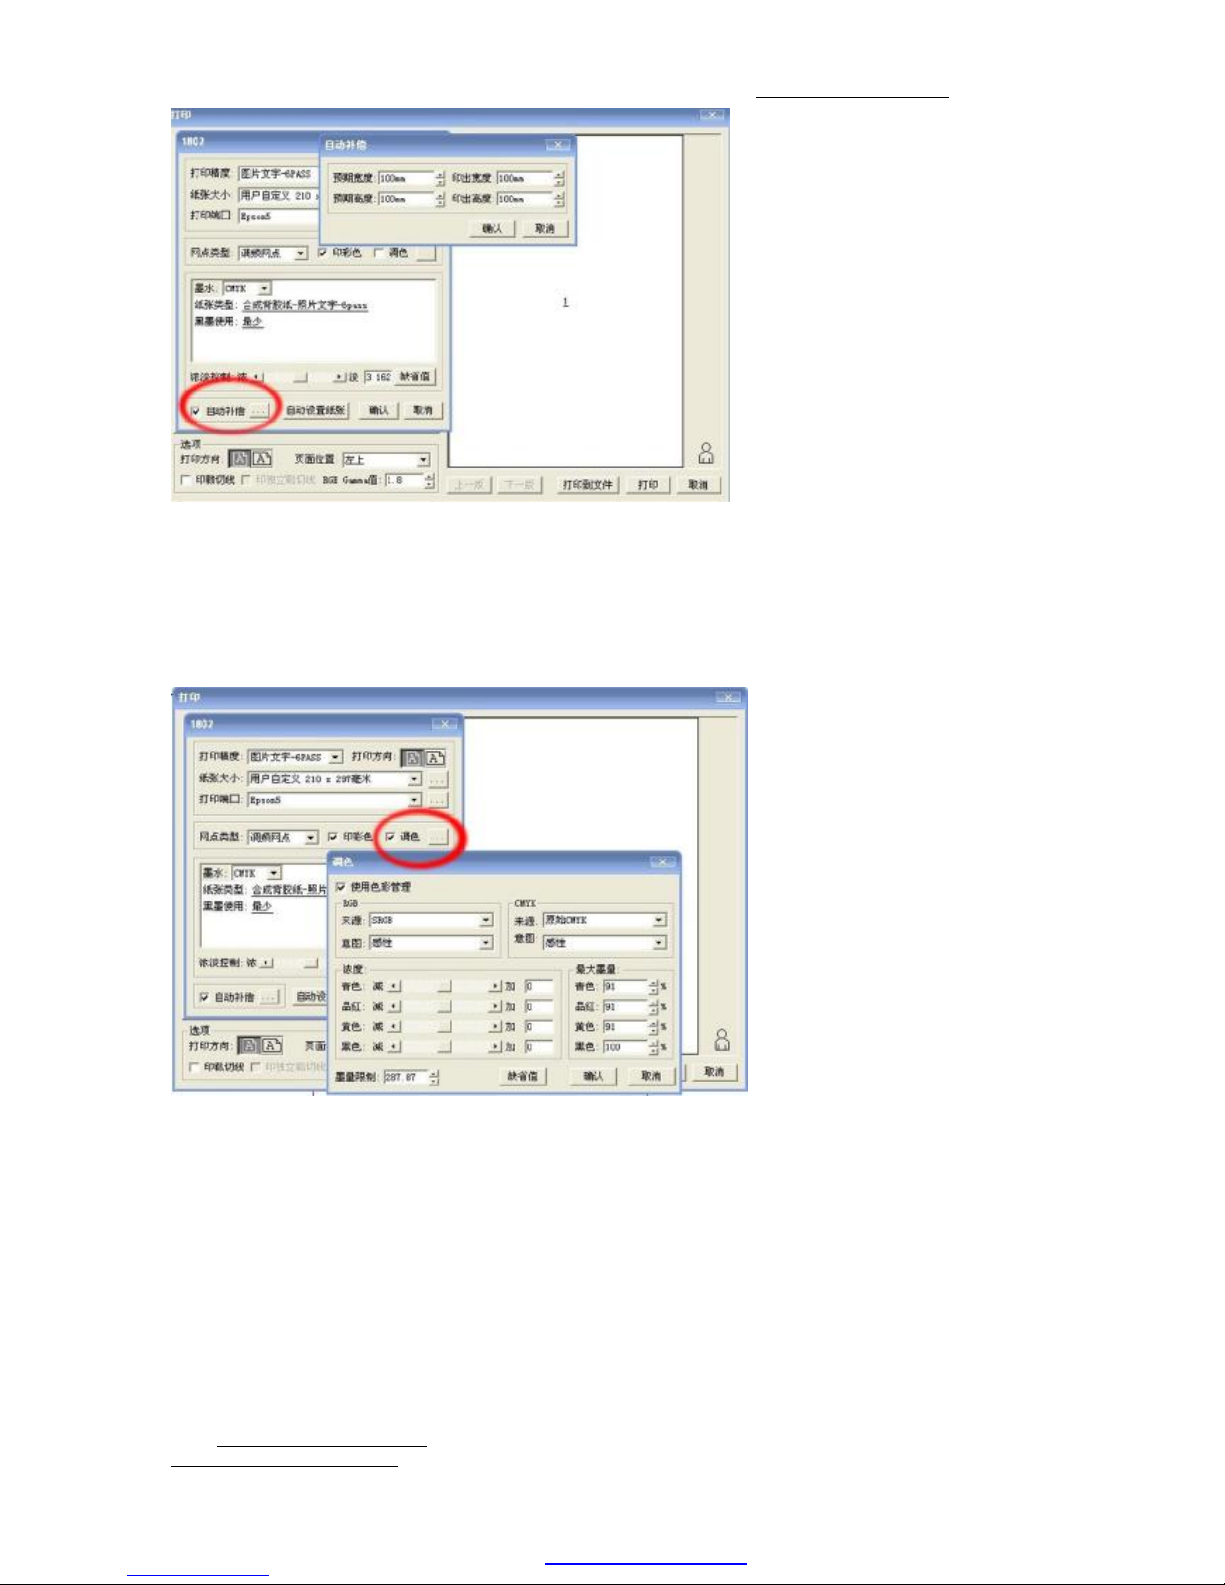
4、Software related
A、dimension compensation:when dimension tolerance existed between printed and designed picture, try to operate as the
following step in Maintop software: click printer setup button in printing dialogue box, and the dialogue box of automatic
compensation will appear.
PDF created with pdfFactory Pro trial version www.pdffactory.com
Page 23
http://www.titanjet.com.cn
Tel:+86-760-88667089 / 88667090
Fax:+86-760-88667096
Web: http://www.titanjet.com.cn
email:sales@titanjet.com.cn
Add:No.6-2,Jin Hua Zhong Road,Zhongshan City,Guangdong,China - 23 -
For example:you are planning to print a picture(expected width:100mm,expected height:100mm),in fact, the printed picture
width is 100mm and height is 110mm,then you just need to adjust the printing height to 110mm in automatic compensation
dialogue box, Click OK, your setup will be saved automatically.
B、Ink volume adjust:when color tolerance existed between printed and designed picture, try to operate as the following step in
Maintop software: click printer setup button in printing dialogue box, and the color adjust dialogue box will appear. Use color
management to get the color you wanted.
C、remind:other unaccomplished matter please refer to maintop users manual
Chapter V Printing control software
1、printing software and main board USB driver installation of TITAN-JET TT-1626 printer (connection
of computer and printer)
1.1、Find the control software CD of TT-1626 printer in spare part box, insert onto CD-ROM, find and double-click Titan
Print –Epson exe setup icon, start installing.
PDF created with pdfFactory Pro trial version www.pdffactory.com
Page 24

http://www.titanjet.com.cn
Tel:+86-760-88667089 / 88667090
Fax:+86-760-88667096
Web: http://www.titanjet.com.cn
email:sales@titanjet.com.cn
Add:No.6-2,Jin Hua Zhong Road,Zhongshan City,Guangdong,China - 24 -
Click“next”
Click“next”
Choose file installation root,set Disk D as default,then click” next”
PDF created with pdfFactory Pro trial version www.pdffactory.com
Page 25

http://www.titanjet.com.cn
Tel:+86-760-88667089 / 88667090
Fax:+86-760-88667096
Web: http://www.titanjet.com.cn
email:sales@titanjet.com.cn
Add:No.6-2,Jin Hua Zhong Road,Zhongshan City,Guangdong,China - 25 -
Click“next”
Click“next”
Software is installing。。。
PDF created with pdfFactory Pro trial version www.pdffactory.com
Page 26

http://www.titanjet.com.cn
Tel:+86-760-88667089 / 88667090
Fax:+86-760-88667096
Web: http://www.titanjet.com.cn
email:sales@titanjet.com.cn
Add:No.6-2,Jin Hua Zhong Road,Zhongshan City,Guangdong,China - 26 -
Click “Finish”, desktop will appear the icon: ,it means finished the installation of printing control software of
TITAN-JET TT-1626 printer.
2、Open TITAN-JET TT-1626 control software
A、Double click the icon on desktop,or click start-procedure-Titan Print,you will open the control software
interface as below(choose dye or eco solvent):
PDF created with pdfFactory Pro trial version www.pdffactory.com
Page 27

http://www.titanjet.com.cn
Tel:+86-760-88667089 / 88667090
Fax:+86-760-88667096
Web: http://www.titanjet.com.cn
email:sales@titanjet.com.cn
Add:No.6-2,Jin Hua Zhong Road,Zhongshan City,Guangdong,China - 27 -
B、installation of main board USB driver
Click tools---choose INSTALL PRINTER DRIVER under the pull down menu
Attention: Printer could not connecting to computer while install printer
driver!!
Install success, Click OK, you can printing now!!
C、Connecting Printer to Computer
Connecting the USB cable to computer and printer, turn on printer, computer will show new hardware
discovered. The new hardware is the main board USB driver of TITAN-JET TT-1626 printer, with install
PDF created with pdfFactory Pro trial version www.pdffactory.com
Page 28

http://www.titanjet.com.cn
Tel:+86-760-88667089 / 88667090
Fax:+86-760-88667096
Web: http://www.titanjet.com.cn
email:sales@titanjet.com.cn
Add:No.6-2,Jin Hua Zhong Road,Zhongshan City,Guangdong,China - 28 -
this hardware, computer will able to control the printer normally.
Click “next”
Click “finish” you can find the installed driver in equipment manager. (my computer—property---hardware-equipment
manager) , see picture below
If you can not find the“Epson5 USB Device” in your computer or the“Epson5 USB Device” display
with a question mark,it means the driver is failed to install.
2、Main Menu
PDF created with pdfFactory Pro trial version www.pdffactory.com
Page 29

http://www.titanjet.com.cn
Tel:+86-760-88667089 / 88667090
Fax:+86-760-88667096
Web: http://www.titanjet.com.cn
email:sales@titanjet.com.cn
Add:No.6-2,Jin Hua Zhong Road,Zhongshan City,Guangdong,China - 29 -
2.1、file menu
Click file menu, the pull-down submenu will show as below:
A、Import File/Import Directory:add file/directory to be printed by printer
B、Exit:exit control software
2.2、printing menu
A、Start print: start to printing current job
B、Stop print: cancel the current printing job
C、Pause: suspend the printing job during printing
D、Resume:Continue to printing current job during pause
E、Option:refer to setup of printing parameters(Details see tools menu introduction)
F、Backup/Restore:you can backup/Restore the well performed parameters into a Disk
2.3、Tools Menu
A、Print Head Clear
B、Voltage Adjust:Adjust voltage of Print head(non-Professional technicians are not suggested to operate)
C、External Device Control:control of Take up system, feeding system and Fan device
D、Clear up preview file:clear up the temporary files created by preview
E、Clear up log file:clear up the printed file record
PDF created with pdfFactory Pro trial version www.pdffactory.com
Page 30

http://www.titanjet.com.cn
Tel:+86-760-88667089 / 88667090
Fax:+86-760-88667096
Web: http://www.titanjet.com.cn
email:sales@titanjet.com.cn
Add:No.6-2,Jin Hua Zhong Road,Zhongshan City,Guangdong,China - 30 -
F:Backup/Restore:see Backup/Restore in printing menu.
G:Statistic:the statistic of everyday printing job
H: Install Printer Driver:install main board USB driver, after install driver, computer could connecting to
printer.
I:language: language transfer between Chinese and English
2.4、Help Menu
A、Go our web site
B、About:Main board/head board serials number and version of control software
3、Tool Menu
Icon introduction: From left to right in orderly:
A、Import Rip file:
B、Reset:Click one time,the carriage will return to home place
C、Start print:
D、Stop print:
E、Pause:
F、Resume:
G、Parameter setting:setup related to printing parameters such as adjust stepping, direction, carriage speed and so on
H、Remove Item
I、Printer Tools:adjust voltage of ink pump and ink wiper
J、Voltage Adjust:Adjust voltage of Print head(non-Professional technicians are not suggested to operate)
K、Check Nozzle:Check ink spray status of nozzle, no breaks is normal,see illustration below:
L、One Key Adjust
M: Exit:Exit control software
4、Printing job List Menu
Show you the current file name, status, print mode, size, path and so on
5、Usually parameter setting
PDF created with pdfFactory Pro trial version www.pdffactory.com
Page 31

http://www.titanjet.com.cn
Tel:+86-760-88667089 / 88667090
Fax:+86-760-88667096
Web: http://www.titanjet.com.cn
email:sales@titanjet.com.cn
Add:No.6-2,Jin Hua Zhong Road,Zhongshan City,Guangdong,China - 31 -
A、Margin:
a、Zero to Paper:setup the margin according to position of material loaded by user
b、Paper Margin:Start printing distance to material edge
B、Print Direction:
a、Single direction:Printing while carriage move to left direction, won’t printing while move to right direction,
b、Double direction:Printing while carriage move to left and right direction
C、Color Bar Setting:
a、Position:you can choose NO Color Bar or printing on left or right side
b、Width:Color Bar width while printing Color Bar
c、To Pic:Distance from Color Bar to the picture to be Printed
D、Flash Frequency:
To avoid the nozzle been blocked and dried, also in order to keeping the nozzle in good spray status, you can choose the
reasonable flash frequency to wet the nozzle when the printer is turn on but not running for printing. at the same time,
the carriage will stay at home place.
E、Stepping setting:
a、Stepping Number:How many mm that the printer printing 1 pass, different pass matches
different stepping number(stepping number will mention in the following text)
b、Feather:feather function armed,this can avoid the pass banding. Printing with feather mode is suggested
F:Apply(save)
Remember to click apply button after all parameters been setup, otherwise you’ve done a blank job.
6、Status Bar
You can get information about what time the printing was started, what time was finished and delivery
information of the main board and software, feedback information of Raster.
7、control software related introduction
Parameter setting:
7.1、Print head Setting
PDF created with pdfFactory Pro trial version www.pdffactory.com
Page 32

http://www.titanjet.com.cn
Tel:+86-760-88667089 / 88667090
Fax:+86-760-88667096
Web: http://www.titanjet.com.cn
email:sales@titanjet.com.cn
Add:No.6-2,Jin Hua Zhong Road,Zhongshan City,Guangdong,China - 32 -
7.1.1、users don’t need to calibrate the print head by themselves due to the calibration has been done
before export in factory.
7.1.2、 this is to adjust the 2 head distance.Single print head printer no need to
adjust.
7.1.3、Carriage speed:there are 3 mode speed of the carriage: speed 1,speed 2、speed 3(Low speed、medium
speed、High speed)
7.1.4、Two-way Adjust:If you choose double direction in Usually Parameter setting. need to adjust two-way
value。To confirm the printing start line if align or not, click testing, you will see the following printing:
If the up and down line keep alignment at a digital, it means the two-way value is the one; you should type the
digital to the Two-way value. For example, in the above printing, the up and down line keep alignment at digital
9, then you should type 9 into the two-way adjust.
7.2、Adjust print head:
7.2.1、Check Nozzle:see introduction of Tool Menu
7.2.2、Print head Adjust:Adjust the X axis of single print head
PDF created with pdfFactory Pro trial version www.pdffactory.com
Page 33

http://www.titanjet.com.cn
Tel:+86-760-88667089 / 88667090
Fax:+86-760-88667096
Web: http://www.titanjet.com.cn
email:sales@titanjet.com.cn
Add:No.6-2,Jin Hua Zhong Road,Zhongshan City,Guangdong,China - 33 -
Click print head adjust, if the above situations happened, it means the installation of X axis of print head is
incorrect, need to loosen the 3 screws on the print head, and push the print head to inside of the carriage, the
tight the screws. See following picture:
The red line and blue line will keep alignment through move up of move down the print head.
7.2.3、Two-way Adjust:see details in 7.1.4
7.2.4、Stepping Adjust:
Pic 1: First time printing Pic 2: Second time printing
Click Stepping Adjust, printer will printing two times, first time will printing 5 short lines, second time only
one lines, and is longer than first time. If the longer line completely matched the middle line of first printing, it
means the stepping is accurate. See above illustration Pic 2
If the longer line locates the up side of the middle line, it means you should add the stepping value. See the
following picture
If the longer line locates the down side of the middle line, it means you should reduce the stepping value.
See the following picture
PDF created with pdfFactory Pro trial version www.pdffactory.com
Page 34

http://www.titanjet.com.cn
Tel:+86-760-88667089 / 88667090
Fax:+86-760-88667096
Web: http://www.titanjet.com.cn
email:sales@titanjet.com.cn
Add:No.6-2,Jin Hua Zhong Road,Zhongshan City,Guangdong,China - 34 -
You have to adjust the stepping according to the situation when you use the printer, to make sure the longer
line printed at the second time match the middle line of first time printing
7.2.5 2-head vertical adjust
if this happens after you click 2-head ver adjust, it means the Y-xais of 2 head is not on same line,
you have to loosen the print head 3 screws and push the print head close to inside, then tight the 3 screws until you get the following
results:
7.2.6: 2-head horizontal adjust:
if these happens when you click 2-head horizontal adjust, it means the
value is not correct, you have to reduce the value for first situation and add the
value for second situation, until you get the following results:
7.2.7、Stepping Number:Refer to Usually Parameter
7.2.8、Margin/Length:Refer to Usually Parameter
7.2.9、Color Select: you can select whatever color for adjust
7.3、Other Parameter setting
PDF created with pdfFactory Pro trial version www.pdffactory.com
Page 35

http://www.titanjet.com.cn
Tel:+86-760-88667089 / 88667090
Fax:+86-760-88667096
Web: http://www.titanjet.com.cn
email:sales@titanjet.com.cn
Add:No.6-2,Jin Hua Zhong Road,Zhongshan City,Guangdong,China - 35 -
7.3.1、Stepping speed:the speed of the material moving after printing 1 pass
7.3.2、Roll Speed:speed of material move forward or backward when no printing.
7.3.3、Finish Print paper setting: length of paper move forward or backward after finished printing(mm)
7.3.4、Preview:color display on Control software interface
7.3.5、Color select:select the color for printing
7.3.6、Machine length:find the left direction icon on control software,click it and the carriage will move to left and
stop,if it did not move to the max length, you have to change the value until the carriage can move the max length.
7.3.7、Printing:
Skip white:printer won’t printing the blank place, only printing where be with image.
Beep:the computer will alarm you when printing start.
Auto Print:select the file,will repeat printing the file automatically.
7.3.8、Group setting: print head number installed, this model printer default for 2 pcs DX6 Epson head
7.3.9、Feather: this can avoid the pass banding. Printing with feather mode is suggested, this is the default setting, no
need to adjust.
7.3.10. More
This function requires technician password. Used by technician of factory to adjust the printer.
Press MORE button
Input the Password: 1234 and click OK.
Please see following picture.
PDF created with pdfFactory Pro trial version www.pdffactory.com
Page 36

http://www.titanjet.com.cn
Tel:+86-760-88667089 / 88667090
Fax:+86-760-88667096
Web: http://www.titanjet.com.cn
email:sales@titanjet.com.cn
Add:No.6-2,Jin Hua Zhong Road,Zhongshan City,Guangdong,China - 36 -
Attention: If you change the parameters, the printer will be abnormal and the responsibility should be beared by
yourself.
2,Speed value setup:
A: Carriage speed setup:operator can fix several best speed value which can make the printer printing well
according to the printing experiences。
B: Roll speed: the speed of move forward or move backward by operator while printer no printing job.
C: Stepping speed: moving speed while finish 1 passes printing, adjust according to printing status.
PDF created with pdfFactory Pro trial version www.pdffactory.com
Page 37

http://www.titanjet.com.cn
Tel:+86-760-88667089 / 88667090
Fax:+86-760-88667096
Web: http://www.titanjet.com.cn
email:sales@titanjet.com.cn
Add:No.6-2,Jin Hua Zhong Road,Zhongshan City,Guangdong,China - 37 -
3、Feather Setting:Only for technician of Manufacturer
4、Epson setting:Here we introduce 4 practical functions:
A: Cleaning print head time: the time for automatically cleaning print head, factory suggestion is betwe
en 4000-12000 milliseconds
B: Strong Spray time: to avoid ink mix together, the print head will perform a strong spray action after finish
cleaning print head, operators can change the time as you like,to avoid wasting ink, factory suggestion is between
2000-5000 millisecond
C: Original position:the print head will stay at the original position and spraying while no printing job,and the
sprayed ink may mix together at the print head, to avoid this happen, operator should setting carriage away from ink
station
All the parameters are not allowed to change by users!
PDF created with pdfFactory Pro trial version www.pdffactory.com
Page 38

http://www.titanjet.com.cn
Tel:+86-760-88667089 / 88667090
Fax:+86-760-88667096
Web: http://www.titanjet.com.cn
email:sales@titanjet.com.cn
Add:No.6-2,Jin Hua Zhong Road,Zhongshan City,Guangdong,China - 38 -
8、Adjust after installed control software
8.1 After installed the control software,turn on printer,open printer tools ,click up or down under brush test to check the printer works well or
not.If it works unnormal, contact and check the printer under the guide of distributor or factory technician
8.2 Click cleaning button , to check carriage, ink pump and wiper works well or not. It should be
working like this: the ink pump will pumping the waste ink in ink station with click cleaning button, and carriage
move to home place and print head move close to capping, ink pump sucking ink from print head for 10 seconds,
the wiper move out while the carriage will move back and print head spray out ink, the wiper should be 0.5-1mm
higher than print head.
8.3、Adjust the distance between print head and media of TITANJET 1626 PRINTER
According to different printing media thickness, adjust the carriage height, the ideal distance between print
head and media is 1mm, to avoid print head scratch the media and damage the printed picture, you’d better to
adjust the carriage height, but max distance not exceed 3mm.the method to adjust the height of carriage is to
loosen the 4 screw on the carriage, then tighten them after you get the wanted height, see the following
picture.
(Attention, For print head safety, before installing, use Maintop to RIP a picture with 1.5X1M and printing to
make sure the machinery works well, then install the print head!! )
PDF created with pdfFactory Pro trial version www.pdffactory.com
Page 39

http://www.titanjet.com.cn
Tel:+86-760-88667089 / 88667090
Fax:+86-760-88667096
Web: http://www.titanjet.com.cn
email:sales@titanjet.com.cn
Add:No.6-2,Jin Hua Zhong Road,Zhongshan City,Guangdong,China - 39 -
8.4、feeding of ink
Attentions:
8.4.1、Keep ink out of the reach of children;
8.4.2、Washing with fresh water if ink splash into eye
8.4.3、to clean ink tube, use the solvent along with the printer
8.4.4、suggested ink temperature between 18℃ to 30℃
8.4.5、store the ink at a cool, room temperature place, avoid to exposure ink to hot, cold place and sunlight
8.4.6、use the ink after open,
8.4.7、if ink freeze, move to normal temperature place for dissolving for several hours。
8.4.8、washing your hands or clothes if ink splashed on hands or clothes
8.4.9、Don’t try to disassembly ink box
8.4.10、ink is chemical product. for better environment, kindly disposal the empty ink bottle, damaged ink tank
and waste ink
8.4.11、don’t remove dampers while feeding ink
8.4.12、use the ink specified, don’t mix use with others
8.4.13、don’t shaking the bottle while feeding ink, feeding ink slowly while printer stopped working to avoid
air bubble generated
Feeding ink into ink tank and put into ink tank holder
Attention:the correct ink tank order is :Y1 Y2 M1 M2 Lm1 Lm2 C1 C2 Lc1 Lc2 K1 K2
8.4.14、use a injector to transfer ink from ink tank to damper,each color at least 20ml and the ink level of
damper should be the same: 2/3 of the damper volume.
8.5、Installation of print head, sucking adjust of ink station and connecting of data cable.
A、Connecting to print head:(Attention:be careful when connecting to avoid damage print head and data
cable!) To avoid ink or other liquid goes inside of the Print head, it is better to seal the cable connection
by tape, see following picture:
PDF created with pdfFactory Pro trial version www.pdffactory.com
Page 40

http://www.titanjet.com.cn
Tel:+86-760-88667089 / 88667090
Fax:+86-760-88667096
Web: http://www.titanjet.com.cn
email:sales@titanjet.com.cn
Add:No.6-2,Jin Hua Zhong Road,Zhongshan City,Guangdong,China - 40 -
Each print head has 6 line nozzles, each line of nozzle has a specified input of ink and each print head has 2
port for connecting flat cable. See following picture.
There are 12 dampers and the ink tube order from left to right side are: Y1 Y2 M1 M2 Lm1 Lm2 C1 C2 Lc1
Lc2 K1 K2 .Turn on Printer and open the control software after carriage reset, then click cleaning button ,it
will spend 30second or 1 minute to finish cleaning. check the ink pump if can pump ink out during cleaning。It is
important, if can not, adjust the position of the ink station or stopper buffer until ink can be pump out well, it spend
times, see the following adjust references:
Loose and tighten screw 1、2、3、4 could adjust the position of ink station. Loose and tighten screw a、b、c、d could
adjust the height of ink station
C、turn off printer after ink pump can work well( working voltage of ink pump can be modified by adjust tools in
control software,6v-15v is the normal working voltage),turn off the printer and connecting the print head data cable
PDF created with pdfFactory Pro trial version www.pdffactory.com
Page 41

http://www.titanjet.com.cn
Tel:+86-760-88667089 / 88667090
Fax:+86-760-88667096
Web: http://www.titanjet.com.cn
email:sales@titanjet.com.cn
Add:No.6-2,Jin Hua Zhong Road,Zhongshan City,Guangdong,China - 41 -
to head board.
The pin number of each flat cable is different,one is23 pins, one is 13 pins, see the following picture:
(Attention:be care of the direction of the insert port while connecting the head board!)
Make sure the connection of print head date cable is correct before turn on printer, then printing the test bar, the
print head is in good performance if all lines been printed. See following picture:
If the printer did not printed the test bar well, cleaning the print head until the printing in good performance. you can
start to printing if the test bar printed perfect picture as the picture.
6、voltage adjustment:
Close printing control software , find the icon in installation file,click the on/off
button Choose language ,you can read the temperature now,if voltage value need to be
changed, type the voltage value into the 26 box as following picture:click set :
PDF created with pdfFactory Pro trial version www.pdffactory.com
Page 42

http://www.titanjet.com.cn
Tel:+86-760-88667089 / 88667090
Fax:+86-760-88667096
Web: http://www.titanjet.com.cn
email:sales@titanjet.com.cn
Add:No.6-2,Jin Hua Zhong Road,Zhongshan City,Guangdong,China - 42 -
7、adjust:
Close printing control software,find the icon in installation file,click the on/off button Choose
language ,choose ,change down and up value,you can adjust the wiper
position:
Chapter V Maintenance guide
5.1 maintenance of machine
5.1.1、the steel beam must be cleaned by paper every half month, and apply bearing lubrication after clean to
avoid the worn of bearing.
5.1.2、other parts is according to the actual operation of printer:
A、the pinch roller
B、gear on take up and feeding system
Kindly tips:
To avoid effect the print speed, the recommended computer configure is:
CPU: higher than P4 dual core 3.0G
ROM: at least 2GB
Hard disk:at least 160G
Main board:at least compatible with PC/945
CD ROM:1 pcs
Monitor: VGA true color
Operation System:Windows XP
PDF created with pdfFactory Pro trial version www.pdffactory.com
 Loading...