

Page 1
Titan Dynamics
Titan Dynamics Webpage
Visit our Facebook page
Join our Discord server
Page 1 of 30
Titan Dynamics – Falcon V2
https://www.titandynamics.org/3dhangar/p/titan-falcon-v2
Build & User Manual
Revision 1.1
Page 2
Titan Dynamics
Titan Dynamics Webpage
Visit our Facebook page
Join our Discord server
Page 2 of 30
Contents
Section 1: Model Information ............................................................................................................. 3
Section 2: Model Specifications & Performance ............................................................................ 4
2.1: Physical Characteristics ............................................................................................................ 4
2.2: Aircraft Performance: ................................................................................................................ 5
2.2.1: Drag, Efficiency, Power, and Angle of Attack at Varying All-up-weights: ............ 6
2.2.2: Turn rate, range, endurance, and max climb rate for a variety of different
battery configurations: .............................................................................................................. 11
Section 3: Required Build Materials ................................................................................................ 14
Section 4: 3D printing ......................................................................................................................... 15
4.1: Things to know before you start printing. ......................................................................... 15
4.2: Part Orientation ........................................................................................................................ 16
4.3: Tuning “hole horizontal expansion” ..................................................................................... 18
4.4: Bed Adhesion and warping .................................................................................................... 18
Section 5: Assembly of 3D Printed Parts ........................................................................................ 19
Section 6: Final Setup & Tuning Tips ............................................................................................... 25
Section 7: Additional Images ............................................................................................................. 26
Page 3
Titan Dynamics
Titan Dynamics Webpage
Visit our Facebook page
Join our Discord server
Page 3 of 30
Section 1: Model Information
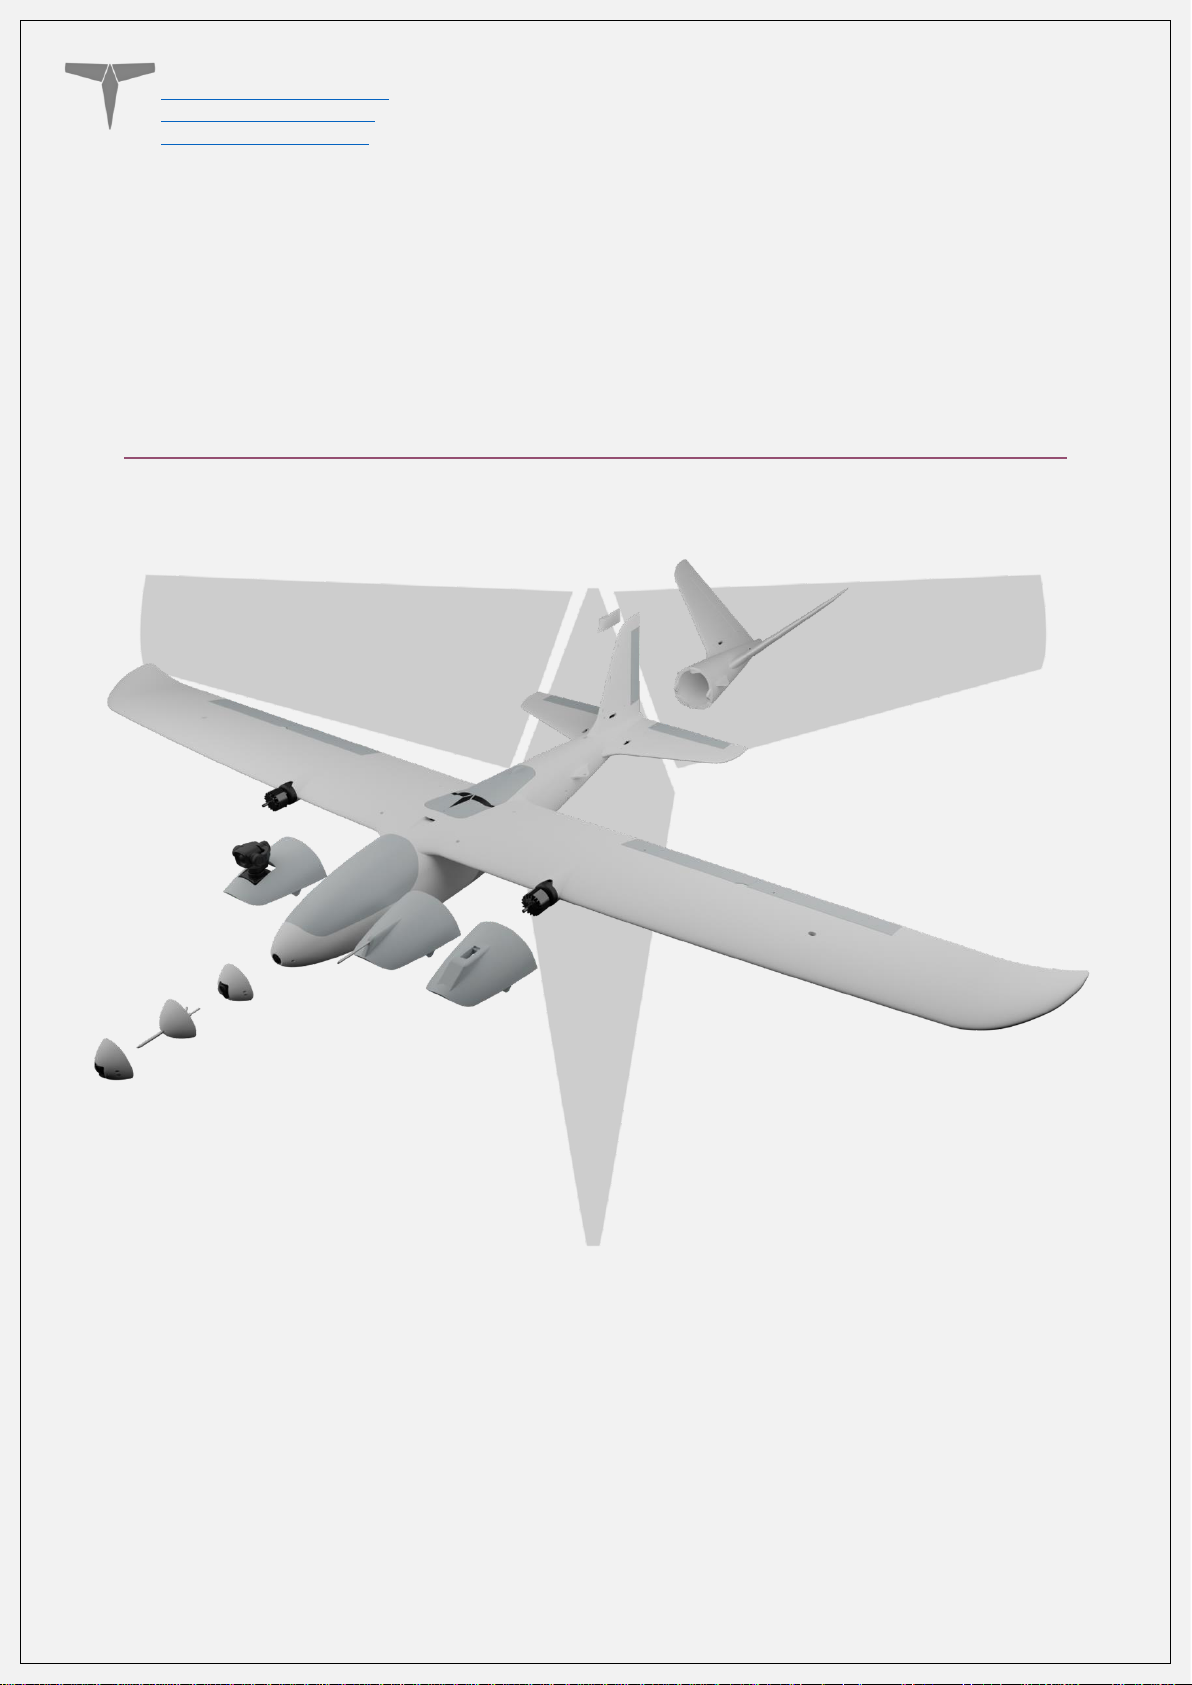
The Titan Falcon V2 is our new flagship UAV – designed to be a ruthlessly effective
workhorse sculpted from hundreds of iterations in CFD. It was designed from the ground
up to be modular, easily repairable, and highly adaptive to your needs. Featuring a
swappable nose, tail and payload bay, Falcon V2 is ready for any application. A multitude
of canopy and camera/antenna mounting options open any and all possibilities. Long
range is in our DNA, and it was directly infused into every design decision during the
development of the Falcon V2. A strong focus was placed on structural integrity, evident
in its spar layout as well as clever tricks built into the STLs to increase strength where
most desired. Prior to release the airframe has been flown over 1000km in total, and it
currently holds the record for longest distance covered in flight for 3D printed aircraft:
300.4km with a flight time of 5 hours and 7.5 minutes – and there’s more left to squeeze
if you dare!
Some of the improvements over V1:
• Built-in support for the flap/aileron to prevent sag in the middle of the hinge
• Minimized ventilation drag with no NACA ducts exposed to frontal area
• Removable / swappable nose
• Removable / swappable tail
• Removable / swappable payload bay
• Optional shelf to mount FC above payload bay
• Optional mountable vertical stabilizer (ex: for a camera on the tail)
• Greatly improved structural rigidity (especially with a full-length spar in each wing)
• Reduced trim drag with the use of a cambered airfoil on the horizontal stabilizer
• Increased aspect ratio on the wing
• Increased Oswald span efficiency with new wing planform / twist / morphing airfoil
• Increased options for FC/Avionics hardware mounting points
• Increased antenna separation on the wings, as well as added antenna mounting
points
• Support for many popular camera systems, both analog and digital
• Support for SIYI A8 with minimized drag mounting solution
• Full clean sheet design with improved aesthetics and curvatures
• Clever aero trickery to make stall characteristics virtually unnoticeable
• New motor mounts with additional reinforcements to combat prop strikes on
landing
• Printable hard-mounting options for FC / Avionics / ESCs
• Multiple airspeed sensor mounting options
• Increased tail length for added pitch stability and authority (especially at low
airspeed under full flaps)
• Larger outer wing bays with 6 points of fixture instead of 4
Page 4
Titan Dynamics
Titan Dynamics Webpage
Visit our Facebook page
Join our Discord server
Page 4 of 30
Section 2: Model Specifications & Performance
2.1: Physical Characteristics
General Stats:
• Wingspan: 2093mm
• Wing area: 4514cm
2
• Maximum take-off Weight: 7kg
• Efficiency: 1.6 Wh/km @ 3.5kg AUW
• Cruise speed: 45-65kph
• Recommended prop diameter: 11-14 inches
Aerodynamic Properties:
• Root airfoil: NACA 4411
• Tip airfoil: NACA 3411
• Stabilizer airfoil (inverted): NACA 2410
• Root chord: 260mm
• Tip chord: 51mm
• Average chord: 176mm
• Root incidence: 4°
• Tip incidence: 0°
• Aspect ratio: 9.71
• Dihedral: 0.5°
• Sweep: 3°
Page 5
Titan Dynamics
Titan Dynamics Webpage
Visit our Facebook page
Join our Discord server
Page 5 of 30
2.2: Aircraft Performance:
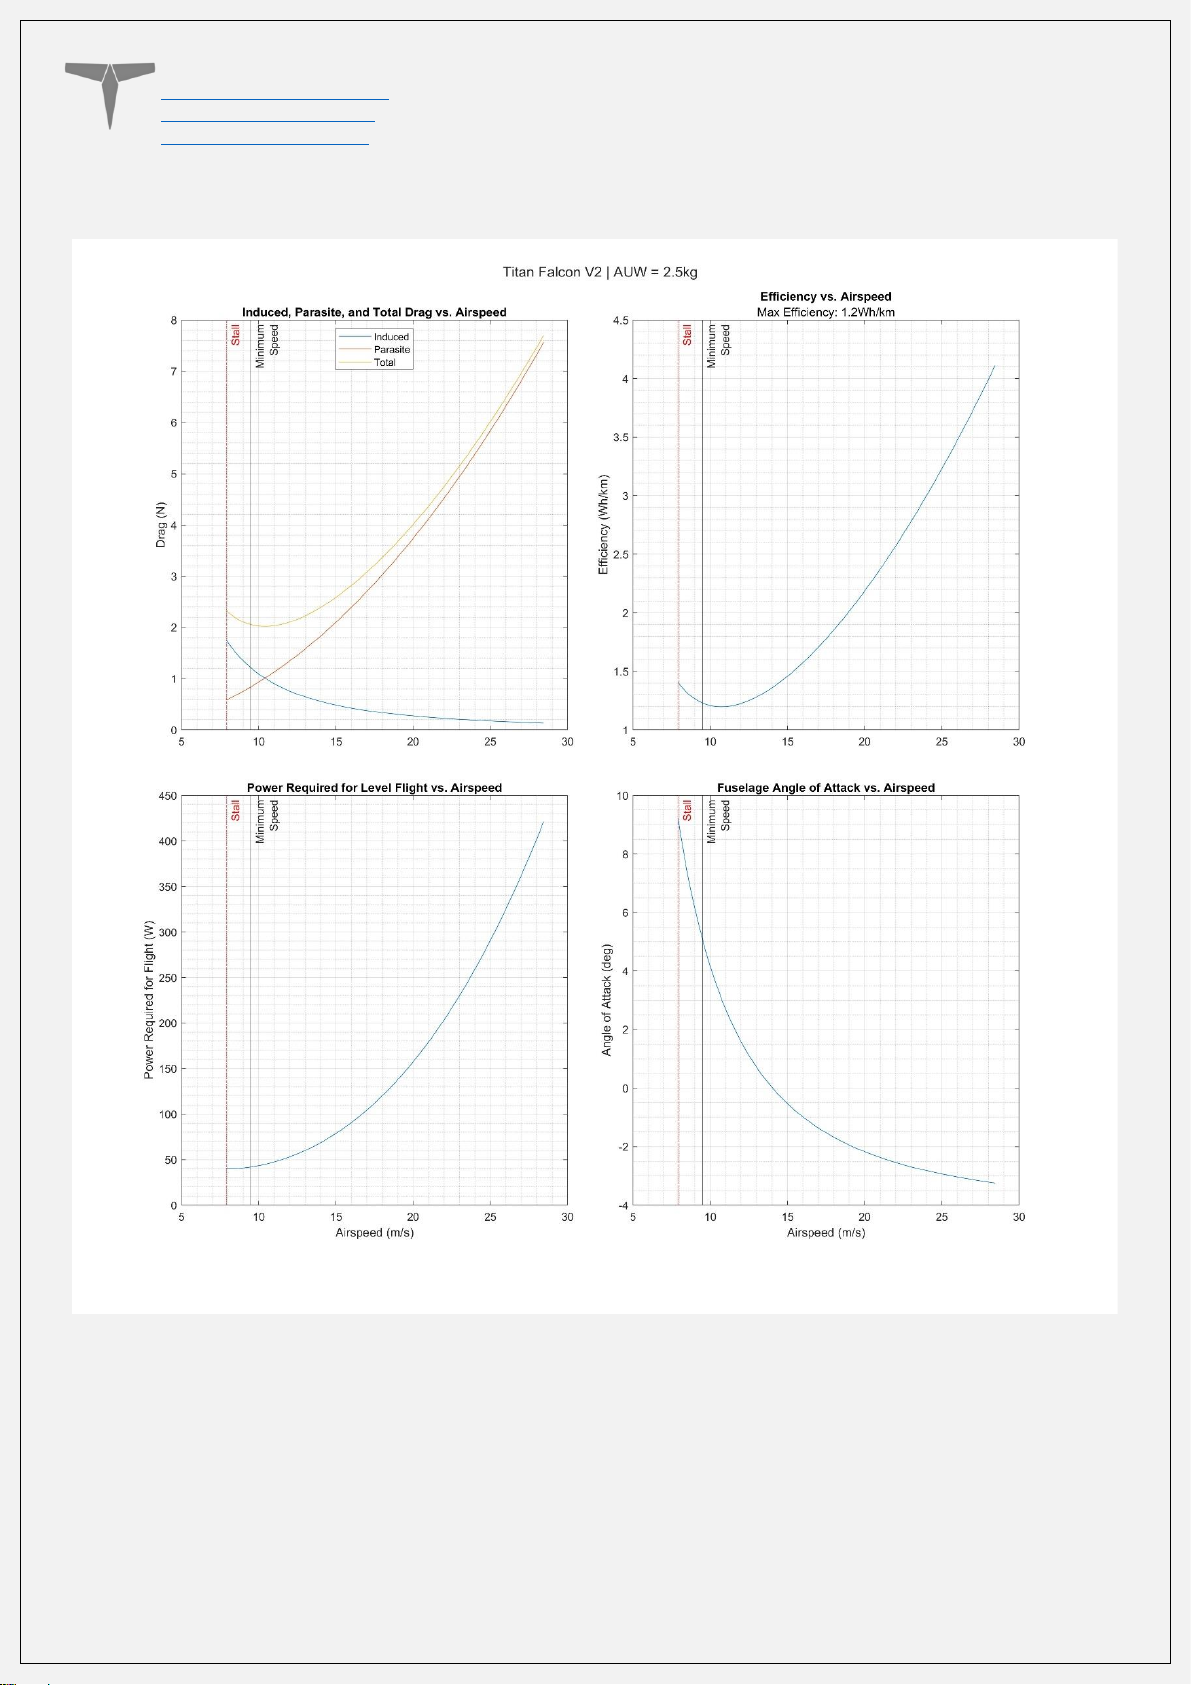
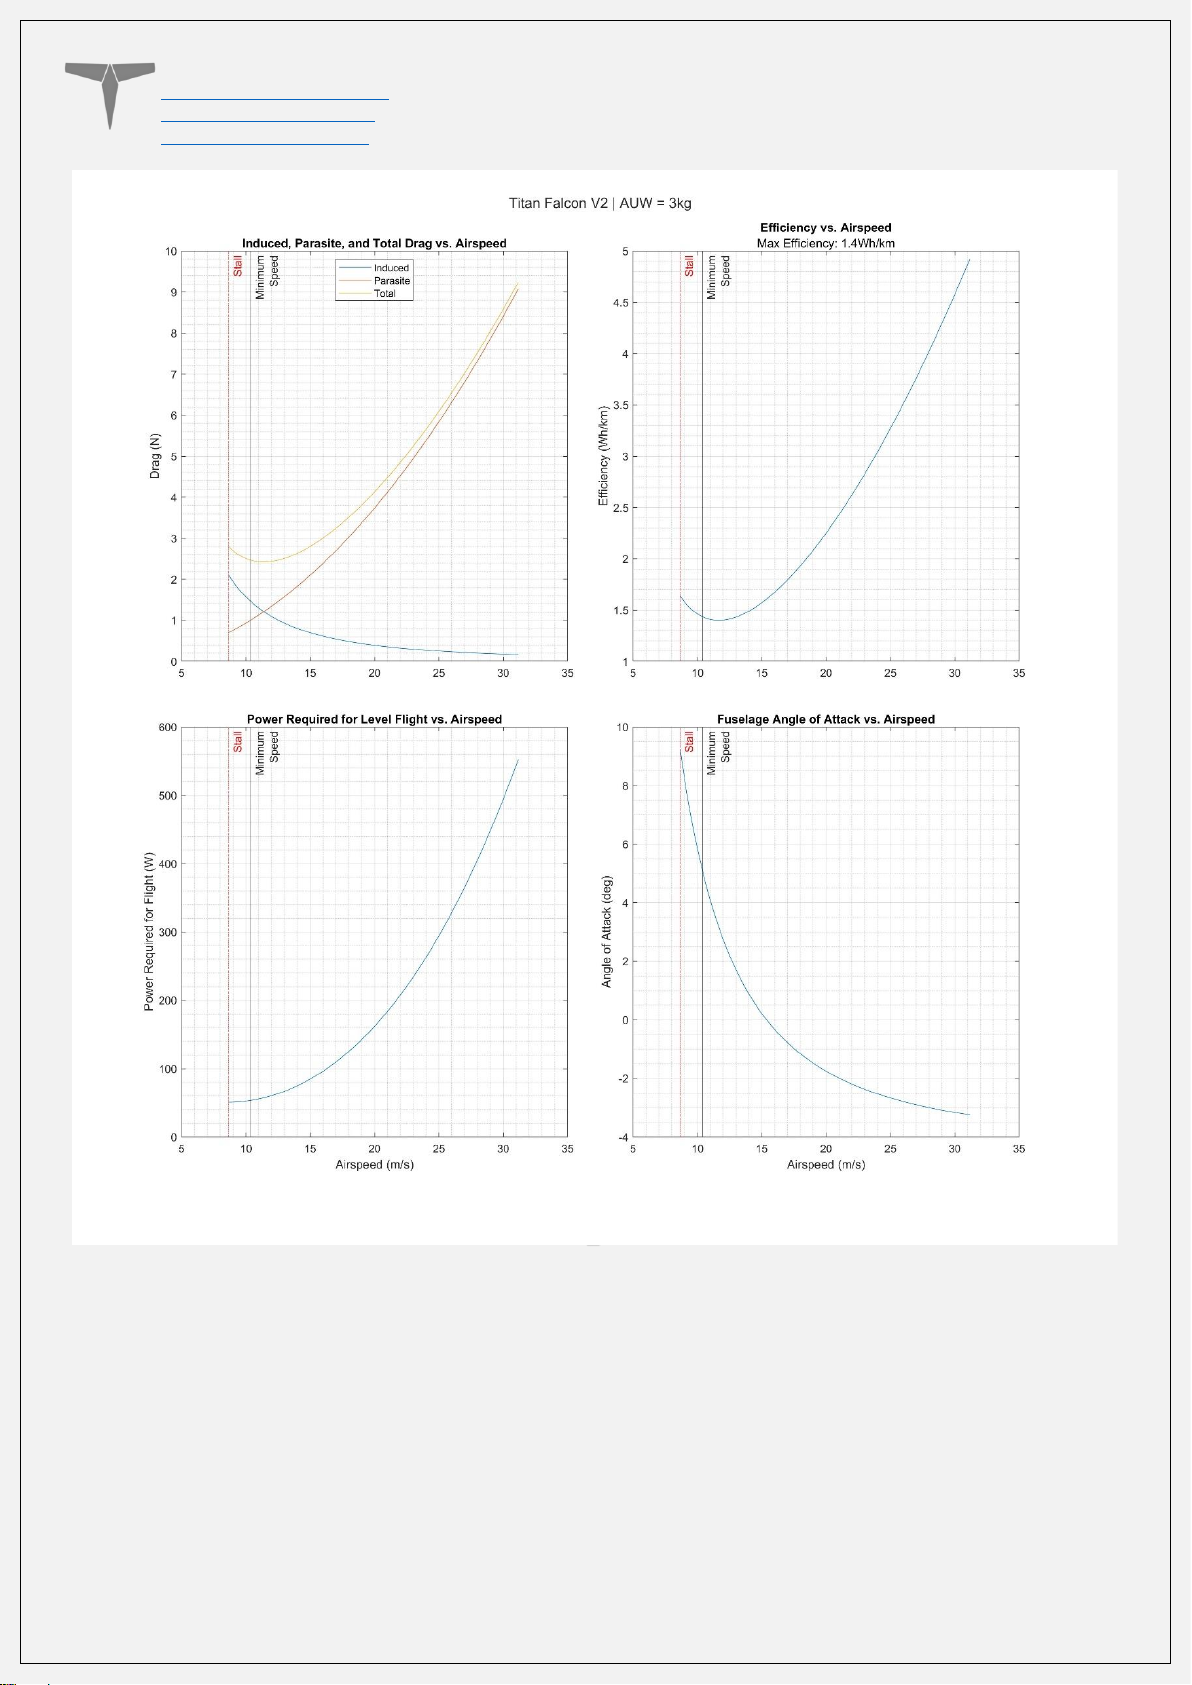
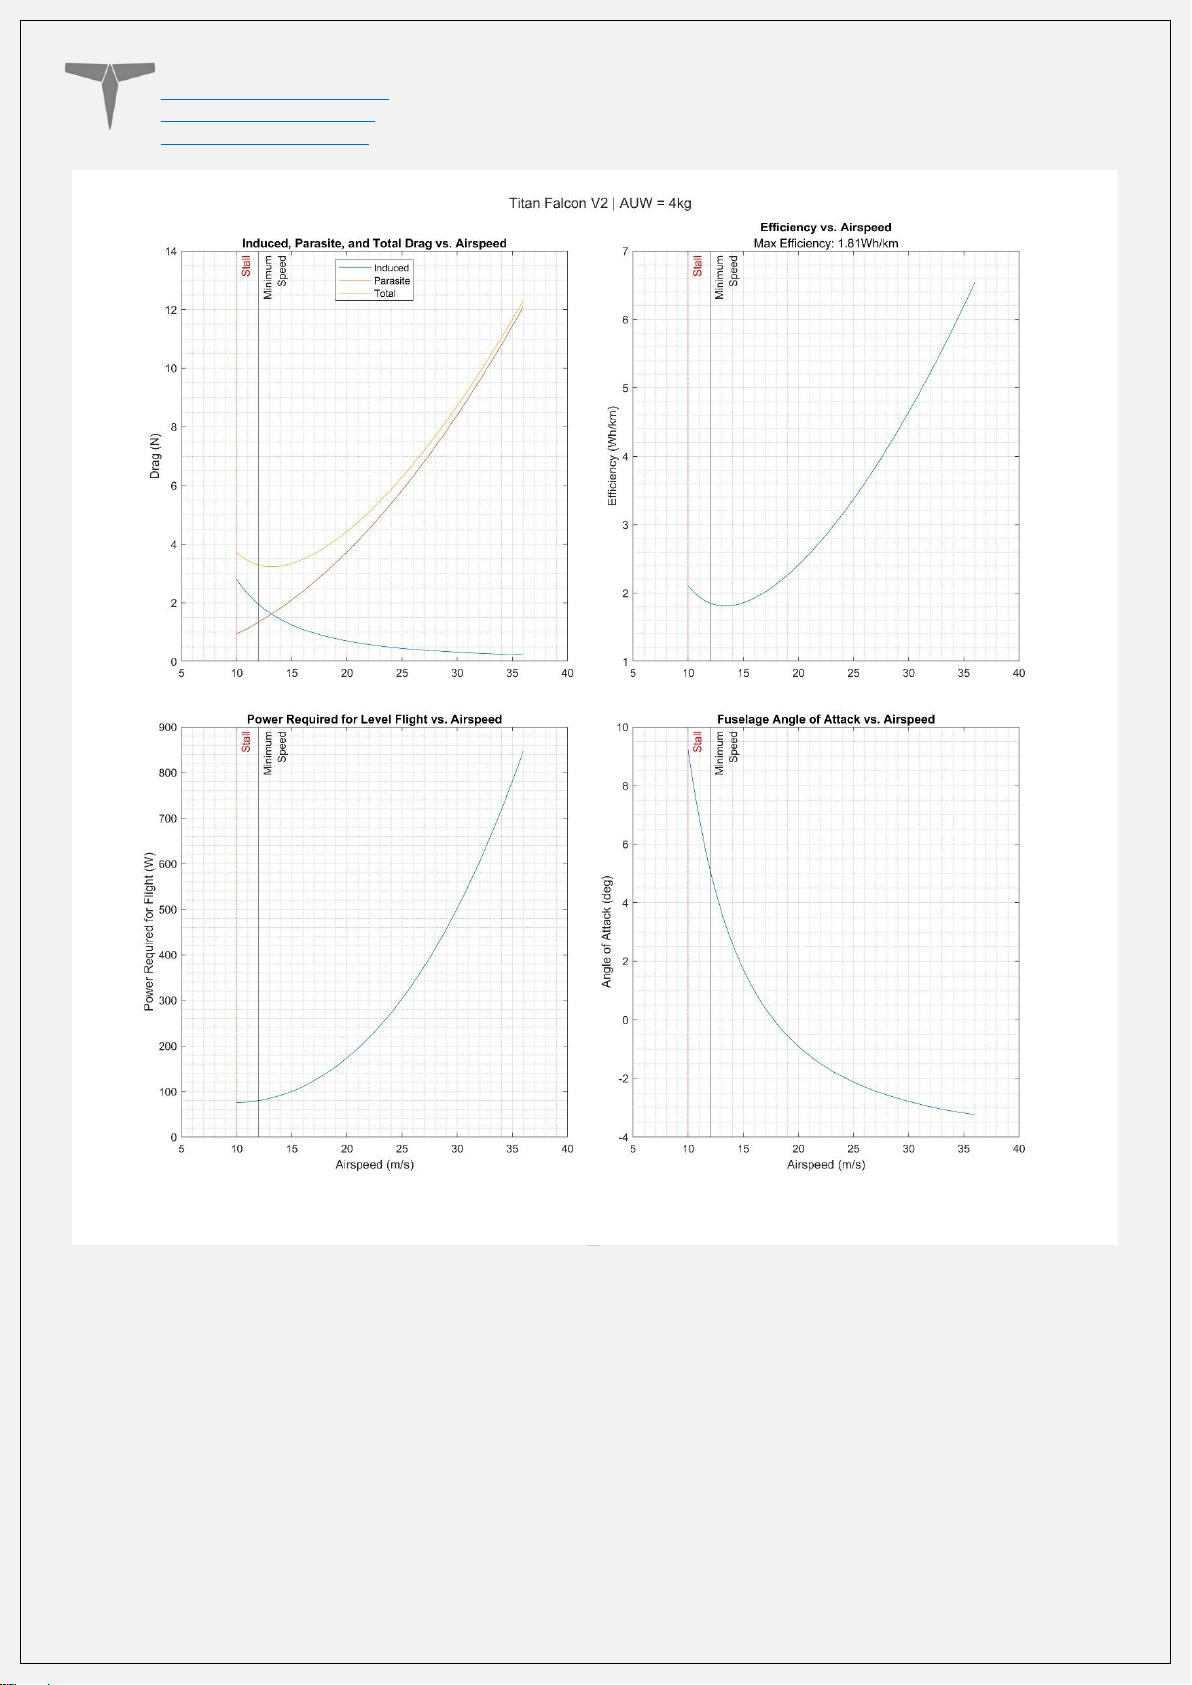
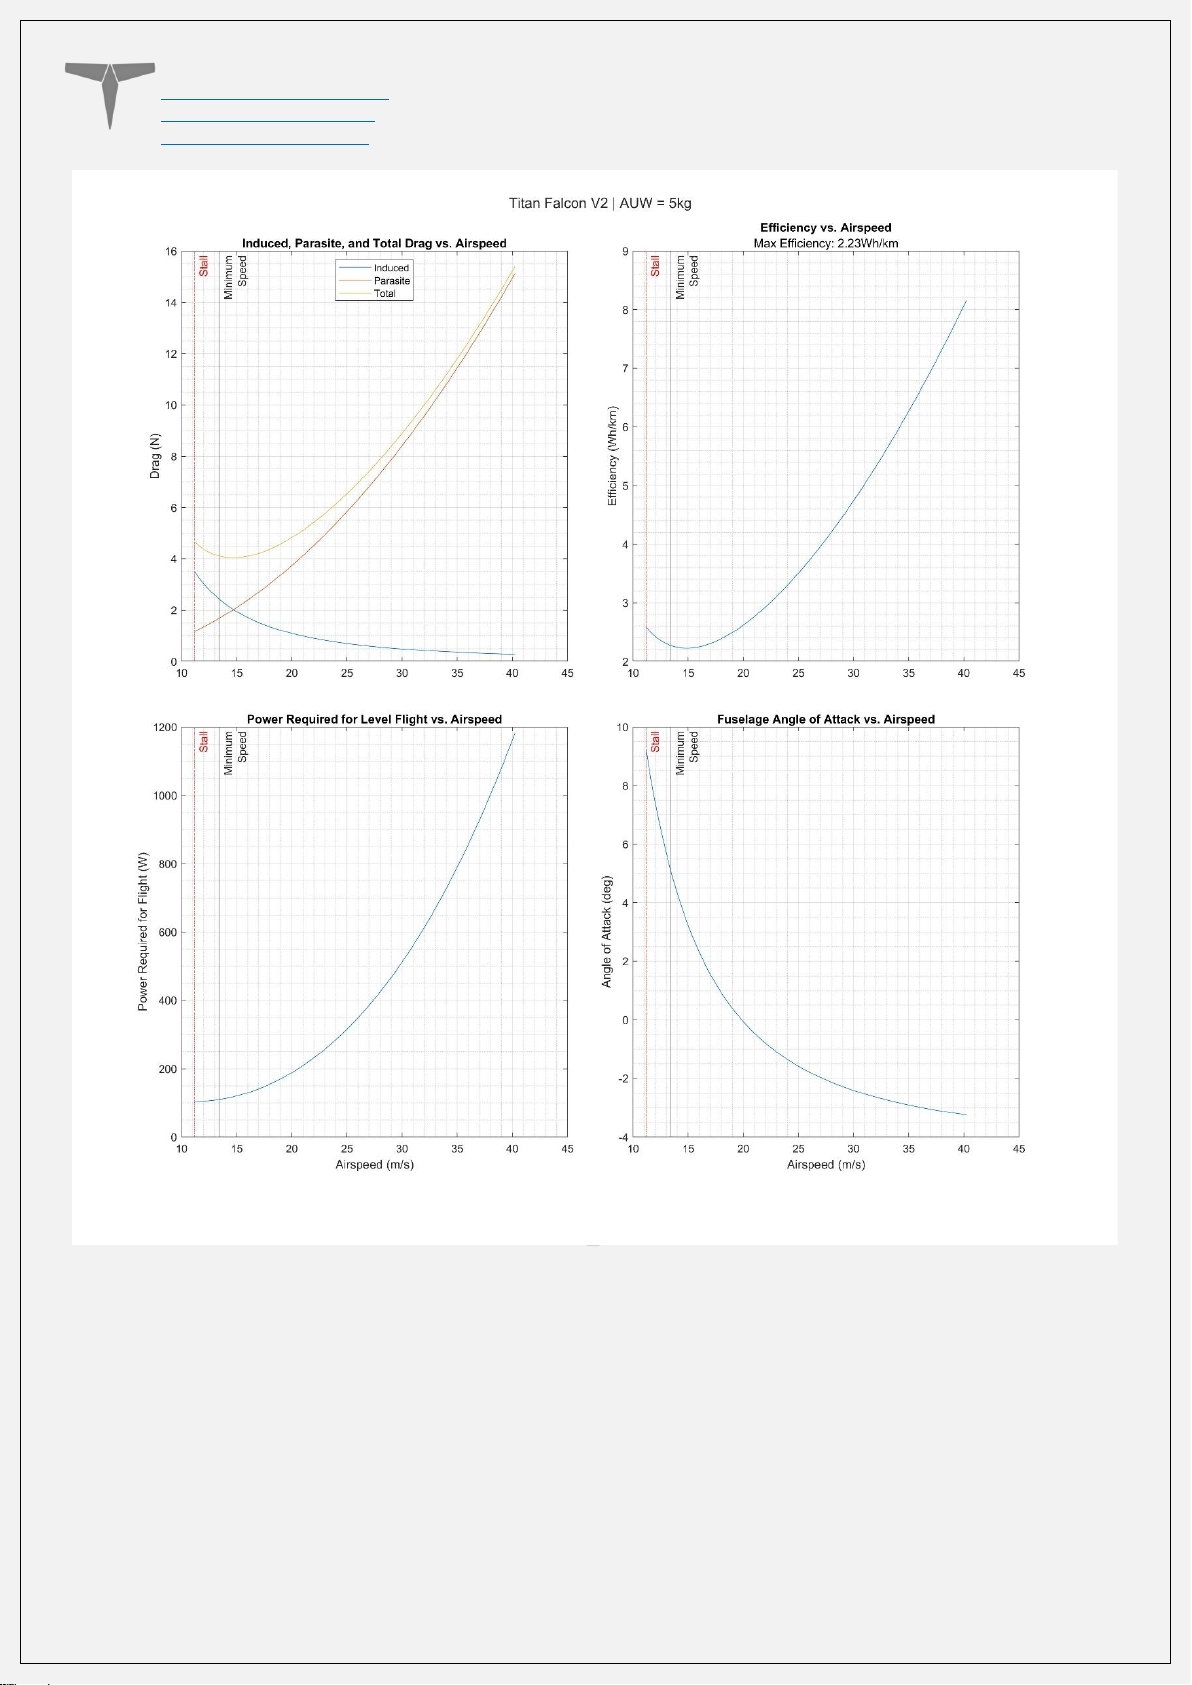
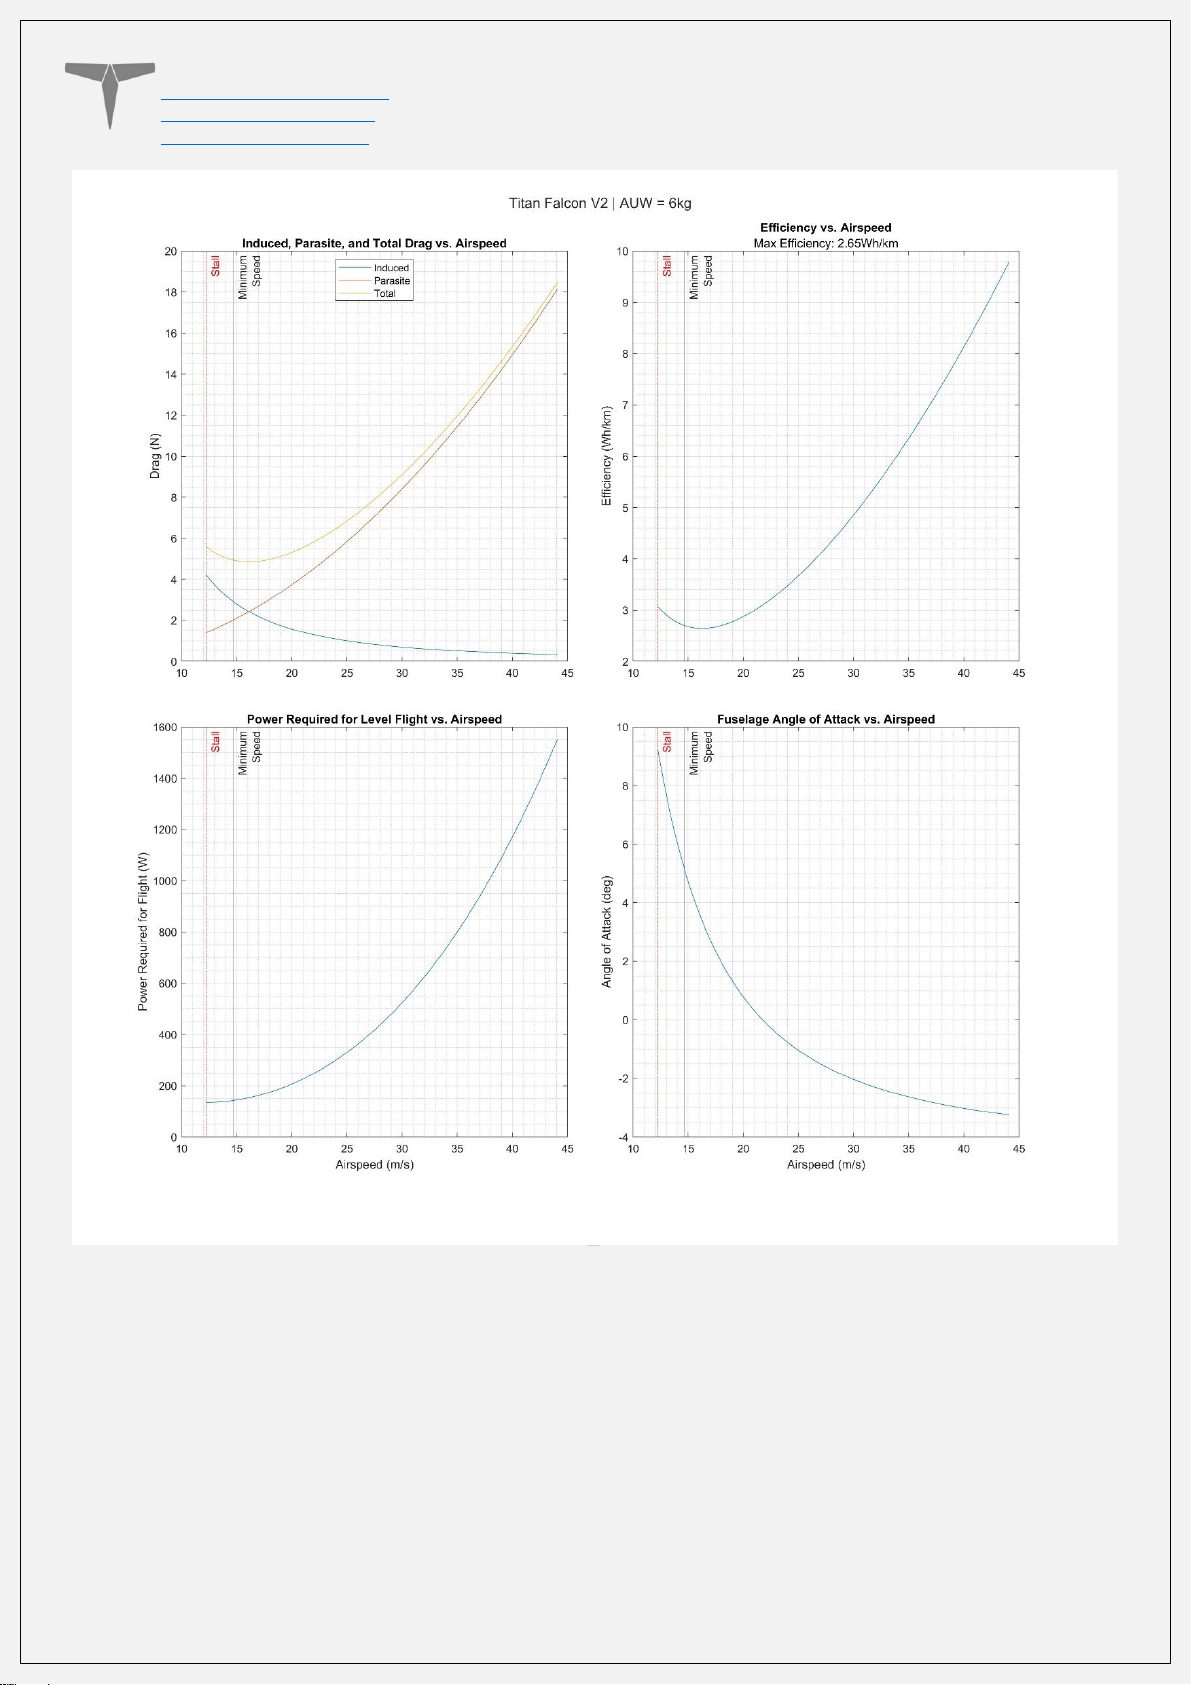
Below are some plots showing aircraft performance at different all-up weights. The
values predicted are not perfect, and values like efficiency can vary greatly based on the
choice of motor and propeller, among many other factors. These just serve to give a
rough idea of the sort of performance you can expect and give you an idea of the flight
envelope of your aircraft before you fly it and help narrow in on the most efficient cruise
speed. The stall speed assumes a C
Lmax
of 1.42, and the minimum speed line is just 20%
above stall speed. Below the minimum speed, a tailwind gust can cause the aircraft to
stall unexpectedly, so be careful.
Using the drag plot can help figure out how much thrust you’ll need in level flight at a
given speed. This allows for the use of propeller data from companies like APC to choose
the best propeller for the type of flying you want to do.
The plot depicting power required for flight can help you estimate your loiter endurance
at a given speed. If you want the maximum time in the air, fly at the speed which uses the
least power to stay in the air.
The efficiency plot shows you what sort of efficiency to expect at each speed. With it, it’s
possible to choose the best cruise speed for your setup and see how changes in that
speed may affect your efficiency.
The fuselage angle of attack plot shows you what angle of attack the fuselage will be at a
given speed. This can be useful when setting the TRIM_PITCH_CD parameter in Arduplane
to the angle of attack value that corresponds with your cruise speed.
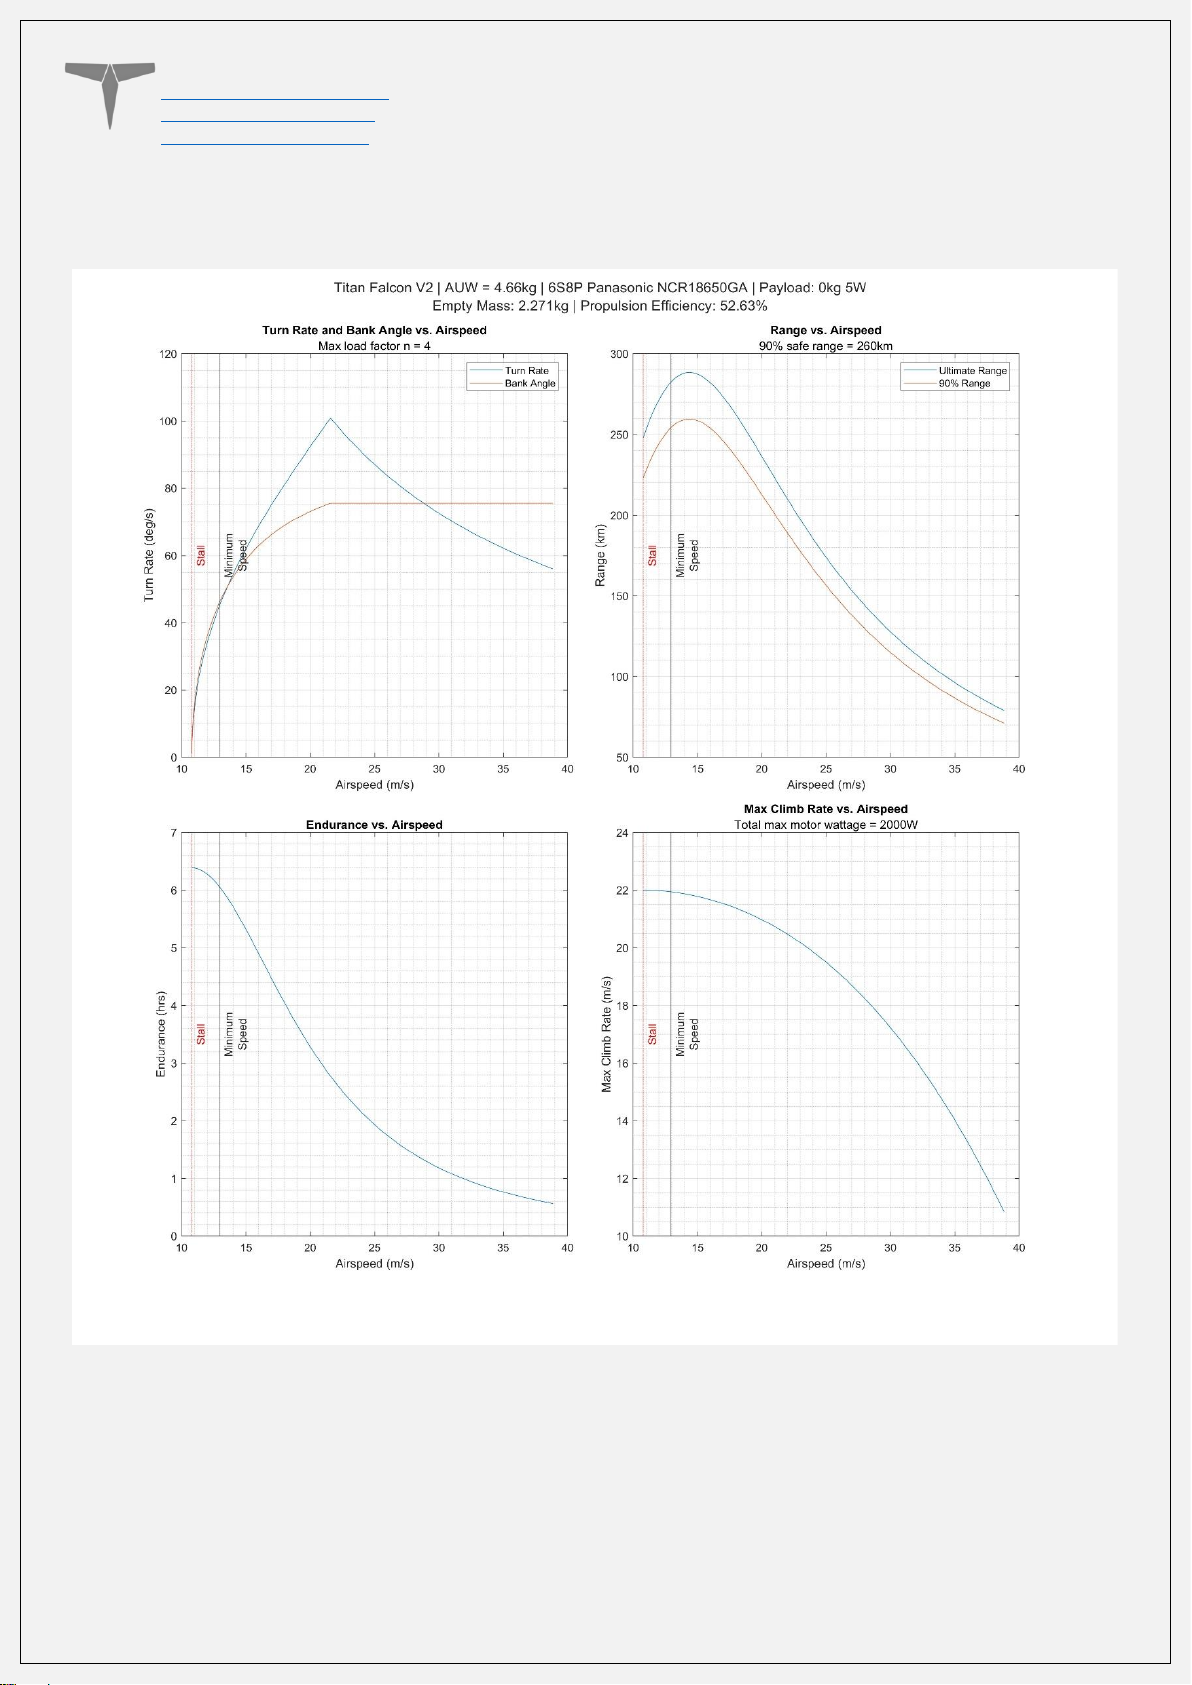
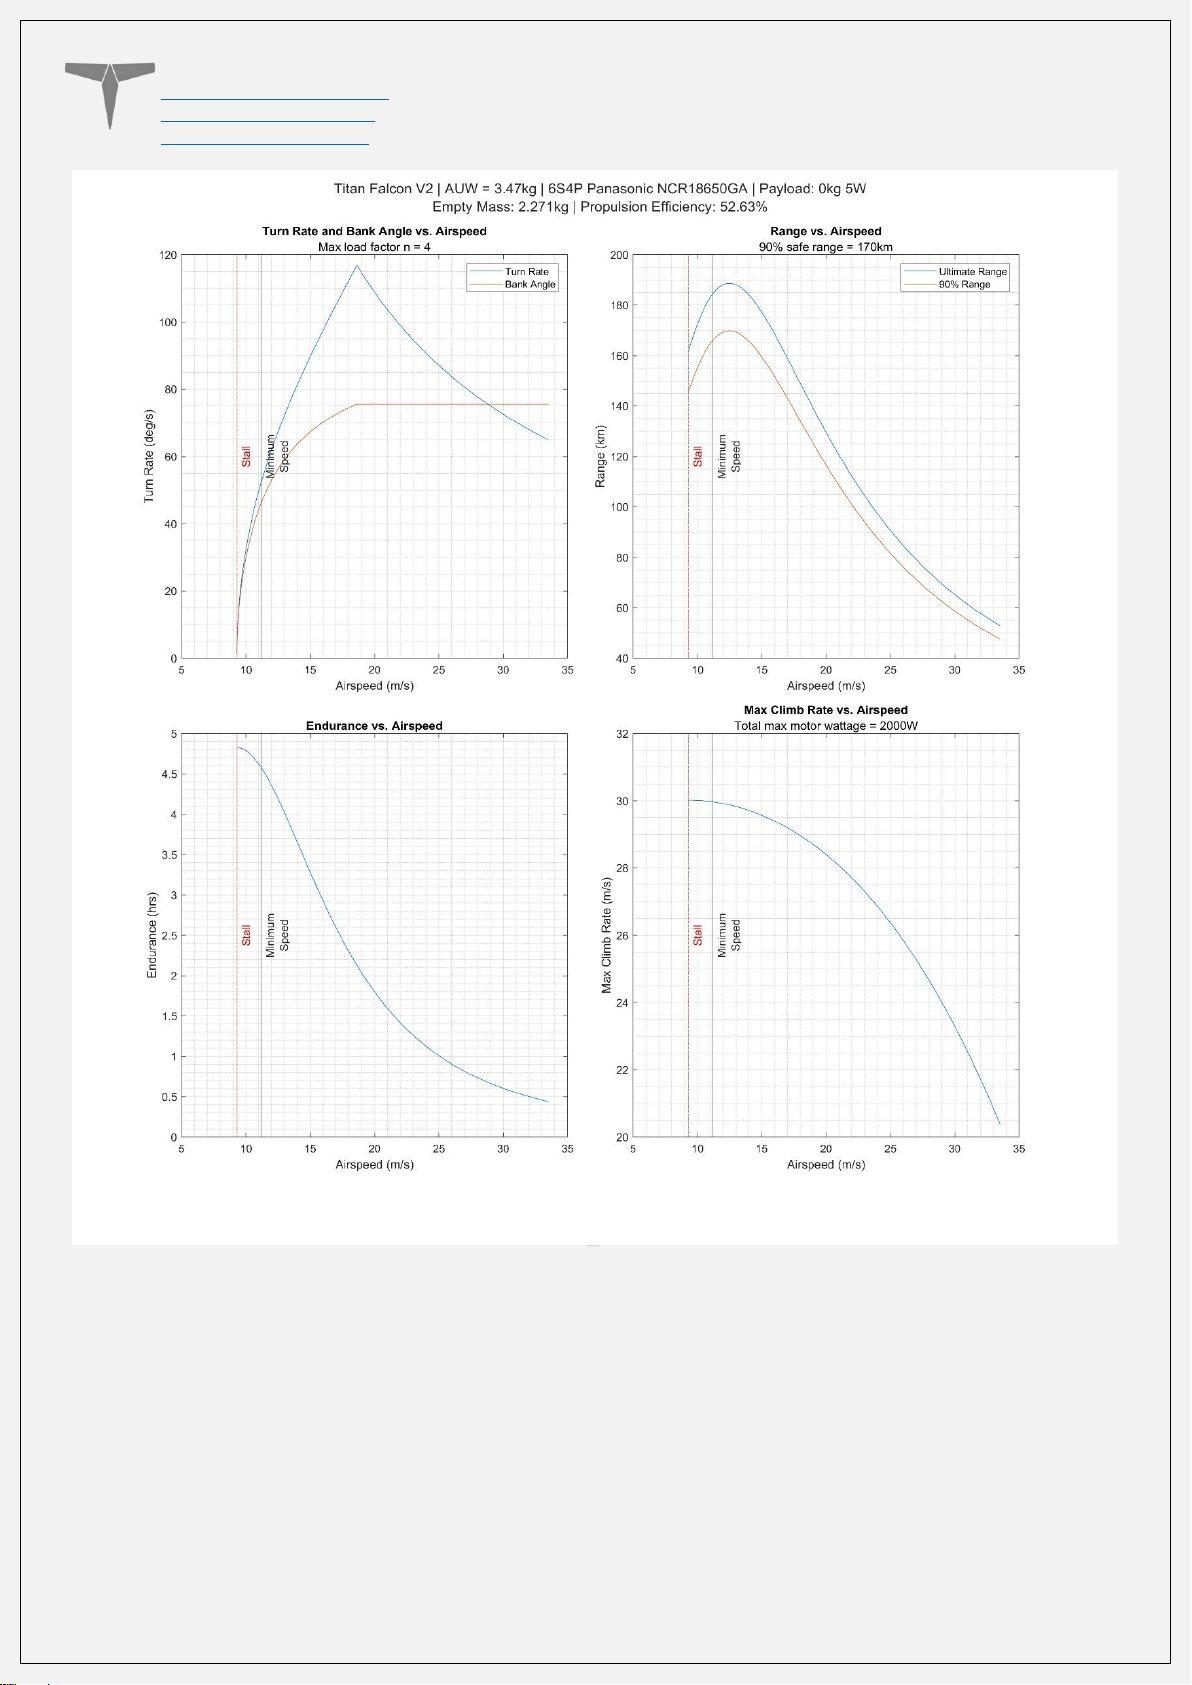
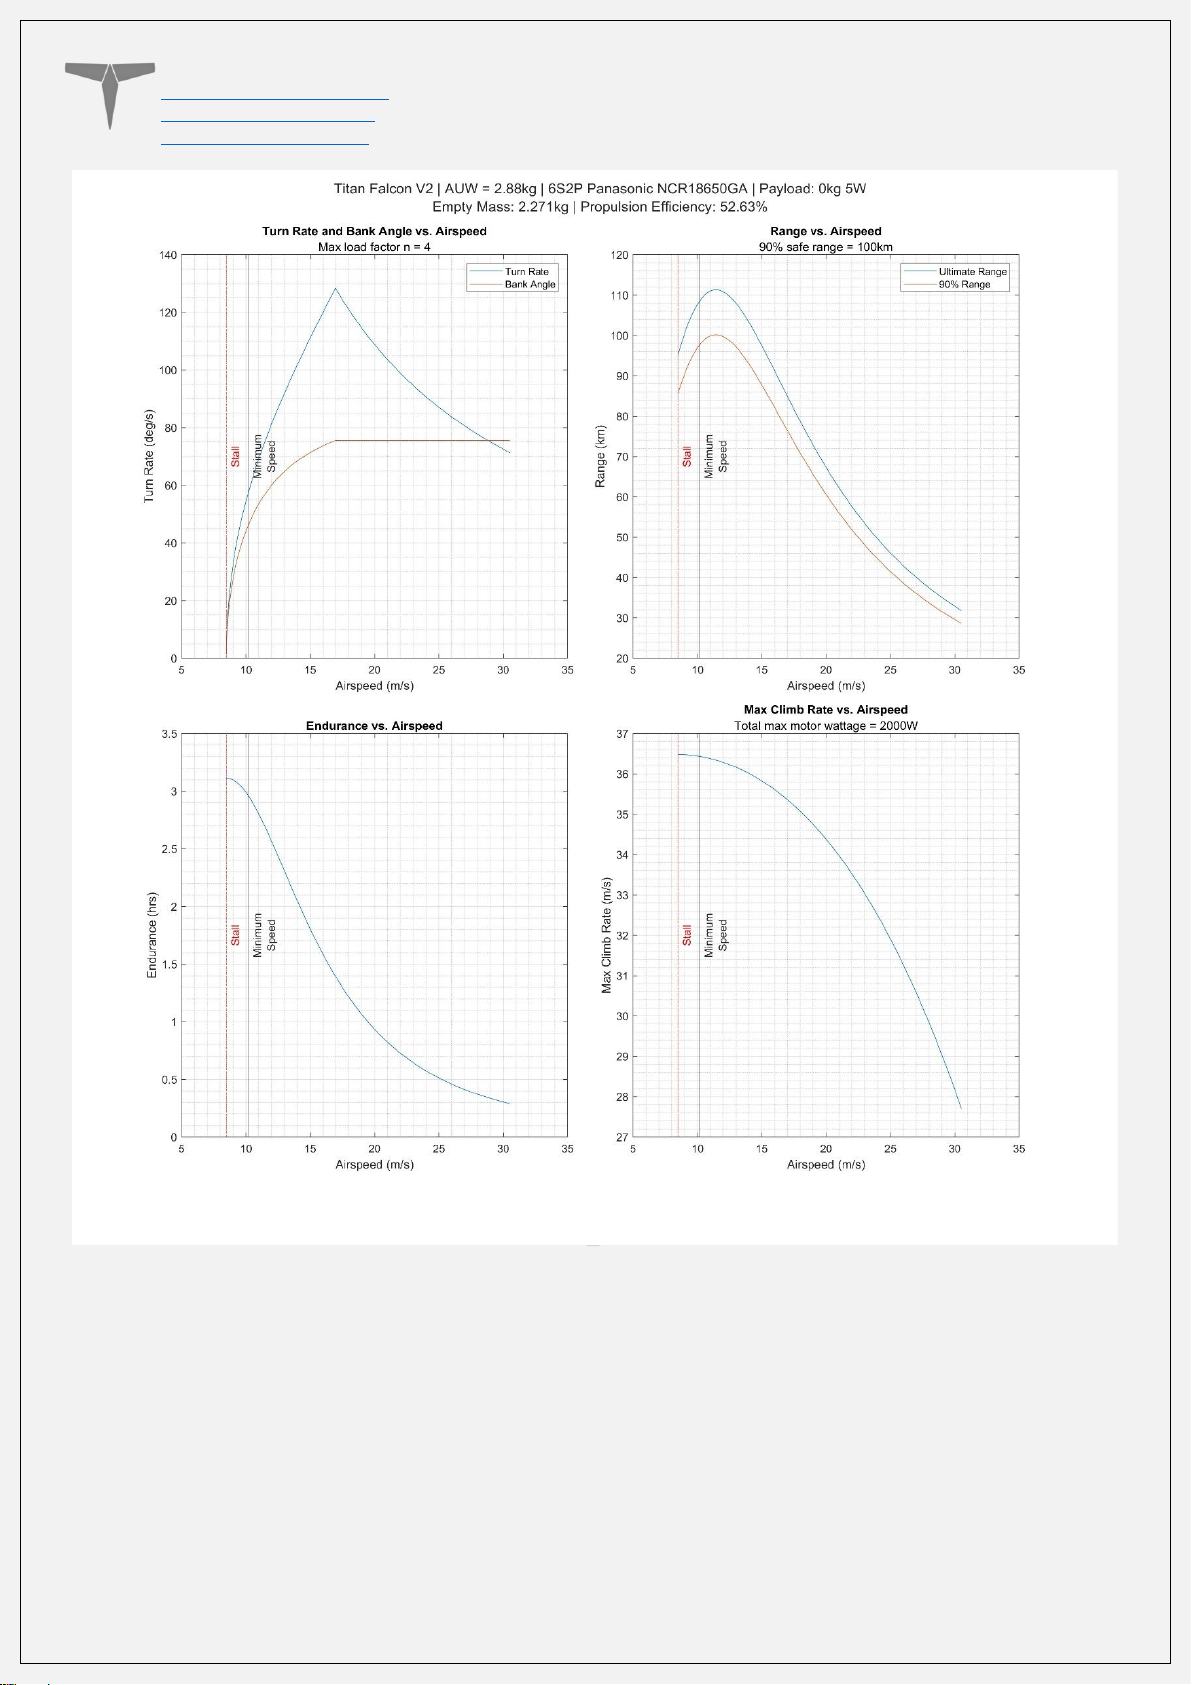
The plots in section 2.2.2 are just to give an idea of the sort of performance that can be
expected for certain battery configurations. They are not a guarantee of performance,
as there are too many variables to account for when individuals build the aircraft. Extra
draggy antennas, inefficient motors, surface quality, etc. can all change flight
performance drastically.
Page 6
Titan Dynamics
Titan Dynamics Webpage
Visit our Facebook page
Join our Discord server
Page 6 of 30
2.2.1: Drag, Efficiency, Power, and Angle of Attack at Varying All-up-weights:
Page 7
Titan Dynamics
Titan Dynamics Webpage
Visit our Facebook page
Join our Discord server
Page 7 of 30
Page 8
Titan Dynamics
Titan Dynamics Webpage
Visit our Facebook page
Join our Discord server
Page 8 of 30
Page 9
Titan Dynamics
Titan Dynamics Webpage
Visit our Facebook page
Join our Discord server
Page 9 of 30
Page 10
Titan Dynamics
Titan Dynamics Webpage
Visit our Facebook page
Join our Discord server
Page 10 of 30
Page 11
Titan Dynamics
Titan Dynamics Webpage
Visit our Facebook page
Join our Discord server
Page 11 of 30
2.2.2: Turn rate, range, endurance, and max climb rate for a variety of different battery
configurations:
Page 12
Titan Dynamics
Titan Dynamics Webpage
Visit our Facebook page
Join our Discord server
Page 12 of 30
Page 13
Titan Dynamics
Titan Dynamics Webpage
Visit our Facebook page
Join our Discord server
Page 13 of 30
Page 14
Titan Dynamics
Titan Dynamics Webpage
Visit our Facebook page
Join our Discord server
Page 14 of 30
Section 3: Required Build Materials
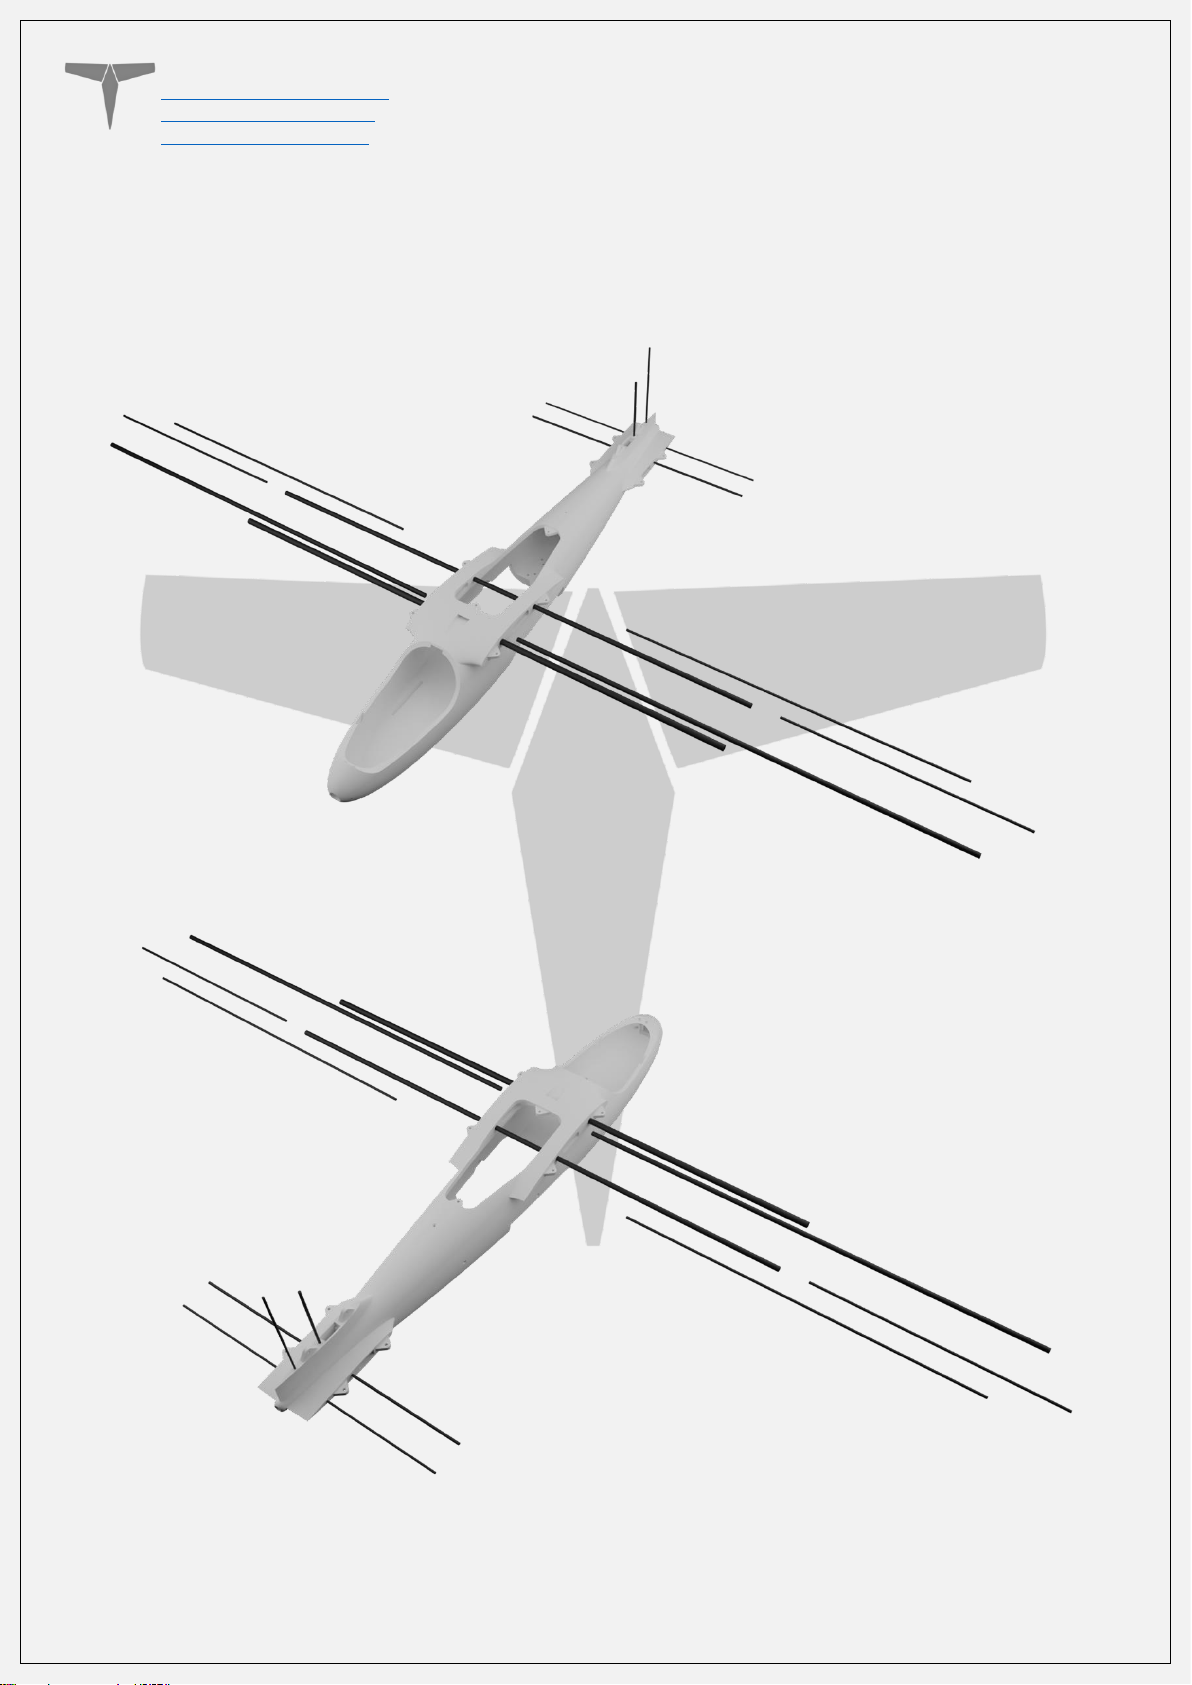
Spars needed (solid rod if no OD/ID specified):
• (1) 10 OD x 8 ID x 1000mm - front main wing spar
• (1) 8 OD x 6 ID x1000mm - rear main wing spar
• (2) 8 OD x 6 ID x 800mm – inner wing spar
• (2) 4x600mm - flap/aileron hinge
• (2) 4x400mm - wingtip support
Conventional tail:
• (1) 4x500mm - hstab support
• (1) 3x500mm - elevator hinge
• (1) 4x170mm - vstab support
• (1) 3x220mm - rudder hinge
Vtail:
• (2) 4x250mm - ruddervator hinge
• (2) 4x150mm - stab support
Recommended motor & prop:
• 19-25mm mounting pattern
• BrotherHobby 2816 620kV and APC 11x8 CW/CCW props (this is only a suggestion,
there are hundreds of other motor and prop combos that would work)
• 11-14 inch propellers – choose according to your build goals
Recommended electronics:
• ELRS / Dragonlink / TBS Crossfire
• 5.8ghz / 1.2ghz analog or digital. Supports DJI / Walksnail / SIYI as well
• Matek F405-WTE or similar flight controller running Ardupilot (optional)
• Matek M10Q-5883 GPS/Compass or similar (optional)
• (2) 35A BLHeli ESC or 51a Lumenier Blheli32 ESC with telemetry
• (7) Emax ES08MAII servos (6 if using V-Tail)
• Li-Ion Battery: 6S3P 21700 15Ah, 6S4P 21700 20Ah, 6S8P 18650 28Ah
• LiPo Battery: 6S 6Ah, 6S 8Ah, 6S 10Ah, 4S 14Ah (many other options…)
Misc:
• Polymaker Polylite prefoamed LWPLA
• PETG or other high-temp filament for the motor mount
• Medium CA glue
• 220x220x240 minimum size print bed
• Control horns and rods
• M3 threaded inserts (max 6mm height)
• M3 bolts of various sizes (countersunk ones as well)
• 6x3mm magnets
Page 15
Titan Dynamics
Titan Dynamics Webpage
Visit our Facebook page
Join our Discord server
Page 15 of 30
Section 4: 3D printing
4.1: Things to know before you start printing.
1. Titan Dynamics strongly recommends using Polymaker Polylite prefoamed LWPLA
for the best results. This filament is much easier to tune your printer for and has
less stringing than active foaming filaments. If you aren’t able to purchase
Polymaker filament, many members of our Facebook group and Discord server
have had success
2. You likely will not get good results unless your printer is well maintained and
calibrated, we would suggest learning how to check and adjust your printer to
perform at its absolute best before starting. This website has useful guides:
https://teachingtechyt.github.io/calibration.html#intro.
3. All the below guidance should be taken as a starting point only. Print a test piece
and check things like retraction settings and fitment of the carbon rods in the
wings for yourself as every printer is different. If the carbon rods are too tight,
increase the “Hole Horizontal Expansion” setting in Cura (or the equivalent setting
in other slicers).
4. All our models are designed to be printed predominantly in LW-PLA filament. All
fuselage, tail, and wing parts should be printed in LW-PLA unless otherwise noted
in the file name.
There are 3 levels of infill / wall settings that we recommend for the LWPLA parts:
1. Maximum efficiency: 3% cubic subdivision, single wall
2. Balanced efficiency and strength: 5% cubic subdivision, single wall
3. Maximum strength: 8% cubic subdivision, single wall
WE RECOMMEND PRINTING FALCON WITH 3.5% CUBIC SUBDIVISION INFILL
Notes:
• Cubic subdivision infill can be increased to 5 or 8% to increase durability, but this
will have an impact on maximum payload capacity (battery), and range by
extension. We recommend and use 3% cubic subdivision infill as it has been tested
to survive over 13G in flight, but some may desire greater general durability when
handling/carrying the model around etc. It will still break if you crash it!
• Because the fuselage takes the most abuse during landings, some may choose to
just print the fuselage sections in higher infill. Using a higher infill just for the
fuselage (4%-8%) can greatly increase the longevity of the plane without as much
of a weight penalty as printing the entire plane in high infill.
• Gyroid infill brings a significant weight penalty with it even at the same
percentage. For the highest strength-to-weight ratio, stick to cubic subdivision or
cubic. A part printed at 3% gyroid is comparable in weight to the same part printed
at 7% cubic subdivision!
Page 16
Titan Dynamics
Titan Dynamics Webpage
Visit our Facebook page
Join our Discord server
Page 16 of 30
Polycarbonate, PETG or other high-temp filament should be used for the motor mounts
and wing bay covers.
• High temp Polycarbonate or PETG parts should be triple wall and high infill (25%).
We recommend using version 5.2.2 of Ultimaker Cura. You can find many instructions
and a suitable LW-PLA profile at this link.
4.2: Part Orientation
It is necessary to orient each part correctly on the build plate to avoid disconnected
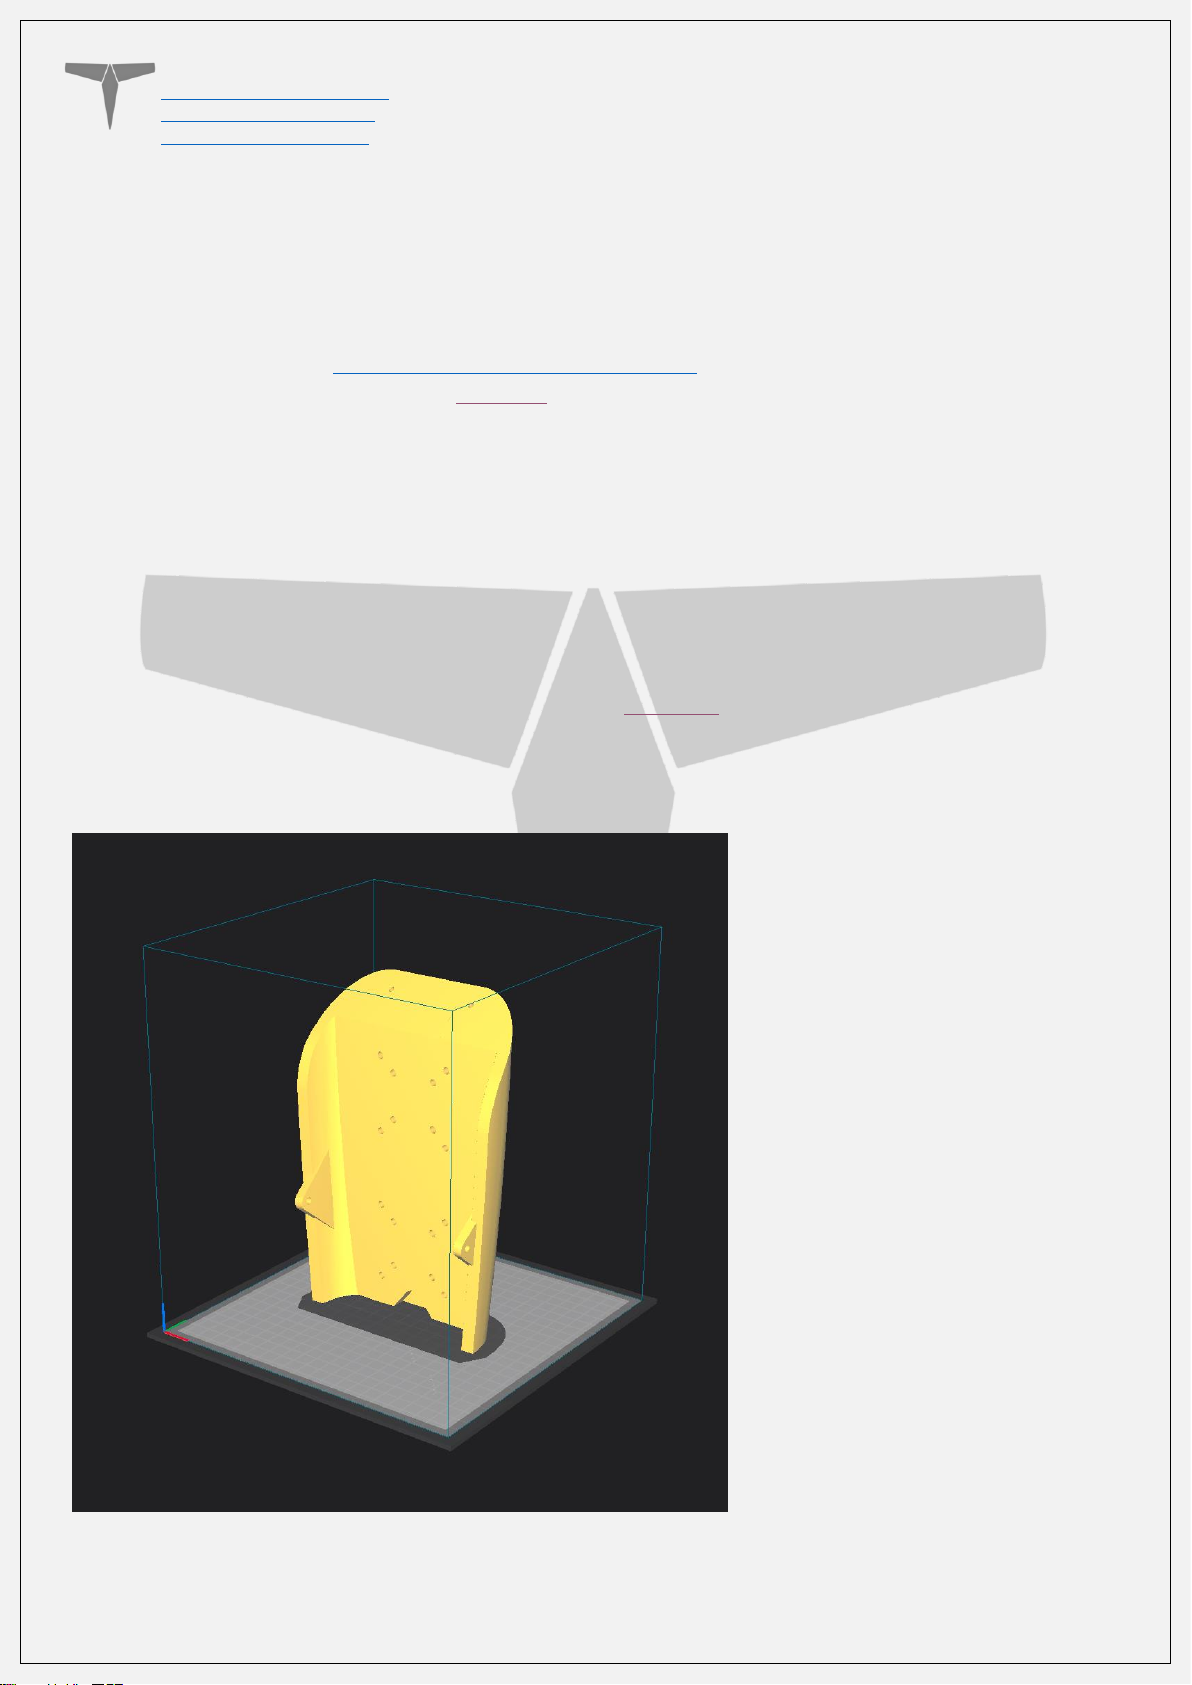
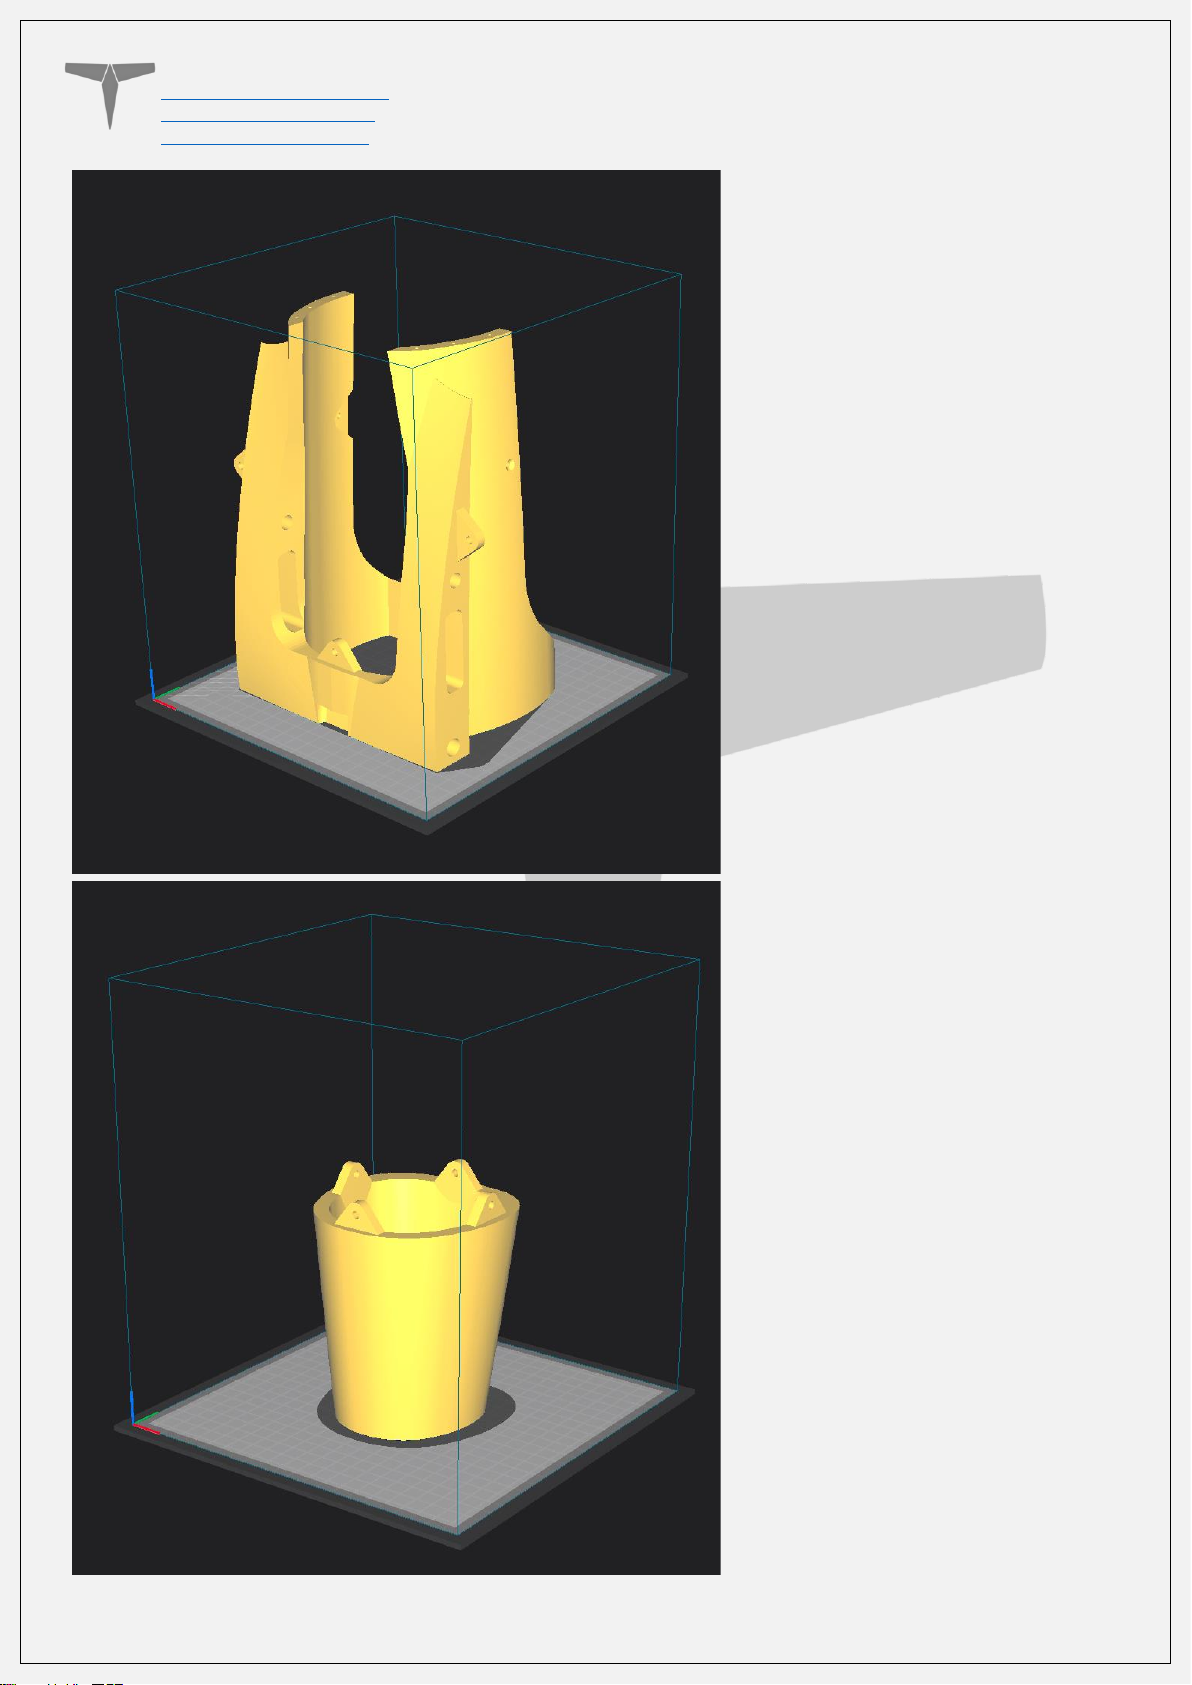
overhangs. Take care when doing this as the entire model is designed to be printed with
no supports. If you orient some parts wrong, the print will fail. It may also be necessary
to rotate and carefully position some parts to fit within the build area on smaller
printers.
We recommend using Cura slicer version 5.1.1. This link can be used to download our
own slicer profile.
Examples for part orientation to avoid using supports:
Page 17
Titan Dynamics
Titan Dynamics Webpage
Visit our Facebook page
Join our Discord server
Page 17 of 30
Page 18
Titan Dynamics
Titan Dynamics Webpage
Visit our Facebook page
Join our Discord server
Page 18 of 30
4.3: Tuning “hole horizontal expansion”
It is very important to check the fitment of the carbon rods in their holes on the first
parts you print. Because everyone may be using different printers, materials and slicer
settings, it is not possible to provide the models with a slicing profile and hole size that
will work for everyone.
Print your first part with carbon spar hole and check fitment, if it is too tight increase the
hole horizontal expansion setting in the “walls” section in Cura (or your slicer’s similar
setting). A good starting point is 0.25mm. If it is too loose, just decrease the setting until
you can reliably push the rods in and still get a snug fit.
4.4: Bed Adhesion and warping
When printing tall parts like this and other models require, having good print adhesion to
the bed is a necessity. Ideally you will print each part without any extra aids, however
this may not be possible for many, especially those printing without an enclosure for
their printer. A full brim can be used but this will typically have mixed results. If it works
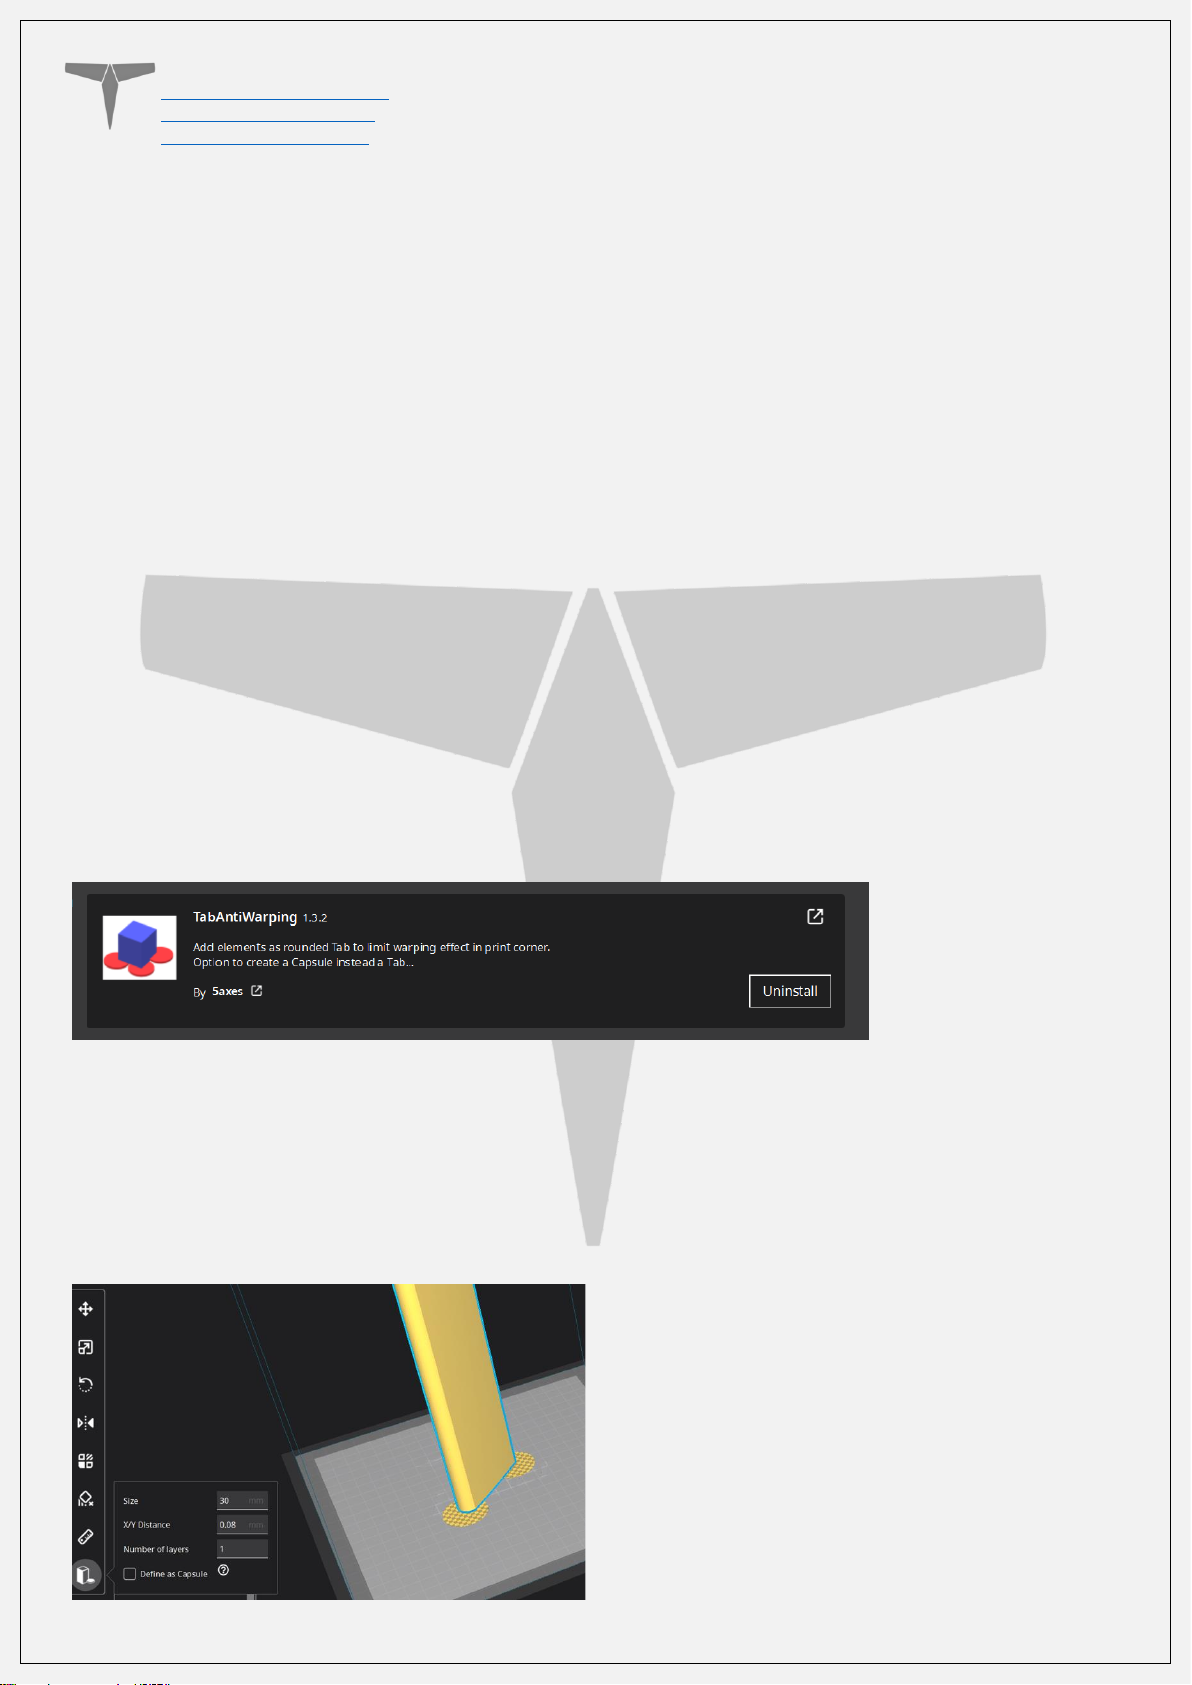
for you, use a glue stick on the print surface to improve adhesion. Cura also has a plugin
that can be used to help with bed adhesion and to avoid warping.
Cura Marketplace: TabAntiWarping Plugin.
When installed, use the new icon at the bottom of the left menu to choose tab diameter
and thickness, then click on the model to add a tab at each point you think is at risk of
warping or poor adhesion (typically parts with low surface area in contact with the print
surface in relation to their height). These new tabs can now be moved around to fine
tune their position using the normal move controls on Cura.
Page 19
Titan Dynamics
Titan Dynamics Webpage
Visit our Facebook page
Join our Discord server
Page 19 of 30
Section 5: Assembly of 3D Printed Parts
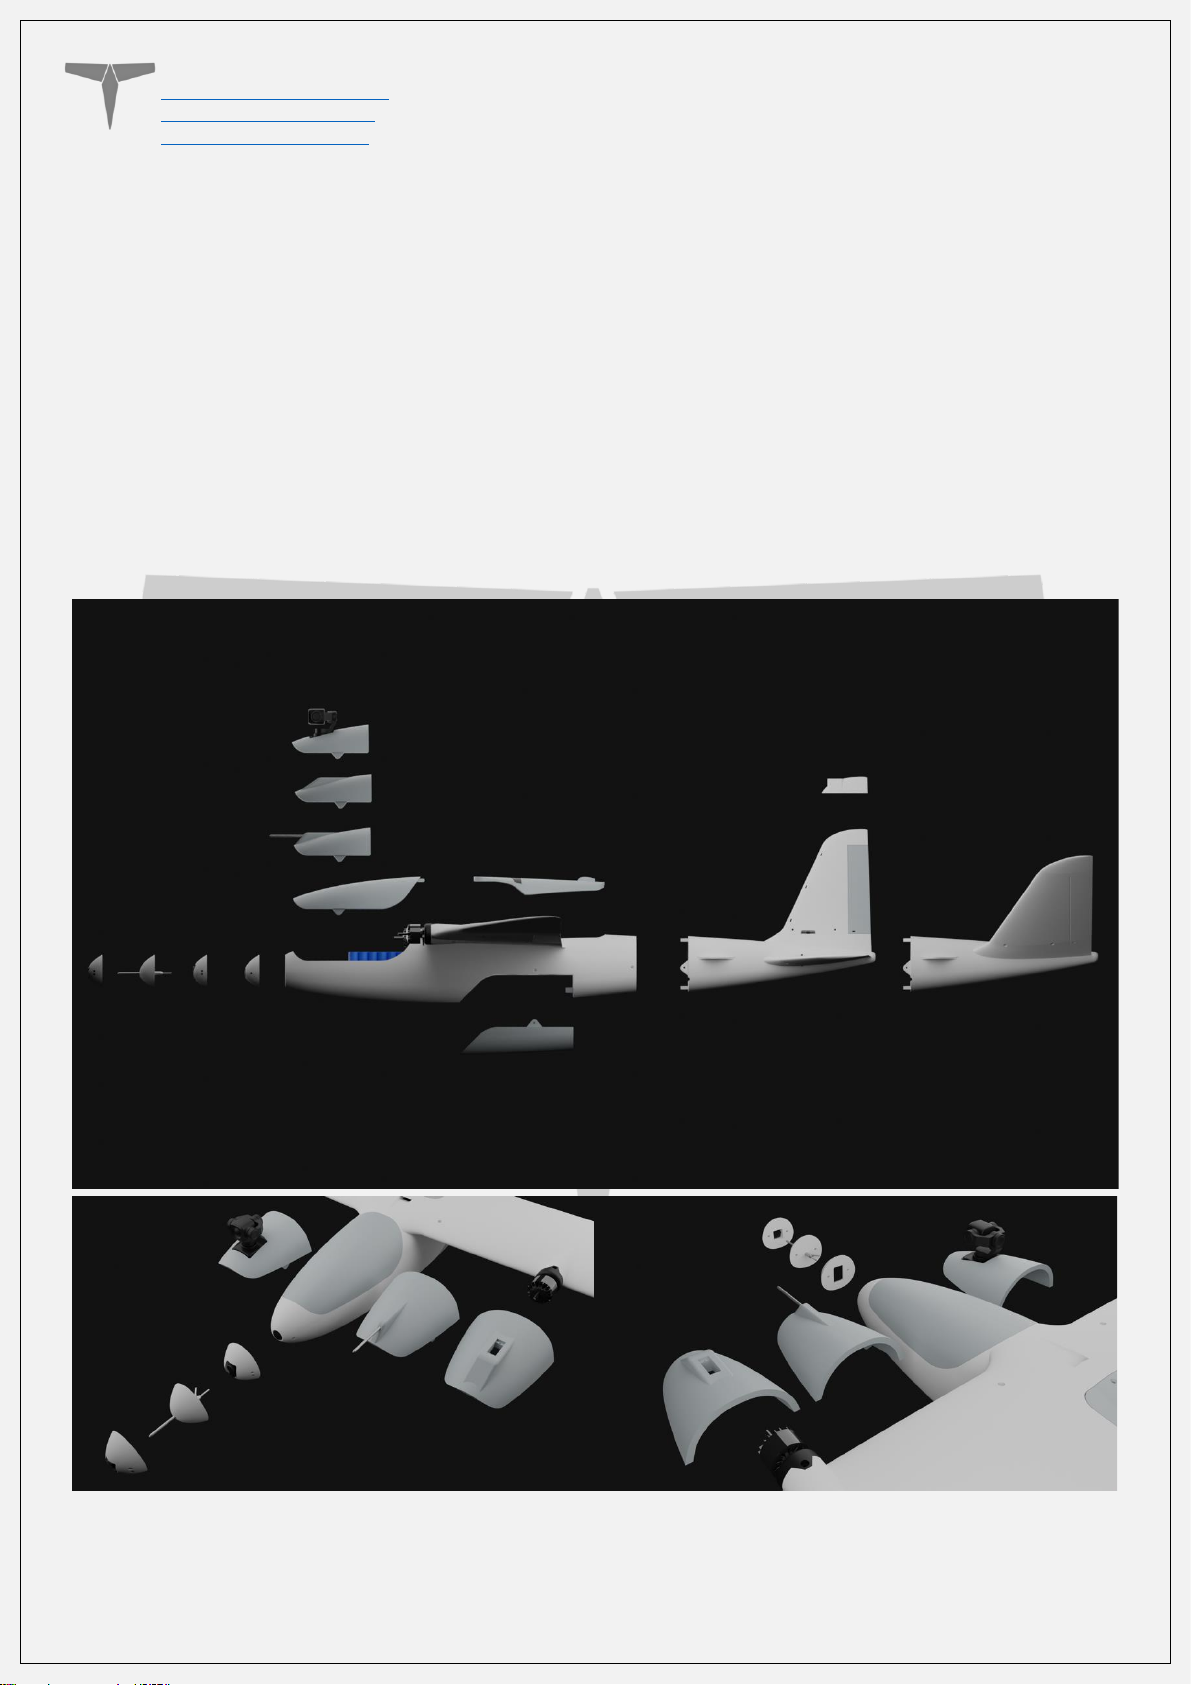
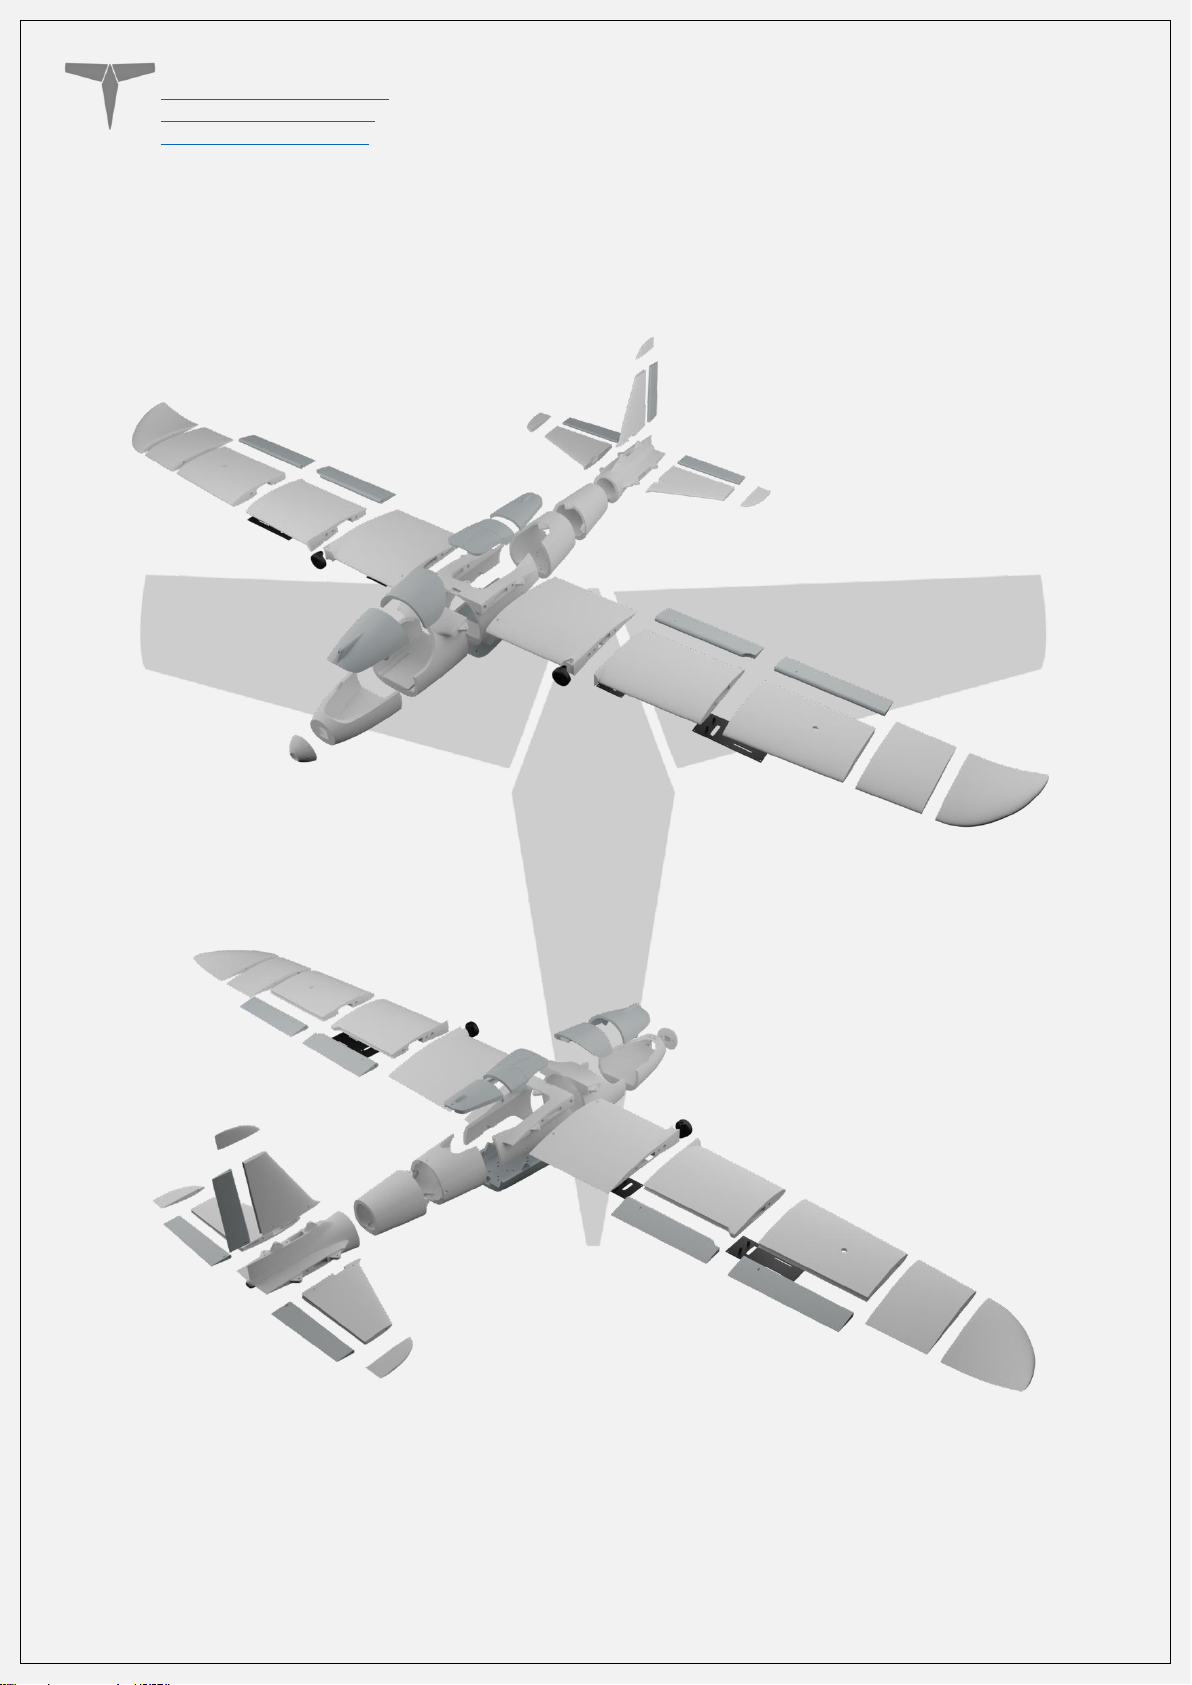
Falcon V2 comes with swappable nose and tail sections. For the tail, you can choose
between Conventional and V-Tail. There are positives and negatives of both. The
conventional tail allows for finer control as well as redundancy, while the V-Tail lowers
assembly time/effort as well as complexity. Performance differences are entirely
negligible, however there is a miniscule drag difference with the V-Tail exposing less
frontal area. The payload bay allows for quickly swapping out different payloads if need
be – or easy mounting and access to the flight controller or other avionics. There is also
an optional mountable vertical stabilizer for the conventional tail, and optional tail pieces
that allow for mounting SMA antennas. There are a variety of canopies as well. There is a
blank nose included for you to modify if needed, as well as a blank payload bay.
Page 20
Titan Dynamics
Titan Dynamics Webpage
Visit our Facebook page
Join our Discord server
Page 20 of 30
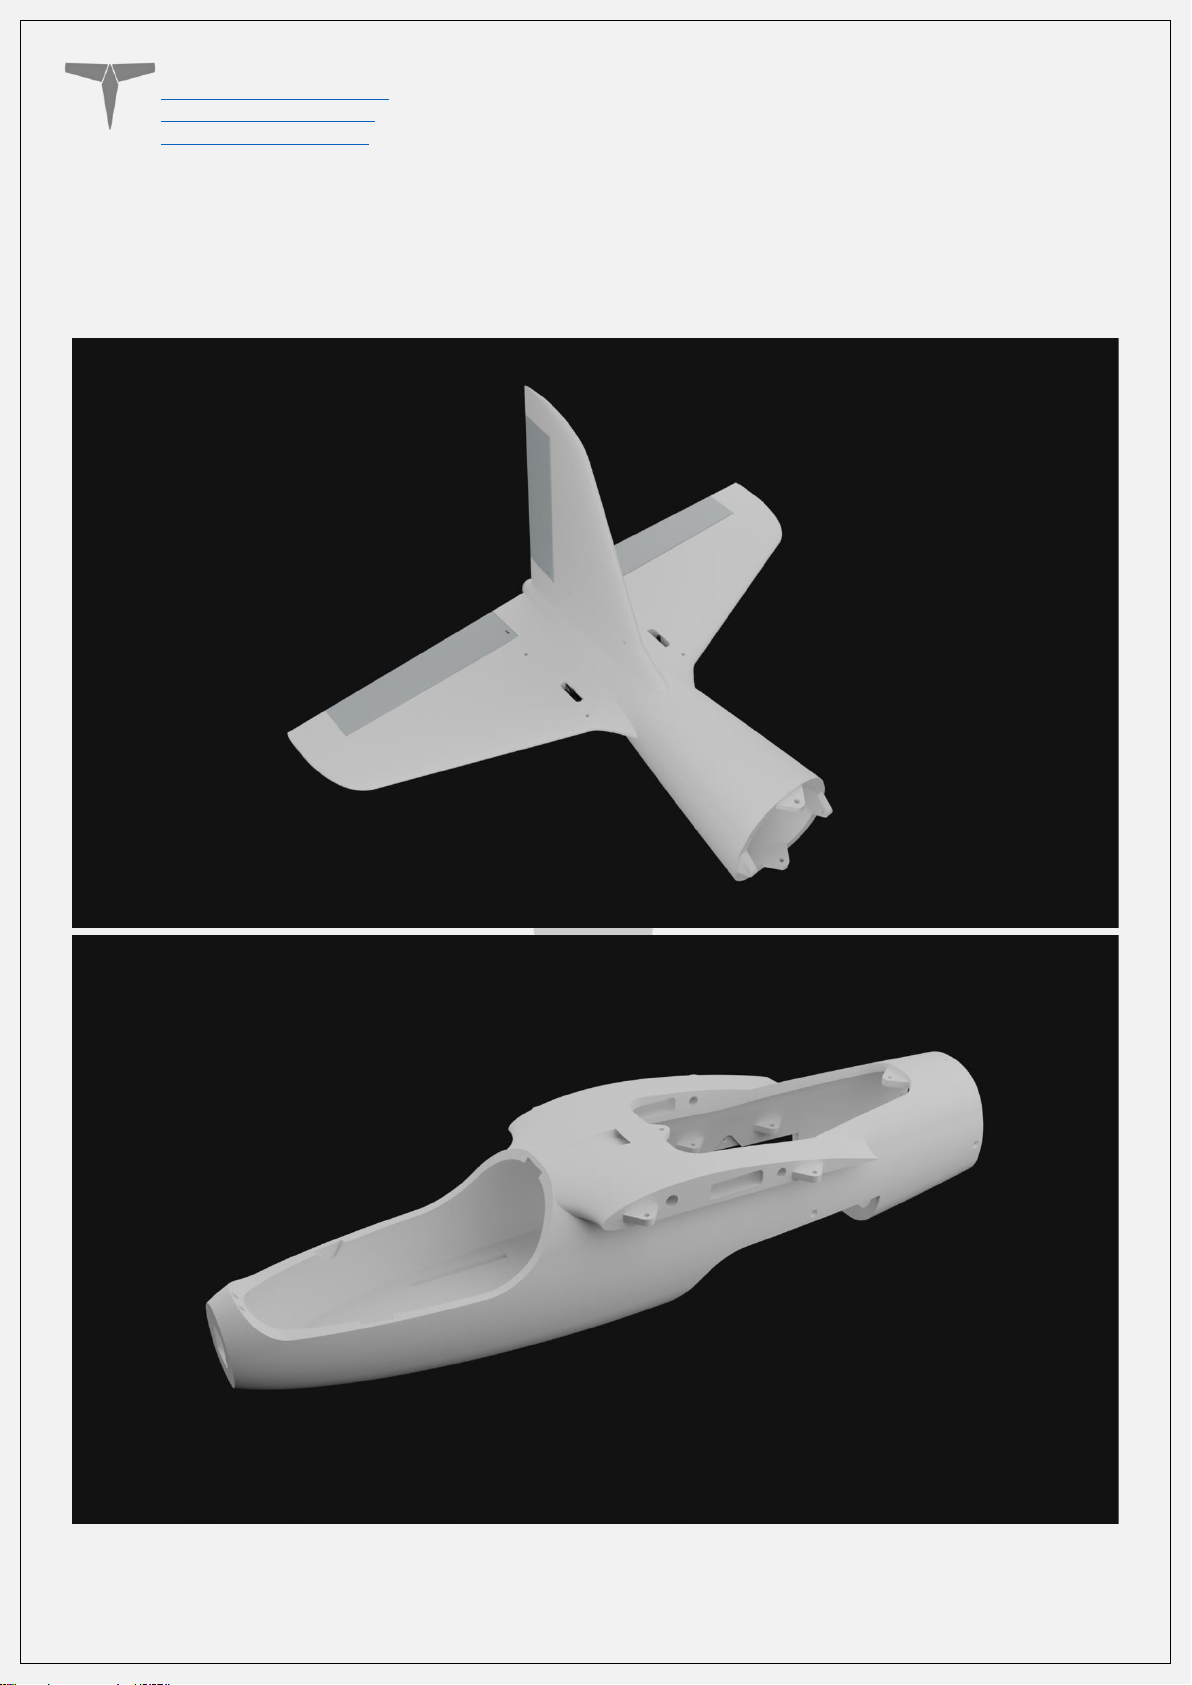
When attaching the tail, payload bay, rear hatch, and nose, please use M3 threaded
inserts on the larger holes. Countersunk M3 bolts will secure these pieces to the main
fuselage. No glue is required. If you have no desire in swapping tails, you can glue the tail
on to the fuselage permanently.
Page 21
Titan Dynamics
Titan Dynamics Webpage
Visit our Facebook page
Join our Discord server
Page 21 of 30
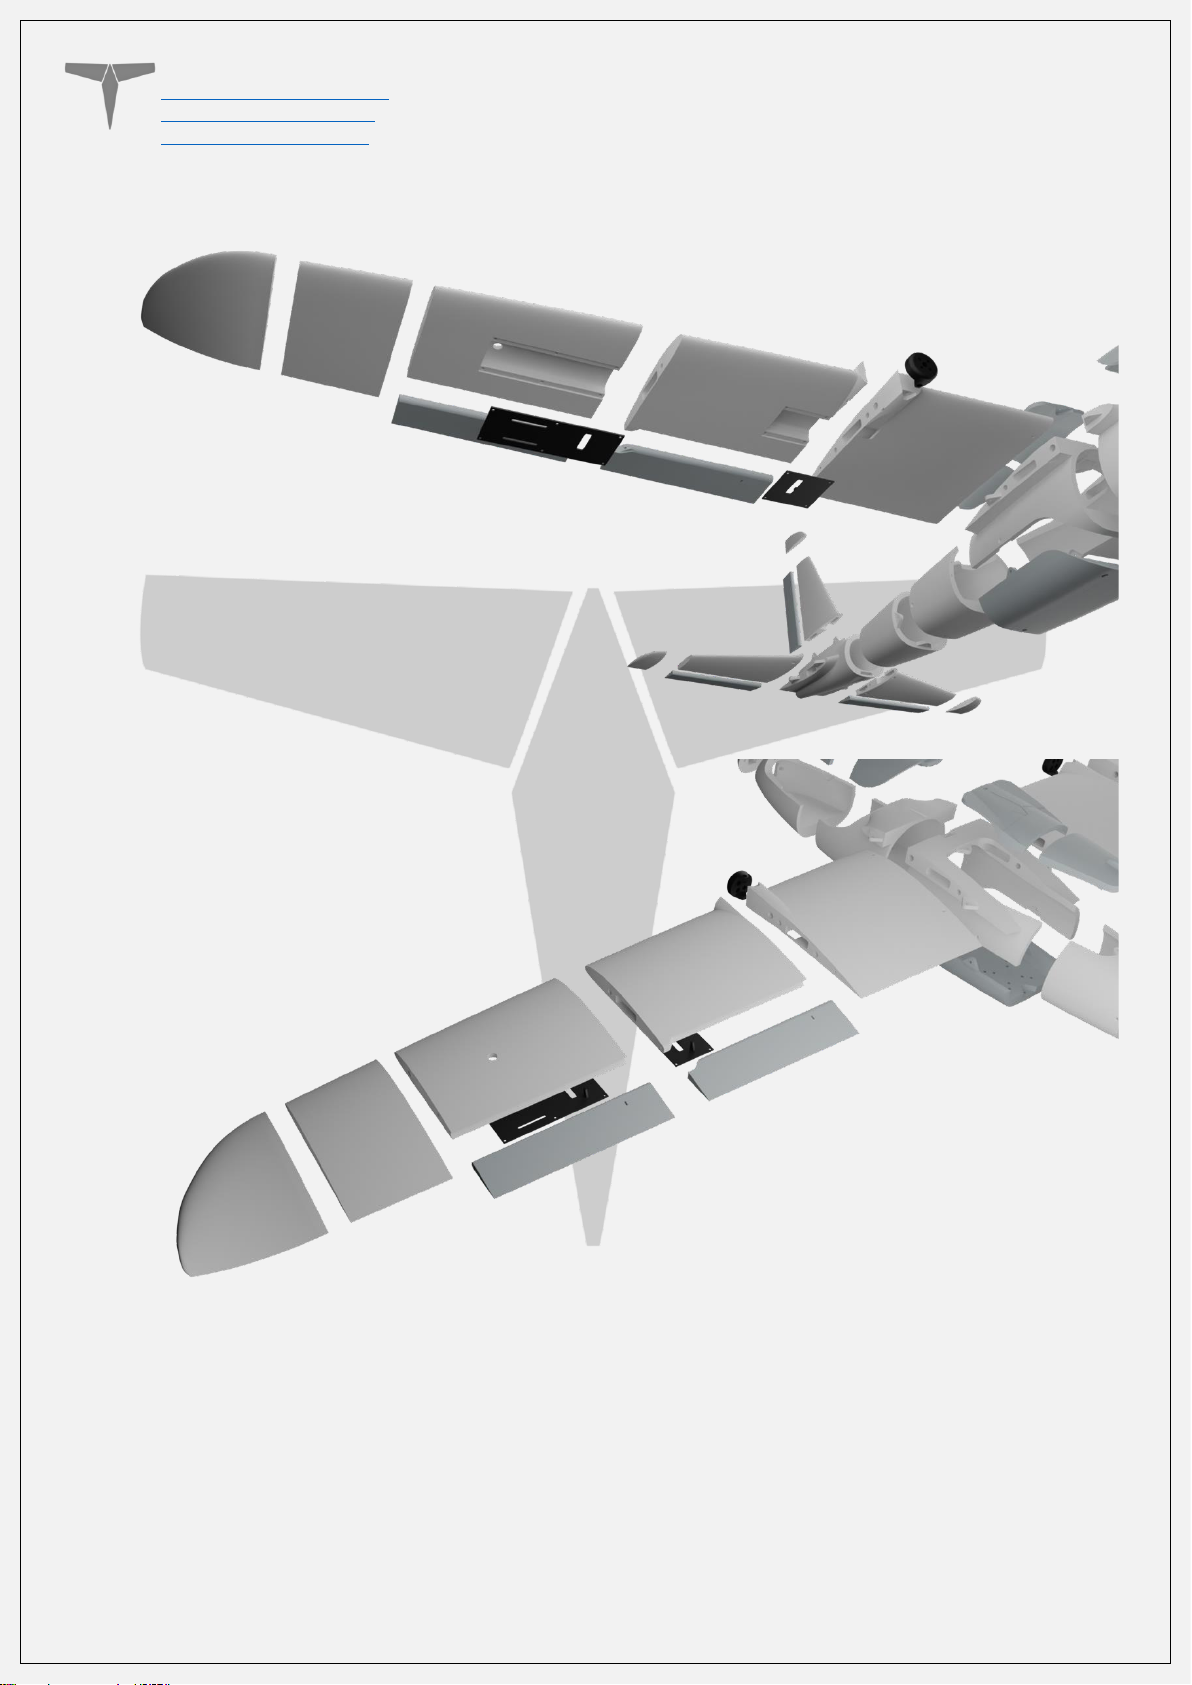
Below are a few exploded views of the Falcon V2 to help with assembly.
Page 22
Titan Dynamics
Titan Dynamics Webpage
Visit our Facebook page
Join our Discord server
Page 22 of 30
Page 23
Titan Dynamics
Titan Dynamics Webpage
Visit our Facebook page
Join our Discord server
Page 23 of 30
The spar layout for Falcon V2 is as depicted below (for conventional tail, you can imagine
how it might look for the V-Tail)
Page 24
Titan Dynamics
Titan Dynamics Webpage
Visit our Facebook page
Join our Discord server
Page 24 of 30
• Medium CA glue should be used to assemble all glued parts.
• When first putting the glued parts together be sure to wipe any excess glue off
before it sets. A kicker may then be used to speed up the setting time; technically
this results in a weaker joint, however it will still be stronger than the base material
LW-PLA.
• Use care when aligning parts for gluing. With medium CA, you should have a few
seconds to get alignment right. Small mistakes in alignment can stack up and
eventually lead to a part not fitting perfectly. We have taken care when designing
the aircraft to make sure there is tolerance for some minor mistakes but try to be
as perfect as possible when gluing.
• When gluing the wings together, use the carbon rods to ensure alignment however
be careful not to glue them in, they should not be glued in on the final product.
• Threaded inserts can be properly installed by using a soldering iron at low heat
setting, a good guide for doing this can be found at this link.
Page 25
Titan Dynamics
Titan Dynamics Webpage
Visit our Facebook page
Join our Discord server
Page 25 of 30
Section 6: Final Setup & Tuning Tips
• Titan Dynamics strongly recommends the use of Arduplane for all our models. If
you encounter an issue in flight, the data logs Ardupilot creates are invaluable for
finding the root cause of any issue and increasing future chances of success.
• Give all control surfaces +- 30 degrees or more throw.
• CG is marked under the wing and should be adhered to within ±10mm.
• Add duct tape or other abrasion resistant material to bottom of the fuselage to
increase durability if landing on rough surfaces.
• Use the included ESC mounting plates for tidiest wiring.
• If your goal is long range, aim for maximum antenna separation by using the wing
bays to mount your VTX and RX.
• Install your propellers such that the left is rotating CCW (looking forward as the
pilot) and right is rotating CW. This gives a small performance boost over the other
rotation.
• Set AUTOTUNE_LEVEL to 8 prior to doing an autotune on Ardupilot for ideal flight
characteristics. PIDs will vary from setup to setup, especially with increased
weight. A good starting point for both roll and pitch PIDs are: P: 0.25, I: 0.125, D:
0.002, FF: 0.125
• You can comfortably budget 3-4kg of total battery + payload weight, given your
power system can produce nearly a 1:1 power to weight ratio or more.
An ideal Falcon V2 setup for maximum range and endurance:
• Arducustom running on H743 or better FC
• Dragonlink for RC + Telemetry (> 100km capable)
• 1.2ghz 1500mw Partom VTX (> 100km capable)
• Lumenier 51a ESCs with telemetry (for RPM/Temp display on the OSD)
• Samsung 50E 6S8P 21700 40Ah LI-Ion
• Brotherhobby T5 640kv + 12x8E/EP APC props | Brotherhobby 2816 620kv +
11x8E/EP APC props
• Airspeed sensor for best speed measurements and TECS behavior
Page 26
Titan Dynamics
Titan Dynamics Webpage
Visit our Facebook page
Join our Discord server
Page 26 of 30
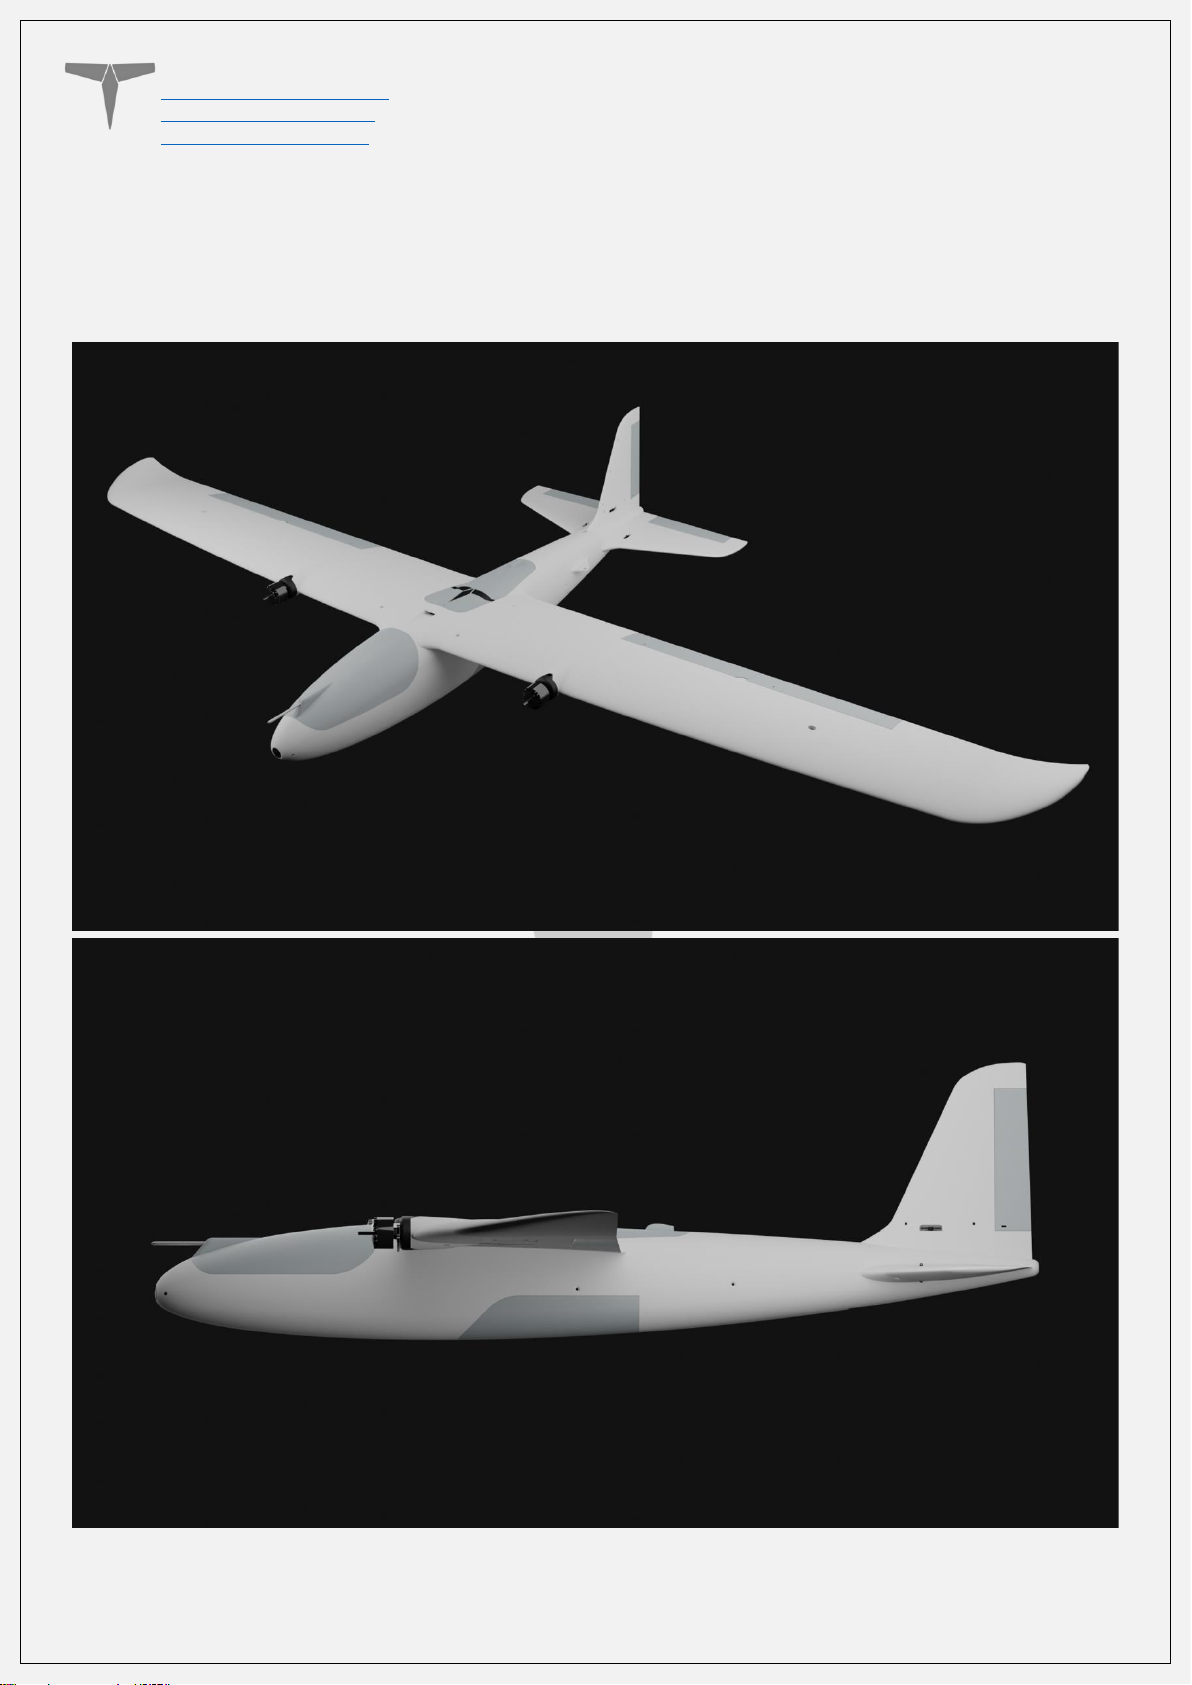
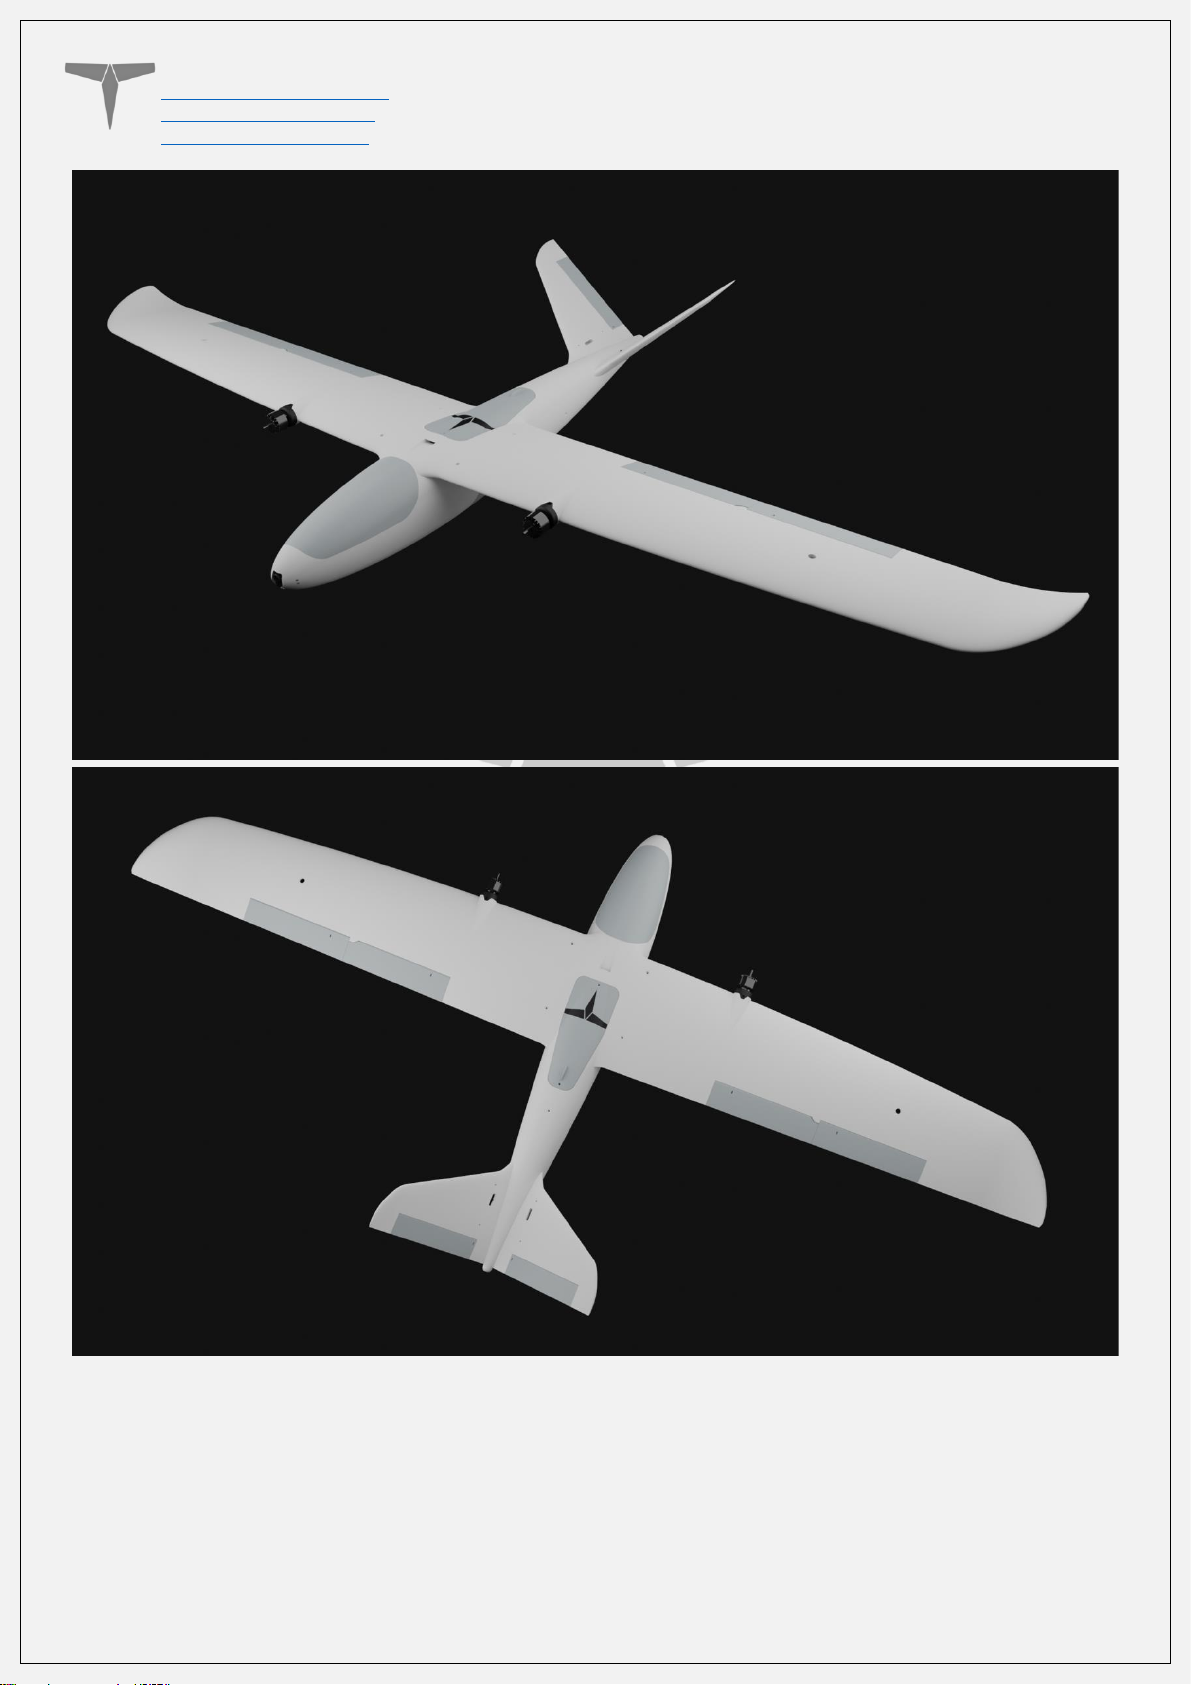
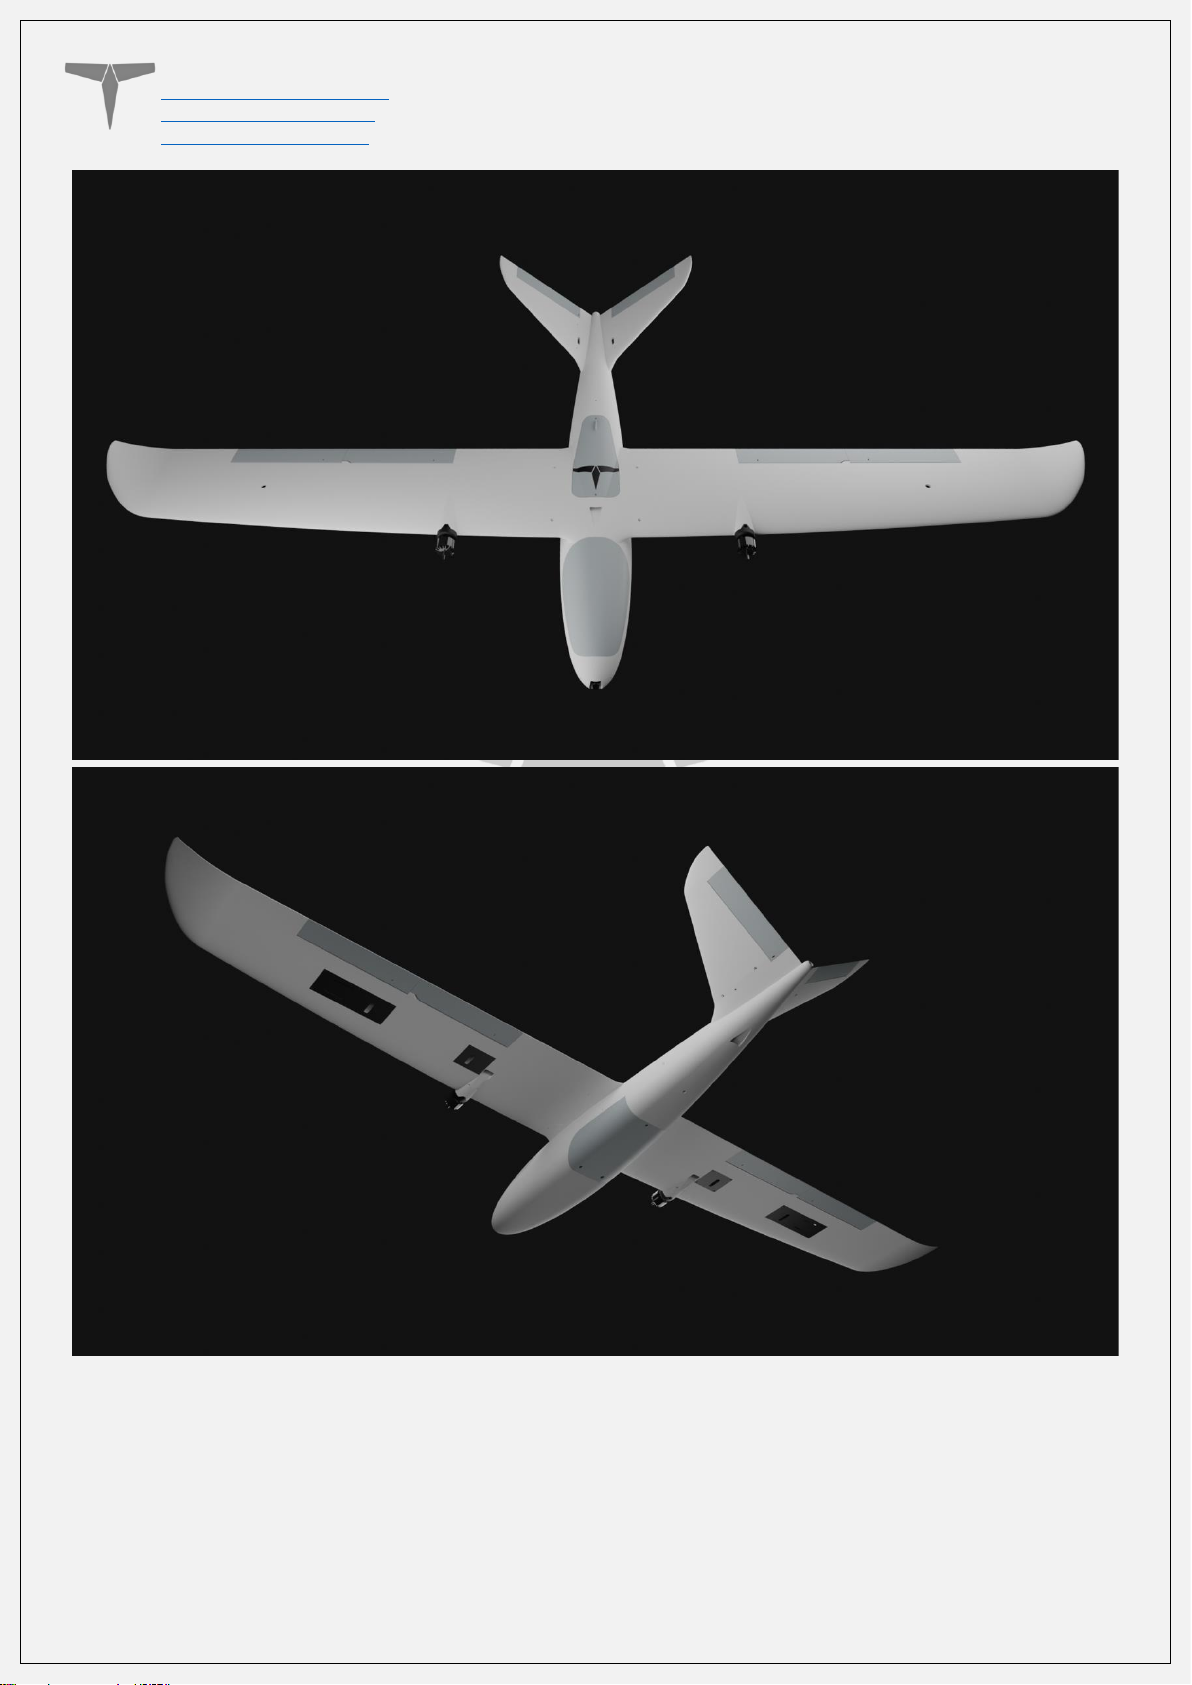
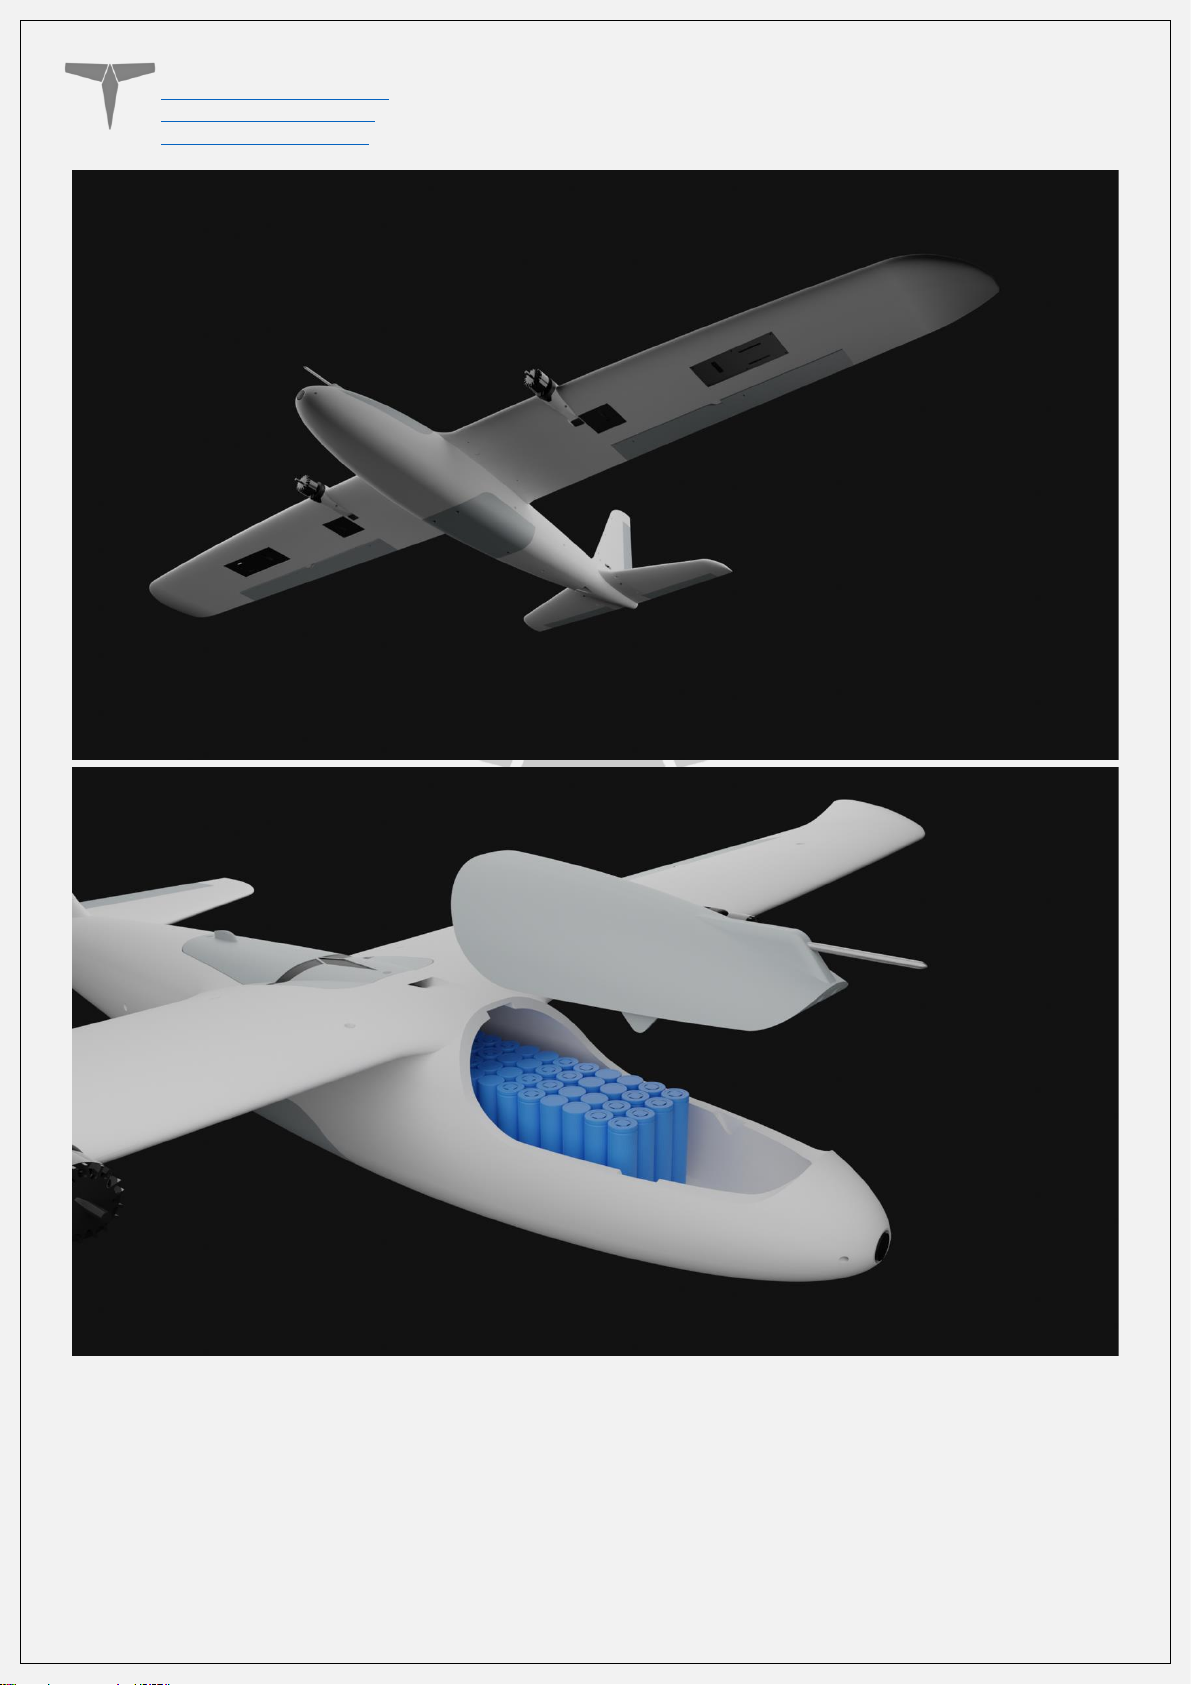
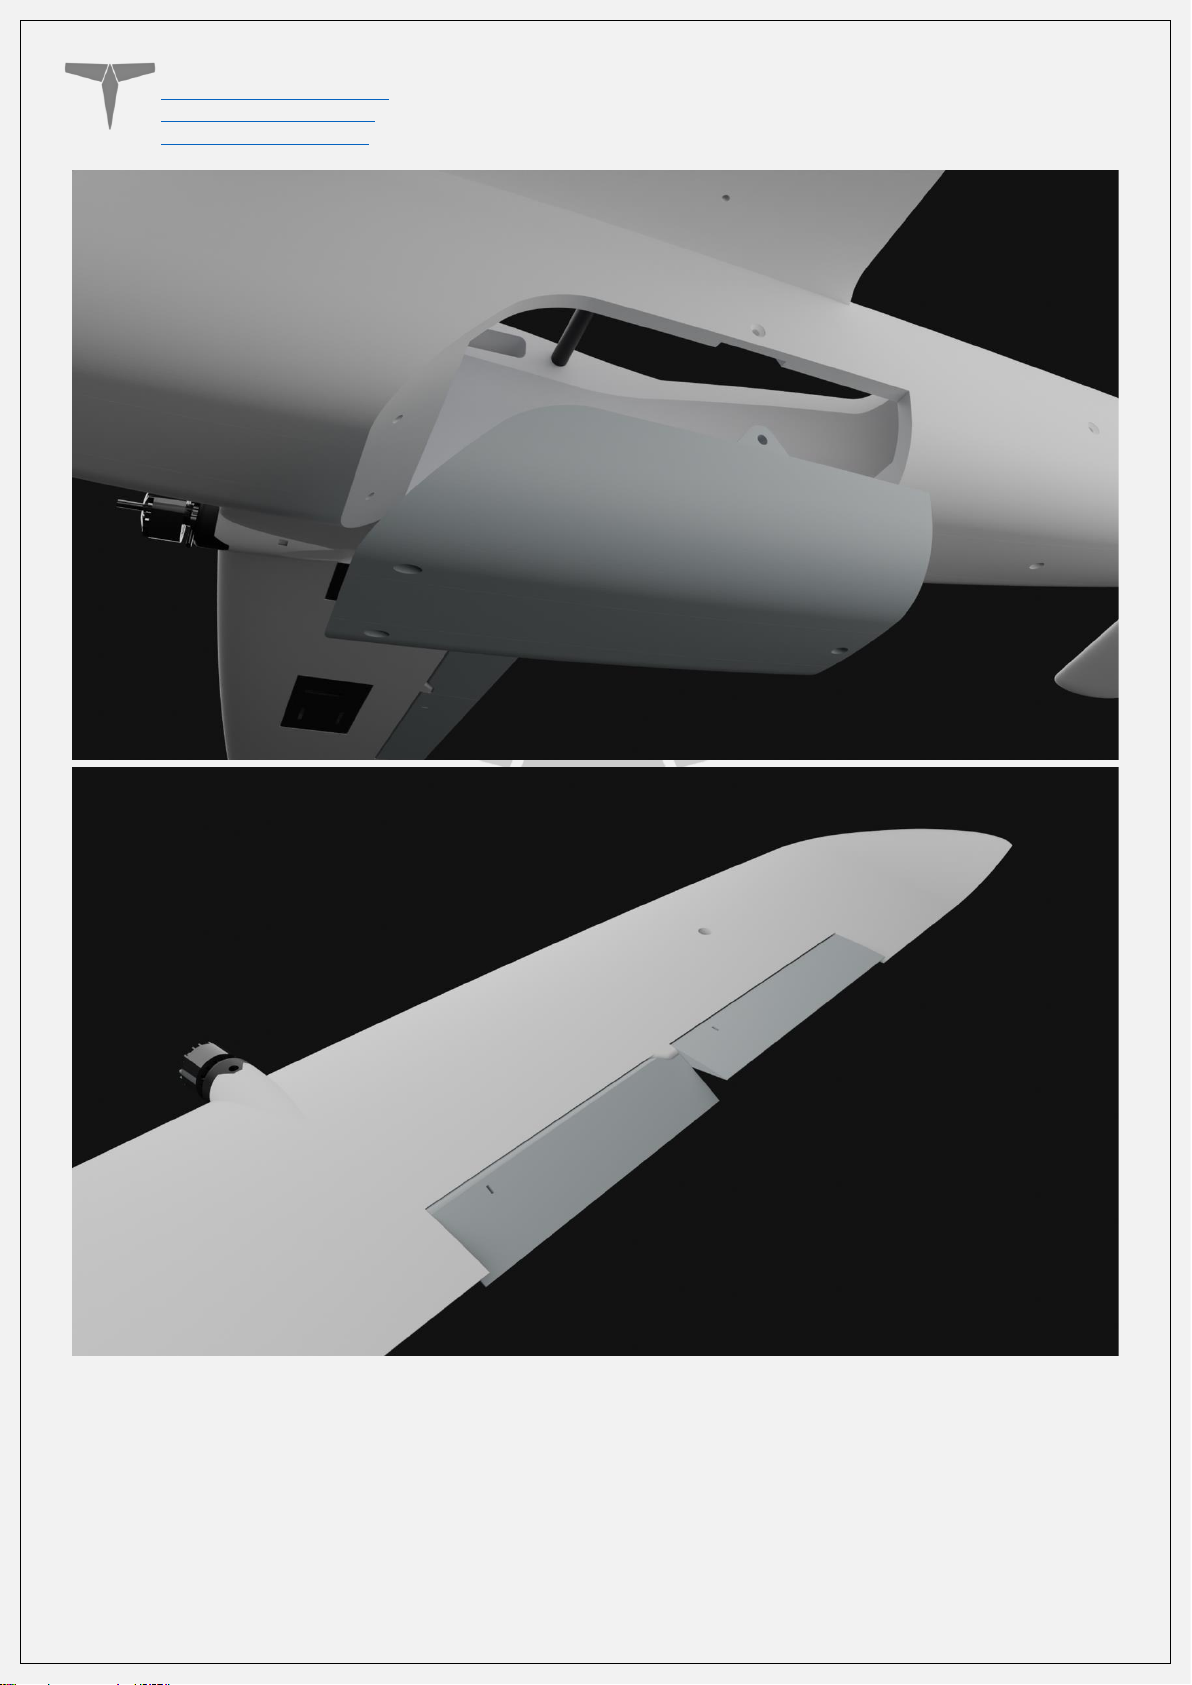
Section 7: Additional Images
Page 27
Titan Dynamics
Titan Dynamics Webpage
Visit our Facebook page
Join our Discord server
Page 27 of 30
Page 28
Titan Dynamics
Titan Dynamics Webpage
Visit our Facebook page
Join our Discord server
Page 28 of 30
Page 29
Titan Dynamics
Titan Dynamics Webpage
Visit our Facebook page
Join our Discord server
Page 29 of 30
Page 30
Titan Dynamics
Titan Dynamics Webpage
Visit our Facebook page
Join our Discord server
Page 30 of 30
 Loading...