

Page 1
Notes:
_________________________________________________
_________________________________________________
_________________________________________________
_________________________________________________
_________________________________________________
_________________________________________________
________________________________________________
1 Square = ____ Foot/Feet
www.titancontrols.net
VANCOUVER, WASHINGTON U.S.A.
www.titancontrols.net
®
VANCOUVER, WASHINGTON U.S.A.
Hades™ 2
Digital Recycle and Lighting Timer
with High Temp Shut-Off
Instruction Manual
Revision F – 6/14/2013 © Titan Controls
®
Page 2

112
Hades™ 2
• Warnings & Cautions
• Hades™ 2 – Digital Recycle & Lighting
Timer with High Temp Shut-Off
• Instructions for Operation
• Troubleshooting Tips
• Controller Specifications
• Installation Example
• Warranty Information
• Service and Repair Program
Warnings & Cautions
• Read all instructions before operating controller.
• Do not put your controller in an area where it can get wet or sprayed.
• Mount your controller securely to the wall.
• When using “bug bombs” in area, cover controller completely to avoid
corrosion.
• There are no serviceable parts in controller. Do not attempt to repair the unit.
• Breaking tamper proof seal will void your warranty.
• Do not put paper clips, tools, etc. into unit. Possible electrocution may occur.
• Plug controller into surge protector to avoid potential damage to the unit.
• Confirm that your power source is 120 Volts/15 Amps prior to plugging controller into outlet.
• Check that all equipment that will be activated by this controller is the proper
voltage(s).
• Verify that the equipment you are controlling does not exceed a total of
14.5 Amps.
• This controller is designed for “inside use” only.
• Avoid placing the controller near heat generating sources such as a
CO2 Generator.
• Use caution if operating controller in extremely humid environments (90%
and above).
• Do not use controller for purposes other than the unit was designed to
function.
• Ask your Dealer for tips and techniques regarding the use of this controller.
• Be conscientious when disposing of any products.
• Enjoy your Titan Controls® environmental controller for years to come.
CAUTION: DO NOT install your controller near electronic/digital ballasts, ozone
generators and other devices that emit large amounts of electromagnetic interference (EMI) & radio frequency interference (RFI), it will disable the controller.
Maintain a minimum distance of 8 feet between the controller & sensor, and all
high EMI/RFI devices.
WARRANTY SERVICE: Please read warranty information first
If after reviewing the troubleshooting tips the unit will still not work, you should return it to the
Dealer where you purchased it. They may be able to further evaluate the unit and test its various
components and quite possibly will be able to identify and/or fix any problems. If the Dealer is
unable to fix the unit, they will return it to us for factory repair.
If there are no Dealers in your area, you may contact us directly for technical support. If we cannot
help you resolve the problem over the phone, we will issue you a Return Merchandise Authorization
(RMA) number authorizing you to return the unit to us for factory reconditioning (if the controller is
currently under warranty). Contact the number below for a RMA number and shipping address.
Please complete the form below and include it with your unit, and write the RMA number clearly on
the outside of the box.
Please package the unit in its original packaging. If it is damaged in shipment we cannot be held
responsible. Insuring the parcel is recommended.
Once we receive the unit back, we will repair it within 48 hours (business) and return it to you freight
prepaid via UPS ground shipment.
www.titancontrols.net
For technical assistance call us at 1-888-80-Titan or 1-888-808-4826.
®
Include the following if returning directly to Titan Controls
®
• Copy of proof of purchase • This completed form • RMA # on the outside of the box
Ret urn Me rchand ise Aut horiz ation N umber ( Requir ed) ________________________________________________
Dea ler / Cu stome r Name: ___________________________________________________________________________
Dea ler / Cu stome r Conta ct Nam e: ___________________________________________________________________
Shi pping A ddress : __________________________________________________________________________________
____________________________________________________________________________________________________
Pho ne #: ___________________________________________________________________________________________
Email address: _______________________________________________________________________________
What is the nature of the problem? Please provide as much information as possible: ___________
____________________________________________________________________
____________________________________________________________________
____________________________________________________________________
____________________________________________________________________
___________________________________________________________________
Shipping address will be given when the RMA # is issued.
Page 3

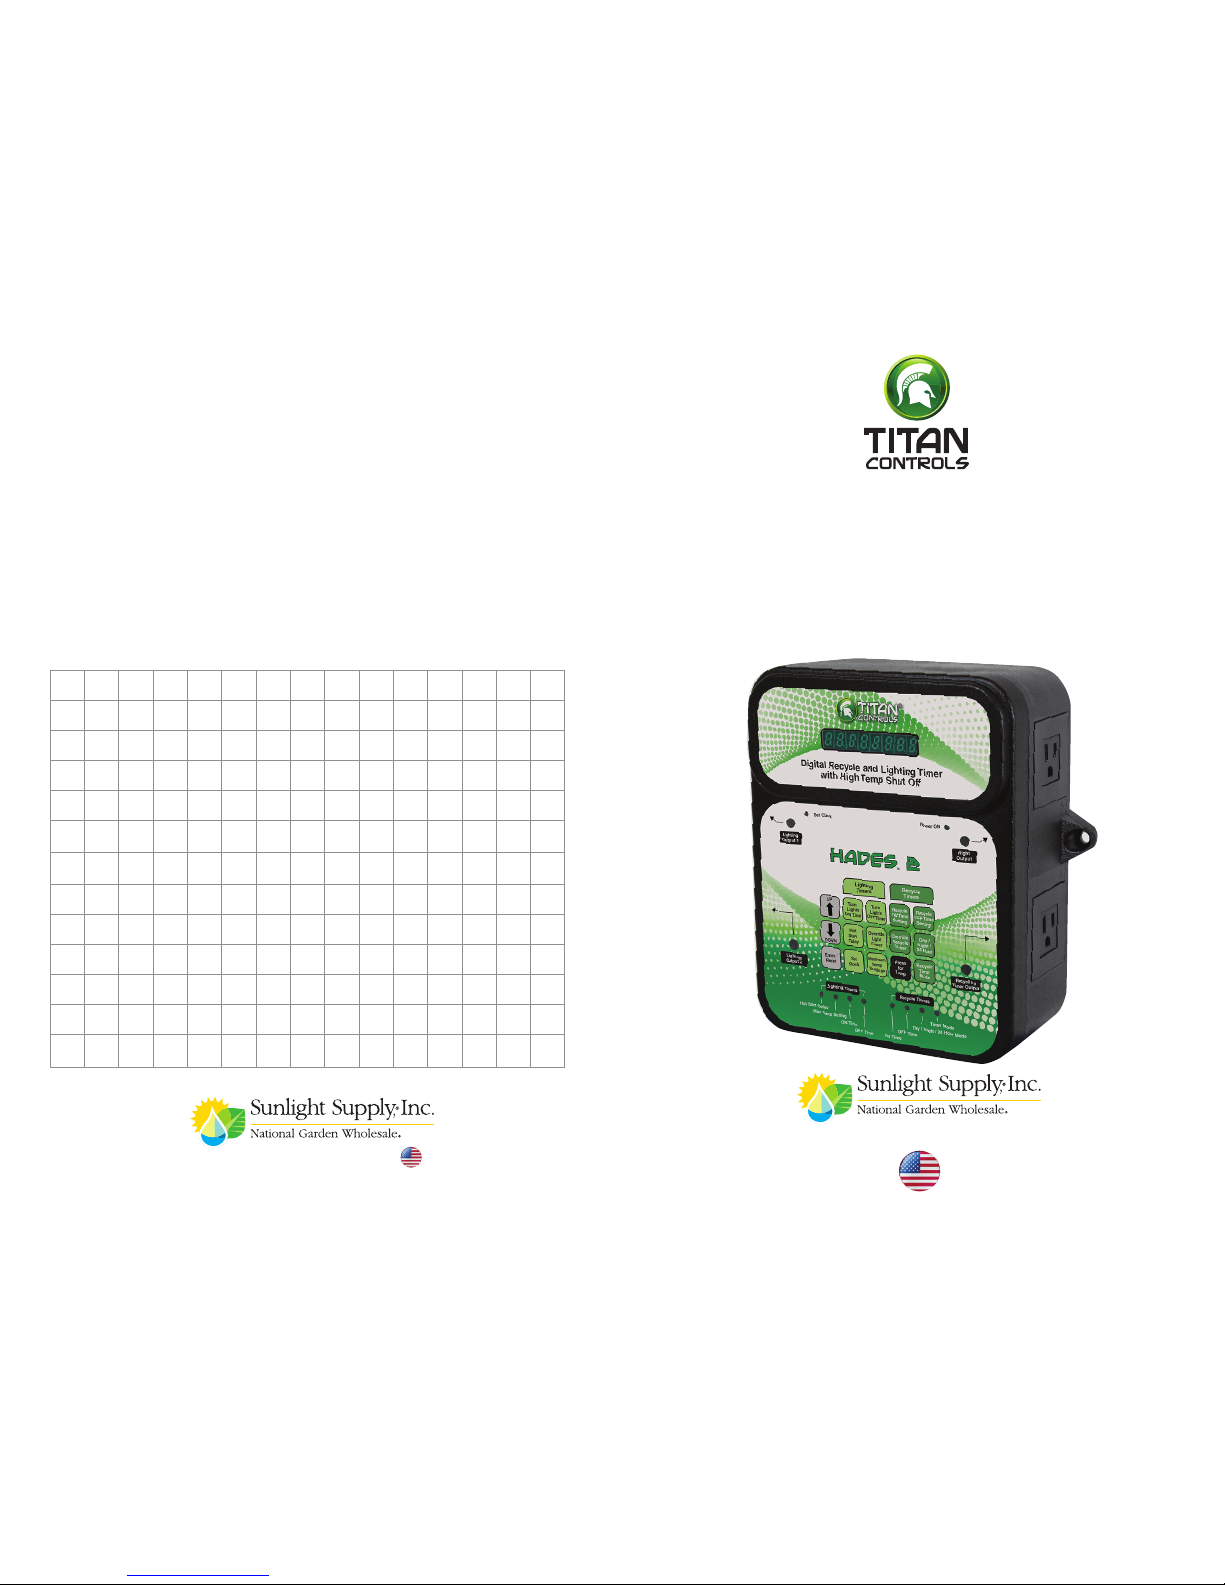
310
Hades™ 2 – Digital Recycle and Lighting
Timer with High Temp Shut-Off
The Hades™ 2 is designed to control: HID lighting, a recycling timer for pumps
or CO2 enrichment and a nighttime output for use with a circulation fan or
heater. It can control up to 1200 Watts (600 W per outlet) of HID lighting and
incorporates an internal temperature sensor, which will automatically shut down
your lights if the ‘Maximum Temp Setting’ is exceeded. It also features: a 30
second preset time delay between the 2 lighting outputs, an internal clock with
a battery back-up and a ‘Hot Start Delay’ setting that controls the cool down
period for your lights in case of power outages. The recycling timer can be
programmed to run during the Day, Night or 24-hours and it also has a battery
back-up to retain your settings in case of power failure. The Hades™ 2 keeps
your garden growing.
Instructions for Operation
1. Securely mount your Hades
™
2 in your grow area and away from any
moisture, spray, pesticides or other materials that could harm the unit.
2. Ensure that all of the devices being connected to the controller are 120
Volt only and will not exceed the maximum amperage rating for the
Hades™ 2.
3. Connect your gear (lights, pump or CO
2
regulator, night circulation fan or
heater, etc.) to the Hades™ 2.
4. The sensor has a quick connect cord set to easily connect or move the
sensor. Secure the quick connect cord to the Hades™ 2 by plugging it in
and securing the QD screw to the unit.
5. Place the sensor in an area with good air movement, preferably at plant
height Avoid placing the sensor in direct sunlight or under direct HID
lighting. NOTE: Do not place sensor anywhere it might get wet. SENSOR IS NOT WATER PROOF.
6. Plug the power cable into a standard 120 Volt wall outlet.
7. Using the buttons, select the Lighting Timers and Recycle Timer param-
eters to program the Hades™ 2.
The Hades™ 2 should now activate and deactivate your equipment based on
the preferred settings you selected.
OUTPUT DESCRIPTION
Lighting Output 1 & 2:
• These outlets are intended to operate your HID lights. You may use up to 600
Watts per outlet. The Hades™ 2 may also be used to operate larger lighting
banks by plugging the relay trigger cord set into this output and setting the
timer to run your lights. Do not exceed 600 Watts per outlet when using
these outputs.
Warranty Information
• Titan Controls® warrants the original purchase of this product against defects in
material and workmanship under normal use for three (3) years from the date
of purchase.
• During the warranty period, Titan Controls® will, at our option, and without
charge, repair or replace this product if the controller or any of its components
fail or malfunction.
• All returns or repairs must be accompanied by a Return Merchandise Authorization (RMA) number prior to any service of the product.
• This warranty is in lieu of all other warranties, expressed or implied, including
the warranties of merchantability and fitness for use, and of all other obligations
or liabilities on the part of the seller.
• This warranty shall not apply to this product or any part thereof, which had
been damaged by accident, abuse, misuse, modification, negligence, alteration or misapplication.
• Controllers with serial numbers or date tags that have been removed, altered or
obliterated; broken seals that show evidence of tampering; or nonconforming
parts, are excluded from coverage.
• Titan Controls® makes no warranty whatsoever in respect to accessories or
parts not supplied by Titan Controls®.
• Monetary refunds of the warranty will not be given.
• The Buyer assumes all responsibility regarding the proper use & installation of
this controller.
• All warranty service is provided through the Titan Controls® factory.
• This warranty shall apply only to the United States, including Alaska, Hawaii
and territories of the United States and Canada
• Defective controllers are required to be returned with the “proof of purchase/
receipt” for warranty coverage.
• For additional warranty information, contact the Titan Controls® Technical Service Representative at 888-808-4826 or your local Dealer.
• NOTE: Titan Controls® is a Manufacturer of environmental, timing, lighting,
ventilation and CO2 controls. All sales offerings to the public are done through
a nationwide group of Dealers. No sales offerings will be made directly to the
general public.
Service & Repair Program
• For all service and repairs, please contact by our Technical Service Representative for troubleshooting your gear and attaining a Return Merchandise
Authorization (RMA) number, if applicable.
• All factory service & repairs will be completed within 48 hours of receipt of
controller at the factory.
• Titan Controls® will, at its discretion, repair or replace the controller.
• Factory calibration services are available for all Titan Controls®.
• Returning Units: Please contact your retail store for information regarding
returns.
Page 4

94
Night Output:
• The outlet can be used for a variety of devices that only require power at
night such as a circulation fan, heater or exhaust fan. This outlet activates
only during the nighttime period.
Recycling Timer Output:
• This output is for use with a pump, CO2 regulator or generator, fan, etc.
BUTTON FUNCTIONS
There are 15 buttons located on the front faceplate of the unit that control all
functions. Pressing each button will display a function and/or current setting(s)
in the green LCD window. Some buttons are programmed to perform more
than one function.
The small green LED lights or status indicators located on the front panel will
light up to show the selected function when certain buttons are pushed.
UP – Press this button to increase setting.
DOWN – Press this button to decrease setting.
Enter/Reset – Press button, hold for 3 seconds to enter new setting and to
reset the Min/Max range.
LIGHTING BUTTONS
Turn Lights ‘ON’ Time – Press button to set the ON Time for the Lighting
Outputs. The lights will turn ON once in a 24-hour time span.
Turn Lights ‘OFF’ Time – Press button to set the OFF Time for the Lighting
Outputs. The lights will turn OFF once in a 24-hour time span.
Hot Start Delay – Press button to set the time delay that allows the HID lamps
to cool before re-striking due to a power failure situation.
Override Light Timer – Press and hold this button for approximately 2 seconds
to manually activate and/or deactivate both of the Lights ON outputs, as well
as the Night Output. Press Override Light Timer button again to return to
normal operation.
Set Clock – Press button to set the current time of day.
Maximum Temp Setting – Press button to set the maximum temperature
level in your garden. This feature will shut off your Lighting Outputs if the
temperature in your garden exceeds the Maximum Temp Setting to protect it
from overheating your plants.
Installation Example:
Temperature
Sensor
CO
2
Regulator
and Tank
Controlling Lights with Heater or Circulation Fan,
& Pump or CO
2
Regulator
Page 5

58
RECYCLING BUTTONS
Recycle ‘ON’ Time Setting – Press button to set the ‘ON’ time for the Recycling
Timer Output. Press Enter/Reset to accept setting.
Recycle ‘OFF’ Time Setting – Press button to set the ‘OFF’ time for the Recycling
Timer Output. Press Enter/Reset to accept setting.
Overide Recycle Timer – Press and hold this button for approximately 2 seconds
to manually activate and/or deactivate the Recycling Timer Output. Press
Override Recycling Timer button again to return to normal operation. This is a
manual override for testing the recycling devices.
Day/Night/24 Hour – Press button to select Day/Night OR 24-hour mode. Press
Enter/Reset to accept setting.
Recycle Timer Mode – Press button to select Stop or Continue mode for
Recycling Output. Press Enter/Reset to accept setting.
Press For Temp – Press button to display current room temperature.
ADJUSTING THE SETTINGS:
Your Hades™ 2 has been pre-set at the factory with the following settings:
• Recycle ‘ON’ Time Setting = 1 minute
• Recycle ‘Off’ Time Setting = 60 minutes (1 hour)
• Recycle Timer Mode = Stop
• Day/Night/24 Hour Setting = Day
• Hot Start Delay = 10 minutes
• Maximum Temp Setting = 90°F
If you ever want to return the Hades™ 2 to the factory settings, do the following:
Press and hold the Enter/Reset & Down buttons at the same time until the LED
reads (f.Set). Press the Enter/Reset button again to restore the Hades™ 2 to the
factory settings. Once the Hades™ 2 reset is complete, the LED screen will read
(doNE).
To adjust your Hades™ 2 to your own customized settings, do the following:
LIGHTING BUTTONS
• Turn Lights ‘On’ Time = Press the Turn Lights ON Time button. The first two
digits (hour) on the LCD will blink. Use the UP or DOWN button to set the
hour that you’d like your lights to come ‘ON’. Press the Enter/Reset button
to lock in the new setting. Next the middle two digits (minutes) will blink. Use
the UP or DOWN button to set the minute that you’d like your lights to come
‘ON’. Press the Enter/Reset button to lock in the new setting. Next the last
two digits (seconds) will blink. Use the UP or DOWN button to set the second
that you’d like your lights to come ‘ON’. Press the Enter/Reset button to lock
in the new setting. Finally, the AM/PM will blink. Use the UP or DOWN button
enheit, press and hold the UP and DOWN keys simultaneously for approximately 3 seconds.
Troubleshooting Tips
1. The Hades™ 2 has no power? Verify power source is providing 120 Volts
A/C. Reset the circuit breaker on the Hades™ 2 by turning OFF the unit, than
turn ON.
2. What if the recycle timer is not keeping the right time? The CR1220 (3
Volt) Lithium battery, located on the internal circuit board that is connected
to the inside of the front faceplate, may need to be replaced. The normal
lifespan of the batteries is approximately 5 years.
3. Why is the display showing ‘Hot_F’? The Maximum Temp Setting has
been exceeded. When this occurs, the LIGHTS ON outputs will remain off,
until the Maximum Temp Setting function is reset by holding the Enter/Reset
button for approximately 2 seconds.
4. Why is the display showing, ‘Err.TEP’? The remote sensor is not connect-
ed or not communicating with the Hades™ 2. Unhook sensor from Hades™ 2,
than reconnect it to the controller. Verify that the cable is not compromised
and that the remote sensor has power.
5. Does the temperature sensor need to be calibrated? No. The tempera-
ture sensor is digital and there is no need for calibration.
6. My temperature is reading quite high? Verify that the sensor is not in a
location with direct exposure to intense light and that there is air circulating
freely around it.
Controller Specifications
• Size = 9”H x 7”W x 3 ¾ ”D
• Input Voltage = 120 Volts A/C
• Output Voltage =120 Volts A/C
• Maximum Amperage = 14.5 Amps
• Remote Probe Cable Length = 3 feet
• Maximum Lighting Watts = 1200W
• ON Time Range = 1 second to 96 hours
• OFF Time Range = 1 second to 96 hours
• Lithium Battery Life = 5 years
Page 6

76 76
to set AM or PM. Press the Enter/Reset button to lock in the new setting.
NOTE: The two Lighting Outputs have a 30 second pre-set time delay
between the two receptacles to reduce start-up surges and high in-rush
current caused by ballasts.
• Turn Lights ‘Off’ Time – Press the Turn Lights Off Time button. The first two
digits (hour) on the LCD will blink. Use the UP or DOWN button to set the hour
that you’d like your lights to go ‘OFF’. Press the Enter/Reset button to lock in
the new setting. Next the middle two digits (minutes) will blink. Use the UP or
DOWN button to set the minute that you’d like your lights to go ‘OFF’. Press
the Enter/Reset button to lock in the new setting. Next the last two digits
(seconds) will blink. Use the UP or DOWN button to set the second that you’d
like your lights to go ‘OFF’. Press the Enter/Reset button to lock in the new
setting. Finally, the AM/PM will blink. Use the UP or DOWN button to set AM
or PM. Press the Enter/Reset button to lock in the new setting.
• Hot Start Delay – Press the Hot Start Delay button to display the current
setting. This mode button is used to prevent ‘Hot Starts’ from occurring by
allowing the HID lamps to cool before re-striking. This function is not activated
unless there is a power failure situation. Use the UP and DOWN buttons to
change the setting. Press the Enter/Reset button to lock in the new setting.
• Override Light Timer – Press the Override Light Timer button to bypass the
Day and Night modes. Press the button for approximately 2 seconds to switch
the Hades™ 2 from Night to Day mode or Day to Night mode (depending on
current status). Press Override Light Timer button again to return to normal
operation.
• Set Clock – To program internal clock to correct time press the Set Clock
button. The first two digits (hour) on the LCD will blink. Use the UP or DOWN
button to set the current hour. Press the Enter/Reset button to lock in the new
setting. Next the middle two digits (minutes) will blink. Use the UP or DOWN
button to set the current minute(s). Press the Enter/Reset button to lock in the
new setting. Next the last two digits (seconds) will blink. Use the UP or DOWN
button to set the current second(s). Press the Enter/Reset button to lock in
the new setting. Finally, the AM/PM will blink. Use the UP or DOWN button
to set AM or PM. Press the Enter/Reset button to lock in the new setting.
IMPORTANT: Verify that internal clock is set to correct time of day or Outputs
will not function properly.
• Maximum Temp Setting – Press the Maximum Temp Setting button to display
the current setting. Use the UP and DOWN buttons to adjust the setting. Press
the Enter/Reset button to lock in the new setting. This is a hi-temp shut-off
feature to protect your garden for overheating.
RECYCLING BUTTONS
• Recycling ‘ON’ Time Setting – Press the Recycling ‘ON’ Time Setting button to
display the current setting. The first two digits (hour) on the LCD will blink. Use
the UP or DOWN button to set the hour that you’d like your recycling timer
to come ‘ON’. Press the Enter/Reset button to lock in the new setting. Next
the middle two digits (minutes) will blink. Use the UP or DOWN button to set
the minute that you’d like your recycling timer to come ‘ON’. Press the Enter/Reset button to lock in the new setting. Next the last two digits (seconds)
will blink. Use the UP or DOWN button to set the second that you’d like your
recycling timer to come ‘ON’. Press the Enter/Reset button to lock in the
new setting. Finally, the AM/PM will blink. Use the UP or DOWN button to set
AM or PM. Press the Enter/Reset button to lock in the new setting.
• Recycling Timer ‘OFF’ Time – Press the Recycling Timer ‘OFF’ Time button.
The first two digits (hour) on the LCD will blink. Use the UP or DOWN button
to set the hour that you’d like your recycling timer to go ‘OFF’. Press the
Enter/Reset button to lock in the new setting. Next the middle two digits
(minutes) will blink. Use the UP or DOWN button to set the minute that you’d
like your recycling timer to go ‘OFF’. Press the Enter/Reset button to lock in
the new setting. Next the last two digits (seconds) will blink. Use the UP or
DOWN button to set the second that you’d like your recycling timer to go
‘OFF’. Press the Enter/Reset button to lock in the new setting. Finally, the
AM/PM will blink. Use the UP or DOWN button to set AM or PM. Press the
Enter/Reset button to lock in the new setting.
• Override Recycle Timer – Press the Override Recycle Timer button for approximately 2 seconds. The Recycling Timer Output will be activated and the
recycling timer will begin counting down the recycle ON TIME. After the timer
counts all the way down, the recycle timer will return to current saved settings and resume normal operation. To end the test early, press the Override
Recycle Timer button again.
• Day/Night/24 Hour – Press the hold the Day/Night/24 Hour button for
approximately 2 seconds to program the Recycling Timer Output to operate
during the day, at night or continuously for 24 Hours. The current setting will
be displayed. Press the UP and DOWN buttons to scroll through the Day /
Night / 24 Hour Settings. Press Enter/Reset to select the new setting. NOTE:
There is no built-in photocell on the Hades™ 2. The recycling timer relies
on the Turn Lights ON TIME & Turn Lights OFF TIME to tell the Hades™
2 when it is Day or Night.
• Recycle Timer Mode – Press the Recycle Timer Mode button to select either
Stop mode or Cont (Continuous) mode. This mode will determine whether
the recycle timer stops or continues when a power interruption occurs. The
default mode is Stop from the factory. The recycling timer will Stop counting
if the power to the timer is interrupted. In the Cont (continue) mode, the recycling ‘ON’ time will continue to count down when the power to the Hades™
2 is interrupted. This countdown sequence will continue until the power is
restored so that no time is lost during the power interruption period. Change
settings using the UP and DOWN keys. Press the Enter/Reset button to lock
in the new setting.
• Press For Temp – Press the Press For Temp button to display the current
room temperature. To switch the temperature reading from Celsius to Fahr-
 Loading...