

Page 1
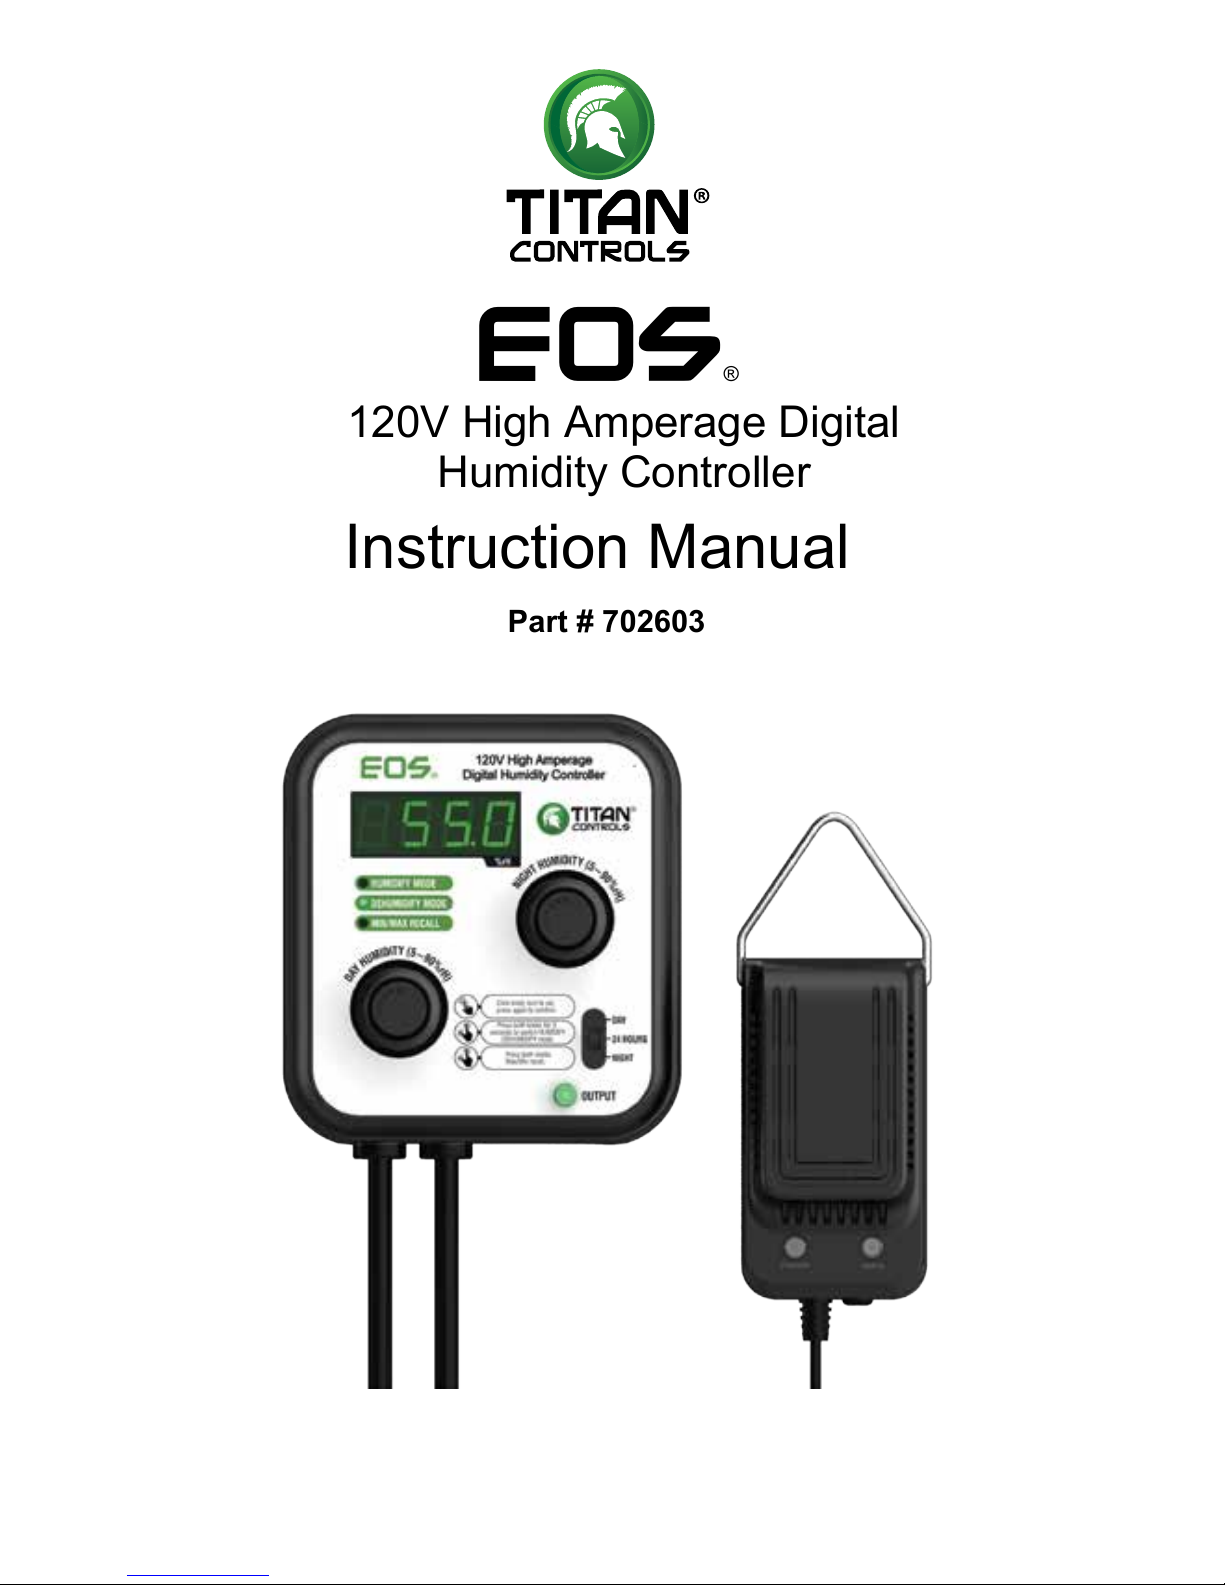
EOS®
120V High Amperage Digital
Humidity Controller
Instruction Manual
Part # 702603
www.titancontrols.net
Page 2

120V High Amperage Digital Humidity Controller
• Warnings and Cautions
• Factory Settings
• Eos
®
120V High Amperage Digital Humidity Controller Overview
• Instructions for Operation
• Error Codes
• Controller Specifications
• Controller Diagrams
• Installation Options
• Installation Example
• Warranty Information
• Service & Repair Program
Warnings & Cautions
• Read all instructions before operating controller.
• Do not put your controller in an area where it can get
wet or sprayed.
• Mount your controller securely to the wall.
• When using “bug bombs” in area, cover controller and sensor completely to avoid corrosion.
• There are no serviceable parts in controller. Do not attempt to repair the unit.
• Breaking tamper proof seal will void your warranty.
• Do not put paper clips, tools, etc. into unit. Possible electrocution may occur.
• Plug controller into surge protector to avoid potential damage to the unit.
• Confirm that your power source is 120 Volts/20 Amps prior
to plugging controller into outlet.
• Check that all equipment that will be activated by this controller is the proper voltage.
• Verify that the equipment you are controlling does not exceed a total of 20 amps.
• This controller is designed for “inside use” only.
• Use caution if operating controller in extremely humid environments (90% rH and above).
• Do not use controller for purposes other than the unit was designed to function.
• Use controller within defined environmental specifications.
• Ask your Dealer fo
r tips and techniques regarding the use of this controller.
• Be conscientious when disposing of any products.
2
Page 3
Factory Settings
• Humidity Day Settings: 50% rH
• Humidity Night Settings: 50% rH
• Humidity Dead-Band: 5% rH
Eos® 120V High Amperage Digital
Humidity Controller Overview
The Eos
®
120V High Amperage Digital Humidity Controller is used to control humidify or
dehumidify device. You can set your desired day and night relative humidity by adjusting the
knobs on the front of unit. The adjustment of dial ranges from 5% rH to 90% rH. After setting
the knobs at the preferred setting, the controller will maintain that setting utilizing a 5%
differential or dead-band. This E
os® unit provides up to 20 amps of capacity on standard 20
amp 120 volt circuit.
Instructions for Operation
Humidity Mode Program
Press both knobs for 3 seconds, turn to select. Press both knobs again to save the setting.
Humidify Mode: Raises the rH% to a level above the desired set point.
Dehumidify Mode: Lowers the rH% to a level below the desired set point.
Day & Night Humidity Set Point
Press each knob and turn to set the Day and Night humidity, press again to confirm the
sett
ing.
Humidity Dead-Band (hysteresis): 5% rH
For example, when using Dehumidify, if the set-point is 45% rH and the dead-band is 5%,
the Humidity output will activate at or above 45% rH and will deactivate at 40% rH. For
Humidify mode, if the set-point is 45% rH, the output will activate at or below 45% rH and
deactivate at 50% rH
Humidity Min/Max Recall
Click both humidity (Day or Night) knobs to display the Humidity min/max rH record. This
shows the lowest rH and
highest rH levels for a 24 hour period. The screen will return to
normal display after 5 seconds or by a pressing both knobs, and the record will be reset.
Day and Night Mode
Day Mode: Humidity device works when the photocell senses light.
Night Mode: Humidity device works when the photocell senses darkness.
24 Hours: Humidity device works during both day and night. This option utilizes both the
programmed DAY and NIGHT humidity settings. In 24 hours mode, the setting
s are locked
and cannot be adjusted. The controller must be switched to DAY or NIGHT mode to change
the humidity setting.
3
Page 4

Error Codes
Check the sensor connection and verify that it is clean and free of debris
If the humidity sensor doesn’t observe the set point being reached in a 2 hour time
period, the screen will flash with error code. Press any knob to reset error
Please check if the appliance outlet has exceeded the controller ’s max amperage
rating (20 A)
Controller Specifications
• Max Amp: 20 amps @ 120V 60Hz
• Sensor Cord Length: 15 ft
• Humidity Range: 5% -90% rH
• Humidity Accuracy: +/-3% rH
• Humidity Dead-Band (Hysteresis): 5% rH
• Weight: 2.1lbs
• Dimensions: 5.07” x 4.68” x 1.95”
•
Indoor Use Only
• Operating Temperature: 50° F to 95° F
• Maximum Relative Humidity: 95%
Controller Diagrams:
4
Humidity
Humidify Mode
Humidify Device
Humidify
Set point
Deadband
TIME
OFF OFF
ON ON
Dehumidify Mode
Dehumidify Device
OFF OFF
ON
Dehumidify
Set point
Deadband
Humidity
TIME
Page 5

Installation Options
Option 1: Secure the unit to a wall
Option 2: Screw the controller to the grow tent tube with a U bolt
Installation Example
5
Remote Sensor
120 Volt
120V
20Amps
Circuit
Page 6

Warranty Information
• Titan Controls
®
warrants the original purchase of this product against defects in material
and workmanship under normal use for two (2) years from the date of purchase.
• During the warranty period, Titan Controls® will, at our option, and without charge, repair or
replace this product if the controller or any of its components fail or malfunction.
• All returns or repairs must be accompanied by a Return Merchandise Authorization
(RMA) number prior to any service of the pr
oduct.
• This warranty is expressly in lieu of all other warranties, expressed or implied, including
the warranties of merchantability and fitness for use and of all other obligations or
liabilities on the part of the seller.
• This warranty shall not apply to this product or any part thereof which had been damaged by
accident, abuse, misuse, modification, negligence, alteration or misapplication.
• Controllers with serial numbers or date tags that have been removed, altered or
obliter
ated; broken seals or that show evidence of tampering; mismatched board serial
numbers or nonconforming parts, are excluded from coverage.
• Titan Controls
®
makes no warranty whatsoever in respect to accessories or parts
not supplied by Titan Controls
®
.
• Monetary refunds of the warranty will not be given.
• The Buyer assumes all responsibility regarding the use & installation of this controller.
• All warranty service is provided through the factory or an authorized service repres
entative.
• This warranty shall apply only to the United States, including Alaska, Hawaii and territories
of the United States and Canada.
• Defective controllers need to be returned with the “proof of purchase/receipt”.
• For additional warranty information, contact a Titan Controls
®
Technical Service
Representative at 888-808-4826 or your Dealer. Our normal business hours are Monday –
Friday, 8 a.m. to 5 p.m. Pacific Standard Time. We are closed most major holidays.
• NOTE: Titan Controls
®
is a manufacturer of environmental controls. All sales offerings to the
public are done through a nationwide group of Dealers. No sales offerings will be made
directly to the general public.
Service and Repair Program
• For all service and repairs please contact one of our Technical Service Representatives
for a Return Merchandise Authorization (RMA) number.
• All factory service & repairs will be completed within 48 hours of receipt of controller and
after authorization by customer for repairs.
• Titan Controls
® will, at its discretion, repair or replace the controller.
• Factory calibration services are available for all Titan Controls
®.
• Returning Units: Please contact your retail store for returns.
6
Page 7

7
Include the following if returning directly to Titan Controls
®
• Proof of purchase • This completed form • RMA # on the outside of the box
Return Merchandise Authorization Number (Required): ____________________________________________
Company Name: ____________________________________________________________________________________
Contact Name: _____________________________________________________________________________________
Address: __________________________________________________________________________________________
____________________________________________________________________________________________________
Phone #: ___________________________________________________________________________________________
Email address: _______________________________________________________________________________
What is the nature of the problem?
______________________________________
___________________________________________________________
___________________________________________________________
___________________________________________________________
___________________________________________________________
___________________________________________________________
Shipping address will be given when the RMA # is issued:
WARRANTY SERVICE: Please read warranty information first
If after reviewing the troubleshooting tips the unit will still not work, you should return it to the Dealer
where you purchased it. They will be able to further evaluate the unit and test its various components
and quite possib
ly will be able to identify and/or fix any problems. If the Dealer is unable to fix the
unit, they will return it to us for factory repair.
If there are no Dealers in your area, you may contact us directly for technical support. If we cannot
help you resolve the problem over the phone, we will issue you a RMA # (return merchandise
authorization) authorizing you to return the unit to us for factory reconditioning (if the unit is under
warranty). Contact the number below for a RMA and shipping address. Complete the form below
and include it with your unit. Also please write the RMA # on the outside of the box.
Please package the unit in its original packaging. If it is damaged in shipment we cannot be
responsible.
Once we receive the unit back, we will repair it within 48 hours (business) and return it to you freight
prepaid via UPS ground shipment.
www.titancontrols.net
For technical assistance call us at 1-888-80-Titan or 1-888-808-4826.
Representative available Monday – Friday, 8 a.m. – 5 p.m. PST.
Page 8
www.titancontrols.net
8
Notes:
_________________________________________________
_________________________________________________
_________________________________________________
_________________________________________________
_________________________________________________
_________________________________________________
________________________________________________
1 Square = ____ Foot / Feet
VANCOUVER, WASHINGTON U.S. A.
Revision C– 09/28/2017 © Titan Controls®
 Loading...