

Page 1
Owner’s Manual
For professional use only
Do not use this equipment before reading this manual!
340 Airless Sprayer
International Model
Model Number:
Skid Complete, 230V 704-2115
Skid Complete, 110V 704-2125
Printed in the U. S. A.
NOTE: This manual contains important warnings
NOTE: This manual contains important warnings
and instructions. Please read and retain for
and instructions. Please read and retain for
reference.
reference.
0804 © 2004 Titan Tool Inc. All rights reserved. Form No. 313-2408B
Page 2
Table of Contents
WARNING
CAUTION
WARNING
Safety Precautions.................................................................2
General Description ...............................................................4
Operation ................................................................................4
Setup ....................................................................................4
Preparing to Paint.................................................................4
Painting.................................................................................5
Pressure Relief Procedure ...................................................5
Spraying
Spraying Technique ..............................................................6
Practice.................................................................................6
Cleanup ...................................................................................7
Cleaning the Spray Tip .........................................................7
Maintenance............................................................................8
General Repair and Service Notes.......................................8
Replacing the Motor .............................................................8
Replacing the Motor Brushes ...............................................8
Replacing the Gears.............................................................8
Replacing the Transducer.....................................................9
Replacing the PRIME/SPRAY Valve.....................................9
Servicing the Fluid Section .................................................10
Replacing the Filters ...........................................................11
Troubleshooting ...................................................................12
Parts Listings........................................................................18
Main Assembly....................................................................18
Motor Assembly ..................................................................19
Electrical Schematic ...........................................................19
Gear Box Assembly............................................................20
Suction Set Assembly.........................................................21
Stand Assembly..................................................................21
Fluid Section Assembly ......................................................22
Accessories ........................................................................23
Labels .................................................................................23
Warranty................................................................................24
..................................................................................6
Safety Precautions
This manual contains information that must be read and
understood before using the equipment. When you come to an
area that has one of the following symbols, pay particular
attention and make certain to heed the safeguard.
Attention! Danger of injury by injection!
In case of injury to skin caused by coating materials or
solvents consult a doctor immediately. Inform the doctor of the
type of coating material or cleaning agent with which the injury
was caused.
The operating instructions state that the following points
must always be observed before starting up:
1. Faulty units should not be used.
2. Secure spray gun using the safety catch on the trigger.
3. Ensure that the unit is properly earthed.
4. Check the permissible operating pressures.
5. Check all connections for leaks.
The instructions regarding regular cleaning and
maintenance of the unit must be strictly observed.
Before any work is done on the unit or for every break in
work the following rules must be observed:
1. Release the pressure from the spray gun and hose.
2.
Secure the spray gun using the safety catch on the
trigger.
3. Turn off the motor.
Be safety-conscious!
All local regulations in force must be observed.
In order to ensure safe operation of the airless systems
the safety regulations listed below must be followed:
1. In order to avoid dangers, read the operating instructions
carefully and follow the instructions laid down in them.
2.
Do not use materials with a flash point below 21ºC (70ºF).
3. The use of this unit is prohibited in workshops which are
covered under the explosion prevention regulations.
4. Never spray near sources of ignition; e.g. open flames,
cigarettes — also cigars and pipes are sources of ignition
— sparks, hot wires and hot surfaces, etc.
5. Attention! Danger of injury by injection!
Never point the spray gun at yourself or anyone else.
Never put your fingers or hands into the spray jet. The
very high spraying pressures can cause very serious
injuries. Never use the spray gun without the safety guard.
This symbol indicates a potential hazard that may cause
serious injury or loss of life. Important safety information
will follow.
This symbol indicates a potential hazard to you or to the
equipment. Important information that tells how to prevent
damage to the equipment or how to avoid causes of minor
injuries will follow.
NOTE: Notes give important information which should
Airless units develop extremely high spraying pressures.
be given special attention.
• Never put your fingers, hands or any other parts of the
body into the spray jet.
Never point the spray gun at yourself or anybody else.
•
• Never use the spray gun without the safety guard.
When installing and removing the tip and during breaks in
work the spray gun must always be secured, so that it
cannot be activated.
6. Wear respiratory equipment when spraying. The operator
must be provided with a protective mask.
In order to prevent work related illness, the manufacturer's
regulations for the materials, solvents, and cleaning
agents used must be observed when preparing, working
with and cleaning the unit. Protective clothing, gloves and,
in certain cases, protective skin cream are necessary to
protect the skin.
7. The spray gun and high pressure hose between the unit
and spray gun must be of a sufficient standard for the
pressure produced in the unit.
The permissible operating pressure for the high-pressure
hose, the manufacturer and date of manufacture must be
indicated by a permanent identification marking on the
hose. Furthermore, it must be constructed so that the
electrical resistance between the connections to the unit
and the spray gun is equal to or less than one megohm.
8. Under certain conditions the flow speed can cause an
electrostatic charge on the unit. This could cause sparks
or flames on discharging. It is, therefore, important that
the unit is always earthed over the electrical installation.
The contact should be made using a shockproof socket
earthed in accordance with the regulations.
2 © Titan Tool Inc. All rights reserved.
Page 3

9. Attention! Please observe the following when working
inside and outside:
No solvent gasses should be carried to the unit. No
solvent gasses should form near the unit. Set up the unit
on the opposite side to the object being sprayed. When
spraying outdoors, take the wind direction into account.
When working indoors there must be sufficient ventilation
to ensure that the solvent gasses are carried away. A
minimum distance of 6.1m (20’) must be observed
between the unit and object being sprayed.
10. Extraction equipment should be installed by the user in
accordance with the local regulations.
11. The objects being sprayed must be earthed.
12. When cleaning the unit, solvent should never be sprayed
into a container with only a small opening (bunghole). An
explosive gas/air mixture is likely to form. The container
must be earthed.
13. Cleaning the unit.
A harsh jet should never be used to spray the unit. In
particular a high-pressure cleaner or high-pressure steam
cleaner should never be used. There is a danger that
water will penetrate into the unit and cause a short-circuit.
14. Pulling the trigger causes a recoil force to the hand that is
holding the spray gun.
The recoil force of the spray gun is particularly powerful
when the tip has been removed and a high pressure has
been set on the airless high-pressure pump. Therefore,
when cleaning without tip set the pressure control valve to
the lowest pressure.
15. The mains plug should always be disconnected from the
socket when work is being carried out on the electrical
components.
16. Work or repairs should only be carried out on electrical
equipment by a trained electrician, even if the work is
described in the operating instructions. No liability will be
accepted for incorrectly installed electrics.
17. Positioning when the ground is uneven.
The front of the unit must point downward so that the
machine does not slip away.
HAZARD: INJECTION INJURY - A high pressure stream
PREVENTION:
• The maximum operating range of the unit is 20.6 MPa
•
• NEVER allow any part of the body to come in contact with
• NEVER put your hand in front of the gun. Gloves will not
• ALWAYS lock the gun trigger, shut the fluid pump off and
• The tip guard must always be in place while spraying. The
• ALWAYS remove the spray tip before flushing or cleaning
• The paint hose can develop leaks from wear, kinking and
© Titan Tool Inc. All rights reserved. 3
of paint produced by this equipment can pierce
the skin and underlying tissues, leading to
serious injury and possible amputation.
DO NOT TREAT AN INJECTION INJURY AS A
SIMPLE CUT! Injection can lead to
amputation. See a physician immediately.
(3000 PSI) fluid pressure.
NEVER aim the gun at any part of the body.
the fluid stream. DO NOT come in contact with a fluid
stream created by a leak in the fluid hose.
provide protection against an injection injury.
release all pressure before servicing, cleaning the tip
guard, changing tips, or leaving unattended. Pressure will
not be released by turning off the engine. The
PRIME/SPRAY valve must be turned to PRIME to relieve
the pressure. Refer to the PRESSURE RELIEF
PROCEDURE described in this manual.
tip guard provides some protection against injection
injuries but is mainly a warning device.
the system.
abuse. A leak is capable of injecting material into the skin.
Inspect the paint hose before each use.
NOTE TO PHYSICIAN:
Injection into the skin is a traumatic injury. It is important
to treat the injury surgically as soon as possible. DO NOT
delay treatment to research toxicity. Toxicity is a concern
with some coatings injected directly into the blood
stream. Consultation with a plastic surgeon or
reconstructive hand surgeon may be advisable.
HAZARD: EXPLOSION OR FIRE - Solvent and paint fumes
PREVENTION:
• Fire extinguishing equipment must be present and in good
• Use only conductive or earthed high pressure fluid hoses
• The pump must be connected to an earthed object. Use
• When flushing equipment use the lowest possible pressure.
HAZARD: EXPLOSION HAZARD DUE TO INCOMPATIBLE
PREVENTION:
• Do not use bleach.
• Do not use halogenated hydrocarbon solvents such as
HAZARD: GENERAL - May cause property damage or
PREVENTION:
• This high pressure airless pump is designed to be used
• Before each use, check all hoses for cuts, leaks, abrasion
• ALWAYS follow the material manufacturer’s instructions
• Clean up all material and solvent spills immediately.
• Wear ear protection. This unit can produce noise levels
• Wear protective eyewear.
• Do not spray on windy days.
can explode or ignite, causing property damage
and/or severe injury.
working order
for airless applications. Be sure that the gun is earthed
properly through hose connections.
the green earthing wire to connect the pump to a water
pipe, steel beam, or other electrically earthed surface.
methylene chloride and 1,1,1 - trichloroethane. They are
not compatible with aluminum and may cause an
explosion. If you are unsure of a material’s compatibility
with aluminum, contact your coating's supplier.
with manufacturer authorized parts only
pump with parts that do not comply with the minimum
specifications and safety devices of the pump
manufacturer, the user assumes all risks and liabilities.
or bulging of cover, as well as damage or movement of
couplings. If any of these conditions exist, replace the
hose immediately. Never repair a paint hose. Replace it
with another earthed hose.
for safe handling of paint and solvents.
above 85 dB(A).
.
MATERIALS- May cause property damage or
severe injury.
severe injury.
. When using this
Earthing Instructions
This product must be earthed. In the event of an electrical
short circuit, earthing reduces the risk of electric shock by
providing an escape wire for the electric current. This product
is equipped with a cord having an earthing wire with an
appropriate earthing plug. The plug must be plugged into an
outlet that is properly installed and earthed in accordance with
all local codes and ordinances.
DANGER — Improper installation of the earthing plug can
result in a risk of electric shock.
If repair or replacement of the cord or plug is necessary, do not
connect the green earthing wire to either flat blade terminal.
The wire with insulation having a green outer surface with or
without yellow stripes is the earthing wire and must be
connected to the earthing pin.
Check with a qualified electrician or serviceman if the earthing
instructions are not completely understood, or if you are in
doubt as to whether the product is properly earthed. Do not
modify the plug provided. If the plug will not fit the outlet, have
the proper outlet installed by a qualified electrician.
Page 4
Specifications
WARNING
WARNING
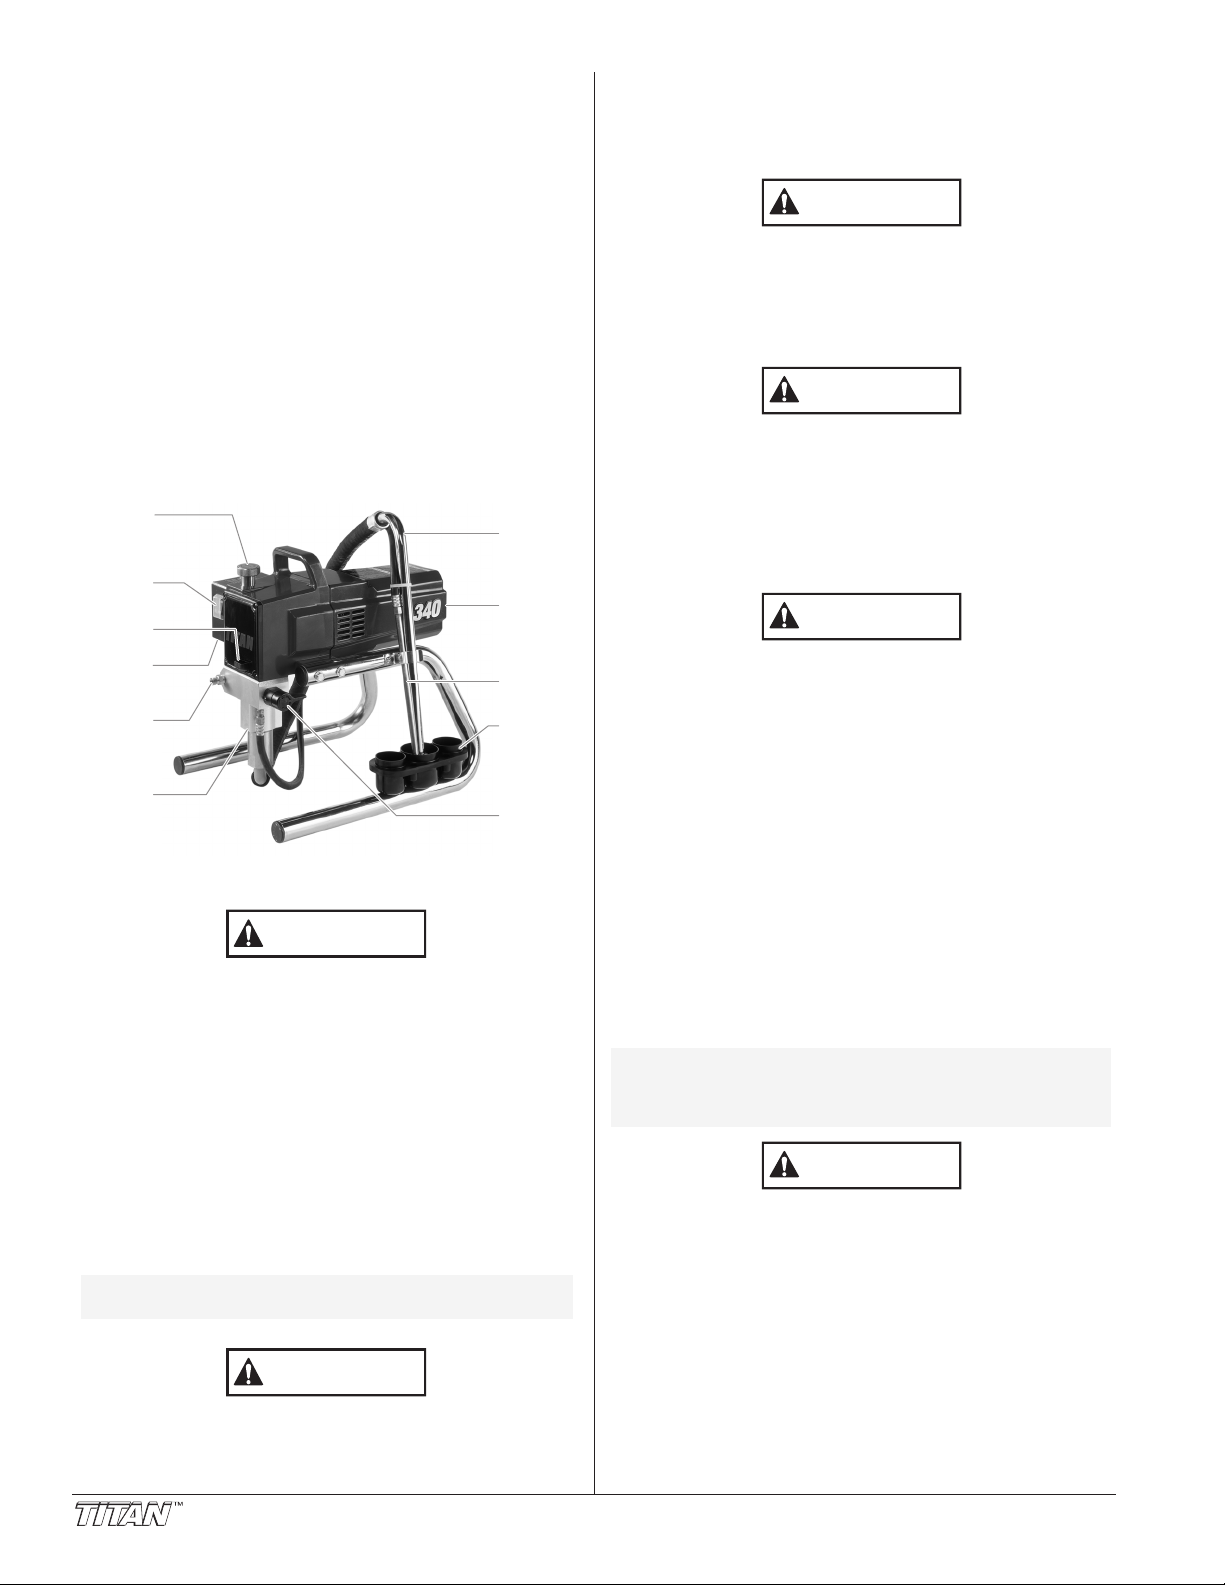
ON/OFF
Switch
Oil Cup
Outlet
Fitting
Fluid
Section
Pressure
Control
Knob
Siphon
Hose
Motor
Return
Tube
Liquid
Holder
and
Drip Cup
PRIME/
SPRAY
Valve
Circuit
Breaker
CAUTION
CAUTION
CAUTION
CAUTION
Liters per minute (LPM) ...................1.5 (0.40 GPM)
Maximum tip sizes ...........................0.019”
Maximum pressure ..........................20.6 MPa (3000 PSI)
Power, 230V unit..............................3/4 HP DC motor, 230V,
Power, 110V unit ..............................3/4 HP DC motor, 110V,
Weight..............................................15.4 kg (34 lbs.)
Maximum hose length......................91.4 m (300’)
Maximum power cord length............91.4 m (300’)
General Description
This airless sprayer is a precision power tool used for spraying
many types of materials. Read and follow this instruction
manual carefully for proper operating instructions,
maintenance, and safety information.
Operation
This equipment produces a fluid stream at extremely high
pressure. Read and understand the warnings in the
Safety Precautions section at the front of this manual
before operating this equipment.
Setup
Perform the following procedure before plugging in the power
cord of an electric unit.
1. Ensure that the suction set and the return hose are
attached and secure.
2. Using a wrench, attach a minimum of 15m (50’) x 10mm
(1/4”) nylon airless spray hose to the unit. Tighten
securely.
3. Attach an airless spray gun to the spray hose. Using two
wrenches (one on the gun and one on the hose), tighten
securely.
NOTE: Do not attach the tip to the spray gun yet.
Make sure all airless hoses and spray guns are electrically
grounded and rated for at least 23 MPa (3300 PSI) fluid
pressure.
50/60 HZ, 4.5 AMP,
1035W
50/60 HZ, 8.8 AMP,
1035W
Remove the tip if it is already attached.
4. Make sure the pressure control knob is turned fully
counterclockwise to its minimum setting.
5. Make sure the ON/OFF switch is in its OFF position.
6. Fill the oil cup with 15g (one tablespoon) of piston seal
lubricant (Piston Lube).
Never operate unit for more than ten seconds without
fluid. Operating this unit without fluid will cause
unnecessary wear to the packings.
7. Make sure the electrical service is correct for the unit.
8. Plug the power cord into a properly grounded outlet at
least 7.6m (25’) from the spray area.
Always use a minimum 12 gauge, three-wire extension cord
with a grounded plug. Never remove the third prong or use
an adapter
.
Preparing a New Sprayer
If this unit is new, it is shipped with test fluid in the fluid section
to prevent corrosion during shipment and storage. This fluid
must be thoroughly cleaned out of the system with mineral
spirits before you begin spraying.
Always keep the trigger lock on the spray gun in the
locked position while preparing the system.
1. Place the suction tube into a container of mineral spirits
that has a flash point of 60ºC (140ºF) or above.
Place the return hose into a metal waste container.
2.
3. Set the pressure to minimum by turning the pressure
control knob fully counterclockwise.
4. Move the PRIME/SPRAY valve down to the PRIME
position.
5. Turn the unit on by moving the ON/OFF switch to the ON
position.
6. Allow the sprayer to run for 15–30 seconds to flush the
test fluid out through the return hose and into the waste
container.
7. Turn the unit off by moving the ON/OFF switch to the OFF
position.
Preparing to Paint
Before painting, it is important to make sure that the fluid in the
system is compatible with the paint that is going to be used.
NOTE: Incompatible fluids and paint may cause the
Always keep the trigger lock on the spray gun in the
locked position while preparing the system.
1. Place the suction tube into a container of the appropriate
2.
3. Set the pressure to minimum by turning the pressure
4. Move the PRIME/SPRAY valve down to the PRIME
5. Turn the unit on by moving the ON/OFF switch to the ON
4 © Titan Tool Inc. All rights reserved.
valves to become stuck closed, which would
require disassembly and cleaning of the
sprayer’s fluid section.
solvent for the material being sprayed (refer to
recommendations of the material manufacturer). An
example of the appropriate solvent is water for latex paint.
Place the return hose into a metal waste container.
control knob fully counterclockwise.
position.
position.
Page 5
6. Allow the sprayer to run for 15–30 seconds to flush the old
WARNING
WARNING
Trigger lock
in locked position.
WARNING
Trigger lock
in locked position.
WARNING
WARNING
Trigger lock
in locked position.
solvent out through the return hose and into the metal
waste container.
7. Turn the unit off by moving the ON/OFF switch to the OFF
position.
NOTE: Make sure that the spray gun does not have a
8. Move the PRIME/SPRAY valve up to the SPRAY position.
9. Turn the unit on. Make sure the pressure is still set to
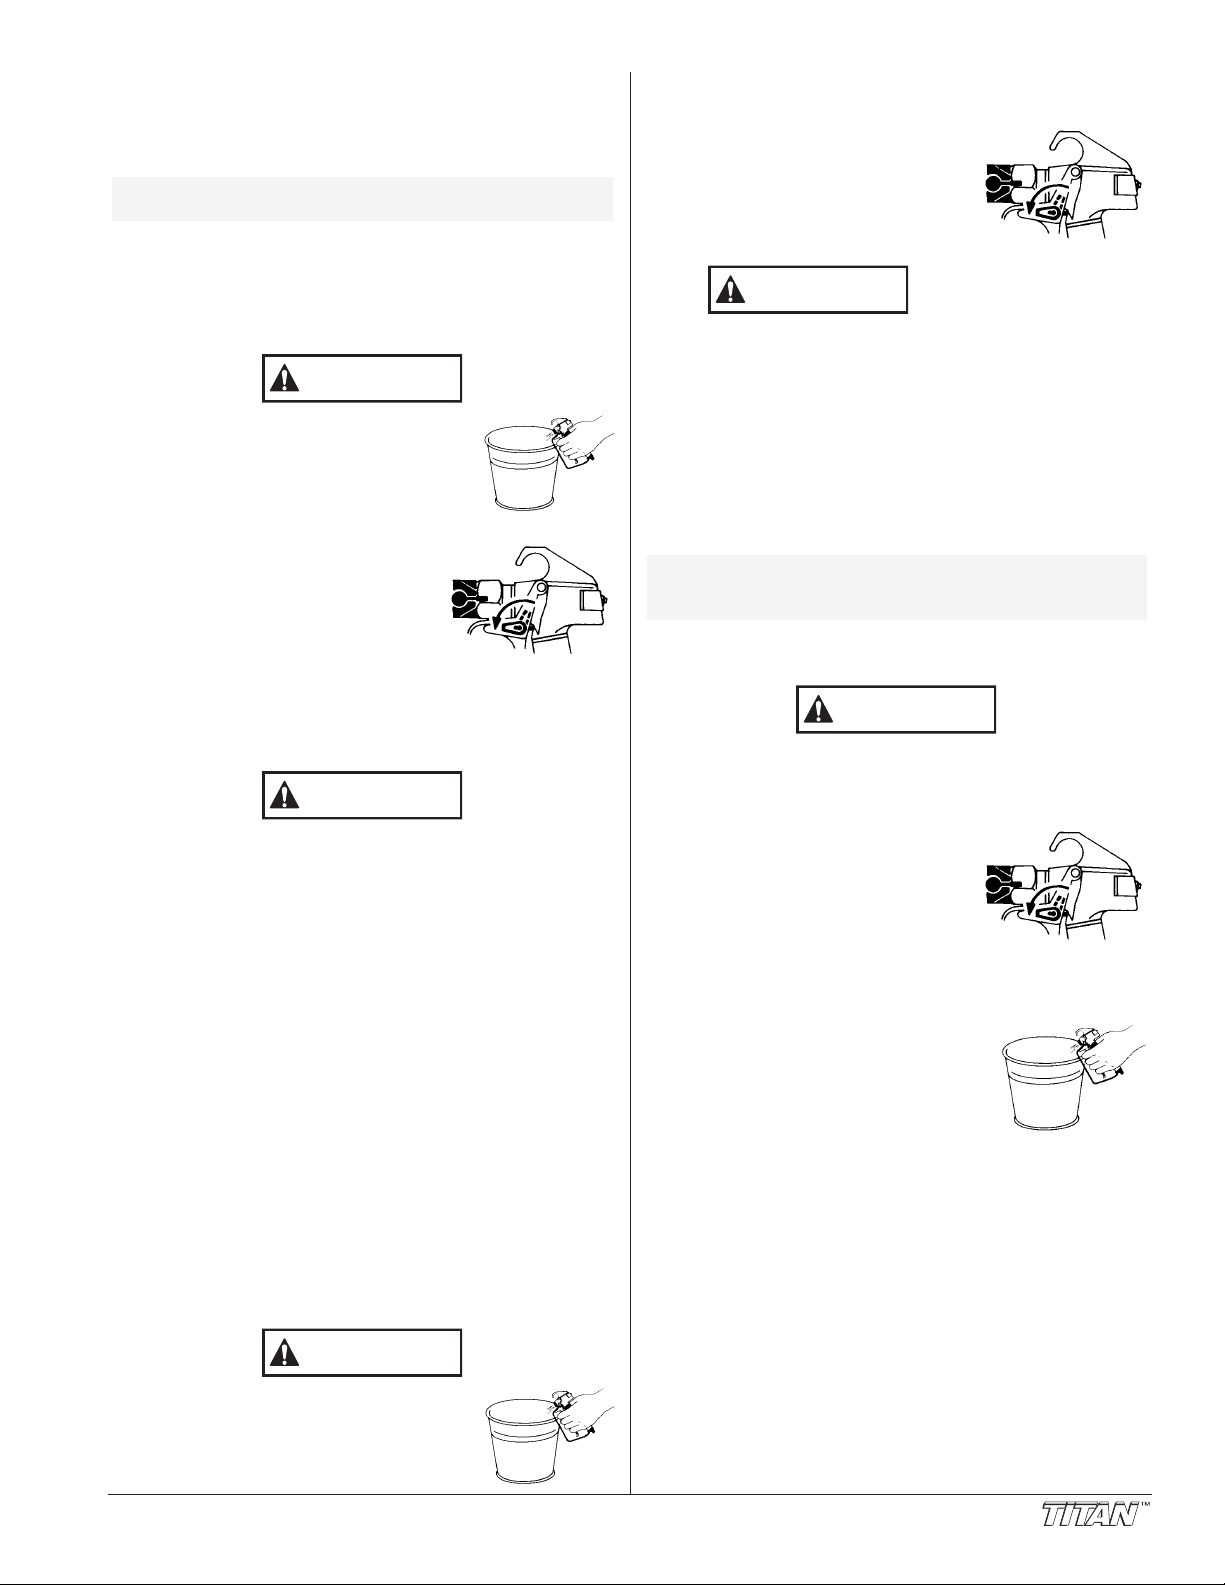
10. Unlock the gun by turning the gun trigger lock to the
Ground the gun by holding it against the
edge of the metal container while flushing.
Failure to do so may lead to a static
electric discharge, which may cause a fire.
11. Trigger the gun into the metal waste
12. Lock the gun by turning the gun
13.
14. Check the entire system for leaks.
15. Follow the “Pressure Relief Procedure” in this manual
Be sure to follow the pressure relief procedure when
shutting the unit down for any purpose, including
servicing or adjusting any part of the spray system,
changing or cleaning spray tips, or preparing for cleanup.
tip or tip guard installed.
minimum with the pressure control knob turned fully
counterclockwise.
unlocked position.
container until the old solvent is gone
and fresh solvent is coming out of the gun.
trigger lock to the locked position.
Set down the gun and increase the
pressure by turning the pressure
control knob slowly clockwise.
If leaks occur, follow the “Pressure
Relief Procedure” in this manual
before tightening any fittings or hoses.
before changing from solvent to paint.
Painting
1. Place the suction tube into a container of paint.
2. Place the return hose into a metal waste container.
3. Set the pressure to minimum by turning the pressure
control knob fully counterclockwise.
4. Move the PRIME/SPRAY valve down to the PRIME
position.
5. Turn the unit on by moving the ON/OFF switch to the ON
position.
6. Allow the sprayer to run until paint is coming through the
return hose into the metal waste container.
7. Turn the unit off by moving the ON/OFF switch to the OFF
position.
8. Remove the return hose from the waste container and
place it in its operating position above the container of
paint.
9. Move the PRIME/SPRAY valve up to the SPRAY position.
10. Turn the unit on.
11. Unlock the gun by turning the gun trigger lock to the
unlocked position.
12. Trigger the gun into the metal waste container until all air
and solvent is flushed from the spray hose and paint is
flowing freely
13. Lock the gun by turning the gun
trigger lock to the locked position.
14. Turn the unit off.
15. Attach tip guard and tip to the gun
as instructed by the tip guard or tip
manuals.
POSSIBLE INJECTION HAZARD. Do not spray without the
tip guard in place. Never trigger the gun unless the tip is
in either the spray or the unclog position.
the gun trigger lock before removing, replacing or
cleaning tip.
16. Turn the unit on.
17.
Increase the pressure by turning the pressure control
knob slowly clockwise and test the spray pattern on a
piece of cardboard. Adjust the pressure control knob until
the spray from the gun is completely atomized. Try to
keep the pressure control knob at the lowest setting that
maintains good atomization.
NOTE: Turning the pressure up higher then needed to
atomize the paint will cause premature tip wear
and additional overspray.
. from the gun.
Always engage
Pressure Relief Procedure
Be sure to follow the pressure relief procedure when
shutting the unit down for any purpose, including
servicing or adjusting any part of the spray system,
changing or cleaning spray tips, or preparing for cleanup.
1. Lock the gun by turning the gun
trigger lock to the locked position.
2. Turn the unit off by moving the
ON/OFF switch to the OFF position.
3. Set the pressure to minimum by
turning the pressure control knob
fully counterclockwise.
4. Unlock the gun by turning the gun
trigger lock to the unlocked position.
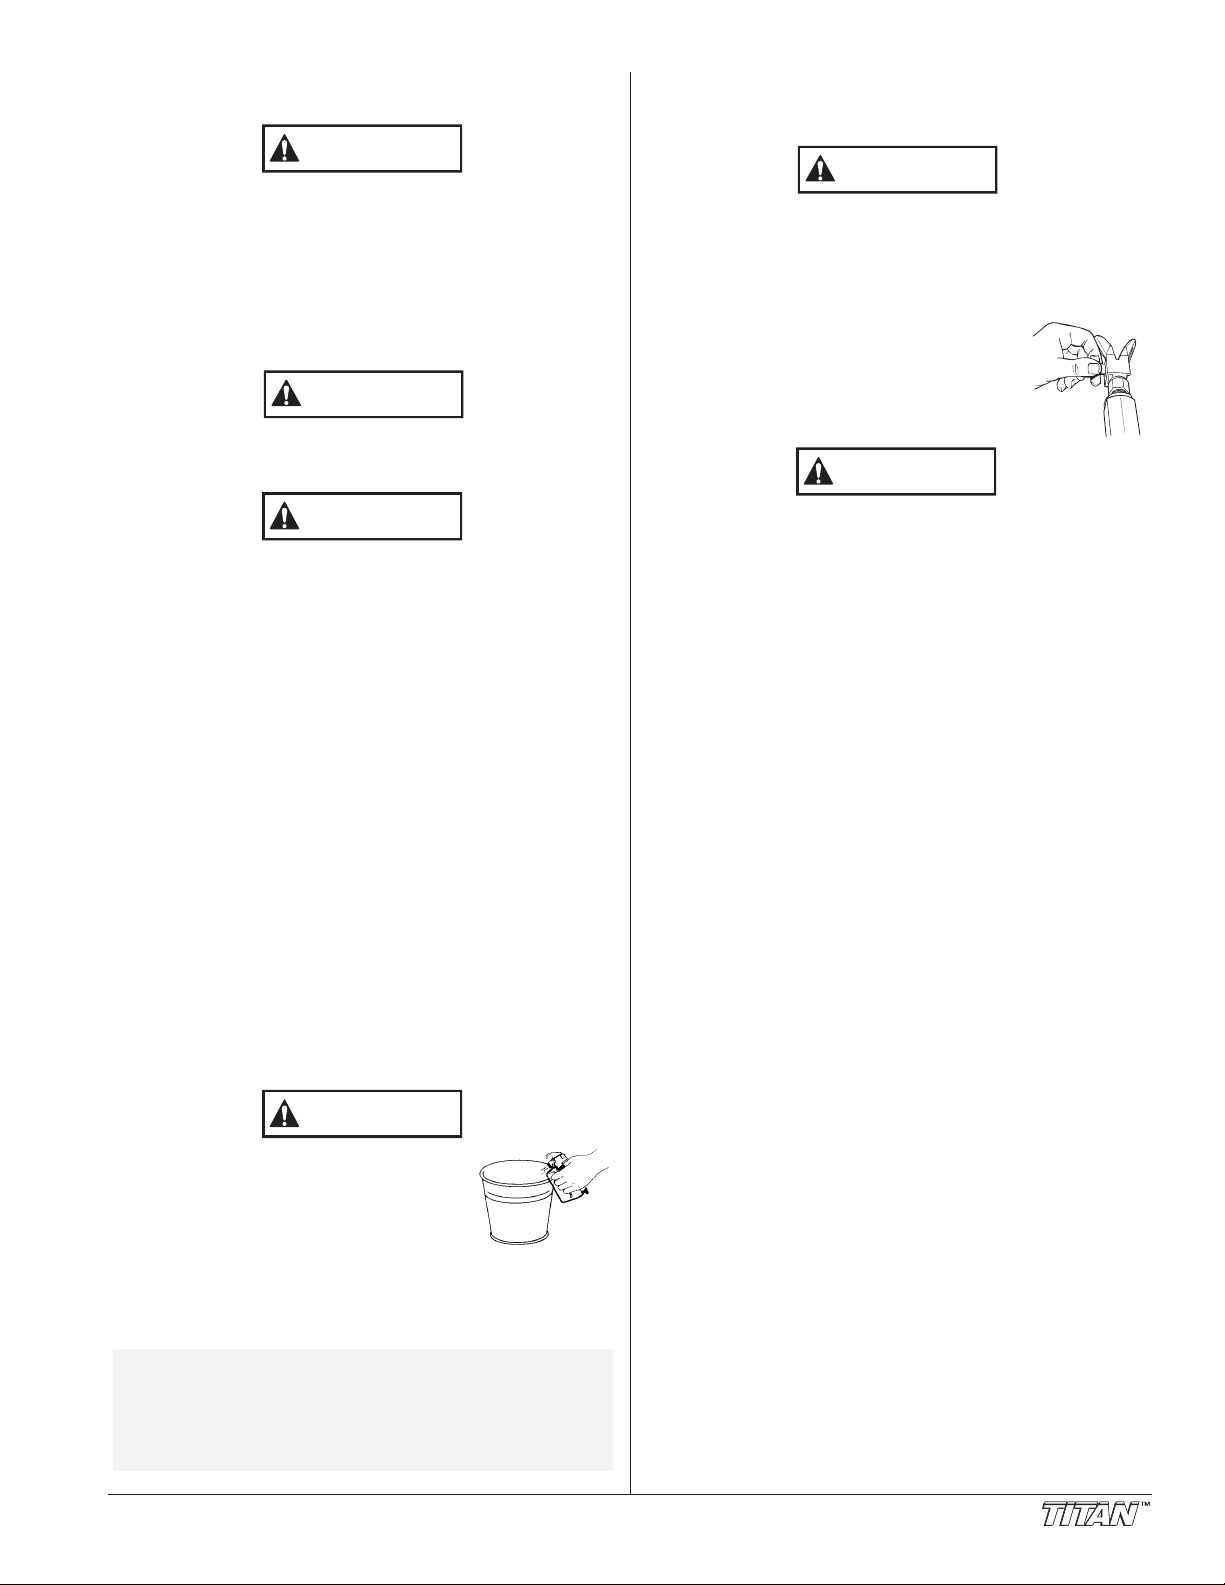
5. Hold the metal part of the gun firmly to
the side of a metal container to ground
the gun and avoid a build up of static
electricity.
6.
Trigger the gun to remove any
pressure that may still be in the hose.
7. Lock the gun by turning the gun trigger lock to the locked
position.
8. Move the PRIME/SPRAY valve down to the PRIME
position.
Ground the gun by holding it against the
edge of the metal container while flushing.
Failure to do so may lead to a static
electric discharge, which may cause a fire.
© Titan Tool Inc. All rights reserved. 5
Page 6

Spraying
Too Thick
Offspray
Arcing Gun at angle
start
stroke
release
trigger
pull
trigger
end
stroke
WARNING
Good spray pattern
Paint tailing pattern
Overlap edges
1st
pass
2nd
pass
3rd
pass
4th
pass
5th
pass
POSSIBLE INJECTION HAZARD. Do not spray without the
tip guard in place. Never trigger the gun unless the tip is
in either the spray or the unclog position. Always engage
the gun trigger lock before removing, replacing, or
cleaning tip.
Spraying Technique
The following techniques, if followed, will assure professional
painting results.
Hold the gun perpendicular to the surface and always at equal
distance from the surface. Depending on the type of material,
surface, or desired spray pattern, the gun should be held at a
distance of 30 to 35 cm (12 to 14 inches).
Move the gun either across or up and down the surface at a
steady rate. Moving the gun at a consistent speed conserves
material and provides even coverage. The correct spraying speed
allows a full, wet coat of paint to be applied without runs or sags.
Holding the gun closer to the surface deposits more paint on
the surface and produces a narrower spray pattern. Holding
the gun farther from the surface produces a thinner coat and
wider spray pattern. If runs, sags, or excessive paint occur,
change to a spray tip with a smaller orifice. If there is an
insufficient amount of paint on the surface or you desire to
spray faster, a larger orifice tip should be selected.
Maintain uniform spray stroke action. Spray alternately from
left to right and right to left. Begin movement of the gun before
the trigger is pulled.
Avoid arcing or holding the gun at an angle. This will result in
an uneven finish.
Proper lapping (overlap of spray pattern) is essential to an
even finish. Lap each stroke. If you are spraying horizontally,
aim at the bottom edge of the preceding stroke, so as to lap
the previous pattern by 50%.
For corners and edges, split the
center of the spray pattern on the
corner or edge and spray
vertically so that both adjoining
sections receive approximately
even amounts of paint.
When spraying with a shield, hold it firmly against the surface.
Angle the spray gun slightly away from the shield and toward
the surface. This will prevent paint from being forced
underneath.
Shrubs next to houses should be tied back and covered with a
canvas cloth. The cloth should be removed as soon as possible.
gun extensions are extremely helpful in these situations.
Nearby objects such as automobiles, outdoor furniture, etc.
should be moved or covered whenever in the vicinity of a
spray job. Be careful of any other surrounding objects that
could be damaged by overspray.
Practice
1. Be sure that the paint hose is free of kinks and clear of
objects with sharp cutting edges.
2. Turn the pressure control knob counterclockwise to its to
its lowest setting.
3. Turn the PRIME/SPRAY valve up to its SPRAY position.
4. Turn the pressure control knob clockwise to its highest
setting. The paint hose should stiffen as paint begins to
flow through it.
5. Unlock the gun trigger lock.
6. Trigger the spray gun to bleed air out of the hose.
7. When paint reaches the spray tip, spray a test area to
check the spray pattern.
8. Use the lowest pressure setting
necessary to get a good spray
pattern. If the pressure is set too
high, the spray pattern will be too
light. If the pressure is set too
low, tailing will appear or the
paint will spatter out in gobs
rather than in a fine spray.
6 © Titan Tool Inc. All rights reserved.
Page 7
Cleanup
WARNING
WARNING
CAUTION
WARNING
WARNING
CAUTION
Special cleanup instructions for use with flammable
solvents:
• Always flush spray gun preferably outside and at least one
hose length from spray pump.
If collecting flushed solvents in a one gallon metal
•
container, place it into an empty five gallon container, then
flush solvents.
• Area must be free of flammable vapors.
• Follow all cleanup instructions.
The sprayer, hose, and gun should be cleaned thoroughly
after daily use. Failure to do so permits material to build
up, seriously affecting the performance of the unit.
Always spray at minimum pressure with the gun nozzle tip
removed when using mineral spirits or any other solvent
to clean the sprayer
buildup may result in a fire or explosion in the presence of
flammable vapors.
1. Follow the “Pressure Relief Procedure” found in the
Operation section of this manual.
Remove the gun tip and tip guard and clean with a brush
2.
using the appropriate solvent.
3. Place the suction tube into a container of the appropriate
solvent (refer to recommendations of the material
manufacturer). An example of the appropriate solvent is
water for latex paint.
4. Place the return hose into a metal waste container.
5. Move the PRIME/SPRAY valve down to its PRIME
position.
6. Set the pressure to minimum by turning the pressure
control knob fully counterclockwise.
7. Turn on the unit by moving the ON/OFF switch to the ON
position.
8. Allow the solvent to circulate through the unit and flush
the paint out of the return hose into the metal waste
container.
9. Turn off the unit by moving the ON/OFF switch to the OFF
position.
10. Move the PRIME/SPRAY valve up to its SPRAY position.
11. Turn on the unit.
, hose, or gun. Static electricity
14. Follow the “Pressure Relief Procedure” found in the
Operation section of this manual.
15. Unplug the unit and store in a clean, dry area.
Do not store the unit under pressure.
Cleaning the Spray Tip
1. Flush the gun with solvent immediately after the work is
completed.
2. Oil the retractor pins to prevent them from seizing up.
Should the spray tip become clogged, reverse
the spray tip with the lever and pull the trigger.
Once the obstruction comes out of the spray
tip, release the trigger, reverse the spray tip
back to the spray pattern setting, and resume
spraying.
Do not attempt to clean the tip with your finger.
Do not use a needle or other sharp pointed instrument to
clean the tip. The hard tungsten carbide is brittle and can
be chipped.
Ground the gun by holding it against the
edge of the metal container while
flushing. Failure to do so may lead to a
static electric discharge, which may
cause a fire.
12. Trigger the gun into the metal waste
container until the paint is flushed out of the hose and
solvent is coming out of the gun.
Continue to trigger the spray gun into the waste container
13.
until the solvent coming out of the gun is clean.
NOTE: For long-term or cold weather storage, pump
© Titan Tool Inc. All rights reserved. 7
mineral spirits through the entire system.
For short-term storage when using latex paint,
pump water mixed with Titan Liquid Shield Plus
through the entire system (see the Accessories
section of this manual for part number).
Page 8
Maintenance
CAUTION
WARNING
BLACK
BLACK
BLACK
RED
RED
RED
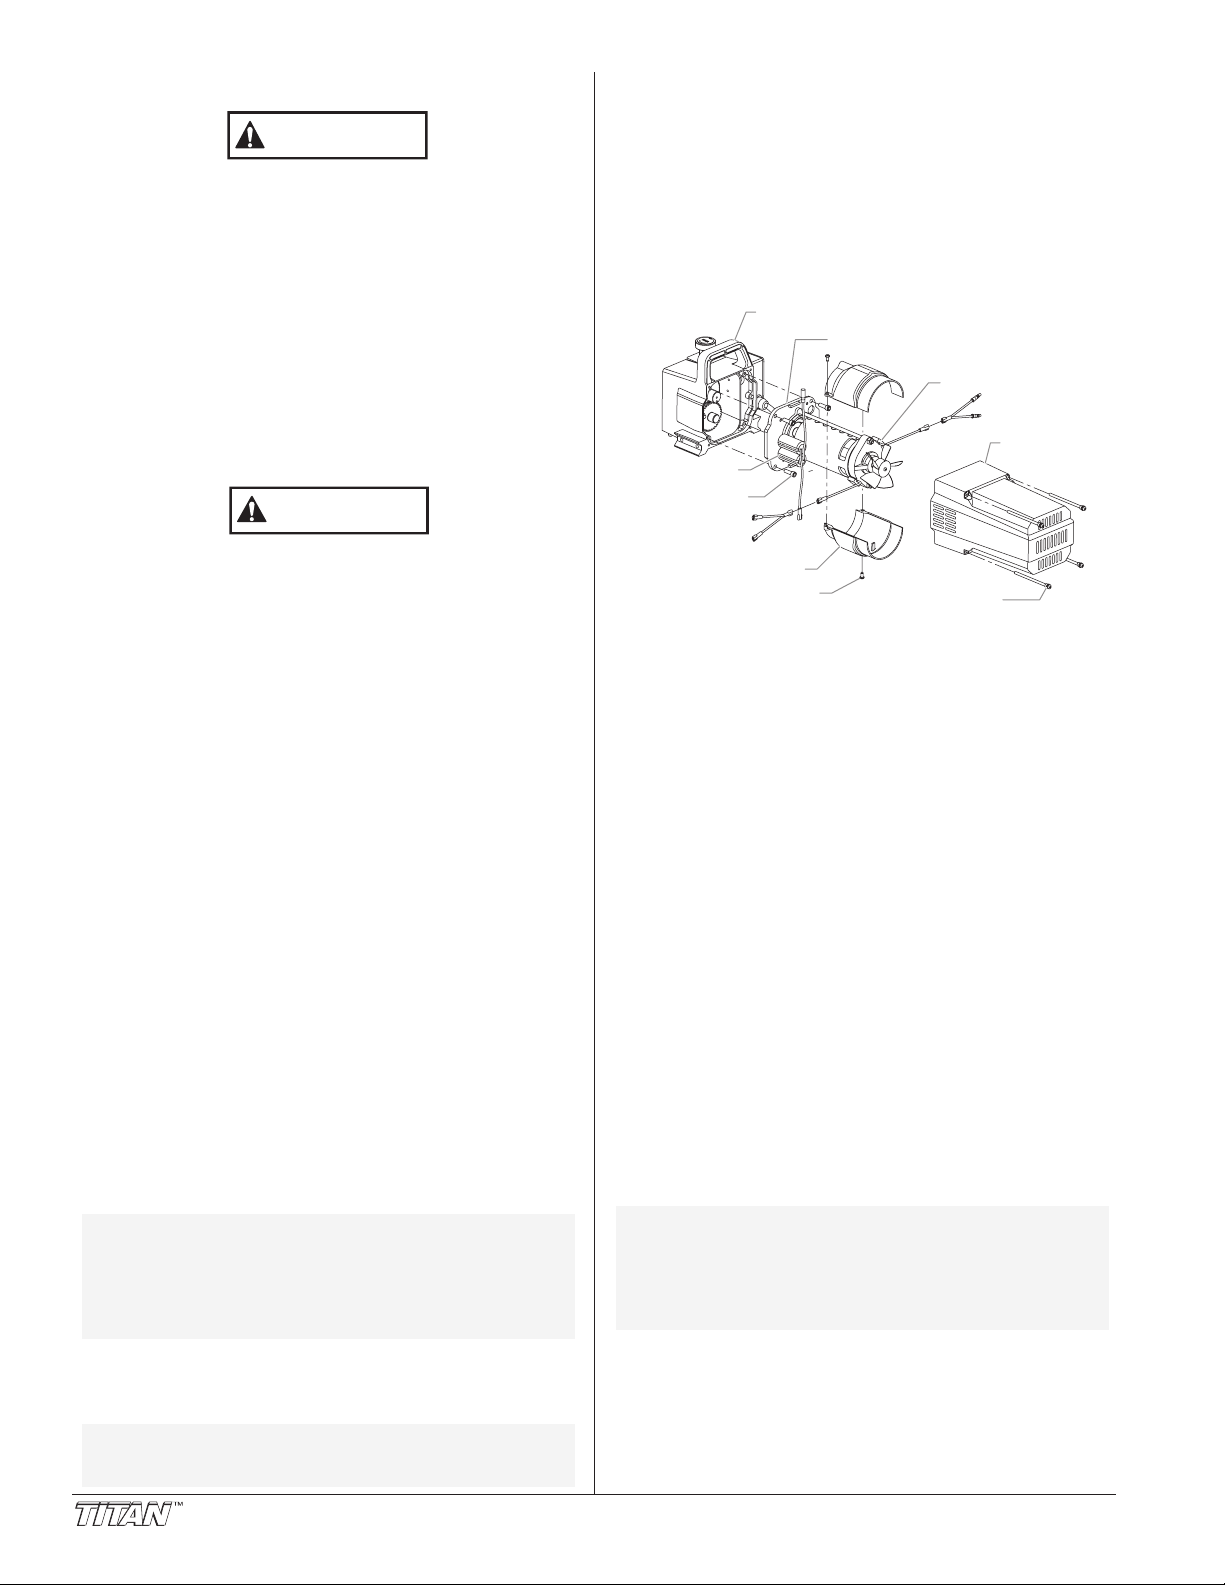
Motor Cover
Brush Cover
Motor
Pump Housing
Capacitors
Motor Mounting
Screw
Shroud
Shroud Screw
Motor Cover
Screw
Before proceeding, follow the Pressure Relief Procedure
outlined previously in this manual. Additionally, follow all
other warnings to reduce the risk of an injection injury,
injury from moving parts or electric shock. Always
unplug the sprayer before servicing!
General Repair and Service Notes
The following tools are needed when repairing this sprayer:
1. Before repairing any part of the sprayer, read the
instructions carefully, including all warnings.
Never pull on a wire to disconnect it. Pulling on a wire
could loosen the connector from the wire.
2. Test your repair before regular operation of the sprayer to be
sure that the problem is corrected. If the sprayer does not
operate properly
everything was done correctly. Refer to the Troubleshooting
Charts to help identify other possible problems.
3. Make certain that the service area is well ventilated in
case solvents are used during cleaning. Always wear
protective eyewear while servicing. Additional protective
equipment may be required depending on the type of
cleaning solvent. Always contact the supplier of solvents
for recommendations.
4. If you have any further questions concerning your TITAN
Airless Sprayer, call TITAN:
Customer Service (U.S.) .......................1-800-526-5362
Customer Service (Canada)..................1-800-565-8665
Customer Service (International)...........1-201-337-1240
Replacing the Motor
1. Unplug the unit.
2. Loosen and remove the four motor cover screws.
Remove the motor cover.
3. Disconnect the black and red wires coming from the pump
housing. Disconnect the black and red wires from the
capacitors. Disconnect the black and red wires from the
motor.
4. Remove the capacitors from their mounting clip.
5. Loosen and remove the four motor mounting screws.
6. Pull the motor out of the pump housing.
NOTE: If the motor will not dislodge from the pump
7. With the motor removed, inspect the gears in the pump
housing for damage or excessive wear. Replace the
gears, if necessary.
8. Install the new motor into the pump housing.
NOTE: Rotate the motor fan manually until the
Phillips Screwdriver 3/8" Hex Wrench
Needle Nose Pliers 5/16" Hex Wrench
Adjustable Wrench 1/4" Hex Wrench
Rubber Mallet 3/16" Hex Wrench
Flat-blade Screwdriver 5/32” Hex Wrench
, review the repair procedure to determine if
Fax ................................................1-800-528-4826
Fax ................................................ 1-905-856-8496
Fax ................................................1-201-405-7449
housing:
• Remove the front cover plate.
• Using a rubber mallet, carefully tap on the
front of the motor crankshaft that extends
through the connecting rod.
armature gear engages with the mating gear in
the pump housing.
9. Secure the motor with the four motor mounting screws.
10. Using the double-sided tape and the tie wrap that came
with the new motor, attach the capacitors to the motor.
a. Place the double-side tape on the capacitors, and stick the
capacitors onto the motor. The capacitors should be
positioned in the same spot as they were on the old motor.
b. Wrap the tie wrap around the capacitors and the motor.
11. Reconnect the wires (refer to the electrical schematic in
the Parts List section of this manual).
12. Slide the motor cover over the motor. Secure the motor
cover with the four motor cover screws.
Replacing the Motor Brushes
Perform this procedure using Motor Brush Kit P/N 704-276.
1. Loosen and remove the four motor cover screws.
Remove the motor cover.
2. Loosen and remove the two shroud screws. Remove the
shroud.
3. Using a small screwdriver, pry off the two plastic brush
covers.
4. Disconnect the black and red wires from the motor
brushes. Remove the motor brushes.
5. Install the new motor brushes and snap on the plastic
brush covers.
6. Reconnect the black and red wires from the motor
brushes (refer to the electrical schematic in the Parts List
section of this manual).
7. Position the shroud over the motor fan. Secure the
shroud with the two shroud screws.
8. Slide the motor cover over the motor. Secure the motor
cover with the four motor cover screws.
Replacing the Gears
1. Loosen and remove the four motor cover screws.
Remove the motor cover.
2. Disconnect the black and red wires coming from the pump
housing.
3. Loosen and remove the four motor mounting screws.
4. Pull the motor out of the pump housing.
NOTE: If the motor will not dislodge from the pump
housing:
• Remove the front cover plate.
• Using a rubber mallet, carefully tap on the
front of the motor crankshaft that extends
through the connecting rod.
5. Inspect the armature gear on the end of the motor for
damage or excessive wear. If this gear is completely
worn out, replace the entire motor.
6. Remove and inspect the 2nd stage gear for damage or
excessive wear. Replace if necessary.
7. Remove and inspect the gear and crank assembly for
damage or excessive wear. Replace if necessary.
8 © Titan Tool Inc. All rights reserved.
Page 9

8. Reassemble the pump by reversing the above steps.
CAUTION
WARNING
Front Cover
Pump Housing
Front Cover Screw
2nd Stage Gear
Thrust Washer
Motor
Gear and Crank
Assembly
Armature Gear
Motor Mounting
Screw
Motor Cover
Motor Cover Screw
Gasket
Cam Base
Valve Stem
Pump Block
Valve Housing
Assembly
Valve
Handle
Groove Pin
T-Slot
Pump
Housing
Pump
Block
Pump
Block
Mounting
Screw
Front
Cover
Front
Cover
Screw
Set
Screw
Transducer
Assembly
Transducer O-Ring
During reassembly, make sure the thrust washers is in
place.
NOTE: Refill the gear box with five ounces of
Lubriplate (P/N 314-171).
Replacing the Transducer
Before proceeding, follow the Pressure Relief Procedure
outlined previously in this manual.
other warnings to reduce the risk of an injection injury,
injury from moving parts or electric shock. Always unplug
the sprayer before servicing!
10. Apply a thin film of grease to the transducer o-ring and
12. Thread the set screw into the pump housing and tighten
13. Reassemble the pump by reversing steps 1–6.
Make sure the transducer is aligned properly with the hole
in the pump block during reassembly. Improper alignment
may cause damage to the transducer o-ring.
© Titan Tool Inc. All rights reserved. 9
1. Loosen and remove the four front cover screws. Remove
the front cover.
2. Stop the sprayer at the bottom of its stroke so that the
piston is in its lowest position. Turn off and unplug the
sprayer.
Additionally, follow all
3. Tilt the pump back for easy access to the fluid section.
4. Using a 3/8” hex wrench, loosen and remove the two
pump block mounting screws.
5. Pull the pump block down approximately 1/2” from the
pump housing to clear the transducer.
6. Slide the pump block and piston rod forward until the
piston rod is out of the T-slot on the connecting rod.
7. Using an 1/8” hex wrench, loosen and remove the set
screw from the bottom of the pump housing.
8. Slide the transducer assembly out of the bottom of the
pump housing.
9. Remove the transducer o-ring from the old transducer
11. Install the new transducer assembly into the pump
assembly.
place it into the bottom of the new transducer assembly.
housing.
securely.
Replacing the PRIME/SPRAY Valve
Perform the following procedure using PRIME/SPRAY valve
replacement kit P/N 700-258.
1. Push the groove pin out of the valve handle.
2. Remove the valve handle and the cam base.
3. Using a wrench, loosen and remove the valve housing
assembly.
4. Make sure the gasket is in place and thread the new valve
housing assembly into the pump block. Tighten securely
with wrench.
5. Place the cam base over the valve housing assembly.
Lubricate the cam base with grease and line up the cam
with the pump block.
6. Line up the hole on the valve stem with the hole in the
valve handle.
7. Insert the groove pin into the valve handle and through
the valve stem to secure the valve handle in position.
Page 10

Servicing the Fluid Section
Outlet Valve
Housing
Outlet Valve
Seat
Outlet Valve
Ball
Upper Cage
Upper Seal
Piston Rod
O-Ring
Foot Valve
Housing
Foot Valve
Seat
Foot Valve
Ball
Bushing
O-Ring
Lower Cage
Lower Seal
WARNING
CAUTION
Install lower packings
with raised lip and O-ring
facing up.
Install upper packing
with raised lip and O-ring
facing down.
O-Ring
O-Ring
Raised Lip
Raised Lip
Connecting
Rod
Retainer
Nut
Piston
Guide
Upper
Packing
Pump
Block
Lower
Packings
Pump Block
Mounting
Screw
Piston Rod
T-Slot
Transducer
O-ring
Use the following procedures to service the valves and repack
the fluid section. Perform the following steps before
performing any maintenance on the fluid section.
1. Loosen and remove the four front cover screws. Remove
the front cover.
2. Stop the sprayer at the bottom of its stroke so that the
piston is in its lowest position. Turn off and unplug the
sprayer.
Before proceeding, follow the Pressure Relief Procedure
outlined previously in this manual.
other warnings to reduce the risk of an injection injury,
injury from moving parts or electric shock. Always
unplug the sprayer before servicing!
3. Unscrew the return hose assembly from the pump block.
Remove the retaining clip that holds the suction set in the
4.
foot valve. Pull the suction set out of the foot valve.
5. Tilt the pump back for easy access to the fluid section.
Servicing the Valves
The design of Titan's fluid section
allows access to the foot valve and
seat as well as the outlet valve and
seat without completely
disassembling the fluid section. It
is possible that the valves may not
seat properly because of debris
stuck in the foot valve seat or outlet
valve seat. Use the following
instructions to clean the valves and
reverse or replace the seats.
1. Using a wrench, loosen and
remove the foot valve housing
from the pump block.
2. Clean out any debris in the foot valve housing and
examine the valve housing and seat. If the seat is
damaged, reverse or replace the seat.
3. Using a 3/4" socket wrench, loosen and remove the outlet
valve housing from the piston rod.
Additionally, follow all
Repacking the Fluid Section
1. Remove the foot
valve and outlet
valve assemblies
using the steps in
the “Servicing the
Valves” procedure
above.
2. Using 3/8” a hex
wrench, loosen
and remove the
two pump block
mounting screws.
3. Pull the pump
block down
approximately 1.5
cm (1/2”)” from the
pump housing.
4. Slide the pump
block and piston
rod forward until
the piston rod is
out of the T-slot on
the connecting
rod.
5. Slide the piston
rod out through
the bottom of the
pump block
6. Loosen and remove the retainer nut and piston guide from
the pump block.
7. Remove the upper and lower packings from the pump
block.
8. Clean the pump block and install the new upper and lower
packings. Refer to the illustration below for proper
packing orientation.
NOTE: Always service the
4. Clean out any debris and
examine the valve housing and
seat. If the seat is damaged,
reverse or replace the seat.
5. Remove, clean, and inspect the
upper cage and upper ball. Replace if they are worn or
damaged.
6. Reassemble the valves by reversing the steps above.
outlet valve with the
piston rod attached to
the pump. This will
prevent the piston rod
from rotating during
disassembly of the
outlet valve.
9. Inspect the piston rod for wear and replace if necessary.
10. Reassemble the outlet valve assembly into the piston rod.
Tighten the outlet valve housing with a wrench until secure.
NOTE: Use the T-slot on the connecting rod to hold
Never use a wrench on the piston itself. This could cause
damage to the piston and cause leakage.
11. Insert the piston guide into the retainer nut. Thread the
12.
NOTE: Coat the piston guide tool and the piston rod
13. Using a wrench, tighten the retainer nut securely.
14. Slide the top of the piston rod into the T-slot on the
10 © Titan Tool Inc. All rights reserved.
the piston rod in position while securing the
outlet valve housing.
retainer nut into the pump block until it is hand tight.
Slide the piston guide tool (included in the repacking kit)
over the top of the piston rod and insert the piston rod
through the bottom of the pump block. Using a rubber
mallet, tap the bottom of the piston rod lightly until the
piston rod is in position in the pump block.
with grease before inserting them into the
pump block.
connecting rod.
Page 11

15. Position the pump block underneath the pump housing
Pump Block
Seal
Filter
Filter Housing
CAUTION
Gun Body
Handle Seal
Filter
Handle
and push up until it rests against the pump housing.
Make sure the transducer is aligned properly with the hole
in the pump block during reassembly
may cause damage to the transducer o-ring.
16. Thread the pump block mounting screws through the
pump block and into the pump housing. Tighten securely.
17. Reassemble the foot valve assembly into the pump block.
18. Insert the elbow on the suction set into the bottom of the
foot valve. Position the retaining clip into the foot valve to
secure the suction set assembly.
19. Thread the return hose into the pump block and tighten
securely.
20. Place the front cover on the pump housing and secure in
position using the four front cover screws.
21. Turn on the sprayer by following the procedure in the
“Operation” section of this manual and check for leaks.
NOTE: Repacking kit P/N 730-401 is available. For
best results use all parts supplied in this kit.
. Improper alignment
Replacing the Filters
Pump Filter
1. Loosen and remove the filter housing.
2. Turning clockwise, unscrew the filter from the pump block.
NOTE: Left-handed threads require turning the filter
3. Inspect the seal. Based on inspection, clean or replace
4. Turning counterclockwise, thread the new or cleaned filter
5. Slide the filter housing over the filter and thread it into the
clockwise to remove. If the filter breaks off in
the pump block, use a small wood screw to
remove.
the seal.
into the pump block.
pump block until secure.
Gun Filter
1. Move the gun trigger lock to the unlocked position.
2. Loosen and remove the handle assembly from the gun
head.
3. Turning clockwise, unscrew the filter from the gun head.
NOTE: Left-handed threads require turning the filter
clockwise to remove.
4. Turning counterclockwise, screw the new or cleaned filter
into the gun head.
5. Make sure the handle seal is in position and thread the
handle assembly into the gun head until secure.
6. Move the gun trigger lock to the locked position.
NOTE: For more detail, part number information, and
assembly drawings at larger scale, please see
the LX-80IIProfessional Airless Gun Owner's
Manual (P/N 313-2293).
© Titan Tool Inc. All rights reserved. 11
Page 12

Problem
The unit will not run.
Troubleshooting
Cause
1. The unit is not plugged in.
2. Tripped breaker.
3. The pressure is set too low (pressure
control knob set at minimum setting
does not supply power to unit).
4. Faulty or loose wiring.
5. Excessive motor temperature.
6. ON/OFF switch is defective.
Solution
1. Plug the unit in.
2. Reset the breaker.
3. Turn the pressure control knob clockwise to
supply power to the unit and increase the
pressure setting.
4. Inspect or take to a Titan authorized service
center.
5. Allow motor to cool.
6. Replace the ON/OFF switch.
The unit will not prime.
The unit will not build or
maintain pressure.
1. The PRIME/SPRAY valve is in the
SPRAY position.
2. Air leak in the siphon tube/suction set.
3. The pump filter and/or inlet screen is
clogged.
4. The siphon tube/suction set is clogged.
1. The spray tip is worn.
2. The spray tip is too large.
3. The pressure control knob is not set
properly.
4. The pump filter, gun filter, or inlet
screen is clogged.
5. Material flows from the return hose
when the PRIME/SPRAY valve is in the
SPRAY position.
6. Air leak in the siphon tube/suction set.
7. There is external fluid leak.
8. There is an internal fluid section leak
(packings are worn and/or dirty, valve
balls are worn).
9. Worn valve seats
10. Motor powers but fails to rotate
1. Rotate the PRIME/SPRAY valve clockwise
to the PRIME position.
2. Check the siphon tube/suction set
connection and tighten or re-tape the
connection with PTFE tape.
3. Remove the pump filter element and clean.
Remove the inlet screen and clean.
4. Remove the siphon tube/suction set and
clean.
1. Replace the spray tip following the
instructions that came with the spray gun.
2. Replace the spray tip with a tip that has a
smaller orifice following the instructions that
came with the spray gun.
3. Turn the pressure control knob clockwise to
increase the pressure setting.
4. Remove the pump filter element and clean.
Remove the gun filter and clean. Remove
the inlet screen and clean.
5. Clean or replace the PRIME/SPRAY valve.
6. Check the siphon tube/suction set
connection and tighten or re-tape the
connection with PTFE tape.
7. Check for external leaks at all connections.
Tighten connections, if necessary.
8. Clean the valves and service the fluid
section following the “Servicing the Fluid
Section” procedure in the Maintenance
section of this manual.
9. Reverse or replace the valve seats
following the “Servicing the Fluid Section”
procedure in the Maintenance section of
this manual.
10. Take unit to a Titan authorized service
center.
Fluid leakage at the upper end
of the fluid section.
1. The upper packings are worn.
2. The piston rod is worn.
12 © Titan Tool Inc. All rights reserved.
1. Repack the pump following the “Servicing
the Fluid Section” procedure in the
Maintenance section of this manual.
2. Replace the piston rod following the
“Servicing the Fluid Section” procedure in
the Maintenance section of this manual.
Page 13

Problem
Excessive surge at the spray
gun.
Troubleshooting
Cause
1. Wrong type of airless spray hose.
2. The spray tip worn or too large.
3. Excessive pressure.
Solution
1. Replace hose with a minimum of 15m (50’)
x 10mm (1/4”) grounded textile braid airless
paint spray hose.
2. Replace the spray tip following the
instructions that came with the spray gun.
3. Rotate the pressure control knob
counterclockwise to decrease spray
pressure.
Poor spray pattern.
The unit lacks power.
1. The spray tip is too large for the
material being used.
2. Incorrect pressure setting.
3. Insufficient fluid delivery.
4. The material being sprayed is too
viscous.
1. The pressure adjustment is too low.
2. Improper voltage supply.
1. Replace the spray tip with a new or smaller
spray tip following the instructions that
came with the spray gun.
2. Rotate the pressure control knob to adjust
the pressure for a proper spray pattern.
3. Clean all screens and filters.
4. Add solvent to the material according to the
manufacturer's recommendations.
1. Rotate the pressure control knob clockwise
to increase the pressure setting.
2. Connect the input voltage to the proper
voltage for the unit.
© Titan Tool Inc. All rights reserved. 13
Page 14

Consignes de sécurité
AVERTISSEMENT
ATTENTION
AVERTISSEMENT
Ce manuel contient des informations qu'il faut lire et
comprendre avant d'utiliser l'appareil. En cas d'accès à une
zone comportant l'un des symboles suivants, faire très
attention et veiller à respecter les mises en garde.
Ce symbole avertit d'un danger potentiel pouvant infliger des
blessures graves ou la mort. Il est suivi d'une consigne de
sécurité importante.
Ce symbole avertit d'un risque potentiel pour vous ou pour
l'appareil. Il est suivi d'une information importante sur la façon
d'éviter les dommages à l'appareil ou de vous protéger des
blessures superficielles.
NOTE: Les notes donnent des indications importantes
Les appareils sans air comprimé génèrent des pressions
de pulvérisation très élevées.
Attention! Danger de blessure par injection!
En cas de blessure de la peau provoquée par des produits de
revêtement ou des solvants, consulter immédiatement un
médecin. Communiquer au médecin la nature du produit de
revêtement ou du solvant qui a provoqué la blessure.
Les instructions d'utilisation précisent qu'il faut toujours
observer les consignes suivantes avant démarrage:
1. Ne pas utiliser d'appareils défectueux.
2.
3. Veiller à ce que l'appareil soit bien relié à la terre.
4. Contrôler les pressions d'utilisation acceptables.
5. Vérifier qu'aucun raccord ne comporte de fuite.
Les consignes concernant le nettoyage et l'entretien
périodique doivent être suivies avec rigueur.
Avant chaque intervention sur l'appareil ou pour chaque
arrêt du travail, les règles suivantes doivent être respectées:
1. Libérer la pression dans le pistolet et le flexible.
2. Bloquer le pistolet Wagner avec le cran de sûreté de la
3. Arrêter le moteur.
Toutes les réglementations locales en vigueur doivent être
respectées.
Pour garantir la sécurité d'utilisation des systèmes sans
air les réglementations de sécurité suivantes doivent être
suivies:
1. Pour éviter les dangers, lire attentivement les consignes
qui doivent être prises très au sérieux.
• Ne jamais mettre les doigts, les mains ou une quelconque
partie du corps dans le jet de pulvérisation.
• Ne jamais diriger le pistolet vers vous ou vers une autre
personne.
• Ne jamais utiliser le pistolet sans sa sécurité.
Bloquer le pistolet Wagner avec le cran de sûreté de la
gâchette.
gâchette.
Soyez attentifs à la sécurité!
d'utilisation et suivez les recommandations qui s'y trouvent.
2. N'employez pas des produits de revêtement avec un point
d'éclair au-dessous de 21ºC (70ºF)
3. L'utilisation de cet appareil est interdite dans les ateliers
soumis aux règlements contre les explosions.
4. Ne jamais pulvériser près d'une source d'inflammation;
par exemple flammes nues, cigarettes (les cigares et les
pipes sont également des sources d'inflammation),
étincelles, fils chauds, surfaces chaudes, etc...
5. Attention! Risque de blessure par injection!
Ne jamais pointer le pistolet vers vous-mêmes ou une
personne quelconque.
Ne jamais mettre les doigts ou la main dans le jet de
pulvérisation. Les très hautes pressions de pulvérisation
peuvent provoquer des blessures très graves. N'utiliser
jamais le pistolet sans sa protection.
Pour le montage ou démontage de la tête de pulvérisation
ou lors des pauses dans le travail, le pistolet doit toujours
être verrouillé, de façon à ce qu'il ne puisse être activé.
6. Porter un équipement respiratoire pour pulvériser. Un
masque de protection doit être fourni à l'opérateur.
De façon à prévenir les maladies professionnelles, les
consignes du fabricant de produits, solvants, et agents
nettoyants doivent être respectées lors de la préparation,
de l'utilisation ou du nettoyage de l'appareil. Des gants et
vêtements de protection et, dans certains cas, une crème
protectrice sont nécessaire pour protéger la peau.
7. Le pistolet et le flexible haute pression entre l'appareil et le
pistolet doivent avoir des spécifications permettant de
supporter la pression produite par l'appareil.
La pression de fonctionnement admissible par le flexible,
le nom du fabricant et la date de fabrication doivent être
indiqués par un marquage d'identification permanent sur
le flexible. En outre, il doit être conçu de telle façon que
la résistance électrique
8. Dans certaines conditions, la vitesse du flux peut
provoquer une charge électrostatique dans l'appareil, ce
qui peut provoquer des étincelles ou des flammes de
décharge. Il est donc important que l'appareil soir relié en
permanence à la terre de l'installation électrique. Le
contact doit se faire par l'intermédiaire d'une douille antichoc mise à la terre conformément aux réglementations.
9. Attention! Observer les précautions suivantes lors de
travaux intérieurs ou extérieurs:
Des vapeurs de solvant ne doivent pas être dirigées vers
l'appareil. Des vapeurs de solvant ne doivent pas se
former autour de l'appareil. Placer l'appareil dans le sens
opposé de l'objet à pulvériser. Lors de pulvérisations à
l'extérieur, tenir compte de la direction du vent. Lors d'un
travail à l'intérieur, prévoir une ventilation suffisante pour
assurer l'évacuation des vapeurs de solvant. Une
distance minimale de trois mètres doit être respectée
entre l'appareil et l'objet à peindre.
10. L'utilisateur doit installer un appareillage d'évacuation
conforme aux règlements en vigueur.
11. Les objets à peindre doivent être reliés à la terre.
12. Lors du nettoyage de l'appareil, ne jamais pulvériser de
solvant dans un récipient avec une petite ouverture
(comme une bonde). La formation d'un mélange explosif
air/gaz est probable. Le récipient doit être relié à la terre.
13. Nettoyage de l'appareil.
Ne jamais se servir d'un jet haute pression pour nettoyer
l'appareil. En particulier de jamais utiliser un nettoyeur
haute pression ou à vapeur. Il y a risque de pénétration
d'eau dans l'appareil ce qui peut provoquer un court-circuit.
Français
14 © Titan Tool Inc. Tous droits réservés.
Page 15

14. L’action sur la gâchette produit une force de recul sur la
main tenant le pistolet.
La force de recul du pistolet est particulièrement élevée
avec buse démontée et réglage maximum de la pompe
Airless à haute pression. Pour cette raison, en cas de
nettoyage sans buse, régler la pompe à la pression
minimum.
15. Les fiches doivent toujours être déconnectées des prises
d'alimentation électrique lors d'une intervention sur les
composants électriques.
16. Seul un électricien agréé doit réparer ou intervenir sur un
appareil électrique, même si le travail est décrit dans la
notice d'utilisation. Aucune responsabilité ne sera
acceptée en cas d'installation électrique incorrecte.
17. Placement de l'appareil sur un sol irrégulier.
L'avant de l'appareil doit être orienté vers le bas, pour que
la machine ne puisse glisser loin de l'utilisateur.
DANGER: BLESSURE PAR INJECTION - Un jet de
MESURES PREVENTIVES:
• La pression de service maximale du fluide dans l'appareil
•
• NE JAMAIS mettre une quelconque partie du corps en
• NE JAMAIS placer la main devant le pistolet. Les gants
• TOUJOURS verrouiller la gâchette du pistolet, fermer la
• Pendant la pulvérisation, toujours vérifier que la protection
• TOUJOURS retirer la protection de buse avant de rincer
• Le flexible d'alimentation en peinture peut fuir par suite
AVERTISSEMENT AU MEDECIN:
Une injection sous-cutanée est un accident traumatique.
Il est important de traiter la blessure de façon
chirurgicale aussitôt que possible. NE PAS RETARDER
le traitement pour des recherches de toxicité. La
toxicité n'est un risque qu'en cas d'injection de certains
enduits directement dans le flux sanguin. Il est
conseillé de consulter un chirurgien plasticien ou un
chirurgien des mains.
peinture sous haute pression produit par cet
appareil peut perforer la peau et les tissus
sous-jacents et provoquer des blessures
graves pouvant conduire à une amputation.
NE PAS TRAITER UNE BLESSURE PAR
INJECTION COMME UNE SIMPLE COUPURE!
Une perforation de la peau peut conduire à
une amputation. Consulter immédiatement
un médecin.
est de 20.6 MPa (3000 PSI).
NE JAMAIS diriger le pistolet vers une quelconque partie
du corps.
contact avec le jet de liquide. NE JAMAIS se mettre au
contact d'un jet de liquide provenant du flexible
d'alimentation en liquide.
n'offrent pas de protection contre une blessure par
injection.
pompe à liquide et décompresser l'appareil lors de son
entretien, du nettoyage de la protection de buse, du
remplacement de la buse de pulvérisation ou si l'appareil
reste sans surveillance. L'arrêt du moteur n'élimine pas la
pression. Le bouton AMORCAGE/PULVERISATION doit
être mis sur AMORCAGE pour libérer la pression. Se
reporter à la PROCEDURE DE DECOMPRESSION
décrite dans ce manuel.
de buse est en place. La protection de buse offre une
certaine protection contre les blessures par injection mais
sa principale fonction est préventive.
ou de nettoyer l'appareil.
d'usure, de vrillage ou de mauvais traitements. Une fuite
peut injecter du produit sous la peau. Vérifier le flexible
avant chaque utilisation.
DANGER: EXPLOSION OU INCENDIE – Les vapeurs de
MESURES PREVENTIVES:
• Toujours avoir un extincteur en état de fonctionner à
• Utiliser uniquement des flexibles haute pression
• La pompe doit être connectée à un objet mis à la terre.
•
DANGER: RISQUE D'EXPLOSION PAR INCOMPATIBILITE
MESURES PREVENTIVES:
• Ne pas utiliser d'eau de Javel.
• Ne pas utiliser de solvants aux hydrocarbures halogénés
DANGER: GENERALITES – Peut provoquer des
MESURES PREVENTIVES:
• Cette pompe à haute pression sans air comprimé est
• Vérifier, avant toute utilisation, que les flexibles ne
• Ne jamais pulvériser quand il y a du vent.
• Porter des lunettes de protection.
solvant ou de peinture sont explosives et
inflammables et peuvent causer des dommages
matériels et/ou corporels sérieux.
portée de la main.
conducteurs ou reliés à la terre pour les utilisations sans
air comprimé. S'assurer que le pistolet est bien relié à la
terre par l'intermédiaire du flexible.
Utiliser le fil de terre vert pour relier la pompe à un tuyau
d'eau, à une poutre métallique ou à une autre surface
électriquement mise à la terre.
Lors du rinçage de l'appareil, utiliser la pression minimale.
DES MA
dommages matériels ou corporels sérieux.
comme le chlorure de méthylène et le trichloroéthane-1-1-
1. Ces produits sont incompatibles avec l'aluminium et
peuvent provoquer une explosion. En cas de doute sur la
compatibilité du produit avec l'aluminium, prendre contact
avec votre fournisseur de peinture.
dommages matériels ou corporels sérieux.
conçue pour être utilisée uniquement avec des pièces
agréées par le fabricant. Toute utilisation de l'appareil
avec des pièces ne répondant pas aux normes techniques
et aux dispositifs de sécurité de base du fabricant de la
pompe se fera aux risques et périls de l'utilisateur.
présentent pas de coupures, de fuites, de traces d'usure
ni de renflement de la gaine, ainsi que des raccords
endommagés. Si le flexible a subi l'un des dommages
précités, le remplacer immédiatement. Ne jamais réparer
un flexible d'alimentation en peinture. Le remplacer par
un autre flexible relié à la terre.
TERIAUX – Peuvent être à l'origine de
Directives de mise à la terre
Cet appareil doit être relié à une terre. En cas de court-circuit,
la mise à la terre réduit le risque de choc électrique en
fournissant une ligne de fuite au courant électrique. Cet
appareil est fourni avec un câble d'alimentation muni d'un fil de
terre et d'une fiche appropriée. La fiche doit être reliée à une
prise correctement installée et mise à la terre selon les normes
et règlements locaux.
DANGER – Une installation inadéquate de la prise de terre
peut être la cause d'un choc électrique.
S'il est nécessaire de réparer ou de remplacer le câble ou la
fiche, ne pas connecter le fil vert de mise à la terre à l'une des
bornes à broches plates. Le fil comportant un isolant vert,
avec ou sans lignes jaunes est le fil de terre et doit être
connecté à la broche de terre.
Contrôler avec un électricien qualifié ou un technicien que les
directives de mise à la terre sont entièrement comprises ou en
cas de doute, que le raccordement de l'appareil à la terre est
ef
ficace. Ne pas modifier la fiche qui est fournie. Si la fiche
ne s'adapte pas à la prise, demander à un électricien qualifié
d'installer une prise appropriée.
© Titan Tool Inc. Tous droits réservés. 15
Français
Page 16

Precauciones de Seguridad
ADVERTENCIA
PRECAUCION
ADVERTENCIA
Este manual contiene información que tiene que leerse y
entenderse antes de utilizar el equipo. Cuando se encuentre
en una área que tenga uno de los siguientes símbolos, esté
muy atento y asegúrese que tiene en cuenta la seguridad.
Estos símbolos indican un peligro potencial que puede causar
graves daños o pérdidas humanas. A continuación se explica
información importante para la seguridad.
Estos símbolos indican un peligro potencial para usted o para
su equipo. A continuación se explica información que puede
prevenir daños en el equipo o cómo evitar las causas que
provocan daños menores.
NOTA: Las notas dan información importante que
Las unidades sin aire desarrollan presiones de
pulverización extremadamente altas.
¡Atención! ¡Peligro de lesiones por inyección!
En caso de lesiones en la piel causadas por materiales de
revestimiento o solventes, consultar a un médico
inmediatamente. Informar al médico del tipo de material de
revestimiento o agente de limpieza con el que se causó la lesión.
Las instrucciones de empleo señalan que deben
observarse siempre los siguientes puntos antes de
empezar:
1. No deben utilizarse las unidades averiadas.
2. Asegurar la pistola pulverizadora utilizando el pasador de
3. Asegurarse de que la unidad está puesta a tierra
4. Comprobar las presiones operativas permisibles.
5. Comprobar todas las conexiones para ver si existen fugas.
Deben observarse estrictamente las instrucciones
referentes a la limpieza y mantenimiento regular de la
unidad.
Antes de realizar ningún trabajo en la unidad o cuando se
tome un descanso en el trabajo, deben observarse las
siguientes normas:
1. Aliviar la presión de la pistola pulverizadora y de la
2.
3. Apagar el motor.
tendría que ser considerada con especial
atención.
• Nunca poner los dedos, las manos ni ningún otro
miembro del cuerpo en la boquilla del pulverizador
• Nunca apuntar la pistola pulverizadora a uno mismo ni a
ninguna otra persona.
• Nunca utilizar la pistola pulverizadora sin la protección de
seguridad.
seguridad en el disparador.
correctamente.
manguera.
Asegurar la pistola pulverizadora utilizando el pasador de
seguridad en el disparador.
¡Ser precavido!
.
Deben observarse todas las ordenanzas locales en vigor.
Para asegurar un funcionamiento seguro de los sistemas
sin aire deben seguirse las normas de seguridad que se
listan a continuación:
1. Para evitar peligros, leer detalladamente las instrucciones
de empleo y seguir las instrucciones que se indican en las
mismas.
2. No utilice los materiales de revestimiento con un punto de
inflamación debajo de 21ºC (70ºF).
3. Se prohíbe el uso de esta unidad en talleres que estén
bajo ordenanzas de prevención de explosiones.
4. Nunca operar cerca de fuentes de combustión, v.gr.:
llamas abiertas, cigarrillos, cigarros y pipas, chispas,
alambres al rojo vivo, superficies calientes, etc.
5. ¡Atención! ¡Riesgo de lesiones por inyección!
Nunca apuntar la pistola pulverizadora a uno mismo ni a
otras personas.
Nunca poner los dedos o las manos en la boquilla del
pulverizador. Las presiones de pulverización que son muy
altas pueden ocasionar lesiones muy graves. Nunca
utilizar la pistola pulverizadora sin la protección de
seguridad.
Al instalar y extraer la puntera y durante los descansos en el
trabajo, la pistola pulverizadora debe estar siempre
bloqueada, de forma que no pueda activarse.
6. Usar equipo respiratorio al pulverizar. El operario debe
estar provisto con una mascarilla protectora.
Para evitar enfermedades profesionales, deben
observarse las regulaciones del fabricante con respecto a
los materiales, solventes y agentes de limpieza utilizados
al preparar, trabajar con y limpiar la unidad. Para proteger
la piel es necesario usar ropa protectora, guantes y, en
algunos casos, crema protectora de la piel.
7. La pistola pulverizadora y la manguera de alta presión
entre la unidad y las pistola pulverizadora debe ser de un
estándar suficiente para la presión producida en la
unidad.
En la manguera debe indicarse con una marca de
identificación permanente la presión operativa permisible para
la manguera de alta presión, el fabricante y la fecha de
fabricación de la misma. Además, debe estar construida de
tal forma que la resistencia eléctrica entre las conexiones a la
unidad y la pistola pulverizadora sea igual a o inferior a un
megaohmio.
8. En ciertas condiciones la velocidad del caudal puede
causar una carga electroestática en la unidad. Esto puede
causar chispas o llamas en la descarga. Por lo tanto, es
importante que la unidad esté siempre puesta a tierra
sobre la instalación eléctrica. El contacto debe realizarse
usando un receptáculo a prueba de sacudidas puesto a
tierra conforme a las regulaciones.
9. ¡Atención! Observar las siguientes indicaciones al trabajar
en el interior y al aire libre:
No deben llevarse gases de solventes a la unidad. No
deben formarse gases de solventes cerca de la unidad.
Instalar la unidad en el lado opuesto al objeto que se vaya a
pulverizar. Cuando se pulverice al aire libre, tener en cuenta
la dirección del viento. Al trabajar en el interior, asegurarse
de que haya suficiente ventilación para la extracción de los
gases de solvente. Debe observarse una distancia mínima
de 3 m entre la unidad y el objeto que se esté pulverizando.
10. El usuario debe tener instalado un equipo de extracción
conforme a los reglamentos locales.
11. Los objetos que se estén pulverizando deben estar
puestos a tierra.
12. Al limpiar la unidad, no pulverizar nunca solventes en un
envase que tenga una abertura pequeña (piquera). Puede
formarse una mezcla explosiva de gas/aire. El envase
debe estar puesto a tierra.
Español
16 © Titan Tool Inc. Todos los derechos reservados.
Page 17

13. Limpieza de la unidad.
Nunca debe utilizarse una boquilla gruesa para pulverizar
la unidad. En particular, nunca debe utilizarse un
limpiador de alta presión o limpiador a vapor de alta
presión. Hay peligro de que el agua penetre en la unidad
y cause un cortocircuito.
14. El apriete del disparador ejerce una fuerza de retroceso
en la mano, con la que se dirige la pistola de
pulverización.
La fuerza de retroceso de la pistola de pulverización es
especialmente elevada con la boquilla desmontada y la
bomba de alta presión Airless ajustada a presión elevada.
Por esa razón, para la limpieza sin boquilla, ajustar la
válvula reguladora de presión a la graduación más baja.
15. La clavija principal debe estar siempre desconectada del
receptáculo cuando se esté trabajando en los
componentes eléctricos.
16. El trabajo o reparaciones en el equipo eléctrico debe ser
llevado a cabo solamente por un electricista especializado,
incluso si el trabajo se describe en las instrucciones de
operación. No se aceptará responsabilidad alguna por una
instalación eléctrica incorrecta.
17. Posicionamiento cuando el suelo está desnivelado.
La parte delantera de la unidad debe señalar hacia abajo
para que la máquina no pueda resbalar.
PELIGRO: LESIONES POR INYECCION - Un chorro de
PREVENCION:
• La gama operativa máxima de la bomba es una presión
•
• NUNCA permitir que ninguna parte del cuerpo entre en
• NUNCA poner la mano delante de la pistola. Los guantes no
• Bloquear SIEMPRE el disparador de la pistola, apagar la
• La protección de la puntera debe estar siempre en su lugar
• Extraer SIEMPRE la puntera de pulverización antes de
• La manguera de pintura puede desarrollar fugas por
NOTA AL MEDICO: La inyección en la piel es una lesión
traumática, por ello es importante tratar la lesión
quirúrgicamente tan pronto como sea posible. NO
retrasar el tratamiento para investigar la toxicidad. La
toxicidad está vinculada con algunos revestimientos
inyectados directamente en la sangre. Es aconsejable
consultar a un cirujano plástico o cirujano de
reconstrucción de manos.
pintura a alta presión producido por este
equipo puede atravesar la piel y los tejidos
subyacentes, ocasionando lesiones graves y
una posible amputación.
¡NO TRATAR UNA LESION POR INYECCION
COMO UN SIMPLE CORTE! La inyección
puede conducir a la amputación. Consultar a
un médico inmediatamente.
de fluido de 20.6 MPa (3000 PSI).
NUNCA apuntar la pistola a ninguna parte del cuerpo.
contacto con el chorro de fluido. NO entrar en contacto
con un chorro de fluido creado por una fuga en la
manguera de fluido.
proporcionan protección contra una lesión por inyección.
bomba de fluido y aliviar toda la presión antes de realizar
el mantenimiento, limpiar la protección de la puntera,
cambiar punteras o al dejar desatendida la pistola. La
presión no se aliviará apagando el motor. La perilla de
PRIME/SPRAY (CEBADO/PULVERIZACION) debe estar
girada a PRIME (CEBADO) para aliviar la presión.
Consultar el PROCEDIMIENTO DE ALIVIO DE PRESION
que se describe en este manual.
cuando se pulverice. La protección de la puntera ofrece un
poco de protección contra las lesiones por inyección, pero
principalmente es un dispositivo de advertencia.
enjuagar o limpiar el sistema.
desgaste, retorcimiento y abuso. Una fuga puede inyectar
material en la piel. Inspeccionar la manguera de pintura
antes de cada uso.
PELIGRO: EXPLOSION O INCENDIO - Los gases de
solventes y pintura pueden explotar o prender
fuego, causando daños a la propiedad y/o
lesiones graves.
PREVENCION:
• Se debe tener a mano un equipo de extintor de incendios
en buen estado de funcionamiento.
• Usar solamente mangueras de fluidos de alta presión
conductivas o puestas a tierra para las aplicaciones sin
aire. Asegurarse de que la pistola está puesta a tierra
correctamente por medio de las conexiones de la
manguera.
• La bomba debe estar conectada a un objeto puesto a
tierra. Usar el cable de puesta a tierra verde para
conectar la bomba a una tubería de agua, viga de acero u
otra superficie puesta a tierra eléctricamente.
• Al enjuagar el equipo, usar la presión más baja posible.
PELIGRO: PELIGRO DE EXPLOSION DEBIDO A
MATERIALES INCOMPATIBLES - Puede causar
daños a la propiedad o lesiones graves.
PREVENCION:
• No usar lejía.
• No usar solventes de hidrocarbono halogenados tales
como cloruro de metileno y tricloroetano - 1,1,1, ya que
los mismos no son compatibles con el aluminio y pueden
causar una explosión. Si no se está seguro de la
compatibilidad de un material con el aluminio, ponerse en
contacto con el proveedor del revestimiento.
PELIGRO: GENERAL - Puede causar daños a la propiedad
o lesiones graves.
PREVENCION:
• Esta bomba sin aire de alta presión está diseñada para su
uso únicamente con piezas autorizadas por el fabricante.
Al usar esta bomba con piezas que no cumplan las
especificaciones mínimas y dispositivos de seguridad del
fabricante de la bomba, el usuario asume todos los
riesgos y responsabilidad.
• Antes de cada uso, comprobar todas las mangueras para
ver si presentan cortes, fugas, abrasión o abultamientos
de la cubierta, así como daños o movimientos de los
acopladores. Si se da alguna de estas condiciones,
reemplazar la manguera inmediatamente. Nunca reparar
una manguera de pintura, reemplazar la misma con otra
manguera puesta a tierra.
• Usar gafas protectoras.
• No pulverizar en días con viento.
Instrucciones de puesta a tierra
Este producto debe estar puesto a tierra. En el caso de que
ocurra un cortocircuito, la puesta a tierra reduce el riesgo de
una sacudida eléctrica proporcionando un cable de escape
para la corriente eléctrica. Este producto está equipado con un
cordón que tiene un cable de puesta a tierra con una clavija
de puesta a tierra apropiada. La clavija de conexión debe
estar enchufada en una salida que esté correctamente
instalada y puesta a tierra de conformidad con todos los
códigos y ordenanzas locales.
PELIGRO — La instalación incorrecta de la clavija de
puesta a tierra puede tener como resultado el riesgo de
una sacudida eléctrica.
Si es necesario reparar o reemplazar el cordón o la clavija, no
conectar el cable de puesta a tierra verde a ninguno de los
terminales de cuchilla plana. El cable con insulación que tiene
una superficie exterior verde con o sin rayas amarillas es el
cable de puesta a tierra y debe estar conectado a la espiga de
puesta a tierra.
Verificar con un electricista o técnico de reparaciones
especializado si no se entienden por completo las
instrucciones de puesta a tierra, o si se tiene dudas de que el
producto esté correctamente puesto a tierra. No modificar la
clavija que se suministra; si la misma no encaja en la toma de
corriente, hacer que un electricista especializado instale la
toma de corriente apropiada.
© Titan Tool Inc. Todos los derechos reservados. 17
Español
Page 18

Parts List
1
2
3
5
6
7
4
8
9
10
11
5
Main Assembly
Item Part # Description Quantity
1 704-181 Screw ..........................................................4
2 704-232 Motor cover.................................................1
3 ---------- Motor assembly ..........................................1
4 704-179 Left leg assembly........................................1
5 761-178 Screw ..........................................................4
6 704-185 Fluid section assembly ...............................1
Item
Part # Description Quantity
7 704-117 Screw ..........................................................2
8 ---------- Gear box assembly.....................................1
9 704-178 Right leg assembly .....................................1
10 700-258 PRIME/SPRAY valve assembly..................1
11 704-300 Suction set assembly..................................1
18 © Titan Tool Inc. All rights reserved.
Page 19

1
2
3
4
5
6
7
8
9
10
11
4
Motor Assembly
AC
AC
+
+
+
Switch
Blue
Circuit
Breaker
Brown
Capacitors
Rectifier
Plug
Motor
Motor
Starter
Micro Switch
(Pressure
Control)
AC
AC
+
+
+
Switch
White
Circuit
Breaker
Black
Capacitors
Rectifier
Plug
Motor
Motor
Starter
Micro Switch
(Pressure
Control)
Item Part # Description Quantity
1 704-373 Capacitor/rectifier kit, 230V
(includes item 22 on page 21)....................1
704-363 Capacitor/rectifier kit, 110V
(includes item 22 on page 21)....................1
2 700-681 Screw ..........................................................4
3 704-269 Y adapter (negative, black).........................1
4 704-276 Brush kit
(includes retainer caps) ..............................1
5 704-285 Shroud ........................................................2
6 704-322 Shroud screw..............................................2
Item
Part # Description Quantity
7 704-371 Motor, 230V, complete
(includes items 1, 5, 6, 10, and 11) ............1
704-277 Motor, 110V, complete
(includes items 1, 5, 6, 10, and 11)............1
8 704-258 Y adapter (positive, red) .............................1
9 704-331 Gasket ........................................................1
10 704-250 Motor fan.....................................................1
11 854-915 Screw ..........................................................1
12 770-099 Tie wrap (not shown)..................................1
13 314-991 Tape (not shown) ........................................1
NOTE: All electrical work should be performed by
a Titan authorized service center.
Electrical Schematic, 230V Electrical Schematic, 110V
© Titan Tool Inc. All rights reserved. 19
Page 20

Gear Box Assembly
2
1
10
11
8
9
13
12
14
15
17
18
16
19
20
21
22
3
25
1
27
29
28
1
30
26
23
24
4
5
6
7
20 © Titan Tool Inc. All rights reserved.
Page 21

Item Part # Description Quantity
1
3
6
2
4
5
7
1
3
2
4
5
6
7
1 700-139 Screw ........................................................10
2 704-019 Front cover..................................................1
3 704-173 Crankshaft/gear assembly ..........................1
4 704-174 Thrust washer .............................................1
5 704-176 2nd stage gear............................................1
6 704-406 Pump housing.............................................1
7 700-735 Connecting rod ...........................................1
8 704-102 Pressure control knob.................................1
9 704-124 Retainer ring ...............................................1
10 704-123 Spring .........................................................1
11 704-158 Plunger .......................................................1
12 704-128 Microswitch .................................................1
13 765-063 Strain relief, 230V .......................................1
14 704-500 Power cord, 230V .......................................1
704-515 Power cord, 110V (includes item 13)..........1
15 704-229 Ground screw .............................................1
16 704-122 Screw..........................................................2
17 704-408 Transducer assembly .................................1
Item
Part # Description Quantity
18 704-439 Transducer o-ring, PTFE............................1
19 800-038 Motor starter, 230V.....................................1
800-044 Motor starter, 110V .....................................1
20 704-126 Lock washer................................................2
21 730-260 Screw..........................................................2
22 704-323 Screw..........................................................1
23 704-169 MIcroswitch mounting plate ........................1
24 704-125 Washer........................................................2
25 700-785 Lock washer................................................2
26 704-380 ON/OFF switch ...........................................1
27 800-377 Circuit breaker, 230V..................................1
704-211 Circuit breaker, 110V
28 710-127 Set screw....................................................1
29 704-373 Capacitor/rectifier kit, 230V
(includes item 22) ........................................1
704-363 Capacitor/rectifier kit, 110V
(includes item 22) .......................................1
30 704-441 Electrical box cover ....................................1
Suction Set Assembly
(P/N 704-300)
Item Part #
1 704-263 Return tube assembly.................................1
2 704-121 O-ring ..........................................................2
704-109 O-ring (for hot solvents, optional)
3 700-1024 Elbow ..........................................................1
4 704-127 Retaining clip ..............................................1
5 700-1023 Siphon hose
6 704-391 Clip..............................................................1
7 700-805 Inlet screen .................................................1
Description Quantity
(includes items 2–4, and 7) ........................1
Stand Assembly
Item Part # Description
1 700-761 Cord wrap ...................................................1
2 710-199 Plug.............................................................4
3 704-164 Leg, left .......................................................1
4 700-642 Screw ..........................................................2
5 700-1043 Drip cup ......................................................1
6 704-188 Screw ..........................................................1
7 704-156 Leg, right.....................................................1
704-179 Leg, left, complete
(includes items 1, and 2–4)
704-178 Leg, right, complete
(includes items 2 and 5–7)
Quantity
© Titan Tool Inc. All rights reserved. 21
Page 22

Fluid Section Assembly (P/N 704-445)
1
2
26
3
*4
*5
6
7
*8
*10
11
13
*14
15
16
*17
18
*19
20
*21
22
*12
9
25
37
24
23
27
28
29
30
31
32
33
34
35
36
Install lower packings
with raised lip and
O-ring facing up.
Install upper packing
with raised lip and
O-ring facing down.
O-Ring
O-Ring
Raised Lip
Raised Lip
NOTE: Packing kit P/N 703-401 includes those
items marked with an *. Also included are
packing grease P/N 700-203 and piston guide
tool P/N 700-793.
22 © Titan Tool Inc. All rights reserved.
Page 23

Item Part # Description Quantity
Tip Size Spray Material Filter Type
.011 – .013 Lacquers and stains 100 mesh filter
.015 – .019 Oil and latex 60 mesh filter
.021 – .026 Heavy bodied latex and blockfillers 30 mesh filter
1 704-274 Fluid section, bare (excludes items 23–37) .1
2 704-090 Piston assembly (includes items 9–15) ......1
3 730-508 Retainer ......................................................1
4 700-587 Piston guide ................................................1
5 700-072 Upper packing w/tool ..................................1
6 704-180 Pump block .................................................1
7 227-006 Outlet fitting.................................................1
8 700-601 Lower packing ...........................................2
9 704-089 Piston rod....................................................1
10 762-111 Upper seal ..................................................1
11 762-135 Upper cage .................................................1
12 762-144 Outlet valve ball ..........................................1
13 762-134 Outlet valve seat.........................................1
14 762-057 O-ring..........................................................1
15 762-073 Outlet vavle retainer ...................................1
16 704-289 Bushing.......................................................1
17 700-821 Lower seal ..................................................1
18 730-510 Lower cage .................................................1
19 762-145 Foot valve ball ............................................1
20 762-137 Foot valve seat ...........................................1
21 762-058 O-ring..........................................................1
22 704-054 Foot valve housing .....................................1
Item Part # Description Quantity
23 700-421 Filter housing ..............................................1
24 500-200-03 Filter............................................................1
25 560-038 Seal.............................................................1
26 700-258 PRIME/SPRAY valve assembly
(includes items 27—37)..............................1
27 700-537 Gasket ........................................................1
28 221-012 O-Ring, Viton ..............................................1
29 222-012 O-Ring, PTFE.............................................1
30 700-246 Valve housing .............................................1
31 700-721 O-Ring, Viton ..............................................1
700-897 O-Ring, PTFE (optional).............................1
32 700-250 Valve stem..................................................1
33 700-244 Spring .........................................................1
34 700-248 Valve retainer..............................................1
35 700-252 Cam base ...................................................1
36 700-697 Valve handle...............................................1
37 700-759 Groove pin ..................................................1
38 762-202 Packing tool (not shown) ............................1
NOTE: When using “HOT” solvents, replace Viton o-
ring (item 31) with optional PTFE o-ring (700-
897). Install with o-ring tool (700-890).
Accessories
Airless Tip Selection
Tips are selected by the orifice size and fan width. The proper
selection is determined by the fan width required for a specific
job and by the orifice size that will supply the desired amount
of fluid and accomplish proper atomization.
For light viscosity fluids, smaller orifice tips generally are
desired. For heavier viscosity materials, larger orifice tips are
preferred. Please refer to the chart below.
NOTE: Do not exceed the sprayer's recommended tip
The following chart indicates the most common sizes and the
appropriate materials to be sprayed.
Fan widths measuring 8" to 12" (20 to 30 cm) are preferred
because they offer more control while spraying and are less
likely to plug.
Liquid Shield Plus
Cleans and protects spray systems
against rust, corrosion and premature
wear. Now with -25º anti-freeze
protection.
size.
Part #
314-483...........4 ounce bottle
314-482...........1 quart bottle
Description
Piston Lube
Specially formulated to prevent materials
from adhering to the piston rod, which
becomes abrasive to the upper seals.
Piston Lube will break down any material
that may accumulate in the oil cup and
keep it from drying.
Part #
314-481...........4 ounce bottle
314-480...........8 ounce bottle
Description
Miscellaneous
Part No. Description
490-012...........Hose Coupling, 1/4" x 1/4"
730-397...........High Pressure Fl. Gauge
314-171...........Lubriplate, 14 ounce individual
314-172...........Lubriplate, 6 lb. can
700-1037..........Electrostatic discharge (ESD) wrist strap
Labels
Part # Description
313-2320 Front cover label
313-2418 “340” motor cover label
313-1673 Warning label
313-1847 Shock hazard label
(injection/explosion)
© Titan Tool Inc. All rights reserved. 23
Page 24

Warranty
United States Sales & Service
1-800-526-5362
Fax 1-800-528-4826
107 Bauer Drive
Oakland, NJ 07436
www.titantool.com
Canadian Branch
1-800-565-8665
Fax 1-905-856-8496
200 Trowers Road, Unit 7B
Woodbridge, Ontario L4L 5Z8
International
1-201-337-1240
Fax 1-201-405-7449
107 Bauer Drive
Oakland, NJ 07436 USA
Titan Tool, Inc., (“Titan”) warrants that at the time of delivery to the original purchaser for use (“End User”), the equipment covered by this warranty is free
from defects in material and workmanship. With the exception of any special, limited, or extended warranty published by Titan, Titan’s obligation under
this warranty is limited to replacing or repairing without charge those parts which, to Titan’s reasonable satisfaction, are shown to be defective within
twelve (12) months after sale to the End User. This warranty applies only when the unit is installed and operated in accordance with the
recommendations and instructions of Titan.
This warranty does not apply in the case of damage or wear caused by abrasion, corrosion or misuse, negligence, accident, faulty installation, substitution
of non-Titan component parts, or tampering with the unit in a manner to impair normal operation.
Defective parts are to be returned to an authorized Titan sales/service outlet. All transportation charges, including return to the factory, if necessary, are to
be borne and prepaid by the End User. Repaired or replaced equipment will be returned to the End User transportation prepaid.
THERE IS NO OTHER EXPRESS WARRANTY. TITAN HEREBY DISCLAIMS ANY AND ALL IMPLIED WARRANTIES INCLUDING, BUT NOT LIMITED
TO, THOSE OF MERCHANTABILITY AND FITNESS FOR A PARTICULAR PURPOSE, TO THE EXTENT PERMITTED BY LAW. THE DURATION OF
ANY IMPLIED WARRANTIES WHICH CANNOT BE DISCLAIMED IS LIMITED TO THE TIME PERIOD SPECIFIED IN THE EXPRESS WARRANTY. IN
NO CASE SHALL TITAN LIABILITY EXCEED THE AMOUNT OF THE PURCHASE PRICE. LIABILITY FOR CONSEQUENTIAL, INCIDENTAL OR
SPECIAL DAMAGES UNDER ANY AND ALL WARRANTIES IS EXCLUDED TO THE EXTENT PERMITTED BY LAW.
TITAN MAKES NO WARRANTY AND DISCLAIMS ALL IMPLIED WARRANTIES OF MERCHANTABILITY AND FITNESS FOR A PARTICULAR PURPOSE
WITH RESPECT TO ACCESSORIES, EQUIPMENT, MATERIALS OR COMPONENTS SOLD BUT NOT MANUFACTURED BY TITAN. THOSE ITEMS
SOLD, BUT NOT MANUFACTURED BY TITAN (SUCH AS GAS ENGINES, SWITCHES, HOSES, ETC.) ARE SUBJECT TO THE WARRANTY, IF ANY, OF
THEIR MANUFACTURER. TITAN WILL PROVIDE THE PURCHASER WITH REASONABLE ASSISTANCE IN MAKING ANY CLAIM FOR BREACH OF
THESE WARRANTIES.
Contact Titan distribution or the location where product was
purchased for local translation of the product manual.
Entrez en contact avec la distribution de Titan ou l'endroit
où le produit a été acheté pour la traduction locale du
Entre en contacto con la distribución del Titán o la
localización en donde el producto fue comprado para la
traducción local del manual del producto.
manuel de produit.
Treten Sie Titan Verteilung oder mit der Position in
Verbindung, in der Produkt für lokale Übersetzung des
Produkthandbuches gekauft wurde.
Mettasi in contatto con la distribuzione di Titan o la
posizione dove il prodotto è stato comprato per la
traduzione locale del manuale del prodotto.
De distributie van de Titan van het contact of de plaats waar
het product voor lokale vertaling van het producthandboek
werd gekocht.
Henvende sig til Titan distribution eller den placering der
hvor fabrikat var købt nemlig lokal gengivelse i den fabrikat
håndbog.
Komma i kontakt med Titan distributionen eller
lokaliseringen var produkt var köpt för lokal översättning
om produkt manuell.
Patents
This product is covered by one or more of the following U.S. patents:
6,031,352 5,848,566 5,769,321 5,725,364 5,671,656 5,435,697 5,228,842
5,346,037 5,252,210 5,217,238 5,192,425 4,908,538 4,768,929 4,744,571
D384,676 6,179,222 5,934,883 4,723,892
Material Safety Data Sheets (MSDS) are available on Titan’s website or by calling Customer Service.
24 © Titan Tool Inc. All rights reserved.
 Loading...