

Page 1

Hidden Video Recording
System Manual
Model Number: 300107 8
P/N: F40078000
Manual Version: 090224
Page 2
- 1 -
Thank you for purchasing our Hidden Video Recorder System.
Please read this manual before installation.
For customer support, please contact your dealer, and please
keep your Invoice for further support.
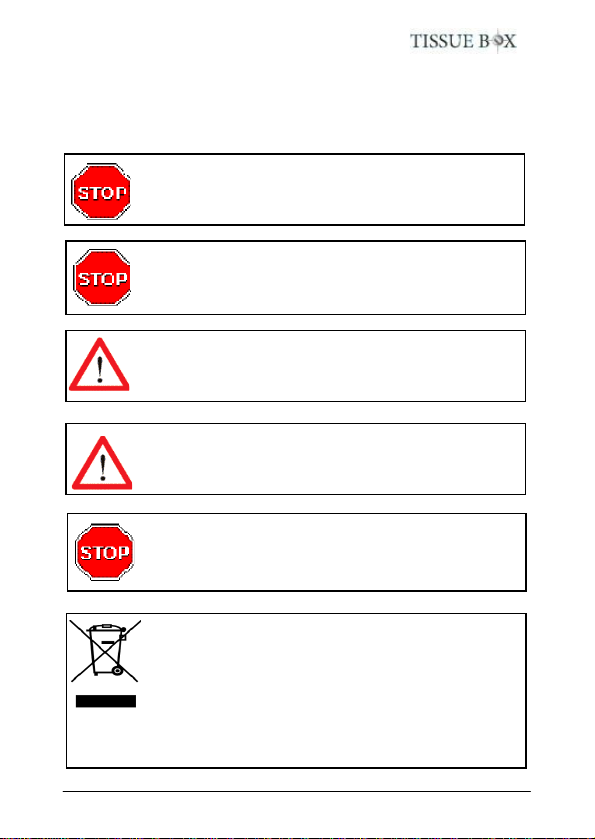
EU Environmental Protection
The symbol of crossed-out garbage shows that this
product should not be treated as household waste,
and it falls into the category of electric /electronic
equipment for recycling. This electronic device
should not be disposed in a regular trash. We
strongly advice you to contact related authorization
before you dispose this product.
Do not open/modify the device, as it may cause
damage to the unit. For internal repairs, consult your
dealer or an Authorized Service Center.
Do not use any accessories other than bundled;
otherwise, it would be out of warranty.
Protect from humidity. Do not put it in water and
be careful to protect it from rain, sea water, or high
humidity environment etc.
Protect from high temperatures
To avoid damage or mis-operation of the device,
only use it where the temperature is 0 ~ +40°C.
Do not bring the device suddenly from a hot to a
cold place, or vice versa. This may cause t he
condensation inside the unit damaged.
Page 3

- 2 -
Before use ..............................................................3
Tissue Box Mechanism ................................ ...........3
Connect AV output .................................................5
Power on/off the Tissue Box ................................ ...6
Charge the Battery ................................ ................. 6
Default Value .......................................................... 7
Start to record ................................ ......................... 7
Playback Function ..................................................7
Remote Control Diagram ........................................8
Screen Icons................................ ...........................9
LED status ................................ ............................ 10
Recording Duration ................................ ...............10
The most frequent use and important functions ....11
FAQ ................................ ................................ ......13
Specifications ................................ ....................... 14
Accessories ..........................................................15
Contents
Page 4
- 3 -
Before use
Please backup/format SD card regularly in order to keep
efficiency of SD card
Please fully charge the bun dled Li-polymer battery with specific
charger cradle for 15 hours when first time using.
Tissue Box Mechanism
Please insert the SD card into Tissue Box, and make sure the
battery gives enough power to start it. Place the Tissue Box
appropriately, and turn it on. Tissue Box will record when motion
is detected (factory default setting) or user can press “REC”
button on remote control to do continuously recording . For more
details about Tissue Box mechanism, please refer to below
sessions.
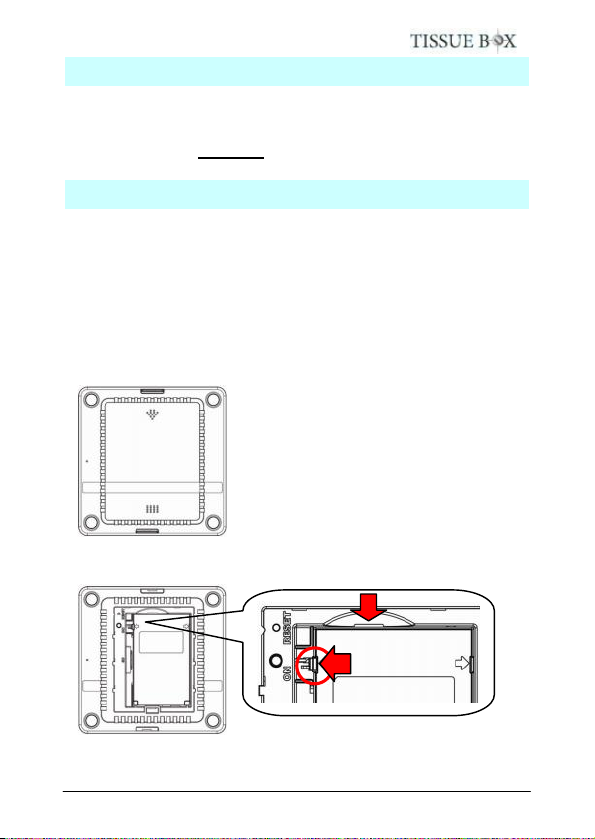
1. Open battery cover
Please push the battery cover on the
bottom of Tissue Box, follow the
direction of arrow, and then pull out the
cover.
2. How to take out the battery / Change the battery
After remove the battery cover, you can take out the b attery or
change the battery. Please notice the lock tenon before taking
2
1
Page 5
- 4 -
out the battery. And make sure the direction of battery when you
put it into device.
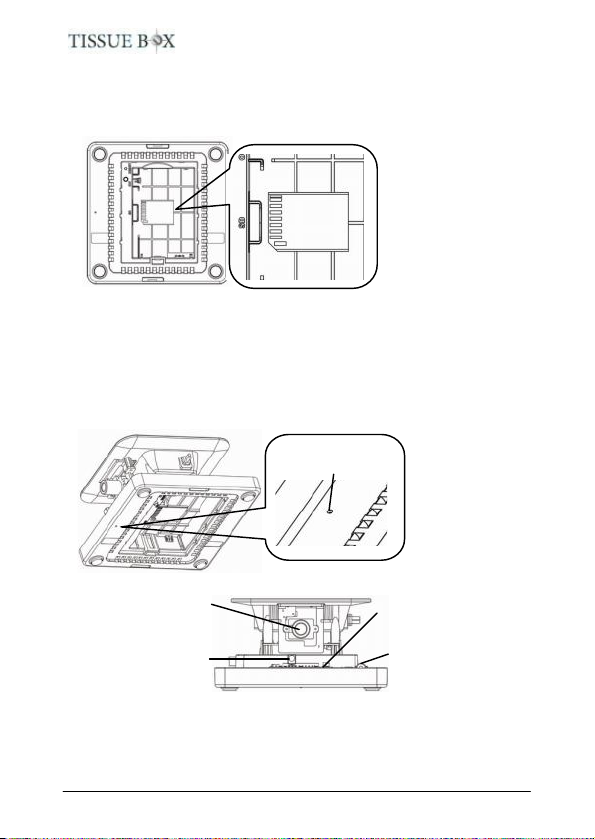
3. How to insert/draw out SD card
The SD card slot is
on the bottom, and
you have to take
out the battery
firstly. Notice the
SD card direction
before insert it.
* Please press “Menu” or “Playback” key, or power off the
board before taking away the SD/microSD card. Hot-swap
the SD/microSD card is not recommended, otherwise, the
card may be damaged.
* Please safely remove SD/MicroSD card on computer.
4. Camera position & IR receiver position
The camera is
at the same side
as reference dot
* The default value of LED indicators and buzzer are ON,
please turn it off via remote control if required.
* LED indicators and buzzer will be ON when powering on,
and then on or off according to user’s setting.
Microphone
Camera
(View angel: 104°
horizontally)
IR receiver
Reference dot
RED, YELLOW,
GREEN indicators
Page 6
- 5 -
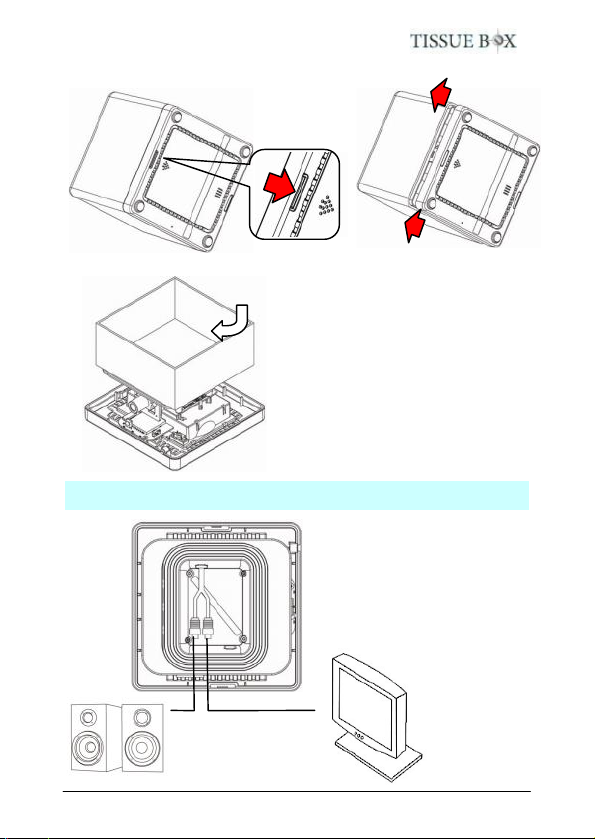
5. How to open device and put tissue in
After open the device, tissue
paper can be put onto the plate
inside Tissue Box. The
Tissue’s size should be 105 x
105 mm.
Connect AV output
On the tissue plate, there
is an AV output for
connecting to external
monitor and/or speaker to
adjust the camera images.
White Yellow
Tissue paper
Page 7
- 6 -
Power on/off the Tissue Box
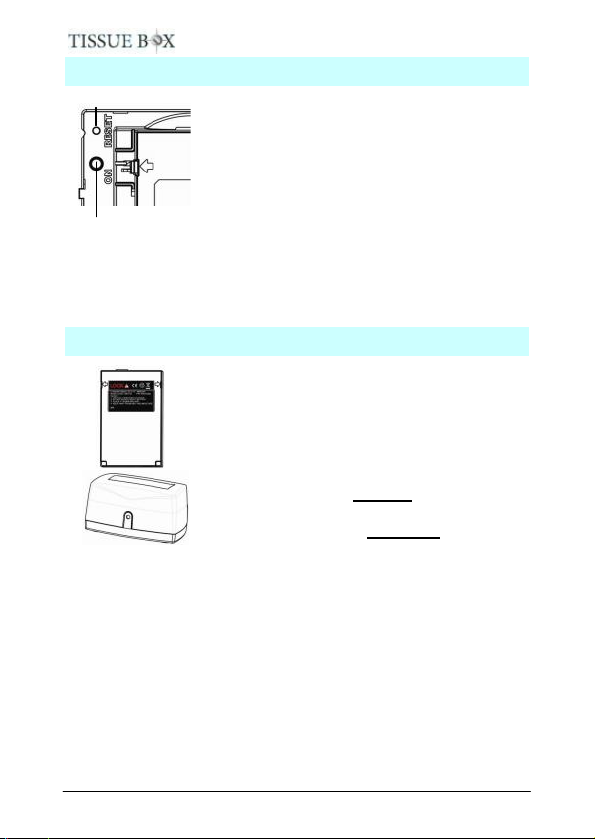
Short press the “ON” button inside battery
cover of Tissue Box, or press “power” button
on remote control to power on Tissue Box.
The LED will be on and buzzer will beep
around 2 seconds after Tissue Box was
powered on.
Press and hold “ON” button for around 2
seconds, or press “power” button on remote
control to power off it.
Short press “Reset” button by a needle, the device will reboot
without saving the current recording. Press and hold “Reset”
button, the device will be turning off.
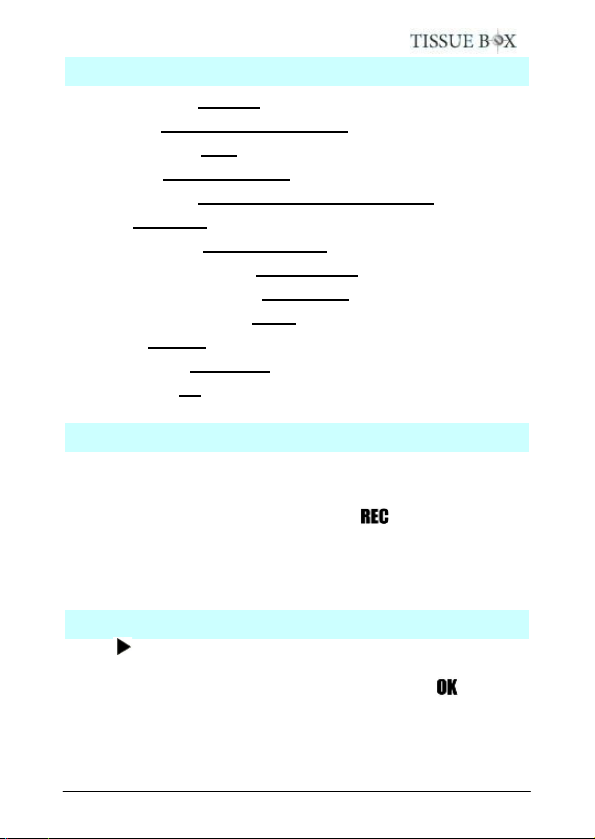
Charge the Battery
Please use the bundled battery and charger
cradle for Tissue Box only.
Put the battery sticker face front, the cradle
LED face front, and put battery on cradle.
The red LED should be on if you put battery
appropriately and start charging. After fully
charged for around 6 hours, the green LED
will be on.
(Please charge for 10 hours when you
charge the battery for the first time.)
The battery can last for 6 hours at least when continuously
recording. If motion activation or power saving when out of
schedule, Tissue Box can last for longer.
* NOTE: Under low temperature conditions, the battery will
have a shorter life than normal
* NOTE: Use the bundled power adapter for the charger
cradle only.
ON
Reset
Page 8
- 7 -
Default Value
Video Resolution: 720x480
Frame Rate: 25/30 frames per second
Motion Sensitivity: High
Motion Area: All area effective
Schedule Setting: All weekdays motion recording
Storage: Overwrite
Recording Length: 30 minutes a file
Date/Time Stamp Format: YYYY/MM/DD
Date/Time Stamp Position: Upper right
Date / Time Stamp Color: White
Language: English
External Trigger: Deactivate
Status Display: On
Start to record
Once power on unit, recording is factory preset at motion
activated. It can be reset as contin uous recording, having
schedule, and external trigger activation thru MENU. Manual
recording can always take place when button is pressed.
( please refer to “Remote Control” session )
* Please press “menu” key before take away the SD card,
otherwise the recording will not be saved onto SD/MicroSD card.
Playback Function
Press key on remote control to get into playback menu. You
can use “Quick search”, and enter the date/time which you
would like to view. Or get into “List all”, and press button to
playback from a selected recording.
Page 9
- 8 -
Remote Control Diagram
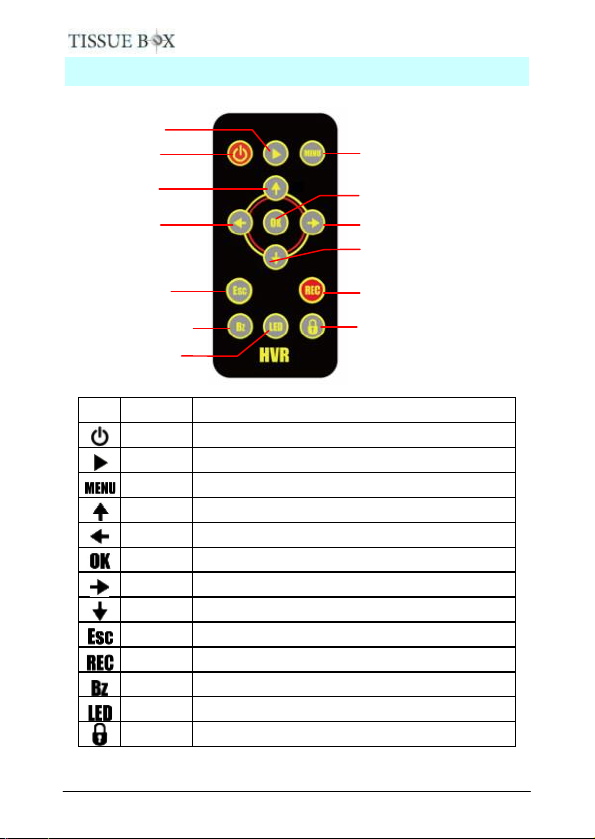
Name
Function
Power
Power on/off the device
Playback
Playback the recording files
Menu
Enter the menu setting
Up
Move upward or increase
Left
Move left
OK
Confirm the setting/change
Right
Move right
Down
Move downward or decrease
Esc
Escape current menu
REC
Manual record
Bz
Buzzer on/off
LED
LED on/off
Keylock
Key lock/unlock
Buzzer on/off
Down
Power
Playback
Up
Left
Escape
LED on/off
Right
OK
Menu
Record
Key lock/
unlock
Page 10
- 9 -
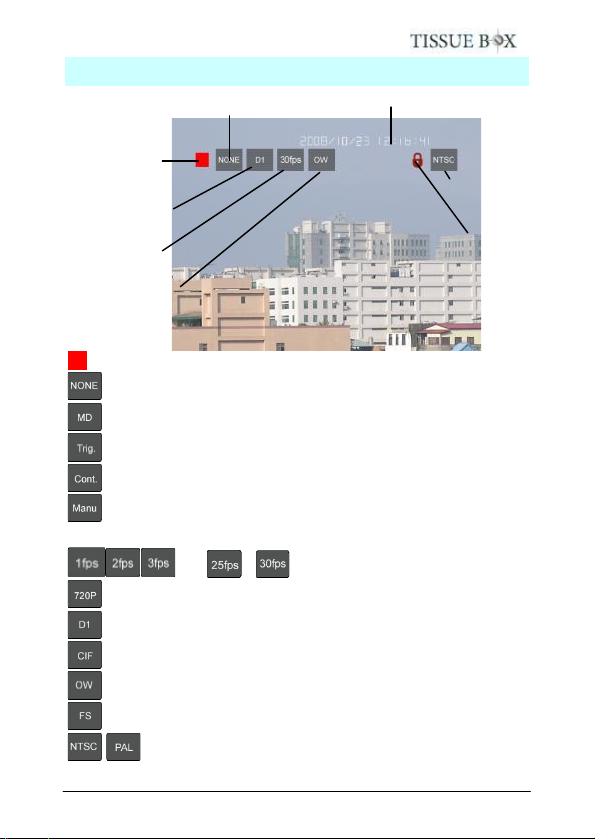
Screen Icons
: The red square will show up continuously when recording
: Standby but not at recording
: Schedule on motion detection activated
: External trigger activate recording
: Schedule continuous recording
: Manual recording by pressing “REC” button on remote
controller
…… / : Frame rate per second
: Resolution: 1280 x 720 (Option)
: Resolution: 720 x 480
: Resolution: 320 x 240
: Overwrite old recordings when SD card is full
: Stop recording when SD card is full
: Video system (NTSC/PAL)
Time/Date stamp
Recording method
Resolution
Frame rate
Video system
Recording
Keylock
SD card method
Page 11
- 10 -
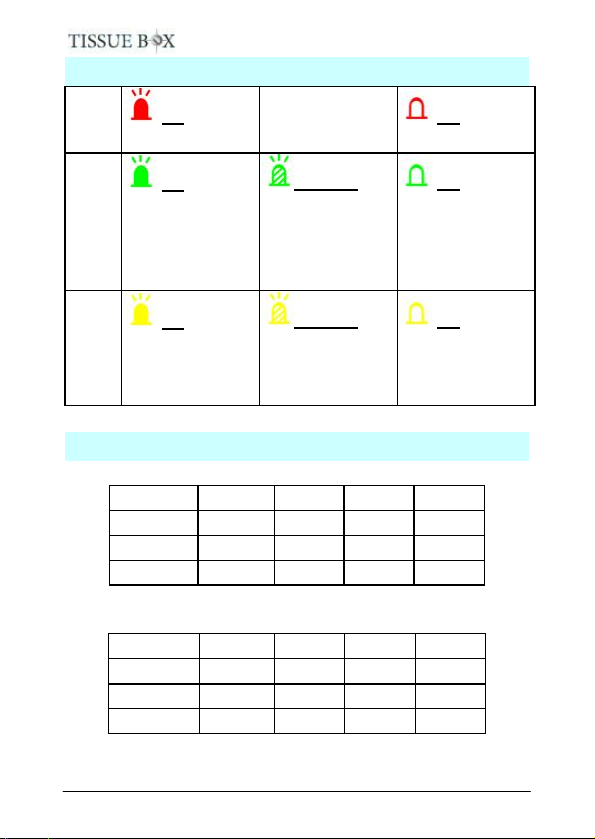
LED status
Red
LED
On
Power on
X
Off
Power off
Green
LED
On
System ready, SD
card normal, and
has schedule
Blinking
System and SD
card normal, but
doesn’t have
schedule
Off
System not ready
or SD card
abnormal
Yellow
LED
On
Battery charging
Blinking
Running out of
battery, please
charge it
Off
Battery not
charging
Recording Duration
NTSC @ 30 fps (unit: hour) * 1280x720 is optional
NTSC
1GB
4GB
8GB
16GB
1280x720
0.59
2.38
4.77
9.54
720 x 480
2.00
7.99
15.98
31.96
320 x 240
4.13
16.52
33.04
66.08
PAL @ 25 fps (unit: hour) * 1280x720 is optional
PAL
1GB
4GB
8GB
16GB
1280x720
0.71
2.86
5.72
11.45
720 x 480
2.39
9.58
19.17
38.35
320 x 240
4.95
19.82
39.64
79.29
* The recording duration may different from image complication and frame
rate setting
Page 12
- 11 -
The most frequent use and important functions
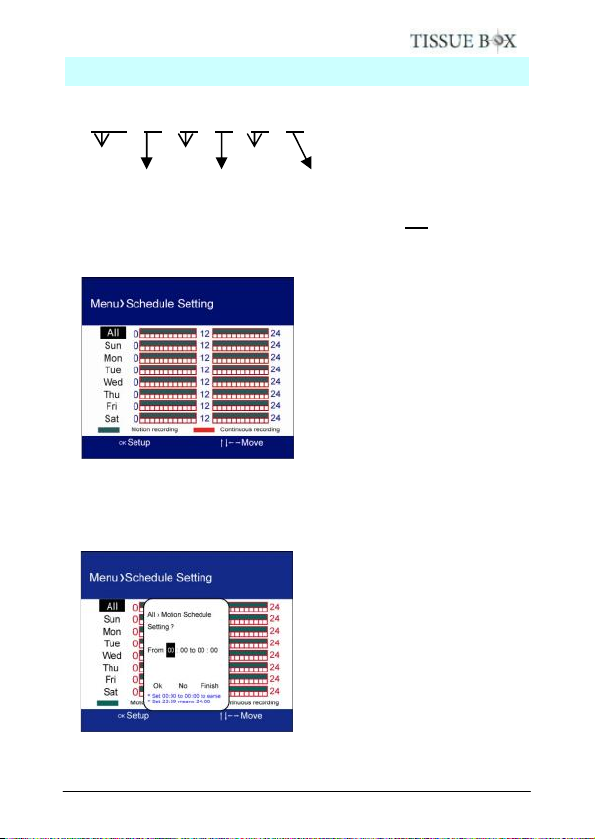
File name explanation
T 2008 09 26 14 19 20 .AVI
To turn off date/time display on screen
System Setting > Date/Time > Stamp Format > Off
To set schedule
Default of schedule is All motion activate.
All means whole week from Sunday, Monday, to Saturday. You
can simply set “All” and it will apply to whole week, or you can
set certain schedule of an individual day. Just press “OK” on the
day to settle the interval.
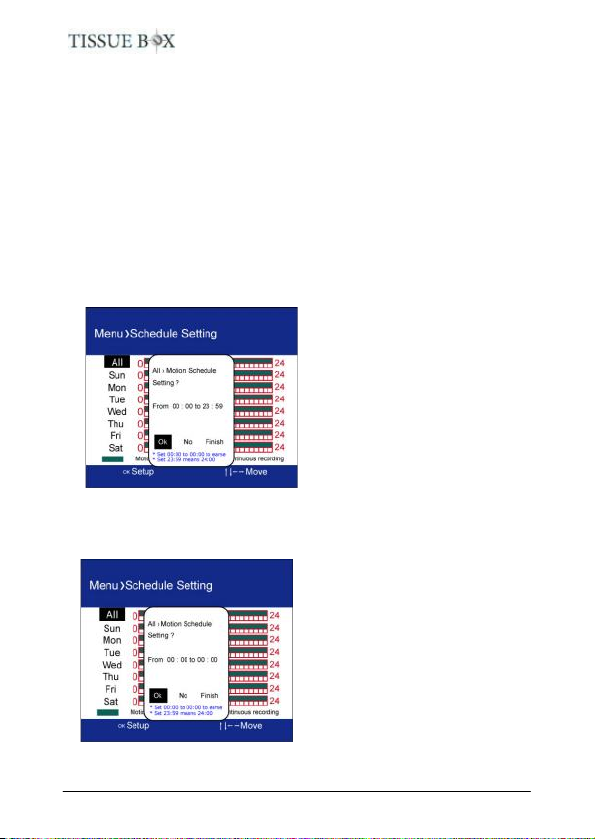
“OK”: To confirm the interval setting, and it will go to next
interval for the same date and same recording method.
Hour
Minute
Year
Date
Month
Second
Page 13
- 12 -
“NO”: Go to next schedule setting without saving the current interval
Schedule setting order:
1. All > Motion → All > Continuous (end)
2. Sun > Motion → Sun > Continuous → Mon > Motion → Mon >
Continuous → Tue > Motion → … Until Sat > Continuous (end)
“Finish”: To escape schedule s etting. Or you can press “Esc”
button on remote control, too.
To set interval up to 24:00
This recorder does not have 24:00 in the schedule setting. For
interval end with 24:00, please set 23:59 instead.
To delete schedule
In motion/continuous recording, if the interval is from 00:00 to
00:00, and select “OK”, then the interval will be canceled ( erase).
* We recommend user to erase the schedule before settling.
Page 14

- 13 -
FAQ
Q1. What player software should I use to playback the
recording files?
Ans. “Media Player Classic ” is most recommended, and can be
downloaded freely at http://ftp.freenet.de/pub/filepilot/windows
/multimedia/video/k-lite_codec_pack/klcodec425f.exe. If you
use “Windows Media Player” you may need to install mpeg -4
decoder. A lot more other mpeg -4 capable player can
playback the record files, such as VLC, Storm Video
Codec, …etc.
Q2. How long can date/time last witho ut outer power supply?
Ans. RTC battery can last for 3 months without power supply
(including battery power supply)
Q3. Why cannot I power on the device?
Ans. 1. Make sure the clear plastic protecter of remote control
has been removed.
2. Make sure the battery is well placed and has enough
power inside.
3. When you use the remote control, make sure it facing to
the device, the side with reference dot on the bottom.
* Please press Menu or Playback key, or power off the board
before taking away the SD /microSD card.
Page 15
- 14 -
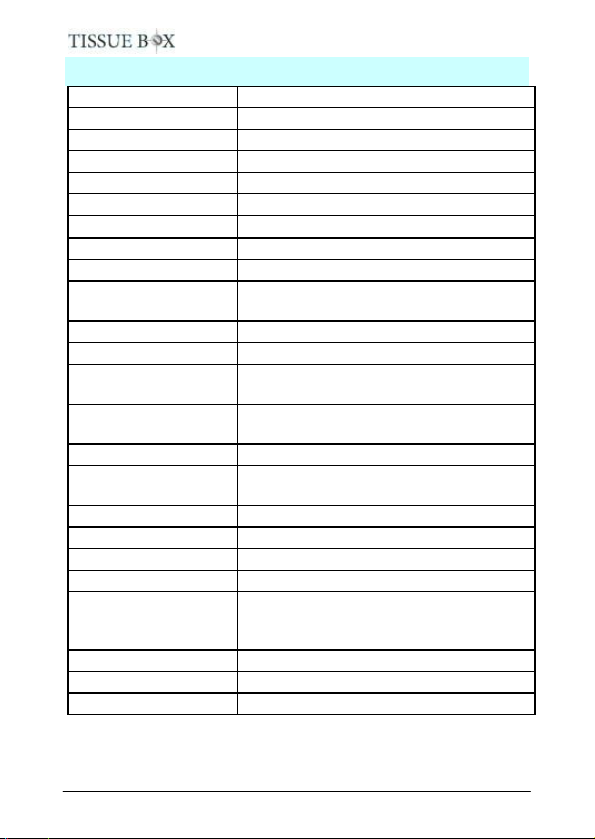
Specifications
Video system
NTSC / PAL
Compression
MPEG-4
Video resolution
1280x720 (option) / 720x480 / 320 x 240
Recording frame rate
1, 2, 3, 5, 13/15, 25/30 fps
Image Sensor
1/3” CCD Interline Transfer Type
Resolution
420 TVL
Lens/ View Angle
2.5mm F2.0/ 104° (horizontally)
Sense-Up
256X
Video size
Approx. 2 hours for 1GB (@720x480)
Recording mode
Manual, Schedule continuous, Schedule
motion
Audio recording
Yes (Optional)
A/V connection
RCA composite AV output
Power supply
Changeable and rechargeable 3.7V
4800mAh Li-polymer battery
Storage Media
SD card (1G to 16G, SDHC Class 6 is
most recommended)
Control
IR remote control
LED indicator
Red, Yellow, Green, can be on/off via IR
remote control
Buzzer
Can be on/off via IR remote control
Date/time stamp
Yes, position adjustable
Power failure
Auto Recovery
Firmware
Upgradeable, through SD Card
Current consumption
Operation mode : 220mA
Standby mode : 210mA
Sleep mode : <10mA
Operation temp.
+0~+50°C
Dimension
135(L)x135(W)x128(H) mm
Weight
550g (w/o battery and tissue paper)
* If there is no schedule and external trigger deactivated, the
board will enter sleep mode after 30 seconds without
control.
Page 16
- 15 -
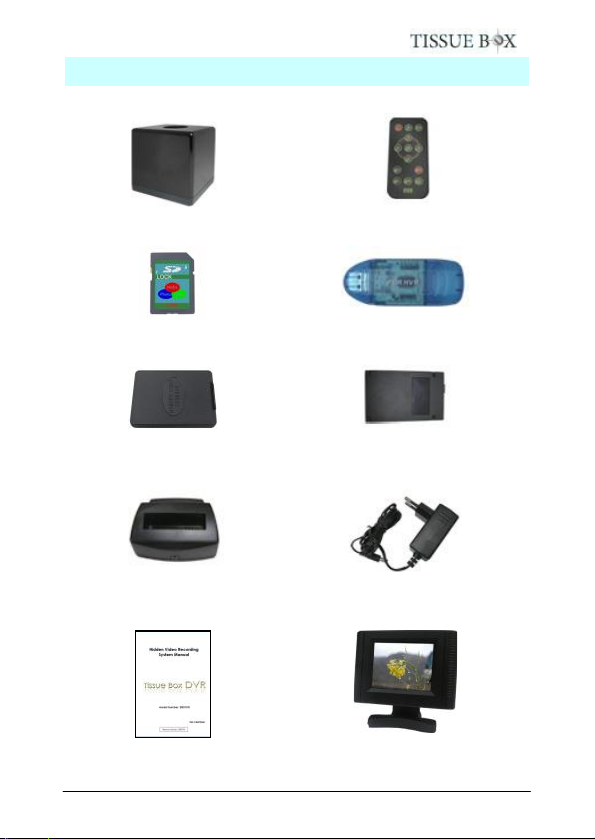
Accessories
Tissue Box
IR remote control
SD card
SD card reader
Memory card holder
3.7V 4800mA Li-polymer
battery
Charger cradle for Li-polymer
battery
5V 1.2A power adapter
(For charger cradle)
User manual
Well-placed angle 2.5” LCD
(optional)
 Loading...