

Tisira TFGC919X User Manual

.
pg 1
tisira | www.tisira.com
USER MANUAL
UPRIGHT COOKER
TFGC919X
IMPORTANT // Please ensure that you read through this user manual prior to installation and use. This
manual contains important information to ensure optimal performance and keep you safe. Please retain your
proof of purchase, as this will be required in the event that you require warranty service. Remember to retain
this manual for future reference.
www.tisira.com

.
pg 2
www.tisira.com | tisira
CONGRATULATIONS ON THE SELECTION OF THIS TISIRA APPLIANCE. TISIRA
APPLIANCES HAVE BEEN SPECIFICALLY DESIGNED FOR AUSTRALIAN AND
NEW ZEALAND KITCHENS.
Please read through this user manual carefully as it contains information that
will ensure that your appliance is installed correctly, important operating &
care instructions and also some advice of what you need to do if this appliance
is not performing as intended.
HELLO

.
pg 3
tisira | www.tisira.com
CONTENTS
HELLO 2
CONTENTS 3
WARNINGS 4
OPERATING INSTRUCTIONS 5-16
MAINTAINING YOUR COOKER 17-19
INSTALLATION 20-23
CONNECTIONS 24-26
PRODUCT SPECIFICATIONS 27
TROUBLE SHOOTING 28-29
PROOF OF PURCHASE 30
NOTES 31
CONTACT DETAILS 32

.
pg 4
www.tisira.com | tisira
WARNING & SAFETY
INFORMATION
• DO NOT MODIFY THIS APPLIANCE.
• DO NOT SPRAY AEROSOLS IN THE
VICINITY OF THIS APPLIANCE WHILE IT
IS IN OPERATION.
• DO NOT STORE OR USE FLAMMABLE
MATERIALS IN THE APPLIANCE
STORAGE DRAWER OR NEAR THIS
APPLIANCE.
• DO NOT FOR USE IN MARINE CRAFT,
CARAVANS OR MOBILE HOME.
(UNLESS EACH BURNER IS FITTED
WITH A FLAME SAFEGUARD)
• WHERE THIS APPLIANCE IS
INSTALLED IN MARINE CRAFT OR IN
CARAVANS, IT SHALL NOT BE USED AS
A SPACE HEATER.
• Servicing should be carried out only by
authorised personnel.
• Do not remove the plug by pulling the
cable.
• In order to prevent accidental tipping
of the appliance, for example by a child
climbing onto the open oven door, the
anti-tilting chain must be installed.
Refer to the instructions on page 15.
• To avoid burns, young children should
be kept away.
• This appliance is not intended for use
by persons (including children) with
reduced physical, sensory or mental
capabilities, or lack of experience and
knowledge, unless they have been given
supervision or instruction concerning
use of the appliance by a person
responsible for their safety.
• Children should be supervised to ensure
that they do not play with the appliance.
• Accessible parts may become hot when
the grill is in use. Children should be
kept away.
• Very important: keep this instruction
booklet with the appliance for handy
references
• This appliance is designed for domestic
use only.
• Keep packaging out of reach of children
at all times.
.
pg 5
tisira | www.tisira.com
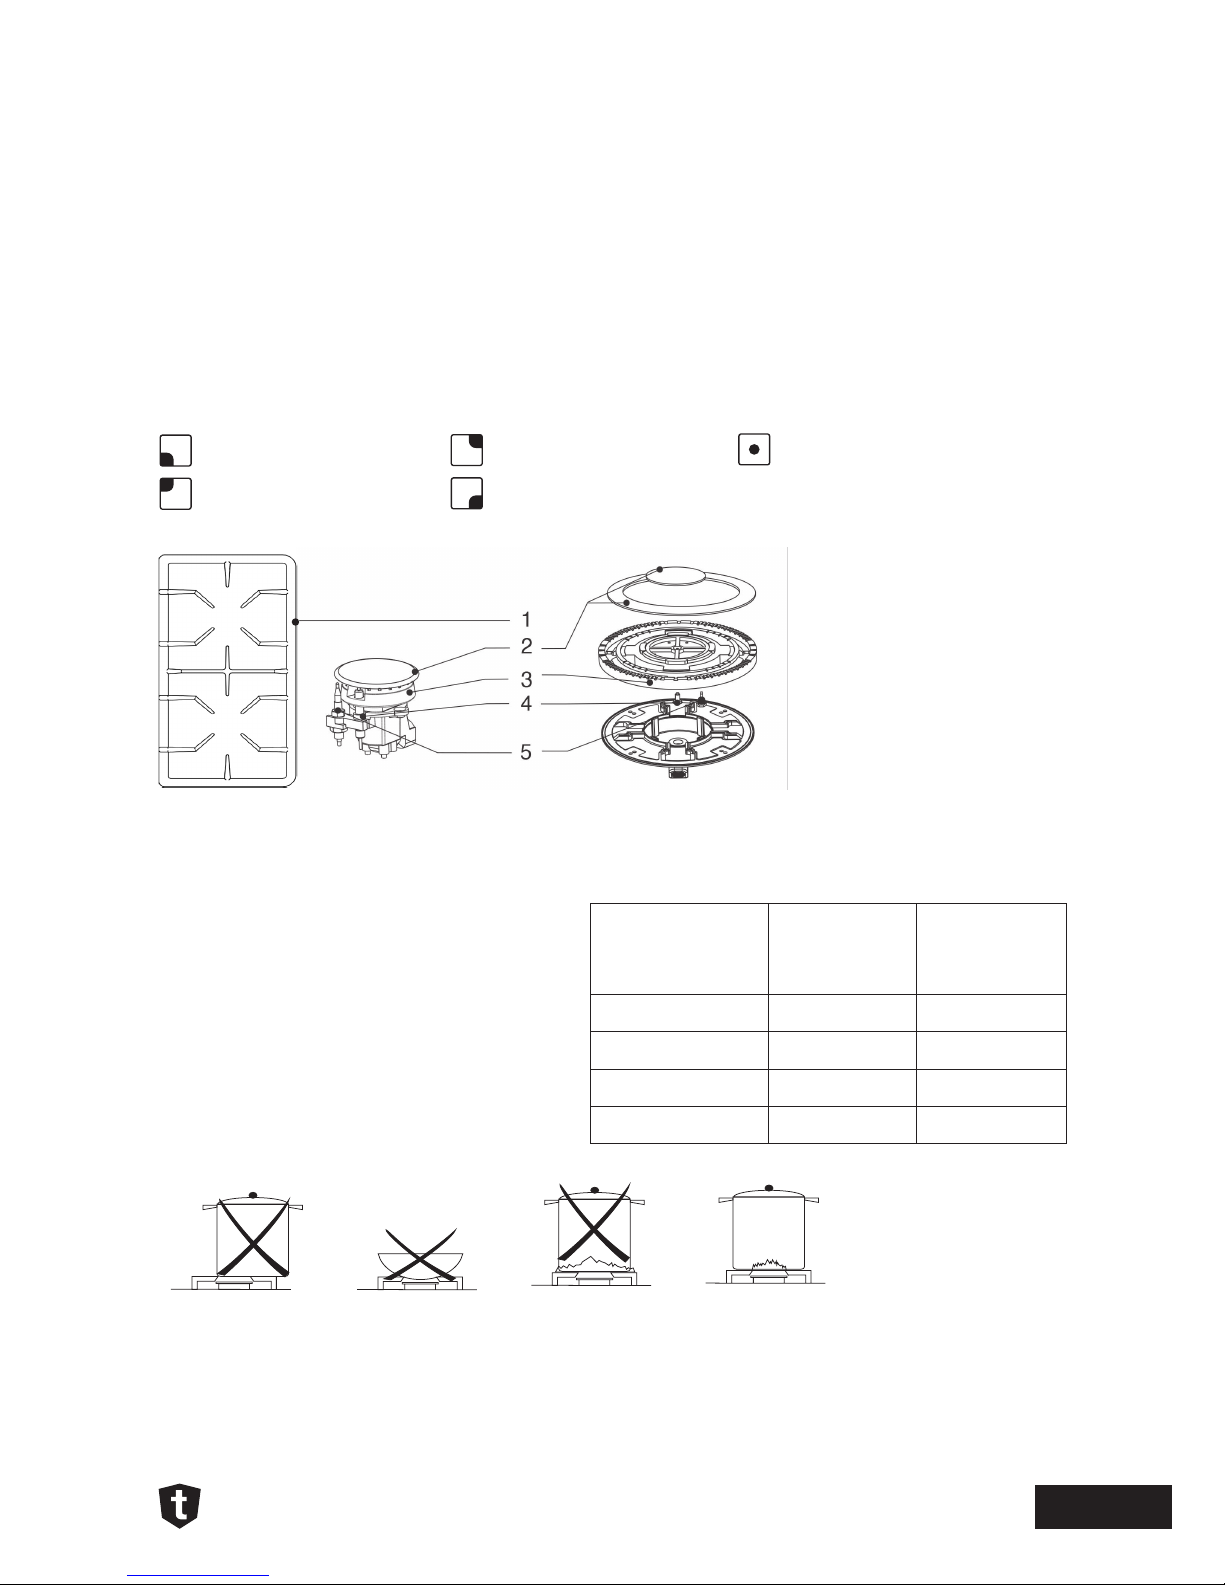
1. Trivets
2. Burner Cap
3. Diffuser
4. Ignition Candle
5. Flame Failure Device
OPERATING
INSTRUCTIONS
DESCRIPTION OF SYMBOLS
Front Left Burner
Rear Left Burner
Rear Right Burner
Front Right Burner
Central Burner
INSTRUCTIONS FOR USE OF COOKTOP
USE THE CORRECT COOKWARE
Burner
Min Ø
Saucepan
(mm)
Max Ø
Saucepan
(mm)
Auxilary 80 160
Semi-rapid 120 200
Rapid 200 230
Wok-Burner 230 260
1. Cookware should be centralised on the
burner when in use.
2. Do not use round bottomed pans (e.g.
woks) without appropriate wok support
recommended by the manufacturer.
3. Adjust the flame according to the size of
your cookware, not allowing the flame
to extend past the edge of the pan.
.
pg 6
www.tisira.com | tisira
OPERATING
INSTRUCTIONS
3
1
2
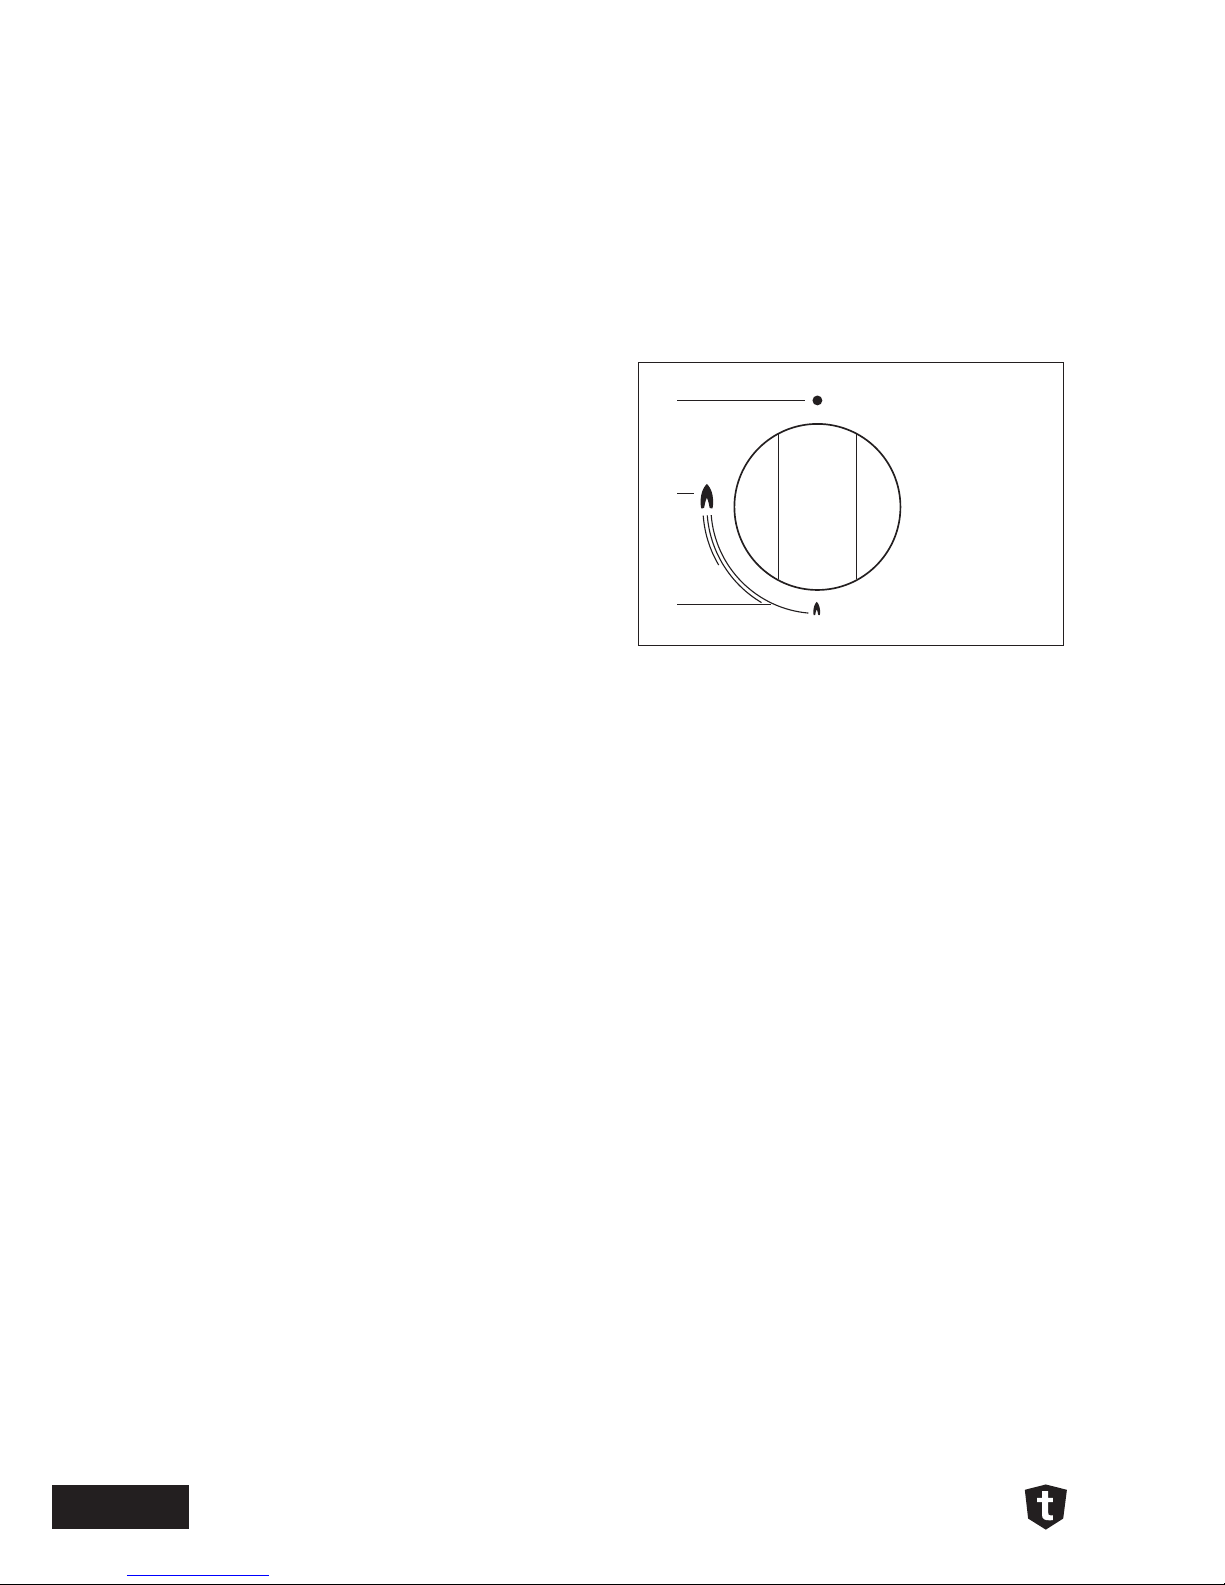
1. Off
2. High Flame
3. Low Flame
1. To ignite a burner, push in the knob and
rotate anti-clockwise to the High Flame
symbol.
2. Keep the knob depressed for 3-4
seconds to ensure that the flame
failure device keeps the burners lit.
3. Adjust the heat level by rotating the
knob between the Low Flame and High
flame symbols.
4. To turn the burner off, rotate the knob
clockwise to the Off symbol.
IGNITION AND OPERATION OF THE BURNERS
When the burners are lit check that the
flame is always regular. Before removing
the saucepans turn the burners off.
There shall be adequate ventilation of the
room when a rangehood is used at the same
time as appliances burning gas. When a
rangehood is not in use, ensure that natural
ventilation outlets are open.
Be careful not to place saucepans with
unstable or deformed bottoms on the
burners to avoid overturning or spilling.
If a burner shuts off accidentally, turn off
at the control knob and wait at least one
minute to re-ignite it.
.
pg 7
tisira | www.tisira.com
INSTRUCTIONS FOR USE OF OVEN
ADJUSTING THE SHELF/TRAY
POSITION
When adjusting or positioning your shelf,
please ensure the following:
1. Ensure that the shelf / tray is located
between the two wire sideracks. (See
point 1)
2. The shelf stops should be facing
downwards and towards the rear. (See
point 2)
3. The guard rail should always be located
at the rear of the oven (See point 3)
BEFORE USING THE OVEN FOR THE
FIRST TIME:
NOTE // After connecting the unit to the
power, “12:00” is displayed on the digital
timer but the time still needs to be set for the
oven to work. Please refer to pages 10 and 11
for instructions on how to set the time.
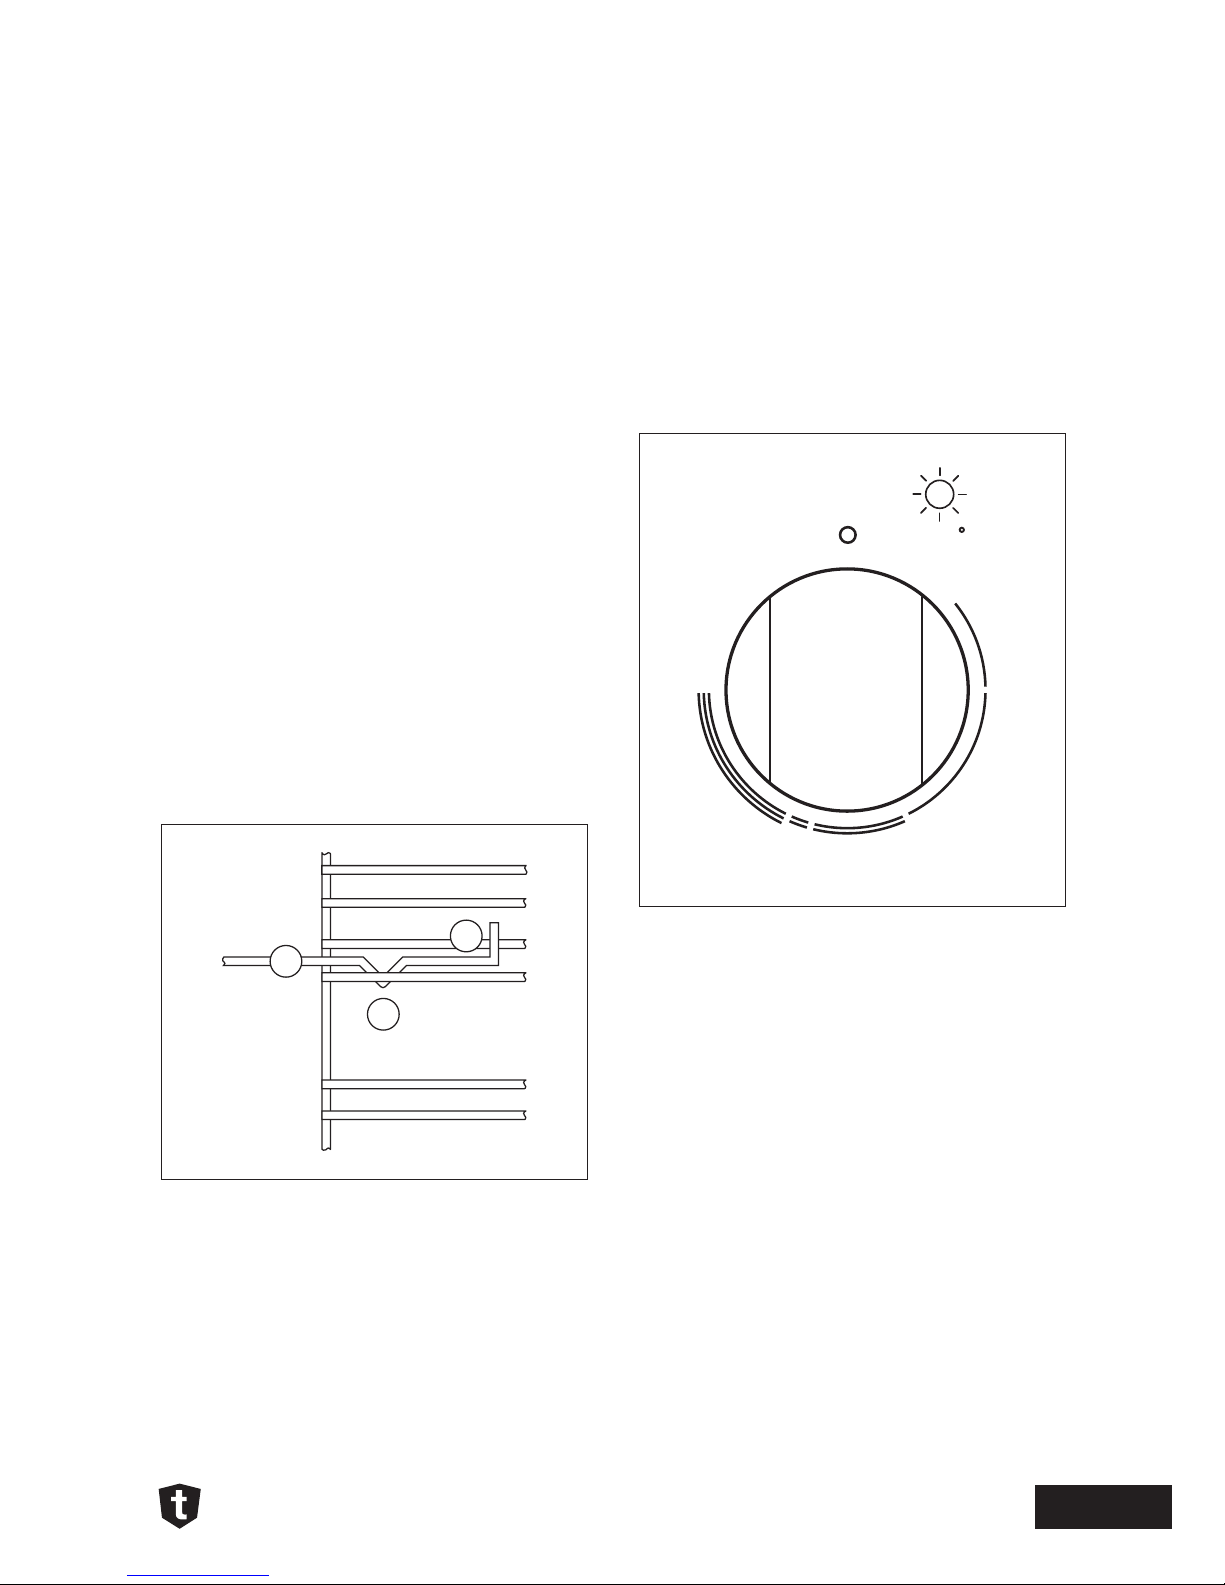
USING THE THERMOSTAT CONTROL
Thermostat Control
• Set the temperature by turning the
thermostat control to the desired level.
• When a temperature is selected,
thermostat light will illuminate.
• When the selected temperature is
reached, the light will turn off.
ATTENTION // During use, the appliance
becomes hot. Care should be taken to avoid
touching heating elements inside the oven.
NOTE // Never line the oven with
aluminium sheets as this can cause
damage to the enamel.
OPERATING
INSTRUCTIONS
150
200
100
50
MAX
180
C
1
3
2
.
pg 8
www.tisira.com | tisira
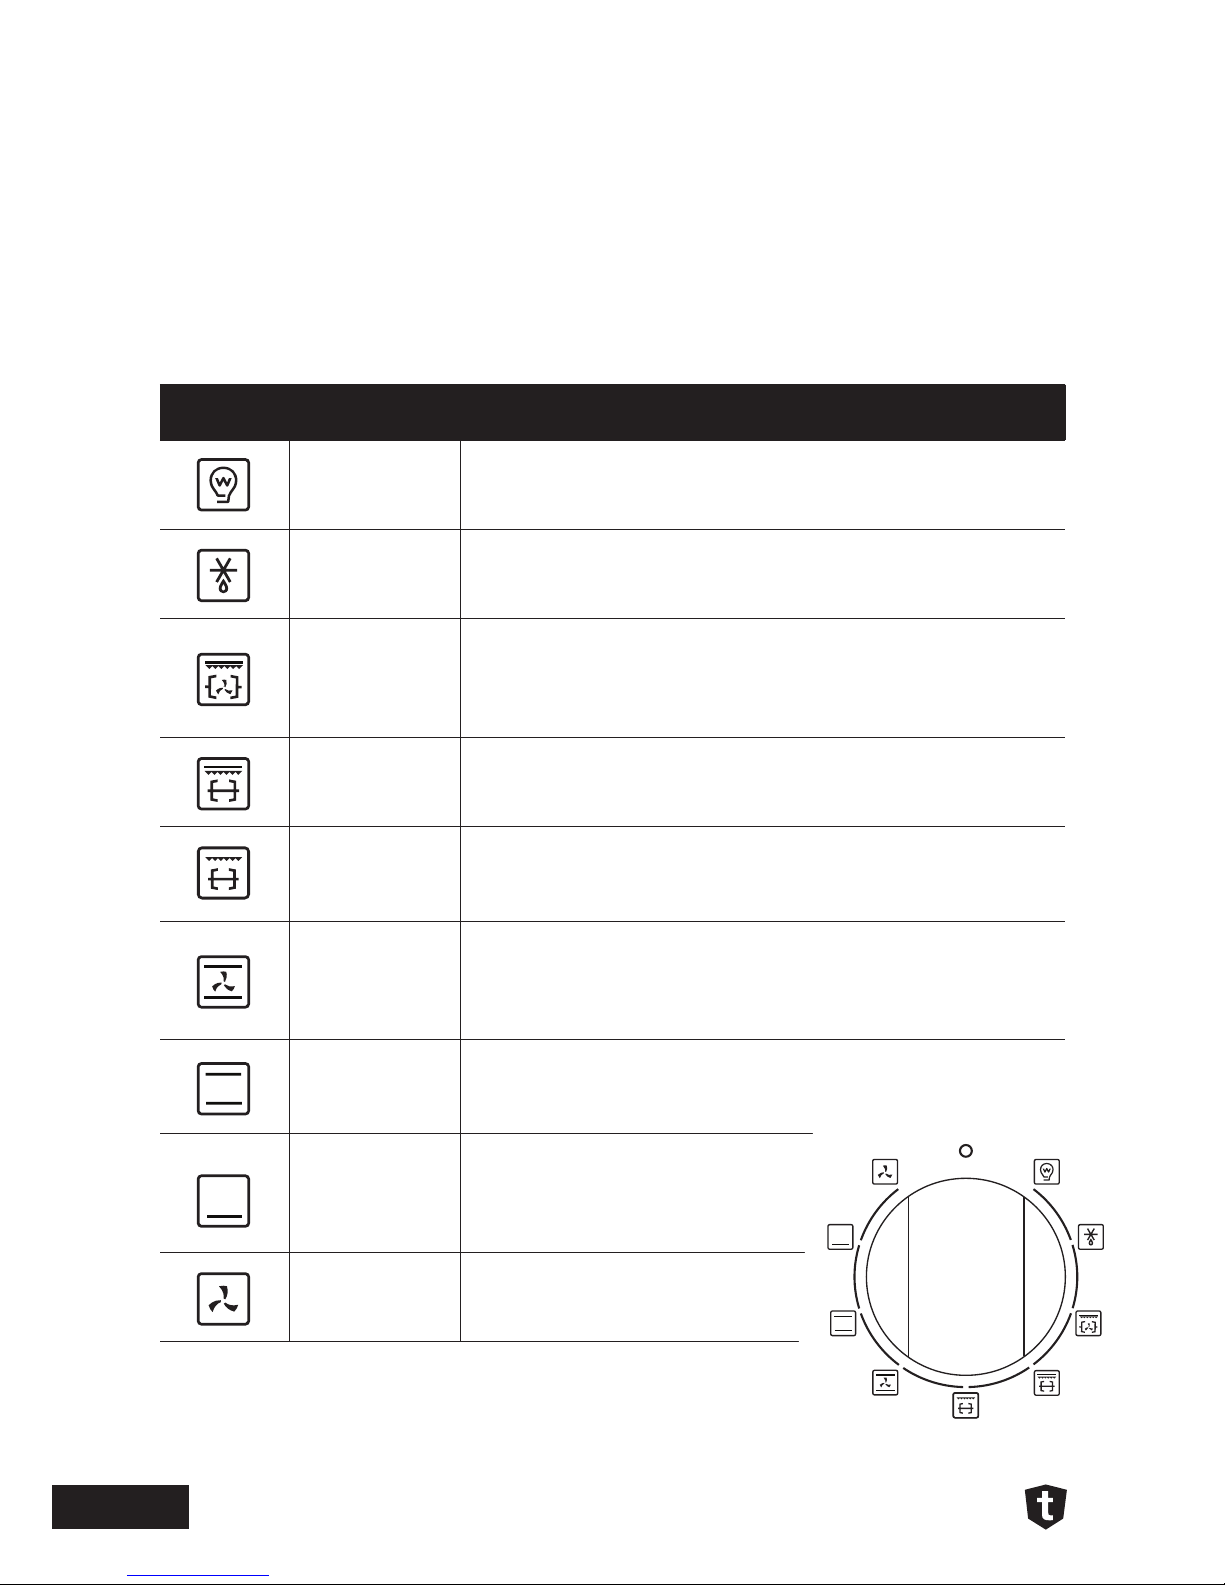
USING THE OVEN FUNCTION SELECTOR
SYMBOL FUNCTION USE
Light
The light mode can be turned on with no heating elements and will
turn on with all oven functions.
Defrost
Defrost mode distributes air at ambient temperature inside the oven
to defrost food quickly and without protein adulterations.
Fan-Assisted
Gril
Fan-assisted Grill mode uses the grill element and oven fan to cook
meats, vegetables and poultry. In this mode, heat is radiated down
then spread throughout the oven. To achieve the best results, use
the middle tray position.
Double Grill
Double Grill mode should be used when maximum grill heat is not
required.
Grill
Grill mode should be used for melting cheese, toasting & browning.
Five minutes preheating is required to heat the element. Use the
upper shelf position for best results.
Fan-Assisted
Convection
Fan-assisted convection mode is ideal for delicate foods such as
desserts. In this mode, the oven uses the oven fan, bottom and top
elements. It is recommended to use the lower shelf position with this
mode.
Natural
Convection
Natural Convection mode utilises the top and bottom elements. This
function is recommended for use with the middle shelf position and
is good for slow cooking casseroles, etc.
Bottom Element
Bottom Element mode is recommended
for cooking pastry based dishes (flans,
quiches and tarts) that require more
heat and radiation from below.
Fan-Forced
Fan-forced mode cooks foods placed
on up to 2 different shelves.
OPERATING
INSTRUCTIONS
.
pg 9
tisira | www.tisira.com
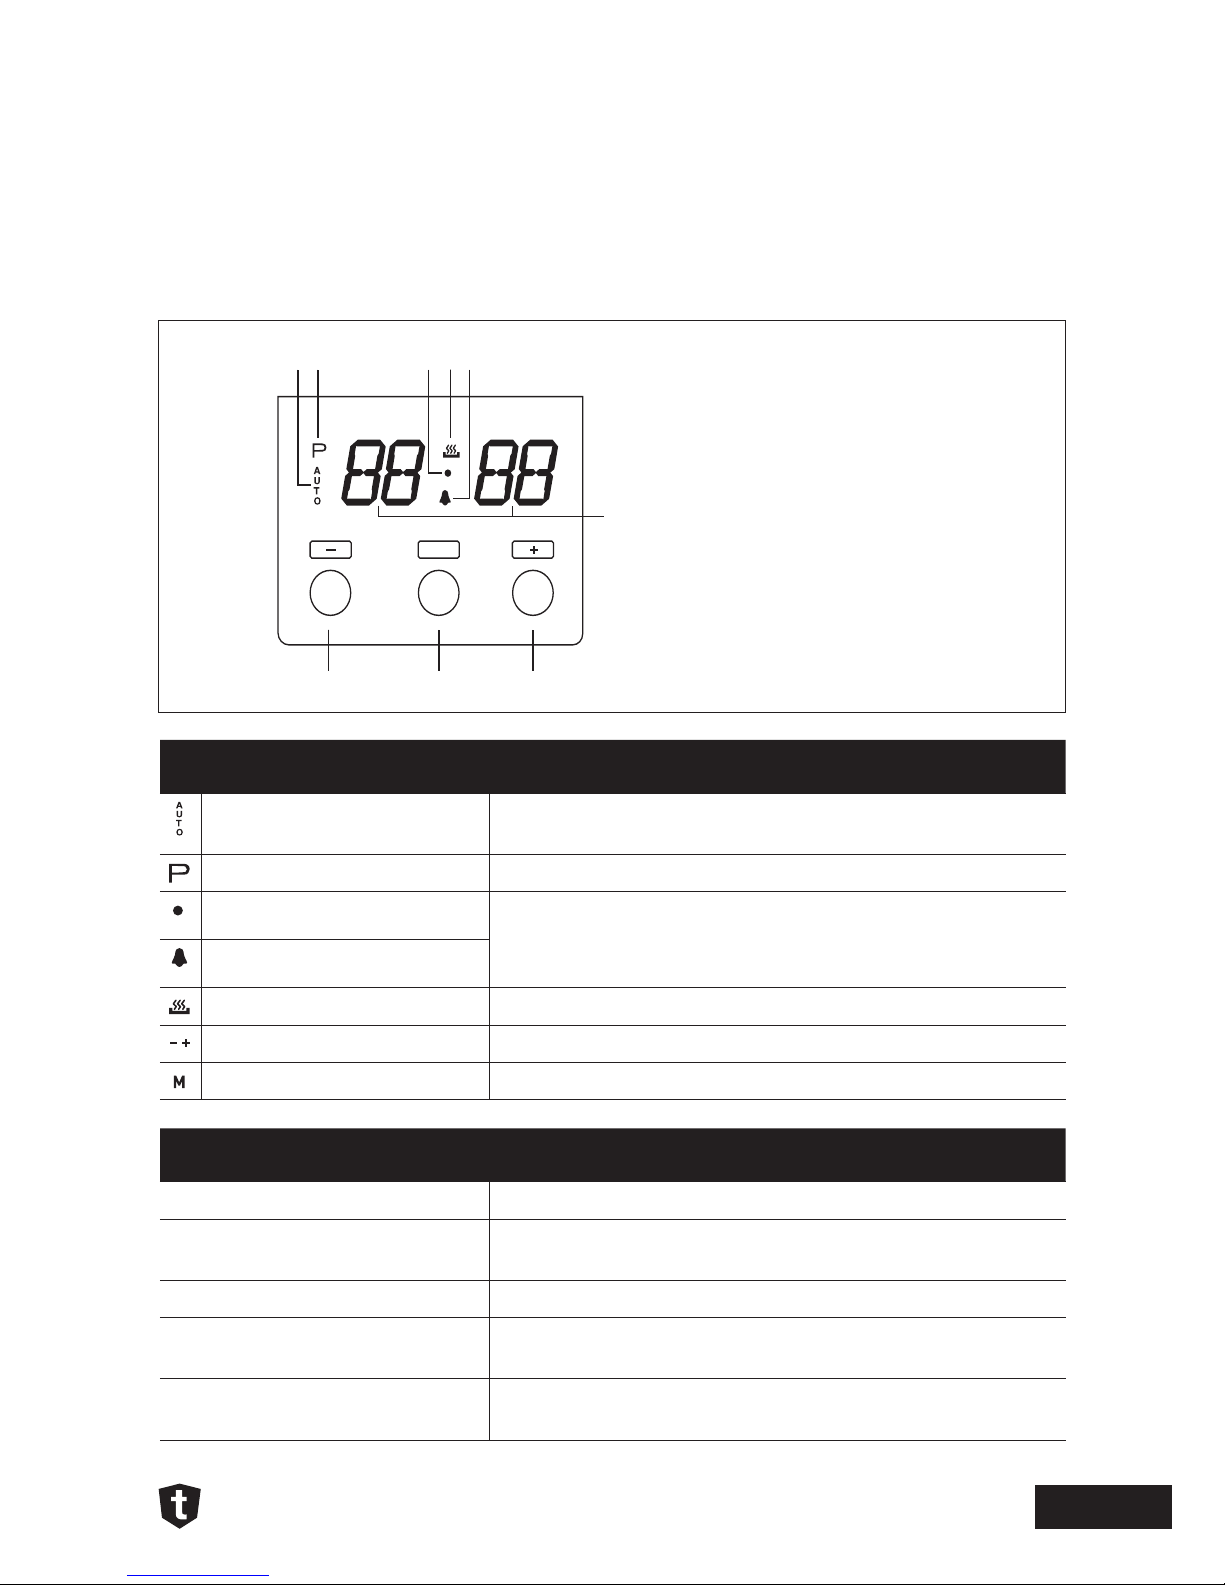
Icon Function
Auto-programming icon Flashes when setting an automatic program, and at the
end of an automatic program
Time-setting icon Flashes when setting the time
Seconds icon Flashes in the time setting or alarm setting mode
Alarm icon
Ready-to-use icon Displays the status of the oven
Decrease and Increase keys Used to increase or decrease time
Mode key Used to change between program modes
Term Meaning
Present time Current 24-hour time at location (Eg. 12:00)
Cooking time Duration of oven cooking time (Eg. 0:10 = 10 minutes
cooking time)
End time The time at the end of the cooking (Eg. 12:10)
Automatic mode Sets the duration of the cooking time, beginning at 0:00
(0:01 = 1 minute)
Semi-automatic mode Sets the end time, beginning with the present time (24
hour time / 0:00 – 23:59)
7
1 2 3 4 5
6
8 9
M
1. Auto-Programming icon
2. Time-setting icon
3. Seconds icon
4. Ready-to-use icon
5. Alarm icon
6. Number display
7. Decrease key
8. Mode key
9. Increase key
DIGITAL TIMER
OPERATING
INSTRUCTIONS
.
pg 10
www.tisira.com | tisira
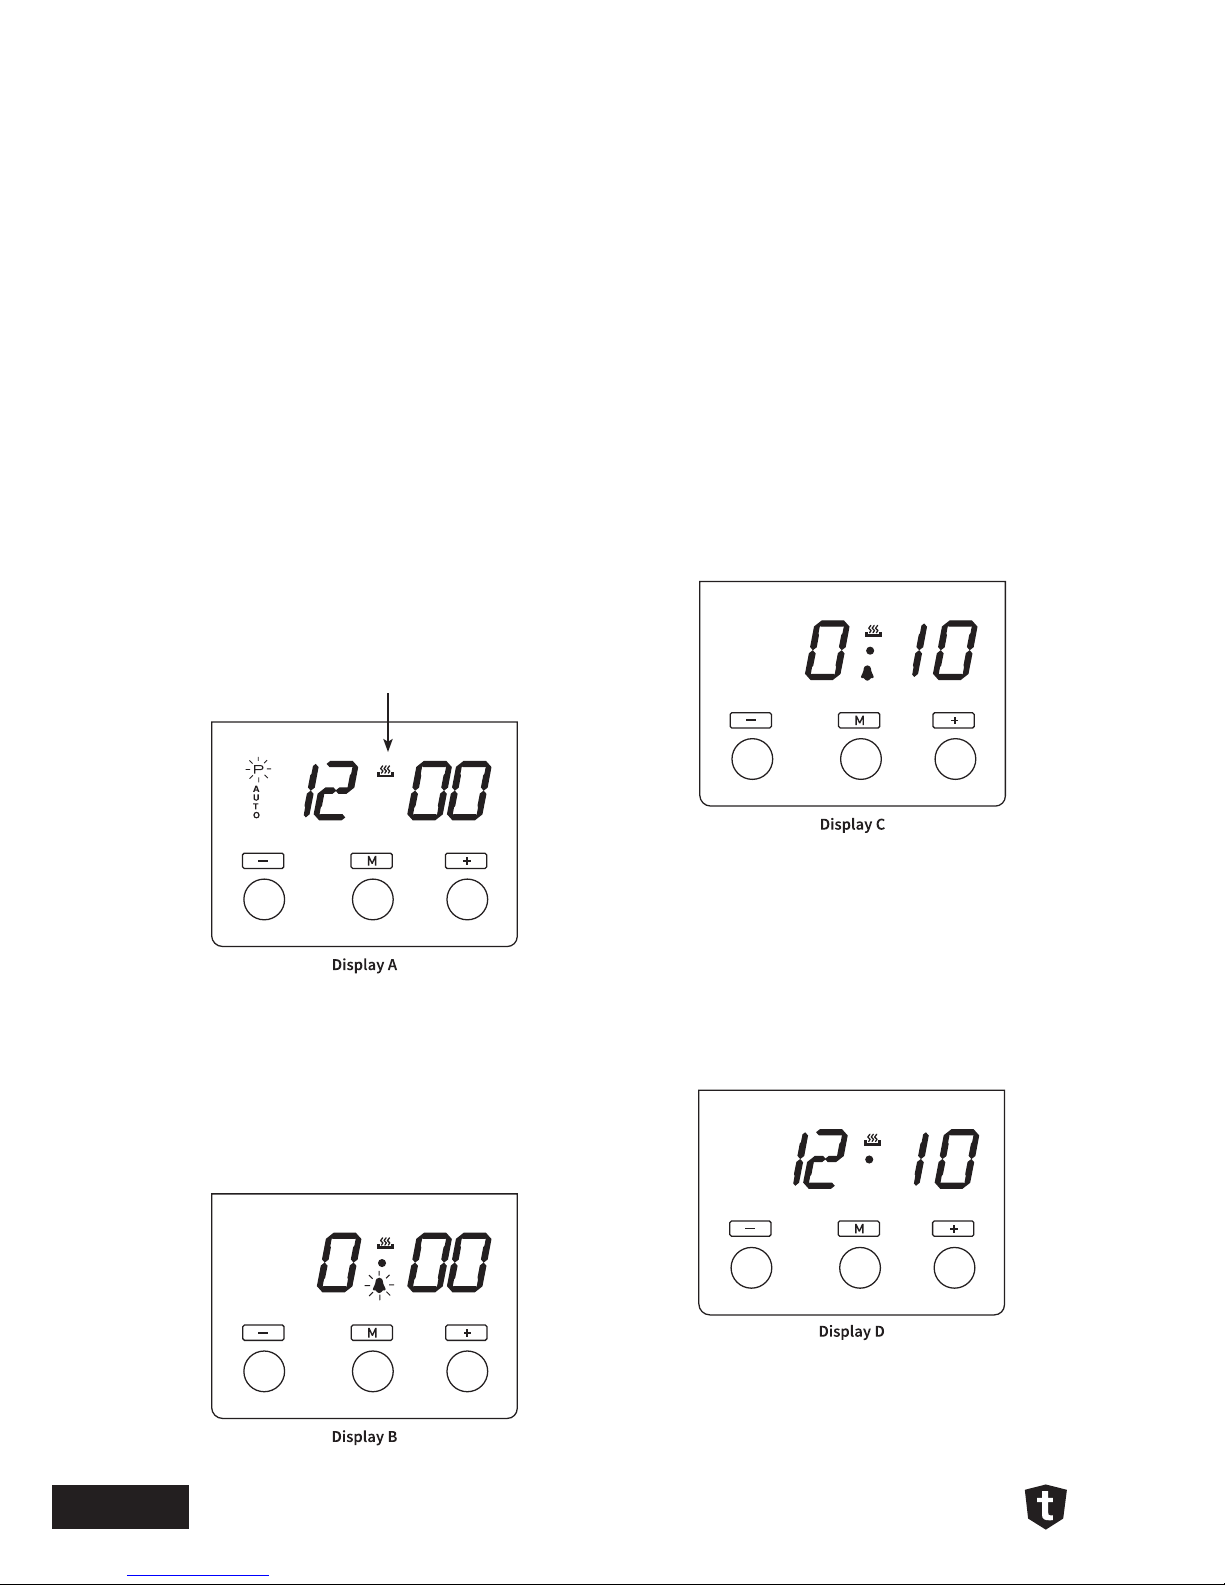
USING THE OVEN TIMER
TIME SETTING
1. Once the oven has been turned on,
’12:00’ is displayed but the ready-to-use
icon may not be displayed.
2. Press ‘-‘ or ‘+’ to set the present
time, or press the mode key to enter
the present working mode. The relay
contact is now connected and the
ready-to-use icon will be displayed (A).
ALARM FUNCTION
To independently set the alarm:
1. Press the mode key once, and the alarm
icon will flash (B)
2. Press ‘-‘ or ‘+’ to adjust the alarm
clock time setting (0:01 = 1 minute). A
few seconds after the time has been
set, the alarm setting will apply and
a countdown will begin from the set
alarm time. (C)
3. Once the alarm program has ended,
the alarm icon will flash and the buzzer
will sound. Press any key to stop the
sounding of the alarm, otherwise, it will
turn off automatically after 2 minutes
and the display will return to the
present time (D).
OPERATING
INSTRUCTIONS
 Loading...