

Tisira TDW9AX, TDW12AX User Manual

USER MANUAL
DISHWASHER
TDW9AX | TDW12AX
IMPORTANT // Please ensure that you read through this user manual prior to installation and use. This
manual contains important information to ensure optimal performance and keep you safe. Please retain your
proof of purchase, as this will be required in the event that you require warranty service. Remember to keep
this manual for future reference
www.tisira.com
Version 4.3

Page 2
Dishwasher User Manual
CONGRATULATIONS ON THE SELECTION OF THIS TISIRA APPLIANCE. TISIRA
APPLIANCES HAVE BEEN SPECIFICALLY DESIGNED FOR AUSTRALIAN AND NEW
ZEALAND KITCHENS.
Please read through this user manual carefully as it contains information that will ensure
that your appliance is installed correctly, important operating & care instructions and
also some advice of what you need to do if this appliance is not performing as intended.
Hello

Dishwasher User Manual
Page 3
Hello 2
Contents 3
Warning & Safety Instructions 4-5
Product Overview 6
Operating Instructions 7-18
Maintenance and Cleaning 19-21
Installation 22-24
Troubleshooting 25-28
Notes 29
Contact Details 32
Contents

Page 4
Dishwasher User Manual
IMPORTANT // To ensure best performance, avoid risk of damage or accidents.
Please read the operating instructions prior to rst time use.
Grounding Instructions
• This appliance must be grounded. In the
event of a malfunction or breakdown,
grounding will reduce the risk of an electric
shock by providing a path of least resistance
of electric current. This appliance is equipped
with a cord having an equipment grounding
conductor and a grounding plug.
IMPORTANT // Check with a qualified
electrician or service representative if
you are in doubt whether the appliance is
properly grounded.
• The plug must be plugged into an
appropriate outlet that is installed and
grounded in accordance with all local
codes and ordinances.
• DO NOT modify the plug provided with the
appliance; If it does not t the outlet, have
a proper outlet installed by a qualied
electrician.
WARNING // Improper connection of the
equipment-grounding conductor can result
in the risk of an electric shock.
Correct Application
• This appliance is designed for domestic
use and similar applications such as: sta
kitchens in oices and other working
environments; farm houses; by clients in
hotels, motels and other residential type
environments; bed and breakfast type
environments.
• This appliance is not suitable for outdoor
use.
• Open the door very carefully if the dishwasher
is running to avoid the risk of water leaking.
• Do not stand or place heavy objects on
the door when open as this will cause the
dishwasher to tip forward.
• Do not touch the heating element during or
immediately aer use.
• Dishes can be very hot immediately upon
completion of a cycle.
• Only use detergent and rinse aid
specically designed for an automatic
dishwasher. Never use soap, laundry
detergent or hand soap in your dishwasher.
• Do not use commercial or industrial
detergents as they may cause damage and
risk of chemical reaction.
• Avoid leaving the door open as this could
present a tripping hazard.
• This appliance is not intended for use by
persons (including children) with reduced
physical, sensory or mental capabilities,
or lack of experience and knowledge,
unless they have been given supervision or
instruction concerning use of the appliance
by a person responsible for their safety.
• Please dispose of packaging material
appropriately.
Warning & Safety Instructions

Dishwasher User Manual
Page 5
Warning & Safety Instructions
Safety with Children
• Young Children should not use this
appliance.
• Children should be supervised to avoid
the risk of locking themselves in the
dishwasher.
• Dishwasher detergents are strongly
alkaline. They can be extremely dangerous
if swallowed. Avoid contact with the skin
and eyes, and keep children away from the
dishwasher when the door is open. Check
that the detergent receptacle is empty aer
completion of the wash cycle.
• Consult a doctor immediately if your child
has swallowed or inhaled detergent.
Technical Safety Instructions
• Before installation, check for visible signs
of damage. Under no circumstance should
you use a damaged dishwasher.
• During installation, the power supply must
not be excessively or dangerously bent or
attened. DO NOT tamper with controls.
• This appliance is to be connected to the
water mains using new hose sets. Old hose
sets must NOT be reused.
• Do not operate your dishwasher unless all
enclosed panels are securely in place.
• If the power supply cord is damaged please
inform the manufacturer or service agent
to arrange replacement of the part to avoid
any hazards.
• There must be no electrical socket behind
the dishwasher as this can cause danger of
overheating and re risk if the dishwasher
were to be pushed against a plug.
• The dishwasher must not be installed
underneath a cooktop or next to an oven.
High temperatures can cause damage to
the Dishwasher.
• Unauthorised repairs could result in
unforeseen danger for the user, repairs
should only be undertaken by approved
service technicians.
• In areas, which may be subject to
infestation by cockroaches or other vermin,
pay particular attention to keeping the
surroundings clean. Any damage caused by
vermin will not be covered by warranty.
Page 6
Dishwasher User Manual
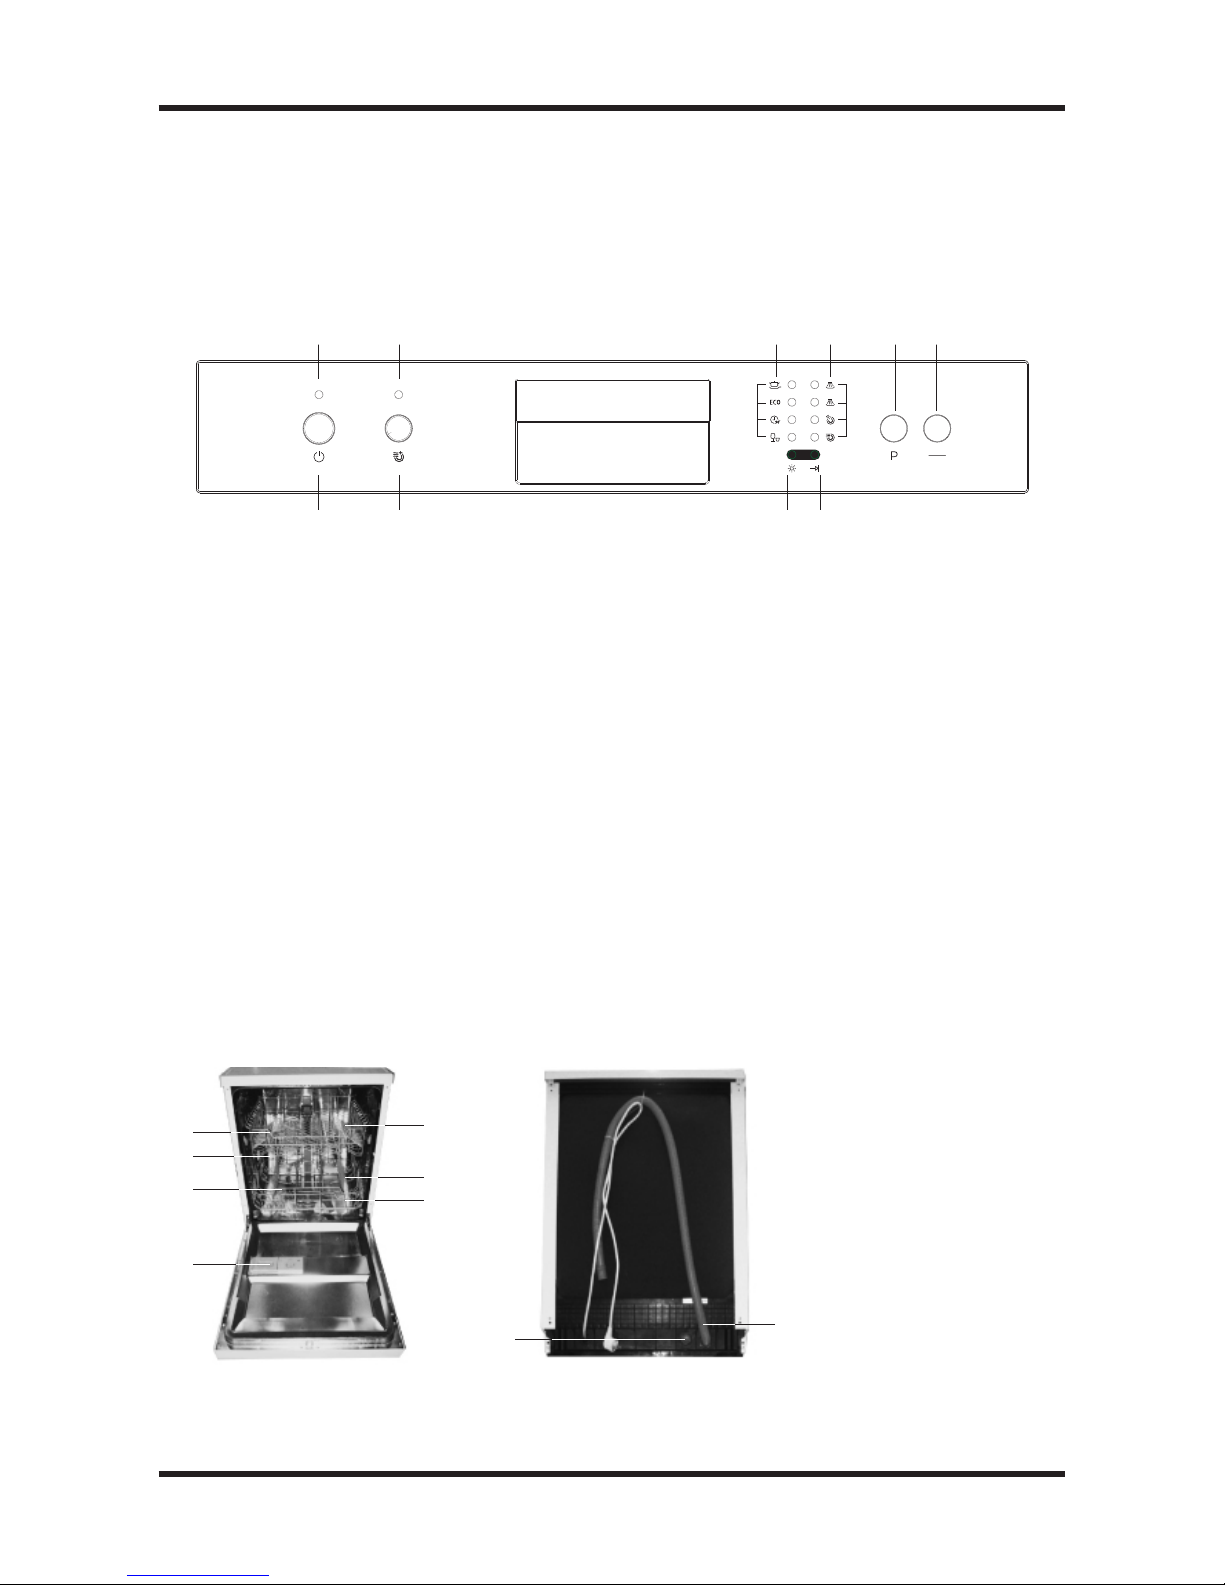
Product Overview
Control Panel
1. Power button: To turn the power supply
on/o
2. Extra Dry Function Button: To activate
the extra dry function
3. Rinse Aid re-ll indicator: To indicate
when the rinse aid dispenser needs to be
relled.
4. Cycle Finish – To indicate the end of a
cycle
5. Program button: To select a wash
program
6. Start/Pause Button: To start the selected
washing program or pause a washing
program when the dishwasher is in use
7. Power Indicator: To indicate the on/o
status of the dishwasher
8. Extra Dry Indicator: To indicate whether
the extra dry function is in use
9. Program Indicator: To indicate which
wash program is in use
A. Intensive
B. ECO
10. Washing Step Indicator: To indicate
which step the washing program is
currently functioning
A. Pre-wash
B. Wash
Front View Back View
Dishwasher Features
C. 90mins
D. Rapid
C. Rinse
D. Drying
Start
Pause
1
8
5
9
2
6
3
7
4
7
1
8
2
9
A A
B B
C C
D D
3 4
510 6
1. Upper Basket
2. Inner Pipe
3. Lower Basket
4. Detergent Dispenser
5. Cup Shelf
6. Spray Arms
7. Filter Assembly
8. Inlet Pipe Connector
9. Drain Pipe

Dishwasher User Manual
Page 7
Dishwasher check
Before operating the dishwasher, the
following should be checked:
• The dishwasher is level and xed
properly
• The inlet valve is open
• There is a leakage at the connections of
the conducts
• The wires are tightly connected
• The power is switched on
• The inlet and drain hoses are knotted
• All packing materials and printings
should be taken out from the dishwasher
Loading the Dishwasher Baskets
When loading items to be washed:
• Position sharp items so that they are not
likely to damage the door seal.
• Knives and other utensils with sharp ends
should be loaded in the basket pointing
down or placed in a horizontal position.
• Prevent plastic items from touching
the heating element, to avoid potential
melting.
• Make sure items are dishwasher safe.
• Remove any large amounts of leover
food before loading them.
NOTE // Very small items should not be
washed in the dishwasher as they can easily
fall out of the baskets.
• Items such as cups, glasses, pots, pans,
etc. should be placed upside down.
• Curved items, or those with recesses, should
be at a slant so that water can run o.
• Make sure items are securely positioned
and cannot tip over.
• Make sure items will not block the
rotation of the spray arms.
• To avoid damage to glasses, ensure
they are not touching other items in the
dishwasher.
NOTE // Do not load items that are dirty with
cigarette ashes, candle wax, lacquer or paint.
When buying new dishware, ensure they are
dishwasher safe.
NOTE // Do not overload your dishwasher.
There is only space for 9 or 12 standard
place settings, depending on the model
of your dishwasher. This is important for
good results and for reasonable energy
consumption.
Operating Instructions
IMPORTANT // Before using your dishwasher for the first time, please read
through these instructions as they contain important information on how to
operate your appliance correctly.
Page 8
Dishwasher User Manual
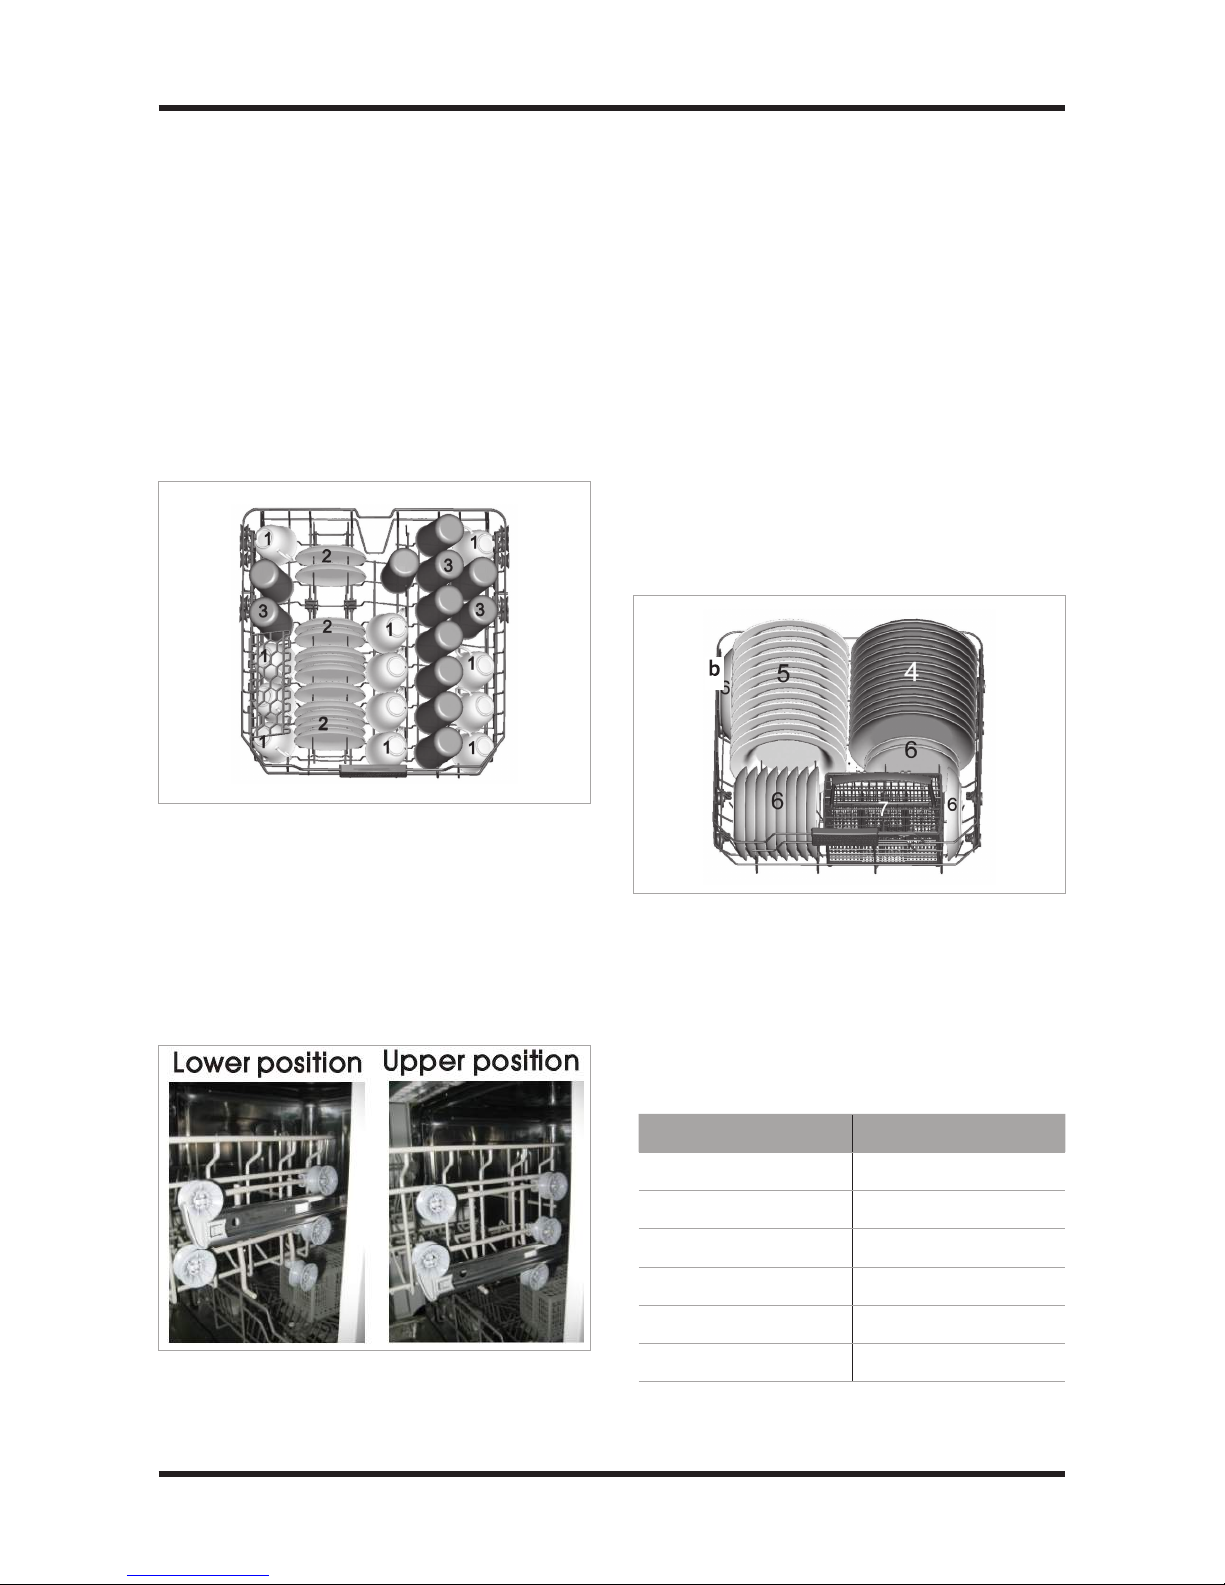
Upper Basket - 12 place model
The upper basket is designed to hold more
delicate and lighter dishware, such as
glasses, teacups, saucers, as well as plates,
small bowls and shallow pans.
The height of the upper basket can be
adjusted in order to create more space for
larger utensils, both for the upper and lower
baskets. The height can be adjusted by repositioning the wheels to the desired height
on the rails.
Long items such as serving cutlery, salad
serves and knives should be placed on the
cup shelf so that they do not obstruct the
rotation of the spray arms.
Lower Basket - 12 place model
The lower basket is designed to hold larger
items, which are most diicult to clean, such
as pots, pans, lids, serving dishes and bowls.
It is preferable to place serving dishes and
lids on the side of the racks in order to avoid
blocking the rotation of the top spray arm.
Please ensure to always place pots, serving
bowls, etc. upside down.
Type Item
1 Cups
2 Saucers
3 Glasses
4 Dinner plates
5 Soup plates
6 Dessert dishes
Operating Instructions

Dishwasher User Manual
Page 9
Operating Instructions
Folding Racks and Cup shelves
12 place model
The folding racks (spike rows) of the lower
basket (a) and the cup shelves (b) can be folded
in to allow more room for larger items.
(a) Folding Racks
(b) Folding cup shelves
Cutlery Basket - 12 place model
The cutlery tray or basket is designed for, as
its name suggests, forks, knives and spoons.
The previous image provides suggestions of
how to arrange the cutlery on the basket.
Type Item
1 Forks
2 Soup spoons
3 Dessert spoons
4 Teaspoons
5 Knives
• Cutlery such as forks and spoons should
be placed in the cutlery basket with the
handles facing downwards
• Long utensils should be placed in the
horizontal position at the front of the
upper basket, as shown in the image.
WARNING // Always load sharp utensils such
as knives with the handle facing upwards.
WARNING // Do not let any item extend
through the bottom of the cutlery basket.
Page 10
Dishwasher User Manual
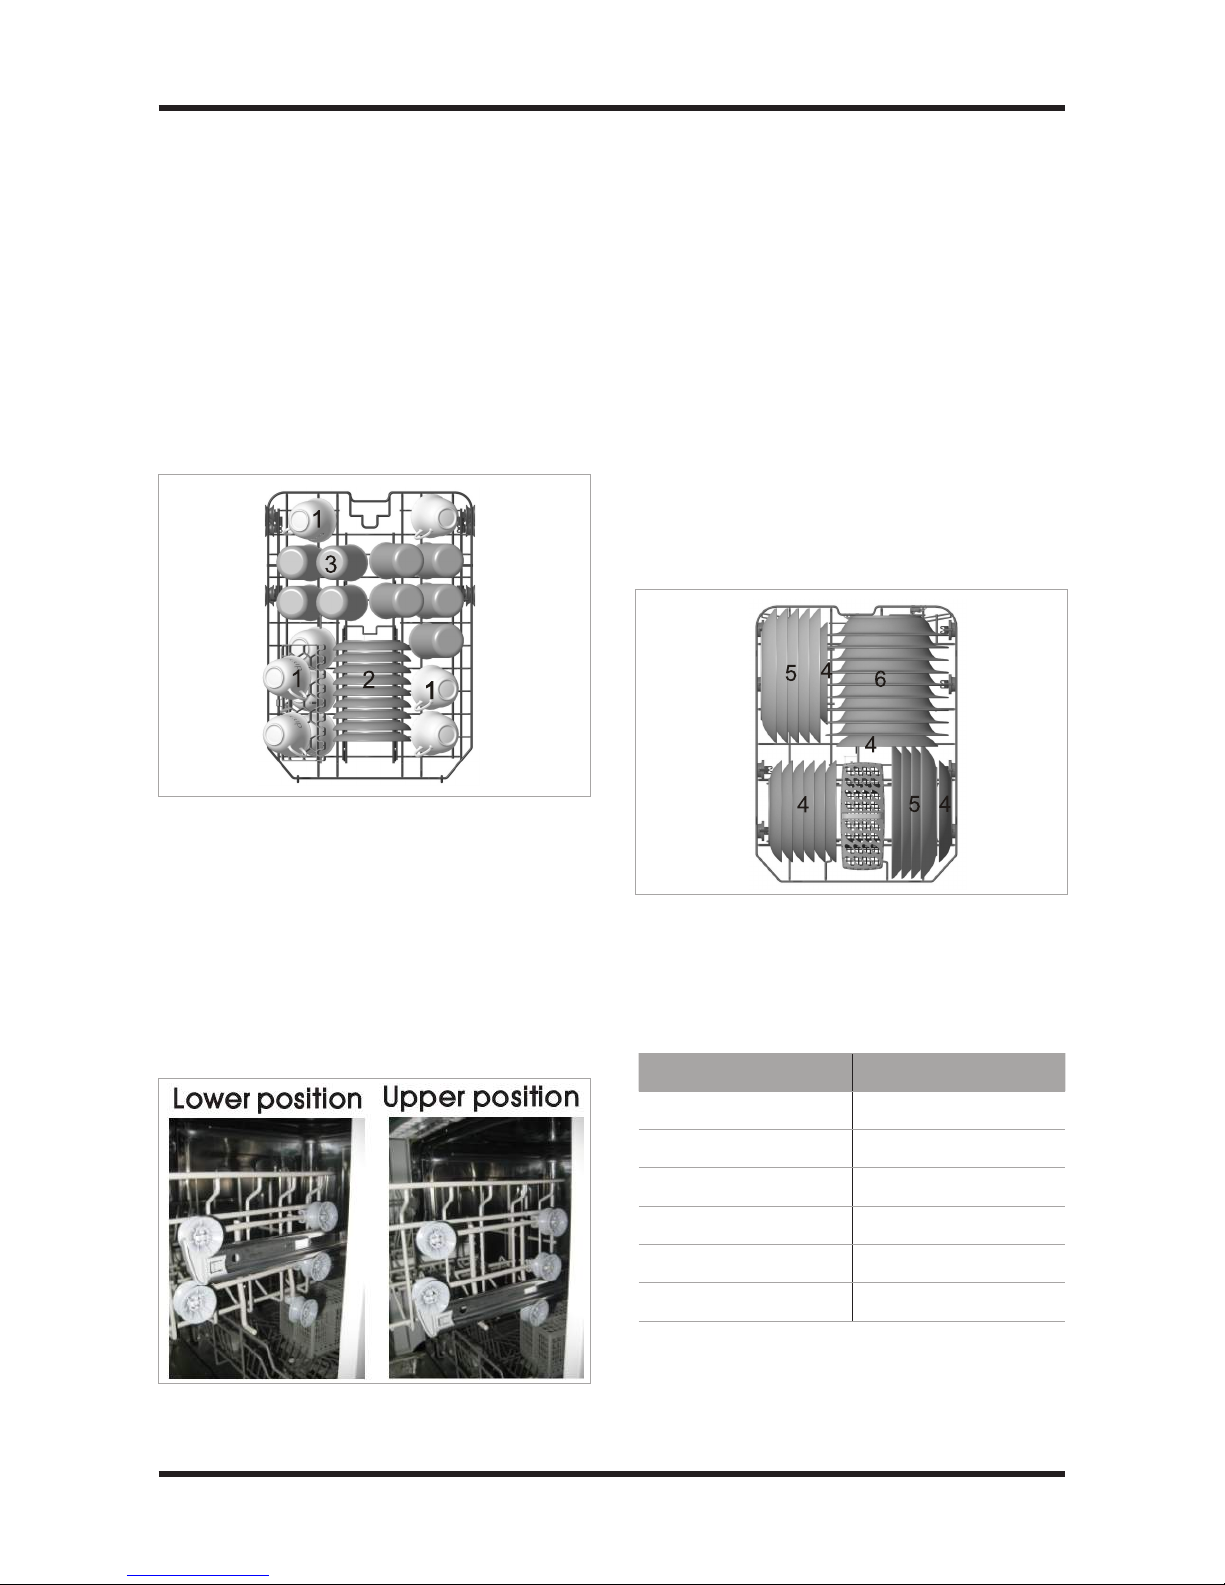
Upper Basket - 9 place model
The upper basket is designed to hold more
delicate and lighter dishware, such as
glasses, teacups, saucers, as well as plates,
small bowls and shallow pans.
The height of the upper basket can be
adjusted in order to create more space for
larger utensils, both for the upper and lower
baskets. The height can be adjusted by repositioning the wheels to the desired height
on the rails.
Long items such as serving cutlery, salad
serves and knives should be placed on the
cup shelf so that they do not obstruct the
rotation of the spray arms.
Lower Basket - 9 place model
The lower basket is designed to hold larger
items, which are most diicult to clean, such
as pots, pans, lids, serving dishes and bowls.
It is preferable to place serving dishes and
lids on the side of the racks in order to avoid
blocking the rotation of the top spray arm.
Please ensure to always place pots, serving
bowls, etc. upside down.
Type Item
1 Cups
2 Saucers
3 Glasses
4 Dessert plates
5 Dinner dishes
6 Soup plates
Operating Instructions
 Loading...