

Tisira TDW6SS User Manual

USER MANUAL
6 PLACE DISHWASHER
TDW6SS
IMPORTANT // Please ensure that you read through this user manual prior to installation and use. This
manual contains important information to ensure optimal performance and keep you safe. Please retain your
proof of purchase, as this will be required in the event that you require warranty service. Remember to retain
this manual for future reference.
www.tisira.com

CONGRATULATIONS ON THE SELECTION OF THIS TISIRA APPLIANCE.
Please read through this user manual carefully as it contains information that
will ensure that your appliance is installed correctly, important operating and
care instructions and also some advice of what you need to do if this appliance
is not performing as intended.
HELLO
To re vie w the sect ion on Troublesh ooting Tips
wil l hel p you to solve som e common problems
by yoursel f .
Dea r Customer ,
Pleas e car efull y rea ding it before using t he di shwasher
will help you to use and maint ain the dishw asher properly.
Pass it on to any subsequ ent o wner of th e app lianc e.
This ma nual contain s sec tions of S afet y Instru ct ion s,
Ope rating Instruc tio ns ,In stall ation Instructions and
Troubles hooting Tips, etc.
Th e manufa ctu re r, fol lo wing a policy of c on stant
development an d updati ng of the p roduc t, may
make modi ficat ions w ithou t givi ng pr ior notice .
Keep it to r ef er to at a late r date.
If yo u ca n not re so lve the tr oubles by y ourself ,
please ask fo r the hel p o f prof essiona l technicians.
Dishwasher F eature s.. . ....... ......... ......... ... ..... ...2
Attenti on b ef ore or afte r lo ading the Di shwas her
Baskets.. . ....... ............ .......... ............ ..... ..... ....6
Filte ri ng System......................... ....................12
Car ing for the Di shw as her..... .......... ..... . ......... 13.
A Fill th e Rinse A id Dispenser.... .. .......... .. ... .... 3、
B Funct io n of Dete rgent ............. .. .... ........... 4,5、
Loading t he Ba sk et ...... ... ...... .... ....... .... ......... .... 7
Cutlery Basket................ ........................ ........ 8
Was h Cycle Tab le.............................. ..... ........10
Turning on the Ap pl ian ce .......... ... .............. .....10
Chang e the P rogramm e.... .......... ....... ...... ...11....
At the End o f the Wash Cycle.. .. ................ .......11
Positio ning t he Appl iance ......... .......... ......... .1 5..
Water C onnection. ............ .......... ..... ...... ..... ..15.
About Power Connec tion.. .. .... ..... ..... ..... . . ..... .1 5.
Conne ction of Drain Hose s............. ........ ...... .1 6.
Start of dishwasher.... .................. ... .... .. .. ....17.. . .
Be fore calling for se rvice........... ................ . ....18.
Error code s.. .......... ....... .... ............ . . ... .. ..... ...19.
Cont rol Panel... ............................. ...................2
When l oad bigger Di nner Pl at es ....... ....... ..... . 9
11) Notes.. .. ......... ... ....... ...................................26
11) Proof Of Purchase.. .. ......... ... ....... .................27
12) Warranty Terms & Conditions.. .. ......... ... ....... .28
To re vie w the section on Tr oublesh ootin g Tips
wil l h elp yo u to so lve some co mmon problems
by yoursel f .
Dea r Customer ,
Pleas e car e fu lly r eading it before using t he dishwas her
will help y ou to use a nd maintain the d ishwa sher p rope rly.
Pass it on to any s ubseq uent o wner of th e applia nc e.
This ma nual contain s se ct ions of S af et y In struc tions,
Ope rating I ns tru ct ion s,Installati on Instruc tions an d
Troubles hooting Tips, et c.
Th e ma nu factu rer, followi ng a p olicy of c on stant
development a nd updati ng of the p roduc t, may
make modi ficat ions w ithou t givi ng pr ior notice .
Keep it to r ef er to at a late r date.
If yo u ca n not re so lve the tr oubles by y ourself ,
please ask fo r the hel p o f prof essiona l technicians.
Dishwasher F eature s.. . ....... ......... ......... ... ..... ...2
Attenti on b ef ore or afte r lo ading the Di shwas her
Baskets.. . ....... ............ .......... ............ ..... ..... ....6
Filte ri ng System......................... ....................12
Car ing for the Di shw as her..... .......... ..... . ......... 13.
A Fill th e Rinse A id Dispenser.... .. .......... .. ... .... 3、
B Funct io n of Dete rgent ............. .. .... ........... 4,5、
Loading t he Ba sk et ...... ... ...... .... ....... .... ......... .... 7
Cutlery Basket................ ........................ ........ 8
Was h Cycle Tab le.............................. ..... ........10
Turning on the Ap pl ian ce .......... ... .............. .....10
Chang e the P rogramm e.... .......... ....... ...... ...11....
At the End o f the Wash Cycle.. .. ................ .......11
Positio ning t he Appl iance ......... .......... ......... .1 5..
Water C onnection. ............ .......... ..... ...... ..... ..15.
About Power Connec tion.. .. .... ..... ..... ..... . . ..... .1 5.
Conne ction of Drain Hose s............. ........ ...... .1 6.
Start of dishwasher.... .................. ... .... .. .. ....17.. . .
Be fore calling for se rvice........... ................ . ....18.
Error code s.. .......... ....... .... ............ . . ... .. ..... ...19.
Cont rol Panel... ............................. ...................2
When l oad bigger Di nner Pl at es ....... ....... ..... . 9
11) Notes.. .. ......... ... ....... ...................................26
11) Proof Of Purchase.. .. ......... ... ....... .................27
12) Warranty Terms & Conditions.. .. ......... ... ....... .28
1
This appliance must be gr ounded. In the event of a
malfunction or breakdown , grounding will reduce
the risk of electric shock by providi ng a path of
least resistance of electric current. This appliance
is equipped with a cord having an equipmentgrounding conductor and a grounding plug.
The plug must be plugged into an appropriate outlet
that is installed and grounded in accordance with
all local codes and ordinances.
Keep children away from detergent and rinse aid, keep
child away from the open door of the dishwasher,
there could still be some detergent left inside.
ren
Do not abuse, sit on, or stand on the door or dish
rack of the dishwasher.
Do not wash plastic items unless they ar e marked
dishwasher safe or the equivalent. For plastic items
n
ot so marked, check the manufacturer's
recommendations.
Use only detergent and rinse additives
designed for an automatic dishwasher.
Never use soap, laundry detergent, or hand
washing detergent in your dishwasher. Keep
these products out of the reach of children.
During installatio n, the p ower su pply must not
be excessively or dangerously bent or flattened.
The door shouldnot be left in the open position
since this could present a trippinghazards.
Do not tamper with co ntrols.
Do not place any heavy objects of stand on the
door when it is open. The appliance could tip
forward.
When l oading items to be washed:
1) Locatesharp items so that they are not likely
to damage the door seal;
2 Warning: Knives and othe r ute nsils with
sharp points must be loaded in the basket
with their points down or placed in a
horizontal position.
)
When using your dishwasher, you should
prevent plastic items from coming into contact
with heating element.(This instruction is only
applicable to machines with a visual heating
element.)
If the supply cord is damaged, it must be replaced
by the manufacturer or its service agent or a
similarly qualified person in orde r to avoid a
hazard.
Please dispose of packing materials properly.
Use the dishwasher only for its intended function.
Dishwasher detergents are strongly alkaline, they
can be extremely dangerous if swallowed.Avoid
contact with skin an d eyes a nd keep children away
from the dishwasher when the door is open.
Check that the detergent receptible is empty
after completion of the wash cycle.
The appliance is to be connected to the water
mains using new hose sets and that old hose-sets
should not be reused.
The maximum size of the dishes is 260mm.
The maximum permissible inlet water pressure is
1Mpa.
The minimum permissible inlet water pressure is
0.04Mpa.
Children should be supervised to ensure that they do
not play with the appliance.
This appliance is not intended for use by persons
(including children with reduced physical, sensory or
mental capabilitie s, or lack of e xperience and
knowledge ,unless t hey have been given supervi sion
or instruction concerning use of the appliance by a
person responsible for their safety.
)
When using your dishwasher, foll ow the precautions listed below:
Improper connection of the equipment-grounding
conductor can result in a risk of electric shock.
Check with a qualified electrician or service
representative if you are in doubt whether the
appliance is properly grounded. Do not modify the
plug provided with the appliance; If it is not fi t for
the outlet. Have a proper outlet installed by a
qual ified elec trician.
2
before using it for the first time.
To get the best performance from your dishwasher, read all operating instructions
Front view
Back View
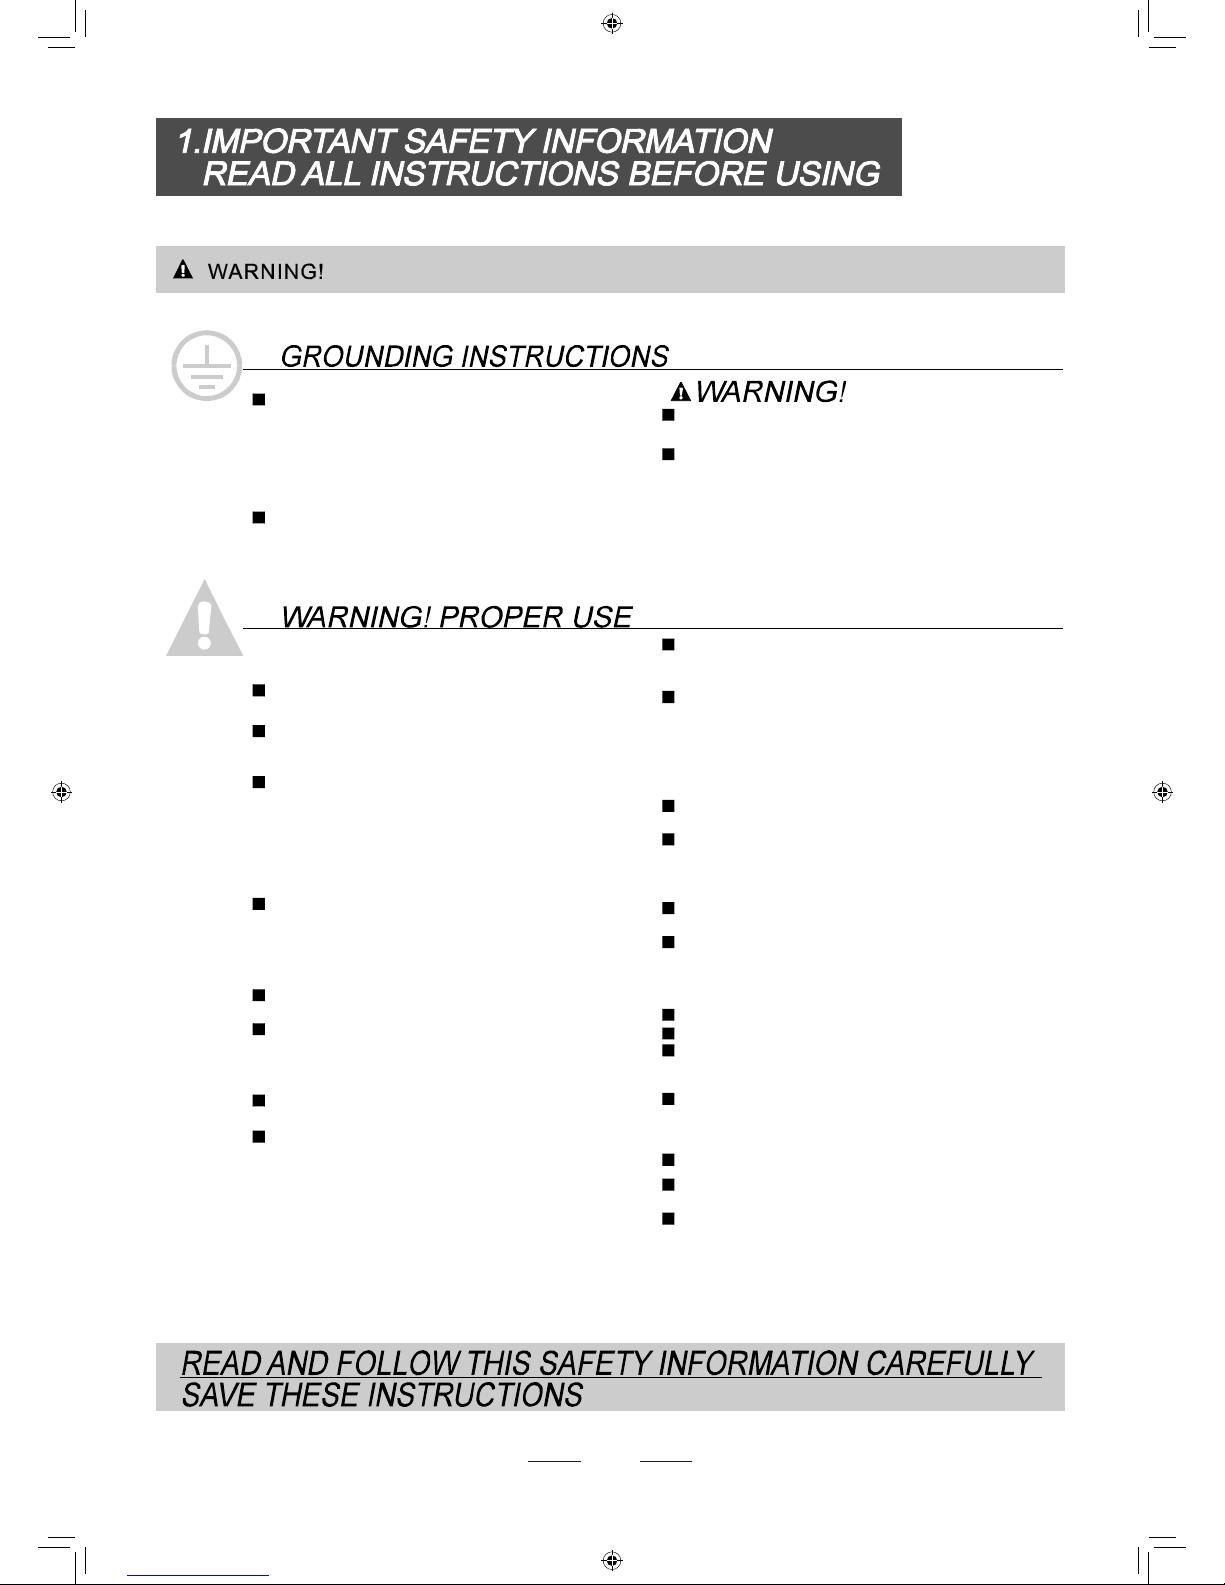
Filter assemblyDetergent Dispenser
Cup Shelf
Cutlery Bask et
Rinse Aid Dispenser
Inlet pipe connector
Drain pipe connector
Spray Arms
Basket
1
5
6
7
8
9
3
2 4
2
1
5
3
6 7
8
4
5
2
4
6
7
1
6
7
Power on light: To comeon when Power ON/OFF
button is pressed down.
ON/OFF Button: To turn on/off the power supply.
Delayed Start Button: Press this button to set the
delayed hours for washing. You can delay the start
of washing up to 24 hours. One press on this
button delays the start of washing by one hour.
Program indicator light: when you select washing
program, the correspond light will display.
Rinse Aid Warning Light : To be on when the
rinse aid dispenser needs to be refilled.
Program button :To select washing program
when press the button.
2
3
4
5
3
Delay time: T o dis play booking time .
9
2
before using it for the first time.
To get the best performance from your dishwasher, read all operating instructions
Front view
Back View
Filter assemblyDetergent Dispenser
Cup Shelf
Cutlery Bask et
Rinse Aid Dispenser
Inlet pipe connector
Drain pipe connector
Spray Arms
Basket
1
5
6
7
8
9
3
2 4
2
1
5
3
6 7
8
4
5
2
4
6
7
1
6
7
Power on light: To comeon when Power ON/OFF
button is pressed down.
ON/OFF Button: To turn on/off the power supply.
Delayed Start Button: Press this button to set the
delayed hours for washing. You can delay the start
of washing up to 24 hours. One press on this
button delays the start of washing by one hour.
Program indicator light: when you select washing
program, the correspond light will display.
Rinse Aid Warning Light : To be on when the
rinse aid dispenser needs to be refilled.
Program button :To select washing program
when press the button.
2
3
4
5
3
Delay time: T o dis play booking time .
9

3
The rinse aid is released during t he final rinse to prevent water from forming droplets on your dishes. That can leave
spots and streaks. It also improv es drying by allowing water to sheet off the dish es. Your dishwasher is designed to
use liquid rinse aids. The rinse aid dispenser is located inside the door next to the detergent dispenser. To fill the
dispenser, open the cap and pour the rinse aid into the dispenser until the level indicator turns completely black.
The volume of the rinse aid container is about 110ml.
Rinse Aid Dispenser
Function of Rinse Aid
Rinse aid is automatically added during the last rinse, ensuring thorough rinsing, and spot and streak free drying.
As the rinse aid d iminishes, the size of the black dot
on the rinse aid level indicator changes, as illustratedbelow.
Full
3 / 4 f ull
1 / 2 f ull
1 / 4 full - Should refill to eliminate spotting
Empty
When to Refill the Rinse Aid Dispenser
If there is no rinse-aid warning light in the control panel, you can judge the amoun t of rinse-aid by the color
of the optical level indicator located next to the cap. When the rinse-aid container is full, the whole
indicator will be dark .As the rinse-aid dim inishes, the size of the dark dot decreases. You shou ld never let
the rinse aid get below 1 / 4 fu ll.
""
Attention!
Only use branded rinse ai d for dishwasher. Never fi ll the rinse aid dispenser with any other substances
(e.g. Dishwasher cleaning agent, liquid detergent). Th is would damage the app liance.
To op en the dispenser, turn the cap to the "open" (left) arrow and lift it out.
Pour the rinse aid into the dispenser, being careful not to overfill.
Replace the cap by inserting it aligned with "open" arrow and turning it to the c losed (right) arrow.
1
2
3
during the next wash.
Don't forget to replace the cap before you close dishwasher door.
Clean up any rinse aid split during filling with an absorbent cloth to avoid excessive foaming
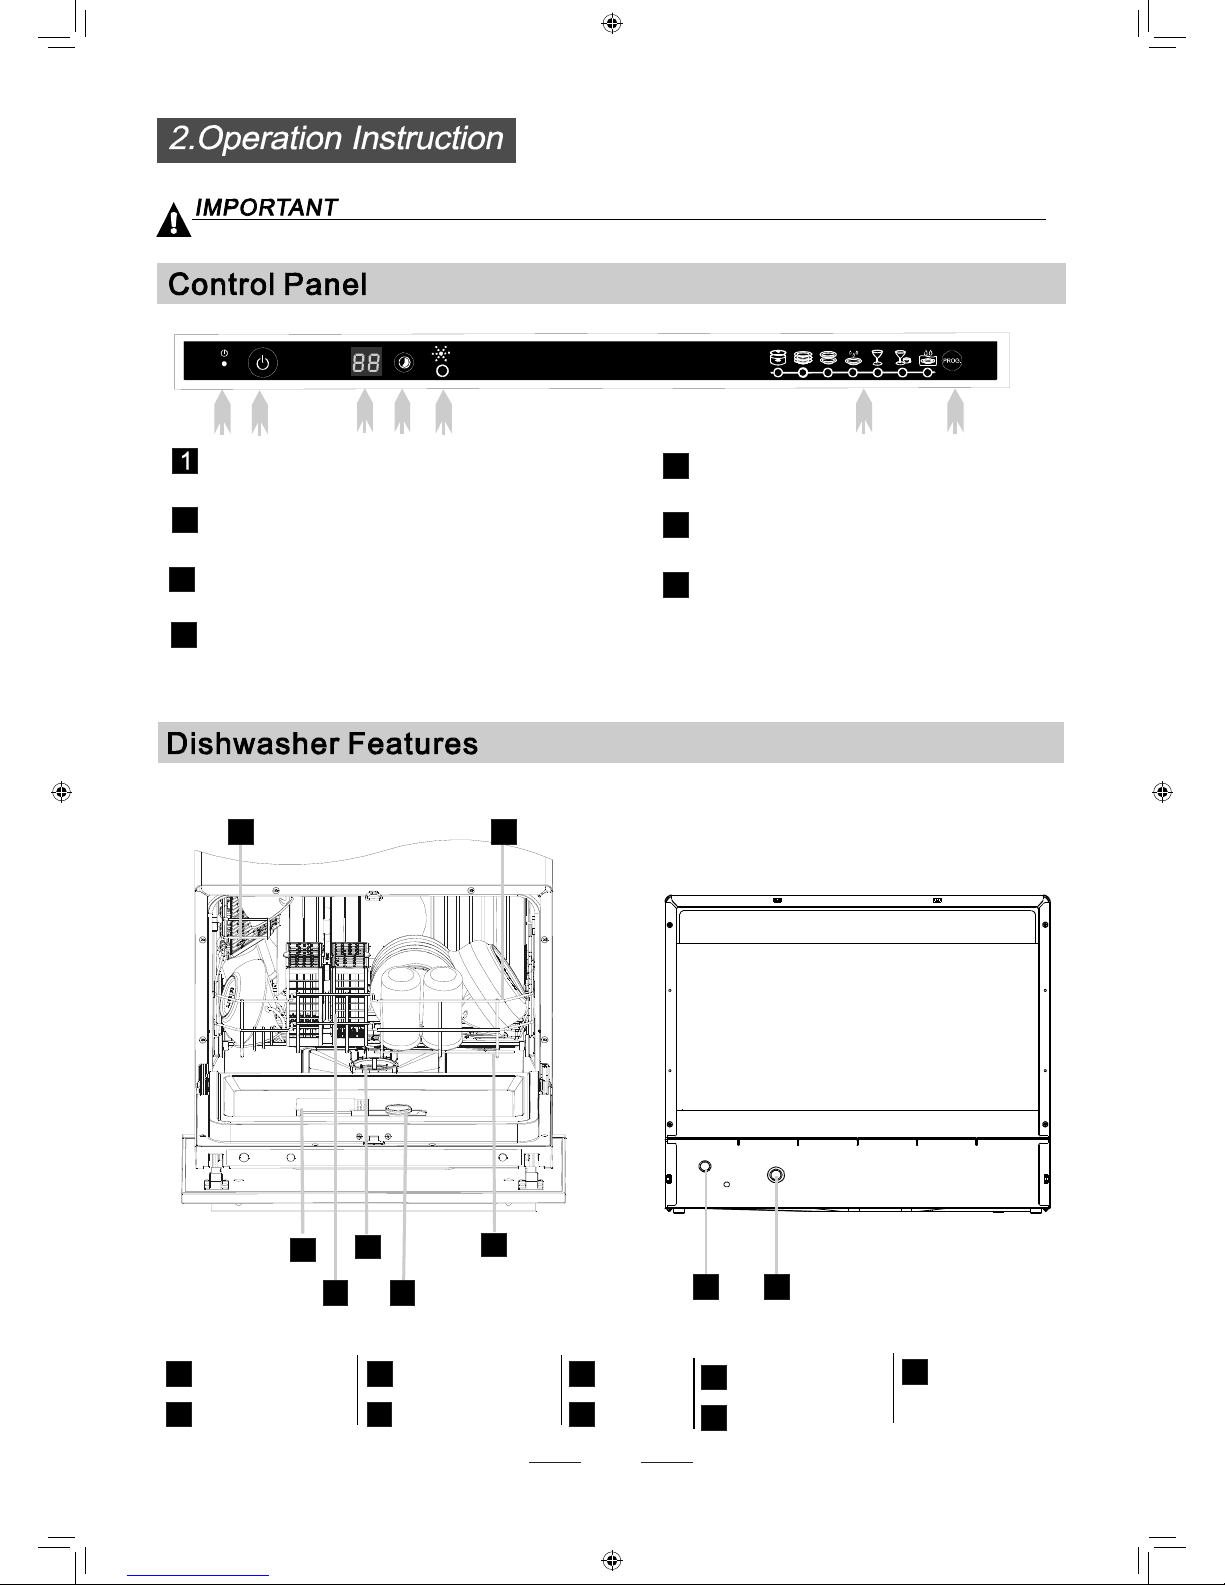
Adjusting Rinse A id Dispenser
Th e rins e aid dispe nser has six or four s ett ings. Always st ar t with the d ispen ser
set on "4". If sp ots and poor dryi ng are prob lem s, incr ease th e amou nt of rins e
aid disp ensed by removin g the d is pense r lid and rotatin g the d ial to "5". If t he
dishes stil l a re not dr yi ng properly o r are spotted, adjust the dial to th e next
highe r n umb er until your di shes ar e spot-fre e. The re commended s ettin g is "4 ".
(F a ct ory value is "6".)
Increase the dose i f th er e are d rops of wat
er or lime s pots o n t he di shes a fte r washin g.
Redu ce it i f there a re s ti cky wh itish stain s on yo ur di sh es o r a bl uish f il m on glassware or
kn ife bl ades.
4
Detergents with it s chemical ingred ie nts are ne ce ssary to re mov e dirt, crus h dirt an d trans port it out of the dishwashe r.
Mos t o f c ommercia l q ualit y det erg ents are su it abl e f or this purpo se .
Detergents
There a re 3 s orts of d et er gen ts
1.With p hosphate and wit h ch lor in e
2.With phosphate and wi th out chlo rine
3.Withou t ph osphate and with out chlo ride
Based on th eir chem ical compo si tio n, di sh washer can be s plit i n tw o basi c t ype s:
The us e of no rmal washing p rog ra mmes i n co njun cti on wi th co nce ntrated dete rgen ts
red uces pollution a nd is g ood for your dishes; thes e wash p rogrammes are sp ec ial ly matched
to t he di rt-di ss olving pr o pert ies o f the enzyme s of the concentra ted d
etergen t. For this reason
no rmal wash prog ramme s in which concentrated d etergen t s are used c an achie ve th e same
res ul ts that c an otherwi se only be achieved us ing inten si ve pro gramm es.
“ ”
“ ”
“ ”
Detergent t ab l et s of different bra nd s dissolve at d iffere nt s pe eds . F or this reason s ome
det ergent t ablet s cannot di ssolv e and devel op the i r fu l l cl eani n g power dur ing short
pro grammes . Th erefore please u se long program mes when using d ete rgen t tablets, t o
ens ure the c omplete remo v al of de
tergent residuals.
Concentrated Detergent
Detergent Tablets
co nvent io nal , alka line dete rgents w ith caus tic co mp one nts
lo w a l kaline c oncentrated d etergen ts wit h n atu ral en zym es
Norma lly ne w pulver ised detergent is wi th out phosphat e. T he w at er so ften e r func ti on o f
pho spha te is not giv en. In this ca se we recommend to fill sa lt i n the salt container ev en w hen
the hardnes s of wate r is o nly 6 d H. I f dete rg ents w ithout phosphate were us ed i n c ase of hard water
often wh ite s po ts ap p
ear at dishes an d gl asse s. In this ca se p lease add mo re de ter gent t o re ach
bet ter resu lt s. D etergents without ch lorine d o only bl ea ch a little. S tro ng and c oloured spots will not
rem oved co mple tely. I n th is c ase pl ease c hoo se a prog ram me with high er Temperatur e.
°
Adjusting Rinse A id Dispenser
Th e rins e aid dispe nser has six or four s ett ings. Always st ar t with the d ispen ser
set on "4". If sp ots and poor dryi ng are prob lem s, incr ease th e amou nt of rins e
aid disp ensed by removin g the d is pense r lid and rotatin g the d ial to "5". If t he
dishes stil l a re not dr yi ng properly o r are spotted, adjust the dial to th e next
highe r n umb er until your di shes ar e spot-fre e. The re commended s ettin g is "4 ".
(F a ct ory value is "6".)
Increase the dose i f th er e are d rops of wat
er or lime s pots o n t he di shes a fte r washin g.
Redu ce it i f there a re s ti cky wh itish stain s on yo ur di sh es o r a bl uish f il m on glassware or
kn ife bl ades.
4
Detergents with it s chemical ingred ie nts are ne ce ssary to re mov e dirt, crus h dirt an d trans port it out of the dishwashe r.
Mos t o f c ommercia l q ualit y det erg ents are su it abl e f or this purpo se .
Detergents
There a re 3 s orts of d et er gen ts
1.With p hosphate and wit h ch lor in e
2.With phosphate and wi th out chlo rine
3.Withou t ph osphate and with out chlo ride
Based on th eir chem ical compo si tio n, di sh washer can be s plit i n tw o basi c t ype s:
The us e of no rmal washing p rog ra mmes i n co njun cti on wi th co nce ntrated dete rgen ts
red uces pollution a nd is g ood for your dishes; thes e wash p rogrammes are sp ec ial ly matched
to t he di rt-di ss olving pr o pert ies o f the enzyme s of the concentra ted d
etergen t. For this reason
no rmal wash prog ramme s in which concentrated d etergen t s are used c an achie ve th e same
res ul ts that c an otherwi se only be achieved us ing inten si ve pro gramm es.
“ ”
“ ”
“ ”
Detergent t ab l et s of different bra nd s dissolve at d iffere nt s pe eds . F or this reason s ome
det ergent t ablet s cannot di ssolv e and devel op the i r fu l l cl eani n g power dur ing short
pro grammes . Th erefore please u se long program mes when using d ete rgen t tablets, t o
ens ure the c omplete remo v al of de
tergent residuals.
Concentrated Detergent
Detergent Tablets
co nvent io nal , alka line dete rgents w ith caus tic co mp one nts
lo w a l kaline c oncentrated d etergen ts wit h n atu ral en zym es
Norma lly ne w pulver ised detergent is wi th out phosphat e. T he w at er so ften e r func ti on o f
pho spha te is not giv en. In this ca se we recommend to fill sa lt i n the salt container ev en w hen
the hardnes s of wate r is o nly 6 d H. I f dete rg ents w ithout phosphate were us ed i n c ase of hard water
often wh ite s po ts ap pe a r a t dish es an d glasse s. In this case p le ase add mo re d eterg ent to r each
bet ter resu lt s. D etergents without ch lorine d o only bl ea ch a little. S tro ng and c oloured spots will not
rem oved co mpl
et ely. In th is c as e please choose a pr og ramme wi th higher Temp er at ure.
°
Amount of Detergent to Use
The dispenser must be refilled before the start of each wash cycle following the instructions
provided in the Wash Cycle Table . Your dishwasher uses less detergent and rinse aid then
conventional dishwashe r. Generally, only one tablespoon of detergent is needed for
a normal wash load. Also, more heavily soiled items need more detergent. Always add the
detergent just be fore starting the dishwasher, otherwise it could g et damp and will not
diss olve pro perly.
Detergent Dispenser
Always add the detergent just before starting each wash cycle.
Only use branded detergent aid for dishwasher.
If the lid is closed: press release button. The lid springs open.
5
Detergen t tablet
Detergent powder
Fill the detergent dispenser with detergent.
The marking indica tes the dosing levels , as
illustrated on r ight:
The place of main wash cycle detergent placed.
The place of pre-wash cycle detergent placed.
Please o bserve the manufacturers dosing and storage
Recommendations as stated on the detergent packaging.
Close th e lid and press un til it lock s in plac e.
If the dishes are heavilysoiled, place an additional
detergent dose in the pre-wash det ergent chamber. This detergent will take effect during the pre- wash phase.
A
B
Fill in detergent
You find information about the amount of detergent for the single programme on the last page.
Please aware, that according to the level soiling and the specific hardness of water differences are possible.
Pleaseobserve the manufacturer's recommendations on the detergent packaging.
Don't put powder det erge nt in to the dispenser unti l you 're r eady to was h dis hes.
Use o nly detergent s peci fically made for use in dishwashers. K eep you r detergent fresh and dry.
Proper Use of Detergent
Dishwasher detergent is corrosive! Take care to keep it out of reach of children.
6
Cutlery with wooden, horn china or
mother-of -pearl handles
Plastic i tems that are not
Older cutlery with glued parts that is not
temperature resistant
Bonded cutlery items or dishes
Pewter or cooper items
crystal glass
Steel item s su bject to rus ting
Wooden platters
Items made from synthetic fib res
heat resistant
Some types of glasses can become
dull after a large number of washes
Silver and aluminium parts have a
tend ency to di scolour during washing
Glazed patterns may fade if machine
washed freque ntly
Are not suitable
Are of limited suitability
Use a mild detergent th at is described as 'kind of dishes'. If necessary, seek further
information from d etergent manufacturers.
For particular items, select a programme with as low a temp erature.
To prevent damage, d o not take glass and cutlery out of the dishwasher immediately
after the programme has ended.
Consider buying utensils which are identified as dishwasher-proof.
Dishesand itemsof cutlery must not lie inside one another, or cover each other.
To avoid damage to glasses, they must not touch.
Load large items which are most difficult to clean into the basket.
Long bladed knives sto red in an upright position are a potential hazard!
Long and/or sharp items of cutlery such as carving knives must be positioned
horizontally in the basket.
Please do not overload your dishwasher.
Load hollow items such as cups, glasses, pans etc. With the opening downwards so that
water cannot collect in the container or a deep base.
(For best performance of the dishwasher, follow these loading guidelines.
Features and appearance of baskets and cutlery baskets may vary from your model.)
Scrape off any large amounts of leftover food. Soften remnants of burnt food in pans
It is not necessary to rinse the dishes under running water.
Place objects in the dishwasher in fol lowing way:
1.Items such as cups, glasses, pots/pans, etc. are face dow n.
2.Curved items, or those with recesses, should be loaded at a slant so that water can run off.
3.All utensils are stacked securely and can not tip over.
4.All utensils are placed in the way that the spray arms can rotated freely during washing.
Very small items should not be washed in the dishwasher as they could easily fall out of the basket.
6
Cutlery with wooden, horn china or
mother-of -pearl handles
Plastic i tems that are not
Older cutlery with glued parts that is not
temperature resistant
Bonded cutlery items or dishes
Pewter or cooper items
crystal glass
Steel item s su bject to rus ting
Wooden platters
Items made from synthetic fib res
heat resistant
Some types of glasses can become
dull after a large number of washes
Silver and aluminium parts have a
tend ency to di scolour during washing
Glazed patterns may fade if machine
washed freque ntly
Are not suitable
Are of limited suitability
Use a mild detergent th at is described as 'kind of dishes'. If necessary, seek further
information from d etergent manufacturers.
For particular items, select a programme with as low a temperature.
To prevent damage, d o not take glass and cutlery out of the dishwasher immediately
after the programme has ended.
Consider buying utensils which are identified as dishwasher-proof.
Dishesand itemsof cutlery must not lie inside one another, or cover each other.
To avoid damage to glasses, they must not touch.
Load large items which are most difficult to clean into the basket.
Long bladed knives sto red in an upright position are a potent ial hazard!
Long and/or sharp items of cutlery such as carving knives must be positioned
horizontally in the basket.
Please do not overload your dishwasher.
Load hollow items such as cups, glasses, pans etc. With the opening downwards so that
water cannot collect in the container or a deep base.
(For best performance of the dishwasher, follow these loading guidelines.
Features and appearance of baskets and cutlery baskets may vary from your model.)
Scrape off any large amounts of leftover food. Soften remnants of burnt food in pans
It is not necessary to rinse the dishes under running water.
Place objects in the dishwasher in fol lowing way:
1.Items such as cups, glasses, pots/pans, etc. are face dow n.
2.Curved items, or those with recesses, should be loaded at a slant so that water c an run off.
3.All utensils are stacked securely and can not tip over.
4.All utensils are placed in the way that the spray arms can rotated freely during washing.
Very small items should not be washed in the dishwasher as they could easily fall out of the basket.
7
IN
1
1
2
3
3
4
5
6
7
1
4
8
Cutlery should be placed in the cutlery basket with handles at the bottom. If the rack has side baskets, the spoon
should be loaded individually into the appropriate slots, especially long utensils should be placed in the horizontal
position at the frontof the upper basket as shown.
Do not let any item extend th rough bottom.
Always load sharp utensils with the sharp point down!
3
33
1
2
1
3
4
5
1
1
3
1
3
5
1
5
5
4
4
2
2
4
2
2
5
5
4
4
2
Teaspoons
4
Soup spoons
2
Forks
1
Knives
5
3
Dessert spoons
 Loading...