

Tisira TDW12X User Manual
pg 1
tisira | www.tisira.com
USER MANUAL
12 PLACE DISHWASHER
TDW12X
IMPORTANT // Please ensure that you read through this user manual prior to installation and use. This
manual contains important information to ensure optimal performance and keep you safe. Please retain your
proof of purchase, as this will be required in the event that you require warranty service. Remember to retain
this manual for future reference.
www.tisira.com

pg 2
www.tisira.com | tisira
CONGRATULATIONS ON THE SELECTION OF THIS TISIRA APPLIANCE. TISIRA
APPLIANCES HAVE BEEN SPECIFICALLY DESIGNED FOR AUSTRALIAN AND
NEW ZEALAND KITCHENS.
Please read through this user manual carefully as it contains information that
will ensure that your appliance is installed correctly, important operating &
care instructions and also some advice of what you need to do if this appliance
is not performing as intended.
HELLO
pg 3
tisira | www.tisira.com
CONTENTS
HELLO 2
CONTENTS 3
WARNINGS 4
PRODUCT OVERVIEW 5-6
OPERATING INSTRUCTIONS 7-15
MAINTENANCE 16-17
INSTALLATION 18-19
TROUBLESHOOTING 20-21
PRODUCT SPECIFICATIONS 22
NOTES 23
CONTACT DETAILS 24

pg 4
www.tisira.com | tisira
IMPORTANT // To get the best performance from your dishwasher, read all operating
instructions before using it for the first time.
SAFETY INFORMATION
WARNING // HYDROGEN GAS IS EXPLOSIVE
Under certain conditions, Hydrogen gas
may be produced in a hot water system that
has not been used for two weeks or more. If
the hot water system has not been used for
such a period, before using the dishwasher
turn on all hot water faucets and let the
water flow from each for several minutes.
This will release any accumulated hydrogen
gas. As the gas is flammable, do not smoke
or use an open flame during this time.
• DO NOT USE OR STORE FLAMMABLE
MATERIALS IN THE APPLIANCE STORAGE
DRAWER OR NEAR THIS APPLIANCE
• DO NOT SPRAY AEROSOLS IN THE
VICINITY OF THIS APPLIANCE WHILE IT
IS IN OPERATION
• DO NOT MODIFY THIS APPLIANCE
• Do not touch the heating element during
or immediately after use.
• Do not operate your dishwasher unless
all enclosure panels are properly in
place. Open the door very carefully if the
dishwasher is operating. There is a risk
of water leaking out.
• Do not place any heavy objects or
stand on the door when it is open. The
appliance could tip forward.
• Use only detergent and rinse additives
designed for an automatic dishwasher.
Never use soap, laundry detergent,
or hand washing detergent in your
dishwasher.
• Young children should be supervised
to ensure that they do not play with the
appliance.
• The door should not be left in the open
position since this could present a
tripping hazard.
• This appliance is not intended for use
by persons (including children) with
reduced physical, sensory or mental
capabilities, or lack of experience and
knowledge, unless they have been given
supervision or instruction concerning
use of the appliance by a person
responsible for their safety.
• If the supply cord is damaged, it must
be replaced by the manufacturer or its
service agent or a similarly qualified
person in order to avoid a hazard.
• Please dispose of packing materials
properly.
• This appliance is intended to be used in
household and similar applications such
as: staff kitchen areas in shops, offices
and other working environments;farm
houses: by clients in hotels, motels and
other residential type environments;
bed and breakfast type environments.
• Dishwasher detergents are strongly
alkaline. They can be extremely
dangerous if swallowed. Avoid contact
with the skin and eyes, and keep children
away from the dishwasher when the
door is open. Check that the detergent
receptacle is empty after completion of
the wash cycle.
WARNINGS
pg 5
tisira | www.tisira.com
START/STOP
3 sec
3H
6H
9H
PRODUCT
OVERVIEW
CONTROL PANEL
1. Power switch: To turn on/off the power
supply.
2. Delay button: The delay start can be set
for 3 different periods: 3, 6 or 9 hours.
3. Child Lock & Unlock: To lock and unlock
the dishwasher controls, press and
hold the INTENSIVE & RAPID buttons
at the same time for a few seconds. The
INTENSIVE & RAPID lights will turn on
or off when the controls are locked or
unlocked, respectively.
4. Start/Pause Button: Press this button to
start or pause washing cycle
5. Rinse aid refill indicator: The indicator
lights up when dispenser needs to be
refilled.
6. Drying indicator: the light comes on
when the dishwasher is drying.
7. Program Buttons: Choose the desired
program and the corresponding light will
turn on indicating the chosen type of wash.
1
5 6 7
2 3 4
pg 6
www.tisira.com | tisira
PRODUCT
OVERVIEW
DISHWASHER FEATURES
FRONT VIEW
1. Upper Basket
2. Upper Spray Arm
3. Lower Basket
4. Detergent Dispenser
5. Rinse Aid Dispenser
6. Cutlery Basket
7. Wine Glass Holder
1
2
3
4
7
6
5
pg 7
tisira | www.tisira.com
OPERATING
INSTRUCTIONS
ATTENTION // Before using your dishwasher for the first time, please make sure that you
read the following sections:
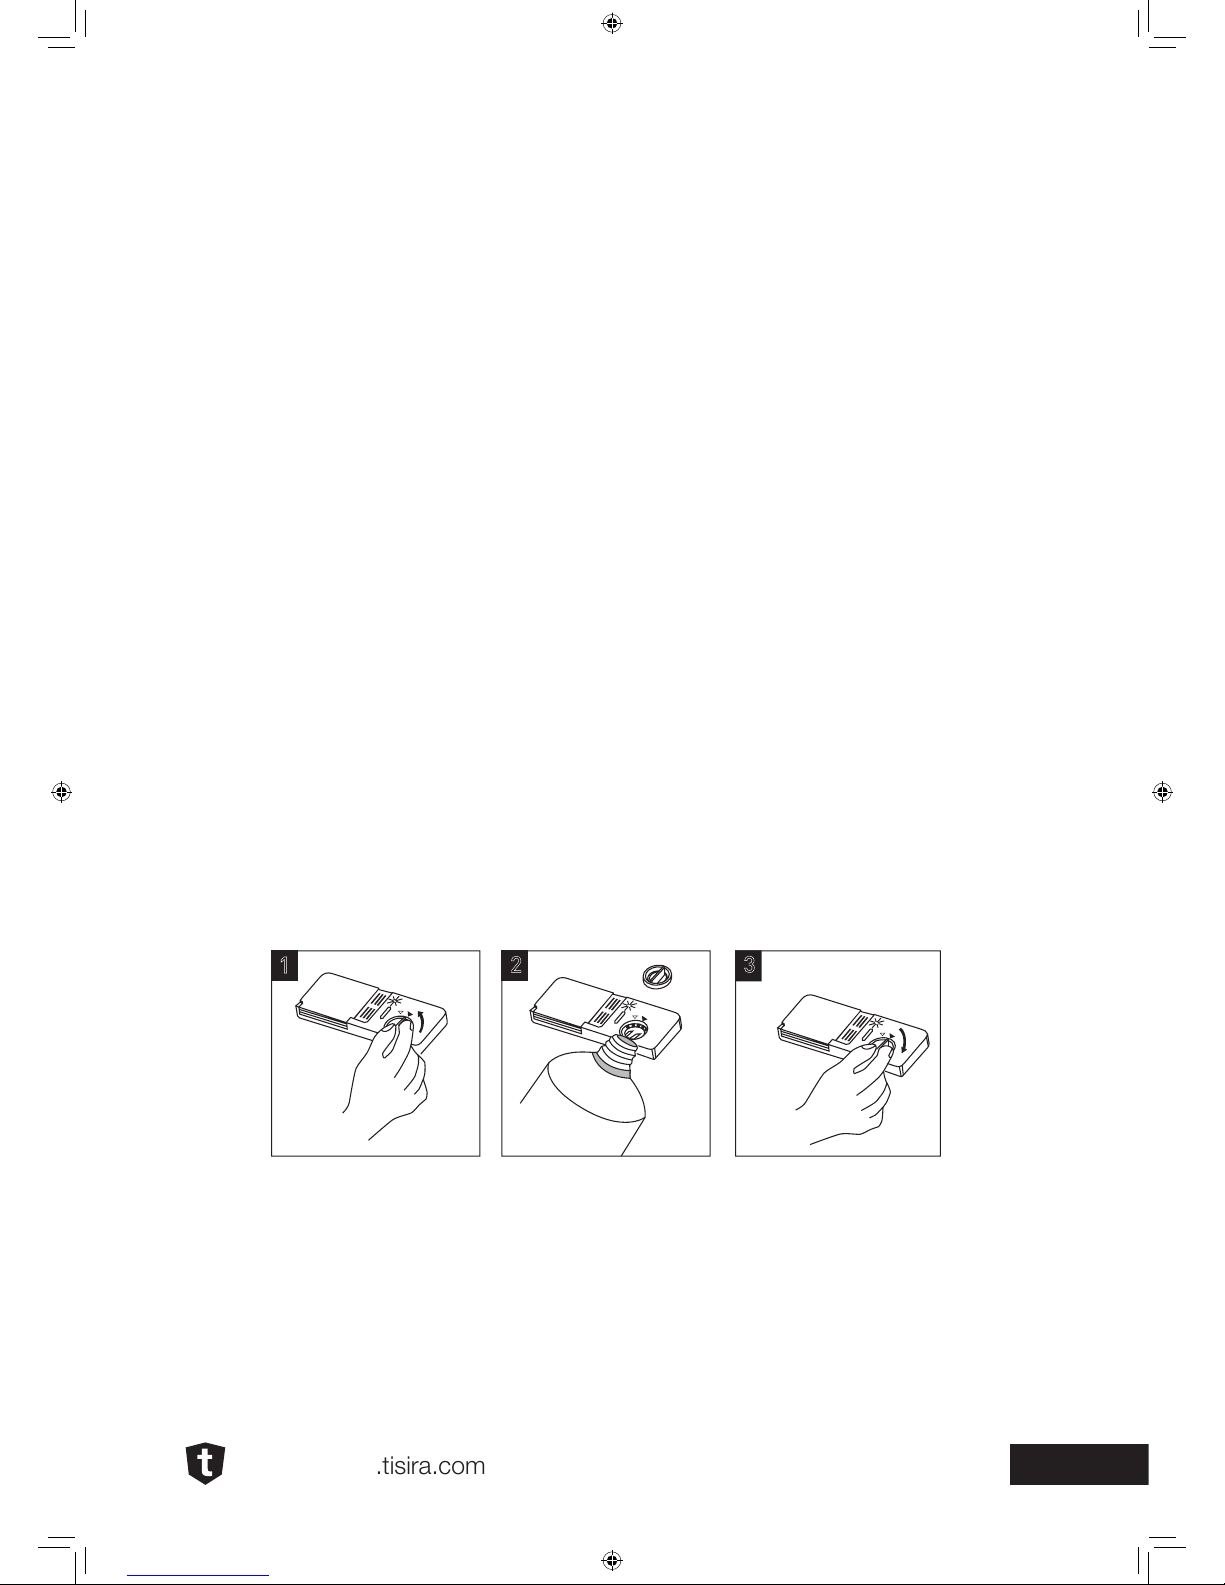
A. Fill the rinse aid dispenser B. Fill the detergent dispenser
A. FILL THE RINSE AID DISPENSER
FUNCTION OF RINSE AID
The rinse aid is automatically released during the last rinse in order to prevent water from
forming droplets on your dishes that can leave spots and streaks.
ATTENTION // Only use branded rinse aid in the dishwasher.
Never fill the rinse aid dispenser with any other substances (e.g. dishwasher cleaning agent,
liquid detergent). This would damage the appliance.
The rinse aid dispenser is located inside the door next to the detergent dispenser.
To fill the dispenser, open the cap and pour the rinse aid into the dispenser until the level
indicator turns completely black. The volume of the rinse aid container is about 140ml.
Be careful not to overfill the dispenser, because this could cause over sudsing. Wipe away any
spills with a damp cloth. Don’t forget to close the cap before you close the dishwasher door.
1. To open the dispenser, turn the cap to the “open” (left) arrow and lift it out.
2. Pour the rinse aid into the dispenser, be careful not to overfill.
3. Replace the cap by inserting it aligned with “open” arrow and turning it to the “closed”
(right) arrow.
ATTENTION // Clean up any rinse aid split during filling with an absorbent cloth to avoid
excess foaming during the next wash.
2
1
3

pg 8
www.tisira.com | tisira
OPERATING
INSTRUCTIONS
WHEN TO REFILL THE RINSE AID
DISPENSER
You can judge the amount of rinse-aid by
the colour of the optical level indicator “D”
located next to the cap. When the rinse-aid
container is full, the whole indicator will be
dark .As the rinse aid diminishes, the size of
the dark dot decreases.
IMPORTANT // You should never let the
rinse aid get below 1 / 4 full.
Full
3 / 4 full
1 / 2 full
1 / 4 full - Should refill to eliminate
spotting
Empty
ADJUSTING RINSE AID DISPENSER
The rinse aid dispenser has six settings.
Always start with the dispenser set on “4”
If spots and poor drying are problems,
increase the amount of rinse aid dispensed
by removing the dispenser lid and rotating
the dial to “5”. If the dishes still are not
drying properly or are spotted, adjust the
dial to the next higher number until your
dishes are spot-free. The dose is factory set
in position 5.
NOTE // Increase the dose if there are
drops of water or lime spots on the dishes
after washing. Reduce it if there are sticky
whitish streaks on the dishes or a bluish
film on glassware or knife blades.
B. FILL THE DETERGENT
DISPENSER
Detergents with its chemical ingredients
are necessary to remove dirt, crush dirt and
transport it out of the dishwasher. Most of
commercial quality detergents are suitable
for this purpose.
CONCENTRATED DETERGENT
Based on their chemical composition,
dishwasher can be split in two basic types:
• conventional, alkaline detergents with
caustic components
• low alkaline concentrated detergents with
natural enzymes
The use of “normal” washing programme
in conjunction with concentrated detergents
reduces pollution and is good for your dishes;
these washing programmes are specially
matched to the dirt dissolving properties of the
enzymes of the concentrated detergents. For
this reason ”normal” washing programme in
which concentrated detergents are used can
Adjust lever
(Rinse)
1
2
3
4
5
6
MA X
D (RINSE-AID
INDICATOR)
1
2
3
4
5
6
MAX
 Loading...