

Page 1

Operating instructions (INT)
tiptel Profi Clip
tiptel
Page 2

Page 2
General information
CE declaration
This device observes the requirements of the EC directives:
99/5/EG telecommunication terminal units
The conformity of this telephone with the above mentioned directives is certified by the CE sign.
TIPTEL AG, Ratingen, Germany
Tiptel GmbH, Vienna, Austria
Tiptel AG, Regensdorf, Switzerland
Tiptel b. v., BC Almere, Netherlands
Tiptel NV/SA, Zaventem, Belgium
© Copyright: TIPTEL AG
All rights reserved.
Correct and intended use:
This device has been designed for the exclusive use within homes and offices. Any other different kind of
use contradicts the intended purpose. Unauthorised modifications which are not described within the
operating instructions (user guide) are not permitted.
Approval:
The telephone has been approved to be connected to the public analogue telecommunication network.
Everyone is allowed to connect this telephone via the telephone plug (TAE) and to put it into operation.
Technical support
Qualified technical advice and assistance for all kind of problems, which might occur during the
installation or the operation of your device, can be obtained from our staff of the Technical Support
department. The relevant national telephone numbers can be found in the appendix, chapter “service”
and on the back cover of this manual.
Content of the delivery
· 1 telephone (basic type)
· 1 handset with curled cable
· 1 telephone connecting cable (TST)
· 1 operating instructions (user guide)
(The 9V block battery for data retention does not belong to the content of the delivery.)
This user guide should provide you with information. Its content is not a part of a contract. All mentioned
data and indications should only be considered to be normal values. The features and functions
described could vary according to national requirements. Technical modifications reserved.
Page 3

Page 3
Table of contents
General information 2
CE declaration 2
Technical support 2
Content of the delivery 2
Table of contents 3
Installation 6
Safety information 6
Connection 6
Installation 7
Initial operation 7
Battery exchange 7
Operation 8
General information 8
Dialling mode 8
Memory capacity 8
Factory pre-set parameters 8
Setting of the loudspeaker volume 8
Setting of call signalling 8
Function menu 8
Display contrast 9
Operation 10
Setting of date / time 10
Setting of flash times 10
LCD messages 10
Visual indications 10
Indication of line occupation 10
LCD display 10
Symbols 10
Example 10
Operation of the telephone 11
General information 11
Outgoing telephone calls 11
Incoming telephone calls 11
Mute function 11
Dialling 11
Manual dialling 11
Block dialling / Pre-dial entry 11
Redialling 11
Dialling from the electronic telephone book 11
Scrolling through the electronic telephone book via the arrow-buttons 11
Operation of the telephone 12
Alphabetical search 12
Dialling via the CLIP function 12
Operation behind a PABX 12
Special functions 12
Call transfer and hold function 12
Call waiting and two-line operation with hold 12
Hold function and two-line operation with hold 12
Electronic telephone book 13
General information 13
New entry in the storage locations M1 up to M5 or in the electronic telephone book 13
Page 4

Page 4
Electronic telephone book 14
Browsing through the telephone book 14
consecutively 14
alphabetically 14
Modifying existing entries 14
Storing the last phone number in the electronic telephone book or in one of the 5 storage
locations M1 up to M5 14
Deleting 15
Delete an entry 15
CLIP function 16
General information 16
Display messages for incoming calls 16
Browsing 16
CLIP function 17
Storing a phone number in the electronic telephone book 17
Deleting 17
Deleting of an entry 17
Deleting of all entries 17
Appendix 18
Technical data 18
telephone 18
General information 18
Service 18
Page 5
Page 5
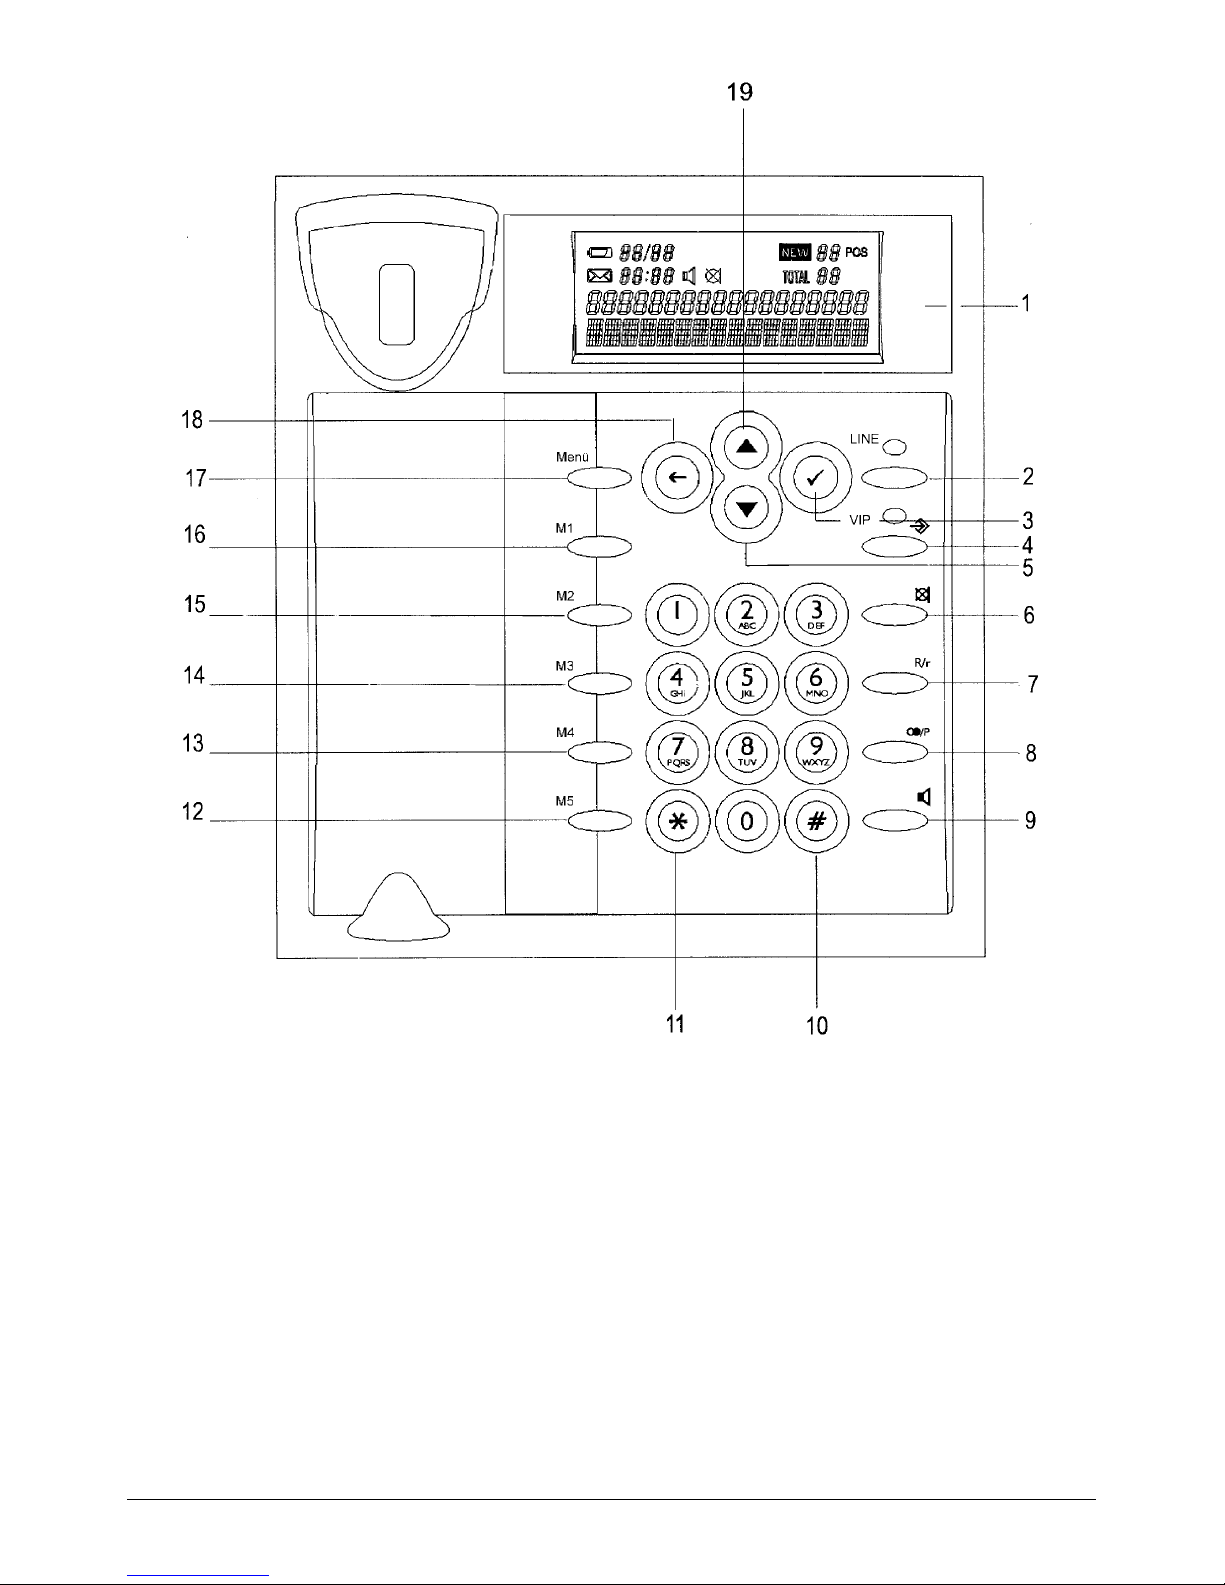
1. display
2. proceed-to-dial-key
3. function key for call list / electronic telephone
book
4. selection of storage location M1 up to M5 or
electronic telephone book
5. scroll button for menu configuration or for
browsing through the electronic telephone
book; reduction of volume
6. mute function
7. flash key (signal key, e. g. for hold function)
8. redialling / pause key
9. hands-free mode
10. # key
11.
* key
12. phone number memory M5
13. phone number memory M4
14. phone number memory M3
15. phone number memory M2
16. phone number memory M1
17. menu button
18. delete button for memory contents M1 –
M5,
call list, electronic telephone book
19. scroll button for menu configuration or for
browsing through the electronic telephone
book, increase of volume
Page 6

Page 6
Installation
Safety information
· Read carefully these operating instructions and keep them for future reference. In case of
questions, please contact qualified personnel. Any work of service and maintenance shall be
carried out exclusively by a correspondingly qualified person. Never open the telephone housing
on your own.
· Do not touch plug contacts with sharp, metallic or moist objects.
· Use a non-slip pad under the device as it might be possible that some types of furniture lacquers or
plastics may attack the rubber feet of your device and thus cause patches on the surface of the
furniture. The manufacturer cannot accept liability for any damage of that kind.
· Do not expose the device permanently to direct sun or other sources of heat.
· Protect the device against dampness, dust, aggressive liquids, steam or smoke.
· Do not expose the device to strong electromagnetic fields (electric engines, television, video
recorder, hifi sets, household appliances). This might have a negative impact on the voice quality.
· Plug the connecting cables of the device only in the corresponding sockets. Do not exchange the
plugs of the connecting cable.
· Do not hold and carry the device at the connecting cables.
· Clean the housing surface with a soft slightly moist or antistatic cloth. Please do not use abrasive
liquids or chemicals to clean the device.
Connection
The receptacles for the telephone connecting cable can be found on the rear side of the device and the
receptacle for the connection of the handset is located on the left side of the housing.
· Connect the curled handset cord with the handset and the relevant receptacle TEL (3) in the
device.
· At the bottom cabinet of the device, open the battery compartment and connect the contacts to the
corresponding battery contacts of the 9 V alkaline block battery. Then, insert the battery and close
the battery compartment. The symbol indicating a necessary battery exchange disappears. The
battery guarantees the maintenance of the telephone functions and features and the retention of
data in case of power failure and does not come with the delivery.
Please note
: Discharged batteries have to be exchanged very quickly (< 60 seconds). Otherwise,
all saved data will be lost.
· Plug the delivered connecting cable in the LINE (2) jack and plug the connecting plug (TST) in the
telephone connecting receptacle (TDO). Handset symbol
Page 7

Page 7
Installation
Initial operation
After connection, your telephone immediately is ready for operation.
The default display language is German, to change it to English, please do the following steps:
- Press the menu button
- Press the
ÑÑÑÑ key 3 times, the display shows “DEUTSCH”
- Press the menu button, and again
ÑÑÑÑ, the display turns to “ENGLISCH”
- Press the menu button again to save your choice
All display texts are now in English
The telephone offers the following function and features:
ð large display (4 lines), two symbol bars, 1 numeric line for presentation of the phone number, 1
alphanumeric line for display of name, status.
ð CLIP function
ð hands-free mode
ð 5 phone number memory M1 up to M5 via speed dialling keys
ð electronic telephone book for up to 65 entries (name and phone number)
ð call list for up to 60 calls with date and time
ð The telephone can be used at a single line or can be connected to a PABX.
Battery exchange
The battery has to be exchanged if the battery symbol + is indicated in the display. For this purpose,
open the battery compartment, remove the discharged battery and insert a new 9 V alkaline block
battery (refer to: “installation”). Please observe the correct polarity! This battery exchange has to be
carried out within one minute. Otherwise, the saved data can be lost (electronic telephone book, entries,
messages etc.). Discharged batteries have to be disposed of environmentally and according to legal
rules and regulations!
Page 8

Page 8
VOLUME
= 3
Operation
General information
Dialling mode
The device should only be operated at DTMF telephone networks or behind PABXs (no earth button,
only flash key for hold).
Memory capacity
- entries in the electronic telephone book: up to 65 names (a maximum of 16 characters) and phone
numbers (a maximum of 18 digits)
- 5 speed dialling keys with a phone number and a name each: M1 to M5
- call list for up to 60 incoming calls with indication of date and time
- storing of the last dialled number for redialling
Factory pre-set parameters
Setting of the loudspeaker volume
By pressing the keys
DDDD and ÑÑÑÑ , the loudspeaker volume can be increased
or decreased. The relevant setting (0-7) is displayed.
Setting of call signalling
By means of the slide switch at the bottom cabinet of the telephone housing, the volume of call signalling
can be increased or decreased.
Function menu
The function menu is controlled via the menu
menu menu
menu button as well as by the keys D
DD
D and ÑÑÑÑ. You may leave the
menu at any time without modifying the parameters/settings by pressing the
menu
menumenu
menu button (checking of
parameters and settings).
In order to get to the function menu, press the
menu button
menu button menu button
menu button. The first menu item CONTRAST is
indicated in the display. Select from the following menu items by means of the keys
DDDD or ÑÑÑÑ:
- Display contrast CONTRAST
- Dialling mode DTMF MODE OR PULSE MODE
- Modification of flash signal FLASH=X (X =100 MS OR 300 MS)
- Language used for display texts GERMAN OR ENGLISH
- Time and date HH:MM DD MMM
- VIP NAME OR EMPTY
To confirm your selection, press the
mmmmenu button
enu buttonenu button
enu button. The display shows the current settings. The desired
modifications are carried out by pressing the keys
DDDD or ÑÑÑÑ. To store the requested function, press the
menu button
menu button menu button
menu button again.
Remark:
If a menu item is not selected within 8 seconds or if a setting is not modified within 15 seconds, the
telephone returns to the initial state.
For the following settings, please select the correspondingly requested menu items.
Page 9

Page 9
Display contrast
Select the menu item CONTRAST. There are 6 degrees for the contrast (0-5). Confirm your settings by
pressing
menu.
menu. menu.
menu. The contrast is set by means of the keys D
DD
D or ÑÑÑÑ. Your selection has to be confirmed by
pressing the
menu button
menu buttonmenu button
menu button.
Page 10

Page 10
12:00 01 JAN
Operation
Operation
Setting of date / time
Remark:
If the service "transmission of the phone number of incoming calls" has been activated, the time is
synchronised when the call is received. During the initial installation of the phone or after a power failure
without charged batteries, the correct weekday has to be programmed anew.
Select the menu item time. The hour blinks. Select the desired hour by
means of the keys
DDDD or ÑÑÑÑ. Confirm your entry by pressing menu
menumenu
menu. The
minute blink. Confirm each setting by pressing the
menu button
menu buttonmenu button
menu button. Select
day and month. After the last setting, the telephone returns to the initial
state.
By pressing the
menu button
menu buttonmenu button
menu button several times, the time setting can be skipped.
Setting of flash times
Select FLASH=100. Program the requested flash time (100 ms for operation of the telephone behind a
PABX or for operation via a network provider, like for example Telekom). The setting is carried out by
means of the keys
DDDD or ÑÑÑÑ. Confirm your setting by pressing the menu button.
menu button.menu button.
menu button. In Germany, 300 ms are
used as hook-flash in connection with DTMF control commands for certain features and services.
LCD messages
Visual indications
Indication of line occupation
A LED (o) indicates the line occupation when the handset is picked up or when the key for the
hands-free mode is pressed.
LCD display
The LCD display indicates the relevant operating modes of the telephone.
1. line: symbol bar
2. line: symbol bar
3. line: indication of the dialled phone number as well as of the caller’s number in case of CLIP function
4. line: indication of menu items, name entries in the electronic telephone book as well as operating
modes.
Symbols
++++ battery voltage too low $$$$ hands-free mode
!
! !
! mute function
F
F F
F flash signal P
P P
P pause
Example
+
+ +
+ 20
2020
20 /12
1212
12
14
1414
14: 35
3535
35
NEW
call no.
3333
Page 11

Page 11
123456789
PRE-DIAL ENTRY
123456789
REDIALLING
123456789
CAROLA
Operation of the telephone
General information
Outgoing telephone calls
Telephone calls can be hold by picking up the handset or by activating the hands-free mode. For the
latter, press
$ . The symbol for the hands-free mode is shown in the display. The loudspeaker volume
can be adjusted via the keys
DDDD or ÑÑÑÑ . If the handset is picked up during the hands-free mode, the
loudspeaker is automatically deactivated. If the loudspeaker is activated after picking up of the handset,
it remains active until the handset is replaced.
Incoming telephone calls
If your telephone rings, the visual indication
lights and the display shows the caller’s phone number
or NO CALLER INFO (also refer to chapter "CLIP function"). During the call, the visual indication
lights permanently.
Mute function
During an external call, the microphone can be switched off pressing the
" key. In order to re-activate
the microphone, simply press the
" key again. A deactivated microphone is displayed by the following
symbol:
!!!! .
Dialling
Manual dialling
The requested phone number is dialled by means of the alphanumeric keys. The dialled number is
shown in the display.
Block dialling / Pre-dial entry
Without picking up the handset or pressing the key for the hands-free
mode, enter the phone number via the alphanumeric keys. The entry can
be corrected by the key ç. After the entry is completed, press the key
o. The telephone activates the hands-free mode and dials the entered phone number after ca. 2.5
seconds.
Redialling
The last dialled phone number is automatically stored. Press the key %
and then the key
o or pick up the handset and press the key %
afterwards. The telephone automatically dials the number that was entered
last.
Dialling from the electronic telephone book
The electronic telephone book distinguishes between entries consisting of name and corresponding
phone number (alphabetical order) and phone number entries without name (ascending order). If no
entries are available in the phone book, the message DIRECTORY EMPTY is shown in the display
(regarding new entries, modifications or deletions of entries, please refer to chapter “electronic telephone
book”).
Scrolling through the electronic telephone book via the arrow-buttons
Press the
DIR/CALLS
DIR/CALLSDIR/CALLS
DIR/CALLS key for more than 1 second. The display shows
entry that was selected last. By means of the keys
DDDD or ÑÑÑÑ , you can browse
through the phone book until the requested entry is found. If only a phone
number is assigned to this entry, <NO NAME> is displayed.
Press the key
o . The telephone activates the hands-free mode and dials the last selected phone
number after ca. 2.5 seconds.
Page 12

Page 12
Operation of the telephone
Alphabetical search
Keep the
DIR/CALLS
DIR/CALLSDIR/CALLS
DIR/CALLS key pressed for more than 1 second. The display shows the entry that was
selected last. Enter the first character of the desired name by means of the corresponding alphanumeric
key. The first entry beginning with this character is displayed. By means of the keys
DDDD or ÑÑÑÑ you can
browse through the entries until the desired name is found. Press the
o
o o
o key. The telephone activates
the hands-free mode and dials the selected phone number after ca. 2.5 seconds.
If no entry can be found starting with the selected character, the message NOT FOUND is displayed.
Dialling via the CLIP function
If the function "calling line identification presentation” is activated, the caller’s phone number will be
shown in the display in case of an incoming call. Furthermore, this phone number is stored in the call
memory in chronological order (also refer to the chapter "CLIP function"). Keep the
DIR/CALLS
DIR/CALLSDIR/CALLS
DIR/CALLS key
pressed for less than 1 second. The phone number of the last incoming call is displayed. Via the keys
DDDD
or
ÑÑÑÑ you can scroll to find the desired phone number.
Press the
o
o o
o key. The telephone activates the hands-free mode and dials the displayed phone number
after ca. 2.5 seconds.
Operation behind a PABX
If the Profi Clip Voice is connected to a PABX, the relevant functions of your PABX have to be
considered (automatic CO line access, CO line access e. g. with „0“ or „9“.). For more details, please
refer to the user manual of your PABX. Otherwise, follow the dialling instructions as described above.
Remark:
According to the PABX type, it can be necessary to press % /P (pause) after the CO line access code.
In case of automatic redialling, a pause is made. This pause can also be stored after the CO line access
code in the electronic telephone book.
For more detailed information, please refer to the user manual of your PABX or contact your authorised
dealer.
Special functions
Call transfer and hold function
Press ! in order to place a conversation on hold. Dial the desired target extension number where the
call should be transferred to. Replace the handset as soon as the other party has accepted the call.
Call waiting and two-line operation with hold
If your PABX or your telephone network offers this possibility, the ! key can also be used for two-line
operation with hold / switching between two external lines. While you have one active conversation, a
third party wants to contact you. This is indicated by a call waiting signal in the handset. Press the !
key to place the current conversation on hold. Press > again and you can answer the second call. By
pressing ? two times, you are again connected to the first caller and the second conversation is placed
on hold.
Hold function and two-line operation with hold
During a telephone conversation, you would like to contact a second party (internal or external) to make
an inquiry. For this purpose, press the > key and place the first conversation on hold. Then, dial the
phone number of the second party and talk to this person to sort out your problem. By pressing the key
> the second conversation is parked, repeated pressing on the key > , the connection with your initial
line is re-established. If you always press the > key twice, you can switch between both conversations.
Replacing the handset interrupts the connections.
Remark: According to the PABX, it is necessary to set the flash time for these functions (also refer to
chapter "function menu").
For more details, please refer to the user manual of your PABX or contact your authorised dealer.
Page 13

Page 13
Press
key
1x 2x 3x 4x 5x
key
1 1
Empty
& / =
2 A B C 2
3 D E F 3
4 G H I 4
5 J K L 5
6 M N O 6
7 P Q R S 7
8 T U V 8
9 W X Y Z 9
0 0
* back
# forward
Please note: Cursor to the left
Cursor to the right
empty space/gap
Electronic telephone book
General information
The electronic telephone book distinguishes between
entries consisting of name and corresponding phone
number (alphabetical order) and phone number entries
without name (ascending order).
You have the possibility to browse through the electronic
telephone book, to add new entries, to edit existing
entries and to delete individual entries or all entries.
In order to add new entries or to carry out modifications
in the electronic telephone book, it is possible to enter in
the editing mode letters, digits or special
symbols/characters via the keyboard. Several
functions/characters are assigned to the keys. Any time
you press the keys, the corresponding character is
displayed. The opposite table shows the assignment of
the desired letters/characters to the individual keys.
Remark:
The individual entries in the following chapters have to be made within 15 seconds, otherwise the
message INVALID is displayed for 3 seconds.
If the content of an edit field should be corrected, use the ç key for the correction of digits/numbers
and, for the correction of letters/characters, press the cursor keys (& o ') until the wrong letter is
reached. Then, delete this letter by means of the ç key or replace it by the correct letter.
New entry in the storage locations M1 up to M5 or in the electronic telephone book
Press the key )
))
). The message CHOOSE MEMORY is displayed. Now, you can select from the 5
available storage locations M1 up to M5 or the electronic telephone book. If the memory M1 should be
used, press the key M1. Enter the desired phone number (with a maximum of 18 digits) where the
blinking cursor is positioned. ENTER NUMBER Enter the requested phone number and confirm your
entry by pressing
)))).
The message ENTER NAME is displayed. Enter the requested letter (a maximum of 18 letters possible)
where the blinking cursor is positioned. Press the key assigned to the desired letter as often as it is
necessary to have the intended letter displayed (the assignment of letters/characters to the individual
keys is indicated in the above mentioned table). In order to enter the next letter, move the cursor to the
right by means of the ' key. After all letters and characters have been entered, confirm your entry by
pressing
). As confirmation, the message STORED is displayed for ca. 3 seconds.
If no name should be assigned to a phone number, please skip the entry process for the name by means
of the
)))) key.
If, however, an entry in the electronic telephone book should be carried out, the key
DIR/CALLS
DIR/CALLSDIR/CALLS
DIR/CALLS has to
be pressed after CHOOSE MEMORY. The message ENTER NUMBER is shown in the display. Enter
the requested phone number and confirm your entry by pressing the
)))) key.
ENTER NAME is displayed. Enter the requested letter (a maximum of 18 letters is possible) where the
blinking cursor is positioned. Press the key assigned to the desired letter as often as it is necessary to
have the intended letter displayed (the assignment of letters/characters to the individual keys is indicated
in the above mentioned table). In order to enter the next letter, move the cursor to the right by means of
the ' key. After all letters and characters have been entered, confirm your entry by pressing
). As
confirmation, the message STORED is displayed for ca. 3 seconds.
If no name should be assigned to a phone number, please skip the entry process for the name by means
of the
)))) key.
Page 14

Page 14
123456789
CAROLA
Electronic telephone book
Browsing through the telephone book
consecutively
Keep the
DIR/CALLS
DIR/CALLSDIR/CALLS
DIR/CALLS key pressed for more than 1 second. The entry
which was selected last is displayed. By means of the keys
DDDD and ÑÑÑÑ you
can browse through the telephone book until the desired entry is found. If
only a phone number is assigned to the displayed entry, the message <NO NAME> is indicated in the
display.
alphabetically
Keep the
DIR/CALLS
DIR/CALLSDIR/CALLS
DIR/CALLS key pressed for more than 1 second. The entry which was selected last is
displayed. Press the alphanumeric key being assigned to the first letter of the desired name. The display
shows the first entry beginning with the entered letter. By means of the keys
DDDD and ÑÑÑÑ it is possible to
scroll the entry list until the desired name is found. If no entry beginning with the entered letter is
available, the message NOT FOUND is displayed.
Modifying existing entries
Browse through the telephone book as described above in order to find the desired entry.
Press the
)))) key. The message ENTER NUMBER is displayed. The entered phone number blinks.
Enter the new phone number. When the first digit of this new number is entered, the previous number
disappears and the newly entered number is displayed. Confirm your modification by pressing the
))))
key.
Now, the entered name blinks in the display. Via the alphanumeric keyboard, the new name is entered.
On entering the first letter of the new name, the previous name disappears and the new entry is
displayed. Confirm your modification by pressing the
)))) key.
If no name is assigned to the entry, the message ENTER NAME is shown in the display. The new
entry of a phone number or a name can be skipped by the
)))) key.
Storing the last phone number in the electronic telephone book or in one of the 5 storage
locations M1 up to M5
Press the )
))
) key. The message CHOOSE MEMORY is displayed. There are 5 storage locations M1 to
M5 or the electronic telephone book to select from. If, e. g., the memory M1 should be chosen, press the
key M1. Enter the phone number where the blinking cursor is positioned. The corresponding display
message is ENTER NUMBER. Now, press the % key. The phone number selected last is displayed.
Confirm your entry by pressing the
)))) key.
The message ENTER NAME is displayed. Enter the desired name by means of the alphanumeric
keyboard. Confirm by pressing
)))). As confirmation, the message STORED is displayed for ca. 3
seconds.
The entry of a name can be skipped by the
)))) key.
If, however, the entry should be stored in the electronic telephone book, the key
DIR/CALLS
DIR/CALLSDIR/CALLS
DIR/CALLS has to be
pressed after CHOOSE MEMORY. Enter the phone number where the blinking cursor is positioned. The
message ENTER NUMBER is displayed. Press the % key now. The display shows the phone
number that was dialled last. Confirm your entry by pressing the )
))
) key.
The message ENTER NAME is displayed. Enter the desired name by means of the alphanumeric
keyboard. Confirm your entry by pressing the
)))) key. As confirmation, the message STORED is
displayed for ca. 3 seconds.
The entry of a name can be skipped pressing the
)))) key.
Page 15

Page 15
Deleting
Delete an entry
Browse through the telephone book as described above in order to find the desired entry.
Press the key ç. The message DELETE ? is displayed. Confirm by pressing the key ç. As
confirmation, the message DELETED is shown in the display for ca. 6 seconds. The entry is deleted.
VIP function
In the VIP list (Very Important Person) it is possible to store the phone numbers of preferred callers.
These callers are signalled by the blinking VIP LED. Furthermore, the VIP symbol is shown in the
display. Thus, important incoming calls can immediately be identified.
The following paragraph explains how the VIP function is programmed:
When entering the phone number:
Press the memory key
)))) . The message CHOOSE MEMORY is displayed. Press the key DIR/CALLS
DIR/CALLSDIR/CALLS
DIR/CALLS
in order to carry out entries in the electronic telephone book (the VIP function can only be assigned to
entries in the electronic telephone book). Enter the phone number where the blinking cursor is
positioned. The message ENTER NUMBER is displayed. Enter the desired phone number now.
Confirm your entry by pressing the key
)))). The display shows the message ENTER NAME. Enter the
desired name by means of the alphanumeric keyboard. Then, press the
menu button
menu buttonmenu button
menu button . The VIP symbol
is displayed. Confirm your entry by pressing the key
)))). As confirmation, the message STORED is
displayed for ca. 3 seconds.
If no name is entered, the
me
meme
menu button
nu button nu button
nu button has to be pressed after the phone number input.
The VIP symbol in the display starts to blink. Press the key
)))) once again. The message ENTER NAME
is displayed. Press the
)))) key and thus ignore this request to enter a name. As confirmation, the
message STORED is displayed for ca. 3 seconds.
or
when the phone number is already stored in the electronic phone book:
Calling up the phone number by keeping the
DIR/CALLS
DIR/CALLSDIR/CALLS
DIR/CALLS key pressed for more than 1 second.
Select the desired phone number by means of the keys
DDDD and ÑÑÑÑ .
Press the
)))) key. The phone number, that has already been stored, blinks and the message ENTER
NUMBER is displayed. Press the
menu button.
menu button.menu button.
menu button. In the display, the VIP symbol starts to blink. Press the
key
)))) once again. The message ENTER NAME is displayed. Press the )))) key and thus ignore this
request to enter a name. As confirmation, the message STORED is displayed for ca. 3 seconds.
VIP list
The keys
menu, /
menu, / menu, /
menu, / contrast / DTMF mode / flash / German / date-time / bring you to the VIP list. This list
contains all entries that have been marked correspondingly in the electronic telephone book.
If you are in the menu item VIP list, confirm by pressing the
menu button.
menu button.menu button.
menu button.
If entries have already been made, the first phone number and – if registered – also the name is/are
displayed. By means of the keys
DDDD and ÑÑÑÑ you can browse through the phone numbers stored in the VIP
list. If no entries are available, the message VIP LIST EMPTY is displayed.
If an entry of the VIP list should be deleted, press the ç key after you have selected the desired entry.
The message DELETE ? is displayed. Confirm by pressing the ç key. The message DELETED is
shown in the display for ca. 6 seconds.
Page 16

Page 16
+
+ +
+ 20/12
20/1220/12
20/12
14
1414
14:35
:35:35
:35
NEW
Call no.
1111
3333
07211783860
CLIP function
General information
The CLIP function of your telephone offers the following possibilities:
- the caller can be identified by means of the displayed phone number before the call is answered
- time and date of incoming calls can be determined
- 60 calls can be registered, numbered according to their chronological order
- the number of all incoming calls as well as all newly received calls is indicated in the display
- the caller’s phone number is compared with that in the electronic telephone book and the caller’s
name is displayed
- browsing through the call memory/call list
- automatic dialling of a phone number from the call list
- storing of a phone number from the call list into the electronic telephone book
- individual entries or all entries can be deleted in the call list
Remark:
In order to be able to benefit from the advantages of the CLIP function, the service “calling line
identification presentation” has to activated by your local network operator/telecommunications company.
In case of an incoming call, the phone number is displayed only if the central office supports this feature
and if the caller has not activated the CLIR function (calling line identification restriction).
Display messages for incoming calls
In case of incoming calls, the caller’s phone number is
stored in the call memory in chronological order. The
following pieces of information are displayed for 15
seconds:
- Consecutive number of new calls
- Time and date of incoming call
- Caller’s phone number
- Total number of incoming calls
If the caller’s phone number is in accordance with an entry in the electronic telephone book, the
corresponding name is displayed.
If the transmission of the phone number was deactivated by the caller or if it was not activated by the
network operator/telecommunications company, the display message is NO CALLER INFO. These
calls will not be stored in the call memory.
Remark:
If the call is answered (handset is picked up) before the call information is displayed, it will not be stored
in the call memory.
Browsing
In order to obtain more information on the incoming calls, you can browse through the call memory.
Press the
DIR/CALLS
DIR/CALLSDIR/CALLS
DIR/CALLS key for less than one second. The phone number of the call received last is
displayed. By means of the keys
DDDD and ÑÑÑÑ , it is possible to scroll back and forward. If the call memory is
empty, the message NO CALLS is displayed. After the last entry in the call memory, END OF LIST
is shown in the display. Press the
ÑÑÑÑ key and the display switches to the beginning of the call list,
indicating TOP OF LIST in the display.
Page 17

Page 17
CLIP function
Storing a phone number in the electronic telephone book
Select the desired entry, as described above.
Press the key
)))). The desired phone number is displayed as well as the message ENTER NAME.
Enter the requested name by means of the alphanumeric keyboard. Confirm your entry by pressing the
)))) key. As confirmation, the message STORED is displayed for ca. 3 seconds.
The entry of the name can be skipped via the
)))) key.
Deleting
Deleting of an entry
Select the desired entry, as described above.
Press the ç key. The message DELETE? is displayed. Confirm by pressing the ç key. As
confirmation, the message DELETED is displayed for ca. 6 seconds. The entry is deleted.
Deleting of all entries
Open the call memory, as described before. Press the keys FFFF or GGGG until the display message TOP OF
LIST or END OF LIST is indicated.
Press the key ç. The message DELETE ALL? is displayed. Confirm by pressing the ç key. As
confirmation, NO CALLS is displayed for ca. 3 seconds. All entries are deleted.
Page 18

Page 18
Appendix
Technical data
telephone
System: analogue telephone
Power supply:
Standard functions: via telephone network
Feature functions: 9 V alkaline block batteries
Ambient temperature: 0° C up to + 60° C; 20% up to 75% humidity
Admissible stocking temperature: -10° C up to + 60° C
Dialling mode: DTMF / pulse
Signal key function: flash
Dimensions: 190 x 170 x 90 mm
Weight: ca. 700 g (without batteries and packing)
Technical modifications reserved!
General information
Service
In case of problems or questions regarding the operation of the telephone, please contact your
authorised dealer who is the person to address within the warranty period.
Page 19

Page 19
Page 20

(INT) 12/01
EDV 4931910
TIPTEL AG
Halskestraße 1
D - 40880 Ratingen
phone: +49 2102 428 189
fax: +49 2102 428 180
e-mail: export@tiptel.de
Internet: www.tiptel.com
 Loading...