

Page 1

Page 2

Page 2 tiptel innovaphone IP 200
Release 5, 1st edition, March 2003
PDF version available for download at:
http://www.innovaphone.com
Brand names are used with no guarantee that they may be freely employed.
Almost all hardware and software designations in this manual are registered
trademarks and should be treated as such.
All rights reserved. No sections of this manual may be reproduced in any way
(print, photocopy, microfilm or by any other means) or processed, duplicated or
distributed using electronic systems without explicit approval.
Texts and illustrations have been compiled and software created with the
utmost care, however errors cannot be completely ruled out. This documentation is therefore delivered under exclusion of any liability or warranty of suitability for specific purposes. innovaphone reserves the right to improve or modify
this documentation without prior notice.
Copyright © 2001-2003 innovaphone
®
AG
Böblinger Str. 76 71065 Sindelfingen, Germany
Tel +49 (70 31) 7 30 09-0 Fax +49 (70 31) 7 30 09-99
http://www.innovaphone.com
Page 3
tiptel innovaphone IP 200 Page 3
1 About this manual
This manual describes how to operate your tiptel innovaphone 200 VoIP
telephone. The comprehensive manual titled "innovaphone Operating Manual VoIP Terminals" which is used for the configuration and connection of the IP
200 can be found in the download area at www.innovaphone.com.
The safety instructions specified in Appendix A must be observed.
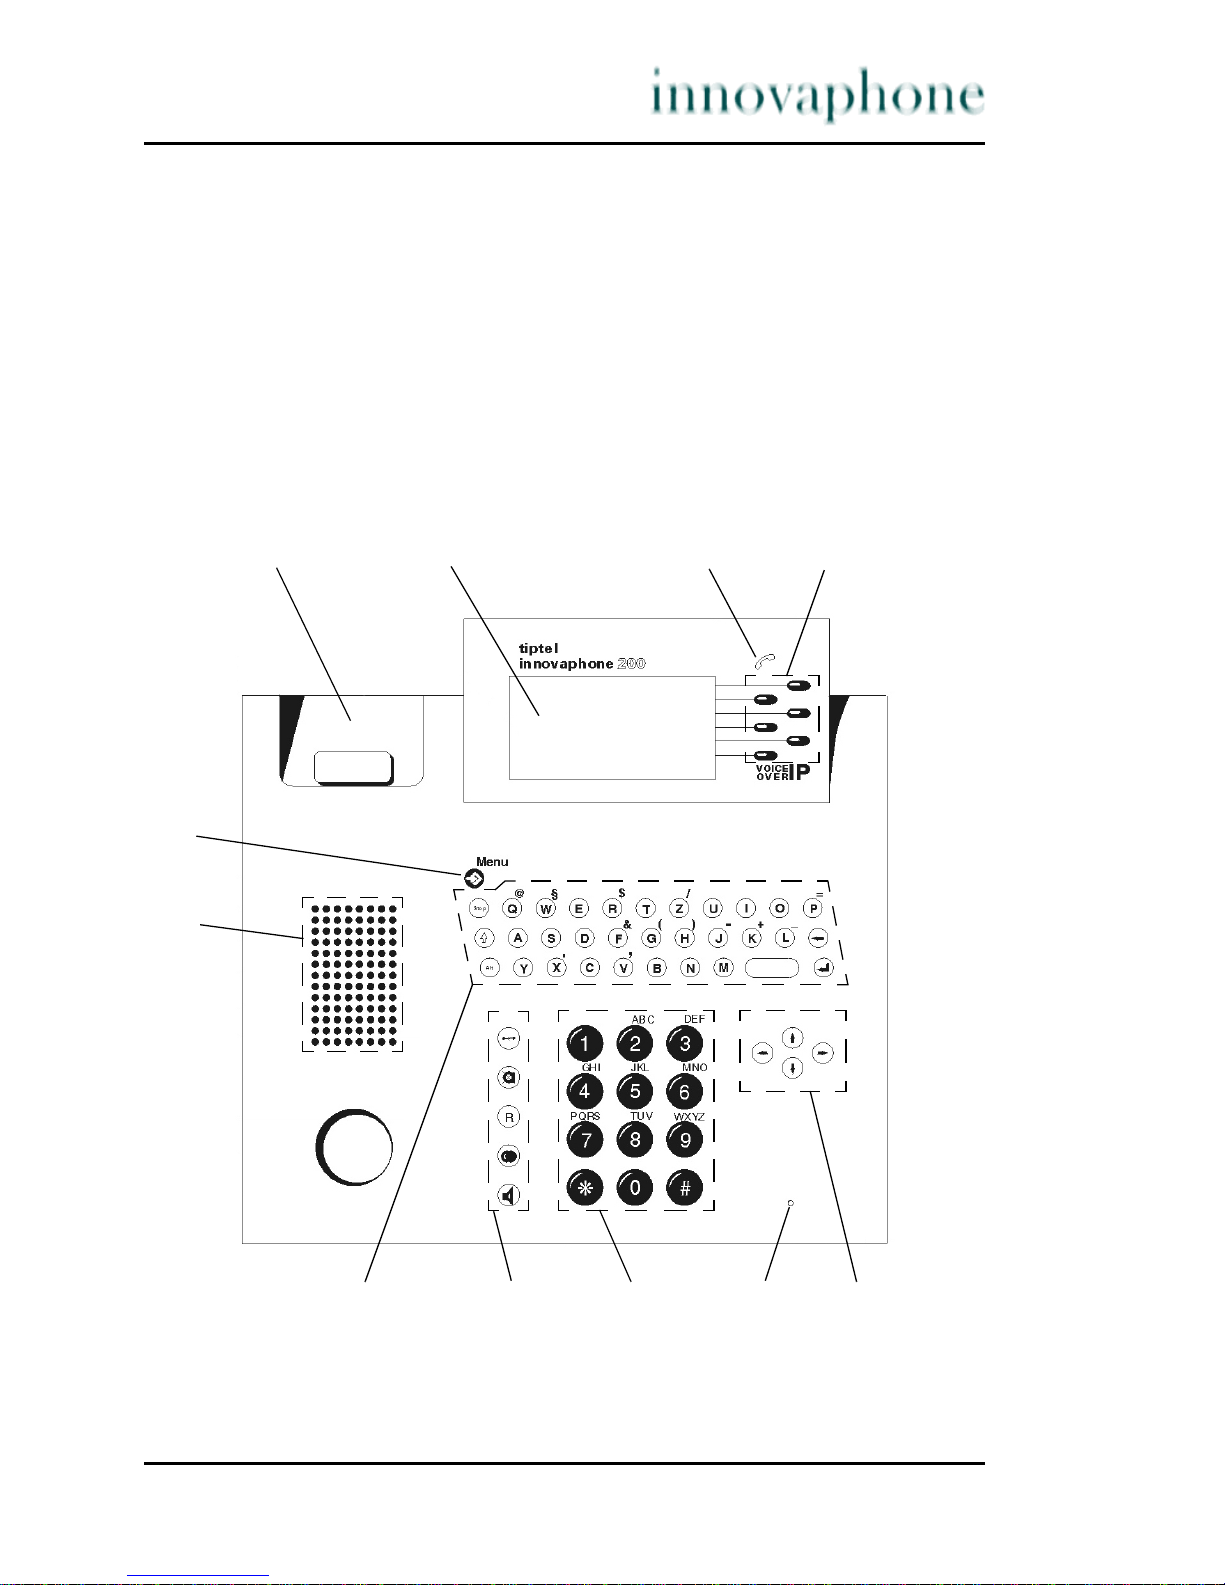
2 Top view of the IP 200
Figure 1 Top view of the IP 200 comfort telephone
12 34
5
6
7891011
Page 4

Page 4 tiptel innovaphone IP 200
Pos. Symbol Description and key function
1Handset support
2Display
3LED
4 Menu selection and Function keys
The six Function keys next to the display are used to select
menus, to execute functions assigned to them or to directly
dial a subscriber displayed there.
5 Menu The Menu key is used to open the main menu or save
changes.
6 Loudspeaker
7Keypad
The Stop key is used to cancel a function and return to the
next higher menu.
The Shift key is used in combination with a subsequent key
to enter capital letters.
The Backspace key is used to delete characters to the left
of the cursor while making an entry.
The Alt key can be used in combination with a subsequent
key to enter the special character above the key as well as
additional special characters.
Space key is for entering spaces
The Enter key is used to complete an entry or select the
current line of a list.
8Function block
The Clearing key is used to end a call.
The Mute key is used to switch off/on the microphone.
The Refer-back key is used to enable the functions "Hold"
and "Switch". In idle mode, the Refer-back key is used to
call up the list of missed calls.
Page 5
tiptel innovaphone IP 200 Page 5
2.1 Display
Figure 2 Display of the IP 200 comfort telephone
Pos. Symbol Description and key function
The Redial key is used to call up the list of 100 last dialled
phone numbers.
The Loudspeaker key is used to switch on/off the handsfree system.
9
n ... v
Dial keypad
Digit keys for entering phone numbers
Star and hash have special functions for touch-tone
dialling.
10 Microphone
11
Arrow keys for menu navigation
1234
Page 6
Page 6 tiptel innovaphone IP 200
Pos. Symbol Designation
1 Name (H.323 ID or nickname of the innovaphone PBX con-
figuration)
2 Status line; gives information on the current status of the
telephone using the following symbols:
Date
Time
No connection to the gatekeeper
Connection established to the gatekeeper
Loudspeaker on
Hands-free system activated
Microphone switched off (symbol flashing)
Head set activated
Call diversion activated
Handset activated
Telephone lock activated
3 Own phone number (E.164)
4 Function keys for dialling a function directly
Page 7
tiptel innovaphone IP 200 Page 7
2.2 Operating instructions
2.2.1 Setting the volume
You can adjust the volume while establishing a connection as well as during the
call. This only applies to the loudness of the device currently active (handset,
hands-free system or head set), which is retained after the call. The "Vol"
display shows the value set (see Fig. 3).
Figure 3 Adjusting the volume
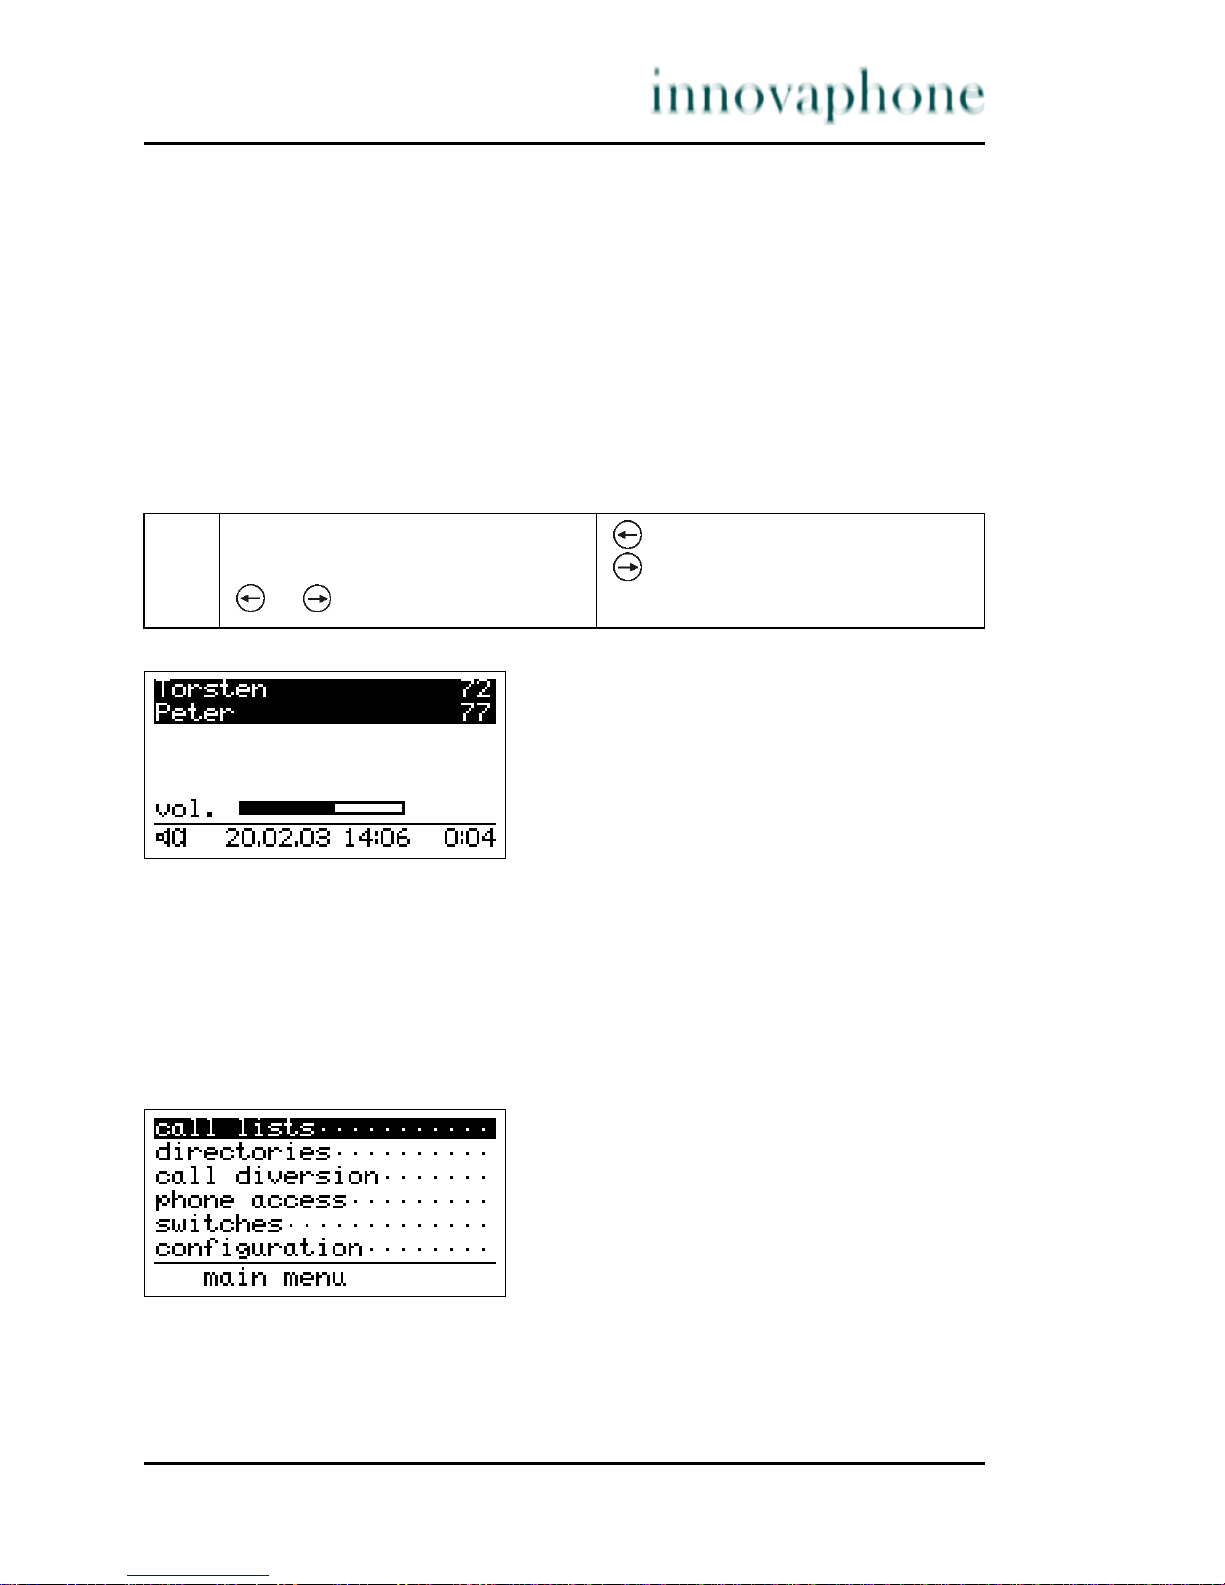
2.2.2 User guidance
The menu system helps you operate your IP 200. Starting at the main menu,
you are directed to your desired function via submenus.
Figure 4 Main menu
1. The volume can be changed in
steps by pressing the Arrow keys
or .
Volume one step quieter
Volume one step louder
Page 8

Page 8 tiptel innovaphone IP 200
Call lists .....................Menu for displaying call lists for incoming, outgoing
and combined calls. A filter is able to be set for the display of combined calls, as well as in the menu for displaying the active return calls.
Directories ................Menu for entering a directory or looking through a
telephone directory.
Call diversion ............Menu for setting and displaying call diversions. This
menu item only appears if the gatekeeper supports the
call diversion in accordance with the H.450 standard.
Phone access ............ Menu for blocking the terminal, changing the PIN or
for changing the user and logging joint users on and
off.
Switches .................... Setting functions such as call waiting, line identifica-
tion presentation, head set and direct dialling
Configuration ............ Secondary menus for configuration
In general, the following applies:
• The initial condition is that the handset is hung up and the display shows
the date and time.
• The Menu key is used to switch from the initial condition to the main
menu. It is used to switch from any submenu to the next higher-level menu,
at the same time confirming any changes made in the submenu.
• The modified values are saved upon returning to the main menu, but first
an enquiry is made about whether the modifications are to be saved.
• The Function keys next to the display are used to switch to the corres-
ponding submenu of the respective line (i.e. one menu level lower) or to
activate the corresponding function of the line.
• The Arrow keys and are used to switch between the menu selection
lines or function lines and the edit fields of a menu, i.e. to determine the
current line of the menu.
• If the current line is a menu selection line or function line, it is displayed
inversely. If it is an edit field, a flashing cursor indicates the input position.
Page 9
tiptel innovaphone IP 200 Page 9
• The Arrow key is used to switch to the corresponding submenu of the
current line (i.e. one menu level lower) or to activate the corresponding
function of the line.
• The Stop key and the Arrow key switch one menu level higher each
time they are pressed. Any changes made in the submenu are discarded.
To adopt any changes, the submenu has to be exited by pressing the
Menu key.
• The Clearing key is used to discard all entries and return to the initial
condition.
• The Enter key is used to complete entries in an edit field.
• The bottom line of the display shows the current menu level (<<...).
The number of arrows "<" corresponds to the level in the menu.
Moving within lists
Your IP telephone offers you a number of lists in which you can move using the
Arrow keys. The respective current entry is displayed inversely.
Figure 5 Example of an entry to a directory
You can move up and down within the list using the Arrow keys and .
In a submenu, the Arrow key moves you to the current entry. The entry can
be edited in this menu.
The Menu key moves you to the current entry in a context menu. Additional
information on the entry is displayed in this menu. Furthermore, it allows dialling with line identification presentation either switched on or off.
The current entry is dialled immediately by lifting the handset or pressing the
Enter key , i.e. the destination specified by the entry is dialled (hand-free
mode).
Page 10
Page 10 tiptel innovaphone IP 200
An entry can also be dialled using the Function keys . This precise function
however depends on the type of list.
Editing entries
Various forms contain edit fields in which you can make entries. A flashing vertical line appears in edit fields as a cursor.
Figure 6 Editing entries
Newly entered characters are added to the left of the cursor. Any characters
present to the right of the cursor are shifted to the right. The Backspace key
(above the Enter key ) deletes the character to the left of the cursor.
The key combination and deletes the character to the right of the cursor.
Entering special characters
You can enter any Western European characters in accordance with ISO 8859-1
on the keypad. Characters without their own key can be reached by first pressing or. , and then the corresponding letter key (see Table 1).
Different characters can be selected by pressing the letter key consecutively in
quick succession. The following special characters are available and can be
entered by pressing the corresponding key combination of the respective character:
! ” # $ % & ´ ( ) * + , - . / : ; < = > ? @ [ ] \ ^ _ ‘ { | } ~ £ §
¿ ÷
Page 11

tiptel innovaphone IP 200 Page 11
Table 1 Special characters
Key + key + +
key
Key + key + +
key
Q @ [ ] \ ... ´ ( ) * ... F & ´ ( ) ... ~ £ § ¿ ...
W§
¿ ÷ ... £ § ¿ ... G ( ) * + ... { | } ~ ...
E è é ê ë È É Ê Ë H ) * + , ... } ~ £ § ...
R $ % & ... % & ´ ... J - . / : ; ... [ ] \ ^ ...
T ð ¥ ð ¥ K + , - . / ... ] \ ^ _ ...
Z / : ; < ... ? @ [ ] ... L _‘ { | } ... ^ _ ‘ { ...
U ü ù ú û Ü Ù Ú Û Y Ý ý ÿ Ý ý ÿ
I ì í î ï i Ì Í Î Ï X . / : ; ... ; < = > ...
O ö ø ò ó ô õ Ö Ø Ò Ó Ô Õ C ç ¢ Ç
P = > ? ... | } ~ £ ... V , - . / : ... + , - . / ...
A ä å æ à á â ã Ä Å Æ À Á Â Ã B
Þ þ
Sß ß Nñ Ñ
DÐ Ð Mµ µ
Page 12

Page 12 tiptel innovaphone IP 200
2.3 Phoning
2.3.1 Answering a call
You receive a call and your telephone rings. The name and the phone number
of the caller are displayed. The name and phone number of the person for
whom the call is intended are also displayed. This is particularly useful if you
wish to identify the actual caller when a call is diverted to your telephone.
Figure 7 Answering a call
If you would like to answer the call:
If you would like to reject the call:
2.3.2 Terminating a call
You would like to terminate an existing connection.
1. Pick up the handset or press the
Loudspeaker key .
You are connected with the caller
and can make a call.
1. Press the Clearing key . The telephone returns to idle
mode.
1. Replace the handset. Press the
Loudspeaker key if you are in
hands-free mode.
The connection is terminated.
Page 13

tiptel innovaphone IP 200 Page 13
2.3.3 Direct manual dialling
In this case, the IP telephone dials the number while it is being entered. If a
connection has already been established, all digits entered are transmitted as
DTMF signals. You can remote control terminals this way.
Figure 8 Direct dialling
2.3.4 Prepared dialling
In this case, the number to be called is first prepared and then dialled.
1. Pick up the handset or switch on
hands-free conversation using
the Loudspeaker key .
In handset mode the symbol
appears, in hands-free mode the
symbol.
2. Enter the phone number using
the keys.
The dial code appears and is dialled
by the telephone (see Fig. 8).
3. After the call:
Replace the handset or switch
off the hands-free system using
the Loudspeaker key .
The telephone returns to its initial
condition.
1. Use the keys to enter the phone
number
The dial code appears on the
display.
2. Pick up the handset or switch on
hands-free conversation using
the Loudspeaker key .
The telephone dials.
Page 14

Page 14 tiptel innovaphone IP 200
The Menu key can be used to switch to a menu in which you can switch call
number suppression on or off before dialling.
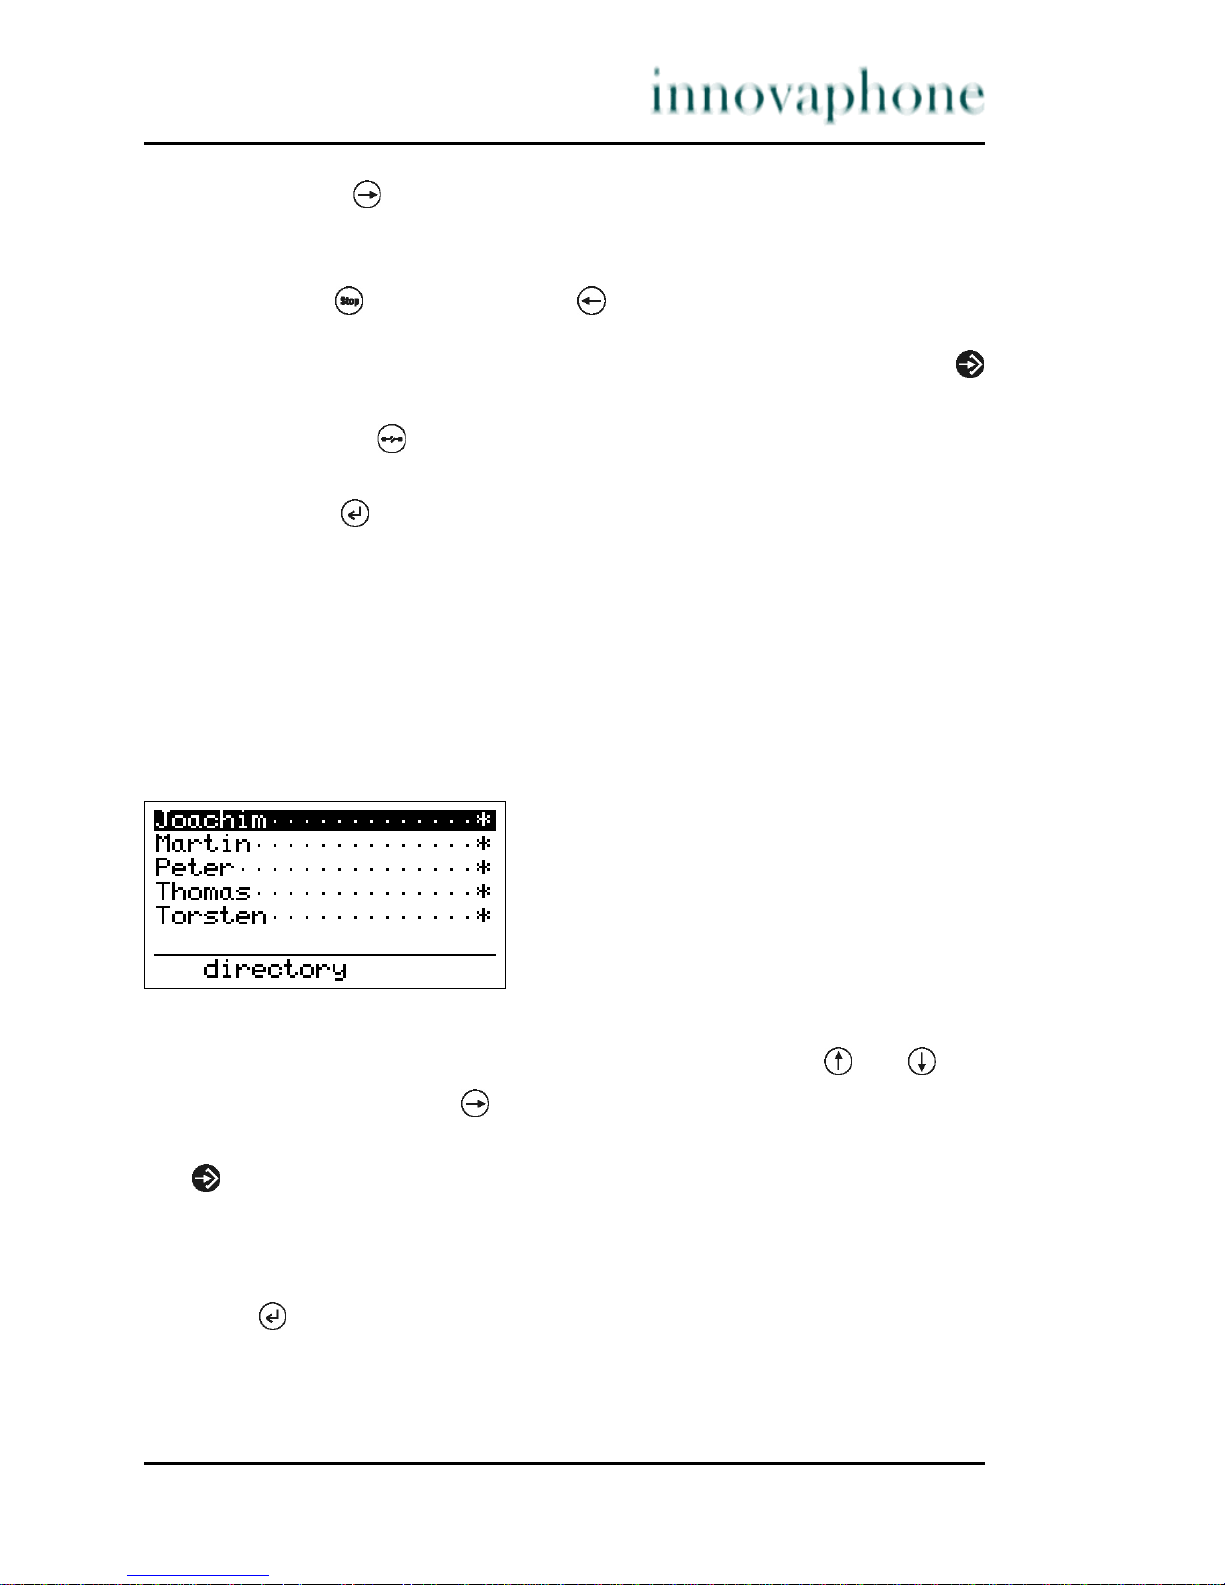
2.3.5 Dialling from the directory
The directory is opened automatically once the first letter of a desired entry is
entered. The entries matching the respective incomplete entry are displayed.
The desired entry can be selected using the Arrow keys or .
Figure 9 Directory menu
This subscriber is dialled by picking up the handset, pressing the Loudspeaker
key or by pressing the Enter key . The current entry can also be dialled
by pressing the Function key next to the entry. The previous entry is dialled
by pressing the Function key next to the sixth line.
Figure 10 Dialling from the directory
1. Enter the first letters of the
entry.
The entries beginning with the
entered letters appear on the
display.
2. Press the Arrow key or . Select the desired entry
(see Fig. 10).
Page 15

tiptel innovaphone IP 200 Page 15
In a context menu, the Menu key moves you to the current entry. You can
initiate dialling from this menu (with phone number suppression if desired).
2.3.6 Different types of phone numbers
In addition to dialling normal phone numbers your IP telephone can also be
used using H.323 names and IP addresses.
Phone numbers consisting of characters other than the digits 0 to 9 and the
characters * and # are interpreted as H.323 names. Phone numbers beginning
with the character @ are always regarded as H.323 name. The @ is removed
before dialling however.
In some cases you can also directly dial an IP address. To do this, enter @ followed by the IP address using the Star key as decimal point . An extension
number can be added, where appropriate, separated by a hash #.
Figure 11 Dialling an IP address
3. Start dialling:
Pick up the handset and press
the Enter key or the Loudspeaker key .
The telephone starts to dial the
phone number.
Page 16

Page 16 tiptel innovaphone IP 200
2.3.7 Redialling
The 100 phone numbers last dialled are saved automatically together with their
time and date and can be dialled again. In the initial condition, press the Redial
key to call up the function. The list of the phone numbers dialled last are displayed. The handset symbol on the display indicates that a call has taken
place.
Figure 12 List of the phone numbers dialled last
Dialling from the redial list
In a context menu, the Menu key moves you to the current entry. You can
initiate dialling from this menu (with phone number suppression if desired).
If, during a connection, a call has been diverted to a different number, the destination of the diversion is displayed in addition to the number initially dialled.
You can also initiate dialling this number (with phone number suppression
where appropriate).
1. Press the Redial key . The contents of the redial list
appear on the display (see Fig 12).
2. Press the Arrow key or . Select the desired entry.
3. Start dialling:
Pick up the handset and press
the Enter key or the Loudspeaker key .
The telephone starts to dial the
phone number.
Page 17

tiptel innovaphone IP 200 Page 17
Corrected dialling from the redial list
It is possible for to first correct the phone number to be repeated.
Editing the redial list
Figure 13 Editing the redial list
1. Press the Redial key . The contents of the redial list
appear on the display (see Fig 12).
2. Press the Arrow key or . Select the desired entry.
3. Press the bottom Function key
next to the entry.
The cursor is within the field for
the phone number. You can now
correct the phone number.
4. Pick up the handset, press the
Enter key or Loudspeaker
key or press the bottom
Function key next to the
entry again.
The telephone starts to dial the
phone number.
1. Press the Redial key . The contents of the redial list
appear on the display (see Fig 12).
2. Press the Arrow key or . Select the desired entry.
3. Press the top Function key
or the Arrow key .
A menu appears in the display.
In addition, the call duration
display appears for the calls
already made (see Fig 13).
Page 18

Page 18 tiptel innovaphone IP 200
Adding a number to the directory
It is possible for you to copy a phone number from the redial list into your direc-
tory.
Deleting an entry
Deleting a list
2.3.8 Open listening
You can switch on the loudspeaker while making a call using the handset,
making it possible for the call to be heard in the room.
Figure 14 Open listening
1. Press the Function key next
to Save no in directory as
illustrated by Fig. 13.
The input field of your directory
appears. The phone number has
already been entered. You can
now add the name and complete
the entry.
1. Press the Function key next
to Delete entry as illustrated
by Fig. 13.
The current entry is deleted.
The display returns to its previous
state (see Fig. 12).
1. Press the Function key next
to Delete list as illustrated by
Fig 13.
All older entries and the entry
being currently processed are
deleted. The display switches to
its previous state (see Fig. 12).
Page 19

tiptel innovaphone IP 200 Page 19
2.3.9 Hands-free conversation
The hands-free system makes it possible to make a call while the handset is
hung up.
Figure 15 Hands-free conversation
a) You receive a call:
1. Press the Loudspeaker key
during a call.
The loudspeaker symbol
appears (see Fig. 14) and the
loudspeaker is switched on.
Adjust the desired volume using
the Arrow keys or .
2. Press the Loudspeaker key
again.
The loudspeaker symbol disappears. The loudspeaker is
switched off.
1. Press the Loudspeaker key . The hands-free system is
switched on. The symbols " "
appear (see Fig. 15). The handsfree system is switched on. Set
the desired volume using the
Arrow keys or .
2. Press the Loudspeaker key
again after the call.
The hands-free system is
switched off.
Page 20

Page 20 tiptel innovaphone IP 200
b) You want to make a hands-free call:
Switching from the handset to the hands-free system and vice versa
You are making a call using the handset and would like to switch to the hands-
free system:
You are making a call using the hands-free system and would like to switch to
the handset:
1. Press the Loudspeaker key . The loudspeaker is switched on.
The symbols " " appear.
2. Enter the phone number. The telephone dials.
3. Press the Loudspeaker key
again after the call.
The hands-free system is
switched off.
1. Press the Loudspeaker key
and hold it down.
The loudspeaker symbol " "
appears.
2. Replace the handset.
3. Let go of the Loudspeaker
key .
The microphone symbol appears
" " next to the loudspeaker symbol " ". The hands-free system is
switched on. Set the desired volume using the Arrow key or
.
1. Replace the handset. The symbols " " disappear. The
hands-free system is switched off.
Page 21

tiptel innovaphone IP 200 Page 21
2.3.10 Muting
You can mute the microphone during a phone call in order to make a confidential enquiry in the room without your conversation partner hearing you.
Figure 16 Muting
1. Press the Mute key during a
call.
The microphone symbol " "
flashes (see Fig. 16). The handset
or the hands-free system is
switched off. Make a room
enquiry.
2. Press the Mute key again. The flashing microphone symbol
" " disappears and the handset
microphone is switched on again
if the call is being made with the
handset picked up.
The microphone symbol " " is
displayed permanently and the
hands-free microphone is
switched on again if the call is
being made with the hands-free
system.
You can resume your call.
Page 22

Page 22 tiptel innovaphone IP 200
2.3.11 Making a refer-back call
The line can be put on hold during a call. With the call on hold, you can make a
refer-back call to another subscriber. Your conversation partner on hold cannot
listen to this refer-back call. You also need the hold function to initiate the
switch and transfer functions.
Figure 17 Holding a call
1. Press the Refer-back key
during a call.
The call partner is put on hold.
You hear a dial tone. The line on
hold is displayed brightly, the
active line is displayed inversely
(see Fig. 17).
2. Dial the phone number. A further connection is estab-
lished.
Page 23

tiptel innovaphone IP 200 Page 23
2.3.12 Switching between lines
You can switch between two lines using the switch function
Figure 18 Switching between lines
2.3.13 Initiating a conference
You can establish a conference between two lines using the 3 party function.
To do this, you need an active line and a line on hold (see Section 2.3.11 "Making
a refer-back call" From page 22).
Figure 19 Conference
1. Press the Refer-back key
during a call with an active line
and a line on hold.
The active line is put on hold and
the line on hold activated
(see Fig. 18).
Page 24

Page 24 tiptel innovaphone IP 200
You can end the conference by pressing the Menu key again. The call on
hold prior to the conference is now on hold again.
2.3.14 Transferring a call
You are making a call and would like to transfer it to another line.
Figure 20 Transferring a call
1. Press the Menu key during a
call involving an active line and a
line on hold.
A conference is initiated between
the active line and the line on
hold. All the subscribers can now
talk with each other (see Fig. 19).
1. Press the Refer-back key
during a call.
The call partner is put on hold.
You hear a dial tone. The line on
hold is displayed brightly, the
active line is displayed inversely.
2. Dial the desired phone number. The connection is established.
If the subscriber answers, you
can make a call with him/her in
the same way as with a referback call.
3. Replace the handset or, if you
are in hands-free mode, the
Loudspeaker key .
The caller is connected to the
dialled line.
Page 25

tiptel innovaphone IP 200 Page 25
When switching a call, you do not have to wait until the desired subscriber
answers. The handset can be replaced immediately after the phone number has
been dialled.
2.3.15 Call waiting
Someone tries to call you during a call. You are notified by a knocking tone.
In addition the red LED flashes to the right above the display and the new connection flashes on the display.
If you would like to answer the caller without terminating the current call, then
press the Refer-back key . If you would like to terminate the current call
before answering the call, then press the Clearing key .
Call waiting can be deactivated in the Switches menu accessed via the main
menu.
2.3.16 Return call in the event of an engaged line or
unanswered call
Automatic recall can be initiated if the line of the called party is engaged.
The IP 200 indicates that the line is free as soon as the called party has terminated the call. As soon as you pick up the handset of the IP 200, the call is initiated and the opposite telephone rings. The telephone network of the call
partner must support this feature.
Figure 21 Recall menu
Page 26

Page 26 tiptel innovaphone IP 200
The recall function is restricted to an hour. The call is then automatically deleted
from the list of active return calls.
Automatic recall is only possible within the network of the innovaphone PBX.
Use the automatic redial function instead of the recall function outside the network of the innovaphone PBX (see next section).
2.3.17 Automatic redialling
Automatic redialling can be initiated, as long as no-one answers the call at the
opposite side or the busy tone is heard.
If the opposite party makes a call again, the recall option is displayed on your
IP 200 and the telephone rings.
1. Press the Menu key if the
busy tone or the distant dial
tone can be heard.
The Recall menu is displayed
(see Fig. 21).
2. Press the Function key next
to Recall and replace the handset.
Automatic recall is activated.
3. If the returned call is indicated
by the IP 200
a) Pick up the handset or press
the Loudspeaker key to initiate the return call.
a) A connection is established
with the opposite party.
b) Press the Clearing key to
reject the return call.
b) The connection is not established and the return call is
deleted from the list of active
return calls.
1. Press the Menu key if the
busy tone or the distant dial
tone can be heard.
The Recall menu is displayed
(see Fig. 21).
Page 27

tiptel innovaphone IP 200 Page 27
Redialling is restricted to 20 minutes. Just simply hang up if you wish to terminate redialling any earlier. The call is deleted from the list of active return calls.
2.3.18 Call counter
The IP 200 has a call counter which indicates the amount of incoming calls
during a period of absence.
Figure 22 Call counter
The call counter is deleted automatically if the call list is called up. You can call
up the call list by pressing the Refer-back key .
2. Press the Function key next
to Recall but do not
replace the
handset.
Automatic redialling is activated.
3. The IP 200 tries to reach the
opposite side at intervals of
30 seconds.
A short signal tone sounds and
the connection is established as
soon as the opposite party
answers the call.
Page 28

Page 28 tiptel innovaphone IP 200
Appendix A: Safety instructions
The manufacturer disclaims responsibility for injury to persons, damage to property or consequential damage resulting from improper use of the telephone set.
innovaphone
®
AG declares that the appliance meets all basic requirements of
the European Guideline 1999/5/EC.
The "innovaphone Administrator Manual - VoIP Gateways" and the "Administra-
tor Manual - innovaphone PBX" should also be observed for the configuration of
the IP 200. All instructions specified there should be carefully observed and the
appliances should only be used in accordance with the instructions.
Safety instructions for the IP 200
Please observe the following instructions for your own safety:
Power supply
The mains adapter of the appliance is designed for operating with a 100 - 240-V,
50-Hz AC mains network. Never try to connect the appliance to other mains.
The appliance can not be operated during a mains failure. The settings of the
appliance however are retained.
The power socket must be nearby the appliance and easy to access. The power
supply of the appliance can be interrupted by pulling the mains adapters out of
the power socket or, with power supply via network cable (power over LAN), by
pulling the network cable.
Installation and connection
Lay the connection lines in such a way that no-one can stumble over them.
None of the connected cables may be bent excessively, pulled or subjected to
mechanical strain.
The appliance is intended for use in dry rooms only.
The appliance may not be installed and operated in the following surroundings.
• In damp, dusty or potentially explosive rooms
• At temperatures over 40 °C or under 0 °C
Page 29

tiptel innovaphone IP 200 Page 29
• Where it is subject to impact stress or vibrations
• At places subject to direct to sunlight
Some types of furniture varnish or care products can damage the plastic feet of
the IP 200 comfort telephone and leave stains behind. In these cases, make
sure you put the appliance on a stable, non-slip surface.
Cleaning
Use a soft, slightly damp cloth to clean the surface of the appliance's housing.
Do not use any chemicals or abrasives. The telephone does not require maintenance.
Malfunctions
It is not necessary to open the appliance if it is operated and serviced as
intended.
Do not open the appliance or connect it any more if it is defective. In this case,
bring the appliance to your dealer or service centre. Keep the original packaging
in case you need to send back the appliance, since it protects your appliance
ideally. Back up all entries (e.g. on a PC) to avoid losing data.
Disposal
If the appliance is to disposed of, it should be disposed of as electronic scrap in
accordance with local regulations.
Page 30

Page 30 tiptel innovaphone IP 200
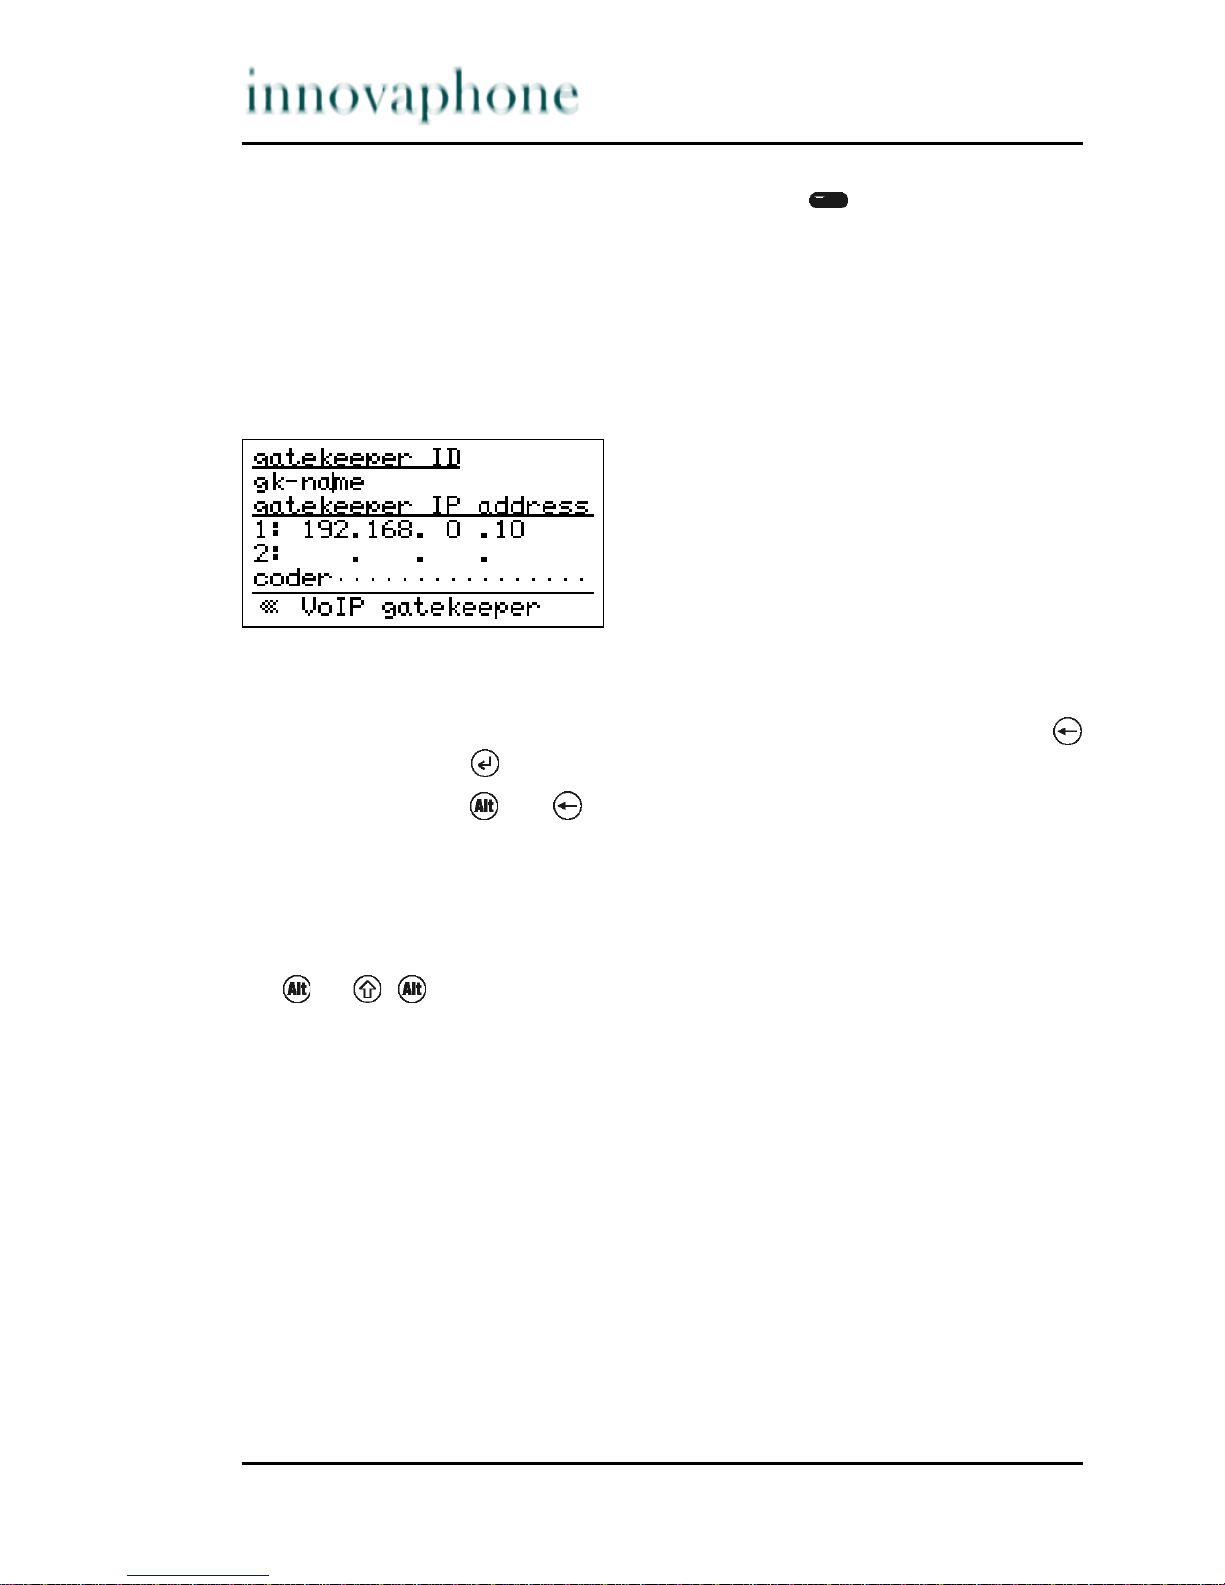
Appendix B: Menu structure
Menu
call lists...........
calls (combined).....
filter...............
calls (inbound)......
calls (outbound).....
active recalls.......
directories..........
directory input......
telephone number.....
number (E164)
name (H323)
setup................
ringing
change melody........
notes................
search (local).......
call diversion.......
clear diversion......
current diversion....
unconditional
telephone number.....
busy
telephone number.....
no reply
telephone number.....
1: ..................
2: ..................
3: ..................
4: ..................
phone access.........
lock phone...........
Page 31

tiptel innovaphone IP 200 Page 31
change PIN...........
switch user..........
register co-user.....
unregister co-user...
switches.............
ringing..............
call waiting
number present.
headset
direct dial
destination number...
configuration........
Page 32

innovaphone® AG TIPTEL AG
Böblinger Straße 76 Halskestr. 1
D-71065 Sindelfingen D-40880 Ratingen
Tel.:+49 (70 31) 7 30 09-0 phone: +49 2102 428-189
Fax:+49 (70 31) 7 30 09-99 fax: +49 2102 428-180
www.innovaphone.com e-mail: export@tiptel.de
info@innovaphone.com Internet: www.tiptel.net
EDV 4931597
 Loading...