

Page 1
Operating instructions
(en)
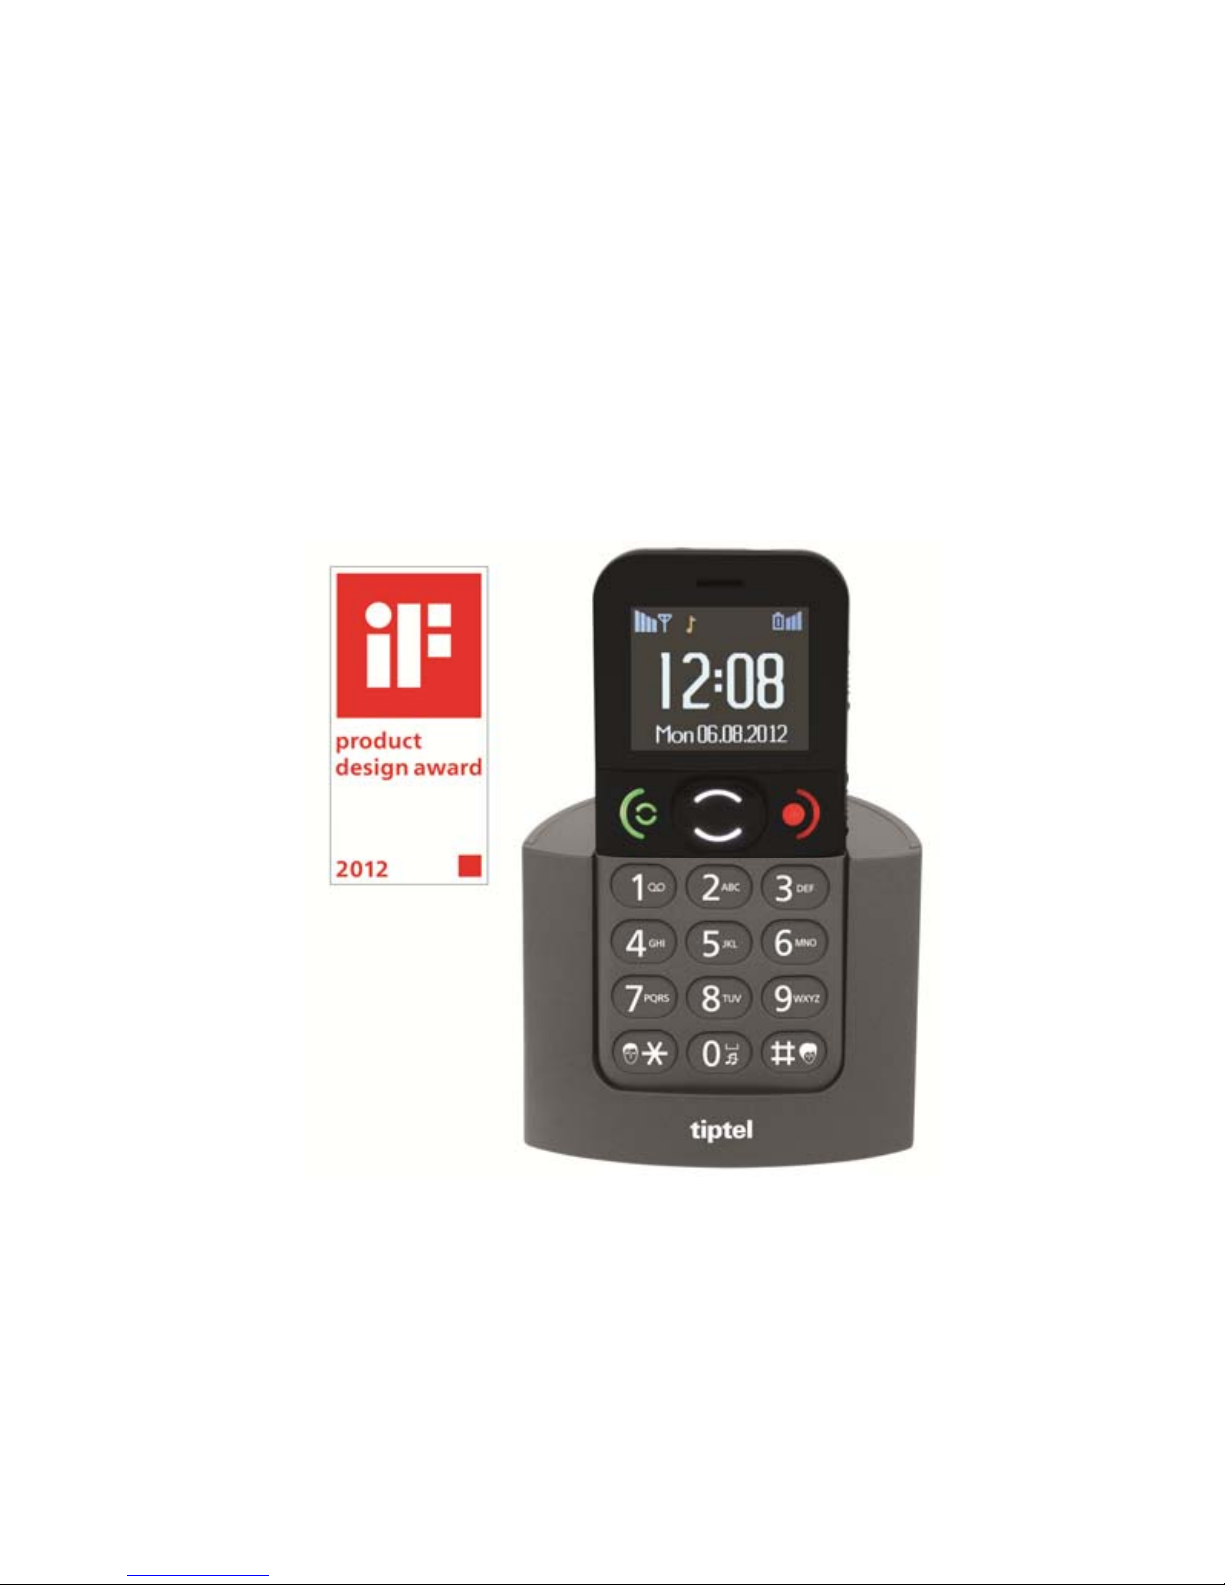
tiptel Ergophone 6050
tiptel
Page 2

Page 3

Contents
3
Contents
Contents ............................................................................................. 3
Safety information .............................................................................. 7
Initial use ............................................................................................ 9
Check the contents ......................................................................... 9
Installing the SIM card and battery ................................................. 9
Switching on the telephone ............................................................ 10
Setting language, date and time ..................................................... 11
Charging the battery ....................................................................... 11
Telephone controls ............................................................................ 13
Controls on the front ....................................................................... 13
Controls on the rear ........................................................................ 15
Controls on the left .......................................................................... 15
Controls on the right ....................................................................... 16
Features on the top ......................................................................... 16
Features on the underside .............................................................. 16
Symbols on the display................................................................... 17
Making calls ........................................................................................ 18
Accepting calls ................................................................................ 18
Rejecting calls ................................................................................. 18
Calling with direct dial ..................................................................... 18
Dialling with the redial function ....................................................... 19
Calling with speed dial .................................................................... 19
Dialling from the contacts ............................................................... 20
Hands-free talking and muting ....................................................... 21
Silent ................................................................................................ 21
Page 4

Contents
4
Speaking keys and telephone numbers ......................................... 22
Phonebook .......................................................................................... 23
Options in contacts ......................................................................... 23
Call ............................................................................................... 23
Send text message ...................................................................... 24
Add new contact .......................................................................... 24
View .............................................................................................. 25
Edit ............................................................................................... 25
Delete ........................................................................................... 25
Move ............................................................................................. 25
Copy/move/delete all contacts .................................................... 25
Phonebook settings ..................................................................... 25
Setup speed dialling .................................................................... 26
Call history .......................................................................................... 27
Options in call logs ......................................................................... 27
Call ............................................................................................... 28
Send text message ...................................................................... 28
Call details .................................................................................... 28
Delete ........................................................................................... 28
Messaging (SMS) ............................................................................... 29
View received SMSs ........................................................................ 29
Send SMS ....................................................................................... 30
Write SMS text .............................................................................. 30
Advanced message functions ........................................................ 31
Drafts ............................................................................................ 31
Templates ..................................................................................... 32
Delete SMS .................................................................................. 32
Message settings ......................................................................... 32
Page 5

Contents
5
Organizer ............................................................................................ 34
Alarm ............................................................................................... 34
Tasks ............................................................................................... 35
Radio ............................................................................................... 35
Radio options ............................................................................... 35
Calendar .......................................................................................... 36
Calculator ........................................................................................ 36
Settings ............................................................................................... 37
Phone settings ................................................................................ 37
Time & date .................................................................................. 37
Language ..................................................................................... 37
Tone settings ................................................................................ 37
Alert type ...................................................................................... 38
Volume ......................................................................................... 38
Time voice ....................................................................................... 38
Call settings ..................................................................................... 39
Caller ID ........................................................................................ 39
Call waiting ................................................................................... 39
Call divert ..................................................................................... 40
Call barring ................................................................................... 40
Network selection ........................................................................ 40
Changing password ........................................................................ 40
Emergency settings ........................................................................ 41
Restore factory settings .................................................................. 41
Emergency calls ................................................................................. 42
Testing the emergency call function ........................................... 43
Set-up of emergency calls .............................................................. 43
Emergency numbers ................................................................... 43
Page 6

Contents
6
Emergency SMS .......................................................................... 44
Emergency display ...................................................................... 44
Cancelling an emergency call ........................................................ 44
Important information on emergency call functions ....................... 45
Appendix ............................................................................................. 46
Service ............................................................................................. 46
Guarantee ........................................................................................ 46
CE sign ............................................................................................ 48
Ecological information .................................................................... 48
Page 7

Safety information
7
Safety information
Only use the telephone at places where it is permitted. The use of mo-
bile phones is generally prohibited in hospitals and aircraft, and at petrol stations.
Do not open the device yourself and do not attempt repairs on your
own. Repairs may only be carried out by qualified specialists.
Do not expose the telephone to smoke, chemicals, humidity, dust or
excessive heat (direct sunlight).
Keep the telephone and accessories away from children.
The telephone's speaker can be set to a very loud volume. Check the
volume before use to avoid damaging your hearing.
When driving, only use the telephone with an approved hands-free set.
Observe national legislation governing the use of mobile telephones.
Keep the telephone 20cm away from an implanted pacemaker. Imme-
diately switch off the telephone if you feel or suspect any impairment.
Do not use any power supply unit other than the one supplied.
Only use original accessories and batteries.
The telephone is not waterproof. Avoid contact with liquids.
Do not rely exclusively on your mobile telephone's emergency call
function in emergencies. Establishing an emergency connection may
not always be possible for technical reasons.
Dispose of the device and the battery in line with environmental guide-
lines. Your local waste disposal provider offers collection points for
electronic waste and batteries. Do not dispose of the device or battery
in household waste or throw into a fire.
Page 8
Safety information
8
Dispose of packaging material in line with local regulations.
Page 9
Initial use
9
Initial use
Check the contents
Included in the delivery:
tiptel Ergophone 6050 mobile phone
Power supply unit
Charger
Li-Ion 3.7 V/1000mAh battery pack
Headset
Operating instructions
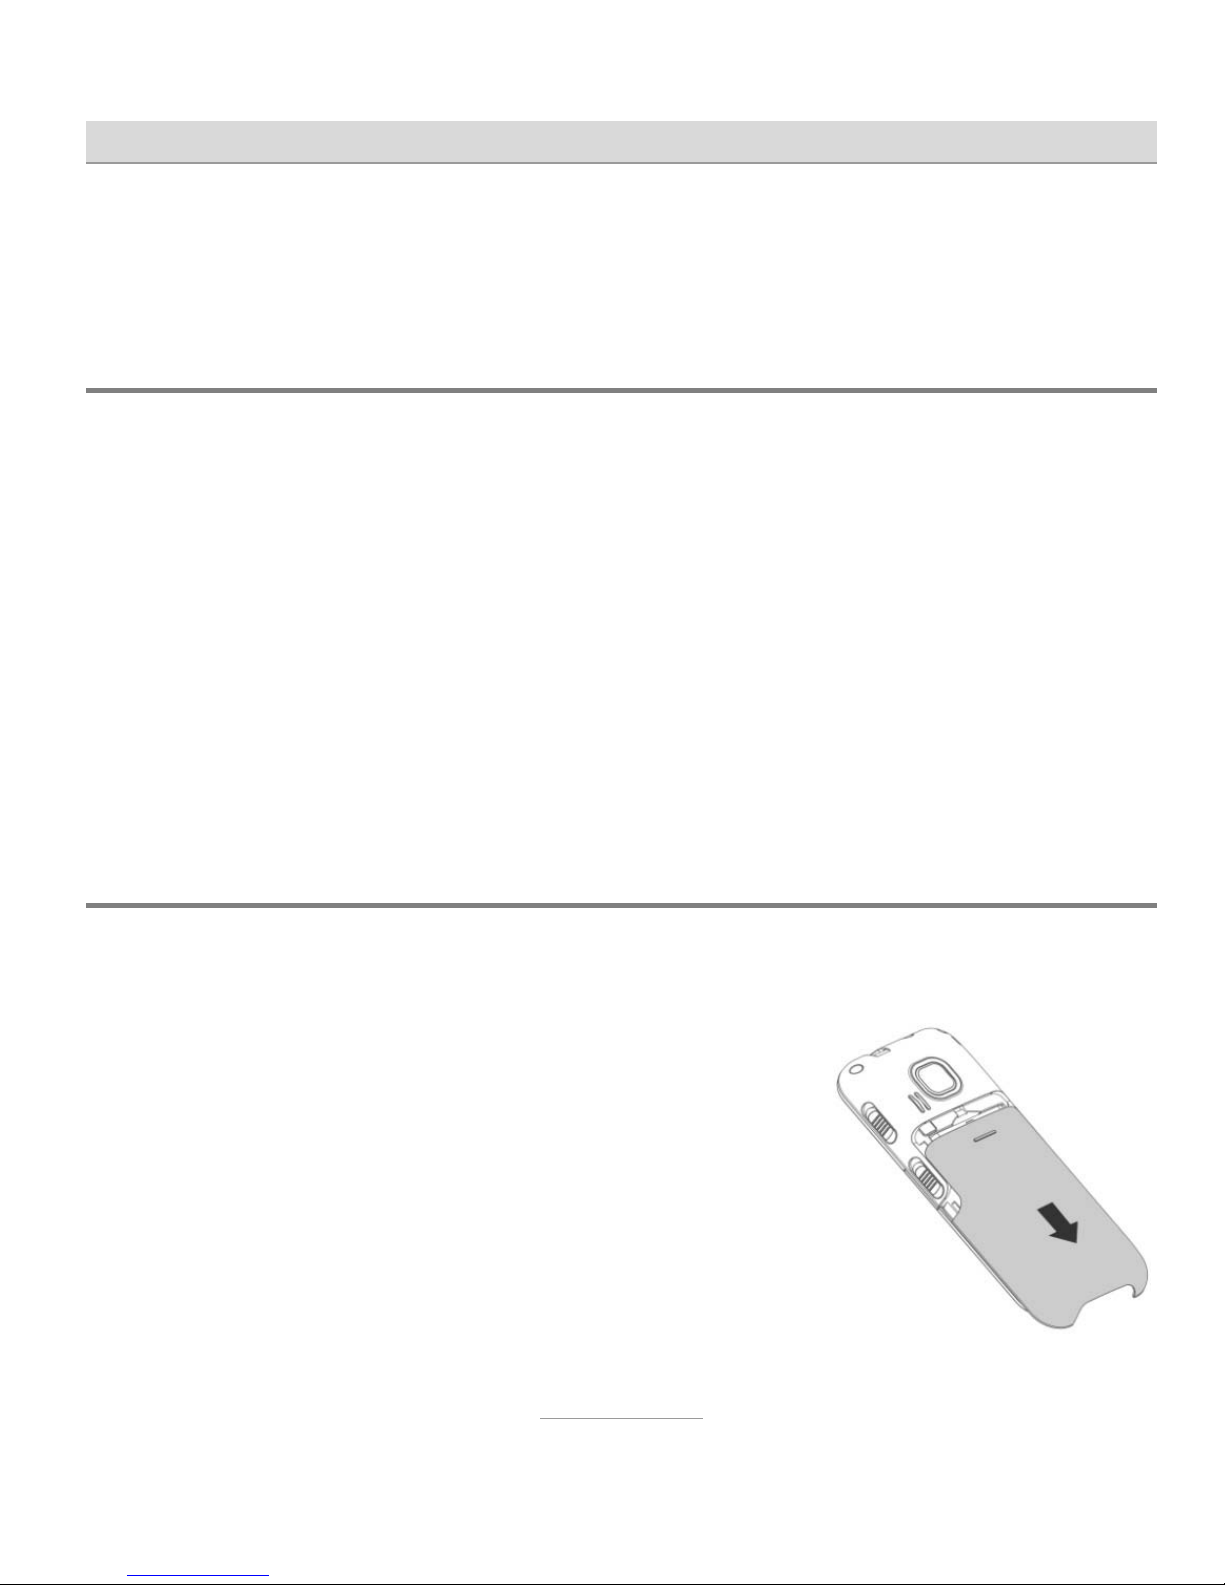
Installing the SIM card and battery
The SIM card and battery need to be installed before the phone is used
for the first time. The SIM card is not provided with the device. Your service provider will provide one. Handle the SIM
card with care and avoid touching its contacts.
Take off the case cover on the back of the device
to insert the SIM card and battery. To do this,
press the top of the cover on the rear and slide it
downwards.
Carefully insert the SIM card into the SIM card
holder as shown. This is on the underside of the telephone.
Page 10
Initial use
10
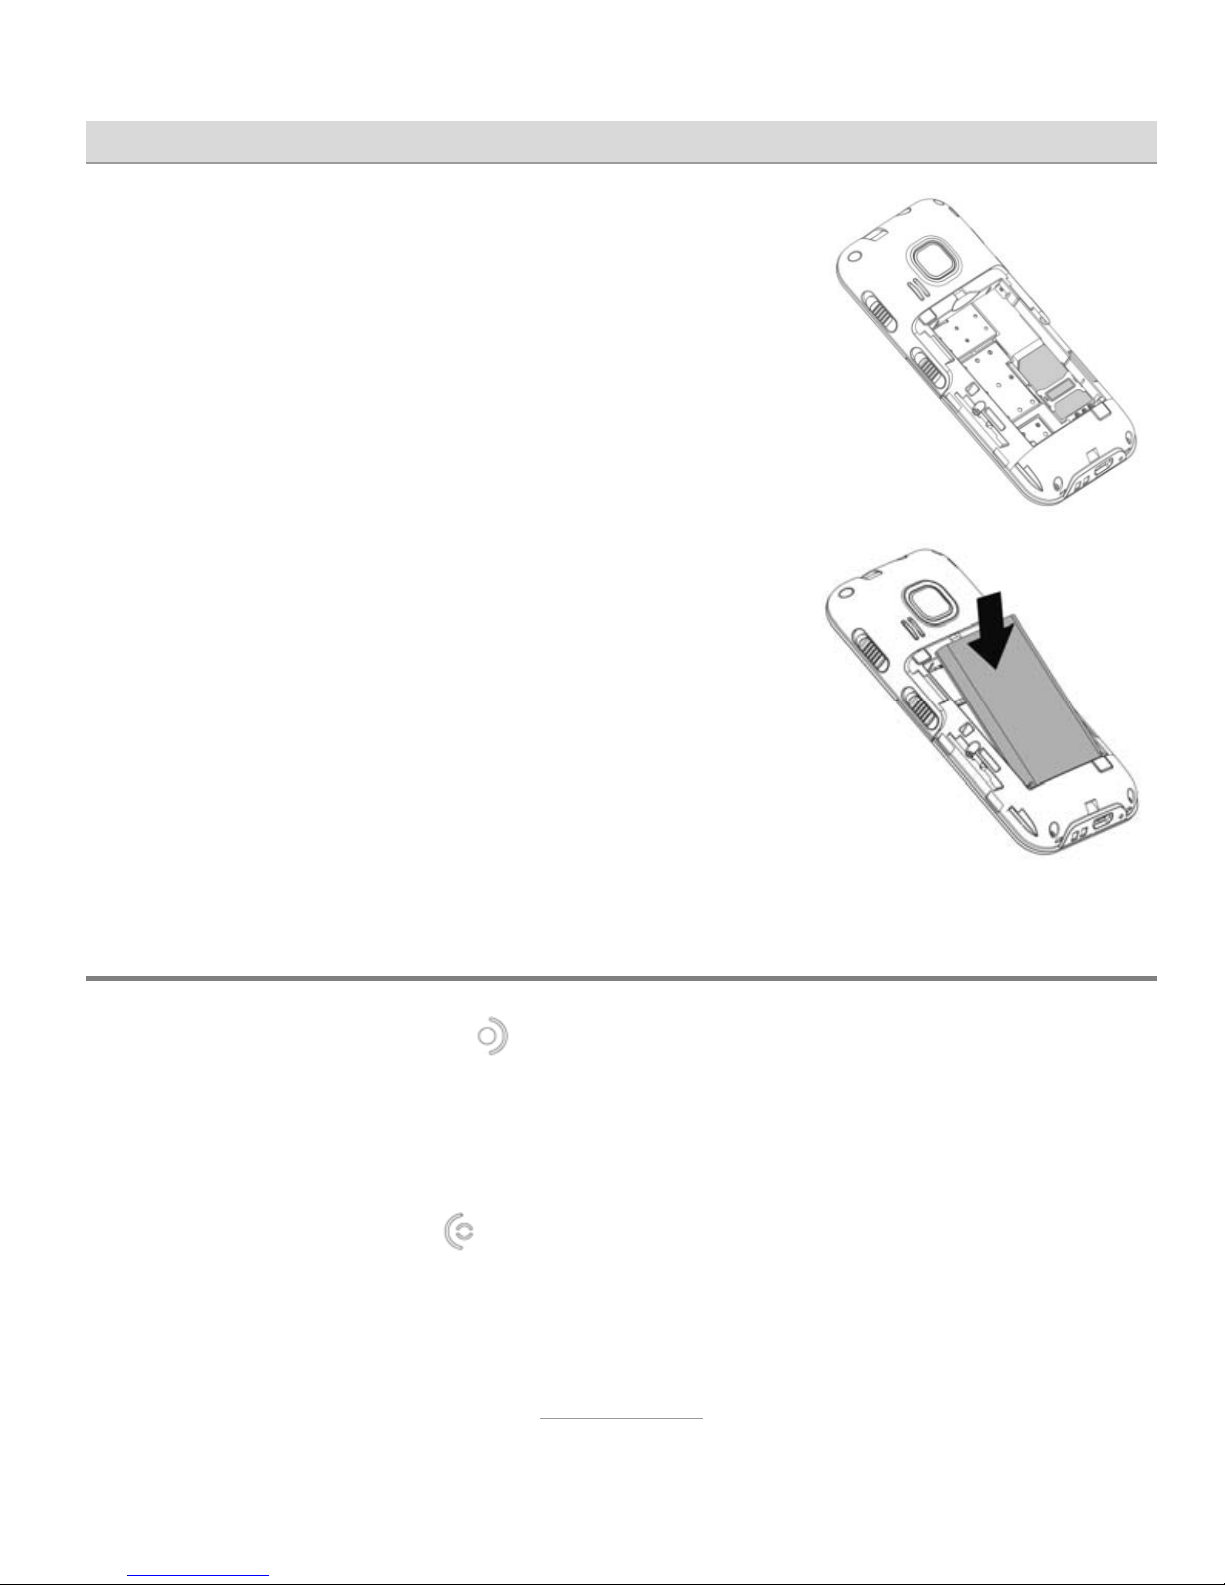
The SIM card is pushed, with the card's contacts
facing downwards, between the telephone's contacts and the metal retaining clip. The notch in
the casing must be facing the same way as the
SIM card. The SIM card must fit exactly into the
notch.
Then the battery is inserted. The three battery
contacts must be pointing towards the three contact pins on the telephone on the bottom right
underneath the SIM card.
The battery is first inserted at the bottom at the
contact areas and then at the top into the notch
of the telephone.
Then replace the casing cover and push it upwards until it clicks into place.
Switching on the telephone
Press the red hang up key for 3–5 seconds until the display lights up.
You are then prompted to enter the PIN (personal identification number)
for your SIM card. You can find this four-digit number in the documentation for your SIM card. Use the keypad to enter the four digits, and then
press the green dial key
.
Page 11
Initial use
11
Note: You can change your SIM card PIN from the telephone set-
tings, and you can also disable the PIN prompt when the telephone is switched on.
The telephone is now ready to be used.
Setting language, date and time
After the telephone is switched on for the first time, you are automatically
prompted to set the language, date and time.
First select the language required and confirm it with the dial key
. Next,
enter the time (first hours, then minutes), then the date (first day, then
month, then year), confirming each time with the dial key
.
Note: The automatic prompt for language, time and date is only
shown when the telephone is switched on for the first time
and when a different SIM card has been inserted. It is possible to change these settings any time from the main menu
Settings Phone Settings and then "Time and Date"
or "Language".
Charging the battery
A charger and a power supply unit are supplied with your telephone. Insert the small connector on the power supply unit into the jack on the rear
of the charger, then plug the power supply unit into the wall socket.
Page 12

Initial use
12
Put the telephone into the charger to charge the battery. The right-hand
bar segment in the charge status display flashes during the charge process. All of the segments in the display are filled when the charge process
is complete. The charge status display no longer flashes.
Note: Instead of charging via the charger, the power supply plug
can also be connected directly to the jack on the underside of
the telephone. The battery can also be charged via a USB
connector on a computer.
Fully charge the battery prior to initial use. To preserve the battery thereafter, only place the telephone in the charger when the battery is almost flat
(when only 1-2 bars in the charge status display are filled).
You will usually need to recharge the battery about once a week (depending on the duration of your calls). Battery performance diminishes over
time. If you notice after a time that you need to recharge your telephone
more frequently, replace the battery.
Page 13
Telephone controls
13
Telephone controls
The telephone has controls and connections on the front and rear, left and
right, and top and underside.
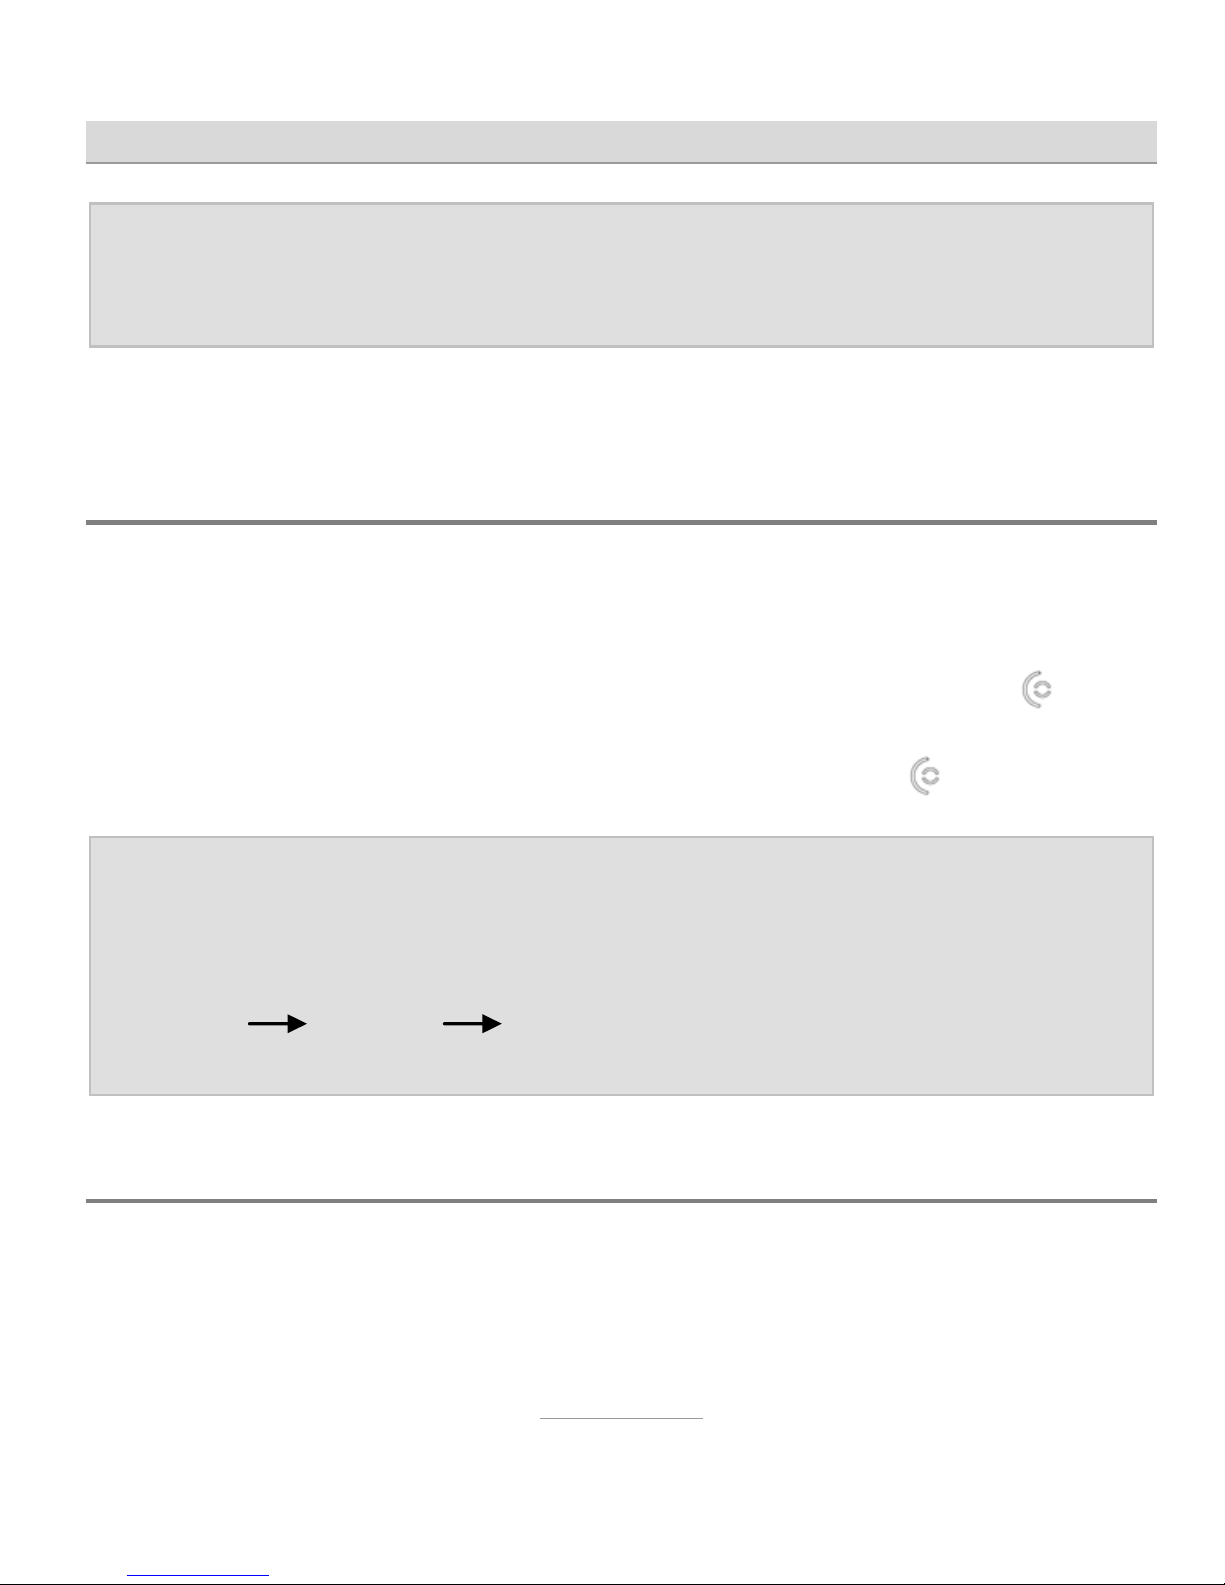
Controls on the front
1
2
3
4
5
6
7
Page 14

Telephone controls
14
1
Dial key
Dialling after entry of a telephone number.
Acceptance of calls when the phone is ringing.
Confirmation of displays in the bottom left.
Redial when in standby.
2
Call of the answering machine with prolonged
pressing.
3
Male speed-dial key with prolonged pressing.
Enter the + sign by pressing twice.
Input of special characters in text entry.
4
Up and
down
arrows
Selection within menus.
In standby, access to the main menu (up key) and
writing a new SMS (down key)
5
Hang up
key
Ends a call.
Call rejection when phone is ringing.
Switch on/off with prolonged pressing.
Confirmation of displays in bottom right.
In standby, direct access to Phonebook.
6
Female speed-dial key with prolonged pressing.
Changing of input method in text entry.
7
Entry of spaces in text.
Switch between ringing and silent, both with vibration,
with prolonged pressing.
Page 15

Telephone controls
15
Controls on the rear
The emergency call key (SOS) is here.
Pressing this for about 3 seconds initiates an emergency call. Please refer to the "Emergency Calls" section for a description of this function.
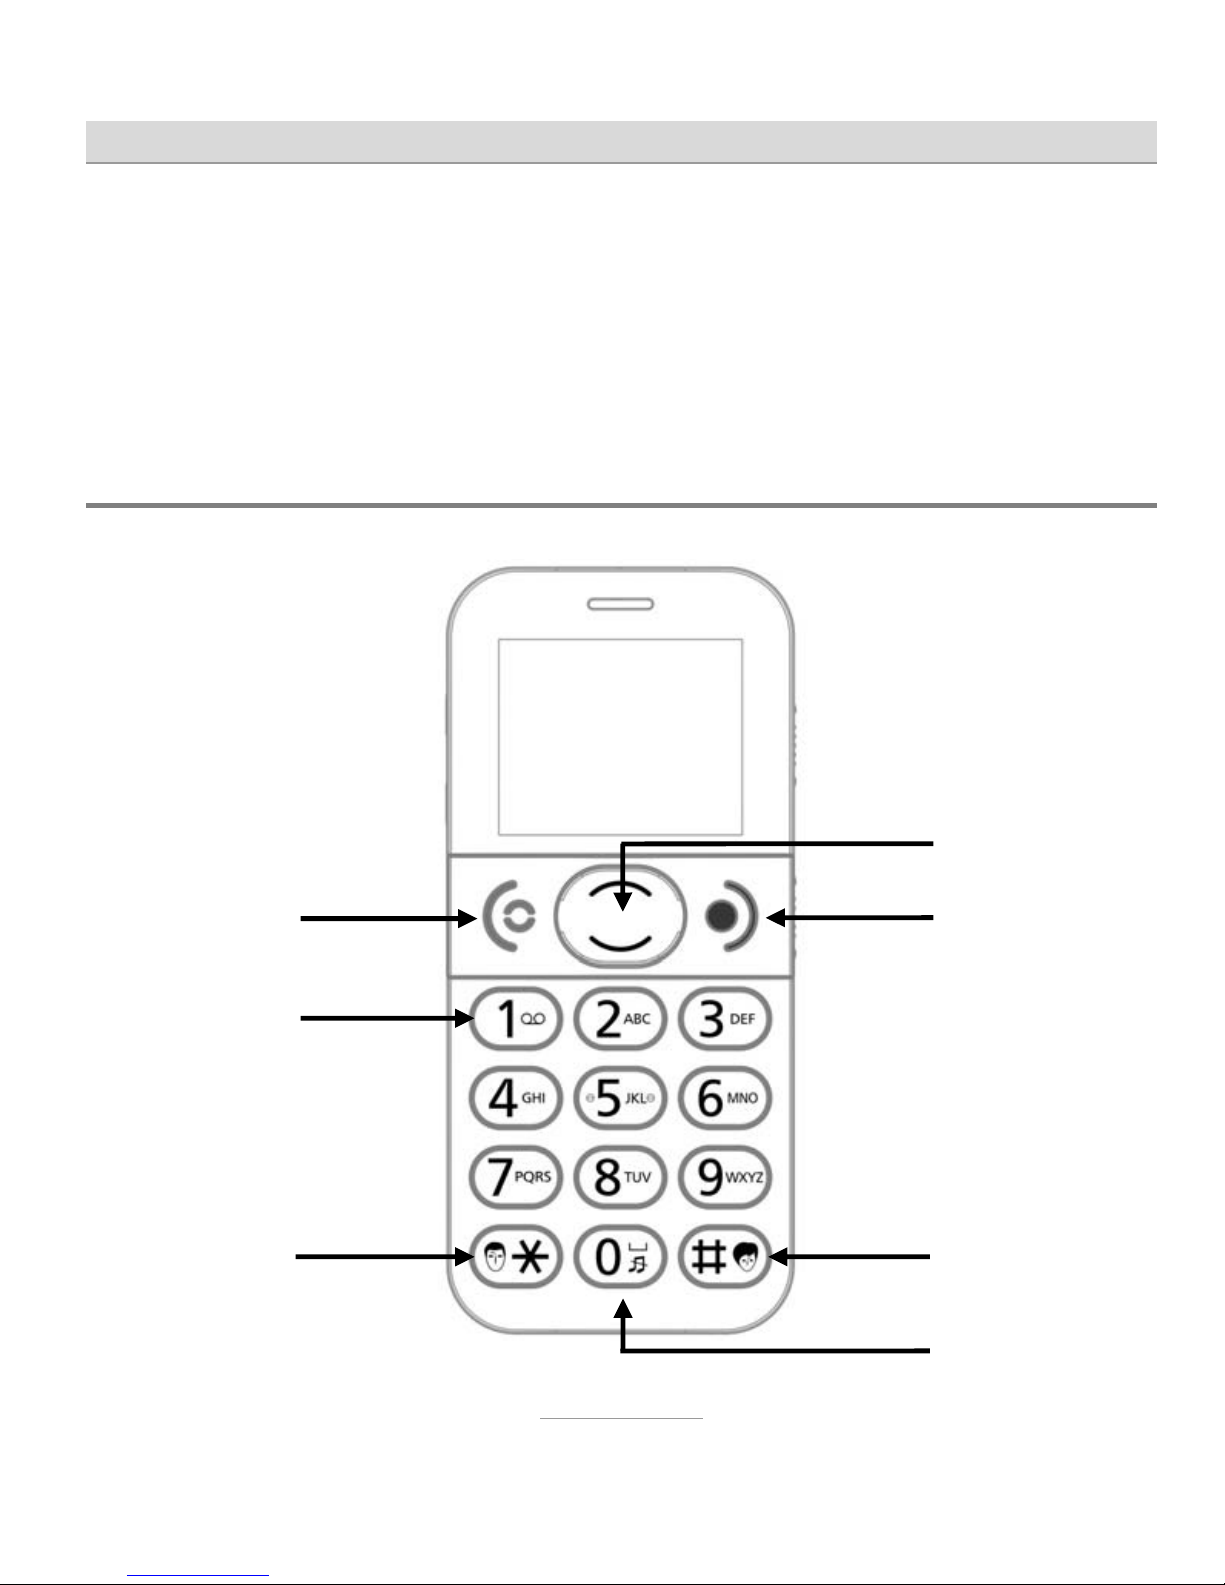
Controls on the left
At the top is a rocker switch marked + and –, and at the bottom a switch marked "FM".
The +- rocker switch enables you to change the speaker volume during a call. It also adjusts the volume of the integrated
radio. If the function is enabled, the telephone provides a time
check when the + key is pressed for a prolonged period in
standby.
Prolonged pressing of the "FM" switch powers on and off the
integrated radio.
Page 16
Telephone controls
16
Controls on the right
Two sliding switches are located here.
The top sliding switch powers on and off the integrated torch
on the top of the telephone.
The lower sliding switch enables/disables the key lock.
An appropriate symbol shows that the key lock is enabled.
Note: Calls can be accepted with the dial key even when the key
lock is enabled.
Features on the top
The integrated torch is on the top. The upper sliding switch on the righthand side is used to power it on and off. Also here is the jack for connecting the headset. A headset is supplied with the telephone.
Features on the underside
On the underside are the contacts for the charger, the mini-USB jack for
charging the battery (using the power unit supplied or a computer) and a
microphone.
Page 17

Telephone controls
17
Symbols on the display
In addition to the name of the mobile network provider, and the date and
time, the display always shows the strength of the mobile network signal
and the battery charge status. The other symbols are dependent on circumstances.
Symbol Description
Displays the wireless network signal strength
Battery charge status
New unread SMS text message(s)
Missed call(s)
Ring tone without vibration enabled
Ring tone with vibration enabled
Silent mode with vibration enabled
Roaming active (mobile is registered in a network abroad)
Call divert enabled
Call waiting from second caller
Alarm clock enabled
Headset connected
Page 18

Making calls
18
Making calls
Accepting calls
When an incoming call is waiting to be accepted, the telephone rings (if
"silent" is not enabled) and vibrates (if vibration is enabled). The display
shows the number of the caller and the symbol for an incoming call. If the
caller having this number is in the phone book, the name of the caller is
displayed instead of the number. The call is accepted by pressing the dial
key
.
Rejecting calls
If the hang up key is pressed when a call comes in, the call is rejected.
The caller hears the engaged tone.
Calling with direct dial
For direct dialling, enter the telephone number with the numeric keys and
then press the dial key
. The connection is established as required.
Note: Always remember that you must always dial an area code in
mobile networks.
Page 19

Making calls
19
Dialling with the redial function
When the telephone is in standby, pressing the dial key without first entering a number opens the call logs (also refer to the "Call logs" section).
The dial key opens the required list, and then you can scroll up and
down within the call log using arrow keys
and . Pressing
again opens a menu from where you are able to call the selected number
or send an SMS.
Note: If you have missed a call or received an SMS, the call log only
displays the missed call or new SMS when you press the dial
key. It is not until you have viewed it and pressed the dial key
again that all call log entries are displayed.
Calling with speed dial
The telephone features speed dial keys to store frequently-dialled numbers.
When the phone is in standby, these speed dial keys are accessed by
pressing digits -, and for about 2 seconds. The corresponding
number is then dialled automatically.
Key
has a symbol of a male face and key a symbol of a female
face. These two keys can be used, for example, to store the speed dial
numbers of your son and daughter.
Page 20

Making calls
20
To use speed dial numbers, they must first be assigned. Main menu
Phonebook
Opt. Speed dial settings is used for this. The tele-
phone numbers for speed dialling must be stored in the phonebook.
The
key is reserved for speed dialling of the answering machine. Here
the telephone number of the mailbox must be set up at the service provider. If this has not yet been set up, prolonged pressing of the
key
prompts for the number.
Dialling from the contacts
If the hang up key is pressed when the telephone is in standby, the
contacts open and the first entry is displayed.
You can scroll up and down using arrow keys
and .
If one of the number keys is pressed several times in quick succession,
the first entry starting with that particular letter is displayed. To display the
first entry beginning with "L" for example, the key must be pressed
three times in quick succession.
Pressing the
key opens a selection menu, and pressing it again when
the "Call" entry is enabled dials the number of the entry currently being
displayed.
Note: Contacts can be called, sent text message, changed and de-
leted.
Page 21

Making calls
21
Hands-free talking and muting
During a call, you can switch from receiver mode to hands-free mode. You
then hear the person you are talking to from the large loudspeaker on the
back of the device.
You can switch off the telephone's microphone if you do not want the person at the other end hearing what you are saying or doing.
If you press the dial key
during a call, a menu opens up with options
"H-free" and "Mute". The functions can be enabled/disabled with the dial
key
.
Hands-free and disabled microphone are shown on the telephone display
with relevant symbols.
Silent
Prolonged pressing of the key enables you to switch the telephone to
silent mode, and to return it to ring mode (both with vibration). Switch the
telephone to silent mode so that you and others, for example, are not disturbed during an event by the ring tone.
Note: It is often better to switch the telephone off rather than put it
on silent because the caller is informed by text that you are
not available.
Page 22

Making calls
22
Speaking keys and telephone numbers
From main menu Settings Phone Settings Tone Settings
Keypad , you can also set "Speaking keys and numbers" instead of
"Silent" and "Click" for the key sounds.
The telephone then "says" the digit of every key you press when dialling.
When a call comes in, the telephone "says" the digits of the caller number
before ringing.
Page 23

Phonebook
23
Phonebook
The telephone has enough memory for up to 250 numbers and names.
Additional numbers can be stored on the SIM card.
To open the phonebook, press the
key when the phone is in
standby. This takes you to the main menu. Select "Phonebok" and press
the dial key
. When the telephone is in standby, the contacts can also
be accessed directly by pressing the hang up key
.
The telephone displays all stored contacts, and symbols in front of the
contacts show whether they are stored in the telephone or on the SIM
card.
Use the
and keys to select the required contact.
If one of the digit keys is pressed more than once, the display jumps to
the first contact beginning with that letter. To access the first contact starting with "L" for example, press digit three times in quick succession.
Options in contacts
Pressing the dial key accesses the options for the contact selected.
Call
Calls the telephone number of the contact selected.
Page 24

Phonebook
24
Send text message
Sends a text message to the contact selected.
Add new contact
This is where you can add a new contact.
You are first asked whether the contact is to be created in the telephone's
memory or on the SIM card. The "Name" and "Number" boxes are then
displayed. Pressing the dial key
for the name enables you to enter the
name. Finish entering the name with the dial key
. Then press the
key to access the Number box. Enter the telephone number using the
numeric keys.
To ensure that dialling of entries also works when calling from foreign
networks, enter numbers in international format, i.e. including country
code. So number 020-1234 5678 would be entered as +442012345678,
with +44 first (the country code for UK), then the area code without lead-
ing zero. For the + sign, press the
key twice in quick succession.
Once the name has been entered, press the dial key
. The entry is then
stored as a contact.
Tip: Refer to Section Messages Write SMS Text for a descrip-
tion of text entry.
Page 25

Phonebook
25
View
This is where you can display the telephone number and name of a contact.
Edit
Here you can edit an existing contact.
Delete
Deletes the selected contact.
Move
Moves the selected contact from the telephone to the SIM card or vice
versa.
Copy/move/delete all contacts
Copies, moves or deletes all contacts in the telephone's memory or SIM
card.
Phonebook settings
Enter your own number under "My Number". "Memory Status" shows the
number of stored contacts and the total capacity on the SIM card and in
the telephone's memory.
Page 26

Phonebook
26
Setup speed dialling
This is where, for digits to , and keys (female speed dial key)
and
(male speed dial key), you can set up the speed dial numbers
dialled when the key is pressed for a prolonged time when the telephone
is in standby. The speed dial numbers are selected from the phonebook
and so must be stored beforehand as contacts.
On the keypad, a female face is next to the
key and a male face next
to the
key. These keys are therefore useful for storing the speed dial
numbers of your son and daughter for example.
The
key is reserved for speed dialling the mailbox (of the answering
machine in your service provider network). Prolonged pressing of the
key dials the number of the mailbox.
In standby, the
key is for switching between ringing and silent (with
vibration) and cannot therefore be used for speed dialling.
Page 27

Call history
27
Call history
Pressing the dial key when the telephone is in standby access the call
history.
If there are calls that have not been accepted, and have also not been
viewed, only the missed calls are shown in the call log. If you have already
seen all missed calls, the call log displays the logs of outgoing, received
and missed calls.
Pressing the dial key opens the required call log for you to see the telephone numbers. If contacts are stored for the telephone numbers, the
name of the contact is displayed instead of the telephone number. Use
the
and keys to select the required call.
In addition to the three call logs, "Delete all call logs" provides the option
to delete all calls from a call log or clear all call logs. "Call timers" shows
the duration of the last call, of all outgoing calls and of all received calls.
Note: You can also access the call logs from the main menu
Call history.
Options in call logs
Once you have selected a call in a call log, the options are available after
pressing the dial key
.
Page 28

Call history
28
Call
Calls the telephone number.
Send text message
Sends an SMS to the number.
Call details
Shows the call details (name, number and frequency of calls).
Delete
Deletes the selected call from the call log.
Page 29

Messaging (SMS)
29
Messaging (SMS)
Your telephone enables you to receive and send short text messages
(SMS).
View received SMSs
A received SMS is shown in the display. Pressing the dial key displays
the contents of the message, the telephone number (or the name if stored
in Contacts) of the SMS sender, and when the SMS was received (date
and time).
Pressing the dial key
again displays a menu from which you can reply
to the SMS, call the number, delete the SMS, forward the SMS or save the
sender as a contact.
Pressing the dial key
enables you to access new SMSs you have not
yet read. Once you have opened the message, it is no longer displayed
after the dial key
is pressed again.
In the telephone's default mode, you can access the messaging centre
with the
key "Messaging".
Shown in "Inbox" are all text messages you have received but not deleted.
Page 30

Messaging (SMS)
30
Send SMS
In addition to replying to an SMS that you have received, you can also
write and send an SMS yourself.
To do this, press the
key when the telephone is in standby.
You can also access the main menu and then Messaging
Write mes-
sage.
Write SMS text
You use the number keys to write the actual text message. Three or four
letters are printed next to number keys to . Pressing a key once displays the first letter, twice in quick succession the second letter, etc.
So for the word "Hello", you would need to press twice, then twice,
then three times, then three times and then three times.
Frequently used characters such as full stop, comma and question mark
are accessed with the key. Press the key to see all the special characters. To enter a space, press .
You can change the input method with the key. The input method currently selected is displayed in the top left - uppercase is the factory setting. Other available input methods are "lowercase", "numerals" and "smart
input", in upper and lowercase.
Smart input
As well as the input methods referred to above, you can also select the "s
ABC" (upper case) and "s abc" (lower case) input methods, whereby the
Page 31

Messaging (SMS)
31
telephone uses your inputs to calculate and propose frequently used
words.
With these input methods, you only press the relevant keys once for each
letter. So to enter "Hello" for example, you would type . In a line
underneath the SMS text, the telephone shows the word it has calculated
to be the most likely based on your inputs. If more than one word fits, the
most likely is shown first and the other words alongside. You can use the
and keys to switch between the possible words. The word sug-
gested is copied to the SMS text by entering a space with the
key or
pressing the dial key
.
Tip: If the word suggested is not quite correct, you can change the
input method with the key to make corrections.
Advanced message functions
In main menu Messaging are additional functions over and above the
simple reading and writing of messages described.
Drafts
After writing an SMS, you can select option "Save in Drafts". SMSs stored
this way are then available to you in "Drafts" for sending at a later time.
Page 32

Messaging (SMS)
32
Templates
Ten pre-defined templates for messages are available in "Templates".
These templates can be edited and deleted, and you can also create your
own.
From within "Templates", you can send a template as an SMS with or
without adding additional text and with or without saving a changed template. This is always recommended when you want to send set, frequently
used text (such as when letting someone know you are going to be late).
Whilst you are writing an SMS, you can insert text stored as a template at
the current position within the SMS by pressing the dial key and selecting
"Add Template".
Delete SMS
Here you can delete texts received, texts sent, all SMSs saved as templates, or all texts.
Message settings
This is where you configure the message settings.
Profile settings
Here you enter into the profile the telephone number of the SMS messaging centre of your service provider, and determine the validity of an SMS.
You are able to create up to four profiles, of which only one is ever active.
Page 33

Messaging (SMS)
33
Note: Normally the number of the SMS messaging centre is auto-
matically copied from the SIM card.
Memory status
This function shows how many text messages are stored on the SIM card
and in the telephone, and the total memory available.
Preferred storage
Here you specify whether messages are stored in the telephone's memory
or on the SIM card.
Save sent SMS
Specified here is whether sent SMSs are stored in the "Outbox" after sending or automatically deleted.
Page 34

Organizer
34
Organizer
The alarm clock, the tasks, the radio, the calendar and the calculator are
here.
Alarm
Select the "Alarm" function to use the telephone as an alarm clock. You
can configure up to three alarm clocks. Press the dial key to access the
alarm clock settings.
First specify whether the alarm clock should be on or off. Then set the
wake-up time. In "Repeat", select whether you want the alarm clock to ring
just once, daily or only on certain days. Choosing "Custom Date" shows a
list of weekdays. You can select a ring tone as your alarm. The "Alert type"
specifies whether the alarm clock only rings, only vibrates, or rings and
vibrates.
End your entries with the hang up key
.
An alarm clock symbol is shown on the display as soon as an alarm clock
is enabled.
At the wake-up time set, the telephone rings and shows the alarm clock
symbol on the display. "Stop" is also shown (use the hang up key
to
stop the alarm clock function). If no key is pressed, the alarm clock continues to ring at regular intervals.
Page 35

Organizer
35
Tasks
This function reminds you of tasks. You enter the date, the time and a
subject, and specify whether the alarm clock is turned on. At the time
specified, the telephone displays the subject and plays the melody. Finish
displaying the task with the dial key . If no key is pressed, the telephone
keeps displaying the task at regular intervals.
Radio
Your telephone features an integrated FM radio. It is turned on and off
with the FM switch on the left-hand side of the telephone and from the
main menu Organizer FM radio.
Switching on the radio selects the station last set and the station's frequency appears in the display together with the radio symbol. Use the
and keys to change the frequency manually. Use the hang up
key
to pause and continue. Select the first nine memorised stations
with number keys to .
Radio options
Access the radio options with the dial key .
Auto search
Performs an automatic search for stations and saves them. Stations saved
previously are cleared.
Page 36

Organizer
36
Manual input
When this option is enabled, the frequency changes by one tenth when
the
and keys are pressed. If the option is disabled, a jump is
made to the next or previous station on pressing the keys.
Quit FM radio
Turns the radio off. Pressing the FM key has the same effect.
Calendar
The calendar shows the weekday for every date.
Calculator
Your telephone features a simple calculator.
To use the calculator, enter the first number, use the arrow keys to select
the arithmetic operations at the top (+, -, x, / and =), enter the second
number and press the dial key
to display the result.
Exit the calculator by pressing the hang up key
several times.
Page 37

Settings
37
Settings
In the default setting, access to the telephone settings is with the key
Settings.
Phone settings
Here you can configure some of the telephone settings.
Time & date
Here you can set the time and date. In standby, the date and time are
shown on the display. They are also needed for internal functions such as
the alarm clock. When the telephone is used for the first time, the user is
automatically prompted to enter the date and time.
Language
Here you set the language of telephone texts. When the telephone is used
for the first time, the user is automatically prompted to enter the language.
Tone settings
Select here the sound settings used by the telephone to indicate incoming
calls and receipt of text messages.
Selecting an option plays the melody currently set. The arrow keys can be
used to change it. Pressing the dial key
saves the melody selected.
Page 38

Settings
38
You can also set here the sounds played by the telephone when a key is
pressed. You can select between "Click", "Silent" and "Speaking keys and
numbers".
Alert type
You can set here whether the telephone only rings, only vibrates, rings
and vibrates, or is silent for incoming calls.
Note: Changing the notification type in standby with prolonged
pressing of the 0 key only switches between "Vibrate only"
and "Vibrate and Ring".
Volume
Here you can set the volume of the ring tone and the key tone.
Note: During a call, the volume of the receiver can be adjusted us-
ing the + and – rocker switch on the left of the device. This
change is then automatically remembered for future calls.
Time voice
The telephone is able to provide regular and automatic time checks. A
manual function is also available.
Page 39

Settings
39
Select "Report time the hour at half/at point or the hour and halftime” if
you want the telephone to automatically provide a time report at these
times.
If "Report time at any time" is enabled, prolonging pressing of the +- key
on the left-hand side when the telephone is in standby provides a time
check.
Call settings
Some of the call settings are configured here.
Caller ID
Here you can specify whether your number is displayed to the person you
are calling.
Call waiting
This is where you can enable and disable call waiting, and query the status currently set at the network provider.
When call waiting is enabled, another incoming call arriving whilst you are
on the phone is signalled by a call waiting tone, and you are able to
switch back and forth between the two calls. The second caller hears the
ring tone. If call waiting is disabled, the second caller hears the engaged
tone when you are on the phone.
Page 40

Settings
40
Call divert
Here you can enable and disable call divert, and query the current status.
Call barring
Here you are able to set up call blocking for incoming and outgoing calls.
Network selection
Here you can set whether your telephone automatically searches for a
mobile network, or whether you prefer to select the network manually.
With an automatic search, your telephone always registers automatically
with your supplier's network within your home country. Abroad, it registers
with the network providing the best reception. Manual selection is only
sensible abroad and only when you want to use a particular network, such
as when you know that charges for roaming calls are cheaper than those
of other networks.
Changing password
Here you can specify whether or not the telephone prompts for the PIN of
your SIM card when the phone is switched on.
Disabling the PIN prompt of course makes life easier because you do not
need to make a note of the PIN and enter it every time. If there is no PIN
prompt however, no protection against unauthorised use is provided if
you lose the phone for example (which can be very costly).
Page 41

Settings
41
Change the PIN of your SIM card with "PIN". This change is made on the
SIM card and is permanent, even when the telephone is changed.
Emergency settings
This is where emergency numbers are entered and emergency call settings configured. Please refer to Section "Emergency Calls" for a description.
Restore factory settings
This is where you can reset the telephone to the settings it had when first
purchased. Contacts and some other details entered are not deleted. You
must enter the PIN () to confirm.
Page 42

Emergency calls
42
Emergency calls
Your telephone features an emergency call function that is activated by
pressing the SOS key on the rear of the device for about 2 seconds.
If at least one emergency number is configured, the telephone makes the
emergency call when the SOS key is pressed for about 2 seconds.
The telephone then sounds an alarm and sends an SMS, with configurable help text, to up to five emergency numbers configured.
The telephone then calls the first emergency number stored. If the call is
accepted, the telephone automatically switches to hands-free mode. If the
called party hangs up, the emergency call function remains activate and
the telephone dials the next emergency number. Prolonged pressing of
the SOS key again ends the emergency call function.
If the call is not accepted, the telephone calls the next emergency number. If no connection is established on any emergency number, the telephone repeats three times all the emergency numbers stored.
After an emergency call is made (irrespective of whether it is accepted,
unsuccessful or interrupted), the telephone automatically accepts incoming calls and switches to hands-free mode. This allows contact with an incapacitated person even if the emergency call has already ended. The
personal details entered are shown on the telephone display. Prolonged
pressing of the emergency call key again, or turning the phone off and on
again, ends this function.
Page 43

Emergency calls
43
Testing the emergency call function
Thoroughly test the emergency call function after set-up. This must involve the owner of the Ergophone and the people whose telephone numbers are stored.
During the test, remember that the user of the phone is in a stressful situation when making the emergency call. Those receiving the emergency call
should therefore be familiar with using the emergency call function so as
to be able to issue instructions as required (such as on how to end the
emergency call function).
Set-up of emergency calls
Setting up emergency calls involves entering the emergency call text and
the emergency call numbers.
When the telephone is in standby, press the
key and then Settings
Emergency settings. This is where all the settings for configuring
emergency calls are.
Emergency numbers
Enter your emergency numbers (up to five) under "Emergency Numbers".
In an emergency, the first number entered is called first, then the second,
etc.
In "Send SOS SMS", specify whether you also want to send an SMS to the
emergency number. This function can be enabled if the emergency number is a mobile telephone number. For landline numbers, you should only
Page 44

Emergency calls
44
confirm this function if you are certain that the telephone can receive SMS
texts.
Note: If you enable SMS for numbers of telephones that cannot re-
ceive SMS text, the service provider calls the subscriber and
reads out the SMS. This call would block the emergency
number telephone at the very moment the mobile telephone
is trying to make the emergency call.
Emergency SMS
This is where you enter the text sent as an SMS in the event of an emergency call. You may change the text.
Emergency display
This is where you can enter the personal details of a family member (user
name, blood group, telephone number and name). These details are
shown on the telephone display once the emergency call has been made.
Cancelling an emergency call
If an emergency call is made inadvertently, it can be cancelled with prolonged pressing of the emergency call key.
Page 45

Emergency calls
45
Important information on emergency call functions
Do not rely exclusively on the emergency call function. In certain situa-
tions (such as no network coverage or no credit for outgoing calls), the
emergency call function might not operate.
Ensure that no answering machines are defined as emergency call
numbers.
Discussing the entering of emergency call numbers with the holders of
these numbers is an absolute requirement so that they know exactly
what to do in an emergency.
The general emergency number for mobile networks (112) may not be
entered as an emergency call number; this also applies to 110 and
other official emergency numbers.
After setting up the emergency call function, test it thoroughly and cor-
rect any mistakes.
Please note that the emergency call key can be pressed by coming in-
to contact with other objects (such as when in a handbag), so take appropriate care of the telephone when the emergency call function is
enabled.
Page 46

Appendix
46
Appendix
Service
You have purchased a modern product of TIPTEL granting a continuous
level of the highest quality. This is underlined by a certification according
to DIN EN ISO 9001.
If, however, problems occur or you have questions on operating the device, please contact your local dealer.
Guarantee
Please contact your local dealer or importer for details of guarantee for
non EC countries.
Within the European Community the following guarantee regulation applies:
Your contact for services arising from guarantee obligations is the authorised dealer where you bought the device.
TIPTEL will grant a guarantee of 2 years from the date of handover for the
material and for the manufacturing of the telecommunications terminal
unit.
Initially, the purchaser shall have only the right of subsequent performance. Subsequent performance entails either repair or the supply of an
Page 47

Appendix
47
alternative product. Exchanged devices or parts shall become the property of the authorised dealer.
If the subsequent performance fails, the purchaser can either demand a
reduction in the purchase price or withdraw from the contract.
The purchaser shall notify the dealer immediately of any defects found.
Proof of the guarantee entitlement shall be furnished by standard proof of
purchase (receipt or invoice).
The guarantee entitlement shall expire if the purchaser or an unauthorised
third party interferes with the device. Damage caused by inappropriate
handling, operation, storage or by force majeure or other external influences shall not be covered by the guarantee.
The guarantee shall not cover any consumable material (e.g. batteries) or
defects that only slightly impair the value or the usability of the device.
Claims for damage caused by transport shall be asserted to the delivery
company.
Notes on settlement:
Repairs can only be conducted by the TIPTEL Service. A warranty repair
does not prolong the warranty period – neither for the replaced parts nor
for the device. This guarantee is not transferable and shall expire if the device is sold on to another party. It shall also expire if the device is interfered with by third parties or if the serial number on the device has been
removed or made illegible. There is a guarantee seal on the device.
Please do not damage or remove this seal because otherwise, your guarantee will expire.
Page 48

Appendix
48
The General Terms and Conditions of TIPTEL, which are part of the contract for a dealer, shall also apply. In the event of a complaint, the defective product shall be sent to the relevant TIPTEL subsidiary, the importer
or dealer along with a description of the defect and the proof of purchase.
CE sign
This device is approved for the connection and use within the analogue
public telephone networks in all EC countries – according to the European
Requirements. Due to technical deviations in individual countries, we cannot grant an unlimited guarantee for the successful operation at all types
of telephone accesses.
TIPTEL hereby declares that the device complies with all fundamental requirements of the European directive 1999/5/EC. This conformity is confirmed by the CE sign on the device.
Further details on the declaration of conformity can be found under the
following internet address: http://www.tiptel.com
Ecological information
During the normal use of the telephone you will not have any contact to
substances damaging to your health. The device is not battery-operated.
The plastics used for manufacturing this device exclusively consist of partially recycled granules. The packaging materials do not consist of plastics
but of partially recycled cardboard and paper.
Page 49

Appendix
49
If you do not have further use of your TIPTEL device, TIPTEL will take back
the device without any charge. The device will be properly taken to pieces
for recycling.
Page 50

Page 51

Page 52

Tiptel.com GmbH
Business Solutions
Halskestraße 1
D-40880 Ratingen
Tel.: 0900 100–84 78 35*
Vanity Tel.: 0900 100–TIPTEL*
Internet: www.tiptel.de
International: Internet: www.tiptel.com
*(1.49 euros/min. from Deutsche Telekom landlines,
varying mobile network charges possible)
Tiptel GmbH
Ricoweg 30/B1
A-2351 Wiener Neudorf
Tel.: 02236 677 464-0
Fax: 02236 677 464-22
E-Mail: office@tiptel.at
Internet: www.tiptel.at
Tiptel AG
Bahnstrasse 46
CH-8105 Regensdorf
Tel.: 044 843 13 13
Fax: 044 843 13 23
E-Mail: tiptel@tiptel-online.ch
Internet: www.tiptel-online.ch
Tiptel B.V.
Camerastraat 2
NL-1322 BC Almere
Tel.: 036 53 666 50
Fax: 036 53 678 81
E-Mail: info@tiptel.nl
Internet: www.tiptel.nl
Tiptel NV
Leuvensesteenweg 510 bus 4
B-1930 Zaventem
Tel.: 0903 99 333 *
Fax: 02 714 93 34
E-Mail: tech@tiptel.be
Internet: www.tiptel.be
* (1,12 Eur/Min.)
Tiptel s.a.r.l.
23, avenue René Duguay-Trouin
F-78960 Voisins-Le-Bretonneux
Tel.: 01 39 44 63 30
Fax: 01 30 57 00 29
E-Mail: support@tiptel.fr
Internet: www.tiptel.fr
(en) 03/2012
EDV 4935441
 Loading...