

Page 1
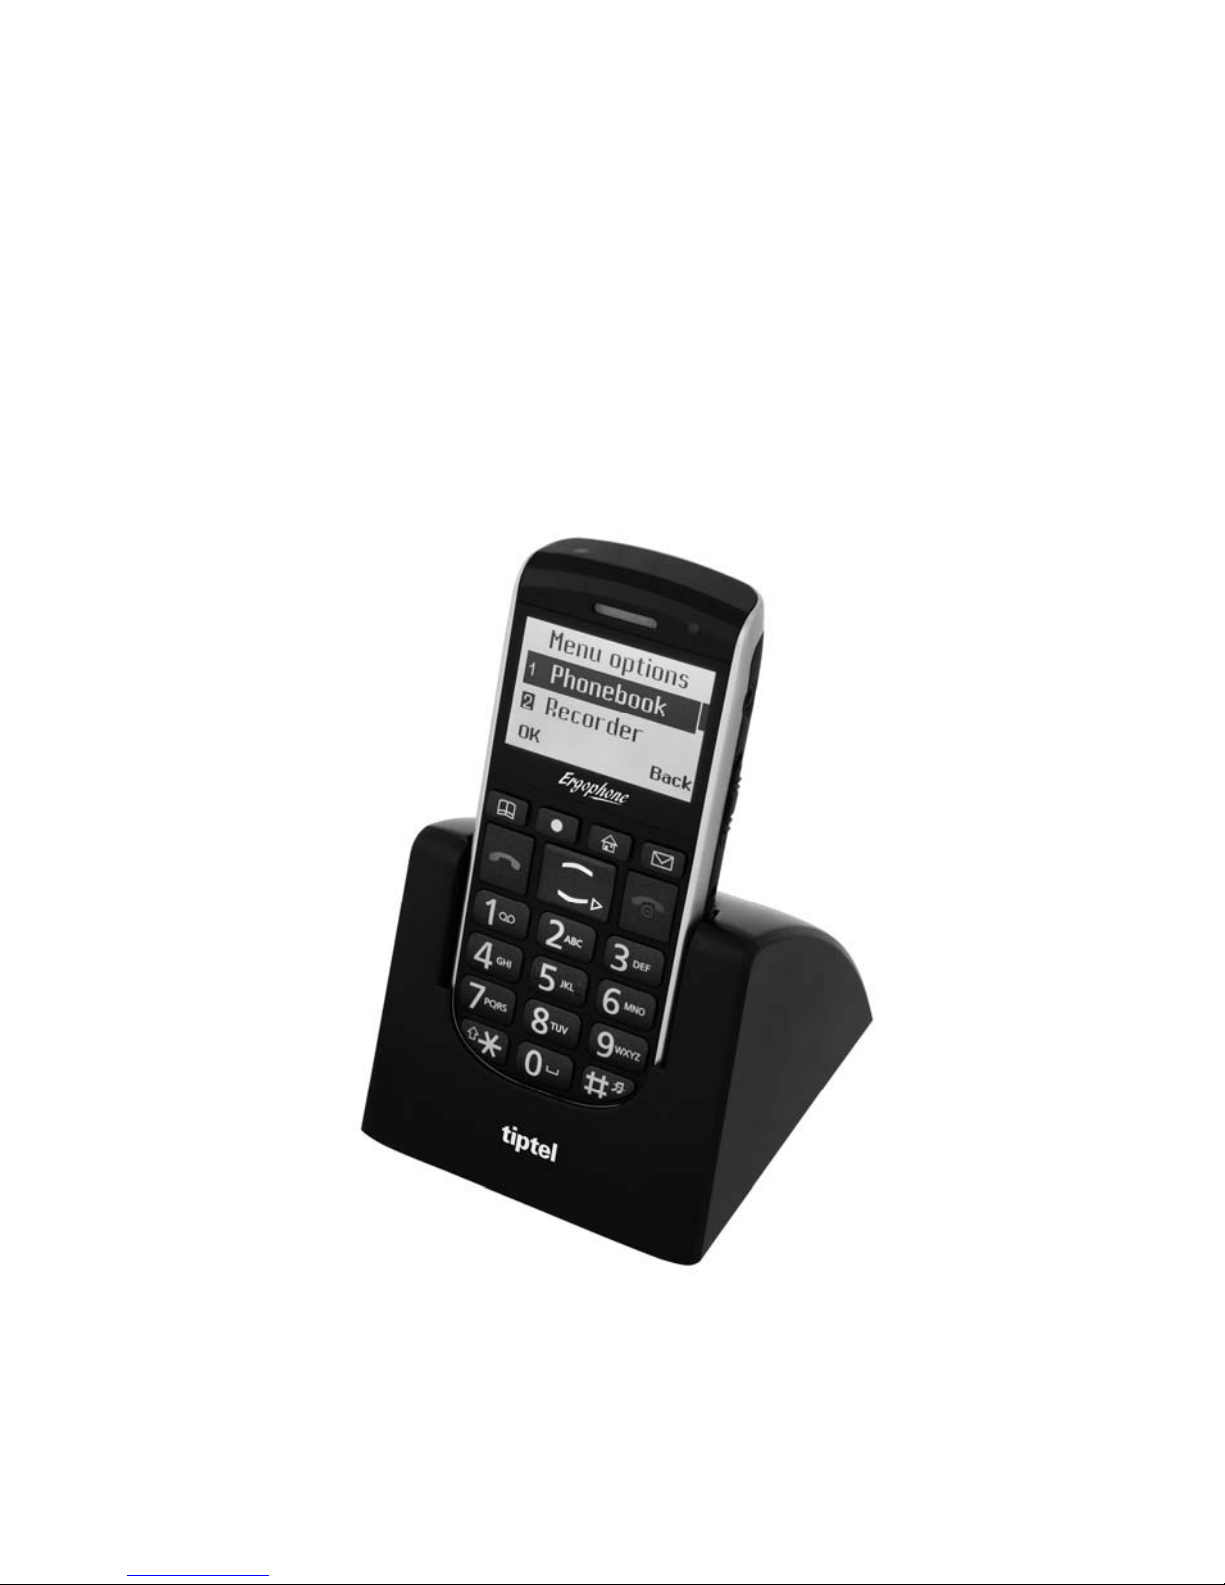
Operating instructions (en)
tiptel Ergophone 6040
tiptel
Page 2

Please note!
For safety reasons, the battery switches off before it is totally discharged. If you have not used the telephone for a long time, wait up
to 5 minutes after you have plugged the charger in. This will switch
the battery back on and the charging process will start.
Page 3

Contents
3
Contents
Contents .................................................................................... 3
Safety information .................................................................... 7
Bringing into service ................................................................ 8
Check packing contents ........................................................ 8
Installing the SIM card and battery ....................................... 8
Switching on the telephone ................................................... 9
Setting the time and date ...................................................... 10
Charging the battery .............................................................. 11
Telephone controls .................................................................. 12
Controls on the front .............................................................. 12
Controls on the rear ............................................................... 13
Controls on the left ................................................................ 13
Controls on the right .............................................................. 13
Features on the top ............................................................... 14
Features on the bottom ......................................................... 14
Symbols on the display ......................................................... 15
Calling ....................................................................................... 16
Accepting calls ...................................................................... 16
Rejecting calls ....................................................................... 16
Calling with direct dialling ..................................................... 16
Dialling with redial function ................................................... 16
Speed dialling ........................................................................ 17
Dialling with the quick phone book key ................................ 17
Dialling with top contacts ...................................................... 17
Dialling from phonebook ....................................................... 18
Hands-free talking and muting .............................................. 18
Messaging (SMS) ..................................................................... 19
View SMS received ................................................................ 19
Writing and sending SMS ...................................................... 20
Writing SMS text ................................................................. 20
Page 4

Contents
4
Sending SMS ...................................................................... 22
SMS settings .......................................................................... 22
SMS server ......................................................................... 22
Voicemail server ................................................................. 23
Common settings ............................................................... 23
Preferred storage ................................................................ 23
Phonebook ................................................................................ 24
Call ......................................................................................... 24
Send text message ................................................................ 24
View ....................................................................................... 25
Add new contact .................................................................... 25
Edit ......................................................................................... 25
Delete ..................................................................................... 25
Copy ...................................................................................... 25
Move ...................................................................................... 26
Copy/Move/Delete all contacts ............................................. 26
Phonebook settings .............................................................. 26
Preferred storage ................................................................ 26
Memory status .................................................................... 26
Call history ................................................................................ 27
Missed calls ........................................................................... 27
Dialled calls and received calls ............................................. 27
Other call log functions ......................................................... 28
Silent mode ............................................................................... 29
Recorder ................................................................................... 30
Recording voice notes and phone calls ................................ 30
Options after recording ......................................................... 31
New record ......................................................................... 31
Play ..................................................................................... 31
Append ............................................................................... 31
Rename ............................................................................... 31
Delete .................................................................................. 31
List ....................................................................................... 31
Page 5

Contents
5
Settings ............................................................................... 32
Play back recordings ............................................................. 32
Options in the recording list .................................................. 32
Play ..................................................................................... 32
Append ............................................................................... 32
Rename ............................................................................... 32
Delete .................................................................................. 32
Delete all files ...................................................................... 33
FM radio .................................................................................... 34
Options in radio mode ........................................................... 34
Channel list ......................................................................... 34
Manual input ....................................................................... 34
Auto search ......................................................................... 35
Settings ............................................................................... 35
Alarm clock ............................................................................... 36
Birthdays ................................................................................... 37
Calculator .................................................................................. 39
Settings ..................................................................................... 40
Phone settings ....................................................................... 40
Time and date ..................................................................... 40
Language ............................................................................ 40
Pref. input methods ............................................................ 40
Contrast .............................................................................. 41
LCD backlight ..................................................................... 41
Sound settings ....................................................................... 41
Tone settings ...................................................................... 41
Volume ................................................................................ 41
Alert type ............................................................................. 42
Ring type ............................................................................. 42
Answer mode ...................................................................... 42
Speed dial .............................................................................. 42
Talking keys ........................................................................... 42
Call settings ........................................................................... 43
Page 6

Contents
6
Caller ID .............................................................................. 43
Call waiting ......................................................................... 43
Call divert ............................................................................ 43
Call barring ......................................................................... 44
Network selection .................................................................. 44
Security settings .................................................................... 44
SIM lock .............................................................................. 45
Phone lock .......................................................................... 45
Change password .............................................................. 45
Emergency settings ............................................................... 45
Restore factory settings ......................................................... 46
Emergency call ......................................................................... 47
The answering machine problem .......................................... 48
Test the emergency call function .......................................... 48
Configuring the emergency call ............................................ 49
Emergency numbers .......................................................... 49
Sending an emergency SMS .............................................. 49
Emergency SMS content .................................................... 50
Emergency alarm ............................................................... 50
Aborting the emergency call ................................................. 50
Important information on emergency call functions ............. 51
Appendix ................................................................................... 52
Service ................................................................................... 52
Guarantee .............................................................................. 52
CE sign .................................................................................. 53
Ecological information ........................................................... 54
Page 7

Safety information
7
Safety information
Only use the telephone at locations where calling is allowed. As a
rule, use of mobile phones is prohibited in hospitals, aircraft and at
filling stations.
Do not open the device yourself, and do not attempt repairs on
your own. Repairs may only be performed by qualified specialists.
Do not expose the telephone to smoke, chemicals, humidity, dust
or excessive heat (direct sunlight).
Keep the telephone and accessories away from children.
This telephone's speaker can be set very loud. Check volume be-
fore use to avoid damaging your hearing.
While driving, use this telephone only with an approved hands-free
set. Observe specific national legislation governing use of mobile
telephones.
If applicable, keep a 20 cm distance between the telephone and
any implanted pacemaker. Immediately switch off the telephone if
you feel or suspect any impairment.
Use only the provided power supply unit, and no other.
Use only original accessories and batteries.
The telephone is not water-tight. Avoid contact with liquids.
In case of emergency, do not rely exclusively on your mobile tele-
phone's emergency call function. For technical reasons, an emergency connexion cannot always be guaranteed.
Dispose of the device and the battery according to environmental
guidelines. Your local waste disposal provider offers collection
points for electronic waste. Do not dispose of the device and the
battery in household rubbish or in a fire.
Please dispose of packaging materials according to local regula-
tions.
Page 8
Bringing into service
8
Bringing into service
Check packing contents
Included in the scope of delivery:
tiptel Ergophone 6040 mobile phone
Power supply unit
Charger
Li-Ion 3.7 V/800mAh battery pack
Headset
User guide
Installing the SIM card and battery
Before the telephone is first used, the SIM card and battery need to
be installed.
The SIM card is not provided with the device. Your service provider
will provide one. Handle the SIM card with care and avoid touching its
contacts.
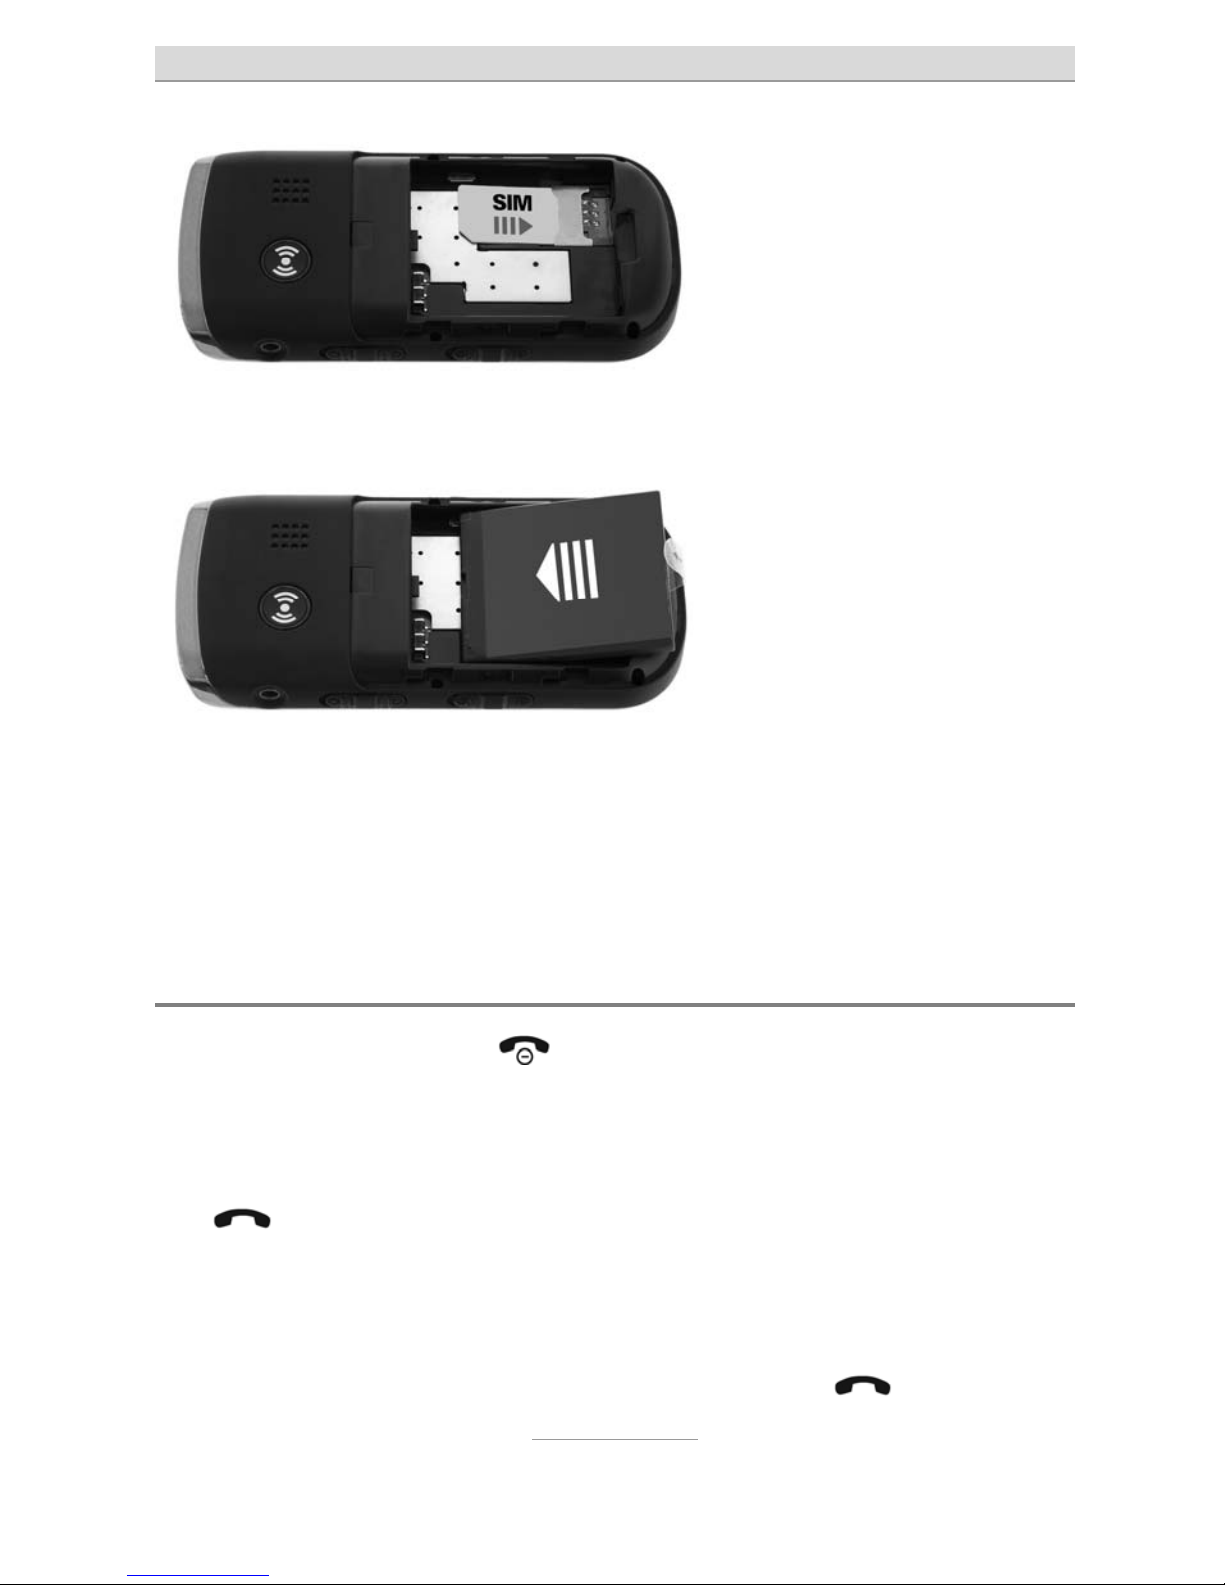
To insert the SIM card and
the battery, the casing cover
at the back of the device must
be removed. To do this,
press on the point indicated
in white in the picture with
your thumbs, and then push
the cover downwards.
Page 9
Bringing into service
9
Push the SIM card into the
SIM card bracket, as
shown. The SIM card is
pushed, with the card's
contacts underneath, between the telephone's con-
tacts and the metal retaining clip. The hollow in the casing must be in the same direction as the
SIM card. The SIM card must fit precisely into the hollow.
The battery is then insert-
ed. The three contacts on
the battery must point to
the three contact pins on
the telephone on the top
left beneath the SOS but-
ton.
The battery is initially place on the top, on the contacts, with the hollow in the battery engaging with the guide on the casing. The battery
is then pressed down from above into the hollow in the telephone.
Then replace the casing cover and press it till it clicks into place.
Switching on the telephone
Press the hang up button (with the red telephone receiver) for 3–
5 seconds until the display lights up.
The first time the telephone is switched on, you will be asked which
language you prefer. Select “English” here and then press the dial
key
(with the green telephone receiver).
You will then be prompted (if it has been enabled) to enter your SIM
card PIN (personal identification number). You will find this four digit
number in the documentation for your SIM card. Use the keypad to
enter the four numbers, and then press the dial key
.
Page 10

Bringing into service
10
Note: You can change your SIM card PIN using the telephone
settings, and you can also disable the PIN prompt given
when the telephone is switched on.
The telephone is now ready to be used.
Setting the time and date
After the telephone has been switched on for the first time (and after
removing the battery), the time and date need to be set.
To do this, press the
key, then use the key in the main
menu to select the "Settings" entry, and then press the dial key
.
In the Settings menu, select "Phone settings" and press the dial key
again.
Then, in the Phone Settings menu, select the "Time and Date" entry,
and press the dial key
again.
The time appears in the HH:MM (hours:minutes) format, and the
hours item is currently selected. Use the number keys to enter the
current hour. The minutes item is then selected. Use the number keys
to enter the current minutes. So, to set the time to 13:06, you would
need to first enter 13 and then 06. Then press the
key to enter
the date.
Use the number keys to enter the current date in the YYYY:MM:DD
format, i.e. first the year (four digits), then the month and then the day
(both two digits). So, for the 23rd August 2011, you would first have
to enter 2011, then 08, and then 23. Confirm your entries with the
hang up key
.
Then press the hang up key
several times until the telephone is
back to its base status. The correct time and date should now be
shown in the display.
Page 11

Bringing into service
11
Charging the battery
Your telephone is delivered with a charger and the corresponding
power supply unit. Insert the small connector on the power supply
unit into the jack at the rear of the charger, then connect the power
supply unit to the wall socket.
Put the telephone in the charger. The battery will now be charged.
The right-hand bar segment in the charge status display will flash on
and off in the display while it is charging. As soon as it is fully
charged, all the segments in the display will be filled in. The charge
status display will no longer be flashing.
Note: Instead of charging via the charger, the power supply plug
can also be connected directly to the jack on the underside of the telephone. The battery can also be charged via
a computer USB jack.
Before initial operation, completely charge the battery. To preserve
the battery, thereafter only place the telephone in the charger once
the battery is almost empty (when only 1-2 bars in the charge status
display are filled in).
Depending on the duration of your phone calls, you will usually need
to recharge the battery about once a week. Over time, battery performance diminishes. If you notice after a time that you have to recharge you telephone more frequently, replace the battery.
Page 12
Telephone controls
12
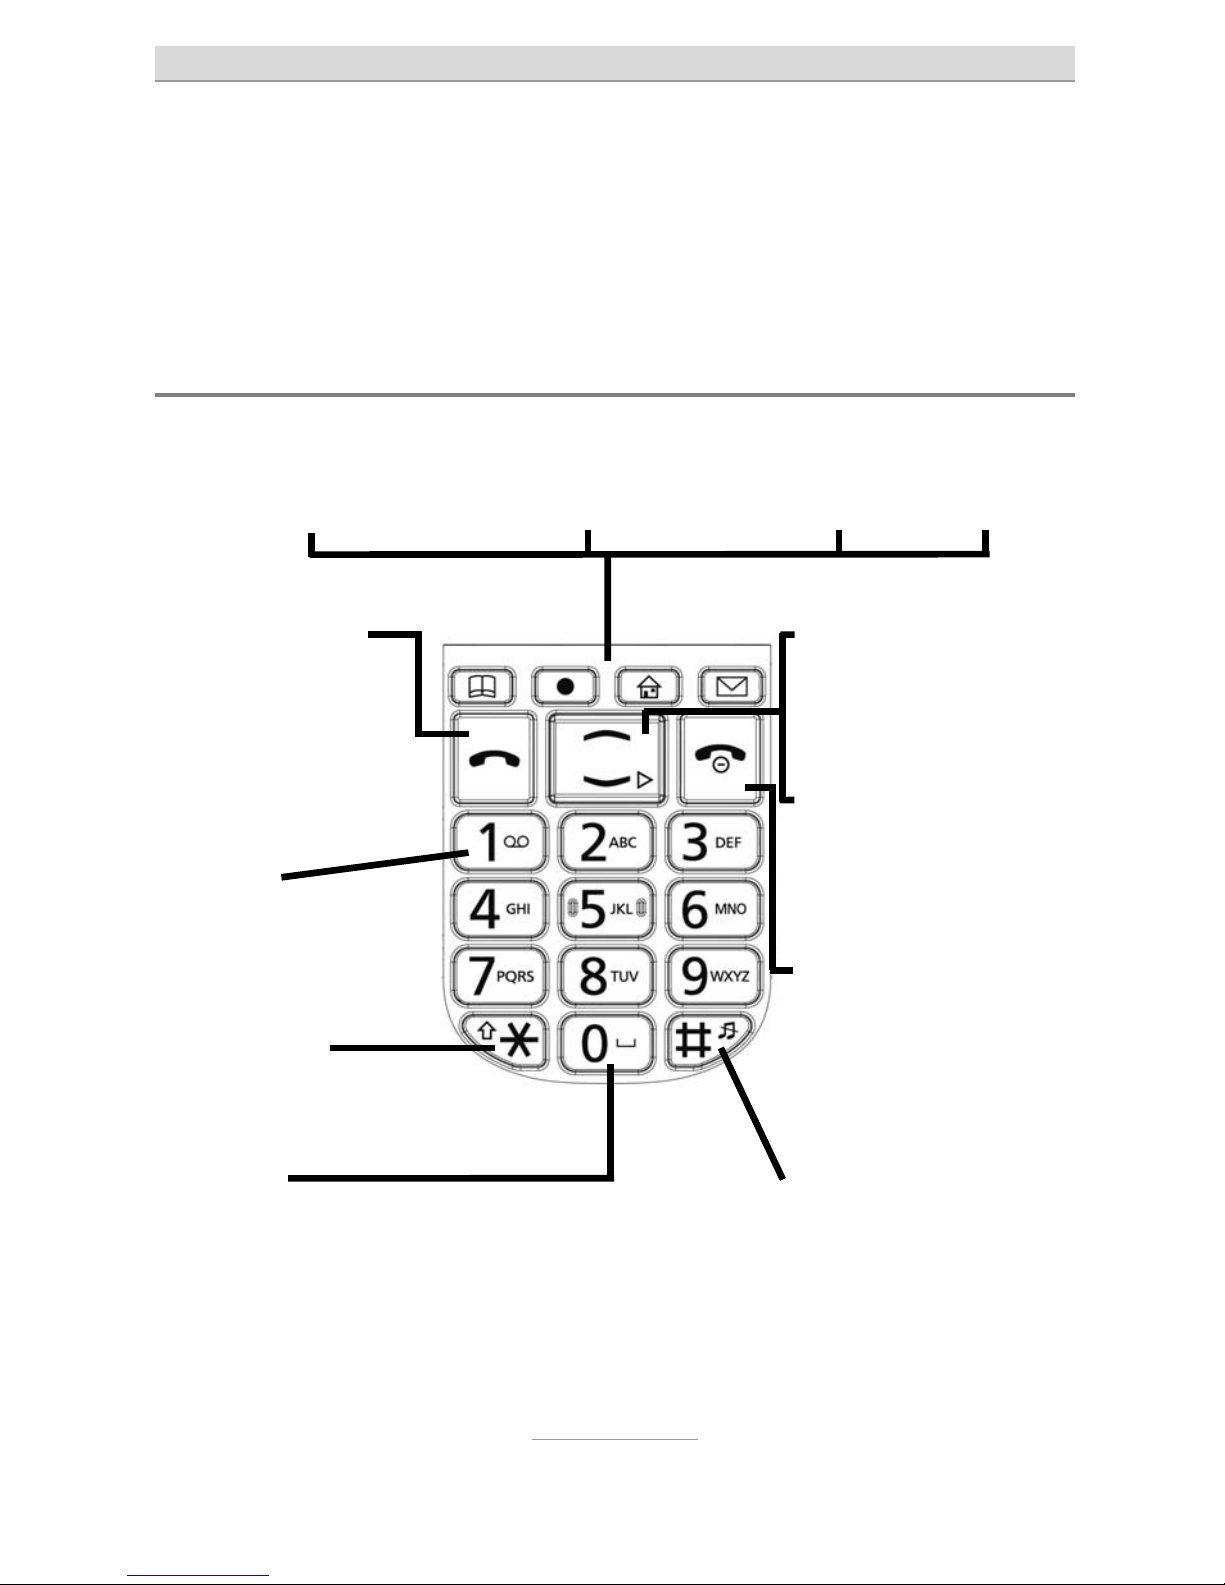
Telephone controls
The telephone has controls and connections on the front and back,
left and right, and top and bottom.
Controls on the front
Up arrow key:
For selecting in menus
Open main menu
Down arrow key:
For selecting in menus
Open recording log
Hang up key:
End or reject a call,
Return to
standby,
Switch on/off
Hash key:
Switch silent mode on
and off
Dial key:
Dialling and call
acceptance,
Opens the
call log,
Confirm in menus
Key 1:
Access answering
machine by
extended pressing
Star key:
Change the input
method e.g. to SMS
Key 0:
Space in SMS
Four speed dial keys:
Quick Contacts Voice Recording Top Contacts SMS
Page 13
Telephone controls
13
Controls on the rear
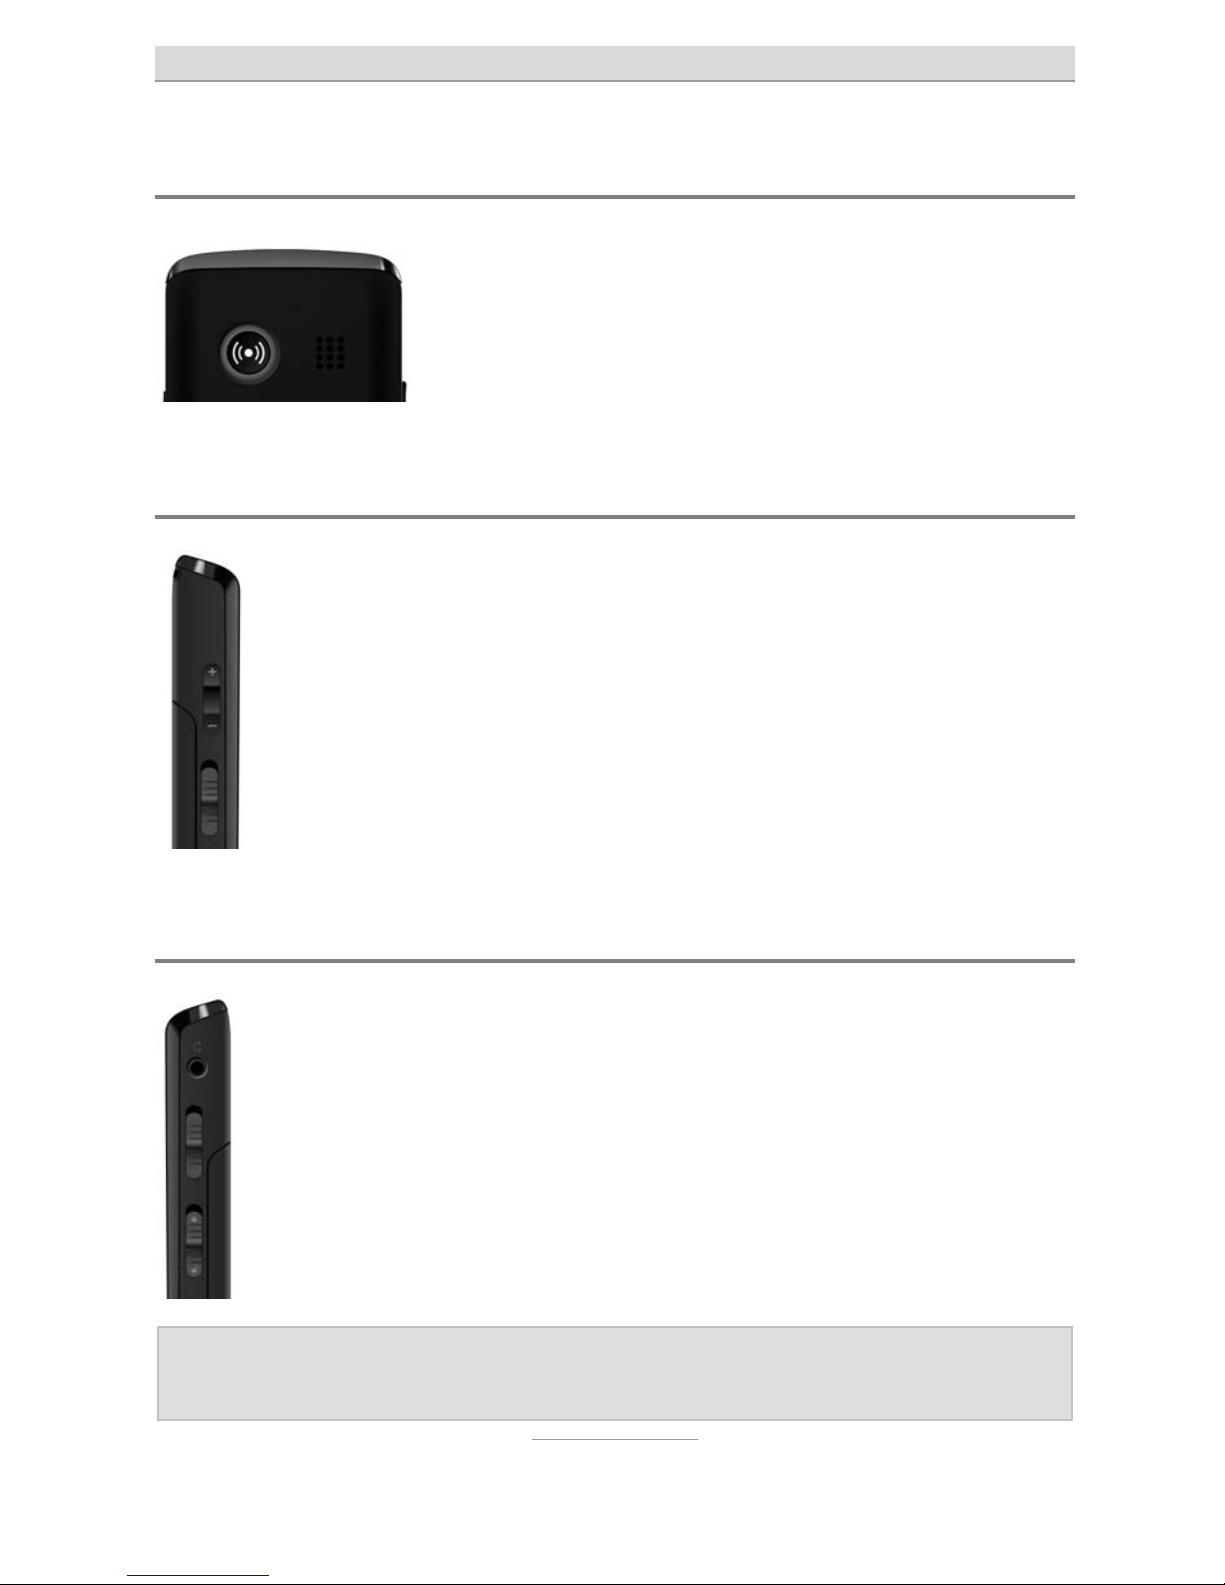
The emergency call (SOS) button is here.
The emergency call function is triggered if this is
pressed for about 3 seconds. You'll find a description of this function in the "Emergency Call"
chapter.
Controls on the left
Here is a rocker switch marked with + and –. It allows you to
control the volume while calling. It also adjusts the volume of
the integrated radio.
Beneath it there is a switch for turning the integrated radio on
and off.
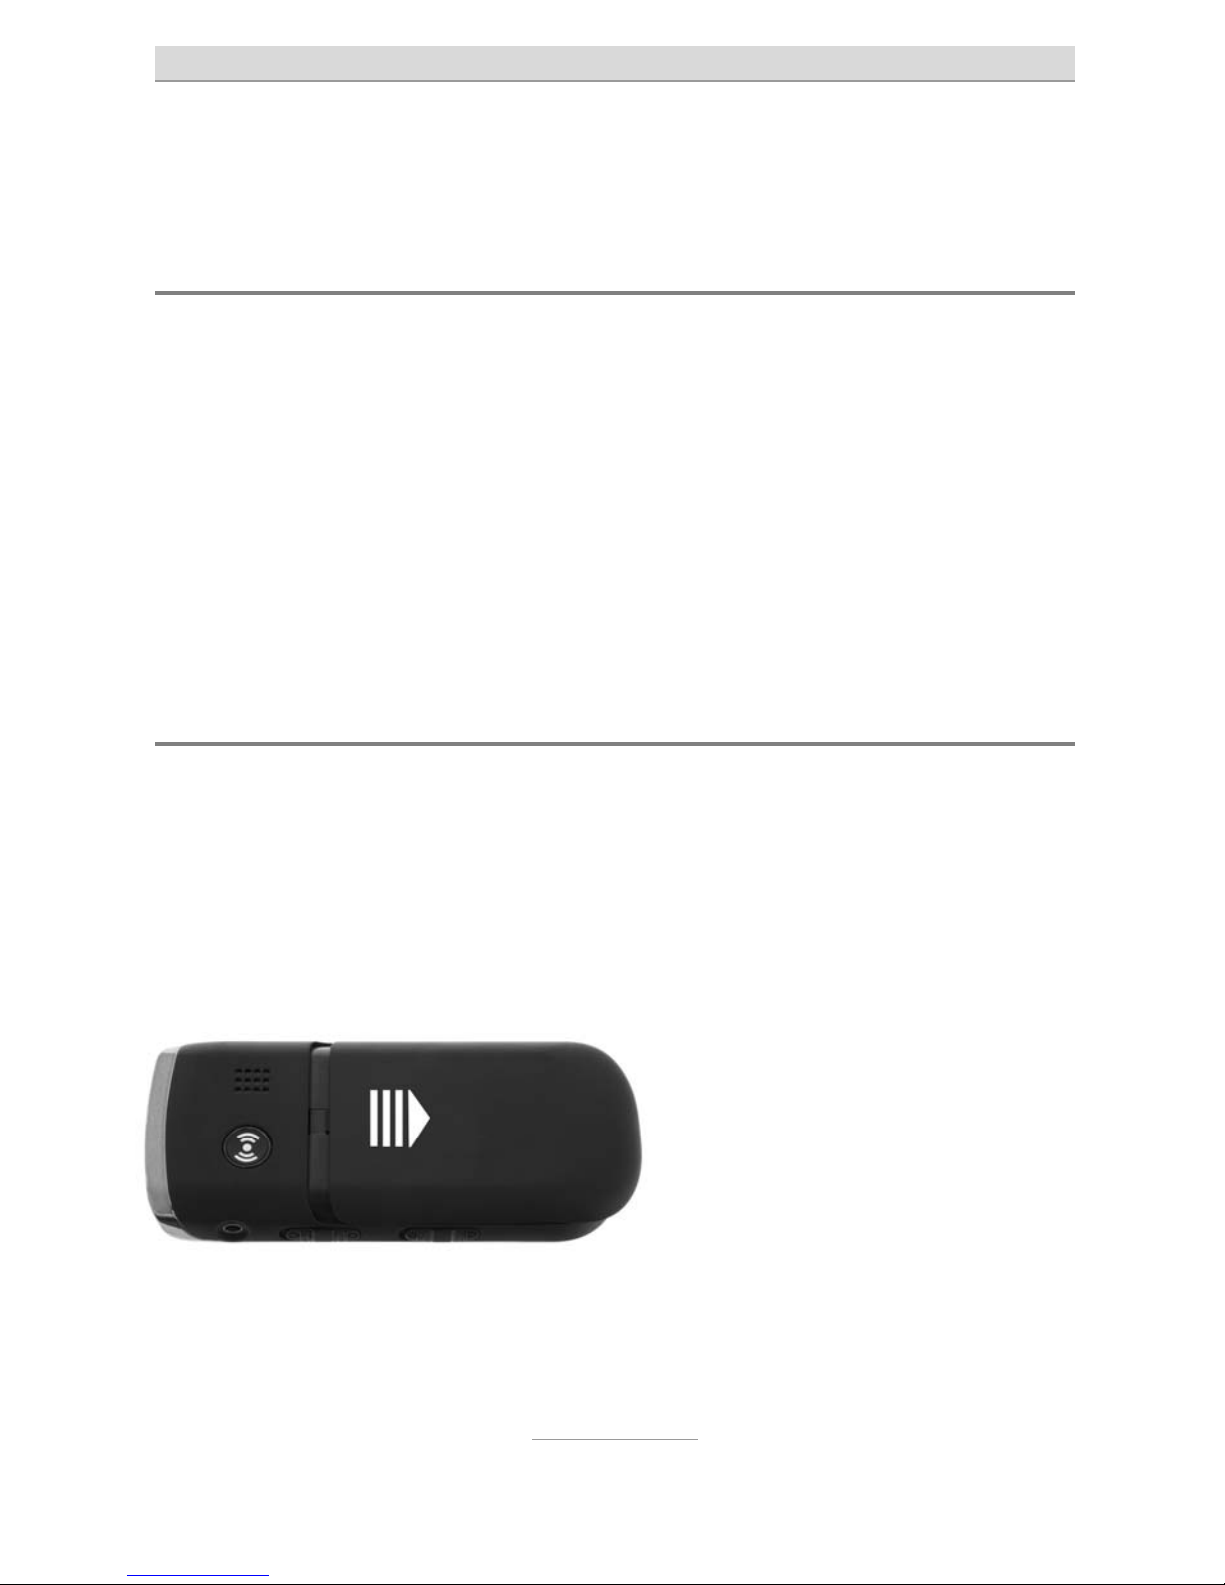
Controls on the right
Here there are two sliding switches and the socket for plugging the headset in (3.5 mm pin). A headset comes supplied.
The upper sliding switch switches the integrated torch on the
top on and off.
The lower sliding switch switches the key lock on and off. If
the key lock is enabled, the display will show the appropriate
symbol.
Note: Calls can be taken with the dial key when the key lock is
switched on.
Page 14
Telephone controls
14
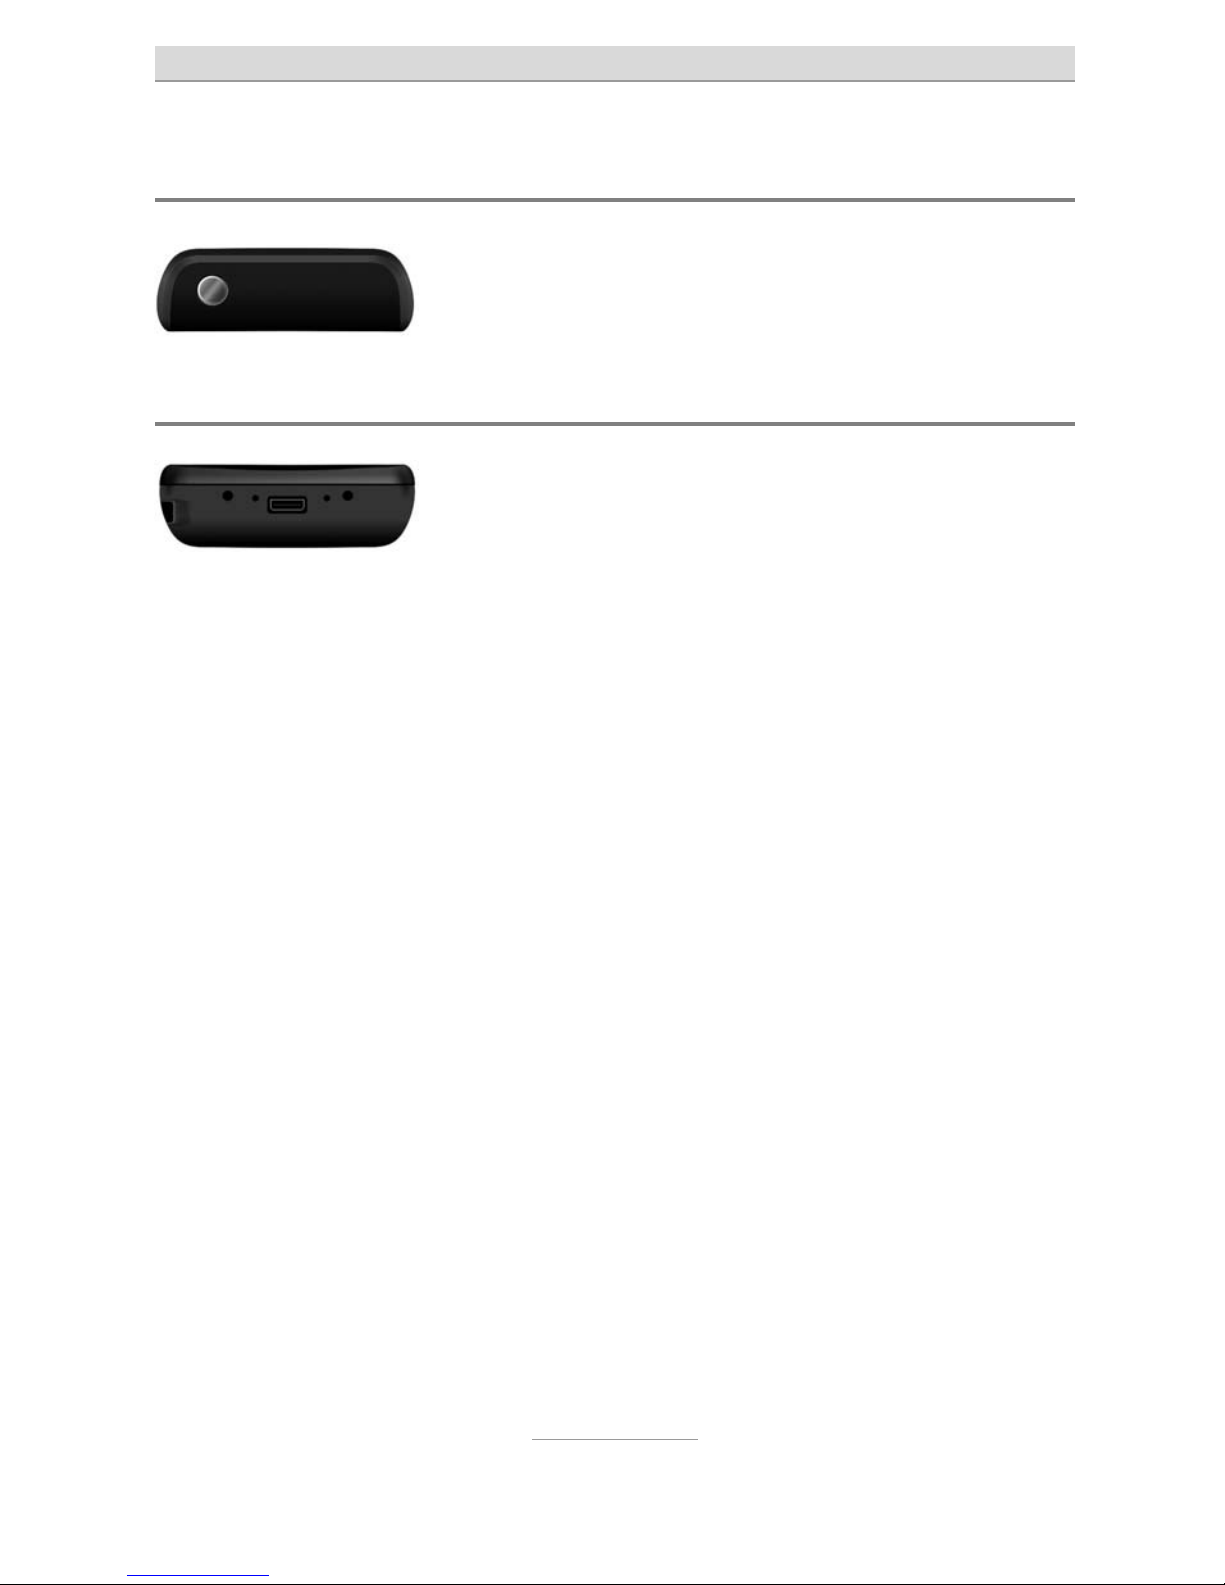
Features on the top
The integrated torch is on the top. The upper
sliding switch on the right-hand side is used to
switch it on and off.
Features on the bottom
On the bottom, on the right and left, you will find
the contacts for the charger and, between them,
the mini-USB jack for charging the battery using
the power unit supplied or a computer. Here, too, on the left, adjacent
to the USB jack, there is another socket for connecting a Nokiacompatible charger and, to the right of this, the microphone.
Page 15
Telephone controls
15
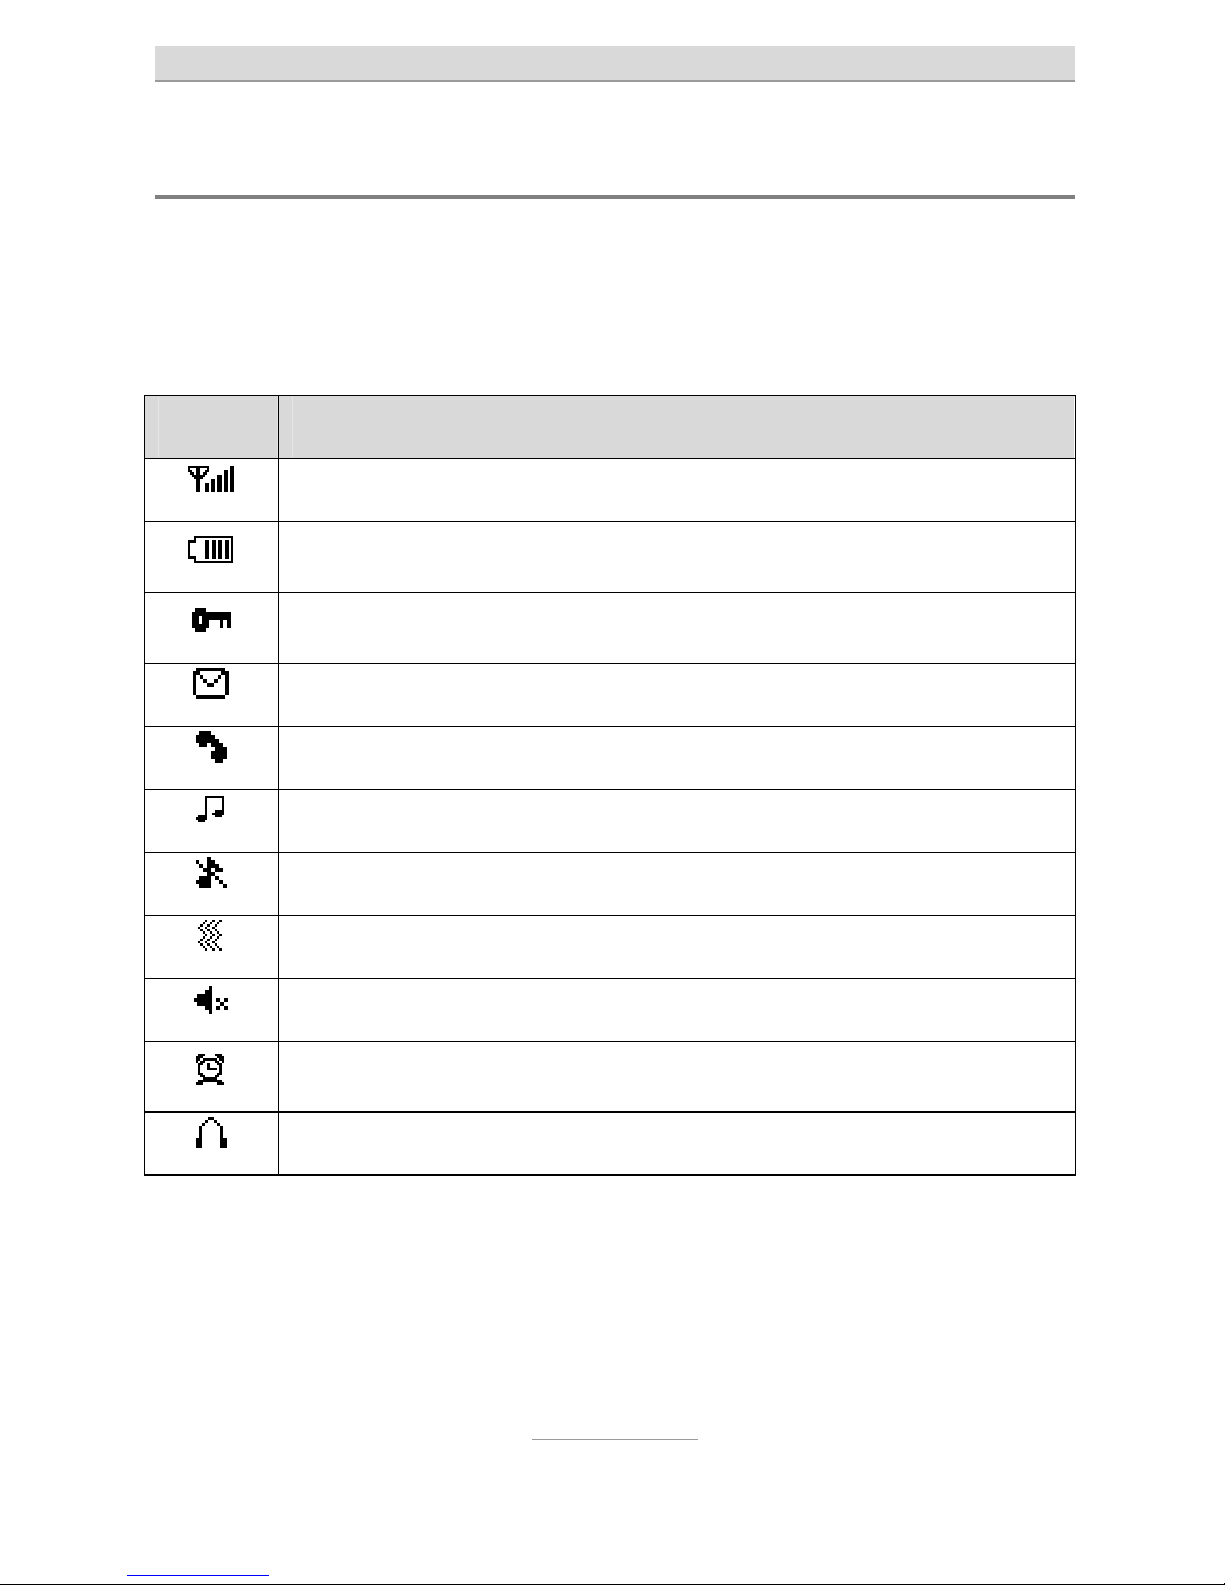
Symbols on the display
As well as the name of the mobile phone provider, the date and the
time, the display always shows the strength of the mobile network
signal and the battery charge status. The other symbols shown only
appear depending on the situation.
Symbol Description
Indicates wireless network strength.
Battery charge status.
Key block switched on
New unread text message(s) (SMS).
Missed call(s).
Normal ring mode enabled
Silent mode enabled.
Silent mode with vibration enabled
Muting during a call enabled
A
larm on.
Headset connected.
Page 16

Calling
16
Calling
Accepting calls
When a call comes in, the telephone rings (providing "Silent" is not
enabled). The calling number appears in the display. If the caller for
that number is saved in the phone book, the name of the caller is displayed instead of the number. The call is accepted by pressing the
dial key
.
Rejecting calls
If you press the hang up key when a call comes in, the call is rejected. The caller hears the engaged tone.
Calling with direct dialling
For direct dialling, enter the desired call number with the numeric
keys, then press the dial key
. The call is made to your desired
subscriber.
Note: Don't forget that with mobile networks you must always di-
al a prefix. If "Speaking keys" is enabled in the settings,
the telephone speaks when keys 0-9 are pressed.
Dialling with redial function
If you press the dial key without first entering a number while the
telephone is in standby, the call history is opened. This shows the
numbers that you have recently called, from which you have taken
calls, and from which you have not accepted incoming calls (see also
the "Call history" chapter). With the
and keys, you can
scroll up and down the call log. Press the green dial key
twice to
dial the number selected.
Page 17
Calling
17
Speed dialling
This telephone features speed dial keys on which frequently-dialled
numbers can be saved.
When the phone is in standby, these speed dial keys are called up by
pressing digits
- for about 2 seconds. The corresponding saved
number is then automatically dialled.
Note: To use the speed dial keys, the function needs to be ena-
bled and the speed dial codes entered. Both of these are
done via the main menu Settings Speed dial settings.
Dialling with the quick phone book key
The tiptel Ergophone 6040 has the key for opening the quick
phone book. When this key is pressed, a list opens with all the contacts saved to the SIM card and the telephone, and showing the
number of the contact.
You can use the
and keys to page through the contacts.
Pressing the
key opens the selected contact.
Dialling with top contacts
You can open your top contacts with the key. When the key is
pressed, up to five top contacts are shown with their name and number. You can use the
and keys to page through the top
contacts. Pressing the
key twice opens the selected top contact.
If "<Empty>" appears instead of the name and number, the top contact has not yet been set up. In this case, select "Edit" with the
key. You are then shown the contacts (see chapter "Phonebook").
You press the
key to save the contact selected as a top contact.
Page 18

Calling
18
Dialling from phonebook
When you press the key when the telephone is
on standby, the main menu opens. If you press the
and then the key, the phonebook opens
and the first entry is displayed.
You can scroll up and down with the arrow keys
and .
If one of the number keys is pressed several times in quick succession, the first entry starting with the corresponding letter is displayed.
For example, to display the first entry beginning with "L", the
key
must be pressed three times in quick succession.
Pressing the
key opens a selection menu, and pressing it again
when the "Call" entry is enabled dials the number of the entry that is
currently selected.
Note: You cannot just call contacts, but also send them a text
message (SMS), and view, edit, delete, copy and move
the contact.
Hands-free talking and muting
During a call, you can switch from receiver mode to hands-free mode.
You then hear the person you are talking to coming from the large
loudspeaker on the back of the device.
If you want to make some enquiry that you do not want the person
you are talking to hear, you can switch off the telephone's microphone.
If you press the dial key during a call, a selection menu opens with
the items "Loudspeaker", "Mute" and "DTMF". Use the
and
keys to select "Loudspeaker" and enable the hands-free function, or
"Mute" to switch the microphone off, and then confirm with the dial
key.
Page 19

Messaging (SMS)
19
Messaging (SMS)
With your telephone, you can receive and send short text messages
(SMS).
View SMS received
If you have received a text message (SMS), the display will show this
and the telephone's red LED will flash.
Pressing the dial key
shows you the message content.
If, when the SMS is open, you press the dial key
, you are given a
selection menu from which you can reply to the SMS, view details,
call the sender, delete the SMS or save the SMS's sender as a contact.
If you have not displayed all the newly received SMSs, the symbol
shown on the telephone display will show that there are more text
messages that you have not yet seen.
Note: If you have not only received texts but calls that you have
not taken, you will first need to use the dial key to open
the log of new missed calls. Only after you have seen,
when you press the dial key again, will the new texts be
displayed.
When you press the dial key when the telephone is on standby,
you can only access new texts that you have not yet read. Once you
have opened the message, pressing the dial key again when the telephone is on standby will no longer display it.
Page 20

Messaging (SMS)
20
However, in the telephone's base status, you can
press the
key to open its main menu and
choose "Messaging" to open your telephone's message centre.
There, in "Inbox", you will see all the text messages that you have received and not deleted. Unread texts are indicated by the symbol
,
read texts by the symbol
.
Writing and sending SMS
Besides replying to an SMS that you have received, you can also
compose and send an SMS yourself.
A new SMS can be created using the "Write message" menu item in
the main menu
Messaging, but it is quicker to use the SMS key
on the telephone keypad.
Writing SMS text
You use the number keys to write the actual text message. Three to
four letters are printed adjacent to the number keys
to . If you
press the relevant key once, the first letter is displayed, twice in quick
succession, the second letter, etc.
So, for the word "Hello", you would need to press the
twice, then
the
twice, then the three times, then the three times and then
the
three times.
You can use the
key to access special characters, such as the full
stop, comma and question mark, which are frequently used. Press
the
key for an overview of all the special characters. To enter a
space, press the
.
You can change input method with the
key. The input method cur-
rently selected is displayed in the top left of the display - this is upper
case in the factory settings.
Page 21

Messaging (SMS)
21
You may also select from the input methods "lower case", "numerals"
and "smart input" in upper and lower case.
Hint: You can use the main menu Settings Phone set-
tings Pref. input methods to set the input method to
be used when writing an SMS.
Smart input
As well as the input methods referred to above, you can also select
the "Smart ABC" (upper case) and "Smart abc" (lower case) input
methods, whereby the telephone uses your inputs to calculate and
propose frequently used words.
With these input methods, you only press the relevant keys once for
each letter. So, e.g., to enter "HELLO", you would type
. In a
row beneath the SMS text, the telephone shows the word that it has
calculated to be the most likely, based on your inputs. If more than
one word fits, the most likely is shown first and the other words
alongside. You can use the
and keys to switch between
the possible words. The proposed word is copied to the SMS text by
entering a space with the
key or pressing the dial key .
Hint: If the proposed word is not quite correct, you can change
the input method with the key to make corrections.
Page 22

Messaging (SMS)
22
Sending SMS
When the SMS text has all been entered, press the dial key and
select "Send to".
You are given a choice by which you can either enter a number manually or add the recipient from your phonebook.
Hint: If you want to send the same SMS to more than one recip-
ient, you can enter more than one number, one after the
other, or add them from your contacts. The SMS is then
sent to all the selected recipients.
When you have selected the message's recipients, press the dial key
and then select "Send". The message is then sent to the recipi-
ent/s.
Apart from Send, the selection menu also enables you to edit or delete a recipient, remove all recipients or save the message as a draft.
Note: If you want to save a message as a draft, it is not sent, but
just saved as a draft. You can open the message under
Drafts in the SMS menu, change the text again, and then
send it.
SMS settings
In the main menu Messaging you can make settings not only for
writing messages but also for your incoming mail and for drafts.
SMS server
This is where you enter the number of your service provider's SMS
service. You can enter up to two numbers for sending SMS and enable the profile to be used. You do not usually need to make any set-
Page 23

Messaging (SMS)
23
tings here, because your service provider's SMS number is automatically taken from the inserted SIM card.
Voicemail server
This is where the number of your service provider for calling the (answering machine) mailbox for your mobile number. This number is
dialled if you keep the
key pressed down while the telephone is on
standby. Your service provider will have given you the number along
with the SIM card. If no number has been entered and you keep the
key pressed down while the telephone is on standby, the number
will be queried and saved in this configuration item.
Common settings
If "Delivery report" is enabled here, a status message will be sent to
you by SMS after you have sent the SMS to the recipient. You should
not usually enable this function, because these confirmations are often subject to charges and they are not always supported.
Preferred storage
Here you can choose whether text messages are to be saved in the
telephone's memory or the SIM card's memory.
Page 24

Phonebook
24
Phonebook
The telephone has storage space for up to 100 numbers and names.
Additional numbers can be stored on the SIM card.
To open the phonebook, press the
key while on
standby. You go to the main menu. There, use the arrow keys to select the "Phonebook" entry, and then
press the dial key.
Only in this way will you be able to use all the options described below.
If you only want to dial numbers that have been saved as contacts,
you can also use the
key to open your quick contacts, or the
key to open your top contacts.
When the contacts have been opened, the first contact will be displayed. You can page through the contacts with the
and
keys. Above the first contact you can select the "Add new contact" entry. This function can also be accessed via the Options.
If you press a number key more than once on the keypad, the associated letter will appear in the line beneath the contact and, as the
contact, the entry which begins with that letter. So, e.g., if you press
the
key twice, the first contact beginning with "N" will be displayed.
If you press the dial key
, the Options open.
Call
Calls the selected contact.
Send text message
Sends a text message (SMS) to the selected contact.
Page 25

Phonebook
25
View
Displays the details (name and number) of the selected contact.
Add new contact
Creates a new contact. You are given selection fields for name and
number. With the "Name" field, you press the dial key
to enter
the name. You enter it in the same way as you write text messages
(see above). The numbers can be entered directly. When both fields
have been entered, press the dial key
. You will then be asked if
the entry is to be saved.
To ensure that dialling contacts also works when you are using the
telephone on a foreign network, you should enter the numbers in the
international format, i.e. including the country code. The number
02102-4280 would thus be entered as +4921024280, with +49 as the
country code for Germany first, then the dialling code without the initial nought. For the + sign, press the
key twice in quick succes-
sion.
Edit
Here you can change the existing selected contact.
Delete
Deletes the selected contact.
Copy
Copies the selected contact. You will be asked whether you want to
copy the contact to the SIM card or the telephone's memory.
Page 26

Phonebook
26
Move
Moves the selected contact to the telephone memory if it was stored
on the SIM card, or to the SIM card if it was stored in the telephone.
Copy/Move/Delete all contacts
These entries copy, move or delete not just the selected contacts, but
all the contacts. These functions are useful, e.g., if you are changing
the SIM card. You can then, first, copy all your contacts from the old
SIM card to the telephone and then back from the telephone to the
new SIM card.
Phonebook settings
This is where you make settings for the contacts.
Preferred storage
Here you specify whether the contacts are to be stored in the telephone or on the SIM card. Storing them on the SIM card is advantageous because the entries are kept if the telephone is changed. Viceversa, saving them in the telephone is advantageous because the entries are kept if the SIM card is changed.
If you in doubt, you can always use the copy function to copy the entries from the SIM card to the telephone or vice-versa if you are
changing your SIM card or the telephone. However, it is important
that all the entries are stored in the same place.
Memory status
The memory status shows how many numbers are stored on the SIM
card and in the telephone and how many numbers, maximum, can be
stored on both media.
Page 27

Call history
27
Call history
When the telephone is on standby, your attention is drawn to calls
that you have not taken by the text "Missed Calls" and the flashing red
LED. When the telephone is on standby and you press the dial key
, the calls log opens and displays only your missed calls.
If you have already displayed all your missed calls, when the telephone is on standby and you press the dial key
, the calls log
displays the calls missed, the calls taken and the numbers dialled.
By selecting the main menu and then "Call history", you
can display the call logs separated by call type.
Missed calls
When the "Missed calls" menu item is selected and you press the dial
key
, you get a log of the calls you have missed and you see the
last number that tried to reach you. You can page through the log
with the
and keys.
If you press the dial key again, a menu appears in which you can call
the caller back, see details about the call, send them a text message
(SMS), or delete the call from the calls log.
Dialled calls and received calls
These logs are used in the same way as the missed calls log, except
for the fact that the logs display the dialled numbers or the accepted
calls.
Page 28

Call history
28
Other call log functions
With "Delete call logs" you can delete individual call logs or all the
logs.
"Call timers" shows the duration of the last call, of all outgoing connections, and all accepted calls, and you can reset the call time meter.
Page 29

Silent mode
29
Silent mode
Switches the telephone to silent mode so that you and other people,
e.g., during an event, are not disturbed by it ringing.
Note: It is usually better to switch the telephone off rather than
put it on silent, as the caller then is then informed by text
that your telephone cannot be reached.
You can use the Silent item in the main menu to switch
silent mode with and without vibration on and off.
If the telephone is set to silent, the
symbol in the display will indi-
cate this. If it is set to silent with vibration, the
symbol indicates this.
Hint: If, while on standby, you keep the pressed down, you
can switch quickly between "Silent" and normal mode.
However, the "Silent and vibrating" function can only be
enabled with the "Silent mode" menu.
Page 30

Recorder
30
Recorder
You can use the recorder to record brief voice messages or to record
phone calls. E.g., you can quickly record a shopping list, or save a
set of directions during a call.
The recorder functionality is accessed via the "Recorder" item in the main menu and, for quick access,
you can use the
key to record and to play
back.
Recording voice notes and phone calls
While the device is on standby, if you press the key, the telephone
will begin to record a voice note.If you press the
key during a
phone call, the phone call will begin to be recorded.
You can interrupt and continue the recording with the dial key
.
Pressing the
key again or pressing the hang up key ends the
recording.
After recording, you can either save it with the dial key
or discard
it with the hang up key
.
When you are recording, speak loudly and clearly towards the microphone which is on the bottom of the device, next to the charge contact on the right-hand side.
Note: Note that you are legally obliged to get the consent of the
person you are talking to before beginning to record a
call.
Page 31

Recorder
31
Options after recording
After recording, you can use the dial key to access the recording
options.
New record
Starts a new recording.
Play
Plays back the recording you have just saved. This option is only
available after saving a recording.
Append
Restarts the recording and adds it to the file that has just been saved.
This option is only available after saving a recording.
Rename
The file name of the saved audio file can be changed here. This option is only available after saving a recording.
Delete
Deletes the audio file that has just been saved. This option is only
available after saving a recording.
List
Opens the list of saved recordings.
Page 32

Recorder
32
Settings
Here you can choose whether recordings are to be saved in the
"AMR" or "WAV" file format and with lower or higher audio quality. The
"WAV" and "High" choice for the audio quality delivers the best result,
but also leave you with correspondingly less recording time.
Play back recordings
When you press the key when the telephone is on standby, the
recording list opens. You can use the
and keys to page
between the recordings.
Options in the recording list
Use the dial key to open the options in the recording list.
Play
Plays back the selected recording.
Append
Restarts the recording and adds it to the selected recording.
Rename
The file name of the selected recording can be changed here.
Delete
Deletes the selected recording.
Page 33

Recorder
33
Delete all files
Deletes all the recordings.
Page 34

FM Radio
34
FM radio
Your telephone features an integrated FM radio.
You switch it on by pushing the lower sliding switch on
the left of the telephone, or via the "FM radio" item in
the main menu.
Note: The headset must be connected to use the radio.
When you switch on the radio, the station last set starts playing and
the station's frequency appears in the display.
You can use the and
keys to change the frequency in small
steps. If you first press the
key and then or , the radio
searches for the next station that can be received. You can use the
to
keys to directly select the first nine stations saved.
While it is playing, you can adjust the volume using the rocker switch
labelled + and - on the left of the telephone.
To switch the sound off, press the
key; to switch it back on,
press the
key again.
Options in radio mode
You can access the radio mode options using the dial key .
Channel list
Displays the list of all the channels that have been saved, and allows
them to be played, deleted and edited.
Manual input
Here you can enter a frequency manually.
Page 35

FM Radio
35
Auto search
Automatically searches for stations and saves them to the memory
fields in the channel list.
Note: The automatic search overwrites the stations saved in the
channel list.
Settings
Here you can specify whether the background playback and the
loudspeaker are to be switched on or off.
When background playback is switched on, the radio continues to
play the selected station even after you quit the radio display with the
hang up key
. To stop playback, you then need to use the radio
switch on the left of the device.
If the loudspeaker is switched on, the radio station plays via the loudspeaker on the back of the device, as well as through the headset.
Page 36

Alarm clock
36
Alarm clock
Your telephone has an integrated alarm clock with up
to five alarm times. To use your telephone as an alarm
clock, select "Alarm" in the main menu.
Select the alarm time that you want to edit, and press the dial key
.
In the alarm settings, you first set whether the alarm is to be switched
on or off. Next, you use the number keys on the keypad to enter the
alarm time you want. Thirdly, you decide whether the alarm is to repeat just once or every day. Under "Alert type", specify whether the
telephone will only ring, only vibrate, or ring and vibrate at the alarm
time.
When you have completed your settings, press the hang up key
to save them.
The
symbol in the display indicates when an alarm has been set.
At the alarm time, the telephone will ring and show the date and time
on the display. It also shows "Stop", which you can select with the dial
key
, and "Snooze", which you select with the hang up key .
"Stop" terminates the alarm function. "Snooze" delays the wake-up
call by 5 minutes.
If no key is pressed, the telephone continues to execute the alarm
function at intervals.
Note: You can change the alarm sound via Settings Sound
settings Tone settings Alarm.
Page 37

Birthdays
37
Birthdays
You can use this function to manage birthdays with
your telephone and remind you of them. Select the
"Birthdays" item in the main menu.
After selecting this function, press the dial key
to create a birth-
day.
If a birthday has already been saved, the Options menu opens when
you press the dial key
. This menu enables you to add a new
birthday, to view, edit and delete the selected birthday, or to delete all
the birthdays that have been created.
In the first field, use the telephone keypad to enter the year of birth,
then the month of birth, and then the day. Then press the
key to
go to the time.
Here you enter the time at which the telephone is to remind you of the
birthday.
Use the
key to go to the "Subject" field. Here you enter a text
that the telephone will display when providing the birthday reminder
(e.g. "Eric's birthday"). The text is entered in the same way as when
writing an SMS. When the text has been entered, press the dial key
and select the "Done" item in the Options menu to apply the text.
Use the
key to then go to the "Alarm" field. Here you can switch
the alarm on and off by pressing the dial key
. If the alarm is
switched off, you will not be reminded of the birthday. If it is on, you
will be reminded at the time you have entered. You also have the option of specifying that the telephone will remind you 5, 15 or 30
minutes before the time that has been set. Then press the hang up
key to save the birthday.
The birthday is then saved. From this point onwards, the telephone
will remind you of the birthday at the time set. At that point the tele-
Page 38

Birthdays
38
phone display will show the date, time and subject, and the alarm will
go off.
It also shows "OK", which you can select with the dial key
, and
"Snooze", which you select with the hang up key
. "OK" terminates the reminder. You can use "Snooze" to be reminded again in 5
minutes' time.
If no key is pressed, the telephone continues to execute the alarm
function at intervals.
Page 39

Calculator
39
Calculator
Your telephone has a simple, integrated calculator.
When the telephone is on standby, you access it via
the Calculator item in the main menu.
To use the calculator, first you enter the first number. The full stop for
then entering decimal places is entered by pressing the
key.
Then use the
or key to select the calculation operation (+,
-, x or /), then enter the second number, and press the dial key
to display the result.
If you want to use the result to continue calculating, instead of the dial
key
you can again press the or key to select another
calculation operation, and then enter the next number that is to be
used with the result so far. Again, press the dial key
to get the
end result.
You delete the result with the hang up key
. Pressing the same
key again quits the calculator.
Page 40

Settings
40
Settings
In the default setting, you get to the telephone settings via the
key Settings.
Phone settings
Here you specify certain telephone settings.
Time and date
Here you can set the date and the time. The date and time appear in
the display when the telephone is on standby, but they are also required for internal functions, e.g. the alarm (see also the chapter "Setting the time and date").
Language
Here you set the language of the telephone text. The first time that
you use the device you will automatically be prompted to select a
language, but you can use this menu to change this at any time afterwards.
Pref. input methods
In the device's default setting, the input method for all text entry is set
to upper case in the selected language. If you prefer a different input
method, you can change the device's default setting here.
Page 41

Settings
41
Contrast
Here you can change the contrast in the display. Select a setting
which enables you to easily read the text on the background. Make
any change with the
and keys.
LCD backlight
Here you can specify how long the display light will remain on if no
key is pressed. Possible values are 5 to 60 seconds. Make any
change with the
and keys.
Sound settings
Here you specify the device's tones and the type of signal.
Note: This setting is available in normal mode only not in silent
mode.
Tone settings
Here you select the tones for incoming calls, the alarm, power the device on and off, messages (SMS) and for the keypad.
When you select the relevant item, the melody that is currently set
plays and you can use the arrow keys to change it. When you press
the dial key the selected melody is saved.
With the key tones, you can choose between a tone and a clicking
sound and switching the key tone off.
Volume
Here you can set the volume of the tones (incoming calls, messages
and Alarm) and the key tone.
Page 42

Settings
42
Note: During a call, the volume of the receiver is adjusted using
the rocker switch with the + and – symbol on the left of
the device. This change will then be automatically saved.
Alert type
Here you set whether your telephone will only ring, only vibrate, first
vibrate and then ring, or ring and vibrate at the same time.
Ring type
Here you can set whether, for incoming calls, your telephone will play
the ringtone just once, or repeatedly, or ascending (starting quietly
and getting louder).
Answer mode
Here you can specify that incoming calls can be taken not only with
the dial key
, but with any key you want.
Speed dial
Here you can assign the speed dial numbers to the numerals to .
When you press the key concerned for about 2 seconds, the number
of the contact selected here is dialled. Under "Set number", for each
numeral you can select a contact who is dialled when you keep the
key pressed down. Under "Status" you switch the speed dial function
on and off.
Talking keys
Here you switch the "Talking keys" on and off. If they are switched on,
the telephone speaks the numbers
to when they are pressed, for
verification purposes.
Page 43

Settings
43
Call settings
This is where you set the network settings for calls.
Caller ID
Here you can specify whether your number is displayed to the person
you are calling on outgoing calls.
"Hide ID" means that your number is not displayed, while "Send ID"
means that it is sent. "Set by network" means that the network provider's setup determines whether your number will be displayed or
not. The usual default setting for network providers is that the number
is displayed.
Call waiting
This is where you can switch call waiting on and off, and query the
status set with the network provider.
If call waiting is switched on, any other call that comes in while you
are on the phone will be signalled by a call waiting tone, and you can
switch backwards and forwards between the two calls. The second
caller hears the ringtone. If you have switched off call waiting, the second caller hears the engaged tone if you are on the phone.
Call divert
Here you can switch call diversion on and off, and query the current
status.
Select "All voice calls" if all your calls are to be diverted. With "Divert if
busy", other incoming calls are only diverted if you are on the phone.
"Divert if no answer" means that calls are diverted if you fail to take the
call within about 15 seconds. When you select "Divert if unreachable",
Page 44

Settings
44
you specify that calls are only diverted if your telephone is switched
off or not logged onto the network.
Select the diversion type you require with the dial key. In the submenu, you can then enable or disable the diversion, and query the
current status with the network provider.
After enabling it you will be asked whether you want to divert callers
to your voicemail box (the answering machine) or to a different number.
Call barring
In this configuration item you can set up call blocking for outgoing
and incoming calls. Your service provider has to support call blocking
and, to set it up, you require the PIN2 that your provider has given
you.
Network selection
Here you can set whether your telephone is to automatically search
for the mobile network, or if you prefer to select the network manually.
With an automatic search, your telephone, in this country, always automatically logs onto your supplier's network, while outside this country it logs onto the network with the best reception. Manual selection
only makes sense outside this country and only if you want to use a
particular network there, e.g. because you know that the charges for
their roaming calls are cheaper than those of other networks.
Security settings
This is where you can set up the PIN queries for the SIM card and the
telephone.
Page 45

Settings
45
SIM lock
Here you can specify whether the telephone queries your SIM card's
PIN (personal ID number) or not when it is switched on.
Switching off the PIN query is more convenient, of course, because
you do not then need to make a note of the PIN and enter it each
time. However, if there is no PIN query there is, for example, no protection against unauthorised use if you lose it, which can lead be very
costly. With the SIM lock your protect your card against unauthorised
use.
You get the SIM card PIN along with the card, from your service provider. However, you can change the PIN with any mobile phone and
save the change on the card.
Phone lock
Here you can specify whether your telephone will be locked with a
password. With the telephone lock, you protect our telephone against
unauthorised use.
In the default setting, the telephone password is
.
Change password
Here you can change the SIM PIN and the telephone password.
Emergency settings
This is where the emergency numbers are entered and emergency
settings made. You will find a description in the "Emergency Call"
chapter.
Page 46

Settings
46
Restore factory settings
Here you can reset the telephone to the settings it had when supplied. Some settings are not reset, e.g. the phone book is not deleted,
the telephone password is not reset, and any saved audio files are
not deleted. To confirm, you need to enter the telephone password
(the default is
).
Page 47

Emergency call
47
Emergency call
Your telephone features an emergency call function which is triggered by pressing the SOS button at the back of the device for about
2 seconds.
If at least one emergency number has been configured and the
emergency call button is enabled, the telephone initiates the emergency call when the SOS key is pressed for approximately 2 seconds.
The telephone will then emit an alarm tone and (if activated) send an
SMS with an individually configurable text to the (up to 5) saved
emergency number(s).
Next, the telephone will call the first of the saved emergency numbers. If the call is accepted, the telephone automatically switches to
hands-free mode. If the called party hangs up, the emergency call
function remains activated and the telephone dials the next emergency number. To stop the emergency call function, keep the hang up
key
pressed down.
If the call is not accepted, the telephone calls the next saved emergency number. If none of the emergency calls goes through (or if the
emergency call function is not stopped after the call), the telephone
repeats the cycle of calls to all emergency numbers three times.
While the telephone is calling one of the emergency numbers, the
number is displayed; as the call occurs in hands-free mode, you can
hear whether the called party picks up.
After an outgoing emergency call (regardless of whether accepted,
unsuccessful or interrupted), the telephone automatically accepts incoming calls and switches into hands-free mode. This allows contact
with an incapacitated person, even if the emergency call has already
ended. To close this function the telephone must be completely
turned off, then back on again.
Page 48

Emergency call
48
The answering machine problem
The telephone cannot differentiate whether the emergency call is accepted by a person, an answering machine or a fax machine.
Should an emergency call be accepted by an answering machine,
you can end the current call by quickly pressing the hang up key
. The telephone then dials the next emergency number.
As the telephone pursues the emergency call function even after acceptance of the call, the call to the next emergency number occurs
even after acceptance by an answering machine in case the distressed person does not quickly press the hang up key
, or is un-
able to do so.
Answering machines are generally configured to break off the call after a few seconds, if no specific and clear vocal message follows – yet
this is no reliable safeguard. When entering the emergency numbers,
you should thus make sure that no answering machine or fax machine is connected to said numbers.
Test the emergency call function
After configuration, thoroughly test the emergency call function. This
process should include both the owner/s of the Ergophone device
and the persons whose call numbers are saved.
While testing, please consider that when making an emergency call
the user of the device will be in a stressful situation. Persons receiving
the emergency call should thus become familiar with using the emergency call function so as to be able to give instructions (e.g. on how
to stop the emergency call function), as the case arises.
Page 49

Emergency call
49
Configuring the emergency call
To configure the emergency call it must be enabled, and the emergency text and numbers must be entered.
When the telephone is on standby, select the
key and then Set-
tings
Emergency Settings. Here, you will find all the settings for
configuring the emergency call.
Emergency numbers
Enter your emergency numbers (up to five) under "Emergency Numbers". If there is an emergency, the first number entered will be dialled
first, then the second, etc. You can enter the emergency numbers
manually or take them from phonebook. To delete an emergency
number, you edit it, you thereby delete the entire number by keeping
the hang up key pressed down and then save the entry.
Sending an emergency SMS
Here you specify whether an SMS will also be sent to the emergency
number. You can decide for each of the emergency numbers, 1 to 5,
whether the emergency SMS will be sent. In the case of landline
numbers, you should only confirm this function if you are certain that
the telephone can receive SMS texts.
Note: If you enable the SMS for numbers of telephones which
are not SMS-capable, the service provider calls the subscriber and reads him/her the SMS. This call would engage the emergency number telephone at the very moment when the mobile telephone is trying to make the
emergency call.
Page 50

Emergency call
50
Emergency SMS content
This is where you enter the text which is sent as an SMS if there is an
emergency call. You may change the text.
Emergency alarm
Here you specify if the emergency call alarm is to be played before
the actual emergency call function. "No alarm sound" means that the
emergency call is made with no alarm. 5 or 10 seconds means that
the alarm sounds for 5 or 10 seconds before the actual emergency
call function begins.
Aborting the emergency call
If an emergency call has been triggered accidentally, it can be aborted by keeping the hang up key
pressed down.
To quit the emergency call function completely, the telephone must
be turned off, then back on again.
Page 51

Emergency call
51
Important information on emergency call functions
Do not rely exclusively on this emergency call function. In certain
situations (e.g. no network coverage or no credit for outgoing
calls), the emergency call function might not operate.
Make sure that no answering machines are associated with emer-
gency call numbers.
It is vital that you discuss the entering of emergency call numbers
with the subscribers of those numbers, so that they know exactly
what to do in case of emergency.
The general emergency number for mobile networks (112) may
not be entered as an emergency call number; this also applies to
110 and other official emergency numbers.
After setting up the emergency call function, test it thoroughly in
order to correct any configuration errors.
Please note that an emergency call can be unintentionally trig-
gered by contact with other objects, i.e. in a handbag; so take
good care of your telephone if the emergency call function is enabled.
Page 52

Appendix
52
Appendix
Service
You have purchased a modern product of TIPTEL granting a continuous level of the highest quality. This is underlined by a certification
according to DIN EN ISO 9001.
If, however, problems occur or you have questions on operating the
device, please contact your local dealer.
Guarantee
Please contact your local dealer or importer for details of guarantee
for non EC countries.
Within the European Community the following guarantee regulation
applies:
Your contact for services arising from guarantee obligations is the
authorised dealer where you bought the device.
TIPTEL will grant a guarantee of 2 years from the date of handover
for the material and for the manufacturing of the telecommunications
terminal unit.
Initially, the purchaser shall have only the right of subsequent performance. Subsequent performance entails either repair or the supply of an alternative product. Exchanged devices or parts shall become the property of the authorised dealer.
If the subsequent performance fails, the purchaser can either demand a reduction in the purchase price or withdraw from the contract.
The purchaser shall notify the dealer immediately of any defects
found. Proof of the guarantee entitlement shall be furnished by
standard proof of purchase (receipt or invoice).
Page 53

Appendix
53
The guarantee entitlement shall expire if the purchaser or an unauthorised third party interferes with the device. Damage caused by inappropriate handling, operation, storage or by force majeure or other external influences shall not be covered by the guarantee.
The guarantee shall not cover any consumable material (e.g. batteries) or defects that only slightly impair the value or the usability of
the device.
Claims for damage caused by transport shall be asserted to the delivery company.
Notes on settlement:
Repairs can only be conducted by the TIPTEL Service. A warranty
repair does not prolong the warranty period – neither for the replaced parts nor for the device. This guarantee is not transferable
and shall expire if the device is sold on to another party. It shall also
expire if the device is interfered with by third parties or if the serial
number on the device has been removed or made illegible. There is
a guarantee seal on the device. Please do not damage or remove
this seal because otherwise, your guarantee will expire.
The General Terms and Conditions of TIPTEL, which are part of the
contract for a dealer, shall also apply. In the event of a complaint,
the defective product shall be sent to the relevant TIPTEL subsidiary,
the importer or dealer along with a description of the defect and the
proof of purchase.
CE sign
This device is approved for the connection and use within the analogue public telephone networks in all EC countries – according to
the European Requirements. Due to technical deviations in individual countries, we cannot grant an unlimited guarantee for the successful operation at all types of telephone accesses.
TIPTEL hereby declares that the device complies with all fundamental requirements of the European directive 1999/5/EC. This conformity is confirmed by the CE sign on the device.
Page 54

Appendix
54
Further details on the declaration of conformity can be found under
the following internet address: http://www.tiptel.com
Ecological information
During the normal use of the telephone you will not have any contact
to substances damaging to your health. The device is not batteryoperated. The plastics used for manufacturing this device exclusively consist of partially recycled granules. The packaging materials do
not consist of plastics but of partially recycled cardboard and paper.
If you do not have further use of your TIPTEL device, TIPTEL will
take back the device without any charge. The device will be properly
taken to pieces for recycling.
Page 55

Page 56

Tiptel.com GmbH Business Solutions
Halskestraße 1
D - 40880 Ratingen
Tel.: 0900 100 – 84 78 35*
Vanity Tel.: 0900 100 – TIPTEL*
Internet: www.tiptel.de
International:
Internet: www.tiptel.com
Tiptel GmbH
Ricoweg 30/B1
A - 2351 Wiener Neudorf
Tel.: 02236/677 464-0
Fax: 02236/677 464-22
E-mail: office@tiptel.at
Internet: www.tiptel.at
Tiptel AG
Bahnstrasse 46
CH - 8105 Regensdorf
Tel.: 044 - 843 13 13
Fax: 044 - 843 13 23
E-mail: tiptel@tiptel-online.ch
Internet: www.tiptel-online.ch
Tiptel B.V.
Camerastraat 2
NL – 1322 BC Almere
Telefoon: 036 – 53 666 50
Fax: 036 – 53 678 81
E-mail: info@tiptel.nl
Internet: www.tiptel.nl
Tiptel NV
Leuvensesteenweg 510 bus 4
B – 1930 Zaventem
Telefoon: 0903 99 333 (1.12 euro / min.)
Fax: 02 714 93 34
E-mail: tech@tiptel.be
Internet: www.tiptel.be
Tiptel sarl
23, avenue René Duguay-Trouin
F – 78960 Voisins-Le-Bretonneux
Tél. : 01 / 39 44 63 30
Fax : 01 / 30 57 00 29
e-mail : support@tiptel.fr
Internet : www.tiptel.fr (en) 12/2011
EDV 4935431
*(1.49 euros/min. from Deutsche Telekom landlines,
varying mobile network charges possible)
 Loading...