

Page 1
User's Manual (en)
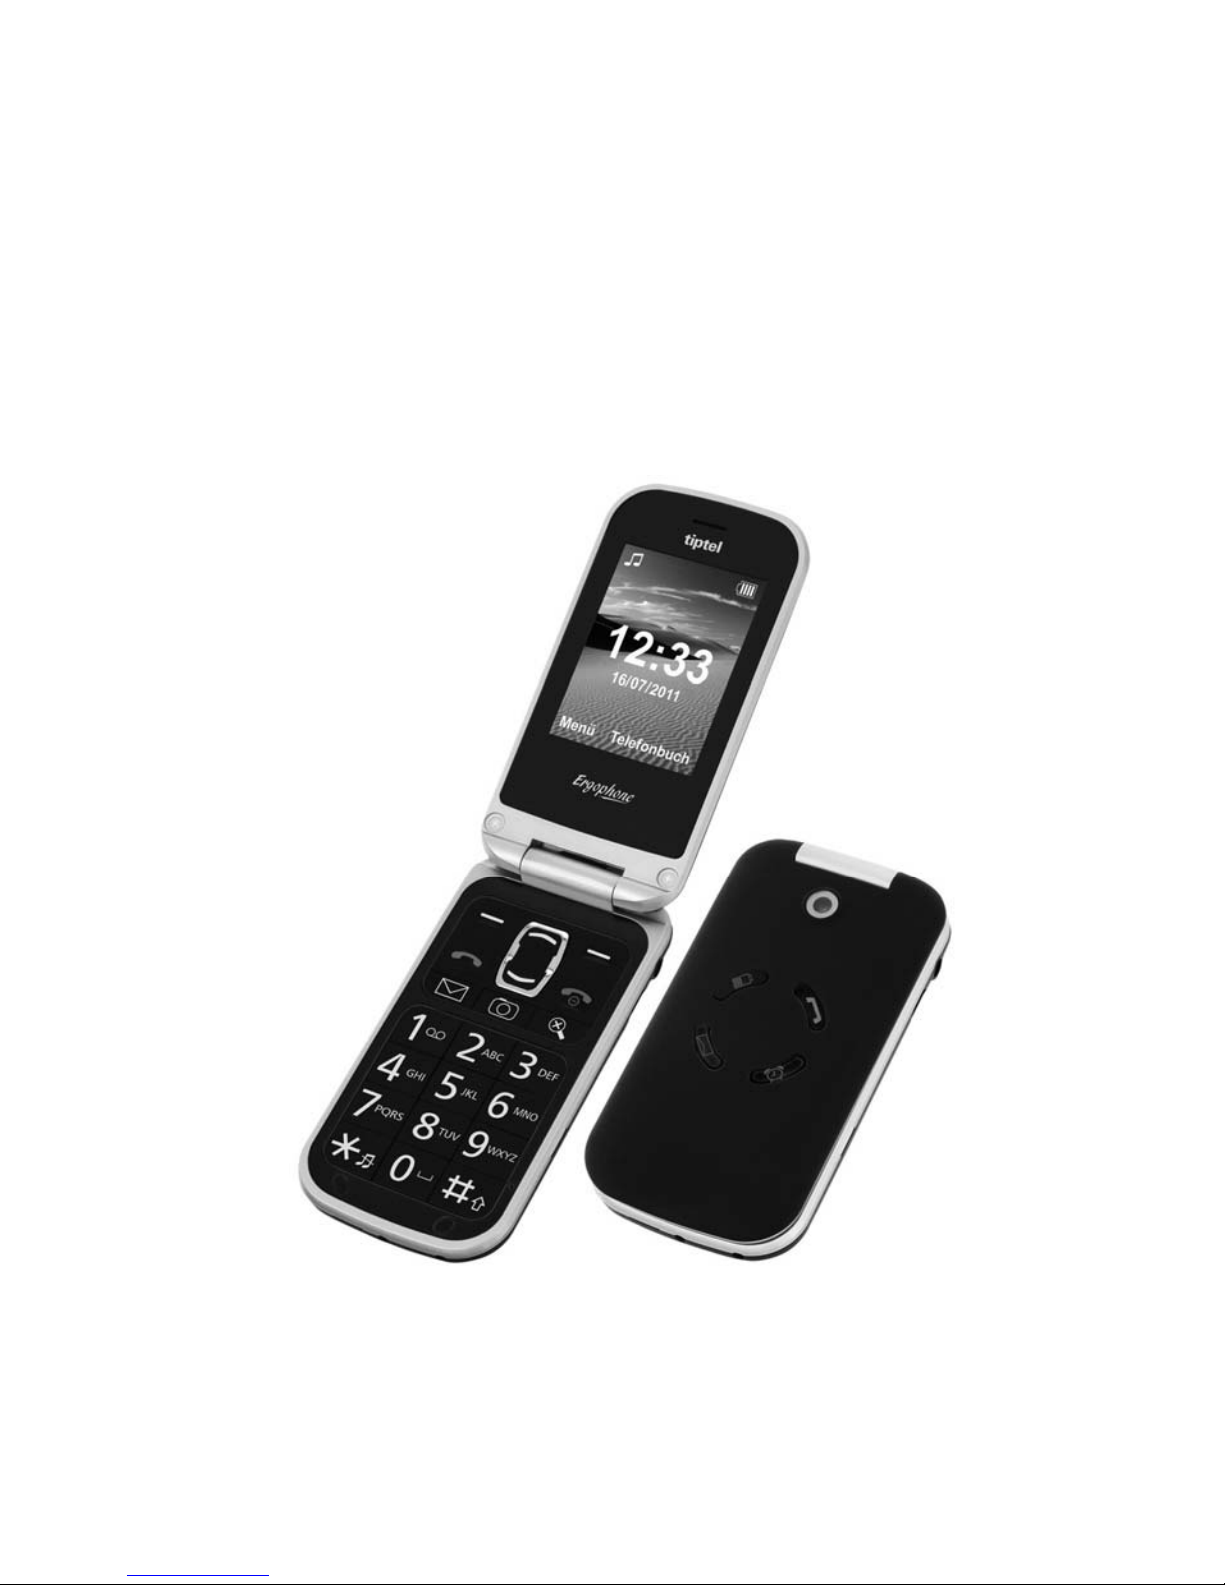
tiptel Ergophone 6020/6021
tiptel
Page 2

Important notice
This telephone is set up for easy operation. Factory settings include
only those functions which as a rule are most frequently used. These
are the functions principally described in this manual.
You can switch the telephone from "Beginner mode" to "Advanced
mode" via menu item "User level setting" in the "Settings" menu. Additional functions then become available.
Note: If you modify telephone settings in the "Advanced mode"
setting, these changes remain available even if you later
switch back to "Beginner mode".
All menu items of the main menu described in the present manual are
visible in the factory settings of the device. You can mask those menu
items of the main menu which you do not intend to use via menu item
"Main Menu Settings" in the "Settings" menu.
Page 3

Contents
3
Contents
Important notice ....................................................................... 1
Contents .................................................................................... 3
Safety notes .............................................................................. 7
Bringing into service ................................................................ 8
Check packing contents ........................................................ 8
Installing the SIM card(s), memory card and battery ............ 8
Switching on the telephone ................................................... 10
Setting date and time ............................................................ 10
Charging the battery .............................................................. 11
Telephone controls .................................................................. 12
Keyboard controls ................................................................. 12
Controls on back side ........................................................... 13
Features on the front side ..................................................... 13
Controls on the left side ........................................................ 13
Features on the right side ...................................................... 14
Features on the underside .................................................... 14
General operating information .............................................. 14
Symbols in the display .......................................................... 15
Calling ....................................................................................... 16
Accepting calls ...................................................................... 16
Rejecting calls ....................................................................... 16
Calling with direct dialling ..................................................... 16
Dialling with redial function ................................................... 17
Calling with speed dial .......................................................... 17
Dialling from contacts ............................................................ 18
Functions while calling .......................................................... 18
Page 4

Contents
4
Contacts .................................................................................... 19
Options .................................................................................. 19
Dial ...................................................................................... 19
Send message .................................................................... 20
Add new contact ................................................................. 20
Delete .................................................................................. 20
Additional options ............................................................... 21
Messages (SMS) ...................................................................... 22
View received messages ....................................................... 22
Sending messages ................................................................ 22
Writing message text ............................................................. 23
Additional message options ............................................... 23
Silent mode ............................................................................... 24
Call history ................................................................................ 25
Display of missed messages ................................................. 25
Camera ...................................................................................... 26
Memory medium ................................................................... 26
Image viewer ......................................................................... 26
Transferring photos to the computer .................................. 27
Magnifier function .................................................................... 28
Radio ......................................................................................... 29
Radio options ........................................................................ 29
Channel list ......................................................................... 29
Auto search ......................................................................... 29
Loudspeaker ....................................................................... 30
Additional options ............................................................... 30
Recorder ................................................................................... 31
Recorder options ................................................................... 31
New record ......................................................................... 31
List ....................................................................................... 31
Settings ...............................................................................
31
Additional options ............................................................... 32
Page 5

Contents
5
Alarm clock ............................................................................... 33
Calculator .................................................................................. 34
Tasks ......................................................................................... 35
Services .................................................................................... 36
Settings ..................................................................................... 37
Phone settings ....................................................................... 37
Time and date ..................................................................... 37
Tone settings ...................................................................... 38
Volume ................................................................................ 38
Alert type ............................................................................. 38
Language ............................................................................ 38
Font size ............................................................................. 38
Additional telephone settings ............................................. 39
User level settings ................................................................. 40
Main menu settings ............................................................... 40
Security settings .................................................................... 41
Additional settings ................................................................... 41
Call settings ........................................................................... 41
Emergency settings ............................................................... 41
Network settings .................................................................... 42
Connectivity ........................................................................... 42
Factory settings ..................................................................... 42
Connection to the computer .................................................... 43
Emergency call ......................................................................... 44
The answering machine problem .......................................... 45
Testing the emergency call function ..................................... 45
Configuring the emergency call ............................................ 46
Active .................................................................................. 46
Numbers list ........................................................................ 46
Send SMS ........................................................................... 47
Breaking off the emergency call ............................................ 47
Important information on emergency call functions ............. 48
Page 6

Contents
6
Appendix ................................................................................... 49
Service ................................................................................... 49
Warranty ................................................................................ 50
CE sign .................................................................................. 52
Page 7

Safety notes
7
Safety notes
Only use the telephone at locations where calling is allowed. As a
rule, use of mobile phones is prohibited in hospitals, aircrafts and
at filling stations.
Do not open the device yourself, and do not attempt repairs on
your own. Repairs may only be performed by qualified specialists.
Do not expose the telephone to smoke, chemicals, humidity, dust
or excessive heat (direct sunlight).
Keep the telephone and accessories away from children.
This telephone's speaker can be set very loud. Check volume be-
fore use to avoid damaging your hearing.
While driving, use this telephone only with an approved hands-free
set. Observe specific national legislation governing use of mobile
telephones.
If applicable, keep a 20 cm distance between the telephone and
any implanted pacemaker. Immediately switch off the telephone if
you feel or suspect any impairment.
Use only the provided power supply unit, and none other.
Use only original accessories and batteries.
The telephone is not water-tight. Avoid contact with liquids.
In case of emergency, do not rely exclusively on your mobile tele-
phone's emergency call function. For technical reasons, an emergency connection cannot always be guaranteed.
Dispose of the device and the battery according to environmental
guidelines. Your local waste disposal provider offers collection
points for electronic waste. Do not dispose of the device and the
battery in household rubbish or in a fire.
Please dispose of packaging materials according to local regula-
tions.
Page 8
Bringing into service
8
Bringing into service
Check packing contents
Included in the scope of delivery:
tiptel Ergophone 6020/6021 mobile telephone
Power supply unit
Desktop charger
Li-Ion 3.7 V/800mAh battery pack
Operating instructions
Installing the SIM card(s), memory card and
battery
Before bringing into service, the SIM card, battery and any memory
card must be installed. Neither SIM card nor memory card are included in the device scope of delivery. You can obtain the SIM card from
your service provider. The Ergophone 6020/6021 supports Micro SD
memory cards up to 4 GB, which can be purchased on the accessories market and in electronics shops.
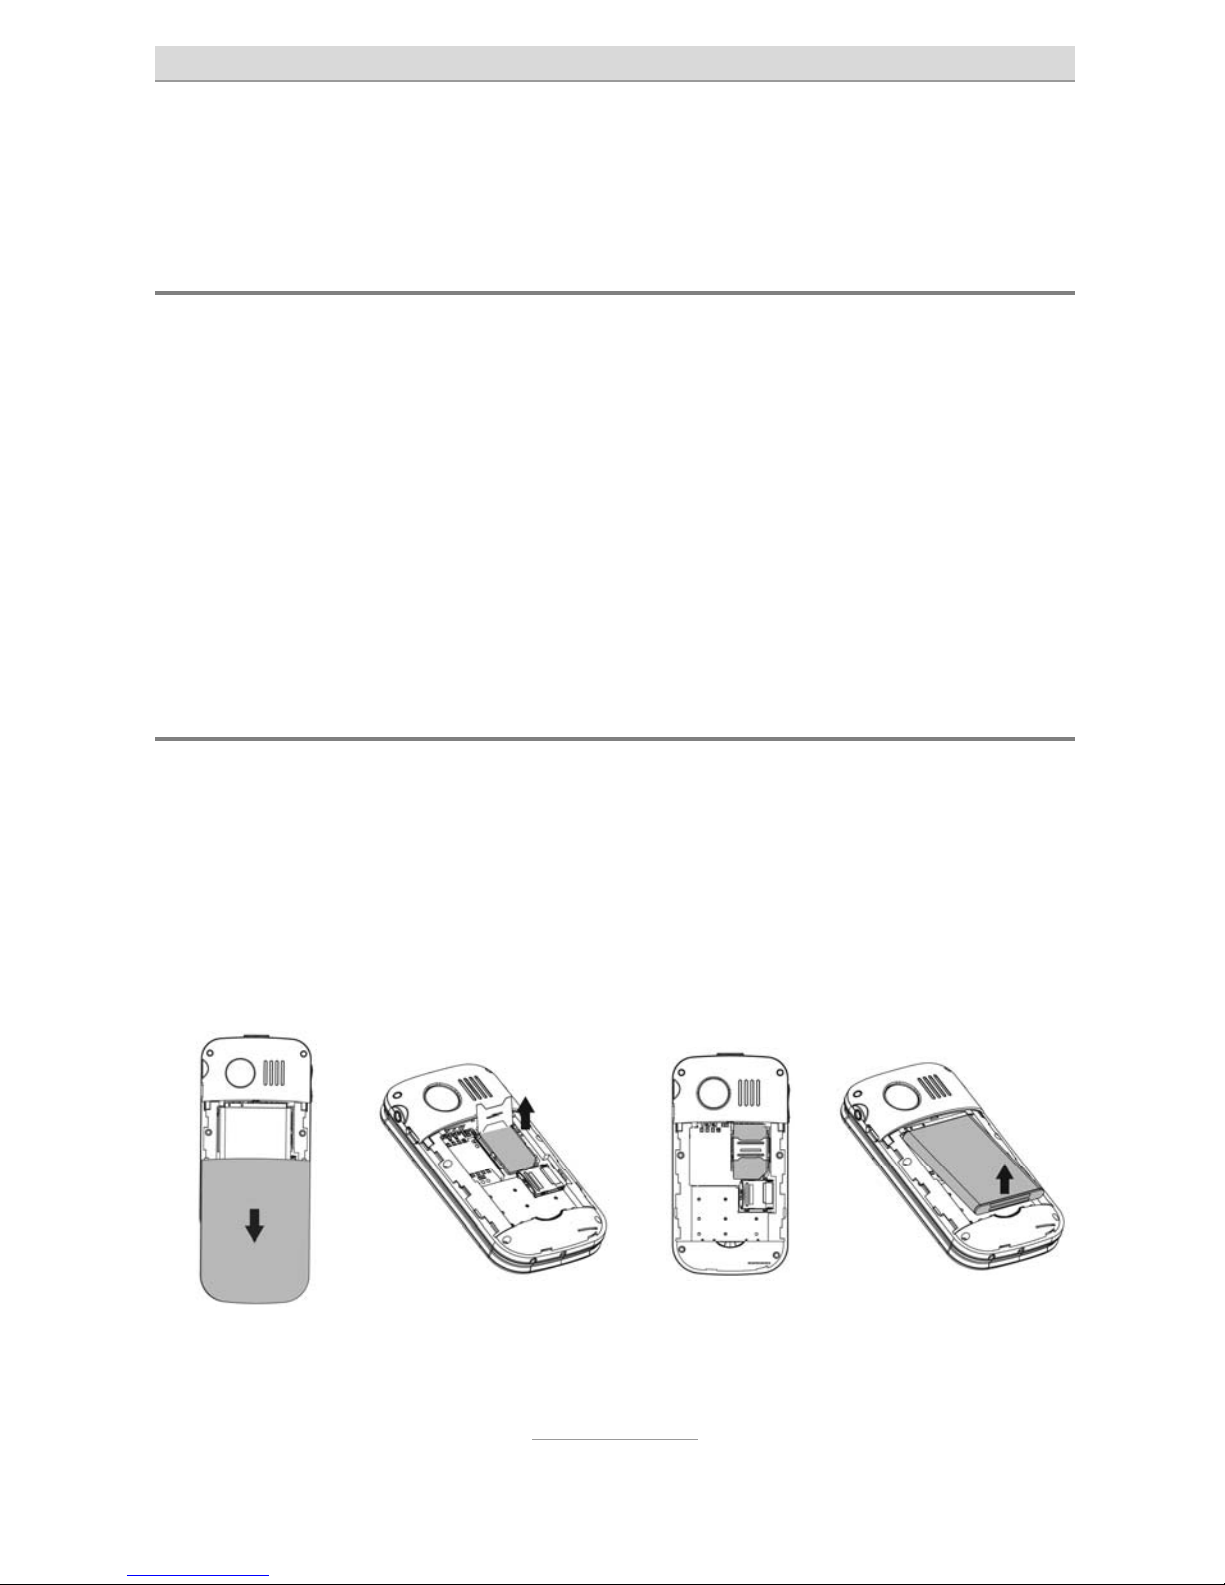
Illustration 1 Illustration 2 Illustration 3 Illustration 4
Page 9

Bringing into service
9
To insert the SIM card, any memory card and the battery, the casing
cover at the back of the device must be removed. Press the casing
cover while sliding it downward until it can be removed (illustration 1).
Slide the metal catch toward the top of the device, then fold open
upward (illustration 2).
Carefully install the SIM card in the card holder. After the card is inserted, the metal holder is pushed forward, so that it secures the card
and can no longer slide upward (Illustration 3). Exercise extra care
here. When the metal holder does not slide easily, it's usually an indication that the card is not correctly inserted.
Next, the battery is inserted, which is only possible in the correct position (illustration 4).
Then replace the casing cover and slide it in the direction of the SOS
button until it engages.
Note: The telephone can be operated without a memory card. In
this case, however, the memory is limited. If you wish to
take a lot of photos or record many vocal messages, the
use of a memory card is recommended. The device supports Micro SD memory cards up to 4 GB.
Page 10
Bringing into service
10
Switching on the telephone
To switch on the telephone, press the red hang-up key for 3–5
seconds.
Your SIM card PIN is then queried (if enabled for the SIM card). Enter
the PIN via the keyboard, then press the OK key.
Note: In Settings → Safety Settings, you can modify the SIM
card PIN and enable or disable its query.
Setting date and time
After initial switching on (and battery removal for longer periods), the
telephone automatically synchronises date and time from the service
provider network.
If your service provider does not support this functionality, date and
time must be set manually. For this, press left display key
under
"Menu", then repeatedly the "Arrow Down" key
, until "Settings" is
displayed. Next press the
key under the "OK" display three times
to call up "Settings", then "Phone Settings", as well as "Time and
Date". Next, successively select "Set time" and "Set date", and enter
the current time and date with the keyboard.
Note: Date entry occurs in international format, i.e. first the year,
then the month, and then the day.
You can close Settings by repeatedly pressing the key under
"Back", but also by pressing the red hang up key
once.
The correct time and date then appear in the display.
Page 11

Bringing into service
11
Charging the battery
Your telephone is delivered with a charger and the corresponding
power supply unit. Insert the small connector of the power supply unit
into the jack at the rear of the charger, then connect the power supply
unit to the wall socket.
Place the telephone in its closed position in the charger; the battery
now charges. During the charging process, the red battery LED at the
front of the device blinks. When the charging process is complete, the
battery LED goes out.
Note: Instead of charging via the charger, the power supply plug
can also be connected directly to the jack on the underside of the telephone. The battery can also be charged via
a computer USB jack.
Before initial operation, completely charge the battery. To preserve
the battery, thereafter only place the telephone in the charger once
the battery is almost empty.
Over time, battery performance diminishes. If you notice after a time
that you have to recharge you telephone more frequently, replace the
battery.
Page 12
Telephone controls
12
Telephone controls
The telephone has controls and displays on the front and back, along
with the left, right and lower sides, and on the keyboard when in the
open position.
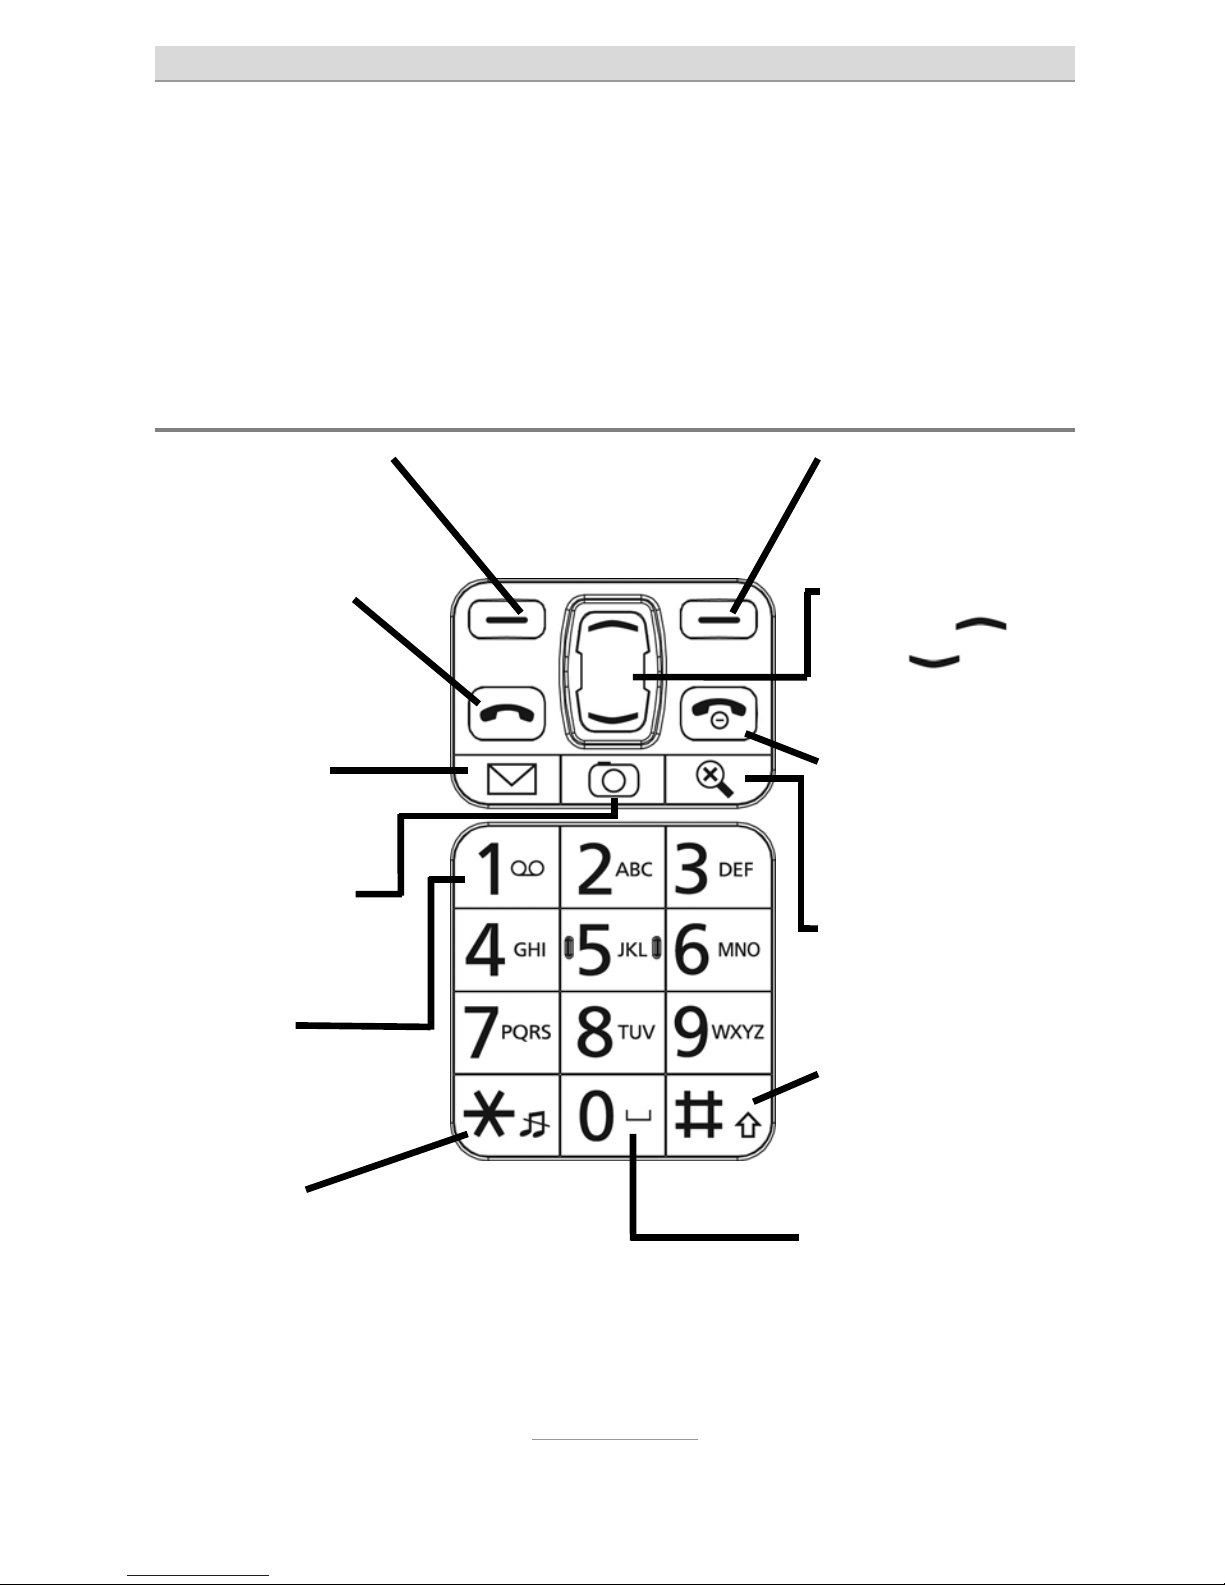
Keyboard controls
Right display key
Confirms entries on
the display
Control keys
Arrow up
and
down
keys to se-
lect in menus.
Hang up key
Ends a call, returns to
standby
Switches on/off
Magnifier key
Enables the magnifier
function
Hash key
Toggles between upper and lower case
characters
0 Key
Space, e.g. in SMS
Left display key
Confirms entries
on the display
Selector key
Dialling and
call acceptance,
Opens call log
SMS Key
Opens
short messages
Camera key
Opens
camera function
Key 1
Extended press accesses answering
machine
Star key
Extended press
switches silent
mode on/off
Page 13
Telephone controls
13
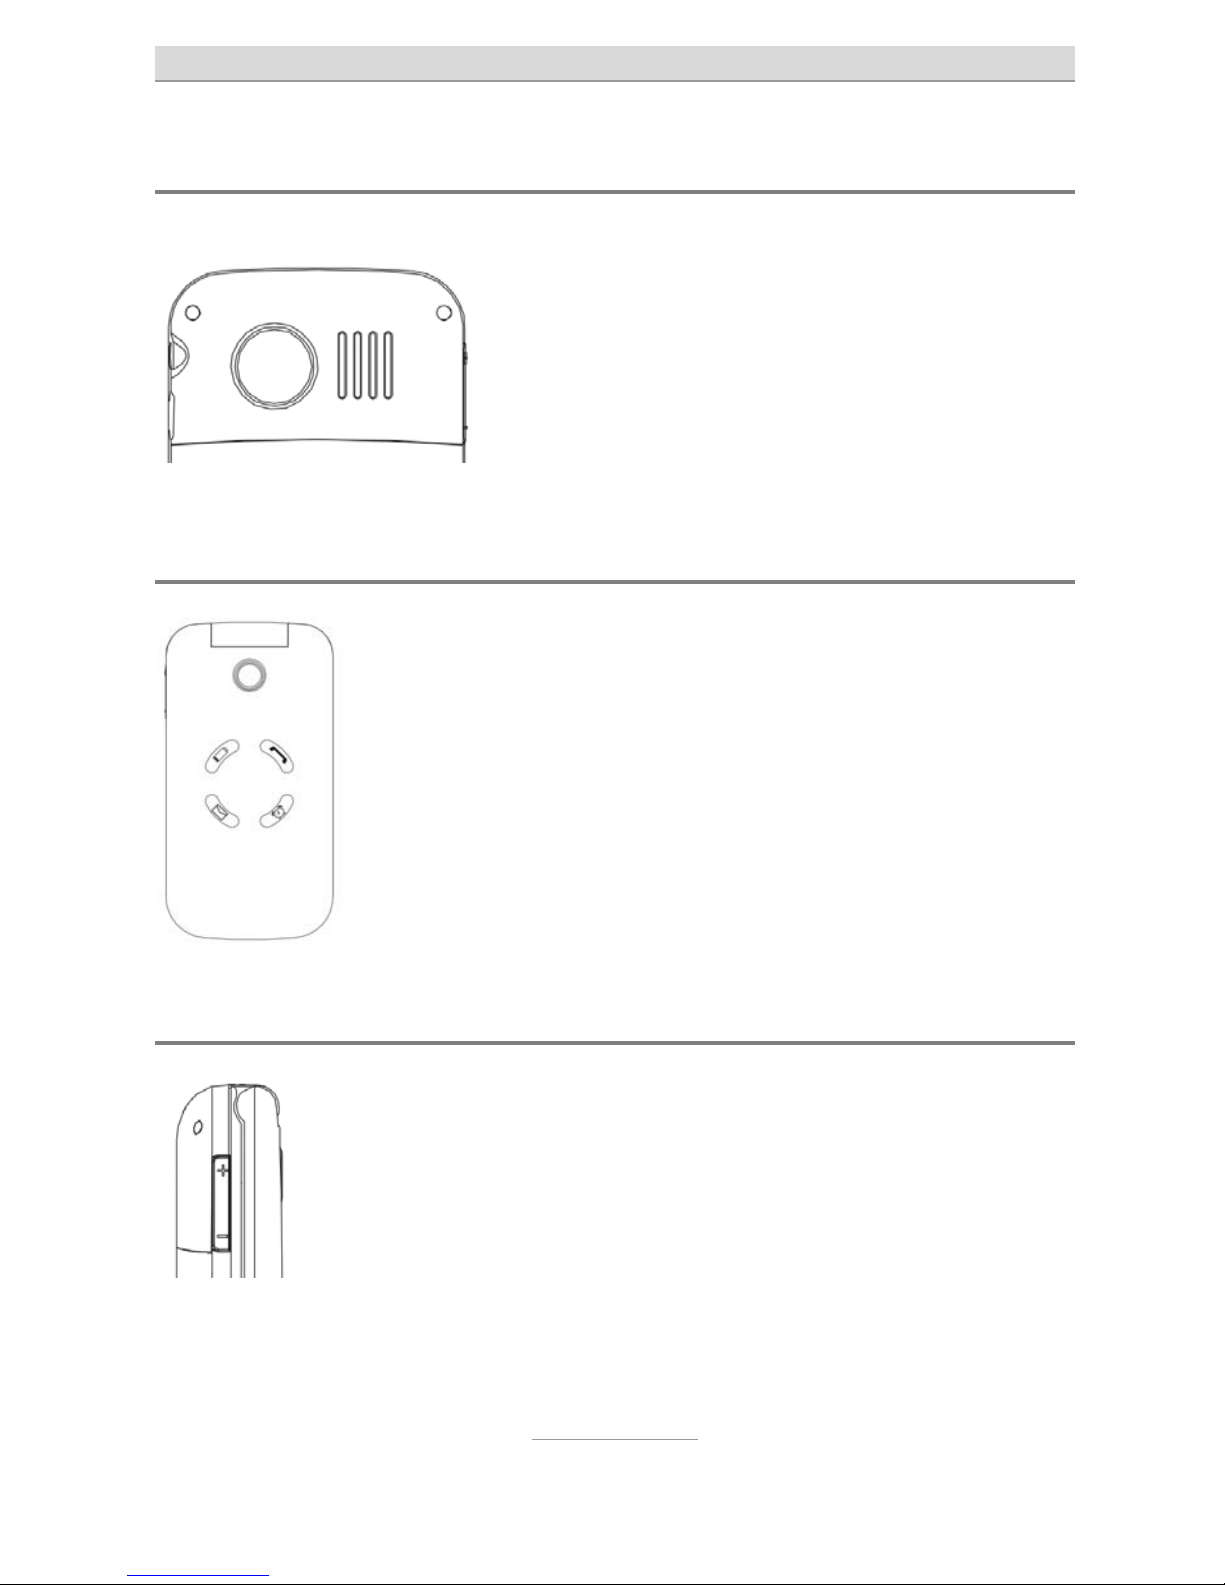
Controls on back side
Here, you have the emergency call button
and the loudspeaker.
The emergency call function is triggered if
the emergency call button is pressed for
about 2 seconds. You'll find a description of
this function in the "Emergency call" chapter.
Features on the front side
Here, you'll find four LEDs, and above these the integrated camera.
The red LED at top left blinks when the telephone is
charging. The green LED at top right blinks for incoming calls, the blue LED at bottom left for incoming short messages (SMS). Both blinking LEDs indicate calls and messages received in your absence.
The LED at right bottom blinks when a configured
alarm rings.
Controls on the left side
Here is a rocker switch marked with + and –.
It allows you to control the volume while calling. It also
adjusts the volume of the integrated radio and recorder.
Page 14

Telephone controls
14
Features on the right side
On the right side, you'll find the connection jack for the
headset, along with the micro USB jack.
This micro USB jack is used to charge the battery with the
power supply unit or via USB cable at the computer.
Features on the underside
The underside has the contacts for the charger.
General operating information
The left and right display keys perform varying functions according to the status of the device. The function currently available for the
keys is indicated above the keys in the display.
In menus, the right display key is mostly used to break off the function, or to move back a step; the left display key confirms functions or
opens the option menu
In standby, the left display key calls up the main menu, the right display key opens the contacts.
Keys
and are used to select entries in menu lists.
The red hang up key
is used to end a call, reject a call and (with
a long press) to switch the device on and off. Within menus, settings
can be broken off with this key.
The green selector key
is used to call after entering a number, or
to select a contact. If you press this key in standby, the list of the latest number is opened for redial.
Page 15
Telephone controls
15
Extended pressing of the key switches silent mode on and off.
The key allows you to toggle between upper and lower cases during text entry, e.g. for an SMS or a name into the contacts.
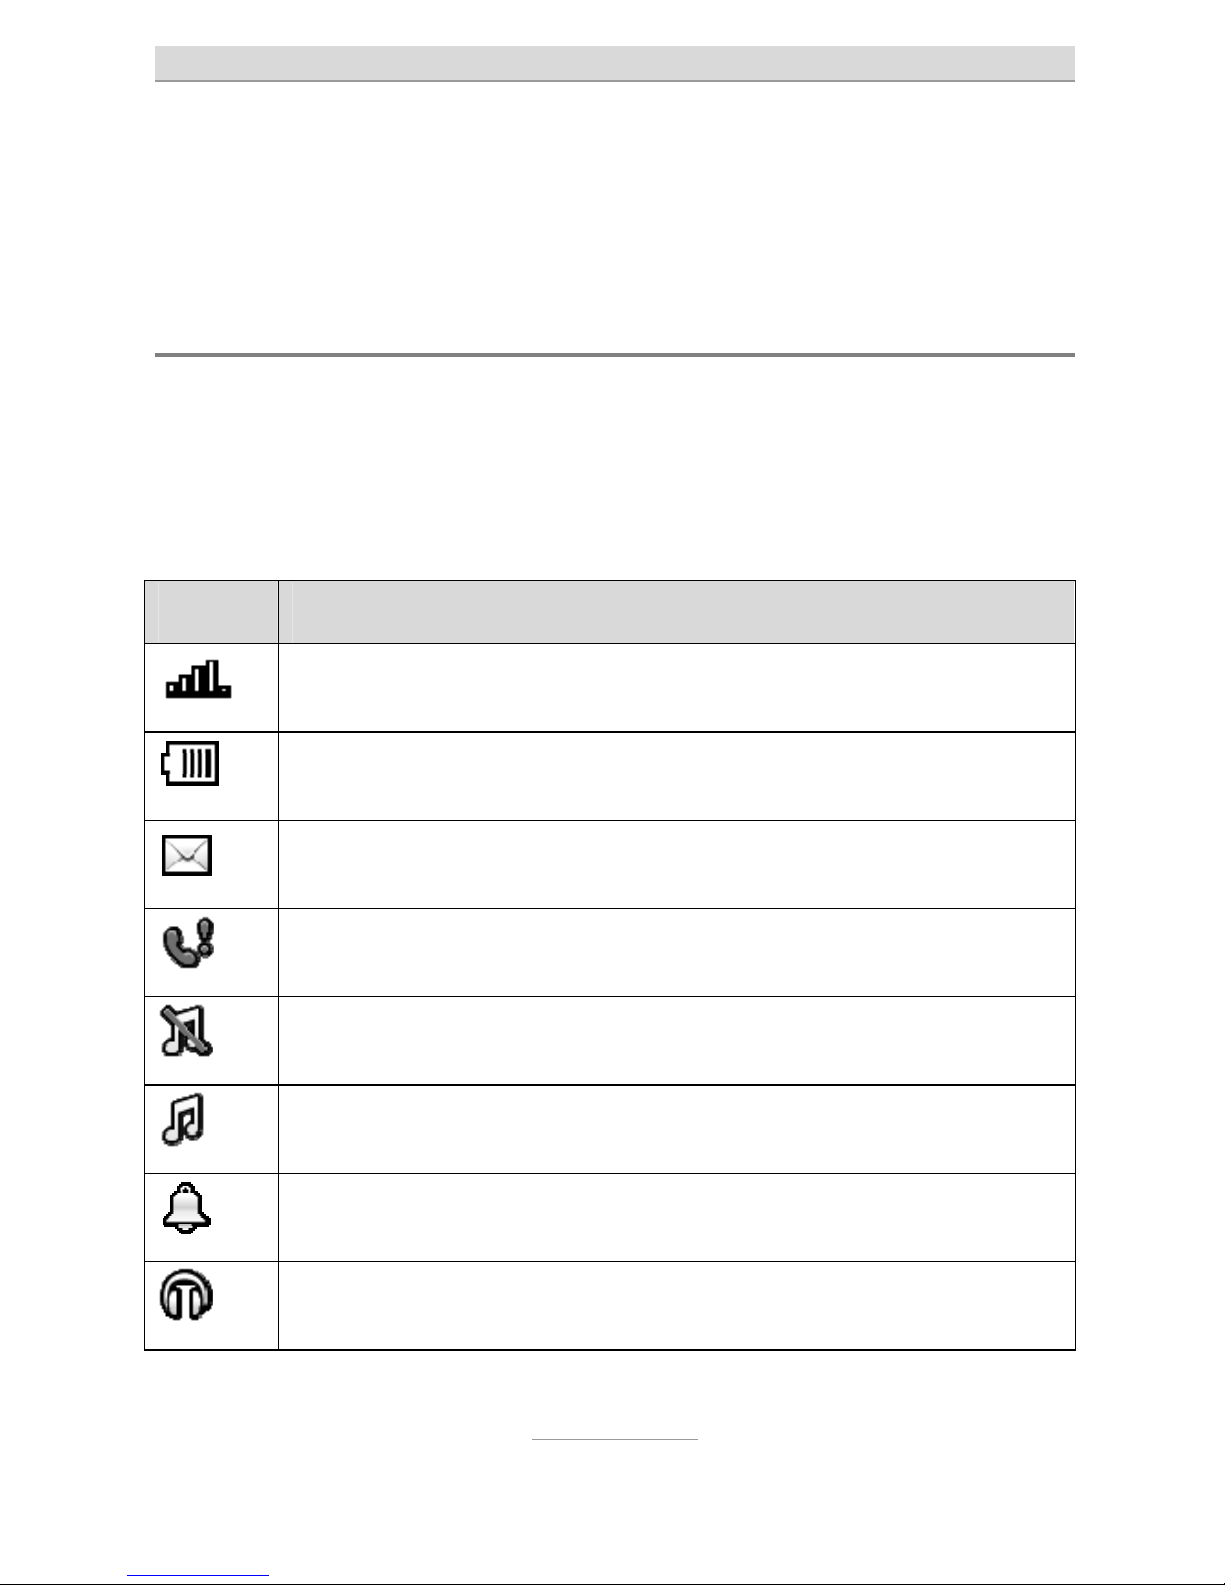
Symbols in the display
The wireless network signal strength is displayed at top left of the
display, the battery charge status on the right.
In addition, indicators for new SMS, missed calls, enabled silent
mode or alarm and connected headset can be displayed here.
Symbol Description
Indicates wireless network strength.
Battery charge status.
Unread text message(s) (SMS).
Missed call(s).
Silent profile enabled.
Silent profile disabled.
A
larm on.
Headset connected.
Page 16

Calling
16
Calling
Accepting calls
With an incoming call, the telephone rings (provided silent mode is
not enabled) and vibrates (provided “vibration” is enabled in alert
type).
The calling number appears in the display. If the caller for that number is saved in the contacts, the name of the caller is displayed instead of the number.
The call is accepted by pressing the green selector key
.
With the right display key
, you can disable the ringtone during
the call
Rejecting calls
If you press the red hang up key with an incoming call, the call is
rejected. The caller hears the engaged tone. Instead of the red hang
up key, you can press the right display key
twice.
Calling with direct dialling
For direct dialling, enter the desired call number with the numeric
keys, then press the green selector key
. The call is made to your
desired subscriber.
Note: Don't forget that with mobile networks you must always di-
al a prefix. Via Menu → Settings → Phone settings →
Tone settings → Keypad → Speaking keys, you can set
up the telephone to announce the corresponding digit
while dialling.
Page 17

Calling
17
Dialling with redial function
If you press the green selector key without first entering a number while the telephone is in standby, the call log is opened. It will indicate your recently dialled numbers, along with the numbers for calls
you have accepted or missed.
With the
and keys, you can scroll up and down the call log.
Press the green selector key
once more to select the desired
number.
Calling with speed dial
This telephone features speed dial keys on which frequently-dialled
numbers can be saved.
When the phone is in standby, these speed dial keys are called up by
pressing digits - for about 2 seconds. The corresponding saved
number is then automatically dialled.
By extended pressing of the key, you call the answering machine.
Note: To use the speed dial keys, these must first be enabled
and configured in the → Call settings → Speed dial settings. This configuration is only possible in the „Advanced
mode“ user levels. The answering machine number is automatically queried after extended pressing of the key, if
it is not already saved.
Page 18

Calling
18
Dialling from contacts
In standby, if you press the right display key ("Contacts" in the display), contacts are called up and the first entry is displayed. With arrow keys
and , you scroll up and down.
If one of the keys is quickly pressed, also in quick succession, the
first entry starting with the corresponding letter is displayed. For example, to display the first entry beginning with „L“, the key must be
pressed three times in quick succession.
Press the green selector key
to directly select the desired num-
ber.
Functions while calling
While calling, you can toggle between hands-free and receiver operation using the
display key.
With the left display key
, you access the options menu with the
"Mute" function (disable microphone).
In the "Advanced mode" user level, under Options, "Record" and
"DTMF" are also available.
Page 19

Contacts
19
Contacts
A contact consists of a name and the corresponding call number; it
structures your phone book for calling subscribers and sending short
text messages.
To call contacts, in standby press the right display key. The contacts
are directly opened. You can also open the contacts via the main
menu, then the "Contacts" item.
All saved contacts are displayed, the first contact is selected. Using
keys
and you can select another contact within the contact
list.
If you select a numerical key (where applicable, in quick succession)
on the keyboard, the contact beginning with the corresponding letter
is selected from the contact list For example, if you select once,
the first contact beginning with the letter "M" opens. If you select
three times in quick succession, the first contact beginning with the
letter "O" opens.
If you press the green selector key
, the selected contact is
called.
Options
If you press the left display key in the contact list, the options menu
opens.
Dial
Dials the contact number. Instead of selecting this menu item, you
can also simply press the green selector key
once the contact is
open.
Page 20

Contacts
20
Send message
From the option menu, select "Send Message" to write a short message (SMS) to the contact:
Add new contact
You can create a new entry via "Add New Contact". "Name" and
"Number" opens.
First, select "Name" and press the left display key
"Edit". Then enter the name of the subscriber via the numerical keys. Pressing the
numerical key once selects the first letter which appears upon it; successive pressing selects the following letters.
To enter a space, press . With -you toggle between upper and
lower case letters, initial letter of a word in upper case and the rest in
lower case, or numerical entry only. Press the key for a selection of
special characters. Once you've finished entering the name, press the
left display key, then select the "Ready" entry.
Next, select "Number" with the
key, and press the left display key
. Enter the call number over the numerical keys. To insure that dialling of entries also works when you're calling on a foreign network,
make sure to enter the numbers in international format, i.e. including
country code. Call number 02102-4280 would thus be entered as
+4921024280, with +49 as country code for Germany first, then the
dialling code without the initial nought. For the + sign, press the
key twice in quick succession. Then confirm with the left display key
, and select the "Done" entry.
Once the name and number are entered, press the right display key
"Done", and confirm saving the new entry.
Delete
Delete the selected contact.
Page 21

Contacts
21
Additional options
In the "Advanced mode" user level, you have the additional options of
delete all contacts, copying one or more contacts and making settings for the contact memory (SIM card or telephone).
Page 22

Messages (SMS)
22
Messages (SMS)
With your telephone, you can receive and send short text messages
(SMS).
View received messages
When you receive a message (SMS), it's announced to you on the
display, and the blue LED with the envelop at the front of the telephone begins to blink.
Press the left display key
to get an overview of received messages; the latest message is displayed at the top. To view messages,
press the left display key
.
If you press the left display key while displaying the message, the Options menu opens, allowing you to reply to the sender per SMS, to
call back the sender or to delete the message.
As long as you have not deleted them, received messages remain
available via the "Messages" menu item from the main menu under
"Inbox".
Sending messages
Besides answering a received message, you can also compose and
send a message on your own.
For this, call up "Messages", then "Write Message" from the main
menu. A window opens in which you can enter the message text with
the keyboard.
Quickly pressing the right display key
deletes the latest entered
character, extended pressing, the entire text.
Page 23

Messages (SMS)
23
When your text is ready, press the left display key
to call up the
options, then select the "Send to" item.
The recipient window opens, in which you may chose, at the top, to
enter the recipient number manually, or to add it from the contacts or
the caller list. Selected recipients are displayed at the bottom.
To send, select the recipient, or one of the selected recipients, press
the left "Options" display key
, then select "Send". As additional
options, you can edit or delete the selected, or all, recipients.
Note: If you wish to write a message to a recipient who is saved
as a contact, you can also open the “Contacts”, select the
contact, then select via the left display key in the "Send
message" options.
Writing message text
Write the message text with the numerical keys. Three to four letters
are imprinted next to numerical keys to . If you press the respective key once, the first letter is displayed, twice in quick succession,
the second letter, etc.
For the word „Hello“ you would thus twice press , then twice ,
then three times , then three times and then three times .
To enter a space, press . With -you toggle between upper and
lower case letters, initial letter of a word in upper case and the rest in
lower case, or numerical entry only. Press the key for a selection of
special characters.
Additional message options
In the "Advanced mode" user level, besides writing text messages,
you can also compose Multimedia Messages (MMS) and access incoming as well as outgoing mail, drafts, saved messages, templates
and message settings for SMS and MMS.
Page 24

Silent Mode
24
Silent mode
You can switch the silent mode on and off via the "Silent Mode" item
in the main menu. In silent mode you receive calls and messages, but
the telephone does not ring. This setting should always be chosen
when the phone ringing would disturb others.
Note: Enable and disable silent operation even more simply with
an extended pressing of .
Page 25

Call History
25
Call history
Pressing the green selector key while the telephone is in
standby calls up the call log, which displays all calls (dialled, received
and missed calls) in a list.
You can view individual call logs for "Missed Calls", "Dialled Calls" and
"Received Calls" via menu item "Call History" in the main menu.
Using the
and keys, you can scroll through the respective
call logs.
Press the green selector key to call the chosen number.
Press the left display key to open the call log options. Here, besides
dialling numbers, you can also send a message, delete the selected
call or view call details.
In the "Advanced mode" user level, you can also delete entire call
logs and display call durations.
Display of missed messages
If you've received calls in your absence, this is notified on your display, and the green LED with the telephone symbol at the front of the
telephone blinks.
You can void the indicator with the right display key
. With the left
display key
, you open missed calls from the missed calls log.
Page 26

Camera
26
Camera
Open the camera function via the "Camera" item in the main menu, or
directly via the camera key
on the keyboard.
After opening the camera, you'll see the image on the display. Make
sure you don't cover the camera lens on the front of the device while
using this function.
The integrated camera possesses a zoom function with which to
magnify the object to be photographed. Press the
key to magnify
the object, or the
key to reduce it.
Press the
key to take a picture. The photo is saved automatically.
If you press the left display key
while in camera mode, you can
select between "Image Viewer" and "Storage".
Memory medium
Here you set whether photos are saved in the internal camera
memory, or on an installed memory card. The telephone memory is
limited to only a few photos. If you wish to take more photos, a
memory card must be installed. The Ergophone 6020/6021 supports
Micro SD memory cards up to 4 GB.
Image viewer
Select "Image Viewer" to display all saved photographs with the name
and size of the file. Use the
and keys to select an image
from the list. Pressing the left display key
allows you, via the Options, to view or delete the image, to delete all files and to select the
storage (phone memory or memory card) from which you wish to
display the images.
Page 27

Camera
27
When one of the images appears on the display, you can show the
next with the
key, or the previous with the key. You can de-
lete the currently displayed image with the left display key
, or
end the display with the right display key
.
In the "Advanced mode" user level, you also have the option of sending an image as MMS, or of using it as wallpaper for the display in
standby.
Transferring photos to the computer
Photos saved with the telephone are either saved on the internal telephone memory or on an inserted memory card, depending on the
setting.
You can connect the telephone to a computer via USB cable to transfer the photos onto the computer. You'll find additional information on
the subject in the "Connecting to a Computer" chapter.
Page 28

Magnifier function
28
Magnifier function
Your telephone features an integrated magnifier, which is opened
with the magnifier key
on the keyboard.
Hold the camera at the front of the device close to the object which
you wish to show magnified. Make sure not to cover the camera lens.
Use the
and keys, to represent the object as larger or small-
er.
The magnifier function is switched off by pressing the red hang up
key
.
Page 29

Radio
29
Radio
Your telephone features an integrated FM radio. It can be opened via
the "FM Radio" item in the main menu. A headset must be connected
to listen to the radio.
When you turn the radio on, the station last tuned returns. You select
the previous or next saved station with the
or key. In radio
mode, you control the loudspeaker volume with the +/- rocker on the
left side of the device. With the
key, you can switch playback on
and off (muting).
Exit radio mode by pressing the right display key
or the red hang
up key
.
Call up radio options with the left display key
.
Radio options
Press the left display key to open the options in radio mode.
Channel list
Lists saved radio channels and offers the option of setting up the
channels manually, or of editing/deleting channels after automatic
search.
Auto search
This function searches for radio channels and saves these automatically in the channel list.
Note: With automatic search, the station list is overwritten.
Page 30

Radio
30
Loudspeaker
With this function, in addition to the headset, sound can be reproduced over the speaker integrated in the telephone.
Additional options
You also have the option of manually entering a radio frequency via
the "Advanced mode" user level.
Page 31

Recorder
31
Recorder
With the recorder you can record memos, to be saved in the device
memory or on a memory card.
For this, select "Sound Recorder" from the main menu.
With the
key, you can start, pause or resume a recording While a
recording is in progress, it can also be paused and resumed with the
left display key
. You stop recording with the right display key
. After the recording is concluded, you are prompted as to
whether you wish to save it.
Recorder options
The options are available via the left display key as long as neither recording nor playback is in progress.
New record
Starts a new recording.
List
Opens the list of saved recordings. The selected recording can be
played back or deleted via Options. Playback can be paused and resumed with the
key.
Settings
In “Settings”, you can select the storage for recordings (Phone
memory or memory card), the file format (AMR or WAV) and the audio
quality (high or low).
Page 32

Recorder
32
Note: The internal device memory is limited to only a few short
recordings. If you wish to make more recordings, you
should insert a memory card.
If a memory card is inserted in the telephone, set file format to "WAV" and audio quality to "high".
Additional options
In the „Advanced mode“ user level, you also have the option of sending a recording as MMS, renaming files and deleting all files simultaneously.
Page 33

Alarm clock
33
Alarm clock
To use your telephone as an alarm, open "Alarm" from the main
menu.
Five alarms are displayed. With the and keys, you can select an alarm and edit its settings by pressing the left display key
.
In Settings, you can switch the alarm on and off and set wake-up
time, ringtone and type (ringing, vibrating, or both).
When an alarm is enabled, this is indicated with an alarm-clock symbol at top left of the display.
At wake-up, the telephone rings and/or vibrates and the display indicates the time and date. In addition, "Stop" and "Snooze", controlled
with the left and right display keys
, are displayed. "Stop" terminates the wake-up function. "Snooze" delays the wake-up call by
about 5 minutes.
As with a conventional alarm, the device automatically turns off if you
select "Stop", and must be turned back on if, for example, you wish to
be woken again the next morning.
In the „Advanced mode“ user level, you also have the option of setting the alarm to ring on a daily basis, or on certain weekdays.
Page 34

Calculator
34
Calculator
To use your telephone as a pocket calculator, open "Calculator" from
the main menu.
Enter the figures for the calculation via the keyboard numerals. For
number of decimals, you enter a point with the key.
Arithmetical operators +, -, x, / and = are selected with the
and
keys. The selected arithmetic operation is performed with the left
display key
.
Actuating the right display key
first deletes the calculation prod-
uct; pressing it a second time closes the calculator.
Page 35

Tasks
35
Tasks
Over this main menu item, you can configure tasks of which the telephone can later remind you. After opening this menu item, you'll see
a list of configured tasks. Via “Options”, you can add new tasks and
edit or delete existing tasks.
If you add a new task or edit an existing task, enter a date, time and
reference.
At the programmed time, the telephone will display the date, time and
reference while emitting a ringtone.
With the left display key
, you confirm the task, with the right dis-
play key
, you can choose to be reminded of the task again 5
minutes later.
In the „Advanced mode“ user level, in addition to adding, editing and
deleting, you can view and search tasks, delete all tasks, select tasks
according to date and display unfinished tasks.
When creating or editing a task, in addition to the date, time and reference, reminder time before task, automatic repeat and priority level
are available.
Page 36

Services
36
Services
In this main menu item, services offered by your provider are available. Which services are offered depends on your service provider.
There, you can also obtain a description of the functionality and costs
of offered services.
Page 37

Settings
37
Settings
With this menu item, you can perform most of your telephone settings. The settings menu features several submenus which in turn
possess subcategories for settings.
We've delivered your telephone with convenient presets, so that you
need only customize settings where needed and as a rule only on a
case-by-case basis.
In the "Beginner mode" user level, only few setting options are available. If you switch the user setting to "Advanced mode", the telephone
offers considerably more setting options. Settings which you have
performed in the "Advanced mode" user level are preserved if you return to "Beginner mode".
Phone settings
Here, you can set the time, date, volumes, language and font size.
Time and date
Enter the current time and date here.
Time must be entered in international format, i.e. first the year, then
the date and then the day, even if the time is represented on the display in a Day -- Month -- Year format.
If you select "Auto update of date and time" to "On", the telephone automatically draws date and time from the service provider network,
while also automatically adjusting for transitions between summer
and winter time and changes in time-zones while travelling. However,
this service is not offered by all service providers.
In addition, setting of time and date format is available in the „Advanced mode“ user level
Page 38

Settings
38
Tone settings
Here, you set the tones produced by the telephone for incoming
calls, switching on/off of the device, folding the telephone
open/closed, incoming messages and key press.
Speaking keys
A special function of this device are "Speaking Keys", which can be
enabled via tone settings→ keypad. If „Speaking Keys“ is enabled,
the telephone "speaks" when keys to , and are pressed on
the keyboard.
Volume
Here, you set the volume for ringer and key tone.
Alert type
Here, you specify whether the telephone shall ring, vibrate, do both
simultaneously, or first ring, then vibrate.
Language
Set the language of display notifications here. In the "Automatic" setting, the telephone automatically adjusts to the language of the installed SIM card.
Font size
Here, you can choose between normal and large lettering. This font
setting applies to all menus and submenus. Display font sizes in
standby, and lettering of both display keys
cannot be modified.
Page 39

Settings
39
Additional telephone settings
Additional telephone settings are available via the „Advanced mode“
user level.
Ring type
Here, you can select whether the telephone signals incoming calls by
ringing repeatedly, once only or with rising intensity (first quietly, then
increasingly louder).
Extra tone
Here, you can enable and disable warning and connection tones.
Answer mode
Here, you can specify whether the telephone should automatically
accept incoming calls when cover is opened, or if any key is pressed.
Display settings
Here, you can select your own image as display background (wallpaper) in standby, and specify whether date, time and your own number
appear.
LCD backlight
Here, you can adjust the duration and brightness of display lighting.
Page 40

Settings
40
User level settings
In the "Beginner mode" setting, for all menus and settings, the telephone only offers those functions which as a rule are actually and
frequently used. Foregoing infrequently-used functions makes operating in this setting very simple.
All functions supported by the telephone remain available within all
menus and settings through the "Advanced mode" settings.
If you modify settings in "Advanced mode", these changes persist
even if you later switch back to "Beginner mode". Thus, if you wish to
modify a setting not available in the "Beginner mode", you can temporarily enable the "Advanced mode" in order to perform the setting adjustment.
Main menu settings
The main menu offers functions for which certain users have absolutely no use. For example, if you never intend to use the alarm, tasks,
or the calculator, it's not necessary that these functions should be included at all in the main menu.
Under the "Main Menu Settings" item, you thus have the ability to
show/hide all main menu items, apart from "Settings".
When you open this menu item, all main menu items are displayed to
be individually activated or deactivated.
However, even after deactivating items in the main menu, the corresponding functionalities remain partly available.
For example, if you deactivated "Messages" in the main menu, the
telephone still receives short messages, notifies you of this, and lets
you read and answer messages. If you deactivate "Contacts", for example, your contacts remain available via the right display key.
Page 41

Settings
41
Security settings
Here, you specify whether the PIN saved on the SIM card (code
number, password) should be queried when the telephone starts up;
you can also modify the PIN.
What's more, in the „Advanced mode“ user level, in addition to locking the SIM card, you can set up a block on the phone.
Additional settings
In the „Advanced mode“ user level, additional complete menu items
with submenus are available via the settings menu; these are not
available in the "Beginner mode" setting.
Call settings
All additional settings are available here:
Hide/Send caller ID
Enable/disable call waiting
Enable/disable call diversion
Configure speed dial on keys 2-9
Emergency settings
Here, you make settings for the emergency call function. You'll find a
description in the "Emergency Call" chapter.
Page 42

Settings
42
Network settings
Here, you specify whether connection to the GSM network occurs automatically or manually, and whether a GPRS connection is always
set up, or only as needed.
Connectivity
Here, you'll find the GPRS connection setting data accounts required
for MMS, and you can manually transmit these to your provider.
Factory settings
Here, the telephone can be reset to factory settings. Please note that
here only settings are reset; functions that you have set up, e.g. contacts, alarms or tasks, or files saved in the telephone memory, such
as photos or recordings, are not deleted.
Page 43

Connection to the computer
43
Connection to the computer
Connect the telephone's micro USB jack to your computer's USB
connection. "Mass Storage" appears on the display. Press the left
display key
. Now, the memory integrated in your telephone and
any inserted memory card is (are) displayed on your computer as
new device(s) with exchangeable media.
This includes, among others, the "Photos" and "Audio" folders. The
"Photos" folder contains photos taken with the camera, the "Audio"
folder, voice messages saved with the recorder and recordings of telephone calls.
If you wish to use your own ringtones or background image, copy the
relevant audio or image file to the telephone memory or memory
card. These files are selected in the telephone as ringer tones or
background images, though they are stored in the memory. We thus
recommend creating a folder for such files in the memory, so as not
to delete them accidentally.
Page 44

Emergency call
44
Emergency call
Your telephone features an emergency call function which is triggered by pressing the SOS button at the back of the device for about
2 seconds.
If at least one emergency number has been configured and the
emergency call button is enabled, the telephone initiates the emergency call when the SOS key is pressed for approximately 2 seconds.
The telephone will then emit an alarm tone and (if activated) send an
SMS with an individually configurable text to the (up to 5) saved
emergency number(s).
Next, the telephone will call the first of the saved emergency numbers. If the call is accepted, the telephone automatically switches to
hands-free mode. If the called party hangs up, the emergency call
function stops but afterwards the phone automatically answers incoming calls and switch to hands free mode.
If the call is not accepted, the telephone calls the next saved emergency number. If none of the emergency calls goes, the telephone
repeats the cycle of calls to all emergency numbers three times.
While the telephone is calling one of the emergency numbers, the
number is displayed; as the call occurs in hands-free mode, you can
hear whether the called party picks up. While the SMS are being sent,
and the calls are being attempted, the telephone continues to emit
the alarm tone. Once a call goes through and the emergency number
is rung, or the called party picks up, the alarm tone stops; however, it
starts anew if dialling resumes.
After an outgoing emergency call (regardless of whether accepted,
unsuccessful or interrupted), the telephone automatically accepts incoming calls and switches into hands-free mode. This allows contact
with an incapacitated person, even if the emergency call has already
Page 45

Emergency call
45
ended. To close this function the telephone must be completely
turned off, then back on again.
The answering machine problem
The telephone cannot differentiate whether the emergency call is accepted by a person, an answering machine, fax machine or an automated voice system.
Should an emergency call be accepted by an answering machine,
you can end the current call by quickly pressing the red hang up key
. The telephone then dials the next emergency number.
Testing the emergency call function
After configuration, thoroughly test the emergency call function. This
process should include both the owner of the Ergophone device and
the persons whose call numbers are saved.
While testing, please consider that when making an emergency call
the user of the device will experience a stressful situation. Persons receiving the emergency call should thus become familiar with using
the emergency call function so as to be able to give instructions, as
the case arises.
Page 46

Emergency call
46
Configuring the emergency call
To configure the emergency call it must be enabled, and the emergency text and numbers must be entered.
With the telephone in standby, select the display key, next "Settings"
in the main menu, then "Emergency Settings". Here, you will find all
settings for configuration of the emergency call.
Note: Emergency call settings are only available in the „Ad-
vanced mode“ user level. If the emergency call has been
set up in this user setting, it remains available even if the
user settings have been reset to "Beginner mode".
Active
Here, you determine whether the emergency call button at the back
of the device is enabled or disabled.
With the button enabled, the emergency call function is active as described. With the button disabled, the emergency call function is not
available, even if you have saved the emergency numbers and text.
Numbers list
Enter your emergency numbers (up to five) under "Numbers List". In
an emergency, the first number is called first, then the second, etc.
When you open the menu item, you will see the five memory fields for
emergency numbers. Press the left memory key
and select the
emergency number from the contacts, or enter it manually.
Under the item "Message Edit", you can modify the emergency call
SMS.
Page 47

Emergency call
47
Send SMS
With this menu item, you can specify whether to send an emergency
SMS before dialling the emergency call numbers.
Note: If you enable the SMS for numbers of telephones which
are not SMS-capable, the service provider calls the subscriber and reads him/her the SMS. This call would engage the emergency number telephone at the very moment when the mobile telephone is trying to make the
emergency call. Hence, only enable sending of emergency SMS if the telephones of all emergency call numbers
are capable of receiving SMS as text messages.
Breaking off the emergency call
If an emergency call has been accidentally triggered, it can be broken
off by extended pressing of the hang up key
.
To close the emergency call function completely, the telephone must
be turned off, then back on again.
Page 48

Emergency call
48
Important information on emergency call functions
Do not rely exclusively on this emergency call function. In certain
situations (e.g. no network coverage or no credit for outgoing
calls), the emergency call function might not operate.
Make sure that no answering machines are associated with emer-
gency call numbers.
Absolutely discuss entering of emergency call numbers with the
subscribers of these numbers so that they know exactly what to do
in case of emergency.
The general emergency number for mobile networks (112) may
not be entered as an emergency call number; this also applies to
110 and other official emergency numbers.
After setting up the emergency call function, test from end to end
to detect and correct any errors in configuration.
Please note that an emergency call can be unintentionally trig-
gered by contact with other objects, i.e. in a handbag; thus handle
and transport your telephone with appropriate care while the
emergency call function is enabled.
Page 49

Appendix
49
Appendix
Service
You have purchased a modern product of Tiptel.com GmbH Business
Solutions. Our high-tech manufacturing facilities grant a continuous
level of highest quality. If, however, problems occur or you have any
questions on operating the device please contact your local dealer.
During the warranty period this is your contact partner. For technical
support of specialist dealers Tiptel.com GmbH Business Solutions
has set up a special phone number so that they can provide you with
high quality consulting service.
In case your dealer is not able to help you, you can contact
Tiptel.com GmbH Business Solutions directly. First information you
will find on our internet pages as shown below. In addition to that you
can contact our experienced technical support staff by telephone at
the times shown below:
In Germany In Austria In Switzerland
www.tiptel.de www.tiptel.at www.tiptel-online.ch
08.00 to 17.00 (Mo - Fr) 08.00 to 17.00 (Mo - Th),
Fr until 15.00
08.00 to 17.00 (Mo - Fr)
Telephone 0900 100 - 84 78
35*
Vanity Tel. 0900 100 - TIPTEL*
*
subject to charges
Telephone 02236 677 464-0,
Fax 02236 677 464-21
Telephone 044 884 01 80
Fax 044 843 13 23
For questions regarding your GSM connection please contact your
service provider.
Page 50

Appendix
50
Warranty
Your contact partner for any warranty issues is the specialist dealer
you purchased the device from. Tiptel.com GmbH will grant a warranty of 2 years from the date of handover for the material and for the
manufacturing of the device.
Initially, the purchaser shall have only the right of subsequent performance. Subsequent performance entails either repair or the supply of
an alternative product. Exchanged devices or parts shall become the
property of the dealer.
If the subsequent performance fails, the purchaser can either demand
a reduction in the purchase price or withdraw from the contract.
The purchaser shall notify the dealer immediately of any defects
found. Proof of the warranty entitlement shall be furnished by standard proof of purchase (receipt or invoice).
The warranty entitlement shall expire if the purchaser or an unauthorised third party interferes with the device. Damage caused by inappropriate handling, operation, storage or by force majeure or other
external influences shall not be covered by the warranty.
The warranty shall not cover any consumable material (e.g. batteries)
or defects that only slightly impair the value or the usability of the device.
Claims for damage caused by transport shall be asserted to the delivery company.
Page 51

Appendix
51
Notes on settlement:
Repairs can only be conducted by the Service Department of
Tiptel.com GmbH Business Solutions. We offer a 48 hours repair service which makes sure that you will usually receive your repaired device or a replacement back after 2 days plus standard shipment time.
A warranty repair does not prolong the warranty period - neither for
the replaced parts nor for the device. This warranty is not transferable
and shall expire if the device is sold on to another party. It shall also
expire if the device is interfered with by third parties or if the serial
number on the device has been removed or made illegible. There is a
warranty seal on the device. Please do not damage or remove this
seal because otherwise your warranty will expire.
The General Terms and Conditions of Tiptel.com GmbH Business
Solutions, which are part of the contract for a dealer, shall also apply.
In the event of a complaint, the defective product shall be sent to the
relevant Tiptel subsidiary, the importer or dealer along with a description of the defect and the proof of purchase. For warranty handling
please contact your specialist dealer or send the device directly to the
following address:
In Germany In Austria In Switzerland
Tiptel.com GmbH
Business Solutions Tiptel GmbH Tiptel AG
Service Service Service
Halskestraße 1 Ricoweg 30/B1 Bahnstrasse 46
40880 Ratingen 2351 Wiener Neudorf 8105 Regensdorf
Page 52

Appendix
52
CE sign
This device is approved for the connection and use within the analogue public telephone networks in all EC countries – according to
the European Requirements. Due to technical deviations in individual
countries, we cannot grant an unlimited guarantee for the successful
operation at all types of telephone accesses. Tiptel hereby declares
that the device complies with all fundamental requirements of the European directive 1999/5/EC. This conformity is confirmed by the CE
sign on the device. Further details on the declaration of conformity
can be found under the following internet address:
http://www.tiptel.com
Page 53

Page 54

Page 55

Page 56

Tiptel.com GmbH Business Solutions
Halskestraße 1
D - 40880 Ratingen
Tel.: 0900 100 – 84 78 35*
Vanity Tel: 0900 100 - TIPTEL*
Internet: www.tiptel.de
International:
Internet: www.tiptel.com
Tiptel GmbH
Ricoweg 30/B1
A - 2351 Wiener Neudorf
Tel.: 02236/677 464-0
Fax: 02236/677 464-22
E-mail: office@tiptel.at
Internet: www.tiptel.at
Tiptel AG
Bahnstrasse 46
CH - 8105 Regensdorf
Tel.: 044 - 843 13 13
Fax: 044 - 843 13 23
E-mail: tiptel@tiptel-online.ch
Internet: www.tiptel-online.ch
Tiptel B.V.
Camerastraat 2
NL – 1322 BC Almere
Telefoon: 036 – 53 666 50
Fax: 036 – 53 678 81
E-mail: info@tiptel.nl
Internet: www.tiptel.nl
Tiptel NV
Leuvensesteenweg 510 bus 4
B – 1930 Zaventem
Telefoon: 0903 99 333 (1.12 euro / min.)
Fax: 02 714 93 34
E-mail: tech@tiptel.be
Internet: www.tiptel.be
Tiptel sarl
23, avenue René Duguay-Trouin
F – 78960 Voisins-Le-Bretonneux
Tél. : 01 / 39 44 63 30
Fax: 01 / 30 57 00 29
e-mail : support@tiptel.fr
Internet : www.tiptel.fr (de) 09/2011
EDP 4935411
*(1.49 euro
/
min. from the fixed network of Deutsche
Telekom; divergent mobile network prices are possible)
 Loading...