

Page 1
Operating instructions (en)
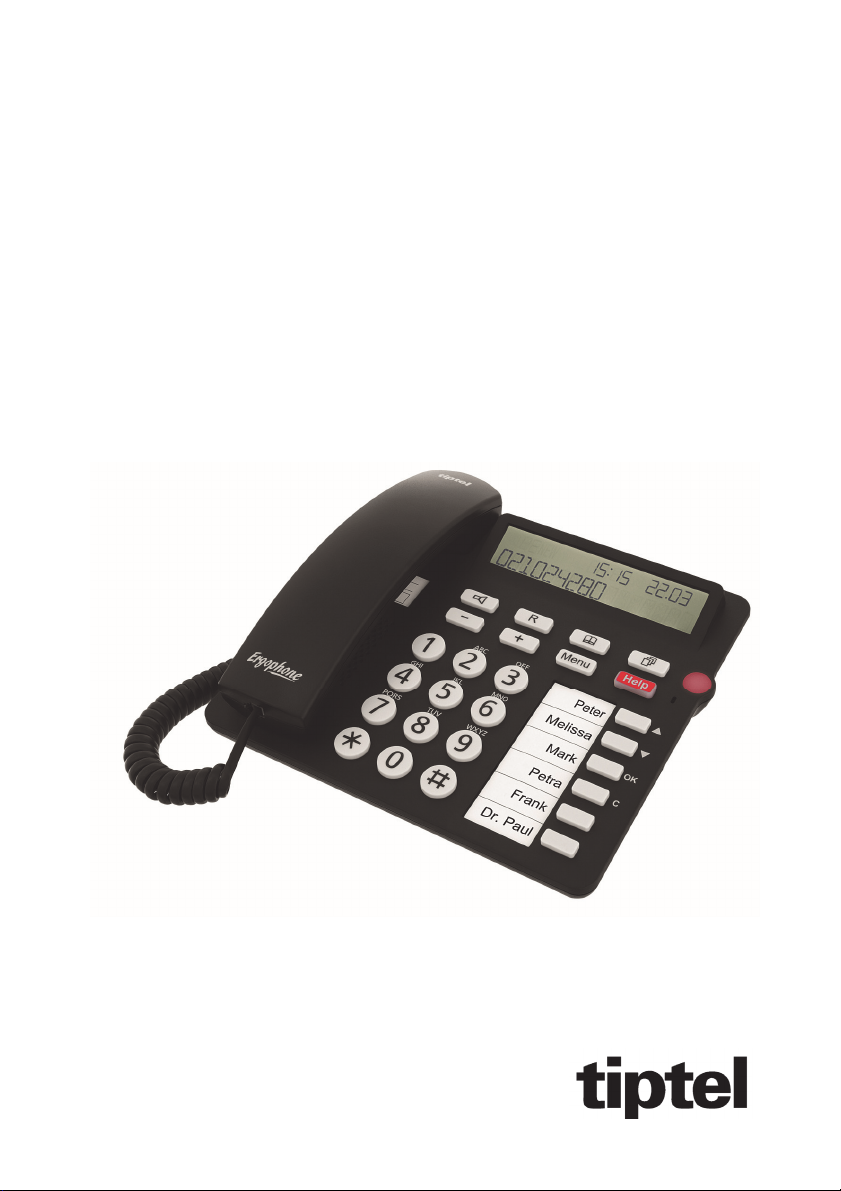
User-Friendly Phone with Emergency
Call Function
tiptel Ergophone 1300
Page 2

Cover
Page 3

Contents
Contents
Contents .................................................................................... 3
Safety information ..................................................................... 5
Assignment of buttons ............................................................. 6
Controls ..................................................................................... 8
Getting started .......................................................................... 9
Deliverables ........................................................................... 9
Setting up .............................................................................. 9
Wall bracket (accessory) ....................................................... 9
Labelling and inserting the Direct dial name insert .............. 10
Connecting ............................................................................ 10
Telephone functions / making calls ......................................... 12
Immediate dialling ................................................................. 12
Non-immediate dialling (dial preparation) ............................ 13
Hands-free talking ................................................................. 13
Transferring calls / Flash (R button) ..................................... 14
Call log ...................................................................................... 15
General .................................................................................. 15
Show calls ............................................................................. 15
Text entries ................................................................................ 17
Text entry from the numeric keypad ..................................... 17
Overview of the characters supported .................................. 18
Phone book ............................................................................... 19
General .................................................................................. 19
Inputting and storing entries ................................................. 19
Dialling from the phone book ............................................... 20
Editing and deleting entries .................................................. 21
Direct dial buttons .................................................................... 23
General .................................................................................. 23
Programming direct dial buttons .......................................... 23
Dialling with a direct dial button ............................................ 24
3
Page 4

Contents
Settings ..................................................................................... 25
Setup options ........................................................................ 25
Advanced setting options ..................................................... 26
Setup menu ........................................................................... 27
Adjusting the volume ............................................................ 28
Emergency call function ........................................................... 29
Emergency call settings ........................................................ 29
Emergency call menu ........................................................... 30
Making an emergency call .................................................... 31
Cancelling an emergency call .............................................. 31
Accepting an emergency call ............................................... 31
Appendix ................................................................................... 32
Hearing aid compatibility ...................................................... 32
Warranty ................................................................................ 32
Guarantee .............................................................................. 32
Declaration of conformity ...................................................... 32
Disposal ................................................................................. 33
Troubleshooting .................................................................... 33
Default settings ...................................................................... 35
Technical specifications ........................................................ 35
Information for administrators ............................................... 36
4
Page 5

Safety information
Safety information
Carefully read through the instructions before use and keep them
for later reference.
Intended use - the phone is suitable for connecting to the public,
analogue phone network and to the analogue ports of phone systems.
Please observe the following very closely when setting up, connecting and using the telephone:
DANGER: Never open up the device yourself Do not use sharp
or metallic objects to touch the plug contacts.
DANGER: You should not make or receive calls, or connect or
disconnect lines, during an electrical storm as doing so presents
a risk of electric shock if lightning strikes the network.
Only plug the connection cables into sockets designated for this
use.
Lay the connection cables such that they do not pose any risk of
accidents Connected cables must not be subjected to excessive
mechanical stress.
Set up the device away from electrical interference.
Only use a soft, damp cloth to clean the device. Do not use
chemicals or abrasive cleaners.
Protect the device from damp, dust, liquids and vapours.
Do not expose the device to direct sunlight.
Do not use the device in potentially explosive atmospheres.
Only use the original telephone connection cable.
The relaying of emergency calls cannot be guaranteed in all cir-
cumstances. For lifesaving actions, the emergency call function
should not be used without additional safeguards.
5
Page 6
Assignment of buttons
Assignment of buttons
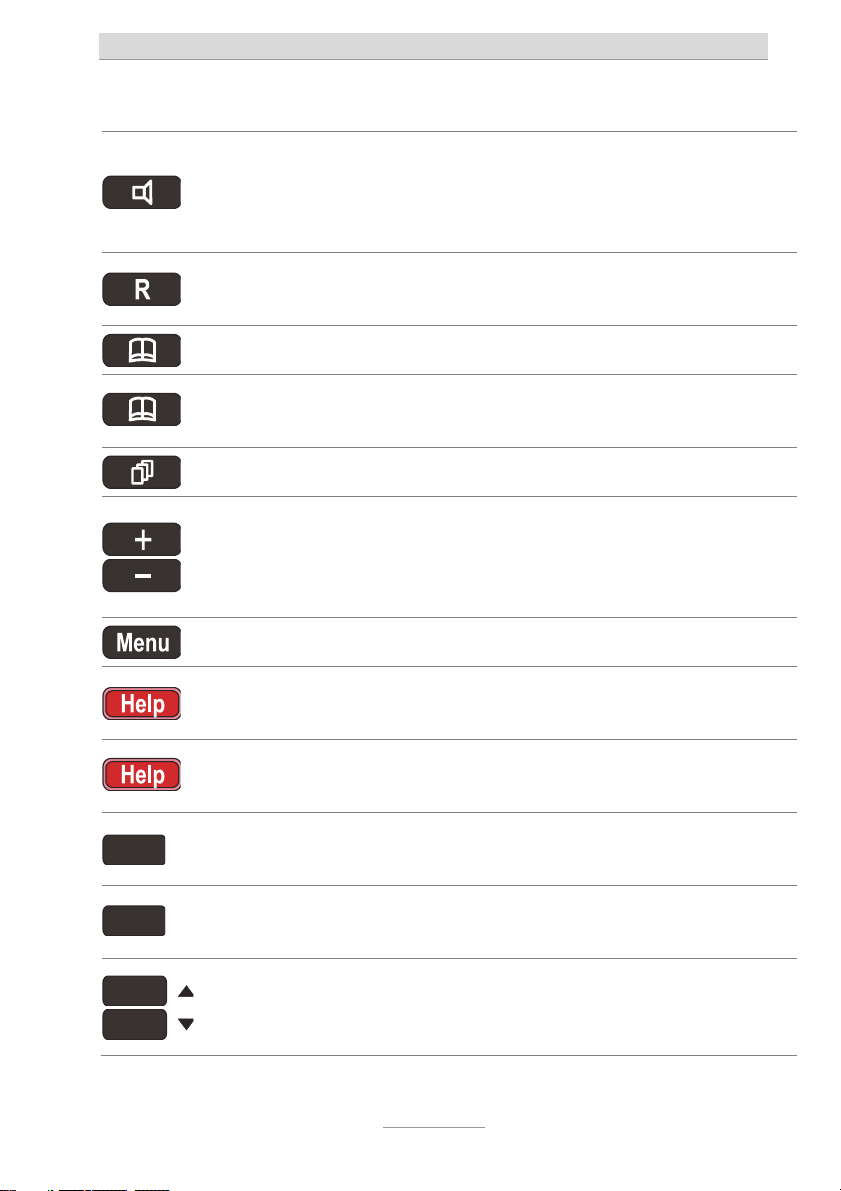
Loudspeaker button: Starts to dial a telephone number entered or
selected. Enables/disables the line with the hands-free function.
Switches to loudspeaker mode during a conversation using the
receiver.
R button: Is used for transferring calls within a telephone system.
Initiates special functions in many networks.
3s
6s
3s
“Phone book” button: Opens and closes the phone book.
Press Phone book for three seconds: Opens the phone book for
a new entry. An entry already called can be edited.
“Call log” button: Opens and closes the call log.
Plus/Minus buttons: They change the volume. The ring tone
volume changes when an incoming call is being indicated. The
receiver volume changes during a telephone call. For lists, the
buttons are used to switch between name and call number.
“Menu” button: Opens and closes the Settings menu.
Emergency call button: Makes an emergency call. Closes the
emergency call menu.
Press the Emergency button for six seconds: Opens the
emergency call menu (settings for the emergency function).
Direct dial button: Here telephone numbers can be stored as
direct destinations.
Press the direct dial button for three seconds Opens the entry
option for a call number.
Control buttons (Up/Down): These are used for navigation within
settings and lists. In the top-level menu, they are used as direct
dial buttons.
6
Page 7
t
…
t
Assignment of buttons
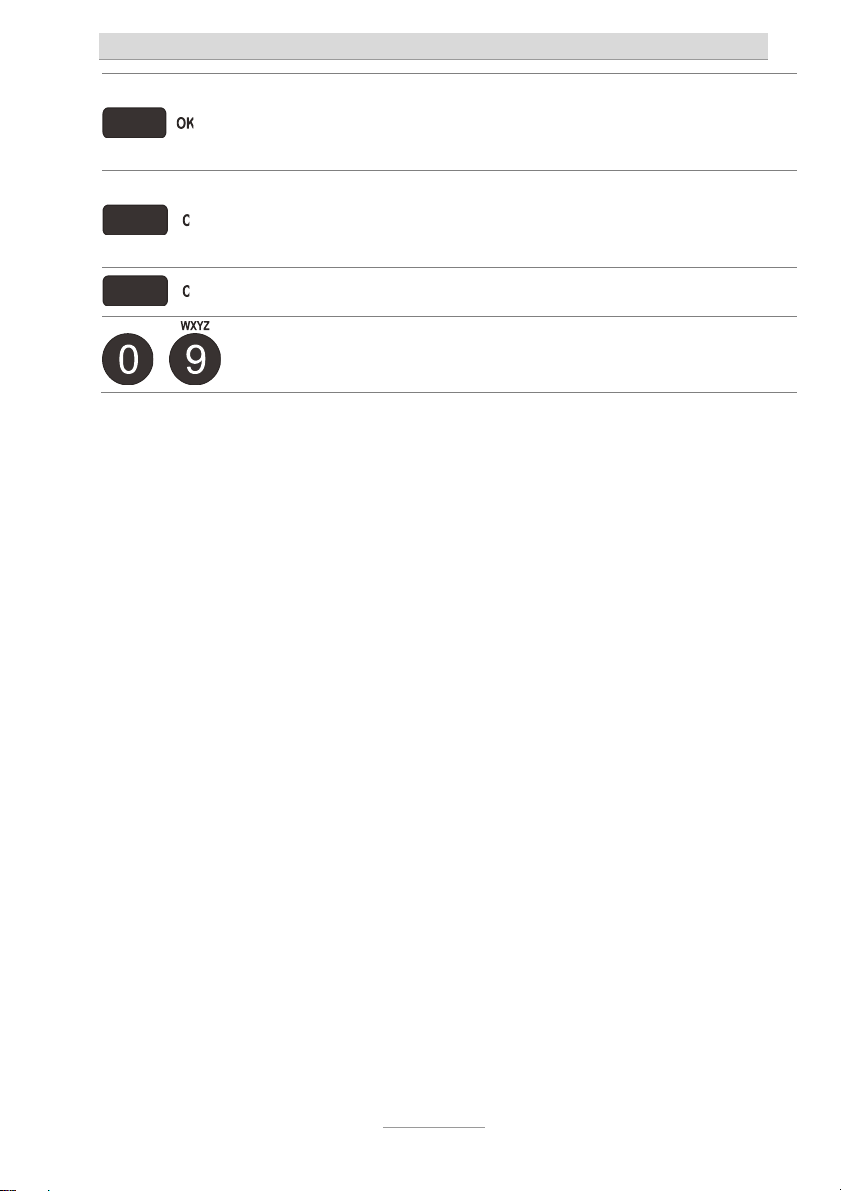
OK button: It is used to accept settings and takes the user to a
lower-level menu. It is used as a direct dial button in the top-level
menu.
C button: Deletes the entry selected. For input boxes, deletes the
position under the cursor. It is used as a direct dial button in the
op-level menu.
Press C button for three seconds: It clears all of the lists.
3s
Digits: Are used to enter numbers and names, and to dial
elephone numbers.
7
Page 8
Controls
Controls
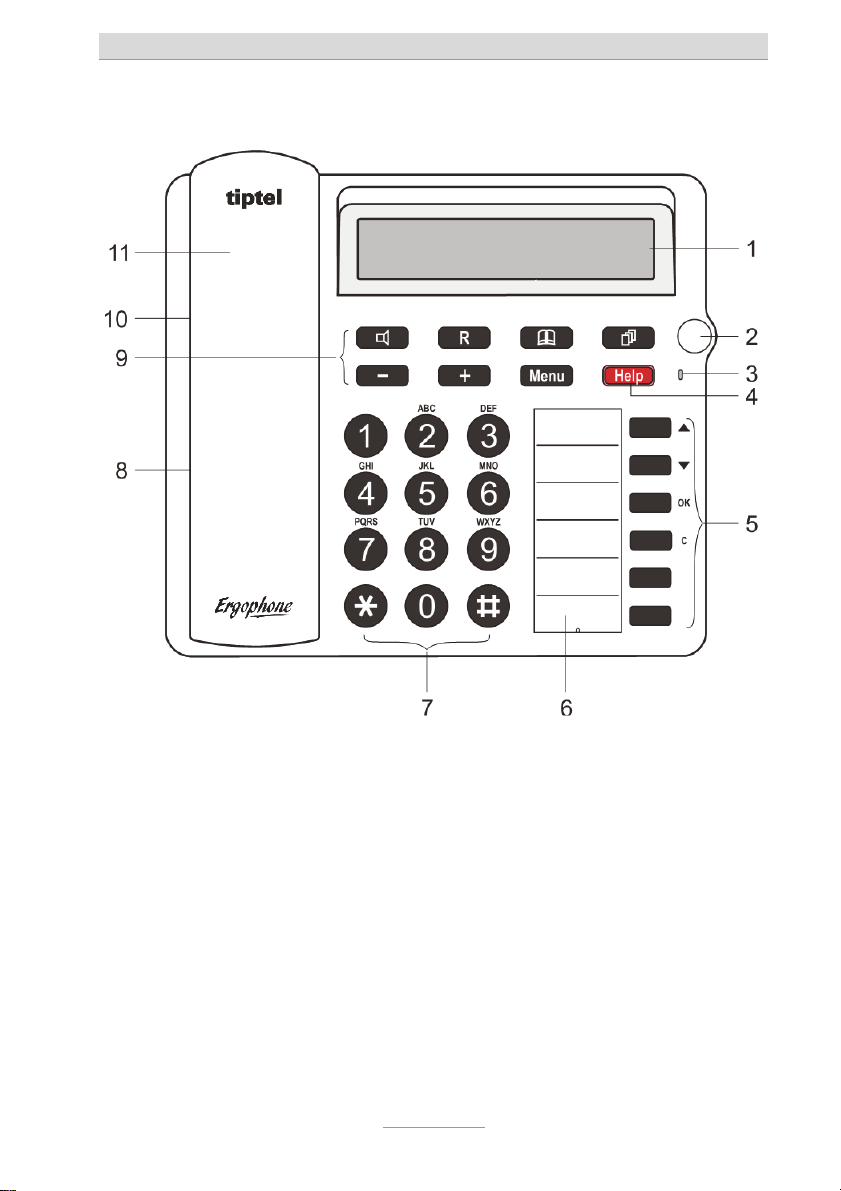
1 Display 8 Loudspeaker
2 LED 9 Function buttons
3 Microphone 10 Insert for phone numbers
4 Emergency call button 11 Receiver
5 Menu and direct dial
buttons
6 Direct dial name insert
7 Numeric keypad
8
Page 9

Getting started
Getting started
Deliverables
Included with your telephone:
Telephone including receiver
Spiral cable (receiver cord)
Phone connector cable and TAE adapter
User guide
Spare inserts for phone numbers
Setting up
Before setting up your phone, please read and following the safety
instructions.
Your telephone has been designed for use under normal conditions. Solvents in furniture lacquers, wood oils and paint preservatives may corrode the device feet, resulting in potential staining of
furniture. Therefore always use a non-slip underlay, especially with
new or recently treated furniture.
Wall bracket (accessory)
A wall bracket is available as an optional accessory. Use three
screws to attach the wall bracket. Then use the hook provided to
hook the phone into the wall holder.
Pull out the plastic piece in the receiver holder, and put it back in
rotated by 180 degrees.
9
Page 10
Getting started
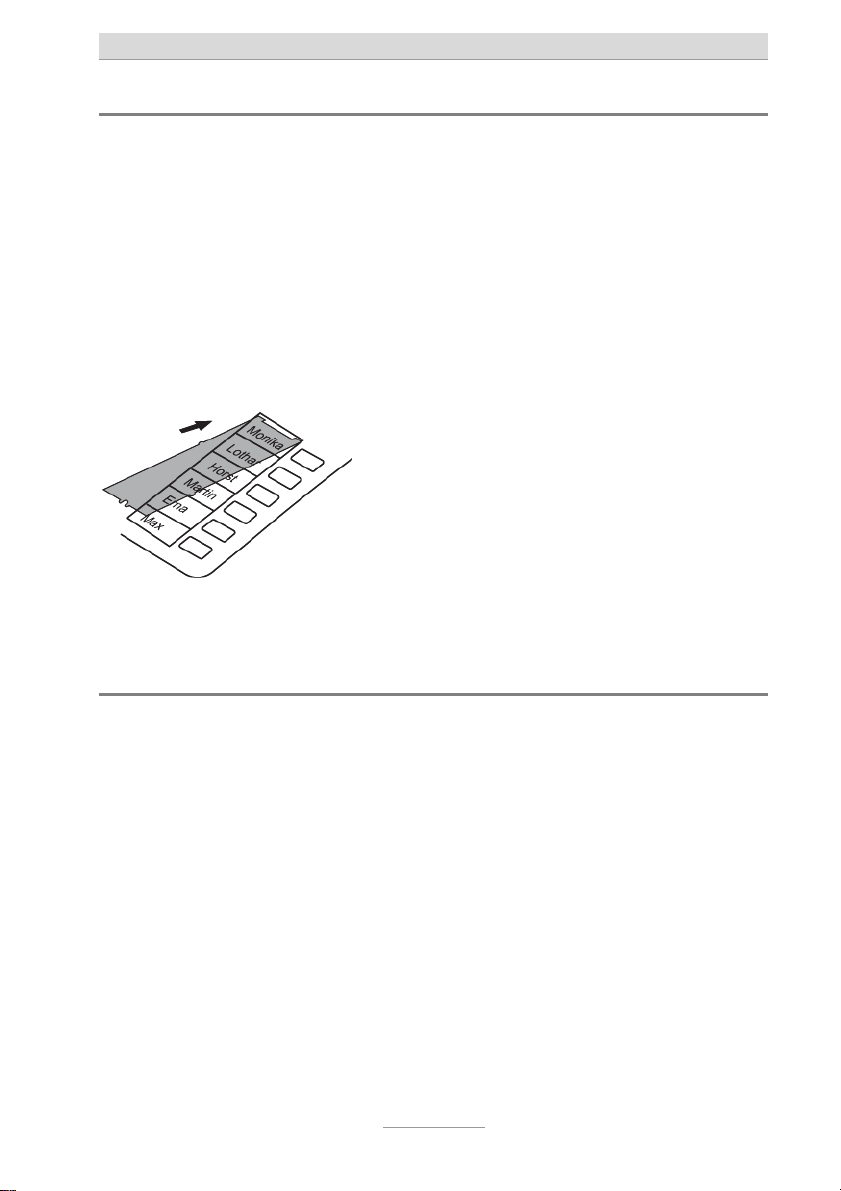
Labelling and inserting the Direct dial name insert
• Remove the plastic cover by using a suitable tool to extend into
the lower opening of the cover and pulling it from the phone until it jumps out of its retainer.
• Write the direct dial names on the label and place it into the recess.
• Affix the plastic cover by pushing it into the top retainer, bend-
ing it slightly and guiding it into the side, and then the lower, retainer.
Proceed the same way for the call numbers insert under the receiver.
Connecting
All of the necessary cables must be plugged in before you can start
using your telephone.
1 Plug one end of the spiral cable into the receiver jack on the
left of the phone, and the other end into the telephone receiver.
2 Insert the TAE adapter into a free end of the phone connector
cable.
3 Plug the second free end of the phone connector cable into
the "LINE" jack, and the TAE adaptor into slot F of the phone
socket.
10
Page 11

Getting started
S
The language selection menu is displayed after connecting the
first time. Use the control buttons (Up/Down) to select a language and confirm with the OK button.
ocket
F
TAE adapter
Connector cable
LINE
tiptel
R
Help
OK
C
ABC
12
JKL MNO
GHI
5
4
PQRS TUV
8
7
+
Menu
DEF
3
6
WXYZ
9
Ergophone
In Austria, slot F corresponds to symbol . Use the TST
0
adapter enclosed in place of the TAE adapter.
In Switzerland, a T+T83 A12 socket should be used, into
which the T+T connector cable (included) is inserted. Use an
A6 to A12 adapter if required.
11
Page 12
Telephone functions / making calls
Telephone functions / making calls
The ring tone set, and also the flashing LED, signal an incoming
call.
During a call, the call duration display shows the time the line has
been busy. This enables you to see at all times how long you have
been on the phone.
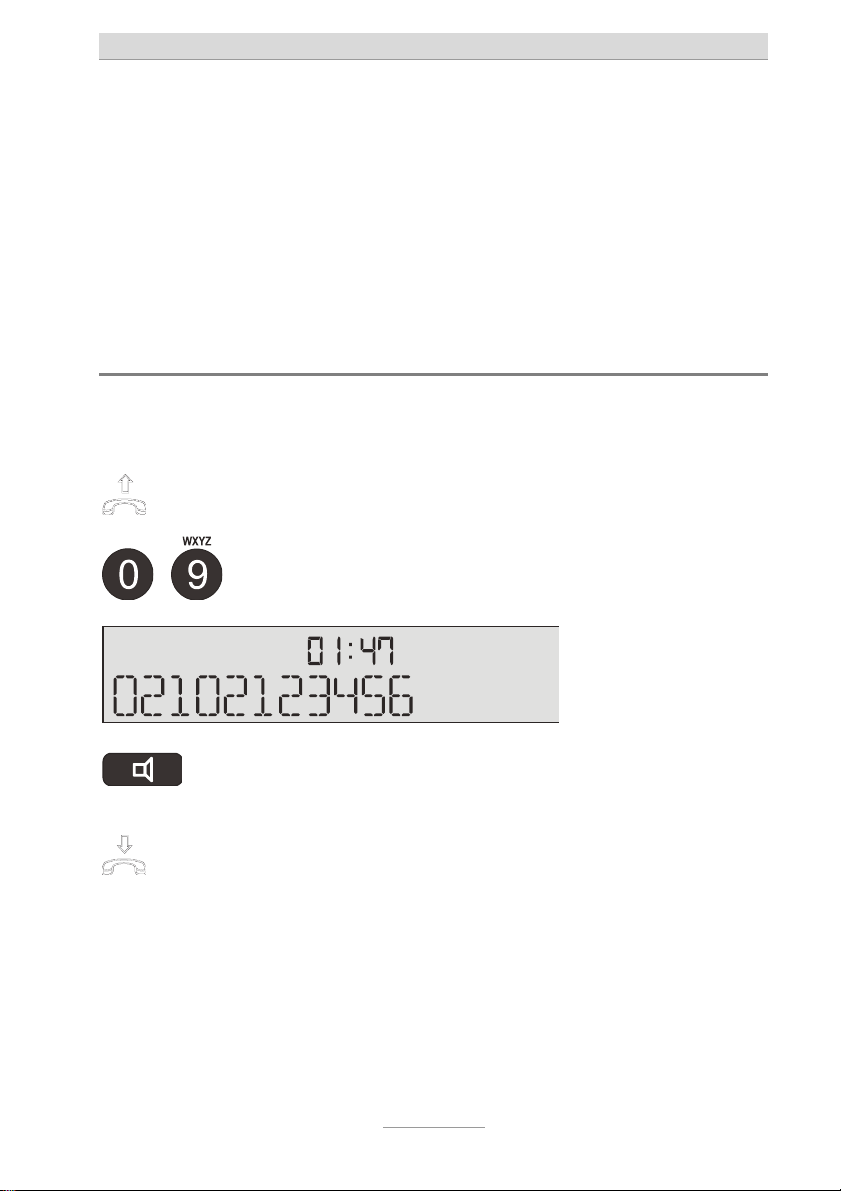
Immediate dialling
Here the digits pressed are dialled immediately without any option
to make corrections.
Pick up the receiver and wait
for the dial tone.
Use the numeric keypad to
enter the numbers required.
…
To enable/disable the loudspeaker, press the Loudspeaker button.
Put down the receiver to end
Not putting the receiver down properly is also not a problem
a call.
The digits pressed are displayed
and dialled immediately.
The loudspeaker is enabled and
others present can listen in on the
conversation.
The line is disconnected.
for the phone - it detects the busy tone and disconnects the
line. If you then want to accept or make a call, you might have
to put down the receiver correctly first.
12
Page 13

Telephone functions / making calls
t
t
t
Y
Y
Non-immediate dialling (dial preparation)
Here the digits entered are not dialled immediately, meaning corrections can be made before dialling.
Use the numeric keypad to
enter the numbers required.
…
If you press a wrong button,
press the C button.
Pick up the receiver to dial a
elephone number entered.
The digits pressed are displayed
but not yet dialled.
The last digit is deleted and can
be re-entered.
The connection is established
and you can hold your conversa-
ion.
Hands-free talking
Instead of using the telephone receiver, you can establish a connection or receive a call using hands-free mode.
Press the Loudspeaker but-
on (same as picking up the
receiver).
To switch from hands-free to
receiver, simply pick up the
receiver.
The Loudspeaker symbol is
shown in the top left of the display. You can hear the dial tone
and make your call.
ou can then continue your con-
versation with the receiver.
pressed
Switching from receiver to
Keep
hands-free mode: Keep the
Loudspeaker button pressed
ou can then continue your con-
versation in hands-free mode.
and put down the receiver.
13
Page 14

Telephone functions / making calls
Y
t
t
t
t
To end the call, press the
Loudspeaker button again
The line is disconnected.
(same as putting down the
receiver).
Transferring calls / Flash (R button)
On most telephone systems, the R button can be used to transfer
calls. Refer to the operating instructions for your telephone system
or ask your system administrator.
Accept call, e.g. with the telephone receiver.
Press the R button.
Use the numeric keypad to
enter the required call recipi-
…
ent.
If the line is busy, you can
reconnect to the caller by
pressing the R button.
ou can speak to the person at
he other end and say the call is
being transferred.
The connection is established.
The R button must be pressed
wice on many telephone sysems.
Tell the caller the call is being
ransferred or simply put
The call is transferred.
down the receiver.
This process can vary depending on telephone system. For
many functions initiated with a flash (R button), setting the
flash from short to long may also be required (also refer to
“Advanced settings”).
14
Page 15

Call log
t
Call log
General
Your phone stores the last 20 calls with date and time. If a caller's
phone number is sent during a call, it is also stored. If the telephone number matches one from the phone book, the name of the
caller is displayed.
The “NEW” display shows whether there are any new, nonaccepted calls in the list. If enabled, the LED also flashes (refer to
“Advanced settings, new calls LED”).
The telephone numbers in the call log can be dialled directly. You
are able to delete individual entries or the whole list. Telephone
numbers can be copied to the phone book. Calls received and
numbers dialled are marked with a right and left arrow respectively
(“>” and “<”).
Show calls
Press the “Call log” button.
The display changes and shows
he newest entry at the very top
of the list.
Use the Control buttons
(Up/Down) to scroll between
individual entries.
To copy the call to the phone
3s
book, press the Phone book
button for three seconds.
15
The required call is shown with
call time and date. Entries not yet
viewed are marked as "NEW".
The input box for the phone book
opens. Change the name as required and save.
Page 16

Call log
t
t
t
t
t
Press the C button to delete
he call selected.
To delete the entire list, keep
3s
he C button pressed for
The call is deleted after acknowledging the prompt.
All entries are deleted after acknowledging the prompt.
hree seconds.
or
Press the Loudspeaker but-
on to establish a connection.
Pick up the receiver.
The connection is established
and hands-free mode is enabled.
The connection is established
and you can hold your conversa-
ion.
Press the “Call log” button to
exit the list.
The display shows the top-level
menu.
If the name is displayed for an entry, you can use the
Plus/Minus buttons to switch between name and call number.
16
Page 17

Text entries
Text entries
Text entry from the numeric keypad
When your phone is in text entry mode, you can enter names from
the digit buttons. Refer to the printing on the case and the "Overview of possible characters" table to see which letters can be entered with which buttons.
Pressing one of the digit buttons when the phone is in text entry
mode shows the first character on the display. Every subsequent
press replaces the current character with the next.
Example: Suppose you want letter "C". "C" is the third letter on "digit
button 2". So press "2" three times in a row.
If there is no entry for one second, the current letter is taken and
the cursor moves to the next location. Use the Control buttons
(Up/Down) to navigate within the text. Press the C button to delete
a character. To clear the entire line, press the C button and keep it
pressed for three seconds.
17
Page 18

Text entries
Overview of the characters supported
Button Assignment Button Assignment
. , ? 1 ’ “ ( ) = + - / < > M N O 6
A B C 2 P Q R S 7
D E F 3 T U V 8
G H I 4
W X Y Z 9
J K L 5 (space) 0
* #
18
Page 19

Phone book
t
t
t
Phone book
General
The phone book manages the names and telephone numbers of
your contacts. A maximum number of 50 entries can be stored. An
entry comprises a name (search term) and telephone number. The
name must start with a letter. The telephone number should always
start with the area code (prefix) so that the appropriate button lights
up when the incoming telephone number matches the number
stored. The entries are sorted alphabetically.
Inputting and storing entries
Keep the “Phone book” but-
3s
on pressed for three sec-
onds.
Use the numeric keypad to
enter the name ("Text entry
…
from the numeric keypad").
The OK button takes you to
he input box for the call
number.
The input box for the name is
displayed.
It is best to enter something here
so that the entry can be sorted
alphabetically and located later
on.
The display switches to entry of
he call number.
19
Page 20

Phone book
t
t
t
t
t
t
Use the numeric keypad to
enter the telephone number.
…
Use the Plus button to insert
a pause of three seconds duration.
A flash can be entered with
he R button.
Press the C button to delete
single characters.
To delete the entire line, keep
3s
he C button pressed for
hree seconds.
Press OK to confirm your input.
Press the “Phone book” but-
on to exit the input box.
Dialling from the phone book
The digits pressed are displayed.
A "P" is shown on the display.
An "F" is shown on the display.
The character under the cursor is
deleted.
The entire line is deleted.
The entry is accepted. The display shows the top-level menu.
The entry is discarded. The display shows the top-level menu.
Press the “Phone book” but-
on.
Use the numeric keypad to
enter the first letter of the
…
name you are looking for
The phone book is opened at the
beginning with "A".
The first name starting with "S" is
displayed.
(e.g. S for Smith).
Use the Control buttons
(Up/Down) to narrow down
your search.
20
The sequential number of the en-
ry is shown in the top left of the
display.
Page 21

Phone book
t
t
t
t
t
t
or
Establish connection: Press
he Loudspeaker button.
Simply pick up the receiver.
The connection is established
and hands-free mode is enabled.
The connection is established
and you can hold your conversa-
ion.
or
Press the Loudspeaker but-
on to end the call.
Simply put down the receiver.
The line is disconnected and the
display switches to standby.
The line is disconnected.
To see the number before dialling, use the Plus/Minus buttons
to switch between name and call number.
Editing and deleting entries
Press the “Phone book” but-
on.
Search for an entry as described in "Dialling from the
phone book".
To delete the entry, press the
C button and acknowledge
he prompt with OK.
To clear the entire phone
3s
book, press the C button for
hree seconds and confirm
with OK.
21
The phone book is opened at the
beginning with "A".
The required entry is displayed.
The entry is deleted.
The entire contents of the phone
book are deleted.
Page 22

Phone book
t
t
t
Press “Phone book” for three
3s
seconds to edit an entry.
Use the control buttons
The first letter of the name flashes.
(Up/Down) to navigate, and
he numeric keypad and C
button to make corrections.
Press OK to confirm your input.
The changes are stored and the
display switches to the phone
number.
Use the control buttons
(Up/Down) to navigate, and
he numeric keypad and C
button to make corrections.
Press OK to confirm your input.
The changes are stored and the
display switches to the top-level
menu.
Press the “Phone book” but-
on to exit the input box.
The display shows the top-level
menu.
22
Page 23

Direct dial buttons
t
t
t
t
Direct dial buttons
General
You can save six frequently used numbers under the buttons on the righthand side of the phone, and
Enter the call recipients in the fields next to the relevant buttons.
Programming direct dial buttons
dial each of them by pressing the button.
3s
Press and hold down the required direct dial button for
hree seconds.
Use the numeric keypad to
enter the numbers.
…
Use the Plus button to insert
a pause of three seconds duration.
A flash can be entered with
he R button.
Press the C button to delete
single characters.
To delete the entire line, keep
3s
he C button pressed for
hree seconds.
The display changes and the
phone is in Enter mode. The
number in the top left is the direct
dial button currently being edited
(1 to 6).
The digits pressed are displayed. At least one digit must
be entered for the entry to be
saved.
A "P" is shown on the display.
An "F" is shown on the display.
The character under the cursor is
deleted.
The entire line is deleted.
23
Page 24

Direct dial buttons
t
t
t
t
Press OK to confirm your input.
The entry is accepted and the
op-level menu is shown again on
he display.
To clear a direct dial button, perform a save without the phone
number.
Dialling with a direct dial button
or
Press the direct dial button
required.
Pick up the receiver.
Press the direct dial button
required.
The loudspeaker is enabled and
he connection is established.
The loudspeaker can be used for
he conversation.
The connection is established
and you use the receiver for the
conversation.
24
Page 25

Settings
Settings
Setup options
Language ...................... Set a language here so that all the oper-
ating instructions are displayed in your
language.
LCD contrast .................. Five levels for the contrast can be set
here, enabling you to adjust the contrast
to your particular viewing angle.
Date................................. Enter the date here. When the date is
sent together with the phone number in
your network, the date is set automatically. Note that the year is not sent and
must be set manually.
Time ................................ Enter the time here. When the time is
sent together with the phone number in
your network, the time is set automatically.
Call signal ...................... On/Off. Selecting "Off" here means
acoustic call signalising is disabled.
Ring tone ........................ Choose here one of the ten possible ring
tones.
Call volume .................... Set the ring tone volume required. Eight
levels are available.
Advanced (PIN) ............. Enter here the current PIN (factory setting
= 000) to access the advanced setting
options.
25
Page 26

Settings
Advanced setting options
Change PIN .................... This is where you can change the current
PIN. The PIN is a 1 to 3-digit number in
range 0 to 999. Please ensure to memorise the new PIN as it is required for the
next PIN prompt.
Outside line prefix ......... Enter here your outside line prefix for the
public phone network (e.g. 0). Your telephone then automatically adds a pause
after this prefix to prevent incorrect dialling.
Flash (R button) ............ Select short or long. The short flash (ap-
prox. 100ms) is usually used in telecommunication systems to initiate functions.
In contrast, the long flash (approx.
240ms) is used by Deutsche Telekom.
New calls LED................ When the function is enabled, the LED
flashes when you have missed and not
yet seen calls in the call log.
Max. volume .................. Set here whether the hands-free volume
should automatically be set to the maximum for emergency calls and return
calls.
Return call no. 1 ............ When the number entered here is recog-
nised, the phone switches to hands-free
mode. The call recipient can end the call
by pressing digit 8 on the phone.
Return call no. 2 ............ See the description for return call no. 1.
Return call no. 3 ............ See the description for return call no. 1.
26
Page 27

Settings
t
Keypad lock ................... Enabling the keypad lock locks all the
buttons. The emergency call button and
direct dial buttons can continue to be
used however. Dialling international
emergency number 112 is another exception.
Exception no. 1 .............. You can enter here another number
which can be dialled despite the keypad
being locked (such as another emergency number).
Exception no. 2 .............. See the description for exception no. 1.
Setup menu
The Setup menu is split into two categories - the first for simple settings and the second for advanced settings only accessible by entering the PIN.
With the receiver down,
press the “Menu” button.
Use the Control buttons
(Up/Down) to search for the
setting you wish to change.
Press OK to select the set-
ing.
Change the setting using the
"Control" (Up/Down) buttons.
Use the numeric keypad to
enter digits.
…
27
The menu is displayed.
The selection flashes.
The digits pressed are displayed.
The cursor flashes.
Page 28

Settings
t
Use the C button to clear or
correct phone numbers.
Press OK to accept the set-
ing.
Change other settings the
The last digit is deleted each time.
The setting is accepted.
same way.
Press the “Menu” button to
exit the settings.
The display switches to the toplevel menu.
Adjusting the volume
The loudspeaker volume can be set when the loudspeaker is enabled. The receiver volume changes when the receiver is picked up.
Whilst a call is being signalled, the volume of the ring tone melody
changes.
Adjust the volume with the
Plus/Minus buttons.
The volume bar shows the current setting.
28
Page 29

Emergency call function
Emergency call function
Up to three numbers can be dialled automatically with the emergency call function at the press of a button. When the call recipient
answers, the following announcement is played: “This is an emergency call, please press 5 to accept the call”.
The announcement keeps repeating with two seconds in-between,
up to a maximum of one minute. To receive the emergency call, it
must be confirmed with the digit 5 on the called phone whilst the
announcement is being played. After the confirmation, the phone
switches to hands-free mode and there is a connection with the call
initiator. After the call, the person called can end the call with digit 8
on the phone. If there is no confirmation with the digit 5, the second
and then third numbers are dialled. If there is still no confirmation,
the second loop starts after a wait time of three minutes. A maximum of four loops are tried, corresponding to 12 dial attempts.
An emergency call has priority over all other functions.
Emergency call settings
The following setting options are in the Emergency call menu:
Emergency call ............. Enable or disable the function here.
Phone number 1 ............ Enter here the first emergency phone
number. This number is called first in an
emergency.
Phone number 2 ............ Enter here the second emergency phone
number. This number is called second in
an emergency.
Phone number 3 ............ Enter here the third emergency phone
number. This number is called last in an
emergency.
29
Page 30

Emergency call function
t
t
t
t
Emergency call menu
With the receiver down, keep
6s
he Emergency call button
pressed for six seconds.
Use the numeric keypad to
enter your PIN.
…
Press OK to confirm. The first setting option is dis-
Use the Control buttons
(Up/Down) to search for the
setting you wish to change.
Press OK to select the set-
ing.
Change the setting using the
control buttons (Up/Down).
The display switches and the
phone prompts for the 3-digit PIN
(factory setting = 000).
The digits pressed are shown on
he display.
played.
The selection flashes.
…
Use the numeric keypad to
enter digits.
Use the C button to clear or
correct phone numbers.
Press OK to accept the set-
ing.
Change other settings the
The digits pressed are displayed.
The cursor flashes.
The last digit is deleted each time.
The setting is accepted.
same way.
Press the Emergency call
button again to exit the
The display again shows the toplevel menu.
menu.
30
Page 31

Emergency call function
Y
Making an emergency call
After an emergency call is made, it can still take a few seconds until
the first number is called.
Press the Emergency button
on the phone.
The Emergency button flashes
and signals an active emergency
call.
Cancelling an emergency call
If you have made an emergency call inadvertently, it is possible to
cancel it from the phone.
Press the C button on the
phone.
Confirm the prompt with OK. The emergency call is cancelled
and the emergency button stops
flashing.
Accepting an emergency call
The phone called starts to ring.
Pick up the receiver.
Press digit 5.
ou hear the emergency an-
nouncement.
The phone from which the emergency call was made switches to
hands-free. Call is made.
Press digit 8 to end the call. The phone from which the emer-
gency call was made puts the receiver down by itself.
Put down the receiver.
31
Page 32

Appendix
Appendix
Hearing aid compatibility
The earpiece in the receiver has a magnetic field generator. For
hearing aids worn behind the ear, magnetic coupling means calls
are received louder and clearer. The switch on the hearing aid must
be set to position “T”. Perfect function cannot be guaranteed with
every hearing aid on the market however.
Warranty
Your point of contact for warranty obligation benefits is the specialist retailer where you acquired your device.
Warranty conditions are based upon the legal regulations of the
country in which the device was purchased. Your specialist retailer
will be glad to provide more information.
Guarantee
Tiptel provides a voluntary guarantee on the device, the conditions
of which are published on http://www.tiptel.com. The guarantee
conditions applicable at the time of purchase apply. The original
sales slip (receipt, bill) with serial number and/or IMEI number is
used as proof of purchase. Please keep these documents in a safe
place.
Declaration of conformity
In accordance with the European requirements, this device must be
permitted for connection to the public switched telephone network
in all member states of the EU. Due to technical differences in individual countries, it is impossible to give an unlimited guarantee for
successful operation with every telephone connection.
32
Page 33

Appendix
This phone satisfies the requirements laid down in Directives
2014/30/EU and 2014/35/EU. Conformity with these directives is
verified by the CE mark.
We hereby declare that the phone satisfies all fundamental requirements of European directives.
Visit www.tiptel.com for more details on the declaration of
conformity.
Disposal
Packaging: Dispose of paper, card and cardboard boxes in the
used paper container and throw plastic parts into a recycling container.
Device disposal: Used electrical devices may not be disposed of
in the household waste. Dispose of the device at your local collection points (scrap or recycling yards). Please contact your local authorities for information on disposal sites.
Troubleshooting
Power failure
The internal clock stops if there is a power failure in the telephone
network. All settings are retained however, meaning the settings
stay as they were before when power is restored. All you need to
do is reset the clock.
In the event a malfunction occurs, you are able yourself to use the
following table to locate the cause of a problem in most cases, and
rectify the problem.
33
Page 34

Appendix
Problem Possible cause
No display, no dial
tone.
Display too light or too
Connector cable not making
contact.
Contrast not set correctly. Adjust the contrast.
dark.
No incoming calls
No call signal connected.
being indicated in the
telephone system.
Buzzing or other
interference in the
loudspeaker or
Interference from cordless
telephone, cordless headset,
monitor, etc.
receiver.
The clock shows the
wrong year but date
and time are right.
The time and date are
incorrect after a call.
The date and time are sent
by the telephone network.
The year is not sent.
The time and date are not
being sent correctly by your
telecommunication system.
Incorrect or no
connection when
dialling from telephone
The outside line prefix for
the public telephone network
has not been entered.
systems.
Solution/recommendat
ion
Check all cables and
connectors.
Check the programming
of the
telecommunication
system.
Change the location.
Set the year manually.
Adjust the clock in your
telephone system.
Enter the outside line
prefix.
The number is not
displayed for a call.
Your network provider or
telecommunication system
does not support this
function or the function is
not enabled. The caller has
suppressed the sending of
the call number or it is ex-
directory.
The call is from a telephone
network that does not
support the sending of call
numbers.
34
Ask your network
provider or
telecommunication
system manufacturer if
the function is available
or if it needs to be
enabled.
Page 35

Appendix
Default settings
The following list shows the factory settings for your telephone. All
of these defaults can be changed.
Language English
LCD contrast 3
Date 01/01/2015
Time 12:00
Call signal On
Ring tone 1
Call volume 8
PIN 000
Outside line -----Flash Short
New calls LED Off
Maximum volume On
Return call Off
Keypad lock Off
Technical specifications
Phone dimensions (W x H x D) 210 x 75 x 190 mm
Weight 700g
Power consumption in stand-by ≤ 25μA / 25V
Ambient temperature
Dial mode Tone dialling (MFV)
Flash duration 100ms / 240ms
Direct dial buttons 6
Phone book Maximum 50 entries
Call log Maximum 20 entries
Ring tones 10
Ring time volume extra loud 8 levels
0 – 40C
35
Page 36

Appendix
Hands-free function Half-duplex
Receiver Suitable for use with hearing aid
Receiver volume extra loud 5 levels
Advanced CLIP functions Name, date/time
Data retention following power failure > 10 years
Clock Quartz
16-segment display LCD, 16-digit, alphanumeric
Information for administrators
Please contact Tiptel Support to enable special functions.
The following settings/functions can be changed and used by Administrators:
Firmware version (for information only)
Default settings
Reset PIN
LCD/LED test
Automatic hands-free mode (for return calls)
Automatic programming, copying of settings via FSK: All
settings are sent (phone book, direct dial buttons, etc.).
Time-saving configuration (for care institutions for example).
36
Page 37

Page 38

Page 39

Page 40

Tiptel.com GmbH Business Solutions
Halskestraße 1, D - 40880 Ratingen
Tel.: 02102 - 428 520
Internet: www.tiptel.de
International:
Internet: www.tiptel.com
Tiptel GmbH
Ricoweg 30/B1, A - 2351 Wiener Neudorf
Tel.: 02236/677 464-0
Fax: 02236/677 464-22
E-mail: office@tiptel.at
Internet: www.tiptel.at
Tiptel AG
Pumpwerkstrasse 40 – CH - 8105 Regensdorf
Tel.: 044 - 843 13 13
Fax: 044 - 843 13 23
E-mail: tiptel@tiptel-online.ch
Internet: www.tiptel-online.ch
Tiptel B.V.
Camerastraat 2, NL – 1322 BC Almere
Telefoon: 036 – 53 666 50
Fax: 036 – 53 678 81
E-mail: info@tiptel.nl
Internet: www.tiptel.nl
Tiptel NV
Imperiastraat 10 B8 – 1930 Zaventem
Telefoon: 02 714 93 33
Fax: 02 714 93 34
E-mail: tech@tiptel.be
Internet: www.tiptel.be
Tiptel sarl
23, avenue René Duguay-Trouin – F – 78960 Voisins-Le-Bretonneux
Tél. : 01 / 39 44 63 30
Fax : 01 / 30 57 00 29
E-mail : support@tiptel.fr
Internet : www.tiptel.fr
(en) 01/2017
EDV 4931493
 Loading...