

Page 1

tiptel
Bedienungsanleitung (D)
Operating instructions (UK)
tiptel DECT Box 300 CLIP/5000 CLIP
Page 2

Page 3

1
Inhaltsverzeichnis
Inhaltsverzeichnis
Wichtige Information..................................................2
Anschlüsse und Anzeigen...........................................3
Hörtöne.......................................................................4
1 Inbetriebnahme...........................................................5
1.1 Montage..........................................................................5
2 Einbuchung /Programmierung ....................................6
2.1 Automatisches Einbuchen ..............................................6
2.2 Programmiermodus.........................................................6
2.2.1 Programmiermodus aktivieren ........................................7
2.2.2 Parametereinstellung im Programmiermodus ................8
2.2.3 Parameterverzeichnis und Lieferzustand ......................16
3 Telefonieren ..............................................................17
3.1 Nach intern telefonieren................................................17
3.2 Nach extern telefonieren...............................................18
Anhang
Technische Daten / Zulassung / CE-Zeichen / Reinigung / Gewährleistung / Service
Page 4

2
Informationen
Wichtige Informationen
Die DECT Box ist ein universell einsetzbarer, schnurloser Adapter
(DECT-Standard) für den Betrieb analoger Endgeräte an GAP-fähigen
DECT-Systemen. Diese „schnurlose Verlängerungsleitung“ erspart
Ihnen aufwändige Verkabelungsarbeiten und kann an jeder handelsüblichen DECT/GAP-Basisstation wie ein zusätzliches Mobilteil eingebucht
werden. Sie können analoge Telefone, Faxgeräte, Anrufbeantworter,
Türsprechstellen oder Modem mit Hilfe der DECT Box an Ihre DECT-Basisstation anschließen. Das Gerät muss mit DTMF-Wahlverfahren (MFVWahlverfahren, Tonwahl) arbeiten. Endgeräte, die nur Impulswahl (IWVWahlverfahren, Pulswahl) unterstützen, können an der DECT Box nicht
verwendet werden. Bitte prüfen Sie in diesem Falle, ob Ihr Gerät auf
DTMF-Wahlverfahren umgeschaltet werden kann.
Die DECT Box 300 besitzt eine integrierte Antenne und hat eine DECTübliche Reichweite von bis zu 30 m im Gebäude und bis zu 300 m im
Freifeld.
Die DECT Box 5000 erfordert den Anschluss einer externen Antenne.
Abhängig von der benutzten Basisstation, der Antenne und den allgemeinen Umgebungsbedingungen können erheblich größere Distanzen
überbrückt werden. Durch die Verwendung einer externen Antenne an
der Basisstation bzw. eines DECT-Repeaters mit externer Richtantenne
können maximale Reichweiten von bis zu 10 km realisiert werden.
Damit der optimale Betrieb an unterschiedlichen Basisstationen möglich
wird, muss die DECT Box eventuell durch Einstellung verschiedener
Parameter an die Basisstation angepasst werden. Siehe dazu Kapitel
„Programmiermodus“.
Durch die unterschiedliche Funktionalität verschiedener Basisstationen
können sich bei der Bedienung Abweichungen ergeben. Bitte beachten
Sie die Bedienungsanleitung Ihrer Basisstation.
Im Lieferzustand ist die DECT Box für den Betrieb an einer Basisstation
mit analogem Anschluss eingerichtet, so dass sie in vielen Fällen nicht
weiter angepasst werden muss. Für den Betrieb an Basisstationen mit
ISDN-Telefonanschluss muss im Programmiermodus der Parameter
40 umgeschaltet werden!
HINWEIS
Page 5
3
Anschlüsse und Anzeigen
Anschlüsse und Anzeigen
1 Stromversorgung
2 Steckernetzgerät
Nach dem Einstecken des Steckernetzgerätes muss der Hörer des angeschlossenen Telefons mindestens 30 Sekunden aufgelegt bleiben!
Verwenden Sie nur das mitgelieferte Steckernetzgerät!
Vor Öffnen des Gehäuses unbedingt Steckernetzgerät ziehen!
3 Leuchtanzeige (LED)
keine Stromversorgung
betriebsbereit / Stromversorgung (220 /
230 V) vorhanden / Gerät ist an einer
Basis registriert und angemeldet
Anruf steht an
bestehende Gesprächsverbindung
Programmiermodus (Menü)
Basis wird gesucht
Basis gefunden
Keine Basis
LED aus
Zeitintervall 8 Sek. LED an
HINWEIS
HINWEIS
Telefon, Anrufbeantworter, Faxgeräte
Rückseite
220V/230V
50 Hz
DECT Box 5000
Page 6

4
Anschlüsse und Bedienelemente
Besetztton
(425 Hz, wiederholt)
Positiver Quittungston
Negativer Quittungston
(einmalig)
(einmalig)
Ton
Darstellung der Töne
Pause
Wählton
(Dauerton)
Sonderwählton
(400/425 Hz, Dauerton)
HINWEIS
Hörtöne (im Hörer oder Lautsprecher)
4 Line-Anschluss Anschluss für Telefon, Fax-
gerät, Anrufbeantworter oder
Modem.
Die RJ 11 Buchse ist auf den
beiden mittleren Anschlüssen
belegt (Pin 3 und 4).
5 Antennenanschluss SMA Antennenbuchse für den
(nur DECT Box 5000) Anschluss einer externen
Antenne.
Die Verwendung eines hochwertigen Antennenkabels und eine möglichst geringe Kabellänge minimiert Leistungsverluste und optimiert die
Reichweite!
Page 7

5
Standort auswahl
Funk-
aus breitung
1.1 Montage
Die
DECT Box
ist für Wandmontage in geschlossenen Räumen ausgelegt.
Beachten Sie dabei bitte, dass Sie das Gerät nicht in unmittelbarer Nähe
von anderen elektronischen Geräten wie z. B. HiFi-Anlagen, Büromaschinen oder Mikrowellengeräten anbringen sollten. Sie vermeiden damit eine
gegenseitige Beeinflussung. Der Aufstellungsort sollte auch nicht in der
Nähe von Wärmequellen gewählt werden (z. B. Heizkörper oder direkte
Sonneneinstrahlung).
Um im Verbindungszustand Störgeräusche zu vermeiden, sollte das angeschlossene Endgerät nicht näher als 1 Meter zur
DECT Box
aufgestellt
werden.
Die DECT Box muss eine Funkverbindung zur DECT-Basisstation herstellen. Vor der endgültigen Festlegung des Montage-Standortes prüfen
Sie bitte, ob der von Ihnen gewünschte Ort innerhalb der Reichweite
der DECT-Basisstation liegt.
Aufgrund der digitalen Übertragung im benutzten Frequenzbereich kann
es - je nach den baulichen Gegebenheiten - auch innerhalb der angegebenen Reichweite zu Abschattungen der Funkwellen kommen. Hierdurch wird die Übertragungsqualität eingeschränkt. Schon eine gering fügige Standortänderung stellt aber die gewohnte Übertragungsqualität
wieder her. Da die DECT Box wie ein Mobilteil Ihrer DECT -Basisstation
arbeitet, können Sie mit Hilfe Ihres Mobilteils prüfen, ob der Montage standort geeignet ist.
1 Inbetriebnahme
Die folgenden Arbeitsschritte sind nötig, um die DECT Box zu montieren:
1. Bohren Sie im Abstand von 60 mm zwei Löcher mit einem Durchmesser von 6 mm in die Wand.
2. Setzen Sie die Dübel ein und drehen Sie die Schrauben bis ca.
5 mm Abstand zur Wand ein.
3. Verbinden Sie die externe Antenne mit
dem entsprechenden Anschluss (nur
DECT Box 5000).
4. Verbinden Sie Ihr Endgerät mit der DECT
Box.
5. Verbinden Sie die DECT Box mit der
Stromversorgung.
6. Hängen Sie die DECT Box ein.
Wand befestigung
HINWEIS
Antennenanschluss
(nur DECT Box 5000)
Page 8

6
2 Einbuchung/Programmierung
2.1 Automatisches Einbuchen
Das automatische Einbuchen der DECT Box ist möglich, solange sie
noch nicht an einer Basisstation angemeldet ist. Voraussetzung dafür
ist, dass die PIN Ihrer Basisstation auf „0000“ oder „1111“ eingestellt ist.
1. Verbinden Sie das Steckernetzgerät mit Ihrer DECT Box.
2. Verbinden Sie Ihr Telefon mit der DECT Box, lassen Sie den Hörer
aufgelegt.
3. Stellen Sie sicher, dass Ihre Basisstation die Möglichkeit bietet,
ein weiteres Mobilteil anzumelden.
4. Während des Einbuchvorganges sollte sich die DECT Box in der
Nähe Ihrer Basisstation befinden.
5. Starten Sie die Anmeldeprozedur an Ihrer DECT-/GAP-Basis-
station, so als wollten Sie ein zusätzliches Mobilteil anmelden.
Die Beschreibung des Bedienablaufes finden Sie in der Anleitung
Ihrer Basisstation.
6. Stecken Sie das Steckernetzgerät in eine Steckdose. Der
Einbuch vorgang wird automatisch gestartet.
7. Den erfolgreichen Abschluss des Einbuchvorganges erkennen Sie
daran, dass die LED in Abständen von ca. 10 sec kurz aufleuchtet.
Sollte der Einbuchvorgang innerhalb von ca. 3 Minuten nicht erfolgreich abgeschlossen sein, führen Sie die manuelle Einbuchung im
Programmiermodus durch.
2.2 Programmiermodus
Der Programmiermodus der DECT Box kann nur innerhalb der ersten
10 Minuten nach Stecken des Netzteils aktiviert werden. Dadurch
wird eine versehentliche Veränderung der Parameter im laufenden
Betrieb verhindert.Nicht alle hier angebotenen Leistungsmerkmale
Die DECT Box muss in Ihre DECT-/GAP-Basisstation eingebucht
werden, bevor sie benutzt werden kann. Die Einbuchung kann im
Regelfalle mit der Funktion „automatisches Einbuchen“ durchgeführt werden.
Der „Programmiermodus“ bietet die Möglichkeit, verschiedene
Parameter einzustellen, um die DECT Box der Funktionalität Ihrer
Basisstation anzupassen. Zusätzliche Parameter erlauben die
Einstellung der DECT Box auf Ihre persönlichen Anforderungen.
Weiterhin können Sie hier die manuelle Einbuchung durchführen.
HINWEIS
HINWEIS
Page 9

7
werden von jeder DECT/GAP-Basisstation unterstützt. Klären Sie mit
Hilfe der Bedienungsanleitung Ihrer Basisstation, welche Leistungsmerkmale Sie nutzen können.
2.2.1 Programmiermodus aktivieren
Um die DECT Box in den Programmiermodus zu bringen, gehen Sie wie
folgt vor:
1. Verbinden Sie Ihr Telefon mit der DECT Box.
2. Verbinden Sie das Steckernetzgerät mit Ihrer DECT Box.
3. Stecken Sie das Steckernetzgerät in eine Steckdose. Lassen Sie den
Hörer Ihres Telefons mindestens 30 Sekunden aufgelegt.
4. Heben Sie den Hörer Ihres Telefons ab. Abhängig davon, ob Ihre
DECT Box schon in eine Basis eingebucht ist oder nicht, hören Sie
einen Besetztton oder einen Wählton.
5. Geben Sie über Ihr Telefon ein:
**9.
6. Sie hören einen positiven Quittungston.
7. Optional: Geben Sie über Ihr Telefon die PIN der DECT Box ein.
Die Eingabe der PIN ist nur notwendig, wenn zuvor im Programmier modus eine PIN, abweichend vom Lieferzustand, eingerichtet wurde.
Durch die PIN kann der Zugang zum Programmiermodus geschützt
werden.
8. Sie hören den Sonderwählton, der Programmiermodus ist aktiviert.
Jetzt können Sie durch Eingabe der Parameterkennzahlen die entsprechenden Leistungsmerkmale Ihrer DECT Box verändern.
Sie möchten Ihre DECT Box an einer Basisstation mit einem ISDN Telefonanschluss benutzen. Aktivieren Sie den Programmiermodus wie
oben in Punkt 1-8 beschrieben.
Dann:
9. Geben Sie die Programmierkennzahl zur Einstellung „Anschluss an
ISDN-/Analog-Leitung ein:
40
10. Geben Sie zum Aktivieren des Leistungsmerkmals ein: 0#
11. Sie hören einen positiven Quittungston und anschließend wieder den
Sonderwählton. Das Leistungsmerkmal ist aktiviert.
2 Einbuchung/Programmierung
Beispiel
HINWEIS
Page 10

8
2 Einbuchung/Programmierung
2.2.2 Parametereinstellung im Programmiermodus
Nicht alle hier angebotenen Liestungsmerkmale weden von jeder DECT-/
GAP-Basisstation unterstützt. Klären Sie bitte mit Hilfe der Bedienuns anleitung Ihrer Basisstation, welche Leistungsmerkmale Sie nutzen
können.
Um diese Parameter einzustellen, muss vorher der Programmiermodus
aktiviert werden. Die Programmierung einer Funktion wird durch Eingabe von
# abgeschlossen und durch den positiven Quittungston bestä-
tigt. Anschließend hören Sie wieder den Sonderwählton und können mit
der Programmierung weiterer Funktionen fortfahren. Die Änderung wird
mit Ausnahme der Programmierpunkte 90, 91 und 99 ohne Neustart
der DECT Box wirksam.
Wird während der Programmierung ein ungültiger Wert eingegeben,
erfolgt ein negativer Quittungston, die Prozedur wird abgebrochen und
Sie hören wieder den Sonderwählton.
Erfolgt während der Programmierung innerhalb einer Minute keine
Eingabe, so wird die Prozedur abgebrochen und Sie hören wieder den
Sonderwählton.
Durch Auflegen des Hörers wird jederzeit der Programmiermodus
beendet, die DECT Box befindet sich wieder im Normalbetrieb.
Funktion Parameter- Weitere Eingaben
kennzahl
Manuelles Einbuchen der 1 Basis PIN #
DECT Box
Zum Einbuchen der DECT Box muss die PIN der Basisstation eingegeben
werden. Es wird eine 0- bis 8-stellige PIN von der distybox akzeptiert.
Nach Eingabe der
# hören Sie einen positiven Quittungston. Legen Sie
den Hörer nicht auf, bis der Einbuchvorgang abgeschlossen ist und Sie
wieder den Sonderwählton hören.
Sollte das Einbuchen nicht innerhalb von ca. 3 Minuten abgeschlossen
sein, überprüfen Sie bitte die Einstellungen der Basis und starten den
Einbuchvorgang erneut.
Durch die vierstellige PIN kann der Zugang zum Programmiermodus geschützt werden.
HINWEIS
Page 11

9
2 Einbuchung/Programmierung
Funktion Parameter- Weitere Eingaben
kennzahl
PIN ändern 2
neue PIN
neue PIN #
Die Eingabe der PIN ist nur notwendig, wenn zuvor mit diesem
Progammierpunkt eine PIN, abweichend vom Lieferzustand eingestellt wurde. Zum Ändern der PIN aktivieren Sie den Programmier modus, geben zweimal die neue PIN ein und bestätigen mit der
#.
Die Änderung wird durch den positiven Quittungston bestätigt. Jetzt
ist ein erneuter Zugang zum Programmiermodus nur noch nach Eingabe der neuen PIN möglich.
Bei vergessener PIN kann die DECT Box nur durch den Service zurückgesetzt werden.
Lieferzustand: 0 0 0 0
Distanz (nur DECT Box 5000) 3 Distanzwert #
Gültige Eingaben sind: 0 — 79. Lieferzustand: 0
Der Einstellwert kann mit Hilfe folgender Berechnungsformel gefunden werden:
Distanzwert = Entfernung [in m] geteilt durch 130
Beispiel: 2300 m : 130 m = 17,69 -> Distanzwert = 18
Diese Einstellung wird nur vorgenommen, wenn die Entfernung
zwischen der DECT Box und der Basis größer als ca. 800 m ist. Bei
kürzeren Entfernungen bleibt der Lieferzustand erhalten. Abhängig
von der benutzten Basis kann es Abweichungen geben. Optimieren
Sie den Distanzwert in Schritten von 2.
Lieferzustand: 0
Anschluss an ISDN-/ 40 0 #
analoge Leitung
Diese Einstellung benutzen Sie, wenn Ihre Basisstation an eine
ISDN-Telefonleitung angeschlossen ist. Wahlziffern werden als
Keypad-Information gesendet. Im Verbindungszustand werden
Keypad-Informationen unterdrückt, damit ist die Übertragung von
MFV-Signalen zur Steuerung von externen Geräten möglich.
40 1 #
„Keypad-Information unterdrücken“, diese Einstellung benutzen Sie,
wenn Ihre Basisstation an eine analoge Telefonleitung angeschlossen ist.
HINWEIS
Page 12

10
2 Einbuchung/Programmierung
Funktion Parameter- Weitere Eingaben
kennzahl
40 2 #
Die Keypad-Information wird immer gesendet. Diese Einstellung
nutzen Sie auch bei Betrieb der DECT Box mit der DECT Box Duo
als Basisstation oder ISDN-Basisstationen.
Lieferzustand: 1
Betriebsart Fax / Daten 41 0 #
Betriebsart „Telefon“, diese Einstellung benutzen Sie, wenn ein
Telefon an die DECT Box angeschlossen ist.
41 1 #
Betriebsart "Fax/Daten", mit dieser Einstellung ist die DECT Box für
den Betrieb von Fax oder Datengeräten optimiert.
Nicht alle DECT-Basisstationen unterstützen dieses Merkmal, im
Zweifelsfalle benutzen Sie die Betriebsart „Telefon“.
Lieferzustand: 0
Unmittelbar nach dem Abheben des Hörers wird ein interner Wählton hörbar.
Interner Wählton 42 0 #
Mit dieser Einstellung wird der Wählton unterdrückt. Diese Ein stellung ist nicht empfehlenswert, wenn der Parameter 71 auf 0
eingestellt ist.
42 1 #
Mit dieser Einstellung ist der interne Wählton als Dauerton (425 Hz)
hörbar. Diese Einstellung ist sinnvoll, wenn Ihre Basisstation an eine
direkte Amtsleitung angeschlossen ist.
42 2 #
Mit dieser Einstellung ist der interne Wählton als unterbrochener Ton
(450 Hz) hörbar. Diese Einstellung ist sinnvoll, wenn Ihre Basisstation
an eine Telefonanlage angeschlossen ist, die ebenfalls einen unter brochenen Wählton generiert.
Lieferzustand: 0
HINWEIS
Page 13

11
2 Einbuchung/Programmierung
Funktion Parameter- Weitere Eingaben
kennzahl
Lautstärkeeinstellung 43 1…6 #
Hier kann die Hörerlautstärke in Schritten von 3 dB an die Akustik
Ihres angeschlossenen Gerätes angepasst werden (1=Min., 6=Max.).
Lieferzustand: 5
Rufnummeranzeige/CLIP 44 0 #
Die Rufnummernübermittlung/CLIP an das angeschlossene End gerät ist deaktiviert. Die Rufkadenz wird von der Basisstation
gesteuert, die Funktion 51 ist außer Betrieb!
44 1 #
Die Rufnummernübermittlung/ CLIP an das angeschlossene Endgerät
ist aktiviert. Die Information wird als FSK Typ 1-Signal übermittelt, ist
damit also in den meisten Ländern nutzbar. Die Rufkadenz ist in der
DECT Box fest eingestellt.
44 2 #
Die Rufnummernübermittlung/ CLIP an das angeschlossene Endgerät
ist aktiviert. Die Information wird als MFV-Signal übermittelt, dieses
Verfahren wird z.B. in den Niederlanden verwendet. Die Rufkadenz
wird von der Basis gesteuert.
Lieferzustand: 1
Blockwahl aus 49 0 #
In diesem Modus wird die Wahl des angeschlossenen Endgerätes
auf herkömmliche Weise Ziffer für Ziffer abgesetzt.
Blockwahl aktiv 49 1 #
Im Blockwahl Modus werden die Wahlziffern in der DECT Box 300/
5000 zunächst zwischen gespeichert. Erst nach Eingabe einer
#
wird die Rufnummer an die Basisstation übertragen. Dieser Modus
ermöglicht die Nutzung an Basisstationen die nur die Blockwahl
zulassen, (z.B. Gigaset C590).
Für diese Funktion sind Parameter einzustellen:
Parameter 49 = 1
Parameter 42 = 1
Parameter 71 = 0
Lieferzustand: 0
Page 14

12
2 Einbuchung/Programmierung
Funktion Parameter- Weitere Eingaben
kennzahl
Feldstärkemessung 50 #
Die aktuelle Feldstärke wird durch die Tonhöhe in 5 Stufen im Hörer
wiedergegeben, höchster Ton = bester Empfang. Damit kann die
Antenne optimal auf die Basisstation ausgerichtet werden.
Mit Hilfe eines CLIP-fähigen Telefons kann die aktuelle Einstellung
verschiedener Parameter ausgelesen werden.
Parameterabfrage 51 Parameter-
kennzahl #
Nach Eingabe der jeweiligen Parameterkennzahl und Bestätigung
mit der
# legen Sie den Hörer Ihres Telefons auf. Sie erhalten
anschließend einen Anruf von der DECT Box; im Display wird die
Parameterkennzahl sowie der aktuelle Status angezeigt.
Beispiel: Eingabe
**9513#, Hörer auflegen, Anruf,
Displayanzeige: 3#45
Beschränkung der Verbindung 70 0 #
Es können kommende und gehende Gespräche geführt werden.
70 1 #
Es können nur kommende Gespräche geführt werden.
70 2 #
Es können nur gehende Gespräche geführt werden. Diese Einstellung ist z. B. sinnvoll, wenn Sie eine Türsprechstelle (TFE) an die
DECT Box angeschlossen haben, damit Amtsanrufe nicht an der
Türsprechstelle klingeln. Lieferzustand: 0
Page 15

13
2 Einbuchung/Programmierung
Funktion Parameter- Weitere Eingaben
kennzahl
Aufbau der Verbindung 71 0 #
Verbindungsaufbau Intern/Extern. Es wird erst nach Wahl einer Ziffer
entschieden, ob eine Verbindung innerhalb der Basisstation oder
nach extern aufgebaut werden soll. Diese Einstellung ist nicht
empfehlens wert, wenn der Parameter 42 auf 0 eingestellt ist.
71 1 #
Verbindungsaufbau Intern. Es wird sofort nach Abheben des Hörers
eine interne Verbindung vorbereitet. Es können nur weitere Mobilteile dieser Basisstation angerufen werden, eine Verbindung zur
Amts leitung kann nicht hergestellt werden. Bei Anschluss einer
Türsprech stelle kann hiermit eine ungewollte Belegung der Amts leitung verhin dert werden.
71 2 #
Verbindungsaufbau Extern. Es wird sofort nach Abheben des Hörers
eine externe Verbindung vorbereitet. Durch Wählen der entsprechen den Kennziffer können auch interne Mobilteile dieser Basisstation
angerufen werden. Lieferzustand: 2
Flashfunktion 72 Einstellwert #
Die Flashtastenerkennung (R Taste) der DECT Box kann auf die Flashzeit Ihres angeschlossenen Gerätes eingestellt werden. Entnehmen
Sie diese der Bedienungsanleitung Ihres Gerätes, z.B. Flashzeit Ihres
Gerätes = 100 ms entspricht Einstellwert = 10. Wird dieser Wert auf
0 gesetzt, erfolgt keine Flash-Signalisierung zur Basisstation.
Lieferzustand: 23, entspricht 230 ms
Gruppenruf 73 0 #
Die DECT Box reagiert auf Anrufe, die als "group ring" von der Basis
signalisiert werden.
73 1 #
Die DECT Box reagiert nicht auf Anrufe, die als "group ring" von der
Basis signalisiert werden.
Lieferzustand: 0
Page 16

14
2 Einbuchung/Programmierung
Funktion Parameter- Weitere Eingaben
kennzahl
Parknummer einstellen 80 Parknummer #
Optional kann der Einbuchvorgang unter Verwendung der max. 15stelligen Parknummer Ihrer DECT Basisstation durchgeführt werden.
Diese Vorgehensweise ist sinnvoll, wenn durch weitere aktive DECTBasisstationen der Einbuchvorgang behindert wird. Entnehmen Sie
die Parknummer der Bedienungsanleitung Ihrer Basisstation.
Lieferzustand: keine Parknummer
Parknummer/ARI aktivieren 81 0 #
Die unter Programmierpunkt 80/85 eingestellte Parknummer/ARI
wird beim Einbuchvorgang nicht verwendet.
81 1 #
Die unter Programmierpunkt 80/85 eingestellte Parknummer/ARI
wird beim Einbuchvorgang verwendet.
Lieferzustand: 0
ARI-Nummer einstellen 85 31 ARI #
An Stelle der Parknummer (siehe Parameter 80) kann die ARI-Nummer zum Einbuchen verwendet werden. Bei der Eingabe wird der
ARI-Nummer die Kennung 31 vorangestellt.
Lieferzustand: keine ARI-Nummer
DECT Box zurücksetzen 90 #
Die DECT Box wird in den Lieferzustand versetzt.
Die DECT Box ist anschließend nicht mehr an einer Basis eingebucht! Alle bisherigen Einstellungen werden gelöscht.
Nach Ziehen / Stecken des Steckernetzteils wird ein Neustart der
DECT Box durchgeführt und es kann mit der Neuprogrammierung
der DECT Box begonnen werden.
HINWEIS
Page 17

15
HINWEIS
HINWEIS
HINWEIS
Funktion Parameter- Weitere Eingaben
kennzahl
Parameter zurücksetzen 91 #
Die DECT Box bleibt an der Basisstation eingebucht, alle anderen
Parameter werden in den Lieferzustand versetzt.
Nach der Eingabe bitte den Hörer auflegen und 30 Sekunden warten.
Die DECT Box führt einen Neustart durch.
Auto-Reset 92 0 #
Der Auto-Reset ist nicht aktiv.
92 1 #
Der Auto-Reset ist aktiv, die DECT Box führt alle 24 Stunden einen
Neustart durch.
Alle Einstellungen bleiben unverändert erhalten, eine zu diesem Zeitpunkt bestehende Verbindung wird getrennt.
Lieferzustand: 0
Ausbuchen 99 #
Die Daten der Basisstation werden aus der DECT Box gelöscht.
Alle anderen Einstellungen bleiben unverändert erhalten.
Nach Ziehen / Stecken des Steckernetzteils wird ein Neustart durchgeführt und die DECT Box kann wieder neu eingebucht werden.
2 Einbuchung/Programmierung
Page 18

16
2 Einbuchung/Programmierung
2.2.3 Parameterverzeichnis und Lieferzustand
Funktion Kennzahl Lieferzustand
Manuelles Einbuchen der DECT Box 1
PIN ändern 2 0000
Distanz (nur DECT Box 5000) 3 0
Anschluss an ISDN-/analoge Leitung 40 0
Betriebsart Fax/Daten 41 0
Interner Wählton 42 0
Lautstärkeeinstellung 43 5
Rufnummernanzeige/CLIP 44 1
Feldstärkemessung 50
Parameterabfrage 51
Beschränkung der Verbindung 70 0
Aufbau der Verbindung 71 2
Flashfunktion 72 23
Gruppenruf 73 0
Parknummer einstellen 80 keine
Parknummer/ARI aktivieren 81 0
ARI Nummer einstellen 85 keine
DECT Box zurücksetzen 90
Parameter zurücksetzen 91
Auto Reset 92 0
Ausbuchen 99
Page 19

17
Abhängig von Ihrer DECT-Basisstation und der Einstellung Ihrer DECT
Box hören Sie, wenn Sie den Hörer des angeschlossenen Gerätes abheben, den Wählton der DECT-Basisstation oder den internen Wählton der
DECT Box.
3.1 Nach intern telefonieren
Interne Telefonate sind Anrufe zu anderen Mobilteilen, die an derselben
Basis eingebucht sind.
Eingabe Funktion
**1
Internes Mobilteil 1 wird gerufen
**2
Internes Mobilteil 2 wird gerufen
**3
Internes Mobilteil 3 wird gerufen
**4
Internes Mobilteil 4 wird gerufen
**5
Internes Mobilteil 5 wird gerufen
**6
Internes Mobilteil 6 wird gerufen
**7
Internes Mobilteil 7 wird gerufen
**8
Internes Mobilteil 8 wird gerufen
**9
Internes Mobilteil 9 wird gerufen
**06
Interner Sammelruf (wenn von der Basisstation
unterstützt)
Innerhalb der ersten 10 Minuten nach Neustart der DECT Box wird die
Tastenkombination
**9 genutzt, um den Programmiermodus zu
aktivieren. Während dieser Zeit ist das interne Mobilteil 9 nicht erreichbar.
Sofern von Ihrer DECT-Basisstation unterstützt, können folgende
Funktionen durch Kennzifferneingabe aktiviert werden. Bitte beachten
Sie die Bedienungsanleitung Ihrer DECT-Basisstation.
Eingabe Funktion
**0+1
INT-Taste
**0+2
R-Taste (Flashtaste)
**0+3
Pause-Taste
**0+4
DTMF-Wahl-Umschaltung
**0+5
Pulse-Wahl-Umschaltung
**0+7 **0
wird an die Basis gesendet
3 Telefonieren
HINWEIS
Page 20

18
3 Telefonieren
3.2 Nach extern telefonieren
Externe Telefonate sind Anrufe zu Teilnehmern Ihrer Telefonanlage oder
zu allen Anschlüssen im öffentlichen Telefonnetz.
Sofern von Ihrer DECT-Telefonanlage unterstützt, können folgende Funktionen durch Kennzifferneingabe aktiviert werden. Bitte beachten Sie die
Bedienungsanleitung Ihrer DECT-Telefonanlage.
Eingabe Funktion
**0+1
INT-Taste
**0+2
R-Taste (Flashtaste)
**0+3
Pause-Taste
**0+4
DTMF-Wahl Umschaltung
**0+5
Pulse-Wahl Umschaltung
**0+7 **0
wird an die Basis gesendet
Page 21

19
Anhang
Zulassung /CE-Zeichen
Hiermit erklärt die Tiptel.com GmbH Business Solutions, dass das Gerät
alle grundlegenden Anforderungen der europäischen Richtlinie
1999/5/EG erfüllt. Die Konformität mit dieser Richtlinie wird durch das
CE-Zeichen auf dem Gerät bestätigt.
Weitere Details zur Konformitätserklärung finden Sie unter folgender
Internet-Adresse: http://www.tiptel.de
Technische Daten
Standard: DECT (Digital Enhanced Cordless
Telecommunications), GAP-fähig
Frequenzbereich: 1880 MHz bis 1900 MHz
Sendeleistung: 10 mW im Mittel
SMA Buchse: für externe Antenne über Koaxialkabel
(nur DECT Box 5000)
Sprachübertragung: 32 kbit/s ADPCM
Faxbetrieb: Gruppe 3, V.29 maximal mit 9600 bit/s
Modembetrieb: 9600 bit/s maximal
Wählverfahren: DTMF (Tonwahl)
Anschließbare
Telefone:
max. drei Standardtelefone parallel
anschließbar
CLIP: Übertragung über FSK1, Protokoll nach ETSI-
Standard
Arbeitstemperatur: +10° C bis +40° C
Relative Feuchte: 20% bis 75%
Zulässige
Lagertemperatur: -10° C bis + 60° C
Anzeigeeinheit: Leuchtdiode (LED)
Abmessungen: 120 x 100 x 38 mm (B x H x T)
Gewicht: 140 g
Montageort: Wandmontage in Innenräumen
Spannungs- 10 V AC (0,12 A Ruhestrom, 0,4 A maximal),
versorgung: alternativ 12 V DC +/- 15% = 10,2-13,8V
(0,12 A Ruhestrom, 0,4 A maximal)
Lieferumfang: Steckernetzteil, 230 V ~, 50 Hz, optional
Anschlussadapter
Reinigung
Wischen Sie das Gerät einfach mit einem leicht feuchten Tuch oder mit
einem Antistatiktuch ab; verwenden Sie bitte kein trockenes Tuch. Vermeiden Sie bitte den Einsatz von Putz- und Scheuermitteln.
Page 22

20
Anhang
Gewährleistung
Ihre Ansprechstelle für Leistungen aus Gewährleistungsverpflichtungen
ist der Fachhändler, bei dem Sie das Gerät erworben haben. Die
Tiptel.com GmbH Business Solutions leistet für Material und Herstellung des Gerätes eine Gewährleistung von 2 Jahren ab der Übergabe.
Dem Käufer steht im Mangelfall zunächst nur das Recht auf Nacherfüllung zu. Die Nacherfüllung beinhaltet entweder die Nachbesserung oder
die Lieferung eines Ersatzproduktes. Ausgetauschte Geräte oder Teile
gehen in das Eigentum des Händlers über. Bei Fehlschlagen der Nacherfüllung kann der Käufer entweder Minderung des Kaufpreises verlangen oder von dem Vertrag zurücktreten. Der Käufer hat festgestellte
Mängel dem Händler unverzüglich mitzuteilen. Der Nachweis des Gewährleistungsanspruchs ist durch eine ordnungsgemäße Kaufbestätigung (Kaufbeleg, ggf. Rechnung) zu erbringen. Der Gewährleistungs anspruch erlischt, wenn durch den Käufer oder nicht autorisierte Dritte
in das Gerät eingegriffen wird. Schäden, die durch unsachgemäße Behandlung, Bedienung, Aufbewahrung sowie durch höhere Gewalt oder
sonstige äußere Einflüsse entstehen, fallen nicht unter die Gewährleistung. Die Gewährleistung umfasst keine Verbrauchsmaterialien (z. B.
Batterien) und Mängel, die den Wert oder die Gebrauchstauglichkeit nur
unerheblich beeinträchtigen.Durch Transport entstandene Schäden sind
bei dem Versandunternehmen geltend zu machen.
Hinweis zur Abwicklung:
Instandsetzungen erfolgen grundsätzlich nur im Service der Tiptel.com
GmbH Business Solutions. Durch unseren 48-Stunden-Instandsetzungsservice erhalten Sie ein Reparaturgerät oder Austauschgerät in der Regel nach 2 Arbeitstagen zuzüglich der üblichen Versandlaufzeiten zurück.
Durch eine Gewährleistungsreparatur tritt weder für die ersetzten Teile
noch für das Gerät eine Verlängerung der Gewährleistungszeit ein. Diese Gewährleistung ist nicht übertragbar und erlischt, wenn das Gerät in
zweite Hand übergeht. Sie erlischt ebenfalls, wenn an dem Gerät von
fremder Hand Eingriffe vorgenommen oder die am Gerät befindliche
Seriennummer entfernt oder unleserlich gemacht wurde. Das Gerät ist
mit einem Gewährleistungssiegel versehen. Bitte achten Sie darauf,
dass dieses nicht beschädigt wird, da sonst Ihr Gewährleistungsanspruch ebenfalls erlischt. Ergänzend gelten die allgemeinen Geschäftsbedingungen der Tiptel.com GmbH Business Solutions, die für Ihren
Händler Vertragsbestandteil sind. Bei einer Beanstandung ist das defekte
Produkt mit einer Fehlerbeschreibung und dem Kaufbeleg einzusenden.
Zur Garantieabwicklung wenden Sie sich bitte an Ihren Fachhändler oder
senden das Gerät direkt an folgende Anschrift:
In Deutschland: In Österreich: In der Schweiz:
Tiptel.com GmbH Tiptel GmbH Tiptel AG
Service Service Service
Halskestraße 1 Ricoweg 30/B1 Bahnstrasse 46
40880 Ratingen 2351 Wiener Neudorf 8105 Regensdorf
Im Garantiefall erfolgt der Rückversand auf Kosten der Tiptel.com GmbH.
Page 23

21
Anhang
Service
Sie haben ein modernes Produkt der Tiptel.com GmbH Business Solutions erworben, welches in Deutschland entwickelt und hergestellt wurde.
Die hochmoderne Fertigung sichert gleich bleibend höchste Qualität.
Dies bestätigt die Zertifizierung nach DIN EN ISO 9001.
Sollten trotzdem einmal Probleme auftreten oder haben Sie Fragen zur
Bedienung des Gerätes, wenden Sie sich bitte an Ihren Fachhändler.
Dieser ist innerhalb der Garantiezeit Ihr Ansprechpartner. Die Tiptel.com
GmbH Business Solutions hat für den technischen Support des Fachhandels eine spezielle Rufnummer eingerichtet, so dass dieser Sie qualifiziert beraten kann. Sollte Ihnen Ihr Händler nicht weiterhelfen, können
Sie sich auch direkt an die Tiptel.com GmbH Business Solutions wenden.
Erste Informationen erhalten Sie auf unseren unten genannten Internetseiten. Außerdem erreichen Sie die erfahrenen Mitarbeiter unseres
technischen Supports telefonisch während der angegebenen Zeiten:
In Deutschland: In Österreich: In der Schweiz:
www.tiptel.de www.tiptel.at www.tiptel-online.ch
service@tiptel-online.ch
8.00 bis 17.00 Uhr (Mo-Fr) 8.00 bis 17.00 Uhr (Mo-Do) 8.00 bis 17.00 Uhr (Mo-Fr)
Fr bis 15.00 Uhr Fr bis 16.00 Uhr
Telefon 0900 100 - 84 78 35* Telefon 02236 / 677 464-0 Telefon 044 / 884 01 80
Vanity Tel. 0900 100 - TIPTEL* Telefax 02236 / 677 464-21 Telefax 044 / 843 13 23
* 1,49 € pro Minute aus dem Festnetz der Deutschen Telekom, abweichende Mobilfunkpreise möglich
Fragen zum Telefonanschluss richten Sie bitte an Ihren Netzbetreiber.
Page 24

Page 25

1
List of Contents
List of Contents
Important information ...............................................2
Connections and indicators .......................................3
Tones .........................................................................4
1 Commissioning ..........................................................5
1.1 Mounting ........................................................................5
2 Registration/programming ........................................6
2.1 Automatic registration.....................................................6
2.2 Programming mode.........................................................6
2.2.1 Activating programming mode........................................7
2.2.2 Setting parameters in programming mode .....................8
3 Making telephone calls.............................................15
3.1 Making internal calls ..................................................................15
3.2 Making external calls .................................................................16
Annex
Technical data / Product approval / CE mark / Cleaning /
Guarantee
Page 26

2
2
Informationen
Important information
The DECT Box is a DECT-standard cordless adapter for universal usage
when operating analogue terminals on GAP-compatible DECT systems.
Essentially a ”cordless extension cable”, the DECT Box eliminates the
need for complicated cabling work and can be registered on any standard DECT/GAP base station just like an extra cordless handset. The
DECT Box can be used to connect analogue telephones, fax machines,
answering machines, entrance intercoms and modems to your DECT
base station. The device must use DTMF dialling (voice frequency
signalling); terminals that only support pulse dialling cannot be used on
the DECT Box. If your device uses pulse dialling, please check if it can
also be switched over to DTMF dialling.
The DECT Box 300 features an integrated aerial and has a standard
DECT range of up to 30 m indoors and up to 300 m out of doors.
An external aerial must be connected to the DECT Box 5000. Much
greater distances may be covered, depending on the base station used,
the aerial and the general environmental conditions. By using an external
aerial on the base station or a DECT repeater with an external directional
aerial, a maximum range of up to 10 km can be attained.
To ensure optimal operation on different base stations, it may be necessary to modify the DECT Box by setting various parameters on the base
station. For more information, see the ”Programming mode” chapter.
The varying functionalities of different base stations may, in turn, result
in variations in operation. Please observe the instructions for operating
your base station.
The factory setting of the DECT Box is for operation on a base station
with an analogue connection, which means that in many cases it will not
require any further modification. For operation on base stations with an
ISDN telephone connection, you will need to switch over parameter
40 in programming mode.
NOTE
Page 27

3
Connections and indicators
Connections and indicators
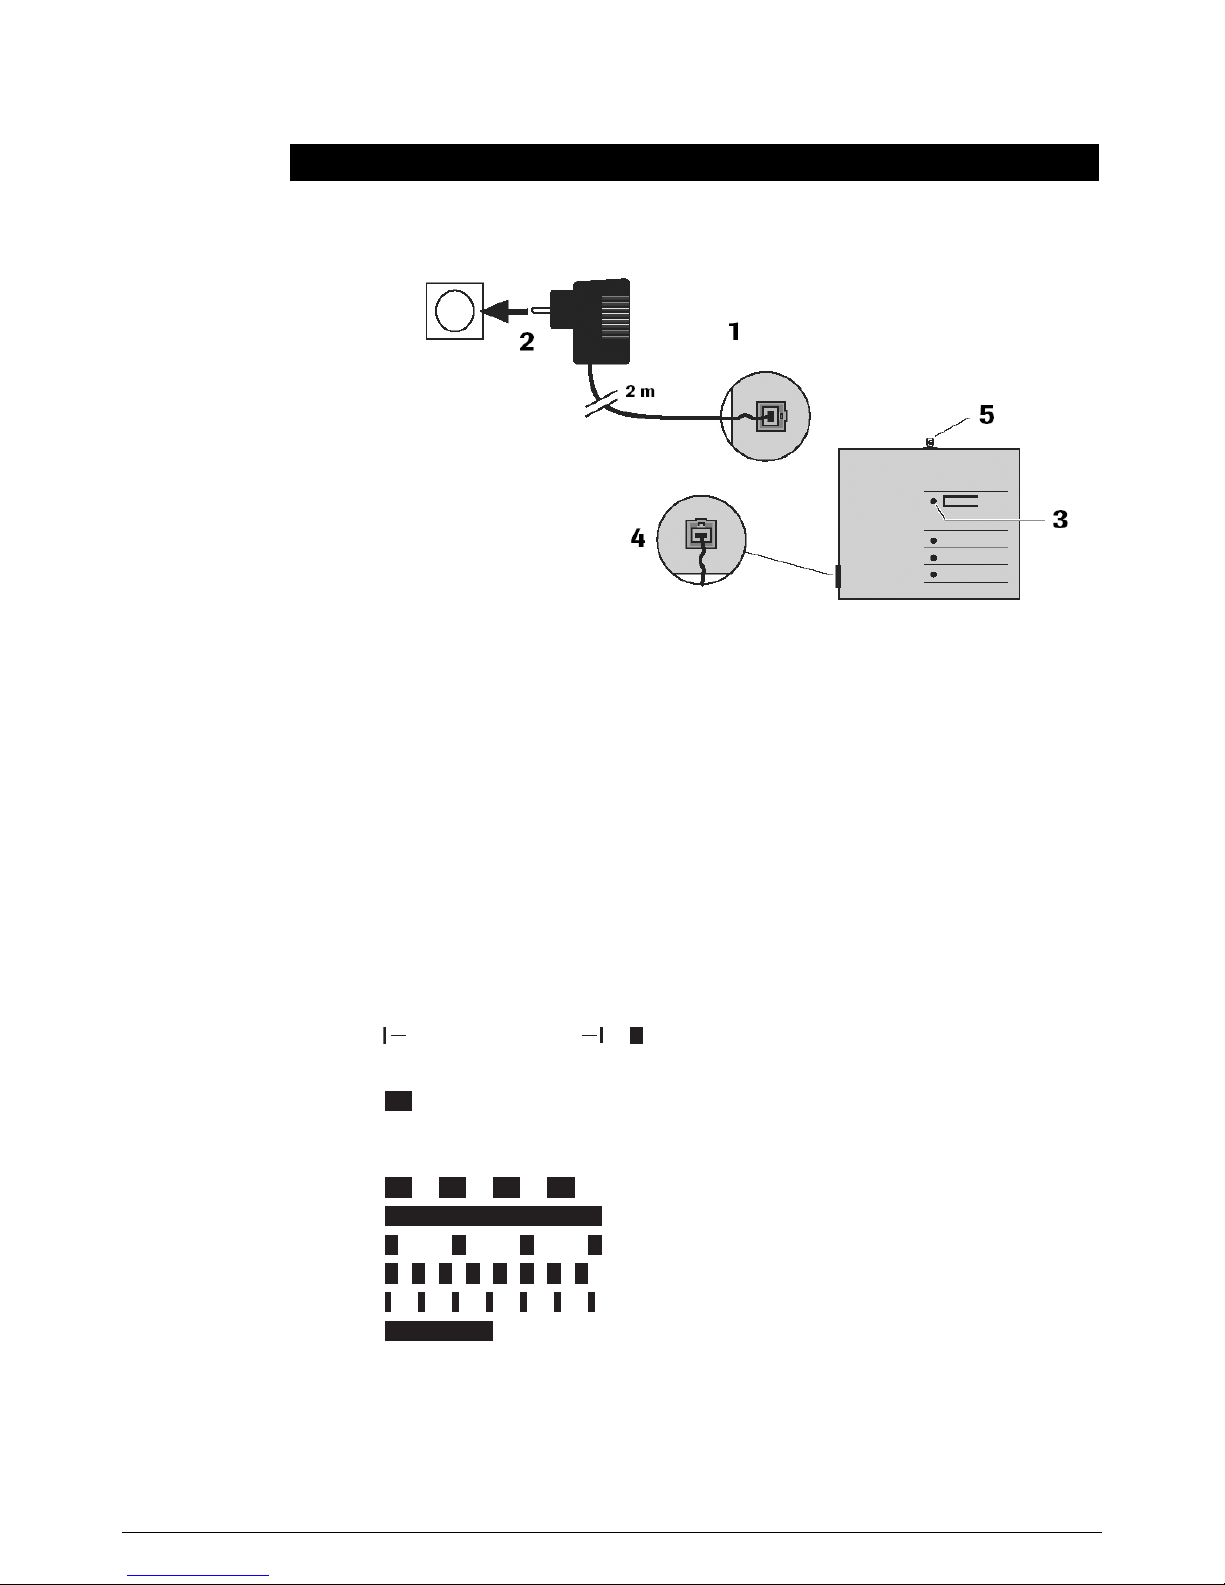
1 Power supply
2 Power supply unit (adapter)
After plugging in the power supply unit, the handset on the connected
telephone must remain on the hook for at least 30 seconds.
Only the power unit supplied should be used.
Before opening the housing, ensure that the power supply unit is
disconnected.
3 LED
220/230V
50 Hz
2 m
Backside
(easyBOX 5000)
T
elephone, answering machine,
fax machine
2
1
4
3
5
NOTE
NOTE
No power supply
Ready to use/ standby mode /
power available (220/ 230 V) /
device is registered at a base station
Incoming call alert
Connection
Programming mode (Menu)
Search for the base station
Found the base station
No base station
LED off
time interval 8 sec LED on
Page 28

4
Connections and indicators
Busy tone
(425 Hz, repeated)
Positive acknowledge tone
Negative acknowledge tone
(single)
(single)
Tone
Description of the tones
Pause
Dial tone
(continuous)
Special dial tone
(400/425 Hz, continuous)
NOTE
Tones
4 Line connection Connection for a telephone,
fax machine, answering
machine or modem.
The RJ-11 socket is assigned to
the two middle connections
(pins 3 and 4).
5 Aerial connection SMA aerial socket for
(DECT Box 5000 only) connecting an external aerial.
The use of a high-quality aerial cable and as short a cable as
short as possible will minimise any losses in performance and
provide the optimum range.
Page 29

5
Selecting
a suitable location
NOTE
Radio
coverage
1.1 Mounting
The
DECT Box
is designed for wall mounting in interior rooms.
Please note that the device must not be fitted in the immediate vicinity of
any other electronic devices such as hifi systems, office machines or microwave ovens. This prevents any interference between the devices. In
addition, the device should not be installed near heat sources (e.g. radiators or in direct sunlight). To prevent noise interference when making calls,
the connected terminal should not be positioned closer than one metre
away from the
DECT Box
.
The DECT Box must be able to establish a radio link to the DECT base
station. Before determining the final mounting position, you should
therefore check that your desired location is within the range of the
DECT base station.
Owing to the digital transmission in the frequency range used, there
may be radiowave ”blind spots” even within the specified range, depending on the nature of the building. This results in a loss of transmission
quality. However, just a small change in position will restore normal
transmission quality. As the DECT Box works as a cordless unit on your
DECT base station, you can use your cordless handset to check
whether or not the mounting position is suitable.
1 Commissioning
Follow the steps given below to install the DECT Box
1. Drill two 6 mm diameter holes into the wall at a distance of
60 mm apart.
2. Insert the rawl plug and turn the screws until they are approx.
5 mm away from the wall.
3. Connect the external aerial to the appro-
priate socket (DECT Box 5000 only).
4. Connect your terminal to the DECT Box.
5. 5. Connect the DECT Box to the power
supply.
6. Fit the DECT Box in place.
60 mm
Antenna plug
(easyBOX 5000 only)
Wall mounting
Page 30

6
2 Registration / programming
2.1 Automatic registration
The DECT Box can be registered automatically, assuming it has not
been registered on any other base station yet. To do this, the PIN on
your base station must be set to ”0000” or ”1111”.
1. Connect the power supply unit (adapter) to your DECT Box.
2. Connect your telephone to the DECT Box, leaving the handset on
the hook.
3. Ensure that your base station enables an additional cordless phone to be registered.
4. During the registration process, the DECT Box should be located
close to your base station.
5. Start the registration procedure for the device on your DECT/GAP
base station as if you were registering an additional cordless unit.
Instructions on how to do this will be given in the operating
manual for your base station.
6. Plug the power supply unit into a power socket. The registration
process will be started automatically.
7. The registration process has been successful if the LED flashes at
intervals of approx. 10 seconds.
If the registration process has not been completed successfully
within approx. 3 minutes, register the device manually in programming mode.
2.2 Programming mode
Programming mode on the DECT Box can only be activated within
the first 10 minutes after plugging in the power supply unit. This prevents the parameters being changed accidentally during operation.
Not all the features offered by the device are supported by every
The DECT Box must be registered on your DECT/GAP base station
before it can be used. The registration process can normally be
carried out using the ”Automatic registration” function.
”Programming mode” allows you to set various parameters to
modify the DECT Box to suit the functionality of your base station.
Additional parameters allow the DECT Box to be set according to
your personal preferences. Manual registration can also be carried
out in this mode.
NOTE
NOTE
Page 31

7
DECT/GAP base station. Refer to the operating manual for your base
station to clarify which features you can use.
2.2.1 Activating programming mode
Proceed as follows to change the DECT Box to programming mode:
1. Connect your telephone to the DECT Box.
2. Connect the power supply unit to your v.
3. Plug the power supply unit into a power socket. Leave the phone on
the hook for at least 30 seconds.
4. Lift the handset on your telephone. Depending on whether or not
your DECT Box is already registered on a base station, you will either
hear a busy tone or a dialling tone.
5. On your telephone, enter
**9.
6. You will hear a positive acknowledgement tone.
7. Optional step: Enter the PIN for the DECT Box via your telephone.
The PIN only needs to be entered if a new PIN has been set up
beforehand in programming mode.
Access to programming mode can be protected using the PIN!
8. You will hear the special dialling tone indicating that programming
mode is active.
You can now enter the parameter codes to change the relevant features
of your DECT Box.
Let’s say, for example, you want to use your DECT Box on a base station
with an ISDN telephone connection. Activate programming mode as
described above in points 1-8 and then proceed as follows:
1. Enter the programming code for connection to an ISDN/analogue line:
40
.
2. To activate the feature, enter
0#.
3. You will hear a positive acknowledgement tone, followed by the
special dialling tone once more. The feature is now active.
2 Registration / programming
Example
NOTE
Page 32

8
2 Registration / programming
2.2.2 Setting parameters in programming mode
Not all the features offered by the distybox are supported by every
DECT/GAP base station. Refer to the operating manual for your base
station to clarify which features you can use.
Programming mode needs to be activated before this parameter can be
set. The function-programming process is concluded by entering
# and
confirmed by the positive acknowledgement tone. You will then hear
the special dialling tone once more, which means that you can continue
programming other functions. With the exception of programming
points 90, 91 and 99, the change is effective without having to restart
the DECT Box.
If an invalid value is entered during programming, a negative acknowledgement tone is sounded, the procedure is cancelled and you will hear
the special dialling tone once more.
If during programming no input is made for one minute, the procedure is
cancelled and you will hear the special dialling tone again.
Programming mode can be left at any time by replacing the handset; the
DECT Box will then return to normal mode.
Function Parameter Other input
code
Manual registration of 1 Base PIN #
the DECT Box
The base station PIN needs to be entered to register the DECT Box.
A PIN with 4 to 8 digits will be accepted by the DECT Box. After entering
# you will hear the positive acknowledge tone. Leave the handset off
hook and wait until you hear again the special dial tone, which means
that the registration is completed. If the registration process has not
been completed successfully within approx. 3 minutes, crosscheck the
settings of the base station and try again. Access to programming mode
can be protected using the four-digit PIN.
Changing the PIN 2
new PIN new PIN #
Access to programming mode can be protected using the four-digit PIN.
The PIN only needs to be entered if a new PIN has been set beforehand
in programming mode. To change the PIN, activate programming mode,
enter the new PIN twice and confirm this by pressing
#. The change is
confirmed by the positive acknowledgement tone. Programming mode
can then only be accessed again by entering the new PIN once more.
If you forget the PIN, the DECT Box can only be reset by the Customer
Service department.
Factory setting: 0 0 0 0
NOTE
Page 33

9
2 Registration / programming
Function Parameter Other input
code
Distance (DECT Box 5000 only) 3
Distance value #
Valid entries are 0 - 79.
The setting can be determined using the following mathematical
formula:
Distance value = distance [in m] divided by 130
Example: 2,300 m : 130 m = 17.69 -> distance value = 18
This setting has to be changed only for distances of more than
800 m. For shorter distances the parameter setting will stay on 0.
This may vary depending on the base station being used. Adjust
the distance value in increments of two.
Factory setting: 0
Connection to an ISDN/ 40 0 #
analogue line
Send keypad information, while connection Keypad information will
be suppressed, so it is possible to transmit DTMF signals.
This setting has to be used if your base station is connected to an
ISDN phone line.
40 1 #
Suppress keypad information: This setting has to be used if your
base station is connected to an analogue phone line.
40 2 #
Send always keypad information. This setting has to be used if your
base station is a specified ISDN system.
Factory setting: 1
Fax / Data mode 41 0 #
”Telephone” Mode: This setting should be used if a telephone is
connected to the DECT Box.
41 1 #
”Fax” Mode: This setting should be used if a fax machine or modem
is connected to the DECT Box. The setting may improve transmission
quality.
Factory setting: 0
Page 34

10
2 Registration / programming
Function Parameter Other input
code
Internal dialling tone 42 0 #
An internal dialling tone is sounded immediately on lifting the handset. The dialling tone is suppressed using this setting. This setting is
not recommended if parameter 71 is set to 0.
42 1 #
With this setting the internal dialling tone is sounded as a continuous
tone (425 Hz). This setting is useful if your base station is connected
to a direct trunk line.
42 2 #
With this setting the internal dialling tone is sounded as an interrupted
tone (450 Hz). This setting is useful if your base station is connected
to a phone system that also generates an interrupted dialling tone.
Factory setting: 0
Volume setting 43 1…6 #
The handset volume can be adjusted here for the acoustics of your
connected device in increments of 3 dB (1 = minimum, 6 = maximum).
Factory setting: 5
Display of caller’s number / CLIP 44 0 #
The caller’s phone number is not transmitted to the connected telephone. The ring cadence of calls is controlled by the base station.
Please note: function 51 is not available.
44 1 #
Display of caller's number/CLIP. For CLIP transmission to the connected phone the FSK type 1 protocol is used, which is common in
most countries. The ring cadence is fixed.
44 2 #
Display of caller's number/CLIP. For CLIP transmission to the connected phone the DTMF protocol is used, which is common in the
Netherlands. The ring cadence of calls is controlled by the base
station.
Factory setting: 1
Page 35

11
2 Registration / programming
Function Parameter Other input
code
Block dialing off 49 0 #
This standard mode transmits the dialed number digit by digit from
connected analogue device to the DECT Box.
Block dialing active 49 1 #
In Block dialing mode the dialed digits are “queued” in DECT Box
300/5000. Dialing the required number followed by
# will result in
the dialed number being transmitted in one block to the DECT Box.
This enables usage on base stations which are expecting block
dialing mode.(Example: Gigaset C590)
For this Function please activate Parameters as shown below:
Parameter 49 = 1
Parameter 42 = 1
Parameter 71 = 0
Factory setting: 0
Field strength measurement 50 #
The current field strength is indicated on the handset by means of
five signals of differing pitch, the highest pitch indicating the best
reception. This ensures optimum set-up of the aerial for the base
station.
Parameter query 51 Parameter-
code #
A CLIP-compatible telephone can be used to read the current setting
of different parameters. After entering the relevant parameter code
and confirming this with
#, replace the telephone handset. You will
then receive a call from the DECT Box and the parameter code and
the current status will be shown on the display.
Example: Enter
**9513#, replace the handset, call,
display shows 3#45
Page 36

12
2 Registration / programming
Function Parameter Other input
code
Limitation of traffic 70 0 #
Incoming and outgoing calls can be made.
70 1 #
Only incoming calls can be received.
70 2 #
Only outgoing calls can be made. This setting is useful, for example,
if you have connected an entrance intercom to the DECT Box to
prevent exchange calls ringing on the entrance intercom.
Factory setting: 0
Connection of calls 71 0 #
Internal/external call connection. A digit must be dialled to distinguish
whether a call is to be connected within the base station or externally.
This setting is not recommended if parameter 42 is set to 0.
71 1 #
Internal call connection. An internal connection is prepared immediately on lifting the handset. Only other cordless units on this base station can be called; no exchange calls are possible. When connecting
an entrance intercom, this can be used to prevent the exchange line
being seized.
71 2 #
External call connection. An external connection is prepared immediately on lifting the handset. By dialling the relevant code, internal
cordless units on this base station can also be called.
Factory setting: 2
Flash function 72 Setting #
The flash key detection function (R key) of the DECT Box can be set
to the flash time of your connected device. (Please refer to the
operating manual for your device for this information).
For example, if the flash time of your device is 100 ms, this
corresponds to the setting ”10”.
The factory setting is 23, which corresponds to 230 ms.
Page 37

13
2 Registration / programming
Function Parameter Other input
code
Group ring 73 0 #
The DECT Box responds calls from the base sent as "group ring" calls.
73 1 #
The DECT Box does not respond calls from the base sent as "group
ring" calls.
Factory setting: 0
Set PARK number 80 PARK number #
As an option, the registration process can be carried out using the
PARK number of your DECT base station (PARK = Portable Access
Rights Key). This can have up to 15 digits.
The procedure is advisable if the registration process cannot be completed due to other active DECT base stations. Please refer to the
user’s guide for your base station for further details about PARK
numbers.
Factory setting: no PARK number set.
Activate PARK/ARI number 81 0 #
The PARK/ARI number set under programming point 80/85 is not
used during the registration process.
81 1 #
The PARK/ARI number set under programming point 80/85 is used
during the registration process.
Factory setting: 0
Set ARI number 85 31 ARI #
Instead of the PARK number (see parameter 80) the ARI number can
be used for subscription. For input of the ARI number use 31 as
prefix.
Factory setting: no ARI number set.
Page 38

14
2 Registration / programming
Function Parameter Other input
code
Reset DECT Box 90 #
The DECT Box is reset to the factory settings. This means, however,
that the DECT Box is no longer registered on a base station. All previous settings are deleted. After unplugging / plugging in the adapter,
the DECT Box is restarted and reprogramming of the DECT Box can
begin.
Reset parameter 91 #
The DECT Box remains registered on the base station; all other
parameters are reset to the factory settings. After entering the parameter, replace the handset and wait for 30 seconds. The DECT Box
will be restarted automatically.
Auto Reset 92 0 #
The Auto Reset function is not active.
92 1 #
The Auto Reset function is active, which means the DECT Box will
restart automatically every 24 hours. All settings remain unchanged;
any call present at the time of the reset is disconnected.
Factory setting: 0
Deregister 99 #
The base station data is deleted from the DECT Box. All other
settings remain unchanged. After unplugging / plugging in the
adapter, an automatic restart is carried out and the DECT Box can be
registered on a different base station.
Page 39

15
3 Making telephone calls
Depending on your DECT base station and the setting of your v, you will
either hear the DECT base station dialling tone or the internal DECT Box
dialling tone when you lift the handset of the connected device.
3.1 Making internal calls
Internal phone calls are calls to other cordless phones registered on the
same base station.
Input Function
**1
Internal cordless unit 1 is called
**2
Internal cordless unit 2 is called
**3
Internal cordless unit 3 is called
**4
Internal cordless unit 4 is called
**5
Internal cordless unit 5 is called
**6
Internal cordless unit 6 is called
**7
Internal cordless unit 7 is called
**8
Internal cordless unit 8 is called
**9
Internal cordless unit 9 is called
**06
Internal hunt group call (if supported by the base
station)
Within the first 10 minutes after the DECT Box is restarted, the key
combination
**9 can be used to activate programming mode.
Internal cordless unit 9 cannot be called during this time.
Assuming your DECT base station supports them, the following
functions can be activated by entering various codes. Please observe
the operating instructions for your DECT base station.
Input Function
**0+1
INT key
**0+2
R key (flash key)
**0+3
Pause key
**0+4
DTMF dial changeover
**0+5
Pulse dial changeover
NOTE
Page 40

16
3 Making telephone calls
3.2 Making external calls
External phone calls are calls to subscribers on your telephone system or
to any connection on the public telephone network.
Assuming your DECT telephone system supports them, the following
functions can be activated by entering various codes. Please observe the
operating instructions for your DECT telephone system.
Input Function
**0+1
INT key
**0+2
R key (flash key)
**0+3
Pause key
**0+4
DTMF dial changeover
**0+5
Pulse dial changeover
Page 41

17
Annex
Product approval/CE mark
This device is approved for the connection and use within the analogue
public telephone networks in all EC countries - according to the European
Requirements. Due to technical deviations in individual countries, we
cannot grant an unlimited guarantee for the successful operation at all
types of telephone accesses.
Tiptel hereby declares that the device complies with all fundamental
requirements of the European directive 1999/5/EC. This conformity is
confirmed by the CE sign on the device.
Further details on the declaration of conformity can be found under the
following internet address: http://www.tiptel.org
Technical data
Standard: DECT (Digital Enhanced Cordless
Telecommunications), GAP-compatible
Frequency range: 1880 MHz to 1900 MHz
Transmission performance: 10 mW on average
SMA socket: For connecting an external aerial via
coaxial cable (DECT Box 5000 only)
Voice transmission: 32 kbit/s ADPCM
Fax mode: Group 3, V.29, 9600 bit/s maximum
Modem mode: 9600 bit/s maximum
Dialling mode: DTMF
Connectable telephones: Up to three standard telephones can be
connected in parallel
CLIP: Transmission via FSK1; protocol
conforms to ETSI standard
Operating temperature: +10°C to +40°C
Relative humidity: 20% to 75%
Permissible
storage temperature: -10°C to +60°C
Display unit: LED
Dimensions: 120 x 100 x 38 mm (W x H x D)
Weight: 140 g
Mounting location: Wall mounting in interior rooms
Power supply: 10 V AC (0.12 A zero signal current, 0.4 A
maximum); alternatively, 12 V DC +/- 15%
= 10.2-13.8 V (0.12 A zero signal current,
0.4 A maximum)
Delivery package: 230 V AC, 50 Hz power supply unit,
optional adapter
Cleaning
Simply wipe the device with a slightly damp cloth or with an antistatic
cloth; do not use a dry cloth. Do not use cleaning or scouring agents.
Page 42

18
Annex
Guarantee
Please contact your local dealer or importer for details of guarantee for
non EC countries. Within the European Community the following
guarantee regulation applies: Your contact for services arising from
guarantee obligations is the authorised dealer where you bought the
device. Tiptel.com GmbH Business Solutions will grant a guarantee of
2 years from the date of handover for the material and for the manufacturing of the telecommunications terminal unit. Initially, the purchaser
shall have only the right of subsequent performance. Subsequent performance entails either repair or the supply of an alternative product.
Exchanged devices or parts shall become the property of the authorised
dealer. If the subsequent performance fails, the purchaser can either
demand a reduction in the purchase price or withdraw from the contract. The purchaser shall notify the dealer immediately of any defects
found. Proof of the guarantee entitlement shall be furnished by standard
proof of purchase (receipt or invoice). The guarantee entitlement shall
expire if the purchaser or an unauthorised third party interferes with the
device. Damage caused by inappropriate handling, operation, storage or
by force majeure or other external influences shall not be covered by the
guarantee. The guarantee shall not cover any consumable material (e.g.
batteries) or defects that only slightly impair the value or the usability of
the device. Claims for damage caused by transport shall be asserted to
the delivery company.
Notes on settlement:
Repairs can only be conducted by the Tiptel Service. A warranty repair
does not prolong the warranty period - neither for the replaced parts nor
for the device. This guarantee is not transferable and shall expire if the
device is sold on to another party. It shall also expire if the device is
interfered with by third parties or if the serial number on the device
has been removed or made illegible. There is a guarantee seal on the
DECT Box. Please do not damage or remove this seal because other wise, your guarantee will expire.
The General Terms and Conditions of Tiptel.com GmbH Business
Solutions, which are part of the contract for a dealer, shall also apply.
In the event of a complaint, the defective product shall be sent to the
relevant Tiptel subsidiary, the importer or dealer along with a description
of the defect and the proof of purchase.
Tiptel.com GmbH Business Solutions, Service, Halskestraße 1,
D - 40880 Ratingen
Service:
You have purchased a modern product of Tiptel granting a continuous
level of the highest quality. This is underlined by a certification according
to DIN EN ISO 9001.
If, however, problems occur or you have questions on operating the
device, please contact your local dealer.
Page 43

Page 44

Tiptel.com GmbH Business Solutions
Halskestraße 1
D - 40880 Ratingen
Tel.: 0900 100 - 84 78 35*
Vanity Tel.: 0900 100 - TIPTEL*
Internet: www.tiptel.de
International
Internet: www.tiptel.com
* (1,49 €/Min. aus dem Festnetz der Deutschen
Telekom, abweichende Mobilfunkpreise möglich)
Tiptel b.v.
Camerastraat 2
NL - 1322 BC Almere
Telefoon: 0900 - BELTIPTEL of
0900 - 2358478(€ 0,50 p/m, max. € 25,00)
Fax: 036 - 53 678 81
E-mail: info@tiptel.nl
Internet: www.tiptel.nl
Tiptel sarl
23, avenue René Duguay Trouin
F - 78960 Voisins le Bretonneux
Tél : 01 - 39 44 63 30
Fax : 01 - 30 57 00 29
E-mail : support@tiptel.fr
Internet : www.tiptel.fr
Tiptel NV/SA
Leuvensesteenweg 510 bus 4
B - 1930 Zaventem
Telefoon: 0903 - 99 333 (1,12 Euro/ min)
Fax: 02 - 714 93 34
E-mail: tech@tiptel.be
Internet: www.tiptel.be
Tiptel GmbH
Ricoweg 30/B1
A - 2351 Wiener Neudorf
Telefon: 02236 - 677 464-0
Fax: 02236 - 677 464-22
E-mail: office@tiptel.at
Internet: www.tiptel.at
Tiptel AG
Bahnstrasse 46
CH - 8105 Regensdorf
Telefon: 044 - 884 01 80
Fax: 044 - 843 13 23
E-mail: tiptel@tiptel-online.ch
Internet: www.tiptel-online.ch
02/10 (D/UK)
EDV 4935360
 Loading...