

Page 1
Operating Instructions (UK)
system telephone
for tiptel 4011 XT
and tiptel 3011/
3022 office/system
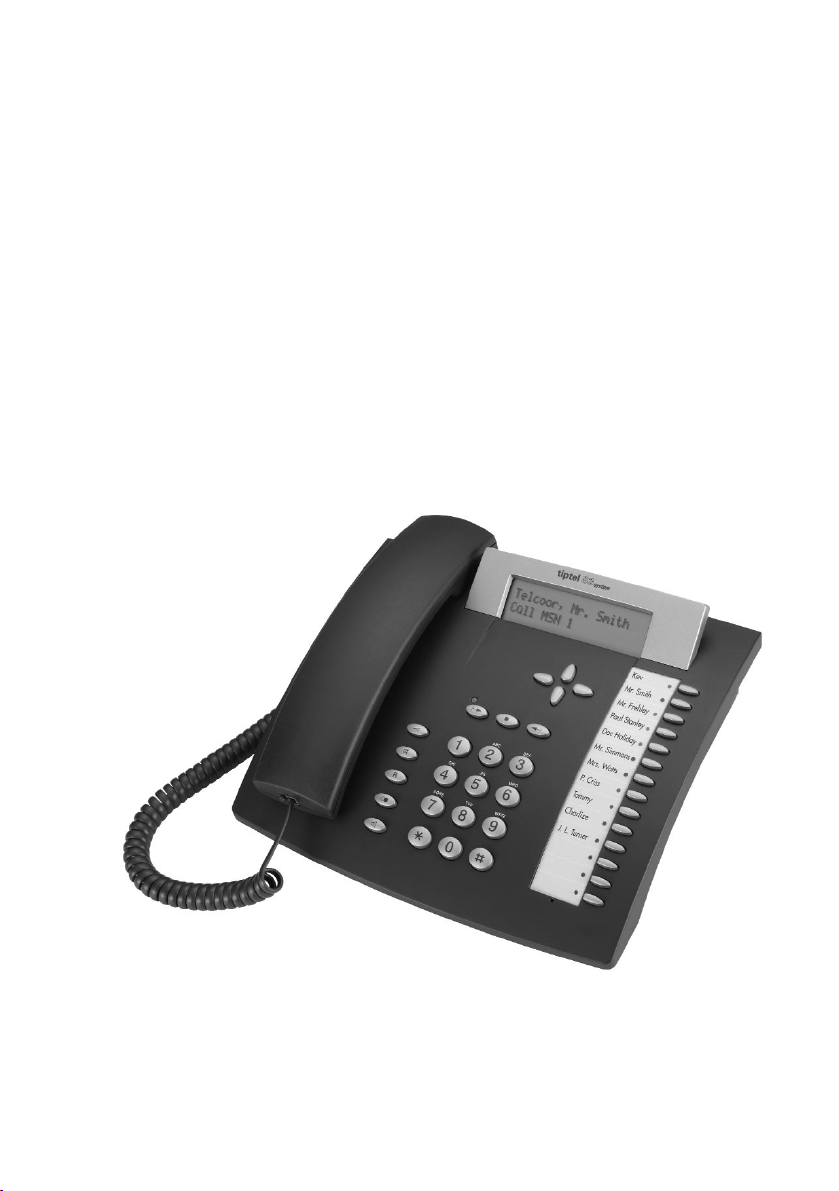
tiptel 83 system
tiptel
Page 2

2
Table of contents
Illustration
Illustration (upper housing, key pad) . . .4
Illustration (underneath) . . . . . . . . . . . .5
Initial operation
Scope of supply . . . . . . . . . . . . . . . . . .6
Connection . . . . . . . . . . . . . . . . . . . . . .6
Connection to tiptel 4011 XT . . . . . . . . .6
Connection to tiptel 3011 / 3022 office /
system . . . . . . . . . . . . . . . . . . . . . . . . .7
Emergency operation . . . . . . . . . . . . . .7
Button functions
Button functions . . . . . . . . . . . . . . . . . .8
Operational hints
Adjusting the volume . . . . . . . . . . . . . . .9
Handset volume . . . . . . . . . . . . . . . . . .9
Operation overview . . . . . . . . . . . . . . .10
Telephone calls
Call counter . . . . . . . . . . . . . . . . . . . . .11
Direct manual call . . . . . . . . . . . . . . . .11
Off-line call preparation (indirect call) . .12
Dialling from the electronic telephone
book / register / chaining of
telephone numbers . . . . . . . . . . . .12-13
Redial . . . . . . . . . . . . . . . . . . . . . . . . .13
Display / erase redial memory . . . . . . .13
Automatic call-back on busy (CCBS) . .14
Edit call-back list . . . . . . . . . . . . . . . . .14
Automatic redial . . . . . . . . . . . . . . . . .15
Loudspeaker . . . . . . . . . . . . . . . . . . . .15
Hands-free operation . . . . . . . . . . . . .15
Switching between handset and
hands-free operation . . . . . . . . . . . . . .16
Headset operation . . . . . . . . . . . . . . . .16
Mute function . . . . . . . . . . . . . . . . . . .16
Call tracing (MCI) . . . . . . . . . . . . . . . .17
Placing a call on hold / additional call .17
Disconnecting a call . . . . . . . . . . . . . .17
2-line operation with hold . . . . . . . . . .18
Three-party conference . . . . . . . . . . . .18
Call transfer . . . . . . . . . . . . . . . . . .18-19
Call parking . . . . . . . . . . . . . . . . . . . . .19
Call waiting . . . . . . . . . . . . . . . . . . . . .20
Answering a call . . . . . . . . . . . . . . . . .21
Keypad . . . . . . . . . . . . . . . . . . . . . . . .22
Sub-addressing . . . . . . . . . . . . . . . . . .22
Call list . . . . . . . . . . . . . . . . . . . . . . . .23
Electronic telephone book /register
General information on the electronic
telephone book /register . . . . . . . . . . .24
Entering data . . . . . . . . . . . . . . . . . . .24
Storing data . . . . . . . . . . . . . . . . . . . .25
Editing data . . . . . . . . . . . . . . . . . . . . .26
System settings
Entering the MSNs . . . . . . . . . . . . . . .27
Selecting the outgoing MSN . . . . . . . .28
Call number display . . . . . . . . . . . . . .29
Setting the call waiting function . . . . . .30
Setting the call transfer function . . . . .31
Setting the call diversion
(CD) function . . . . . . . . . . . . . . . . . . .31
Setting time and date . . . . . . . . . . . . .32
Contrast adjustment . . . . . . . . . . . . . .32
Changing the PIN . . . . . . . . . . . . . . . .33
Charge rate . . . . . . . . . . . . . . . . . . . . .33
Access to the public exchange . . . . . .34
Factory pre-set . . . . . . . . . . . . . . . . . .35
Update via ISDN . . . . . . . . . . . . . . . . .36
Update via RS232 . . . . . . . . . . . . . . . .37
Macro programming
Assignment of speed dialling stations .38
System functions with tiptel 4011 XT
Internal target number with "busy"
LED . . . . . . . . . . . . . . . . . . . . . . . . . .39
External target number (line key) with
LED signal . . . . . . . . . . . . . . . . . . . . .39
Logging in and out of ACD groups . . .40
Voicebox-functions with tiptel 340 clip /
tiptel 345 pro . . . . . . . . . . . . . . . . . . . .40
Voicebox-functions with tiptel 350 ISDN /
tiptel 350-10 ISDN / tiptel 355 ISDN . .41
Room monitoring . . . . . . . . . . . . . . . . .42
Announcement / Duplex mode from an
internal and external location
(Intercom) . . . . . . . . . . . . . . . . . . . . .42
Page 3

3
Table of contents
Initiating the Announcement / Duplex
mode from an internal location . . . . . .42
Initiating the Announcement / Duplex
mode from an external location . . . . . .43
Activating the authorisation for the
Announcement / Duplex mode
(Intercom) . . . . . . . . . . . . . . . . . . . . .43
System functions with tiptel 3011 / 3022
office / system
Internal target (internal phone number
with busy-line-indication (LED)) . . . . . .44
Status CO-line access . . . . . . . . . . . . .44
CO-line access with specific MSN /
DDI (line key) . . . . . . . . . . . . . . . . . . .45
Call forwarding unconditional . . . . . . .45
Call forwarding on no reply . . . . . . . . .45
Call forwarding on busy . . . . . . . . . . . .45
Call forwarding on no reply and
on busy . . . . . . . . . . . . . . . . . . . . . . . .46
Status voicebox - message waiting
and on / off . . . . . . . . . . . . . . . . . . . . .46
Voicebox pick-up . . . . . . . . . . . . . . . . .47
Status warning voicebox -
memory capacity . . . . . . . . . . . . . .47-48
Free macro key . . . . . . . . . . . . . . . . . .48
System Phonebook . . . . . . . . . . . .48-49
Call Forwarding
Call Forwarding . . . . . . . . . . . . . . .50-51
Telephone settings
Ringing tone . . . . . . . . . . . . . . . . . . . .52
Direct dialling (baby call) . . . . . . . . . . .53
Call blocking / keypad locks . . . . . .54-55
Appointments
Enter / edit appointments . . . . . . . . . .56
Time control
Enter / edit time control data . . . . .57-58
Information
Charges . . . . . . . . . . . . . . . . . . . . . . .59
Memory . . . . . . . . . . . . . . . . . . . . . . .60
Calls . . . . . . . . . . . . . . . . . . . . . . . . . .61
PC connection / TipKom
PC connection / TipKom . . . . . . . . . . .62
Installation . . . . . . . . . . . . . . . . . . . . .62
Further information . . . . . . . . . . . . . . .62
Dialling via AT commands . . . . . . . . . .62
TAPI driver . . . . . . . . . . . . . . . . . . . . .63
Important information
Operation during power failure . . . . . .64
Cleaning . . . . . . . . . . . . . . . . . . . . . . .64
Installation . . . . . . . . . . . . . . . . . . . . .64
Possible malfunctions . . . . . . . . . . . . .64
Ecological information . . . . . . . . . . . . .64
Factory pre-set . . . . . . . . . . . . . . . . . . .65
Troubleshooting . . . . . . . . . . . . . . . . . .66
Appendix . . . . . . . . . . . . . . . . . . . . .67-68
Technical data . . . . . . . . . . . . . . . . . . . .69
Index . . . . . . . . . . . . . . . . . . . . . . . . . . .70
Quick reference card for operation
of your voicebox . . . . . . . . . . . . . . .71-73
Page 4
4
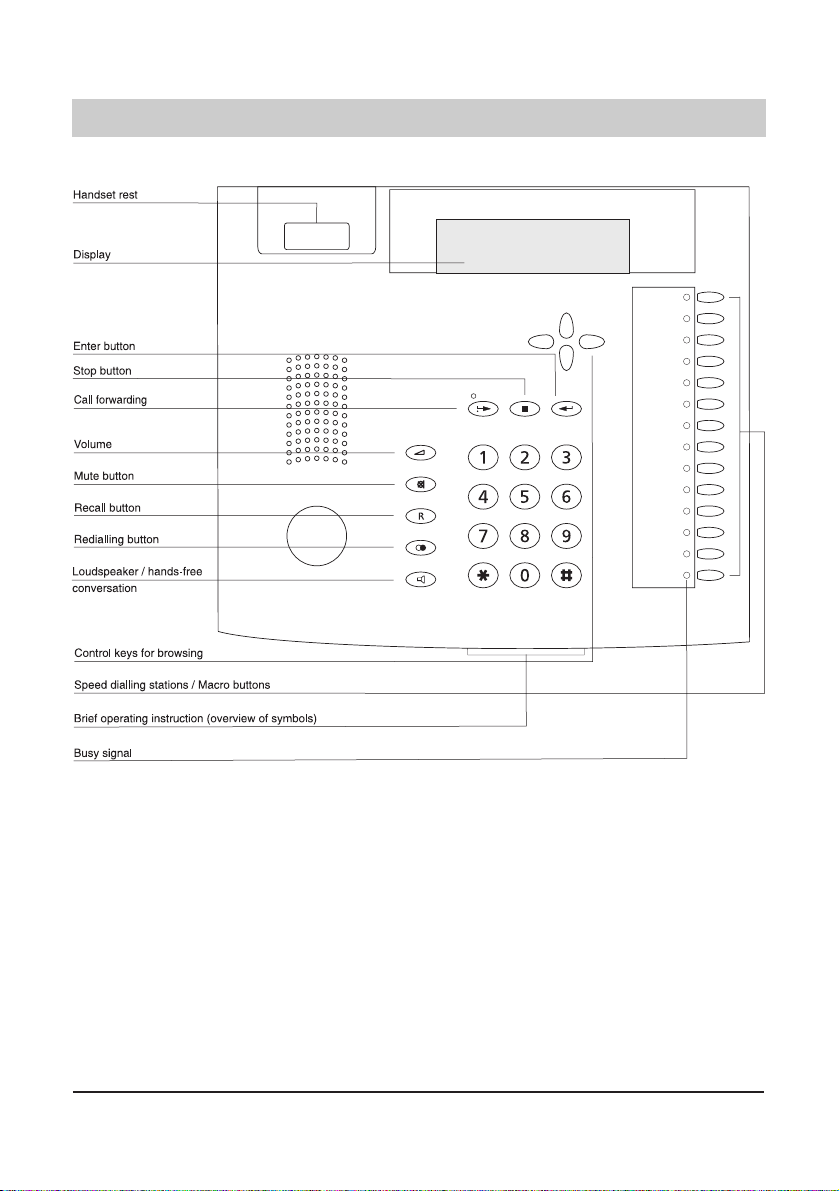
Illustration (upper housing, key pad)
Page 5
5
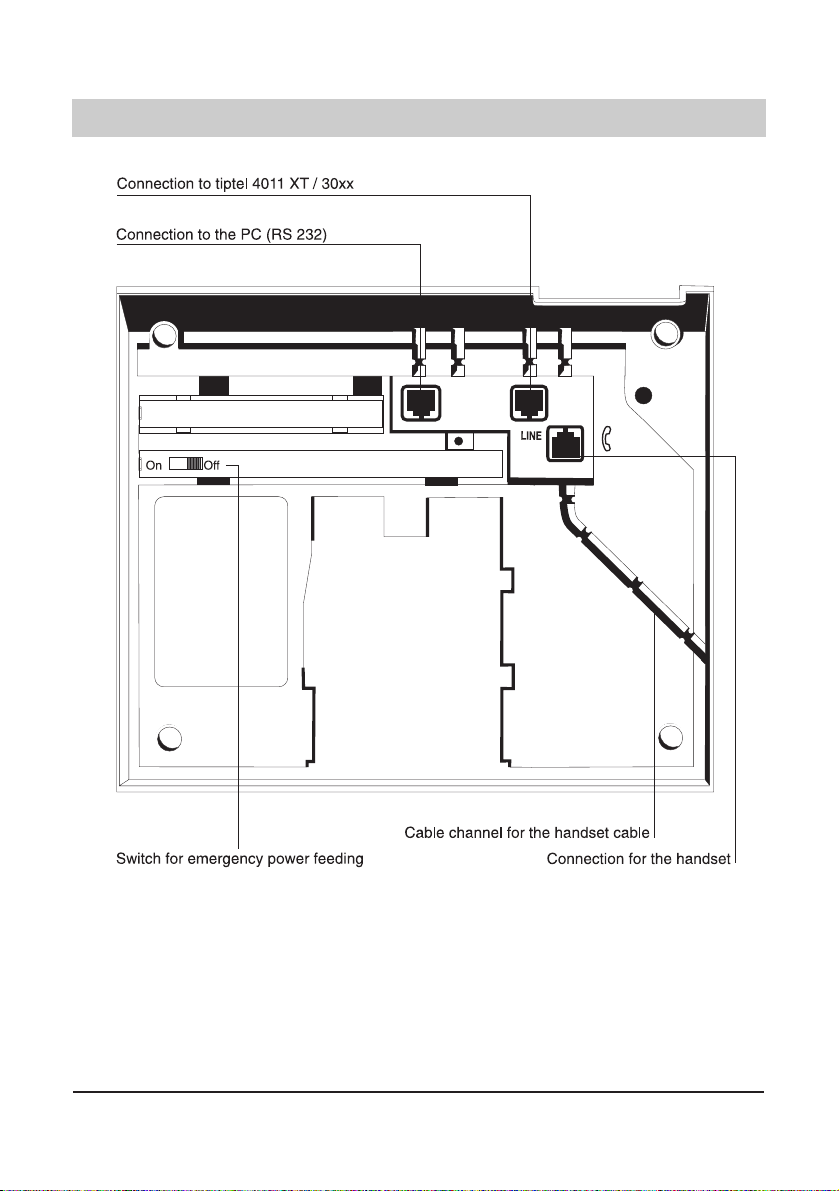
Illustration (underneath)
Page 6

6
Initial operation
Scope of supply
The tiptel 83 system scope of supply comprises:
❍ a telephone handset
❍ a spiral cable
❍ an ISDN connecting cable (IAE)
❍ operating instructions
❍ an interface cable RS 232
❍ the WINDOWS software "TipKom" (for Windows
®
)
❍ the TAPI driver “tiptel phone 1"
Connection
Your feature phone tiptel 83 system is solely designed for the connection to an internal S0-port
of the telephone system tiptel 4011 XT/30xx. Before taking the device into operation, all
required connecting cables have to be plugged in. To do this, turn the device so that the inputs
under the telephone are easily accessible:
❍ Plug the long end of the curled handset cable in the jack. The small end of the cable
has to be plugged in the corresponding receptacle of the handset.
❍ Plug the telephone connecting cable in the "LINE" jack. Connect the other end of the cable to
the ISDN socket.
❍ For strain relief, press the cables into the provided cable channels.
Connection to tiptel 4011 XT
As system terminal the tiptel 83 system should only be operated with an internal telephone number. For entering this telephone number, please see page 27 (entering the MSNs). It is
possible to enter 5 additional telephone numbers, however this is not recommended. You should
use the line keys (see page 38) for choosing the going MSN and identifying the MSN of the
calling subscriber.
First the extension MSN has to be entered as subscriber "83 system" in the menu item "user
type" of the tiptel 4011 XT configuration program. Should this option not be available, you can
either update your PC-software or use a telephone with configuration authorisation in order to
define the user type via the following numeric code:
PIN NN
(NN is the desired extension MSN). PIN NN resumes the
normal state. Please also see chapter "Access to the public exchange" (page 34).
Remark:
The firmware V 1.117 in your tiptel 4011 XT is minimum requirement for the use of system
functions. If necessary, carry out an update.
Page 7

7
Initial operation
Connection to tiptel 3011 / 3022 office / system
As system terminal unit, the tiptel 83 system should only be operated with an internal phone
number. The phone number has to be entered according to the instructions on page 27
(entering the MSNs). Further internal phone numbers (up to 6) can however only be used for
group and team calls. The system functions (exception: internal target or line key) exclusively
refer to the subscriber number entered first (MSN1).
Information for the administrator of the telephone system: In order to use the system functions,
the telephone system must at least be equipped with firmware version V 1.36. If necessary, an
update has to be carried out. After connecting the device to an internal S0 bus of the telephone
system, the system telephone is automatically identified and can be configured under the menu
option "subscriber". At this respect, please also consider the corresponding information in the
installation instructions of the telephone system.
Emergency operation
The tiptel 4011 XT provides power supply for your telephone in the case of power failure, provided that the tiptel 83 system is connected to the internal ISDN access on the mainboard of the
tiptel 4011 XT. This will only work for one terminal as a maximum. Should a further terminal be
connected to the internal port, the switch for emergency power feeding of this terminal must be
set to position "OFF"!
In the case of a power failure, the telephone system tiptel 4011 XT connects the external ISDN
access to the internal access on the mainboard. The emergency power feeding will only work
properly provided that the external ISDN access is a point-to-multipoint access.
In the case of a power failure, the exchange office provides a remote power feeding for the
emergency operation of one terminal as a maximum. If you want to use your tiptel 83 system as
emergency telephone, you have to set the switch for emergency power feeding to
position "ON".
Please be aware that the telephone functions are restricted during emergency operation. The
following functions will then not be available:
❍ LCD display in the idle state
❍ Telephone configuration features
❍ Hands-free operation / loudspeaker
Page 8

8
Button functions
Use the "arrow" keys up/down to open the electronic telephone book. When you are
in the data entry mode, you can delete a character or number by the button and
insert a character or number by the button.
Use the "arrow" keys left/right to select functions or menu levels. You can also
position the cursor when you are in the data entry mode.
The "enter" button serves to confirm an entry or a selected function.
Pressing the "stop" button will interrupt a current function or will take you to the
higher menu level.
Use the "call forwarding" button to activate or deactivate the pre-programmed call
forwarding function.
Having pressed the "volume" button, you can adjust the volume using the or
keys.
Pressing the "mute" button turns the microphone on or off.
The "recall" button allows to use the functions "hold" or "2-line operation with hold".
The "redial" button is used to redial the last telephone number dialled.
The "loudspeaker" button turns the hands-free operation on or off and serves to
connect or disconnect the CO line.
Numeric buttons to dial telephone numbers.
Star and rhombus buttons may support special functions for tone dialling.
Use the speed dialling stations to dial the corresponding stored telephone number
directly or assign a specific function via the macro programming control.
…
…
Page 9

9
Operational hints
Adjusting the volume
When executing a function with activated loudspeaker, you can adjust the volume to your needs.
The display shows the selected volume level.
If the volume remains unchanged after 2 seconds, the telephone automatically resumes the
earlier displayed volume.
Handset volume
When making a telephone call (and not using the loudspeaker), you can either increase or
decrease the handset volume.
If the volume remains unchanged after 2 seconds, the telephone automatically resumes the
earlier displayed volume.
1. Press the button.
2. Press the button or the button.
The currently set volume is indicated in the
display.
The volume is increased by one step.
The volume is decreased by one step.
1. Press the button.
2. Press the button or the button.
The currently set handset volume is indicated
in the display.
The volume is increased by one step.
The volume is decreased by one step.
Volume
❚❚❚❚❚❚❚❚❚❚❚❚❚❚❚❚
Handset volume
❚❚❚❚❚❚
Page 10
10
Operation hints
Operation overview
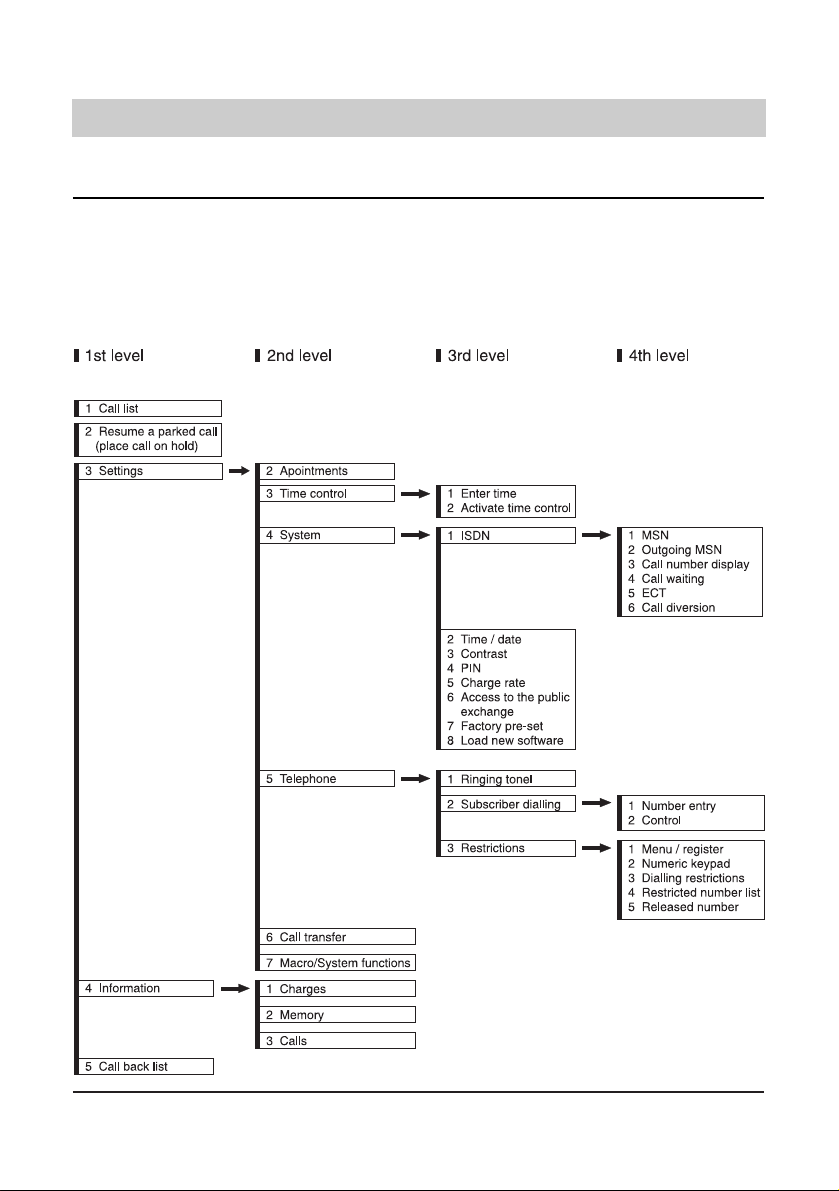
All adjustable functions are accessible via the menu. Hereinafter, please find an overview on
the different menu levels.
You can access the programming menu by pressing the "arrow" button or . The
button serves to go to the next sub-menu or level. Confirm your entries by pressing the
"enter" button . The "stop" button brings you back to the next higher level. If you press the
"stop" button two times, this will lead you back to the initial state.
Page 11

11
Telephone calls
Call counter
The telephone has an integrated call counter displaying the number of incoming telephone calls.
The call counter is erased automatically:
- when you pick up the handset
- when you check the call list
Direct manual call
Pick up the handset and dial the telephone number to initiate the dialling process. After entering
the last digit of the telephone number, all further numbers are sent as dual tone multi-frequency
signals (DTMF). This gives you the option to remote-operate terminal equipment.
After several seconds, the display returns to the initial state.
The charges incurred for the call are added to the charge memory.
Sa 18.03.2006 12:30
2 calls
1. Pick up the handset.
2. Dial the telephone number via the
numeric keypad.
After completion of the call:
3. Replace the handset
The display shows "Please dial".
The numbers are displayed and the device
dials the entered telephone number. As soon
as the target subscriber answers the call, the
call duration and the charging information are
displayed.
Call duration
Charging information
(AOC)
current date and time
021024280
0:00:02
0.121
Page 12

12
Telephone calls
Off-line call preparation (indirect call)
As for the off-line call preparation, the telephone number is dialled first. Here, you have the
option to check the number and to correct it if necessary.
021024289
Please dial
1. Enter telephone number
2. Pick up the handset
After completion of the call:
3. Replace the handset.
1. Press the button.
2. Press the or button.
3. Pick up the handset.
or
3. Press the speed dialling station.
or
3. Press the line key
The telephone number is shown in the display.
You can erase the last entry by pressing the
button. Use the button to enter a blank
and the buttons to move the cursor.
The dialled telephone number is called.
The duration of the call and the incurring
charges are displayed as soon as the target
subscriber answers the call.
After some seconds, the display returns to
the initial state. The charges incurred for this
call are added to the charge memory.
The display shows the first entry of the electronic telephone book.
You can browse through the electronic telephone book using the “arrow“ buttons until
the desired name is shown in the display.
The device starts dialling the telephone number.
The hands-free mode is activated. The telephone number stored with the speed dialling
station (e. g. the call-by-call number of a telephone carrier) is dialled followed by the telephone number stored in the electronic telephone book.
The hands-free mode is activated. The telephone number stored with the line key is defined as outgoing telephone number for this
outgoing call (the target subscriber may see
this telephone number on his telephone display). Then the telephone number stored in
the electronic telephone book is dialled.
Dialling from the electronic telephone book /register / chaining of telephone numbers
Page 13

13
Telephone calls
Redial
The 20 telephone numbers dialled last are stored automatically and can be redialled if desired.
The telephone number dialled last is always positioned as the first entry in the list. If you wish to
call the telephone number dialled last, just pick up the handset and press the button afterwards.
Mo 20.03.2006 07:24
1: 021024280
1. Press the button.
2. Press the or button.
Dialling from the redial memory
3. Pick up the handset.
Display/erase redial memory
3. Press the button.
4. Press the or button.
Erasing:
5. Erase the entry and confirm by pressing the button.
6. Press the button in order to exit
the list.
The display shows the redialling memory.
Use the “arrow“ buttons to browse through
the redial memory entries until you found the
telephone number or name that you were
looking for.
The device starts dialling the displayed telephone number.
The entry is selected.
Every time you press the button, the display
switches between:
- telephone number or name
- date/time
- call duration/charges
- erase entry
The entry is erased. The next number of the
redial list is displayed.
The display resumes the normal state.
Dialling from the electronic telephone book /register / chaining of telephone
numbers (continued)
Remark:
When the electronic telephone book is open, you have the option to enter a name via the
numeric keypad (see page 24 chapter "Electronic telephone book"). After confirming the new
entry by pressing the button, the corresponding entry is shown. Afterwards, you can
continue to browse through the electronic telephone book.
Page 14

14
Telephone calls
Automatic call-back on busy (CCBS)
Should the desired target subscriber's line be busy, the display shows a selection field for automatic redialling and the automatic call-back function, i. e. the function completion of call to busy
subscriber. This special feature needs to be released by your telephone network provider. This
is not only valid for your installation, but also for the target subscriber's installation. Just replace
the handset if you do not wish to use this function. The corresponding menu line is only shown
in the display if the CCBS feature is available.
subscriber busy
call-back
1. Press the or button in order to
select the "call-back" function.
2. Press the button and replace the
handset.
3. Wait for signal tone.
4. Pick up the handset.
Edit call-back list
In the idle state:
1. Press the or button in order to
select the "call-back" function.
2. Press the button.
3. Press the or button.
4. Press the button
or
4. Interrupt the transaction by pressing
.
Every time you press the button, the display
switches between the available functions.
The display resumes the normal state. The
call-back request is stored in the call-back
list.
As soon as the target subscriber's line is free
again, a signal tone is heard.
After picking up the handset, you hear a ringing tone and the target subscriber's telephone rings.
Every time you press the button, the display
switches between the available functions.
The call-back list is displayed.
These buttons allow to browse through the
call-back list until you found the desired telephone number or name.
The entry is erased from the call-back list.
You have activated different call-back requests (6 as a maximum) and now intend to erase some
of those.
021024280
call-back - delete?
Page 15

15
Telephone calls
Automatic redial
Should the desired target subscriber's line be busy, the display shows a selection field for the
automatic redial or the automatic call-back function (CCBS). Select the automatic redial function
so that your telephone continues to dial the chosen telephone number.
You can stop the automatic redial process:
- by picking up the handset
- by pressing the button
The process is stopped automatically after 10 unsuccessful dialling attempts.
Loudspeaker
When holding a telephone conversation, you can activate the loudspeaker in order to allow other
people in the same room to follow the conversation.
Hands-free operation
The hands-free mode allows you to hold a telephone conversation while the handset is on-hook.
1. Press the or button in order to
select the "redial" function.
2. Press the button and replace the
handset.
Every time you press the button, the display
switches between the available functions.
The time interval for the next redialling process is displayed. Every 30 seconds, the telephone automatically dials the telephone number in question.
1. Press the button.
2. Press the button again.
The loudspeaker is activated.
The loudspeaker is deactivated.
You receive an incoming call:
1. Press the button.
2. Press the again after having ended
the telephone conversation.
Y
ou initiate an outgoing call:
1. Press the button.
2. Dial the target telephone number.
3. Press the again after having ended
the telephone conversation.
The hands-free mode is activated. Now, you
can hold your conversation while the handset
is on-hook.
The hands-free mode is deactivated. The call
is being disconnected.
The hands-free mode is activated.
The device starts dialling.
The hands-free mode is deactivated. The call
is being disconnected.
Page 16

16
Telephone calls
Switching between handset and hands-free operation
You are holding a telephone conversation using the handset and want to switch to the handsfree operation:
You are holding a conversation in the hands-free mode and now want to use the handset:
1. Press the button and keep it
pressed.
2. Replace the handset.
3. Release the button.
1. Pick up the handset.
The hands-free mode is activated.
The hands-free mode is deactivated and you
can continue holding your telephone conversation via the handset.
1. Press the button.
2. Press the button again.
The symbol "mute" is displayed. The handset
microphone and the hands-free microphone
are deactivated. You can now make your
enquiry in the room.
The handset and the hands-free microphone
are activated again. You can continue with
the telephone conversation.
Headset-operation
It is possible to connect the tiptel headset (item no. 3054110) instead of the handset. This makes
telephoning in the office even more comfortable. Remove the curled cable of the handset from
the corresponding receptacle and replace it by the relevant headset connecting cable. The handset can either be removed or remain on the telephone.
The function "connection set-up" must have been assigned to one functional key (refer to chapter
macro programming).
You receive an incoming call:
1. Press the key "connection set-up".
2. At the end of the telephone call, press
the key "connection set-up" anew.
You make an outgoing call:
1. Press the key "connection set-up".
2. Enter the phone number.
3. At the end of the telephone call, press
the key "connection set-up" anew.
The call is accepted via the headset.
The call is being disconnected.
The headset is switched on.
The telephone starts dialling.
The call is being disconnected.
Mute function
When holding a telephone conversation you can make a confidential enquiry in the room without allowing your telephone partner to listen to what is spoken.
Page 17

17
Telephone calls
Call tracing (malicious call identification MCI)
(This feature must be released by your local telephone network provider.)
If you are bothered by an unknown caller and want to identify the calling party, you have the option to do so even when the corresponding telephone number is not being transferred and shown
in the display.
Placing a call on hold / additional call
During a telephone conversation, you have the option to place the call on hold. While a call is
placed on hold, you can make enquiries in the room or make an enquiry call to another subscriber. The party placed on hold cannot listen to your enquiries. In addition, the "hold" function
serves to initiate the feature "2-line conversation with hold", "three-party conference" and "call
transfer".
Disconnecting a call
Proceed as follows to disconnect an existing telephone call in order to resume a connection placed on hold:
1. Press the or button in order to
select the function "malicious call
identification (MCI)".
2. Press the button.
Every time you press the button, the display
switches between the available functions.
The telephone number in question is stored
in the public exchange office and you can
submit a request to your telephone network
provider in order to get information about the
corresponding subscriber's name.
1. Press the button.
2. Press the button again.
The party is placed on hold within the public
exchange office and hears an announcement. Now, you can make your enquiry in the
room or dial the telephone number to make
an enquiry call to another party.
You are being reconnected to the first telephone partner.
1. Press the or button to select the
"disconnect" function.
2. Press the button.
Every time you press the button, the display
switches between the available functions.
The call is disconnected. The connection
placed on hold is resumed automatically.
Page 18

18
2-line operation with hold
The function "2-line operation with hold" allows you to switch between an active connection and
a call placed on hold.
Three-party conference
(This feature must be released by your local telephone network provider.)
If you intend to establish a call with two parties at the same time, you need to establish an active
call and place one caller on hold.
Call transfer (only for telephone system operation)
You receive an incoming call and want to transfer it to another extension (see also chapter
"Setting the call transfer function" page 31).
Telephone calls
1. Press the button.
The active call is placed on hold and the call
placed on hold is activated.
1. Call subscriber 1 and place the call on
hold by pressing the button.
2. Call subscriber 2.
3. Press the or button to select the
function "2-line operation with hold".
4. Press the button.
To end the 2-line conversation with hold:
5. Press the or button to select the
function "end 2-line operation wit
hold".
6. Press the button.
Every time you press the button, the display
switches between the available functions.
Now, you can hold a conference call with both
parties.
Every time you press the button, the display
switches between the available functions.
The conference call is stopped. One of the
called parties is placed on hold and the other
one remains active.
You want to transfer an incoming call:
1. Press the button.
2. Dial the telephone number to which
the call shall be transferred or press
the speed dialling station for the
desired extension.
3. Speak/Replace the handset.
The call is being placed on hold. You hear the
dialling tone.
A new connection is being established.
The incoming call is transferred to the dialled
extension number.
Page 19

19
Telephone calls
1. Press the button.
2. Press the or button to select the
function "call transfer".
3. Press the button.
4. Dial the desired extension number for
call transfer.
The call is being placed on hold. The connection to the party issuing a call waiting signal is
activated.
Every time you press the button, the display
switches between the available functions.
You hear the dialling tone.
A new connection is being established. The
party issuing the call waiting signal is transferred. You are reconnected to your earlier
telephone partner.
Call transfer (continued)
You are holding a telephone conversation and want to answer and transfer a second incoming
call:
Call parking
This feature must be released by your local telephone network provider.
You are holding a telephone conversation with an external party and want to park this call for a
short time in order to
- resume the call at another telephone at the same ISDN access.
- operate the telephone at another ISDN socket within the same ISDN access.
The call parking feature allows you to place an existing call on hold within the tiptel 4011 XT/ 30xx
exchange office and to resume it later. Moreover, you have the option to enter a two-digit code
number allowing you to differentiate between different calls placed on hold.
Call parking:
1. Press the or button to select the
function "call parking".
2. Press the button.
3. Enter the two-digit code number and
confirm your entry by pressing .
Resume a parked call (handset is
on-hook):
1. Press the or button to select the
function "resume parked call".
2. Press the button.
3. Enter the two-digit code number and
confirm your entry by pressing .
Every time you press the button, the display
switches between the available functions.
The display shows a request to enter the twodigit code number for call identification.
The call is placed on hold.
Every time you press the button, the display
switches between the available functions.
The display shows a request to enter the twodigit code number for the desired call.
The parked call is resumed and you can continue your telephone conversation.
Page 20

20
You are holding a telephone conversation
and receive another incoming call.
You want to answer the second incoming
call:
1. Press the button.
You want to reject the second incoming
call:
1. Press the or button to select the
function "reject".
2. Press the button.
You want to transfer the second incoming
call to another telephone number:
1. Press the or button to select the
function "call diversion".
2. Press the button.
3. Press the button.
Your current call is placed on hold. You are
connected to the second party. You now have
the option to switch between these two calls
by pressing the button (2-line conversation
with hold).
Every time you press the button, the display
switches between the available functions.
The display resumes the normal state.
Every time you press the button, the display
switches between the available functions.
The pre-programmed telephone number is
displayed. If required, dial a new telephone
number.
The call is being transferred.
Telephone calls
Call waiting
You are holding a telephone conversation while another party is trying to call you. This is indicated by a call waiting signal (two short tones). In addition, the telephone number issuing a call
waiting signal is displayed. Use the arrow buttons to select the desired function or answer the
second call directly by pressing the button.
Page 21

21
Telephone calls
Answering a call
You receive a call; your phone rings. The first line of the display shows the caller by:
- Name, or
- Telephone number, or
- Shows the call is being made from an analog telephone network, or
- Shows that the caller has blocked caller ID (anonymous call)
The second line of the display shows the phone number being called:
- MSN index in the phone
- Number of the extension called*
- Name of the extension called*
- External MSN*
* These options are only displayed if your PABX transmits this information.
02102 4280
Scott
You want to answer the incoming call:
1. Pick-up the handset.
Y
ou want to reject the incoming call:
1. Press the button.
Y
ou want to transfer the incoming call to
another telephone number:
1. Press the or button to select the
function "call diversion".
2. Press the button.
3. Press the button.
You are connected to the caller and can start
your telephone conversation.
Your telephone resumes the normal state.
Every time you press the button, the display
switches between the available functions.
The pre-programmed telephone number is
displayed. If required, dial a new telephone
number.
The call is being transferred.
Page 22

22
Telephone calls
Keypad
In some exchange offices, the programming of special features (e. g. call forwarding) is effected
via the "Keypad protocol". The programming is done via the numeric keys and the buttons
and . Here, macro programming is provided to assign the keypad function to a speed dialling
station (see chapter "Macro programming").
The possible keypad functions are given by your telephone network provider.
1. Pick-up the handset.
2. Press the "keypad" speed dialling
station.
3. Enter the desired programming
sequence.
4. Replace the handset.
The display shows "please dial".
The display indicates keypad programming
by the symbol "K".
The corresponding numbers are displayed.
The exchange office receives the data and
confirms them.
Your telephone resumes the normal state.
Sub-addressing
(This feature must be released by your local telephone network provider.)
In addition to the multiple subscriber number, you have the option to enter sub-addresses. This
can be useful, e. g. if you intend to remote-control your terminals. Use the macro programming
to assign the function "sub-addressing" to a speed dialling station. Entering the sub-address is
only possible via the off-line call preparation or via the electronic telephone book. Your telephone does not evaluate incoming sub-addresses.
1. Enter the telephone number via the
numeric keypad.
2. Press the "sub-addressing" speed
dialling station.
3. Enter the sub-address via the numeric
keypad.
4. Pick-up the handset.
5. Replace the handset.
The numbers are shown in the display.
The display shows the symbol "S".
The numbers are shown in the display.
The telephone number is dialled together
with the sub-address. Now, the called terminal answers or executes a function.
The telephone resumes the normal state.
Page 23

23
Telephone calls
Call list
The call list provides you with information on the last 20 incoming calls, such as date and time
of the call, called multiple subscriber number (MSN) and the corresponding telephone number
of the calling party. If the PABX provided the name of the caller, this will be displayed instead of
the caller's telephone number (only tiptel 83 system). If the telephone number was not transmitted, only "Call" or "Number Blocked" will be displayed. A call that was picked up is marked with
a star (only tiptel 83 system).
Dialling from the call list:
1. Press the or button to select the
function "call list".
2. Press the button.
3. Press the or button to select the
desired subscriber.
4. Pick-up the handset.
Display/erase call list:
1. Press the or button to select the
function "call list".
2. Press the button.
3. Press the or button to select the
desired subscriber.
4. Press the button.
5. Press the or button.
6. Press the button.
Every time you press the button, the display
switches between the available functions.
The telephone number or the name of the last
caller is displayed with date and time of the
call.
You browse through the call list.
The telephone number is dialled.
Every time you press the button, the display
switches between the available functions.
The telephone number or the name of the last
caller is displayed with date and time of the
call.
You browse through the call list.
The display shows the addressed multiple
subscriber number (MSN) and possibly also
the duration of the call.
Every time you press the button, the display
switches between:
Take over telephone number:
The electronic telephone book becomes
editable.
Erase entry:
The selected entry is erased from the list.
Erase call list:
The entire call list is deleted.
The selected function is executed.
Page 24

24
Electronic telephone book / register
General information on the electronic telephone book / register
The electronic telephone book manages names and telephone numbers of your telephone partners
and thus becomes your personal telephone manager. The electronic telephone book can store and
manage up to 100 entries. You have the option to activate a cost counter and different filter functions
per entry. If the cost counter is active, all incurring charges for the entry in question are accumulated
and can be viewed via the function "electronic telephone book". The filter function allows a special
handling of incoming calls (only possible if the caller's telephone number is presented). On one hand,
you have the option to activate the "VIP filter". In this case, your telephone will ring for incoming calls
from this specific number even if you have deactivated the ringing signal earlier. Another option is
the "call filter", restricting the ringing signal for incoming calls by a specific telephone number. Then,
you can select the "call diversion (CD) filter" where incoming calls by a specific telephone number
are automatically transferred to a pre-programmed extension number (see chapter "Setting the call
diversion function", page 31). You can easily see whether a filter function had been activated when
browsing through the electronic telephone book. In this case, "F" is displayed next to the corresponding name. The entries are listed in alphabetical order. For further use and in order to have a backup of your data, the entire telephone book can be loaded on a PC and reloaded afterwards (see
chapter "PC connection TipKom", page 62).
Names are entered via the numeric keypad. The corresponding letter is selected by pressing the
number key in question either one or several times. Wrong entries can be erased by pressing the
button. A blank can be inserted by pressing the button. In the text field, you can move the
cursor by pressing the
or button.
Entering data
Alphabet (number button 2 to 9):
Special characters (button 0, 1, * and #):
Numbers:
Examples:
A = press 2 once
B = press 2 two times
C = press 2 three times
D = press 3 once
E = press 3 two times
F = press 3 three times
G = press 4 once
H = press 4 two times
I = press 4 three times
J = press 5 once
K = press 5 two times
L = press 5 three times
M = press 6 once
N = press 6 two times
O = press 6 three times
P = press 7 once
Q = press 7 two times
R = press 7 three times
S = press 7 four times
T = press 8 once
U = press 8 two times
V = press 8 three times
W = press 9 once
X = press 9 two times
Y = press 9 three times
Z = press 9 four times
ä = press 1 once
ö = press 1 two times
ü = press 1 three times
ß = press 1 four times
/ = press 0 once
( = press 0 two times
) = press 0 three times
_ = press 0 four times
* = press * once
+ = press * two times
- = press * three times
: = press * four times
; = press * five times
# = press # once
, = press # two times
. = press # three times
@ = press # four times
& = press # five times
1 = press 1 five times
2 = press 2 four times
3 = press 3 four times
4 = press 4 four times
5 = press 5 four times
6 = press 6 four times
7 = press 7 five times
8 = press 8 four times
9 = press 9 five times
0 = press 0 five times
1 x button 8
= T
3 x button 4
= I
1 x button 7
= P
1 x button 8
= T
2 x button 3
= E
3 x button 5
= L
Page 25

25
Electronic telephone book/register
Storing data
An entry in the electronic telephone book consists of the name (= search criterion), the telephone number and additional settings if required (e. g. filter function, cost counter).
1. Press the button.
2. Press the button.
3. Enter the name via the numeric keypad.
4. Press the button.
5. Enter the telephone number via the
numeric keypad.
6. Press the button.
7. Press the or button.
8. Press the button.
9. Press the or button.
10. Press the button.
11. Press the button.
The display shows "new entry".
The display shows "name".
Your entry is displayed. The character entered last can be erased by pressing the
button.
The name is now entered. The display shows
"number:".
The display shows your entry.
The telephone number entry is complete. The
display shows "cost counter off". If you do not
wish to take out further settings, just press
the "stop" button. You are then lead to the
end of the entry options automatically (continue as of point 10).
Every time you press the button, the display
switches between:
off: The cost counter is deactivated and
erased.
on: The cost counter is activated. The tele-
phone charges relating to the entry in
question are accumulated and updated after each call.
The display shows "filter off".
Every time you press the button, the display
switches between:
Filter off: No active filter.
VIP filter: An incoming call from this number
is indicated by a ringing signal
even if the ringing signal had
been turned off.
Call filter: Incoming calls are not indicated
by a ringing signal.
Call diversion (CD) filter: The caller is
being transferred to the preprogrammed extension (see
chapter "call diversion", page 31).
The display shows "store entry?"
The entry is stored.
Page 26

26
Electronic telephone book/register
Editing data
Entries in the electronic telephone book can be checked, corrected or erased at any time.
1. Press the button.
2. Press the or button to select an
entry.
3. Press the button.
For editing:
4. Press the button.
5. Enter your changes.
or
For erasing:
4. Press the or button to select the
entry to be erased.
5. Press the button.
The first entry of the electronic telephone
book is shown in the display.
Use these buttons to browse through the
electronic telephone book until the desired
entry (name) is displayed.
The display shows "edit entry".
The display shows "name:".
You can now enter your changes. Proceed as
for entering new data.
The display shows "erase entry".
The entry is erased.
Page 27

27
System settings
Entering the MSNs
During the configuration of your tiptel 4011 XT/ 30xx a certain extension telephone number was
allocated to your tiptel 83 system on the corresponding ISDN access. This extension number
must also be entered into the tiptel 83 system. It is possible to enter 5 additional telephone numbers, however this is not recommended. You should use the line keys for choosing the going
MSN and identifying the calling subscriber's MSN. Please take into account that the busy signal
cannot work properly if several MSNs are used.
1. Press the or button to select
"settings".
2. Press the button.
3. Press the or button to select
"system".
4. Press the button.
5. Press the button.
6. Press the button.
7. Press the or button to select the
desired "MSN" (MSN1 ... MSN6).
8. Press the button.
9. Enter your MSN via the numeric keypad.
10. Press the button.
Every time you press the button, the display
switches between the available functions.
The display shows "appointments".
The display shows "system".
The display shows "ISDN".
The display shows "MSN".
The display shows "MSN1" and the MSN if it
had been entered.
The display shows the MSN.
The display shows "enter MSN".
The MSN is stored.
Page 28

System settings
28
1. Press the or button to select
"settings".
2. Press the button.
3. Press the or button to select
"system".
4. Press the button.
5. Press the button.
6. Press the or button to select the
desired "outgoing MSN".
7. Press the button.
8. Enter a number between 1 and 6 via
the numeric keypad to select the MSN.
9. Press the button.
Every time you press the button, the display
switches between the available functions.
The display shows "appointments".
The display shows "system".
The display shows "ISDN".
The display shows "MSN".
The display shows "outgoing MSN".
The display shows the current setting.
The setting is stored.
Selecting the outgoing MSN
You have the option to select the outgoing MSN (i.e. the telephone number transferred and
shown at the target subscriber's display) via the function "line key" (see page 38).
If you have entered several MSNs for the tiptel 83 system contrary to our recommendation, you
can define as follows, which internal phone number shall be used by the terminal. In this case
the outgoing MSN depends on the programming of the tiptel 4011 XT / 30xx (setting "Determining
outgoing number").
Page 29

29
System settings
Call number display
You have the option to activate or deactivate the call number display for outgoing or incoming
calls. The selected option becomes valid for all entered MSNs.
1. Press the or button to select
"settings".
2. Press the button.
3. Press the or button to select
"system".
4. Press the button.
5. Press the button.
6. Press the or button to select
"call number display".
7. Press the button.
8. Press the or button.
9. Press the button.
Every time you press the button, the display
switches between the available functions.
The display shows "appointments".
The display shows "system".
The display shows "ISDN".
The display shows "MSN".
The display shows "call number display".
The display shows the current setting.
Every time you press the button, the display
switches between:
outgoing, incoming: Your telephone number as well as the number of your telephone
partner is transmitted and presented.
outgoing: Your telephone number is transmitted and presented only.
incoming: The calling party's telephone
number is transmitted and presented only.
OFF: Neither your telephone number nor the
calling party's telephone number is transmitted and presented.
The setting is stored.
Page 30

30
System settings
Setting the call waiting function
If you receive an incoming call while already holding a telephone conversation, you can determine, whether a signal (two short tones) shall be given for this call or not.
1. Press the or button to select
"settings".
2. Press the button
3. Press the or button to select
"system".
4. Press the button.
5. Press the button.
6. Press the or button to select
"call waiting".
7. Press the button.
8. Press the or button.
9. Press the button.
Every time you press the button, the display
switches between the available functions.
The display shows "appointments".
The display shows "system".
The display shows "ISDN".
The display shows "MSN".
The display shows "call waiting".
The display shows the current setting.
Every time you press the button, the display
switches between:
ON: You will hear a call waiting signal when
receiving an incoming call while holding a telephone conversation.
OFF: Should you receive an incoming call
while holding a telephone conversation, this will not be indicated by a call
waiting signal.
The setting is stored.
Page 31

31
System settings
Setting the call transfer function
The call transfer function offers you the option to transfer an answered call (see also chapter
"Call transfer", page 18) to another extension. This is done via the ISDN feature ECT (explicit
call transfer) within the telephone system tiptel 4011 XT. If you do not wish to support the
explicit call transfer (ECT), you can deactivate this function as follows:
1. Press the or button to select
"settings".
2. Press the button.
3. Press the or button to select
"system".
4. Press the button.
5. Press the button.
6. Press the or button to select
"ECT".
7. Press the button.
8. Press the or button.
9. Press the button.
Every time you press the button, the display
switches between the available functions.
The display shows "appointments".
The display shows "system".
The display shows "ISDN".
The display shows "MSN".
The display shows "ECT".
The display shows the current setting.
Every time you press the button, the display
switches between:
ON: Call transfer via ECT is activated.
OFF: Call transfer via ECT is deactivated.
The setting is stored.
Setting the call diversion (CD) function
Here, you have the option to transfer an incoming call to another extension without the necessity
to answer this call before. You can pre-program an extension number for this function.
1. Press the or button to select
"settings".
2. Press the button.
3. Press the or button to select
"system".
4. Press the button.
5. Press the button.
6. Press the or button to select
"call diversion".
7. Press the button.
8. Via the numeric keypad, enter a telephone number to which the incoming
call shall be transferred.
9. Press the button.
Every time you press the button, the display
switches between the available functions.
The display shows "appointments".
The display shows "system".
The display shows "ISDN".
The display shows "MSN".
The display shows "call diversion".
The display shows "enter target number".
The number is shown in the display.
The setting is stored.
Page 32

32
System settings
Setting time and date
The time and date are automatically set when an outgoing call is made. In addition, you have the
option to set time and date manually.
1. Press the or button to select
"settings".
2. Press the button.
3. Press the or button to select
"system".
4. Press the button.
5. Press the or button to select
"time/date".
6. Press the button.
7. Enter the time and date via the numeric keypad.
8. Press the button.
Every time you press the button, the display
switches between the available functions.
The display shows "appointments".
The display shows "system".
The display shows "ISDN".
The display shows "time/date".
The entered time and date is shown in the
display.
The entry is stored.
Contrast adjustment
Here, you can adjust the display contrast.
1. Press the or button to select
"settings".
2. Press the button.
3. Press the or button to select
"system".
4. Press the button.
5. Press the or button to select
"contrast".
6. Press the button.
7. Press the or button.
8. Press the button.
Every time you press the button, the display
switches between the available functions.
The display shows "appointments".
The display shows "system".
The display shows "ISDN".
The display shows "contrast".
The display shows "contrast" and the contrast
indicator bar.
The contrast is increased or decreased.
The setting is stored.
Page 33

33
System settings
Changing the PIN
You need a PIN (personal identification number) to activate or deactivate call or dialling restrictions (in the factory pre-set, the PIN is 000).
1. Press the or button to select
"settings".
2. Press the button.
3. Press the or button to select
"system".
4. Press the button.
5. Press the or button to select
"PIN".
6. Press the button.
7. Enter your personal identification
number via the numeric keypad
(10 digits as a maximum).
8. Press the button.
9. Now, enter a new PIN via the numeric
keypad.
10. Press the button.
Every time you press the button, the display
switches between the available functions.
The display shows "appointment".
The display shows "system".
The display shows "ISDN".
The display shows "PIN".
The display shows "enter PIN".
The entered PIN is shown in the display.
The display shows "enter new PIN".
The entered PIN is shown in the display.
The entry is stored.
Charge rate
The price for a call charge unit (= charge rate) can be determined individually. If you set the charge rate, your telephone will display the costs incurred for a call directly. The registration of calls
and costs (advice of charge) can only work properly if charging information are transferred by
your exchange office.
1. Press the or button to select
"settings".
2. Press the button.
3. Press the or button to select
"system".
4. Press the button.
5. Press the or button.
6. Press the button.
7. Now, enter the desired charge rate via
the numeric keypad.
8. Press the button.
Every time you press the button, the display
switches between the available functions.
The display shows "appointments".
The display shows "system".
The display shows "ISDN".
The display shows "charge rate".
The entered charge rate is shown in the
display.
The entry is stored.
Page 34

34
System settings
Access to the public exchange
The telephone system tiptel 4011 XT / 30xx automatically ensures that a line prefix for the access
to the public exchange is entered in the call list of your tiptel 83 system – if necessary. The
following constellations are possible:
Automatic exchange connection has been programmed for the extension number of your
tiptel 83 system: The normal telephone number without any line prefixes is shown in the call list
and must be entered in the telephone book / register.
No automatic exchange connection has been programmed for the extension number of your
tiptel 83 system: The number "0" before the normal telephone number is shown in the call list
and must be entered in the telephone book / register.
Targeted exchange connection has been programmed via the telephone system tiptel 4011 XT
for the extension number of your tiptel 83 system:
Via PC (programming of your tiptel 4011 XT) a code number for targeted exchange connection
has been set for your feature phone (i.e. 9911). This number followed by the normal telephone
number is shown in the call list and must be entered in the telephone book / register (see
chapter "Targeted exchange connection" in the manual of your tiptel 4011 XT).
In this case, no additional line prefix may be entered. Should a line prefix be programmed for
your tiptel 83 system, this must be deleted as follows:
1. Press the or button to select
"settings".
2. Press the button.
3. Press the or button to select
"system".
4. Press the button.
5. Press the or button to select
"CO line".
6. Press the button.
7. Now, enter the line prefix via the
numeric keypad (4 digits as a maximum).
8. Press the button.
Every time you press the button, the display
switches between the available functions.
The display shows "appointments".
The display shows "system".
The display shows "ISDN".
The display shows "CO line".
The display shows a cursor for entries.
Your entry is displayed.
The entry is stored.
Page 35

35
System settings
Factory pre-set
You can resume the factory pre-set parameters at any time.
1. Press the or button to select
"settings".
2. Press the button.
3. Press the or button to select
"system".
4. Press the button.
5. Press the or button.
6. Press the button.
T
o resume the factory pre-set:
7. Press the button.
T
o interrupt:
7. Press the button.
Every time you press the button, the display
switches between the available functions.
The display shows "appointments".
The display shows "system".
The display shows "ISDN".
The display shows "factory pre-set".
The warning message "ATTENTION! All data
are erased" is shown in the display.
The factory pre-set is resumed.
The function is interrupted (the data are
retained).
Page 36

36
System settings
1. Press or in order to
select "Settings".
2. Press .
3. Press or in order to
select "System".
4. Press .
5. Press or in order to
select "Update via ISDN".
6. Press .
7. Enter the Tiptel.com server
number if it is not displayed.
Please note when using the tiptel
83 system on extensions that
you may need to precede this call
number with a code for the outside
line. Use the cursor buttons to
change the call number if
necessary; to enter the numbers
press the button; to
delete press the button.
8. Confirm the correct entry of the
server call number with the
button.
9. Confirm this with the button.
Each time you press the button the display
alternates between the possible functions.
The display shows "Appointments".
The screen shows "System".
The display shows "ISDN".
The display shows "Update via ISDN".
The display shows the "Server number" and
may show the number "00492102428438".
You will be asked whether you really want to
start the update.
The display shows "Dial" and the call number
of the TIPTEL server.
During the update the display will show "Updating, please wait" and a rotating symbol in the
bottom left corner. After ending the process, the tiptel 83 system restarts automatically and goes
into standby mode.
Note:
If, after dialling the number, the display shows "You already have the current version" no
update is required and the device returns to standby mode.If the connection to the server is
broken during the update, the display shows "Update interrupted" and the device returns to the
"Update via ISDN" menu option. Start again at Point 6 (see above).
All the settings are usually maintained after updating. But we recommend backing up all data
beforehand using the "TipKom" PC program supplied.
If necessary you can update the operating software on the telephone. This is possible via ISDN
line from our update server or via the serial RS 232 port of the telephone from your local PC.
Update via ISDN (only tiptel 83 system)
Page 37

37
System settings
Update via RS-232
You have the option to load a new operating software on your telephone -if necessary. This software can be downloaded from the tiptel-website http://www.tiptel.com. Please store the file on
your PC and do not forget this storage place!
Afterwards you connect the telephone with your PC via the serial connecting cable and start the
software "TipKom phone" as usual. Ensure that the correct COM-port has been set in the menu
"configuration" and test the correct function of the connection. Then you define whether the settings shall be stored or not and select "start transfer". In the following window the file must be
activated, that was stored right before (it may be necessary to change the index). Upon demand
change to the operating modus "load new software" and confirm with "ok".
During the update the display shows a rotating symbol in the left. After finishing the update, your
telephone will automatically restart and resume the initial state. Afterwards you may remove the
connecting cable.
Remark:
If the display shows "Loader V1.5" although you do not intend to load a new operating software,
this function had been activated by mistake. Your telephone is no longer operational. Now you
have to load a new operating software and proceed as detailed above. It is not possible to save
the data - this menu item must be deactivated. Upon receiving the request to change into the
operating modus "load new software", please unplug the connecting cable of the telephone for
a few seconds. Thus the PC knows that the telephone is already in this operating modus.
Should the operating software be damaged - for what reason ever - and you cannot use the setting menu any longer, you have the option to start the loader program directly: Press buttons
2 and 4 at the same time while reconnecting the telephone to the ISDN access. Afterwards you
proceed as described in the above paragraph.
1. Press the or button to select
"settings".
2. Press the button.
3. Press the or button to select
"system".
4. Press the button.
5. Press the or button to select
"new software".
6. Press the button.
7. Press the button to delete the operating software (program) and to start
the loader.
Every time you press the button, the display
switches between the available functions.
The display shows "appointment" .
The display shows "system".
The display shows "ISDN".
The display shows "load new software".
The display shows "Attention, program is
being deleted" and after some seconds "start
loader?".
After some seconds, the display shows
"Loader V1.5".
Page 38

38
Remark:
The following macro functions will either directly be executed by the telephone or the display will
show an entry request:
Target telephone number (dialling, pick-up ...), keypad (change to the keypad mode with entry
option), subaddressing (change to subaddress with entry option), three-party-conference,
disconnecting a call, call transfer, call parking, call deflection (CD) and enquiry / switching
between lines, connection set-up (headset operation).
In contrast to this, the following macro functions directly lead to the relevant menu item and thus
shorten the browsing through the menu:
Call list, outgoing MSN (only needed if several MSNs are used, which is not recommended),
phone number display, contrast, appointments, time control, call forwarding, ringing tone, information, direct dialling and macro.
Important:
It is not possible to further operate the telephone while entering menu settings via macro buttons.
Macro programming
Assignment of speed dialling stations
Via the macro programming, you have the option to assign functions or telephone numbers to
the 14 speed dialling stations of your telephone. This allows you to execute frequently used
settings or functions during a call.
The last speed dialling station is alredy pre-assigned and labelled "macro". By pressing this button, you skip steps 1 to 3 of the following procedure and start with step 4.
1. Press the or button to select
"settings".
2. Press the button.
3. Press the or button to select
"macro".
4. Press the button.
5. Press the desired speed dialling
station.
6. Press the or button to select a
macro function.
For telephone numbers only:
- Press the button.
- Enter the desired telephone number
via the numeric keypad.
7. Press the button.
Every time you press the button, the display
switches between the available functions.
The display shows "appointments".
The display shows "macro".
The display shows "select key".
The display shows the corresponding speed
dialling station.
The display shows "enter telephone number."
The telephone number is shown in the display.
The function or telephone number is stored.
Page 39

39
System functions with tiptel 4011 XT
Via the macro programming, the following features for the programming of target telephone
numbers are available:
Internal target number with "busy" LED
If an internal telephone number has been stored on the speed dialling station, the following
signal modes are available:
❍ extension in the idle state - LED off
After pressing the speed dialling station a connection to the stored target number is being
established. An active call can be transfered to the stored telephone number by pressing the
button without the necessity to announce this before.
❍ incoming call at the extension - LED flashing
Provided that the corresponding authorisation has been programmed (see manual of the
tiptel 4011 XT, Pick-up groups), you have the option to pick up the call by pressing the button
beneath the flashing LED.
❍ active call at the extension - LED lit
Provided that the corresponding authorisation has been programmed (see manual of the
tiptel 4011 XT, Device connection), you have the option to take over the call by pressing the
button beneath the lighting LED.
Should a second call come in at the same extension during an active call (LED lit), this is signaled by a flashing LED. Thus you can pick up the second call.
External target number (line key) with LED signal
In order to execute this function, the MSN (in case of point-to-multipoint access) or DDI (in case
of point-to-point access) that shall be used has to be stored in a specific form: You enter two
times the button "
" before and once the button " " after the desired telephone number.
Example:
to use the going MSN 471112 at the point-to-multipoint access
to use the DDI 0 (switchboard 428-0) at the point-to-point access
If a going telephone number has been stored with the button in that form, the following functions
are available:
❍ No incoming call on this MSN / DDI - LED off
After pressing the speed dialling station, a CO line with this going MSN is being established.
Afterwords the desired telephone number can be dialled. Alternatively you can use this
button after having chosen an entry of the electronic telephone book (see page 12 "Dialling
from the electronic telephone book / register").
❍ Incoming call on this MSN / DDI - LED flashing
You can pick up this call by pressing the flashing speed dialling station. This function also
allows an easy identification of the telephone number that was dialled by the telephone
partner. For example you can separate private calls from business calls.
Remark:
Your extension must be member of the same pick-up group as the other extensions at which the
MSN / DDI in question is signalled. Otherwise you establish a CO line with the stored going telephone number instead of answering the incoming call.
Page 40

40
System functions with tiptel 4011 XT
Voicebox-functions with tiptel 540 office / tiptel 545 pro
If a tiptel 540 office or tiptel 545 pro is used, one voicebox is availabe for each feature phone.
If you wish to receive an indication of messages waiting (Message Waiting Indication), you
have to store on a button the internal telephone number of the extension to which the tiptel 540
office / tiptel 545 pro is connected (not the telephone number of the extension assigned to your
tiptel 540 office / 545 pro!) Please add the own extension telephone number and once the rhombus.
Example (tiptel 540 of
fice / 545 pro at extension 10):
to indicate messages waiting on the voicebox of your extension 15
The following signal modes are available:
❍ no message waiting - LED off
❍ messages already checked - LED lit
❍ new messages - LED flashing
Upon pressing the button, a connection to the voicebox is being established. The description
how to proceed further can be taken from the manual of the tiptel 540 office / 545 pro (chapter
Remote Control).
Remarks:
If you intend to take over a call from your tiptel 540 office / 545 pro, you simply store on a button the extension telephone number to which the tiptel 540 office / 545 pro is connected. Thus
you have the option to use all functions described in the paragraph "Internal target number with
"busy" LED".
In order to activate / deactivate a voicebox, please use the call diversion (CD) function.
The target telephone number is the extension number to which the tiptel 540 office / 545 pro is
connected (see page 31, Setting the call diversion function).
Logging in and out of ACD groups
If you are a member in one or more ACD groups, you can log in or log out your number and other
extensions in the group.
Save the numbers to be dialed on one or several buttons. These consist of the function code
9799 followed by the ACD group (1 through 4) and the desired extension.
Example (logging in and out of extension 33 in ACD group 2):
9799 2 33
The following functions are available:
❍ logged out, LED off
❍ logged in, LED on
Page 41

41
System functions with tiptel 4011 XT
Voicebox-functions with tiptel 350 ISDN / tiptel 350-10 ISDN / tiptel 355 ISDN
When a tiptel 350 ISDN / tiptel 350-10 ISDN / tiptel 355 ISDN is used, several voiceboxes are
availabe for each feature phone.
If you wish to receive an indication of messages waiting (Message Waiting Indication), you
have to store on a button the internal telephone number of the voicebox and add once the rhombus.
For example (tiptel 350 / 350-10 / 355 with voicebox telephone numbers 47 and 48):
to indicate messages on the voicebox with the internal telephone number 47
to indicate messages on the voicebox with the internal telephone number 48
The following signal modes are available:
❍ no message waiting - LED off
❍ messages already checked - LED lit
❍ new messages - LED flashing
Upon pressing the button, a connection to the voicebox is being established. If the telephone
number of your extension has been stored as a QRC number (quick remote control) in your
tiptel 350 / 350-10 / 355, it is possible to perform a remote interrogation without entering the
remote control PIN. The description how to proceed further can be taken from the manual of the
voicemail systems (chapter Remote Control).
It is also possible to see if the recording capacity of your voicebox is exhausted: Instead of the
button "
", please add once the button " " to the telephone number.
Example:
to indicate that the voicebox with the internal telephone number 47 has no free
recording capacity
The following functions are available:
❍ free recording capacity available - LED off
❍ recording capacity exhausted - LED flashing (messages must be erased: you have direct
access to the voicebox by pressing the button)
Remarks:
If you intend to take over a call from your voicebox, you simply store on a button the extension
telephone number of the relevant voicebox (see Internal target number with "busy" LED,
page 38.)
In order to activate / deactivate a voicebox, you can also activate the call diversion function (CD).
The target telephone number is the extension telephone number of the relevant voicebox (see
page 31. Setting the call diversion function).
Page 42

42
System functions with tiptel 4011 XT
Room monitoring
In order to activate Room monitoring, please follow the instructions of the tiptel 4011 XT manual.
The authorisation to use this feature must be activated at the telephone from which room
monitoring shall be initiated (monitoring telephone). Furthermore the authorisation to execute this
function must be given for the extension telephone number of the monitored tiptel 83 system.
The monitoring and the monitored telephone do not necessarily have to be feature phones.
Announcement/Duplex mode from an internal and external location (Intercom)
These functions are only available for the tiptel 83 system. It is not possible to activate them with
other telephones. However, the initiating telephone does not necessarily have to be a
feature phone.
Should a call come in while your tiptel 83 system is in the announcement/duplex mode, the line
is busy for the calling subscriber.
Initiating the Announcement/Duplex mode from an internal location
Any internal extension can activate the Announcement/ Duplex mode by dialling the according
code number before the extension telephone number.
XX in order to execute an Announcement XX = extension telephone number of the
tiptel 83 system
XX in order activate the Duplex mode XX = extension telephone number of the
tiptel 83 system
Example:
Subscriber 15 executes an announcement at feature phone 22
Requirements:
❍ Subscriber 15 must be authorised to initiate Room Monitoring / Announcement / Duplex mode
❍ Subscriber 22 must be a tiptel 83 system
❍ Subscriber 22 must be authorised to execute an announcement
Subcriber 15 has to dial:
Recommendation: If this feature shall be performed frequently, you can store this code number
on a button.
Remark:
In the following cases, the initiating party will receive an error signal:
❍ The authorisation for the execution of Room Monitoring / Announcement / Duplex mode had
not been activated for the initiating party
❍ The target extension had not been configurated as a feature phone
❍ The authorisation for Announcement and/or Duplex mode had not been activated for the
target feature phone
Page 43

43
System functions with tiptel 4011 XT
Initiating the Announcement / Duplex mode from an external location
These features can be executed via an external telephone in the same way as external room
monitoring. Please proceed according to the tiptel 4011 XT manual (chapter: Room Monitoring).
Instead of the code number 58 you just have to dial 561 or 562.
Example:
Duplex mode shall be activated from an external location. The feature phone is at extension 22.
Requirements:
❍ Subscriber 22 must have been assigned authorisation for Announcement/Duplex mode (Intercom)
❍ Subscriber 22 must have been assigned authorisation for Announcement/Duplex mode form
an external location.
❍ The virtual extension of the tiptel 4011 XT (here: 29) has been assigned to the external MSN 40555
❍ The PIN code for Room Monitoring / Announcement / Duplex mode from an external location
is 123456
The external subscriber dials:
As soon as a connection has been established, you dial (= PIN code) by
MFD dialling. Please wait until this entry will be confirmed by a positive acknowledgement tone
followed by a programming signal. Afterwards the feature can be activated by dialling
.
Recommendation:
If this feature shall be performed frequently, you have the option to store this
code number either on a button or in the electronic telephone book (for example of your mobile
phone). In this case a space must be entered after the telephone number (in our example after
dialling 40555) and after the PIN code (in our example 123456) so that a connection can be
established before the remaining key sequence (in our example 56222#) will be dialled.
Activating the authorisation for the Announcement / Duplex mode (Intercom)
The authorisation for the extensions with a tiptel 83 system can be assigned by
programming the telephone system tiptel 4011 XT. Should this option not be available, you can
either update your PC-software or configurate the authorisation manually via a telephone with
configuration authorisation.
Remark:
NN is the desired extension MSN of the tiptel 83 system
Announcement and Duplex mode not allowed: . . . . . . . PIN NN
Announcement and Duplex mode allowed: . . . . . . . PIN NN
Announcement allowed,
Duplex mode not allowed: . . . . . . . . . . . . . . . . . . . . .
PIN NN
Additionally the allowed functions can be activated from an external location provided that the
authorisation has been programmed as follows:
Activation from an external location mode not allowed: PIN NN
Activation from an external location mode allowed: PIN NN
When performing the feature Duplex mode (Intercom), the display shows the symbols for loudspeaker and microphone. During an announcement, the microphone symbol is crossed through.
Page 44

44
System functions with tiptel 3011/ 3022 office /system
The macro programming of buttons regarding the available system functions is carried out at the
telephone system. The assignment of the keys programmed correspondingly cannot be modified
by you as these modifications can only be carried out by the administrator of the telephone
system. Should you try to modify the key assignment, the error message: "only functional keys
allowed!" will be displayed. The keys that have not been pre-programmed can, however, be
modified according to your individual requirements. To do this, please refer to page 37 (chapter
macro programming).
The following functional keys can be set on your device:
Internal target (internal phone number with busy-line-indication (LED))
An internal subscriber number has been saved on this key. The following functions are available:
❍ Subscriber in the idle state, LED off
When this key is pressed, a connection to the programmed subscriber phone number is set
up.After pressing the R-key, an active call can be transferred with or without announcement
to the programmed subscriber number.
❍ Incoming call for the subscriber, LED blinks
If the corresponding authorisation is available, the call can be picked up by pressing the key
(call pick-up).
❍ Subscriber is holding a call, LED on
When the necessary authorisation is available, the call can be picked up by pressing the key.
If a second call is signalled at the same subscriber number while this subscriber is holding a
telephone call (LED on), this second call is indicated by means of a blinking LED. That means
that a call pick-up can be carried out for the second call (waiting call).
Status CO-line access
For this function, the LED indicates whether a CO-line is available for an external call. It will be
taken into account to which external S0 connections your subscriber number has been assigned.
It is thus possible that no external line is available though not all external S0 connections are
busy.
❍ No CO-line available, LED on
❍ An external line is available, LED off
Pressing the key activates the hands-free mode and an external line is made available
(external dialling tone after standard exchange connection). When the handset is lifted, the
hands-free mode is not automatically activated.
❍ Exchange authorisation has been withdrawn, LED blinks
The reason could be, for example, that the exchange authorisation has been deactivated or
that the subscriber number has exceeded the limit of the charge account..
Page 45

45
System functions with tiptel 3011/ 3022 office /system
CO-line access with specific MSN/DDI (line key)
It is determined here via which MSN/DDI of your telephone system an outgoing external call
should be created. As the MSNs/DDIs are assigned to certain external S0 connections, you
determine at the same time which port should be used for the telephone call. The LED
indicates the corresponding status:
❍ This MSN/DDI is being used for the telephone call, LED on
❍ Idle state, LED off
Pressing this key activates the hands-free mode and provides an external line for this outgoing phone number. Afterwards, the requested subscriber number can be dialled. As an
alternative, it is also possible to use this key after selecting an entry in the electronic telephone book (see page 12, "dialling from the electronic telephone book"). When the handset is lifted, the hands-free mode is not automatically activated.
❍ An incoming call for this MSN/DDI, LED blinks
Pressing this key activates the hands-free mode and the incoming call can be accepted.
A lifted handset does not automatically activate the hands-free mode.
This function also allows an easy identification of the phone number dialled by the caller,
that means, for example, a distinction between private and business calls is possible.
Call forwarding unconditional
Pressing the functional key activates, for your system telephone, a direct call forwarding to the
programmed subscriber. Incoming calls are no longer signalled at your phone. The LED indicates
the corresponding status:
❍ Call forwarding is active, LED on
❍ Call forwarding is not active, LED off
Call forwarding on no reply
By pressing the functional key, the function "call forwarding on no reply" to the programmed subscriber is activated for your system telephone. Your telephone rings for 15 seconds before the
call is transferred to the destination number. The LED indicates the corresponding status:
❍ Call forwarding is active, LED on
❍ Call forwarding is not active, LED off
Call forwarding on busy
When the functional key is pressed, call forwarding on busy to the programmed subscriber is
activated for your system telephone. The LED indicates the corresponding status:
❍ Call forwarding is active, LED on
❍ Call forwarding is not active, LED off
Page 46

46
System functions with tiptel 3011/ 3022 office /system
Call forwarding on no reply and on busy
This is a combination of the two functions mentioned before. Both call forwarding types have the
same target number.
❍ Call forwarding functions are active, LED on
❍ Call forwarding functions are not active, LED off
Please note:
When using several call forwarding buttons, please note that their functions can contradict each
other. At this respect, please also consider the button "voicebox on/off status" as this key activates
a call forwarding on no reply and on busy to your voicebox.
Status voicebox - message waiting and on / off
Your telephone system supports the voicemail systems tiptel 350 ISDN, tiptel 350-10 ISDN and
the Call Manager tiptel 355 ISDN. The LED indicates the corresponding status:
❍ Your voicebox is active, LED on
If your subscriber number is busy or if the call is not accepted within 15 seconds, your voicebox answers the call. If the key is pressed, the voicebox is switched off. Afterwards, all
incoming calls are exclusively signalled at your subscriber number.
❍ Your voicebox is not active, LED off
All incoming calls are exclusively signalled at your subscriber number. If the key is pressed,
the voicebox is switched on. If, afterwards, your subscriber number is busy or if the call is not
accepted within Ist danach Ihre seconds, your voicebox answers the call.
❍ New incoming messages available in your voicebox, LED blinks
When the key is pressed, the hands-free mode is activated and your voicebox is called. A
lifted handset does not automatically activate the hands-free mode. Information on the
functions available in the voicemail system can be obtained in the chapter "remote interrogation" in the corresponding user manual. In the appendix, you also find a quick reference
card for your relevant voicemail system. With regard to the type, please contact, if necessary,
the administrator of your telephone system.
Please note:
As long as new ICMs are available in your voicebox, the voicebox cannot be switched off. It is
thus guaranteed that always all messages are played back. Besides, your voicebox accepts
further incoming calls during the interrogation (as your subscriber number then is busy).
Page 47

47
System functions with tiptel 3011/ 3022 office /system
Voicebox pick-up
By means of this key, it is possible to pick up calls that have already been accepted by your
voicebox (call pick-up). The LED indicates the corresponding status:
❍ Your voicebox has accepted a call, LED on
Pressing this key activates the hands-free mode and the call is picked up from your voicebox.
A lifted handset does not automatically activate the hands-free mode.
❍ Idle state, LED off
When the key is pressed, the hands-free mode is activated and your voicebox is called. A
lifted handset does not automatically activate the hands-free mode.
❍ An incoming call for your voicebox, LED blinks
When the key is pressed, the hands-free mode is activated and the incoming call is picked up
from your voicebox. A lifted handset does not automatically activate the hands-free mode.
Status warning voicebox - memory capacity
The LED of this key indicates when the memory capacity of your voicebox is exhausted.
❍ All messages in your voicebox are deleted (voicebox empty), LED off
Pressing the key activates the hands-free mode and your voicebox is called. The hands-free
mode is not automatically activated when the handset is lifted. For information on the
functions available in your voicemail system, please refer to the chapter "remote interrogation" in the corresponding user manual. In the appendix, you also find a quick reference card
for your corresponding voicemail system. For information on the type, please contact, if
necessary, the adminstrator of your telephone system.
❍ Messages already played back are available in the voicebox, LED on
If the key is pressed, the hands-free mode is activated and the voicebox is called. A lifted
handset does not automatically activate the hands-free mode. For information on the available
functions in your voicemail system, please refer to the chapter "remote interrogation" in the
corresponding user manual. In the appendix, you also find a quick reference card for your
relevant voicemail system. Regarding the type, please contact, if necessary, the administrator of your telephone system.
❍ The capacity of the voicebox is exhausted and the voicbox has been deactivated or set
to the "announcement-only" mode (if OGM 1 has been programmed as "announcement-only"), LED blinks
Pressing the key activates the hands-free mode and your voicebox is called. A lifted handset
does not automatically activate the hands-free mode. It is necessary to delete messages. For
information on the functions available in your voicemail system, please refer to the chapter
"remote interrogation" in the relevant user manual. In the appendix, you also find a quick
reference card for your corresponding voicemail system. Regarding the type, please contact,
if necessary, the administrator of your telephone system.
Page 48

48
System functions with tiptel 3011/ 3022 office /system
Please note:
After deleting messages, it might be necessary to activate your voicebox anew (function remote
activation of the answering mode,
button, key ) or to return to your normal OGM (function
remote modification of OGMs key key up to , according to the requested OGM).
Free macro key
If the administrator of your telephone system has defined several keys as "free macro key", the
assignment can be determined according to your individual requirements as described on
page 37 (chapter macro programming). Keys that have been programmed by the admininstrator
cannot be modified. Should you, by mistake, try to change the assigment of these keys, the
errror message "only functional keys allowed!" will be displayed.
Please note:
In contrast to the system functions mentioned above, your individual assignment is only saved
directly in the telephone and has to be entered anew in case of an exchange of the device. It is
recommended to take note of your individual assignment before.
System Phonebook
(This function is only available with firmware V.4.0.xx and higher of the system software.)
With the tiptel 83 system, you can select an entry from the phonebook of your tiptel 3011/3022
office/system and then connect to this party. The system phonebook is set up using the telephone system's configuration software and is available to all system users.
Search for Entry
There are two different methods to search for an entry: scrolling through the phonebook, or entering the name directly via the numbers on the phone's keypad. To find out which letters are
assigned to which numbers on the keypad, please see the section "Entering Characters" in the
unit "Telephone Directory".
Page 49

49
System functions with tiptel 3011/ 3022 office /system
1. Press .
2. Press or to select an entry.
3. Press or .
or
3. Lift the receiver.
This opens the phonebook.
This scrolls between entries.
This connects to the party selected.
1. Press .
2. Enter the name using the numbers
2-9.
3. Press or .
or
3. Lift the receiver.
This opens the phonebook.
This connects to the party selected.
To look for an entry by scrolling through the system phonebook:
You can exit the phonebook at any time by pressing .
To look for an entry in the phonebook by entering a name:
When entering a name, the last letter can be changed by pressing cursor buttons or .
The last letter entered can be deleted by pressing or
.
A blank space can be inserted using or
.
You can switch at any time from name entry to scrolling by pressing
.
Page 50

50
Call forwarding
The call forwarding feature allows you to forward an incoming call for your extension to another
subscriber number (for example to your voicebox). This call forwarding can be individually pre-
programmed for each MSN. In order to activate this feature, just press the button while the
telephone is in the initial state. The activated call forwarding feature is indicated by a lit LED. You
can deactivate this feature by pressing the button again.
Should call forwarding for your extension be programmed within the telephone system tiptel
4011 XT or tiptel 3011/3022 office/system, the LED also lights up. This call forwarding function
can be deactivated as ususal by means of the functional key. At the same time, the setting will
be saved in the system telephone. If call forwarding is activated anew, the configuration of the
telephone system will then be saved.
Call forwarding
Page 51

51
Call forwarding
1. Press the or button to select
"settings".
2. Press the button.
3. Press the or button to select
"call forwarding".
4. Press the button.
5. Press the or button to select the
MSN.
6. Press the button.
7. Press the or button.
8. Press the button.
Enter the target telephone number for call
forwarding:
9. Enter the desired target telephone
number for call forwarding via the
numeric keypad.
10. Press the button.
Every time you press the button, the display
switches between the available functions.
The display shows "appointments".
The display shows "call forwarding".
The display shows "MSN1" and the activated
call forwarding.
Select the desired MSN.
The display shows "Act. call forwarding".
Every time you press the button, the display
switches between the available options:
unconditional, on busy, on no reply, answering mode and off.
unconditional: All incoming calls are directly
forwarded to the programmed
target telephone number.
on busy: An incoming call is only forwar-
ded to the programmed target
telephone number if your line is
busy.
on no reply: An incoming call is forwarded
if it is not answered within 15
seconds.
off: There will be no call forwarding.
The cursor is displayed.
The display shows "enter target number"
(only for call forwarding unconditional, on
busy, on no reply).
The display shows your entry.
The setting is stored.
Call forwarding (continued)
Page 52

52
Ringing tone
The ringing tone can be adjusted individually with regard to volume, melody and speed. You
can assign an individual ringing tone to each entered MSN. If you do not wish to be disturbed by
incoming calls, just deactivate the ringing tone. If you want the volume to increase by each
ringing tone, you can activate the function "incremental volume control".
Telephone settings
1. Press the or button to select
"settings".
2. Press the button.
3. Press the or button to select
"telephone".
4. Press the button.
5. Press the button.
6. Press the or button to select the
MSN.
7. Press the button.
8. Now, enter the desired ringing signal
via a two-digit function code (00 ...99).
9. Press the or button to select the
desired volume or the incremental
volume control.
10. Press the button.
Every time you press the button, the display
switches between the available functions.
The display shows "appointments".
The display shows "telephone".
The display shows "ringing tone".
The display shows "MSN 1" and the selected
ringing tone melody.
The MSN is shown in the display.
The ringing signal is being heard for verification of the setting.
The display shows the entry. The new melody is heard.
The display switches between "ringing tone
OFF", the volume indicator bar and
"incremental volume control ON".
The setting is stored.
Page 53

53
Telephone settings
Direct dialling (baby call)
The function "direct dialling" (or baby call) allows the automatic dialling of a pre-programmed subscriber number by just pressing any key (except for the menu buttons) or by picking up the handset.
1. Press the or button to select
"settings".
2. Press the button.
3. Press the or button to select
"telephone".
4. Press the button.
5. Press the or button to select
"direct dialling".
6. Press the button.
7. Press the button.
8. Now, enter the desired subscriber
number for the direct call or erase the
currently stored subscriber number
by pressing the button.
9. Press the button.
10. Press the or button to select
"switch".
11. Press the button.
12. Press the or button to activate
or deactivate this function.
13. Press the button.
Every time you press the button, the display
switches between the available functions.
The display shows "appointments".
The display shows "telephone".
The display shows "ringing tone".
The display shows "direct dialling".
The display shows "enter number".
The display shows your entry.
The entry is stored.
The display shows "switch".
The current setting is displayed.
The display switches between "ON" and
"OFF".
The setting is stored.
Remark:
This feature can also be activated via your telephone system tiptel 4011 XT!
Page 54

54
Telephone settings
Call blocking / keypad locks
You have the option to lock different buttons (e. g. the numeric keypad or access to the menu or
electronic telephone book). Locked buttons or dialling restrictions will only get accessible after
entering the PIN.
1. Press the or button to select
"settings".
2. Press the button.
3. Press the or button to select
"telephone".
4. Press the button.
5. Press the or button to select
"blocking".
6. Press the button.
7. Press the or button.
8. Press the button.
Every time you press the button, the display
switches between the available functions.
The display shows "appointments".
The display shows "telephone".
The display shows "ringing tone".
The display shows "blocking".
The display shows "menu / register".
Every time you press the button, the display
switches between:
Menu/register: Restricts the entry or operation via the menu or via the electronic telephone book.
Numeric Keypad: As for the functions
"manual dialling" and "speed dialling", the
dialling of telephone numbers via the keypad
is restricted.
Dialling restriction: Here, you activate or
deactivate the call blocking.
Blocked numbers list: Here, you will get an
entry option for telephone numbers that shall
be restricted for dialling. You can enter up to
10 different telephone numbers or parts of
telephone numbers.
Authorised numbers: Here, you will get an
entry option for telephone numbers that shall
be released for dialling. You can enter up to
10 telephone numbers.
Now, you get an entry option for the selected
function.
Page 55

55
Telephone settings
Call blocking / keypad locks (continued)
Menu / register:
9. Press the or button.
10. Press the button.
Numeric keypad:
9. Press the or button.
10. Press the button.
Dialling restriction:
9. Press the or button.
10. Press the button.
Blocked numbers list:
9. Press the or button to select a
storage location.
10. Press the button.
11. Enter the corresponding numbers via
the numeric keypad.
12. Press the button.
Authorised numbers:
9. Press the or button to select a
storage location.
10. Press the button.
11. Enter the corresponding numbers via
the numeric keypad.
12. Press the button.
Now, enter further telephone numbers
or exit the menu by pressing the
button.
Every time you press the button, the display
switches between:
on: The function is activated.
off: The function is deactivated.
The setting is saved.
Every time you press the button, the display
switches between:
on: The function is activated.
off: The function is deactivated.
The setting is saved.
Every time you press the button, the display
switches between:
on: The function is activated.
off: The function is deactivated.
The setting is saved.
The display shows the content of the selected
storage location.
The cursor position is displayed indicating an
entry option.
Your entry is displayed.
The entry is stored.
The display shows the content of the selected
storage location.
The cursor position is displayed indicating an
entry option.
Your entry is displayed.
The entry is stored.
Page 56

56
Appointments
Enter/edit appointments
The telephone can manage 50 different - one-time or daily recurring - appointments. In addition,
it will remind you of an entered appointment by a signal tone right at the entered start time. The
appointment list allows you to view all entered appointments and to select them for editing. In
order to enter a new appointment, just select the entry "new entry".
1. Press the or button to select
"settings".
2. Press the button.
3. Press the button.
4. Press the or button to select an
entry.
5. Press the button.
New entry:
6. Enter the appointment via the numeric
keypad.
7. Press the button.
8. Enter further information (one line) via
the numeric keypad.
9. Press the button.
Editing:
6. Press the button
7. Enter your changes.
8. Press the button.
Erasing:
6. Press the or button to select
"erase entry".
7. Press the button.
Every time you press the button, the display
switches between the available functions.
The display shows "appointments".
The display shows the first existing entry or
"new entry".
The display shows "edit entry" or the entry
field as for "new entry".
As for a one-time appointment which will be
erased after being executed, just enter the
corresponding time and date.
If you do not enter a date, this will indicate
that a daily recurring appointment is meant.
The display shows "enter information".
The display shows the entry.
The appointment is stored.
The display shows "enter appointment:".
The changes are saved.
The appointment is erased.
Page 57

57
Time control
Enter/edit time control data
The time control function allows you to control the button (call forwarding ON/OFF). The time
control refers to a specific time and specific days of the week. A maximum of 10 entries is possible. You can enter the valid day of the week for each entry. In order to make a new entry, just
select the first item "new entry". The entire time control function can be activated or deactivated
via the menu item "time control". If time control data exist, the display indicates this via the
symbol
c in the normal state.
Remark referring to the illustration: The button is activated on mondays, wednesdays, thursdays, fridays, saturdays and sundays at 12:00 hrs.
Mo - We Th Fr Sa Su
12:00 ON
1. Press the or button to select
"settings".
2. Press the button.
3. Press the or button to select
"time control".
4. Press the button.
5. Press the or button to select
"enter time".
6. Press the button.
7. Press the or button to select an
entry.
8. Press the button.
New entry:
9. Press the or to select the desi-
red weekday for the time control.
10. Press the or button to activate or
deactivate the function for the
selected weekday.
11. Press the button to select the time
settings.
12. Enter the time settings via the nume-
ric keypad.
Every time you press the button, the display
switches between the available functions.
The display shows "appointments".
The display shows "time control".
The display shows "enter time".
The display for time control switches between
"enter time" and "activate".
The display shows the first entry or "new
entry".
The display shows "edit entry" or in the case
of "new entry" it shows the entry field.
The selected weekday is displayed.
The display shows the weekday in order to
indicate the activation of the time control and
the symbol "- -" to indicate a deactivation.
The display shows the cursor to indicate an
entry option.
Your entry is shown in the display.
Page 58

58
Time control
13. Press the button to select the time
control switching function.
14. Press the or button to activate or
deactivate the button (i. e. call forwarding function).
15. Press the button.
Editing:
9. Press the button.
10. Now, enter your changes.
11. Press the button.
Erasing:
9. Press the or button to select
"delete entry".
10. Press the button.
The display switches between "ON" and
"OFF".
The entry is saved.
The changes are saved.
The entry is erased.
Enter/edit time control data (continued)
Page 59

59
Information
Charges (This feature needs to be released by your telephone network provider)
The charge counter shows the total of all telephone charges for the corresponding MSN accumulated since the last reset of the charge counter. In addition, you can check the accumulated
charges for the entire connection (even the charges incurred for other terminals at your S
0
bus).
1. Press the or button to select
"information".
2. Press the button.
3. Press the button.
4. Press the or button to select a
desired MSN.
5. Press the button.
6. Press the button.
or
6. Press the button.
The display shows "information".
The display shows "charges".
The display shows "extension" and the incurred telephone charges.
The display switches between the individual
MSNs.
The display shows "erase charges?".
The charge counter is reset to 0. The current
date is taken as the starting date for further
accumulation of charges.
The accumulated charges are not erased.
The earlier display is shown.
Page 60

60
Information
Memory
Here, the display will show the currently free memory capacity of the electronic telephone book
in per cent. The erase function will delete the entire electronic telephone book.
1. Press the or button to select
"information".
2. Press the button.
3. Press the or button to select
"memory".
4. Press the button.
5. Press the button.
6. Press the button.
or
7. Press the button.
The display shows "information".
The display shows "charges".
The display shows "memory".
The display shows "telephone book" and the
free memory capacity in per cent.
The display shows "erase memory?".
The memory is being erased.
The memory is not erased. The earlier display is shown.
Page 61

61
Information
Calls
The call counter gives you an impression on the call frequency. It shows the number of incoming
as well as the number of outgoing calls.
1. Press the or button to select
"information".
2. Press the button.
3. Press the or button to select
"calls".
4. Press the button.
5. Press the or button.
6. Press the button.
7. Press the button.
or
7. Press the button.
The display shows "information".
The display shows "charges".
The display shows "calls".
The display shows "outgoing:" and the number of outgoing calls.
The display switches between "outgoing" and
"incoming".
The display shows "erase memory?".
The memory is being erased. The current
date is taken as the starting date for the new
call counter.
The call counter is not erased. The earlier
display is shown.
Page 62

62
PC connection / TipKom
PC connection / TipKom
The software "TipKom for Windows" from the scope of supply enhances the functional scope of
your tiptel 83 system, e. g. by the options:
❍ Loading and saving the call number memory
❍ Call data management
❍ Change of settings
❍ Dialling
❍ Loading a new operating software. You will always find the latest operating software version
and the latest PC software and TAPI driver in the Internet under www.tiptel.de.
Installation
❍ Connect your tiptel 83 system to any serial interface of your PC. Should you only have a
25-pin port free at your PC, you can use a customary adapter (9 pin <> 25 pin).
❍ Insert the TipKom disk and start the "SETUP" program. Then, just follow the given instruc-
tions.
Further information
On the disk, you will find a comprehensive software documentation giving you information on the
handling and the functionality. Just start the help function in the TipKom software.
System requirements:
❍ 486/DX 66 or higher
❍ VGA monitor
❍ Sound card (optional)
❍ 4 MB RAM
❍ Mouse
❍ Windows® 98 or higher
Windows is a registered trademark of the Microsoft Corporation.
Dialling via AT commands
Configuration of the PC interface: 9600, 8, N 1 without data flow control
Command:
❍ ATD telephone number <CR> Establish connection
❍ ATH <CR> Disconnect connection
❍ ATA <CR> Answer incoming call
Page 63

63
PC connection / TipKom
TAPI driver
The scope of supply comprises an installation software for the TAPI driver "tiptel phone1". This
software allows you to control your telephone via TAPI applications (e. g. Outlook, WinPhone,
orgAnize, ACT, AdressPlus, ProCall).
Installation:
An already existing TSP driver will not be uninstalled or replaced by the setup. If necessary, it
has to be uninstalled manually. At this respect, please observe the relevant information provided
by the Windows help on the telephone settings in the system control.
Please note:
Principally, difficulties have to be expected when several TSP / modem drivers have access to
the same COM port. This is typical for Windows and due to the control of the individual drivers.
It is required to have TAPI 2.1. or higher versions installed on the PC. Pay attention especially
with Windows 98 and NT these driver may have to be installed beforehand. The TAPI-driver is
available from Microsoft.
Call
charges:
❍ During each outgoing call, the telephones send charge information to this TSP driver.
❍ The TSP driver automatically identifies whether the call charges are signalled by the tele-
phone as currency amount or as charge units. However, it is important that the correct charge
rate has been set in the TSP driver. The conversion of units into currency is realised internally with four digits after the decimal point.
❍ With regard to the data output (that means in the direction of the CTI application), the TSP
driver can be set as follows: "units as character sequence", "currency ammount as character
sequence" and "currency amount in AOCDCurrency format". If necessary, contact the retailer/
manufacturer of your CTI application for information on the required setting.
The T
API driver supports the following functions:
❍ accepting a call ❍ rejecting a call
❍ terminating a call ❍ setting up a call
❍ call waiting ❍ accepting a waiting call
❍ rejecting a waiting call ❍ hold
❍ two-line operation with hold
(switching between 2 lines) ❍ charge indication (see above)
Further functions are currently not supported.
Please note:
The number of features and the realisation of the individual functions depend upon the used CTI
application. Several applications do not support, e. g. the features call waiting and two-line
operation with hold. In case of doubt, please contact the retailer/manufacturer of your CTI application.
Page 64

64
Important information
Operation during power failure
Even in the case of a power failure, the basic telephone functions remain executable (manual
dialling and ringing signal for incoming calls, see chapter "Emergency operation", page 7).
Cleaning
Use a soft, slightly moist cloth for the housing surface. Please do not use abrasive liquids or
chemicals to clean the device. The telephone is maintenance-free.
Installation
Please take care that the cables do not lead to any danger of stumbling and avoid folding,
pushing and pressing of the cables.
Some furniture lacquers or furniture cleaning products may attack the rubber at the feet of your
tiptel 83 system and thus cause patches. In such cases please use a non-slip pad under the
device.
The telephone may not be installed and used in an inappropriate environment. Avoid:
- humid rooms, dusty rooms and rooms with danger of explosions
- temperatures of more than 40°C and less than 0°C
- strong vibrations
- exposure to direct sunlight
Possible malfunctions
Use the information provided in chapter "Troubleshooting" or plug another telephone at the
corresponding telephone wall socket in order to detect whether the malfunction was caused by
your tiptel 83 system or not. Never open or connect a defective device. Bring the device to your
local dealer or service centre. Please keep the original packaging carton and material in case
that it will become necessary to return the device. This material will grant optimal protection while
transported. You should make a back-up of all your entries (e. g. by using the software TipKom
on a PC) in order to avoid a loss of data.
Ecological information
During the normal use of the telephone, you will not have any contact to substances damaging
your health. The synthetic material and plastics used for manufacturing this device exclusively
consist of partially recycled granules. Our packaging materials do not consist of plastics but of
partially recycled cardboard and paper.
Page 65

65
Factory pre-set
Telephone settings
Direct call: . . . . . . . . . . . . . . . . . . . . . . . . . . . . . .None
Ringing tone
Melody: . . . . . . . . . . . . . . . . . . . . . . . .Triadic (66)
Incremental volume control: . . . . . . . . .Off
Volume . . . . . . . . . . . . . . . . . . . . . . . . .Medium
Restrictions: . . . . . . . . . . . . . . . . . . . . . . . . . . . . .None
System settings
MSN: . . . . . . . . . . . . . . . . . . . . . . . . . . . . . .None (the first MSN is set by the first inco-
ming call)
Call number display: . . . . . . . . . . . . . . . . . . . . . . .On
Call waiting signal: . . . . . . . . . . . . . . . . . . . . . . . .On
ECT (explicit call transfer): . . . . . . . . . . . . . . . . . .Off
Telephone number for CD (call diversion): . . . . . . .None
Exchange identification code: . . . . . . . . . . . . . . . .None
PIN: . . . . . . . . . . . . . . . . . . . . . . . . . . . . . .000
Charge rate: . . . . . . . . . . . . . . . . . . . . . . . . . . . . .0.06
Call forwarding function: . . . . . . . . . . . . . . . . . . . .none
Page 66

66
Problem
No dialling tone after picking
up the handset.
PIN code forgotten.
"Memory capacity exhausted"
is displayed.
Telephone does not ring or
rings only sometimes.
No display at all.
The display shows "Loader
V1.5"
Possible error source
Connecting cable, handset's
cable, ISDN wall socket
The maximum number of
entries in the electronic telephone book is reached.
Call filter active; do not disturb
function on; not all MSNs registered; Call forwarding active.
Possibly, your telephone
connection works in the emergency mode.
Operating software erased.
Recommendation
Check all cables, check telephone wall socket by using
another telephone.
Contact our customer service.
Erase electronic telephone
book entries that are no longer
needed.
Read chapters: "Electronic
telephone book", "set ringing
tone", "Entering MSN" and
"Call forwarding".
Check power feeding of your
ISDN NTBA.
Load an operating software
on your telephone using the
PC software. Please bear in
mind:
– Deactivate the function
"save data/restore" in the
PC software.
– Confirm the instruction
"Please set your tiptel
feature phone to the operating mode LOAD NEW
SOFTWARE by unplugging
and replugging the S
0
plug.
Troubleshooting
Page 67

67
Appendix
Service
You have purchased a modern product by Tiptel which was designed and manufac-tured in
Ratingen near Düsseldorf. The high-tech manufacturing facilities "Made in Germany" grant a
continuous level of the highest quality. This is even underlined by the certification according to
DIN EN ISO 9001. If, however, problems occur or you have questions on operating the device,
please contact your local dealer.
Guarantee
Please contact your local dealer or importer for details of guarantee for non EC countries.
Within the European Community the following guarantee regulation applies: Your contact for
services arising from guarantee obligations is the authorised dealer where you bought the
device.
Tiptel.com GmbH Business Solutions will grant a guarantee of 2 years from the date of handover for the material and for the manufacturing of the telecommunications terminal unit.
Initially, the purchaser shall have only the right of subsequent performance. Subsequent
performance entails either repair or the supply of an alternative product. Exchanged devices or
parts shall become the property of the authorised dealer.
If the subsequent performance fails, the purchaser can either demand a reduction in the purchase
price or withdraw from the contract.
The purchaser shall notify the dealer immediately of any defects found. Proof of the guarantee
entitlement shall be furnished by standard proof of purchase (receipt or invoice).
The guarantee entitlement shall expire if the purchaser or an unauthorised third party interferes
with the device. Damage caused by inappropriate handling, operation, storage or by force
majeure or other external influences shall not be covered by the guarantee.
The guarantee shall not cover any consumable material (e.g. batteries) or defects that only
slightly impair the value or the usability of the device.
Claims for damage caused by transport shall be asserted to the delivery company.
Notes on settlement:
Repairs can only be conducted by the Tiptel Service. A warranty repair does not prolong the warranty period – neither for the replaced parts nor for the device. This guarantee is not transferable and shall expire if the device is sold on to another party. It shall also expire if the
device is interfered with by third parties or if the serial number on the device has been
removed or made illegible. There is a guarantee seal on the tiptel 83 system. Please do not
damage or remove this seal because otherwise, your guarantee will expire.
The General Terms and Conditions of Tiptel.com GmbH Business Solutions, which are part of
the contract for a dealer, shall also apply. In the event of a complaint, the defective product shall
be sent to the relevant Tiptel subsidiary, the importer or dealer along with a description of the
defect and the proof of purchase.
Page 68

68
Appendix
CE sign
This device is approved for the connection and use within the analogue public telephone
networks in all EC countries – according to the European Requirements. Due to technical
deviations in individual countries, we cannot grant an unlimited guarantee for the successful
operation at all types of telephone accesses.
Tiptel.com GmbH Business Solutions hereby declares that the device complies with all fundamental requirements of the European directive 1999/5/EC. This conformity is confirmed by the
CE sign on the device.
Further details on the declaration of conformity can be found under the following internet
address:
http://www.tiptel.org
This equipment is marked with the recycling symbol. It means that at the end of life of
the equipment you must dispose of it separately at an appropriate collection point and
not place it in the normal domestic unsorted waste stream. This will benefit the en-
vironment for all (European Union only)
Page 69

69
Technical data
Power supply: S0-fed, emergency power supply possible
Display:
Resolution: 2 x 20 characters (alphanumeric)
Contrast: 20 levels
Connecting cables:
Telephone connection cable: Length = 3 m
Data cable RS 232: Length = 3 m, 9-pin, sub socket strip
Handset cable: Length = max. 1.8m, curled cable
Telephone/memory:
Electronic telephone book: 100 entries
Call list: 20 entries
Repeated dialling: 20 entries
Appointments: 50 entries
Time control: 10 entries
Data retention during power failure: > 7 days
General data:
Weight: Approx. 900 g
Dimensions (W x H x D): Approx. 220 x 90 x 200 mm
Standard: EURO-ISDN
Ambient temperature: 0° C up to 40° C
Page 70

70
Index
Announcement . . . . . . . . . . . . . . . . . . . . .42-43
Appointments . . . . . . . . . . . . . . . . . . . . . . . .56
Automatic call-back (CCBS:
completion of call to busy subscriber) . . . . . .14
Automatic redial . . . . . . . . . . . . . . . . . . . . . .15
Button functions . . . . . . . . . . . . . . . . . . . . . . .8
Call-back list . . . . . . . . . . . . . . . . . . . . . . . . .14
Call blocking . . . . . . . . . . . . . . . . . . . . . .54-55
Call counter . . . . . . . . . . . . . . . . . . . . . . . . . .11
Call filter . . . . . . . . . . . . . . . . . . . . . . . . . . . .41
Call forwarding . . . . . . . . . . . . . . .45-46, 50-51
Call list . . . . . . . . . . . . . . . . . . . . . . . . . . . . .23
Call number display . . . . . . . . . . . . . . . . . . . .29
Call parking . . . . . . . . . . . . . . . . . . . . . . . . . .19
Call tracing / malicious call identification . . . .17
Call transfer . . . . . . . . . . . . . . . . . . . . . . .18-19
Call waiting . . . . . . . . . . . . . . . . . . . . . . . . . .20
Changing the PIN . . . . . . . . . . . . . . . . . . . . .33
Charge rate . . . . . . . . . . . . . . . . . . . . . . . . . .33
Charges . . . . . . . . . . . . . . . . . . . . . . . . . . . .59
Cleaning . . . . . . . . . . . . . . . . . . . . . . . . . . . .64
Connection . . . . . . . . . . . . . . . . . . . . . . . . . . .6
Dialling via AT command . . . . . . . . . . . . . . . .62
Dialling via the electronic telephone book .12-13
Direct dialling (baby call) . . . . . . . . . . . . . . . .53
Direct manual call . . . . . . . . . . . . . . . . . . . . .11
Display contrast . . . . . . . . . . . . . . . . . . . . . . .32
Display/erase redial memory . . . . . . . . . . . . .13
Duplex mode . . . . . . . . . . . . . . . . . . . . . .42-43
Editing data . . . . . . . . . . . . . . . . . . . . . . . . . .26
Electronic telephone book / register . . . . .24-26
Emergency operation . . . . . . . . . . . . . . . . . . .7
Entering data . . . . . . . . . . . . . . . . . . . . . . . . .24
Entering the MSNs . . . . . . . . . . . . . . . . . . . .27
External target number . . . . . . . . . . . . . . . . .39
Factory pre-set . . . . . . . . . . . . . . . . . . . . . . .65
Free macro key . . . . . . . . . . . . . . . . . . . . . . .49
Guarantee . . . . . . . . . . . . . . . . . . . . . . . . . . .67
Handset volume . . . . . . . . . . . . . . . . . . . . . . .9
Hands-free operation . . . . . . . . . . . . . . . . . . .15
Illustration (underneath) . . . . . . . . . . . . . . . . . .5
Illustration (upper housing, keypad) . . . . . . . . .4
Important information . . . . . . . . . . . . . . . . . . .64
Initial operation . . . . . . . . . . . . . . . . . . . . . . . .6
Initiating the announcement . . . . . . . . . . . . . .42
Installation . . . . . . . . . . . . . . . . . . . . . . . . . . .64
Internal target number . . . . . . . . . . . . . . .39, 44
Keypad . . . . . . . . . . . . . . . . . . . . . . . . . . . . .22
Macro programming . . . . . . . . . . . . . . . . . . .38
Memory . . . . . . . . . . . . . . . . . . . . . . . . . . . . .60
Mute function . . . . . . . . . . . . . . . . . . . . . . . .16
Off-line call preparation . . . . . . . . . . . . . . . . .12
Operation overview . . . . . . . . . . . . . . . . . . . .10
PC connection / TipKom . . . . . . . . . . . . . .62-63
Placing a call on hold . . . . . . . . . . . . . . . . . .17
Redial . . . . . . . . . . . . . . . . . . . . . . . . . . . . . .13
Scope of supply . . . . . . . . . . . . . . . . . . . . . . .6
Selecting the outgoing MSN . . . . . . . . . . . . .28
Setting the call diversion function . . . . . . . . .31
Setting the call transfer function . . . . . . . . . .31
Setting the call waiting function . . . . . . . . . . .30
Setting time and date . . . . . . . . . . . . . . . . . .32
Status CO-line access . . . . . . . . . . . . . . . . . .44
Status voicebox . . . . . . . . . . . . . . . . . . . .46-47
Storing data . . . . . . . . . . . . . . . . . . . . . . . . .25
Sub-addressing . . . . . . . . . . . . . . . . . . . . . . .22
Switching between handset and hands-free
mode . . . . . . . . . . . . . . . . . . . . . . . . . . . . . .16
System settings . . . . . . . . . . . . . . . . . . . .27-36
System functions . . . . . . . . . . . . . . . . . . .39-49
TAPI-Driver . . . . . . . . . . . . . . . . . . . . . . . . . .63
Technical data . . . . . . . . . . . . . . . . . . . . . . . .69
Telephone calls . . . . . . . . . . . . . . . . . . . . .11-23
Telephone settings . . . . . . . . . . . . . . . . . .52-55
Three-party conference . . . . . . . . . . . . . . . . .18
Time control . . . . . . . . . . . . . . . . . . . . . . .57-58
TipKom . . . . . . . . . . . . . . . . . . . . . . . . . . . . .62
Troubleshooting . . . . . . . . . . . . . . . . . . . . . . .66
Two-line operation with hold . . . . . . . . . . . . .18
Voicebox-functions . . . . . . . . . . . .40-41, 46-47
Voicebox pick-up . . . . . . . . . . . . . . . . . . . . . .47
Volume adjustment . . . . . . . . . . . . . . . . . . . . .9
Page 71

71
Quick reference card for operation of your voicebox
tiptel 350 ISDN / tiptel 350-10 ISDN / tiptel 355 ISDN
Page 72

Page 73

73
Quick reference card for operation of your voicebox
tiptel 540 office/ tiptel 545 pro
Page 74

Page 75

Page 76

09/ 07 (UK)
EDV 4935332
Tiptel.com GmbH Business Solutions
Halskestraße 1
D - 40880 Ratingen
Tel.: 0900 100 - 84 78 35*
Vanity Tel.: 0900 100 - TIPTEL*
Internet: www.tiptel.de
International
Internet: www.tiptel.com
*gebührenpflichtig
Tiptel b.v.
Camerastraat 2
NL - 1322 BC Almere
Telefoon: 0900 - BELTIPTEL of
0900 - 2358478
(niet gratis)
Fax: 036 - 53 678 81
E-mail: info@tiptel.nl
Internet: www.tiptel.nl
Tiptel sarl
23, avenue René Duguay Trouin
F - 78960 Voisins le Bretonneux
Tél : 01 - 39 44 63 30
Fax : 01 - 30 57 00 29
E-mail : support@tiptel.fr
Internet : www.tiptel.fr
Tiptel NV/SA
Leuvensesteenweg 510 bus 4
B - 1930 Zaventem
Telefoon: 0903 - 99 333
(1,12 Euro / min)
Fax: 02 - 714 93 34
E-mail: tech@tiptel.be
Internet: www.tiptel.be
Tiptel GmbH
Tenschertstraße 5
A - 1230 Wien
Telefon: 01 - 616 78 71
Fax: 01 - 616 78 71-22
E-mail: office@tiptel.at
Internet: www.tiptel.at
Tiptel AG
Bahnstrasse 46
CH - 8105 Regensdorf
Telefon: 044 - 884 01 80
Fax: 044 - 843 13 23
E-mail: tiptel@tiptel-online.ch
Internet: www.tiptel-online.ch
 Loading...