

Page 1
Operating instructions (en)
Professional answering machine
with caller ID and message transfer
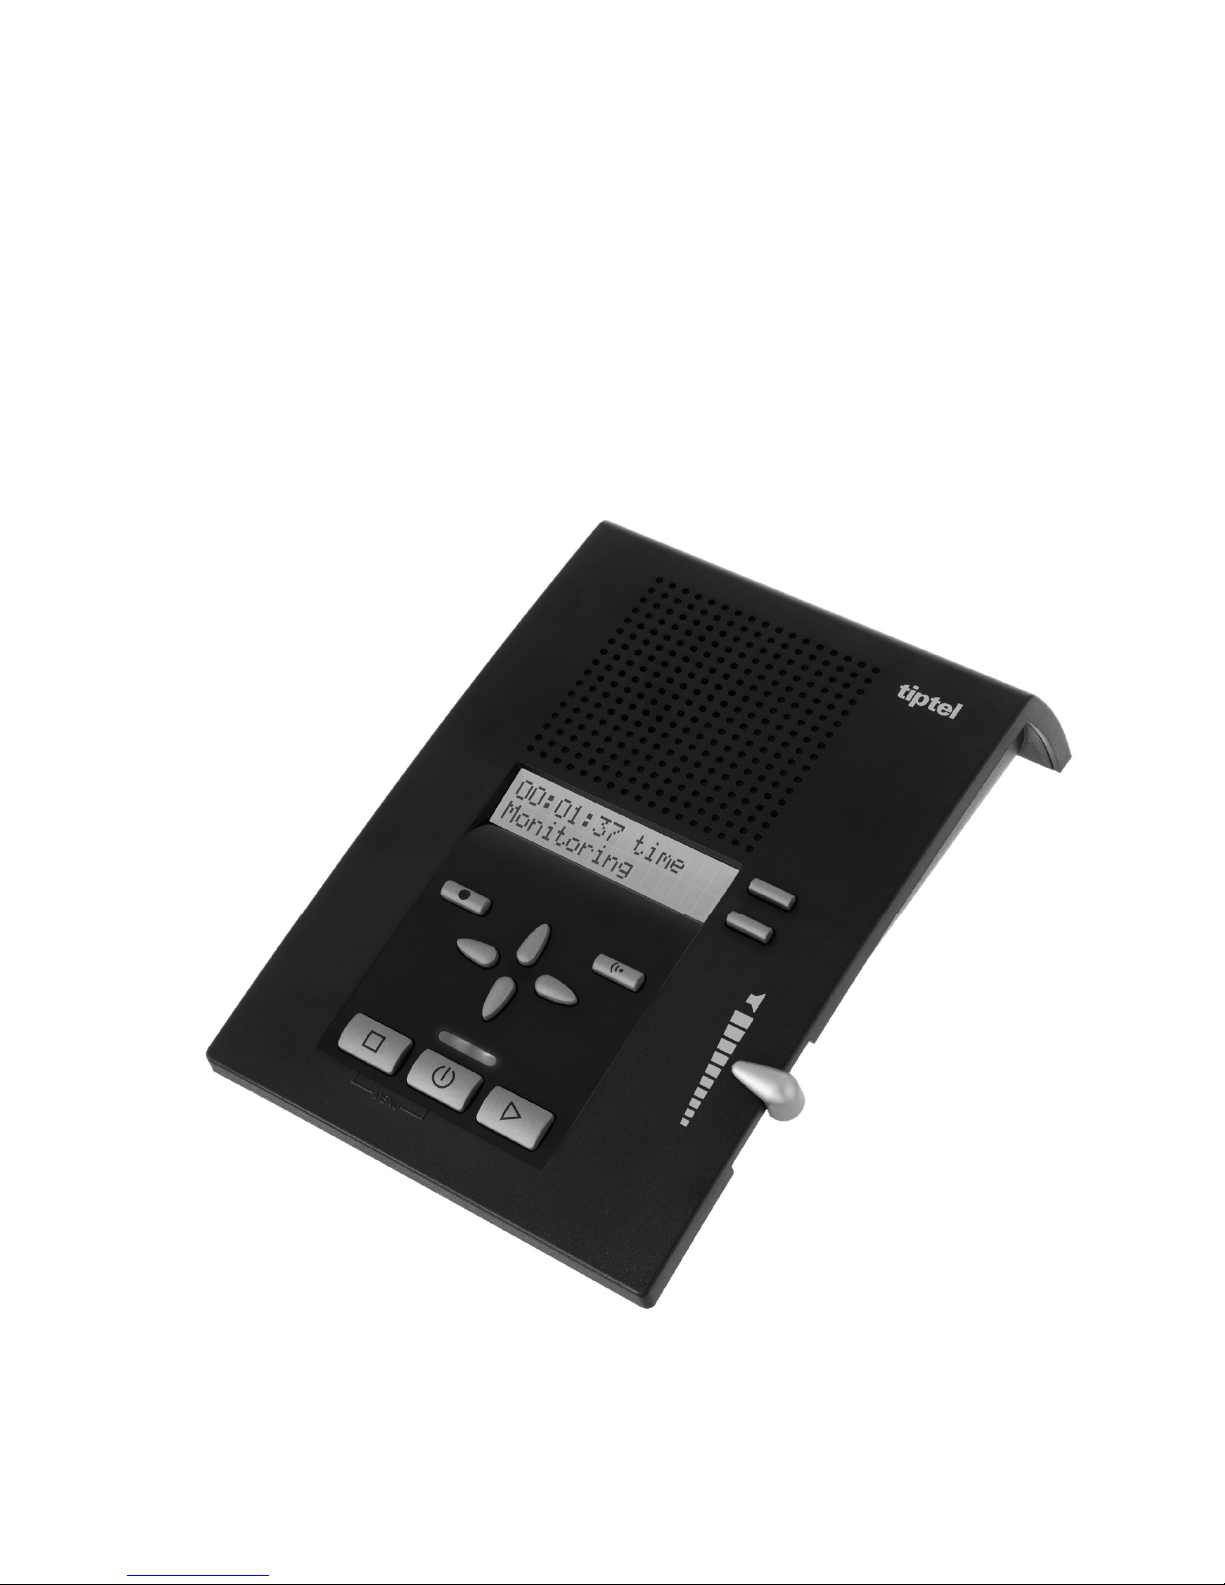
tiptel 333
tiptel
Page 2

Page 3

Contents
3
Contents
Contents .................................................................................... 3
Safety notices ........................................................................... 4
Controls ..................................................................................... 5
Assignment of keys .................................................................. 6
Service ....................................................................................... 8
Scope of delivery ................................................................... 8
Setting up .............................................................................. 8
Connecting ............................................................................ 8
Announcements ........................................................................ 11
General .................................................................................. 11
Examples of announcements ............................................... 11
Recording an announcement ............................................... 12
Checking announcements .................................................... 13
Deleting announcements ...................................................... 13
Switching on and off ................................................................. 14
Playing back and deleting messages ...................................... 16
Playing back new messages ................................................ 16
Playing back all messages ................................................... 16
Playing back specific messages ........................................... 17
Replaying ............................................................................... 17
Pausing playback .................................................................. 17
Search (Skip) ......................................................................... 18
Deleting individual messages ............................................... 18
Deleting all messages ........................................................... 18
Two-way conversation recording / Personal information
(dictation) .................................................................................. 19
Two-way conversation recording of telephone calls ............ 19
Personal information (dictation) ............................................ 20
Message transfer ...................................................................... 21
Setting the destination number ............................................. 21
Activating the message transfer............................................ 22
Page 4

Contents
3
Call list ....................................................................................... 23
General .................................................................................. 23
Browsing the call list ............................................................. 23
Call back from the call list ..................................................... 24
Message function ..................................................................... 25
Absent-subscriber-manager .................................................... 26
Remote operation ..................................................................... 28
Remote access ...................................................................... 28
Remote operating functions .................................................. 29
Switching on the device remotely ......................................... 31
Settings ..................................................................................... 32
Setup options (functions) ...................................................... 32
Setup menu ........................................................................... 34
Appendix ................................................................................... 35
Service ................................................................................... 35
Guarantee .............................................................................. 35
CE sign .................................................................................. 36
Ecological information .......................................................... 37
Troubleshooting .................................................................... 37
Default setting ....................................................................... 39
Technical specifications ........................................................ 40
Index .......................................................................................... 41
Page 5

Safety notices
4
Safety notices
Please read the following notices very closely before setting up,
connecting and operating the tiptel 333:
Only connect the connection cables to sockets designated for
this use.
Install the connection cables in a safe manner. Connected cables
must not be subjected to excessive mechanical stress.
Do not set up the device in the immediate proximity of electrical
interferences.
Only connect accessories which are permitted with this device.
Never open up the device yourself. Do not allow the plug
contacts to touch sharp or metallic objects.
Only clean the tiptel 333 with a soft, moist cloth. Do not use
chemicals or abrasive cleaners.
Protect the device from damp, dust, liquids and vapours.
Do not expose the device to direct sunlight.
Do not use the device in explosion-prone environments.
Only use the original power supply unit and the original telephone
connection cable.
The wall socket that you use must be located close to this device
and easy to access.
Page 6
Controls
5
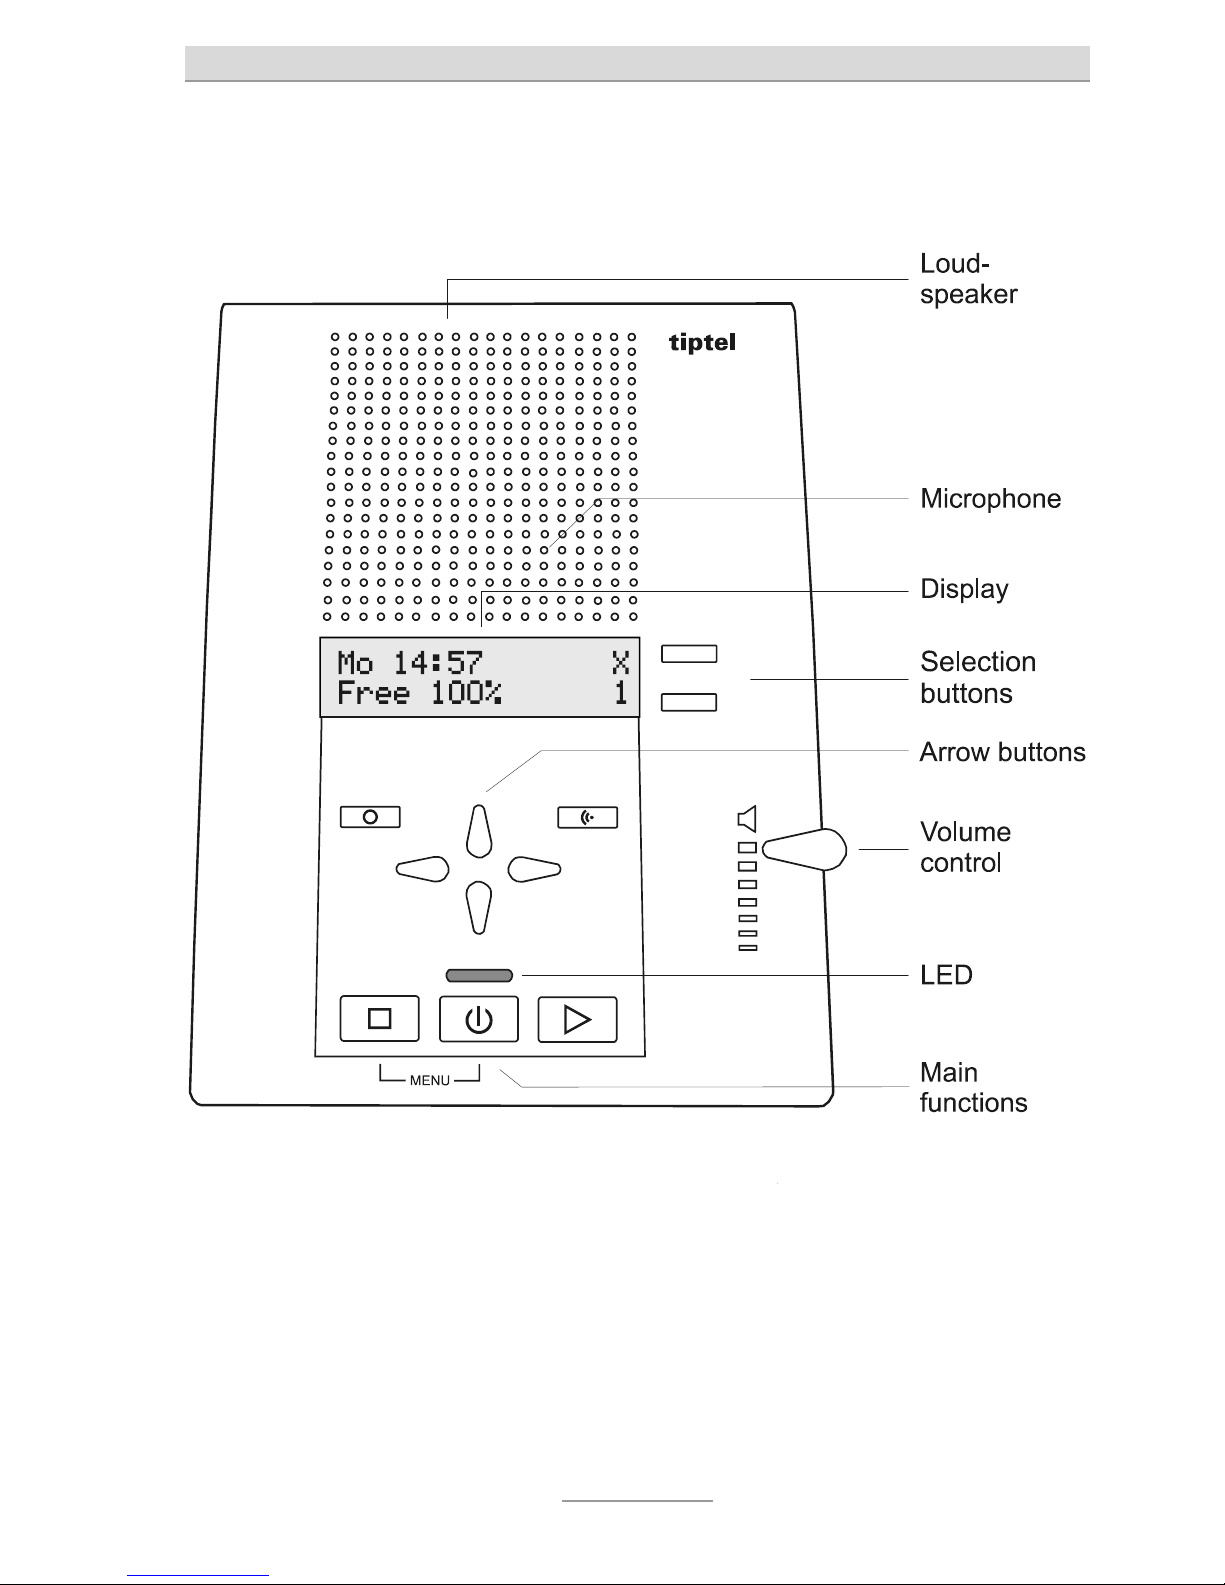
Controls
Page 7
Assignment of keys
6
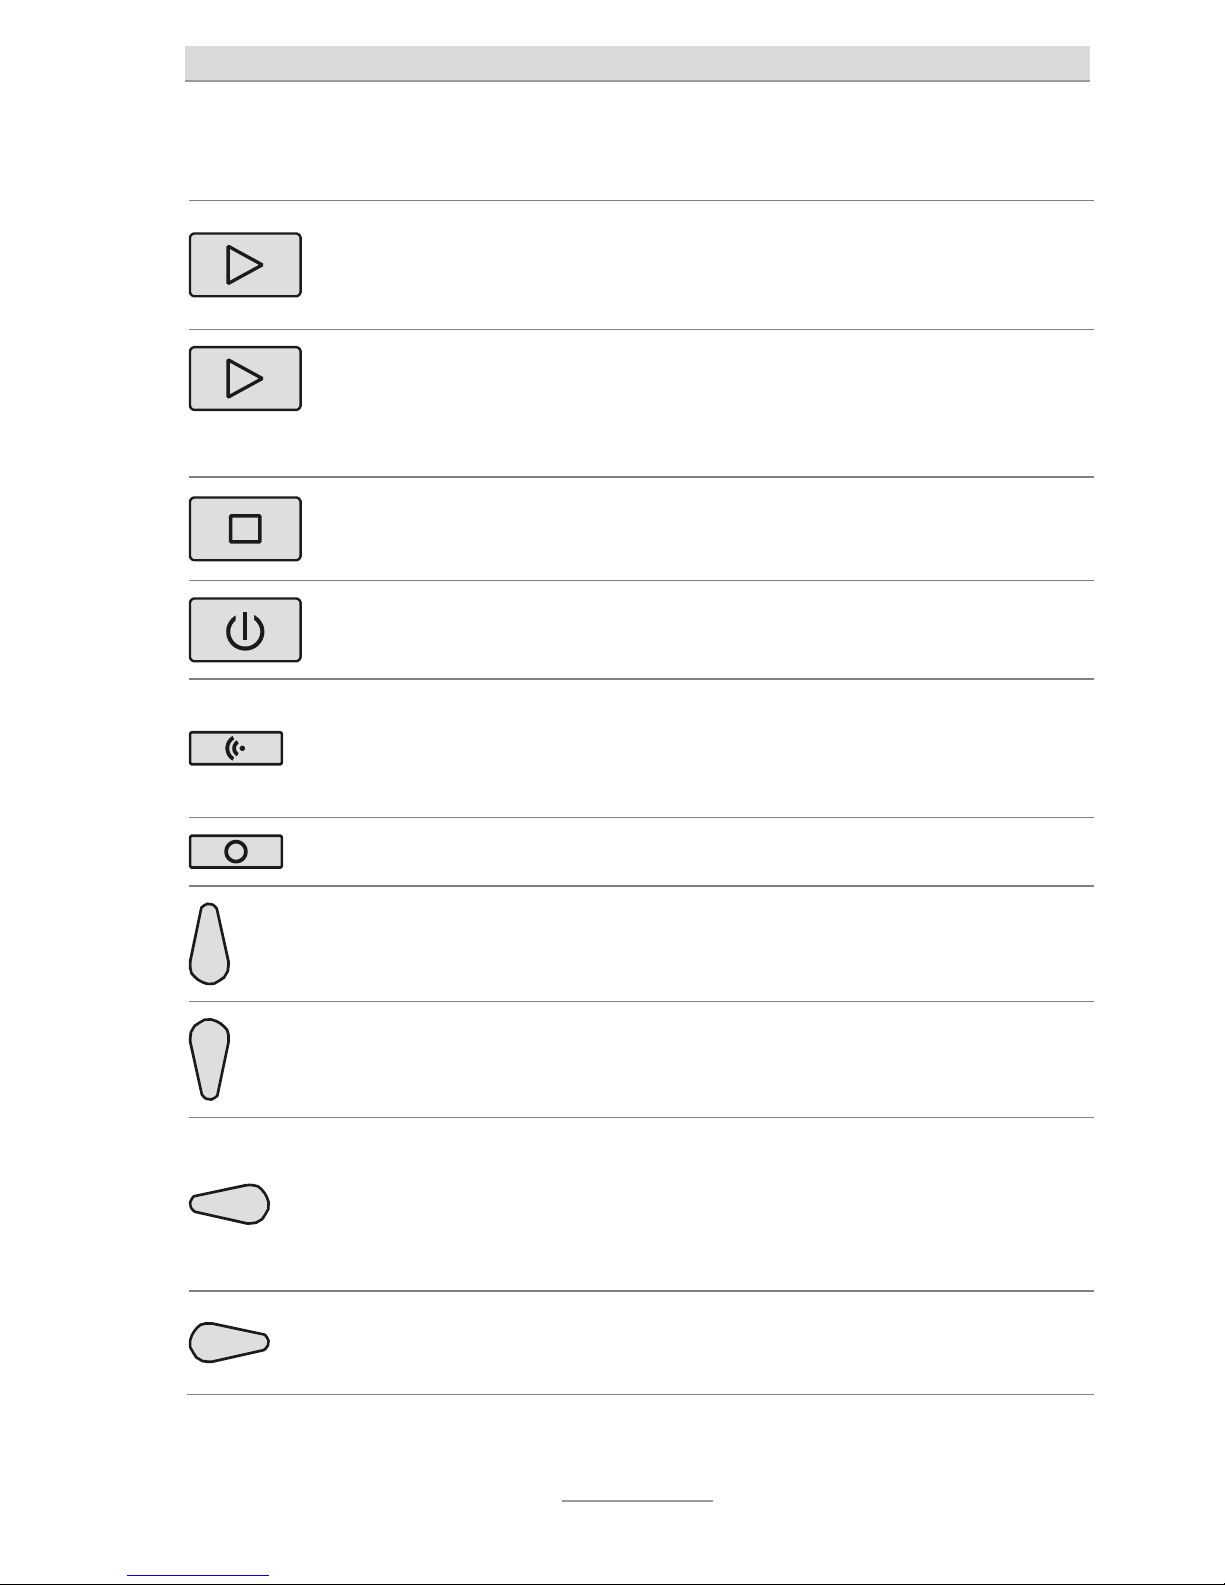
Assignment of keys
Playback: Starts the playback of new messages which you
have not yet listened to. Press and hold Playback to repeat the
last 3 seconds of the message.
2 secs
Playback: Press for 2 seconds. Starts playback of all
messages. Playback will begin with the oldest message and
will end with the newest one.
Stop: Stops the current function, also serves to confirm
settings.
On/Off: Switches the answering machine's functions on or off.
Announcement: Press briefly to start playback of your current
announcement. Press and hold to start recording a new
announcement.
Record: Starts recording a dictation of personal information.
Control (up): Opens the list of messages and serves to
navigate and set up in the setup menu.
Control (down): Opens the caller list and serves to navigate
and set up in the setup menu.
Control (left): Moves the cursor to the left. Press during
playback to repeat the current message. Press twice in quick
succession to switch to the previous message during
playback.
Control (right): Moves the cursor to the right. Press during
playback to skip to the next message.
Page 8

Assignment of keys
7
Select: Press this key to select input fields and functions
which appear in the display next to the corresponding key.
and
Stop and On/Off pressed at the same time: Opens the setup
menu.
and
On/Off and Playback pressed at the same time: Activates or
deactivates the message transfer function.
2 secs
On/Off pressed for 2 seconds: Opens the set-up menu of the
absent-subscriber-manager.
Page 9

Service
8
Service
Scope of delivery
Included in the packaging of your tiptel 333 are:
tiptel 333
Connection cables
Adaptor (not in all countries)
Power supply unit 5V / 1A / DC
Operating instructions
Setting up
Your tiptel 333 is manufactured intended for normal conditions of
use. Solvents in furniture lacquers, wood oils and paint preservatives
may corrode the bases of the device. Bases altered in this way may
then leave stains on furniture.
Therefore always use a non-slipping base, especially with new or
recently treated furniture.
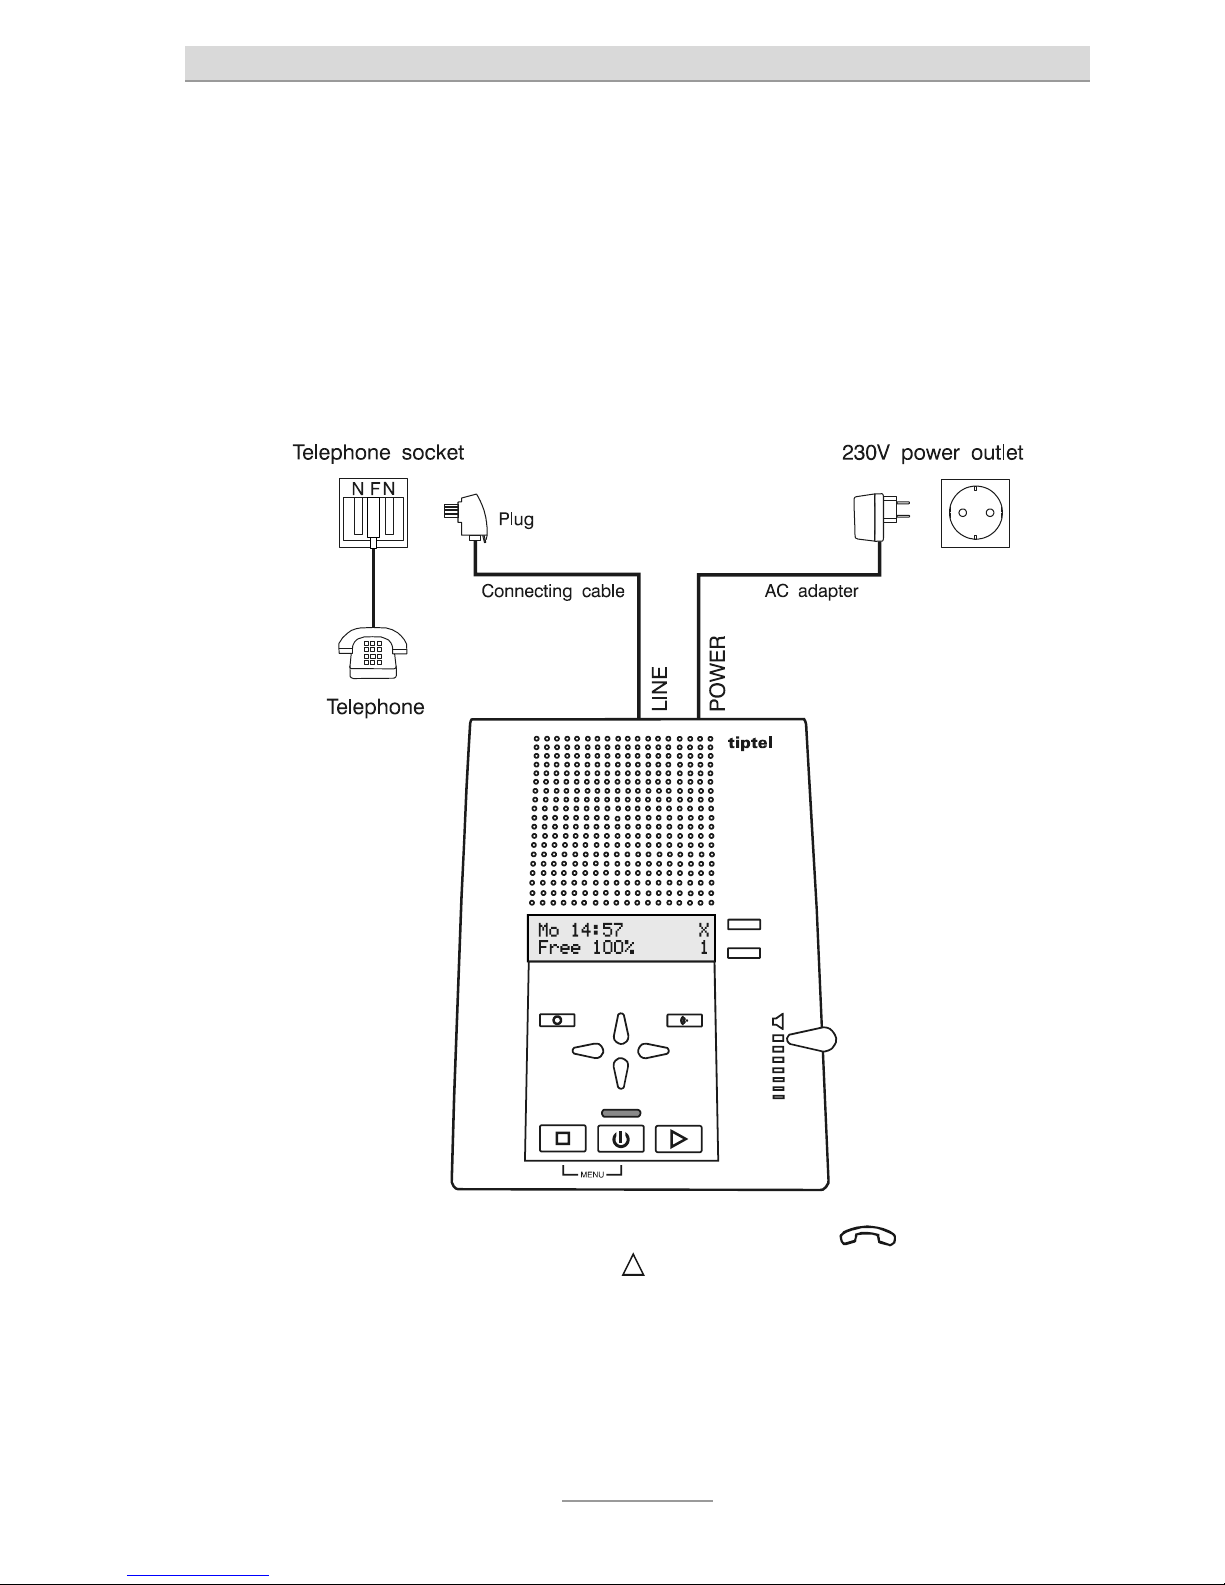
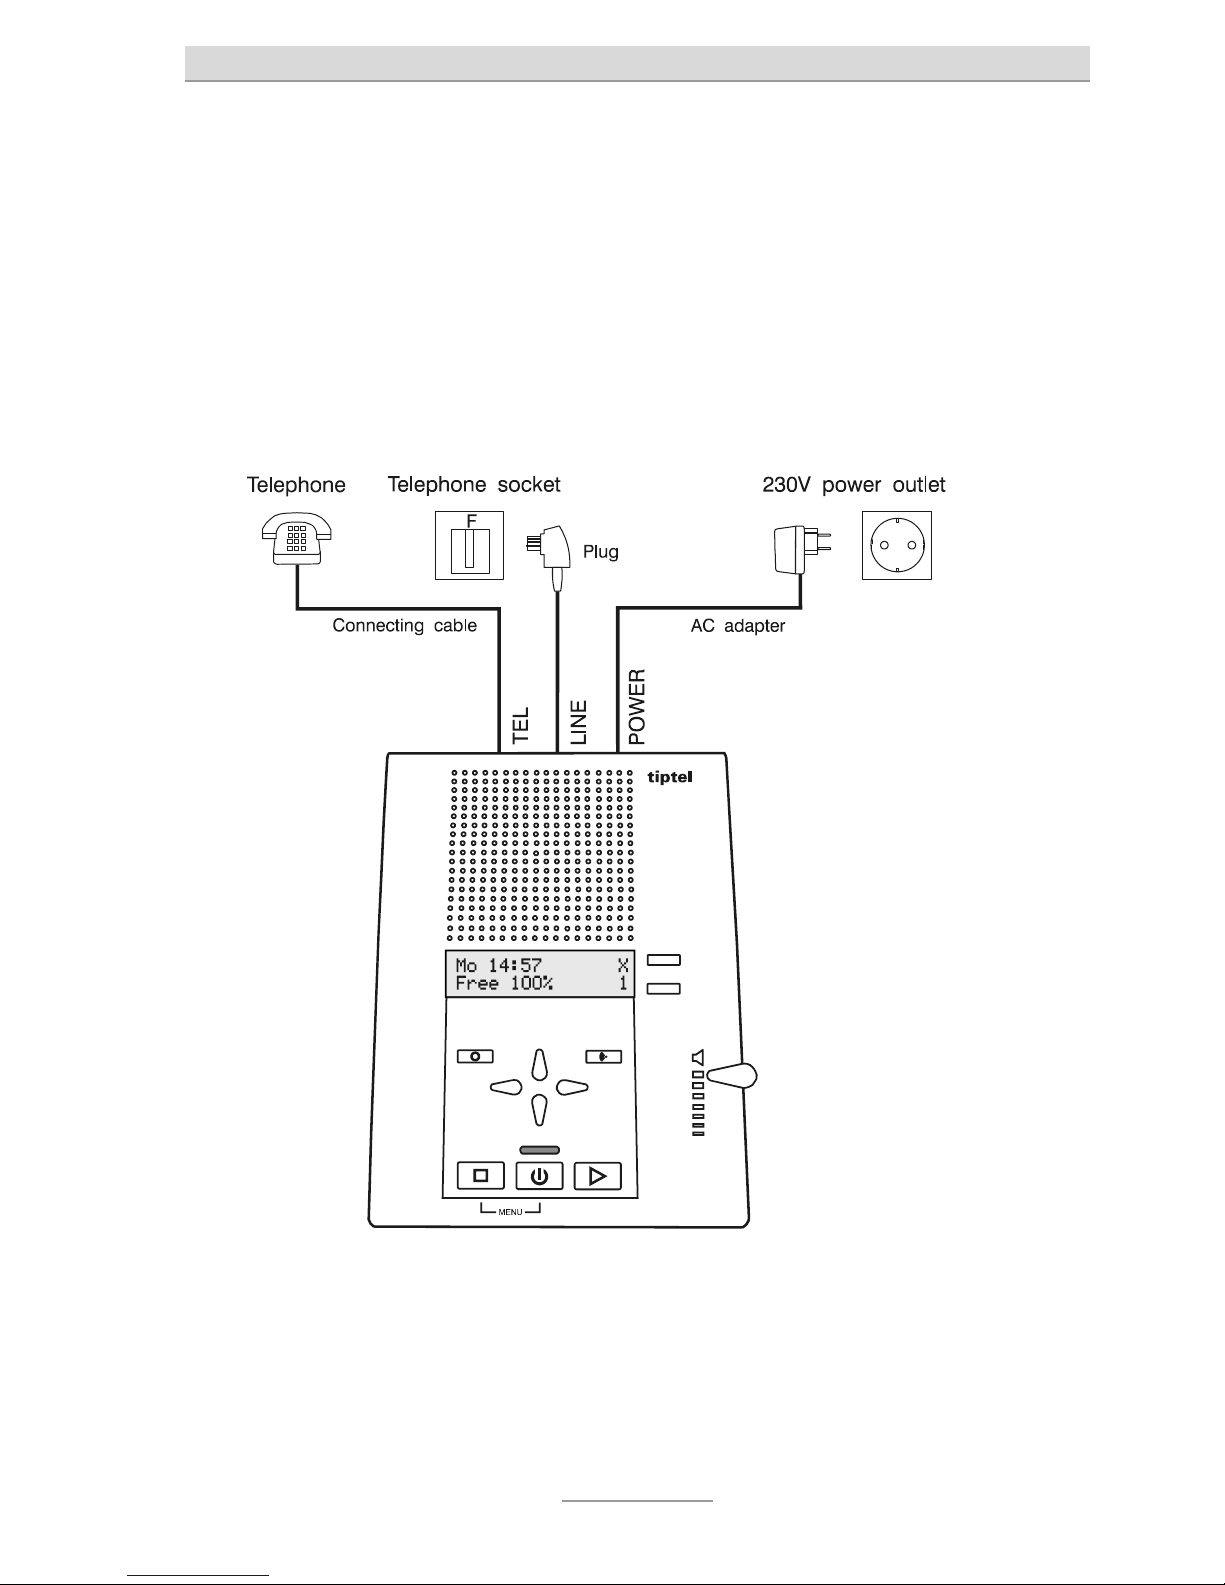
Connecting
You must attach all necessary cables before you can start using
your tiptel 333. The device offers two different connection options,
depending on whether you are using a socket with several slots or
just one.
When you switch on the device for the first time, you will be
invited to choose your language. Press the Select key until
your language appears. Now press the Stop key to confirm
your choice of language.
Page 10
Service
9
Socket with several slots
1 Plug the existing telephone into the socket (slot F).
2 Insert the power supply unit with the small connector into the
POWER jack and then insert the power supply unit into a 230V
wall socket.
3 Insert the TAE adaptor into the free end of the connection cable.
4 Insert the second free end of the connection cable into the LINE
jack, and insert the TAE adaptor into the socket (slot N).
In Austria, slot F corresponds to this symbol: and slot N
corresponds to this symbol:
. Use the enclosed TST adaptor
in place of the TAE adaptor.
In Switzerland, a T+T83 A12 socket should be used, into
which you should insert the enclosed T+T connection cable.
If required, use an A6 adaptor in place of an A12 adaptor.
Page 11
Service
10
Socket with only one slot
1 Insert the power supply unit with the small connector into the
POWER jack and then insert the power supply unit into a 230V
wall socket.
2 Disconnect the existing telephone cable from the telephone and
insert the freed-up connector into the LINE jack.
3 Insert the connection cable provided into the telephone with
one connector and insert the other connector into the TEL jack.
This connection option is recommended on the assumption
that the telephone's connections are a normal pair of telephone
cable connections. This is the case if the telephone complies
with Regulations TBR21 or ETSI ES 203 021. In the event that
the "earth" and "alarm" contacts are used on your telephone
socket, you must exclusively use a two-core telephone cable.
Page 12

Announcements
11
Announcements
General
Your tiptel 333 allows you to make two different announcements
(announcement 1 - 3) and also has a built-in internal announcement (message 4). You can toggle between announcements using
the lower Select key. Announcement 4 cannot be altered. An
anouncement can be between two seconds and three minutes
long.
There are two different types of announcements: recordable and
non-recordable announcements. With a recordable announcement,
the caller can leave a message after hearing your announcement.
With a non-recordable announcement, the caller is simply informed
that you are unavailable and is not able to leave a message.
Examples of announcements
Recordable announcement
Hello, you've reached Kevin Seconds in .... I'm out of the office at
the moment and will be back at about ... You can reach me personally between ... and ... on [number]. Otherwise, simply leave
your name and number and I will return your call. Please leave a
message after the tone.
Non-recordable announcement
Hello, this is Steve Youth, sales representative for [company] in ...
My office is temporarily closed due to staff sickness, for the holi-
days etc. Please call my colleague Mr. ... in ... on [number]. He will
be able to assist you. Thank you for your call. Goodbye.
Page 13
Announcements
12
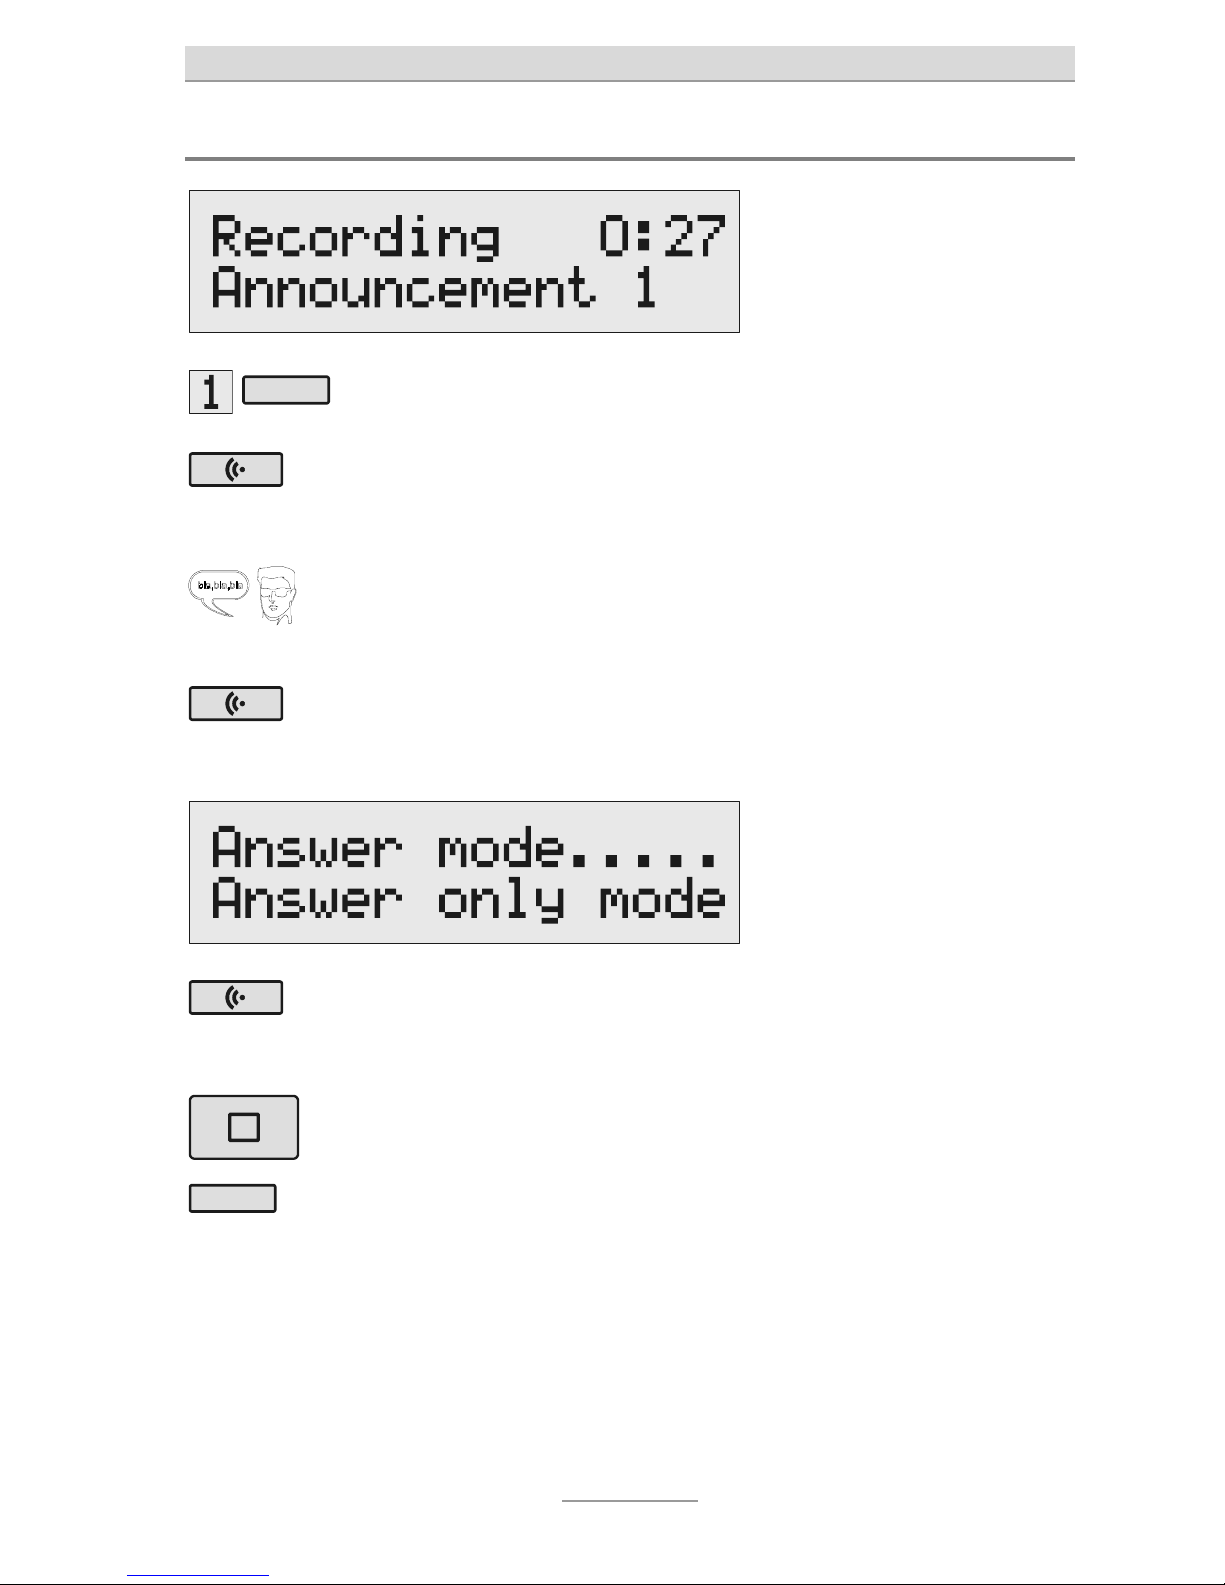
Recording an announcement
Press Select to choose your
desired announcement.
The announcement will appear at
t
he bottom-right of the display.
Press and hold Announcement.
Wait until you hear a short beep.
Then "Recording.." will appear on
t
he display.
Start speaking (speak into
t
he microphone from a dis-
t
ance of about 15 cm).
The display will indicate how
many minutes and seconds you
have been speaking for.
To pause the recording,
release the Announcement
key.
"Recordable" and "Nonrecordable" will appear on the
display.
To continue recording, press
and hold Announcement
once more.
Recording will continue.
To cancel the recording,
press Stop.
The recording will be deleted.
Use the Select key next to
t
he corresponding line to
choose whether you want
t
he announcement mode
t
o be recordable or not.
Recording is complete and the
announcement will play again for
you to check. You will hear one
beep at the end of a recordable
announcement. You will hear two
beeps at the end of a nonrecordable announcement.
Page 14
Announcements
13
If you record announcement 3 as a non-recordable message,
your tiptel 333 will automatically switch to this message if the
recording memory is full.
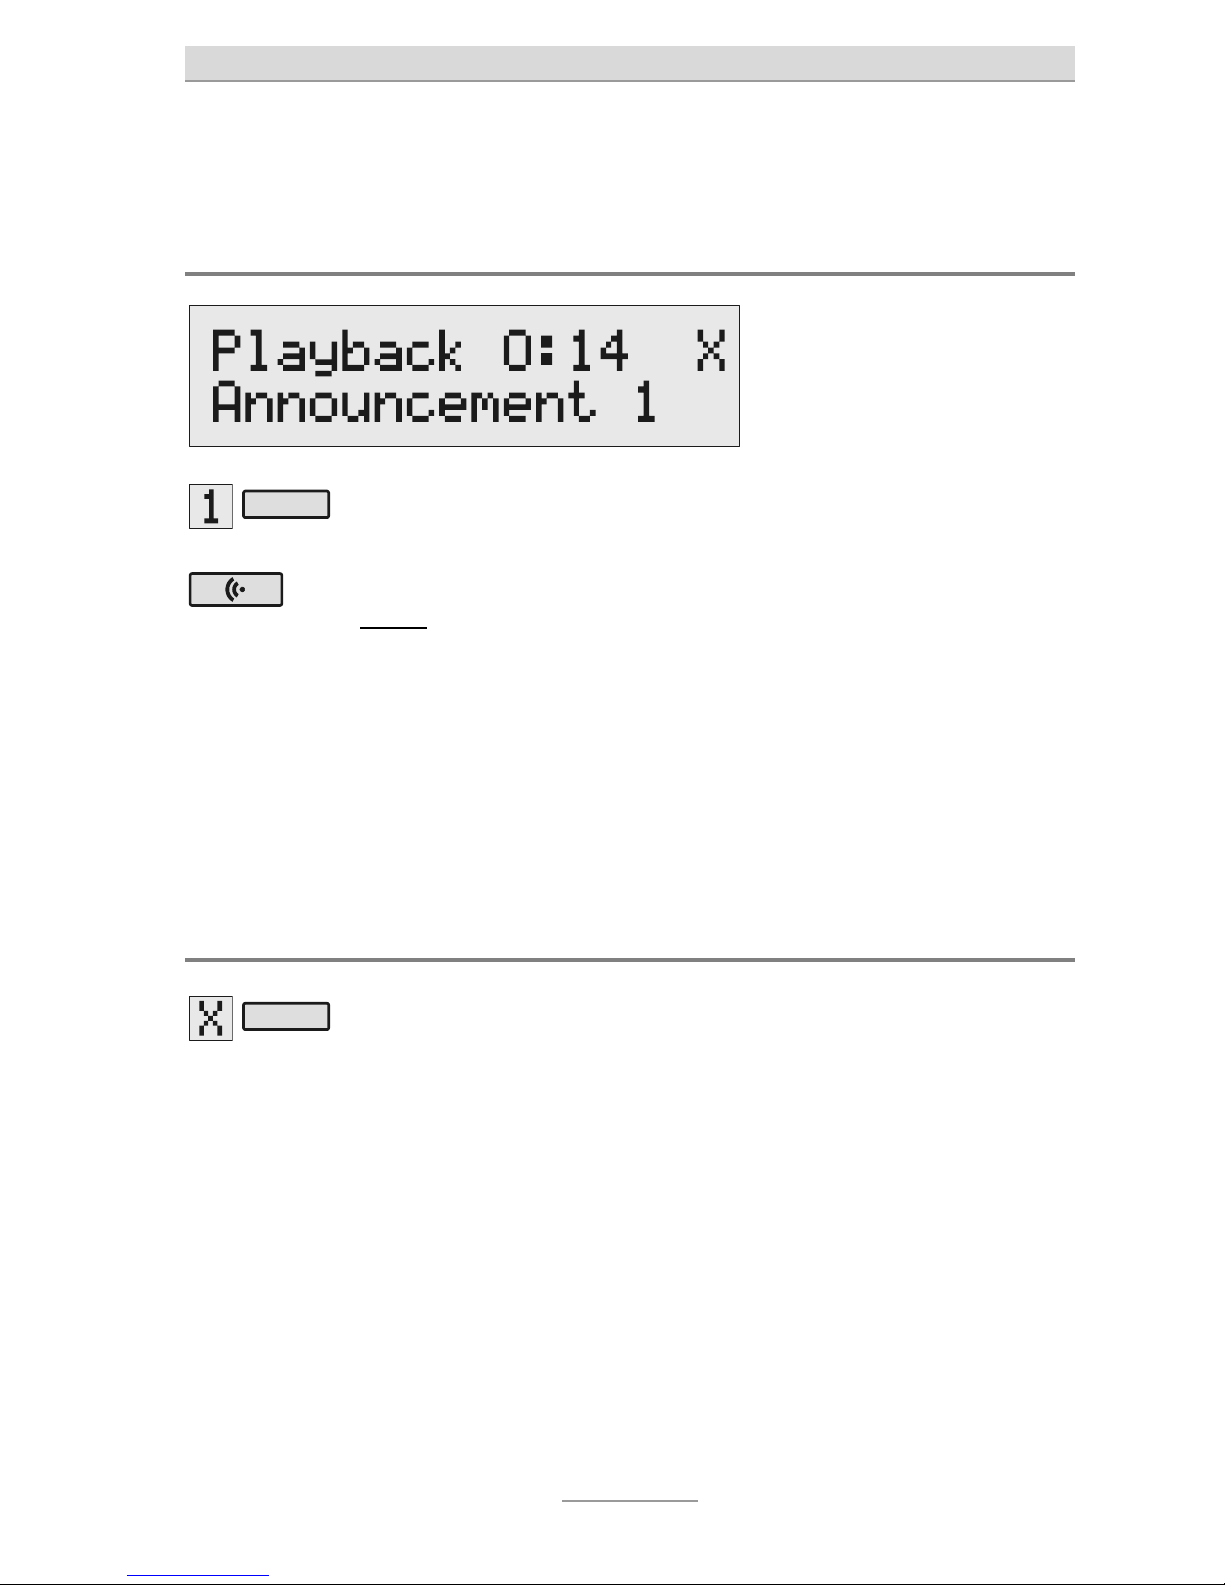
Checking announcements
Press Select to choose your
desired announcement.
The announcement will appear at
t
he bottom-right of the display.
Press Announcement
briefly.
Y
our announcement will play
back. On the display will appear
t
he word Playback, the time
you have already listened to
t
he message and the sequence
number of the announcement.
Y
ou can set the volume by
using the volume controls.
Deleting announcements
Press the Select key next to
t
he delete symbol during
playback.
The current announcement will be
deleted.
Page 15
Switching on and off
14
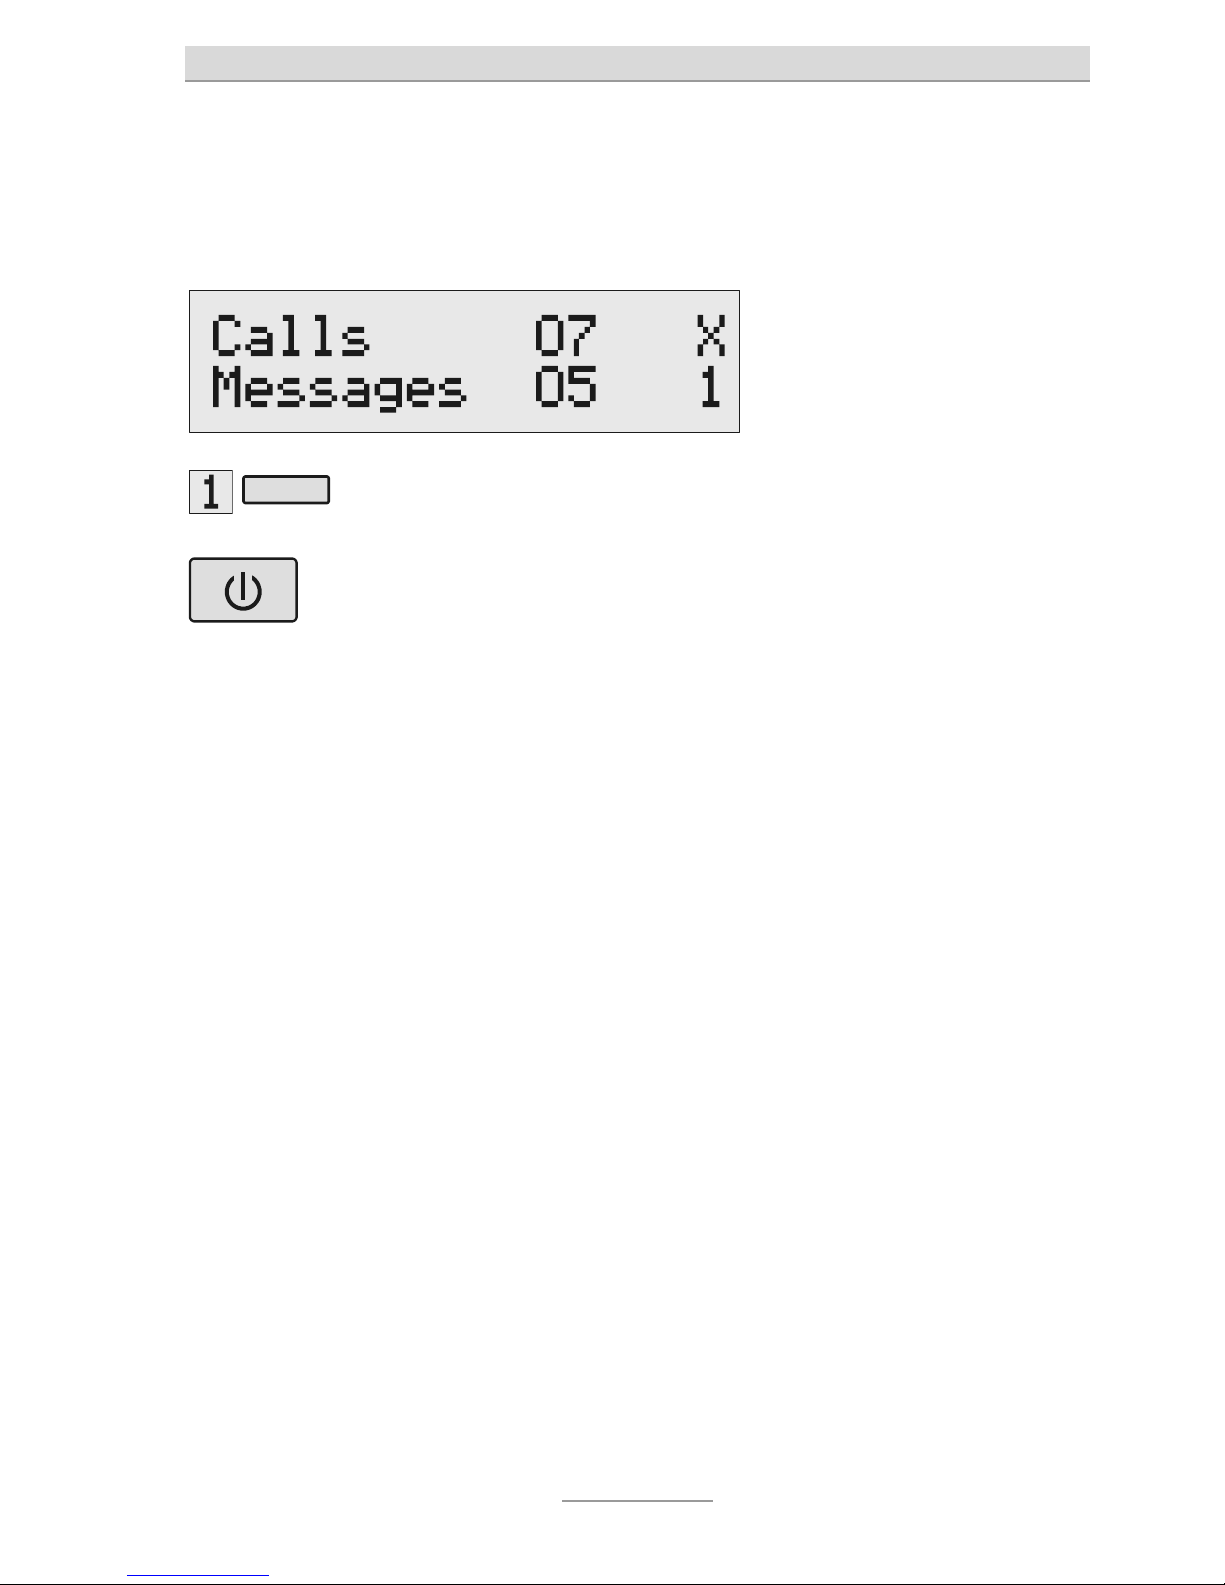
Switching on and off
Make sure there is enough recording memory available. You
can delete all messages or individual ones, when necessary.
Press Select to choose your
desired announcement.
The announcement will appear at
t
he bottom-right of the display.
To switch on: Press On/Off. The LED will light up. With a non-
recordable announcement, two
lines will appear, representing
t
he number of messages. The
number of calls you have
received will flash while the
answering machine is dealing
with the call.
If the caller's phone number is
known, the display will change
and the caller's number will
appear on it for the duration of
t
he call.
Y
ou can set the volume by
using the volume control.
Y
ou can then listen to incoming
messages. You can lift the
receiver any time while the
message is recording to talk
t
he person calling you. The LED
will flash if there are any new
messages.
Page 16

Switching on and off
15
To switch off: Press On/Off
once more.
No further calls will be answered.
The display will return to the
default mode. The LED will flash
for as long as there are messages
which have not yet been listened
t
o.
If the recording memory is full, your tiptel 333 will automatically
switch to announcement 3 if this is a non-recordable
announcement. Otherwise, the device will automatically
switch off and will not answer any further calls.
Page 17

Playing back and deleting messages
16
Playing back and deleting messages
Playing back new messages
Press Playback. Playback of new messages which
you have not yet listened to will
begin. The message's sequence
number and the phone number of
t
he caller of the current message
will appear on the display. At the
end of each message, you will be
informed of the date and time that
t
he call was made.
Y
ou can set the volume by
using the slide control.
Playing back all messages
2 secs
Press Playbac
k
for
2 seconds.
Playback will begin at the first
message.
If the phone number of the caller has been transmitted you
can directly return the call from the mailbox. Please press the
selection key next to the phone number.
Page 18

Playing back and deleting messages
17
Playing back specific messages
Press Control (up). The list of messages will open.
Search for the message that
you want to play back with
t
he Control keys (up/down).
To play back the chosen
message: Press Playback.
Playback will begin.
You can also open the list of messages from the menu.
Replaying
Press Playbackduring
playback.
The last 3 seconds will replay.
Pausing playback
Press Stop. Playback will be paused.
Press Playback. Playback will resume.
Page 19

Playing back and deleting messages
18
Search (Skip)
Press the Control keys
(left/right) during playback.
The current message will be
repeated or skipped.
Deleting individual messages
Press the Select key next to
t
he delete symbol during
playback.
The current message will be
deleted. All following messages
will be automatically re-numbered
and move up one place.
Deleting all messages
Press Stop. The display will show default or
on-state mode.
2 secs
Press the Control key next
t
o the delete symbol for
2 seconds.
All messages will be deleted.
Page 20

Two-way conversation recording / Personal information (dictation)
19
Two-way conversation recording /
Personal information (dictation)
Two-way conversation recording of telephone calls
You have the option to record important conversations. A record
must have a duration of 2 seconds at a minimum.
Press the Record key during
a telephone conversation.
The device starts recording. The
display shows “Monitoring”.
To end the recording, press
Stop or replace the handset.
The display resumes the idle
state. If the device was previously
in on-state mode, the message
counter will increase by one.
A two-line recording is stored as any other recording (incoming
or outgoing message) and can be played back at any time.
Page 21

Two-way conversation recording / Personal information (dictation)
20
Personal information (dictation)
You can record your personal information into the in-built microphone. A recording must be at least 2 seconds long.
Press Record. Wait until you hear a short beep.
Then "Recording" will appear on
t
he display.
Start speaking (speak into
t
he microphone from a
distance of about 15 cm).
The display will show how many
minutes and seconds you have
been speaking for.
To end the recording, press
Stop.
Recording will finish. The LED will
flash to indicate a new message.
If the device was previously in
on-state mode, the message
counter will increase by one.
You can also record personal information in on-state mode.
Other people can then access this information with the remote
access code.
Page 22

Message transfer
21
Message transfer
In the answering mode with activated message transfer, your tiptel
333 dials a pre-programmed destination phone number after a new
message has been recorded. When the handset of the programmed
destination number is picked up, the following announcement will be
heard:
“Automatic call, … please perform a remote interrogation. …
I repeat, …automatic call, … please perform a remote interrogation.
… The unit disconnects now. Good bye.”
During the announcement, there is the option to start the remote
interrogation of the recorded message(s). If the destination number
is busy, the device will redial the number up to three times every
three minutes.
Setting the destination number
Please enter the destination number as described in the chapter
“Settings”.
For telephone systems, the following special characters are
available:
P = 3 seconds pause / wait for dialling tone
i
= internal (within telephone systems)
F = flash (short, 90 ms)
H
= hook-flash (long, 240 ms)
If you use a telephone system, the exchange identification code is
automatically dialled before each telephone number (see chapter
“Settings / Exchange identification code“). In order to avoid this for
internal extension numbers, you need to dial “i” before any internal
destination number.
Page 23

Message transfer
22
Examples:
subscriber’s main station
normal subscriber
mobile phone
02102123456
01701234567
telephone systems
from extension to extension
to the public exchange
(exchange identification code has been set)
to the public exchange
(no exchange identification code has been set)
i 269
02102123456
0 P 02102123456
Activating the message transfer
and
Press On/Off and Playback at
t
he same time to activate the
message transfer.
The display shows the symbol
(double arrow) for message
t
ransfer.
and
Press On/Off and Playback at
t
he same time to deactivate
t
he message transfer again.
The symbol for message transfer
(double arrow) disappears.
During the transfer of a message, the symbol for message
transfer (double arrow) blinks.
Page 24

Call list
23
Call list
General
The last 30 incoming calls together with information about the date
and time of the calls are stored in the call list. If the caller’s telephone number has been transmitted during a call, it is displayed
in addition. You have the option to dial any telephone number from
the call list directly by just pressing a button. Individual entries from
the list or even the entire list can be deleted.
Browsing the call list
Press the Control key (up). The display will show the newest
entry in the call list.
Y
ou can browse through the
whole list using the Control
keys (up/down).
If a name is available to the external caller's number then the name
will be shown on the display
instead of the phone number.
Press the Select key next to
t
he delete symbol to delete
an entry.
The entry will be deleted.
2 secs
To delete the entire call
list, press the Control key
next to the delete symbol
for 2 seconds.
The entire call list will be
deleted.
To go out of the list, press
Stop.
The display switches back to its
initial status.
Page 25

Call list
24
Call back from the call list
Browse through the list and
select the desired entry (see
“Browse through the call
list”).
Press the Select key next to
t
he desired telephone
number.
The telephone number is being
dialled. You can listen to the
dialling process via the integrated
loudspeaker.
After the dialling process, the
call can be taken over by
picking up the handset.
The display shows a stop watch
indicating the duration of the call.
The handset may not be picked up during the dialling
process, as otherwise errors might occur.
Page 26

Message function
25
Message function
The message function allows a caller who knows the message code
to leave a message, even when your tiptel 333 is set to play a nonrecordable announcement. When your tiptel 333 is set to play a
recordable announcement, the message function gives the caller
the possibility to skip the announcement.
Instructions on how to configure your message code can be found
in the "Settings" section.
Call your tiptel 333 from
another phone.
Y
ou will hear the announcement.
Start input by pressing the
Star key.
The announcement will stop.
Enter the message code with
t
he telephone keypad. If you
make a mistake, you can go
back using the Star key, and
start again.
An electronic voice confirms
every single digit.
To accept the code that you
have entered, press the Hash
key.
The device will then prompt you
t
o speak. If an incorrect code has
been entered, your tiptel 333 will
switch off immediately.
Leave your message and
finally replace the receiver.
The telephone from which you use the message function must
be set up for tone dialling (MFV).
Page 27

Absent-subscriber-manager
26
Absent-subscriber-manager
If you have to leave your office for a short time, e. g. to attend in a
meeting, your tiptel 333 can inform callers in your absence at which
time you will be available again. In this case, the caller can hear the
following message:
“Hello, and thanks for calling. Please call back at …. I repeat ...
Thank you, the unit disconnects now, good bye.”
After the set time has expired, your tiptel 333 automatically switches
this message off.
2s
Press Answering mode
for 2 seconds.
The display changes and
indicates the current time and
date. The hours blink.
Use the Control keys (up/
down) to set the requested
t
ime.
The display indicates the absence
t
ime which should be announced.
Press the Control keys
(left/right) changes between
t
he entry positions.
By means of the Select key
next to the date, it is possible
t
o switch to the entry field to
modify the date.
The day blinks.
Use the Control keys (up
/
down) to set the requested
date.
If the date is modified, also day
and month will be announced.
Page 28

Absent-subscriber-manager
27
Press the Control keys
(left/right) changes between
t
he entry positions.
Press Stop. Now, the setting is terminated,
t
he LED lights up and the display
indicates the absence time.
Incoming calls will be informed
with the absence announcement.
Page 29

Remote operation
28
Remote operation
You can operate your tiptel 333 remotely from anywhere in the world
using the numeric keys on a touch tone (MFV) telephone. For this
you will need your personal remote access code. Instructions on
how to individually configure the remote access code can be found
in the "Settings" section.
Remote access
Call your tiptel 333 from
another phone.
Y
ou will hear the current
announcement.
Start input by pressing the
Star key.
The announcement will stop.
Enter the remote access
code using the telephone
keypad. If you make a mis-
t
ake, you can go back using
t
he Star key, and start again.
An electronic voice confirms
every single digit.
To confirm the code that you
have entered, press the Hash
key.
When the correct code is entered,
a voice prompt on your tiptel 333
will confirm this. If an incorrect
code is entered, the device will
disconnect.
Start your desired function by
entering the corresponding
digit.
If there are any new messages,
playback will start automatically.
When you have finished your
desired function, press "8".
The current function will end.
Y
ou can stop the remote
access by pressing the
Star key followed by the
Hash key.
Page 30

Remote operation
29
If 180 seconds have passed since the last key input, a voice on
your tiptel 333 will say "please confirm", to check if you are still
on the line. You must answer this confirmation request by
pressing any key (e.g. “8”
) within 8 seconds, otherwise the
device will disconnect.
Remote operating functions
Message playback function
Play back all messages
Press "3".
Playback will begin at the first
message.
Play back new messages
Press "2".
Playback of the new messages
which you have not yet listened to
will begin.
Replay
Press "5" during playback
.
The last 3 seconds will replay.
Pause playbac
k
Press "8".
Playback will be paused.
Continue playbac
k
Press "5".
Playback will continue from the
place where you paused (e.g. after
a confirmation request).
Search (Skip)
During playback, press "4" to
go back or "6" to go forwards.
The current message will stop and
will replay or skip to the next one.
Delete current message
Press "7" during playback.
The current message will be
deleted.
Delete all messages
Press "*" then "7".
All messages will be deleted.
Page 31

Remote operation
30
Two-way communication function
Room monitoring/Intercom
Press "1".
The microphone will switch
on, and you will hear what is
happening near the tiptel 333.
Press "1" once more. The device will switch off the room
monitoring function. You will hear
anyone present near the tiptel 333
over the loudspeaker.
Programme switching function
...
Changing to another announcement
Press "7" then "1" … "4",
depending on which
announcement you would
like to switch to.
The announcement selected will
play for you to check and confirm.
The device will play this message
for the next caller.
Altering your announcement
...
Altering your announcement
Press "9" then "1" … "3",
depending on which
announcement you would
like to change.
Y
our tiptel 333 will prompt you to
speak.
Record the message.
For a recordable personalised
message: Press "8" after you
have finished speaking.
Y
our message will play back for
you to check. At the end, you will
hear one single beep.
or
For a non-recordable
announcement: Press "#" after
you have finished speaking.
Y
our message will play back for
you to check. At the end, you will
hear two beeps.
Page 32

Remote operation
31
Switching off the device remotely
Switching off the device
Press "
*
" then "0".
Y
our tiptel 333 will disconnect
and will not accept any further
incoming calls.
Switching on the device remotely
Call your tiptel 333 from
another phone.
After 50 seconds, you will hear a
beep.
Enter the remote access
code using the telephone
keypad. Start your keypad
entry with "
*
" and confirm it
with "#".
Y
our message will play back for
you to check. The device can
now be operated remotely (e.g.
t
o record a new announcement).
After you have left the remote
operation mode, your tiptel 333
will be switched on and will
accept incoming calls.
Page 33

Settings
32
Settings
Setup options (functions)
Messages ...................... Opens the list of messages.
Language ...................... German, English, French, Italian or Dutch.
Time ............................... Here you can re-configure the time.
Date ................................ Here you can re-configure the date (day,
month, year).
Talking clock ................ Yes or No. If you choose "Yes", you will
hear the date and time at the end of every
message.
Network clock ............... Yes or No. If your telephone network or
telecommunications system broadcasts
the time, you can incorporate this time into
the internal clock (the year will not be
saved and must be set manually).
Message length ............ Between 1 and 5 minutes, or indefinite.
Here you can restrict the length of a
caller's message.
Listen live ...................... Yes or No. You can decide whether or not
you want to be able to hear messages as
they are being recorded.
Rings ............................. Between 1 and 9 rings. Here you can set
the number of times your phone rings
before it diverts the call to the answering
machine.
Remote access code ... The remote access code is a 1 to 4-digit
number from 0 to 9999. Switch off the
remote access by setting the code to " - ".
Page 34

Settings
33
Remote access ............. Yes or No. If you choose "Yes" and there
are new messages, your tiptel 333 will
answer a call after one ring (regardless of how you have configured
the answering machine). If there are no new messages, the device
will only answer a call after the set amount of rings. So you will know
if there are any new messages even before the call is answered.
Message code .............. The message code is a 1 to 4-digit
number from 0 to 9999. Switch off the
message function by setting the code
to " - ".
Exchange identifi-
cation code ..................
Here, you enter the identification code (only
for telephone systems) to access the public
telephone network (e. g. 0). This number
will then always be dialled automatically
before the telephone number. The code “–”
is used to turn this function off.
Contrast .......................... The display has 15 contrast levels.
Destination number ...... Here, you enter the phone number for
the message transfer (for example your
mobile number). A set number can be
deleted by pressing the selection button
next to “X”.
Basic setting .................. If you answer "Yes" to the confirmation
message, the device will return to the
default setting. All announcements and
settings will be deleted.
Page 35

Settings
34
Setup menu
and
Press Stop and On/Off
t
ogether:
The setup menu will appear on
t
he display.
Search for the desired setup
option using the Control keys
(up/down).
All setting sub-sections will
appear on the display.
or
Press the Select key next to
t
he setting you would like to
change until the desired set-
t
ing appears on the display.
The display will show the current
setting.
If you are required to enter
digits, press the Select key
next to the corresponding
line.
The cursor will blink. Move the
cursor a few times and the previous setting will be deactivated.
Change the setting using the
Control keys (up/down).
The display will count up or
down.
With multi-digit settings, use
t
he Control keys (left/right)
t
o move the cursor to the
desired place.
The cursor will blink at the
desired place.
To finish the digit entry, press
t
he Select key once more,
next to the corresponding
line.
The cursor will stop blinking.
To finish inputting, press
Stop several times.
The display will return to the
original state.
Page 36

Appendix
35
Appendix
Service
You have purchased a modern product of Tiptel. The highly modern
production ensures consistently high quality. The production is
certified according to DIN EN ISO 9001.
If, however, problems occur or you have questions regarding the
operation of our devices, please contact your local dealer.
Guarantee
Please contact your local dealer or importer for details about
guarantee claims for non EC countries.
Within the European Community the following guarantee regulation
applies:
Your contact for services arising from guarantee obligations is the
authorised dealer where you bought the device.
Tiptel grants a guarantee of 2 years from the date of handover for
the material and for the manufacturing of the telecommunications
terminal unit.
Initially, the purchaser shall have only the right of subsequent
performance. Subsequent performance entails either repair or
the supply of an alternative product. Exchanged devices or parts
shall become the property of the authorised dealer.
If the subsequent performance fails, the purchaser can either
demand a reduction of the purchase price or withdraw from the
contract.
The purchaser shall notify the dealer immediately of any defects
found. Proof of the guarantee entitlement shall be furnished by
standard proof of purchase (receipt or invoice).
Page 37

Appendix
36
The guarantee entitlement shall expire if the purchaser or an
unauthorised third party interferes with the device. Damage caused
by inappropriate handling, operation, storage or by force majeure
or other external influences shall not be covered by the guarantee.
The guarantee shall not cover any consumable materials (e.g.
batteries) or defects that only slightly impair the value or the
usability of the device.
Claims for damage caused by transport shall be asserted to the
delivery company.
Notes on settlement:
Repairs can only be conducted by the Tiptel Service. A warranty
repair does not prolong the warranty period – neither for the replaced parts nor for the device. This guarantee is not transferable
and shall expire if the device is sold on to another party. It shall also
expire if the device is interfered with by third parties or if the serial
number on the device has been removed or made illegible. There is
a guarantee seal on the device. Please do not damage or remove
this seal because otherwise, your guarantee will expire.
The General Terms and Conditions of Tiptel, which are part of the
contract for a dealer, shall also apply. In the event of a complaint,
the defective product shall be sent to the relevant Tiptel subsidiary,
the importer or dealer along with a description of the defect and the
proof of purchase.
CE sign
This device is approved for the connection and use within the
analogue public telephone networks in all EC countries – according
to the European Requirements. Due to technical deviations in
individual countries, we cannot grant an unlimited guarantee for the
successful operation at all types of telephone accesses.
Tiptel hereby declares that the device complies with all fundamental
requirements of the European directive 1999/5/EC. This conformity
is confirmed by the CE sign on the device.
Page 38

Appendix
37
Further details on the declaration of conformity can be found under
the following internet address: http://www.tiptel.com
Ecological information
During the normal use of the telephone you will not have any contact
to substances damaging to your health. The device is not batteryoperated. The plastics used for manufacturing this device exclusively consist of partially recycled granules. The packaging materials do
not consist of plastics but of partially recycled cardboard and paper.
If you do not have further use of your Tiptel device, Tiptel will take
back the device without any charge. The device will be properly
taken to pieces for recycling.
Troubleshooting
The device cannot function during a power failure. The internal clock
will pause, all other settings will however be saved. So when the
power supply is restored your settings will be available again. All
you have to do is to reset the clock.
In the case of any errors please try first of all to narrow down the
cause and rectify the problem with the aid of the following table.
Problem Possible cause Solution/recommendati
on
No display The device is not
plugged in.
Check all cables and plug
connections. Perhaps try
another wall socket.
Display too light or dark. Contrast misaligned. Set the contrast.
No tone The volume is set to
zero.
Turn the volume up.
Announcement number
flashing
No announcement
recorded.
Record a announcement.
No calls are coming in Device not switched on. Switch on the device.
Page 39

Appendix
38
No answer with
telecommunications
system
Telecommunications
system has no signal.
Check the
telecommunications
system's programming.
Buzzing or other
disturbance during
playback
Interference from e.g.
cordless telephones,
monitors etc.
Change the installation
location.
No incoming messages
are recorded
The device is set to a
non-recordable
announcement.
Change announcement
setting or record a new
one.
No incoming calls,
connected telephone not
working
Incorrect connection
cable, sockets
incorrectly wired.
Only use original cables
to check that the sockets
are working (you may
wish to call in a
technician).
No caller ID with
incoming call
Your network provider
or telecommunications
system does not support
this function or the
function is not activated.
The caller has hidden
his number or has an
x-directory number.
The call is from a public
telephone.
Ask your network
provider or tele-
communications system
manufacturer if the
function is available or
if it must be activated.
Wrong or no connection
when operated with a
telephone system.
You have not entered the
exchange identification
code, the telephone
system does not support
tone dialling.
Enter exchange
identification code.
Page 40

Appendix
39
Default setting
You will see the tiptel 333's factory settings in the following list. You
can change these pre-sets individually. You can return to the default
setting at any time by going to the setup menu and selecting "basic
setting".
Language (E)
Talking clock Yes
Network clock No
Message length 2 mins
Listen live Yes
Number of rings before diverting to answering machine 2
Remote access code Remote access No
Message code Exchange identification code (telephone systems)
Display contrast (middle)
8
Message transfe
r
Destination number for message transfer
Announcement
Off
4 (fixed text)
On/off-state (when accepting calls) Off
Page 41

Appendix
40
Technical specifications
Dimensions (W x H x D)
tiptel 333 140 x 50 x 210 mm
Power supply unit 25 x 50 x 65 mm
Weight
tiptel 333 350 g
Power supply unit 80 g
Operating voltage
Power supply unit 100-240 V, 50/60 Hz
Power consumption in stand-by less than 1 W
Ambient temperature 0 – 40 C
announcements
Number of announcements 4
Length of announcement 2 secs - 3 mins
Messages
Recording technique A-Law 88,2 kBit/s
Sampling frequency 11,025 kHz
Number of messages 99 (max)
Total recording memory 90 mins (approx)
Clip
Caller ID Dual mode DTMF/FSK
Caller list 30 entries
Data retention after power failure > 10 years
Clock Quartz clock
Display Alphanumeric LCD 2 x 16
characters, backlit
Page 42

Index
41
Index
A
Absent-subscriber-manager . 27
Activating the message transfer
........................................... 23
Assignment of keys ................. 7
B
Basic setting ......................... 34
Browsing the call list ............. 24
C
Call back from the call list ..... 25
Call list ................................... 24
Caller ID .......................... 15, 17
Caller’s phone number ......... 27
CE sign ................................. 37
Checking announcements .... 14
Confirmation request ............ 30
Connecting .............................. 9
Connection cables .................. 9
Connection options ................. 9
Contrast ................................ 34
Controls ................................... 6
D
Date ....................................... 33
Default setting ....................... 40
Deleting all messages........... 19
Deleting announcements ...... 14
Deleting during remote
operation ............................ 30
Deleting individual messages
........................................... 19
Destination number ......... 22, 34
E
Ecological information .......... 38
Examples of announcements 12
Exchange identification code 34
Exchange identification code 34
G
Guarantee ............................. 36
L
Language ............................. 33
Listen live .............................. 33
M
Main station .......................... 23
Message code ................ 26, 34
Message function ................. 26
Message length .................... 33
Message transfer .................. 22
N
Network clock ....................... 33
Non-recordable announcement
........................................... 12
P
Packaging............................... 9
Packaging materials ............. 38
Pausing playback ................. 18
Personal information (dictation)
........................................... 21
Playing back all messages ... 17
Playing back new messages 17
Playing back specific
messages .......................... 18
Power failure ......................... 38
Power supply unit ............... 5, 9
R
Recordable announcement .. 12
Recording a non-recordable
announcement .................. 31
Recording a recordable
announcement .................. 31
Recording an announcement 13
Page 43

Index
42
Remote access ............... 29, 34
Remote access code ...... 29, 33
Remote operating functions . 30
Remote operation ................. 29
Replaying .............................. 18
Rings ..................................... 33
Room monitoring .................. 31
S
Safety notices.......................... 5
Scope of delivery .................... 9
Search (Skip) .................. 19, 30
Service .................................. 36
Setting up ............................ 5, 9
Setup options ....................... 33
Switching off ......................... 15
Switching on ......................... 15
Switching on remotely .......... 32
T
TAE adaptor ........................... 9
Talking clock ......................... 33
Technical specifications ....... 41
Telephone systems .............. 23
Time ...................................... 33
Troubleshooting ................... 38
Two-way conversation
recording ........................... 20
Page 44

Page 45

Page 46

Page 47

Page 48

Tiptel.com GmbH Business Solutions
Halskestraße 1
D - 40880 Ratingen
Tel.: 0900 100 – 84 78 35*
Vanity Tel.: 0900 100 – TIPTEL*
Internet: www.tiptel.de
International:
Internet: www.tiptel.com
Tiptel GmbH
Ricoweg 30/B1
A - 2351 Wiener Neudorf
Tel.: 02236/677 464-0
Fax: 02236/677 464-22
E-mail: office@tiptel.at
Internet: www.tiptel.at
Tiptel AG
Bahnstrasse 46
CH - 8105 Regensdorf
Tel.: 044 - 843 13 13
Fax: 044 - 843 13 23
E-mail: tiptel@tiptel-online.ch
Internet: www.tiptel-online.ch
Tiptel B.V.
Camerastraat 2
NL – 1322 BC Almere
Telefoon: 036 – 53 666 50
Fax: 036 – 53 678 81
E-mail: info@tiptel.nl
Internet: www.tiptel.nl
Tiptel NV
Leuvensesteenweg 510 bus 4
B – 1930 Zaventem
Telefoon: 0903 99 333 (1.12 euros/min.)
Fax: 02 714 93 34
E-mail: tech@tiptel.be
Internet: www.tiptel.be
Tiptel sarl
23, avenue René Duguay-Trouin
F – 78960 Voisins-Le-Bretonneux
Tél. : 01 / 39 44 63 30
Fax : 01 / 30 57 00 29
e-mail : support@tiptel.fr
Internet : www.tiptel.fr (en) 10/2012
EDV 4932881
*(1.49 euros
/
min. from Deutsche Telekom landlines,
varying mobile network charges possible)
 Loading...