

Page 1
Operating Instructions (UK)
Telephone Answering
Machine
tiptel 330
tiptel 331
tiptel
Page 2
2
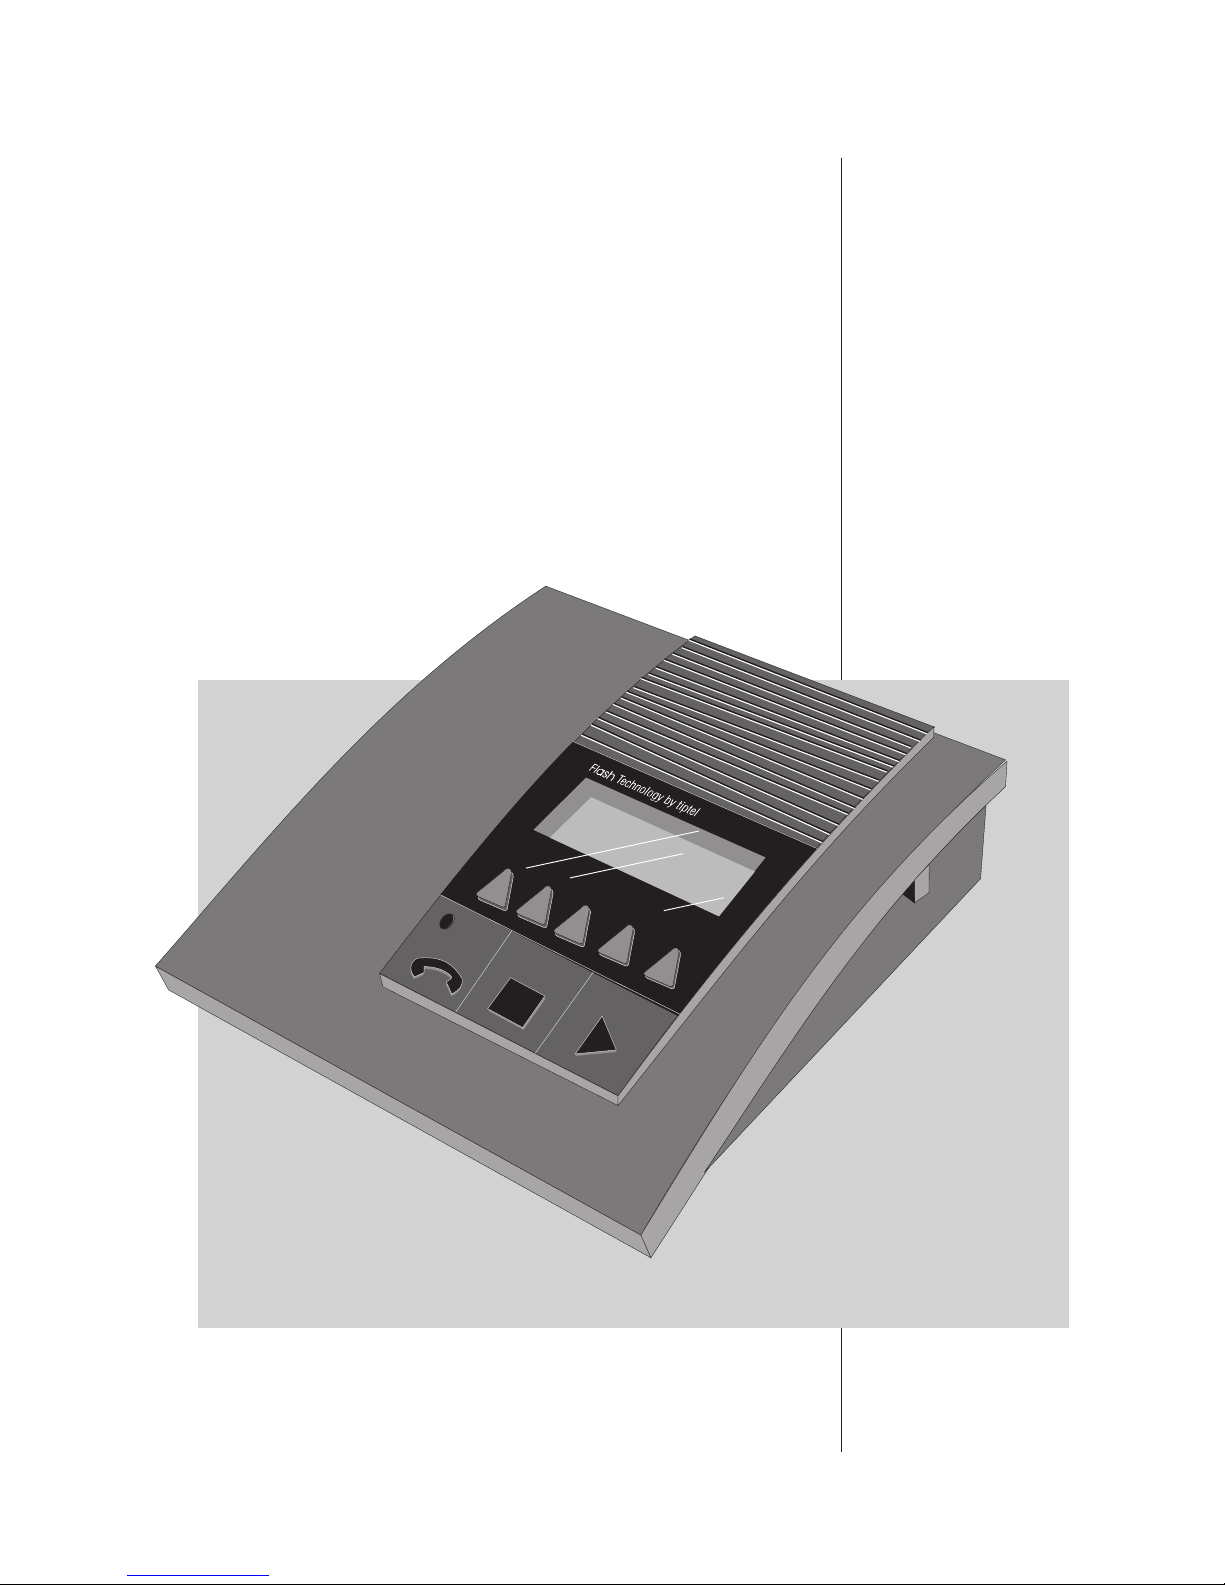
Illustration
Introduction
Your tiptel 330/331 is a highly sophisticated telephone answering machine.
As an excerpt of available features it offers you:
Three individual outgoing messages (OGM) with final announcement.
One pre-recorded outgoing message with final announcement (Plug & Answer)
Day/time stamp for each incoming recording
Selective erasing of messages
Time control according to time and weekday
Message transfer (331)
Voice guided remote control
Incoming and outgoing messages are stored digitally. Thus, there will be no mechanical abrasion. Even in the case of a power failure, outgoing messages as well as incoming messages are
stored practically unlimitedly. Your tiptel 330/331 applies the most modern and environmentallyfriendly flash technology. You will not need any batteries at all.
Page 3

3
Table of contents
Illustration . . . . . . . . . . . . . . . . . . . . . . . .2
Introduction . . . . . . . . . . . . . . . . . . . . . . .2
Initial operation
Scope of supply . . . . . . . . . . . . . . . . . .4
Wall mounting . . . . . . . . . . . . . . . . . . . .4
Connection . . . . . . . . . . . . . . . . . . . . . .4
Factory pre-set . . . . . . . . . . . . . . . . . . .5
Plug & Answer . . . . . . . . . . . . . . . . . . .5
Helpful hints . . . . . . . . . . . . . . . . . . . . .5-6
Examples of outgoing messages . . . . . .7
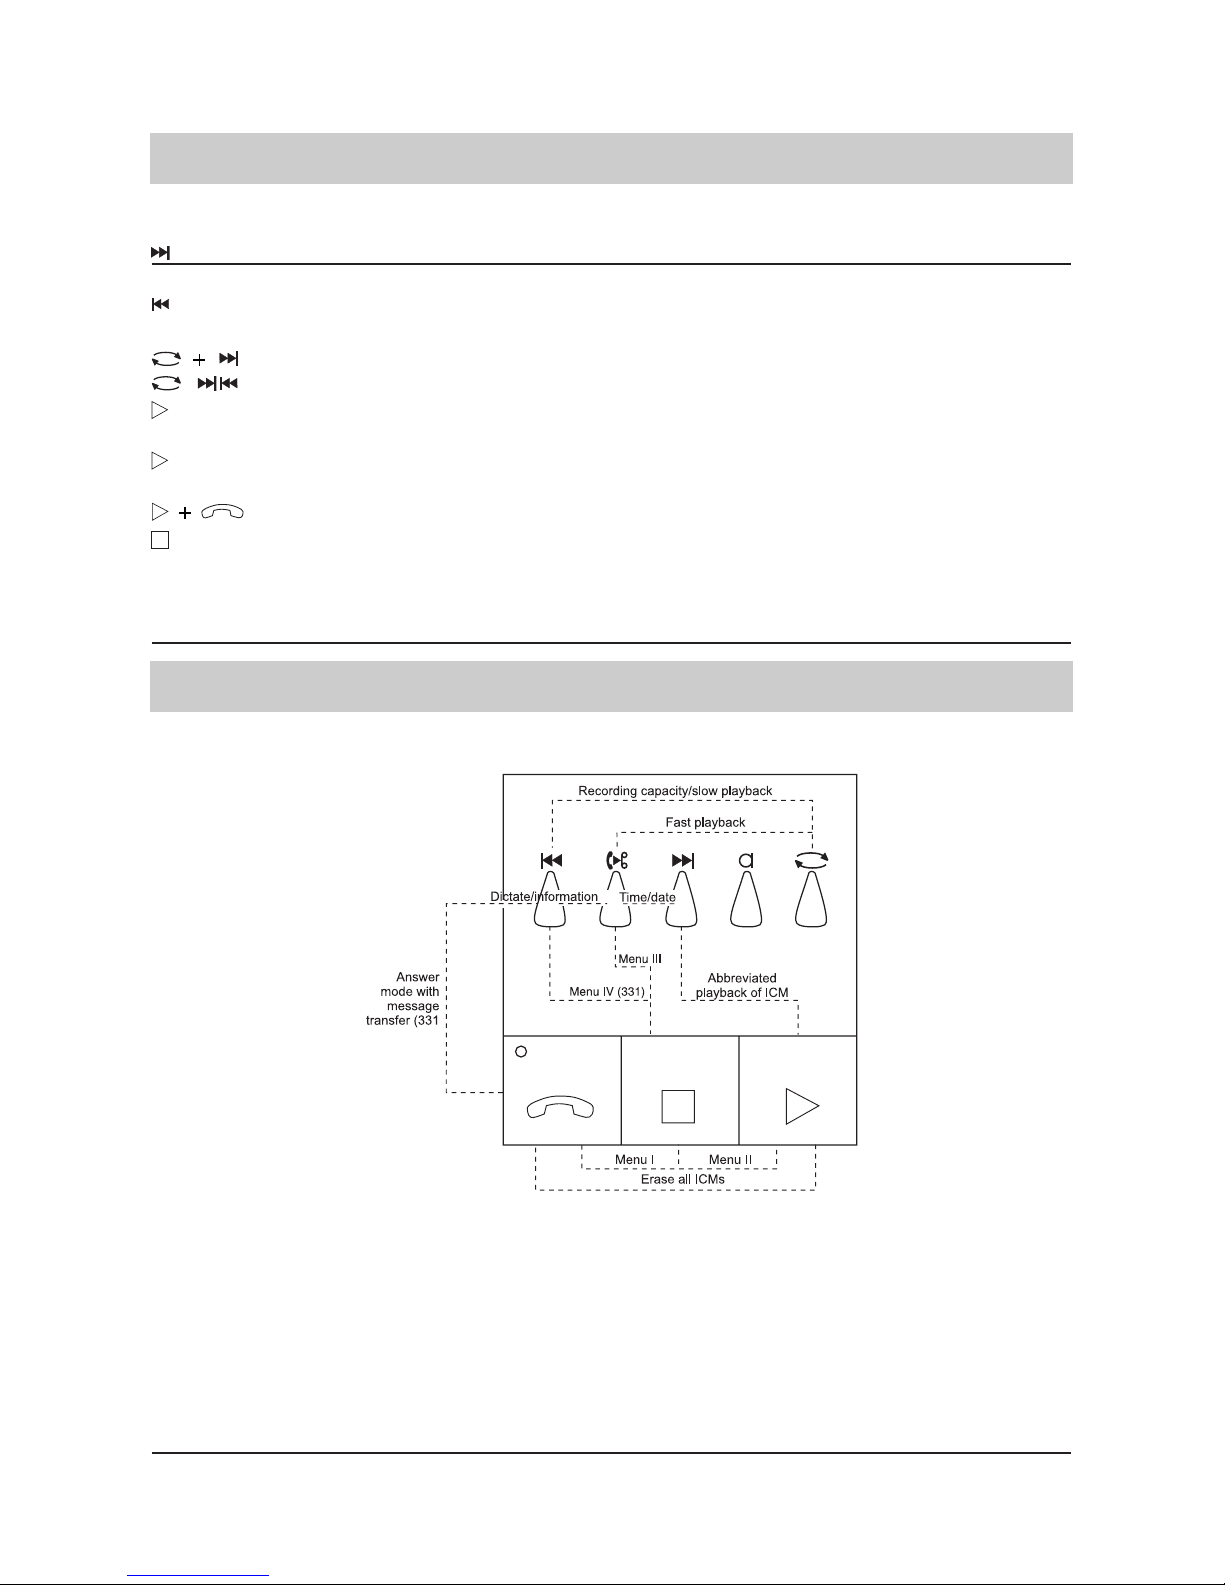
Button functions
Overview
Key assignment . . . . . . . . . . . . . . . . . .9
Factory pre-set (answering mode off)/outgoing message recording
Recording the OGM . . . . . . . . . . . .10-11
Test of OGM . . . . . . . . . . . . . . . . . . . .11
Change of OGM . . . . . . . . . . . . . . . . .11
Factory pre-set/playback
Playback of incoming messages . . . . .12
Repeat . . . . . . . . . . . . . . . . . . . . . . . .12
Search (switching between messages) 12
Scanning function . . . . . . . . . . . . . . . . . .
Abbreviated playback of outgoing
messages . . . . . . . . . . . . . . . . . . . . . . . .
Interrupting the playback . . . . . . . . . . .13
Erasing individual ICM
Erasing all ICMs
Factory pre-set/telephone 2-way conver-
sation recording . . . . . . . . . . . . . . . . . .14
Factory pre-set/personal info/dictate
Factory pre-set/voice day time stamp .15
Factory pre-set/display of available
recording capacity . . . . . . . . . . . . . . . .15
Factory pre-set/programmable parameters
Maximum recording time . . . . . . . . . . .16
Number of ringing tones . . . . . . . . . . .16
Remote control code . . . . . . . . . . . . . .16
Remote erase . . . . . . . . . . . . . . . . . . .17
Room monitoring . . . . . . . . . . . . . . . .17
Date . . . . . . . . . . . . . . . . . . . . . . . . . .17
Weekday . . . . . . . . . . . . . . . . . . . . . .17
Time . . . . . . . . . . . . . . . . . . . . . . . . . .17
Answering mode
Answering mode on/off . . . . . . . . . . . .18
Testing the recording capacity . . . . . . .19
2- way telephone conversation
recording . . . . . . . . . . . . . . . . . . . . . .19
Personal info, dictate (mailbox) . . . . . .19
Playback of incoming messages . . . . .20
Special functions
Message function /VIP function . . .20-21
Time Controll/settings
Settings . . . . . . . . . . . . . . . . . . . . . . .21
Programming . . . . . . . . . . . . . . . . .22-23
Examples . . . . . . . . . . . . . . . . . . . . . .24
Message transfer (only tiptel 331)
General information . . . . . . . . . . . .25-26
Setting the message transfer parameters
(only tiptel 331)
Programming the telephone number . .27
Programming the pager procedure . . .27
Telephone number transfer . . . . . . . . .28
Mailbox . . . . . . . . . . . . . . . . . . . . . . . .28
Collecting messages prior to transfer .28
Dialling mode . . . . . . . . . . . . . . . . . . .29
Identification number . . . . . . . . . . . . . .29
Test function . . . . . . . . . . . . . . . . . . . 29
Examples . . . . . . . . . . . . . . . . . . . . . .30
Answering mode on with message
transfer (only tiptel 331) . . . . . . . . . . .30
Remote beeper/remote control features
Remote beeper . . . . . . . . . . . . . . . . . .31
Remote control functions . . . . . . . .31-32
How to operate the remote control . . .32
Button functions . . . . . . . . . . . . . . .33-36
Summary of button functions . . . . . . .37
Operation/troubleshooting . . . . . . . . . .38
Important information . . . . . . . . . . . . .39
Warranty . . . . . . . . . . . . . . . . . . . . . . .39
Page 4
4
Initial operation
Scope of supply:
AC/AV adapter 16V/300 mA
Telephone cord
Operating instructions
Remote beeper
Quick reference instructions
Wall mounting:
Your tiptel 330/331 is prepared for easy wall mounting. Fix two round head screws 3.5 x 40 with
a dowel S6 horizontally on the wall. The screw heads must have a distance of about 7 mm from
the wall. Now hook your tiptel 330/331 into the two screw holes at the bottom of the housing.
Connection:
The telephone answering machine is delivered with a telephone cord and an AC adapter.
Plug the small plug of the AC adapter into the 16V AC jack on the rear of the device.
Plug the AC adapter into a 230V AC power outlet.
Plug the small plug of the telephone cord in the "LINE" jack. The bigger plug is to be
plugged in the telephone wall socket.
If you do not have a telephone wall socket, please contact your local telephone company.
This device is intended for connection to analogue telephone lines connected to the public telephone network. tiptel 330/331 allows a configuration with subsequent peripherals.
Page 5

5
Initial operation
Factory pre-set:
Your tiptel 330/331 is delivered with the following factory pre-set:
Maximum recording time for incoming messages: 1 minute
Number of ringing tones before the answering machine picks up: 2
Remote control code: 0000
Message code: . . . . 0000
VIP code: . . . . . . . . 0000
Remote erase: . . . . blocked
Room monitoring: . . blocked
Time control: . . . . . off
Message transfer (only 331): deactivated
Plug & Answer
Your answering machine tiptel 330/331 provides a pre-recorded OGM. By this, telephone calls
can be answered right after installation (see above). Just press the ANSWER mode button.
Today, the use of telephone answering machines is a daily routine for advanced people. The
procurement of an answering machine results in the advantage of a permanent telephone service. You will always be present for the caller and you will always know who tried to contact you
during your absence. By the remote control functionality, your answering machine becomes a
flexible tool. Even if you are not at home or in your office you can control the functions of the
device, play back incoming messages or adapt your outgoing message to your current needs –
remotely. This service can be used world-wide, from any telephone.
How to optimise the use of your answering machine
- If you only wish to inform the caller and if you do not need the name, telephone number, the
reason for the call etc, just record an outgoing message „without" incoming recording (only
announcement) and switch on the answering mode. Only callers who know the message
code will be able to leave an incoming message.
- If you request information such as name, telephone number, reason for the call etc by the
caller, record an outgoing message "with" incoming recording + final announcement. Then
switch on the answering mode and replay the recorded messages later.
- If you do not want to be disturbed by incoming calls, record an outgoing message with incoming recording and final announcement. Then switch on the answering mode. If you adjust
the volume you can hear the incoming message while it is recorded. Should you wish to
answer the call, just pick up the handset and take over the call personally. Should there be
an incoming call using the VIP code, your tiptel 330/331 informs you by a beep.
Helpful hints
Page 6

6
Helpful hints
- You have the option to record several individual outgoing messages. As an example you
could use outgoing message number 1 as a standard announcement and outgoing message number 2 to refer to current events. Your standard outgoing message will be retained and
there will be no need to record it again. The time available for the recording per announcement is 2 minutes.
- By using the time control you can welcome the caller either with a "good morning" in the morning or "good evening" in the evening.
- If you want to retain the content of important telephone conversations, select the "conversation recording" function. The conversation is recorded and can be played back at any time.
The above examples just give you a rough idea about the wide range of applications. They
should help you to use as many of the advantageous functions as possible provided by your
tiptel 330/331.
Besides, if you are interested in the exact time a message was left for you, this is no problem for
your tiptel 330/331. A voice day and time stamp provides precise data for each incoming message.
Are you familiar with the advantages of remote control?
- If you wish to know whether a message was left during your absence, use the next phone to
call your answering machine and activate the remote interrogation function. If you did not
understand the message or if you wish to take notes, choose the function repeat or stop of
your remote beeper (or a tone dialling telephone).
- If you intend to inform people where to contact you while you are away, use the next phone
to change your outgoing message indicating your current location or telephone number by
the remote change function.
- If you want to know what is happening in the area around your answering machine, just call
your answering machine and activate the room monitoring function. The answering machine
then activates the microphone and through the telephone handset you can hear what is happening around the device. This practical feature can be used as a telephone babysitter or as
an acoustic monitoring of the surroundings.
Are you familiar with the function of a remote pre-interrogation free of charge?
You can program your tiptel 330/331 in a way that if you call your answering machine it picks up
after the first ringing tone in the case that new incoming messages have been recorded. In the
case that no new incoming messages have been recorded, there will be 4-6 ringing tones until
the answering machine picks up. This indicates that a remote interrogation is not necessary as
no incoming messages have been recorded.
Are you familiar with the advantages of message transfer (only tiptel 331)?
Enter your pager number or the telephone number where you can be reached. Tiptel 331 will
automatically call you informing you that an incoming message has been recorded. You can then
use the remote interrogation function to play this message back.
Page 7

7
Examples of outgoing messages
General information
For most callers it is discouraging when they hear a message from a telephone answering
machine instead of speaking to somebody personally. Indeed, this is often only a question of the
recorded outgoing message. If you are creative and sensitive regarding this announcement,
such inhibitions can be overcome easily.
People successfully using telephone answering machines recommend:
- Avoid any aspirations for perfection reminding people of machines.
- Take care that you behave as usual when recording your outgoing message. A relaxed voice
encourages people to leave a message. Do not be afraid to talk dialect or to clear your throat. This will give your message a human touch.
- Change your outgoing message frequently. This will also allow you to get practice so that you
will be able to adapt your announcement quickly to any new situation.
What should be included in your outgoing message?
- Your name, location or telephone number.
- A reference to the fact that an answering machine is connected.
- If desired, ask the caller to leave a message.
- A final message
The sequence as well as the content can vary according to your individual requirements.
Outgoing message "without" incoming recording (only announcement)
Example:
Hello, this is ........(name), Sales Representative of ........... (name of the company). My office is
temporarily closed due to illness (holidays etc.). Please call my deputy, Mr. ......... in ......... . His
telephone number is .......... He will assist you. Many thanks for your call. My answering machi-
ne will switch off now.
Outgoing message "with" incoming recording
Example:
Hello, this is the answering machine of ........ (name) in ........ I am out seeing customers and will
be available in the office at approx. ..........o’clock. You can call me between ....... o’clock and ......
o’clock under the telephone number ....... If you prefer, you can leave your name and number. I
will ring you as soon as I am back. Please speak after the beep.
Final message: Many thanks for your message. The device will now switch off.
Page 8
Answer mode "off"
Starts the telephone answering mode.
The available recording capacity is
indicated by voice messages.
Starts playback of incoming messages
Abbreviated playback of incoming
messages.
(press briefly) Starts playback of the outgoing message.
(press and hold for 2 sec.) Starts recording of an outgoing message.
Switches between outgoing message 1,
2, 3 and the pre-recorded announcement
The available recording capacity is indi-
cated on the display.
Starts conversation recording
Starts recording of a personal
information/dictate.
Voice time/day stamp.
Gives access to programming the
maximum recording time, number of
ringing tones, remote operation code,
remote erase, room monitoring, date,
weekday and time.
(press and hold for 2 sec.) Gives access to programming the
message code and the VIP code.
(press and hold for 2 sec.) Gives access to programming the time
control.
(press and hold for 2 sec.) All incoming messages are erased.
Only tiptel 331:
Starts the telephone answering mode
with message transfer.
Gives access to programming the mes
sage transfer.
Answer mode "on"
The available recording capacity is indi-
cated by voice message.
Starts conversation recording.
Starts recording of a personal informati-
on/dictate.
Starts playback of incoming messages.
Abbreviated playback of incoming
messages.
Device switches to neutral status.
8
Button functions – summary
+
+
+
+
+
+
+
+
+
Page 9
Playback:
Starts playback of the next incoming
message.
Starts playback of the previous incoming
message.
The playback speed is increased .
The playback speed is decreased.
Starts abbreviated playback of all
incoming messages (scan function).
Abbreviated playback of all incoming
messages off.
Erases the current incoming message
Device switches to neutral status.
Conversation recording, personal information/dictate and all other functions:
Stop The running function stops
Menu I: Maximum recording time, number of ringing tones, remote control code, remote
erase, date, weekday, time.
Menu II: Message code, VIP code.
Menu III: Time control: on/off, switching times.
Menu IV: Message transfer: telephone number, pager procedure, telephone number trans
fer, number of repetitions (synthesised voice), message collection, dialling
mode, subscriber, ID, test.
9
Button functions – summary
Buttons functions - key assignment
Page 10
10
Factory pre-set (answer mode off)/outgoing message
In the factory pre-set the device displays the time. The LED indicator is off or blinks at short intervals (when the LED indicator blinks at short intervals in the factory pre-set this means that new
or not yet played back incoming messages exist). No calls are answered in the factory pre-set
mode.
Remark:
If the complete display
blinks in the factory pre-set mode, the time has to be set.
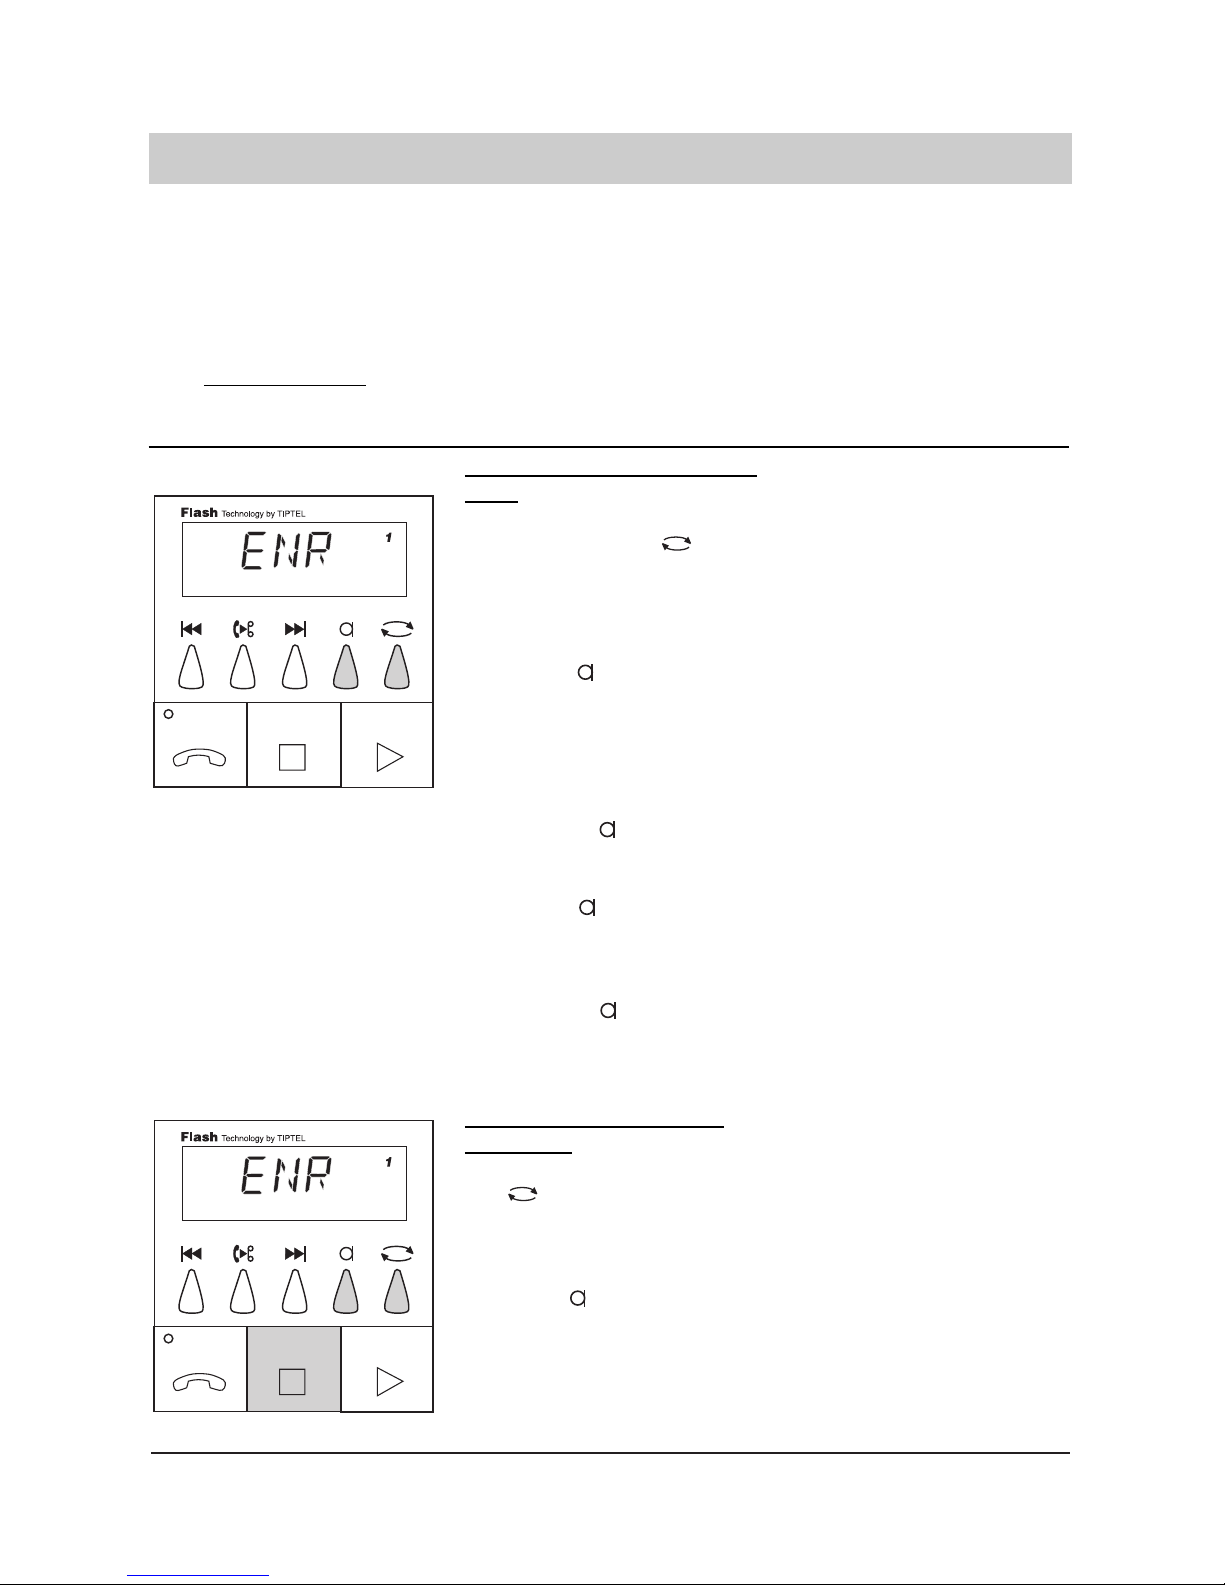
Recording the outgoing message
OGM "with" incoming recording:
1. Select outgoing messa
ge 1, 2 or 3 by .
2. Press and hold.
3. Release after having
spoken the message.
4. Press and hold.
5. Release after
having spoken the final
announcement.
OGM "without" incoming
recording:
1. Select OGM 1, 2 or 3 by
.
2. Press and hold.
The display shows a number for
the desired OGM. If there is no
number displayed this stands for
pre-recorded OGM which cannot
be changed.
Wait until a tone is heard and the
display shows "REC". Speak
from a distance of about 25 cm
into the microphone. The display
shows how many seconds you
have already spoken.
The display shows "FIN" for the
final message.
Wait until a tone is heard and the
display shows "REC". Record
your final announcement.
The recording is finished. Your
OGM is played back for control
purposes.
The display shows a number for
the desired OGM. If there is no
number displayed this stands for
pre-recorded OGM which cannot
be changed.
Wait until a tone is heard and the
display shows "REC". Speak
from a distance of about 25 cm
into the microphone. The display
shows how many seconds you
have already spoken.
Page 11
1. Press . The corresponding following
OGM is activated. The display
shows the number of the selected OGM (1 – 3 or no number for pre-recorded OGM).
11
Factory pre-set (answer mode off)/outgoing message
Change of outgoing message
3. Release button
after speaking your
OGM.
4. Press .
The display shows "FIN" f o r
the final announcement.
The recording is finished. Your
OGM is played back for control purposes.
1. Select outgoing messa
ge 1, 2 or 3 by .
2. Press briefly.
The display shows the number
for the desired OGM. If there
is no number displayed this
stands for pre-recorded OGM.
The OGM is played back and
the display shows "TEST".
Adjust the volume control if
necessary.
Remark:
If the recording capacity
ends during the answering mode the device plays back the final announcement and switches to outgoing message 3 in the case that OGM 3 is an "announcement
only" message. In the other case the device switches to the factory pre-set (answering mode
off).
The final announcement is played back if the caller exceeds the programmed recording time for
incoming messages, makes pauses that are longer than 8 seconds of if the recording capacity
is exceeded.
Page 12
12
Remark:
Your telephone answering machine has a scanning function which allows you to increase the
playback speed without changing the pitch of the caller’s voice. In this way you can play back
many incoming messages in a short time.
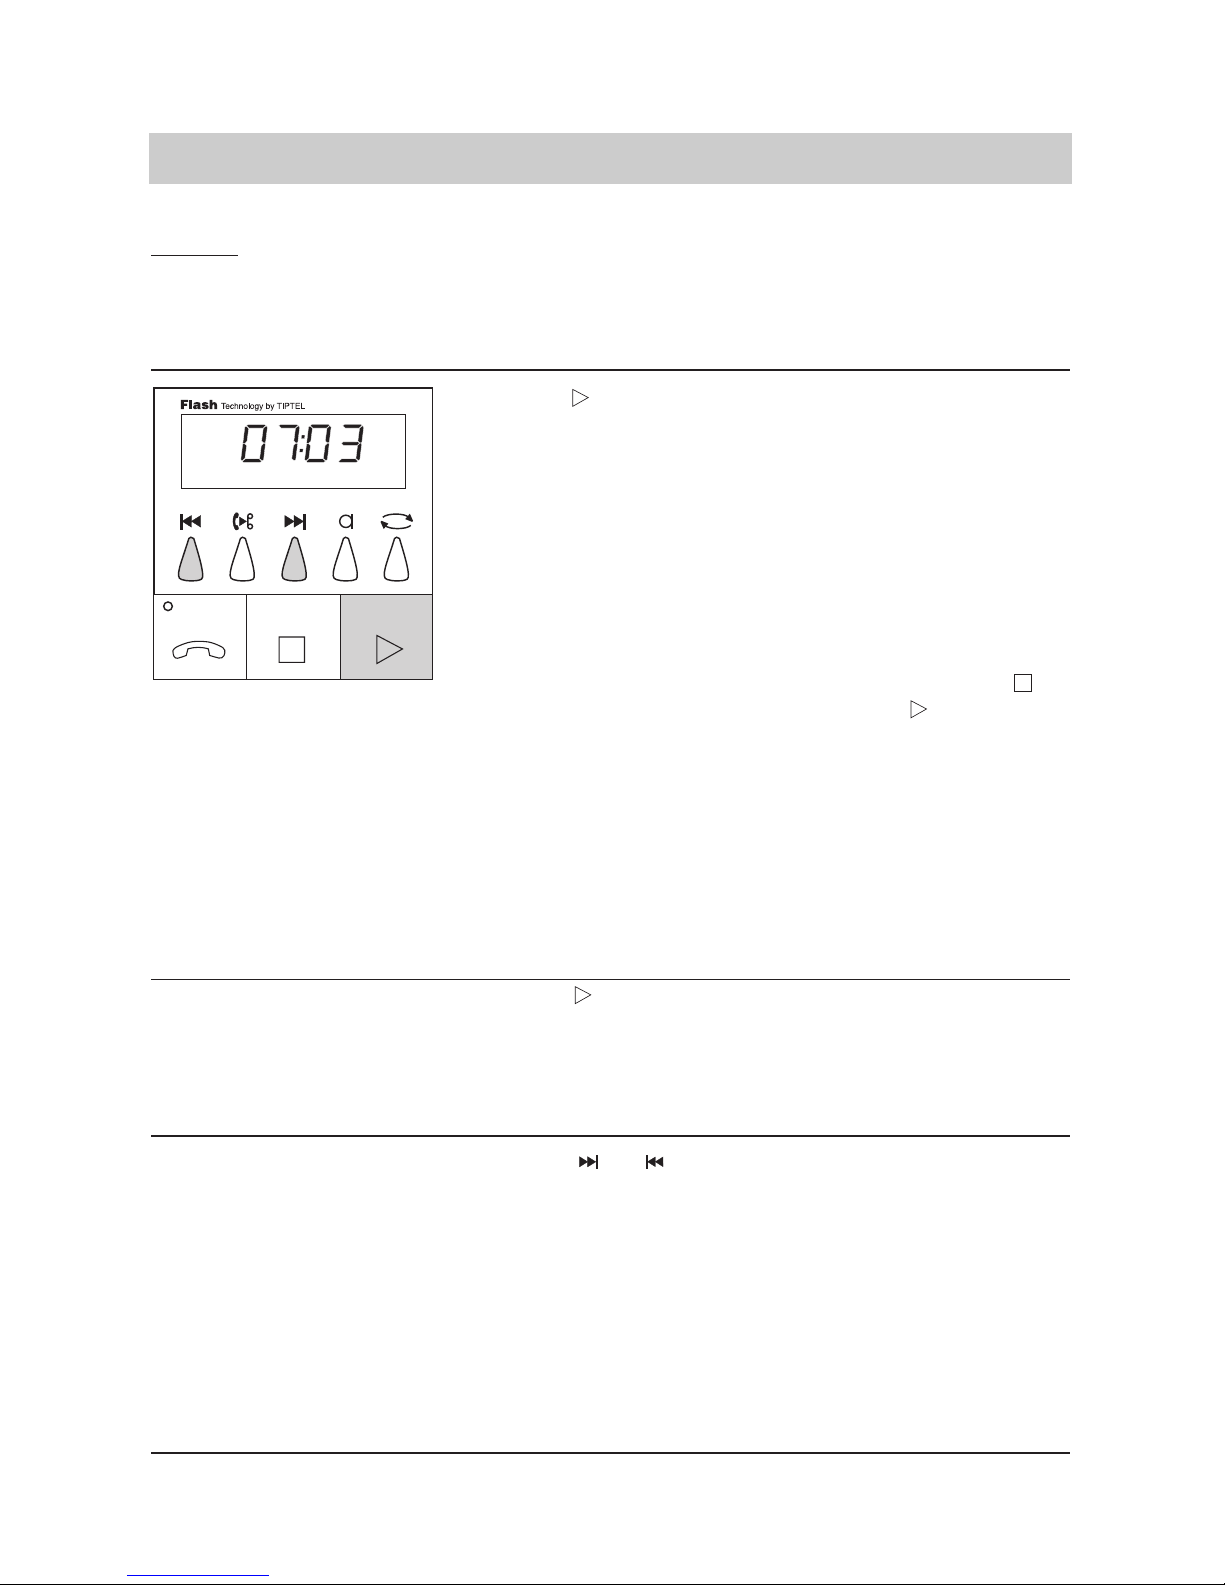
Playback of incoming messages
Repeat:
Search (forward or rewind during playback)
1. Press . The incoming messages are
played back in the sequence
of recording. The display
shows the total number of
ICMs (07) as well as the number of the recording played
back at that moment (03).
The playback starts with the
new and not yet played back
incoming messages – if existing. The playback can be
interrupted by pressing .
Pressing the button continues the playback at the
same position where it was
interrupted. A voice day/time
stamp is recorded after each
incoming message. When all
incoming messages are played back, a synthesised voice
informs "end of messages".
1. Press during playback.
The last seconds of the recorded ICM are repeated.
1. Press or .
The playback of the next or the
previous message is started at
the beginning of the ICM.
Factory pre-set (answering mode off)/playback
Page 13

1. Press and
simultaneously during
the playback of the
message to be erased.
The current message is erased. The display shows e. g.
E 03, i. e. erase incoming
message number 3.
13
1. Press during play
back.
2. Press
The playback is interrupted
and the device returns to
factory pre-set.
The playback is resumed at
the former position.
1. Press and
simultaneously.
The first seconds of each
incoming message are played back. By pressing
PLAYBACK, the normal
playback is resumed.
Factory pre-set (answering mode off)/playback
Scanning function:
Abbreviated playback of all incoming messages
Interrupting the playback
Erasing individual incoming messages
1. Press during the
.
2. In addition, press
or .
The display shows the current playback speed.The
playback speed is increased
or decreased.
The display briefly shows the
current playback speed
(range from 0.5 to 2 times
the playback speed). When
the playback is stopped
(STOP button), the normal
playback speed is resumed
automatically.
Page 14

14
1. Press .
2. Press and
simultaneously and
hold for 2 seconds.
The telephone answering
machine goes back to the
factory pre-set (answer
mode off).
All incoming messages are
deleted. During the erasing
procedure the display shows
"- - - -".
1. Press .
2. Press .
The answering machine
starts the recording. "CONV."
blinks in the display.
The answering machine
ends the recording. The factory pre-set is resumed and
the display shows the time.
The LED indicator blinks.
1. Press and
simultaneously.
2. Press .
The device starts the recording. "INFO" blinks in the
display.
The answering machine
ends the recording. The factory pre-set is resumed. The
LED indicator blinks.
Erasing all incoming messages
The content of important telephone conversations can be recorded.
Personal information can be recorded by the built-in microphone.
Factory pre-set (answering mode off)/playback
Factory pre-set / telephone conversation recording
Factory pre-set / personal info/dictate (mailbox)
Page 15

15
Factory pre-set / Voice day and time stamp
Initial situation / Display of available recording capacity
1. Press and simultaneously.
You will hear the current
date and time.
Initial situation / Display of
available recording capacity.
1. Press +
simultaneously and
hold.
The display shows the available recording capacity, e.
g. 12 minutes and 30
seconds.
tiptel 330/331 has a "speaking" day and time stamp informing you about the exact time and date
an incoming message was recorded. If you want to check whether the date and the time settings
are correct you can play back information. Should the day and time not be correct you can program those (see programming parameters).
Even in the case of a power failure or if the device is disconnected from the power supply the
clock works on for one day without loss of data. If your answering machine is disconnected from
the power supply for a longer period, date and time have to be programmed again (the time
shown in the display is 00:00 and the LED indicator blinks).
Page 16

16
Factory pre-set / programmable parameters
1. Press and
simultaneously
and hold for 2 seconds.
2. Set desired recording
time by the buttons
or .
3. Press .
4. Select number of ringing tones by the but
tons or .
5. Press .
6. Select remote control
code by the buttons
or .
Press .
The display blinks and the current recording time is
displayed.
The display shows "1, 2, 3, 4,
5 min" or "ENDL".
The last entry is programmed.
The display shows the programmed number of ringing
tones.
The display shows "1 ton", "8
ton" as well as "1_ _ 4" and
"1_ _6".
The last displayed number of
ringing tones is programmed.
The display shows the programmed remote control code,
e. g. "1234".
The display counts up or down
from 0000 to 9999. With 0000
the remote control operation is
off.
The last displayed remote control code is programmed.
You can determine the following programmable parameters:
Maximum recording time: Here you can program the maximum recording time
placed at disposal for the recording of the caller’s incoming message: 1, 2, 3, 4, 5 minutes or endless.
Number of ringing tones: Indicates after how many ringing tones the answering
machine will pick up: 1 – 8 ringing tones as well as 1 –
4 and 1 – 6 ringing tones. Only when 1 – 4 or 1 – 6 rin
ging tones are programmed, a remote incoming mes
sage interrogation is possible. This means that the
answering machine picks up only after 4 or 6 ringing
tones if no new incoming messages have been recorded. If new messages exist the device picks up after
just one ringing tone.
Remote control code: The remote control code is a 4-digit number between
0001 and 9999.
The remote control operation is switched off if code
number 0000 is programmed.
Remote erase: Yes/no (see remote operation)
Room monitoring: Yes/no (see remote operation)
Date
Weekday
Time
Before switching on, the device must be in the factory pre-set mode (answer mode off).
If required, press the STOP button.
Page 17

17
Factory pre-set / programmable parameters
8. Select the desired
mode by or .
9. Press .
10. Select the desired
mode by or .
11. Press .
12. Set the desired date by
or .
13. Press .
14. Set the desired week
day by or .
15. Press .
16. Set the desired time by
or .
17. Press .
The display shows whether
remote erase is possible (see
remote beeper). The display
switches between "RE:Y"
(remote erase possible) and
"RE:NO" (remote erase not
possible).
The last entry is programmed.
The display shows whether
the room monitoring function is
admitted. (see remote operation).
The display switches between
RM:Y (room monitoring possible) and "RM:NO" (room monitoring not possible).
The last entry is programmed.
The display now shows the set
date, e. g. 24.12. (day/month).
The display counts the date up
or down.
The last date entered is programmed. The display shows
the programmed weekday, e.
g. "MO" (Monday).
The display counts the weekdays up or down.
The last weekday is programmed.
The display shows the programmed time, e. g. 19:35
(hour:minute).
The display counts the time up
or down. The last displayed
time is programmed.
The display stops blinking and
the time is shown.
The programming is finished.
Flash
Technology by TIPTEL
Page 18

18
Telephone answering mode
1. Press the button.
2. Press to switch
the answering mode
off.
The LED indicator lights up and
the recording time is informed by
a synthesised voice. The counter for the number of incoming
recordings and calls is displayed
when outgoing message "with"
incoming recording was selected, e. g. 02:03. This means that
there have been 2 incoming
messages and 3 calls during
your absence. You may screen
incoming calls. By picking up the
handset you can take over the
call personally. The LED indicator blinks if incoming messages
have been recorded. "AO"
(announcement only) is displayed if you selected outgoing message "without" incoming recording. The number of calls can
be taken from the two digits on
the right. If there are incoming
recordings not played back or
information was recorded,
the display shows the number of calls not yet played
back instead of "AO"!
Further calls will not be answered up by the answering machine. The display shows the time
again. The LED indicator will
blink as long as the recorded
messages have not been played back.
In the telephone answering mode, your tiptel 330/331 answers incoming calls. It picks up after
the programmed number of ringing tones. When the answering mode is on, the LED indicator
lights up or blinks at short intervals (if the LED indicator blinks at short intervals you have new
and not yet played back messages).
The number of calls can be taken from the two digits on the right. The number of recorded incoming messages can be taken from the two digits on the left.
Answering mode on/off
Be sure that there is sufficient recording capacity available.
If necessary, you can erase individual or all older incoming messages.
Be sure that your outgoing message is complete. The pre-recorded OGM is automatically selected for the initial operation as this is the factory pre-set. Thus, it can be used immediately.
Page 19

19
Telephone answering mode
Remark:
You can also record your personal information while the device is in the answering mode. Other
persons can listen to your information by the remote control code. In this way, your telephone
answering machine becomes an "electronic mailbox".
1. Press . The available recording time
is informed by a synthesised
voice.
1. Press .
2. Press .
The answering machine
starts the conversation recording. The display shows
"CONV."
The answering machine ends
the recording. The counter for
incoming recordings is
increased by one, the telephone answering mode is
continued.
1. Press and
simultaneously.
2. Press .
The answering machine
starts the recording. The display shows "INFO".
The answering machine
ends the recording. The
counter for incoming recordings is increased by one,
the telephone answering
mode is continued.
Testing the recording capacity
Remark:
If you do not erase your incoming messages regularly, please make sure that the recording capacity for the answering mode will be sufficient.
Telephone conversation recording
The content of important telephone conversations can be recorded.
(Also possible in the factory pre-set, see page 14).
Personal info/dictate (mailbox)
Personal information can be recorded through the built-in microphone.
(Also possible in the factory pre-set, see page 14).
Page 20

Playback of incoming messages
You can start the playback of incoming messages as well as the abbreviated playback if the
answering mode is on. After the playback, the device switches to the factory pre-set, i. e. the
answering mode is not resumed automatically.
Message function
By the message code, it is possible to leave a message also if the outgoing message of your tiptel 330/331 is an "announcement only" message. To do so, call your answering machine and wait
until the announcement starts. Send your 4-digit message code (from 0001 – 9999) by the remote beeper or a tone dialling telephone. A signal tone is heard when the answering machine identified your message code and you can now record your message. If there is no reaction after
entering the message code, please repeat the entry (press keys for about 1 second, pause of
about 1 second after the individual numbers). The function is deactivated when the code is 0000.
VIP function
When you do not want to be disturbed by the telephone, the answering machine will answer your
calls and still leaves it up to you whether you want to be reached by privileged callers. By the
VIP code your tiptel 330/331 can inform you if a privileged person wants to talk to you personally. Let the privileged callers have your 4-digit VIP code (0001 – 9999). The caller must enter this
code from the remote beeper or a tone dialling telephone during the OGM or a following message. If the VIP code was identified successfully, the microphone of your tiptel 330/331 emits a
60 seconds attention signal. During this time you can pick up the handset and answer the call
personally. This function is switched off when the code is 0000. Even after the 60 seconds, the
caller still has the possibility to leave a message. By pressing the key "8", the caller can stop the
attention signal early.
Programming the message and VIP codes
The message and VIP codes must be entered consecutively. The remote control code, the message code and the VIP code must differ in order to be able to distinguish between the functions.
20
Message and VIP function
Telephone answering mode
Page 21

21
Message and VIP function
Time control
The time control offers you the option to switch 4 outgoing messages, the telephone answering
mode and the message transfer (only tiptel 331) on or off at a programmed day and time. 20 programming stations are at disposal for this function.
Time control/settings
Start: Weekday and time the desired operating mode shall start
(instead of a weekday you can also enter - - which erases an
existing setting).
Outgoing message: An outgoing message which shall be announced as of the
desired start time. If no OGM is selected the telephone answe-
ring mode is switched off during this time.
Message transfer
(only tiptel 331): Here you can program whether the message transfer shall be
switched on or off during the desired period of time.
Stop: Weekday and time the desired operating mode shall stop.
1. Press and
simultaneously and
hold for 2 seconds.
2. Program the desired
message code by
pressing or .
3. Press .
4. Program the desired
VIP code by pressing
or .
5. Press .
The display blinks and shows
"MES" for message code.
The programmed message
code is displayed after 0.5
seconds.
The display counts up or
down.
The selected message code
is programmed. The display
now shows "VIP" for VIP
code. The programmed VIP
code is displayed after 0.5
seconds.
The display counts up or
down.
The selected VIP code is programmed. the programming
ends.
Page 22

22
1. Press and simul
taneously and hold for
2 seconds.
2. Press of to turn the
time control on or off.
3. Press .
4. Select the desired
switching time (timer)
by pressing
or .
5. Press .
6. Select the desired
weekday by pressing
or .
7. Press .
8. Select the desired start
time by pressing
or .
9. Press .
The display blinks and shows
whether the time control is on
or off.
The display shows "ON" or
"OFF".
The last entry is programmed.
If the time control is "OFF" the
programming is finished. If the
mode is "ON", the desired
times have to be entered next.
The switching time to be set
is counted up or down on the
two left digits of the display, e.
g. switching time 1. The right
side of the display is reserved
for the weekday of the start
time or it shows "- - " if the
switching time had not been
selected yet.
You can now change the switching time.
The weekday to be set is
counted up or down on the
two right digits of the display.
The range is from "MO" to
"SU" as well as "- - ".
If you enter "- - "a possibly
existing switching time is erased and the device changes
to the next switching time
entry if you press STOP. In
this case continue as described under point 4.
The desired weekday is programmed.The display counts
the time up or down.
The desired start time is programmed.
Time control
Programming the time control
Page 23

10. Select the desired out
going message by
pressing or .
11. Press .
12. (Only tiptel 331) Select
the desired mode by
pressing or
(entry is only possible
if outgoing message 1,
2, 3, or 4 were selec
ted).
13. Press .
14. Select the desired
weekday the mode
shall be switched off
by pressing or
15. Press .
16. Select the desired stop
time by pressing
or .
17. Press
or press and
hold for 2 seconds.
The display shows 1, 2, 3, 4
or "- - " on the right side ("4"
stands for the pre-recorded
outgoing message). If you
select "- - " the telephone
answering mode is switched
off for this period of time.
The desired OGM is programmed.
If the message transfer
mode is not activated, the
display shows "MT" for message transfer on the left side
and "NO" on the right side. If
the display shows "Y" on the
right side the message transfer is activated.
The desired setting is programmed.
On the left side, the display
shows the programmed switching time, e. g. switching
time 1. The weekday can be
read from the right side of
the display ("MO" to "SU").
The desired weekday is programmed.
The display counts the time
up or down. The desired
stop time is programmed.
Now you can program the
next switching time.
Continue as described under
point 4.
The desired stop time is programmed. The programming
is now finished. The control
menu exit follows. Please
take into account that all
switching times that are not
explicitly erased will be retained.
23
Time control
Remark:
The seconds are rounded off, i. e. if you enter 12:00 hrs as the start time and 14:59 hrs as the stop
time, the timer will run from 12:00 hrs to 14:59 and 59 seconds.
Page 24

24
Time control
Examples:
Outgoing message 1 is your standard OGM. You want to switch to OGM number 2 on Wednesdays
from 15:00 hrs to 18:30 hrs as well as on Saturdays from 09:30 hrs to 13:00 hrs. At the same time,
the message transfer mode shall be active (only tiptel 331). The telephone answering machine shall
be switched off on Sundays.
1. Select outgoing message 1.
2. Enter the following switching times:
3. Exit the menu by pressing and hold for 2 seconds.
4. Make sure that the answering mode is on (only valid for this example).
only tiptel 331
only tiptel 331
Page 25

25
Message transfer (only tiptel 331)
General information
In the answering mode with message transfer on, the answering machine dials the pre-programmed target number after each or after every 2nd, 3rd, 4th or 5th incoming message (see
message collection) has been recorded. When the handset of the programmed target number is
picked up, the following announcement is heard:
"Automatic call, X messages, please perform a remote interrogation. I repeat ...",
or if you also programmed your own telephone number as identification:
" Automatic call, telephone number ... (own telephone number), x messages, please perform
remote interrogation. I repeat ..."
During the announcement, there is the option to start the remote interrogation of the recorded
incoming message(s). Apart from the message transfer to normal telephone numbers, your tiptel offers you the option to program various paging service numbers. For pager numbers, this
automatic announcement will not be played back. If the target telephone number is busy, the
device will redial the number up to three times every 3 minutes. If a remote interrogation is not
performed within 20 minutes, the answering machine will call the target telephone number again
as a reminder. This procedure will be repeated twice if no remote interrogation is performed.
Remark:
It is not possible to use the message transfer function if the remote code is 0000.
The following programming is necessary for the message transfer:
Target telephone number:
The target telephone number is the number your tiptel 331 dials for the message transfer. If a
normal target telephone number is programmed, your tiptel 331 informs you if one or more callers left you a message. Your tiptel 331 will also inform you about incoming messages if a pager
number was programmed as the target number. For identification purposes, please enter the
pager symbol " 0" at the end of the entered target number.
After selecting the paging service, it is possible to enter numeric information which is transferred
to your pager during the message transfer.
Pager procedure:
(Offers you the option to program an own access procedure when you select the pager service
with the pager symbol “ 0”.)
Page 26

The following elements are at your disposal for the programming:
A = Wait for announcement. Your answering machine waits for an outgoing message. The pager
procedure is continued after the OGM ended.
P = Pause. Your answering machine waits 1 to 9 seconds. The duration of the pause can be
determined by the number entered after the special character "P".
N = Free variable parameter for numeric information. The numeric information is sent here.
M = Wait for a multifrequency dialling tone. Your answering machine waits to receive a multifre
quency dialling tone. The determination of the done is done by the sign entered after the
special character "M".
The following signs/keys are possible:
1 ... 0 : Numbers 1 to 0
✱ : star
# : hatch
: joker symbol, wait for a multifrequency dialling tone.
T
elephone number transfer:
If you entered a pager number as target telephone number and if the message transfer function
is active, a caller can even transfer his telephone number or other numeric information. In order
to use this function, the caller must have a tone dialling telephone or a remote beeper. First, the
"✱" button has to be pressed after the outgoing message. Then, the caller can enter his telephone number and at the end the "#" button has to be pressed to finish the entry.
The following parameters are possible:
Telephone number transfer yes: A telephone number transfer can be conducted.
Telephone number transfer no: A telephone number transfer cannot be conducted.
Number of synthesised voice messages:
In the case that your tiptel 331 shall call a mailbox, there is the option to determine the number
of synthesised voice messages to be between 1 and 10. The charges for mailbox applications
are determined by the number of repetitions.
Message collection:
You can program whether your tiptel 331 executes the message transfer after either each or
every 2nd, 3rd, 4th or 5th incoming message recording.
Dialling mode:
IWV: Pulse dialling mode
MFV: Tone dialling mode
Identification:
If you enter your own telephone number it will be included in the synthesised voice message.
26
Message transfer, general information (only tiptel 331)
Page 27

1. Press and
simultaneously and
hold 2 seconds. An existing number can be
verified by pressing the
button several
times.
2. Select the desired num
bers and special characters by pressing
and .
3. Press the button.
The display blinks and
shows "NR".
Numbers and special characters are shown in the display. The special character
are as follows:
"P" = 3 seconds pause
"W" = wait for dialling tone
(PABX)
"F" = flash
"E" = earth
" " = paging service
" " = Q(for paging
services only)
" " = # (for paging
services only)
The last entry is programmed. The cursor jumps to
the second position.
27
Message transfer parameters (only tiptel 331)
4. Press to finish the
entry of the telephone
number.
5. An existing pager pro
cedure can be verified
by pressing
several times.
Select the numbers
and special characters
of the desired pager
procedure by pressing
and .
The display blinks and
shows "PPRO".
The display shows numbers
and special characters. An
entry is only required if you
intend to use your own
pager procedure (" 0").
Programming the telephone number
Remark:
If you wish to erase the entire target telephone number please press and
and hold for 2 seconds.
Programming the pager procedure:
Page 28

28
12. Press .
13. Select the desired mes
sage collection by
pressing and .
The display switches and
shows the selected message
collection mode.
The display switches between 1, 2, 3, 4 and 5.
Message transfer parameters (only tiptel 331)
6. Press . The last entry is program-
med. The cursor jumps to
the second position.
7. Stop the entry of the
pager procedure by
pressing .
8. Select the desired
mode by pressing
and .
9. Press .
10. Select the desired
number by pressing
and .
11. Press .
The selected pager procedure is programmed. The display switches and shows
whether a telephone number
transfer is possible.
The display switches between NT:Y and NT:NO.
The last entry is programmed.
The display shows how
many times the synthesised
voice message shall be played back.
The last entry is programmed.
T
elephone number transfer:
Message collection:
Flash
Technology by TIPTEL
Page 29

29
20. Press .
21. You can now initiate a
test dialling to verify
the programmed number. Just press the
button.
22. Press to finish
the test dialling. The
answering machine
switches to the factory
pre-set (answering
mode off).
The programming is finished.
The display blinks and
shows "TEST".
The display shows numbers
and special characters for
verification purposes. The
loudspeaker is set on for
verification purposes.
The display stops blinking
and shows the time.
Message transfer parameters (only tiptel 331)
Remark:
Press the buttons and to activate the telephone answering mode with message transfer.
14. Press . The display switches and
shows the programmed dialling mode.
15. Select the desired dial
ling mode by pressing
and .
16. Press .
The display switches between "IWV" and "MFV".
The display switches and
shows "ID".
17. Enter the first number
of your own telephone
number by pressing
and .
18. Press the button.
19. Enter further numbers
(20 as a maximum) by
pressing , and
.
The display counts up or
down.
The last entry is programmed.
Dialling mode:
Identification number:
Fonction test:
Flash
Technology by TIPTEL
Flash
Technology by TIPTEL
Flash
Technology by TIPTEL
Page 30

Operation from normal exchange line programming examples
- normal subscriber 0234 567890
Example of a programmed access procdure
1. BT (numeric)
Target telephone number: 04325 - 123456 0 123
#
numeric info
Pager procedure: A N
wait for message send numeric into
2. PAGE ONE
target telephone number: 0881 - 123456 0 123
# 1
numeric info
Pager prosedure: P 4 N
4s Pause send numeric info
The “#” or “ #1” can bei placed at the target telephone number as in the example or
after the “N” in der Pager procedure.
Operation from normal P
ABX (0 for exchange line)
- normal subscriber 0P0234 567890
Operation from sub-telephone system
(Earth for main PABX and 0 for exchange line to the public telephone network.)
- normal subscriber EP0P0234 567890
Answering mode on with message transfer
30
Message transfer / examples (only tiptel 331)
1. Press and
simultaneously.
The answering machine switches to the telephone answering mode. The red LED indicator lights up. The display
shows the symbol for "message transfer".
All other function correspond
to the normal telephone
answering mode.
Page 31

31
Message transfer / examples (only tiptel 331)
Remote beeper
To activate the remote control operation you will either need a
remote control beeper or a tone dialling telephone. the beeper
is supplied with two standard batteries (micro cells type R03).
By normal use, the batteries should last for at least two years.
Your remote control beeper can be switched on or off by the
switch. We suggest that you switch off the beeper if you do not
use it for a longer period of time or while it is carried. This will
prevent the batteries from discharging. To change the batteries, slide the cover of the battery compartment down. Check
that the polarity of the batteries is correct when inserting. Slide
the battery compartment cover upwards until it clicks into
place. Discharged batteries are indicated by a low and distorted tone.
Remote control features
The following remote control features are available:
REMOTE INTERROGATION of ”all” messages. The consecutive number as well as date and
time is announced after each recording. If all messages were played back you hear the
announcement ”end of messages”
REMOTE INTERROGATION of only the ”new” messages which have been recorded since
your last remote interrogation. The consecutive number as well as date and time is announ
ced after each recording. If all messages were played back you hear the announcement
”end of messages”.
REPEAT of the last few seconds, e. g. if you did not understand the text properly.
STOP the playback, e. g. if you want to take notes or need a pause.
PLAYBACK if you want to continue listening.
REWIND
FORWARD
REMOTE ERASE of all recorded messages, e. g. in order to provide new recording capacity.
REMOTE ERASE of individual recorded messages, e. g. in order to retain only selected messages.
2. Press to switch the
telephone answering
mode off.
Further calls will not be
answered. The display shows
the time and the arrow "message transfer" is no longer
displayed. The red LED indicator blinks as long as recorded incoming messages are
not played back.
*
*
*
*
*
*
*
*
*
*
ON
Surveillance
Ecoute
Changer
Eteindre Fin
Stop Modifier
Tousles
messages
Nouveaux
messages
Q3tiptel
+ 1 Programmation horaire
+ 2 Signal de présence
+ 3 Capacité d'enregistrement
+ 4 Effacement sélectif
+ 5 Date/Heure
+ 7 Tout effacer
+ 0 Fin, mise hors service
+ # Fin, mise en service
+ 6 Transfert activé/désactivé
+ 9 Modific
uniquement tiptel 331
Retour
Avance
330/331
1
2
3
4
5
6
7
8
9
0
*
#
numéro
Page 32

32
1. Switch remote beeper on.
2. Call your answering machine and wait until you hear the OGM.
3. Hold the remote beeper against the mouthpiece of the handset.
4. Enter the remote control code. The remote control code can be sent during the OGM or while
one of the following incoming recordings are played back.
Attention: A remote operation is not possible if the remote control code is 0000.
When entering the code, please press and hold each key for approx. 1 second. Make a pause
of approx. 1 second after entering each number. If the answering machine identified the correct remote control code you will hear the announcement informing you about the number of
incoming recordings. Please re-enter the remote control code if no such announcement is
made. If an incorrect remote control code is entered three times, the answering machine switches off.
5. Wait for the announcement. Select the desired remote control function. Your answering machine gives a voice confirmation for nearly all of the available functions. Also errors are indicated by voice message.
6. Conclude your remote operation by pressing the buttons ❋ and # (consecutively).
Remark:
If you conclude the operation by replacing the handset it may take up to 180 seconds before your
tiptel 330/331 returns to the answering mode.
Remote beeper
ROOM MONITORING. The microphone of the answering machine switches on and you
hear what is happening in the surroundings (can be useful for telephone babysitting or
acoustic operation control of machinery).
ROOM SPEAKING. The speaker of the answering machine switches on. Persons
present in the room can listen to you.
REMOTE CHANGE of outgoing messages.
REMOTE CHANGE of the telephone number for the message transfer (only tiptel 331).
REMOTE EXCHANGE of selected outgoing message.
REMOTE ON/OFF of the telephone answering mode.
REMOTE ON/OFF of the time control mode.
MESSAGE CODE which allows privileged callers to leave a message although the machine
might be in the announcement mode only.
VIP CODE for privileged callers who want you to take over the call personally if you are present.
ROOM SIGNAL. The loudspeaker emits a signal in order to inform people present that
they should take over the call personally.
How to operate the remote control
To make sure that you are still on the line, your telephone answering
machine emits a confirmation request if no button was pressed during the
remote operation for about 180 seconds.
You must answer this confirmation request by pressing any button of the
remote beeper. Otherwise, the answering machine will disconnect the line
and resume the answering mode.
The remote operation tones can be entered either with a remote beeper or
a tone dialling telephone.
Page 33

33
Remote interrogation of all messages:
1. Press 8 (stop).
2. Press 3 (ALL).
Remote interrogation of new messages:
1. Press 8 (stop).
2. Press 2 (NEW).
Repeat:
1. Press 5 (playback) during playback.
Switch:
1. Press 4 (rewind) during playback.
2. Press 6 (forward) during playback.
Playback speed:
1. Press 1 (room) during playback.
2. Press 3 (ALL) during playback.
Interrupt playback:
1. Press 8 (stop) during playback.
2. Press 5 (playback).
Remote erase of individual messages:
1. Press ❋❋and 4 afterwards or
during playback of the message to
be deleted.
The running function stops.
All incoming recordings are played back.
The running function stops.
The new messages recorded after your last
remote interrogation are played back.
The last few seconds of the current incoming recording are played back.
The answering machine positions on the
start of the previous incoming recording.
The answering machine positions on the
start of the next incoming recording.
The playback speed is decreased. The pitch
remains unchanged.
The playback speed is increased. The pitch
remains unchanged.
The playback is interrupted.
The playback is resumed at the same position.
The selected message is erased.
Remote control: button functions
Page 34

Remote erase of all messages:
1. Press 8 (stop).
2. Press ❋❋and 7 (erase) afterwards.
Remote exchange of OGM:
1. Press 8 (stop).
2. Press 7 (change).
3. Press 1 for OGM 1, 2 for OGM 2 or
3 for OGM 3. Press 4 to select the
pre-recorded OGM.
Remote change of OGM:
1. Press 8 (stop).
2. Press 9 (change).
3. Press 1 for OGM 1, 2 for OGM 2 or
3 for OGM 3.
For an outgoing message "without" inco
-
ming recording:
4. Press # (end) after recording your
OGM.
For an outgoing message "with" inco
-
ming recording:
4. Press 8 (stop) after recording your
OGM.
5. Press # (end) after recording your
final announcement.
The running function stops.
All messages are erased.
The running function stops.
You are asked to select an OGM.
The selected OGM is played back for verification purposes. If there is no outgoing
message recorded for the specific OGM
number, you are asked to do this (please
make sure that there is sufficient recording
capacity available).
The running function stops.
You are asked to select an OGM.
You are asked to record the OGM.
The OGM is played back for verification purposes.
You are asked to record your final announcement.
The OGM is played back for verification purposes.
34
Remote control: button functions
Remark:
If you wish to use this OGM as the valid OGM, you have to select is this "remote exchange of
outgoing message".
Page 35

35
Remote control: button functions
Room monitoring/speaking:
1. Press 8 (stop).
2. Press 1 (room).
3. Press 1 (room) again.
Room signal:
1. Press 8 (stop).
2. Press ❋❋and 2 afterwards.
Remote interrogation/date and time:
1. Press 8 (stop).
2. Press ❋❋and 5 afterwards.
Remote interrogation/recording capacity:
1. Press 8 (stop).
2. Press ❋❋and 3 afterwards.
Stop remote interrogation:
1. Press 8 (stop).
2. Press ❋❋and # (end) afterwards.
Remote OFF of the answering mode:
1. Press 8 (stop).
2. Press ❋❋and 0 (off) afterwards.
Remote ON of the answering mode:
1. Call your tiptel 330/331.
2. Enter your remote control code.
The running function stops.
The microphone switches on. You can listen
to what is happening in the surroundings of
your answering machine.
You can switch between room monitoring
and room speaking by pressing this button.
The running function stops. The loudspeaker emits a beep tone.
Persons present in the room are informed
that they should take over the call personally.
The running function stops.
A voice day and time stamp is given.
The running function stops.
The answering machine informs you about
the remaining recording capacity.
The running function stops.
The device disconnects the line.
The running function stops.
The device disconnects the line. Further
calls are not answered.
The answering machine emits a beep tone
after approx. 50 seconds.
If the code is identified, the OGM is played
back for verification purposes.
The device is now ready for remote control
operation (e. g. for recording a new OGM).
After you are finished with remote control your
tiptel 330/331 resumes the answering mode
and will answer incoming calls.
Page 36

1. Press 8 (stop).
2. Press ❋❋and 9 (change) after
wards.
3. Enter the new telephone number by
the remote control beeper or a tone
dialling telephone. A special function
is available for the dialling procedu
re. These functions can be accessed
by the ❋❋button.
Press:
❋❋
button and 1 afterwards for:
❋❋
button and 2 afterwards for:
❋❋
button and 3 afterwards for:
❋❋
button and 4 afterwards for:
For pager numbers press ❋❋and 5
afterwards.
You can select the desired paging
service (see message transfer) by
pressing a corresponding button.
You can also enter a numeric infor
mation if this option is supported by
the paging service. Please press the
following buttons for special charac
ters: # .
press ❋❋twice.
4. Press ❋❋and 7 (change) to erase
the telephone number.
5. Press ❋❋and 8 (stop) to program
the telephone number.
The running function stops.
You are asked to enter a new telephone
number.
You will get a confirmation after each number.
Three seconds pause.
Wait for dialling tone
Flash
Earth.
= hatch
= star
The telephone number is erased.
The new telephone number is played back
for verification purposes.
36
Remote control: button functions
Remote ON/OFF of the time control:
Remote ON/OFF of the message transfer (only tiptel 331):
1. Press 8 (stop).
2. Press ❋❋and 1 (room) afterwards.
The running function stops.
The selected status ON or OFF is indicated
by synthesised voice.
1. Press 8 (stop).
2. Press ❋❋and 6 (forward) after
wards.
The running function stops.
The selected status ON or OFF is indicated
by synthesised voice.
Page 37

37
Remote control: summary of button functions
Button
combinations:
1
2
3
4
5
6
7
8
9
❋
0
#
❋ + 1
❋ + 2
❋ + 3
❋ + 4
❋ + 5
❋ + 6
❋ + 7
❋ + 8
❋ + 9
❋ + 0
❋ + #
Basic function
Room monitoring/room speaking
Remote interrogation of new messages
Remote interrogation of all messages
Start the playback
Remote exchange of OGM
Stop
Change OGM
Select secondary function
-
Time control on/off
Room signal
Announcement of the remaining
recording capacity
-
Announcement of day and time
Message transfer on/off
(only tiptel 331)
Remote erase of all messages
Stop
Change telephone number
(only tiptel 331)
Finish remote interrogation,
answering mode off
Finish remote interrogation, answering mode on
Function during playback
Decrease playback speed
Increase playback speed
Switch to previous recording
Repeat the last few seconds
Switch to next recording
Stop
Select secondary function
-
-
-
-
-
Remote erase of the current recording
-
-
-
-
-
-
-
Page 38

38
Operation/troubleshooting
Troubleshooting/problem
FE01
FE02
FE03
FE04
The device exchanges the
OGM or switches the answer
mode on or off although such
functions were not selected.
The remote control does not
work.
The display blinks and the
time information of the recordings is incorrect.
During the time control mode
the device does not play back
the selected OGM.
The device switches the
answering mode off or switches to OGM 3 although
such functions were not selected.
Only tiptel 331:
No line is established during
the message transfer.
Only tiptel 331:
The message transfer remains
within the PABX only.
Only tiptel 331:
Message transfer is not activated during the time control
period.
The answering machine is inoperable.
Cause:
No remaining recording capacity.
OGM not recorded.
Time control: no valid switching time programmed.
Message transfer: no target
number programmed or
remote control code is 0000.
Time control is switched on.
Time was not set or time control is switched off.
Time was not programmed.
OGM not recorded.
No remaining recording
capacity.
Wrong dialling mode or
wrong telephone number.
Paging service changed the
access procedure.
Wrong special character
(earth, flash, pause).
Message transfer: no target
number programmed or
remote control code is 0000.
Action:
Erase incoming recordings to
provide free recording capacity.
Record OGM.
Check switching times.
Enter target telephone number or change remote control
code.
Switch time control off or
change switching times.
Program time or activate time
control.
Program time.
Record OGM.
Erase messages.
Change the dialling mode or
correct the target telephone
number. Verify programmed
parameters. Use the new
pager procedure and verify
programming. See operating
instructions of the PABX.
Enter target telephone number or change remote control
code.
Unplug the telephone answering machine, wait 1 minute
and plug in again.
Page 39

39
1. This telephone answering machine is designed for usage within the German telephone net-
work. The usage in other countries may offend against their valid regulations. Trouble-free
operation outside the German network is not guaranteed.
2. In case of telephone malfunction unplug the telephone answering machine from the tele-
phone wall socket. Check the telephone while the telephone answering machine is disconnected. If your tiptel 330/331 is the cause of the malfunction have it repaired in an authorised workshop. Do not connect the device until it has been repaired. In the case of improper repair the approval by the Federal Telecommunications Authority will expire.
3. The answering machine tiptel 330/331 may not be used in an inappropriate environment.
Avoid:
- humid or damp rooms
- exposure to direct sunlight
- temperatures of more than 40
0
C and
- temperatures less than 0
0
C
- high humidity
- strong vibrations
- dusty environments
- rooms with danger of explosions
4. The answering machine does not work during power failures. The functionality of the tele-
phone is not affected.
5. Some furniture lacquers or furniture cleaning products may attack the rubber feet of the
answering machine. In such cases please use a non-slip pad under the device.
6. Please take care that the cables do not lead to any danger of stumbling.
7. Avoid folding, pushing and pressing of the cables.
8. During the normal use of the telephone answering machine you will not have any contact to
substances damaging to your health (e. g. electrolyte capacitors). The synthetic material and
plastics used for manufacturing this device exclusively consist of partially recycled granules.
Our packaging materials do not consist of plastics but of partially recycled cardboard and
paper.
9. Use only the original tiptel AC adapter for your tiptel 330/331.
10. Use only the original tiptel connecting cable for your tiptel 330/331 as other cables might be
inappropriate. Your specialised dealer will assist you.
Your tiptel 330/331 is a sophisticated and modern telephone answering machine manufactured
under quality assurance and by using most modern manufacturing facilities. High-quality components grant a maximum of reliability.
This device was developed and manufactured in Germany which is a guarantee for advanced
technology and a lasting value.
You will find two warranty seals on the bottom of the device (type identification label and one of
the screws used for the housing). Please do not damage or remove these seals as the warranty
will expire.
Important information
Warranty
Page 40

(UK) 05/99
EDV 4932907
TIPTEL AG
Halskestrasse 1
40880 Ratingen
Germany
http://www.tiptel.com
e-mail: export@tiptel.de
 Loading...